


Leaderboard
-
Lady Elanore
FREEDOM32Points24,877Posts -

Lee01
FREEDOM24Points36,174Posts -
MikeTheThinker
FREEDOM17Points8,484Posts -
.jpg.1006585dfe4e2977315b67c3d642e37b.jpg)
Guest_
FREEDOM15Points83,824Posts

.thumb.jpg.9dd3f612ba7f13d10be5c518d3c8d255.jpg)


Popular Content
Showing content with the highest reputation on 19/01/24 in all areas
-
5 points
-
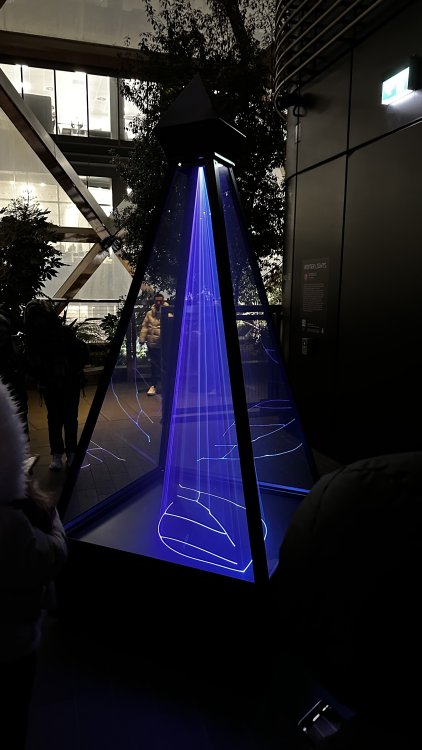
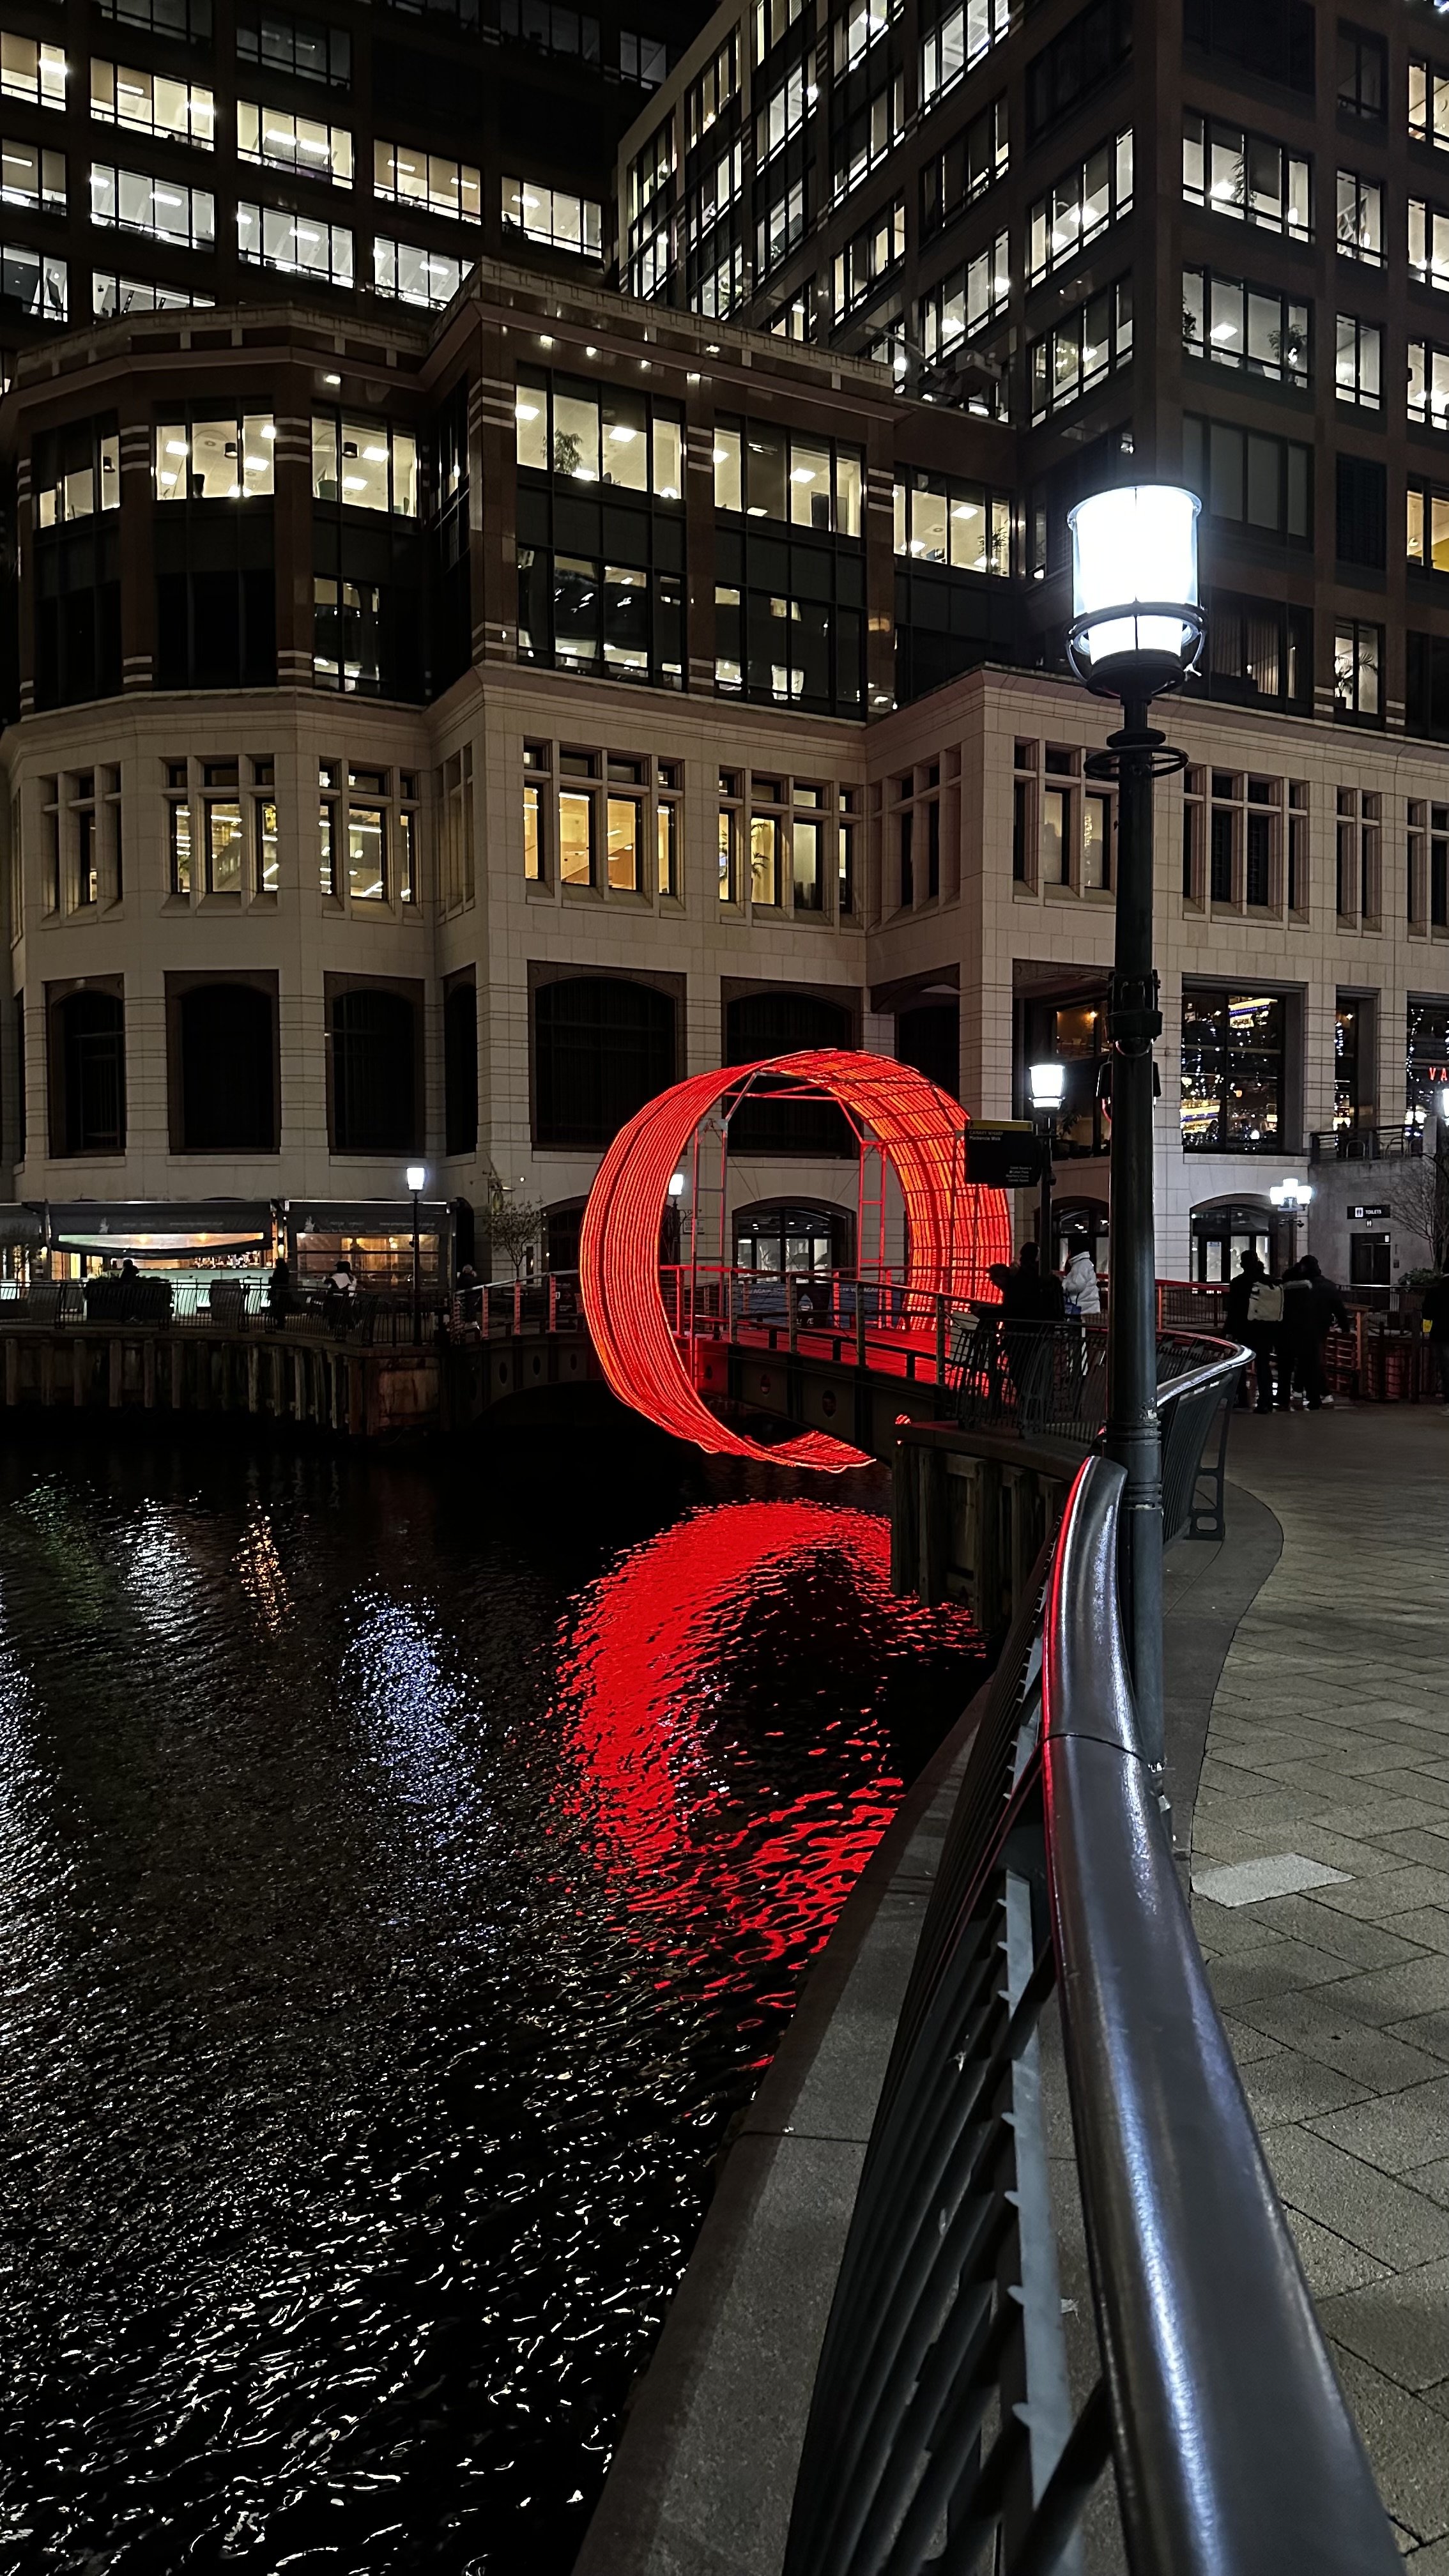
4 pointsFrom a visit to the Canary Wharf Winter Lights event (on until 27th January) IMG_9367.mov
 4 points
 -
3 points
-
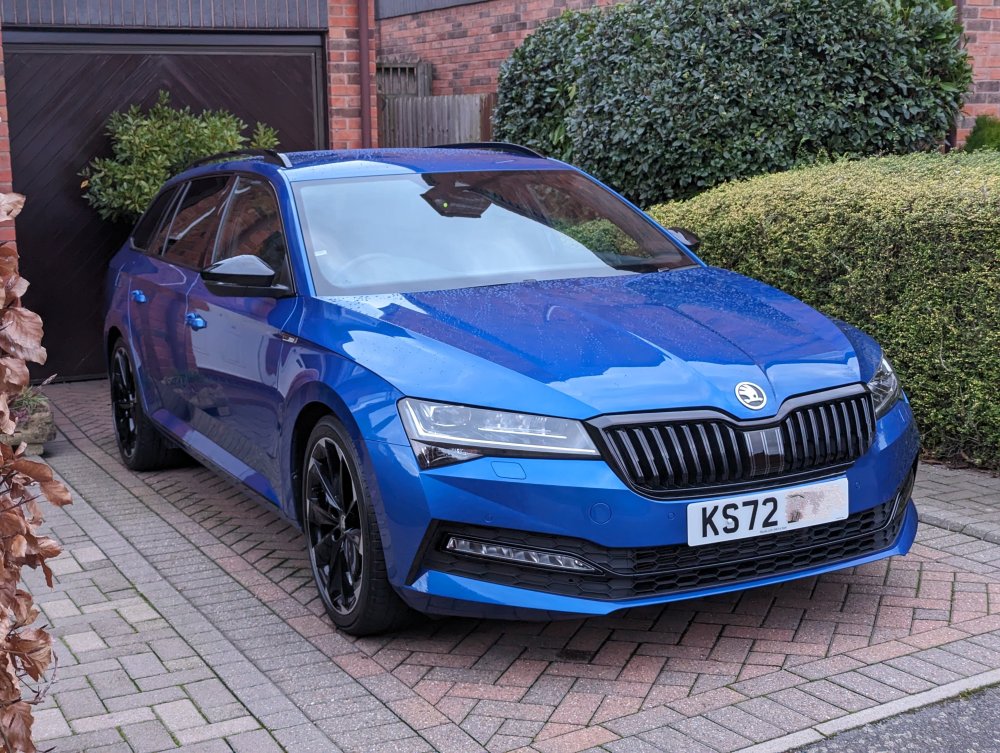
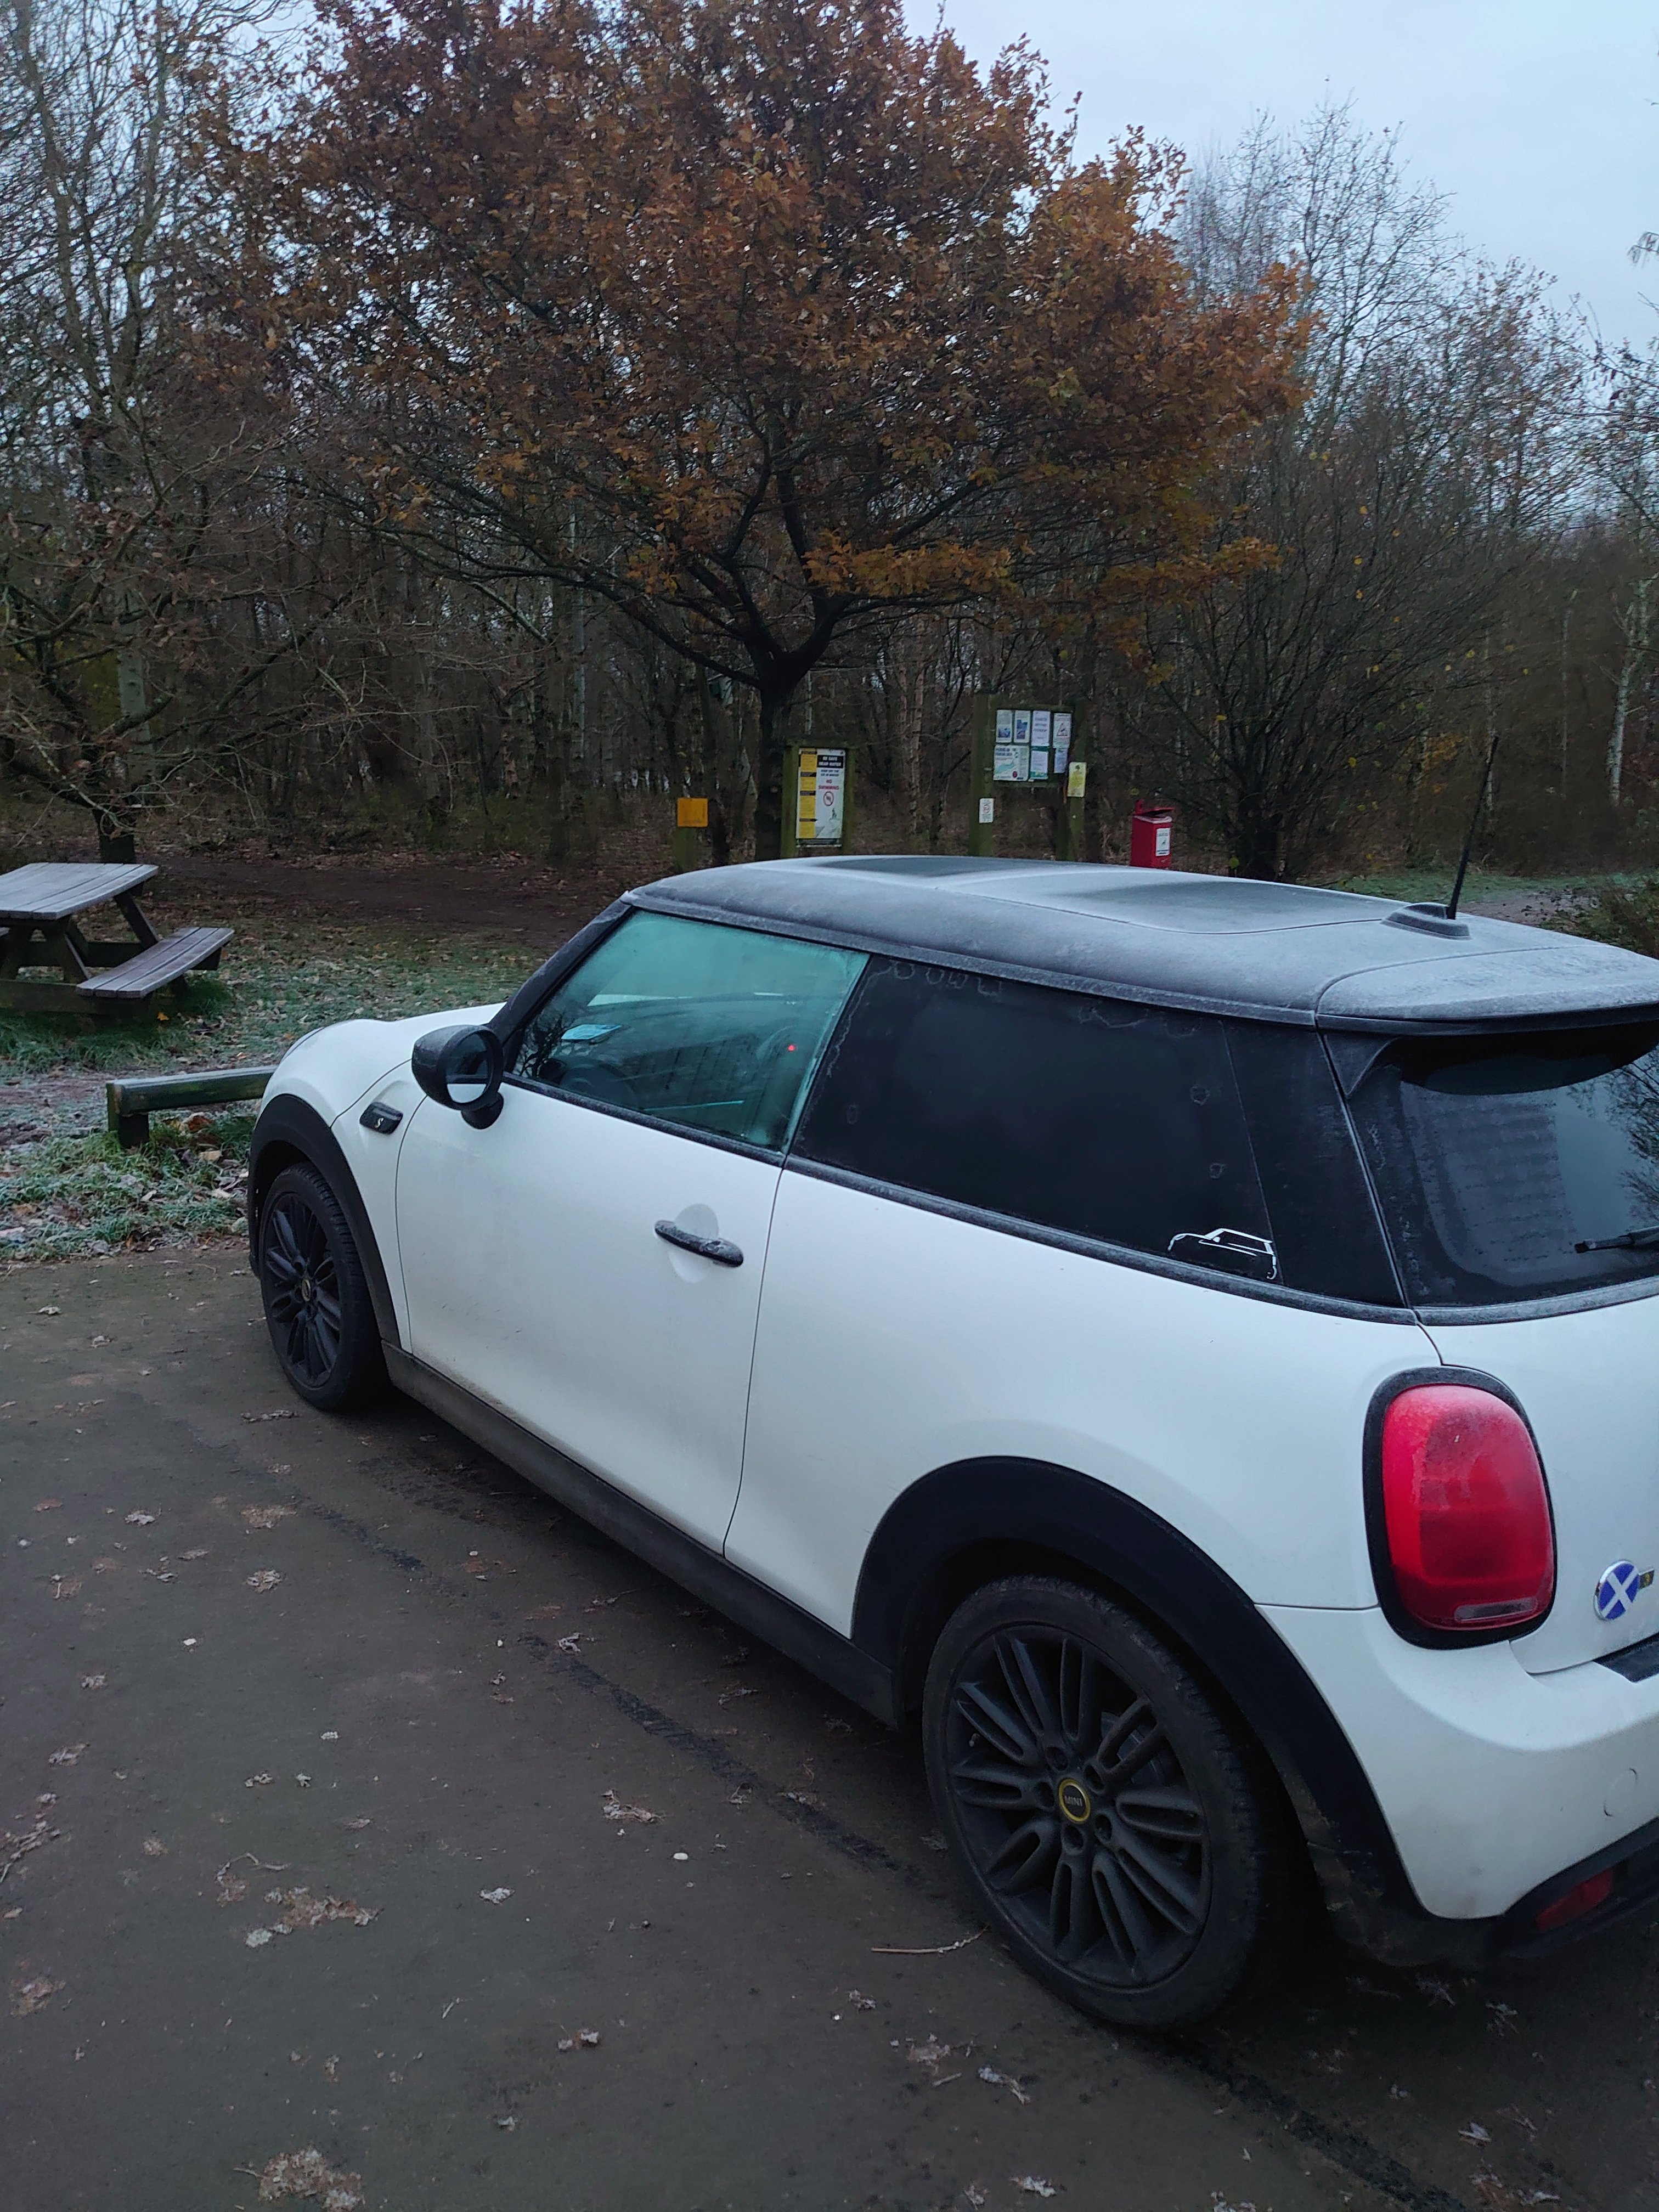
3 points3 points3 pointsI think you'll find the running lights come on automatically whatever the temperature.3 points3 points3 pointsMy new beast. I got I just before Christmas and absolutely loving it so far.
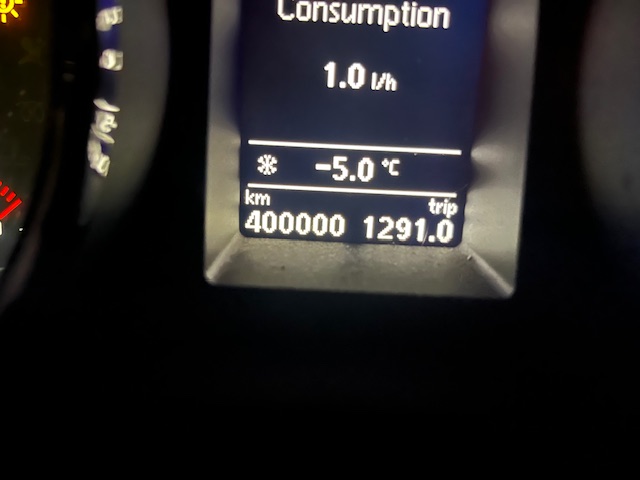
 3 pointsWell changing the oil and oil filter every 10000 km does pay out !! And 2 minutes later hit the big 400000 km !!
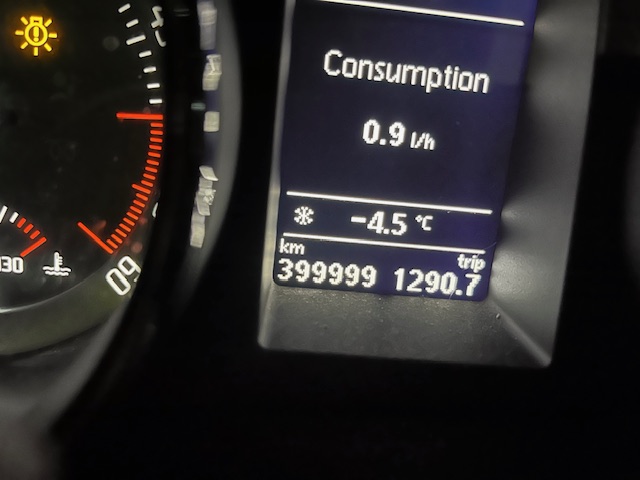
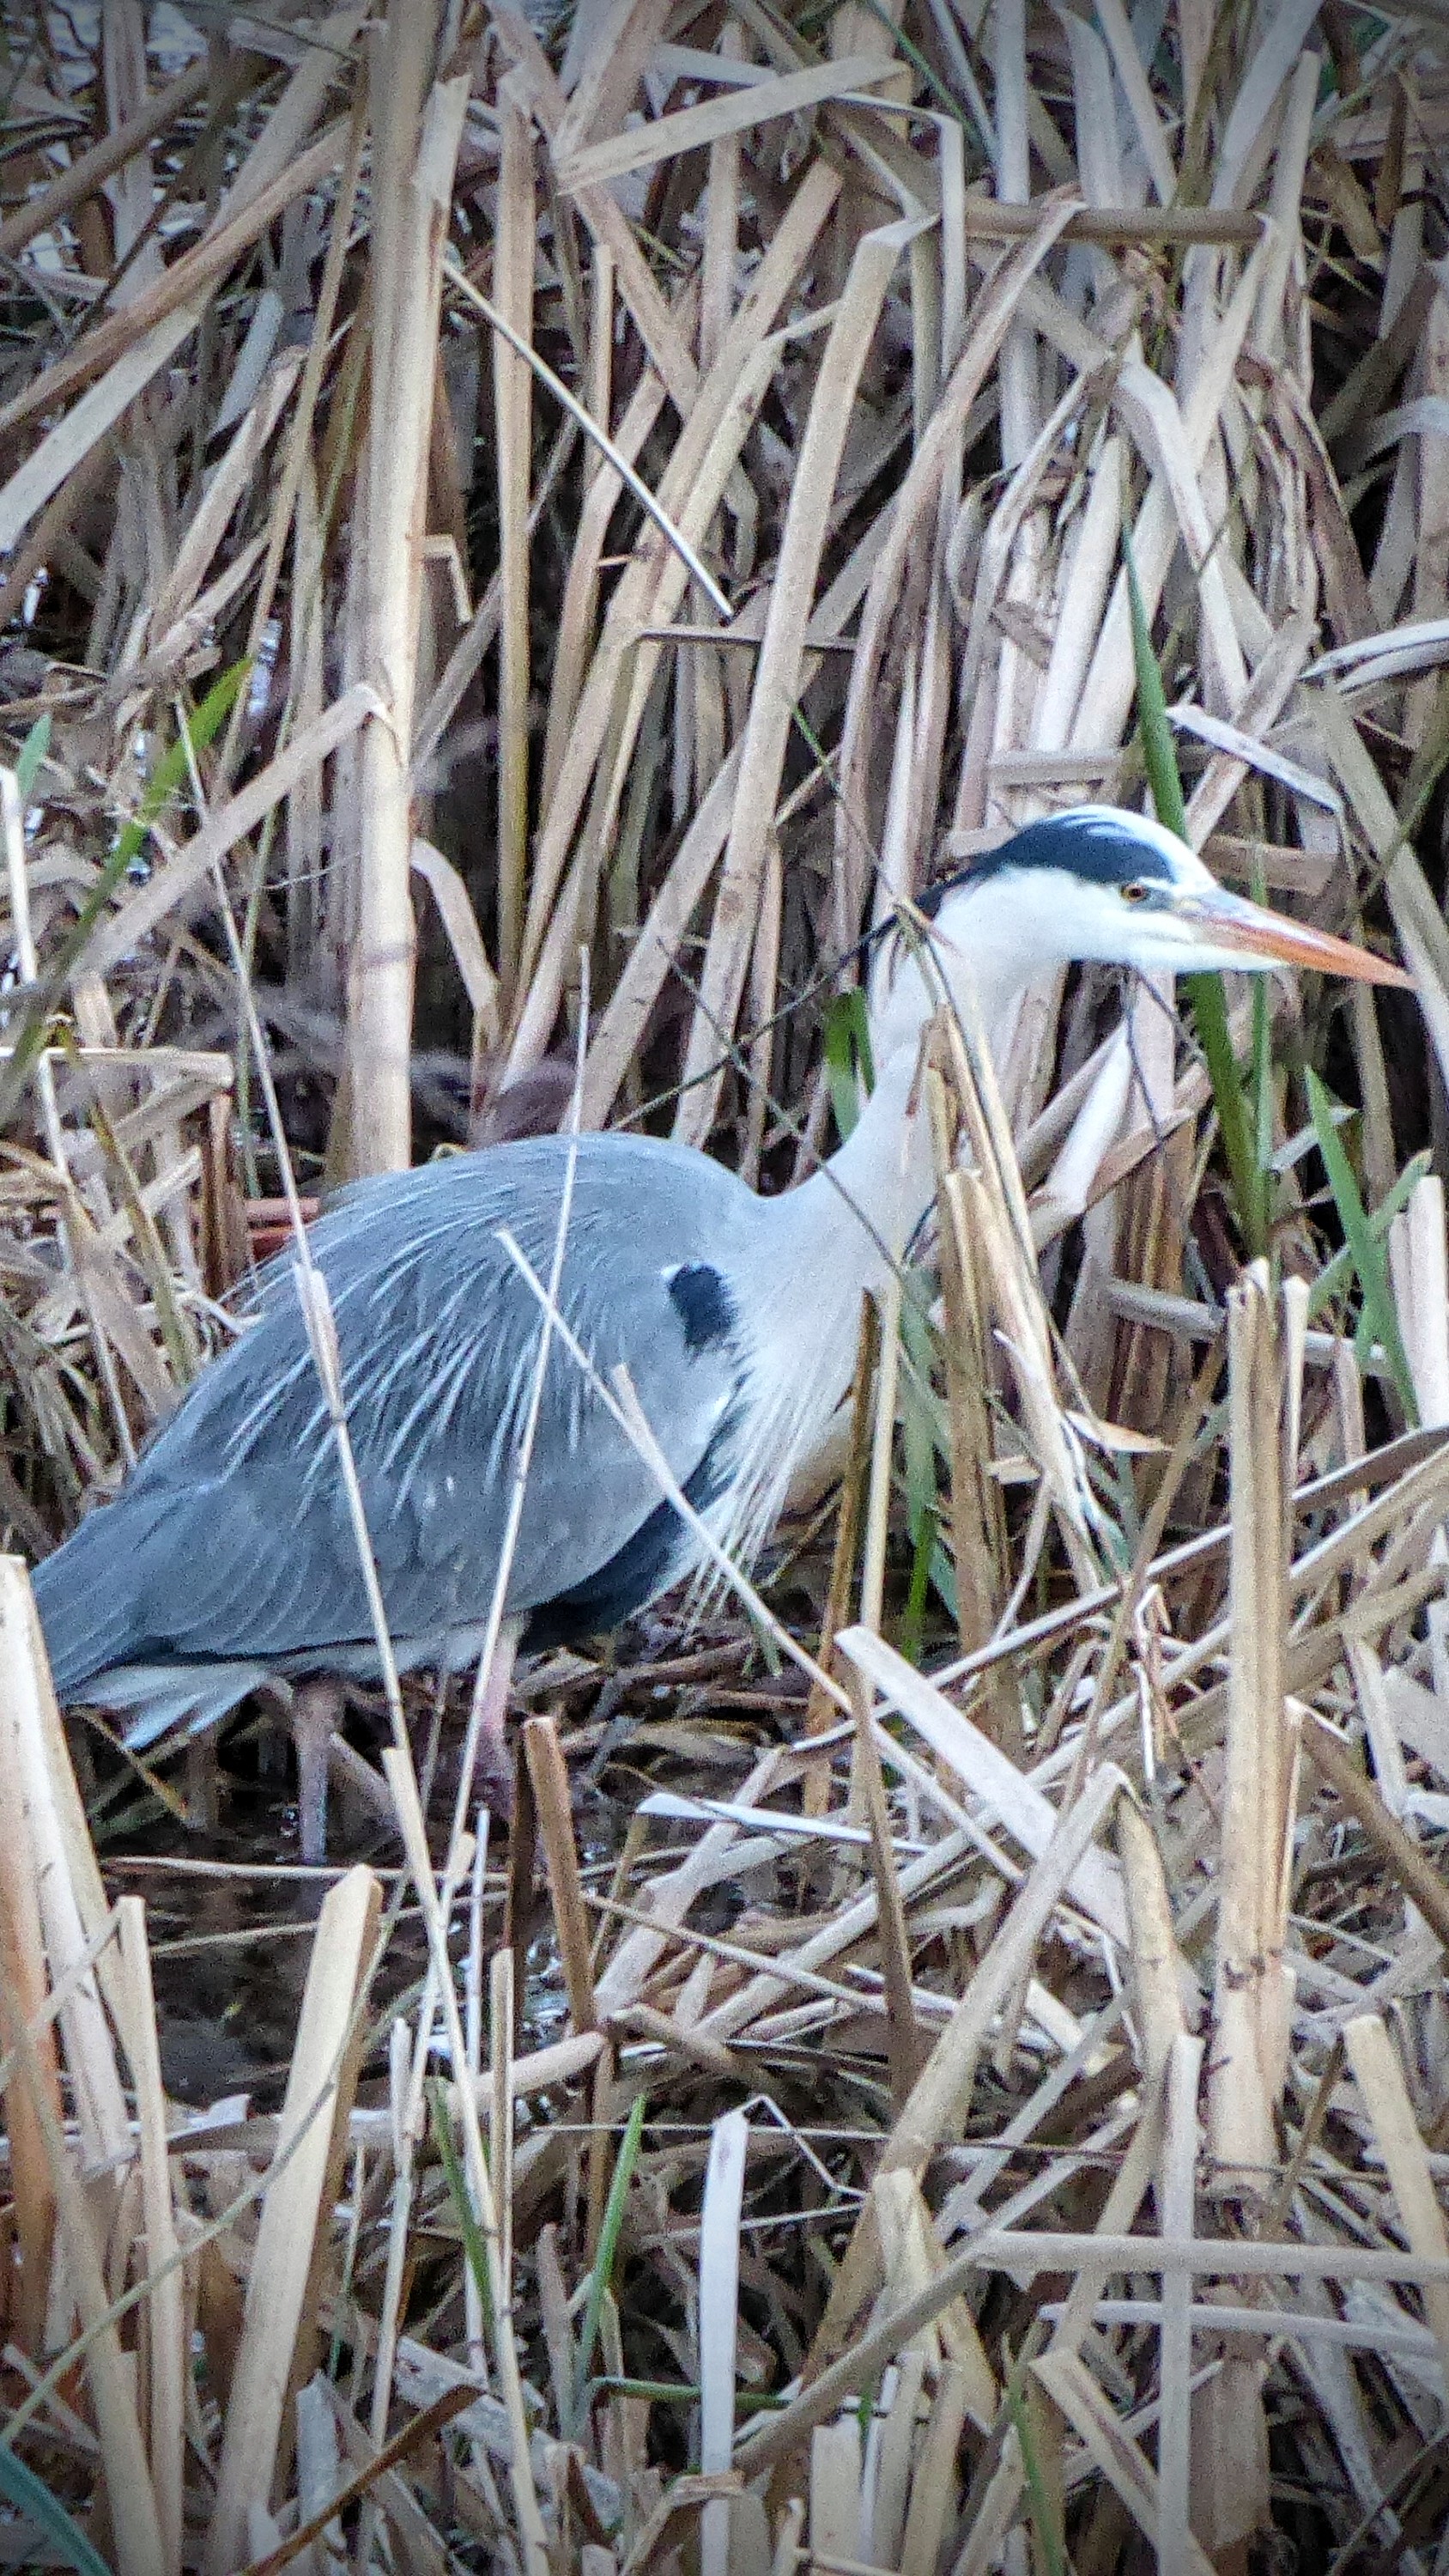
 2 points2 pointsAnother one from yesterday’s trip, stopped off at Wisley for an hour or two en route to Canary Wharf. This little chap (or chap-ess) joined us for lunch 😊
 2 points2 points2 pointsAny bulb that uses a blue filter to achieve whiter light is not an upgrade. They are blocking part of light. And any H4 with higher wattage is not street legal and may damage the headlamp. Osram bulbs achieve whiter light by pushing the filament to limits - this is why they are much more sensitive with a shorter lifespan, but they actually produce a bit more light in the visible spectrum. How much - who knows, it'd be interesting to see actual measurements.2 points2 pointsIndeed @Graham Butcher. Heating a large cabin does have an effect in an EV. As mentioned earlier my ID.4 uses around 2kW to maintain cabin temp at just below freezing. The electronically identical ID.3 uses only 1.5kW due to a much smaller cabin.2 pointsYour bus tilt picture isn’t the UK. I really don’t know where you search to find so much electrified FUD material. I imagine if you put similar effort into ICE…2 pointsHave you had your battery checked? A lot of weird things can be caused by a duff or failing one.2 points2 pointsInteresting the car relying on heat pump (blue Tesla MY) warms up slower than resistive heater (red Nissan Leaf). Probably used less energy though, hard to measure. Wife school run, I came home late last night due to work, so had to move my car this morning. Pressed pre-condition button at same time. Leaf had a minute delay in starting due to slower (hopeless terrible) Nissan servers. Leaf pre-heating will only use PTC resistive heater. Tesla with heat pumps will only use heat pump. It was evident when I came out and hearing the compressor under the bonnet for blue car but not the red one. -5c outside today. Leaf’s bonnet rarely iced up this year. Probably due to V2H keeping the car electronics awake.
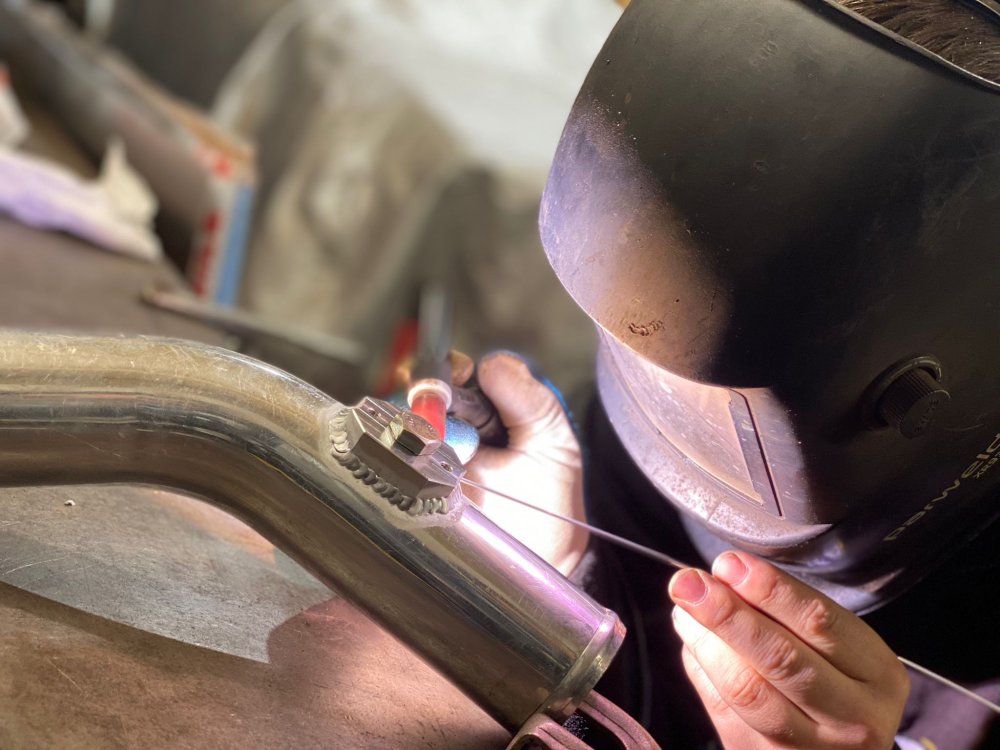
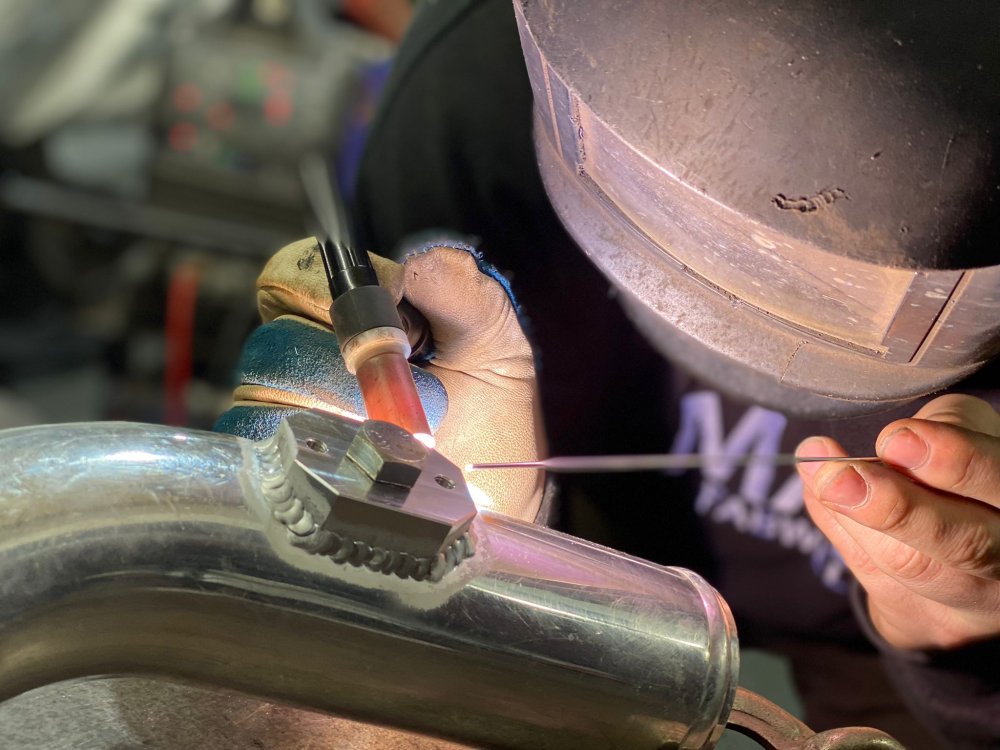
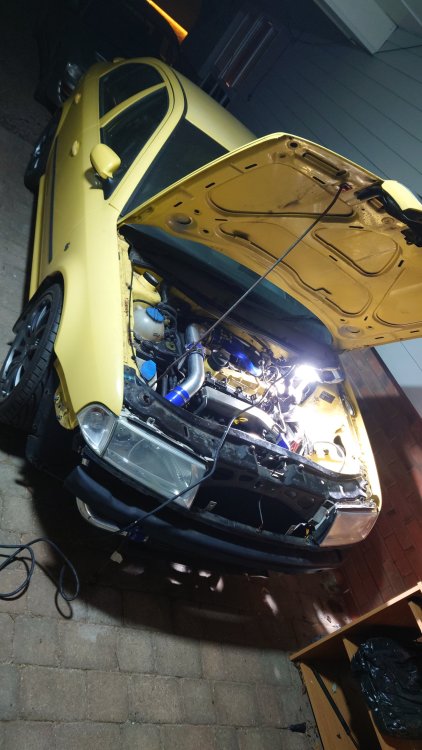
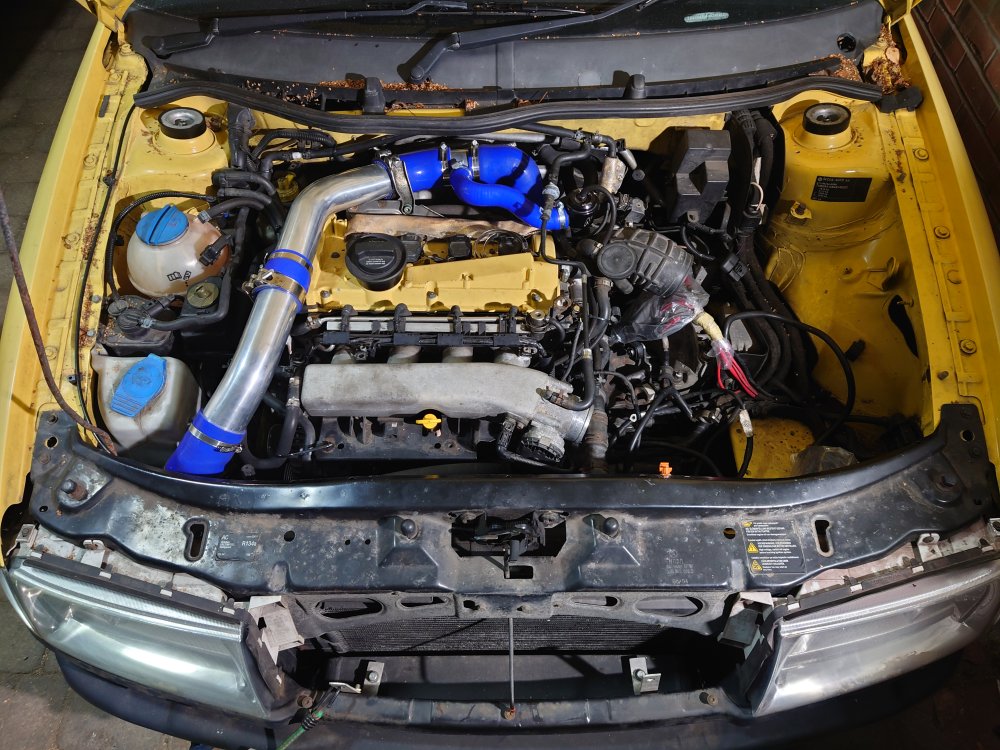
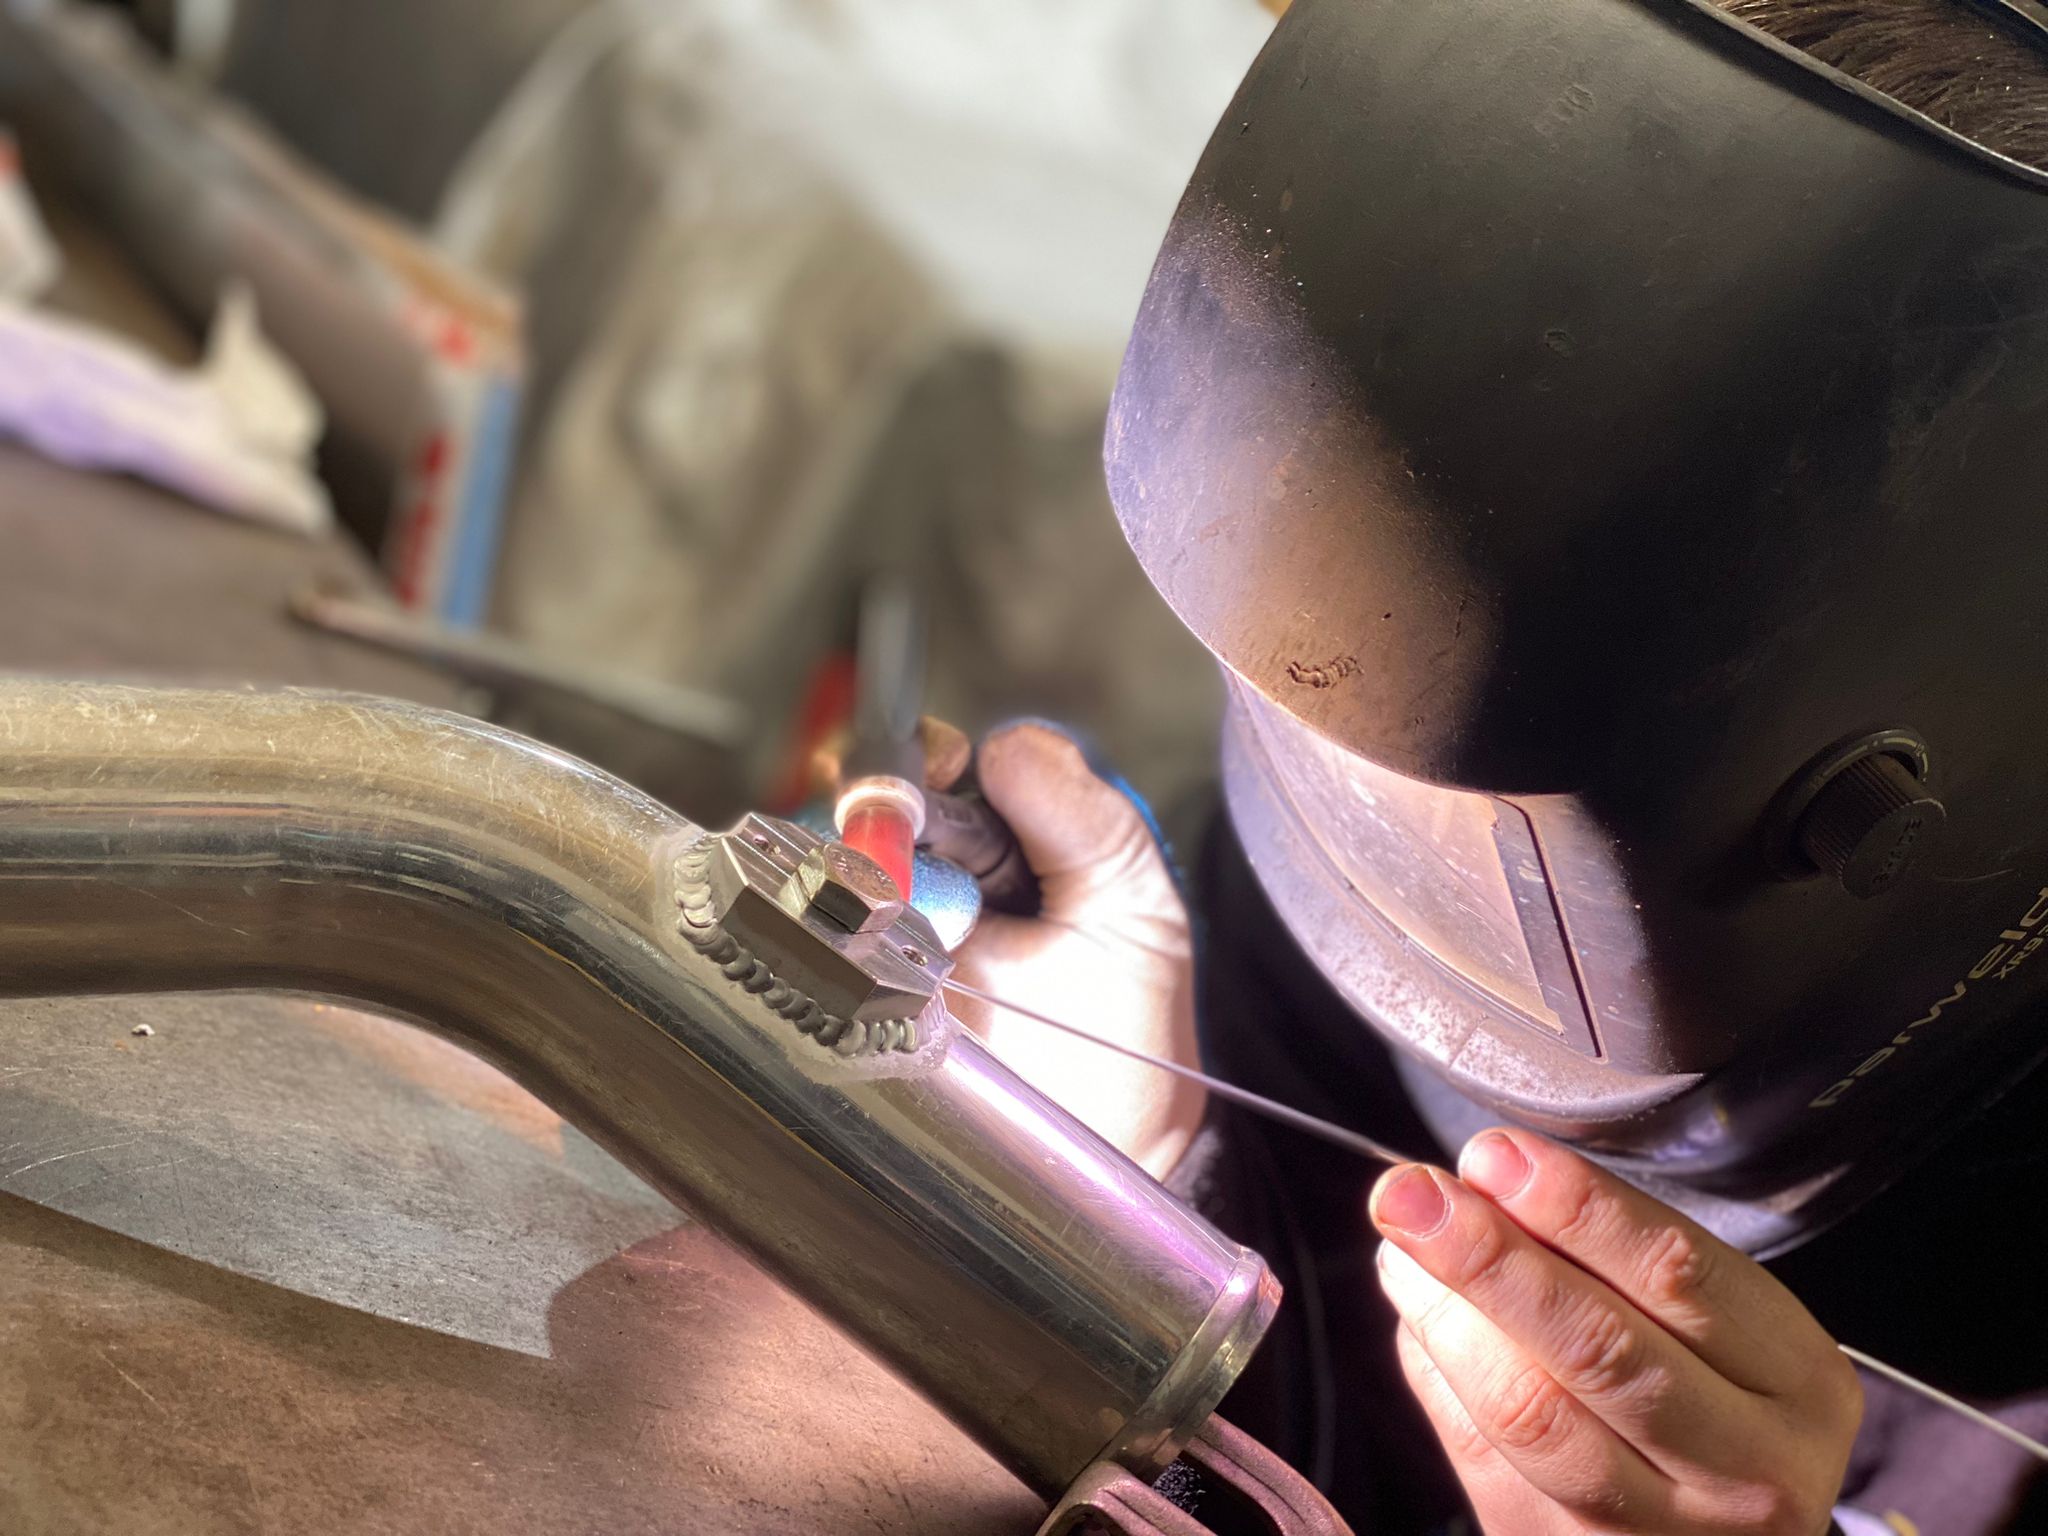
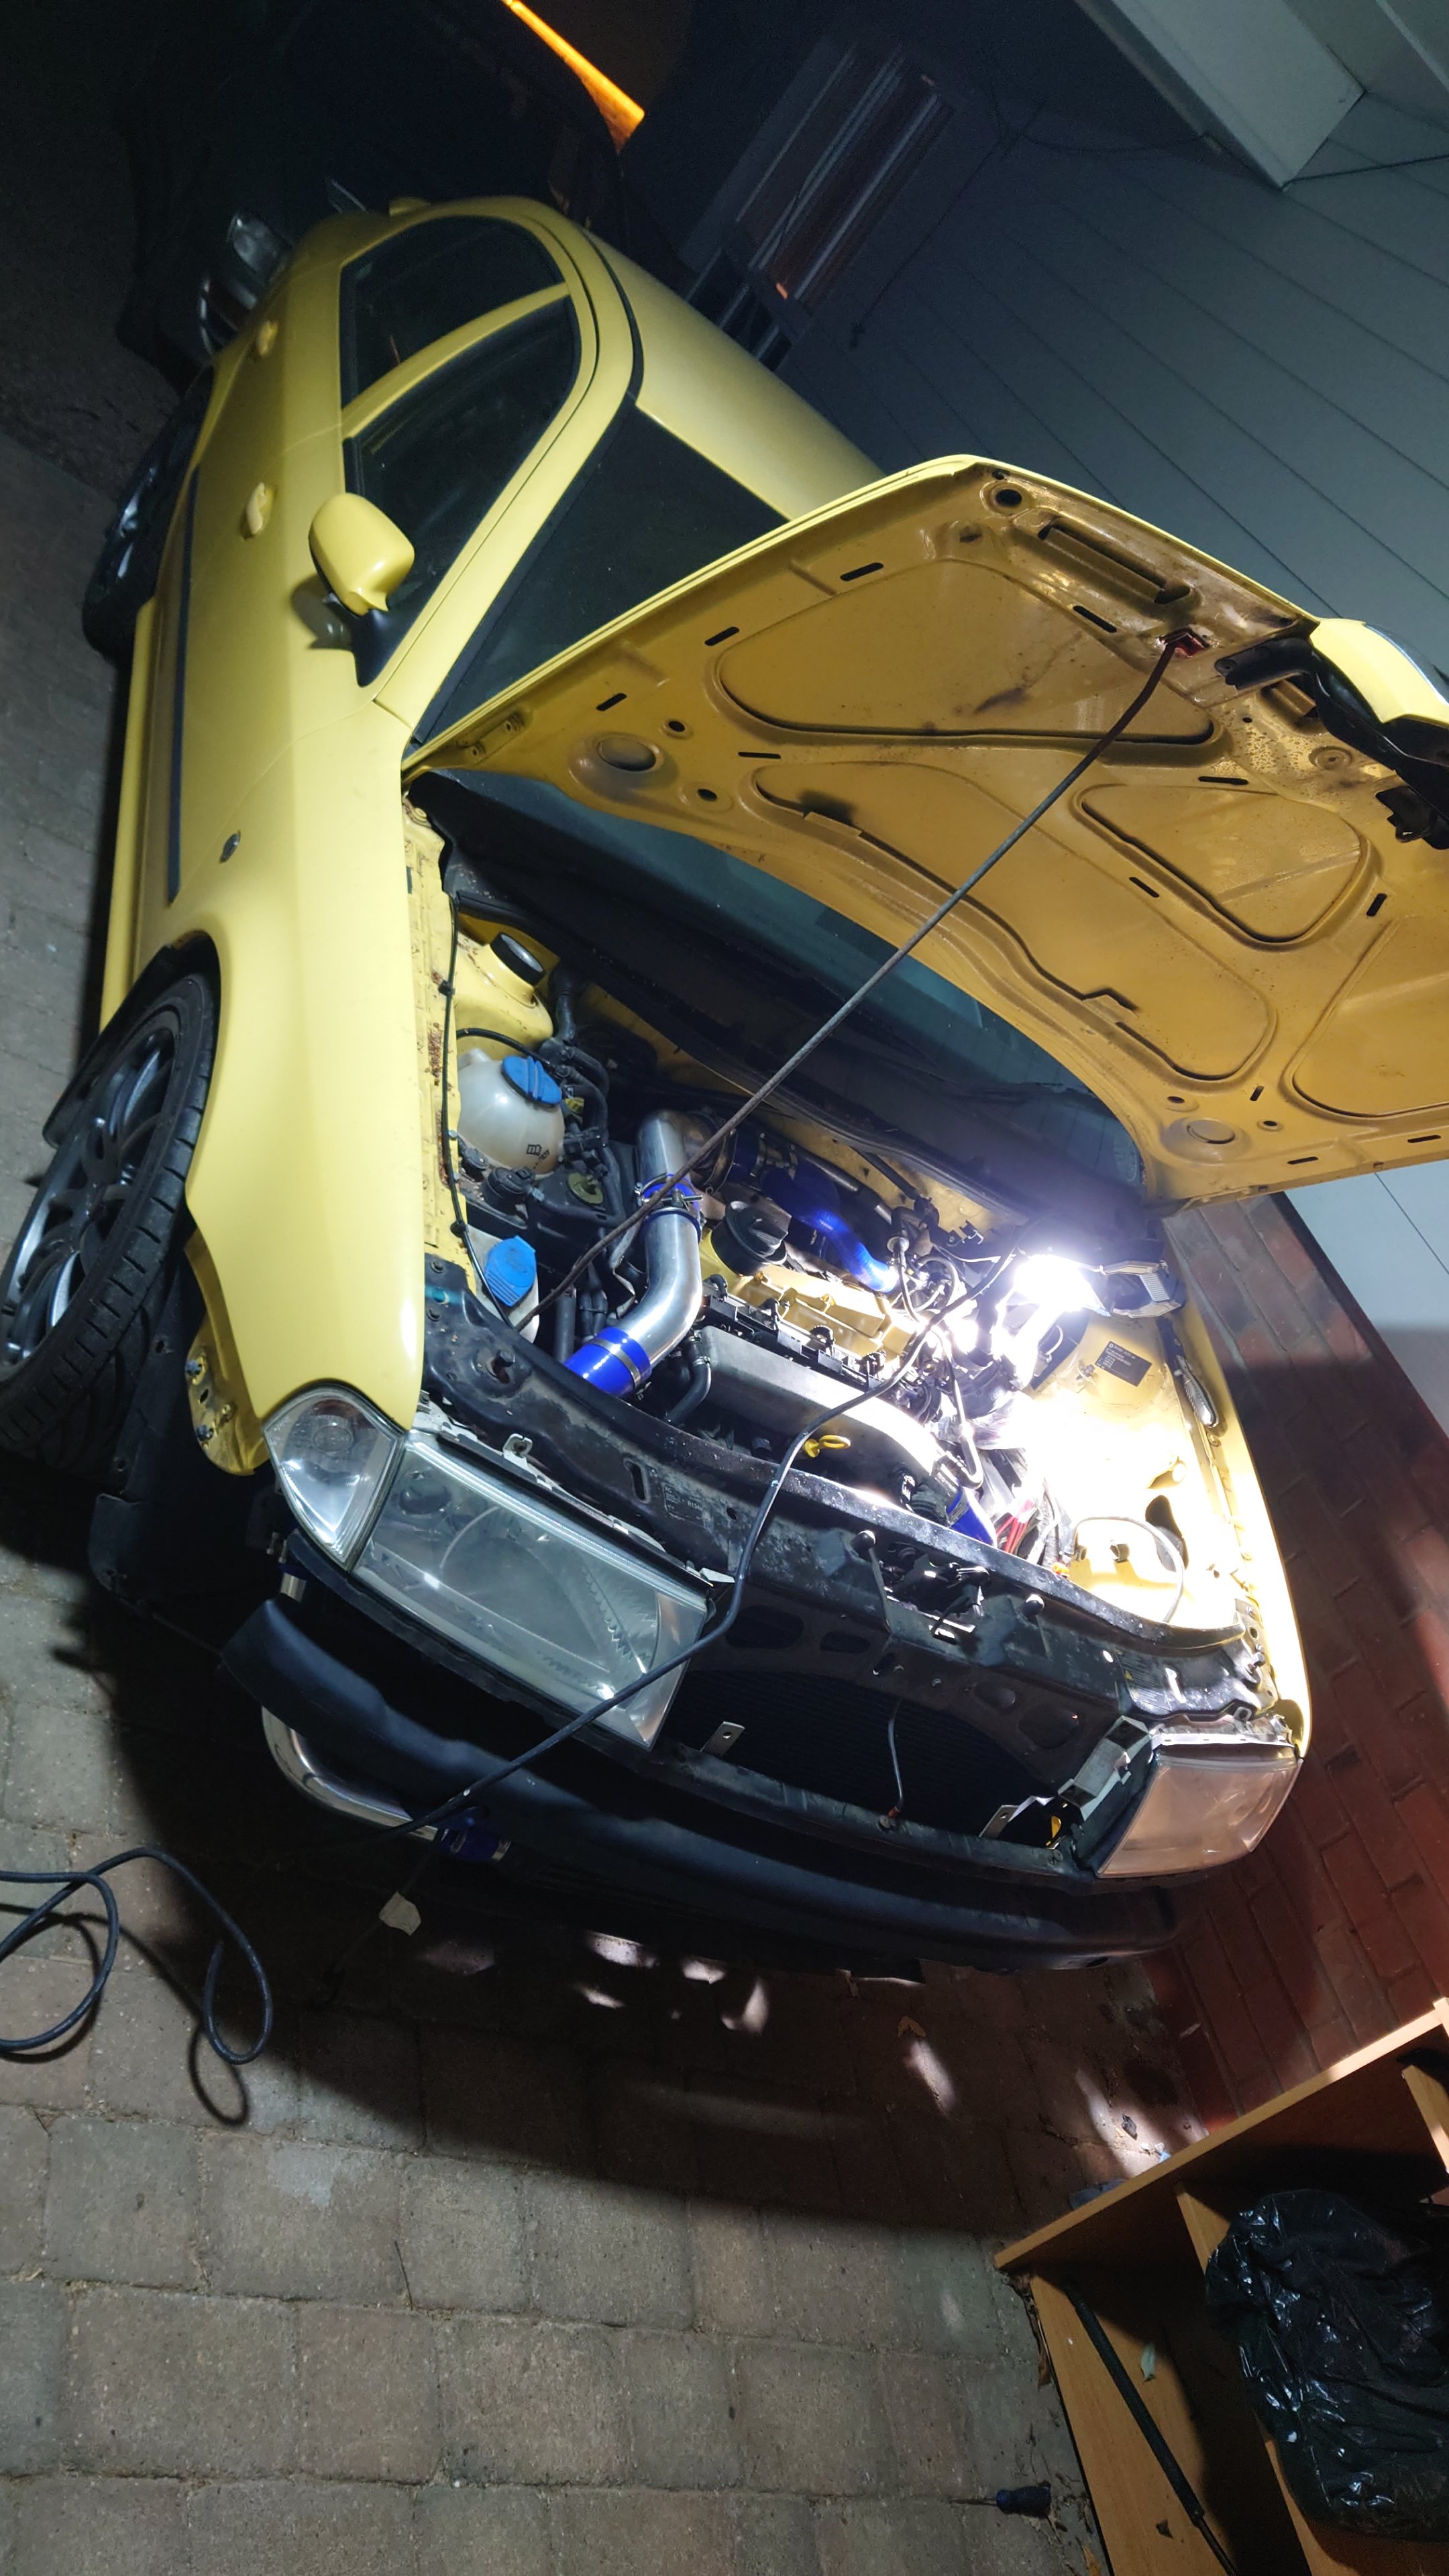
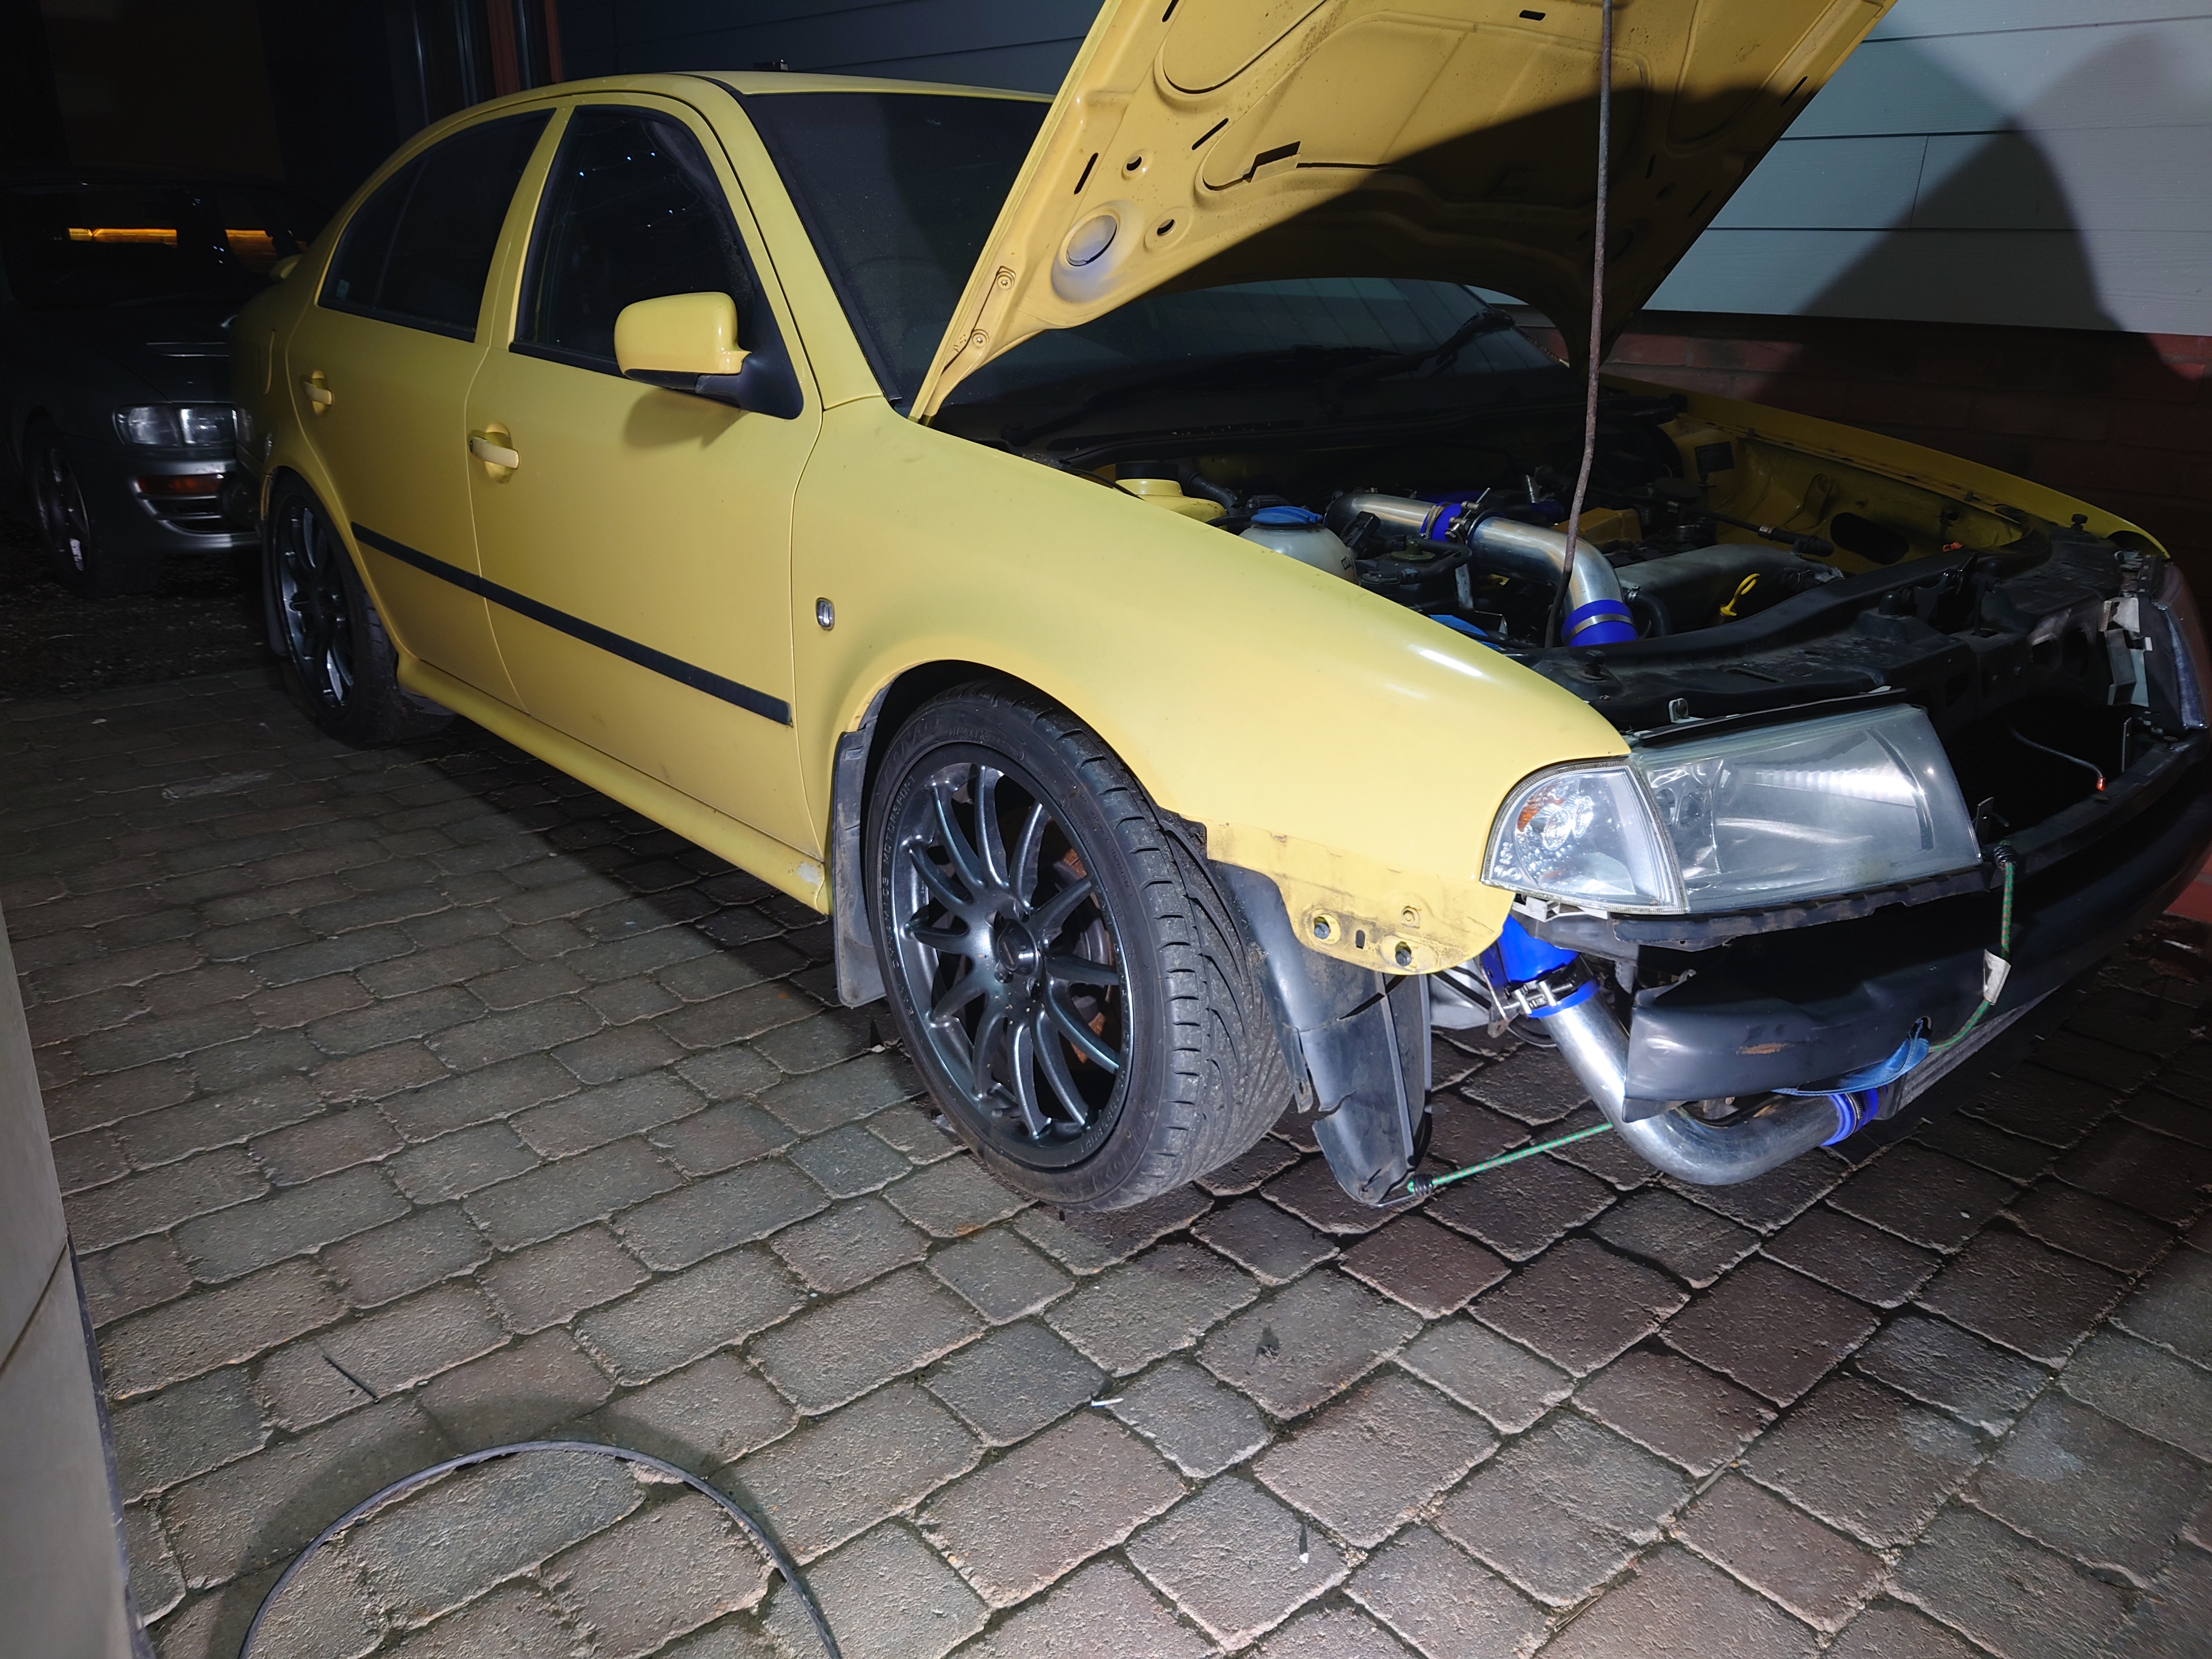
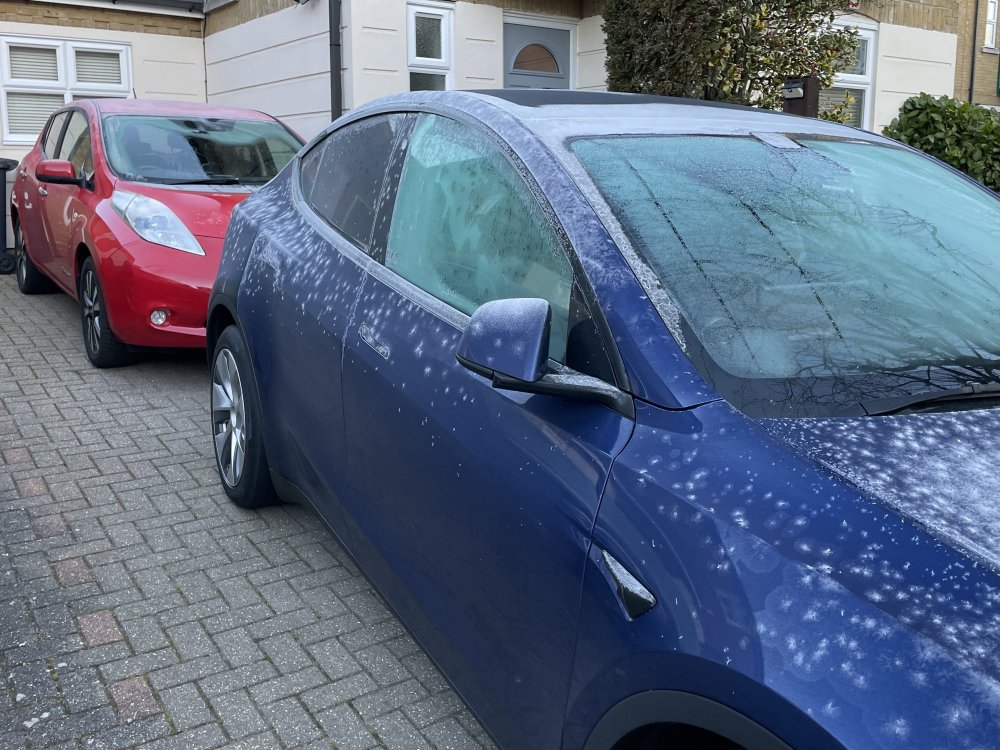 2 points2 pointsAnd that’s fine for a bit, but sat for hours in the negative temperatures on the blocked road at Negative temperatures scenario you posted for an EV it wouldn’t. As an example also, our EV will keep the car at 23degrees at -4 and was using 1.4-1.8kW to do so. The 1.8 from stone cold until defrosted. Call it 1.5 to make the maths easy and probably less for say 18-20 degrees. 24 hours stuck on a road, permanently heating to a warm temperature without any attempt to eco mode would use 36kWh. Oh and electric cars can turn off and wrap up too. i just don’t think this is the problem you seem to think this is.2 pointsSo it's been a while since I did any updates. For one reason and another it's been a nightmare few months since things started nearing completion. I will say these conversions aren't "plug and play" like some people say they are. There's a lot of stuff that's different between the standard VRS running gear and the AMK/BAM engine, 6 speed box, driveshafts, suspension, steering rack to name but a few. The issues I ran into (from what I can remember ...it's been a while), were: Sourcing the correct driveshafts was a nightmare. Not many places seem to sell new, complete driveshafts. And there is differences in shaft length and whether they are hub or bolt type. Long story short.. I had a new complete driveshaft on the left hand/nearside of the car that fitted no problems. The right hand/offside driveshaft was too short. Then I found I couldn't swap the new ends onto an old shaft (which was the right length but had nut type ends) because the CV joints wouldn't fit an OEM shaft. So ended up having to send one of the shafts back, buying two CV joints. And fitting them to the old shaft. Problem solved. There were issues with the "quick rack". From what I can remember I had to swap some bits over. Namely one of the pipes because of clearance issues with the downpipe. But can't remember exactly. The power steering pump is different but I've fitted the Octavia one as apparently (due to it being a smaller pump) it gives more 'feel' to the steering when used with the quick rack. The heater matrix pipes are completely different and had to be somewhat "fabricated" using old pipes. Some vacuum and cooling lines are different from what I can remember. There is an electric auxillary water pump that screws onto to the radiator. And because it's not fitted to the VRS.. there's no wiring there for it. So will have to get that sorted and wired in. The gear linkage ends needed changing to fit onto the 6 speed selector mechanism. Slave cylinder pipes were different. And that's about as much as I can remember or have ran into till now. I've tried looking for progress pics but I'm not great at taking photos and generally tend to just crack on with fitting stuff (when I'm actually working on the car). Although for some reason.. everything that could go wrong, has gone wrong on this build. And jobs that should take 2 minutes to complete, quickly turn into an hour. But still I press on. I've paid attention to detail throughout and tried not to cut corners. So hopefully when it's complete, everything will work as it should and there will be no problems... Fingers crossed! So I believe the last update was when the engine and box had been fitted.. Since then the subframe and suspension have all gone on, driveshafts fitted, vacuum lines plumbed in (I hope), coolant lines plumbed in, intercooler pipework fitted, wiring pretty much all connected up, and S3 ECU reprogrammed and swapped over. I've spent the last few days tidying up wiring and pipework to make sure nothing is fouling on anything or rubbing. I'm now ready to fit the battery, wang some fluids in, and hopefully she'll fire up... first time! Pics are of (in no particular order) the front suspension looking all shiny, engine bay with intercooler pipework fitted, flange for MAP sensor being welded, and the car as it looks now sat on its new wheels. After I get it running... I need to source some wheel spacers. The wheels currently clear the coilovers by about 2mm! I don't like spacers as they mess with alignment so much, namely scrub radius which is important. But they will need fitting, so I need to measure up and get them ordered. Then I will fit the brakes and bleed them along with the clutch, power steering fluid, tighten a few screws here and there, and fit the front bumper and the Leon Cupra R splitter. Then she should be good to go! Will need a rudimentary alignment at the local tyre place, and 1 tyre needs swapping as the wheels I bought have 3 going one way, and 1 going the other! Then to run her in for a short while before getting it mapped and getting a proper geometry done and then I can book a track day and see what's she's capable of
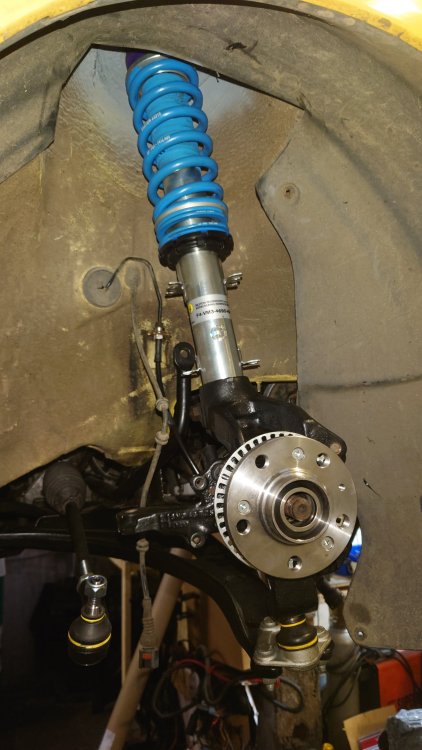

 2 points2 points1 pointDacia Spring now the cheapest of any cars in Europe so EVs not just the best selling model but also the cheapest car of any propulsion type. Dacia spring now 13k Euros in Germany and that is without any government subsidies.1 pointhiya thanks for your response to my question had heard these suffered with bad injectors of the siemens from about 2009 up to about 2013 on these engines as the are the same engines as the VW just mine sounds like the fault you have although its still judders right through the rev range it seems lessen a bit when you put your foot down . It was juddering before i ham the DMF and clutch replaced and thinking that masked the judder more but now that is fixed can notice the engine judder more now with the misfire happening at low revs whewn pulling away so at a loss as you say it can certainly be expepensive ive just had to pay out £920 to have the DMF and clutch replaced so going to have to live with as it is until either it breaks down or I manage to save some money to have it fixed hoping its not the injectors too watch this space >>>>1 pointQuite right and here is a London Transport RT bus undergoing the tilt test with nothing but ropes to act as a safety system if it fails to pass the required standard of 28 degrees tilt, and the ropes can be seen to perfectly slack and the upper deck is fully loaded with sand bags to simulate passengers on the top deck only and then the test inspector actually boards the bus and goes on the top deck and walks along it while it is tilted, in perfect safety. I only used that particular photo as it was one that showed a modern bus, the videos all seem to show old LT buses and they are of poor quality. Tilt test (vehicle safety test) - Wikipedia (71) Archive: Bus Tilt Testing - YouTube1 point1 pointPretty much my thinking too but its always nice to test your thoughts - thanks for your kind advice1 point1 pointSimple really, you go with their diagnosis and quoted costs and possible final bill or get a 2nd opinion from a Auto / DSG specialist with all the gear and maybe more than ideas. The Specialist in Diagnosis on German Vehicles might be right on the money. It is for you to decide.1 point1 pointNo, i haven't used any spacers, but i have added some self adhesive foam to the edges of the speakers, same way as in factory speakers, but it's it's a bit longer, so it still touches the door card. Yes, 165 fit without any problem. I had same doubts, so i got 155 and 165. Plan was to use 165 in the back, if they do not fit in the front. However it turned out, that 165 fit perfectly in the front, so now i have 155 in the back. One note about Focal speakers: i recently found out (own experience) that they tend to "freeze" during heavy winter. They play very well, but seemingly the air gap in those speakers is not really suitable for car audio. Smaller air gap improves sound, but in case of low temps (recently we had -11 where i live) speaker stops working most probably due to voice coil shrinking and touching the magnet (my assumption, as it\t not related to water freezing). So something to consider, but you live in Greece, so you should have no problem Guys living in Finland should avoid Focals 😁1 point1 pointCondensation dripping from a glass roof was my problem. But only because i was taking a dog out 4 or 5 times in a day and no further than 1.5 miles each time and heating on and back in to a cold car with a wet dog and the windows cracked open when i go into the shop and eventually condensation and me not wiping and then ice and next time melting. So the circumstances likely to have icing up inside of any small car or maybe even an ICE Mini used the same way, or a bigger car with a dog or 3 or people. Location location location. All my previous cars with a sun roof had a solid sliding cover and not just a net sliding black out screen. My Shogun did get a bit of mould starting on the headliner because it sat lots but the wind deflectors meant i could leave the windows down a little. My Jimnys were the same as in i had them many years and they were always aired or a heater in them when parked, only one was a bit damp because not used for 3 years. @Leeasked about me putting insulation between the glass and a screen and i had already done that with pieces of closed cell camping mat. I will see how that has done because not used the car since.
 1 pointYou don't say which model. Or whether it empties within a few days when just parked, or when using the washers a fair bit. I had a problem when I first bought my car at about 9000 miles, turned out the connection at the back of one of the headlight washers had fractured. The headlight washers (assuming you have them) are only activated when the headlights are on and (I think) then once every 3 times the washers are activated but the fracture was allowing lots of fluid to escape. Anyway it will be leaking somewhere, just a matter of finding out where. Although it also has to be said that if you have the washer reservoir on the right side, the capacity is not very big and the headlight washers do use a fair bit even when they are not leaking. So check for drips under the car when parked. Put a towel over the windscreen, headlights off, run the washers (so the towel absorbs the water and it doesn't run down under the car) and look underneath to see if any water drips out elsewhere. Same tactic with headlights on although it is harder to distinguish between what comes out of the headlight washers and what might be leaking from the pipework behind. Probably the towel tactic will still work but you need to allow the headlight washers to pop out.1 point1 pointI've only glanced briefly at the docs provided by @fabdavrav, but aren't they exactly for the case where you can't get at those normal screws cos of non-working front-to-back motor?1 point1 pointPS. I did 80 miles in the BMW the other day starting with the snow swept off the bonnet and the bonnet covered in ice. The ice did not thaw until I was sitting in the sun and it was still around freezing outside. 150 miles later when it was above freezing I picked chunks of ice out of the front scuttle and let the dog lick it.1 pointI suspect Octopus didn't give a back hander or advertising so were 'forgotten'. Online comments section for the article only has two comments, both asking about IOG.1 point1 pointYes only the power connector. I made a wiring myself buying some connectors. I have come this far1 point1 point1 pointIt says something about the superb & 280 that almost everyone seems to have problems that needed to be rectified, some at reasonable expense, and yet everyone loves it so much they would buy a new one tomorrow!!1 pointGo for it. Might get some Guys on here crawl out of the woodwork..... In 1963. First bike, Aerial Leader 250 two stroke twin. 1964 BSA 500 ex WD. 1964 Norton Navigator. 1965 Dads Velocette. 1966-1968 Cars + couple of bikes had for about 2 weeks then sold. 1969 Got Married, fun ended. 1969 Cars - 2002 2002 Back to bikes. Fun reinvented.1 pointHi, I sold my 2016 Monte estate this week and put my spare up for sale on eBay. A bit far from Hull and posting probably prohibitively expensive but if you every find your way down towards Hertfordshire you are welcome to collect, happy to sell a bit cheaper than I have it listed for. I also have the genuine heavy duty boot liner and the netting system if you are interested in them.1 point1 pointWhat's your problem with it? There will often be a few posts that contain nonsense in any given thread. Unfortunately CAN data bus is a subject misunderstood by a large majority of posters. It's just a communication network. Do you have any useful information to contribute @Neily03?1 pointIt's a low quality, universal Chinese kit. You would do much better purchasing the genuine Skoda kit, and it's not expensive. The kit includes everything except for the actual spare wheel. Any VAG parts department can order this in if you give them the OEM part number, ie. 6V0093860A Foam and jack kit for Fabia MK3 6V0093860A (1109CZK is about £38.32) https://eshop.skoda-auto.cz/cs_CZ/sada-pro-vymenu-rezervniho-kola-15/p/6V0093860A Uniroyal RainExpert 5 185/60R15 84H (Euro label C A 70dB) https://www.mytyres.co.uk/rshop/tyre/Uniroyal/RainExpert-5/185-60-R15-84H/D-124245 The Alcar 7760 is the correct 15" steel rim for the Fabia MK3, but it's out of stock at mytyres and autodoc. The Alcar 8380 is the same specification as the Alcar 7760 and is in stock. Alcar 7760 6Jx15 ET38 5/100 57.1 steel rim (from Fabia MK3) (out of stock) https://www.autodoc.co.uk/alcar/14750638?search=ALCAR+Rim+(7760) Alcar 8380 6Jx15 ET38 5/100 57.1 steel rim (from Octavia MK1) (£51.32) https://www.autodoc.co.uk/alcar/14750737?search=ALCAR+Rim+(8380)1 point1 pointI love mine. best car I have ever owned. 5 years old now and will keep until I have to change.1 pointI fully expect when a vehicle is in the care of a main dealers that they are responsible for the cars safety and care & storage. Something that the Motoring Journals should maybe cover. Autocar, Auro Express etc. rather than the regular rubbish about what some manufacturers plan to launch in 2 years or more time and how cheap they will be then.1 pointIt is not over until the fat lady sings, or maybe until customer get the dealerships owner into court.
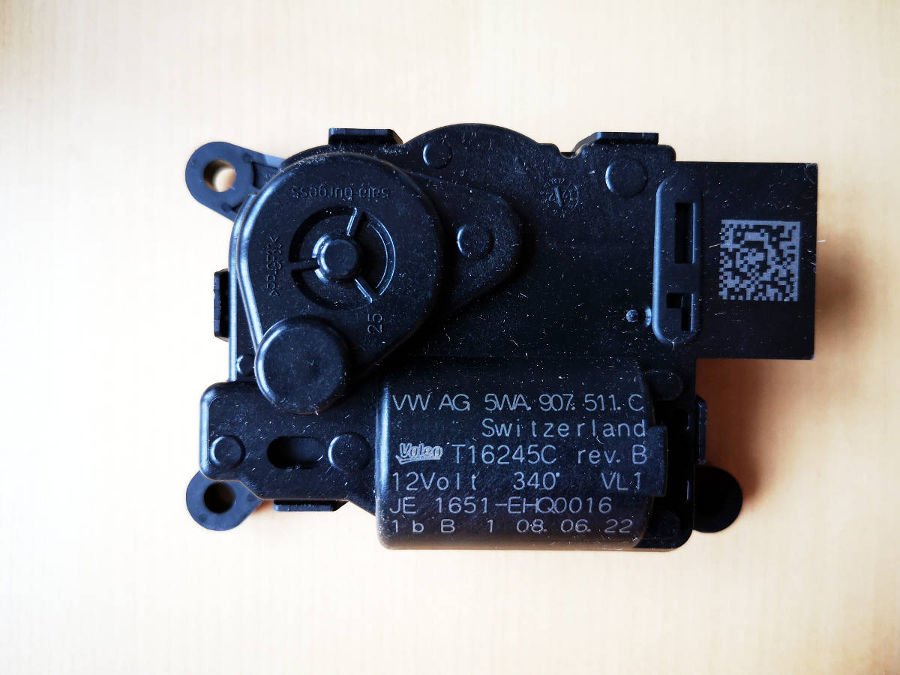
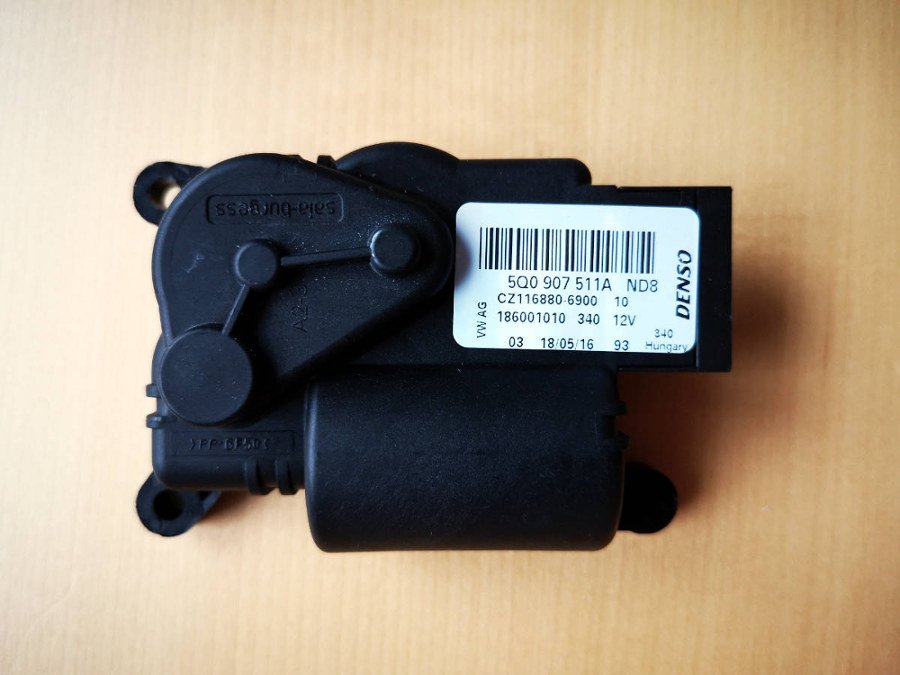
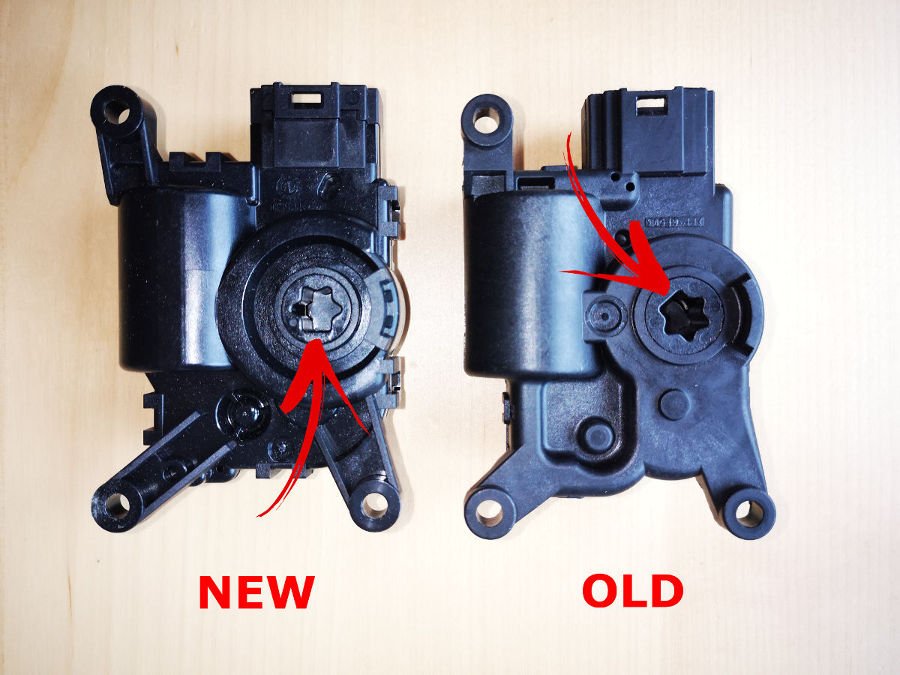
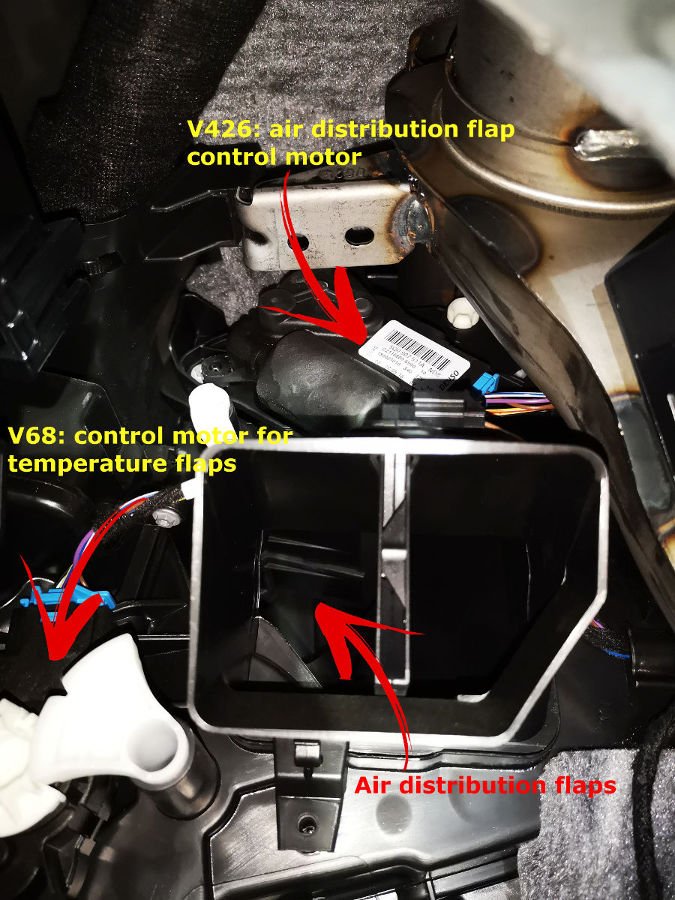
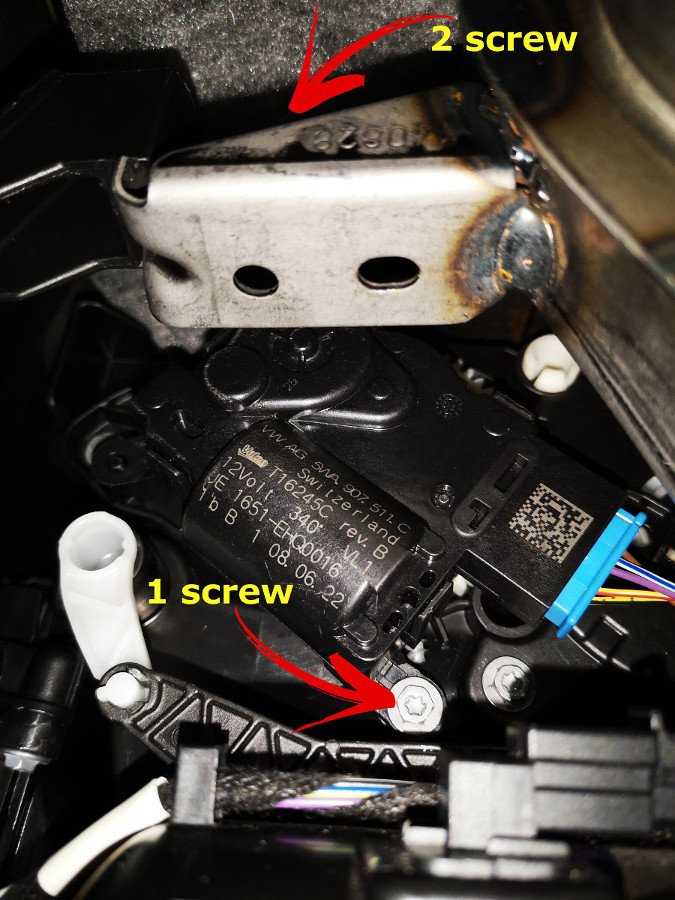
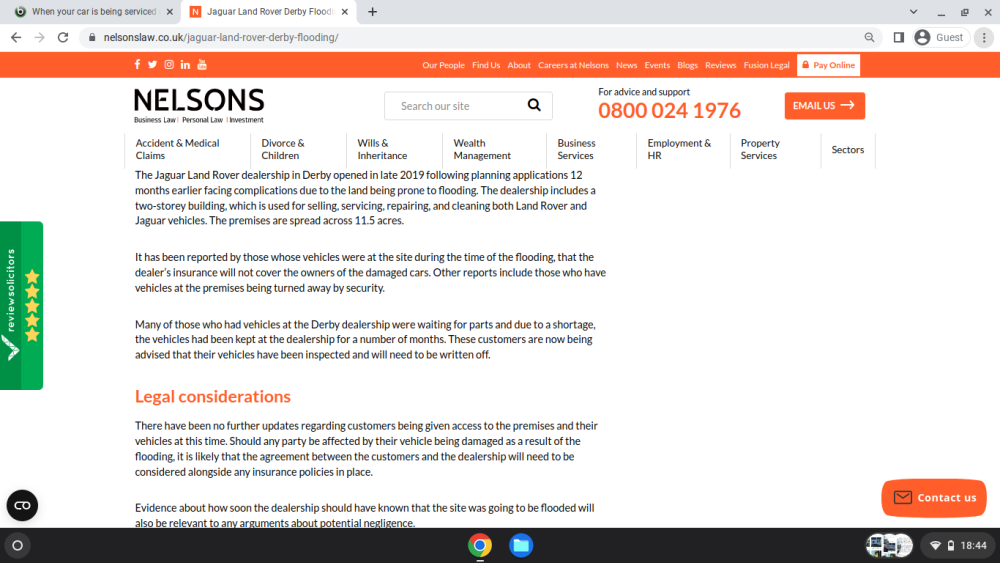 1 pointYou do not attach the bottle of gunk to the compressor. If you get a puncture and want to try to repair with the gunk, you add the gunk before inflation. The manual is in the infotainment system i.e. electronic. Press the Help tile to access the manual. There is also an online version of the manual on the Skoda UK website. (https://www.skoda.co.uk/apps/manuals/models) which you can access with your car's VIN EDIT Here is what the manual says about using the kit... Using the kit Sealing the tyre Unscrew the valve cap of the damaged tyre. Using the attachment, unscrew the valve insert and place it on a clean pad. Shake the sealant bottle. Screw the filler hose onto the bottle. Puncture the foil on the cap. Remove the stopper from the filler tube and fit it onto the tyre valve. Hold the bottle upside down and pour the entire contents into the tyre. Remove the filler hose from the valve. Screw on the valve insert. Inflate the tyre Fit the compressor hose onto the tyre valve. Secure the vehicle with the parking brake. Turn on the ignition. Insert the compressor plug into the 12-volt socket. Switch on the compressor. When the pressure reaches 2.0 – 2.5 bar, switch off the compressor. Observe the maximum compressor run time specified by the kit manufacturer. If the tyre pressure has not reached 2.0 – 2.5 bar, remove the hose from the valve. Move forward or backward approximately 10 m to allow the sealant to spill in the tyre. Refit the hose to the valve and repeat the inflation.1 pointSo I fixed the issue and I want to share how I did it 😁 I bought new part. Factory installed module V426 was number 5Q0907511A but part available in official distribution currently has new number 5WA907511C (note, that I write about part for Denso HVAC unit). Removing the dashboard is not required to replace V426/V428 module (in LHD vehicles) although the official service manual begins with this step. Access to this part is possible from the bottom - under steering column or as you prefer: above pedals. If you want to do that without removing the dashboard you should remove knee airbag (mounted on 3 torx screw) and next: remove left footwel vent (mounted on only one torx screw). You don't must unplug knee airbag, you just need to unscrew it and rest against on the center tunnel. When you remove this two parts, you get access to problematic servomotor. Be very careful when removing screws from V426, because when they fall, it will be very difficult to locate and remove them. With the screws removed, you remove the module from the climatronic mechanism axis, and then you need to unplug the plug - a small screwdriver may be useful, but there's not much space to work with both hands. In fact there is no space, so you have to work in a truly paralytic position. When you disconnect the plug, the module is ready to be removed. I have one advice for you: before you start unscrewing the module, restore power to the car and turn on the ignition. Next, turn on the ventilation and switch the airflow directions (face, feet, windshield) looking in front of the removed footwell vent, watch if the flaps inside the HVAC unit moves when you click the buttons on the air conditioning panel. In my case, the flaps were dead. Mounting new part - now the true play starts. Step one: connect the plug to new module but not try to mount it yet. Next: turn on ignition and try to choose combination of climatronic switches to set up new module in position which allows to to mounting its on axle of HVAC unit (in other words: you have to set the new motor in the same position as the old, disassembled module was in) When the axle and new part is synchronized, you mount servomotor on the place. Then you screw the motor with two screws: at the bottom and top. Installing the top mounting screw is dramatically difficult. Putting the top mounting screw is so heavy because there is no space at all to grab it with even two fingers. A moment of inattention and the screw drops, and its find is another challenge. When you screwed the motor with the two screws, turn on the ignition and check the flaps again during switching the airflow direction on the air conditioning panel. In my car the flaps came to life. You will also need to perform adaptation and read errors from the HVAC controller. The adaptation can be started on the air conditioning panel - turn on the airflow: to the windshield, to the legs and to the face vents, and then press "AC" + "front vents" buttons at the same time for 3 seconds. When its finish again check errors in HVAC module and clean them. If adaptation was finished correctly errors shouldn't back. During adaptation you can observing via left footwel vent that flaps are working right. At the end you mount again footwell vent and knee airbag and are you going for a test ride to testing that HVAC works right. If you unplugged battery you should also make test ride for few km's, next check and clear faults in all car modules. In authorized Skoda service center in Polad repair of this issue costs about 450 EUR (with dashboard and central tunnel removing). I repaired myself this fault for the price of about 70 EUR 🤭 However a lot of self-denial is required for made it. Good luck 😁 and sorry for my English...
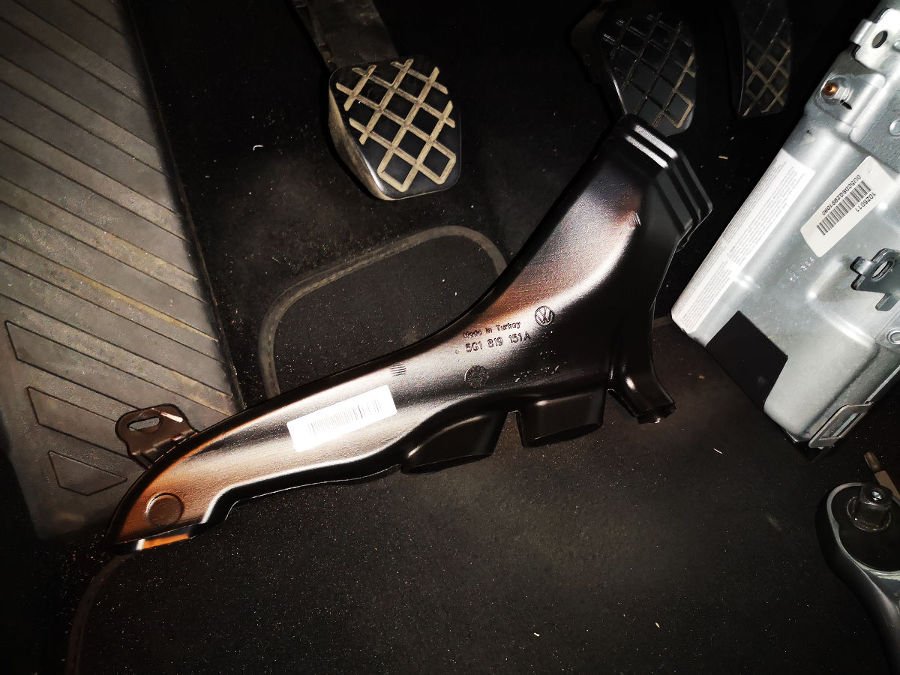


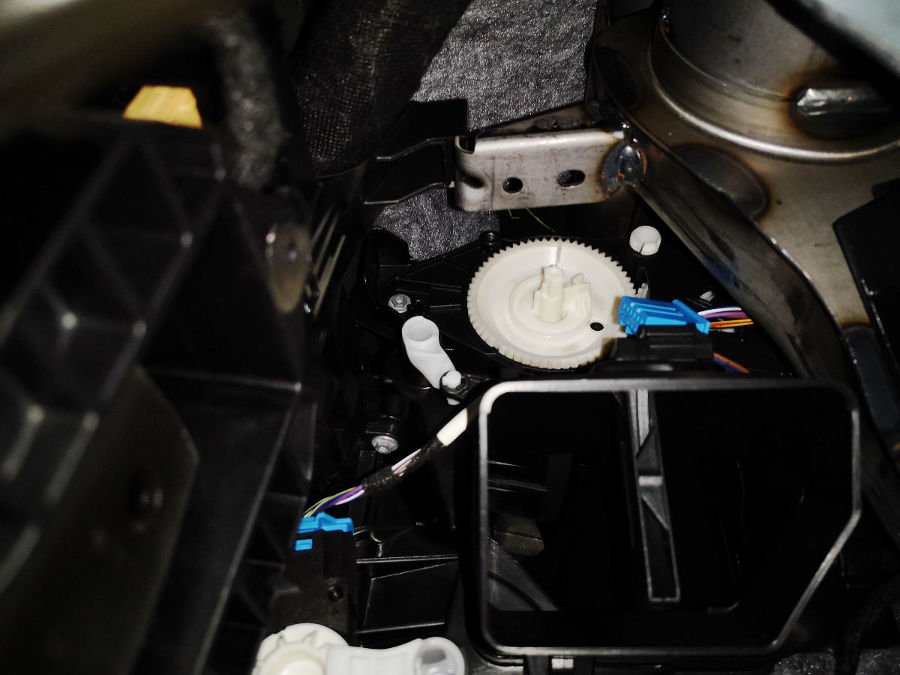 1 point1 pointHello! I've got the same problem in my Skoda Octavia mk3 '17. I've noticed yesterday that I can't off front vent - blower is blowing on face, independent that I turn on or off switch. When I try to enable blowing "on socks" on climatronic panel - nothing happen. Other functions of HVAC works good. Adaptation which was shown in link above doesn't help. During adaptation I can't hear any incorrect noises, such as crackles or clicking from HVAC flaps or some servomotor. When I plugged diagnostic interface I saw the same fault code in HVAC module (928364). I looked at the official documentation of the heating system in Octavia and concluded that cause of the fault must be a damaged V428 module (front air distribution flap control motor) or some mechanical problem with the flap. The service manual says that on LHD cars, the dashboard must be removed for repair. In RHD vehicles access to the V428 servo motor is quite easy, because it is placed on the same side as LHD vehicles... and it means, that you should remove glovebox and you can get access to problematic part. However, I would like to ask if anyone replaced this motor in left-hand drive cars, and if so, is it really necessary to disassemble the entire dashboard, or maybe it is enough to remove the knee airbag pad and it would be possible to get there without disassembling the board? Today I checked whether the flap motor could not be accessed after removing the instrument panel, but it doesn't resolve problem with access. Servomotor placed too deep...
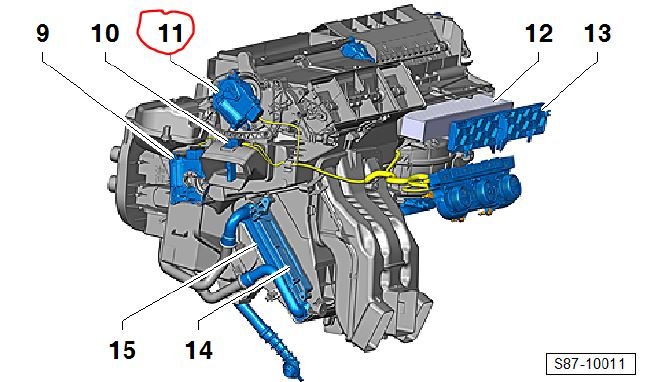 1 point


Important Information
Welcome to BRISKODA. Please note the following important links Terms of Use. We have a comprehensive Privacy Policy. We have placed cookies on your device to help make this website better. You can adjust your cookie settings, otherwise we'll assume you're okay to continue.