


Leaderboard
-
.jpg.1006585dfe4e2977315b67c3d642e37b.jpg)
Guest_
FREEDOM14Points83,824Posts -
Lady Elanore
FREEDOM14Points24,912Posts -
Stonekeeper
Resident Member14Points2,883Posts -
Tilt
FREEDOMLite12Points3,939Posts


Popular Content
Showing content with the highest reputation on 15/11/24 in all areas
-
3 points^^^T0$$er. Bigger battery EV and a house with a drive / off street parking. The great divide. Thine eyes are blind he can not see if he does not wear his glasses or open his mind.3 points
-
3 pointsHi Lee. You haven’t missed a post as such other than a couple of images of the roof when we finished it as it was quite a mission. It’s more project material than photography so I don’t normally post here except if I’m feeling except pleased with myself🤣 It’s a cemetery gatehouse in the Scottish Borders. Last used by the council for their park keepers etc. We’re extending and converting it. Doing most of the work ourselves.3 points
-
Oh believe me they do... and I've seen them make / suggest things that are even more daft2 points
-
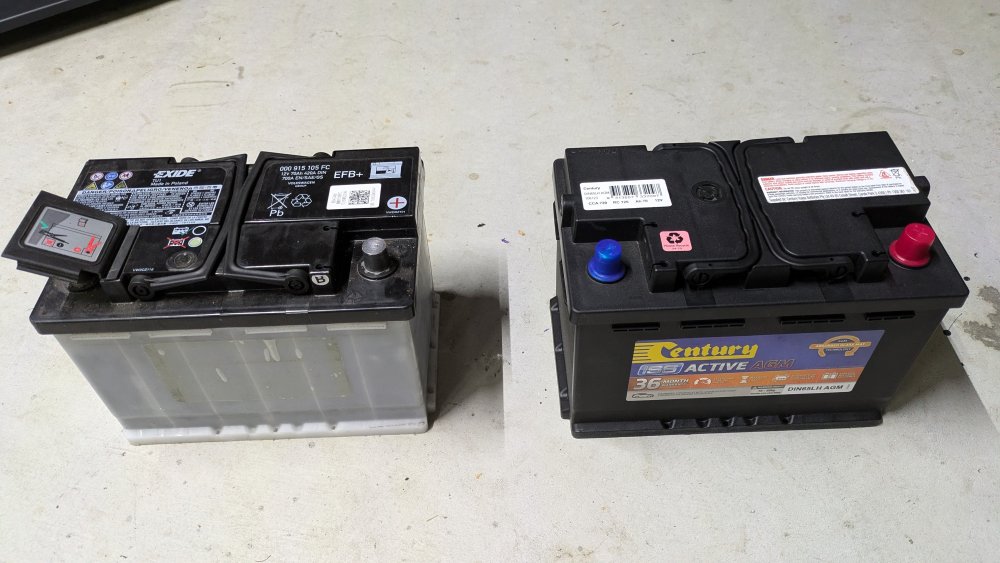
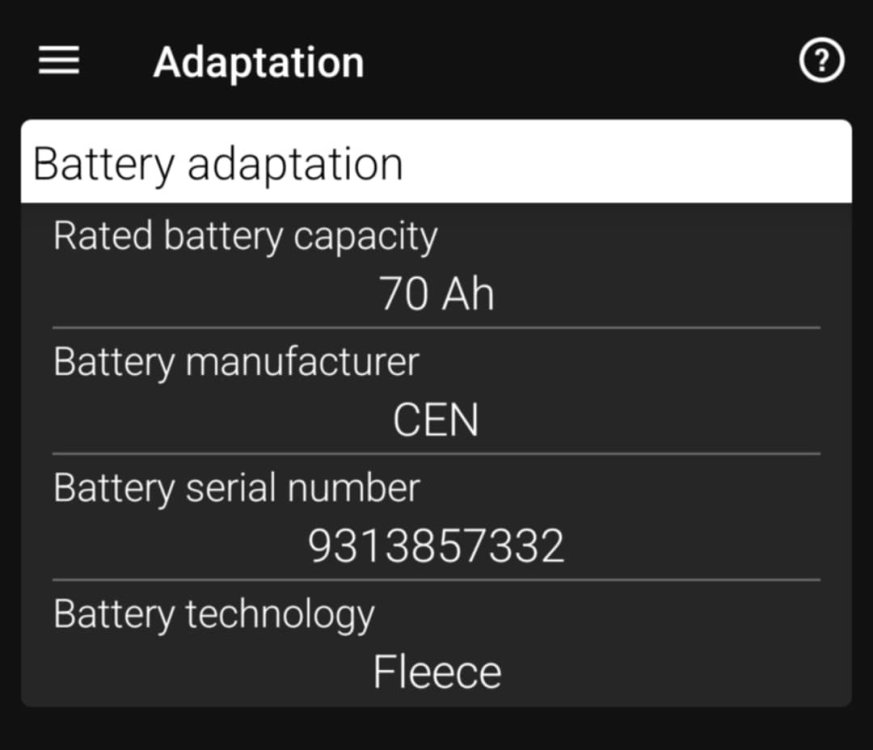
2 pointsAfter almost 4.5 yrs, Gandalf's battery was showing signs of weakness when cracking the engine. So I replaced the Exide EFB+ battery with a Century ISS Active AGM battery. Old: 12v 70ah 700CCA EFB+ New: 12v 70ah 720CCA AGM Did the Battery Adaptation too, changing it to Fleece.
 2 points
 -
2 points
-
Read the guide below and watch the YouTube video which is extremely useful and shows you an update process in real time. Only perform this procedure if you are confident in doing so and it is at your own risk. Apparently, Skoda has stated this will be the last major software version update for the Skoda Octavia Mk4s, although I imagine the mid-Mk4 facelift models will get further updates. I applied the update to my Octavia Estate First Edition 2021 plate and all seems to have gone smoothly but it goes without saying manually update only if you are confident performing the procedure and it's at your own risk. FYI, I updated from version 1969. You will need an ExFat formatted USB-C type drive - oddly my Sandisk Micro SD Card with USB-C adapter wasn't detected by my Octavia so I switched to a 1TB USB-C Lacie hard drive I had lying around and that worked fine. You can tell if your drive is "compatible" and has mounted when you start the update process as, at one stage you will have to select either "USB1" or "USB2" - if a drive is mounted/detected one of these will be in bold. 1. Download the compressed package from one of the two links below: Octavia Infotainment Update Version 1985 - Google Drive https://e.pcloud.link/publink/show?code=XZSh8xZ7iUQu9K1u4uwTGbHqtxFE7m0OFtV 2. Create a temporary folder on your PC or Tablet, for example, MU1985 3, Locate the downloaded compressed file package and then right-click on it or press and hold on it, so the menu appears and it should offer you the opportunity to Extract here or elsewhere, tell it to extract the files to the MU1985 folder and let it get on with it. When it has finished extracting the files you will have the following TWO folders (previously there has been a third file but not this time, just the two folders below): Data Meta 4, Copy the above two folders directly to the root of your ExFat formatted UB-C drive. These two folders need to be at the root / top level of the USB-C drive, not contained in any other folder and you don't want anything else on that drive THERE MUST BE NO OTHER FILES / FOLDERS THAN THIS. Once done you are ready to move to your car to start the update. 5, Insert your USB-C drive into one of the front USB ports and put your car in ignition mode, which you need to do to apply the update, just press the Start Stop button on its own, without depressing the Clutch / Brake which you would do if you were starting the engine I also switched off the climate control before proceeding although I imagine the Update process would disable its functioning anyway. At this point, you must have a full or very well-charged car battery so that the car doesn't shut down halfway through the process. The ignition needs to be ON, the Engine needs to be OFF (NOT RUNNING)! DO NOT START IT DURING THE PROCESS. 6. Hold the "Menu" button until the engineering menu appears. 7, Watch this video which essentially shows you in real-time the update process. It's in German but it's easy to follow and the video relates to software version 1941 but it's essentially the same process. https://youtu.be/4AsSbGd3caU Be warned, there are moments when the screen goes black, the system reboots and the CPU upgrade stage looks like it has frozen but it hasn't. Just be patient, let the system do its thing and you should get a successful update of your system. UNDER NO CIRCUMSTANCES MUST THE PROCESS BE STOPPED ONCE IT HAS STARTED OTHERWISE YOU'LL MORE THAN LIKELY NEED A NEW INFOTAINMENT SYSTEM. Notes. After it has finished updating the system, give it a couple of minutes to ensure that all is well and like it shows on video press resume an wait for about 90s or so and the system will restart just, like in the video. DO NOT START THE CAR UNTIL THE SYSTEM HAS RESTARTED After the update the built-in manual is unlikely to be available for about 48hrs, it does come back! You will more than likely receive another OTA update, it's OK to accept it. Ultimately if you are at all worried about doing it, take it to a VW Independent or Skoda dealer and ask them to do it for you.1 point
-
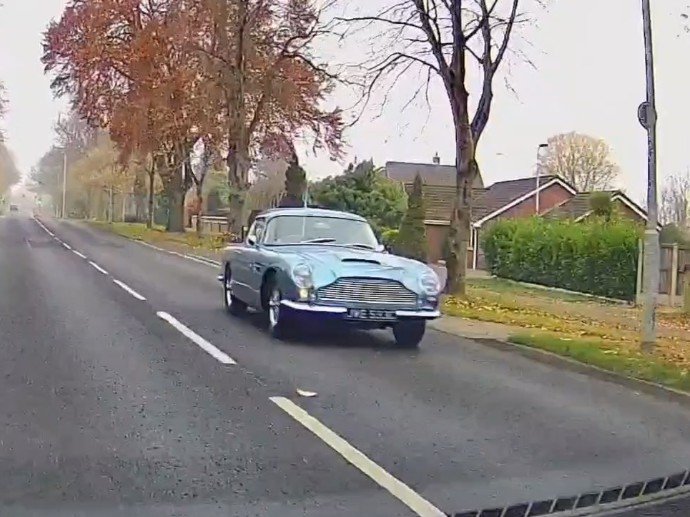
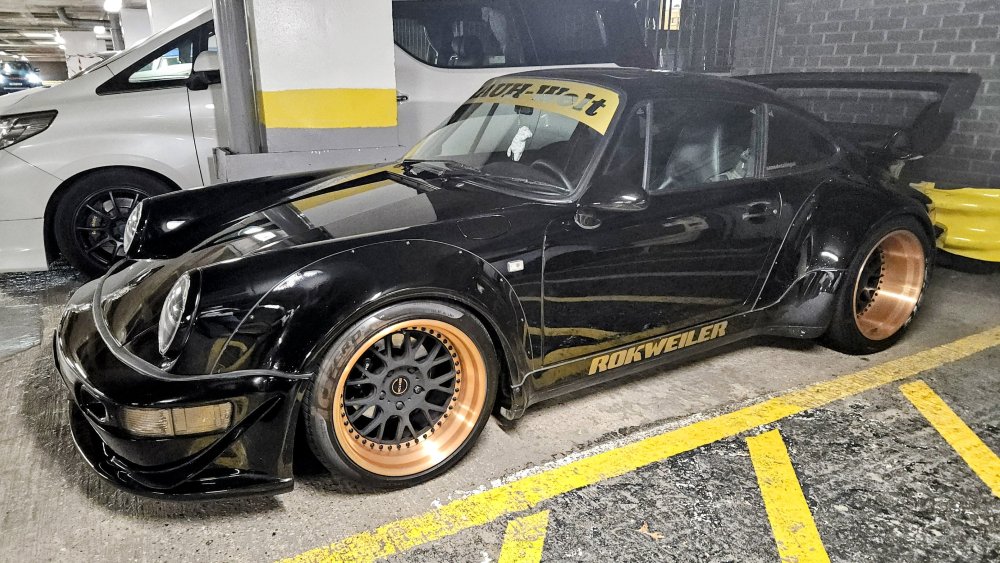
The DB5 was a still from my dashcam, so a bit grainy, but stunning in the flesh though! The Porsche was in a multistorey car park:
 1 point
 -
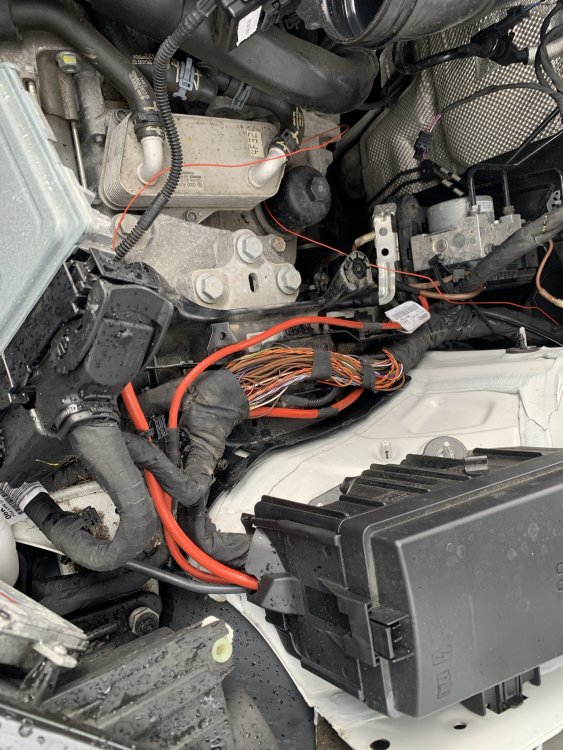
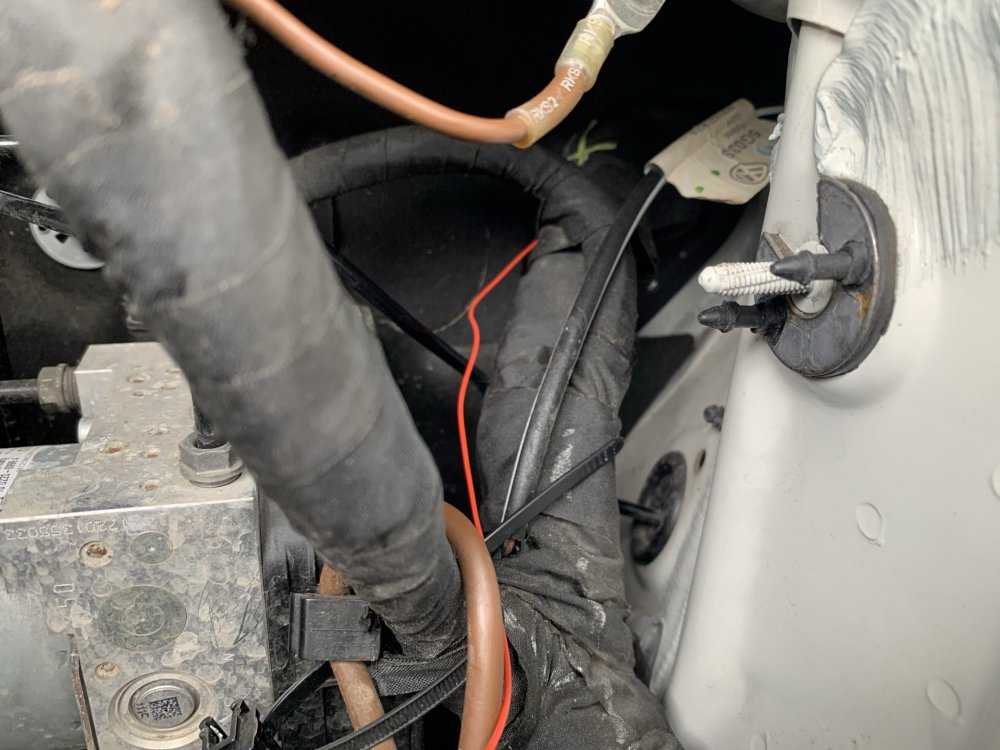
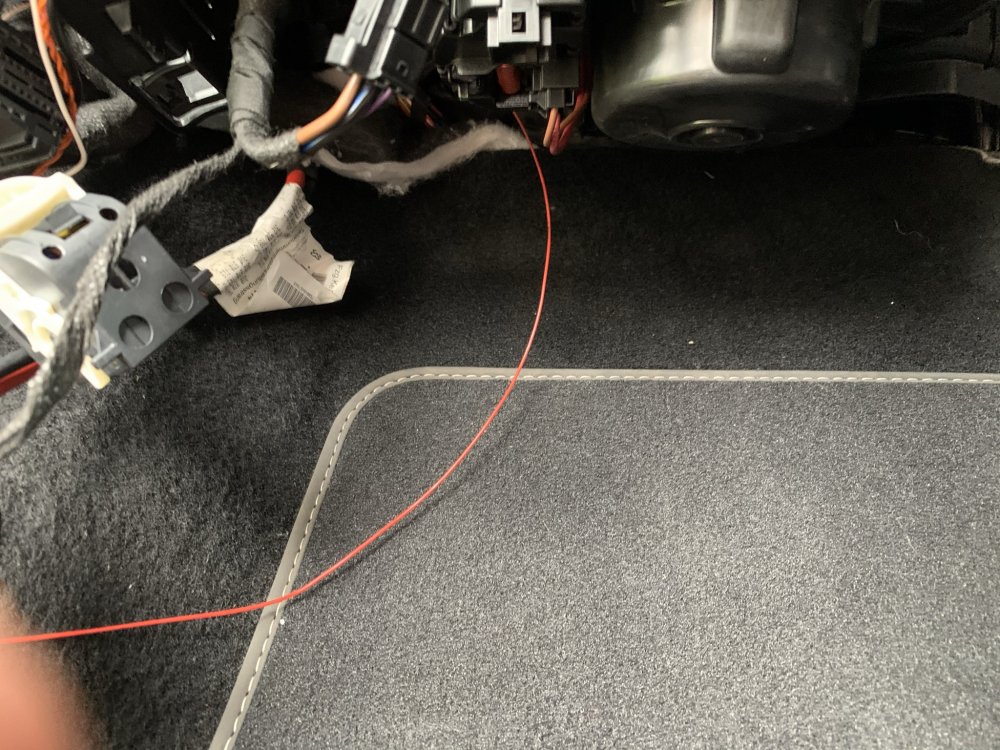
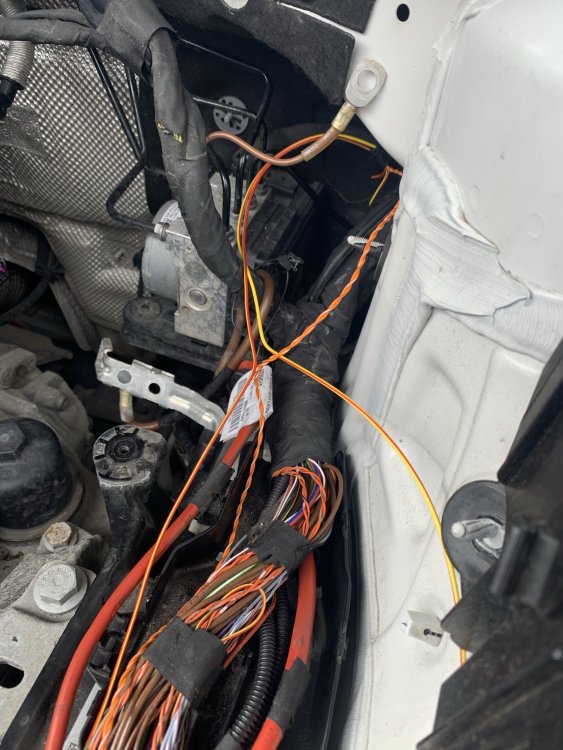
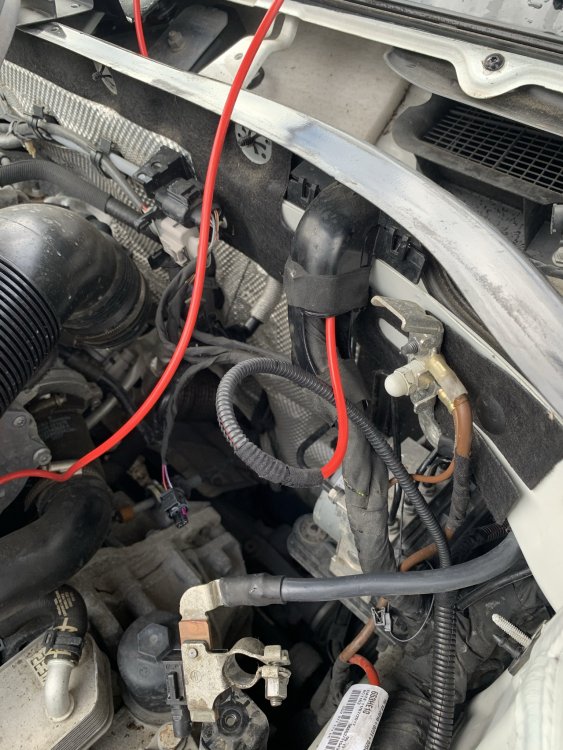
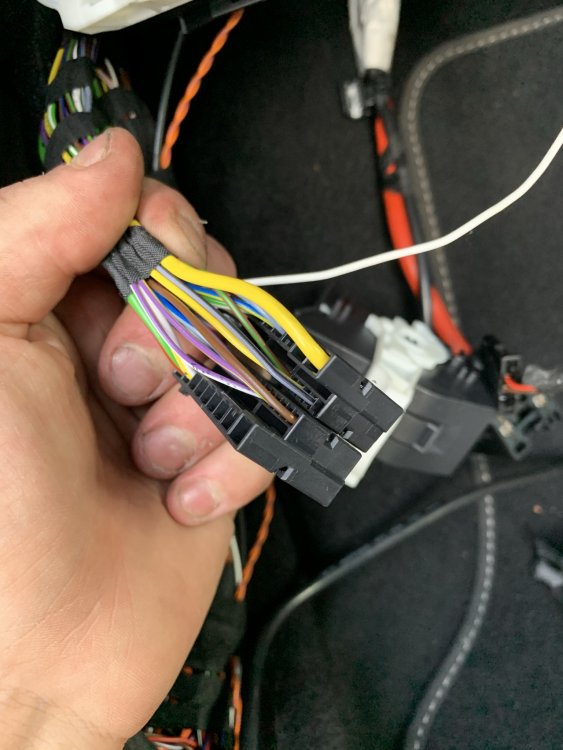
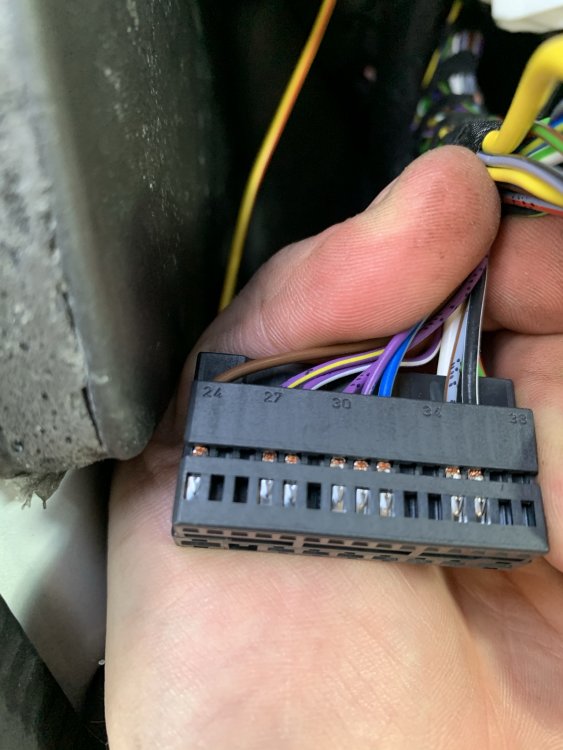
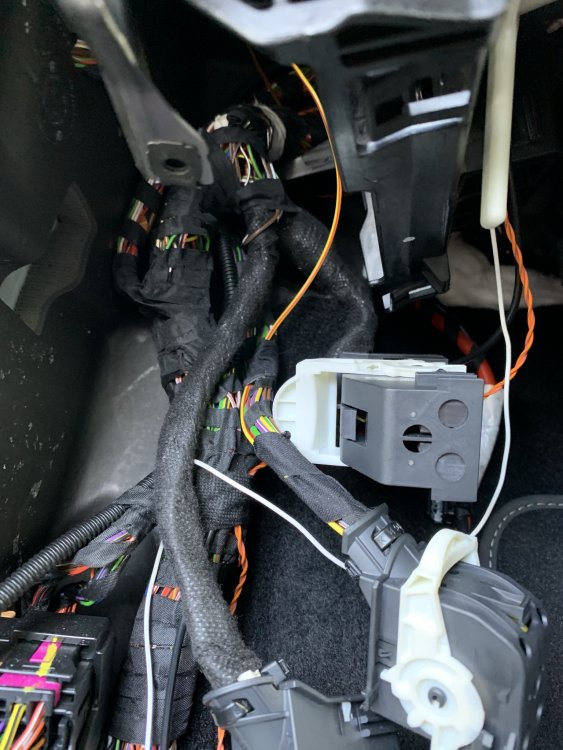
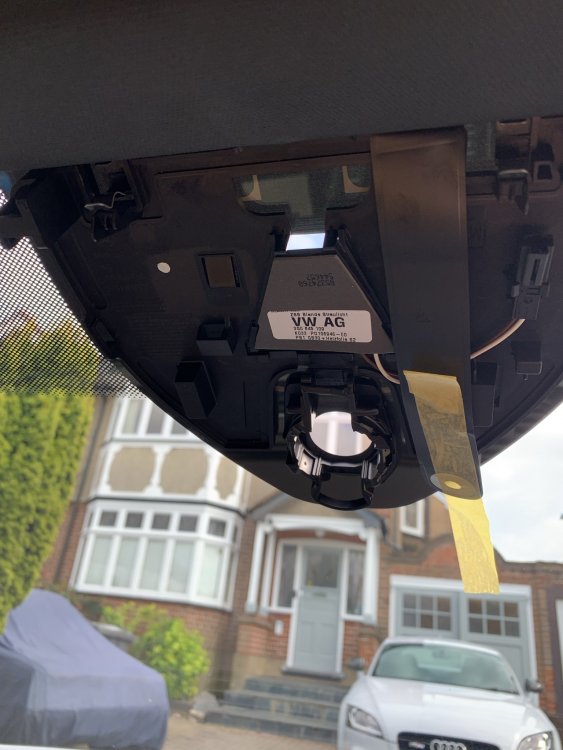
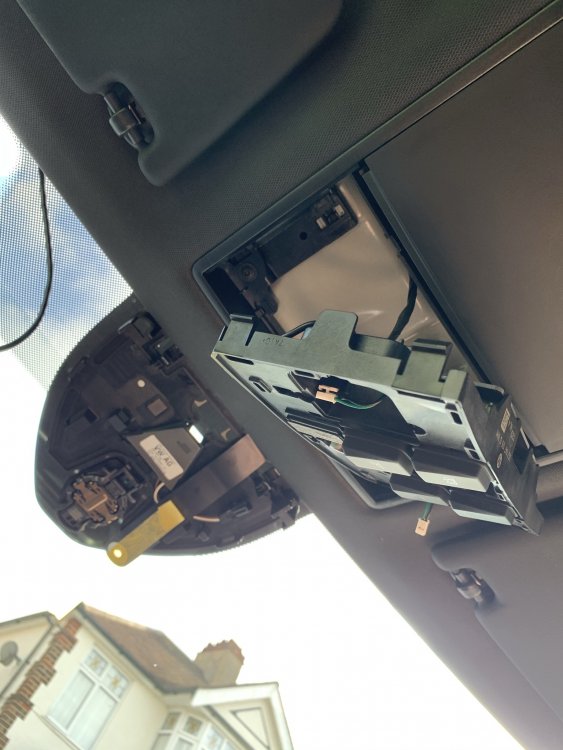
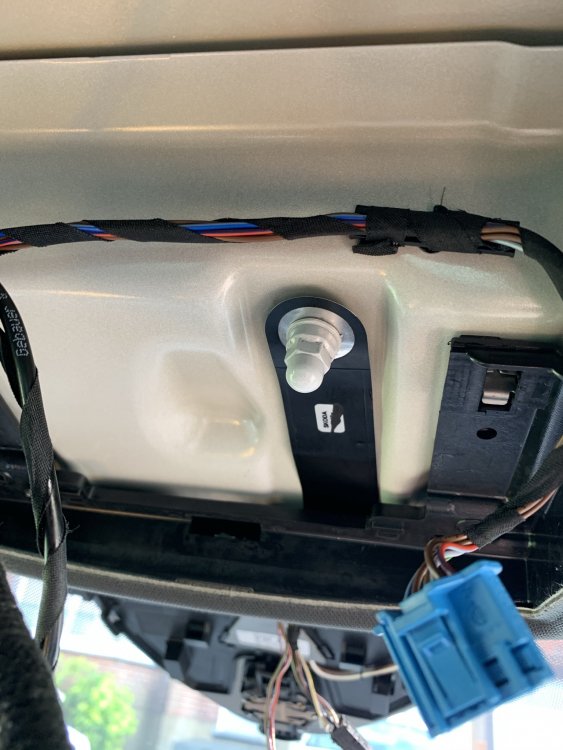
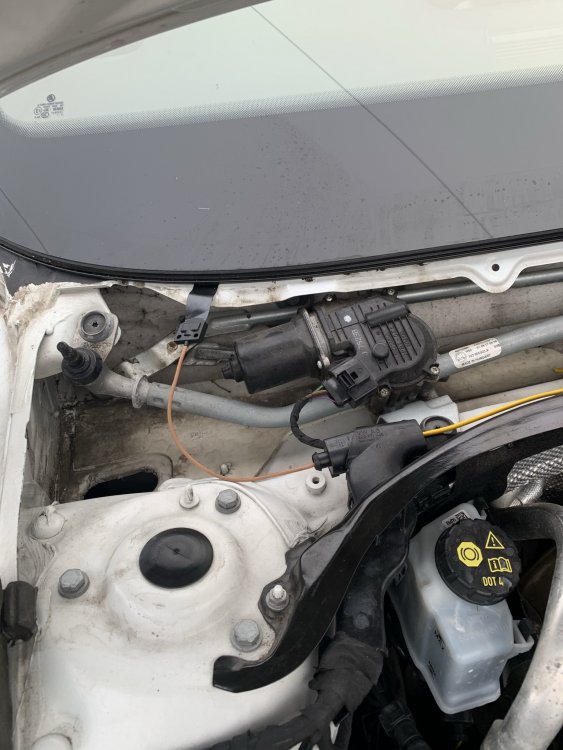
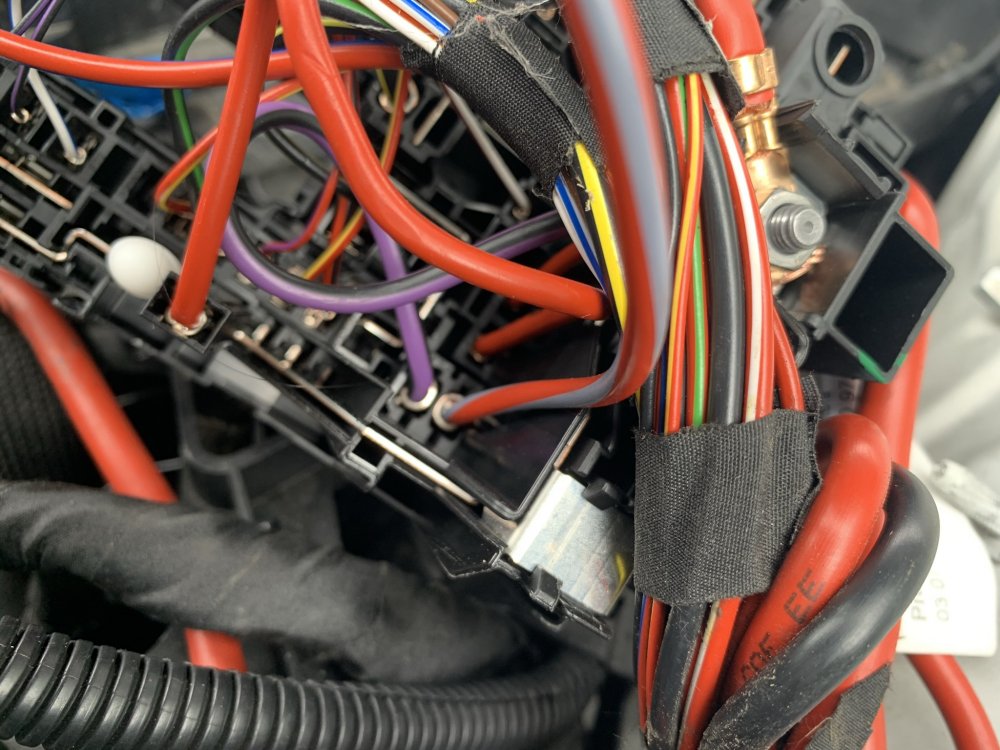
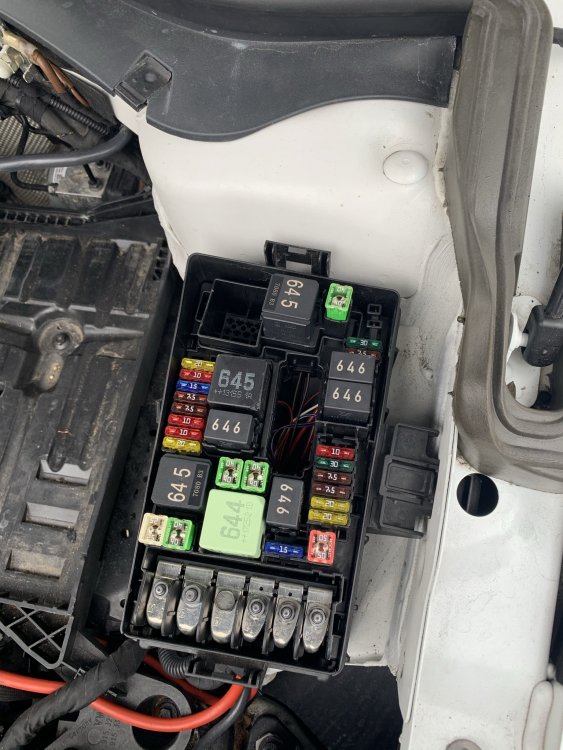
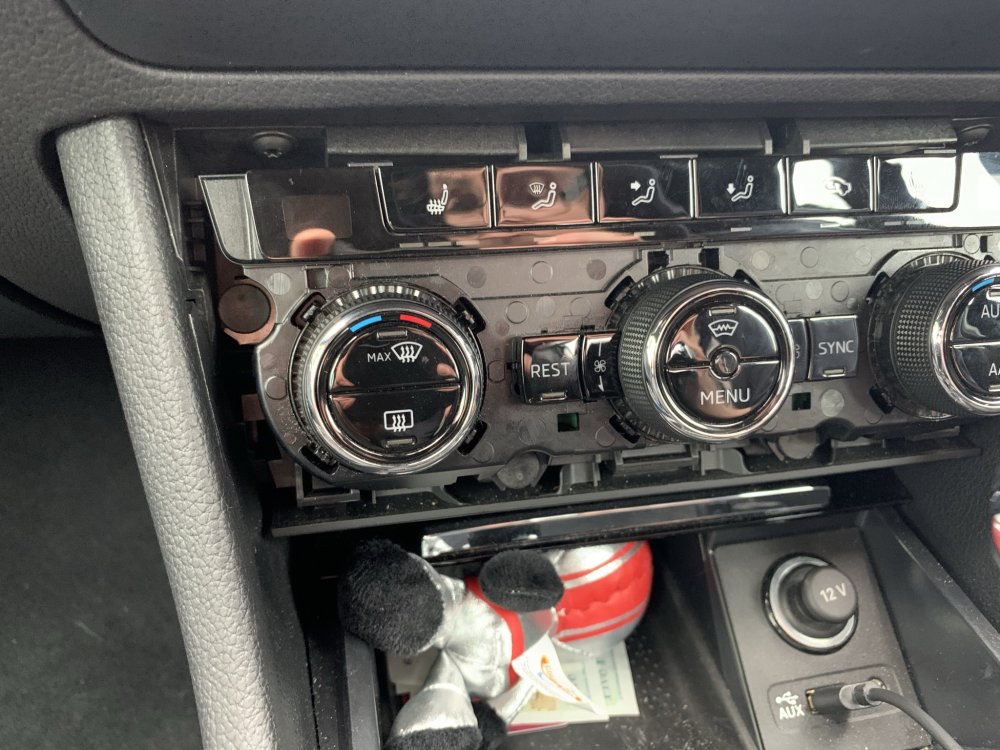
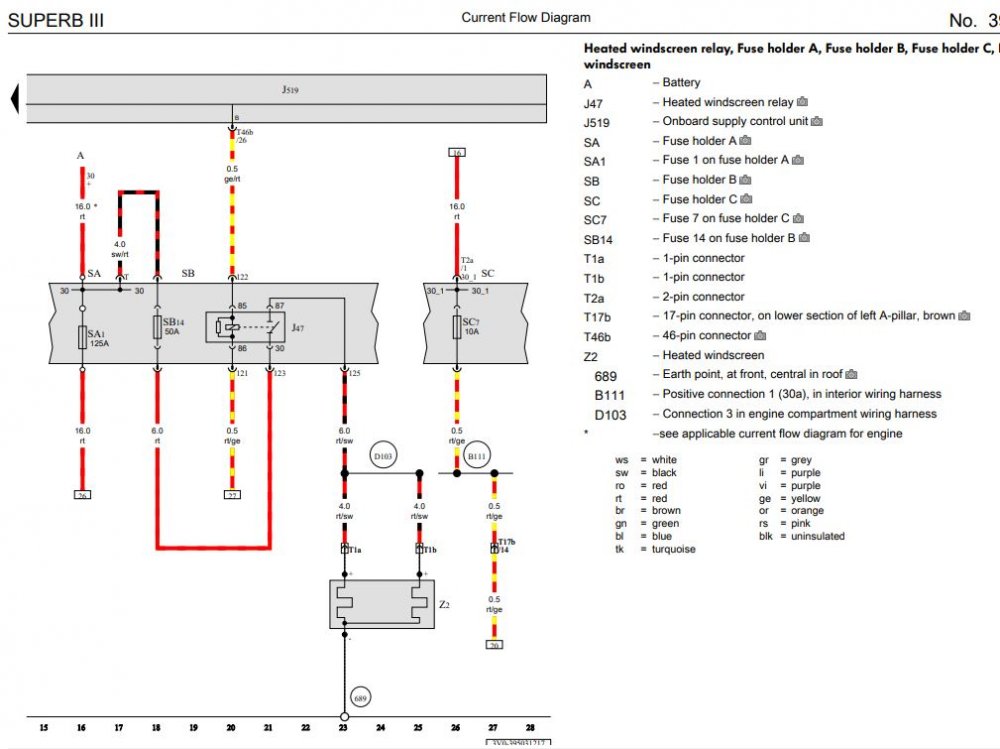
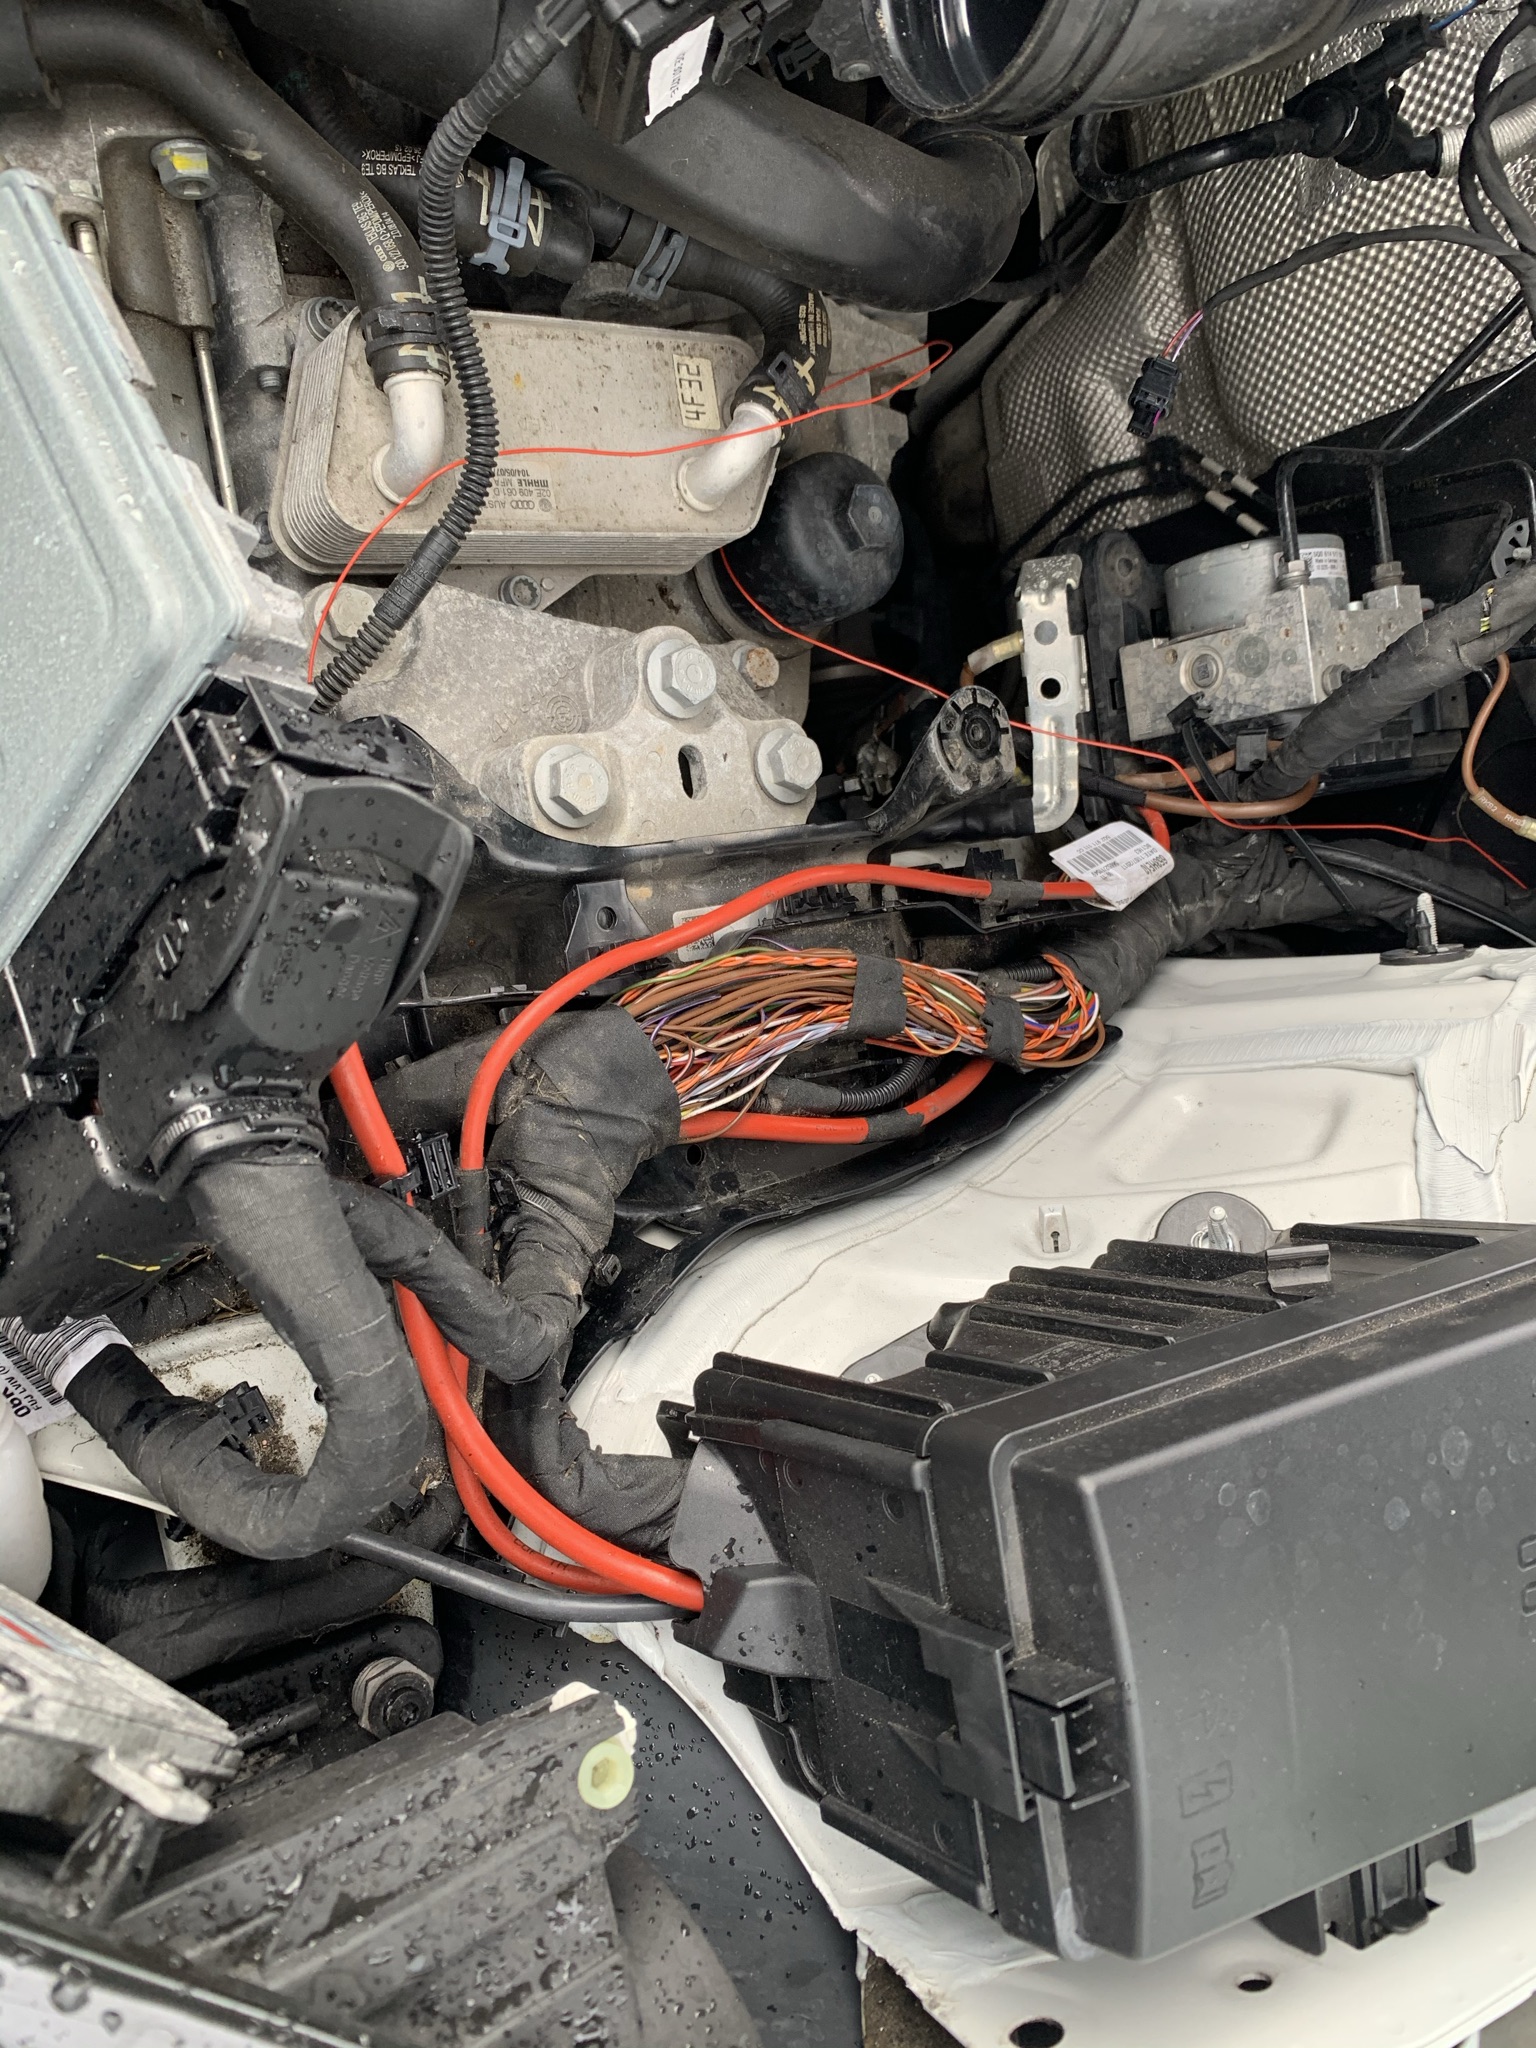
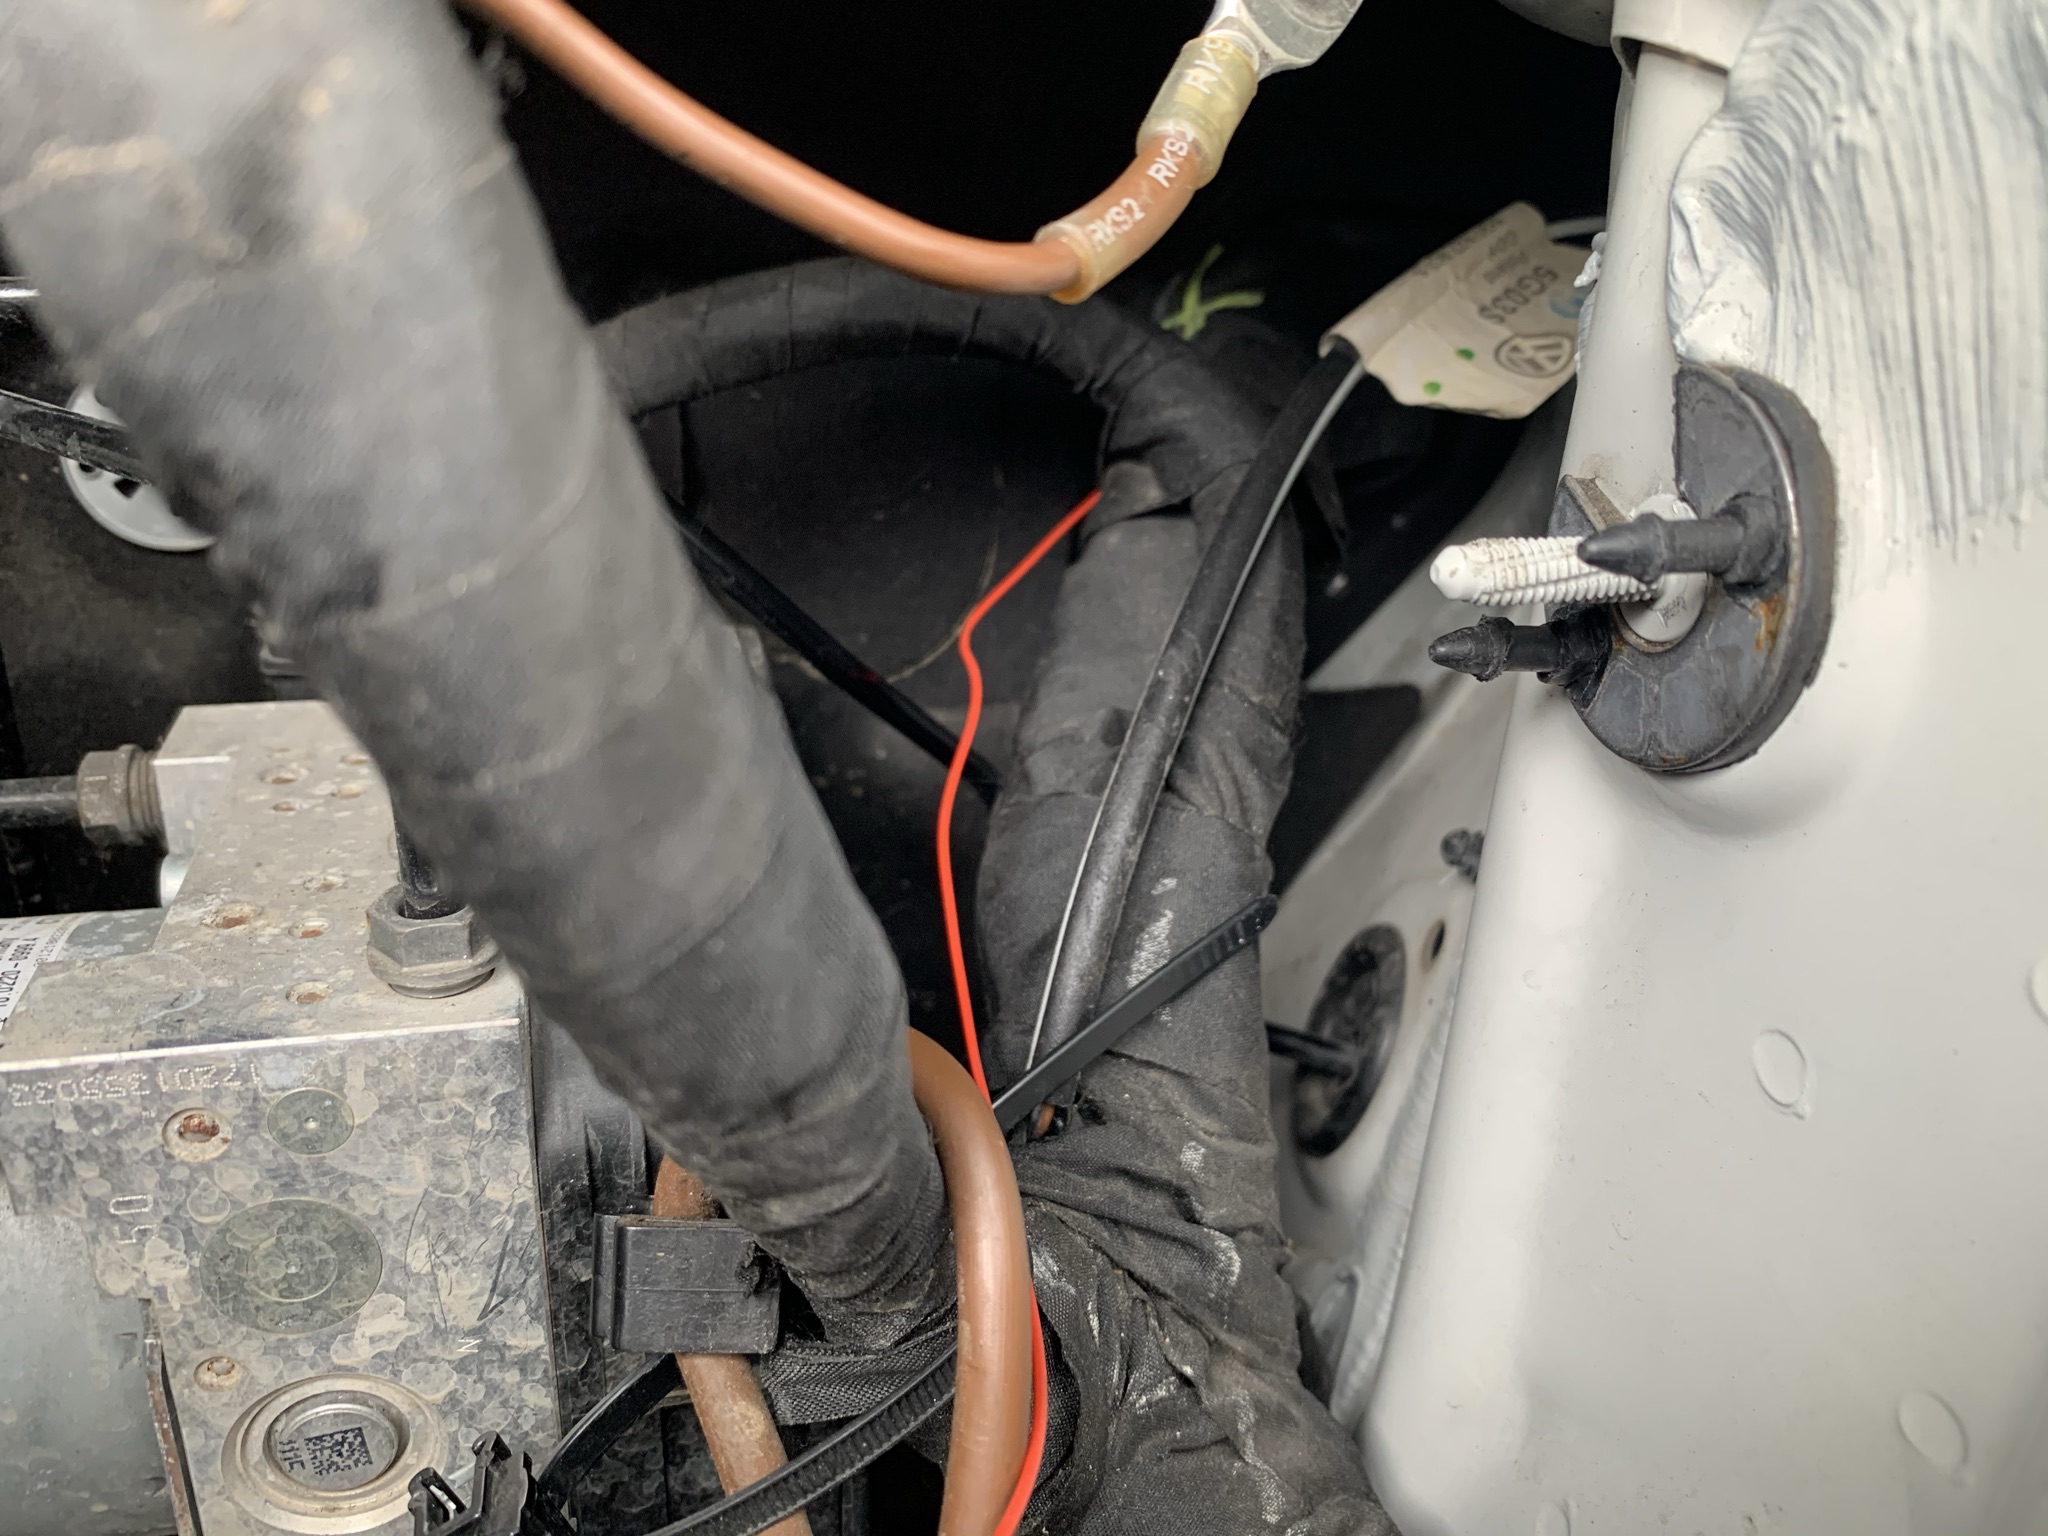
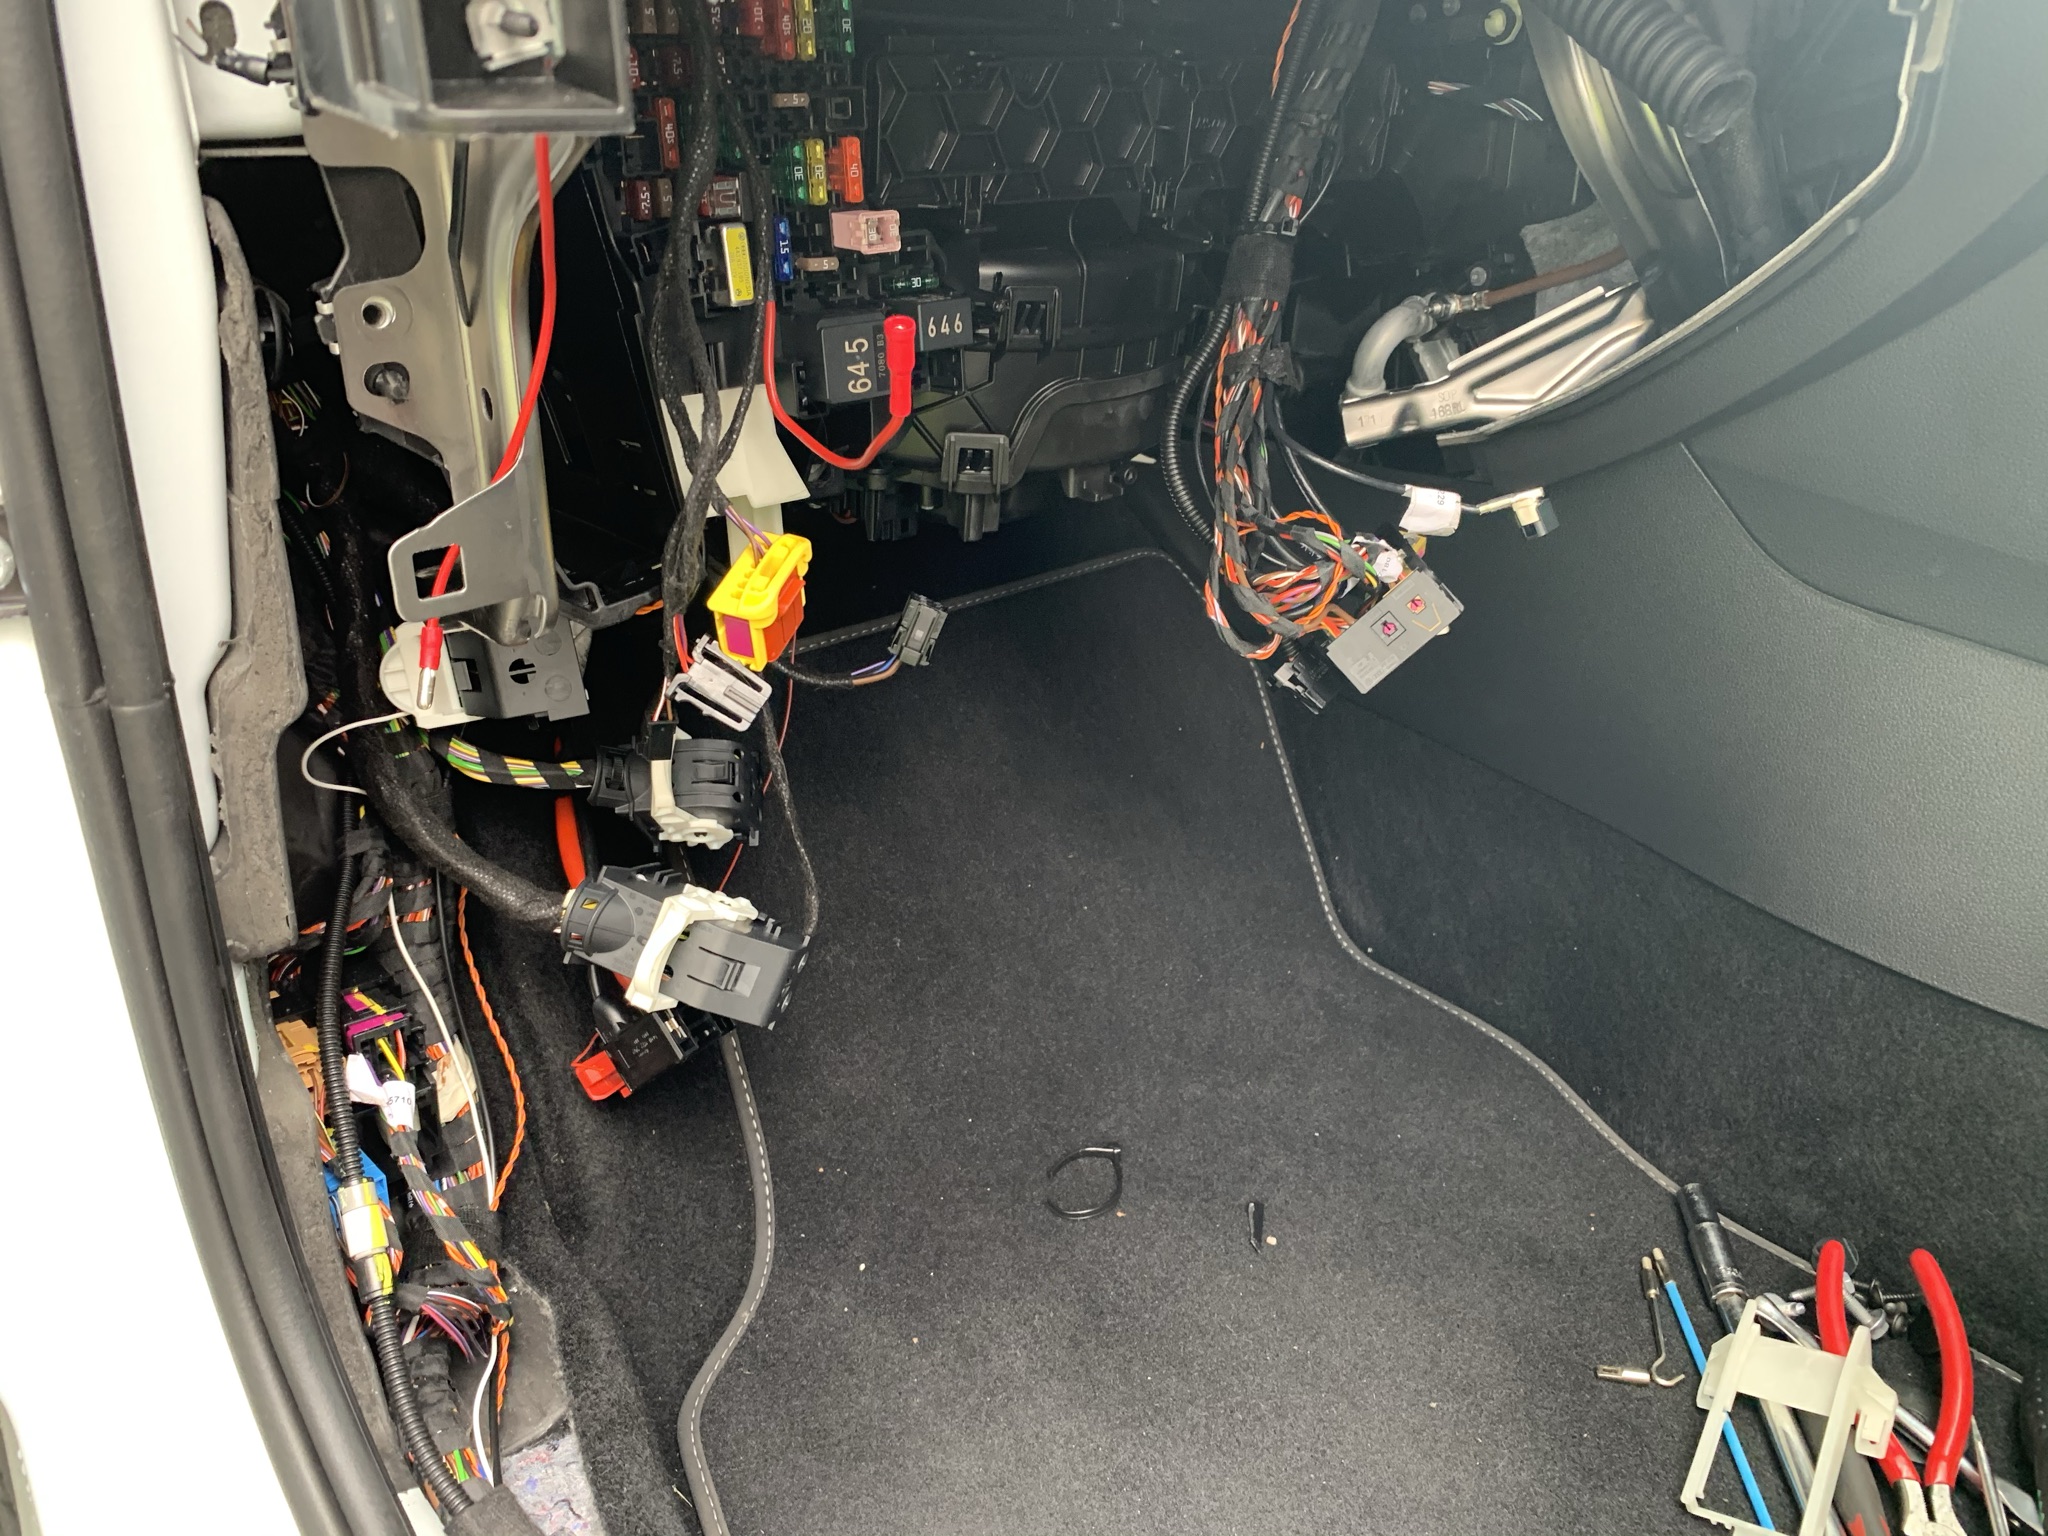
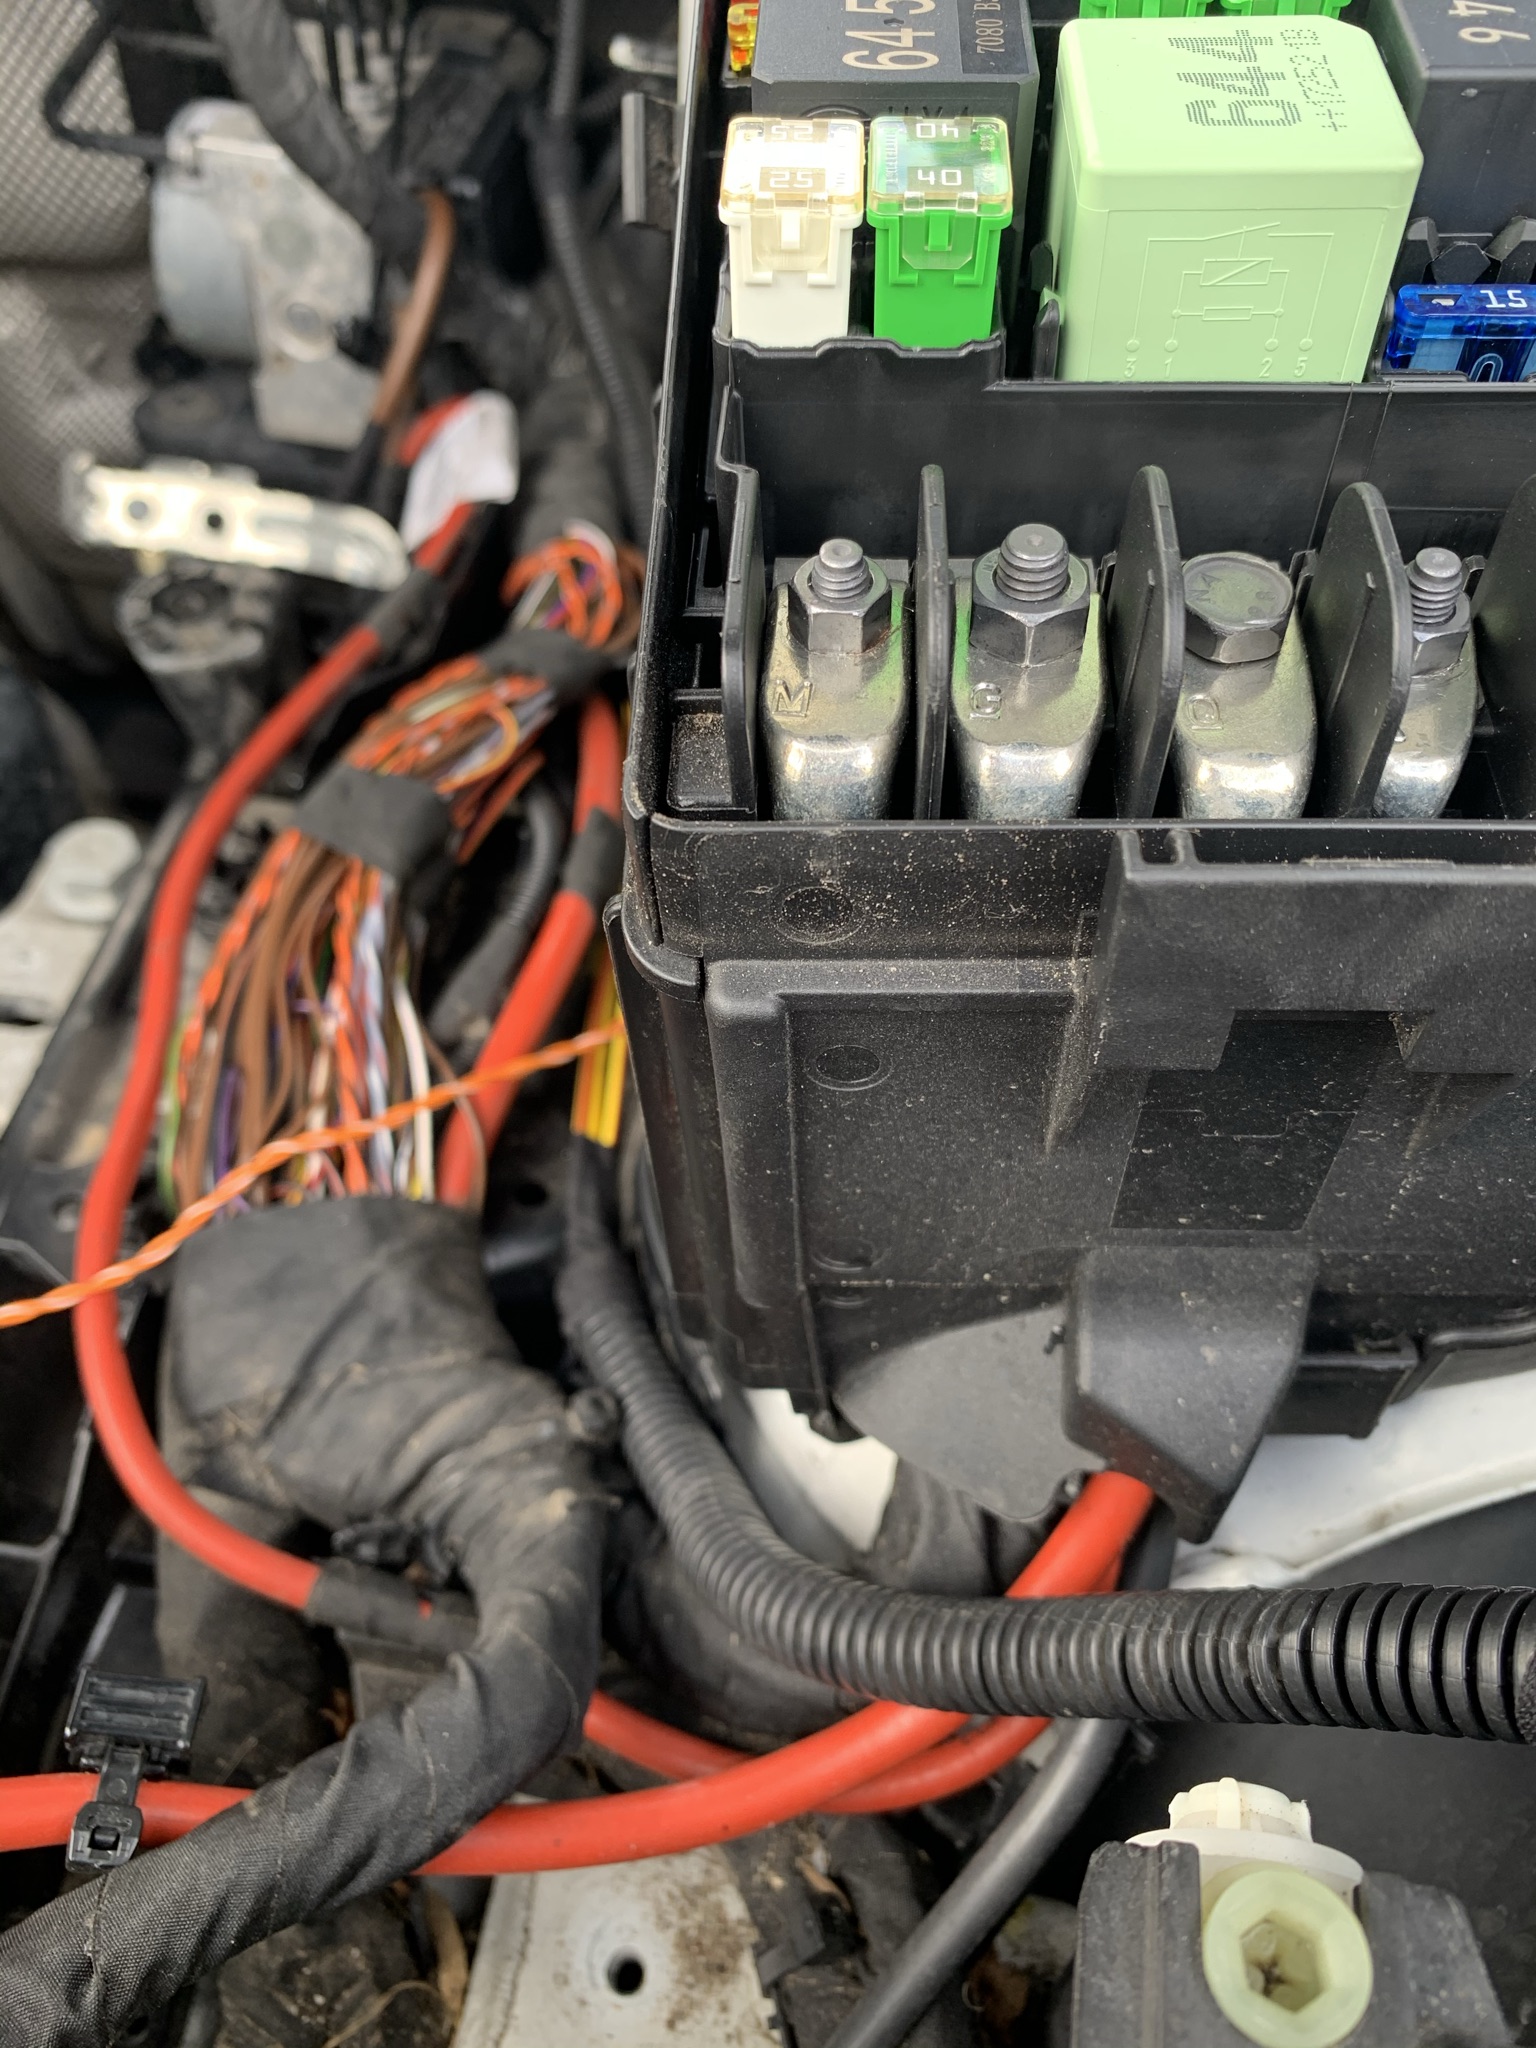
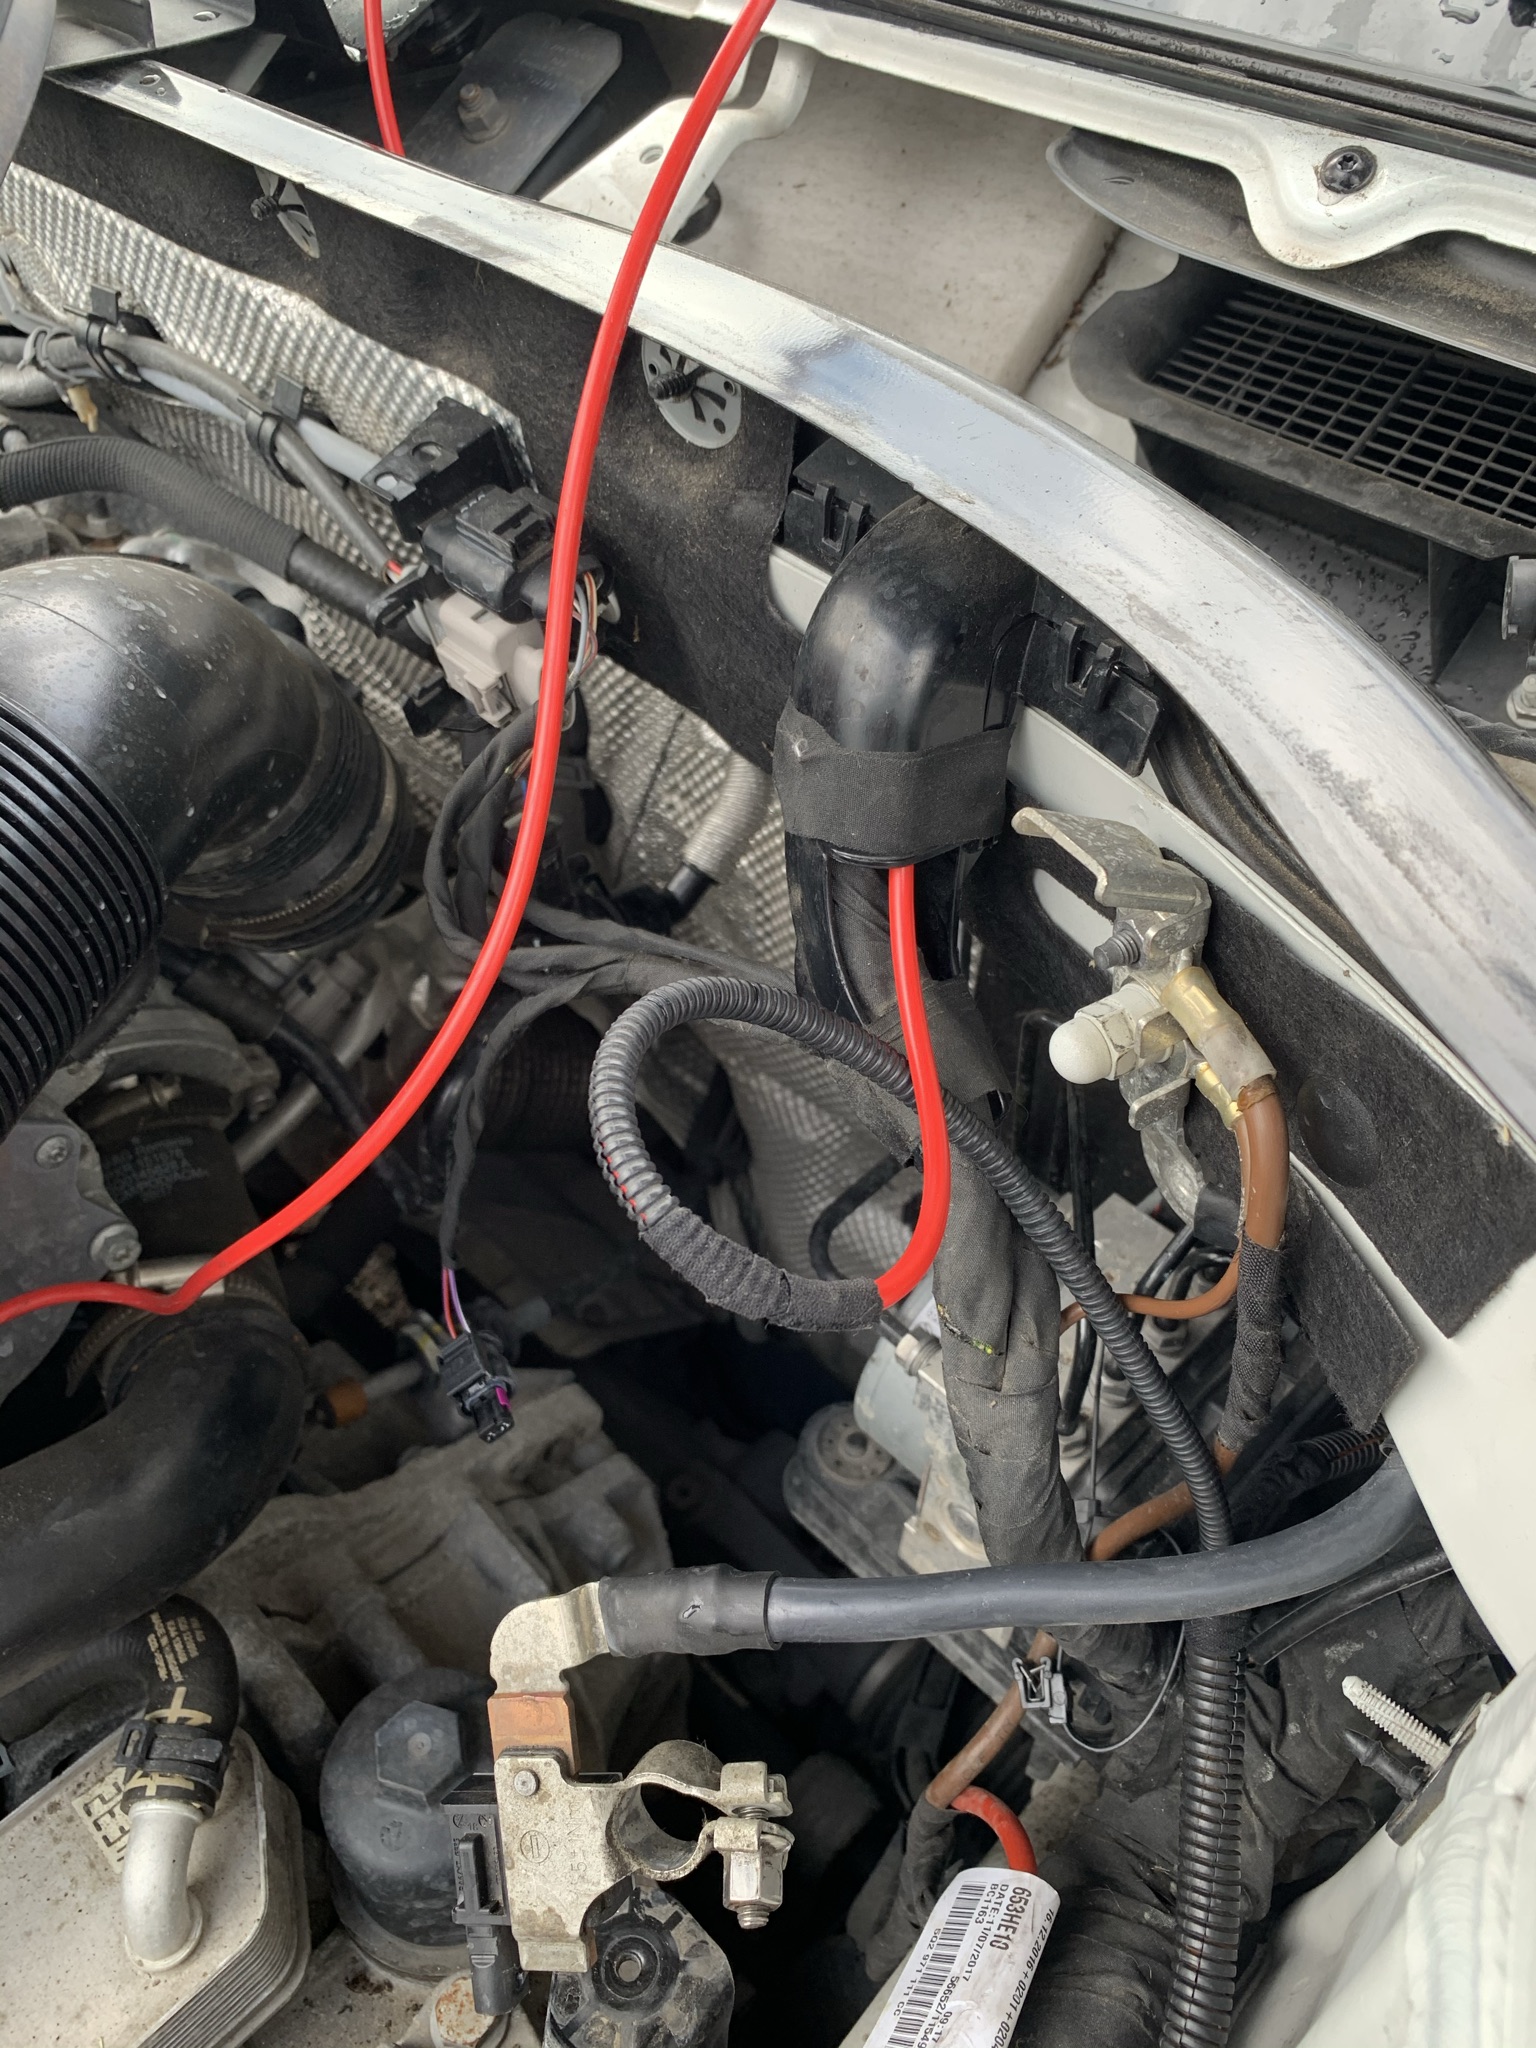
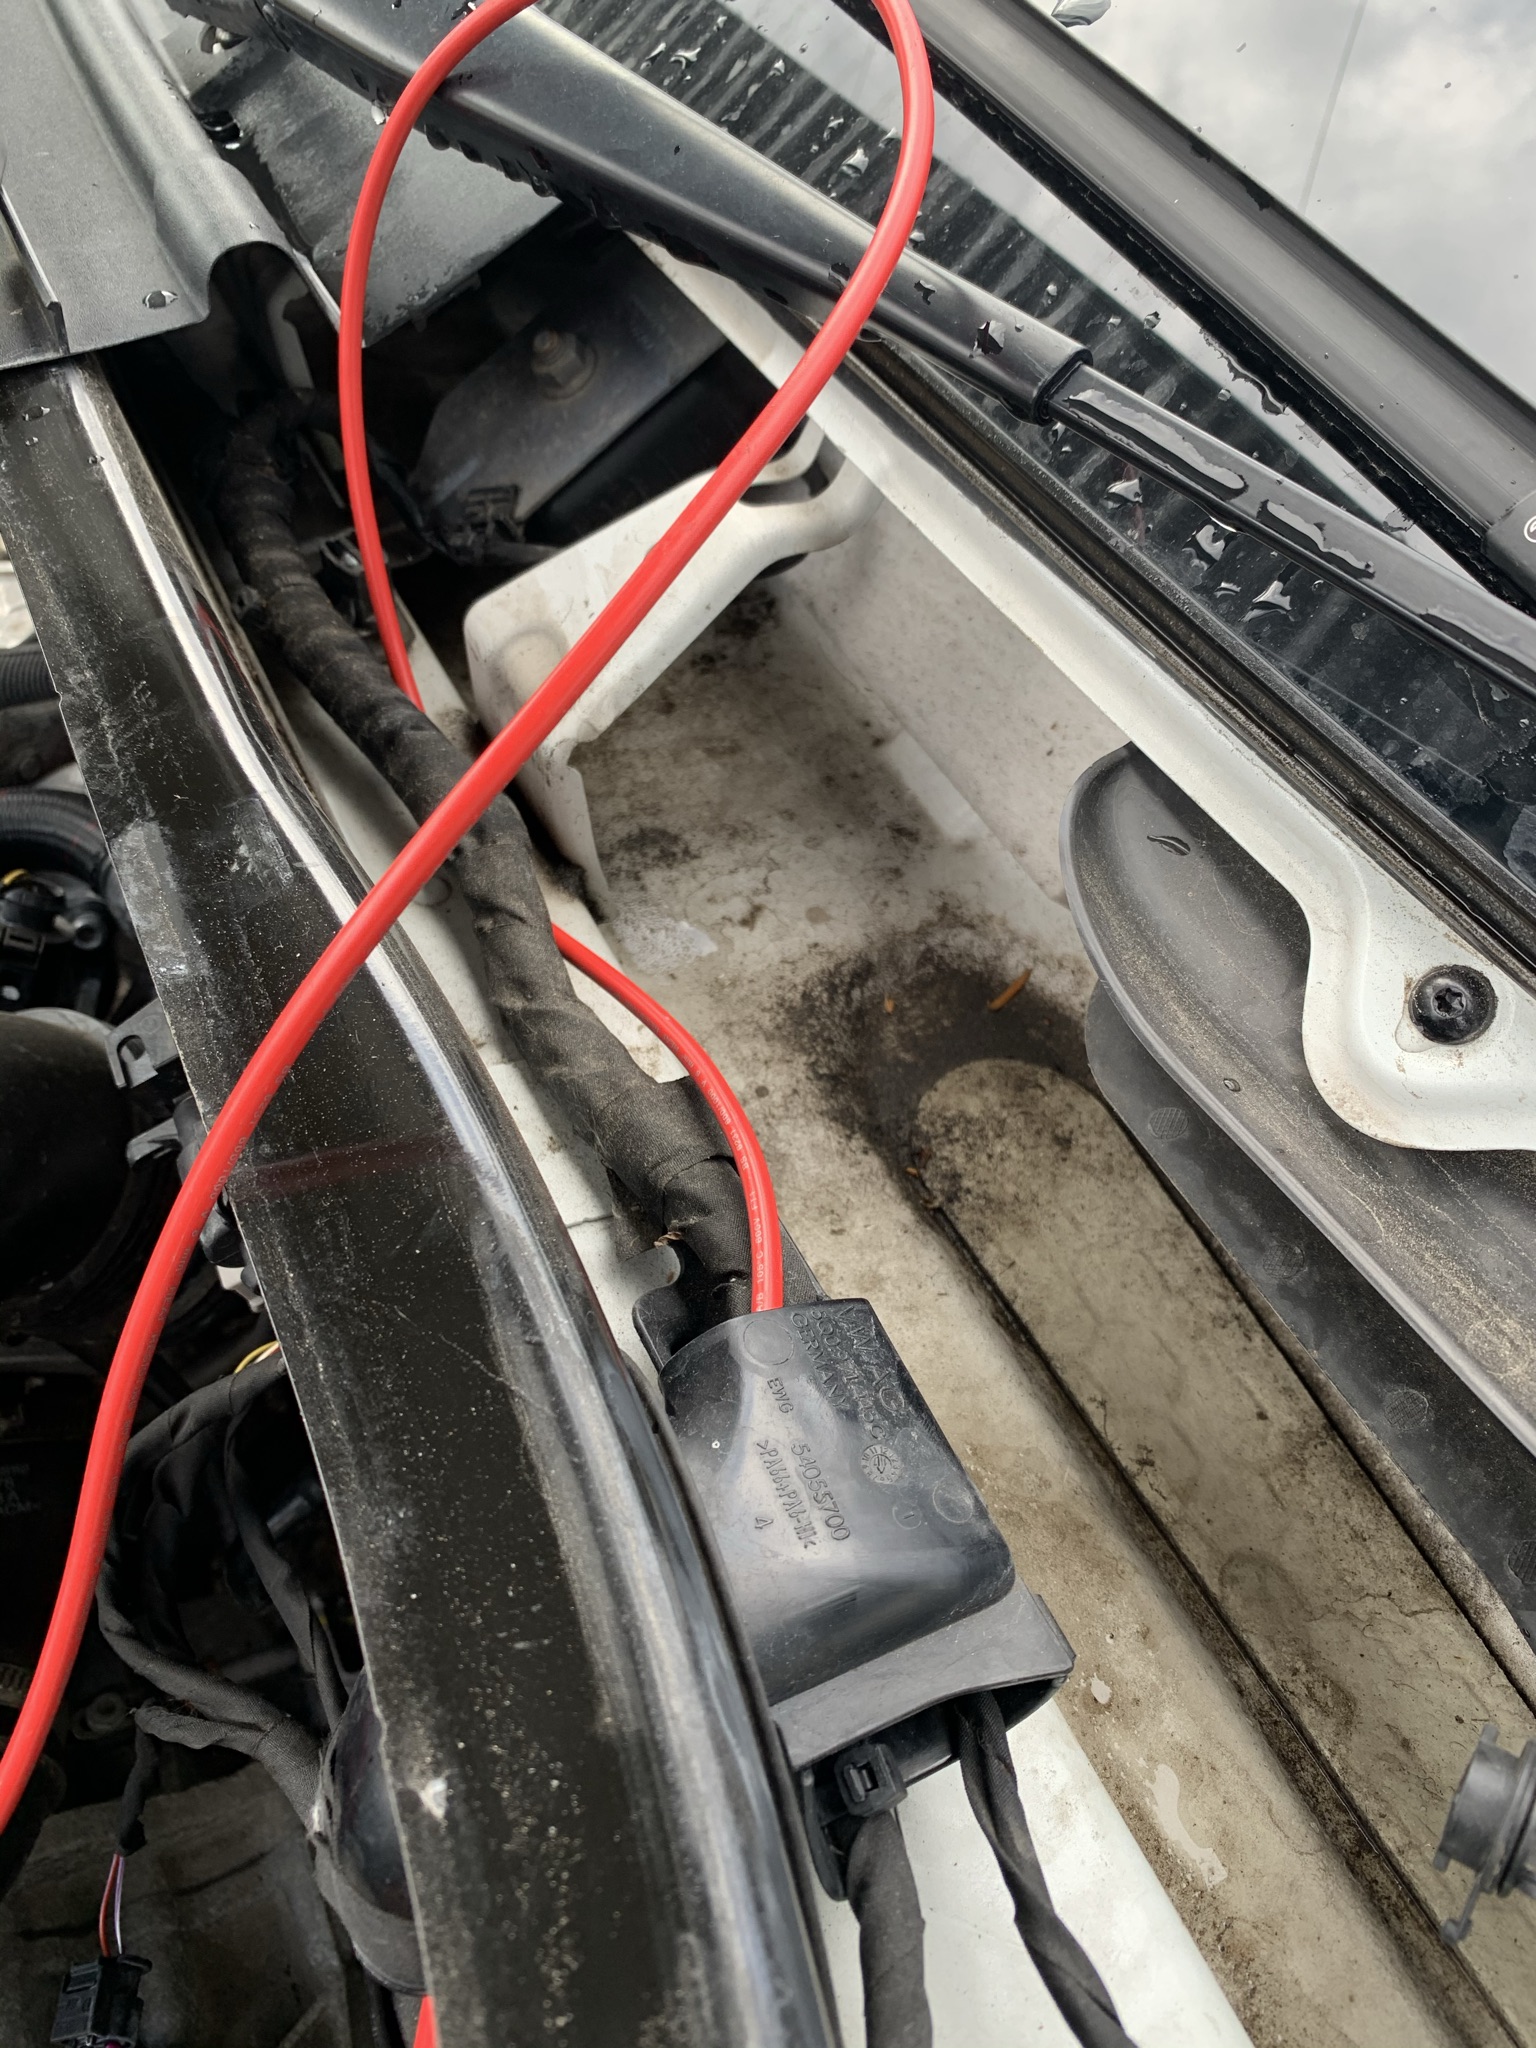
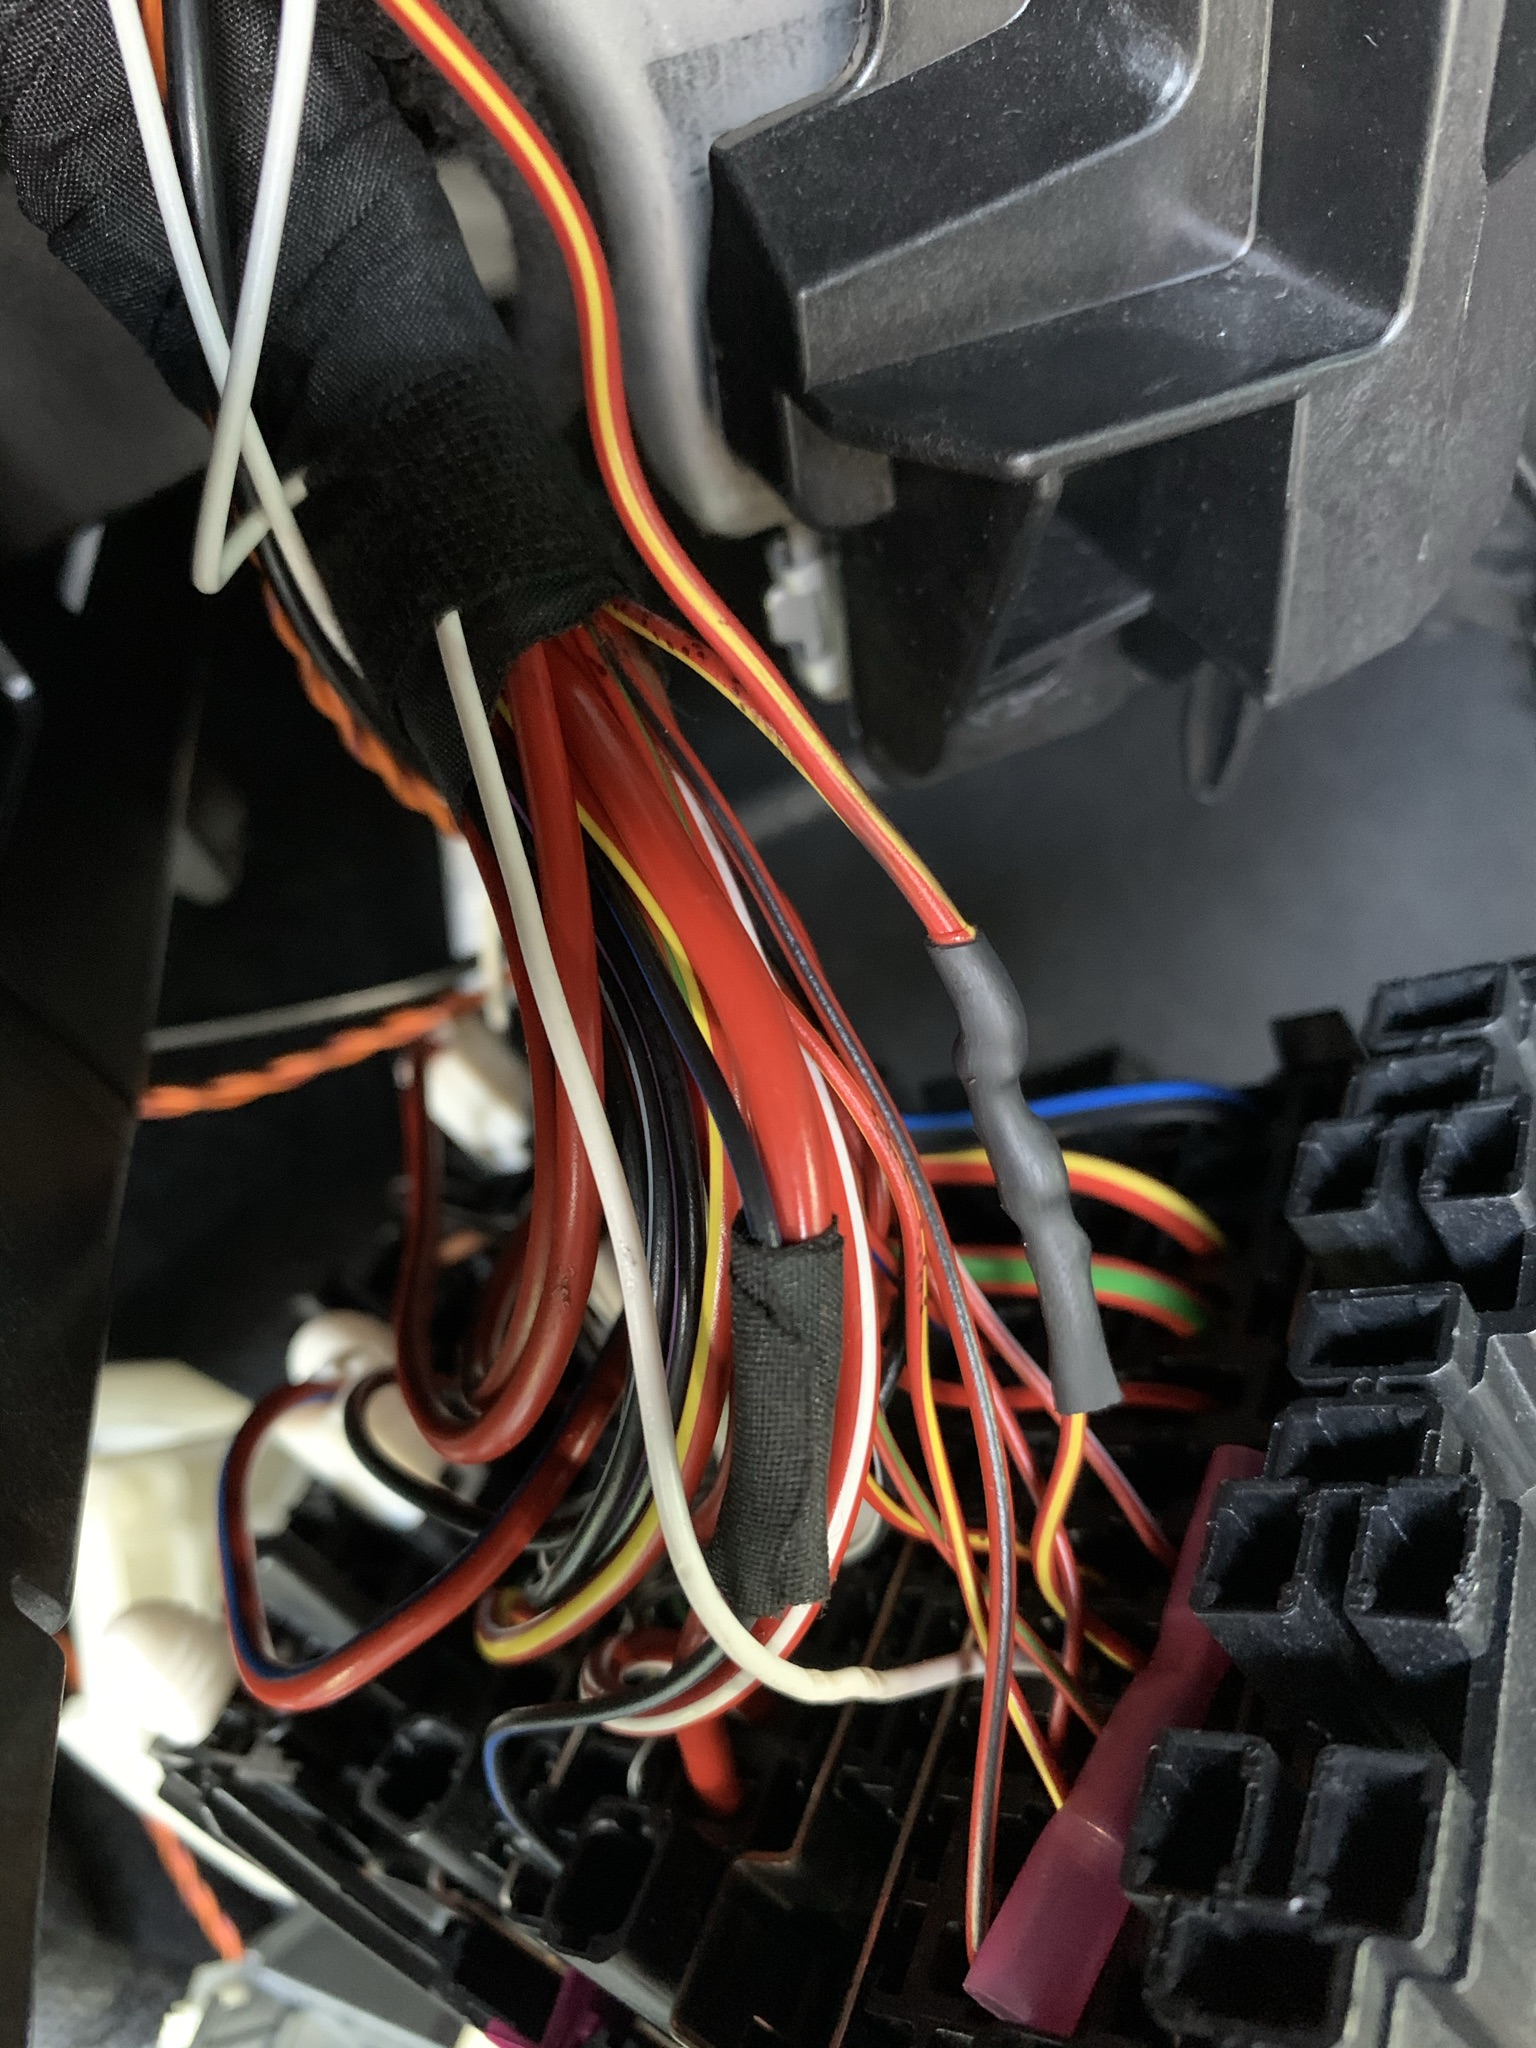
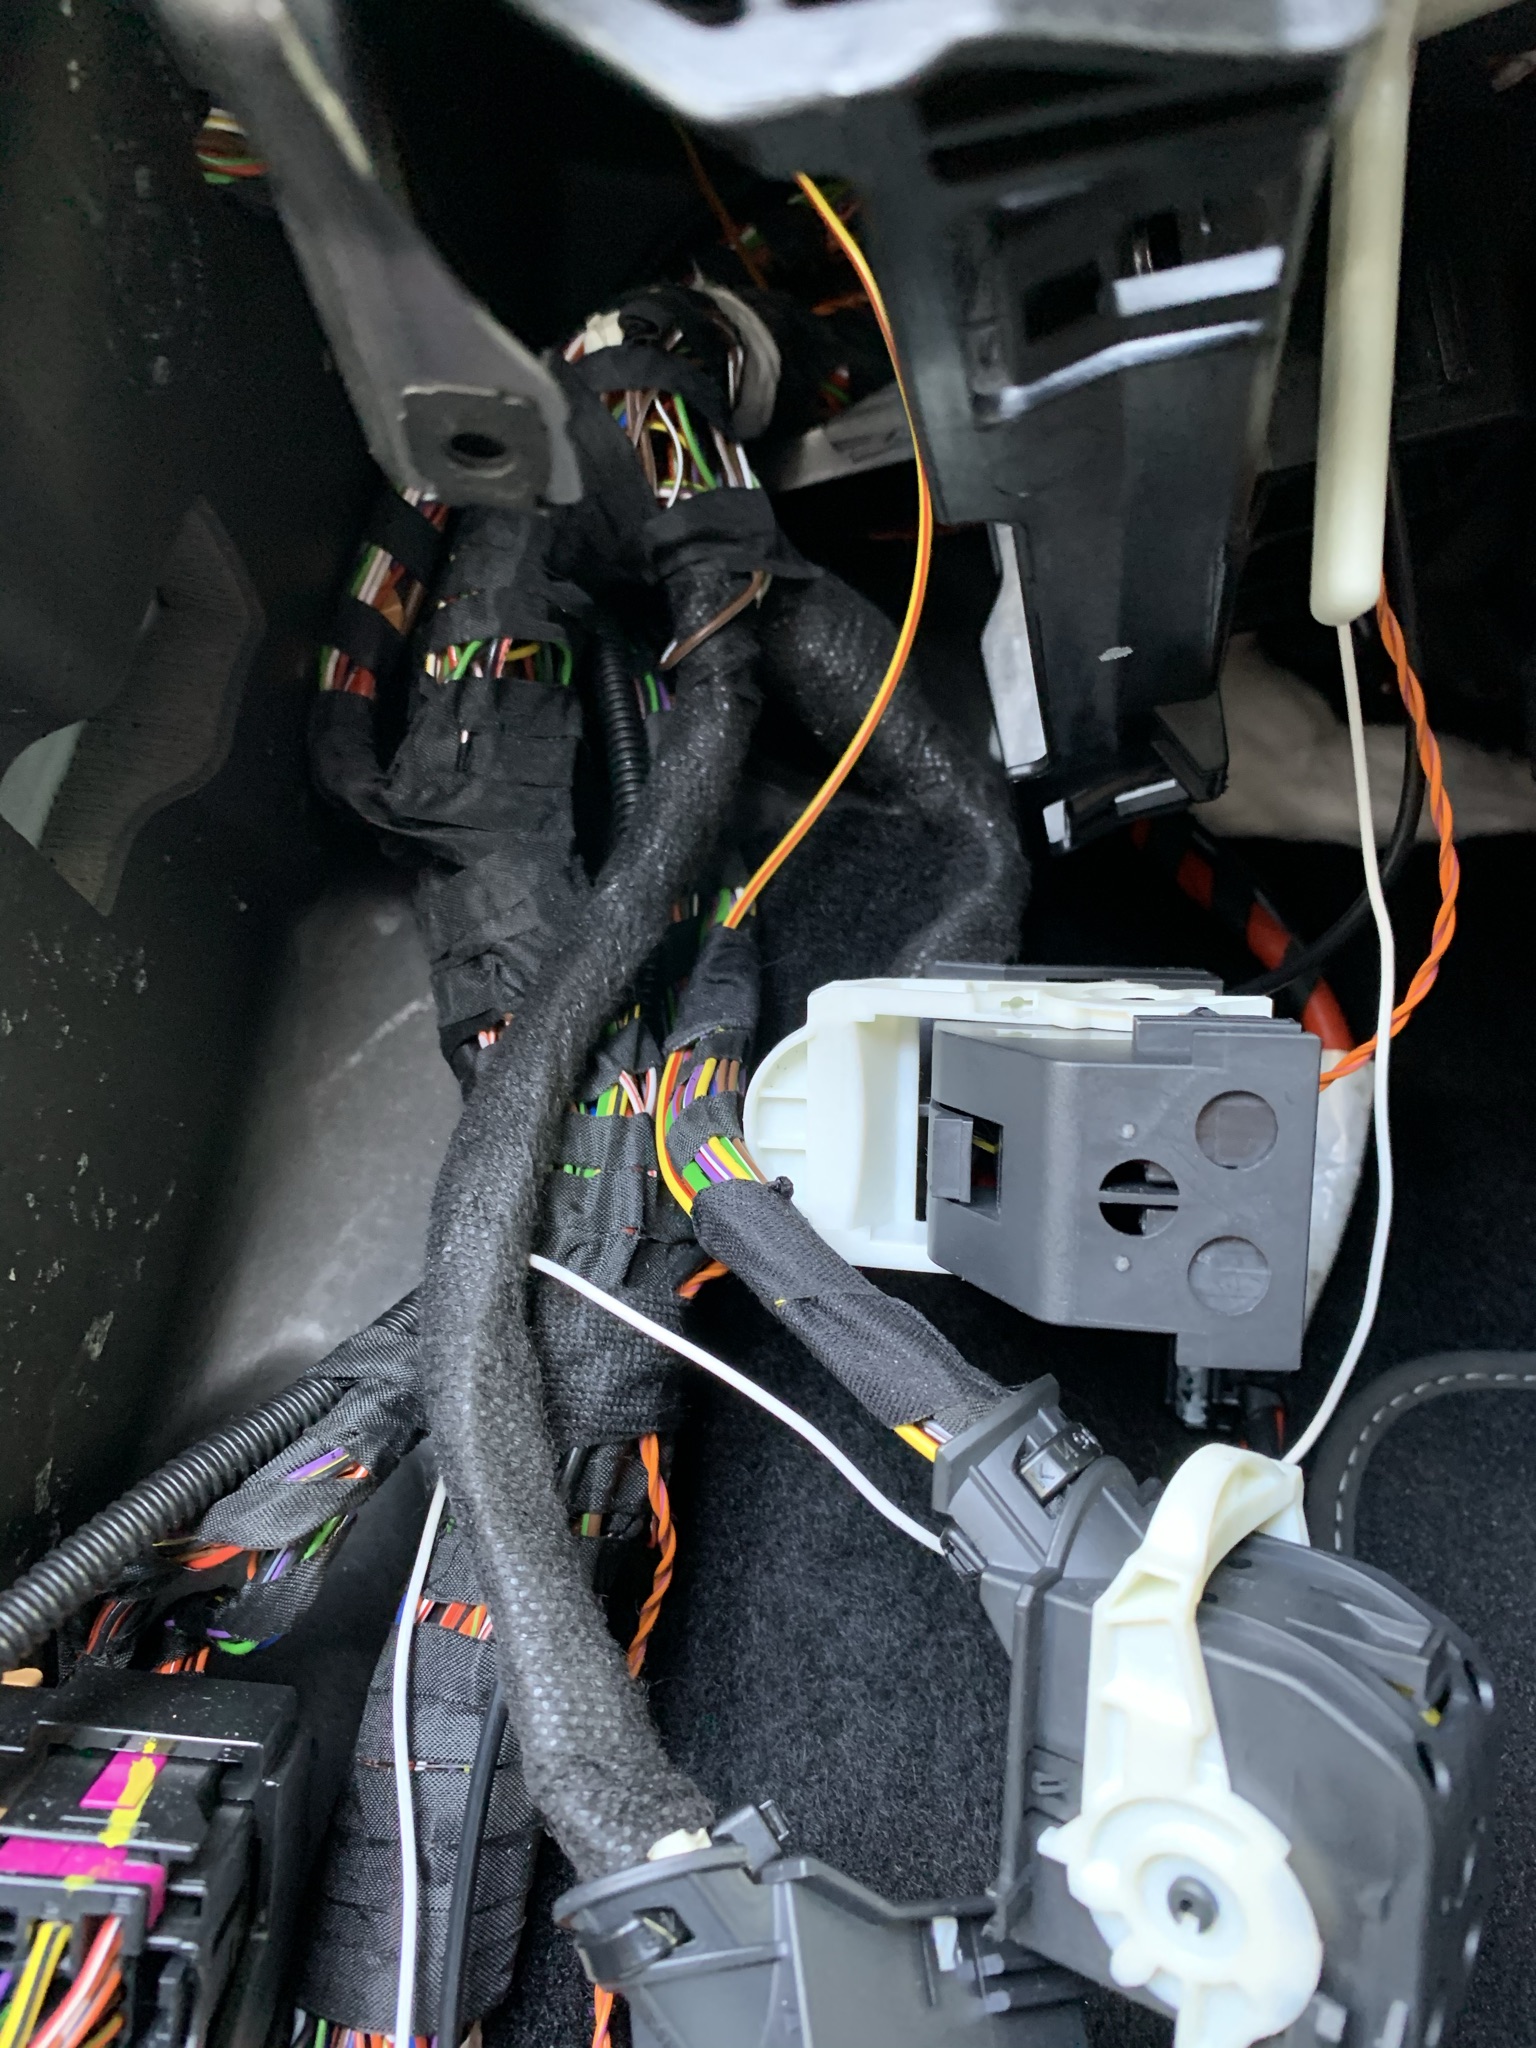
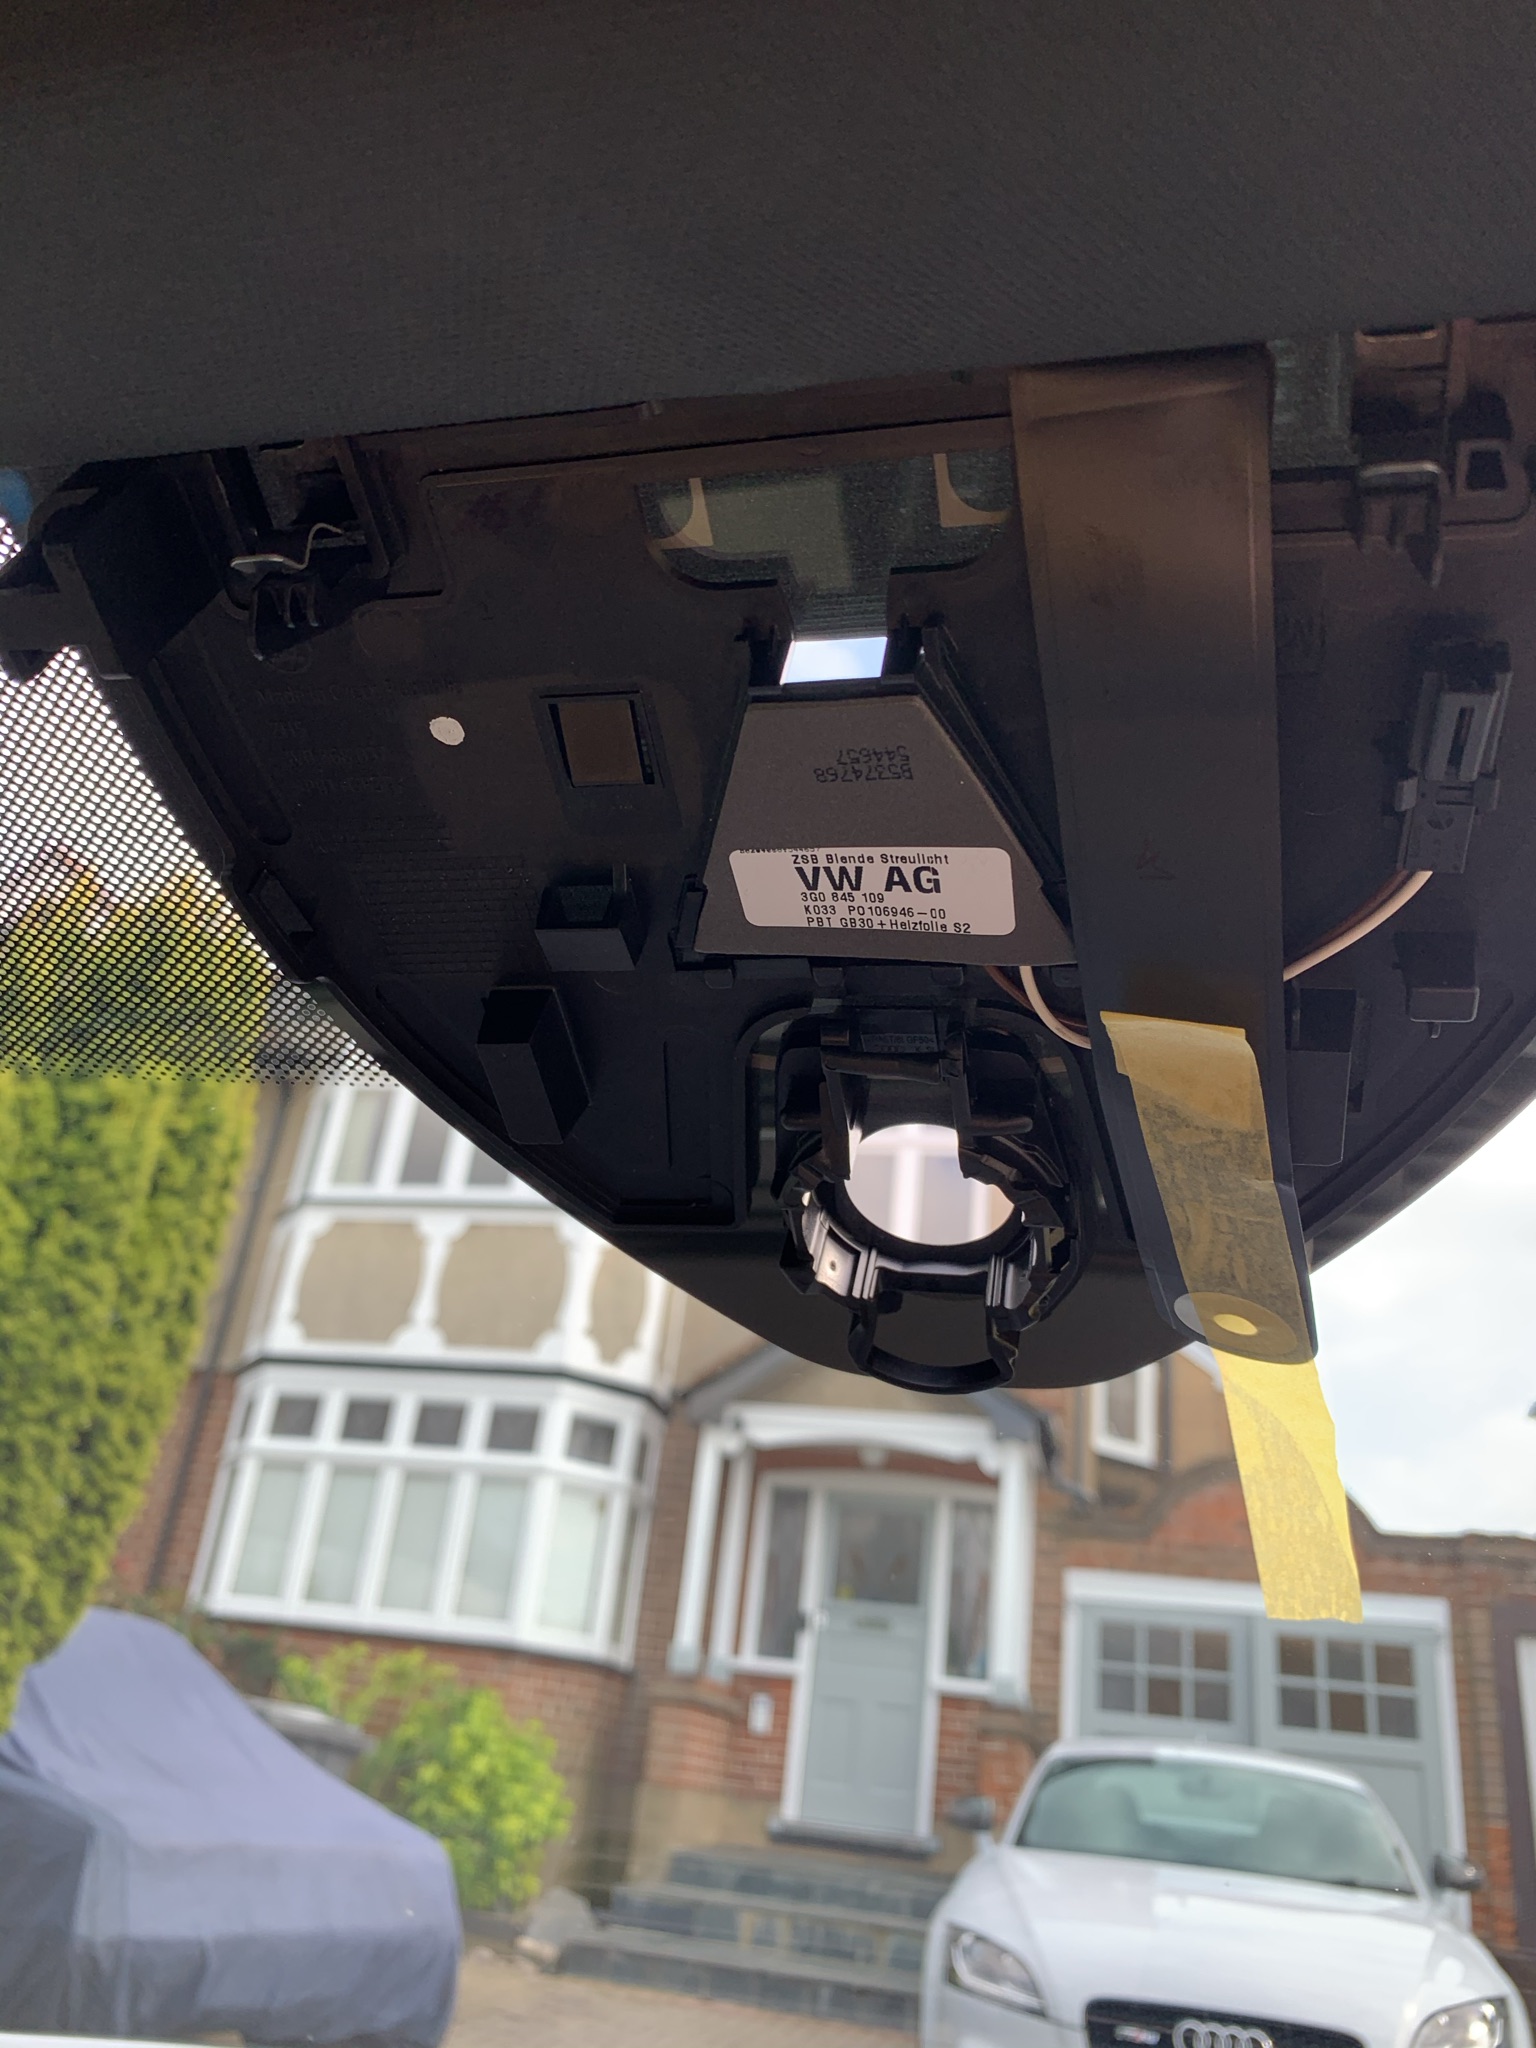
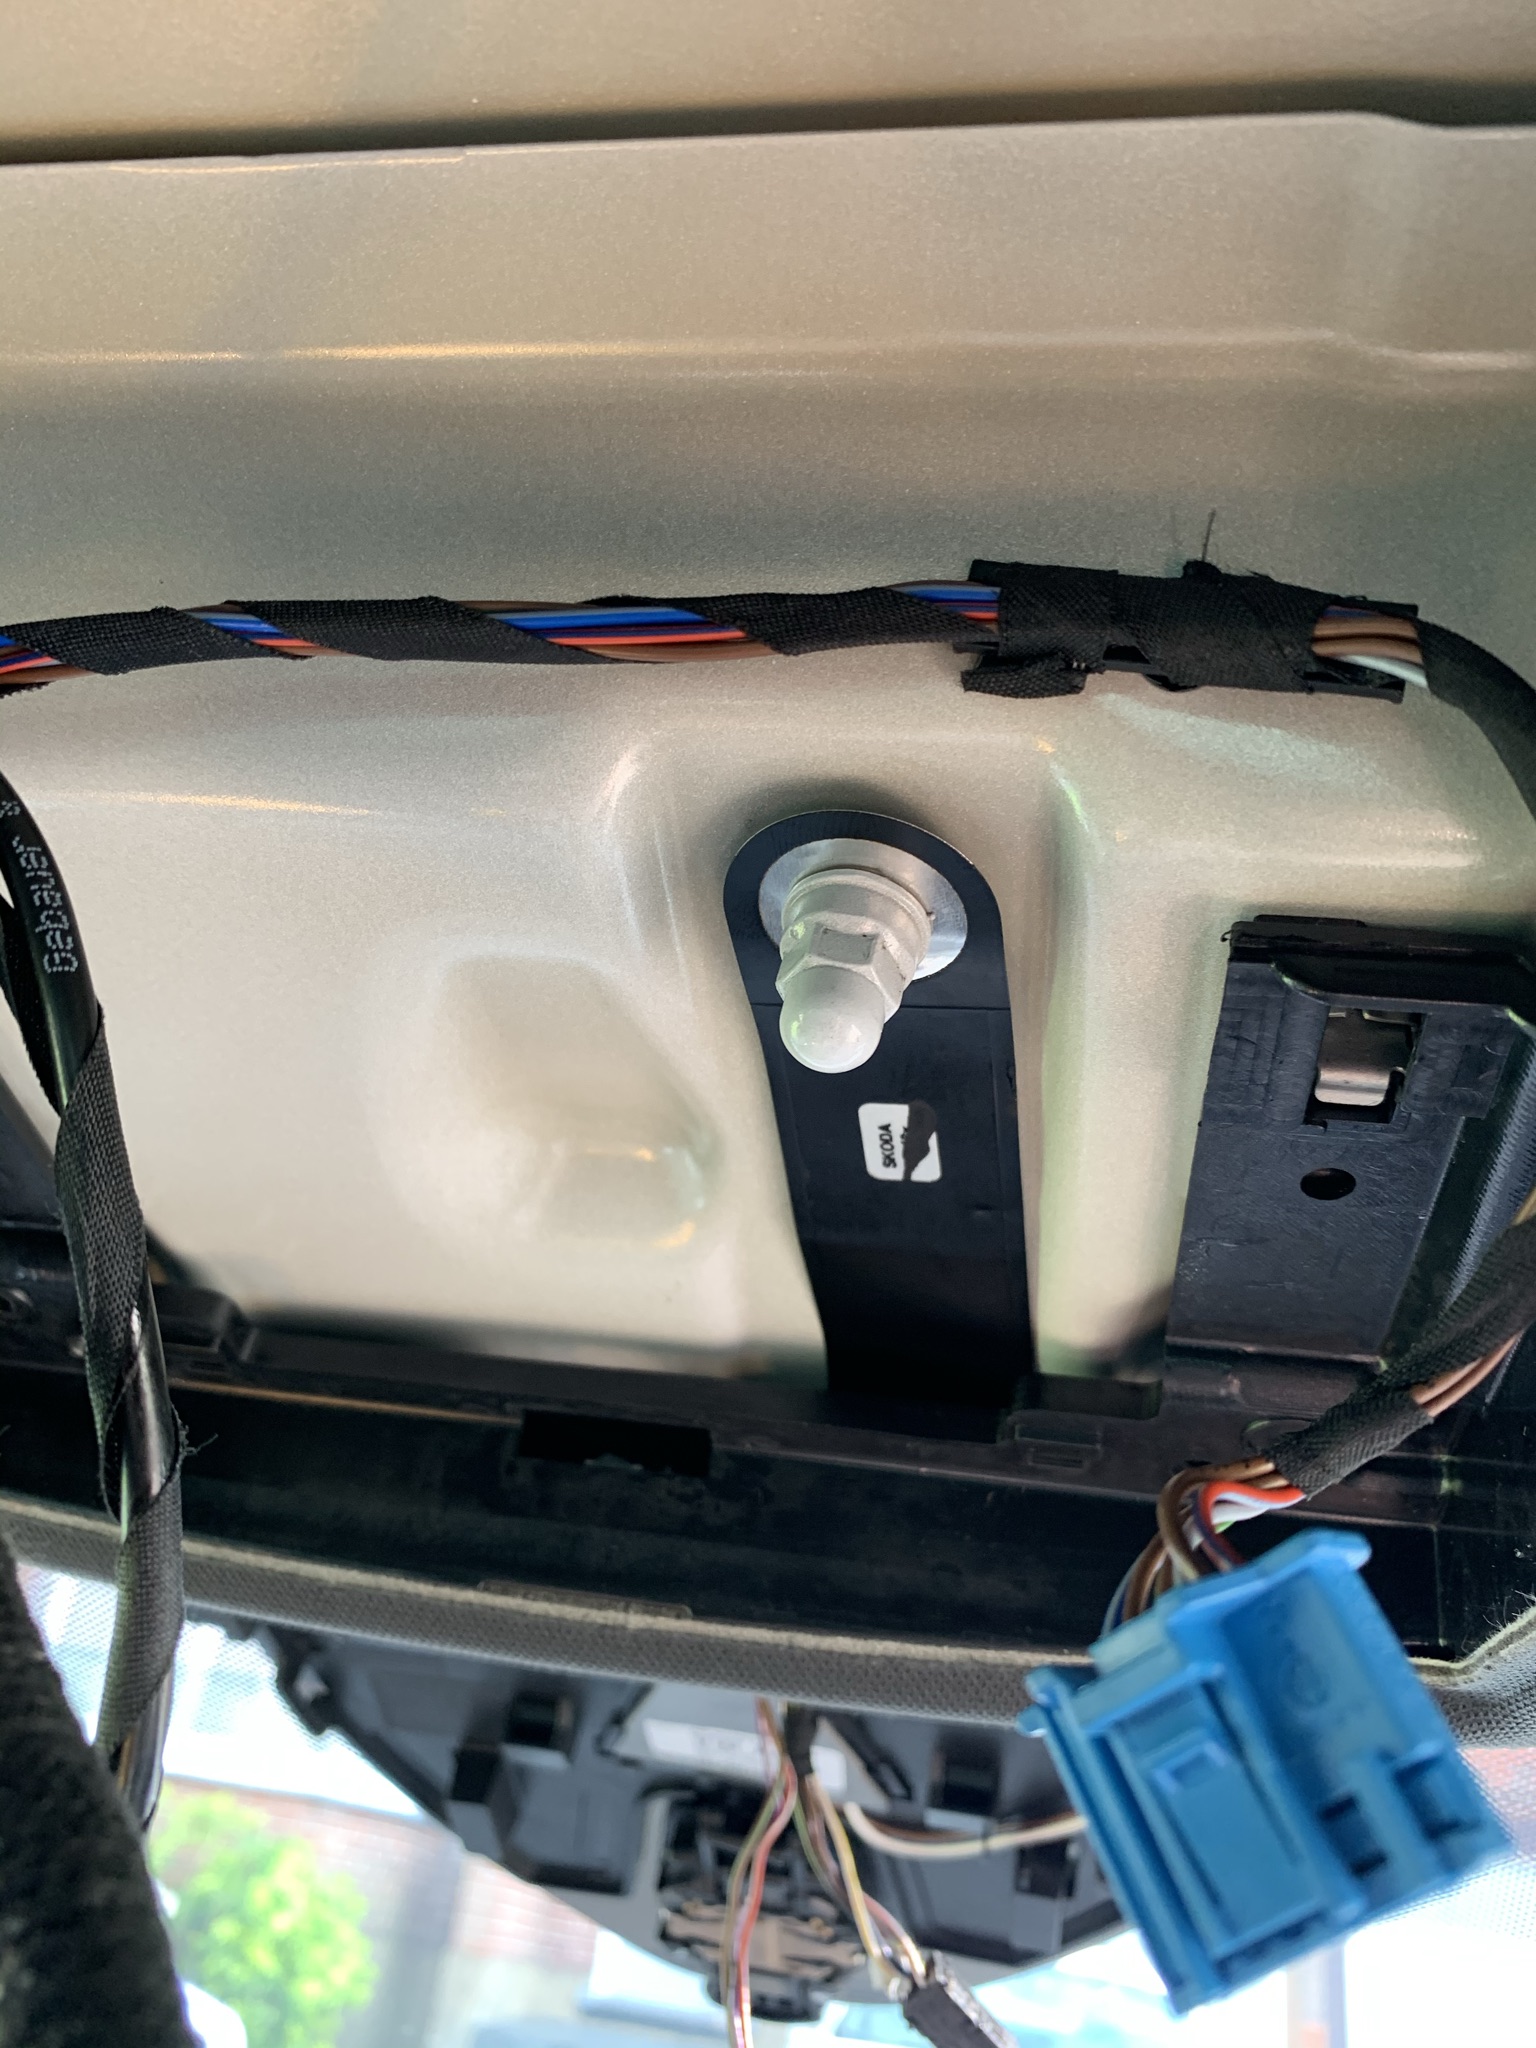
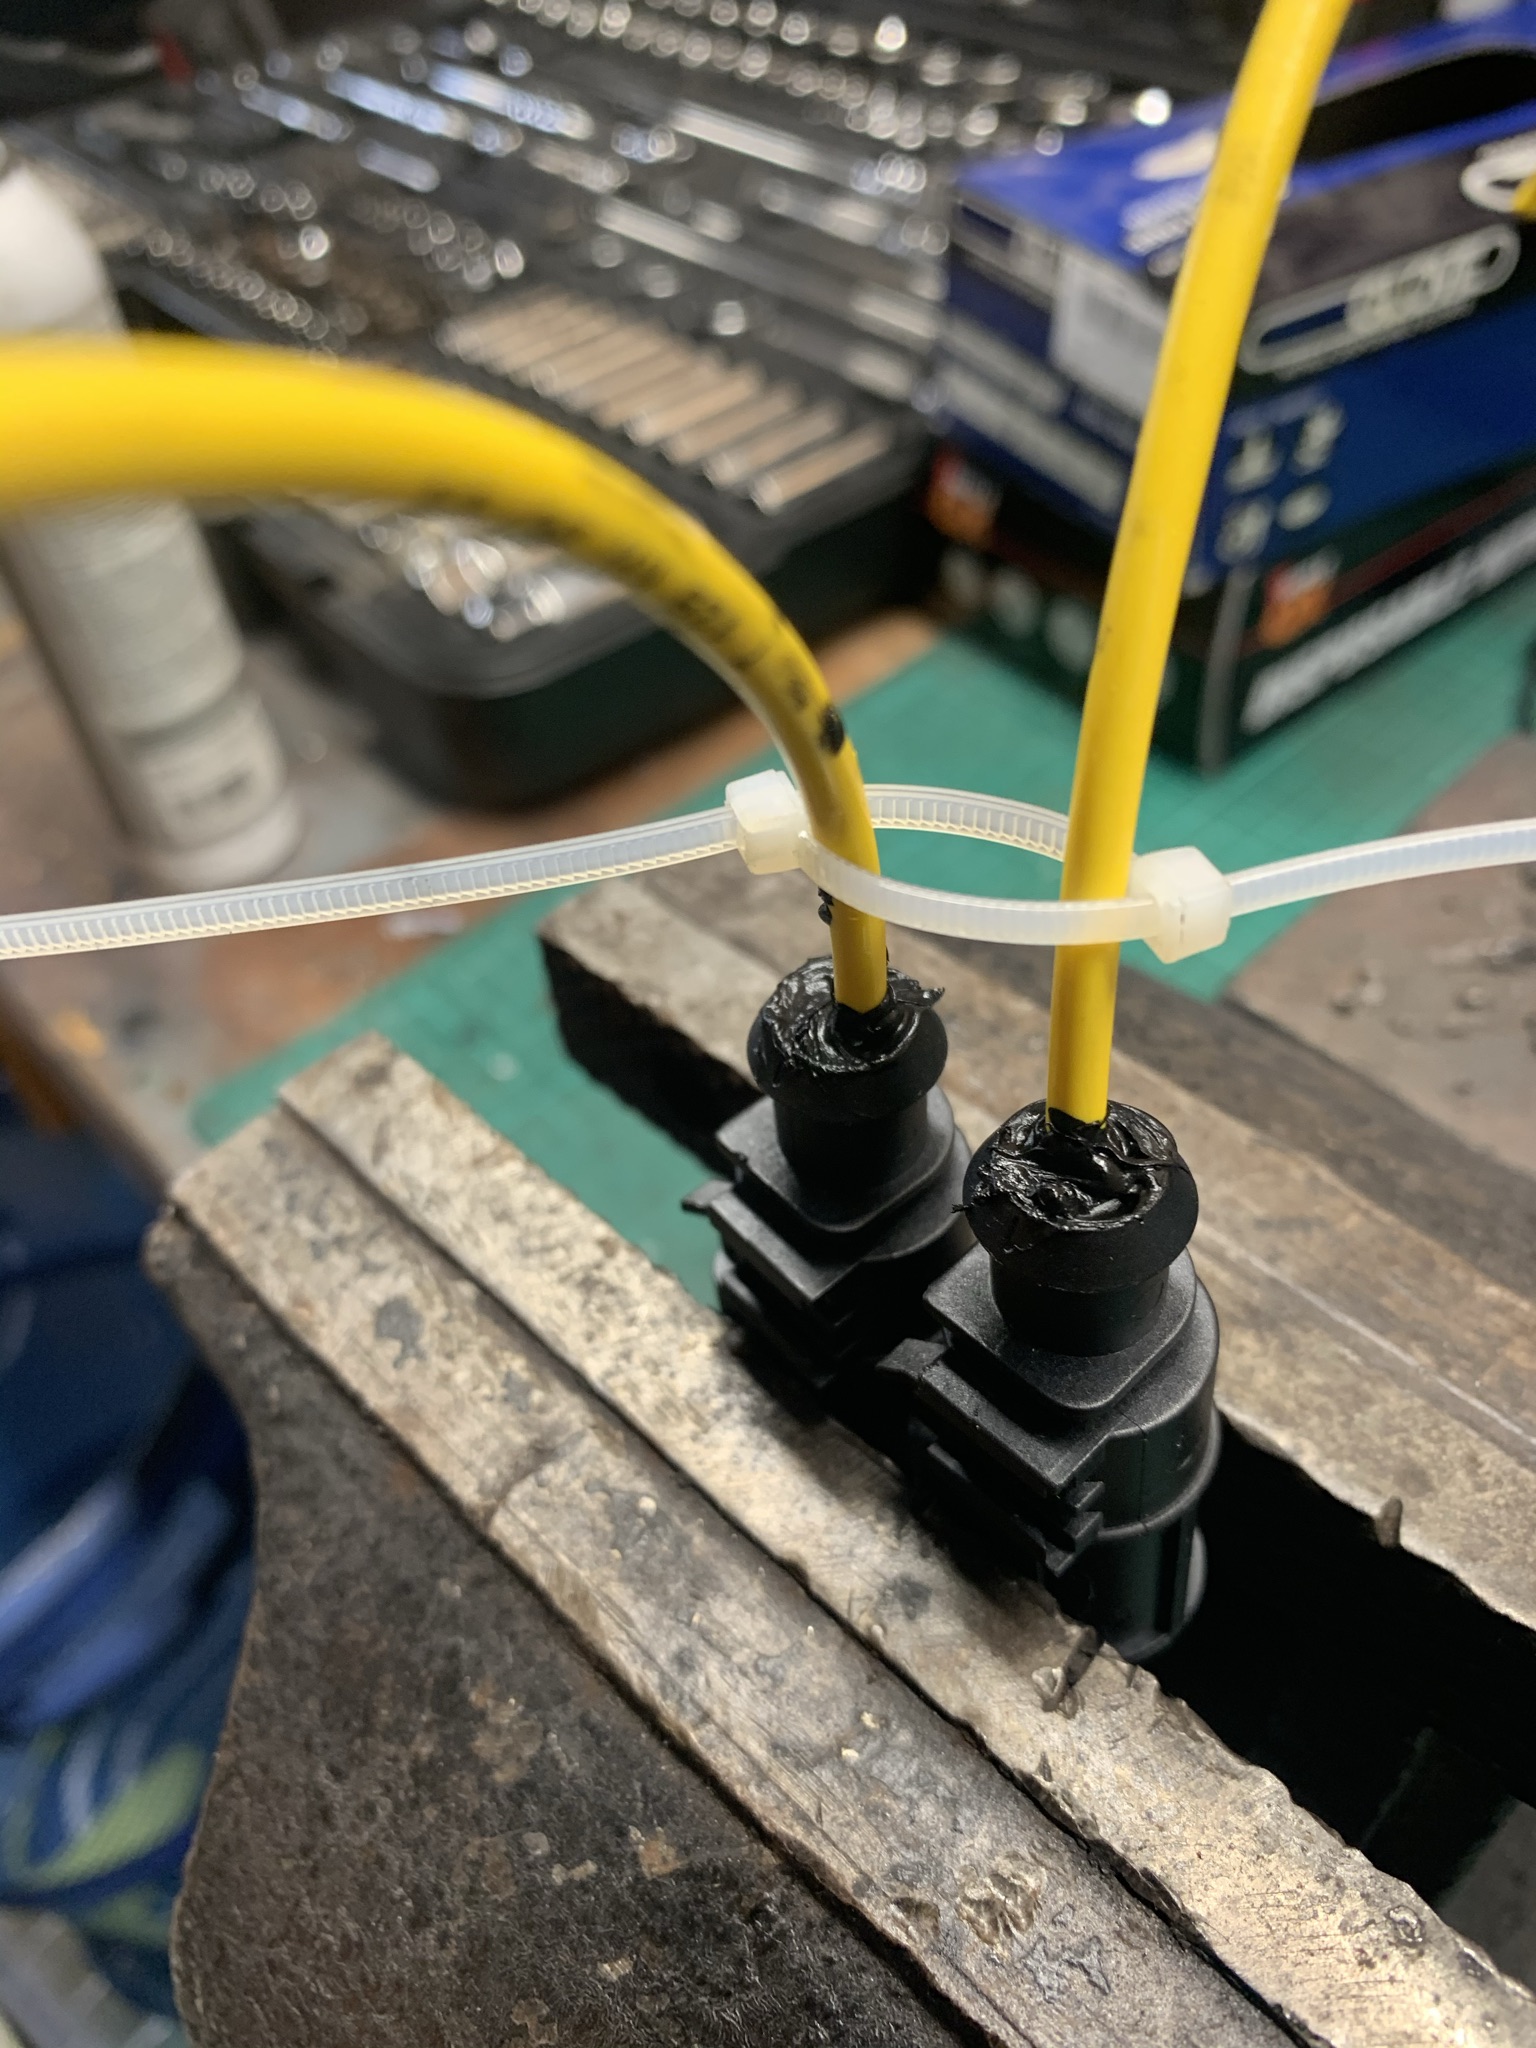
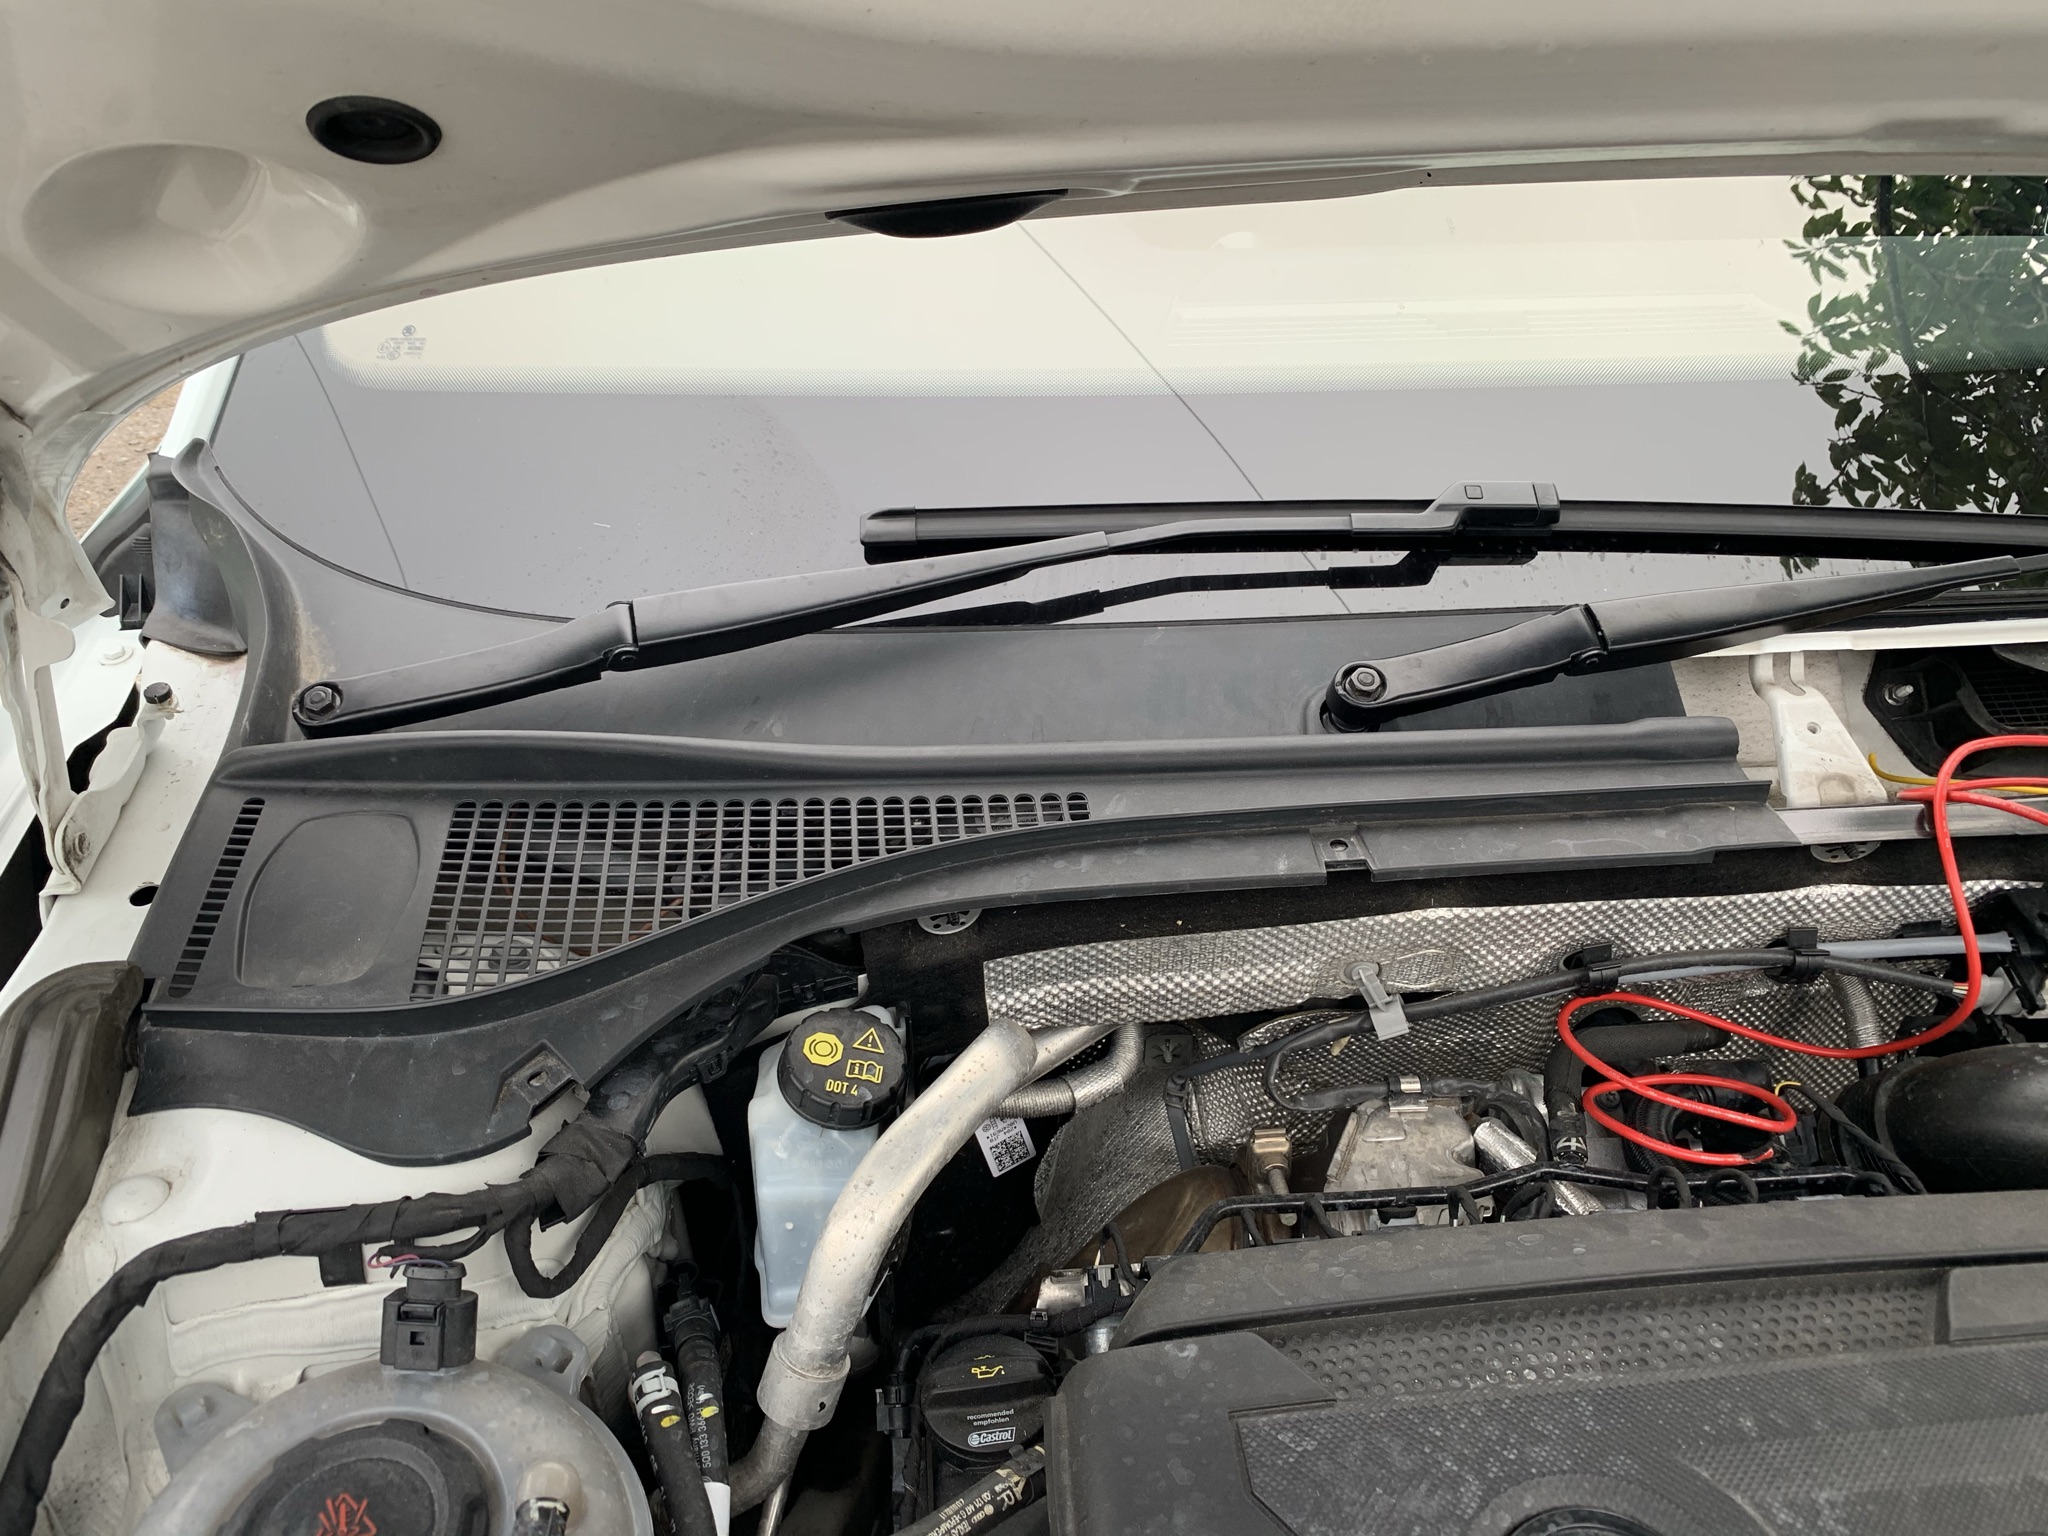
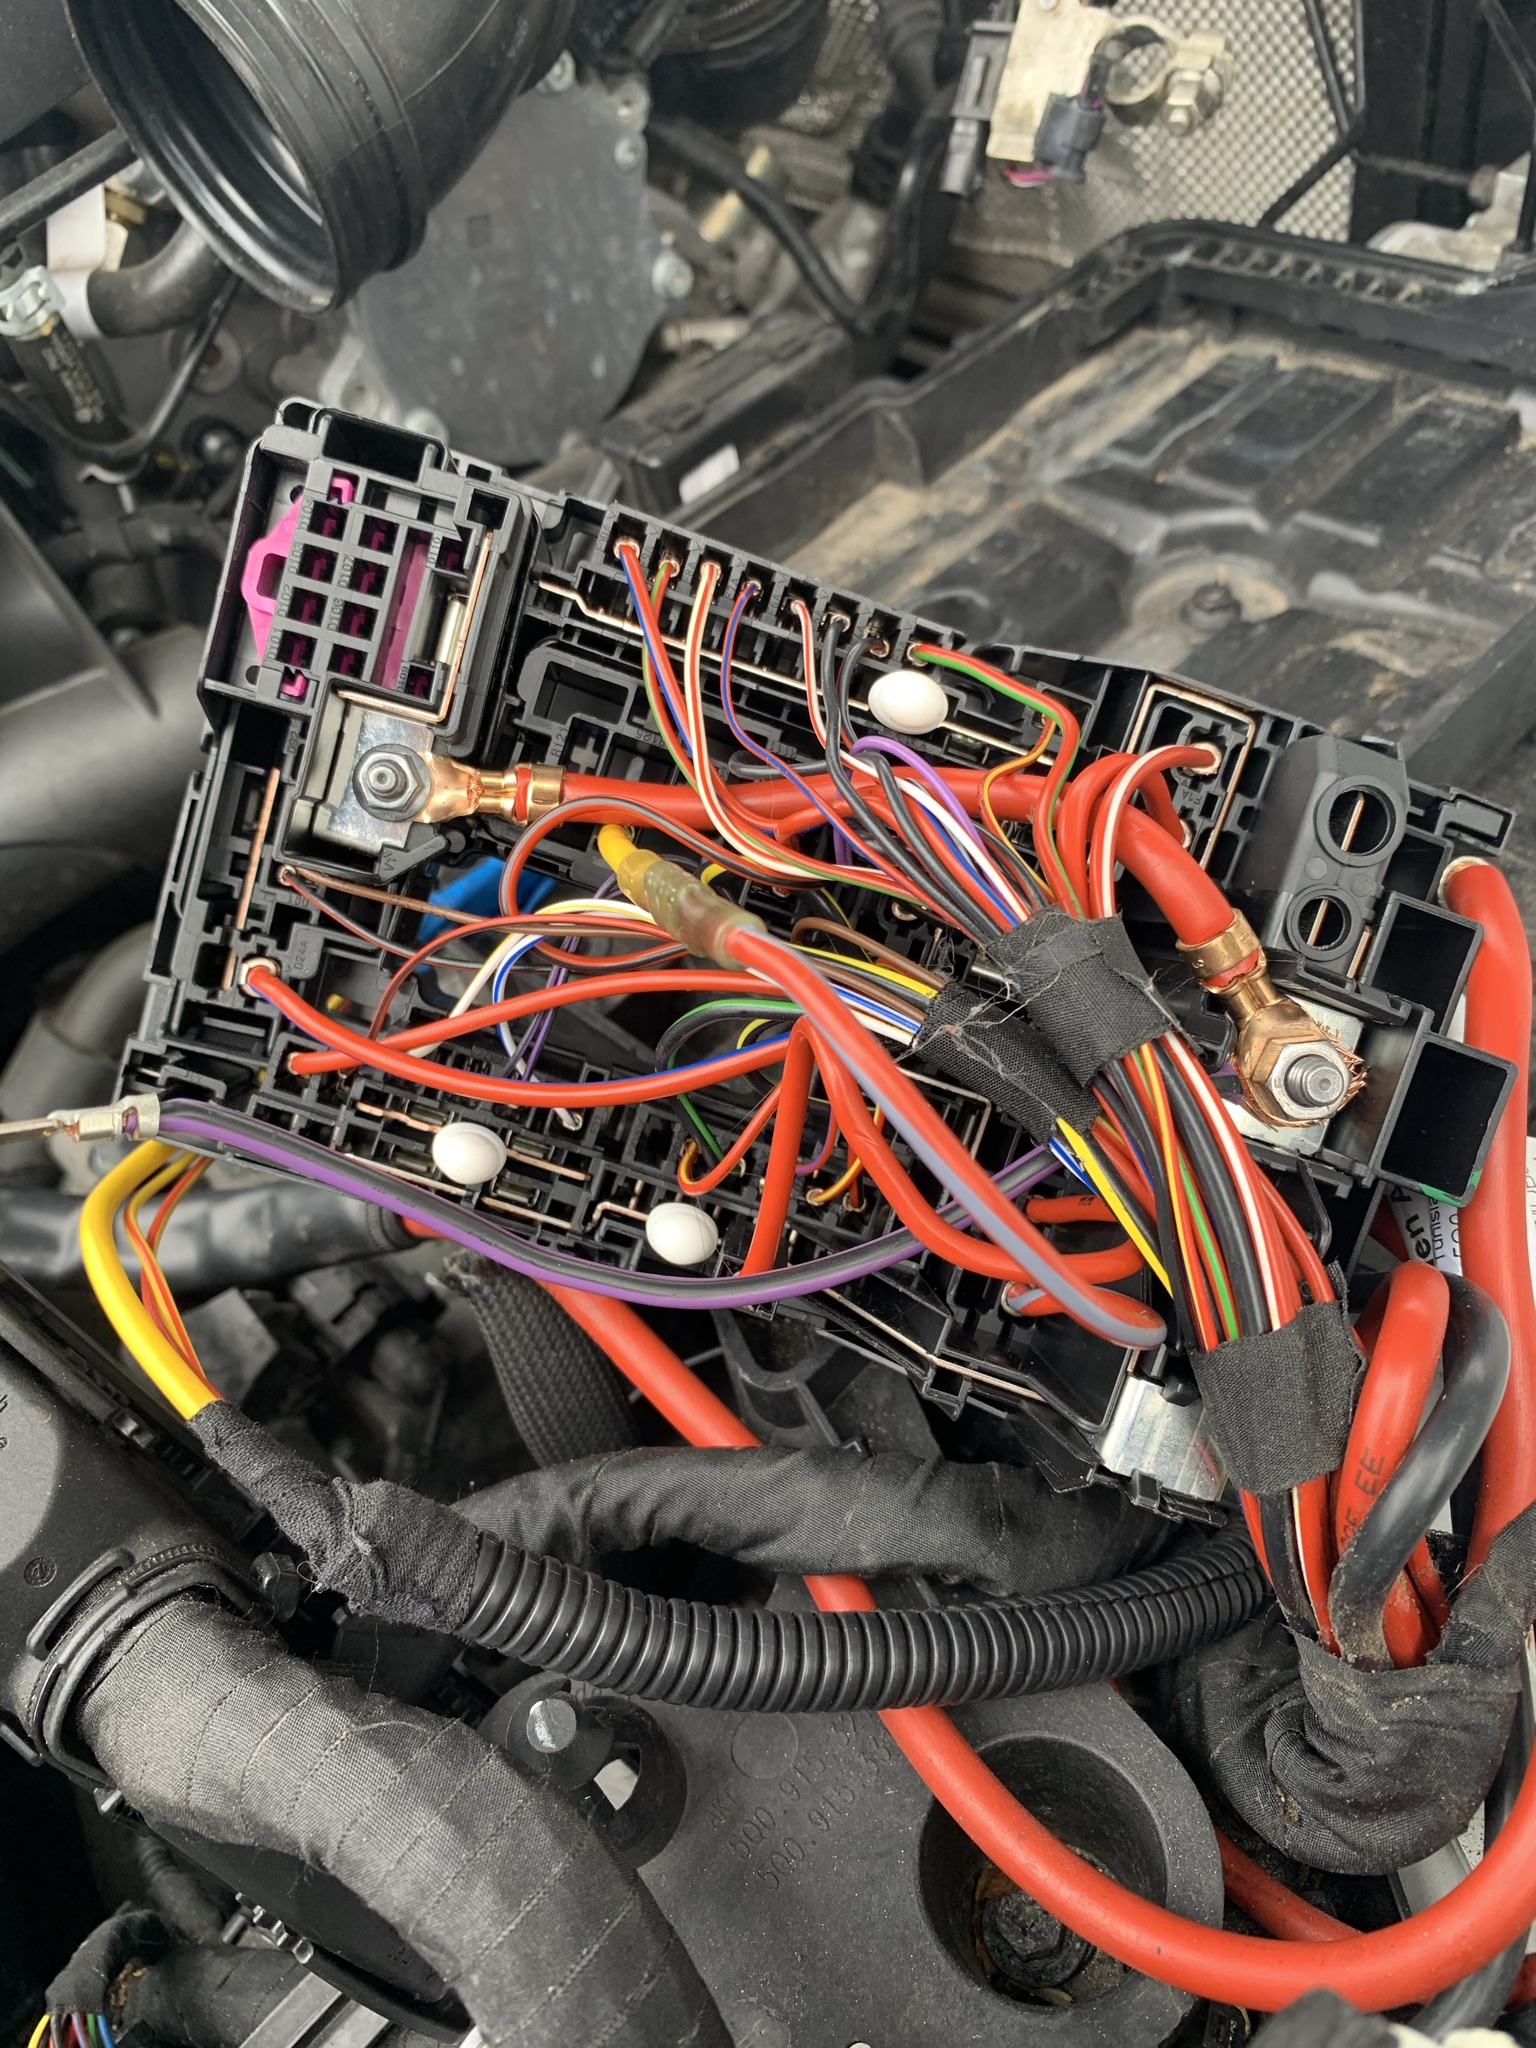
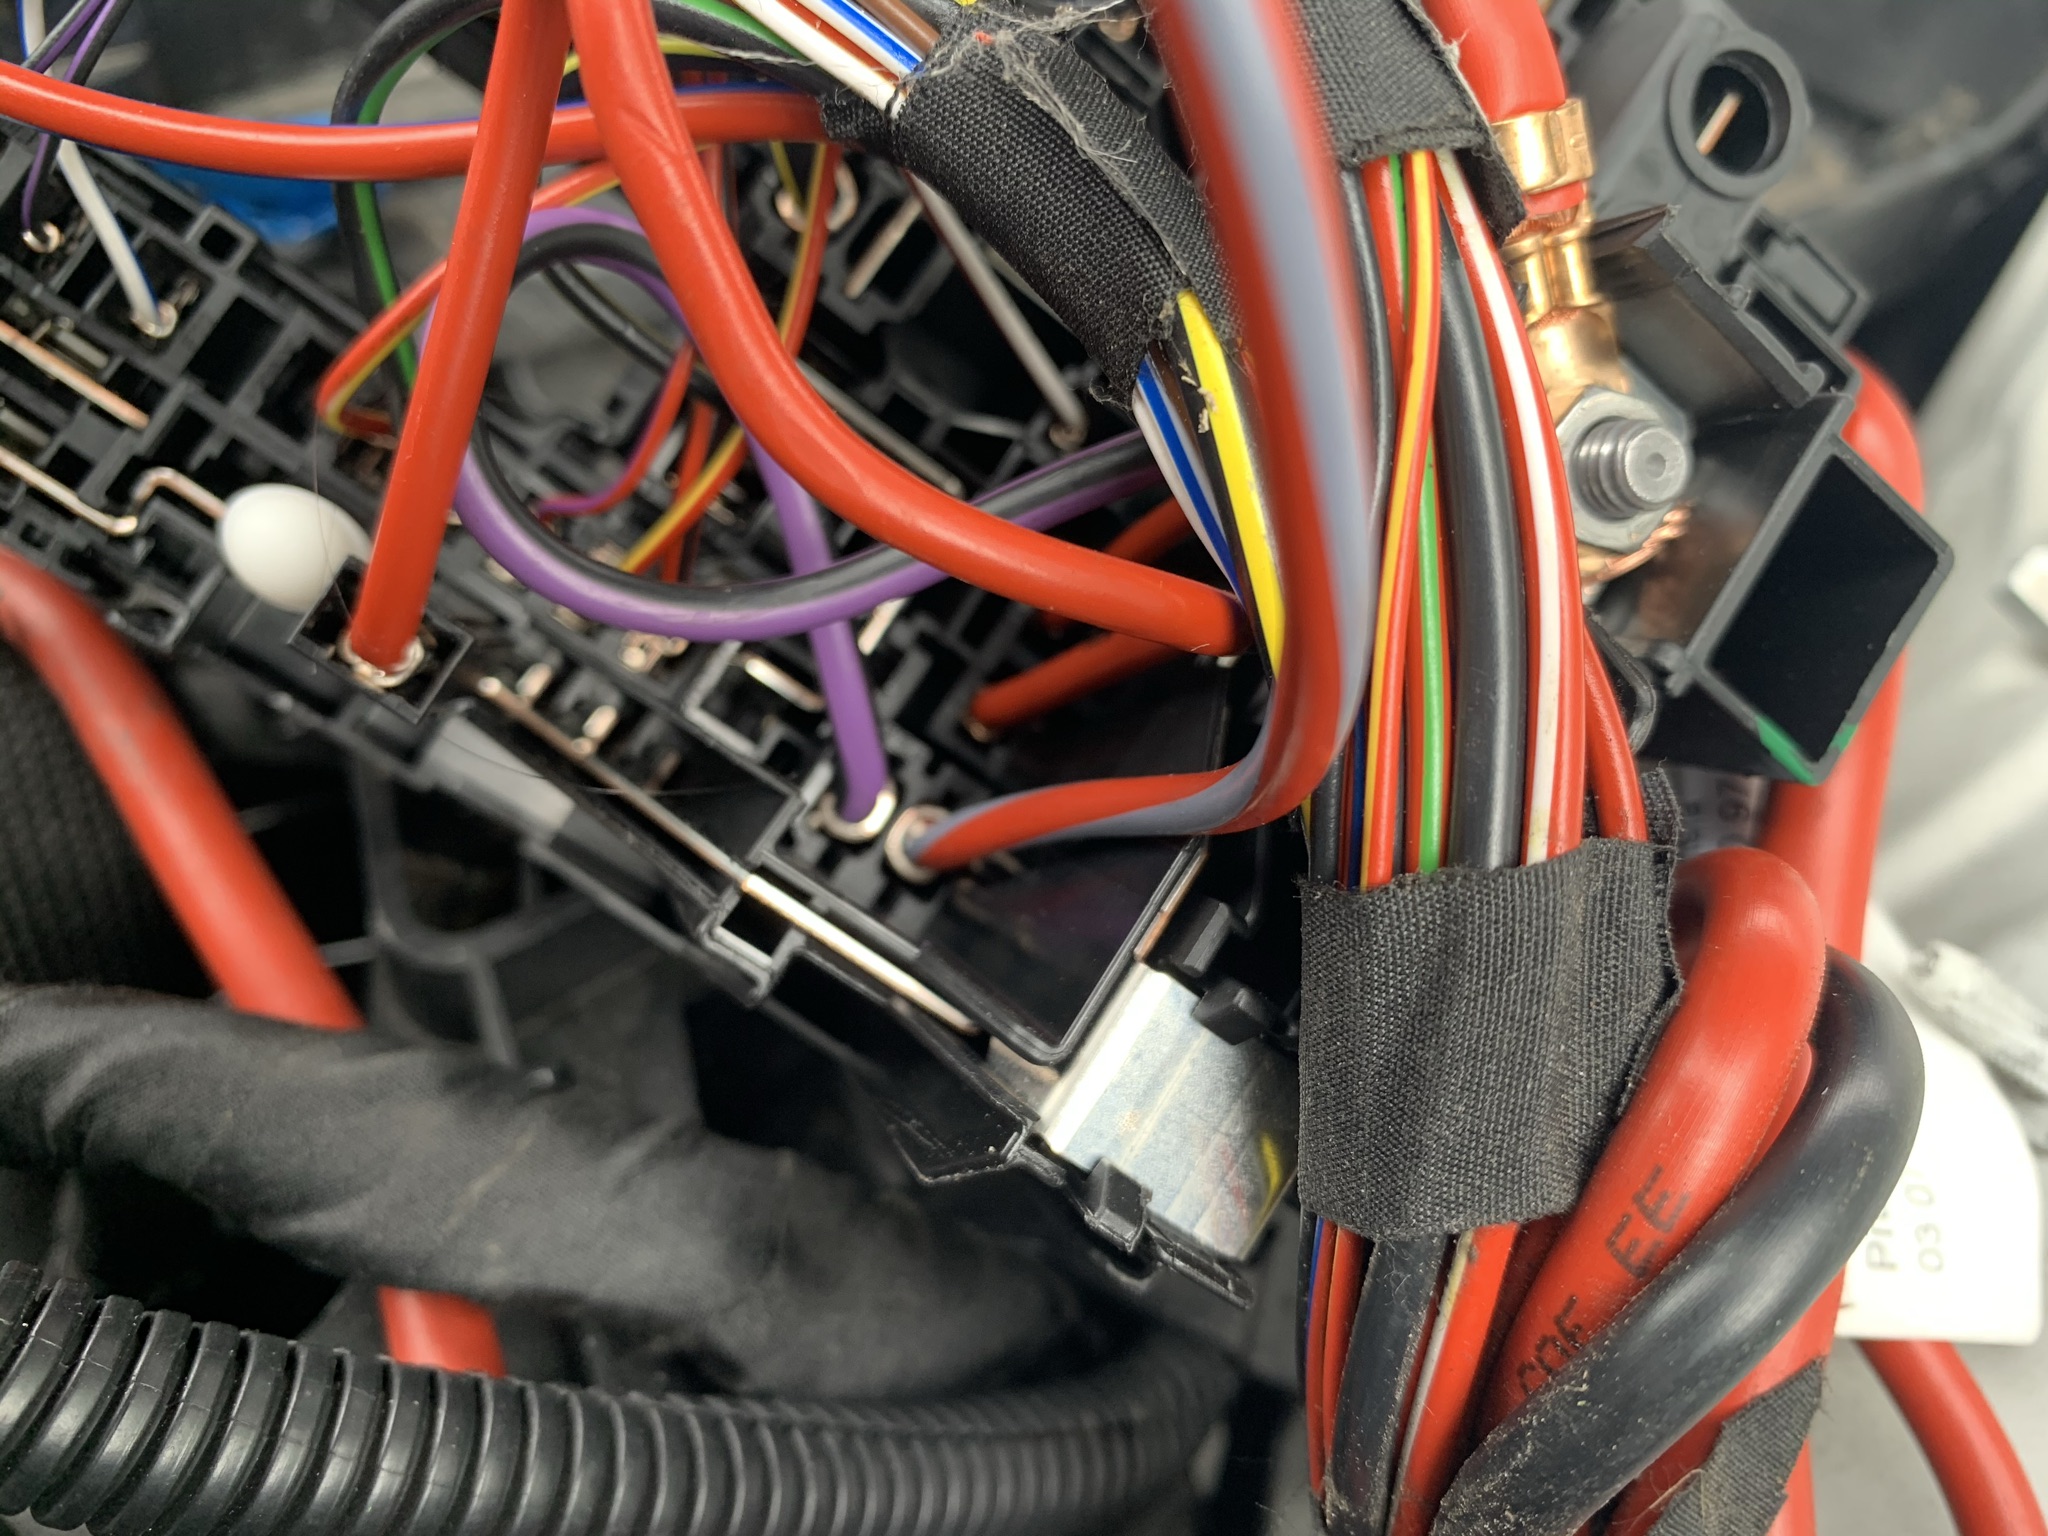
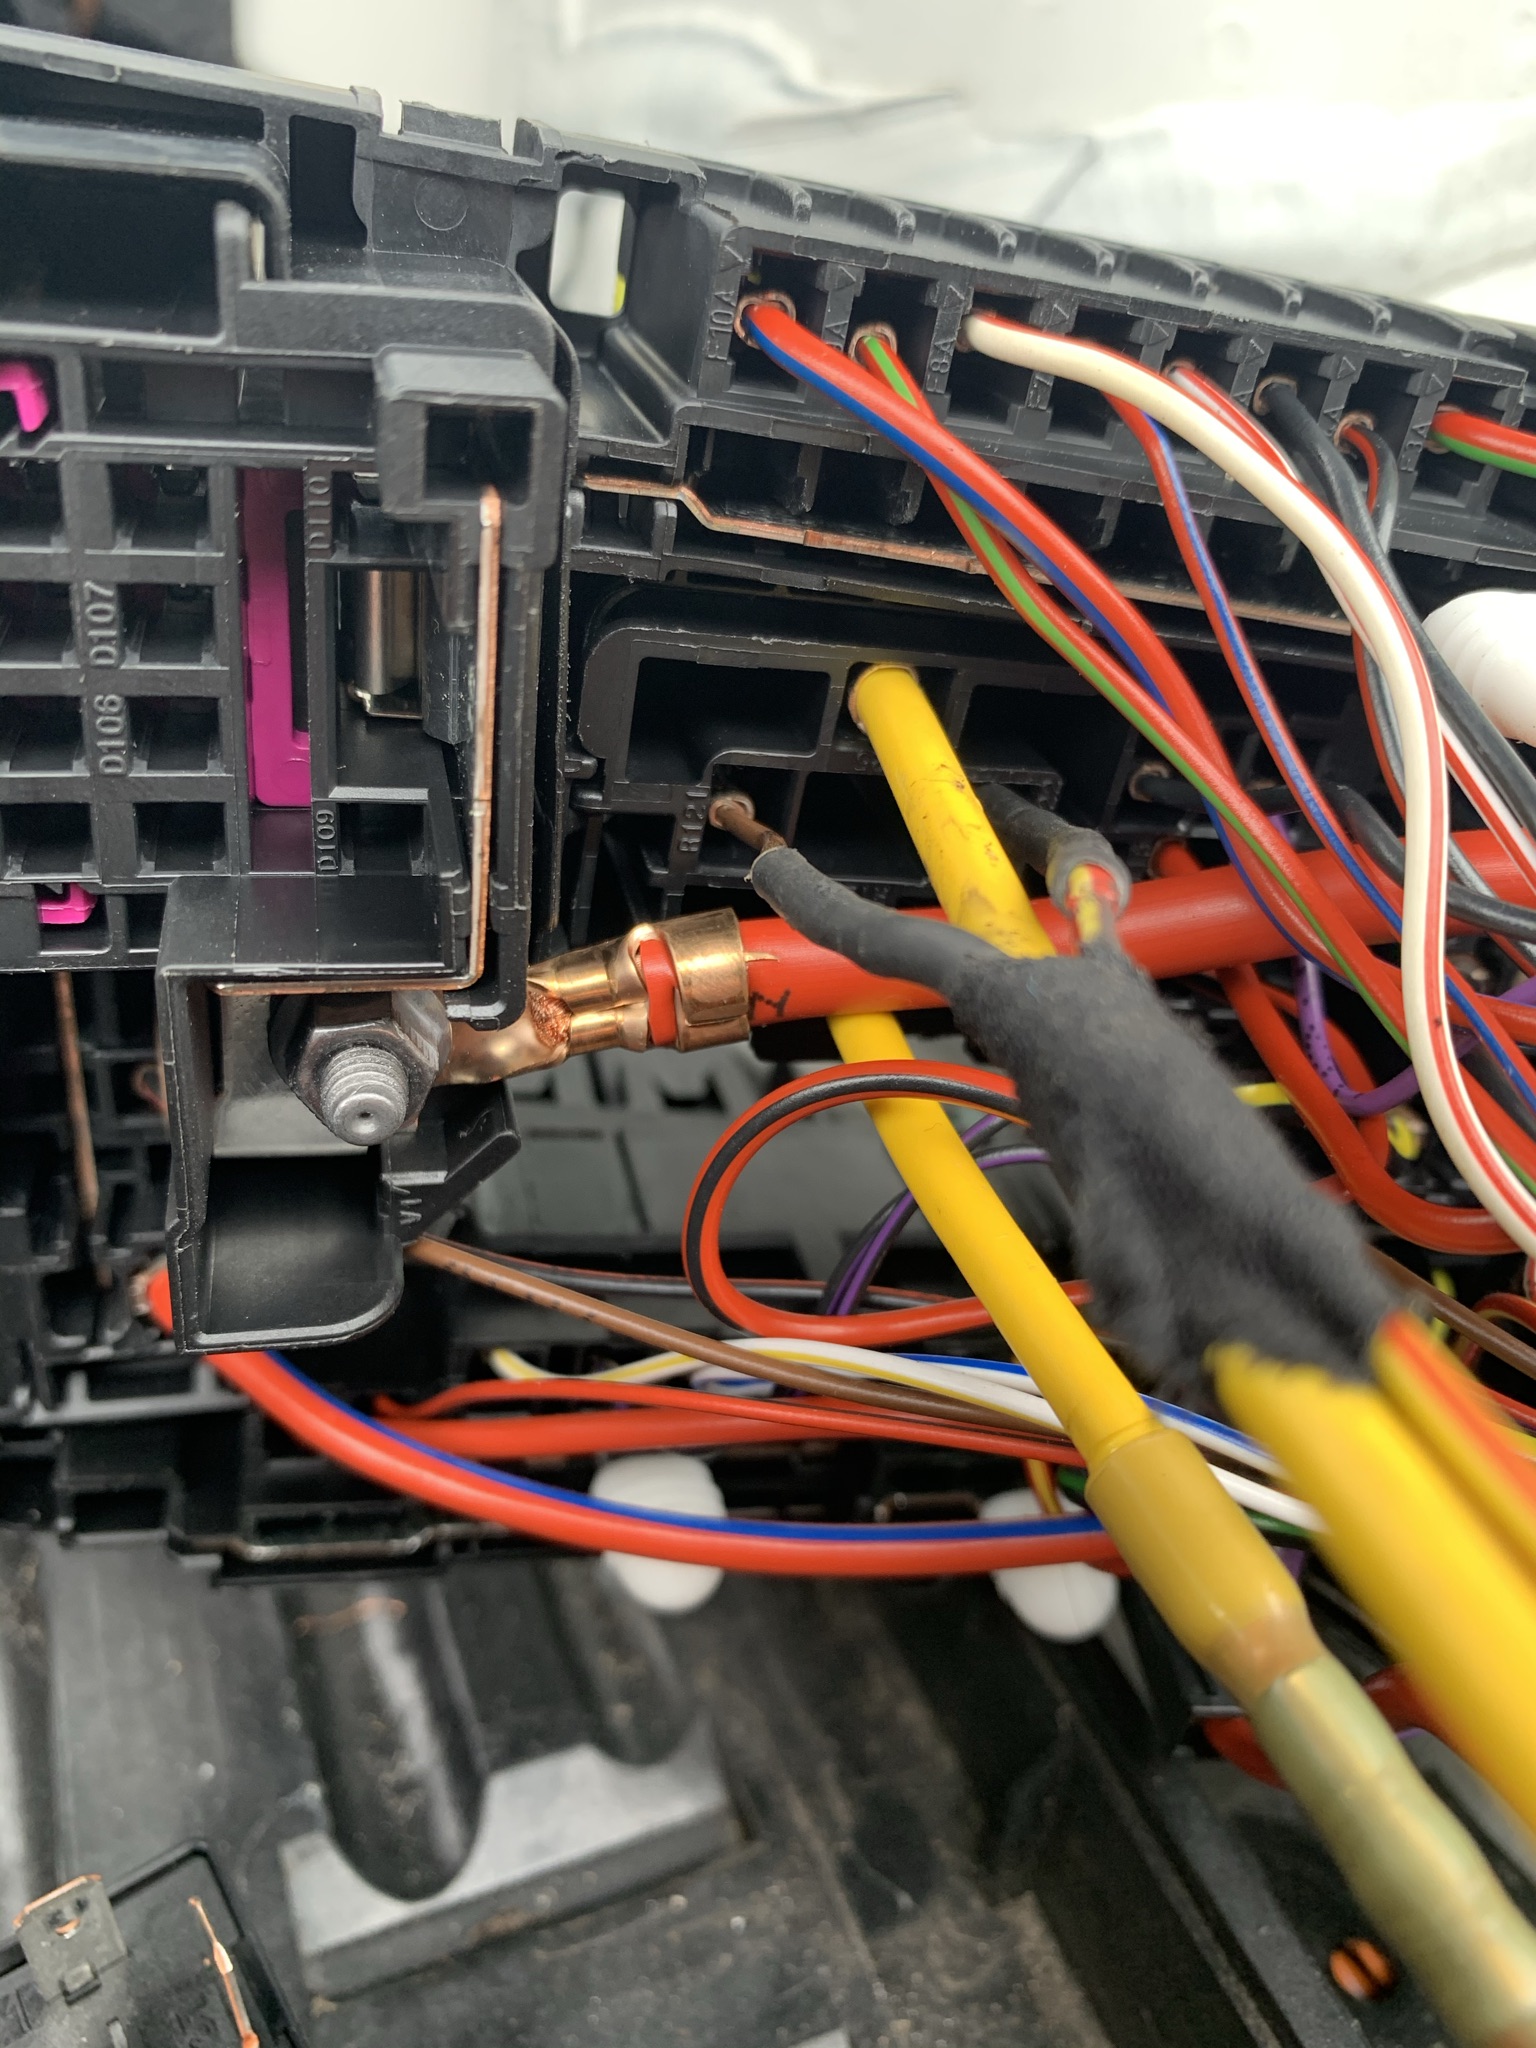
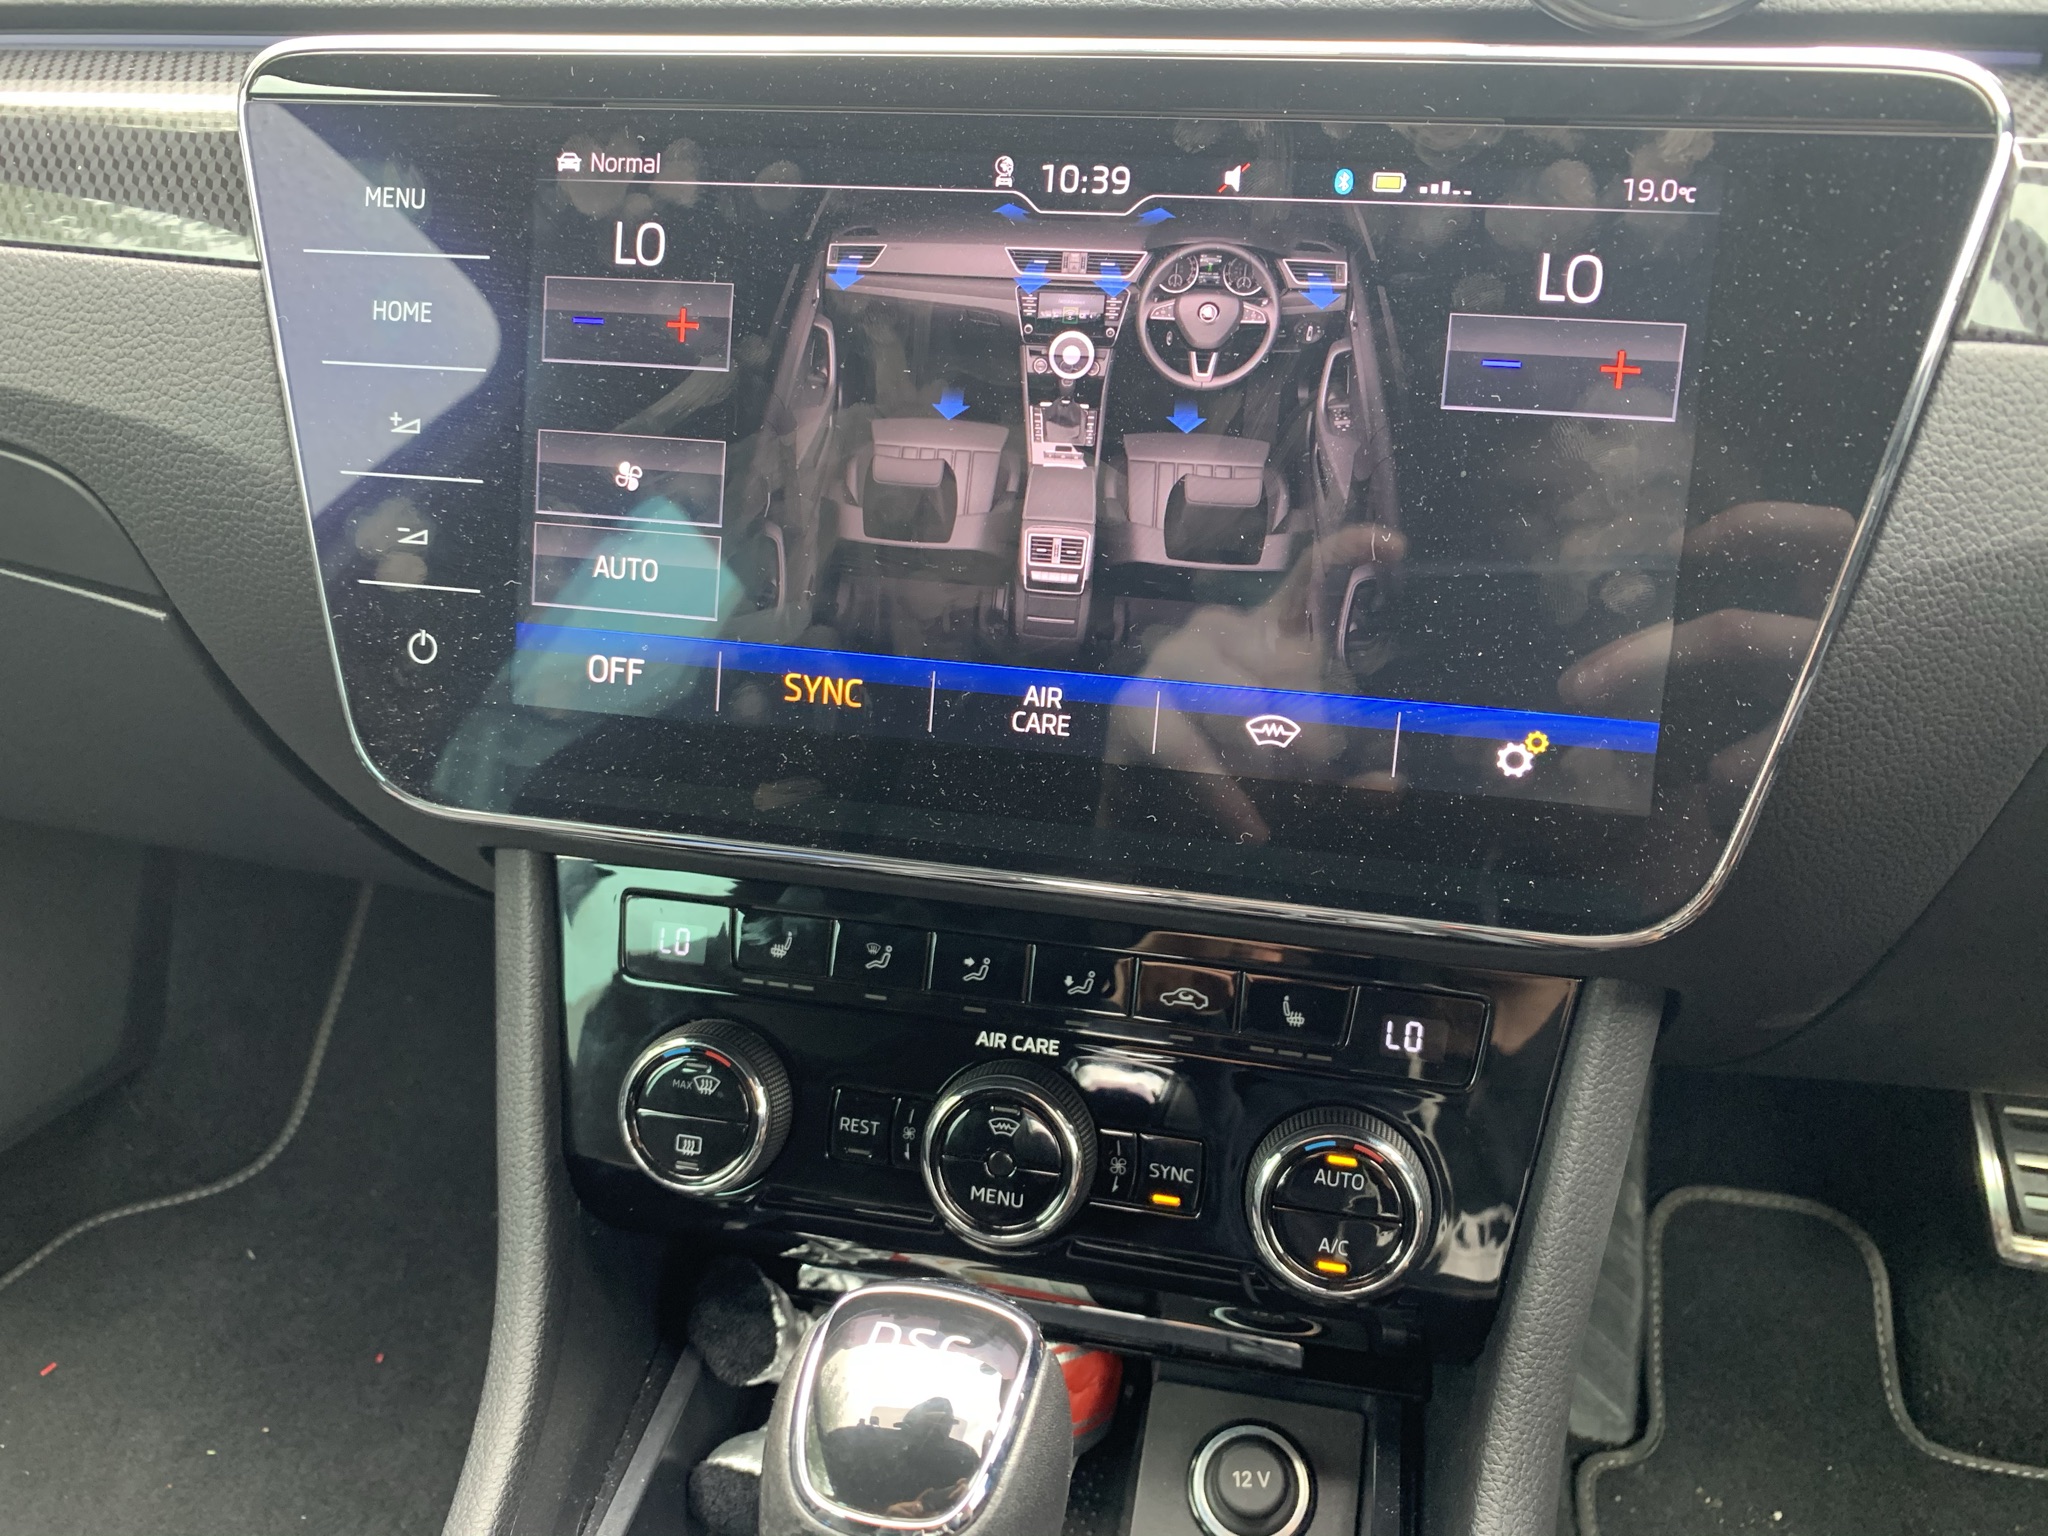
How to: Heated Windscreen Retrofit All of this is done at your own risk and is just meant as a general guide, not a full instruction manual. Just cause some things may work for my car may not mean the same for yours. Parts List 3V0845011AE - Heated Windscreen WITH A5 camera support - Will be different for everyone so confirm it first! 3V0907044DA - Dash Control Panel with heated windscreen button - Will be different for everyone so confirm it first! 071973851 x2 - Large Plug Housing for Heated screen connector 000979307E - Pins for large plug, comes with 2 pins so only order 1 000979425E - Pins for relay with 6mm wire attached, comes with 2 pins 000979027E - Pins for relay with 0.5mm wire attached. comes with 2 pins 4H0951253A - 645 Relay for main current flow 5Q0937507D - Relay holding plate, my car already came with but heres the part number 000979424E - Pins for Jtype fuse in engine bay fuse box with 6mm wire attached, comes with 2 pins N91186305 - 50A Slow blow fuse for heated screen 6mm repair wire - Only required 2 meters to be on the safe side (red) 0.5mm repair wire - Yellow/red repair wire 5m 0.5mm repair wire - Red/yellow repair wire 5m Fuse box terminal - Was not required as it splices into already used OEM pin for climate control 000979009E - Small pin for BCM plug with wire attached Varied Conduit - For wrapping the under bonnet looms to give an OEM feel and protect them Loom tape - for wrapping wiring and securing inside and outside cabin Heat shrink crimp connectors - These are genuine repair methods so order both 1mm and 6mm versions Silicone - For sealing the exterior connectors You will need VCDS & ODIS for this or equivalents. Once you have your parts together and your screen is fitted you will have 3 additional connections, 1 in the headliner, 2 at the base of the windscreen. Wiring Diagram For anyone that fancies going alone and doing the wiring themselves, here is the only wiring diagram you need. Fitting ground wire To start you'll need to drop the front interior lamp, this is done by opening the sunglasses holder and pulling the trim off around the SOS button and around the interior light buttons. Pull the interior light unit out of the housing and if need be remove the torx screws to drop the entire assembly out of the way. Here you will see the 10mm ground stud with a nut on it, remove the nut and fit your ground strap before tightening back up - DONT go crazy as it will tear the strap. Run wires through bulkhead You'll now need to run your 2x 0.5mm wires through the bulkhead, this can be fiddly so a coat hanger of some kind makes the job a lot easier, to start, remove the battery and battery tray to expose the main wiring loom which will be under a plastic cover and disapear into the passenger rear most corner of the bulkhead, the best way to do this is to poke a small hole from the outside in with the coat hanger, then from inside the car, go up under the glovebox and behind the blower motor, you will just see the end of the hanger, attach a wire to it and pull it back through. It might take a few tries to get right and just make sure you don't tear the boot or damage other wires. These 2 wires will be going from the interior fuse box area to the under bonnet fuse box so run them either inside the original loom or use some small conduit to keep them protected under the bonnet from road grime and heat. Whilst you are here, get your 6mm red wire and run it from the under bonnet fuse box area, through the plastic casing under the battery, then up the loom which heads into the scuttle panel area. Again, protect this wire with conduit or run it inside the original loom. Wire up windscreen power supply Now you have the large 6mm wire in the scuttle area, you need to remove the wiper arms which is done with 2x 13mm nuts under plastic covers, once the nuts are off, gently press on the pivot point of the wiper arm to release the entire arm making sure not to damage the screen. There are 4/5 metal clips holding the plastic scuttle covers down, these just pull off. Then starting at the outer most edge of the screen where it meets the plastic, slowly lift to remove all the plastic covers. Do this on both sides to fully expose the lower screen/scuttle area. You should now see your 2 large connectors with brown wires running into the windscreen. You will need to run your 6mm wire to both of these. You may choose a different method but mine was; place the 4mm wire with male pins inside the connector and push the purple tab inside the connector across till it clicks, I then placed the connectors in a vice and filled the rear with silicone to prevent any water getting in. The yellow wire was then cut in half. I ran the red wire all the way to the drivers side of the screen and used a OEM crimp connector to attach the 4mm wire to the 6mm wire. For the passenger side, I cut some of the insulation off the red 6mm wire near the passenger side and soldered the wires together. You will need a big soldering iron for this as the wires are massive. Both connections should be water tight. Secure the new wiring to the original loom and play close attention to making sure the drivers side connector will not make contact with the wiper motor as this will rip the wiring apart. Also make sure the connectors are not sitting in the lower section of the scuttle panel as this gets full of water, the flat part of the connectors should not be kinked either as it will damage the flat wires. Refit all the plastic trim and wiper arms - Use the dirty marks on the windscreen to line the arms back up, short wiper always goes on the passenger side. Wire up interior fuse box Next we are back inside the car and need to remove the glovebox to access the rear of the fuse box. This is done with around 8 torx screws both under and inside the glovebox, slowly lower the glovebox and make sure to disconnect all plugs. I also disconnect all plugs for the infotainment system and move the glovebox completely out of the way to give yourself more space. Now you should see your 2 wires that came through the bulkhead, we only want the red with yellow trace wire right now. Run it neatly towards the fuse box, pull the fuse box forward using the small plastic tabs giving enough room to access the back of it. At this point remove fuse 7 which is a 10A one. Find the red/yellow wire behind the fuse box that goes into fuse slot 7 it will be on the top row, this is where we want to splice our own red/yellow wire to. Make sure to use heat shrink and solder or OEM crimp connector. Place the fuse box back but DO NOT refit the fuse yet. Wire up body control module This will be our last wire under the glovebox area which is our yellow with red trace wire. You will be able to see the body control module (bcm) on the left hand side of the fuse box, it will look awkward to get to but the trick is, it doesn’t need to be fully removed. Where the lower foot well trim meets the side trim you will want to pull up on the side trim, this means you can tell pull the footwell trim out of its clip and remove it fully, once this is out the way you will see a big group of connectors we don't need any of these but instead, you should be able to see the BCM plugs directly above this group of connectors, 3 big plugs, we want the centre one, once the white locking lever is pulled down, you can pull the connector out of the unit then down a track and it will come out under the BCM area, cut the cable tie on the plug if there is one, press the 2 locking tabs in and release the inside of the plug. You will now want to run the yellow/red wire neatly to the plug you have just stripped down, attach the very small pins wire to the end of the yellow/red wire using solder or an OEM crimp connector. The plug you now have will be numbered for each pin hole, you are looking for pin location 26. Insert your pin into this until you hear a click, put the plug back together, secure your new wire to the loom and refit the plug in the opposite way to what you took apart. Refit all the trim at this point, including the glovebox unit but NOT THE FUSE - if you put the fuse back in with exposed wires under the bonnet you will blow it. Wire Up Under Bonnet Fuse Box You will now have your 3 wires at the under bonnet fuse box, you want to cut the cable tie where the wires run into the fuse box and then remove the inside section of the fuse box, this is fiddly as the little clips around the outside are a very tight fit. Once you are in and you can access the underside of the fuse box. In your parts pile you will need to find your 2 sets of repair terminals, all 4 ends will have the same terminal but 2 will be thick wires, 2 will be thin. Cut these in half so you have 4 individual wires with terminals. Attach the thin wire ones to the red/yellow and yellow/red wire. These need to be inserted into the correct relay points. Refer to the photo below which is the brown wire and yellow/red wire you see in the photo, they can go in either slot. This leaves us with 1 more red wire which runs to the windscreen, crimp one of your last 2 big terminal repair wires to it and insert into the LOWEST yellow wire point you see on the relay. Youre nearly there now! You now need to take your 2 large flat male pins with 6mm wire and you will need to cut this in half, this will leave you with 2 large male connectors and 1 large female connector all with 6mm wires. Join one of the large male and female wires together with a wire length of about 10cm. The female end will need inserting into the top relay connector which is pictured with a yellow wire. The male end will go to the fuse holder, this is shown in my picture with a red wire with grey trace and it shows where it must go, take note it will only go in one way round. The final wire which is 1 last big male terminal will need inserting next to the one you just inserted, this will give you your 2 pins for the fuse. The other end of this wire I placed securely under one of the large nuts with a red wire already attached to it. This is to supply the 12v constant supply required. This is shown pictured as a purple and black wire. Make sure all wire strands are secured and none are left to short out anywhere. At this point you can now insert your 645 relay and your 50A fuse. Put all the fuse box back together making sure no wires get caught anywhere, refit all trim, battery and everything else you took apart. You can NOW fit the 10A fuse back inside the car by just dropping the glovebox down, release the hinge on the side and with the 2 clips inside it it will lower to access the fuse board fully. That is all the wiring done! Only 2 more things to do now. Change display unit At this point you should have your new climatronics panel with the heated windscreen button. If you couldn't work out which one you needed, drop me a message. The key is 4GW = Heated front screen. First you will want to connect your VCDS to the car and SAVE YOUR CURRENT LONG CODING for module 08. If you don't do this, you'll run into trouble. Now remove the old unit, pull the plastic trim from underneath to remove it, then do the same with the actual unit no screws, just clips, remove the 3 connectors on the back and fit your new unit in the reverse order. You will notice that you cant turn the fan on or do anything with the heating yet. Don’t panic. Coding Once this is all done you can relax and just do the coding side of things now. Connect ODIS/VCDS to the vehicle and run the basic settings on the unit, this will teach the new unit your heater flap positions. Now put your old long coding back into the unit to save time and make sure everything is how it should be. You now want to open the long coding to make your modifications as follows: Byte 5 bit 0-3: 04 Windshield Glass A/C Comfort Glass [PR-4GW] Byte 11 bit 0: Windshield Defogger/Heater installed [PR-4GW] At this point, clear codes, turn the car off and lock it up for 15 minutes to allow the car to reset the canbus network. Get in, start the car and just confirm the heater is all working again as it should be. The windshield heater will not turn on but the button will flash at this point when pressed. Go to module 09 which is your BCM, Enable security access and go to your adaptations, you are looking for IDE04927-ENG142021-Window heater-Heizbare_Frontscheibe this needs to be changed from Not installed to installed. And that is it. You are all done, heated windscreen fully working. Some of you may notice the empty ADAS A5 camera spot, hopefully another guide for that will be coming in the near future as i fit it all up. Any issues with the guide or comments, let me know.


 1 point
 -
Hi all, I've recently upgraded my Octavia 3 and now have a 2020 L&K TDI with low mileage and FSH. from a main Skoda dealer so i've got warranty i've been so impressed with the car so far, but have a few small niggles and noises i'd like to seek advice about, in order of annoyance: 1. Auto hold brake pedal click noise. When the car stops and i take my foot off the brake, the car holds but as soon as my foot lifts completely off, the pedal makes a rather loud click noise. When auto hold is off it doesn't happen Anyone else had this and know the fix? 2. rattle behind the driver seat. It sounds like its coming from inside the B pillar or somewhere in the rear of the car. It wasn't there when i first got the car 500 miles or so ago. any key places to check? I will try getting in the back with my wife driving soon to ear up a few areas to locate it.. 3. rattle when revs are over 3k from under the steering column. Sounds like plastic on plastic vibrating when i put my foot down a bit. nothing seems loose and i am yet to get stuck in to look under.- is there a common issue here? 4. lack of radio control when using android auto. I can't even see what station i'm listening to on the screen wtf? Don't get me started on no Waze on the speedo screen.. 5. updating the maps - its stuck on 2020, i've tried downloading and updating via SD card in both slot 1 and 2 and the car doesn't seem to be able to find the files 6. lag when trying to turn on heated seat / steering wheel when first starting the car. it takes a good 15 seconds for the pop up on the screen to show me the heated, cooled and steering wheel controls. 7. lane assist - take over steering beep beep - i'm going in a straight line! i have to move the wheel left or right to stop the alert, why isn't there a sensor that i'm holding the wheel? 8. The lack of a back button on the information system - want to go from background lighting to the settings menu. NOPE go all the way back to menu, settings, scroll to where you were all in all i'm still really glad i upgraded, the comfort, matrix headlights and stereo are worth it alone!1 point
-
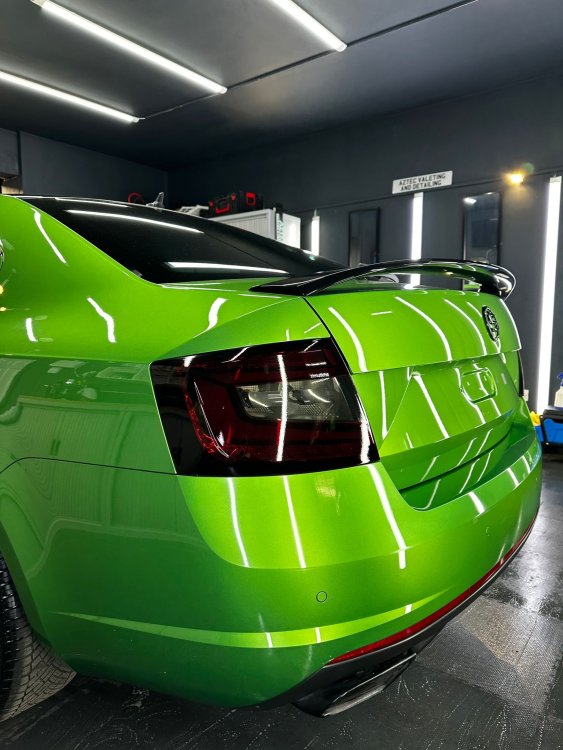
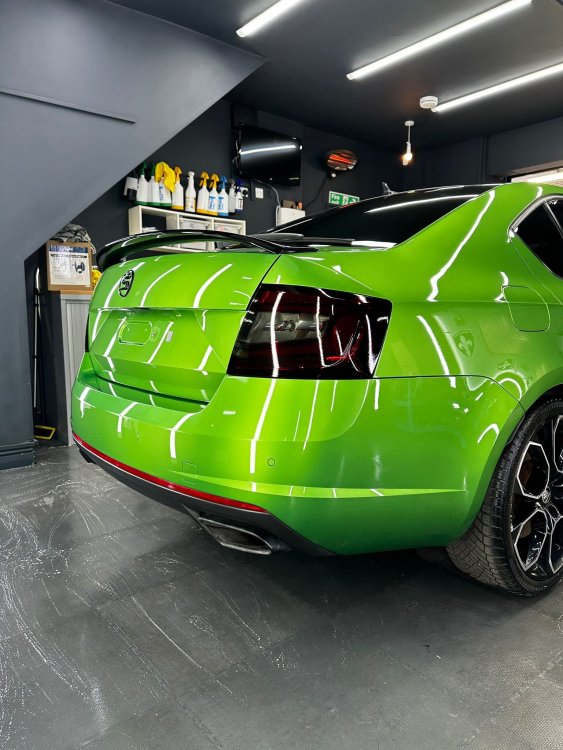
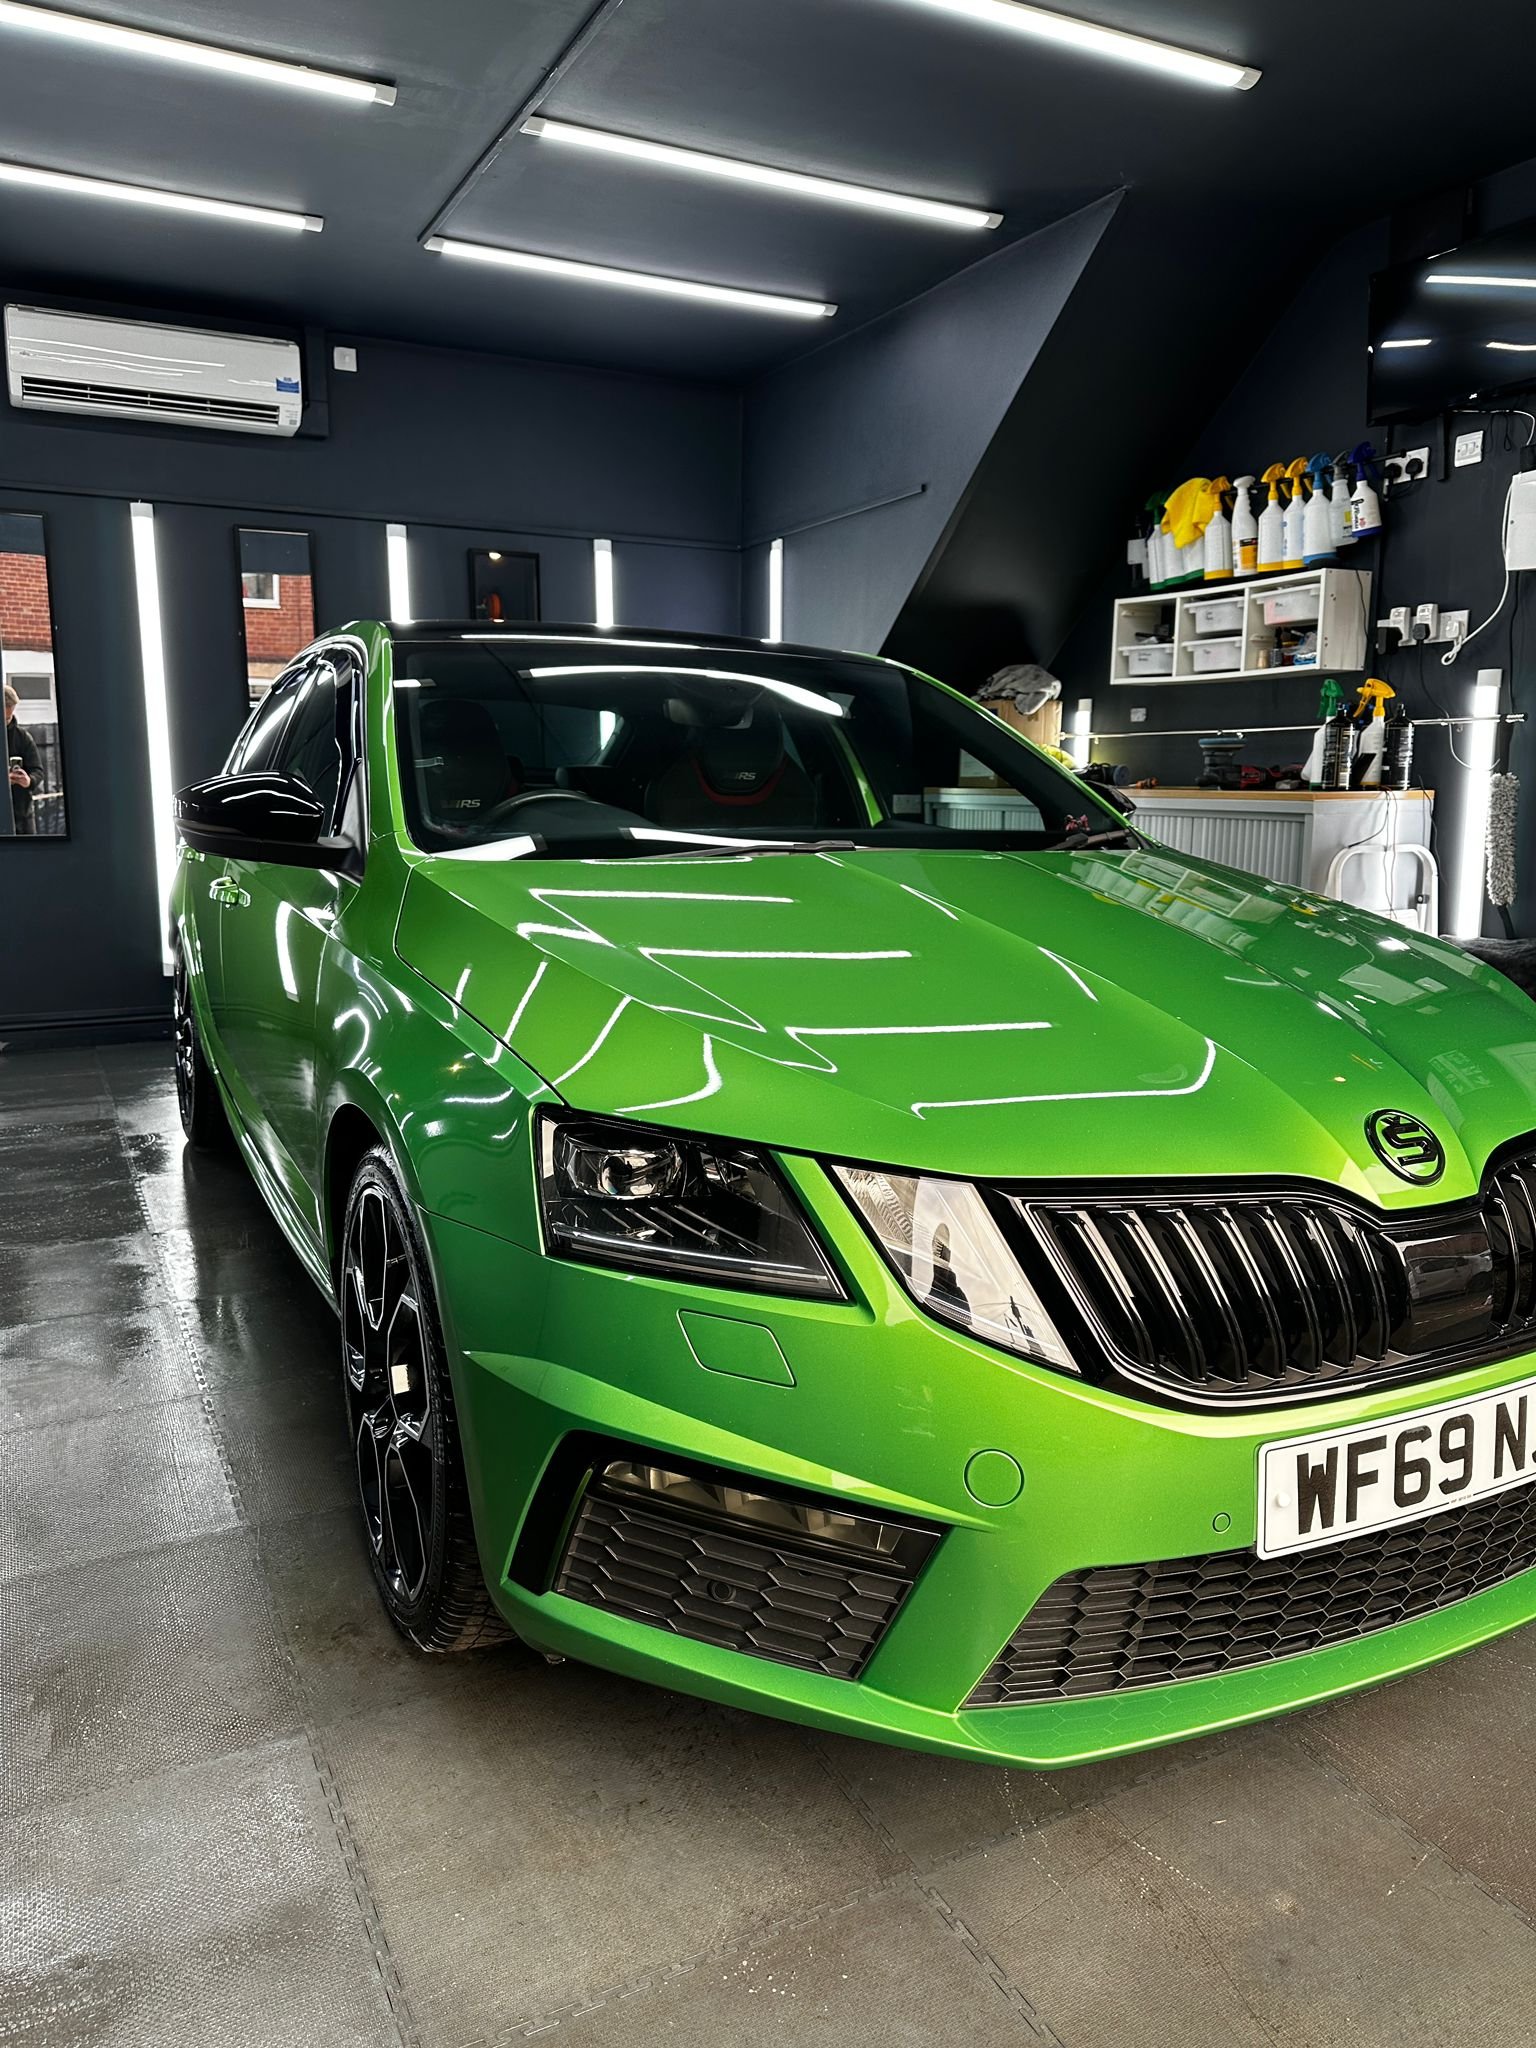
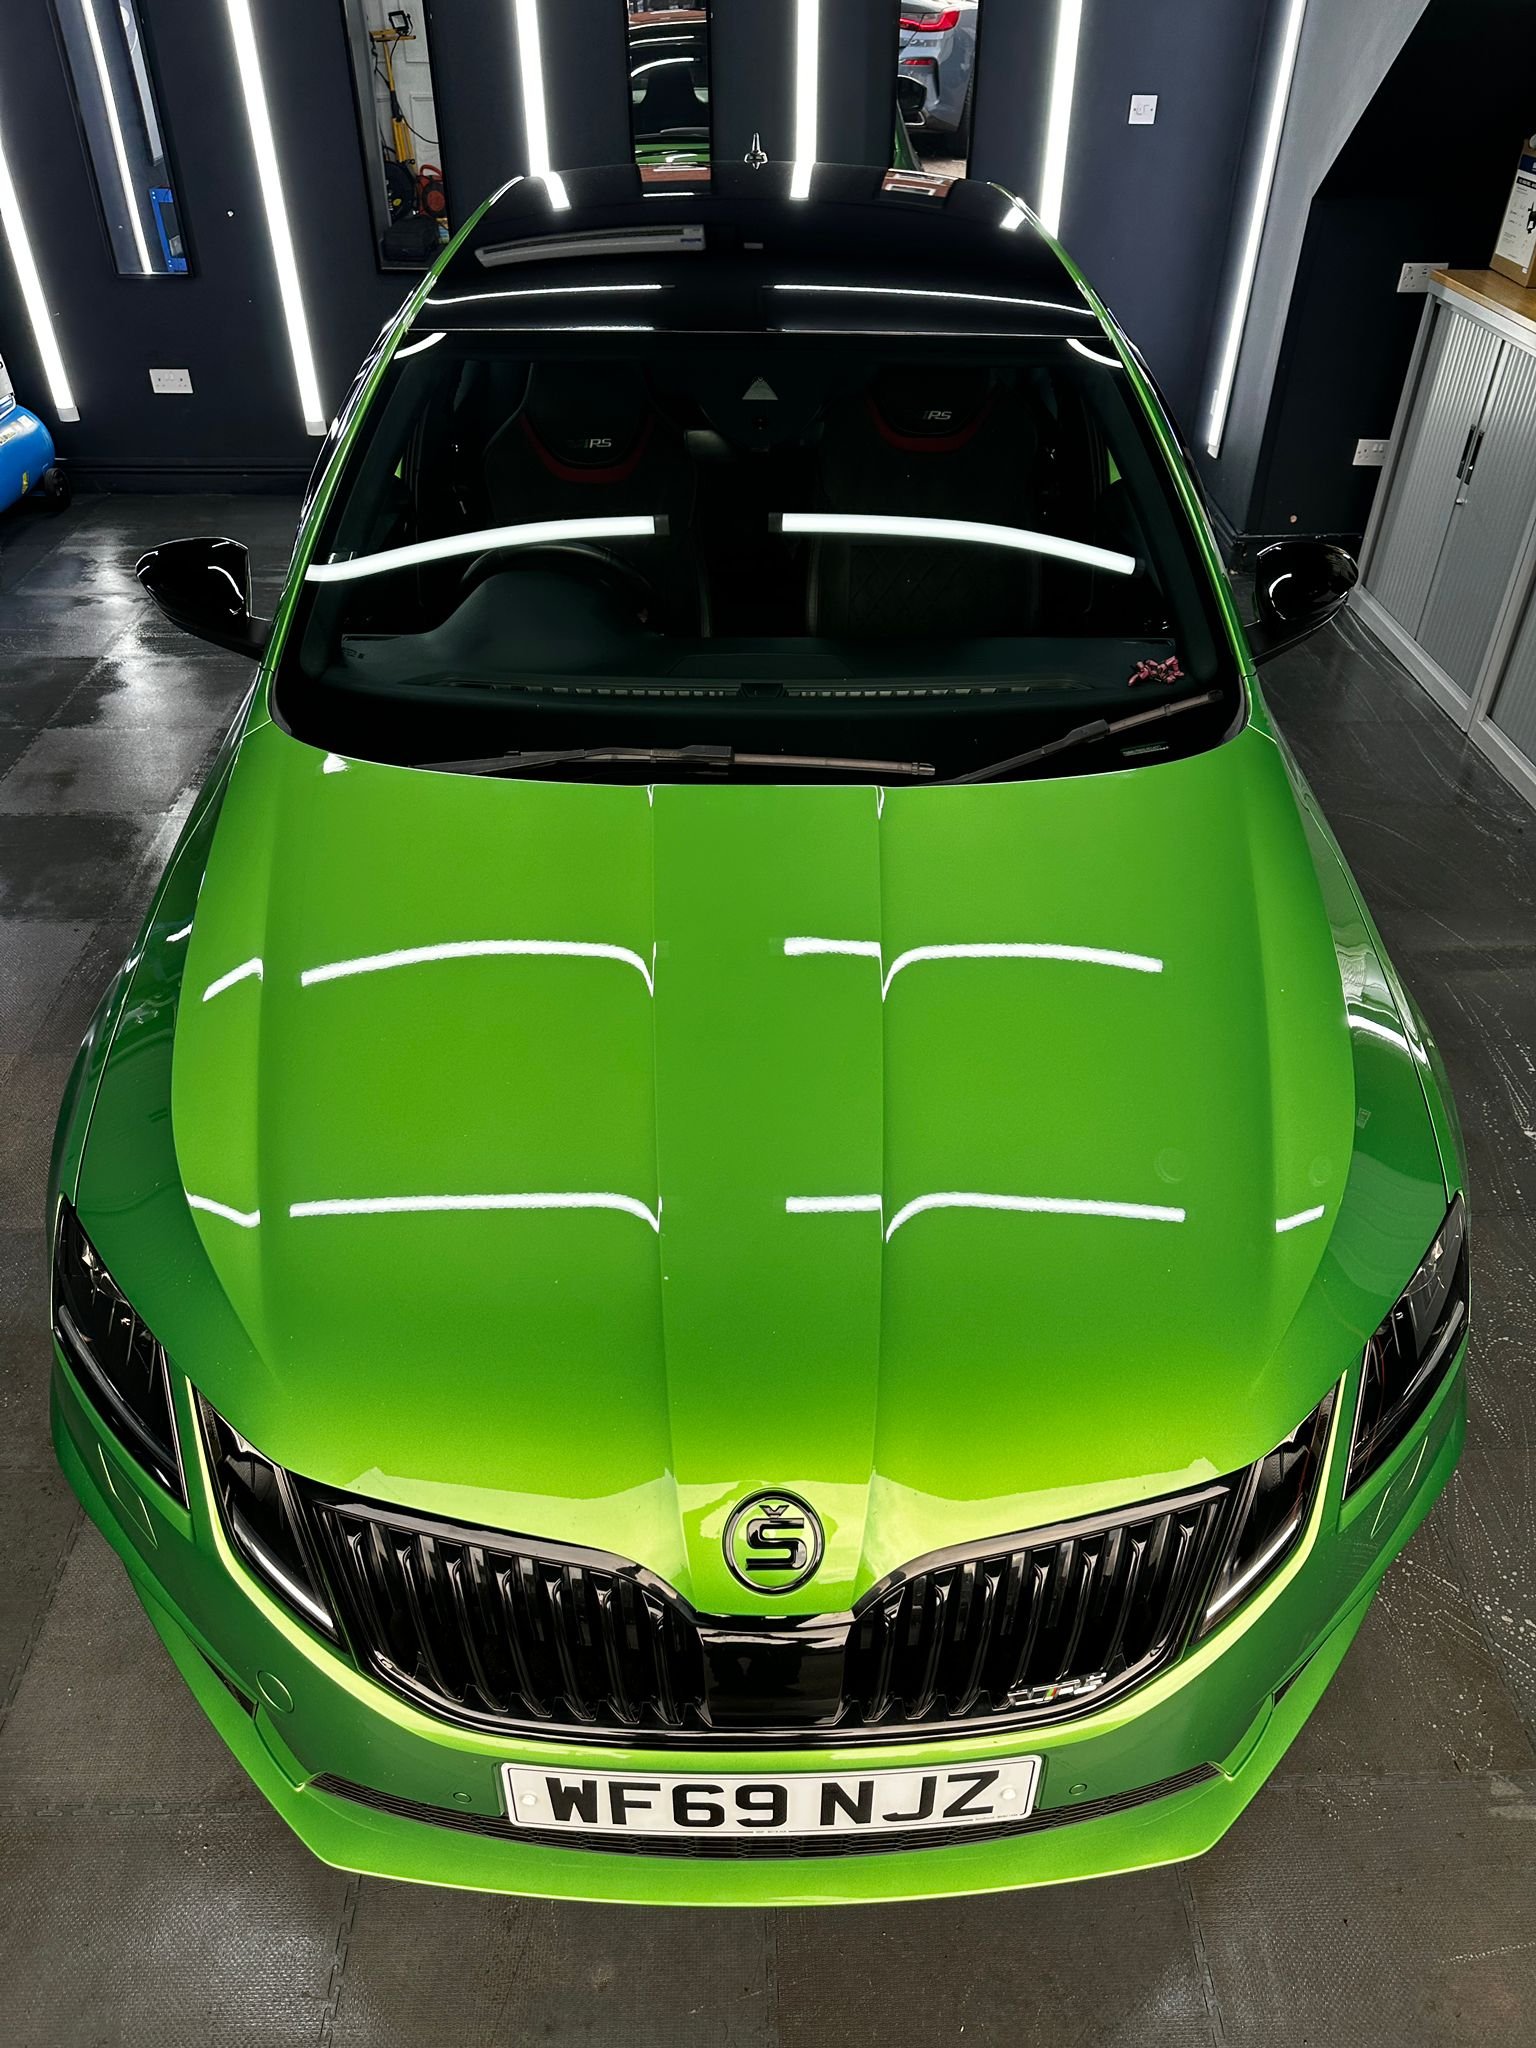
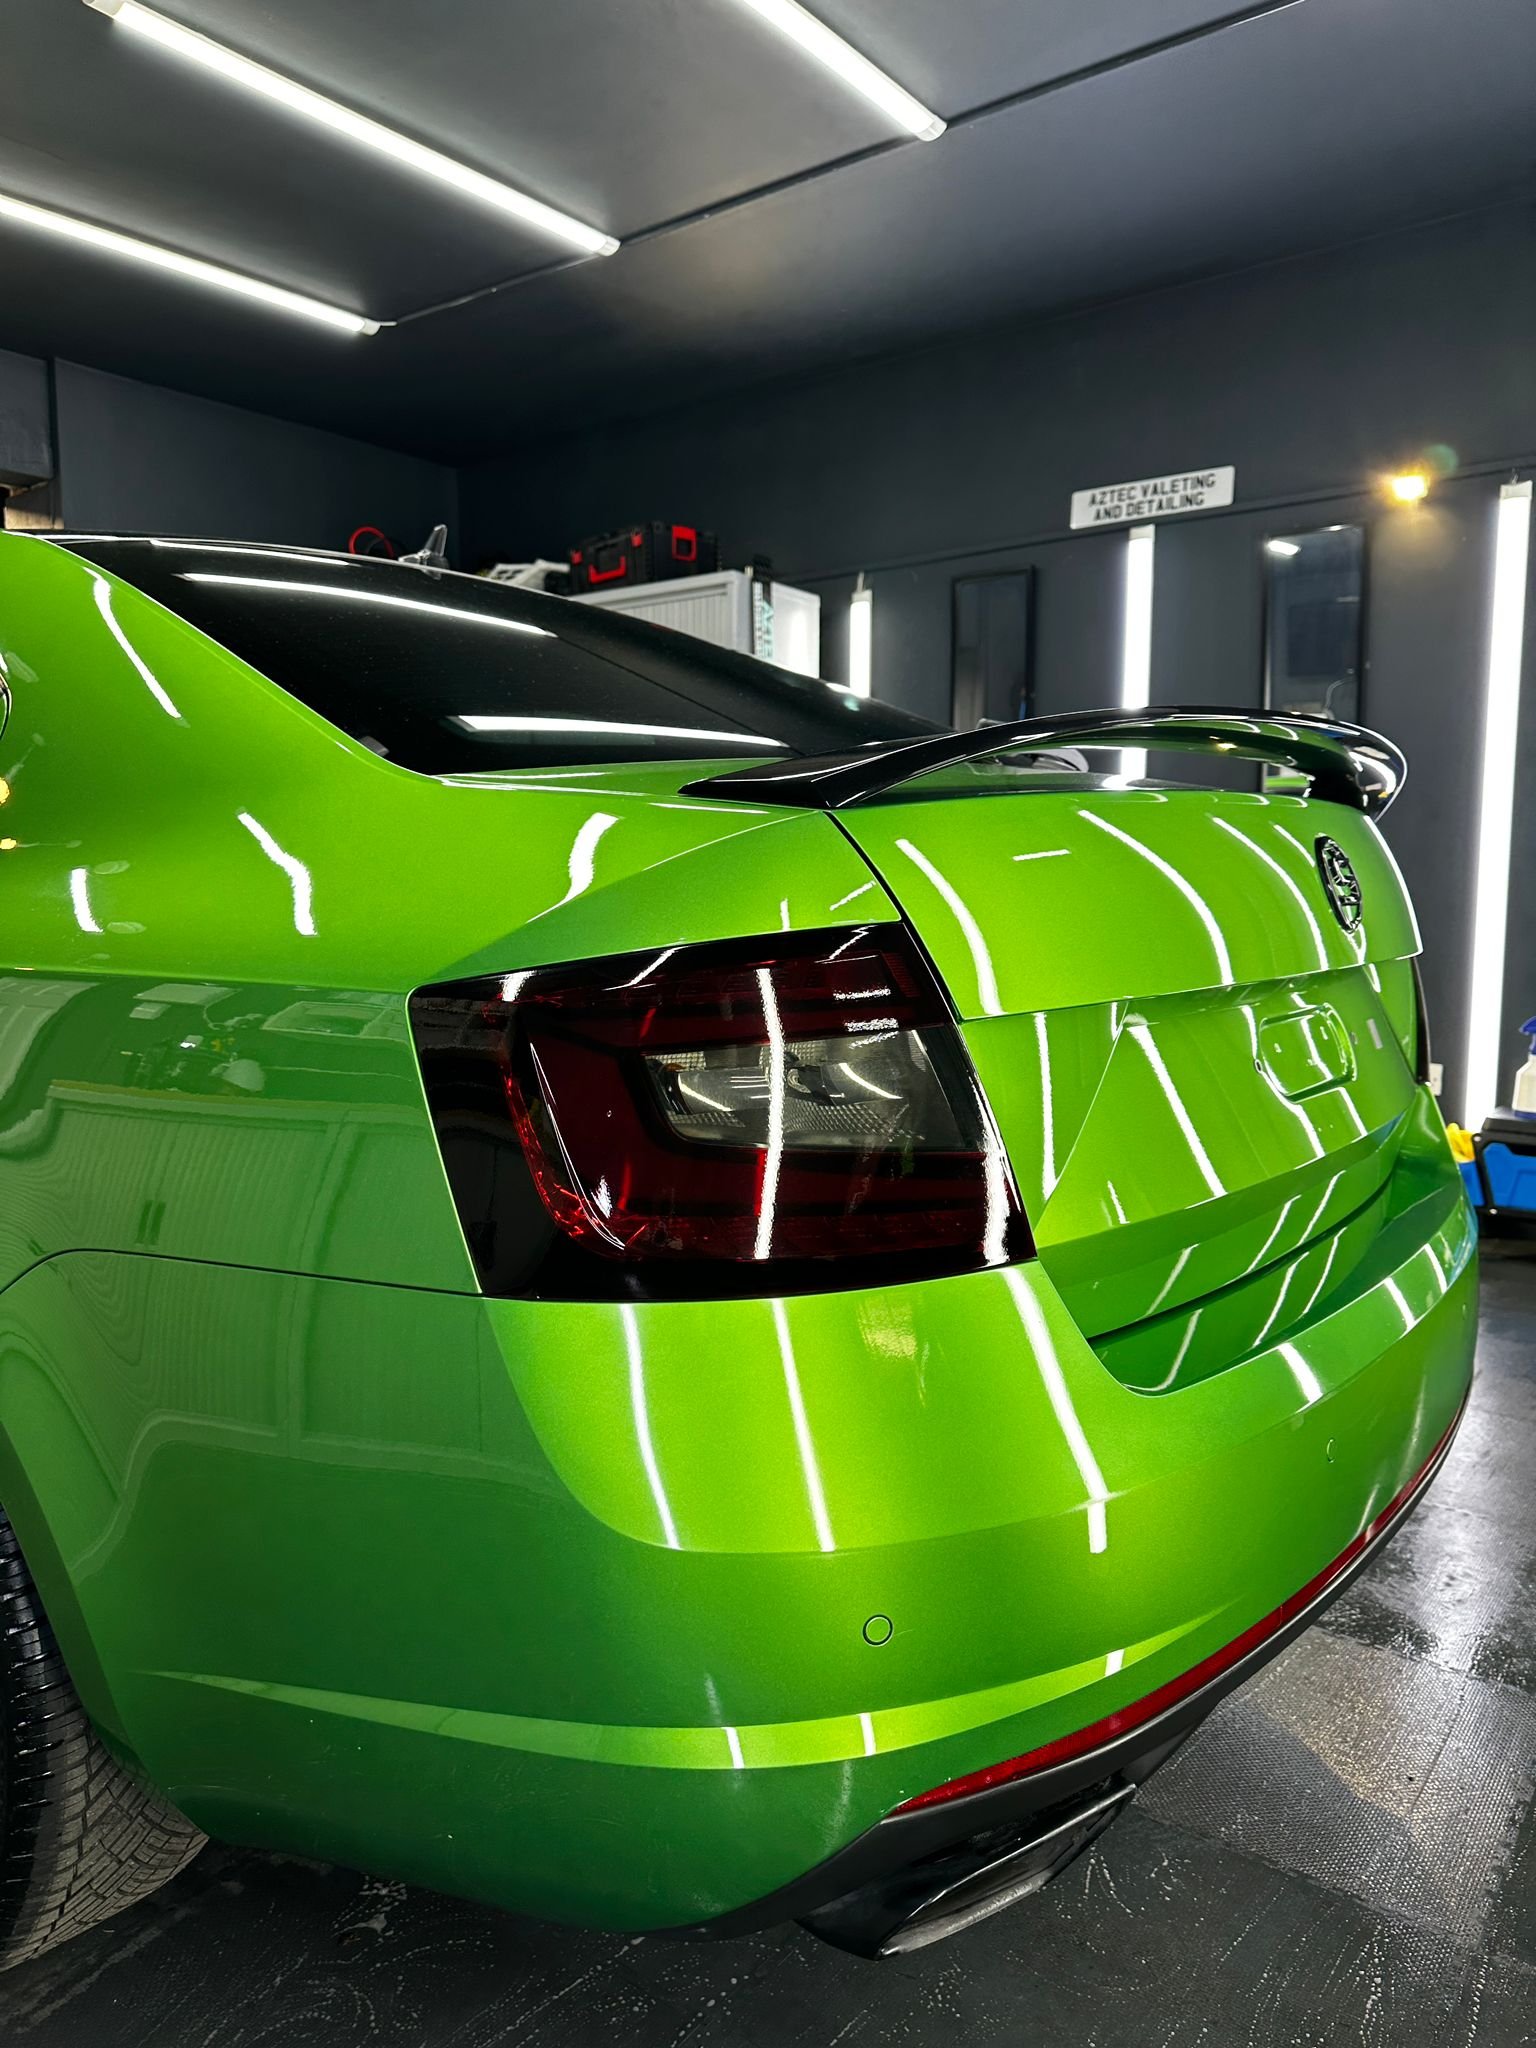
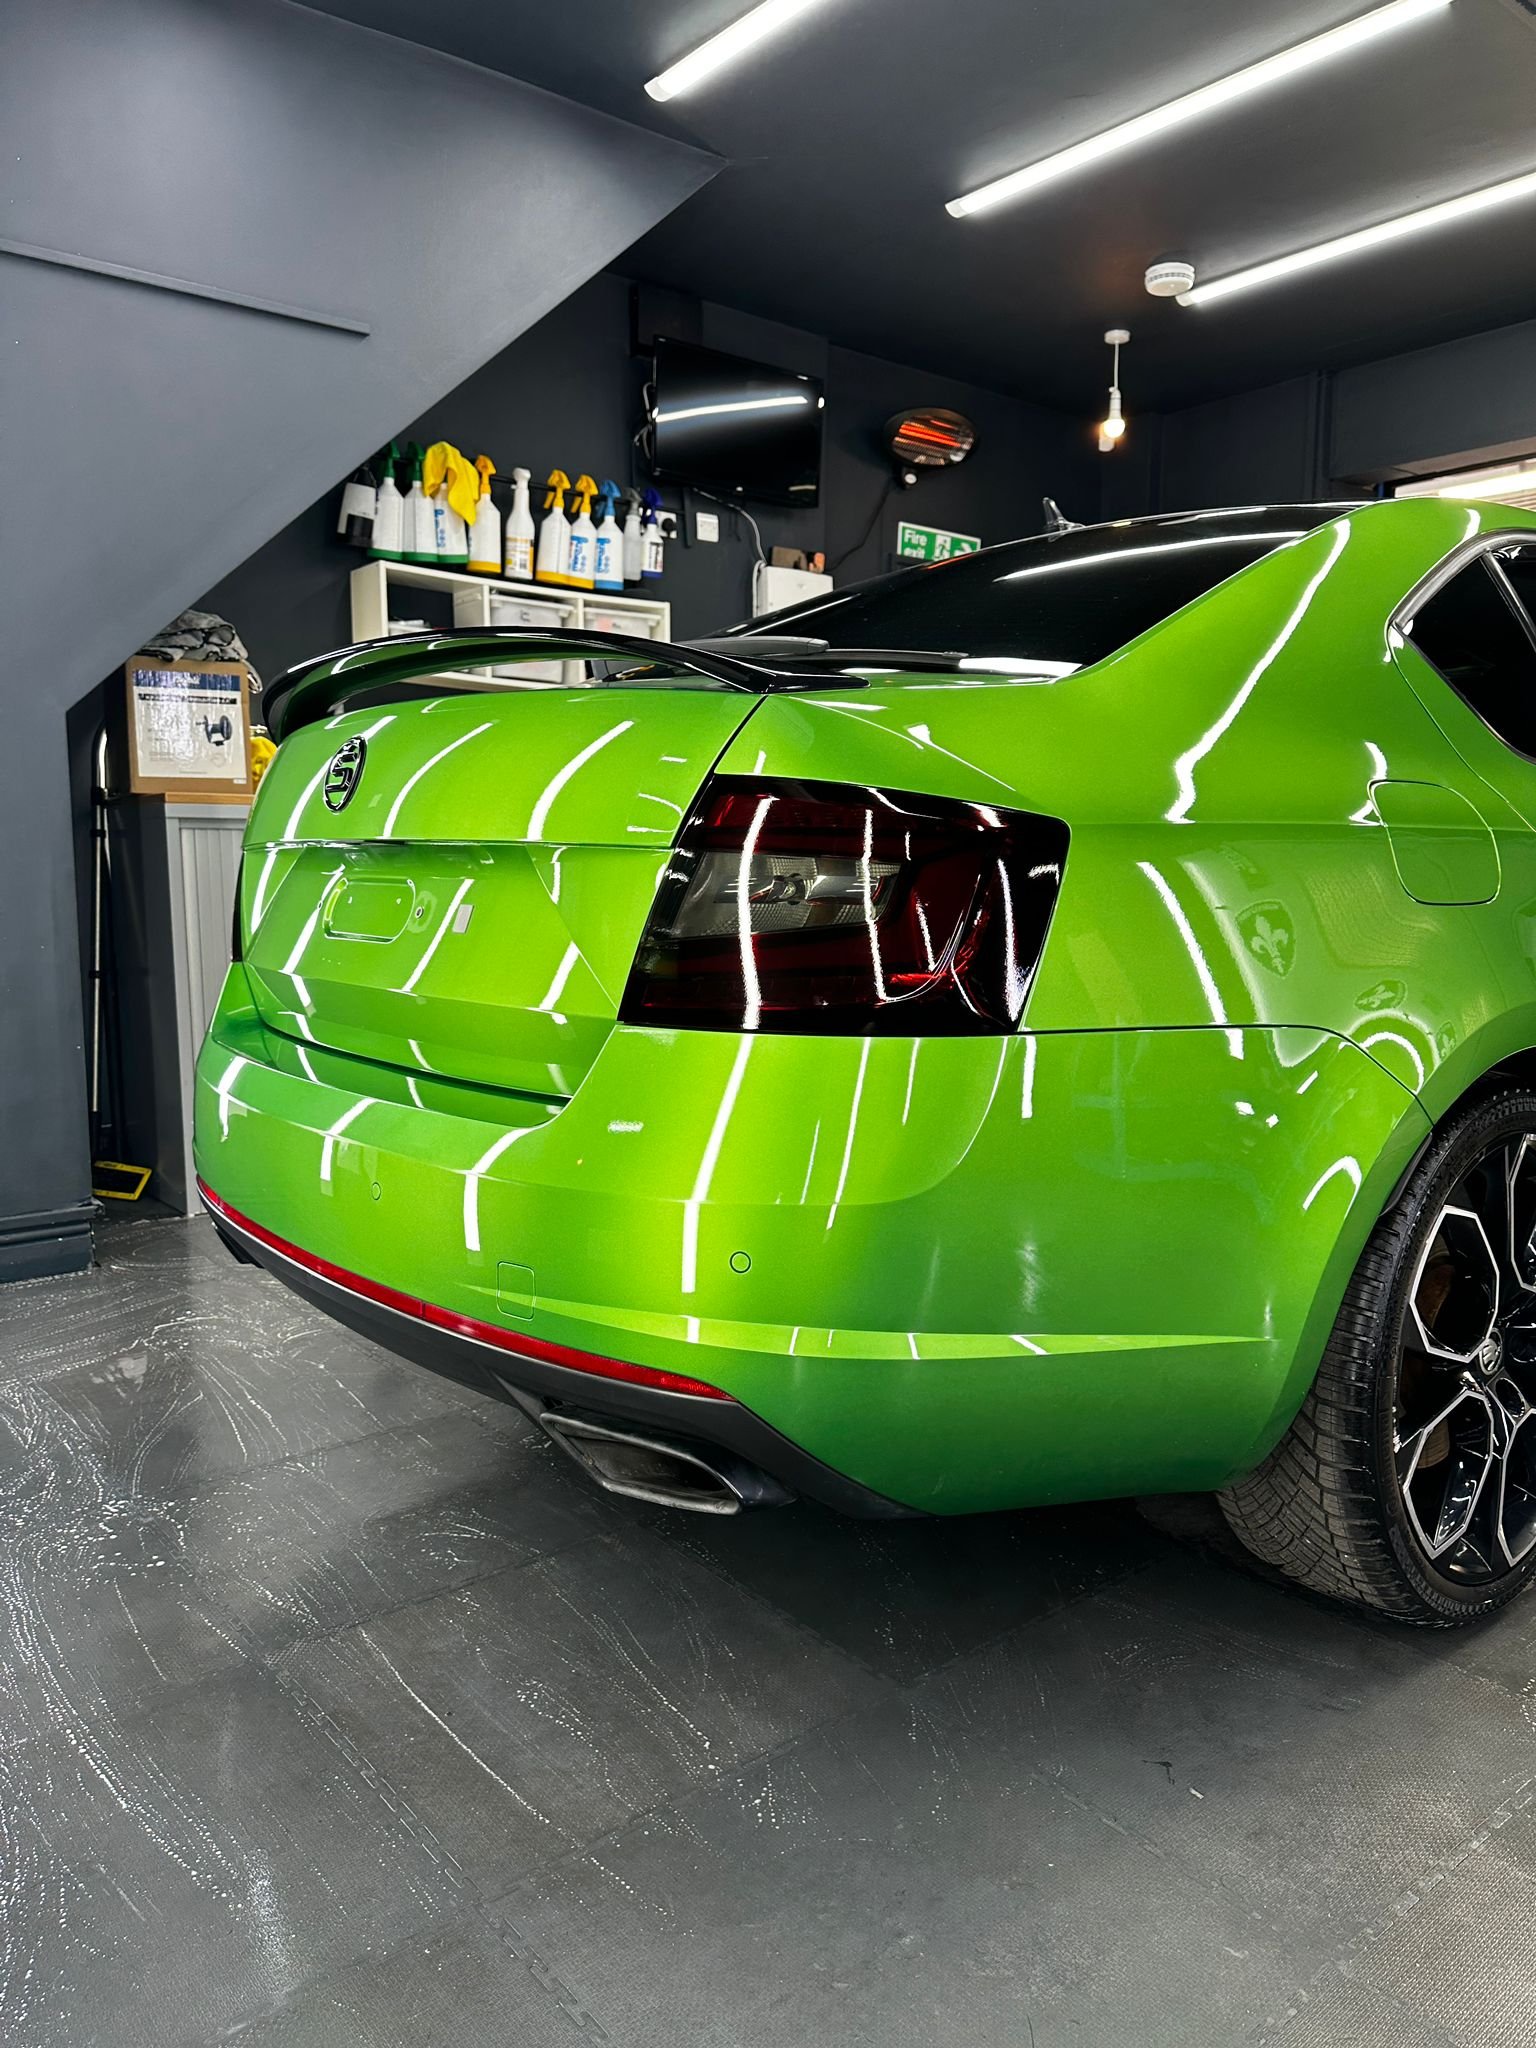
1 pointSo after having a few bits kicking around for long enough, that I'd ordered online. I finally found the time to give the car a bit of love. Debadged and added some cleaner looking Skoda emblems front and back. New gloss mirror caps due to a few chips and fitted the smoked, Audi style repeaters. Finished off with new numberplates, going for a Lamborghini style on the rear just cos I thought it matched the boot angles nicely. Gloss black roof wrap, smoked rear light units and front fogs courtesy of The Wrap Pod in Featherstone West Yorks. Then an amazing job done by Aaron at Aztec Valeting & Detailing in Altofts West Yorks, with interior valet & single stage paint correction and machine polish and ceramic coating. Due to a mix up, gonna have it back in with him in a couple weeks time for calipers repainting and all 4 wheels refurbed. I know the colour is a bit Marmite, but I love it! Definitely feel the detailing was money well spent


 1 point
 -
1 pointNew to the forum and this is my first post! I had the pleasure of buying a second hand citigo from Oldham in Manchester for £4250 with 43K miles. I bought from Plymouth and drove up with my stepdad to collect. This replaced my aging Toyota iQ that had awful paint peel and was having some age related mechanical issues. after 8 months of ownership I noticed rust around the fuel filler cap. After getting onto my local ŠKODA dealership about it, they offered a partial warranty repair and expected me to pay either £400 or £800 depending on the level of work. I wasn’t happy about this as they said it was essentially my fault for not getting a body inspection done. I argued back saying that the car had a full service history with a Volkswagen dealership and surely they would have done this. I stuck to my guns and got in touch with ŠKODA head office and explained the situation. After 8 weeks(!) of them working on it, I got a phone call from the local Murray ŠKODA again saying they were going to cover the full repair FOC and gave me a walloping great big Kodaq to use without charge too along with a massive apology! just heard from them today too and they said it needs a full panel replacement. I’m glad they’ve done it but what a hassle. if anyone else is going through this explain that THEY should have done the body inspections as per their servicing schedule and ask them why THEY didn’t do it.1 point
-
1 point
-
So you can install 1985 without problems when you know how1 point
-
1 point
-
Hello, it was not necessary to code the new module (I could not have done it, either), the system recognizes it if the serial number (ten digits) is exactly the same as that of the old one. After a circa 200 km driving the faults disappeared. Now, everything is ok.1 point
-
1 pointCoded away my hill assist, much better now. I hated it, but also habe dsg.... Kept xds and that is somethong thats does the work. But hill assist on a dsg? No way Jose. If module in abs is installed, one can find it in 02 ABS, long coding, bit 16 and 17 (in vcds)1 point
-
I have no reason to believe otherwise, however, I am NOT an expert so you may want to consider further advice before going ahead. But I CAN confirm that you can update to 1985 straight from 1896, no need to go to 1941 or 1969 first.1 point
-
You only need to ABS Bleed if you got air into the ABS unit. I did once by letting the brake fluid reservoir run dry, only realising when only air came out of the bleed nipple instead of fluid, and did indeed do the ABS Bleed Procedure using VCDS. So unless you have a reason for why air has got into the ABS unit or you have fitted a replacement unit it won't be required. You may find the pedal improves as the brakes bed in. If after a while you still feel the pedal travel is too much then if normal bleeding does not help then there is no harm doing an ABS Bleed just to be sure. Did you bleed using a pressure bleeder ?1 point
-
1 pointNo Yeti has headlights suitable for LED. They are either Halogen or Bi-Xenon1 point
-
Probably spent their childhood playing video games rather than experiencing the natural world.1 point
-
That was somewhat condescending especially as I had edited to say that I understood after watching the video you kindly linked to. I do not need to do a Google search to understand lighting a fire using a magnifying glass, I was once a child and understood that the curved glass of a fragment of a milk bottle would act as one.1 point
-
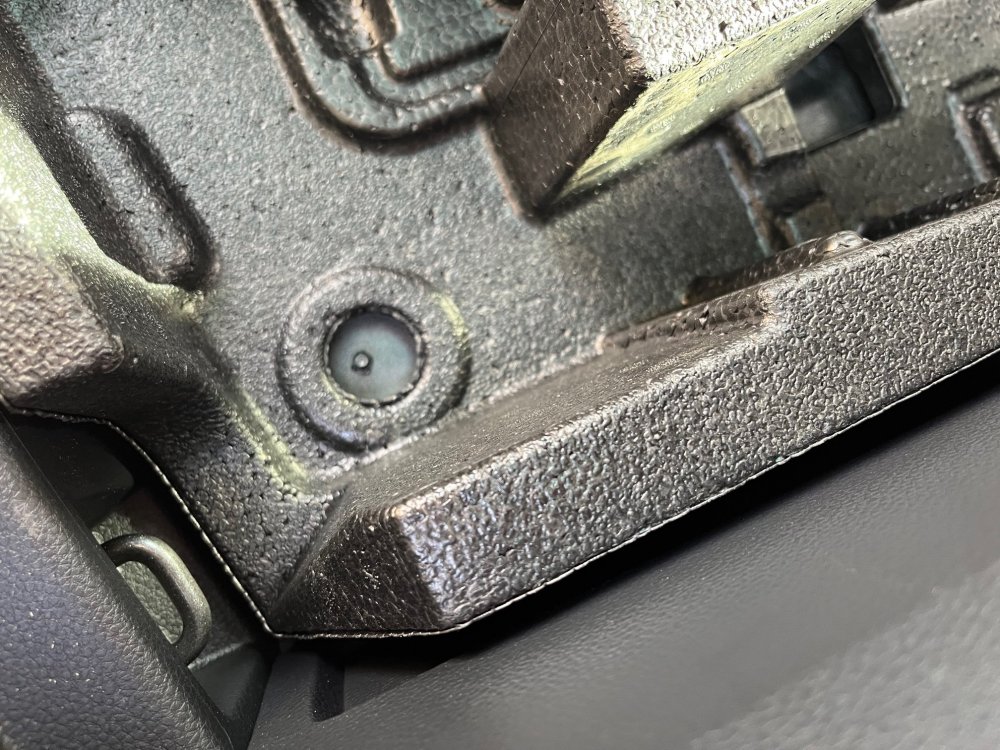
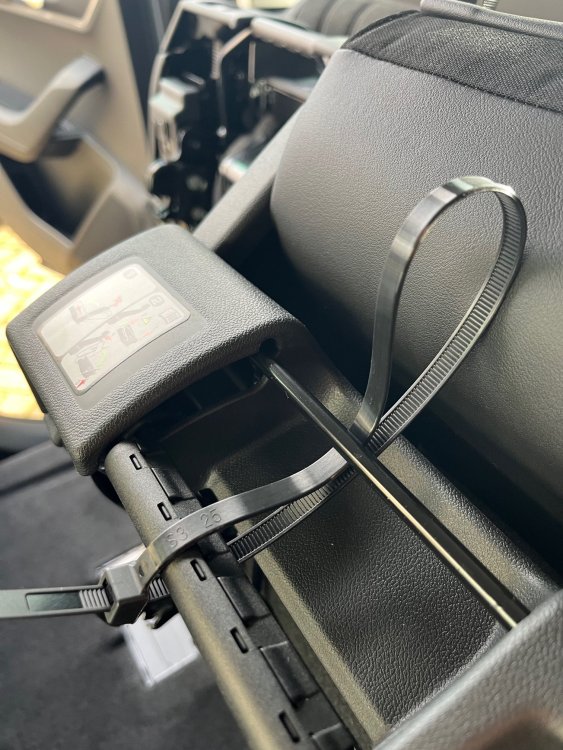
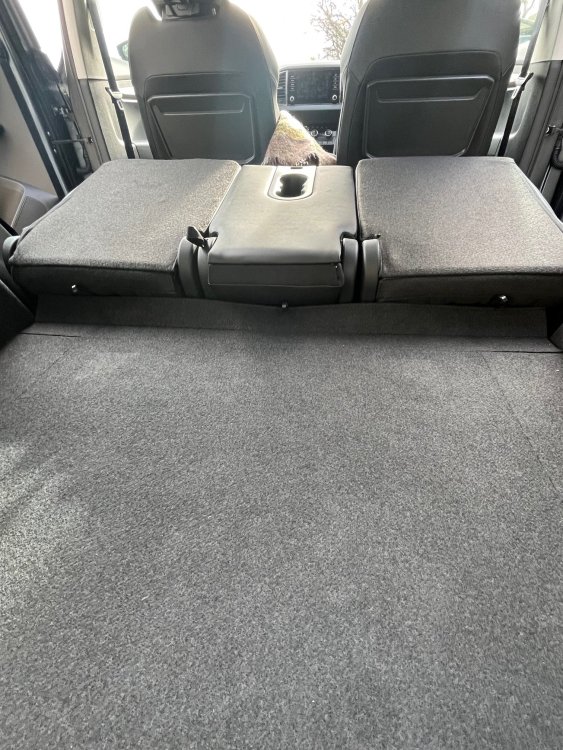
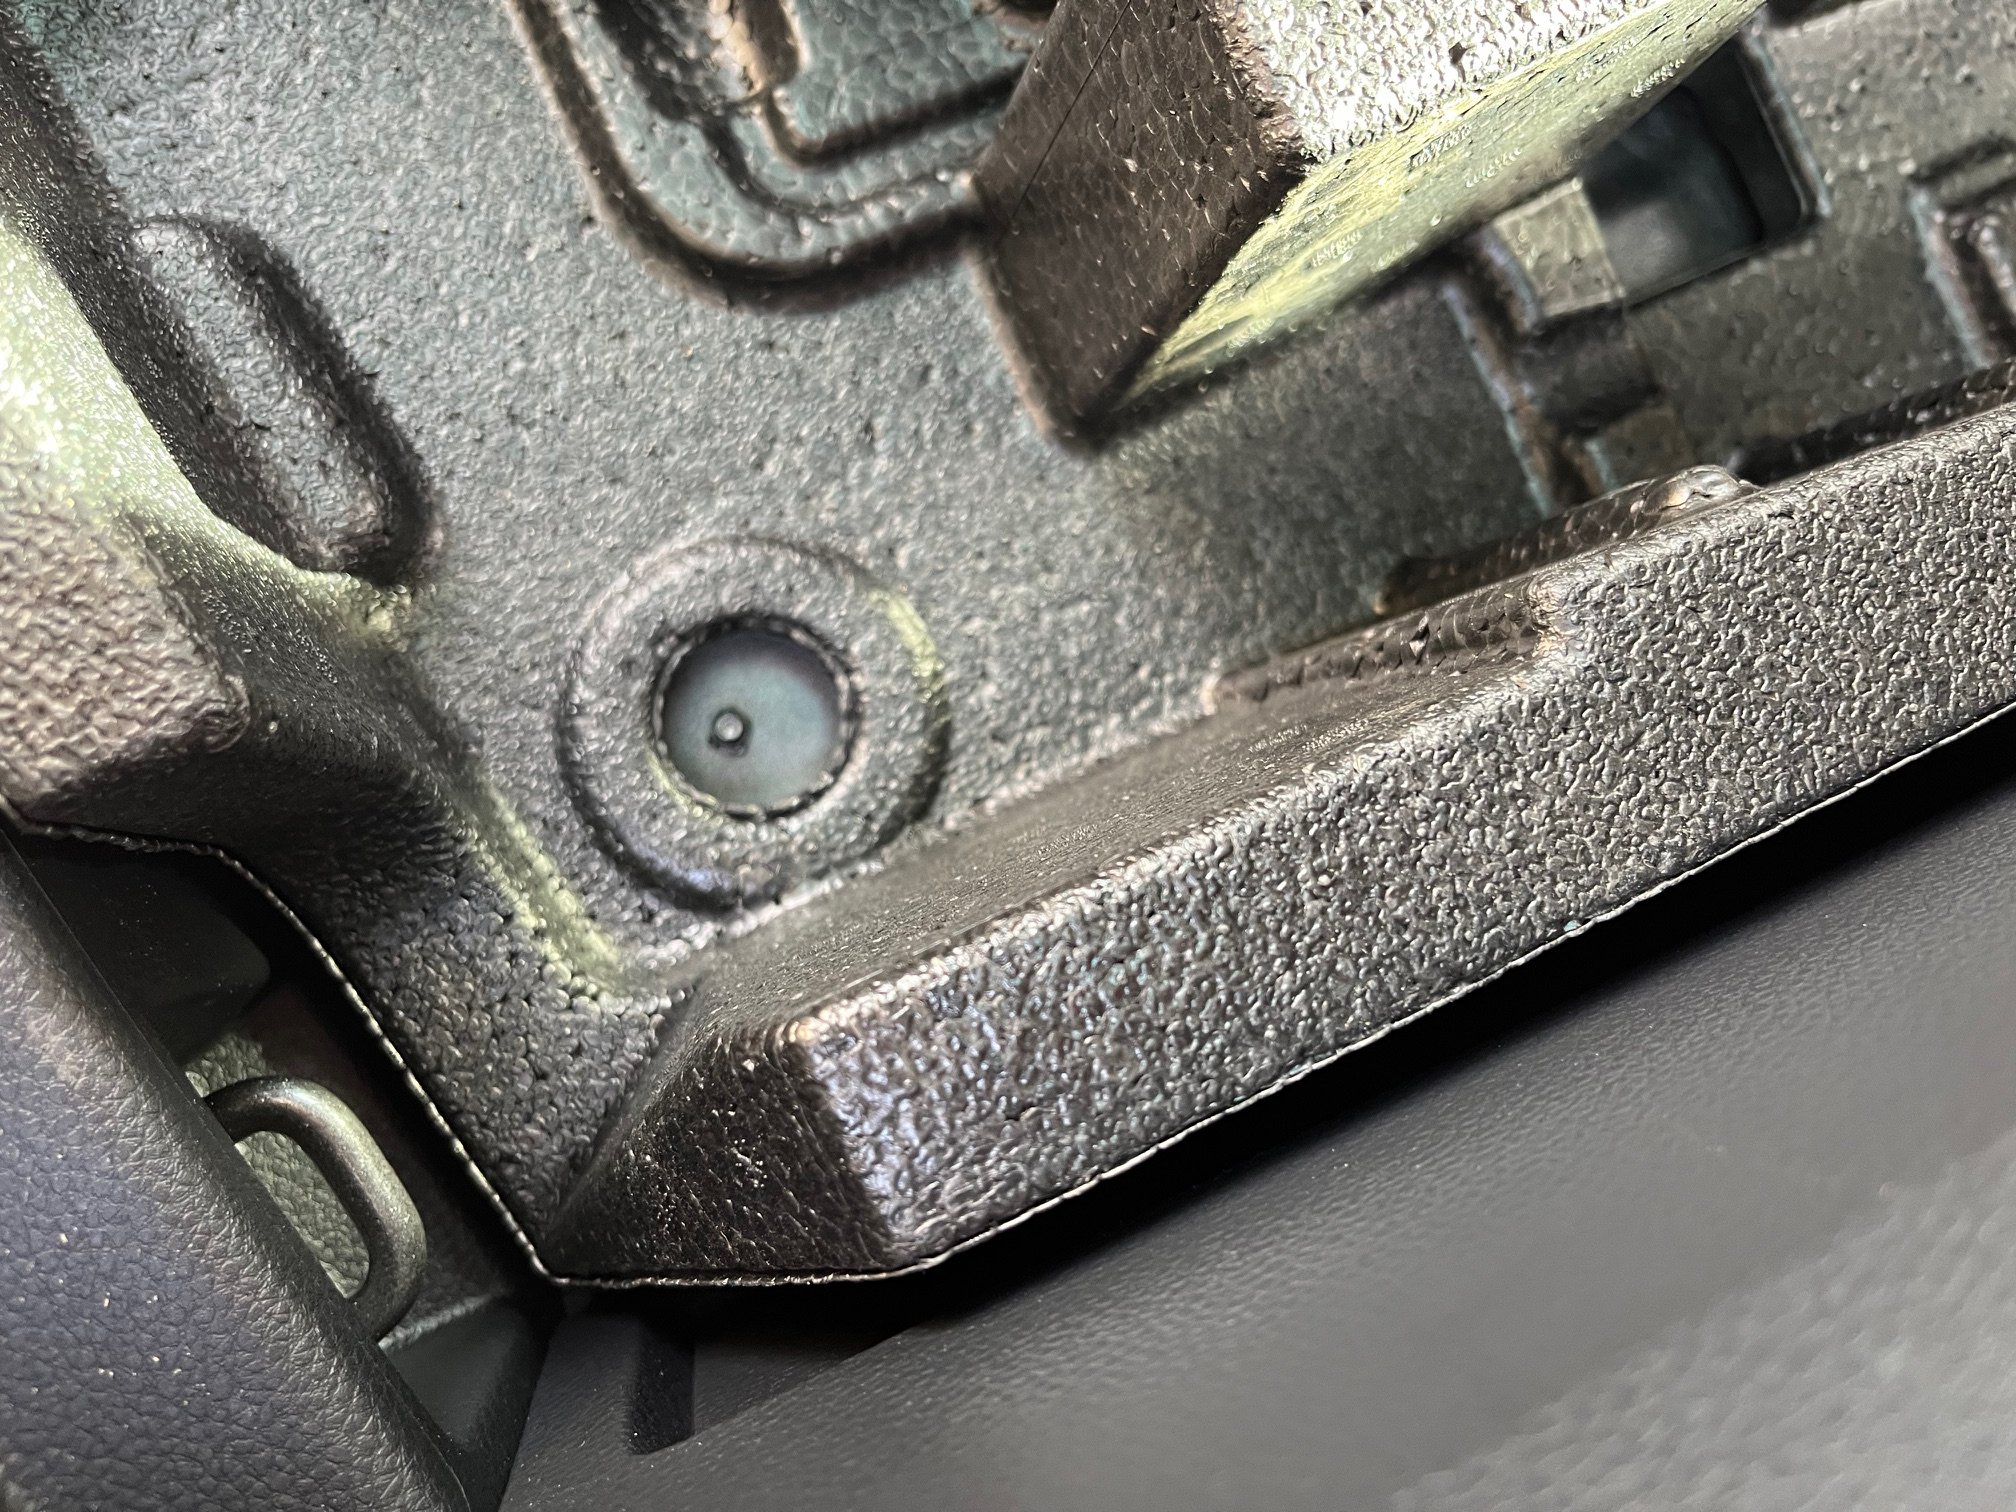
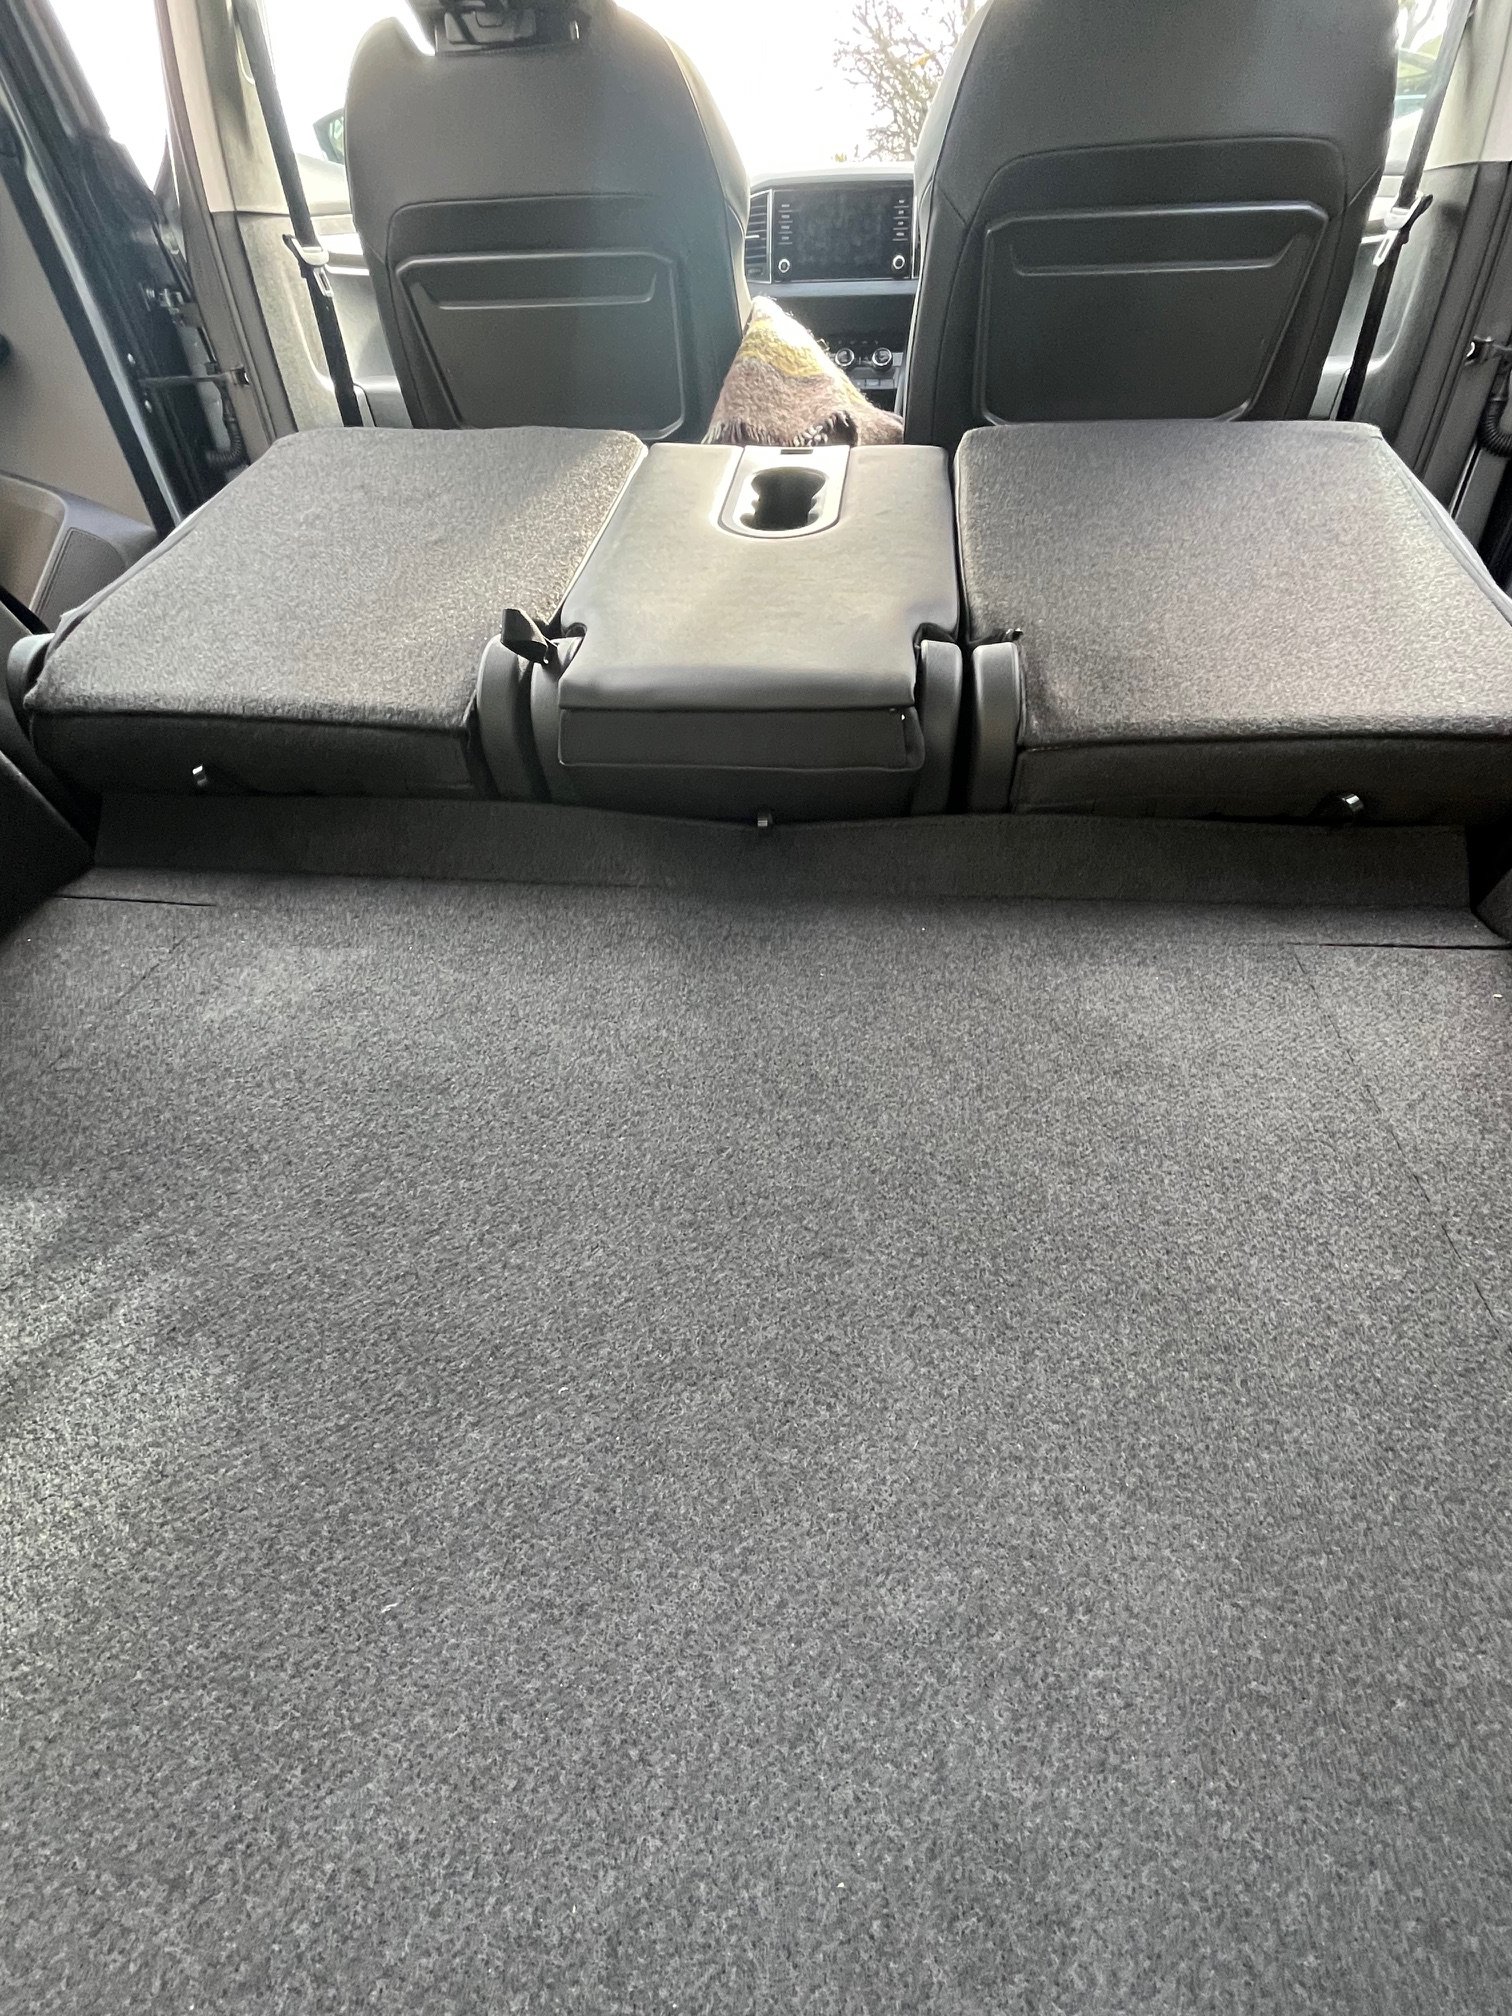
An update and a few questions and a few observations regarding the space-saver wheel and fitting kit (4x4). 1. The space saver wheel. The tyre rim notes that the tyre should be inflated to 490 kpa. Mine arrived with 360 kpa of inflation and so needed to be further pumped up. Learning point: do this first, rather than mount the wheel in place, put in the new boot floor and load the car's boot with item, like, erm...I did having only realised afterwards I really ought to check the pressure ...doh! Still with the spare, I see it can only be mounted with the label side down, as the securing stem and large plastic screw won't screw in place. While I understand how having the spare this way up provides some extra storage space, and arguably protects the vulnerable valve stem, it does however mean that if you want to regularly check the pressure of the spare, you have to remove the whole wheel in order to get to the valve (see above point!). 2. Polystyrene boxes to support the spare wheel installation. Firstly, can anyone enlighten me on how these are supposed to be secured other than by the weight of the boot floor? I see there are possible securing points but nothing to screw into these. See photo: Varioflex seats. Elsewhere on this site there was some really helpful advice about the polystyrene tool box and modifying it by cutting sections away to enable access to the rear levers on the seats. As it happened, I didn't need to cut into the boxes and a decent work around is to attach robust cable tie loops to the levers and to tug on these instead. Works a treat. When in situ you can either leave the top of the ties proud or tuck them in to be more discrete, or even use something bright and obvious for easy location, such as braided coloured rope. I don't know if Skoda have modified this polystyrene box, but it doesn't snag the rear of my seats, although without the cable ties it is fiddly and tight to reach for the seat releasing / tipping levers. See photos: A few other questions and points. I seem to recall that the tool kit that came with the Fabia we part exchanged and with my two previous Yetis, had a small wire-like tool for pulling out the towing eye covers on the bumpers. Nothing like that here. Am I missing some items or aren't these supplied anymore? We also had a Skoda screw driver in the last spare wheel kit. Unfortunately, we left this with the Fabia as we were driving over 300 miles to collect the Karoq and had we left the spare at home, well, I know the Gods of Fate like a laugh sometimes! The towing eye: Skoda and VAG enthusiasts will already know this, but I didn't. Last year while marshalling at an equestrian event, I had the dubious honour of hitching up over 14 vehicles to a tractor and towing them off a muddy field. One learns quickly the following: VAG towing eyes have a left hand thread (ie. turn anti-clockwise to tighten - so forget the saying 'righty tighty, lefty loosey ). Most folks on the day didn't know what a towing eye was (I'm making no comment about their gender least I appear on a watch-list), or indeed if they had one in their vehicle or where it was, and those that did found it deeply buried and had to scrabble under heavy loads of equine tack, water containers, and sundry kit, while waiting in queue to be towed. Other makes of vehicle had a standard thread. Further point: you often need a short bar, such as a heavy duty screwdriver stem to put through the eye-let of the towing eye in order to help tighten it, making sure it goes all the way home least something very unfortunate happens when the chain from the tractor is attached. Maybe that's why Skoda supplied a screw driver in their tool kits? Simply Clever. Here's something that I'm guessing might cause some contention. Positioning the space saver spare on the car. There is nothing in the Skoda owner's manual about this, so it might just be my imagination that I've read this somewhere, but it makes sense to me albeit extra effort at a time of, usually, high stress. Here goes! I've been told that the space saver spare wheel should ideally be placed only on the rear axle. So, if you have a puncture on the front set of wheels, you should first use the space saver on the rear and to remove the replaced, intact rear wheel, and move that full size intact wheel to replace the punctured tyre on the front. However, I can imagine that on a dark, busy roadside somewhere, and when you need to get out of there to somewhere safer in a hurry, you might just swop the front over with the space saver to get yourself moving. The Jack. For several years now I've been carrying a couple of plastic scaffold pole base plates to place under the jack after having to change wheels in country spots such as verges or in soft grounded pull-ins and lay-by https://www.amazon.co.uk/Scaffold-Foot-Plate-Scaffolding-Footplate/dp/B09JZMGMW6/ref=sr_1_1?crid=QEIM4GPFGUPQ&dib=eyJ2IjoiMSJ9.hqOvx87vui7l6jXDfHQ_ND6ly2ZxbsO37ZCir4uquK5fBqann62ulT33nZJUGFMdiB5JJxH30HDyZ2W0dPe6h7xC5HJ8OqGRxLi7C38FkbjrNkcxmib4E84Kyi6SQ95JPxv2FXFYB9XlygJ6IZ5iE4JNImEM58qpjzSy08JCJFBfqmOQtIt4eAye1DRBcIcFrfnr9APNI8zMgsRgyJrcZT0iPSzyTuxWekF00HCI8plQw6YRC3pVoCzgF5w9t-5fDplzP1Looh2PPSW2KL8CorpzBFUgxLdgw7kN4FbubIY.rlxVNgiN1OyhGrZuvIfzJTqBBn5YFV96hYJCr8sEZbA&dib_tag=se&keywords=scaffold%2Bpole%2Bplates%2Bbase&nsdOptOutParam=true&qid=1731684471&sprefix=scaffold%2Bpole%2Bplates%2Bba%2Caps%2C526&sr=8-1&th=1 and a folding plastic wheel choke saves you also from needing to hunt around for a rock or similar to lodge under the diagonally opposite wheel to the one being lifted. https://www.amazon.co.uk/Leisurewize-Foldable-Chocks-Caravan-Stoppers/dp/B07BRRYR64/ref=sr_1_6?crid=2KQUGKPXAJ1AI&dib=eyJ2IjoiMSJ9.1XQRyYT69OQwc1PFrUD31_NE2nf3VDdrLY_9soGuT706yidF-m2N8L3X3Jf-A8utDcPIrWEzRONCBriTZUgWIoCyqGCCw31c-anvChYLzii53VBXy4bJTvPhx0m7RpPhlWbjn98g0xqhmJW9Yn9kKTSaIzBjkOa4TVcls6geXhsrFDPwoq9hs9BzCOVSviq8WizjxLH5hBCmA1C1wqwiQh5R_Hw6MROtB7xVdgfAkJi0z_i9ak1iaSIzb-UiqdJEhONCoJ0joCtHoFLOXFFaXeLcOaNArzoRsWLTqwPGFZQ.UC9u0ttyTVC_E2d8MHPqSYA6lmqgi0jJQIXYYvP78Eo&dib_tag=se&keywords=wheel+chocks+folding&nsdOptOutParam=true&qid=1731684597&sprefix=wheel+chocks+floding%2Caps%2C154&sr=8-6 Really pleased with the Karoq so far - its steering is so much lighter than the Outback, and it's a pleasure to drive with the diesel engine.
 1 point
 -
Same here! But I have read threads on here that imply door wiring harnesses differ between models depending on specification. So you may need to replace wiring harnesses in both doors in addition to mirrors and switch.1 point
-
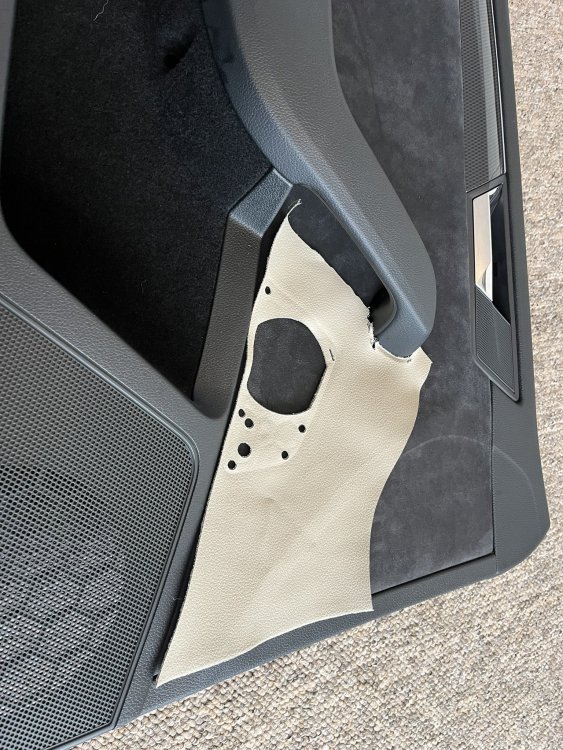
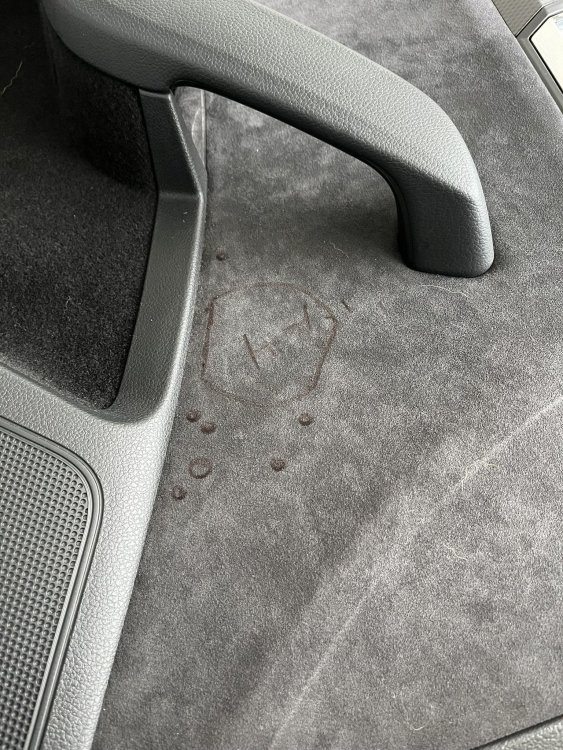
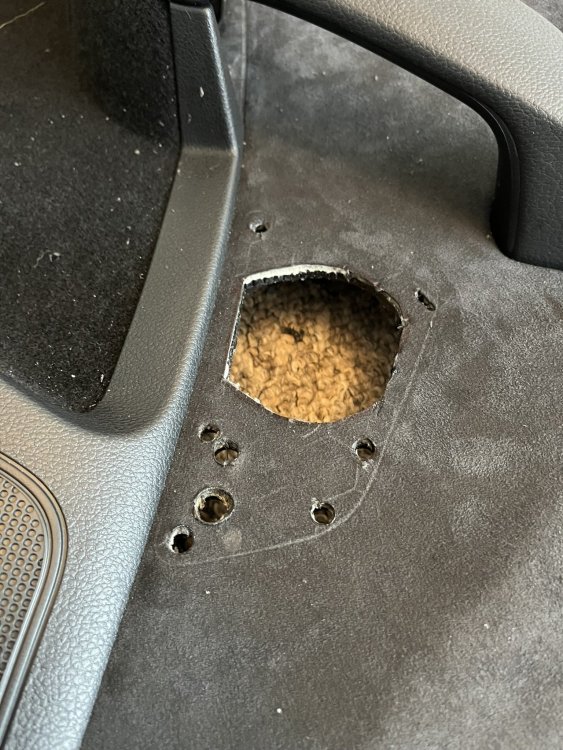
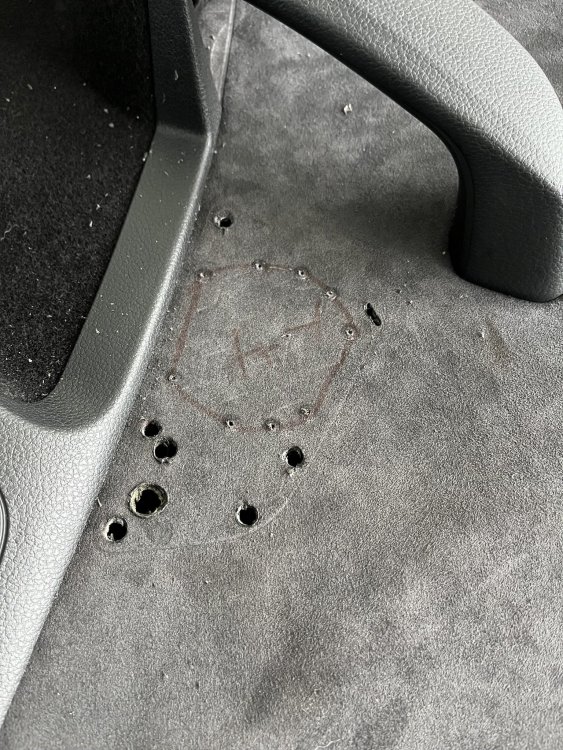
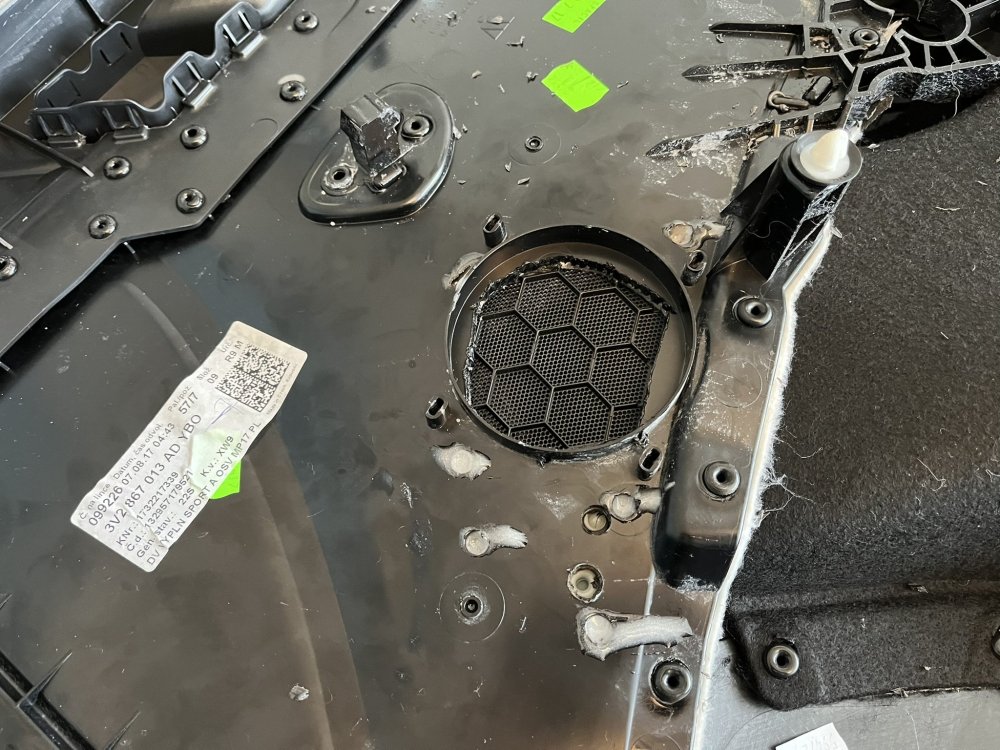
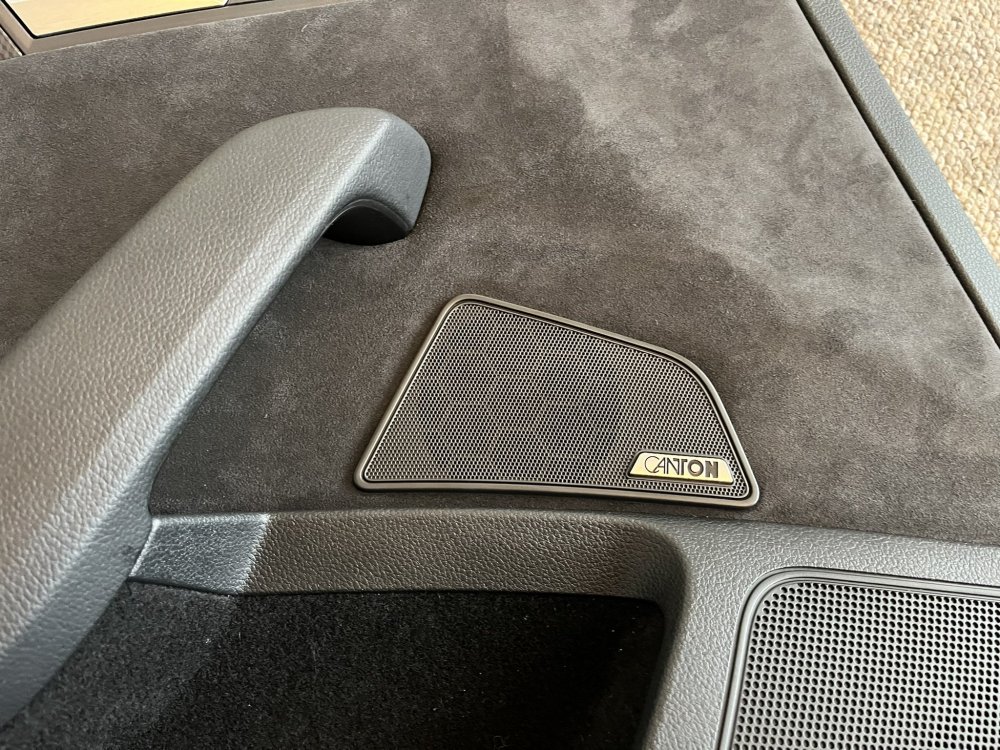
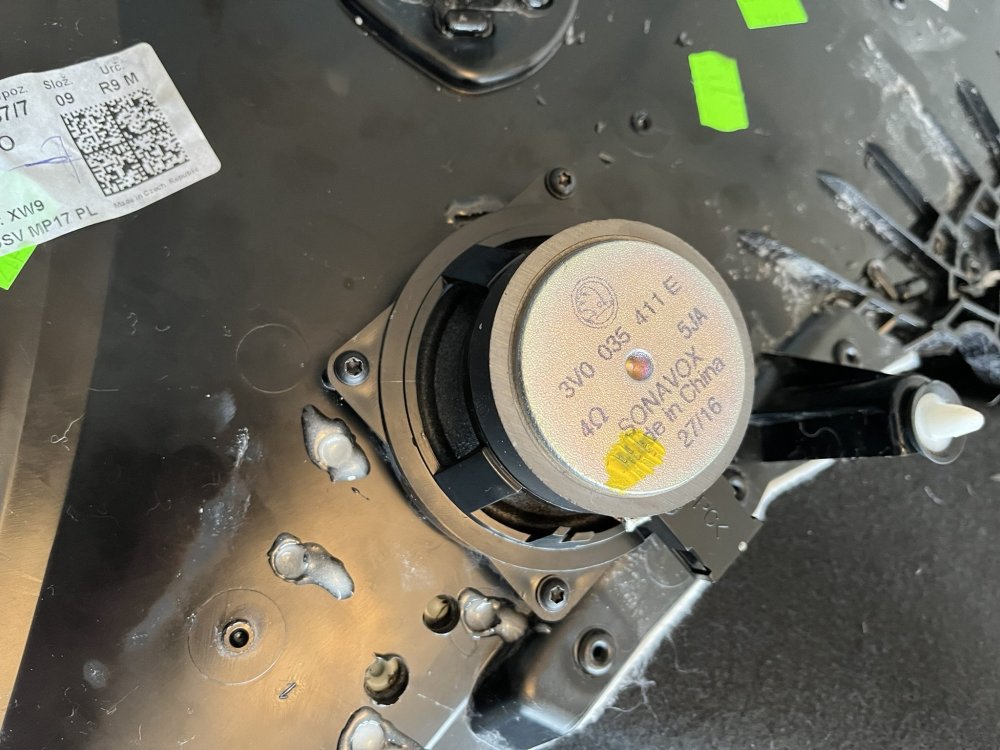
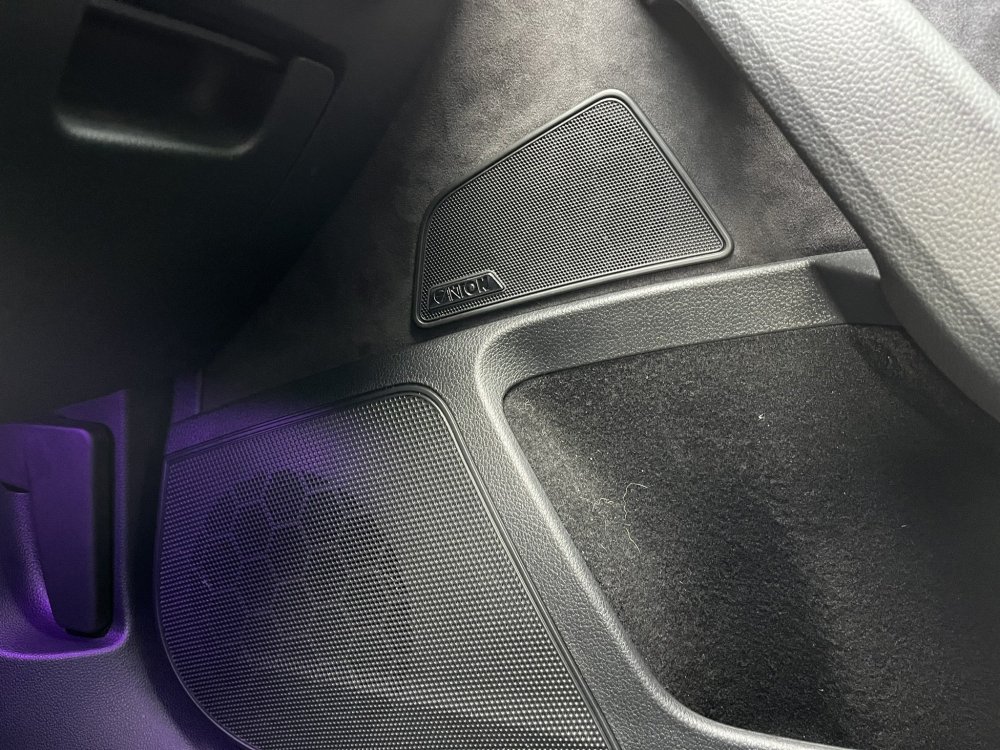
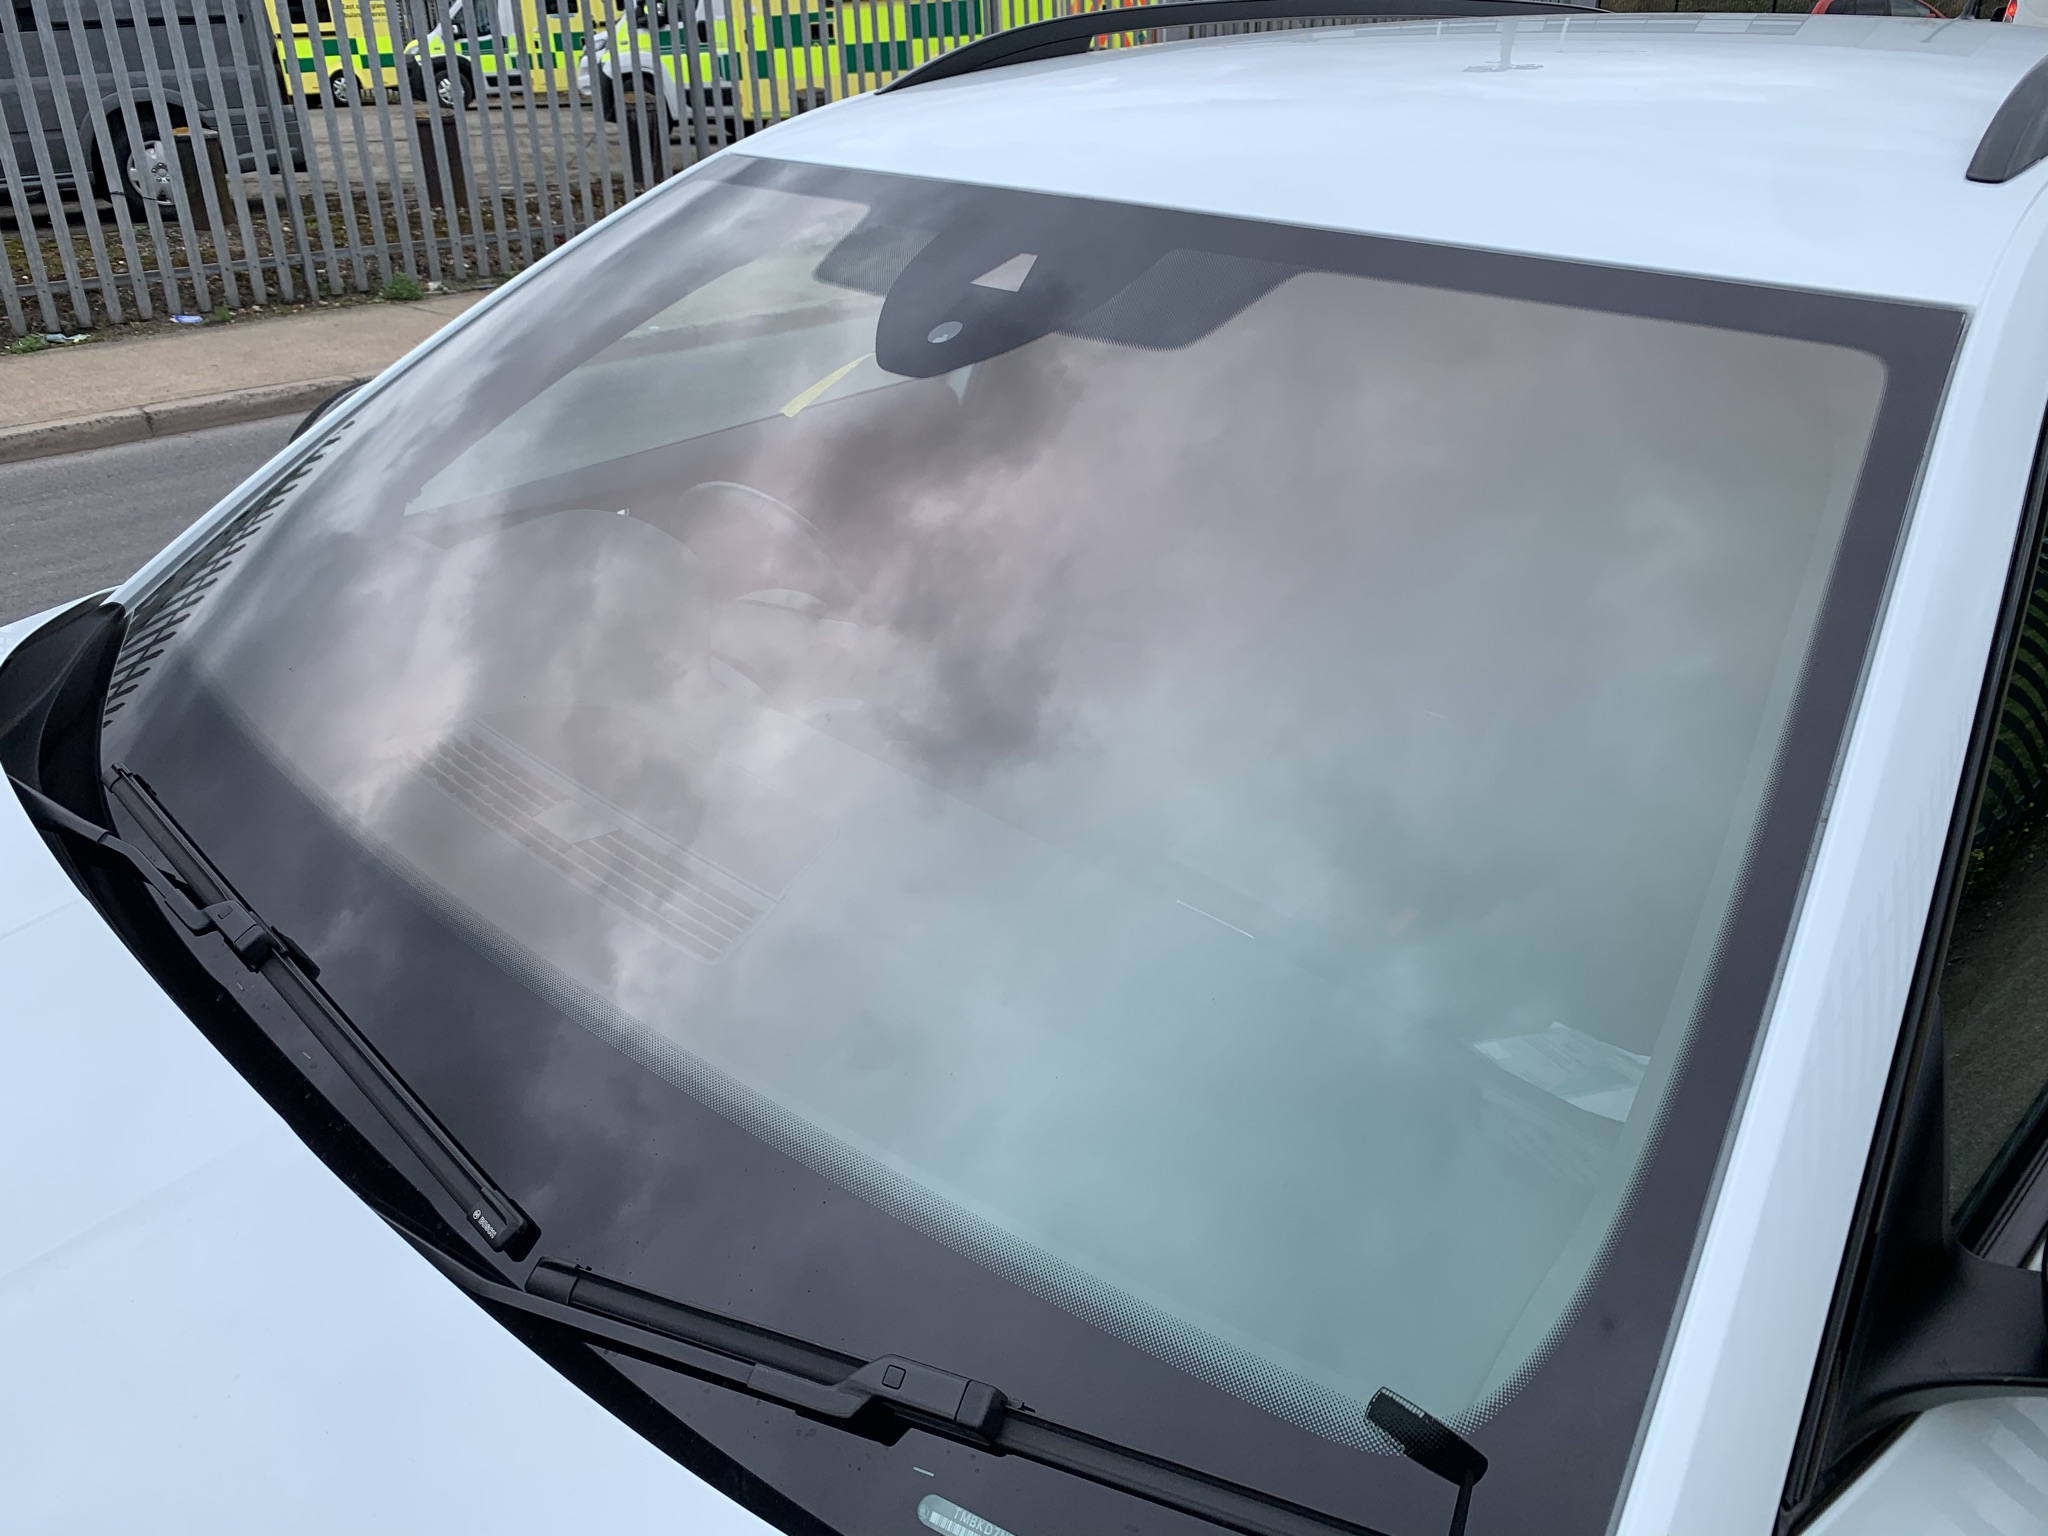
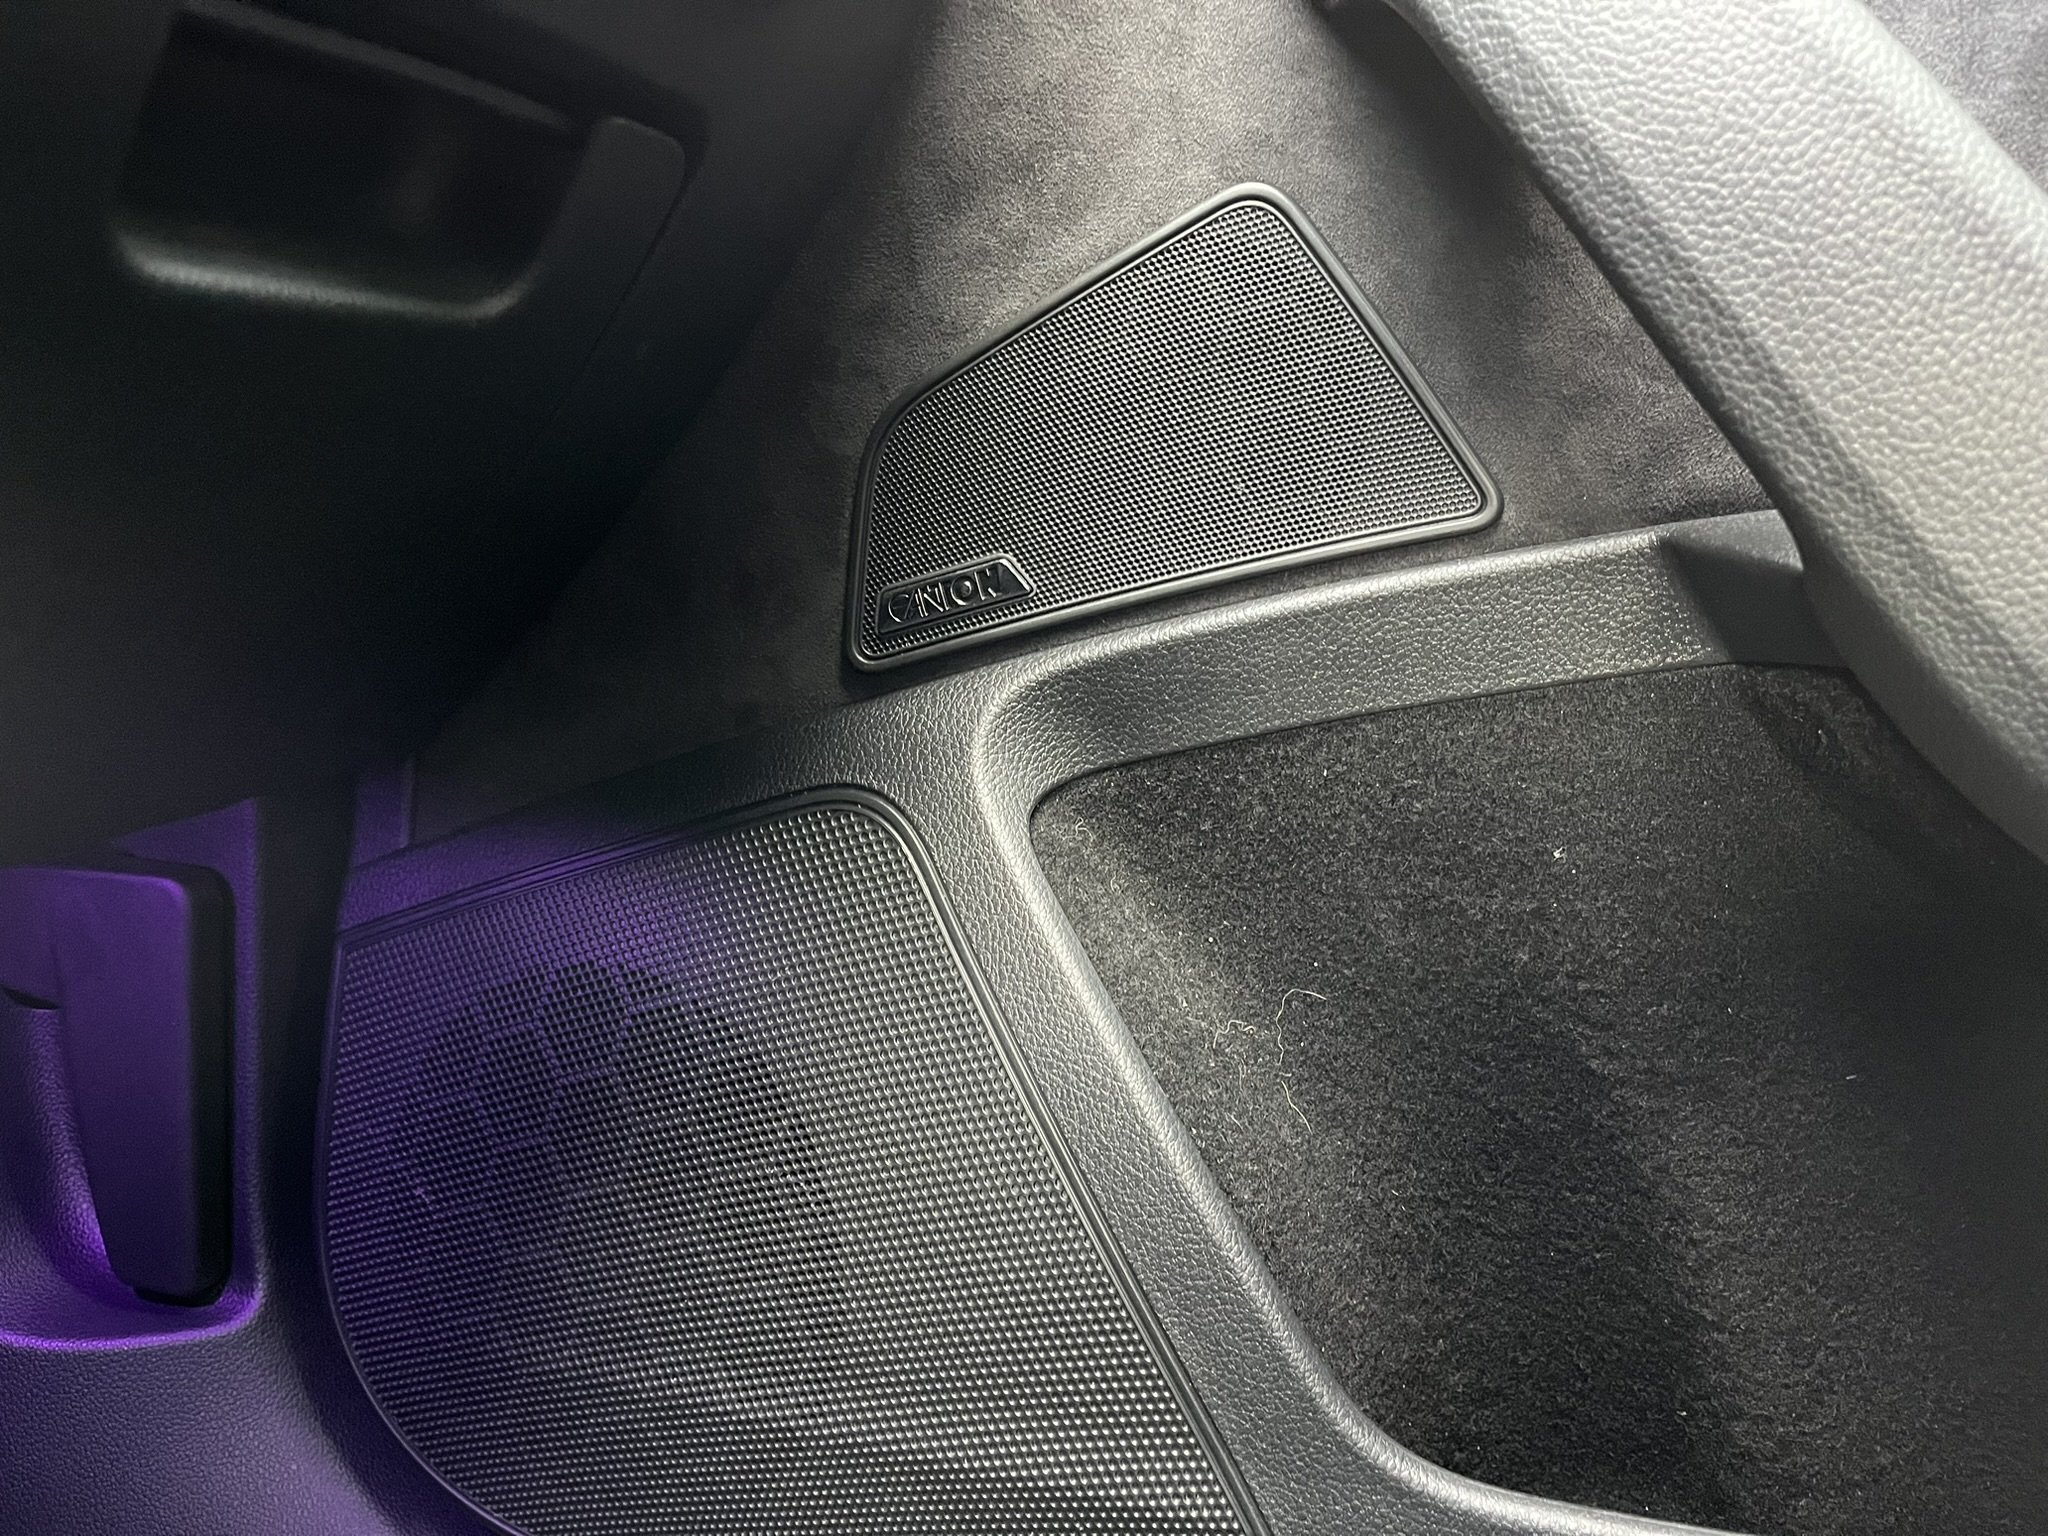
1 point1 pointUPDATE: The service center mounted everything back, we are gonna bring it to a TRUSTED ( ypu, trusted ) generic mechanic ( will replace the transmission for under 2200€-ish ) Problems solved i think,1 point1 pointthis isn't just the ability to move the car back and forth when in a tight spot, but actually park itself (also remembers a few positions you use regularly)1 point1 pointSo you bought a car that doesn't suit your Mrs perhaps you should have part exch the Mrs instead. 🤡1 pointwelp, time to open up em' mirrors and check what i need to do, tysm1 point6: Lag. Bloody irritating some days I can’t even use the wipers for what seems like forever.1 point1 pointI don’t start paying until I take delivery and the lease also starts then, as normal. Most of the adaptations are paid for by Motability but I need an under ring for the accelerator, which is the bit I’m waiting for. I’ll be paying for this as, unfortunately, it’s not on the free list. Sadly, the cost has doubled from my current car five years ago.1 point1 pointLooking for used ones sold by a car breaker / salvage would be the thing is it not rather than buying new. As to electricary & switches / wires / fuses, it is all magic as far as i am concerned.1 point1 pointAgree with classic - I tend to flick into S for a variety of situations including coming up to a roundabout where I may be slowing down but may be able to keep going at the last minute, or any reactive spirited driving such as overtaking.1 pointReally not a Skoda issue, it would not matter if it was a Rolls Royce or a Mercedes really. Reflections or magnification from the sun can start fires. Quite common but the story in the UK was big 11 years ago.1 pointhello; here is problem update, as You said earlier, the car was parked in front of glass building, for 2-3 hours, and this is damage from sun reflecting even it was November. This is sad, the quality of skoda has obviously dropped terribly, it is almost imposible.1 point1 point1 point1 pointI guess an adapter adds and additional part that could fail or be knocked and interrupt the update - potentially bricking your unit. I used a portable ssd with a usb-a to usb-c adapter and had no issues. I just made sure it was stable and didn't touch it during update! I didn't have to open my hood during update. Updating from 1941 to 1985 was much faster than my update from 1804 to 1941. ~5-10mins compared to ~30mins. Was worried it didn't update properly, but after a few days of driving everything looks good 🙂1 pointIf this guy sorts his microphone out I may be able to save myself £50 (the difference) and not have to go all the way to Derby, Lol. https://www.youtube.com/watch?v=VbltBaLKSXM1 point1 pointCitigo/Up/Mii was a slightly shrunken Fabia platform I believe and there are various interchangeable parts. Most people who go to Fabias just need a bit more space; they are very similar cars... I reckon at current used prices it's good value at £2400. Check for rust around the fuel filler on the rear quarter, but it's not a show-stopper.1 point1 pointI have found with mine (albeit a 1.5 with dq200 7 speed) that any situation where you need a decent response, put it in S mode. I tend to put mine in S when approaching particularly busy roundabouts, the throttle response is a lot better and it will drop 1 or 2 gears quicker than in D.1 pointThose supporting pegs appear to be part of the moulding of the parcel shelf support and therefore not individually replaceable. You will need to replace each side. Try looking for 5E6867762 and 5e6867761, maybe. If you dismantle the car first, the part numbers are often visible on the hidden side. İyi şanslar!1 point1 pointI meant testing the brake lights a number of times while stationary - should give a reasonable indication the switch is operating correctly, or not.1 point1 pointThink this is for adverts only - perhaps move to general chat forum. I think cheap tyres are probably a bit of a false economy however.1 point1 pointI was born up the road - just into Ecclesall, moved to Beauchief after getting married and now in Bradway. It's a small world!1 point1 pointAgreed! I went through batteries at an alarming rate initially, then started using Panasonic CR2032PG/18's which last for ages.1 pointSo we are all due an update I believe, So first of all ive been flat out with my new job to the point ive hardly had any time to do any car work! But ill update the small amount that has been done! Calibrate areaview - this still is yet to be done, got to find time on a sunday before it gets dark to find an empty well lit car park to get this sorted hopefully! Check the coolant leak repair - So, since the coolant pipe clips have been replaced with the constant tension type, opposed to the single ear type, i have done around 500 miles without a coolant top up! This is now called a success! I mentioned an alarm fault before replacing the battery - since replacing the battery the alarm is yet to go off, so thats a very good sign! Ambient lighting fault - Earlier I complained of an ambient light fault, this is still yet to be investigated although there are no visible symptoms. So basically, we are all on track, but I will have to scan for fault codes next weekend to see if the alarm or ambient light faults have returned! Fingers crossed no. Next up, we finally got round to fitting the canton grills in the front doors, So I first took a cut out of the fabric from the old doors and laid it on top of the sportline doorcards. This was then all marked out with a marker pen. After this we drilled out the holes, these were all odd sizes, from 6mm up to 11mm. Then the centre hole was cut out, this was done by drilling lots of 1mm holes and then using a blade to join them all together. The fabric then overhung the holes a fair bit, so the solution to this was to heat up a step drill bit till it was red hot, put it in some grips and poke it into each hole to slightly melt the fabric and allow it to retract from the hole. Next the grill itself was fitted, and as much as I wanted the backside to look pretty and as OE as possible, it was near impossible to apply pressure to the grill, keep it aligned, keep it pressed in, and keep it face down for the glue to flow into the holes, so the glue spreading on the back was my lowest concern. The 2 part epoxy was allowed to dry for 48 hours to be sure it wouldnt crack or come loose. The speaker itself was then refitted - 3V0035411E (its the same as the speaker in the centre of the dashboard) A tip to note, ETKA shows the required screws for this as N10549603 which are 4mm wide, 16mm long with a Torx 20 head. This is close, but not close enough! The actual screws are 4mm wide, 8mm long with a Torx 20 head and couldnt find a part number for these so ended up buying some from my local hardware shop. So speakers, grill and doorcard refitted, now the final product:
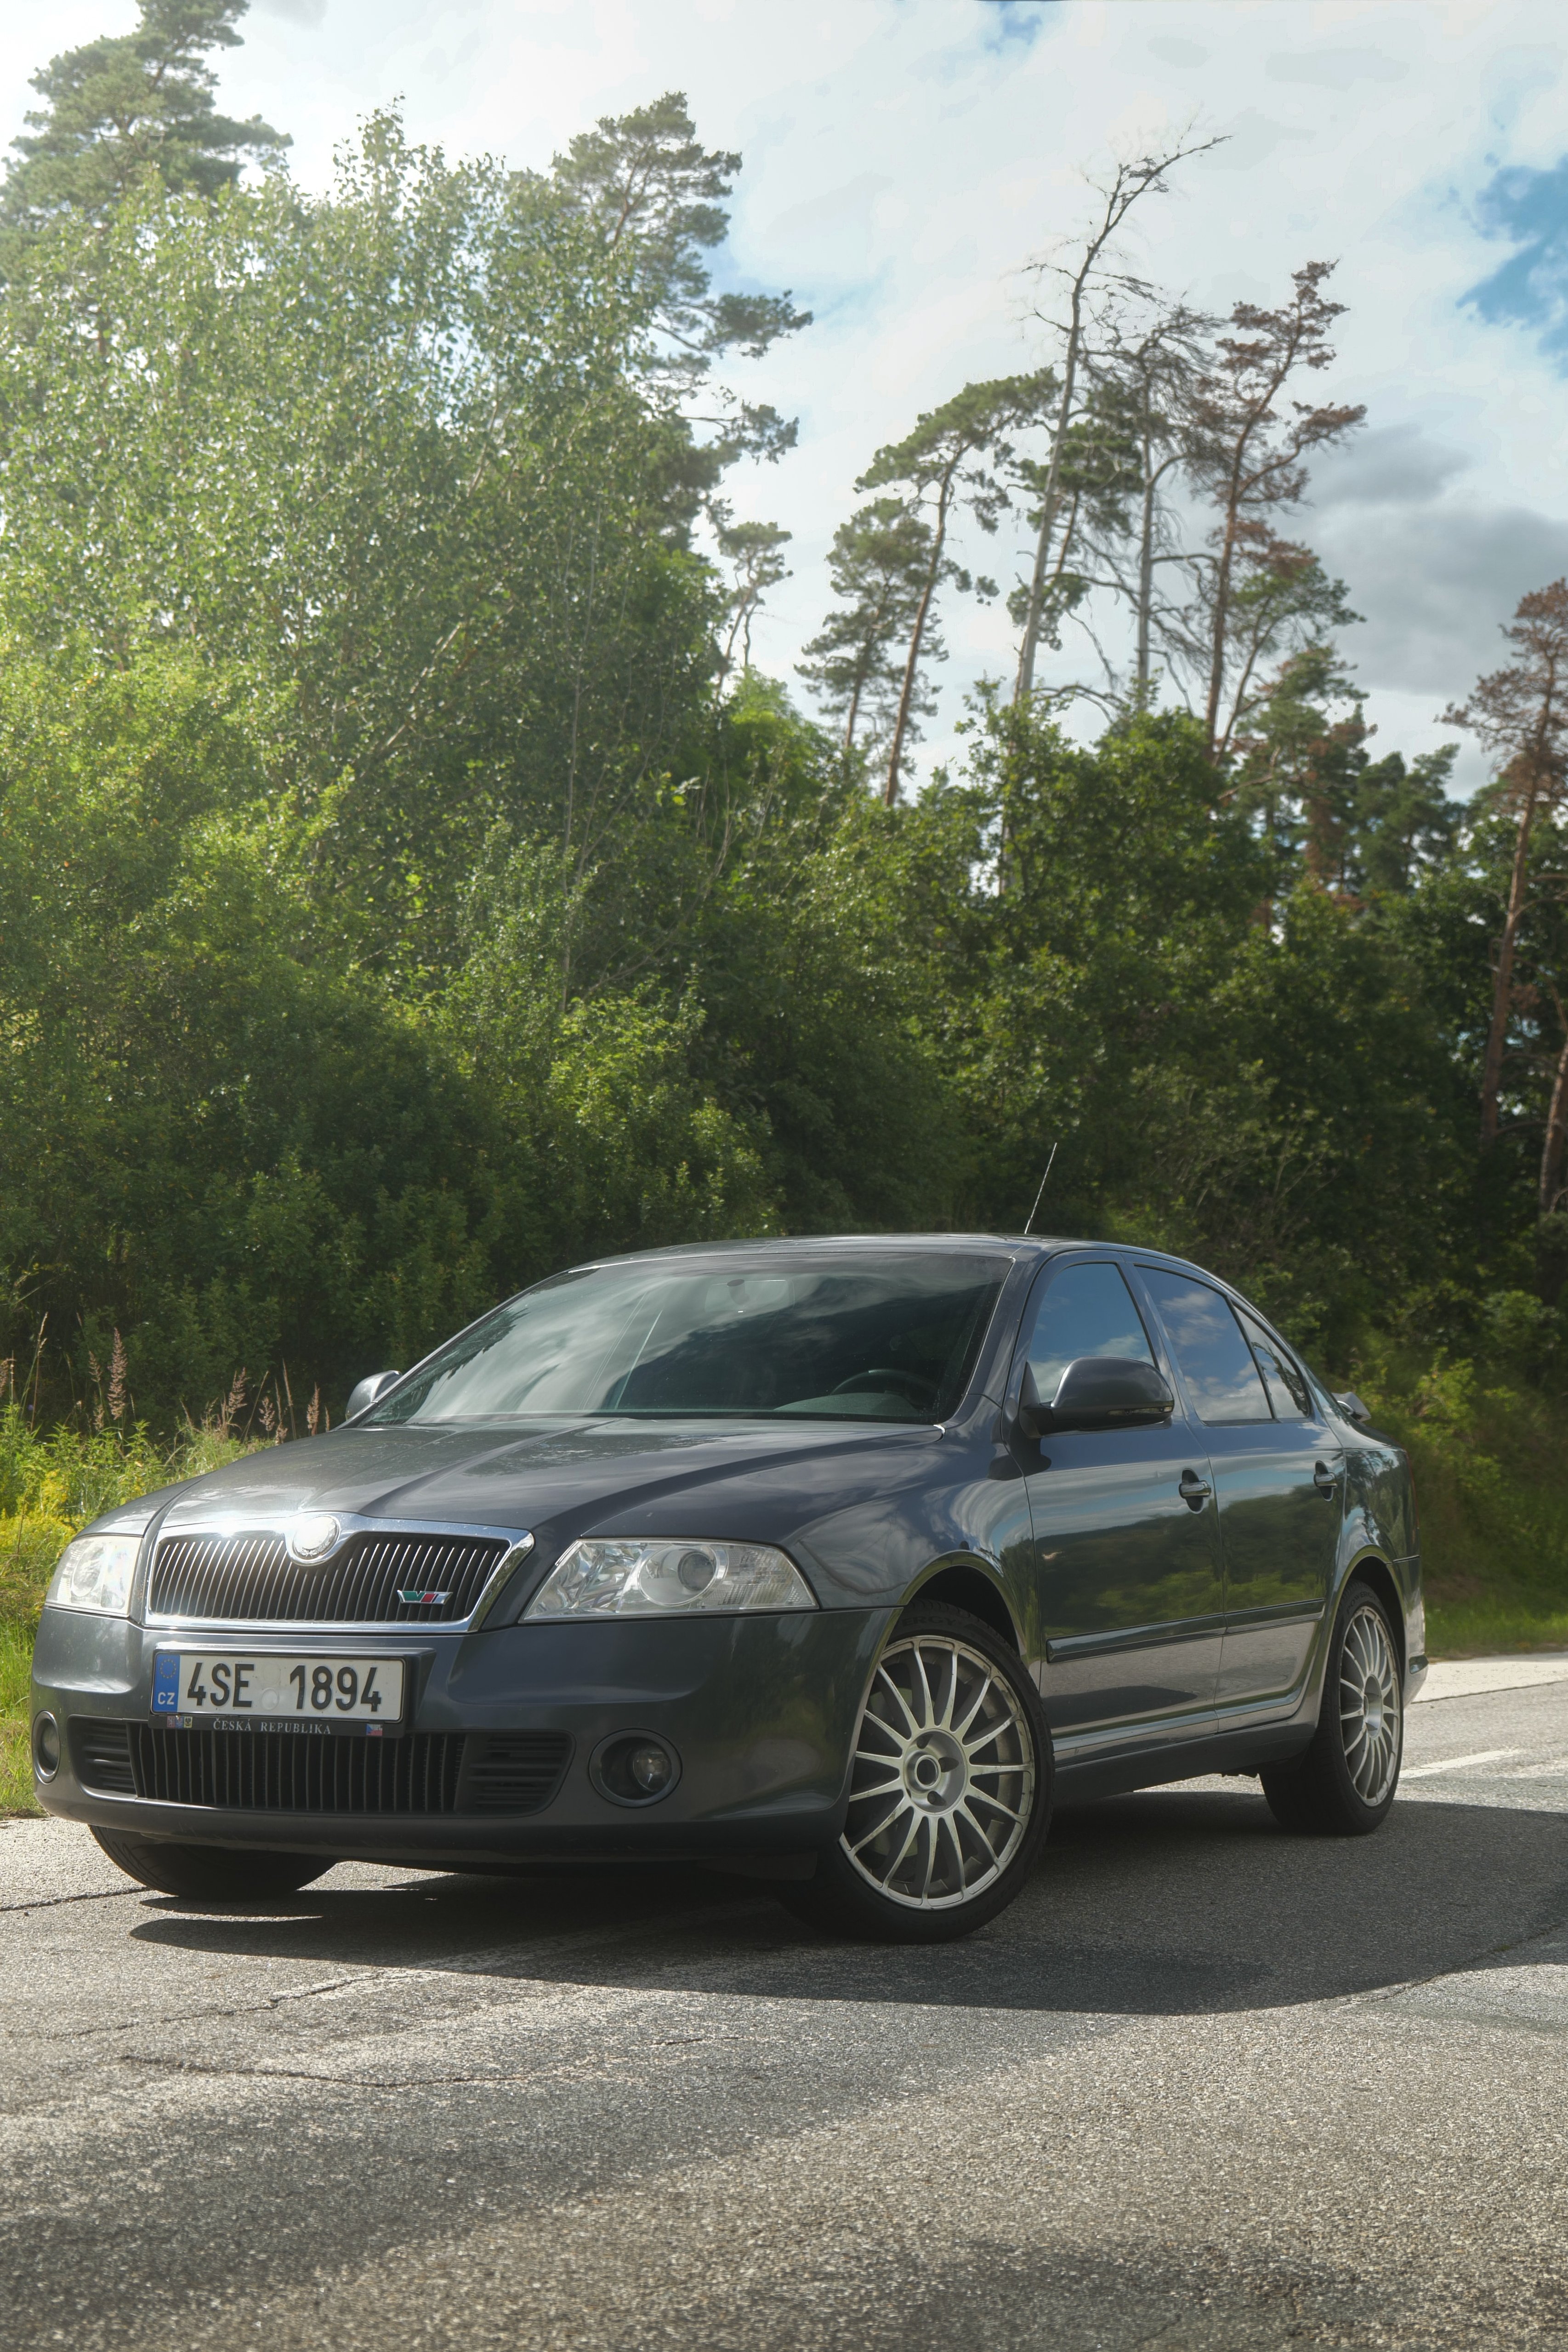
 1 point1 pointVersion 1985 Update files available to download with installation guide available here:1 point1 pointIt was Driving Licence renewal time for me. I will be interested in what classes still have on the new licence, my entitlement to Mopeds, full licence for Trikes, Bike & Sidecar but not Solo Bikes as i have a disabled class. Various other vehicles, provisional or full, but basically Automatics. I could not apply on-line for Renewal. This is £14. Apply by Post is £17. I thought i had to do at the post office & supply the new photo. £21.50 My local Post Office only has the extra staff on a Monday. Never had that for a past month of Mondays. So today the girl can not do it. As on her own. But she had no customers so said lets see. I was sending my Licence in so did not need a picture & she is not DVLA trained but ticked the correct boxes i have missed, the ones probably on eyesight i could only see with glasses and a magnifying glass so had missed. She put in the envelope and addressed it i had to get a Postal Order to pay for the licence. I asked for recorded mail as a couple of documents in with the application, so total £27.45 But better than fingers crossed and a stamp. As to total muppetary. I had got a Photo taken at ASDA £6. Thought i would accept the offer of 2 sets, thinking that meant a discount. No i am am Idiot, i press approve payment, & i got 8 pictures for £12. That was from not having on reading glasses while in the photo booth.1 point278 - Oxynek - 2.0 TDI CR - Hatch - Trebic, Czech Republic
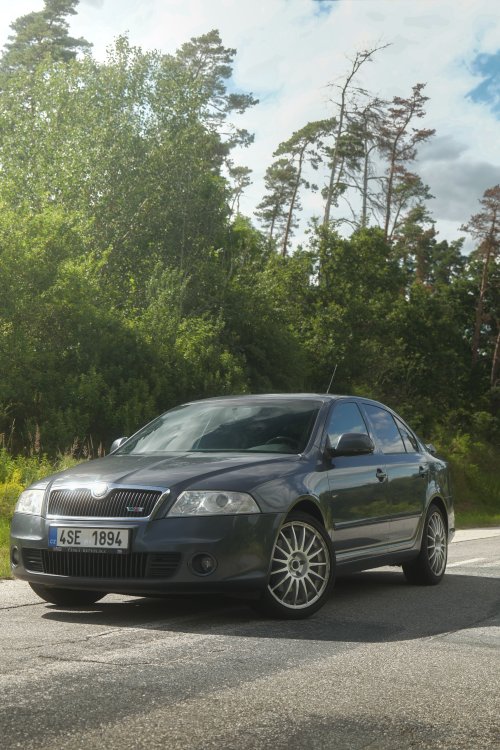 1 point


Important Information
Welcome to BRISKODA. Please note the following important links Terms of Use. We have a comprehensive Privacy Policy. We have placed cookies on your device to help make this website better. You can adjust your cookie settings, otherwise we'll assume you're okay to continue.