


Leaderboard
-
shyVRS245
Locked21Points0Posts -
Greenliner1
Members17Points2,090Posts -
MikeTheThinker
FREEDOM7Points8,484Posts -
skomaz
FREEDOM7Points11,089Posts


Popular Content
Showing content with the highest reputation on 06/10/20 in all areas
-
4 points
-
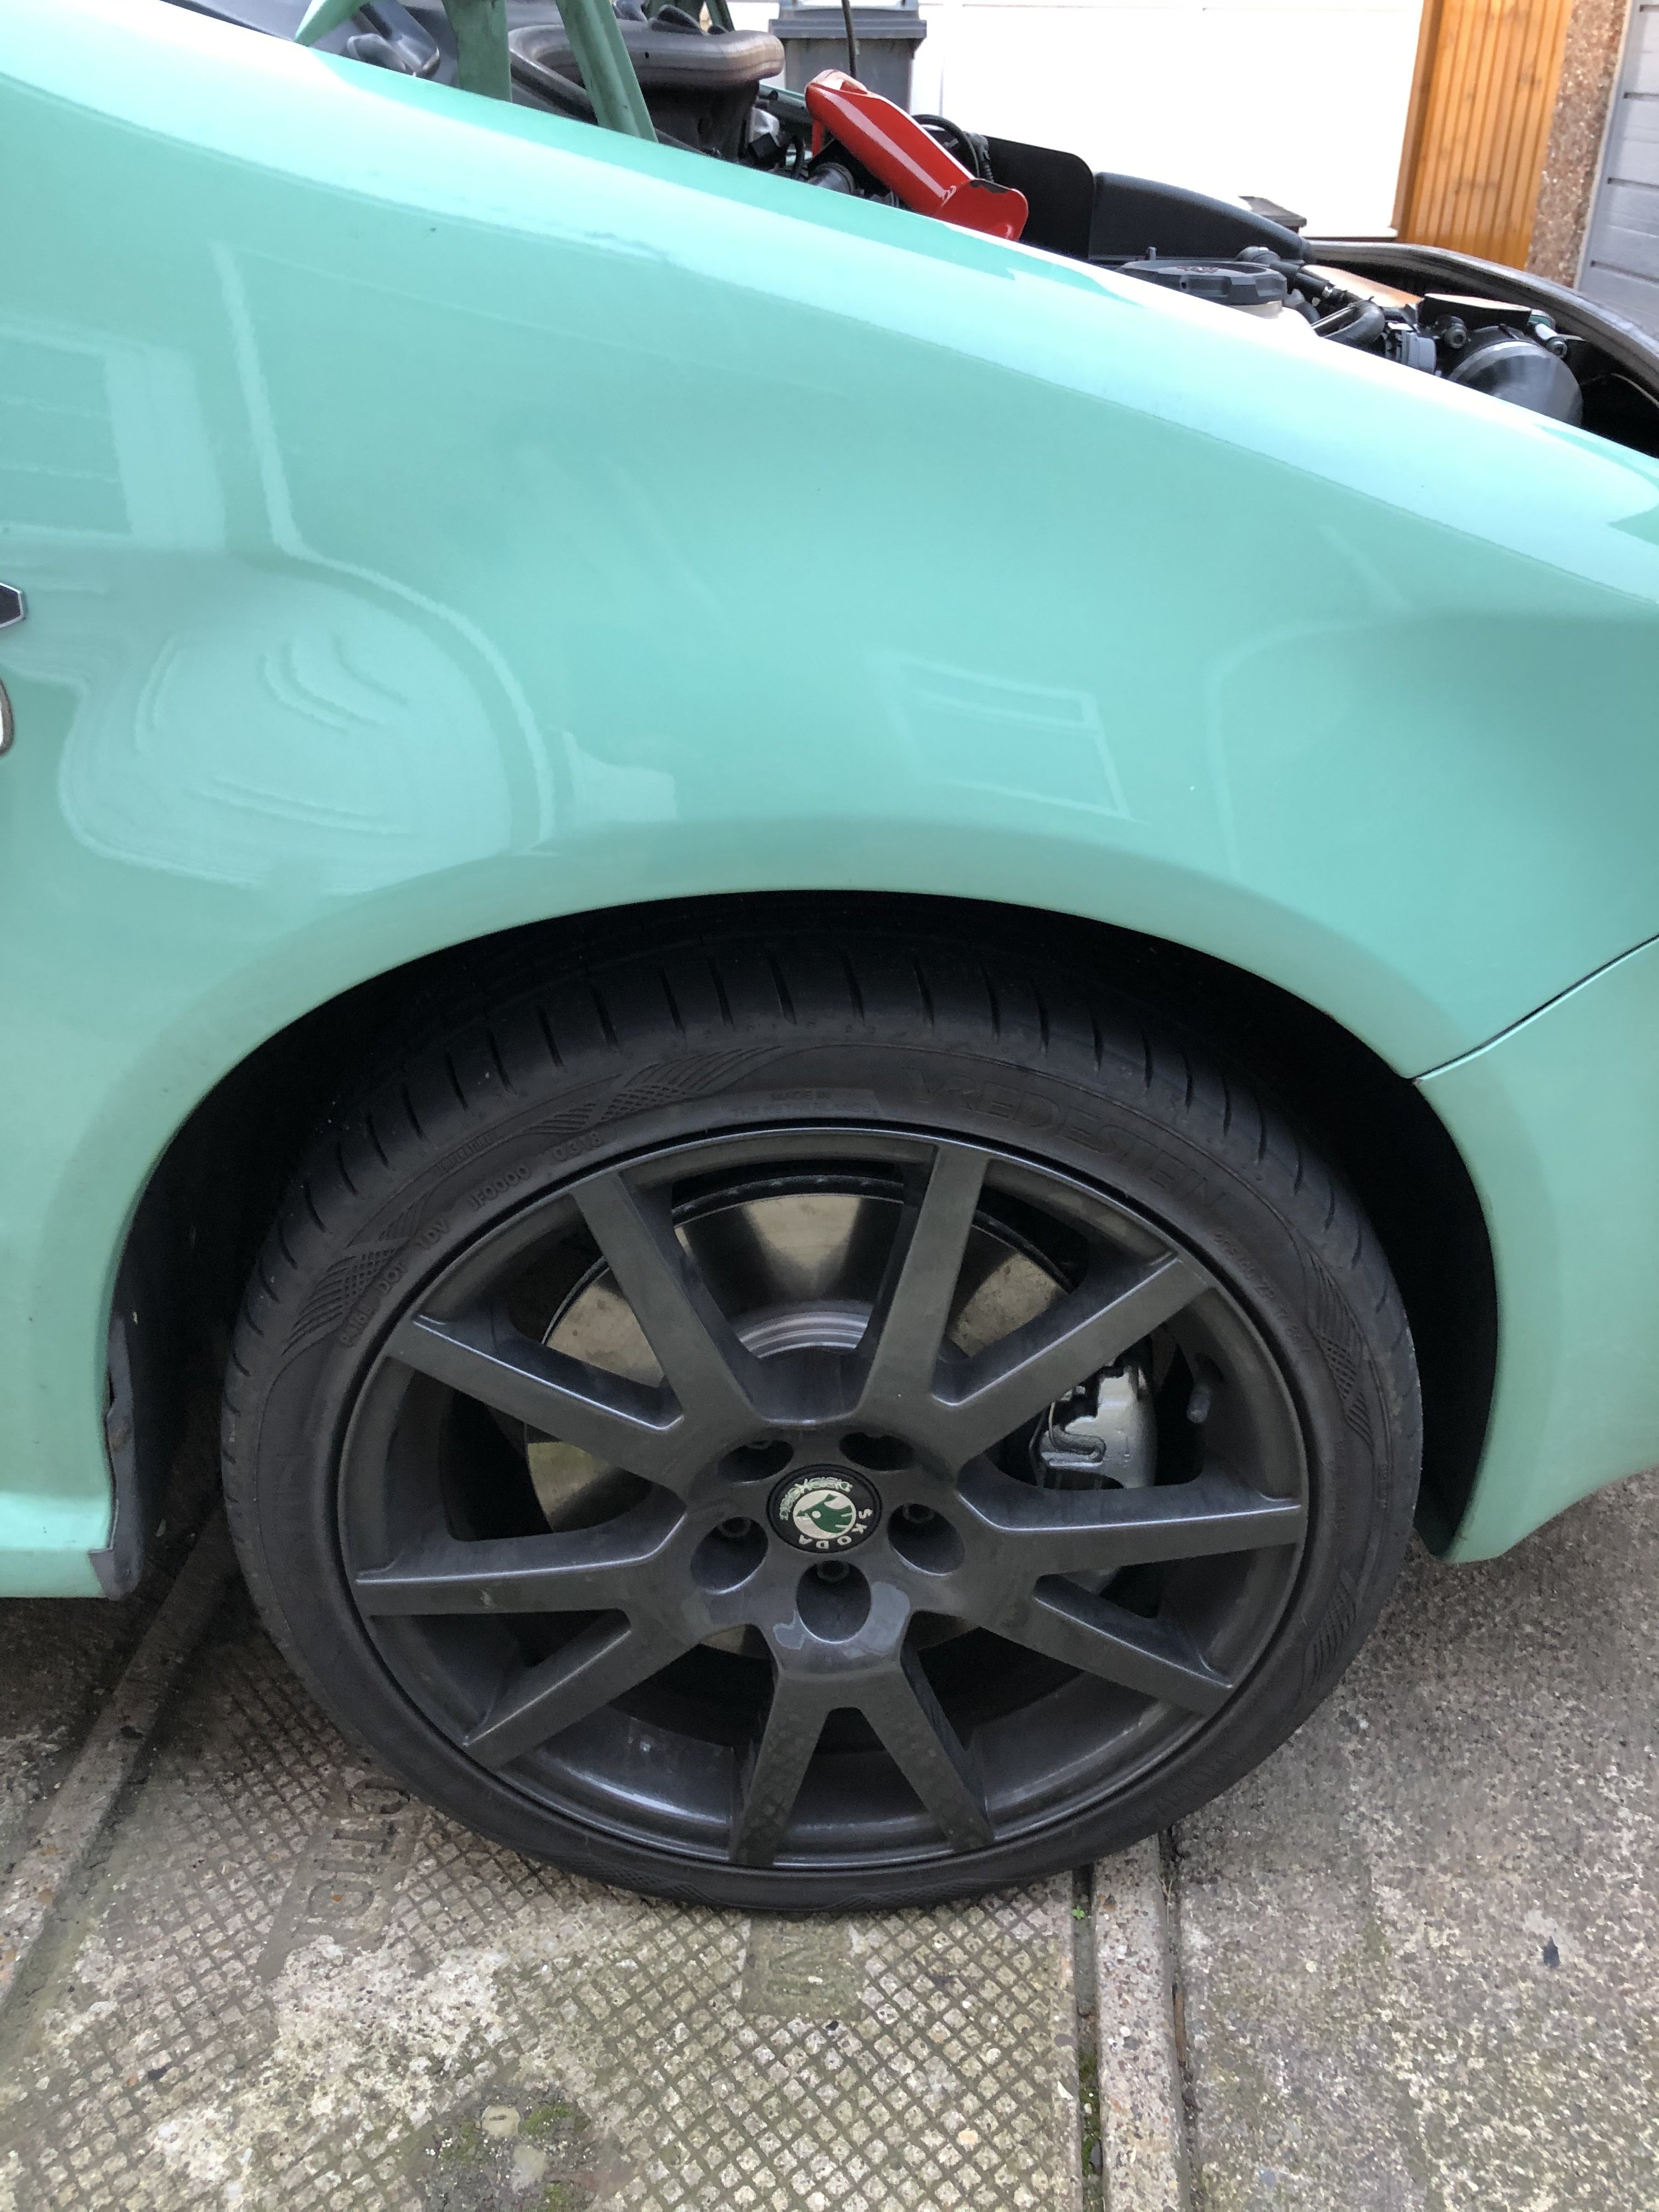
Hi all The Superb Mk3 AWD is fitted with a 5th generation Haldex. Regarding VAG Group, and Skoda in particular, it also equips: Octavia 3, Superb 2, Karoq, Kodiaq. It may also apply to Scala and Kamiq, unless they're equipped with 6th generation. I actually don't know for these latter. Since I have limited trust in garages in my neighborhood and because I like 'DIYing' on my car, I've decided to change the oil of my Haldex system on my own. If one follows Skoda recommendations, workshop manuals (see cardiagn.com) only mention a simple oil replacement every 3 years and that's it! But when you start diving into documentations or in youtube videos about 5th gen Haldex, you can notice that the oil pump has an intern strainer, which trends to get really dirty, whereas it's never cleaned ! Hence, here is this humble tutorial ! I apologize, if there are any vocabulary issues... I'm French. Firstly, here are all elements, that we're going to look at: #13 : Bleeder screw (M10x30) - P/N N 910 827 01 (tightening torque 38 Nm for Superb Mk3, but on other VAG model it may be 32Nm - Have a look to the workshop manual corresponding to your car. See cardiagn.com) #14 : Filler screw (M10x1x10) - P/N N 902 818 02 (tightening torque 15 Nm) #3 : Retaining screw (M6X35) for the Haldex Control Unit - P/N N 105 540 05 (tightening torque 9,5 Nm) #11 : Retaining screw (M6X35) for the Haldex hydraulic pump - P/N N 105 540 05 (tightening torque 9,5 Nm) #9 : O-rings for the pump - P/N 0CQ 598 305 (⚠️Note : This P/N is a kit, which includes both O-rings, but also both retaining screw #11! Don't by these screws twice!) Gear Oil : According to ifinterface.com: P/N G 065 175 A2 or According to what dealer sold me: P/N G 60 175 A2 - 850 ml (~29.9 fl oz) By the way, don't forget to check that the oil can actually contains 850ml through the gauge on the side of the can. Indeed, just for the short story, the oil can I had bought only contained 750ml, though brand new and still crimped . I had to go back to the dealer to exchange the oil can. The requested volume for the maintenance operation is usually around 700-720 ml (24.6-25.3 fl oz), thus it leaves little room for error (and even less if the can is not filled correctly). The total bill was ~75 € for all parts (without screws #3, which you don't need to change). - Difficulty : 2 - Time needed : 1h30 approx. - Number of person needed : 1 - Necessary tools : ¤ Screws #3 and #11 : Torx T30 or 10mm Hex socket, if you don't have Torx ¤ Screw #13 : 8mm Hex ¤ Screw #14 : 5 mm Hex ¤ For Hydraulic pump strainer screws : Torx T10 ¤ Ratchet or classic wrenches for disassembly ¤ Torque wrench(es) to apply specified torques: (9,5 / 15 / 38 Nm) ¤ Short and intermediate extensions for ratchet or torque wrenches to enable easier access to screws ¤ A small flat screwdriver ¤ Oil drip tray ¤ Rags ¤ 1 wooden toothpick ¤ Lifting means ¤ Syringe for oil filling Dealing with the syringe, I've bought this one for 20-25€ on Amazon. It makes the job perfectly! Step #0 : Preparation You need to lift the car high enough to get under the car and to get enough space to move your arms comfortably. In my case, 370mm (~14.5") of ground clearance were enough. Note: Though you've lifted the car, it needs to remain horizontal to make a proper filling with right oil level (see step 5). If this case, I had to compensate the natural slope of the ground. Step #1 : Oil draining Start with the filler screw (#14 / blue square) removal for more safety. Indeed, if it's stuck, you won't be "snooked", with a completely empty Haldex oil tank and no way to refill it. Once you've removed the filler screw. Don't get rid of it immediately. You'll need it again temporarily for Step #4! Now, you can remove the bleeder screw (#13 / red circle). There's no difficulty to remove these 2 screws. There are 2 good news for this step: - The drain screw is long enough, so that you won't get surprised, when the thread gets totally disengaged from the housing. - Even if the drain screw has an horizontal axis, there's only a small quantity of oil, and since it is very fluid, it flows well vertically from the edge of the hole. Little chance of getting trapped with the oil, which flows suddenly and farther than the drip tray. Phew! However, it takes several minutes to really let all the oil drain: Step #2 : Hydraulic pump removal Whereas oil is still dripping, start removing 2 retaining screws (#3) for the Haldex Control Unit. They are quite easy to access with a small 1/4'" ratchet. After that, you can rotate the Haldex Control Unit, to bring the connectors on the top upside down. This simple operation will help you saving a huuuuuuge amount of time ! But this tip is explained / told nowhere!!! Otherwise, you will have to disconnect the pump connector 'blind'... And if you do this operation for the first time, You hardly understand how to proceed. Decency leads me to shut up the time that I spent trying to remove this µ%£$@&# connector before I changed my mind on the operating process. Pump connector before Control Unit removal : Once the 2 retaining screws of the Control Unit have been removed, you can easily access to the connector: Now simply insert a small screwdriver in the notch (red circle) and push in the arrow direction. Very simple... Then, you need to unclip the black plastic wire protection, which keeps the pump wiring away from the propeller shaft. It's clipped in 2 locations on each side of the shaft, You just need to pinch the 2 lugs at their end to make them go back through the hole in the housing. Left side (Control Unit side) : The upper red circle in the mirror shows what you hardly see in the lower dotted circle... It's clearly the circled part, that has to be pinched and then pushed/pulled in the arrow direction. Right side (pump side), just proceed the same way : The pump wire is now fully free. You can now remove the 2 retaining screws (#11) of the hydraulic pump (#10). Very easy too. Warning from this point, it will be 'Apocalypse pump' ! Please keep children and sensitive souls away from following pictures! Pull in the pump axis direction, while rotating it around its axis in one direction and then the other to ease the removal. Be very careful, when the pump is about to get out completely, not to strike the contact surface of the housing, nor to strike the pump strainer. FYI, the strainer is not sold alone. It's sold with the pump, which approximately costs 180-200 € (w/o VAT) ! And there, under your dumbfounded eyes , here is the sinister spectacle that awaits you: A strainer almost entirely clogged with sh**t! And the pump housing is not even better... FYI, this Haldex is only 2.5 years old and has only 45000 km (~28000 mi) on the clock. And considering the way I use my car, I don't think the Haldex faces a heavy duty use. Therefore, as I already mentioned somewhere on this forum, one can only notice that the oil replacement process in the maintenance manual for the Haldex 5th generation is clearly incomplete ! By the way, look at this video below from ~28 mn, you'll see the impact of the strainer cleaning on the pump demand signal ... It's clearly a proof that w/o a strainer cleaning, the pump unnecessarily faces severe conditions and that sooner or latter there's a risk of pump failure... Step #3 : Pump cleaning and reassembly Since the pump is now removed, you need to remove the strainer. Use a Torx T10 for both screws: Then wipe the pump dry with a rag, being careful not to get the dirt into the ports. Fort the strainer, a cleaning with some white spirit and a soft paintbrush. But be careful, not to brush to hard to avoid tearing the strainer mesh, which is very thin!!! Eventually, a simple soaking in a small glass of white wine ... sorry , I mean... White Spirit should help removing most of the dirt and finishing finely with the paintbrush. Let the strainer dry, while you remove both O-rings around the pump, using a wooden toothpick as a lever. It will avoid hurting the grooves. You can now, clean the area between both grooves with white spirit. Once everything is clean, you can mount the strainer back onto the pump. Be careful ⚠️ ! I didn't find any information about their tightening torque. Thus be sure to tighten enough to firmly place the strainer on the pump body (to make a good seal against dirt), but not too hard to avoid risks of cracking the plastic. Shall I remind you the price of the pump, just in case ?!? Now, pour some drops of fresh oil in a small container. By the way, FYI : Haldex used Oil 2.5 years old & 28000 mi on the clock / Haldex fresh oil Put few oil drops on both O-rings to lubricate them and install them onto the pump. Keep using the wooden toothpick if needed. The pump is now ready to be mounted back onto the car : Now, you can clean the housing with rags before putting the pump back in place: Don't forget the bearing surface, where the threads of the retaining screws are located. Here you can see some dirt left, that I removed right after taking the picture... You can now put the pump back into the housing. Be careful, not to pinch both O-rings . Once there's only 5-6mm (1/5 -1/4") between bearing surfaces of the pump and the housing, it gets a bit harder to push in by hand. This is probably caused by O-rings, which may act as a slight "bead" to efficiently seal. You now realize how clever it is, to lubricate both O-rings to prevent them from rolling inside out and to make this operation even more difficult. When the pump stops into the housing, you can put 2 retaining screws back in place (#3 - tightening torque = 9,5 mm) Put the black palstic pump wire protection in the correction position and clip it into both holes. Be careful, you still work 'blind' (unless you have a small mirror) . Reconnect the pump connector on the Haldex Control Unit and rotate the Haldex in its normal position. Watch out to rotate the Control Unit in the correct direction not to twist unnecessarily the pump wire. Put both retaining screws to fix the control unit (#3 - tightening torque = 9,5 Nm). For the lower screw, the propeller shaft flector is slightly in the way and leads you to put the bit with a small angle. But you can still manage to have enough grip with the bit to tighten. You can now install the new bleeder screw (#13 - tightening torque = 38 Nm). Step #4 : Oil filling According to the workshop manual, the filling shall be performed with an oil temperature between 20°C and 40°C (68°F / 104°F). If the ambient temperature is to low, put the oil can in a bucket filled with hot water for a while to bring the oil at the right temperature. You can now inject fresh oil in the filling hole (see blue square, on the 5th picture) with the syringe. You have to fill with oil, until it overflows. This should be approximately 650ml (~22 fl oz). Put the OLD filler screw back in place temporarily and tight it slightly. Yes, you've been told to keep it upon removal at step #1! Do you remember? ! Etape 5 : Oil level adjustment and ending Start the engine and let it run for ~1mn, to let the hydraulic pump fill with oil correctly. Shut the engine down, then remove the old filler screw again (#14 / still the blue square on the 5th picture ). Top up with oil until it overflows again, and you can put the new filler screw to finalize the operation (#14 - tightening torque 15 Nm). That's it! Fresh oil! Clean pump strainer! Happy Skoda owner! ... You can put the car back onto the floor now ! Now it's up to you!3 points
-
Not sure about anyone else but I'm loving the look of the Cyan Racing P1800... https://www.cyanracing.com/news/2020/09/02/revealing-the-volvo-p1800-cyan
 3 points
 -
Well good news is the engine turns over freely, nothing has stuck or siezed in the 2years since the engine went back in. Only wound it over with a ratchet on the crank bolt but it’s a start. I have now got a running in base map from Faboka (John) which will allow me to at least get it started and run in. Boost pressure is standard VRS which is more than enough to bed everything in. Battery is on a long trickle charge, hopefully it’ll come back to life after 4yrs off the car. Tomorrow evening will see the battery reconnected, a test of all systems, then try and load the new map onto the ecu with my mpps cable- if I can remember how to do it?? I’ll try and bleed some fuel through up to the engine and check everything for leaks. I’m not going for the big start until my two mates who’ve helped me out so much are round, beer and pizza have been mentioned so all will be good I hope. I have fitted the spare wheel tonight, cleaned all the tools and that’s the boot finished.. More tomorrow2 points
-
2 points'Simply Clever' would be to sell the Citigo and buy an Up! GTI.2 points
-
2 pointsHey, I had a set of Fabia vRS projector bowls refurbished by a place in Birmingham called "Dual Metallising" https://www.google.co.uk/url?sa=t&rct=j&q=&esrc=s&source=web&cd=&cad=rja&uact=8&ved=2ahUKEwjT8ZTT5Z_sAhXPX8AKHeSBBy0QgU8wAHoECAsQMA&url=http%3A%2F%2Fwww.dual-metallising.co.uk%2F&usg=AOvVaw03KRejezrjjpNmiAMtrCfZ You need to strip the headlights down to their component pieces and then take / send the bowls to them. I dealt with a lovely lady called Maz in the office. They do a lot of this work for new car manufacturers so they know their stuff. Be warned, it' not a cheap thing to have done.. One thing to be wary of, even when as good a new the Fabia MK1 Factory Xenon unit is no where near as bright as a modern day headlight, in fact even when the cars were new it was a marginal upgrade over the standard Halogens. Matt2 points
-
2 pointsI agree (not that you need it). What a shame. I'd have expected better from Toyota Unimog it is then? (Parking space still available ). Onwards and upwards. Gaz2 points
-
That looks like SMF, it's a big lump of cast Iron, DMF is smaller and a lot lighter and much more expensive.2 points
-
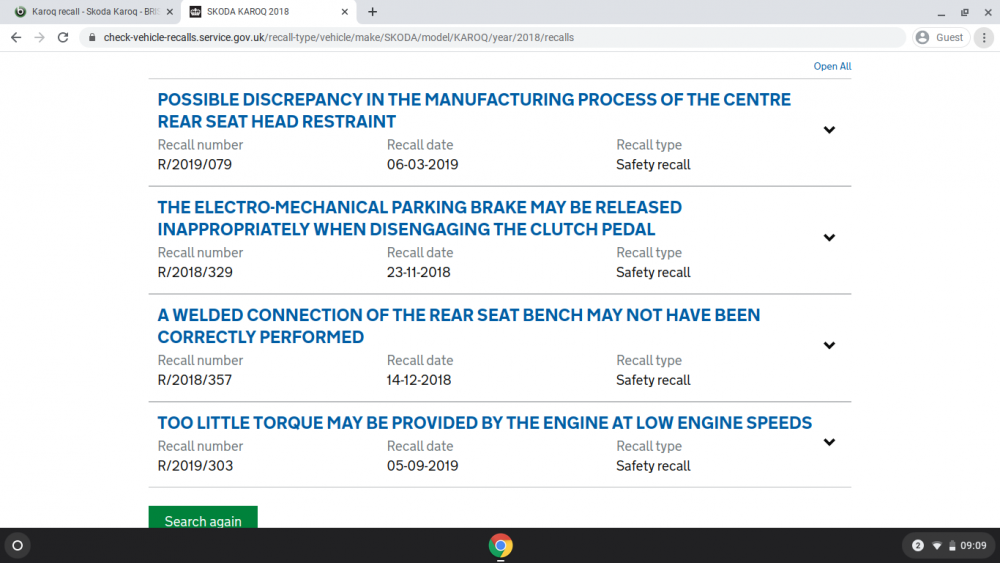
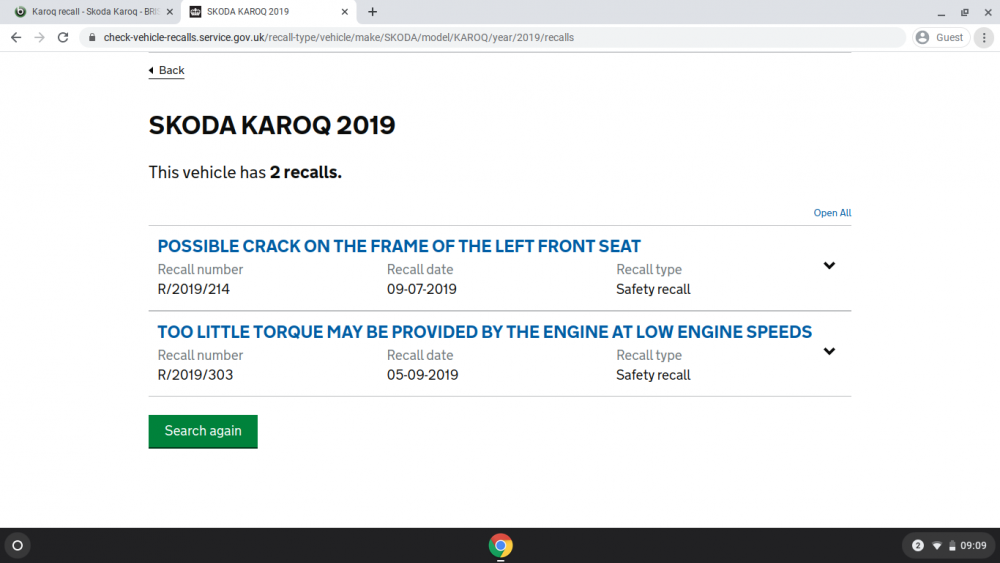
2 pointsHere is a link to check your car http://recall.skoda-auto.com/004/en-com You might think that if your car is affected then all you have to do is once you have conformation all you have to do is contact your dealer. But it is not that simple - First of all the recall check only tells you you car is affected or not - It does not tell you what the recalls are. eg Dear customer, - a recall campaign has been found for the entered VIN It tells you to contact your dealer but when I did so I was told as far as they knew my car was not affected. I rang customer sevice and after a long phone call an adviser confirmed there were in fact two advisories on my car but I did not need to worry because it did not affect the safety. I then used the web chat to ask about the issues and then finally discovered that The Recalls on your KAROQ are 23CE S-Fuel line and 60E3 W-Drain valve. I'm sorry to learn that you had not received a recall letter for this, I appreciate this is not what you have come to expect from ŠKODA. So The fuel line fault could cause a leak and I presume could deposit diesel fuel on the road This IS a safety issue for other road users. And as for the 60E3 W-Drain valve - this is the sun roof drain and could soak the front carpets - not a safety issue but not very pleasant and something that I want to find in my car But Skoda do not think that it is worth informing us customers about - Shame on them2 points
-
2 pointsI have to admit I think Adaptive Cruise Control is a fantastic bit of kit on long motorway runs but I do not use Lane Assist as I think it is not there yet. Both of the aids above make a LOT of use of when you indicate so you need to think about that. Lane Assist would help if you nodded off or wandered out of lane, it would probably keep you in lane and save the usual pile-up if you had a motorway heart attack. It does, however, have a couple of failings like following painted-over white lines through road works in low sun when they often shine brighter than the actual painted lines. I can't think of an easy fix for that. If you are cutting the apex of a bend it sometimes gives you a really unhelpful shove back into the middle of the road exactly mid-bend. I tend to leave it switched off. I would make use of the blind-spot warning (which is one thing my Octy does not have)2 points
-
2 pointsYou don't have the 7th gear but you'll have port injectors and exhaust flaps. Bonus! Enjoy the car!2 points
-
1 point1 point1 pointEasy to tell if it is sawtoothing, rub your hand one way round the tread and it will feel smooth, rub it the other way it will feel rough. Some tyre makes are more prone to it than others. Wheel bearing still a possibility, that should also be easy to tell up on a ramp or axle stands.1 point1 pointIf you have just purchased it from a Skoda dealer and it is under Skoda Approved Used Warranty then pay £100 at a Skoda dealer.1 point1 pointHi and welcome to the wonderful world of Yeti.... It is worth noting that when the main dealers service the Haldex they would not normally take the filter out and clean it. For that reason I took mine to a local indy specialist and asked them specifically to change the oil and remove and clean the filter....I think they charged about £70 for this....and yes if it were me i would get it done given the horror stories i have read on this forum!.....and make sure they use the correct drain plugs as per another recent post! ...enjoy your Yeti1 point1 pointIt's a tough life being a ring taxi! Shame the Porsche was turbocharged, robs the sound quite a lot imho :( GT3 with its stratospheric red line sounds so much better1 pointI would go back to the dealer who did the work. Seems funny the car ran with no issues until 5 days after it failed, just after some work had been done 🤔 My guess would be it was not filled with enough oil, overheated and failed.1 point1 pointIt was a pre built car. It was awaiting transport to UK so was held up due to Covid 19. Took about 2.5 months.1 pointFlywheel part number is on here, if that helps at all? https://skoda.7zap.com/en/cz/fabia/fab/2010-608/1/105-105010/ 045 105 2691 point1 pointAaaand I've not bought a Land Cruiser So Toyota phones me up last night - "we're really sorry but we offered you £4k too much for your car we can't go through with the deal" "My plate is on retention and I've just scheduled the cancellation of my insurance" "Aye sorry about that, we'll cover your expenses but we won't go through with the deal" I started haggling over free servicing etc but eventually I just said that I didn't want it anymore give me my money back. Waiting on the call this morning to sort that out. Can't uncancel my car insurance either so I need to start a new policy. (anyone looking for insurance and you're looking at OneCall you can get £40 off with code - AM6) I also need to get new plates printed because my private plate is on retention (probably quicker and will be less hassle when I eventually switch). I also need to restart the direct debot for the extended warranty on the beemer which I'd also cancelled. I know I could threaten them with legal action as I have a signed contract for the sale of my vehicle but it's not worth the bother. The search goes on I guess.1 point1 pointhttp://skoda-auto.com/services/recall-actions https://www.gov.uk/check-vehicle-recall https://www.gov.uk/vehicle-recalls-and-faults Below, 2018, then 2019 and for 2020 nothing showing with the DVLA..
 1 point1 pointit means the basic chassis is the same, so seat mounting points, and suspension connections, engines mounting piints etc are in the same places, but the cars are designed up from that differently. so, are they "basically the same car" yes and no. the basic underpinnings are same, but they are not the same in terms of weight and weight distribution over the axles.1 point1 pointI don't see any obvious need for a torque wrench for this. What you will need is a bit of the correct style and size for the screw heads. If the ones on your car are the same as what was pictured on the thread you linked, they are XZN/triple-square type, not Torx as someone on there posted.1 pointThat's a LOT of miles for a small engine, no matter how well it's been looked after.1 point1 point1 pointSo after a 200 mile trip home I'm very happy with it. The DCC definitely makes a difference. The sat nav took me down some great roads between Edinburgh and the M74 and the interior is lovely at night. Only negatives I would say are that it definitely needs a 7th gear on the motorway and it seems to harm the mpg on long motorway runs. I've not had radar cruise before but i think it cuts in a bit early. Pretty sure I put it in the closest setting but I still found it reacting to cars I didn't think I was near to. But looking forward to driving it more.1 pointSnow mode helps, it adjusts the ABS to allow more slip, the traction control is adjusted to allow the wheels to slip when pulling away, throttle response is softened. AWD is engaged too (if you have it). DSG engages 2nd gear to pull away (irrelevant for you appreciated). These all help. I ran mine on summer tyres in snow mode and it made a discernible difference to the general control and stability of the vehicle. Winter tyres undoubtedly help but snow mode alone makes a difference.1 pointYep, all wheel drive and proper tyres is the best solution.1 pointWelcome. I can't help with the Kamiq unfortunately, however heard good things about it. Enjoy it when it comes 😎1 pointCrossovers are usually simple affairs so I don't think would cause a clipping sound. I didn't realise anything more complex was fitted to the standard setup. Usually best to upgrade amp and speakers together, especially bass speakers. Wire some good speakers to the head unit though to test that is ok.1 point1 pointSatisfying when you over come a problem and it's all back together. Is that a good load of copper grease I see behind the disc. I don't think you'll have any trouble getting it off next time.1 pointUnless a belt change has been documented, I'd assume you'd be best changing it.... Clutch may be fine - try it, if no slip or noises then no need to do anything. Depends on whether 124K miles are town or motorway miles! For £2K I might look at other cars with lower mileages....1 point1 pointGood morning and Thanks for the info I've booked a Dekra inspection at a nominated garage for peace of mind and next steps forward. thanks once again1 point"As I'm oldish....." Unless I'm much mistaken that's actually an essential requirement to be a Yeti owner - that and devilish good looks and wearing socks with sandals. You have to score two out of three. And back to the OP's thread.1 point1 pointI'd take a Dremel to it to make a flat head driver slot. Then lots of firm pressure with some sort of impact driver. Just make sure the fit is good.1 pointI honestly don't get this obsession with big wheels and skinny tyres. Yeah, sure on a performance vehicle it's going to improve the handling etc... but even then when driving them day to day I'd far prefer a smaller wheel/bigger tyre combo as it's a much nicer balance between handling/performance and comfort. My previous car came with 19" wheels and skinny 235/35 tyres. Yeah it handled like.it was on rails but the comfort was awful. A drop to 17" 235/45/17 was a massive improvement. And now on 205/55/16 it's a pleasure to drive. Soaks up the bumps etc but the car is still responsive enough when needed. And when driving fast I actually find it inspires more confidence out on the road. Since the roads aren't perfect you can just sling it around on the bumps without it crashing and banging around. My previous Octavia also had 205/55/16 tyres and I did a couple of laps of the Nurburgring. My passenger was impressed with my commitment into the Karussell and I was faster than a tuned up Clio on lowered suspension and skinny tyres that had just passed me 😂🤣1 point1 pointOr a centre punch sharpened to an acute angle is my preferred method, I used to have a special small cold chisel with I think it was called a diamond point head which was very effective, it basically had one bevel like wood chisel and a 2 stage side rake angle, bad description but I know what I mean I would love to be able to replace it.1 point1 pointI wonder if its a cracked Haldex unit or really shrapnel from a grenaded differential making a bid for freedom through the diff casing? There really isnt anything to break on a haldex coupling, its just a shaft with a multi-plate clutch that spends most of its time freewheeling. Sounds like someone else not knowing one hole from another, I would get an independant engineer to look carefully at the differential and Haldex drain & fill plugs for evidence of what has been drained & from where, hopefully he will find that the Haldex fluid is still dirty and perhaps overfilled by topping up with new fluid and what remains in the diff casing is a tiny bit of blackened hypoid oil and that the diff drain plug shows clean hypoid oil stains from where they mistakenly drained it. Was there much oil that leaked onto the ground? Whether it was the Haldex casing which I doubt or the diff casing which I believe there will have been a pretty big puddle growing quickly but it should have looked clean, I reckon it was a small amount of blackened oil. As long as the dealer themselves are not closing down then they will remain responsable for any negligence by their service division. good luck!1 point1 point@John@C Best thing then. They should not touch it until you get an Independent Expert to examine your car. Maybe via your insurance as you might be claiming off their insurers.1 point1 pointMight be wise to put your steel toe protectors on just in case. Might be sharks waiting for a juicy toe to be dipped.1 point1 pointOnly did 500 kilometers in last two months due to the lockdown. Need to do a road trip ASA the lockdown is lifted.
 1 point1 pointSo it's just a revenue earning choice by Skoda UK with no real technical justification?1 pointThis has been debated for several years on here. Continental have been producing cambelts without a change interval for almost as long. All of this is however irrelevant, Skoda UK insist that the interval is 5 years. Skoda UK's choice has nothing to do with operating conditions, it's their choice and they want you to change it more often than several other markets (the mileage limit is engine and model year dependant). Whether you choose to or not is your choice, the vehicle will be out of the manufacturers warranty by then anyway. What's the average lifespan of a modern car in the UK? 15 years? So two cambelt changes throughout its whole life. Hardly worth losing sleep over.1 pointTiming belt change interval varies from country to country (don't understand why) - VAG say it's maintenance free, some importers say inspect after n years/x miles but Skoda UK say change after 5 years. Makes no sense at all to me1 point1 pointYou can't really compare standard petrol engines to similar powered diesel versions. The petrol engine will be quieter, smoother but needs to be pushed a fair bit more than the diesel to get anything like the same performance and most of us who've had diesel cars in the past don't tend to drive that way anymore; hence reason why petrol engines feel that bit slower if you're driving the car in the same way as your old diesel version. I try nursing my current car to get better fuel economy but its hard going since the software "update" which took away at least 10-12% average fuel economy and left the engine feeling a bit flatter all the time. I've had the 1.6 TD engine in an early mark 3 Octavia and most of the time it actually felt faster and more powerful than my current 1.5 petrol engine. Even though that is a lowish power output from the 1.6 TD engine it has a lot of torque once you get it over 30mph; lower speeds driving around town it will feel quite flat if you're in too high a gear, which is quite easy with the cheapskate five speed box and gappy gear ratios. Before the Octavia 1.6TD I had a Mondeo 2.2 TD Estate; definitely a wolf in sheep's clothing with incredible torque all the way through but an absolute pig of a clutch made driving it painful in town traffic.1 pointHappened to me: Driver side rear door motor intermittent since early summer. I should have removed the lock then and converted it into manual use (not hard when it's on the table). As a lazy guy I didn't and it gave up finally in late July. I had done some preparation, i.e. removal of screws from door panel, so removing it while door was closed, wasn't too hard. But getting the door open took hammer, chisel, big pliers, side cutters, lot of curse words and 2 hours, eventually removing all the plastic parts on top of the metal parts. Got it open, removed the lock and noticed that I cant use it as manual lock as one of the pieces actually pressing the latch release got lost somewhere while hammering. Ouch. So no other options than buy a new lock Fortunately those aren't expensive. I did at some early point see that gear (step 12) but I managed to turn it from end to other and and no change; Still deadlocked so I used brute force. It works in this case.1 point1 pointFWIW, wireless mirroring trashes the battery, at least on iPhone - so you're better on a cable anyway IMHO1 point


.thumb.jpg.f83a46b9b3c0d976b9dbffbb523c9874.jpg)


Important Information
Welcome to BRISKODA. Please note the following important links Terms of Use. We have a comprehensive Privacy Policy. We have placed cookies on your device to help make this website better. You can adjust your cookie settings, otherwise we'll assume you're okay to continue.