


Leaderboard
-
Monkhai
Moderators14Points31,968Posts -
MikeTheThinker
FREEDOM14Points8,482Posts -
skomaz
FREEDOM12Points11,082Posts -
Lady Elanore
FREEDOM11Points24,875Posts


Popular Content
Showing content with the highest reputation on 31/08/22 in all areas
-
4 pointsI've got a nice update: - this morning I checked the Skoda App (as I've been doing every morning in my coffee time) and the car miraculously showed up! - some 30 minutes later the dealer writes to me saying the car is ready for shipment and is waiting for the next transport from the factory - whenever that might be... So to summarize: - car ordered @ Aug.23rd 2021 - VIN received @ July 13th 2022 - VIN accepted by SkodaApp @ Aug.23rd 2022 - car shows up in SkodaApp @ Aug.31st 2022 (the same day the dealer notified the car is completed)
 4 points
 -
4 pointsMorning All, I've just been informed that my car now has an unconfirmed build week of week 39 (end of September). So fingers crossed I'll be seeing my Hatchback VRS by Christmas 🙂4 points
-
Mr Towbar Man has just been and gone, took 20mins, and everything seems to be fine, so fingers crossed! In case anyone else has these issues, he said it's a problem with the module power - it apparently just 'goes to sleep' when it shouldn't, meaning it causes the assistance systems to trip out , hence the intermittency. I haven't done any long drives as yet but I'll be pootling around over the next couple of days so will update if it's all still clear or not.3 points
-
There are many factors that influence if stop/start will shut down the engine. How much charge is in the battery (it needs enough reserve to start) What temperature the engine coolant is Interior temperature Heated seats Demisters Faults Your battery as it ages will be affecting how much charge it can store, and potentially if 7 years old, it might be getting down on health. Ideally you should get the car scanned and tested (there is a forum list of members with VCDS) that might show reasons (faults) as to why it isn't working as it should. Getting a garage to test the health of the battery.2 points
-
2 pointsGood time to point out that you can get 3 Fabias or 2 Karoqs for the price of one Enyaq?2 points
-
2 pointsMid week bucket wash and interior vacuumed. Also applied RainX to windscreen as it’s got to rain soon !
 2 points
 -
2 pointsThere's a screenshot of two of those for £33 delivered in the third post of this thread. Link 2x5L Mannol 5W-30 C3 vw 504 00 / 507 00 Fully Synthetic Engine Oil Longlife 3 5056511600579 | eBay2 points
-
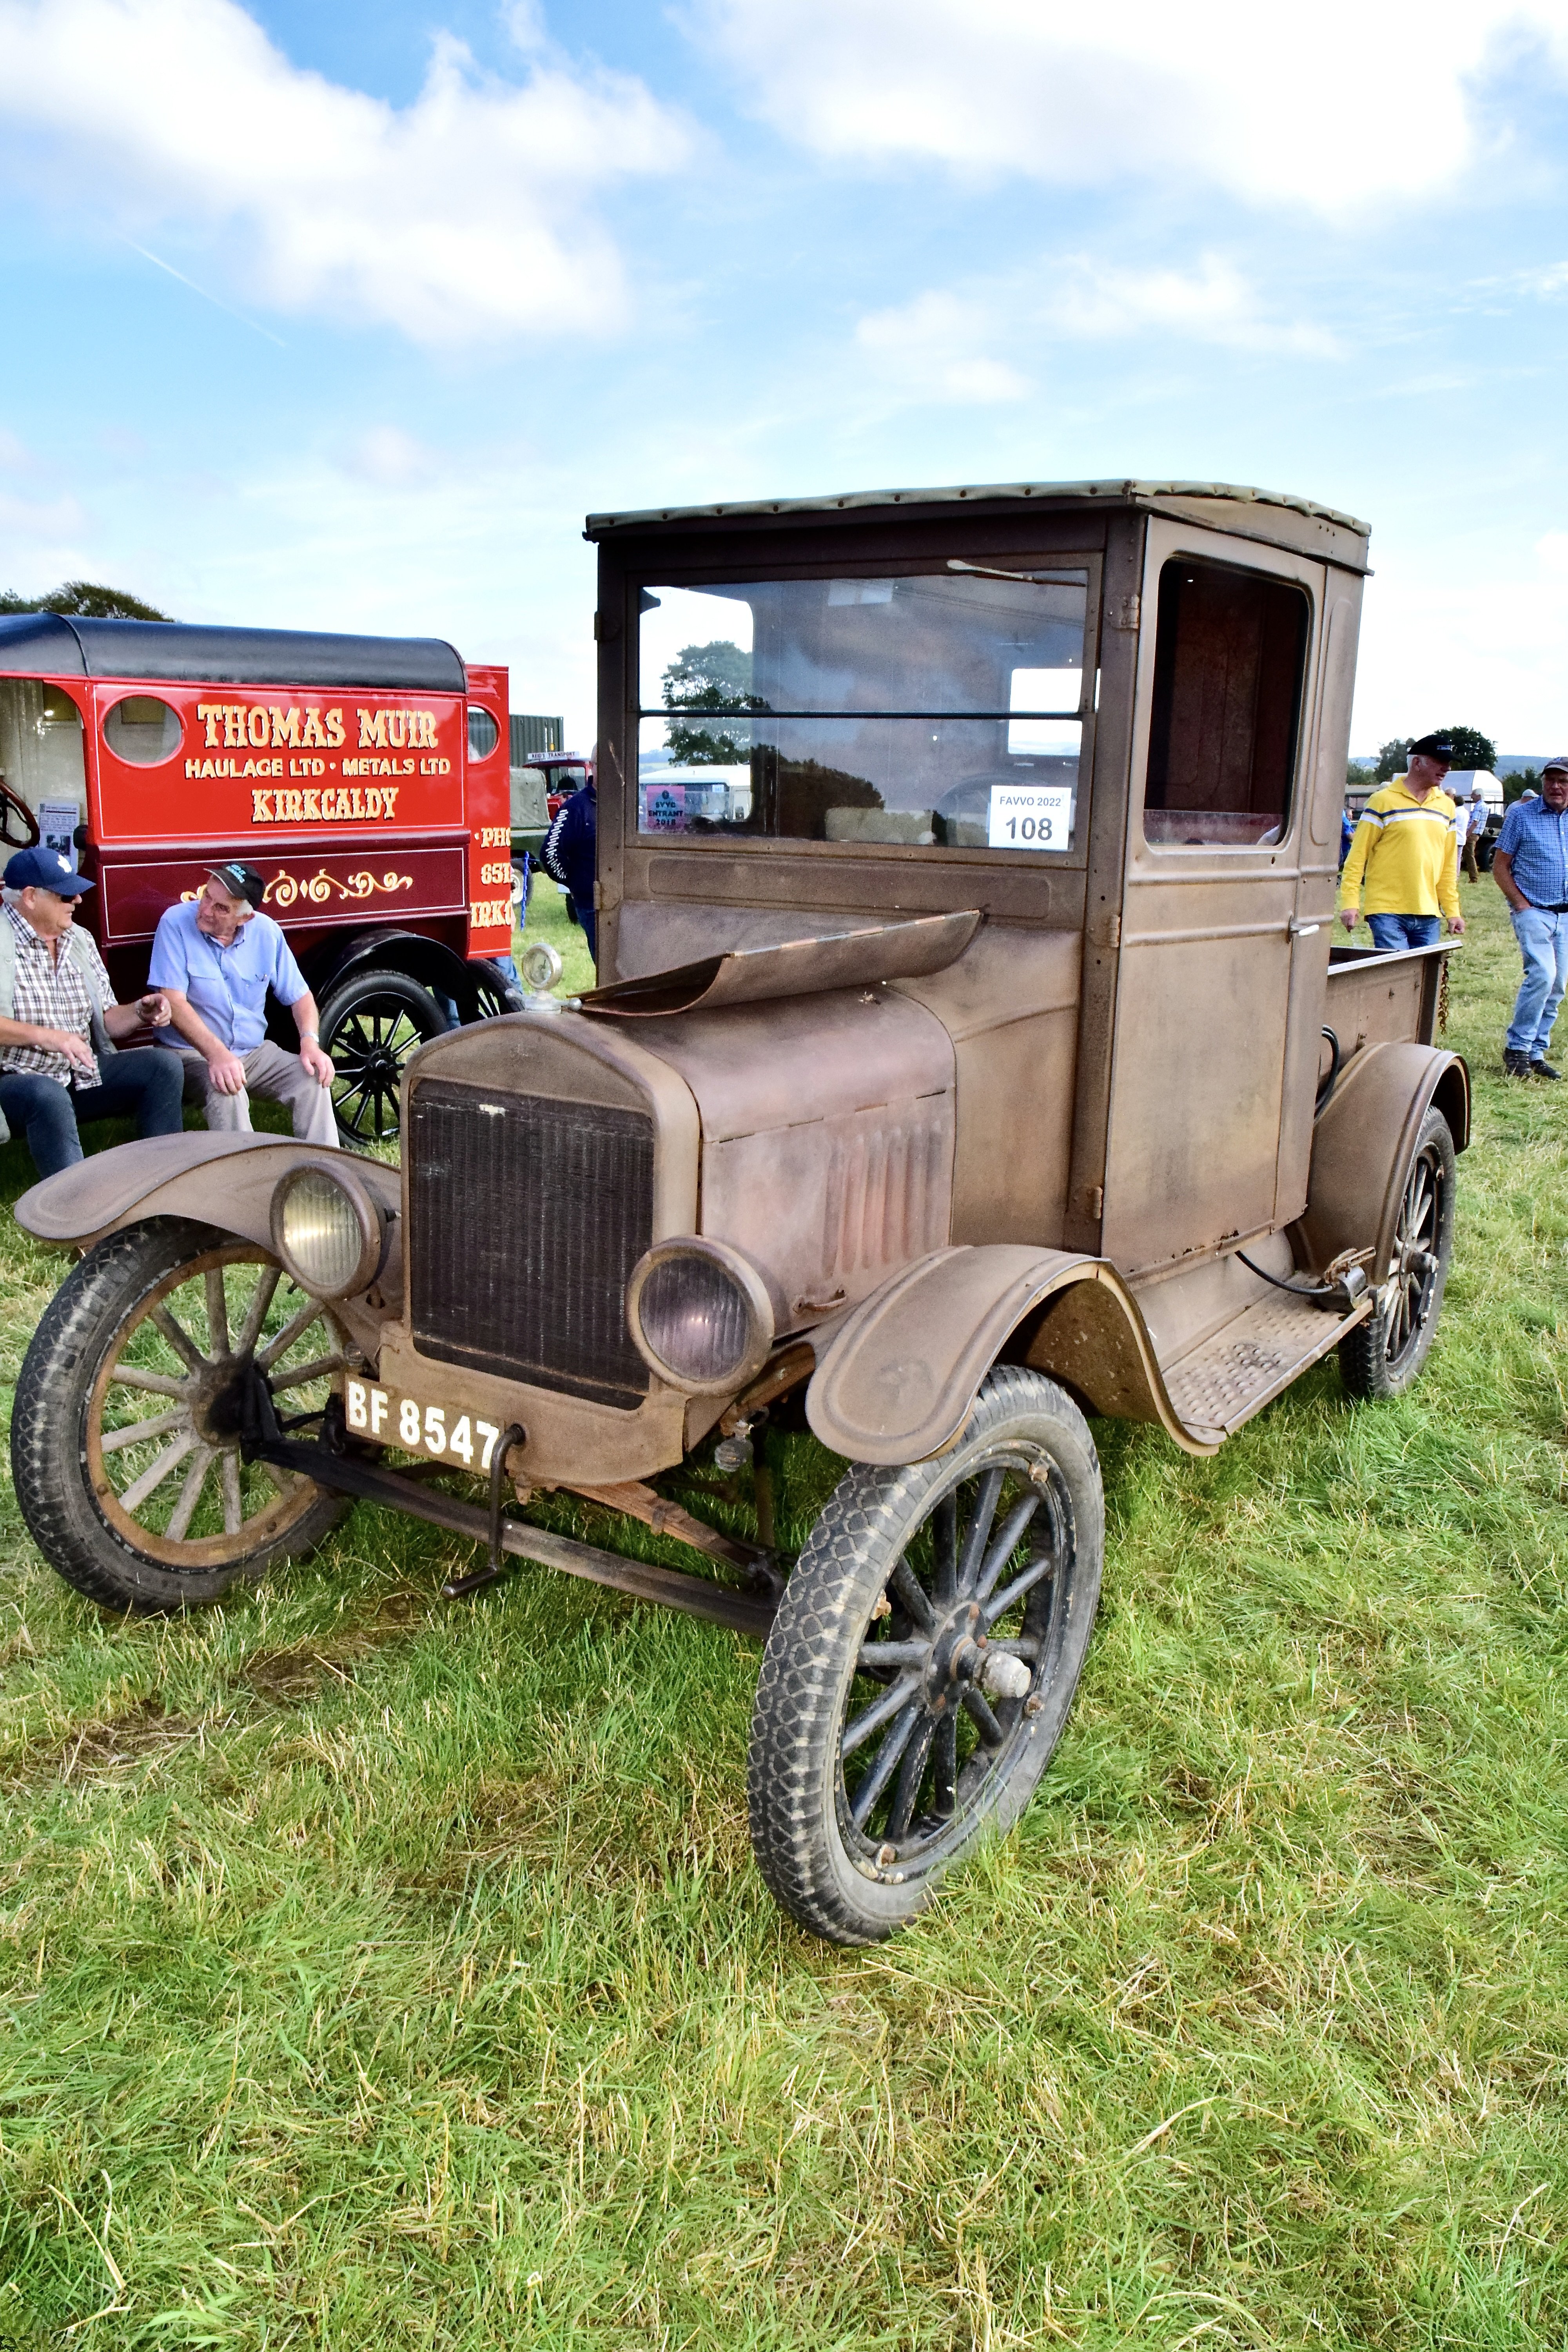
2 pointsThe Model T pickup reminded me of this old Dodge Bros. pickup truck decomposing in the desert at Berlin ghost town in Nevada. I took this pic in 2005. It'd be interesting to see what state of decay it's reached over the past 17 years.
 2 points
 -
2 pointsdamn! sorry about that! no idea, I had it on my Clipboard... 🙃 Oh, don't remind me about that; I posted here recently that a car ordered later than mine with all the extra's on top was delivered last month (same engine and DSG as mine). They are messing up things&orders big time at Skoda HQ, as @MaximusMeridius was writing to them on reddit. About the camera: today when they notified me the car is completed, I asked for a quotation to have the rear-view cam installed by them (during the delivery preparation if I'm in luck). I remember they deduced about 200E from the total price when I gave up this option; now I'm anticipating they'll ask for 500E to install it 😡. That's in case they don't have to wait 6 months for a rear camera to be delivered... I'll let you know when they send me the offer.2 points
-
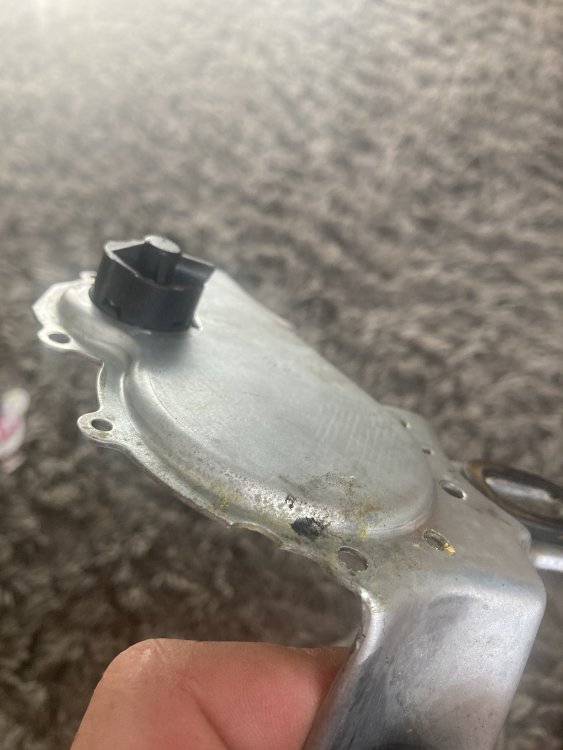
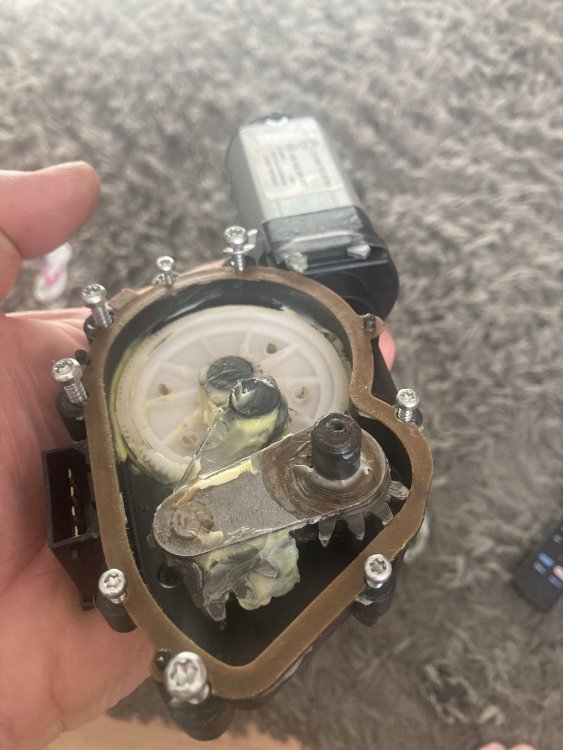
2 pointsMorning peeps,, awhile back the washer part of my rear wiper motor had broken off (like it when I purchased) so I ordered a new motor off fleabay to which unfortunately was the wrong one but according to them it’s completely compatible 🤣,, can’t be as it over wipes and cleans my boot lid aswell anyway this morning I decided to have a look at the the old motor and strip it down to see if I could modify the washer part to work??? ANSWER I think I can utilise the back plate off the new motor and put it on the old motor thus stopping the over wipe as the old motor is correct pics or the old motor disassembled, I’m hoping the back plate will be a direct fit onto the shaft… hopefully the aftermarket wiper shaft into the washer part is of the same diameter,, pinkies crossed
 2 points
 -
2 pointsThere's definitely a fault there. By law your braking system must allow for two applications of the brakes after the compressor or vacuum pump stop working. This would be tested by a police officer or VOSA at the roadside by running the engine to ensure a vacuum in the chamber, switching the engine off and then pumping your brake pedal. Any less than four applications of the brakes would be a deferred prohibition, and less than two would be an immediate. The fact you state that when you start on a hill with your foot applied to the pedal and the vehicle is able to roll means it's definitely not right. Perhaps visiting your dealership with the Categorisation of Vehicle Defects manual, which is the book both Police vehicle examiners and VOSA vehicle examiners go by, and pointing out the defect to them (page 159) will get you somewhere.2 points
-
2 pointsThe E-Type was fun but it seems that in times of austerity, we must all make sacrifices. This suits the zeitgeist to a T. 😇
 2 points
 -
2 points
-
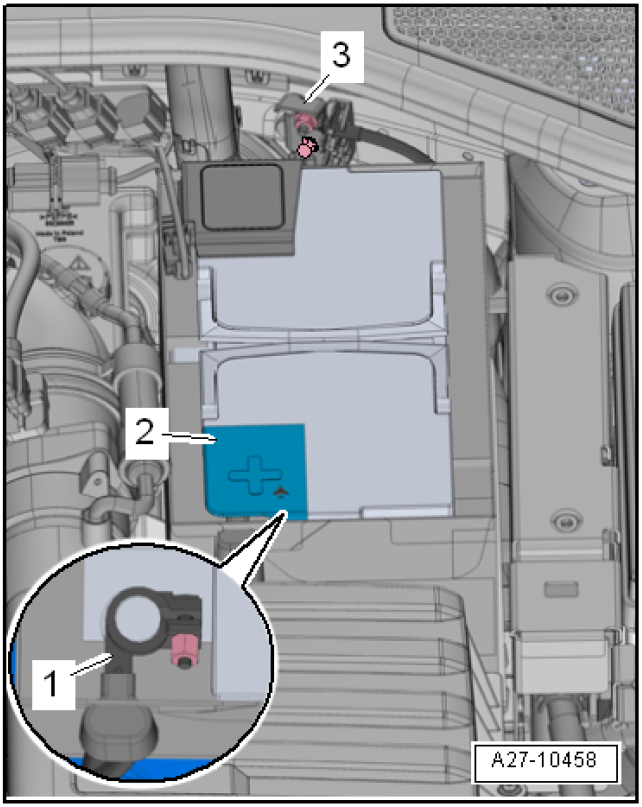
Hi all, As many VAG cars, my Superb Mk3, is fitted with a DSG6 (DQ250) gearbox. Here is a tutorial to change its oil and filter on your own. You'll probably tell me: What's the point with it? Just have a look on Google or YouTube and you'l find plenty of them! That's true, but having done this exercise, I could see that it is very rare to have all information in a single tutorial. I will therefore try to be as exhaustive as possible. Here a list of some Skoda models also DSG6 equipped (I nevertheless let you check on your own, since depending on engine type or MY, some may be DSG7 fitted⚠️ instead of DSG6) ! - Octavia 2 - Yeti - Kodiaq - Superb 2 - Superb 3 First of all, here is the DQ250 gearbox: We're going to focus on the following items: #17: Filter housing - Tightening torque : 20Nm #18: O-ring - P/N N910 845 01 (normally sold with the filter) #19: Oil filter - P/N 02E 305 051C #26: Oil pipe - Tightening torque: 3Nm #27: Seal ring - P/N N 043 089 2 (normally sold with the sealing plug) #28: Sealing plug - P/N N902 154 04 - Tightening torque: 45Nm Not shown on this pic: DSG Oil - P/N G 052 182 A2 - 6l - Difficulty : 2 - Time needed : approx. 2h - Number of person needed : 1 - Necessary tools : ¤ VCDS software (or similar, To be confirmed) ¤ 24mm socket ¤ 8mm and 14mm Hex ¤ Torx 25 and 45 ¤ Ratchet or classic wrenches for disassembly ¤ Torque wrench(es) to apply specified torques (3 / 20 / 45 Nm) ¤ Short and intermediate extensions for ratchet or torque wrenches to enable easier access to screws ¤ Small flat screwdriver ¤ Filling hose VAS6262 ¤ Wooden toothpick ¤ Small fork ¤ Slip joint pliers ¤ Oil drip tray ¤ Twine (about 80cm long) or an old metallic hanger (wire one) ¤ Wide masking tape ¤ Rags ¤ Lifting means Concerning VAS6262, you can find one on numerous website at various prices. Without switching to a much more expensive pump model, I suggest taking a filling hose with a 1/4 turn shut-off valve close to the adapter on the can side. These ones are less widespread but still at affordable price and of course easier to use, since you can work without being 'showered' with oil. I've chosen this one on toolstogo-uk.com https://www.tools2go-uk.com/13664247/gear-oil-filling-hose-for-vag-dsg?g…=&Lng=en Dealing now with the DSG oil kit, you really have to be careful on the kit content ⚠️. Indeed some kits only content DSG oil and oil filter, but no sealing plug nor seal ring! ⚠️ Warning: Prices can really be different from a website to another (starting form 90€ up to ~200€ !) Chose the right one! After hours of searches and checks, I finally bought the Febi-Bilstein kit, which can be found on autodoc.co.uk for 100€-ish https://www.autodoc.co.uk/febi-bilstein/15821763?search=FEBI BILSTEIN Transmission oil change kit (171762) It effectively contains: - 6l of gearbox oil - DSG oil filter (#19) and its O-ring (#18) - Sealing plug (#28) and 2 seal rings (#27). By the way, I still don't understand why 2 rings?🤔 Note: I did not take time to ask for OEM spare parts prices by my local dealer. Step #0 : Preparation You need to lift the car high enough to get under the car and to get enough space to move your arms comfortably around the gearbox. Note: Though you've lifted the car, it needs to remain horizontal to make a proper filling with right oil level (see step 7). Step #1 : Air system removal Start with removing the air box. You first have to remove the 2 T25 Torx screws (#1), then unclip the cover on the rear face (#2) and lift it by rocking it as shown by arrow to avoid breaking the 2 lugs at the front side of the cover (#3). Finally simply push to the rear to release the lugs (#3). You now have to unclip the 2 lugs, where the 2 torx screws you have just removed where tightened (#1). Be careful for this step, since these 2 lugs may break. I've seen 1 or 2 pics of broken lugs on this forum. ⚠️ Then, you need to push the airbox backwards, so that its front side can 'rip' other the bonnet slam panel. Then unclip the hose (#3) and with a rocking motion back and forth, release the front side so that the airbox can be fully removed. However, do not hesitate to put one hand on the back of airbox to be able to pull forwards more easily (#4) and take the airbox out, which is quite large. This being done, you need to remove the air filter housing. This is simpler. Start with unplugging the small hose (#2) at the air filter housing outlet and unplug the air flow meter connector (#3). ⚠️Be careful: There's a small grey latch on the connector (if equipped) to unlock before pulling the connector off, otherwise it won't come out or you risk ripping it off. Now, remove the metal collar (#4) on the large air hose downstream the air flow meter. Use a slip joint plier for this. You can now unclip the air filter housing, which is simply fitted onto 3 shock absorber pins (#1). Pull vertically upwards. Don't hesitate to pull hard (continuously and not jerkily), it holds up really well! The 3rd pawn is under the air box (dotted circle), but it comes out quite easily when the other 2 are already out. Once the air filter hosing has been unclipped, all you have to do is disconnecting the large hose, downstream from the flow meter. Be careful to 'close' the hose to avoid any foreign object damage or even just dust towards the engine. Masking tape will do do the job! Step #2 : Battery removal To take it out, you need to remove a 13mm hex screw, which tightens a retaining bracket et holds the battery in place. This screw is on the front of the battery (#5 on previous pic). Then remove both battery terminal covers (by lifting vertically) to access the clamping nuts of both battery terminals posts (10mm Hex socket). Warning⚠️: Start disconnecting the "-" terminal post before disconnecting the "+" terminal post! For more safety, wrap them with masking tape as well if you want. Battery can be then removed easily, even if it weighs! Step #3 : Battery fixing plate removal You can now access the battery fixing plate, which is held by 2 10mm Hex screws (blue squares) and one 10mm hex nut. Sorry, the latter is out of the pic, but it can be found easily (just follow blue arrow). Be careful don't be too quick at this step, several fixing staples are indeed attached to the battery holder. You might be tempted to cut the tie-wraps, but these are attached to small brackets, which are simply stapled (red circles) or clipped (orange circle) to the battery fixing plate. Staples can be removed by simply pushing them with a flat screwdriver, while the clip-on holder can be pulled out with a small fork. There is now a small Control Unit attached to the battery fixing plate. Unclip the small lug (red circle) and pull the control unit vertically (as suggested by arrow) to remove it from the battery fixing plate: The battery fixing plate can now be removed. Step #4 : Oil draining You can finally access the DSG oil filter housing: A 24mm hex socket is necessary to remove it. Once done, protecting the filter location against foreign object damage or dust is necessary. Aluminium foil will do the job. FYI, here is the difference between a new filter and a filter with 60,000 km on the clock. Now remove the sealing plug with the 14mm Hex. Once done, the oil flow will be very thin, due to the oil pipe. Remove the oil pipe, using a 8mm Hex. After that, the oil flow is more important. Step #5 : Oil filter replacement Once the gearbox is empty, you can put back in place: - The Oil pipe (still using the 8mm Hex. Tightening torque = 3nm). If you don't have a torque wrench complying with such a low range. Take it easy! Just to give an idea, it is roughly the same order of magnitude as for closing a jam jar lid. (Sorry, this is the only simple image I found quickly ...). Well just keep in mind, it's light !! - The new DSG oil filter (don't forget to moisten the O-ring in its hole) - The new O-ring on the filter housing (don't forget to moisten this one too) - The filter housing, which must be tightened at 20 Nm (with the 24mm Hex socket) Step #6 : Reassembly Steps #1 and #2 can be processed in the reverse order to reassemble : - The battery fixing plate (and the small control unit) - The Battery - The air filter housing and the hoses - The airbox. Step #7 : Oil filling The filling hose can now be screwed in the sealing plug thread At the other end, donc forget to shut the 1/4 turn valve, before screwing it onto the oil can. To make it easier, you can attach the can to the bonnet with a 80cm long twine or an old metal hanger (wire one), that you can shape to transform it as a can holder. If you want to fill the gearbox faster, you just need to make a little hole in the can bottom (now upside down ) to enable air getting in the can. Of course, don't forget to open the 1/4 turn valve. http://img.xooimage.com/files1/b/e/c/whistle-1bb1.gif You have to fill approximately 5,5l. Once again, don't forget to shut the 1/4 turn valve upon each oil can change http://img.xooimage.com/files1/b/e/c/whistle-1bb1.gif. Warning: Do not make a hole in 6th can, otherwise there could be some side effects... http://img.xooimage.com/files1/3/e/0/33-2bc7.gif When the 6th can is half empty, shut the 1/4 turn valve, remove the can from the filling hose. Put now the free end of the filling hose into the dip tray. You can now open the 1/4 turn valve to start adjusting the oil level Step #8 : Oil level adjustment ⚠️ Now, start the engine and keep your foot pressing the brake pedal. Move the gear lever in accordance with the following sequence: P to R, wait 3s R to N, wait 3s N to D, wait 3s D to S, wait 3s S to D, wait 3s From this point, most other tutorial suggest getting back directly to P. I personally rather got back step by step, still waiting 3s after each step. Once back to P, you can remove your foot from the brake pedal, but keep the engine idling. Now, connect your VCDS cable and select the gearbox controller (02 Auto Trans): Once in the gearbox controller menu, there are 2 options: 1) Either get into "08 Meas. Blocks". then in the new window, get into "Group 019" and check the Temperatur cell of "ATF (Auto Tranmission Fluid)" parameter. This is at least what I've found in several other tutorials. But though owning an official VCDS cable, the "08 Meas. Blocks" is greyed on mine. (may be my Micro-CAN version starts reaching its limits). Hence I had to use option #2 below. 2) Or get into "Adv. Meas. Values" menu: From this point, type "trans" in the search cell to find all parameters related to the gearbox. In the results list, tick "ATF temperature - Transmission fluid temperature": Now with the engine still idling, just wait for the oil temperature to get between 35 and 45°C. It may take several minutes. Be patient. When oil temperature is close to 35°C, you can remove the filling hose completely. Don't worry temperature is increasing really slowly. The oil flow from the oil pipe starts decreasing. Once the oil temperature is within the 35-45°C range, you can observe that a slight amount of oil flows out via the overflow tube every 30 seconds, independent of the oil level. This is caused by oil pulses, which cool down the coupling. According to workshop manual, this oil quantity is not a criterion to determine the correct oil level. Therefore, they must not be taken into account when assessing oil level. You can now screw back the sealing plug (with 14mm Hex). Tighten it at 45Nm. From this point, you only need to stop the engine, disconnect your VCDS cable and put the soundproof housing back in place under the engine, and... That's it! Well, non counting the specific tools, you've just saved ~200€! Note: I'd also like to write special Thanks to @J.R., who helped me to translate some technical words I was missing! Much appreciated.👍 _1 point
-
Gendan https://www.gendan.co.uk/product_VAGUSB.html sell a cable for use with VCDS-Lite but it is only K line not Canbus and yours being a 2006 it will want a Canbus capable cable for full diagnosis ability I have a full Hex v2 unlimited based in Milton Keynes but at the moment I'm without transport as my Treg engine is in the process of being repaired1 point
-
1 pointOne advantage of the nights drawing in is I can photograph both the sunset and Moon on the same walk👍

 1 point
 -
1 pointJust ordered one of these. Most of the USB-C options seem far too long ie no equivalent to the USB A mini flash drive https://www.amazon.co.uk/gp/product/B09R2C9DH9/ref=ppx_yo_dt_b_asin_title_o00_s00?ie=UTF8&psc=11 point
-
1 pointThe ones I jave seen have been C...mine ends in N bit only seen 1 of those and it was more than I wanted to pay...my car is an early 2015 mk11 ...not really bothered about DAB...just need it to be compatible with the Bluetooth module and have sat nav and the radio of course 👍 the climatic blower suddenly stopped working monday but that seems an easier thing to sort.1 point
-
1 point
-
That was my fault. I posted without noting where in the world he was posting from. My bad. Still, it would be worth checking your local vehicle standards, because most of them are standardised throughout Europe.1 point
-
1 pointWhat matters for drag is CdA i.e. Cd multiplied by effective frontal area - so a low profile car and an SUV might both have the same Cd but the SUV will almost certainly have a larger effective frontal area and hence less range for the same battery capacity.1 point
-
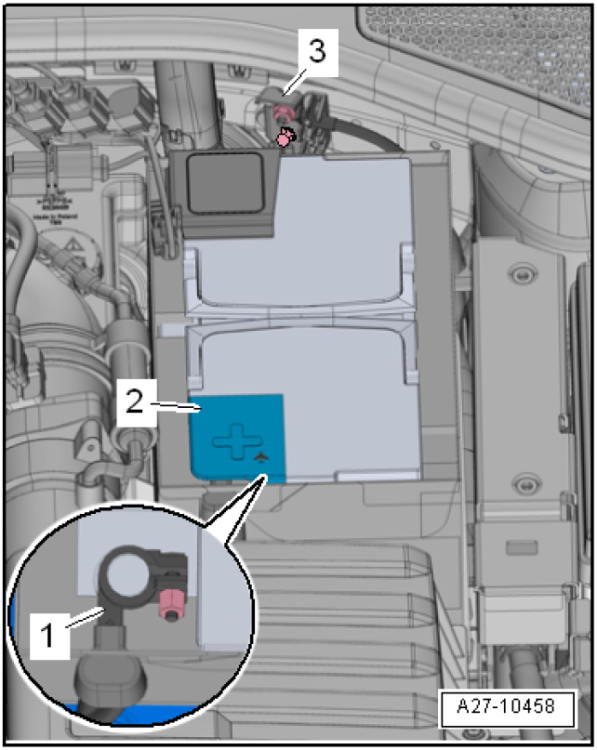
Yes it's behind battery (3) for negative It say igntion off, and leave the front door open during charging.
 1 point
 -
1 point
-
That Mercedes A class PHEV is capable of CCS rapid charging IIRC. So should have used CCS. It's a totally stupid decision by Mercedes to provide that capability for the tiny PHEV battery and dealers to never educate users on the idea of different charging speeds. I sat through an hour of Tesla owners club new-owner presentation a few nights ago. I was there to get my questions answered, but it is great to see charging explained to new owners in such detail. Most dealers won't bother with this level of knowledge transfer, leaving new owners to figure out for themselves. Also, I think Chargemaster/Polar/Pulse are the only ones still doing triple head chargers. It's about time to only install dual-head DC chargers and provide a 22 kW AC charging post for Zoe's. If it doesn't fit, uninformed won't use it.1 point
-
1 pointWith the seats unplugged, don't switch the ignition ON or you set a fault code in the airbag system and that'll need the correct kit to turn off the airbag warning light1 point
-
It is i 2013 model, i rang Skoda and they told me it was was manufactured 20/05/2012. I will have to look at the service book, when i look at the car today. The power output is 86HP (63kw), and it is a 4 cylinder. I specifically asked the seller regarding rattling noices with the enigne, i dont see why he would lie about this, as i will hear the engine myself when i am test driving it.1 point
-
1 pointSome more pictures that might assist. Earth Point B Pillar I think this might be in rear of vehicle, but might not be, also optional equipment choice. Hard to make out the location in my head exactly. You should have a small part of the loom not pictured heading to the fuel tank under the seat, if I can find an image I will post it.
.png.8f3b7085f05d94002d42223e62157a07.png) 1 point
1 point -
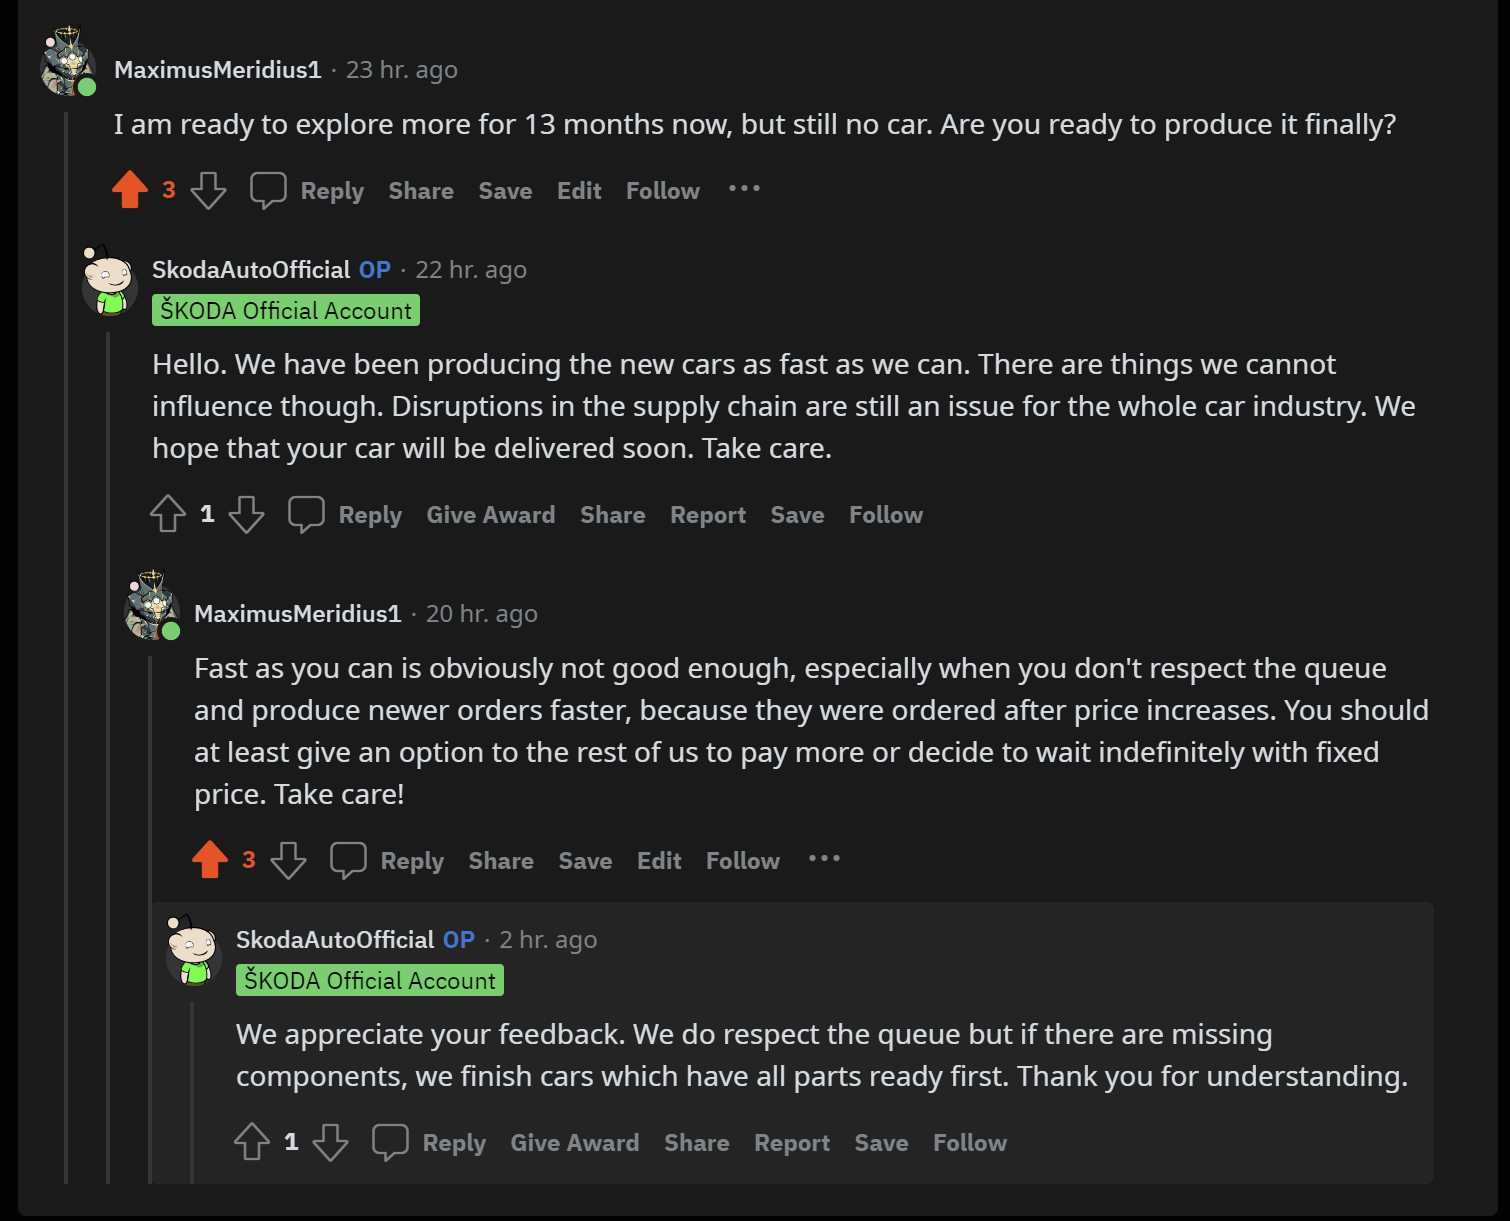
1 pointLook at their response to my complaining on reddit. At least is not the "same old same old" template of excuses. So that is something. Too bad I see everything I ordered in many other orders.
 1 point
 -
1 pointDamn Škoda, this is not the way to treat customers… No offense to the lucky ones, it’s clearly not your fault…1 point
-
1 point
-
Your posting did not say that the handbrake was functioning well and you were attempting a hill restart using the footbrake and clutch only, very very bad practice and one which requires heeling and toeing, Kens comment was appropriate given the information posted. I have no choice but to do it on a hillstart when I have a heavily loaded trailer (2 or 3 tonne) behind me as the vehicle handbrake is not sufficient but I am heel & toeing in addition to the handbrake.1 point
-
1 point
-
1 point
-
1 point@Subshah Please stop posting in text speak as it’s extremely hard for other to read and search for. This is an English Language forum, albeit with global users. Using text speak just makes it harder for those where English isn’t their first language ( and even those where it is)1 point
-
1 point
-
You probably could have paid for a couple new batteries for the cost of parking for two months!1 point
-
Drove it home from Heathrow. No great drama, I hear you say. Except that it was parked up there for two months. And it's on the original battery, which is 5 years old. I'd made sure my jumper was fully charged before we went, but it wasn't needed. Didn't even need to use the fob to open the doors. Genuinely impressed.1 point
-
It is normal in O4 if you ask me. O4 has a new, electro-mechanical brakes servo, unlike older cars, that had vacuum servo. It means, that car's computers can operate the servo at any time. On many occasions my car is "hardening" the pedal as i have my foot on it. I literally can feel pedal is lifting my foot, and being a rather strong guy, i cannot really stop it. But to be honest i cannot remember now in what situations it does that. Will try to check and report back, when i have a chance. Again - it's a completely different servo/booster, than in old cars. Has nothing to do with vacuum.1 point
-
1 point
-
1 point
-
1 pointSorry I might have sowed some confusion. The one I was referring to as excellent is the eBay one mentioned by cestrian.1 point
-
Are you kidding me? If by any reason the electric handbrake isn't working? I added this question because this is a strange behavior of this car and I never saw this till now( I drove probably more than 100 manual cars , on different brands) . Please don't try to be 'smart' and help if it's possible, if no, just skip. Thx1 point
-
@akonWelcome. Are you parking and applying the Parking Brake /e-Brake and keeping on until time for it to release. @KenONeill What Transmission lock do you get on Manual Gearbox Skoda's? They are not a Hand Brake if they are an e-Brake, more of a finger brake with the Parking Brakes. The e-Brake is not 'Autohold; or Hill Hold Assist, the e-Brake like a Hand Brake works on rear brakes.1 point
-
1 pointHave had confirmation that I should be able to pick mine up in the next week, which is a nice bonus. Just around 13 months wait.1 point
-
1 pointMaybe some lucky ones get the car after six months, but the majority of us after at LEAST 14 months.😀 Referring to the removal of additional equipment: it seems to me that all extra or "not so necessary equipment" for car operations, which include cable harnesses or chips to be built in, is eliminated by the car manufacturer by the trade-off principle. Those cable harnesses are used instead in the production of the regular, standardised car versions or where possible, in the EV versions. When the resources (inputs) are scarce, they prioritise their use, based on their profitability targets. And due to the increase in prices of inputs (inflation); materials, energy, workforce etc. and the scarcity and setbacks in the supply chains: they cut out some extra equipment options and, on the other side, increased the end (market) prices of new cars. All the point here is the profitability of the Skoda company, not individual orders. The most probably institutional orders (such as from police) are a priority due to mass order and delivery requirements stipulated in the purchase contracts. In contrast, the individual orders, as discussed in this thread before; the cars with higher profit margins go into the production sooner than the others (the ones with a waiting period of over 12 months for a build date).1 point
-
1 pointI came across this article on the CZ forum: https://www.garaz.cz/clanek/servis-nakup-auta-zjistovali-jsme-jak-dlouho-se-ceka-na-nejoblibenejsi-auta-v-cr-nekde-par-mesicu-jinde-i-rok-a-pul-21008805 They also say that delivery times depend also on the annual sales quotas of individual dealers. I guess it’s one of the aspects we haven’t mentioned much. Well as long as the Slovenian police force got plenty of them, the rest can wait indefinitely… I’m really getting tired of this waiting, my mother-in-law even more so as I am currently using her car to drive to work… I know I should be near now, but can’t stay positive with all the current experience. I also said I would restrain myself from checking the app - but had to check yesterday evening and guess what - yep, 😞. And yesterday while driving home, 2 white Octys right in front of me, going in the same direction for quite a while, I mean c’mon, stop teasing me 🤬 Sorry about the whine guys, not one of my best days 😞1 point
-
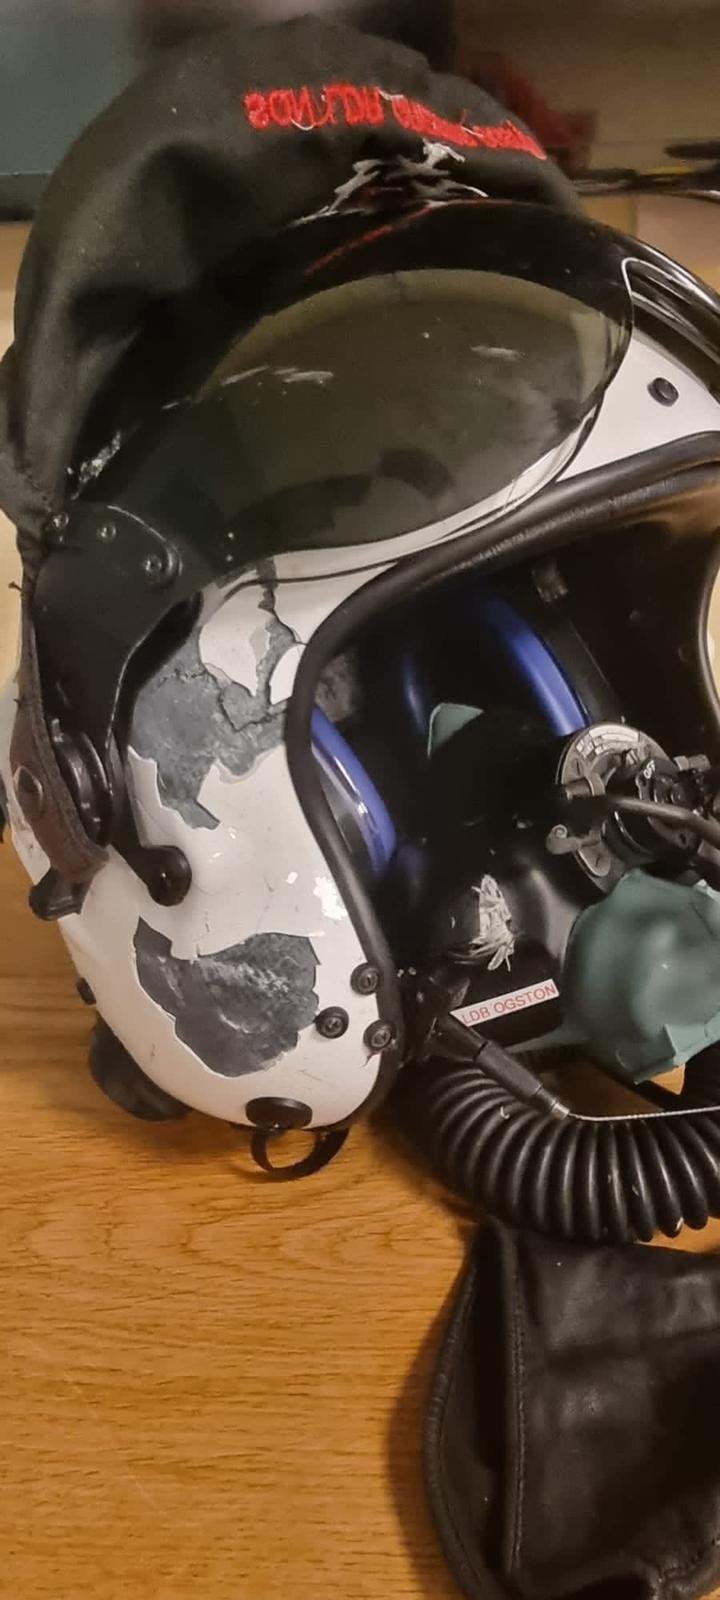
1 pointThat's it then - hatch vs. wagon difference. The hatch has a felt/carpet like surface on the boot lid trim.1 point1 pointOnly the adaptive cruise control has a separate stalk, the cruise control fitted as standard uses small switches on the indicator stalk. There is a switch on the top of the indicator stalk which is moved to the left to switch th cruise control on. On the end of the indicator stalk is a rocker switch which reads RES+ at the top and SET- at the bottom. Once you are driving at the speed you want to maintain press the lower edge of the rocker switch marked SET- The speedometer symbol at the bottom of the instrument display will turn green and the car will maintain a constant speed. You can accelerate if necessary and when you take your foot of the pedal the car will slow to the set speed. If you press the brake pedal the set speed is cancelled. The speedometer symbol then turns white. Alternatively moving the switch on the top of the indicator stalk to the right against spring pressure cancels the set speed (moving the switch all the way to the right turns of the cruise control altogether. To resume the set speed, press the upper edge of the rocker switch marked RES+ and the car will accelerate to the previously set speed. Pressing SET- will set the current speed as the new set speed. When the cruise control is engaged (green speedometer symbol lit) pressing RES+ increases the set speed and SET- decreases the set speed. On early cars the speed limiter was a press button under the indicator stalk. Later ones, including mine, have the limiter buried in the driver assist menu accessed by a button on the right hand side of the steering wheel.1 point1 pointA few shots from Sundays visit to Coningsby............. The Lancaster suffered a bird strike, but happily returned safe and sound 👍


 1 point


.thumb.jpg.f83a46b9b3c0d976b9dbffbb523c9874.jpg)


Important Information
Welcome to BRISKODA. Please note the following important links Terms of Use. We have a comprehensive Privacy Policy. We have placed cookies on your device to help make this website better. You can adjust your cookie settings, otherwise we'll assume you're okay to continue.