


Leaderboard
-

Lee01
FREEDOM60Points36,149Posts -
skomaz
FREEDOM17Points11,077Posts -
Graham Butcher
FREEDOM15Points6,501Posts -
Breezy_Pete
Sponsor11Points24,179Posts
.thumb.jpg.9dd3f612ba7f13d10be5c518d3c8d255.jpg)


Popular Content
Showing content with the highest reputation on 10/09/24 in all areas
-
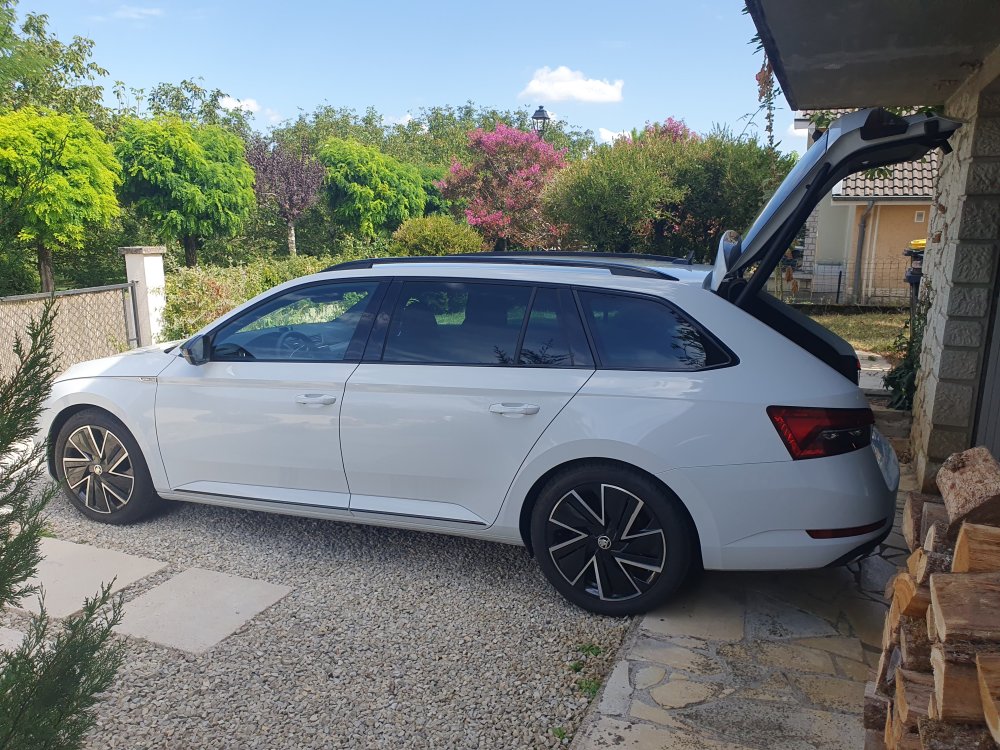
It's mine now. I got the rear brakes done today. Thought for a little while I wasn't going to get the new discs in without taking the carriers off, but managed it with a bit of bodgery. 😁 MOT booked for Thursday.4 points
-
4 pointsShort end to this tale. I was talking to a couple of dealers both with similar cars. Spoke to second dealer late yesterday and he came back and offered an additional £2k for the Jimny, Had a dealer down south willing to pay more. So for me £11k was good enough to avoid the hassle of selling private. I am soon to be the owner of a Subaru Outback. Not the most exciting car in the world but possible one of the most all round cars.4 points
-
2 pointsI actually tried locking the car with the key still inside and it wouldn't lock so it definitely should be impossible to lock yourself out....... The only thing i can think in the OPs case is that he says he left the keys in the boot rather than in the cockpit around the key storage pocket so maybe the car didn't realise the keys were inside due to them being away from the storage pocket. Also another reason to make sure you have the app setup when you get the car just in case you do leave the keys in the boot etc.....2 points
-
2 pointsIf you go for aftermarket be careful. I ordered a set of Sachs for my vehicle (ORM 5Q0 511 115Q) but it matched 2 OEM part numbers. In the end I sent them back and went for KYB as it matched the original single part number.2 points
-
1 pointJust collected today. 6000 kilometres showing and very happy after a few hours behind the wheel. mk111 , I assume but registered Feb this year. Pleased to say it has all of the kit I wanted, inc reversing camera, heated seats, heated steering wheel. In fact the only (very small) thing missing is wireless charging. Sure I will get over it !

 1 point
 -
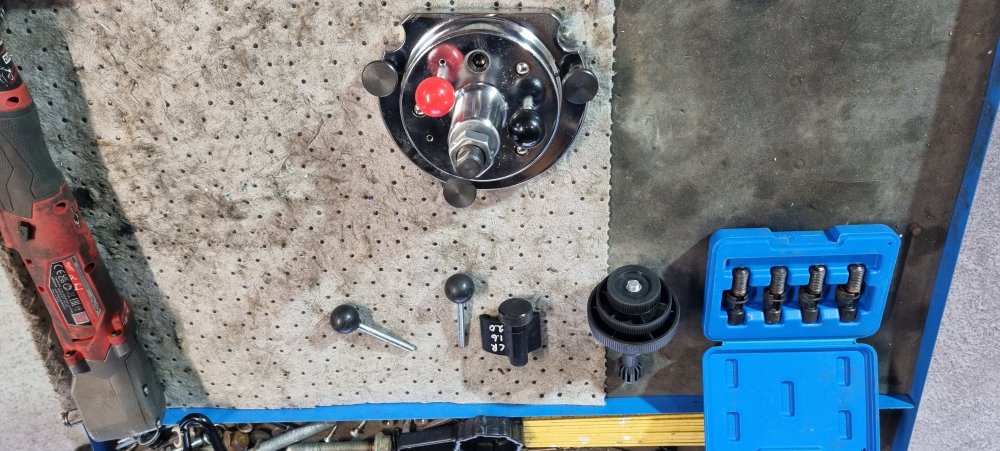
2011 superb 2.0tdi, 4x4 DSG. Well yes, tomorrow I'll start the process of changing these parts. Also dsg oil/filter service, front diff service and general inspection service when things are disassembled. I will try to document as best I can, but I know for a fact that when I am in the "zone" , pictures are not in the front of my head... My scheduled work order is: Empty dsg case and engine oil. FL+FR wheel off Front axles off Front subframe down Disconnect pipes to/from webasto heater DPF down Next start disassemble things in order to get the transmission case removed from the gearbox housing. Then removal of dsg gearbox. Behold, there I will have a clear and present view of the infamous EGR cooler 😆 Replace. Well, flywheel off and finally use tool T10134 to assemble new crank seal. But first, remember to set engine at TDC by use of tool T10050. Wish me luck. (Have done a couple of flywheels, timingbelts and other **** before) Will document in here with pics and what special tools or helpful gadgets I use. Worth to mention, I do this in my own garage (have own scissorlift).
 1 point
 -
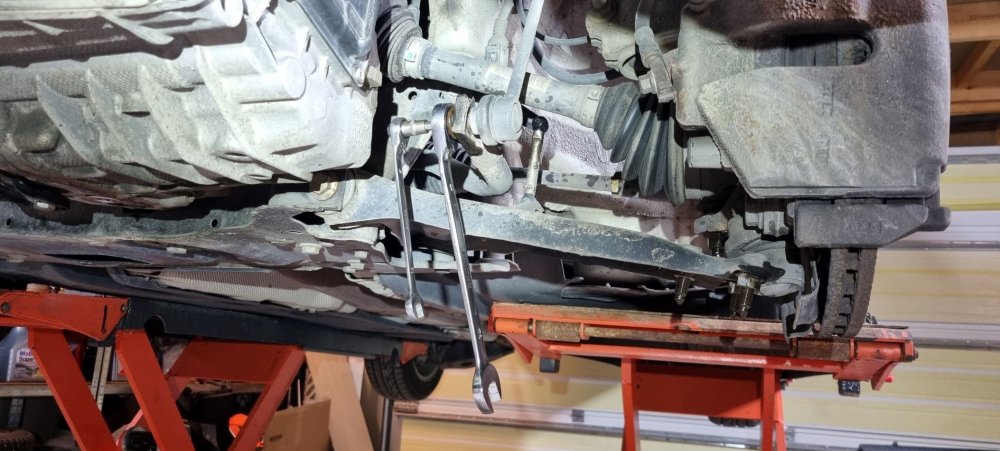
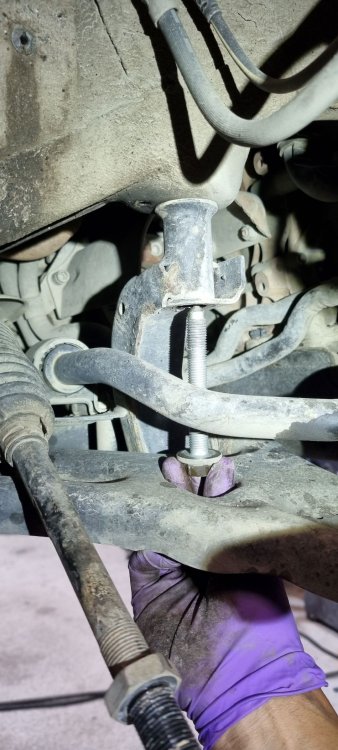
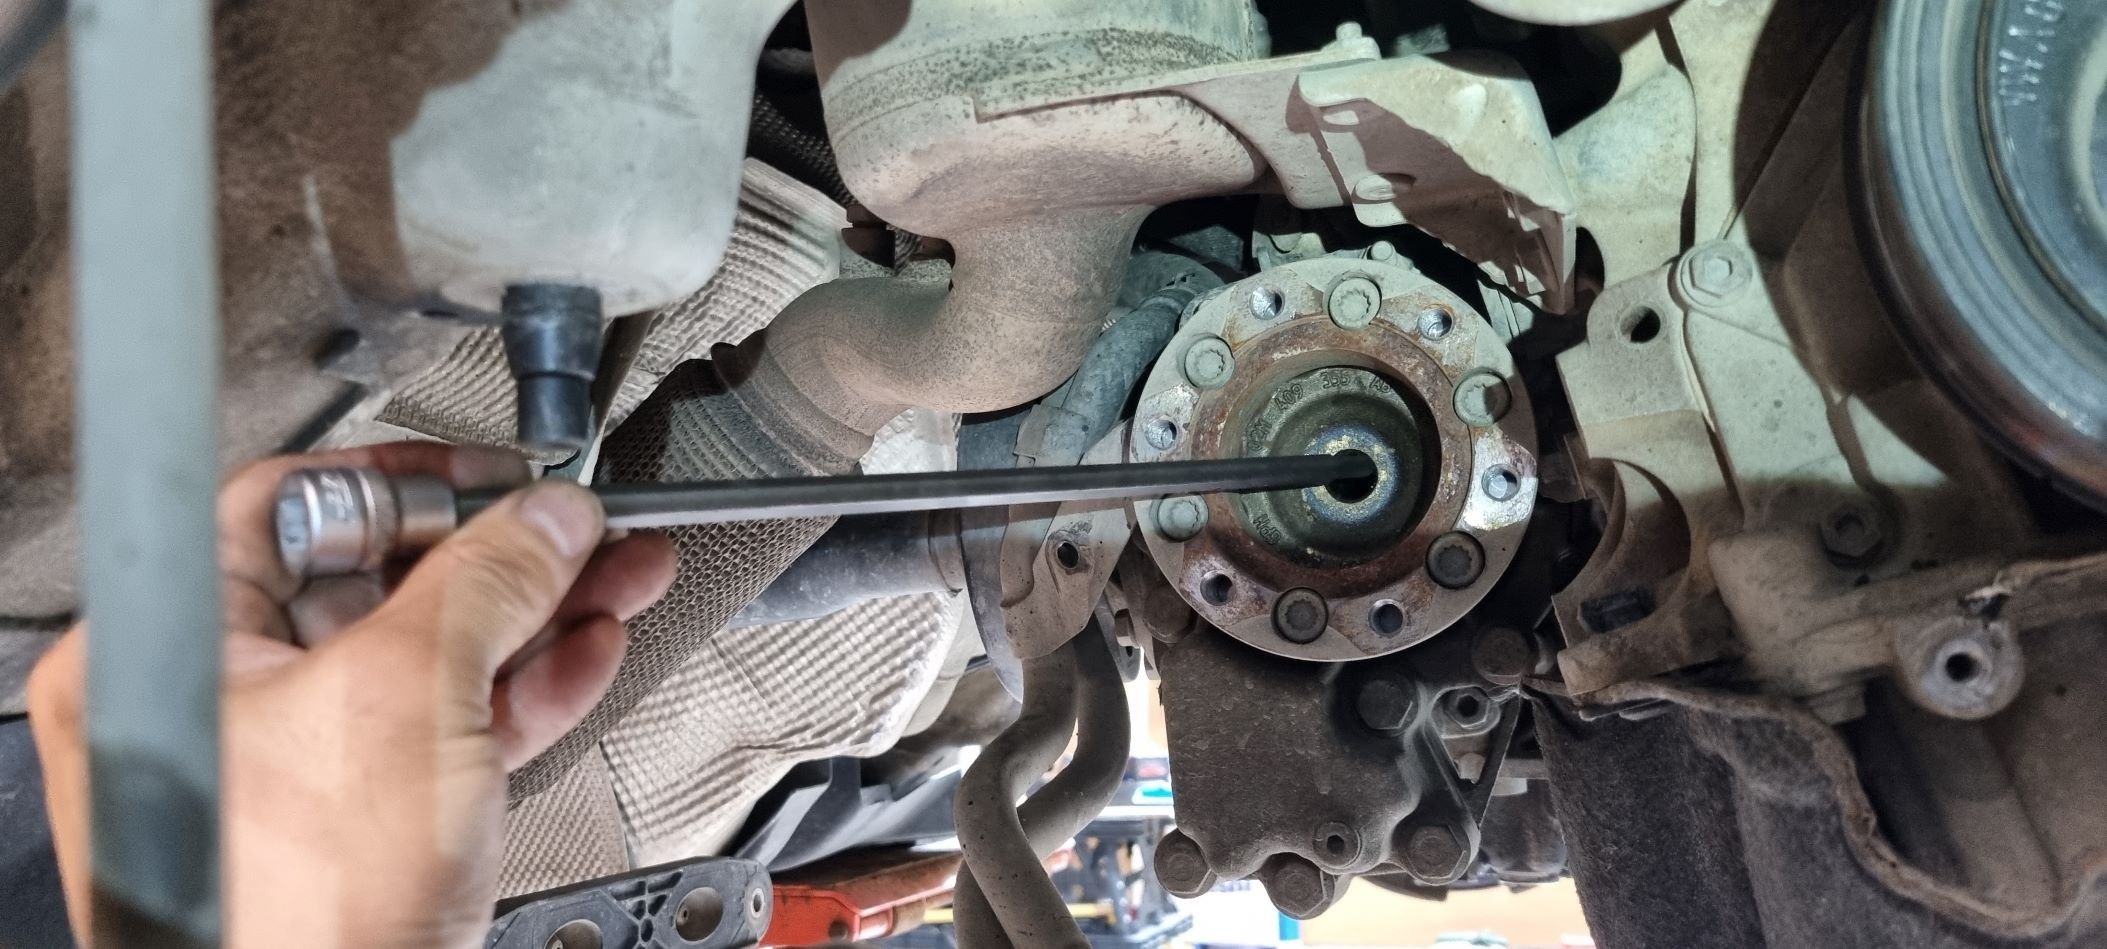
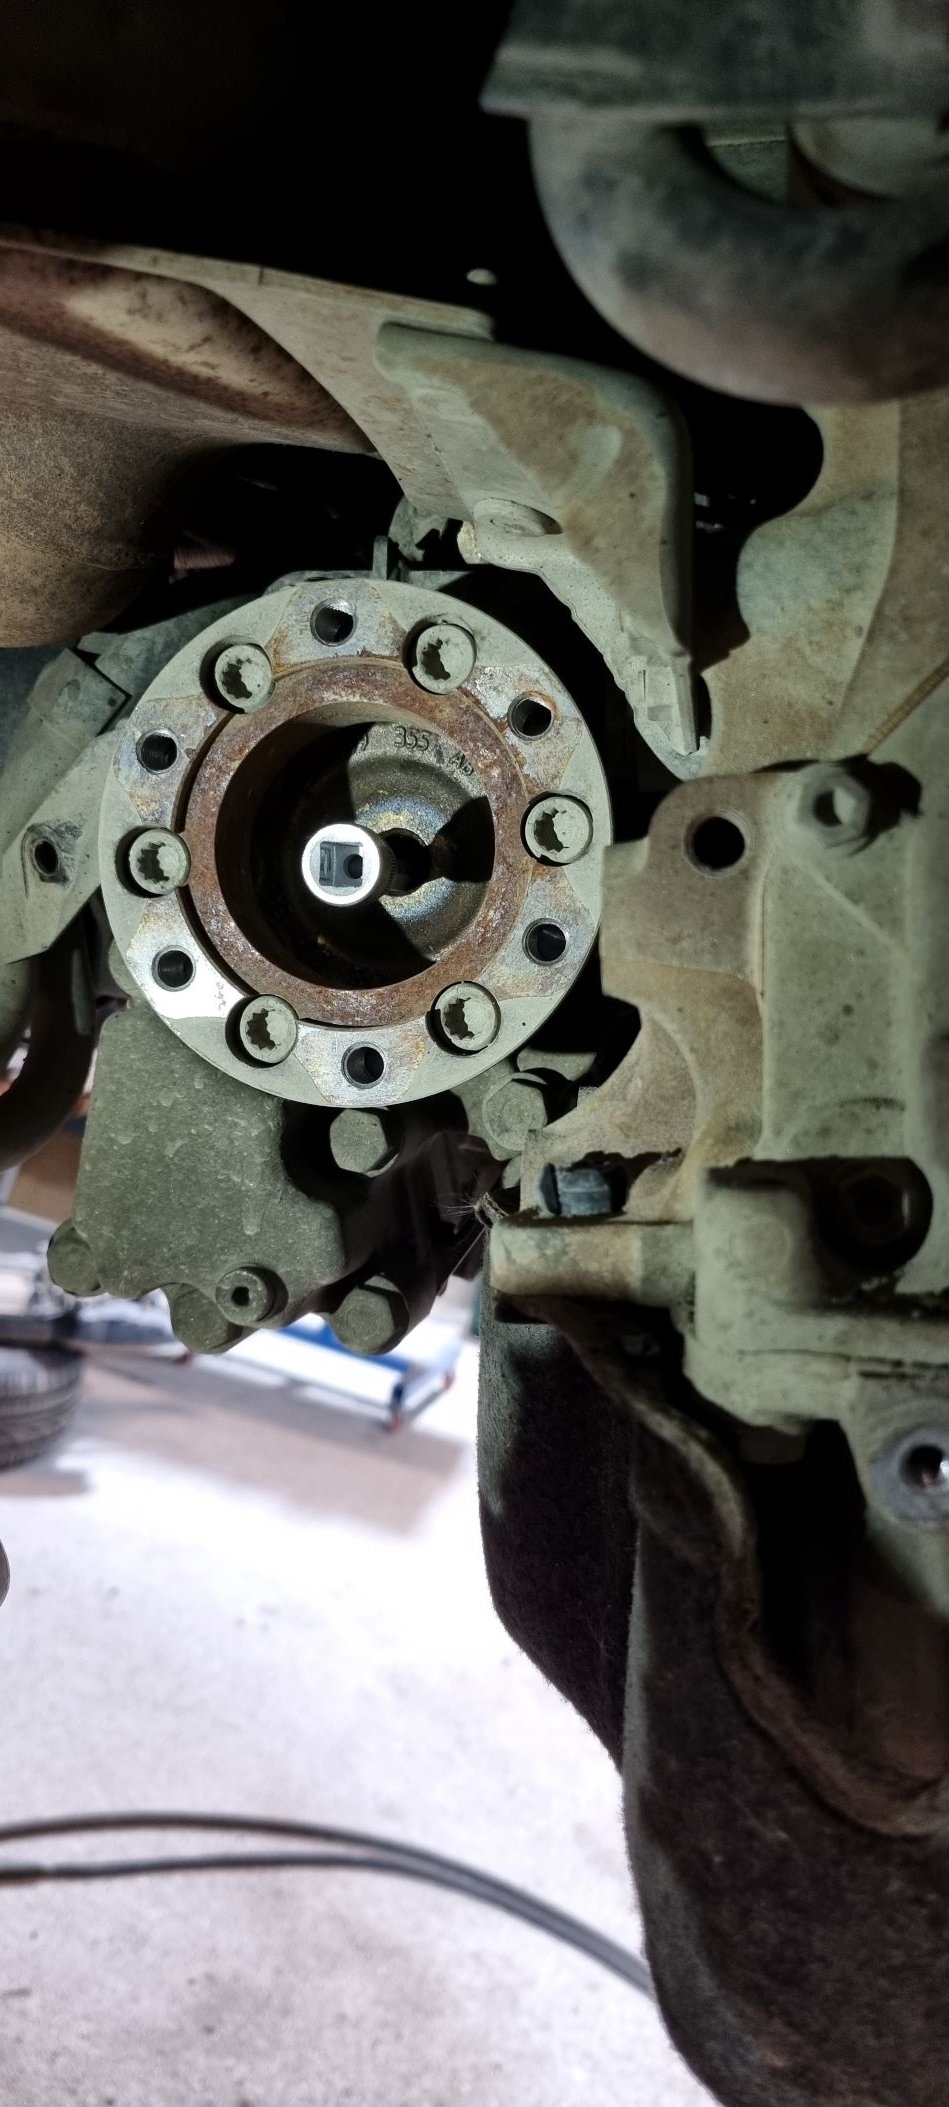
1 point1 pointAre we going to be introduced? 😁1 point1 pointMy estate is the same color as yours But you have the 13" screen. Mine is the 10". I will check if I can find a Laura button on the wheel, but when I call "Hey, Laura!", nobody answers. Neither Laura Linney, nor Laura Dern. And definitely no Laura Prepon...1 pointThere was a programme on Radio 4 today that i listened to. It will be on BBC Sounds probably. 'Uncharted with Hannah Fry.' 12. Scandal in the air'. Tells how VW were caught out. EDIT. http://www.bbc.co.uk/sounds/play/m0022ssm1 pointVin plate doesn't show Kerb weight. The four values are. Gross Vehicle Weight Gross Train Weight Front Axle Limit Rear Axle Limit. Mass in Service on V5 is whatever weight dealer decides to declare and is often incorrect. Certificate of conformity shows the exact kerbweight but we in the UK don't often get the CofC DIN and UK definitions do not include 75kg for the driver. Public weighbridges are easy to use and is only the real way to find the kerbweight. But for the OP I wouldn't really get to hung up. The cars going to be around 1500kg, max tow is 1500kg and will be the difference between GVW and GTW on the vin plate. Stay under 1500kg, load the trailer caravan correctly and drive safely.1 point1 pointNo, the issue has got worse over time. My wife heard water sloshing and it’s only after a really heavy rain storm that the water builds up and you can hear it. I can only assume the window seals have hardened as well, so may replace them. When I open the door, water drains but very slowly. Obviously with heavy rain the water cannot escape quickly enough and builds up when he door is closed and the seal compressed. I opened the door tonight and no water came out, pulled back the seal and out it came. Cannot see what your point is, doesn’t matter when I find out about an issue. I carry bottles of water in my door as I travel a lot. At the time I assumed that was the water moving.1 pointHmmm... A scary moment indeed, but I thought it wasn't supposed to do that. So pleased you managed to get it unlocked to continue your trip (albeit with reduced funds which were no doubt much needed for a wee dram, or three).1 pointThank you very much indeed, and apologies for the delayed response. I became distracted! I appreciate your help1 pointIf yours is an Amundsen MIB1 then there is this workaround posted by @Tell. It will get you 2023 maps.. I've done it successfully. There is a 2023 mib1 map on mibsolution.one which Seat drivers have been able to use with a part number shuffle. Seat never got mapcare or rather had to fork out for map updates unless you use workarounds. Not sure of the Skoda position on mapcare in mib1, it got dropped in mib2. Lucky souls whilst Audi users are in the same boat. The workaround in mib1 appears to be edit DBInfo file with notepad. PartNumber1="your old part number" PartNumber="your old part number" Edit the the new map file two parameters too: PartNumber1="your old part number" PartNumber="your old part number" Obviously your your old part number is your old part number. Use the notepad editor if Windows. You might not need the part number on Skoda... pass on that, but if you do it appears to be just carrying forward you old PartNumber1="your old part number" PartNumber="your old part number" The unit being tethered on what was originally in place. The file is P106_N60S3MIBS2_EU_NT (8V0060866S): https://mibsolution.one/#/1/15/MSTD Always take a copy of the map file before deleting the contents !.1 point1 pointFilters and everything else all okay, including spark plugs; although changed those anyway as they were getting on a bit. Fault codes P030200, P030000 + P130A00 all pointed to faulty coil pack in cylinder 2. Having that replaced.1 pointFronts 5Q0 411 105 HC - £82.40 + VAT each. Rears 5Q0 511 115 Q - £98.60 + VAT each currently at Skoda dealers.1 pointHello @varooom, I have SW version 8740 and have the same crackling problem. Could you please send me version 8755? my mail is [email protected]1 pointThat’d be interesting to see if other part numbers are thrown into the mix 😂 blown away by the help so far especially from @Carlston. thank you, everyone.1 pointMany thanks, much appreciated!1 point1 pointBlanking off one of the holes in the floor stamping as per @pab567 illustration. You may well find a roughly circular wet patch in the carpet.1 point1 pointRe New Jimny Automatics. Those that Ordered a New Style Jimny and received it First Registered to them from the like of West End Broughty Ferry could sell them the same day and get a £2,000 profit easily. Some got more than that on Automatics. The Dealerships were not allowed to keep them and bump the price. I know people that bought a few and sold them immediately.1 point1 pointJust looked it up, the Jimny SZ4 was list price £14,700 in 2016. Deprecation (to me) of £3700 or 25% in 8yr. Potentially looking at the listings I guess someone has bought one of these and made money over that time. Salesguy said the prices online were too high really didn't know who would be paying that sort of price (£20k for an old auto, they'd sold new edition Jimnys for not much more) and thought that they were being stockpiled for some reason. Might be true might be rollocks.1 pointInteresting, I find myself in a similar position looking at other cars now and getting a bit restless after seven years of ownership. I've been looking at a couple of EVs which feel like a quantum leap in terms of technology and performance. Yet every time I get back into the Superb I am struck by just what a brilliantly resolved package it is, the ergonomics are brilliant and everything just falls to hand, it does everything so well and is without like the best car I've ever owned. I would suspect that the novelty of a new car would wear off soon and I would miss so much of what is good about the Superb. Tread carefully!1 pointEither that (check drain holes in the heater inlet in the engine bay) or around the rotted window frame. Sealing it up, as d.fylaktos advices, is only a temporary solution. Anyway, water in the fusebox very likely drained the battery and it's possible that some corrosion happened. Make sure it's all dry and clean before recharging the battery, corrosion can damage the fusebox.1 pointI was taught not to grip the gear lever but to cup an open hand around it in a way that 'suggests' to it the direction you want it to go. For 1st hand on the right rear, for 2nd hand on right front, for 3rd hand behind, for 4th hand in front, for 5th hand on the left rear and for 6th hand on the left front.1 point1 pointNo I just assumed they all did it from time to time. It happens about once every 20 uses for me.1 pointBecause of the way 1 to 2 and 5 to 6 gates are biased, you do need to maintain very slight left or right pressure on the stick to align those gates correctly, as the stick is weighted towards middle gate.1 pointTaxi driving is probably the kindest thing one can do to these diesel engines, my chauffeur pal put 188K miles on the MK1 Octavia he sold me after 3 years, I took it on to 325K miles and it still sounded like a sewing machine despite all the abuse and neglect it suffered in my hands. Pleased to hear you invested in the EGR device, its reassuring to be (fairly) confident that it is not going to go pop and give me a major job to do, its a real work up on a 4x4.1 point1 pointI’ve been driving for over 30 years and up until recently I never had the option to check my mpg or average speed on an app. Thing is, back in the glory days of the early 90’s when I was tearing around in my Escort XR3i my mpg or average speed was the last thing on my mind. Same throughout the 2000’s with my various other cars, until relatively recently when apps became available to check such things. Point is, I didn’t care then and I don’t care now. Do any of you really drive like your nan just to see how high you can get your mpg on the app? If you do I feel very sorry for you, and would encourage you to get a life. My car is a tool for me to get from A to B, work, the shops etc, therefore I get in and drive it. If I want to put my foot down I put my foot down, if I don’t I don’t, the app is the last thing on my mind. I totally get the argument for driving conservatively in order to save fuel, but in reality how much in monetary terms are you actually saving, a quid in every full tank? Two quid maybe? All that effort and stress to save a pound or two, I’ve got far better things to worry about. The ONLY thing remotely useful is the health check of the car, although I suspect that even that isn’t totally reliable. Im all for progress, but this app just seems like a useless gimmick to me, and therefore not worth a second of my time worrying about it. Each to his own I suppose.1 point1 pointOkay thank you! I will get the dealership to update mine when they have my car in a few weeks.1 point1 pointNope. I worked out the cost of one bottle of fuel additive (Forte) was the equivalent in price to two full tanks of Premium diesel over standard. Just buy a tank of Esso Ultimate or BP Super. Go for long motorway drive and keep revs over 3000 rpm for 10 miles. That'll do more cleaning than an additive.1 point1 point1 pointLast month I replaced all four tyres on mine, 46k miles from a set of Michelin Primacy 4. The fronts slightly more worn than the rears. They were down to about 3.5mm tread left but decided to replace all as I had an unrepairable puncture near the sidewall in the right rear and with winter approaching thought a new set of boots was worth it.1 pointTbh I never understood what's the point in lane change. I'd rather do it myself.1 pointThank you Bigade1 for all your work.1 pointThanks again bigade1, much appreciated !1 pointthanks bigade1👍1 pointDoing this repair I estimate to save 3500-3700 GBP everything included (NOK converted to GBP) yes, workshop jobs are expensive in Norway.... EGR cooler, dual mass flywheel, crank shaft seal, poly v-belt, dsg oil service, front diff oil service and a thorough inspection.1 pointThanks bigade1 much appreciated !1 pointMine was a manual gearbox, was yours being a DSG the reason for removing the drive flange? You did not explain the actual reason for doing so only that not doing it was a no-no and it would cause lots of trouble. I really like your scissor lift, it looks portable, is it? Do you find it stable? any drawbacks that you have found? It might be the solution for my new workshop not having enough height, I did not want to have a 2 post lift outside in all weathers.1 pointThe drive axle flange..Do not try to remove gearbox on a 4x4 without removing the axle flange first. That is a nogo and save yourself of a ton of work, and just remove them during the subframe removal process. I use a special tool, it is just a very long hex 5. And to get the drive axle flange out you will need a press or use what I used, a slidehammer. You will figure out what is best, but VAG do have a special press tool for this, but a slide hammer is just as good.


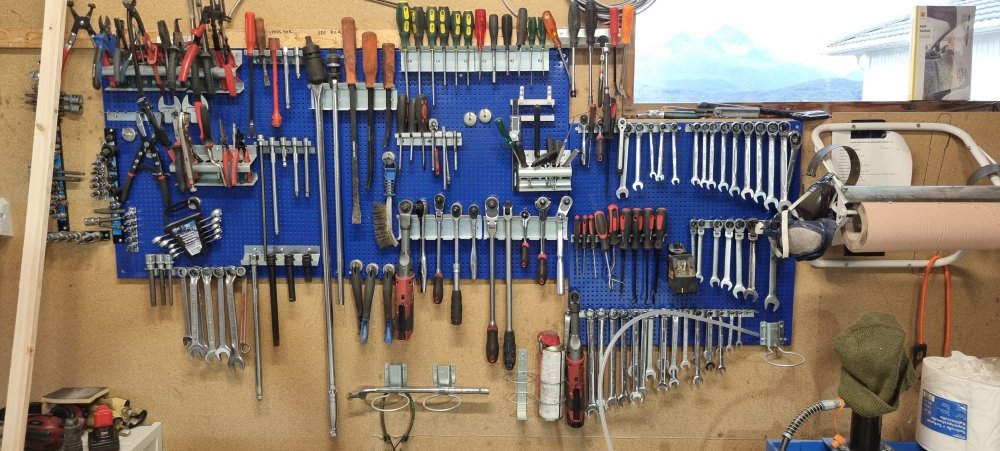
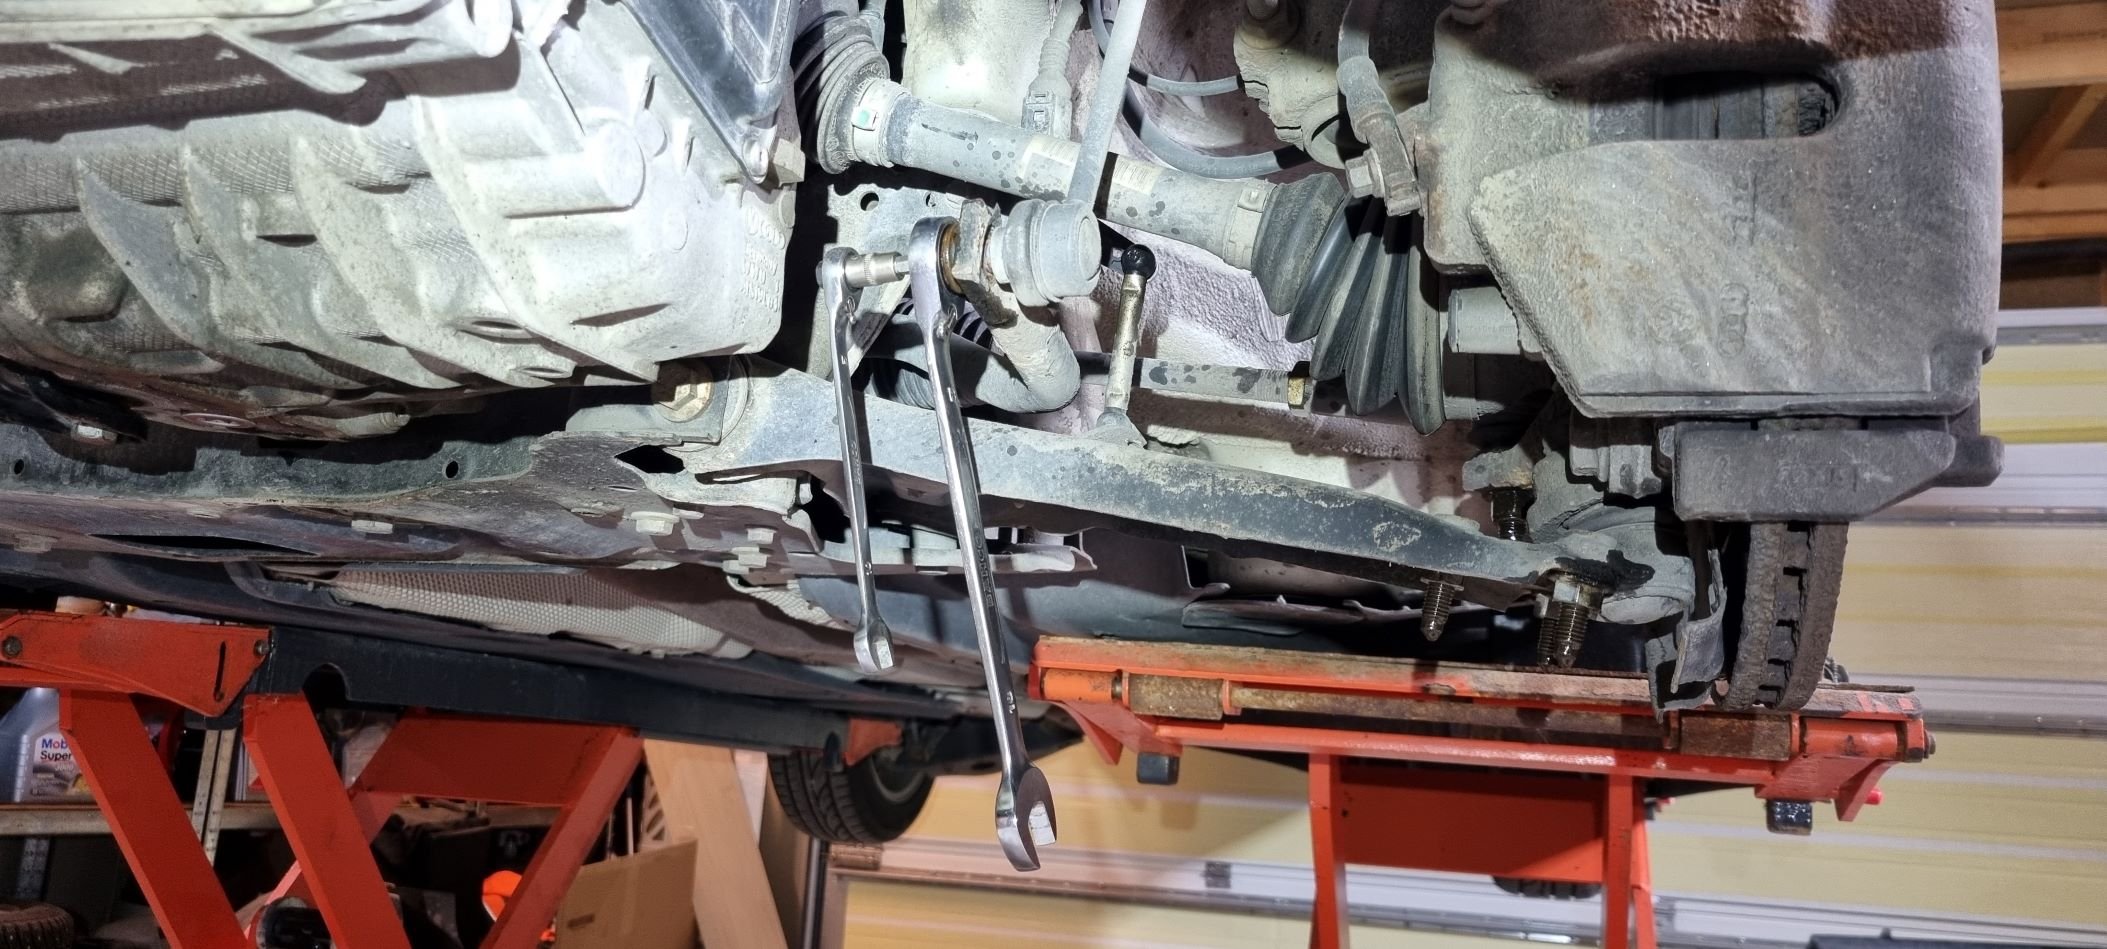
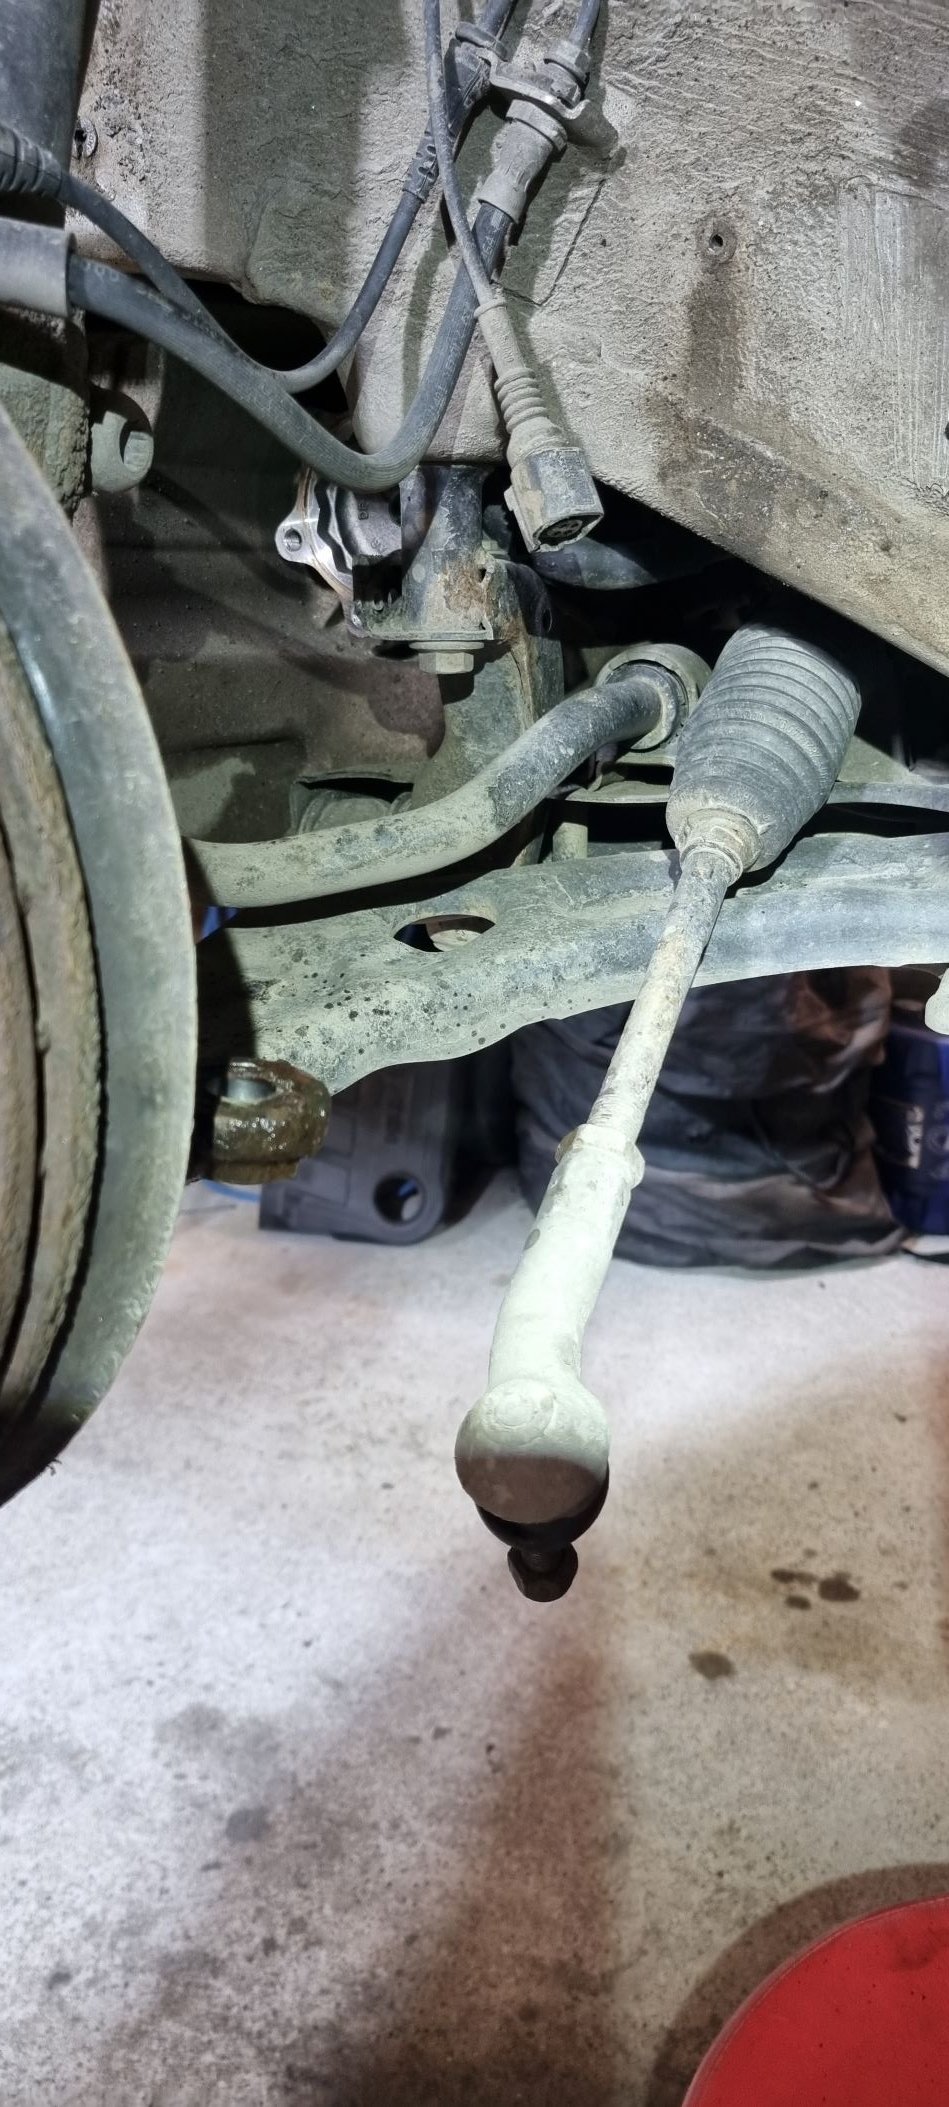
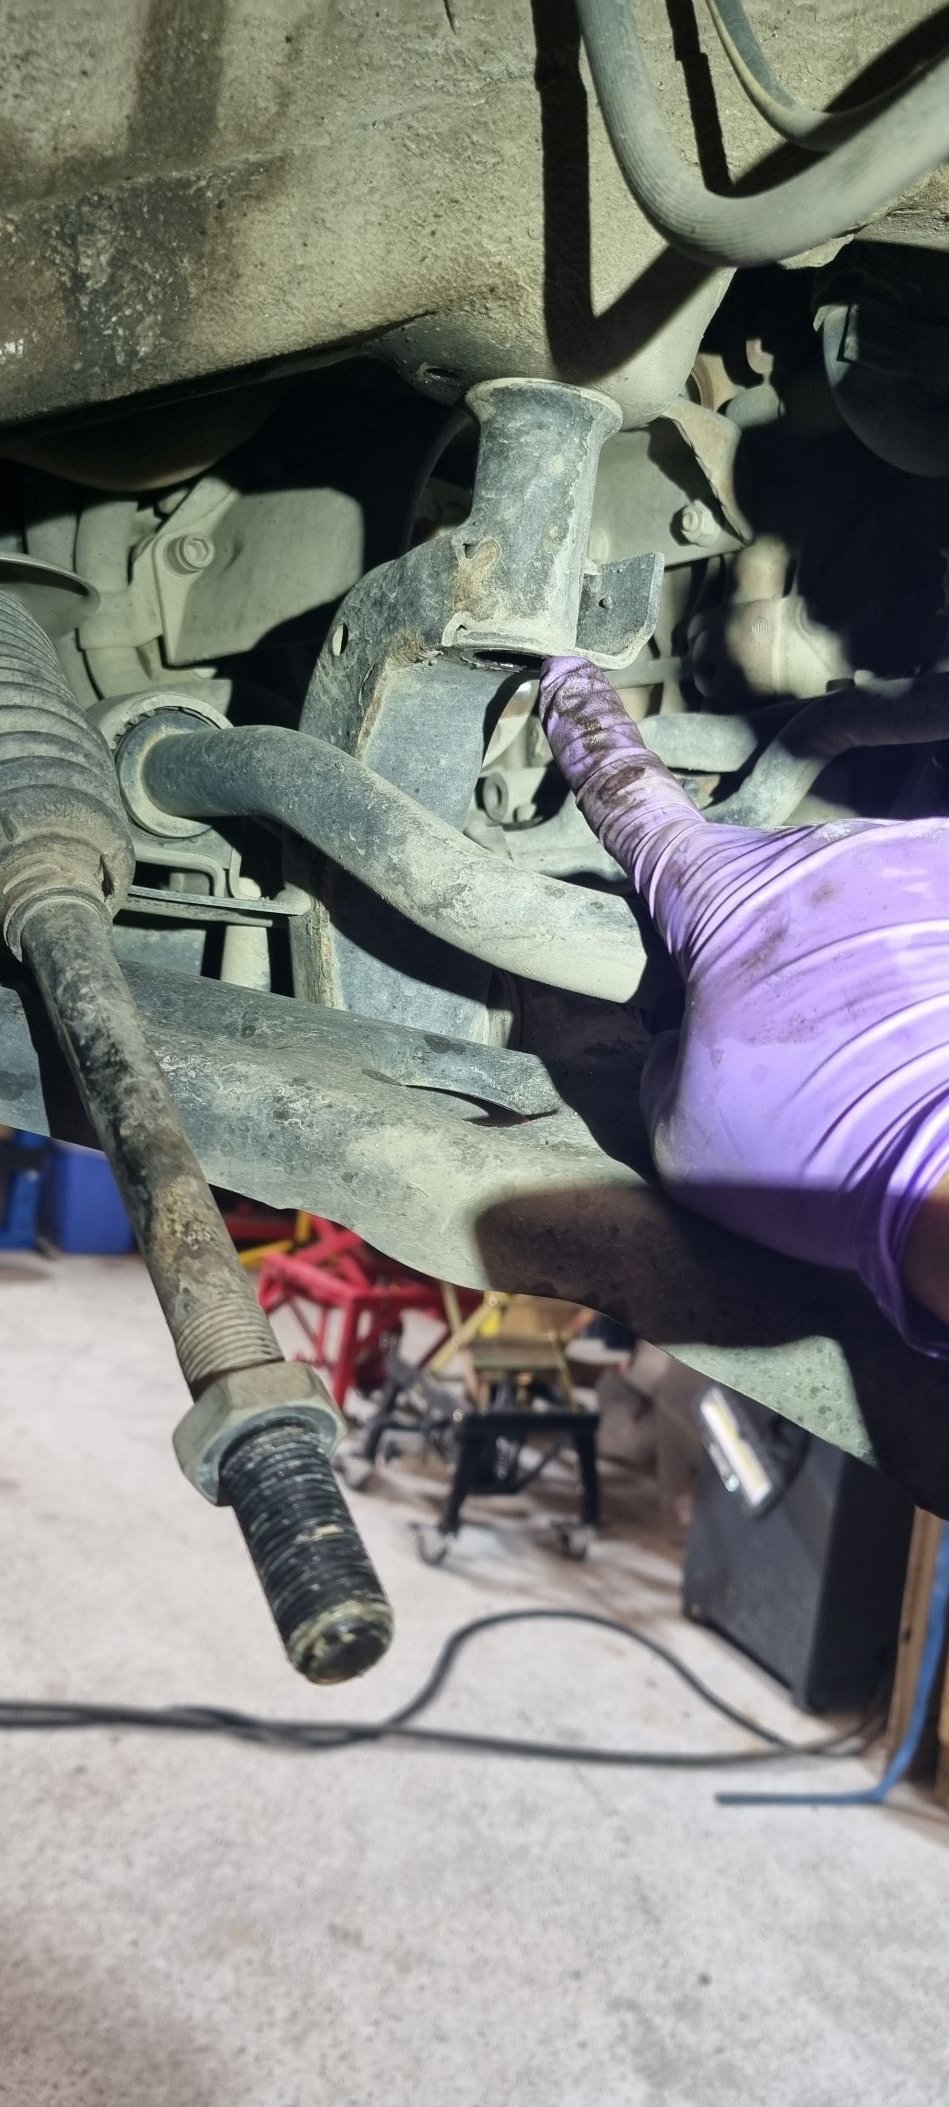
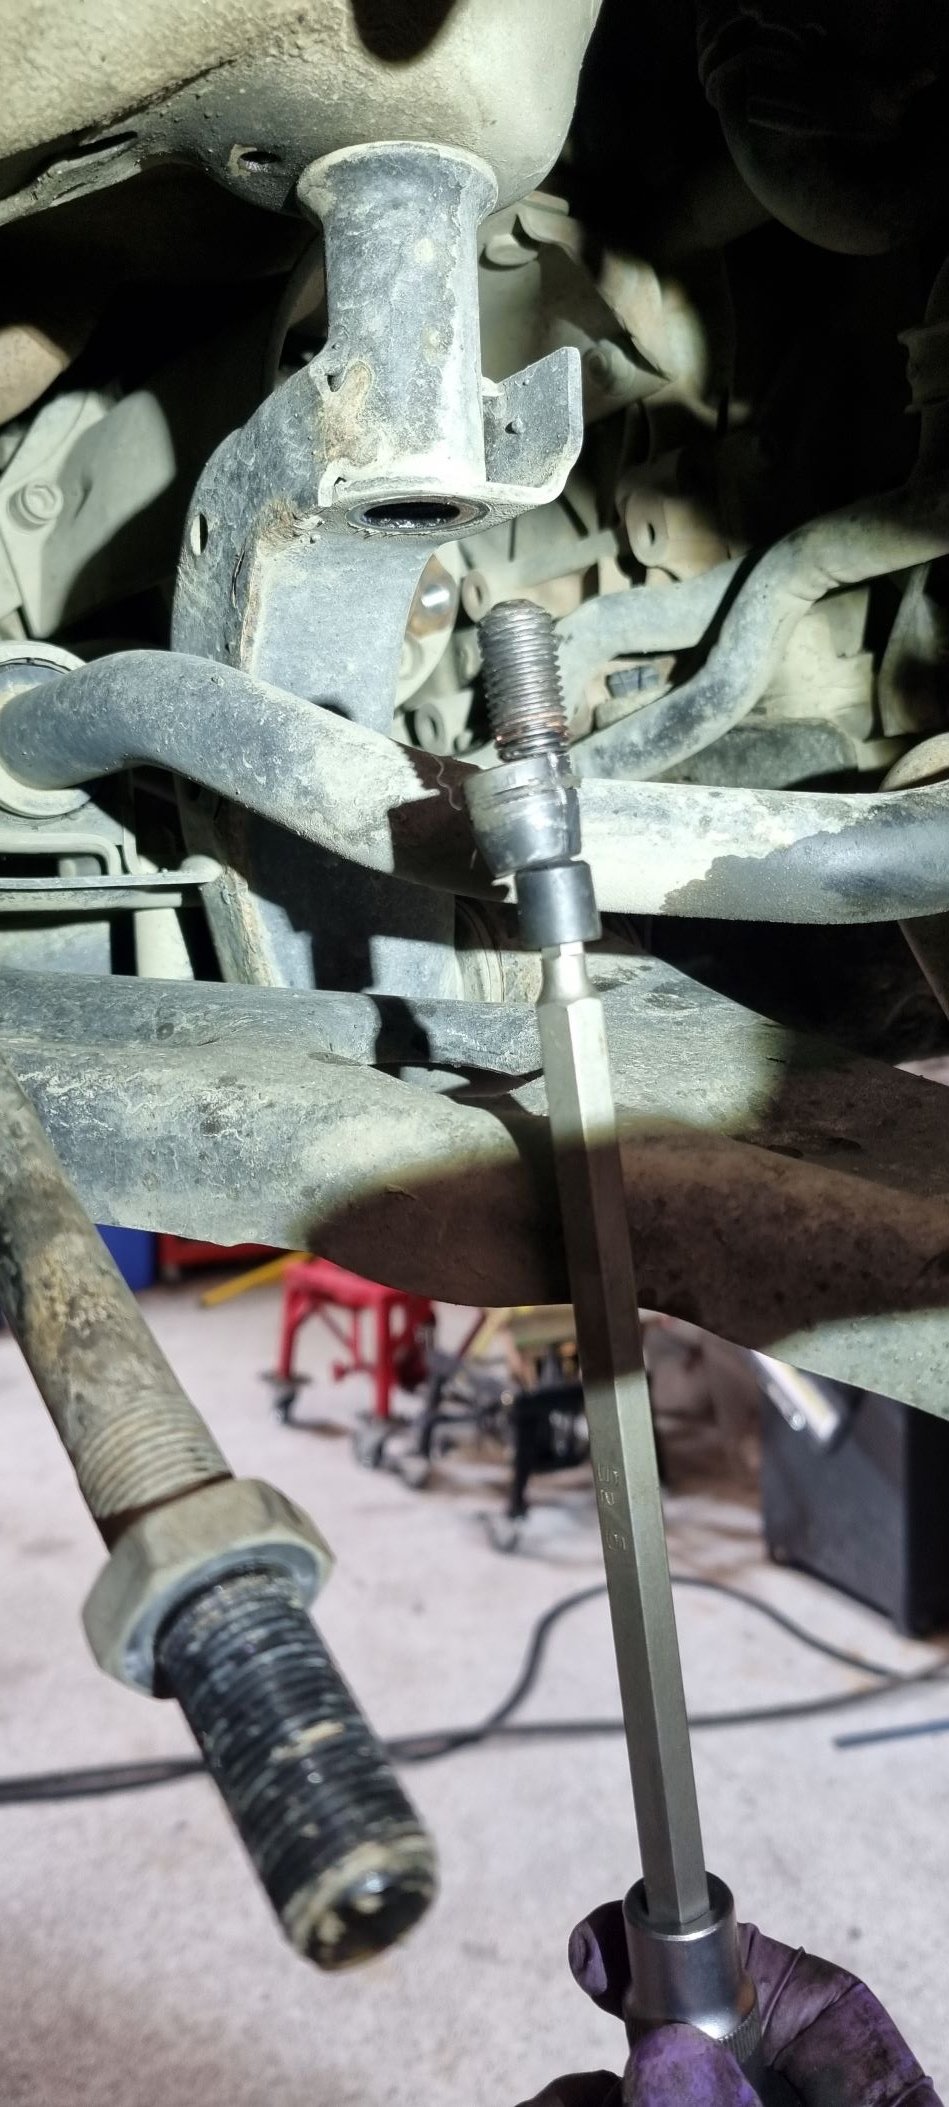
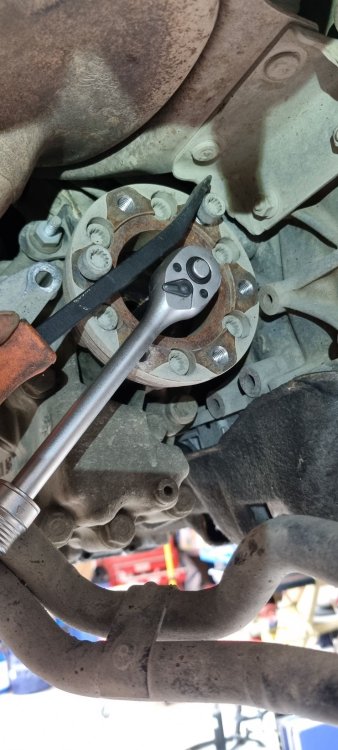 1 pointTo replace the dual mass flywheel on superb 2.0tdi 4x4 engine code CFFB and 6spd DSG box (wetclutch), there are some precautions I need to consider. First, get the right tools for the job. You never know what you get in terms of availability to certain bolts and nuts. Next is to consider, are they easy to unscrew? So, to me I have different tools to these jobs. Mostly I use Milwaukee battery tools, but also a lot of hand tools, since it is easy to brake bolts and nuts with too much power. For rusted nuts I have a induction heater and that helps a lot. When everything else is a failure, a well loved grinder is the way to go. Both a big one or a small Dremel like one. I started with loosening the axle bolts on both sides before raising the vehicle. Used 24mm 12-point socket and biggest Milwaukee M18 Impact wrench (1898NM) to get them loose. Take off wheels using 17mm socket and undo all plastic under engine and wheel housing with Torx25 and torx 30 Take out both axles using a long XZN 10 (or no 8). I stick a screwdriver into the vented brake disc plate to stop rotating. This should be easy. I actuallu disassembled the right brake caliper, disc and disck protection back plate to get better access to the drive axle bolts. In GB that would be on the driver side, but in Norway thas is the passenger side. Next is to disassemble the lower vertical stabilizer nut to free the joint from the knuckle I think it was a 16mm pipe and also disassemble end link on steering rod from the knuckle (21 mm pipe I guess). Use a press, not a hammer imho. Last, unscrew 3 nuts, 16mm pipe, holding the lower control arm from the knuckle. Dont forget the height adjustment device (green one) on the left side of the vehicle bolted to the inner side of the lower control arm. Use 10mm socket. Now, disconnect the 10mm nut inside on the steering rack behind the gas pedal in you car. Lift up and disconnect. Do not touch the steering wheel after this! Remove the 3 dogbone bolts, one is 18mm, the 2 front are 16mm. Remove dogbone. Remove the 2 13mm bolts holding the exhaust to the subframe Now the subframe is held by total of 3 bolts to your car on each side. One is located thorugh a hole in your subframe and the other 2 in the back of your subframe. You will find them bolted directly to your car chassis. There are other bolts as well, but they are not connected to your car chassis, but to the steering rack etc. I use subframe guiding pins to avoid needing a 4-wheel adjustment after the subframe is taken down. See picture. Take out bolt by bolt replacing each one with a guiding pin. Also set a gearbox jack or MC jack under subframe to support it. Now when all 6 bolts are removed, the subframe will come down and out. Remember to disconnect cables to the subframe assembly, especially the oil level sensor will easily break if you forget to disconnect. Just lower the subframe enought in order to use your hands to unscrew the 3 torx 30 bolts on the heat shield over the subframe electronics. And use a small pick to disconnect the cables. When all are loosened, lower subframe. There, subframe down and ready to continue next step. Here is a picture of the guiding pins in use.
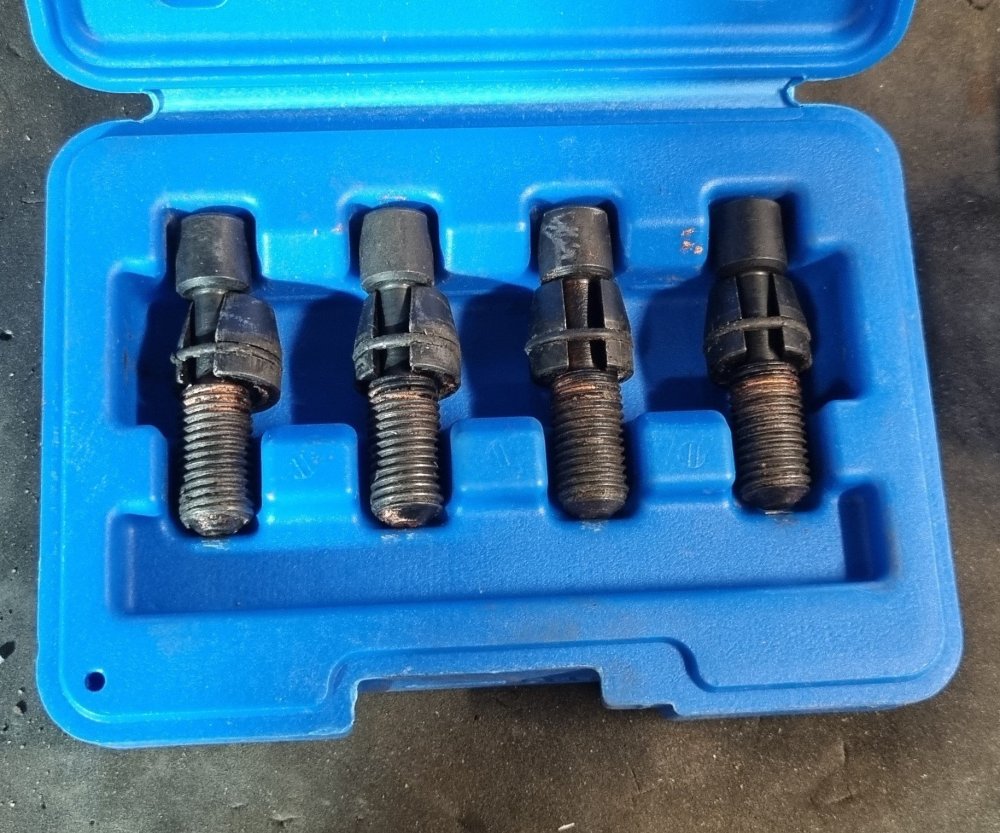


 1 point1 pointA Mk1 Fabia is unlikely ever to become a valuable classic so whether is worth repairing depends on your attitude to the car - if it's just a means of getting from A to B then no, but if it has some sentimental value that exceeds its market value (probably a lot less than the £800 you paid 5 years ago) then maybe yes. Two cars I've owned I now regret selling - a 1995 Renault 5GT Turbo and a 2007 Audi RS4 Avant - I now realise I loved driving them so much that for me they're worth so more than the market value.1 pointParts to be replaced and some special tools required.
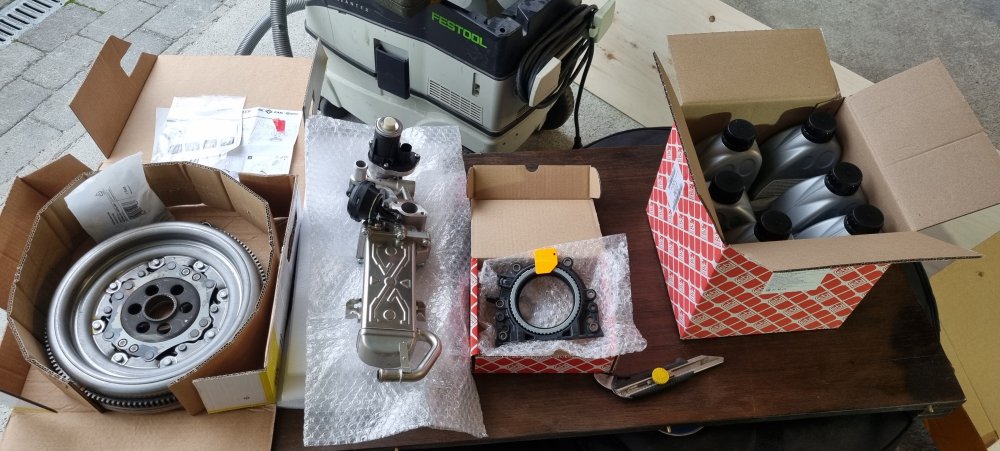
 1 pointI bought a ski bag! But, rather than buying the genuine Skoda one (cheapest I could find new was £50), I bought the Audi one. Exactly the same bag (literally identical, same instructions printed on it and everything), just with an Audi logo in place of the Skoda one. Same applies for VW and Seat, but the Audi one was the cheapest option (guess there's shedloads of them about unsold as Audi owners don't ski it seems) - got it new for £20 delivered.1 pointHey up, Im from the area! I do most of the work on my car myself, but I've heard very good things about Kendal VW Centre! Garages I have used include Westgate Tyres for any wheel/exhaust works, Been multiple times and theyre great chaps or York Bridge MOT Center for my MOTs - but I believe they also do preventative maintainence so could do the cam belt. Although I'd probably stick to Kendal VW Centre as theyll be well used to the EA211 engines in the fabia1 pointUnder the MENU button he needs to look for the SMARTLINK option. See here:- Thanks. AG Falco1 point


.thumb.jpg.f83a46b9b3c0d976b9dbffbb523c9874.jpg)


_1.thumb.jpg.a1192bbf41f272c9e8d062560a0c4c2a.jpg)


Important Information
Welcome to BRISKODA. Please note the following important links Terms of Use. We have a comprehensive Privacy Policy. We have placed cookies on your device to help make this website better. You can adjust your cookie settings, otherwise we'll assume you're okay to continue.