Leaderboard
-
.jpg.5f5908b5afb5ed410c43d763df801089.jpg)
Evolution13
FREEDOM18Points2,490Posts -

Lee01
FREEDOM10Points36,412Posts -
skomaz
FREEDOM9Points11,162Posts -
varooom
Resident Member8Points4,411Posts

.thumb.jpg.9dd3f612ba7f13d10be5c518d3c8d255.jpg)


Popular Content
Showing content with the highest reputation on 10/05/26 in all areas
-
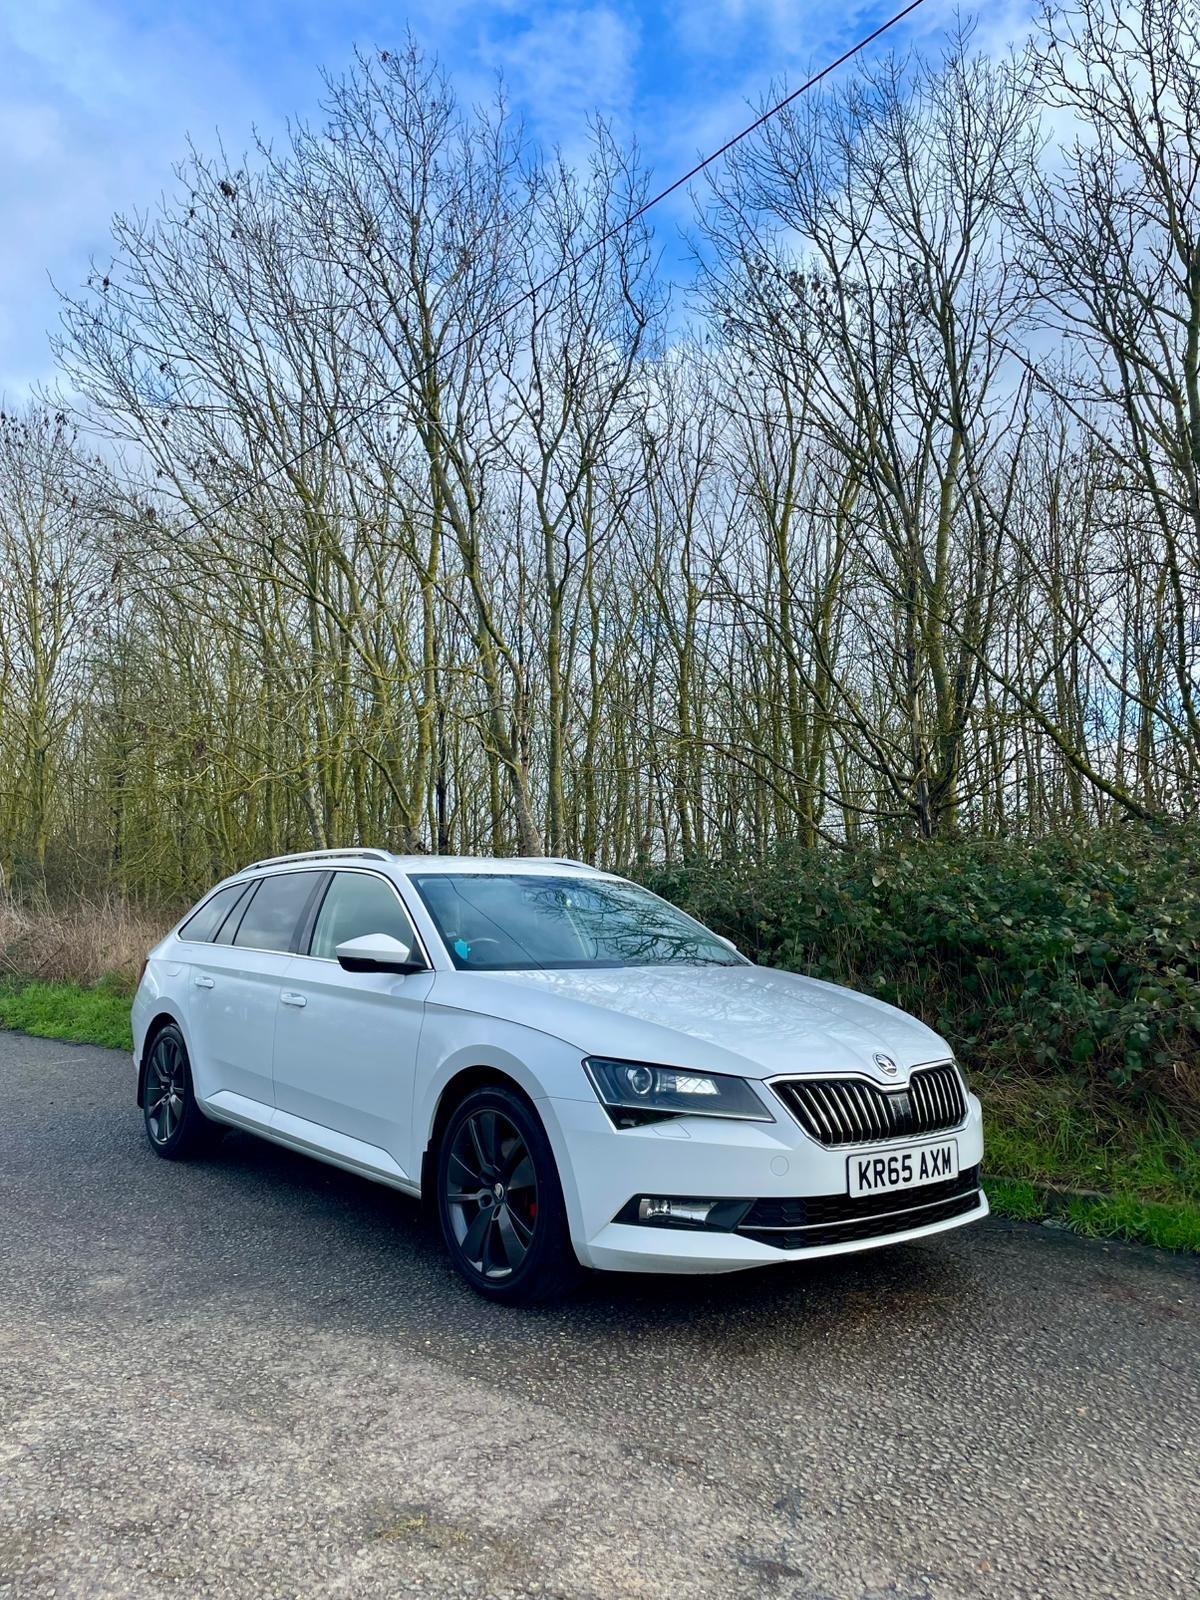
Hi folks, Had a call from my local dealer yesterday to confirm that my new Elroq has arrived (ordered start of February), and it’s due for collection on Thursday. Really looking forward to it! It’ll be my first EV, and I’m coming from a 66‑plate Skoda Superb L&K 2.0 TDI with just over 141,000 miles on it. I've had it almost 10 years, love it. I’ve already had a Hypervolt 3 charger installed, so everything’s ready to go. Pretty buzzing! For those who already own an Elroq: Do you have any advice for a first‑time EV owner? Anything I should check, set up, or be aware of when I pick it up (other than just enjoying it 😄)? I’ve got a feeling the standard tyres might not be the best—bit disappointing from Skoda on a car at this price point—but I’m not quite ready to drop nearly £1k on a set of Continental all‑seasons just yet. Car: Škoda Elroq SportLine 85 Added Equipment: Graphite Grey Metallic Front aluminium door‑sill covers Front & rear mud flaps Foldable tow bar Winter Package Maxx Package Heat pump Driver Package 5‑year / 100,000‑mile extended warranty3 points
-
As already mentioned, check your tyre pressures when you get home. Before you leave the dealership, check for any damage to bodywork or interior trim. Take someone with you that can go over the car whilst you're doing the paperwork. The excitement of collecting a new car can give you rose tinted glasses so let someone else check it. Also be sure to check under the car as well especially side sills (rocker panels) for damage.3 points
-
Hi new to the site I have just purchased a 2008 superb Laurin and klement edition in dark blue with cream leather 118000 with original wheels athou the wheels need full refurb i think they are diamond cut but maybe someone could correct me could anyone tell me how many were produced in mk1s and are they a rare car I would have preferred the 1.9 as apose to the 2.0 litre but it drives just a good and coud not find this edition in a 1.9 but I don't think they did a laurin klement in a 1.9 tdi but correct me if iam wrong2 points
-
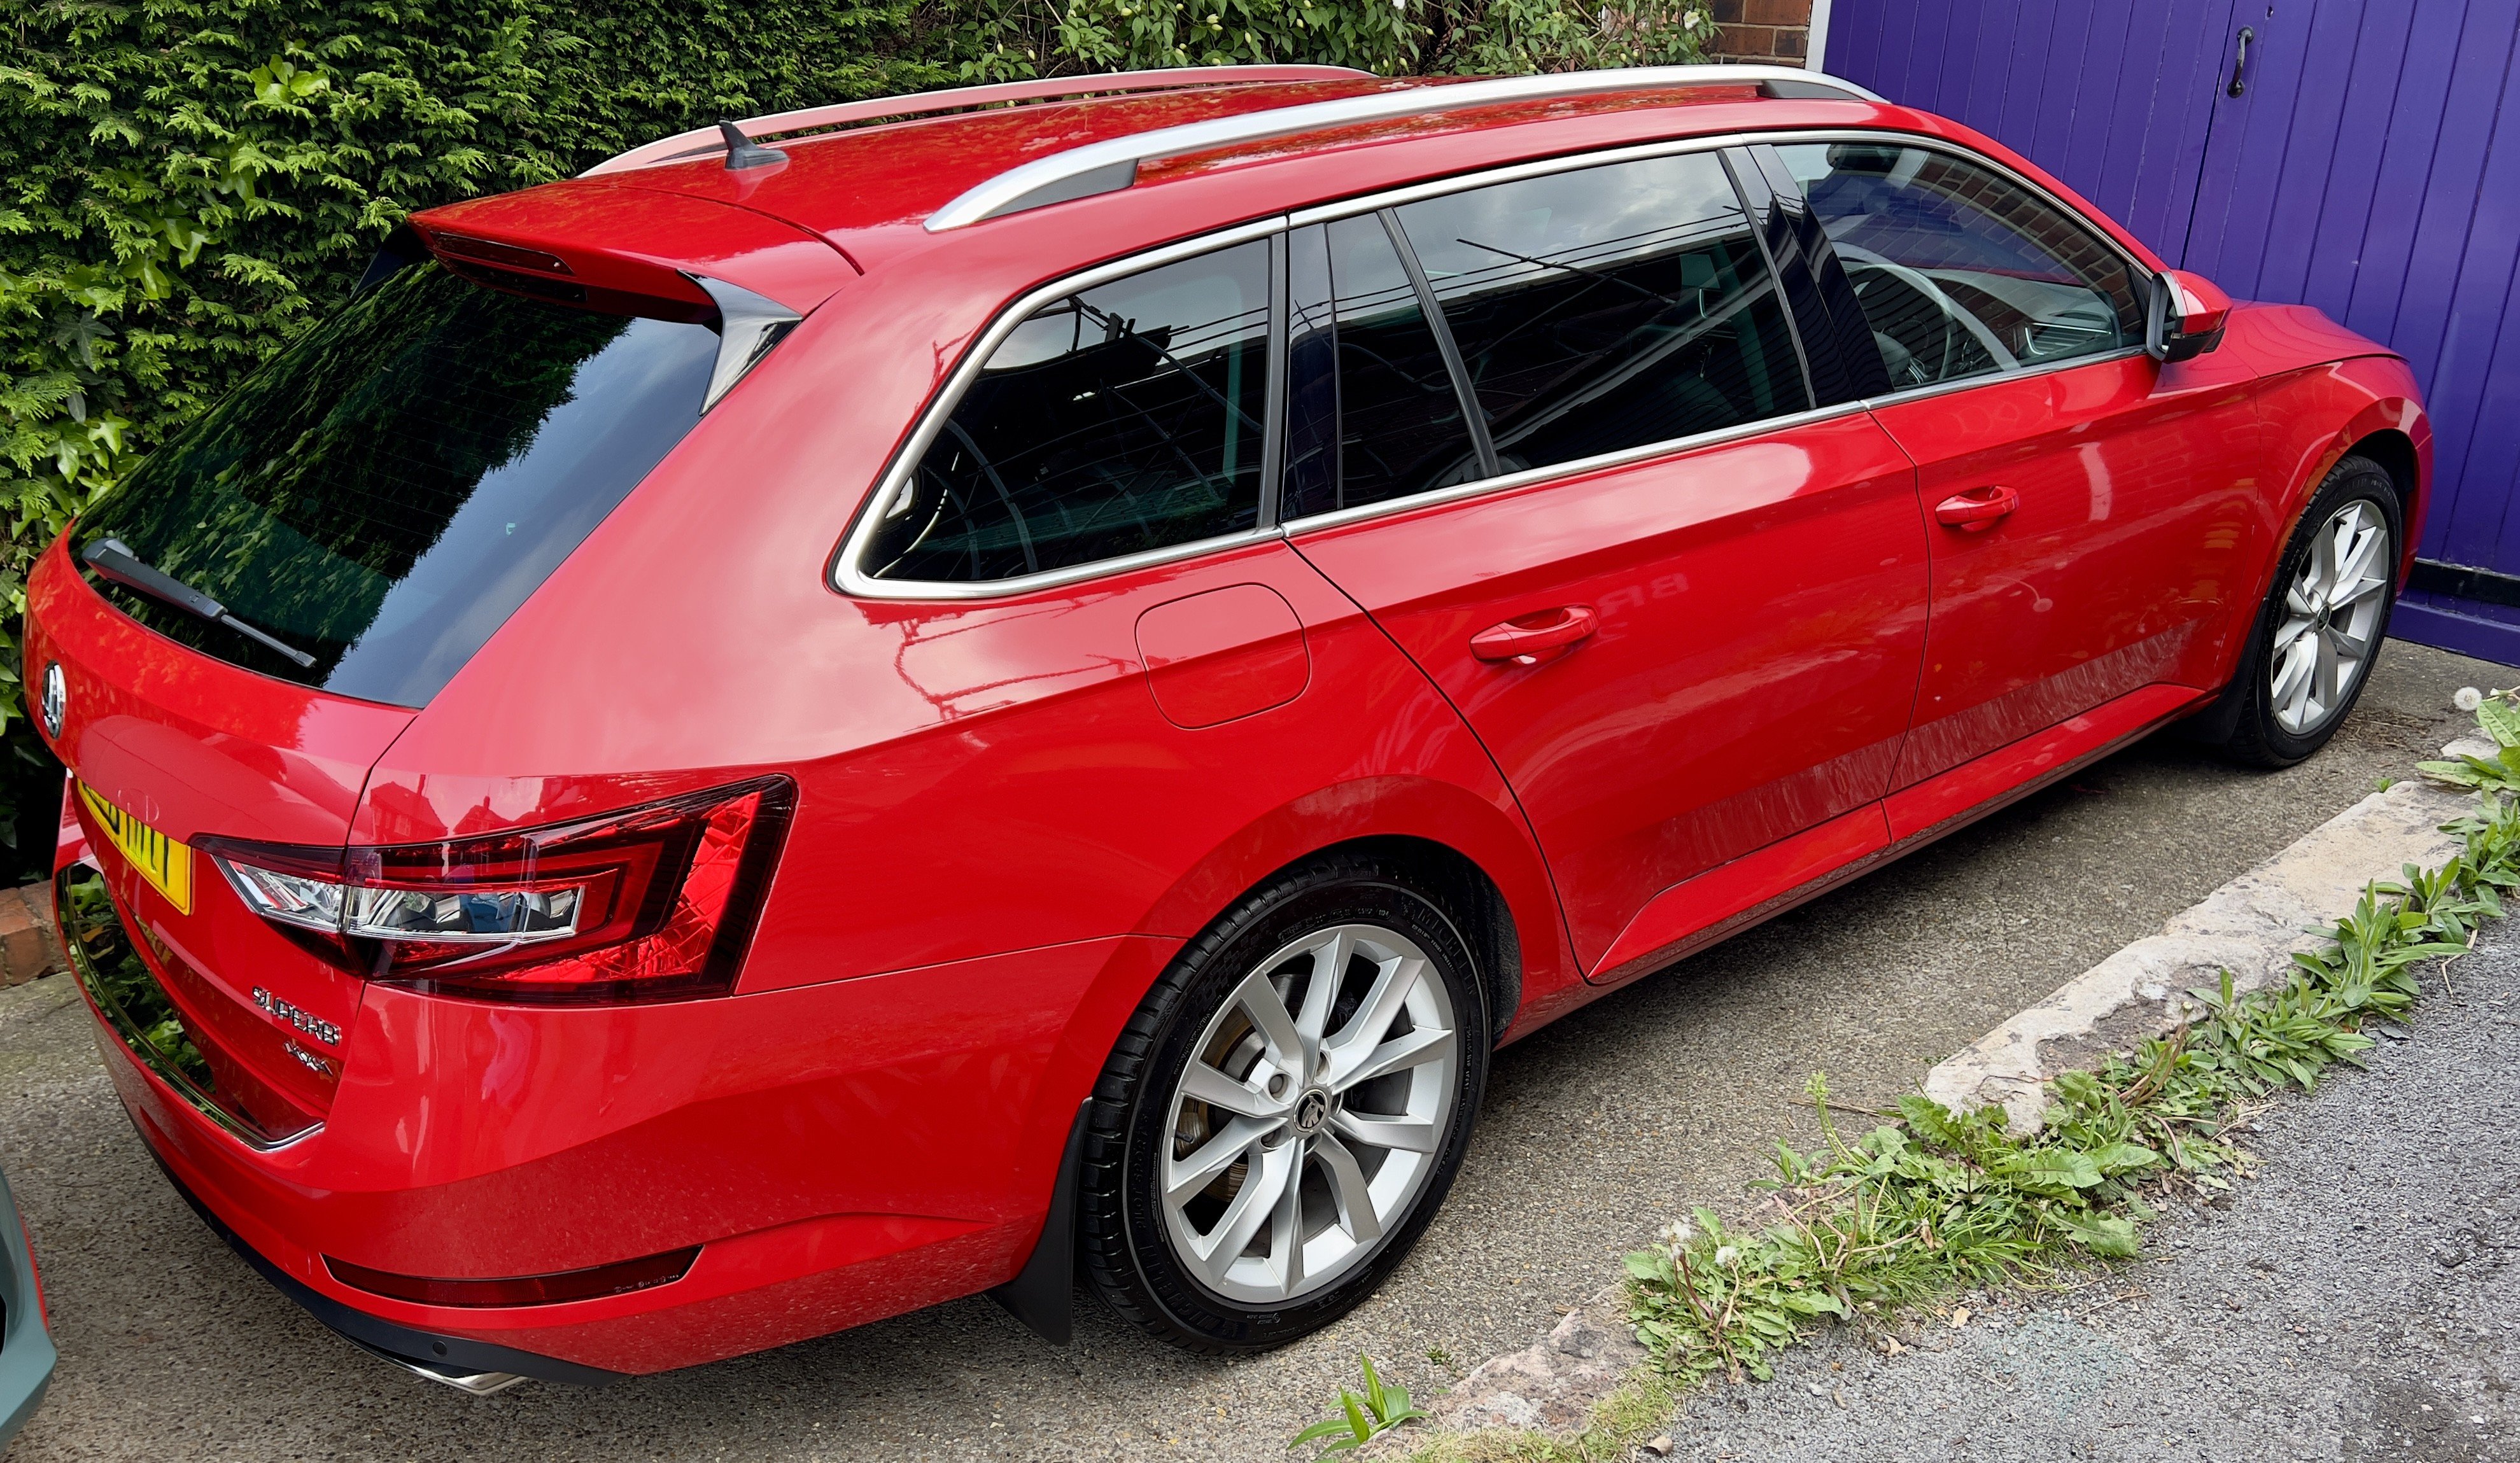
Hello. I have ordered a Black Octavia Vrs Estate. Service Pack and 5yr warranty, Heated Windscreen and Steering Wheel, Canton Speaker upgrade, Space Saver Spare, and Assisted drive package plus with remote park plus. I am seriously considering a Gyeon Ceramic Coating by a known local Car Valet / Detailer as this car will not spend much time garaged. I’m comfortable with the car on order and the selected options. I’ve owned 3 VAG cars since 2006 from new, so not new to VAG,er, foibles. The Skoda is the best available for the money in my view. I prefer a new car rather than a used 2yo Audi Estate or Mk8 Golf R. Im not a great fan of the dealers local to me for used purchases. A Mk8.5 Golf R is no longer available, and in any case they had become rather expensive with options. I have owned and cherished a 2019 Golf R from new. Loved it. All of it. The only dislikes are the poor turning circle and the small boot due to 4-Motion and the raised boot floor. I’ll miss the acceleration, grip and performance as well as the all weather security of 4 driven wheels, but I’m hoping still to have some fun and good times in an Octavia vRS estate. I’ve also been an active member of the Golf R Forum - VWROC- which I found enhanced the ownership experience. I’m intending to be active on here too, and plan to keep my Wagon for several years to come. I’m looking forward to it.2 points
-
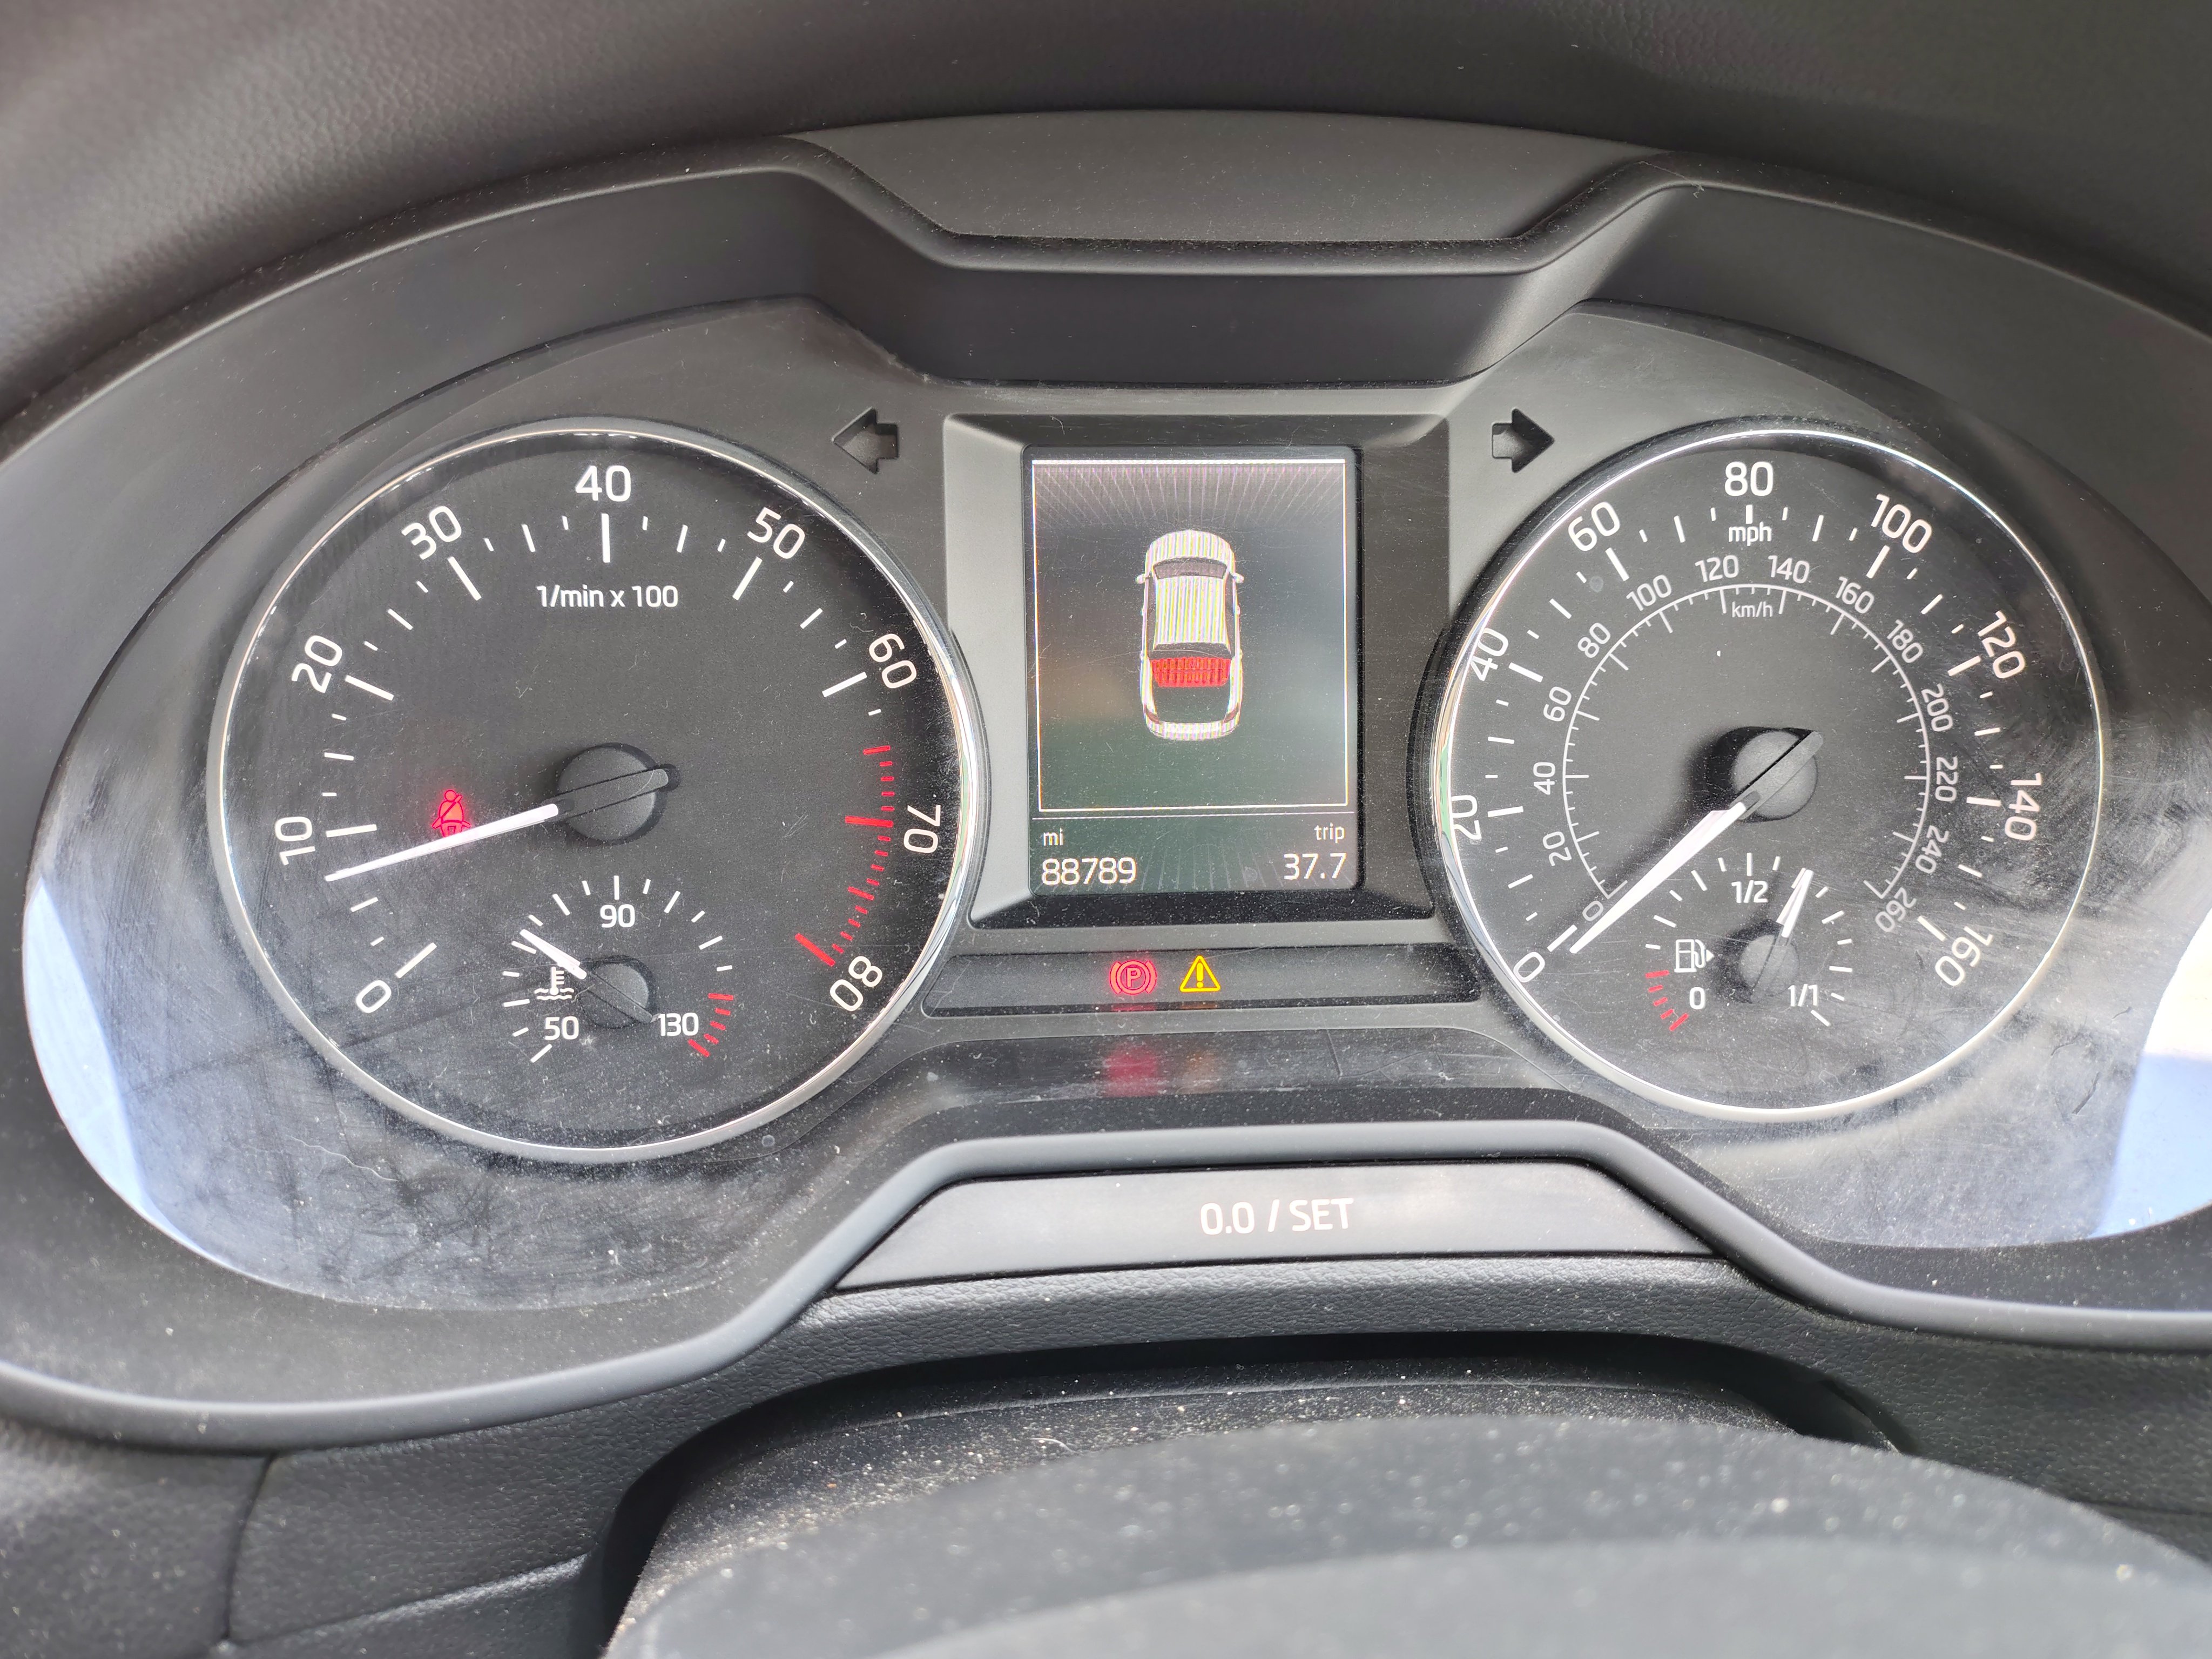
2 pointsI was intrigued, so just had a look. Bear in mind this is 2015 Elegance so might be different to your 2016 Greenline. As @Breezy_Pete said, the fog H21W comes on but dimmer as a sidelight, as does the brake P21W.. FOUR rear sidelights! P21W goes to full brightness when brake pedal pressed, and H21W goes to full brightness when fog switched on. The 5W sides stay on. I then took the H21W out to simulate a blown bulb, then very briefly got a message on the MFD to "Check rear right fog light". That message disappeared after a few seconds, but a little yellow triangle remained on the dash, and in the Car bit of the screen the warning remained , although I had to go looking for it. Edit: Top.. yellow triangle on dash Mid: fog and sides Bottom: sides only Those three pics filled the 10MB upload limit, was going to put up a pic of the screen for completeness, but we know what that looks like!

 2 points
 -
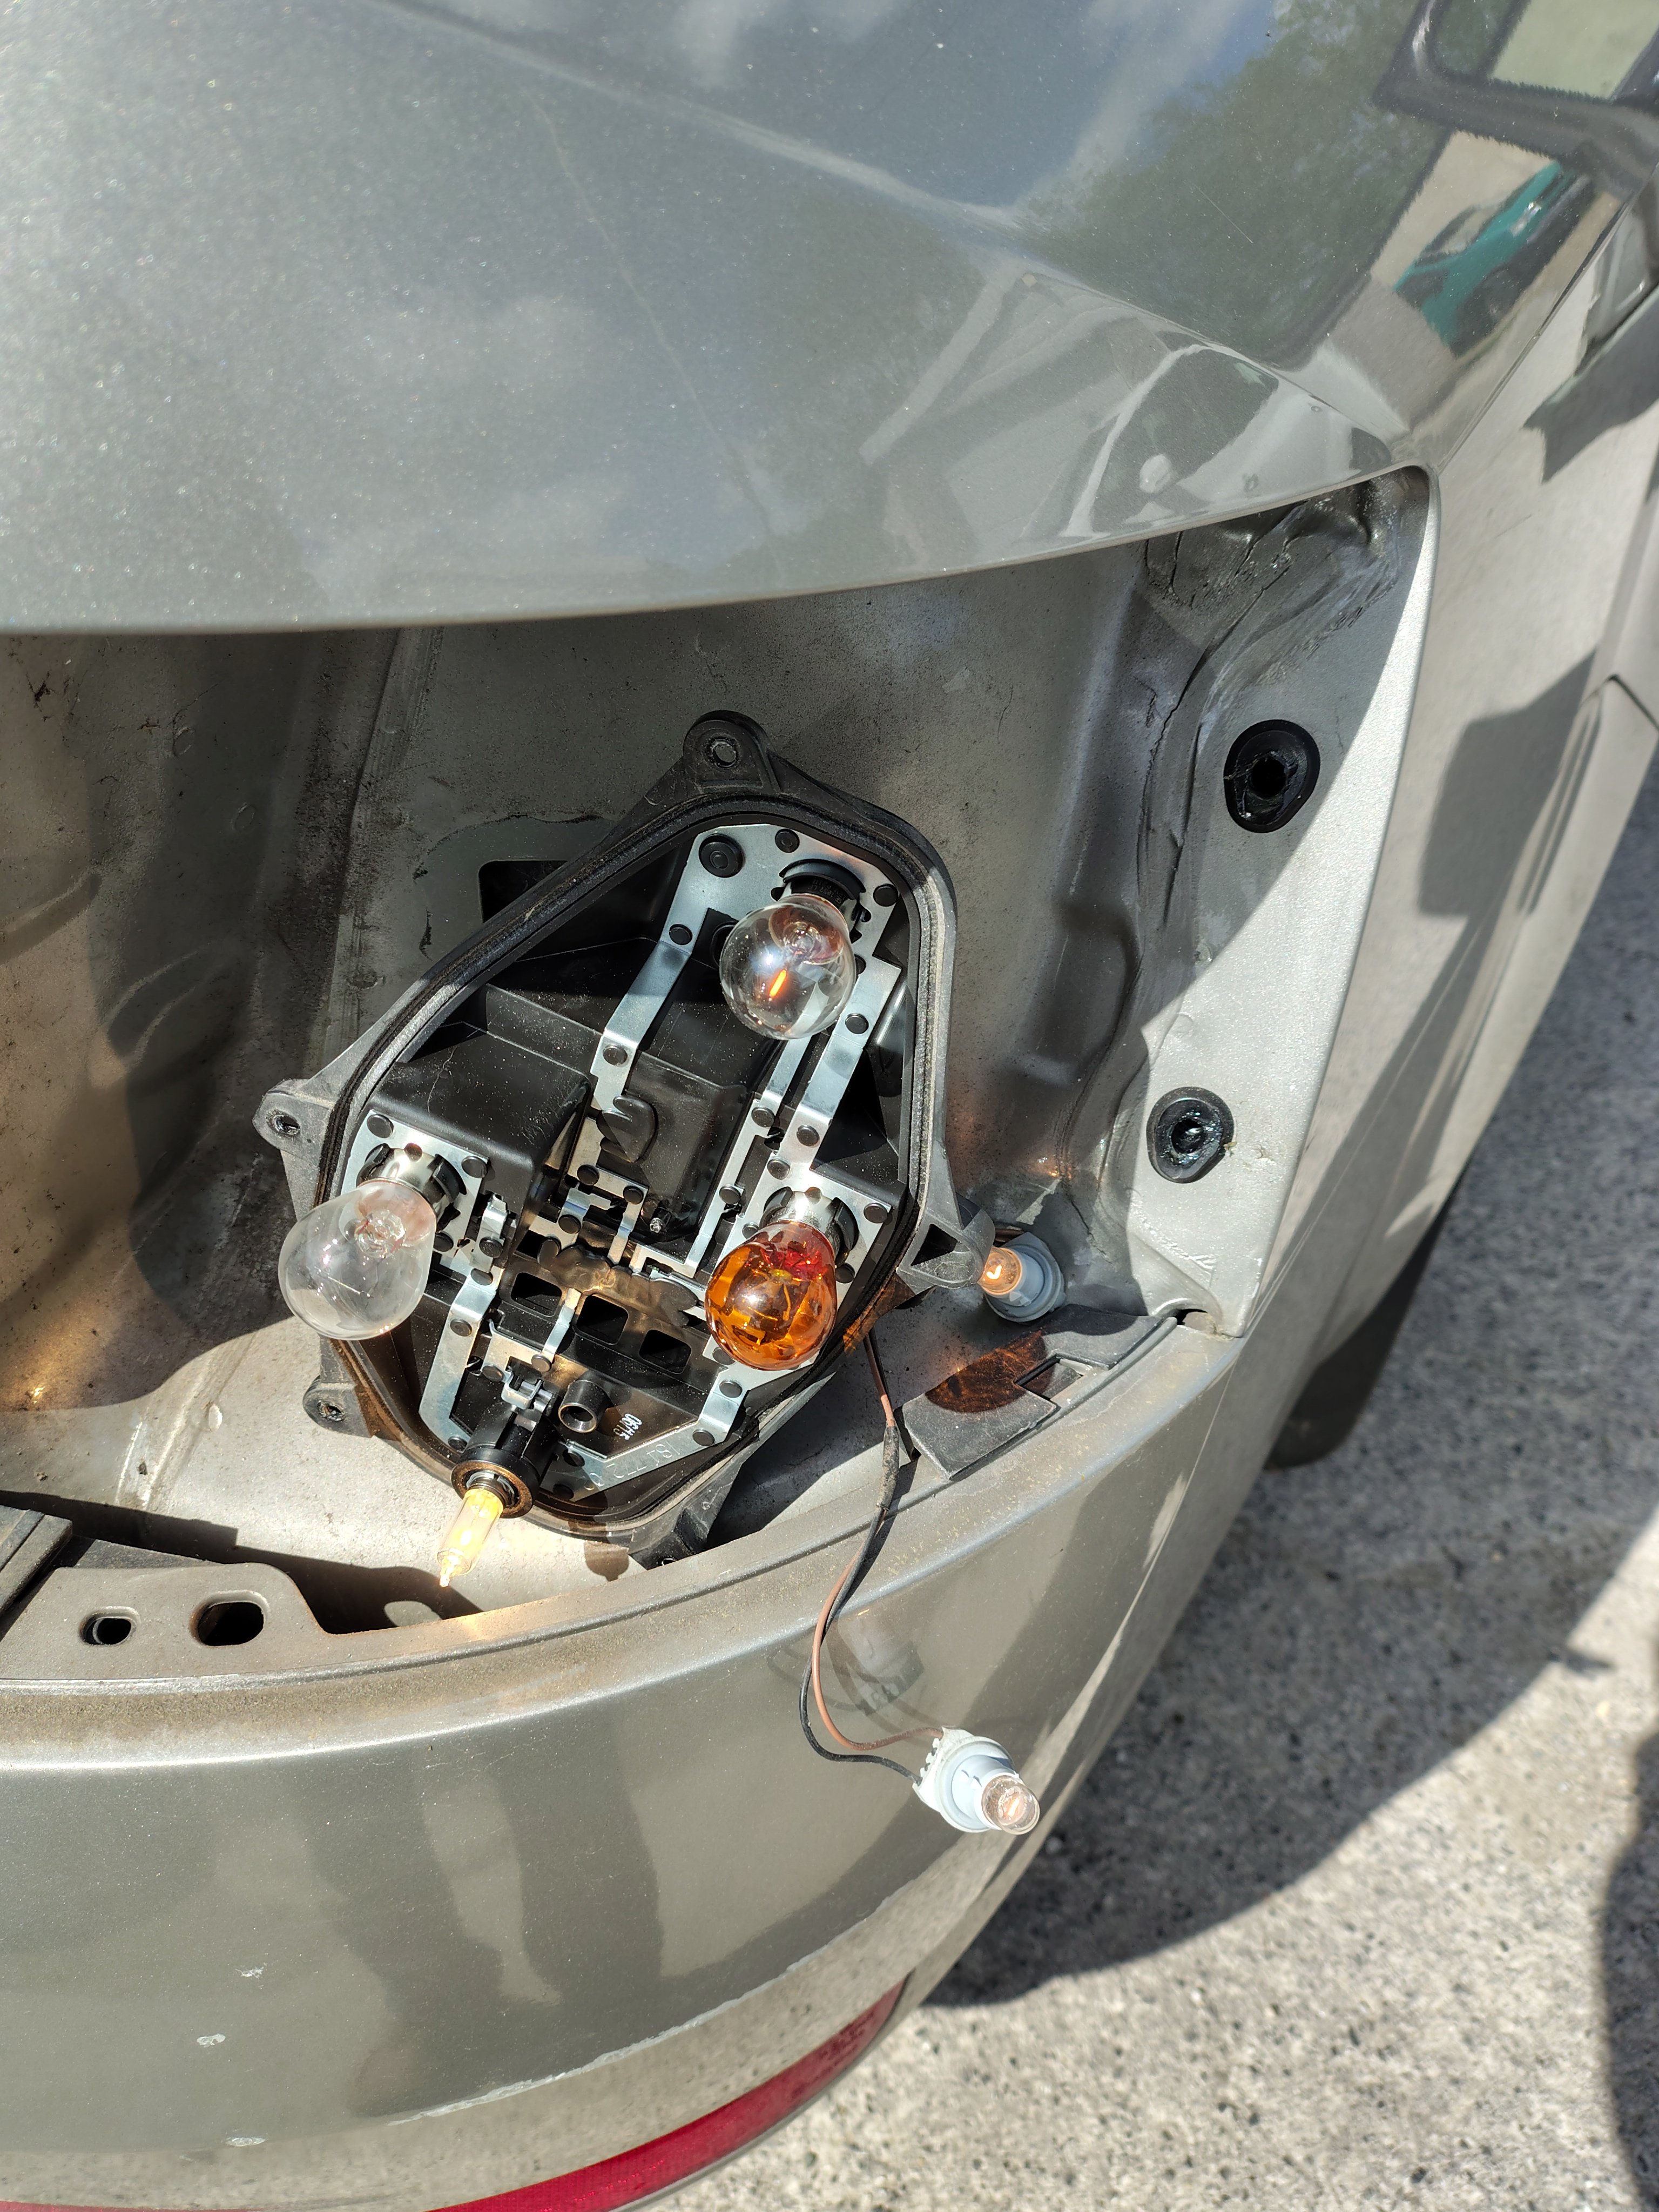
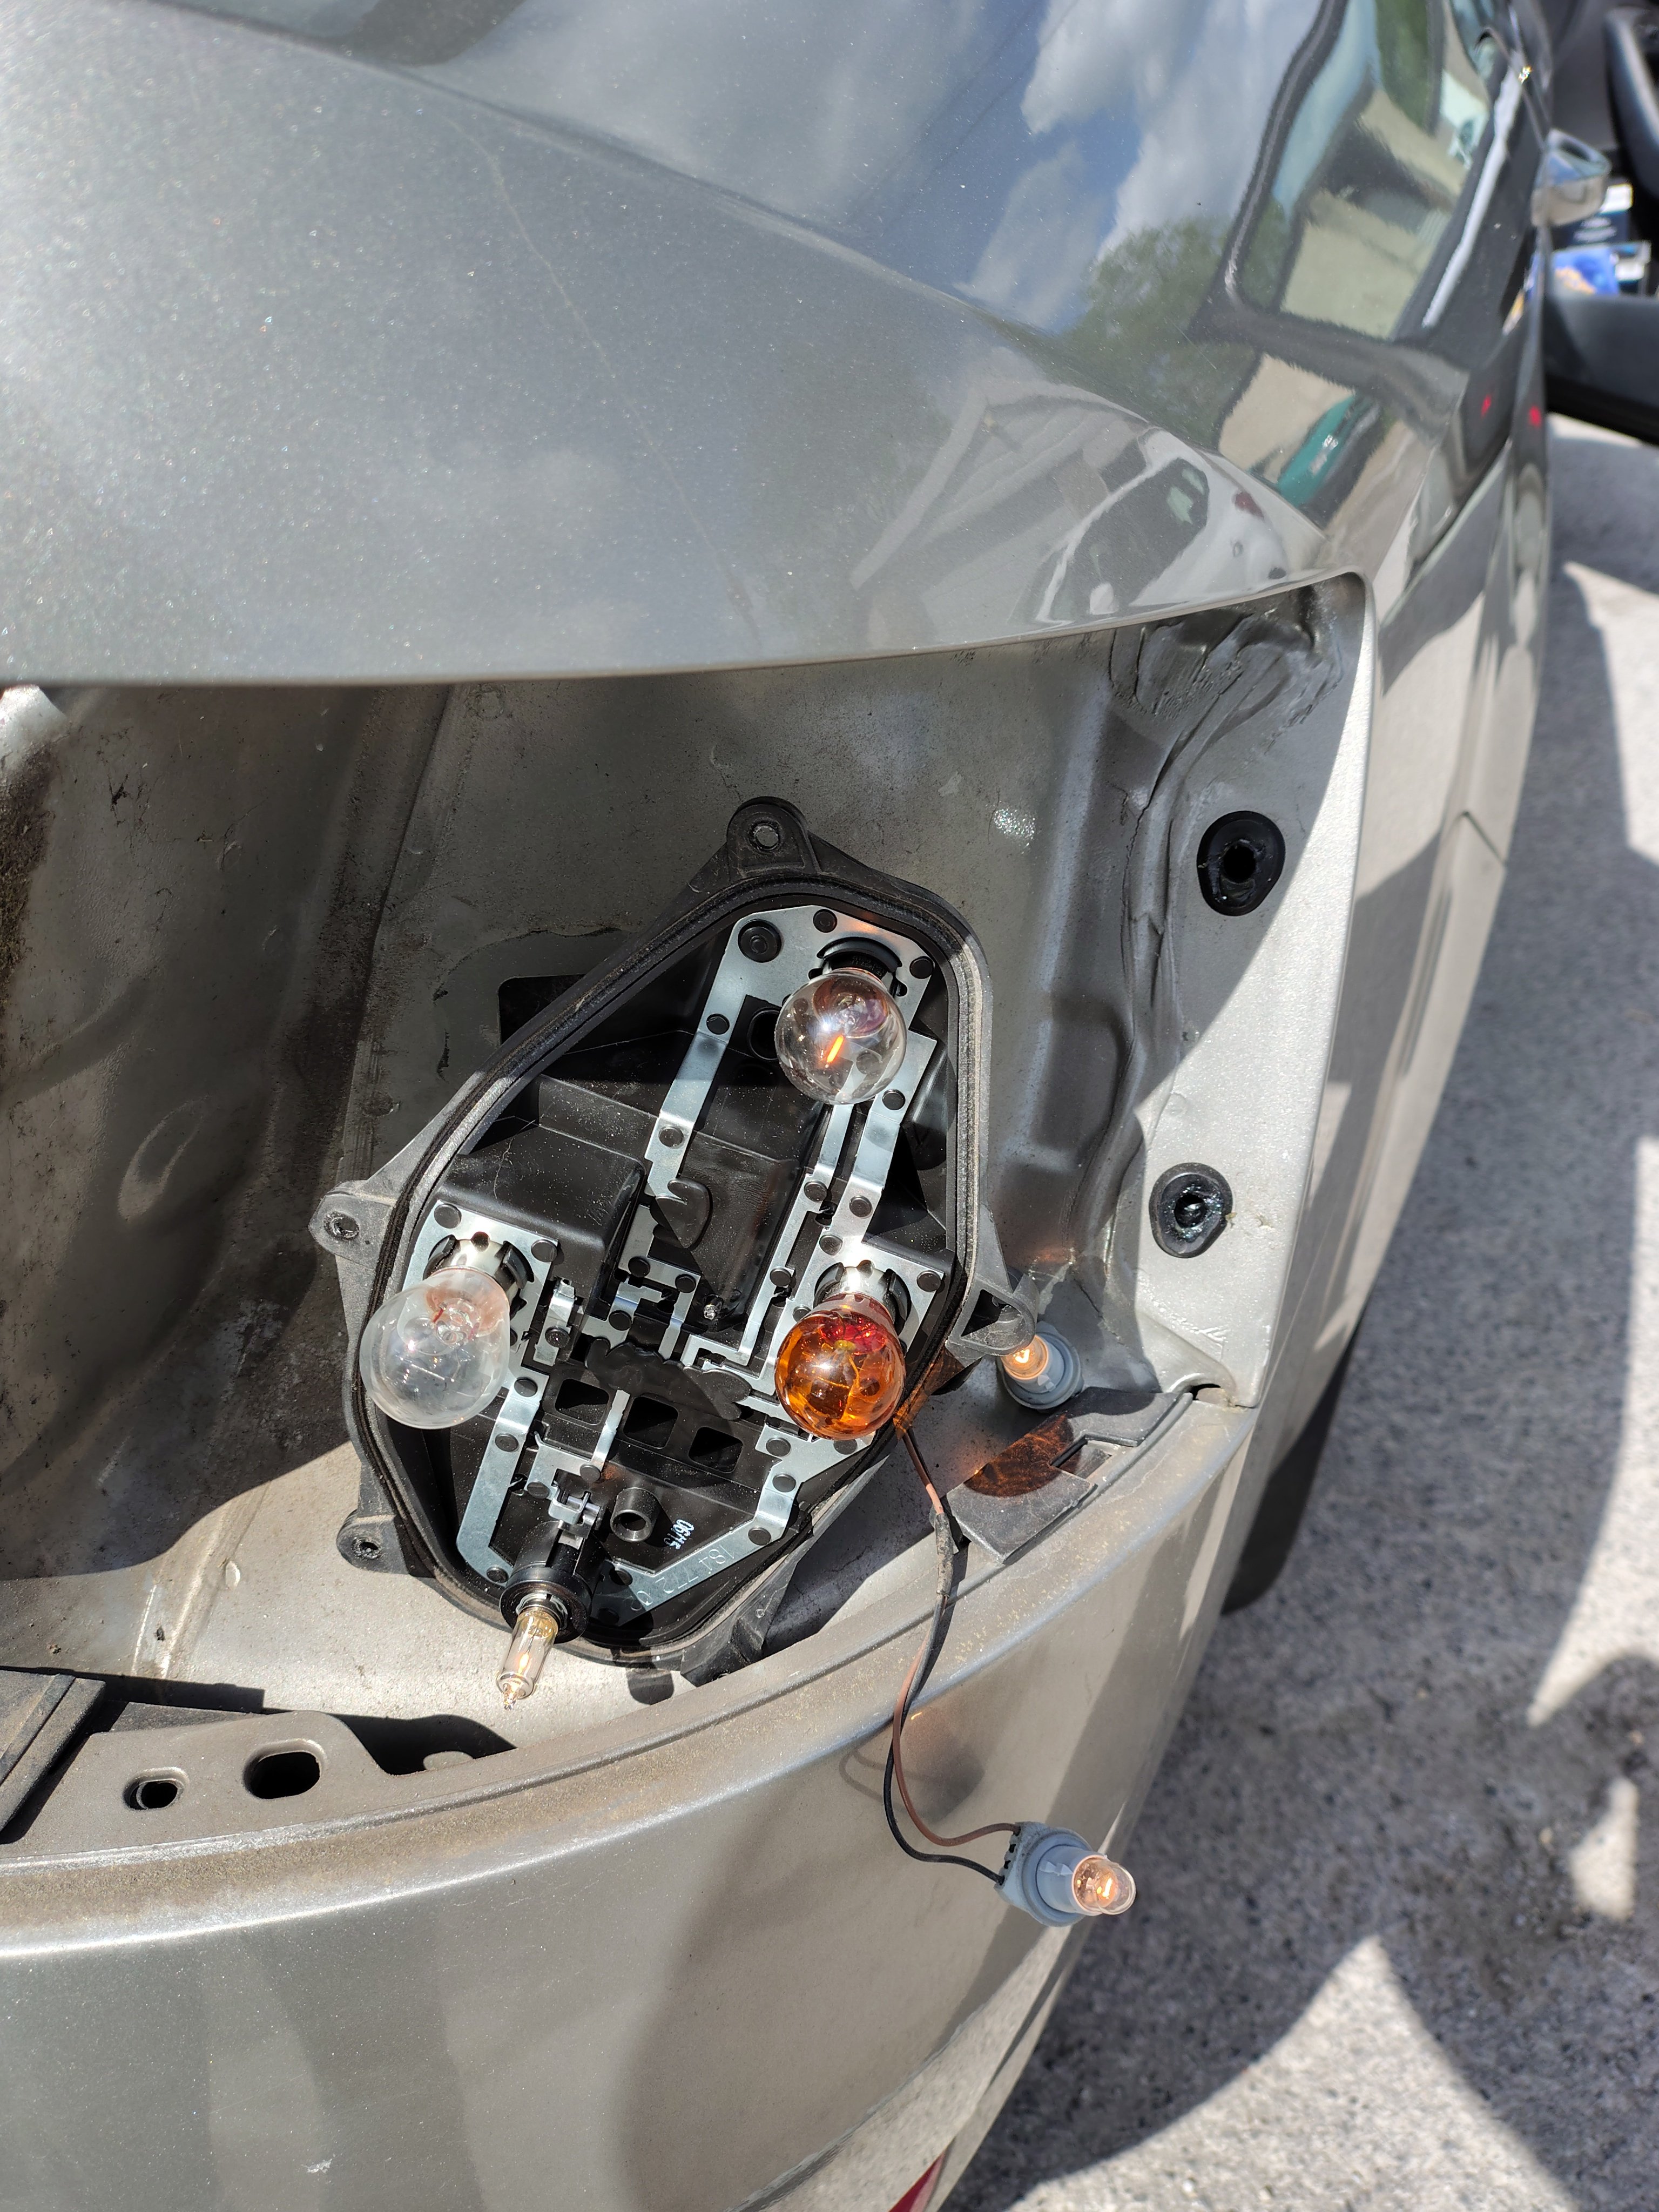
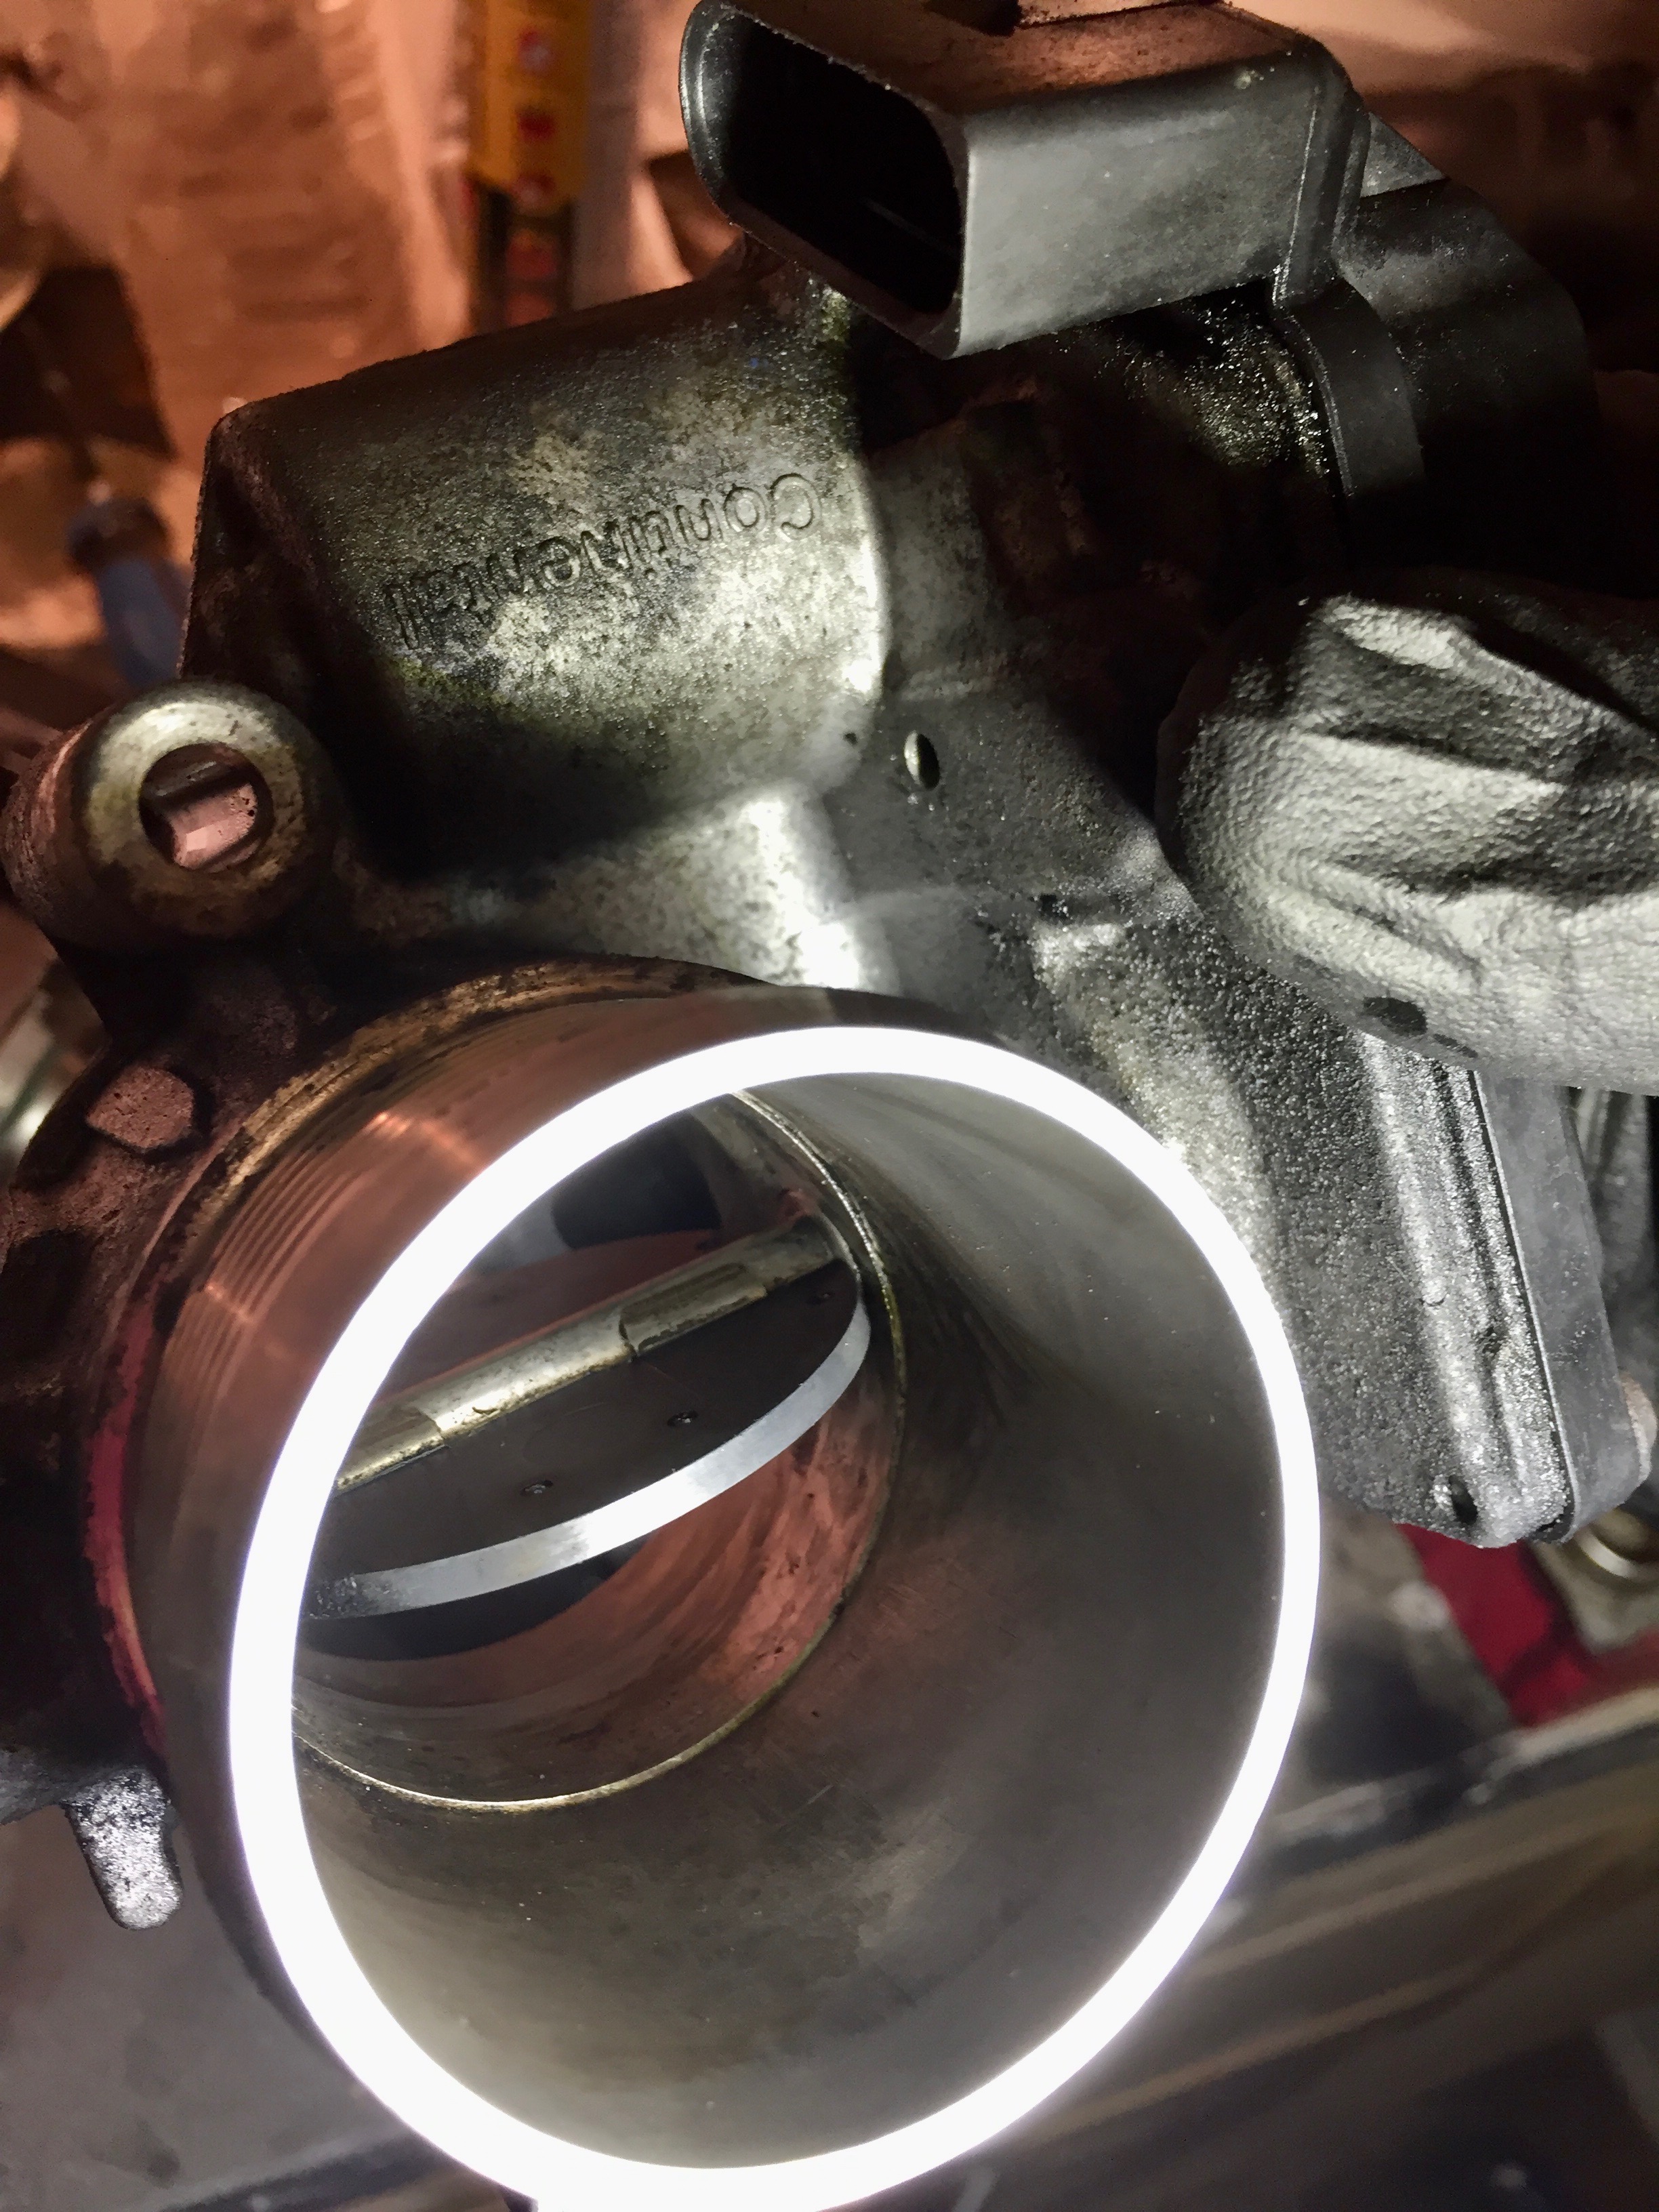
2 pointsAll sorted. Bumper off, radiator and AC removed, allowing full access. Drilled, tapped and removed with bolt and slide hammer. Expensive fix but these things happen. My observation is that the aluminium body oxidised and reacted with engine casting to seize. After replacing sensor, at least my ACC now works, which was the reason replacing in first instance.2 points
-
Request clear confirmation that suspension transit blocks have been removed during PDI.2 points
-
@PeterJB Why not just charge your car up once and then tell us what range you actually get from full to near empty for where you drive and how you drive? PS. Welcome to the forum.2 points
-
2 pointsI have used Varioflex, usually removing all rear seats, in a Roomster, on average once a quarter over the 14 years, be it to take waste to recycling centre, kids to/from uni, or to bring in furniture / appliances. Every time I do, it saves at least another car drive, or hiring a van. There was also a period of 12 months around 2020 when I've been clearing out my parents house after my father passed away. My father was a bit of a hoarder, so it was about 20 trips to the recycling centre in a fully loaded Roomster with all rear seats removed, over a period of 6 months or so. With a bit of tarpaulin on the floor, no visible wear on the car because of these activities, so Varioflex works for me. Not to mention a small advantage of having a car with van-like space that does not need a van permit when showing up at a local recycling centre, saves on bureaucracy and possibly cost (have not looked into repeated van permits in detail). Another advantage nowadays is that when the car is used only by 2 people as a shopping trolley, the rear seats can be slid all the way forward resulting in significantly bigger boot for the weekly shopping. Frankly, yes, you could cover these needs with 2 sizes larger SUV (i.e. Kodiak, because I doubt Karoq with folded seats has high enough boot opening as well as loading space over the folded seats now there is no Varioflex), but it is much more convenient, far less expensive and better on the wear of the (otherwise folded and heavily loaded) seats. Basically, much like Octavia's vast boot for the car class, the Varioflex allows to use a smaller car for things you'd otherwise need a car 1-2 sizes larger. For me at least, this was part of long-term Skoda's value for money offering that is now largely gone from the range. I would have paid an extra grand for Varioflex, just to be able to cover peak loading scenario without the inconvenience of hiring another car every time I need the cargo space. Just my 2 pence.2 points
-
2 pointsAll Europa Dont Work anymore on 16GB SD Card, File to big2 points
-
Enjoy. Check tyre pressures and set as for your use and reset the TPMS. Be sure the Wheel bolt secure socket is there.2 points
-
Not today, but finally found the way how to convert seat unit from 5Q0959760B/C/D/E/F to 3Q0 with lumbar massage About an hour of soldering, then firmware, and we get a unit with a massage2 points
-
2 points
-
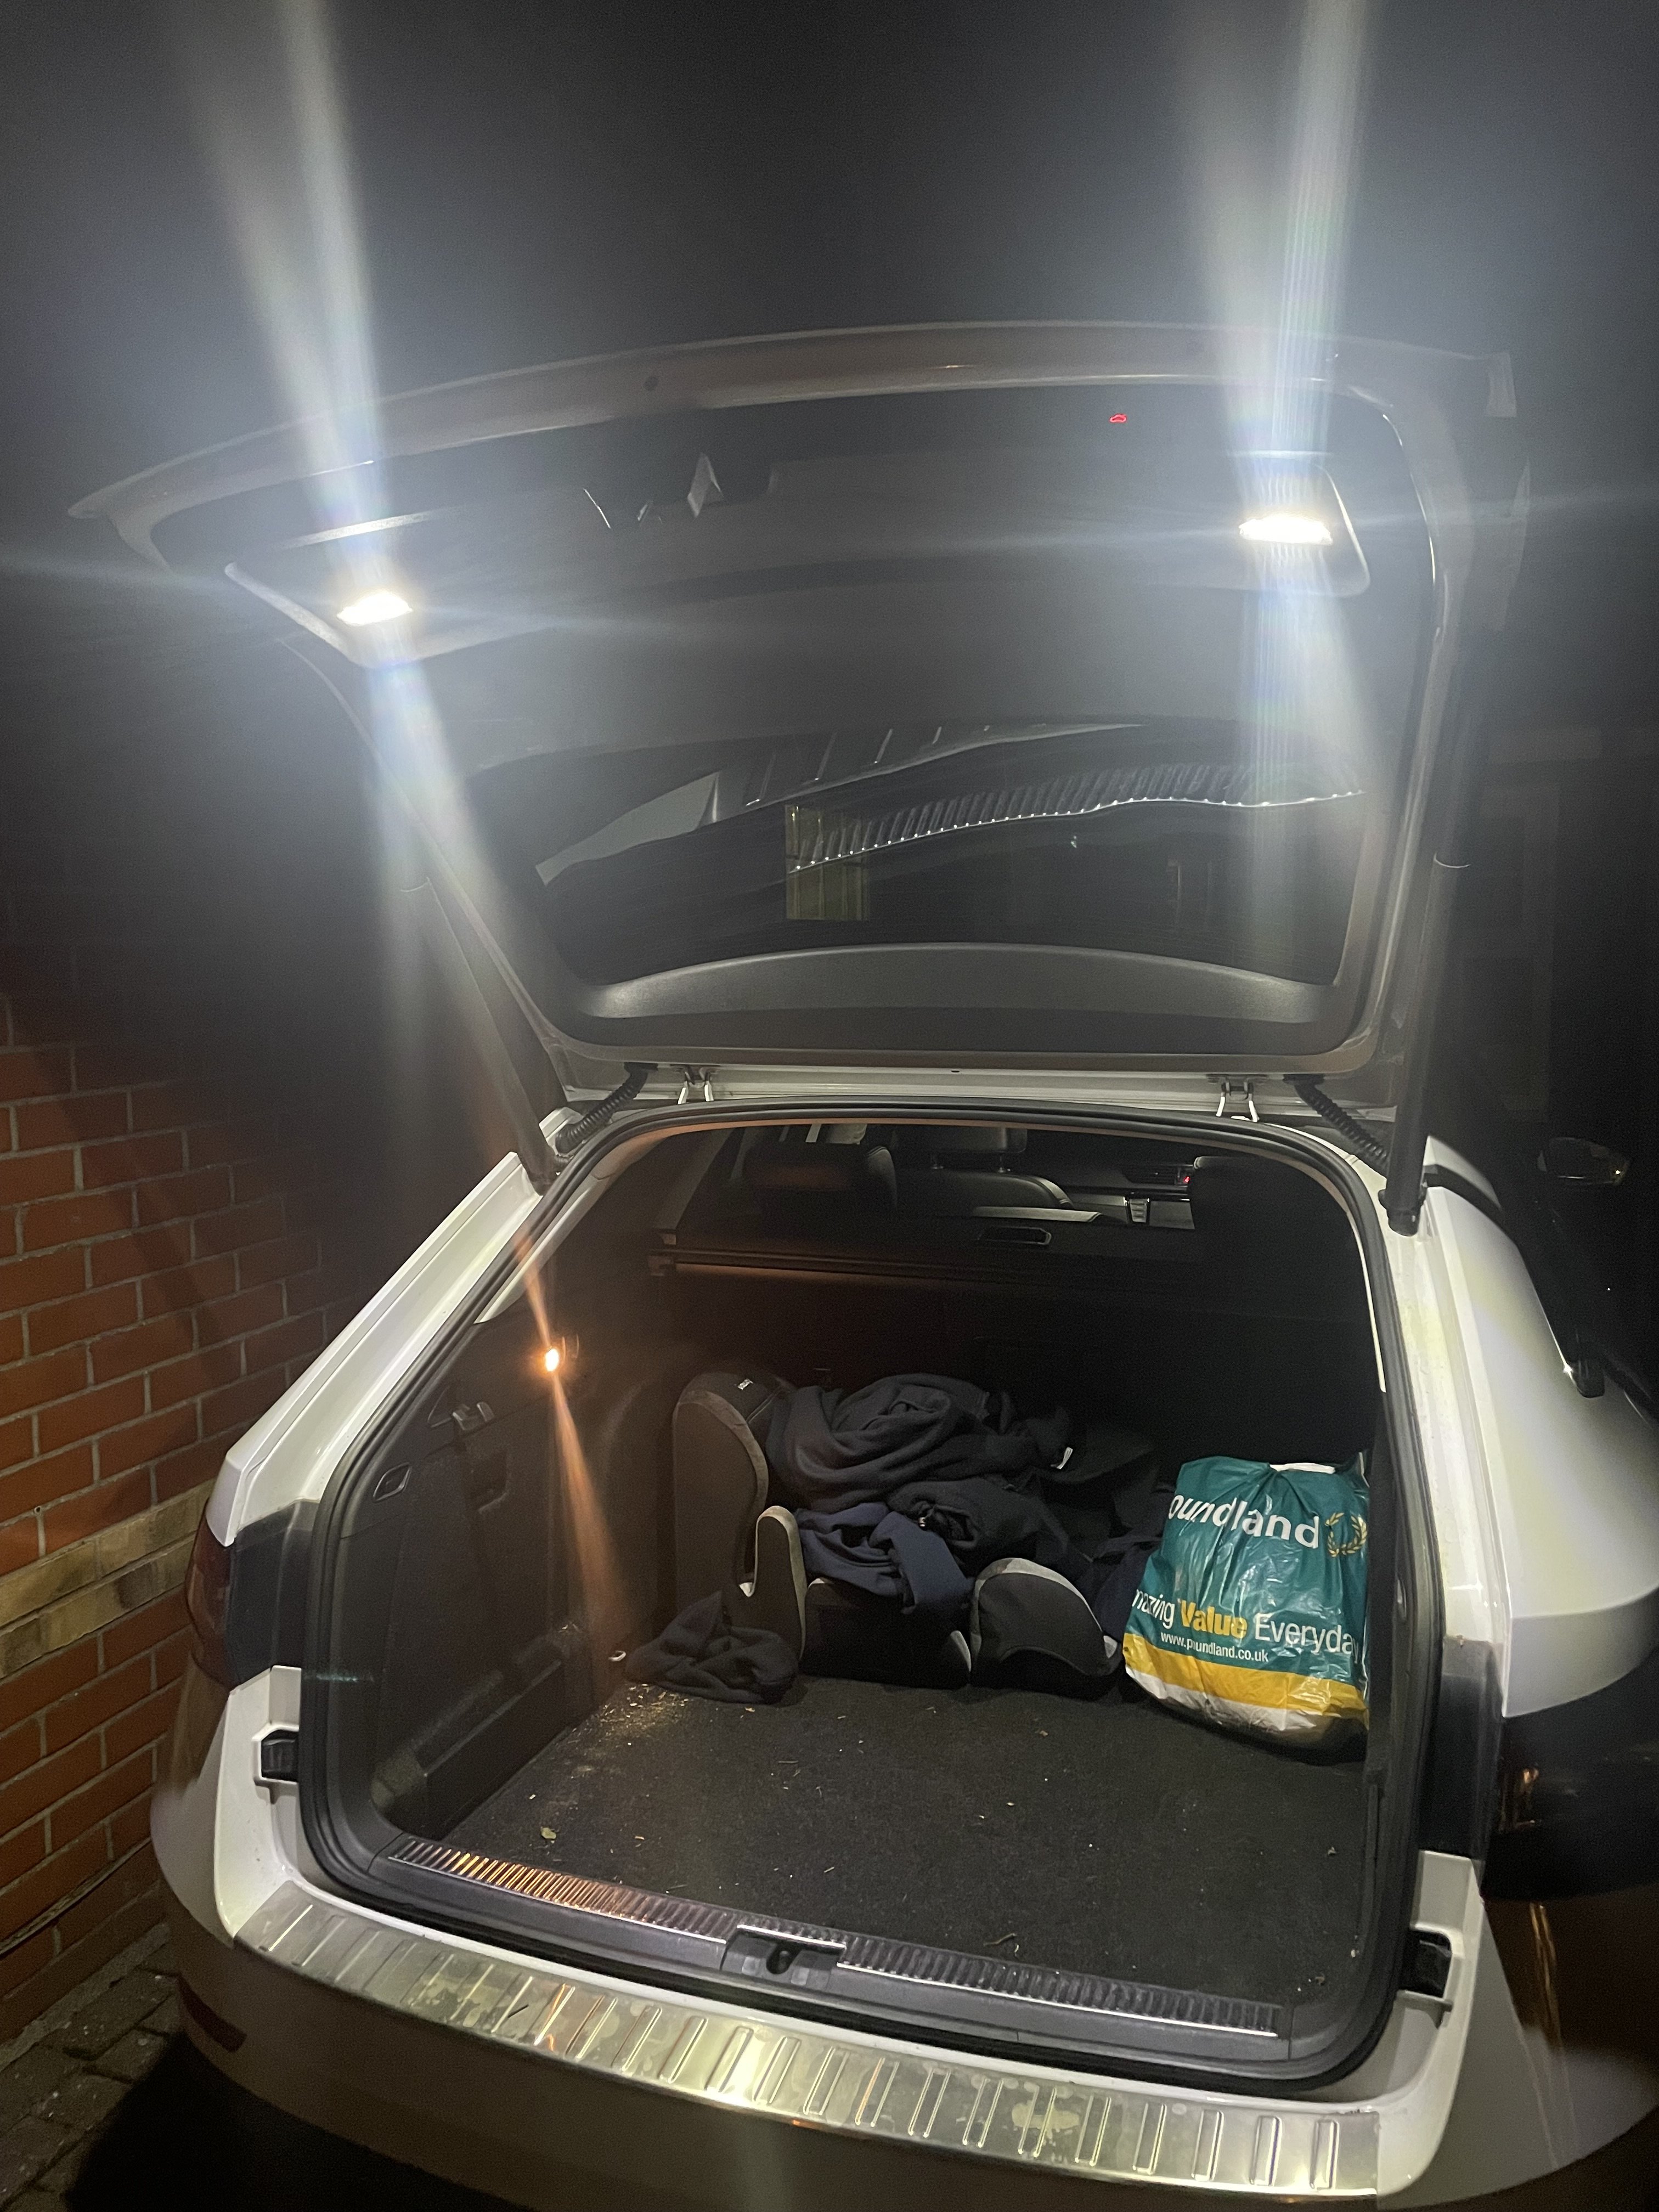
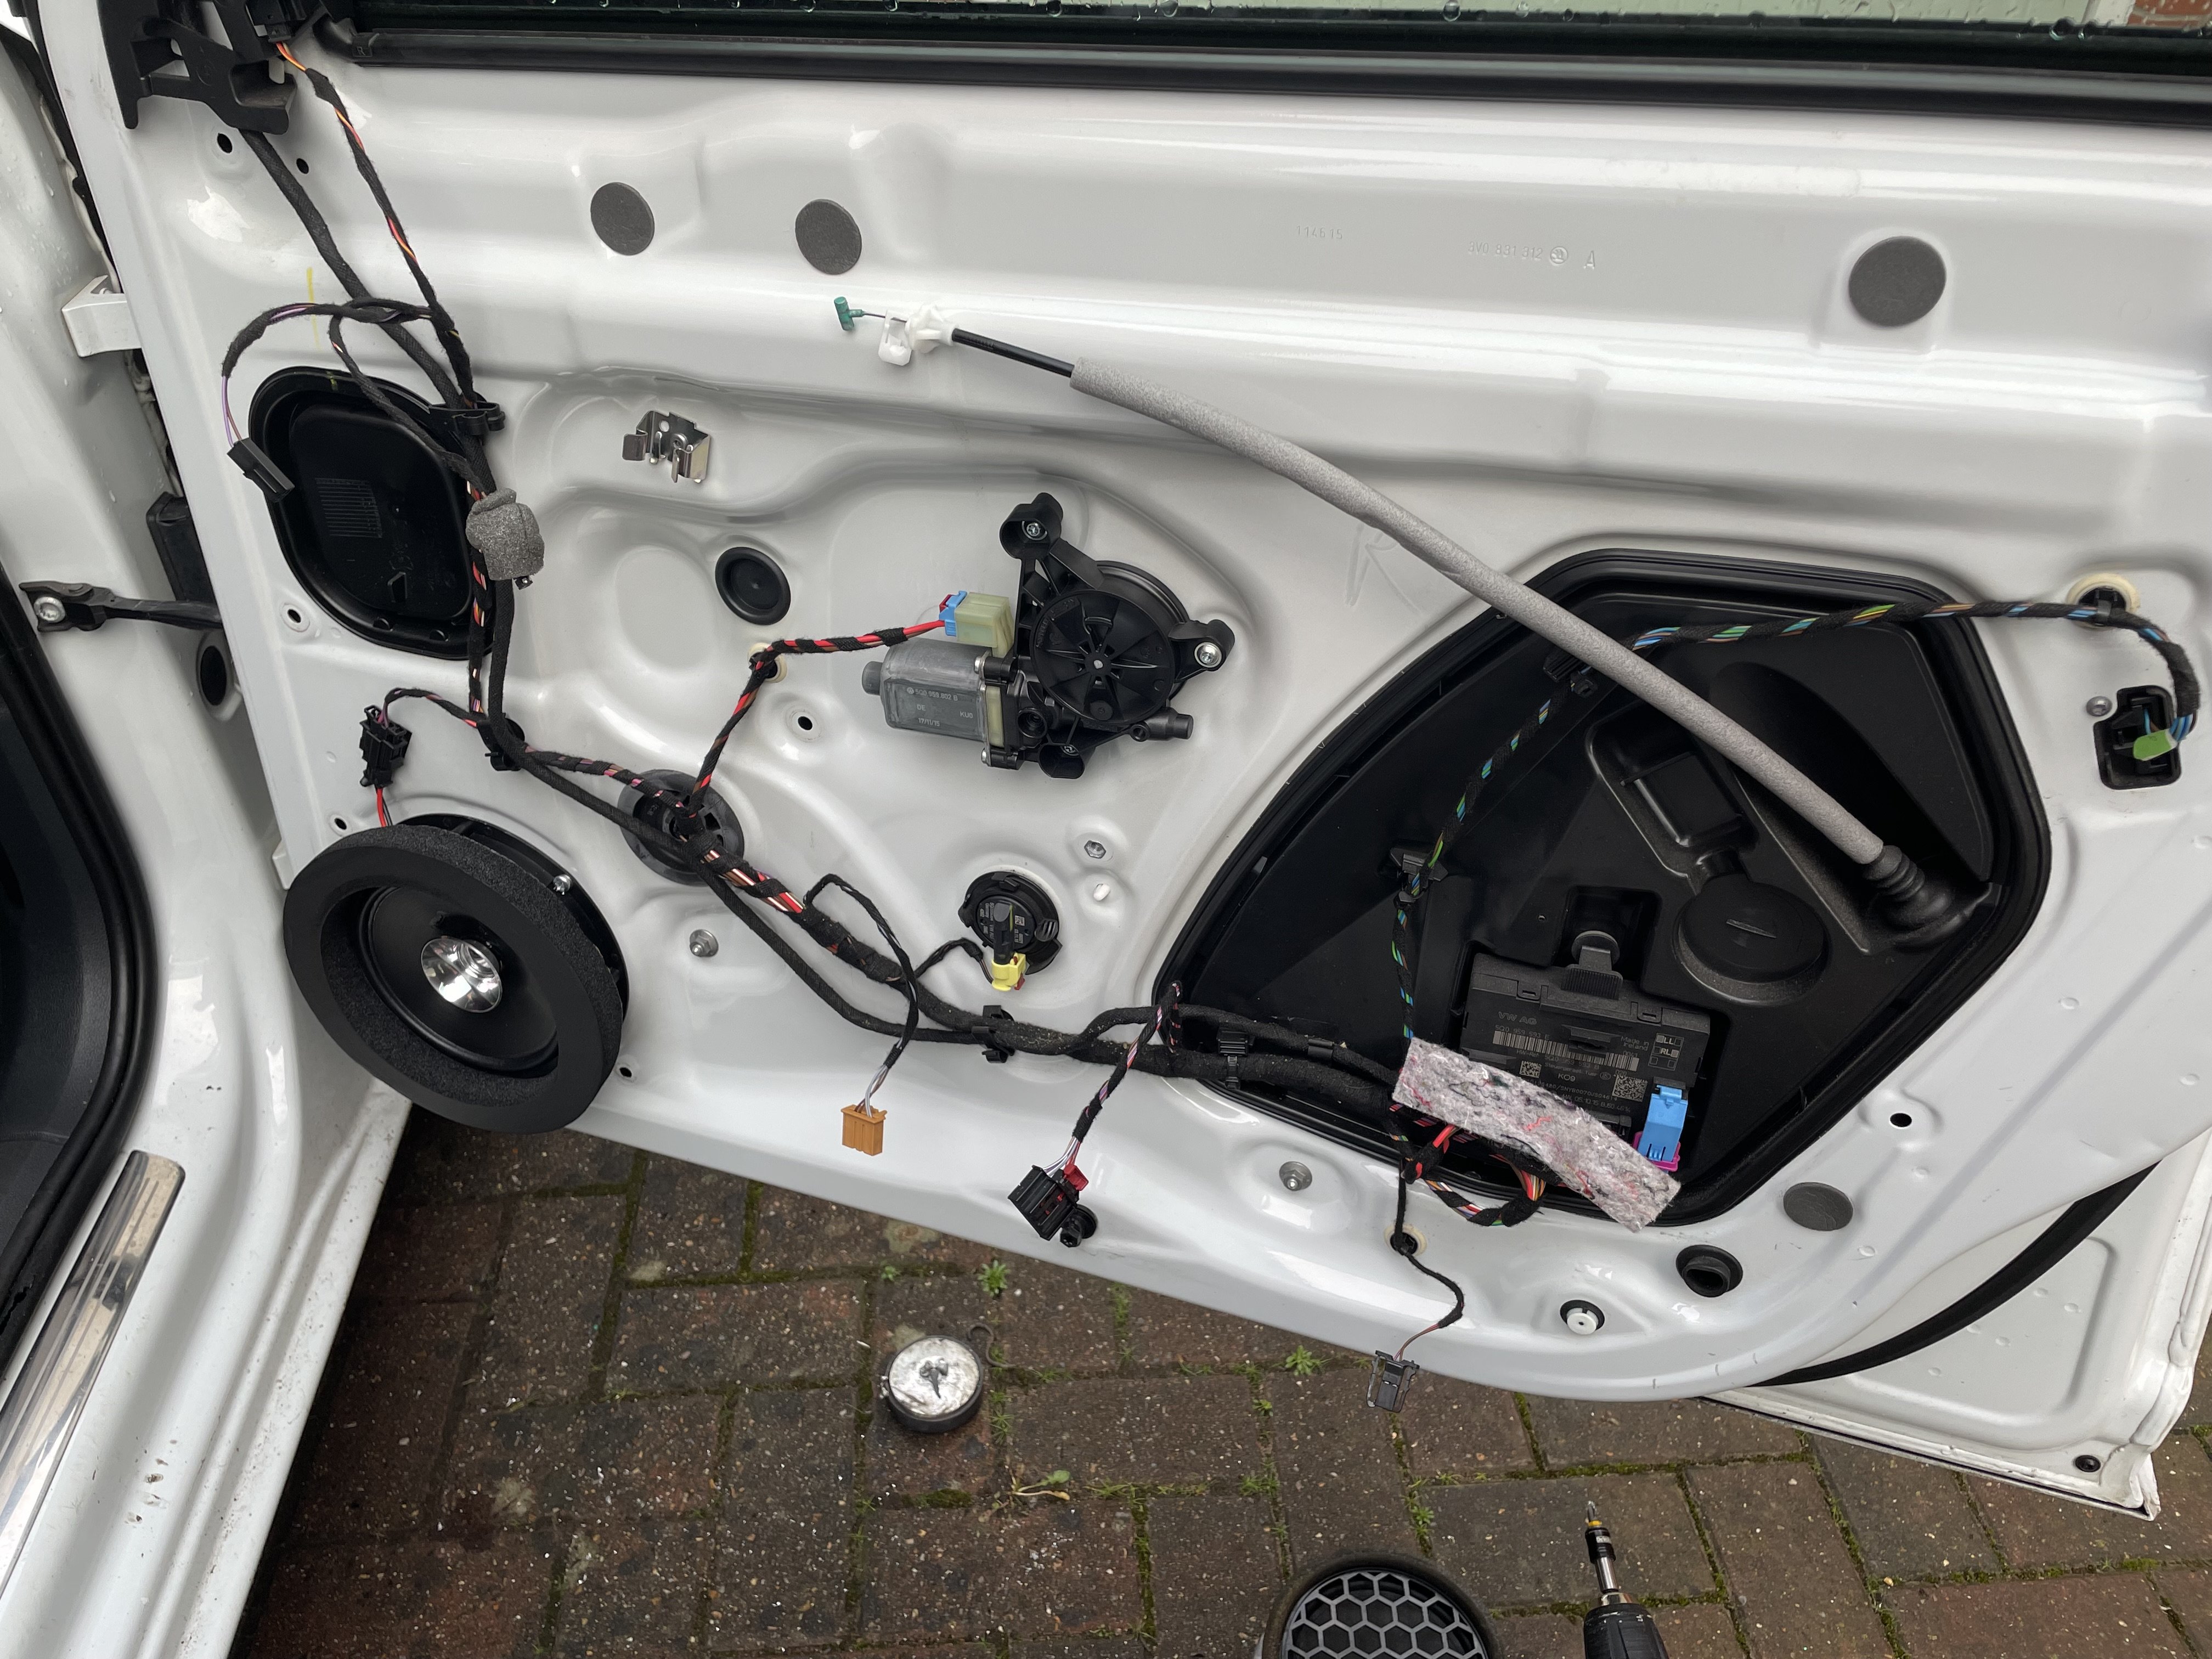
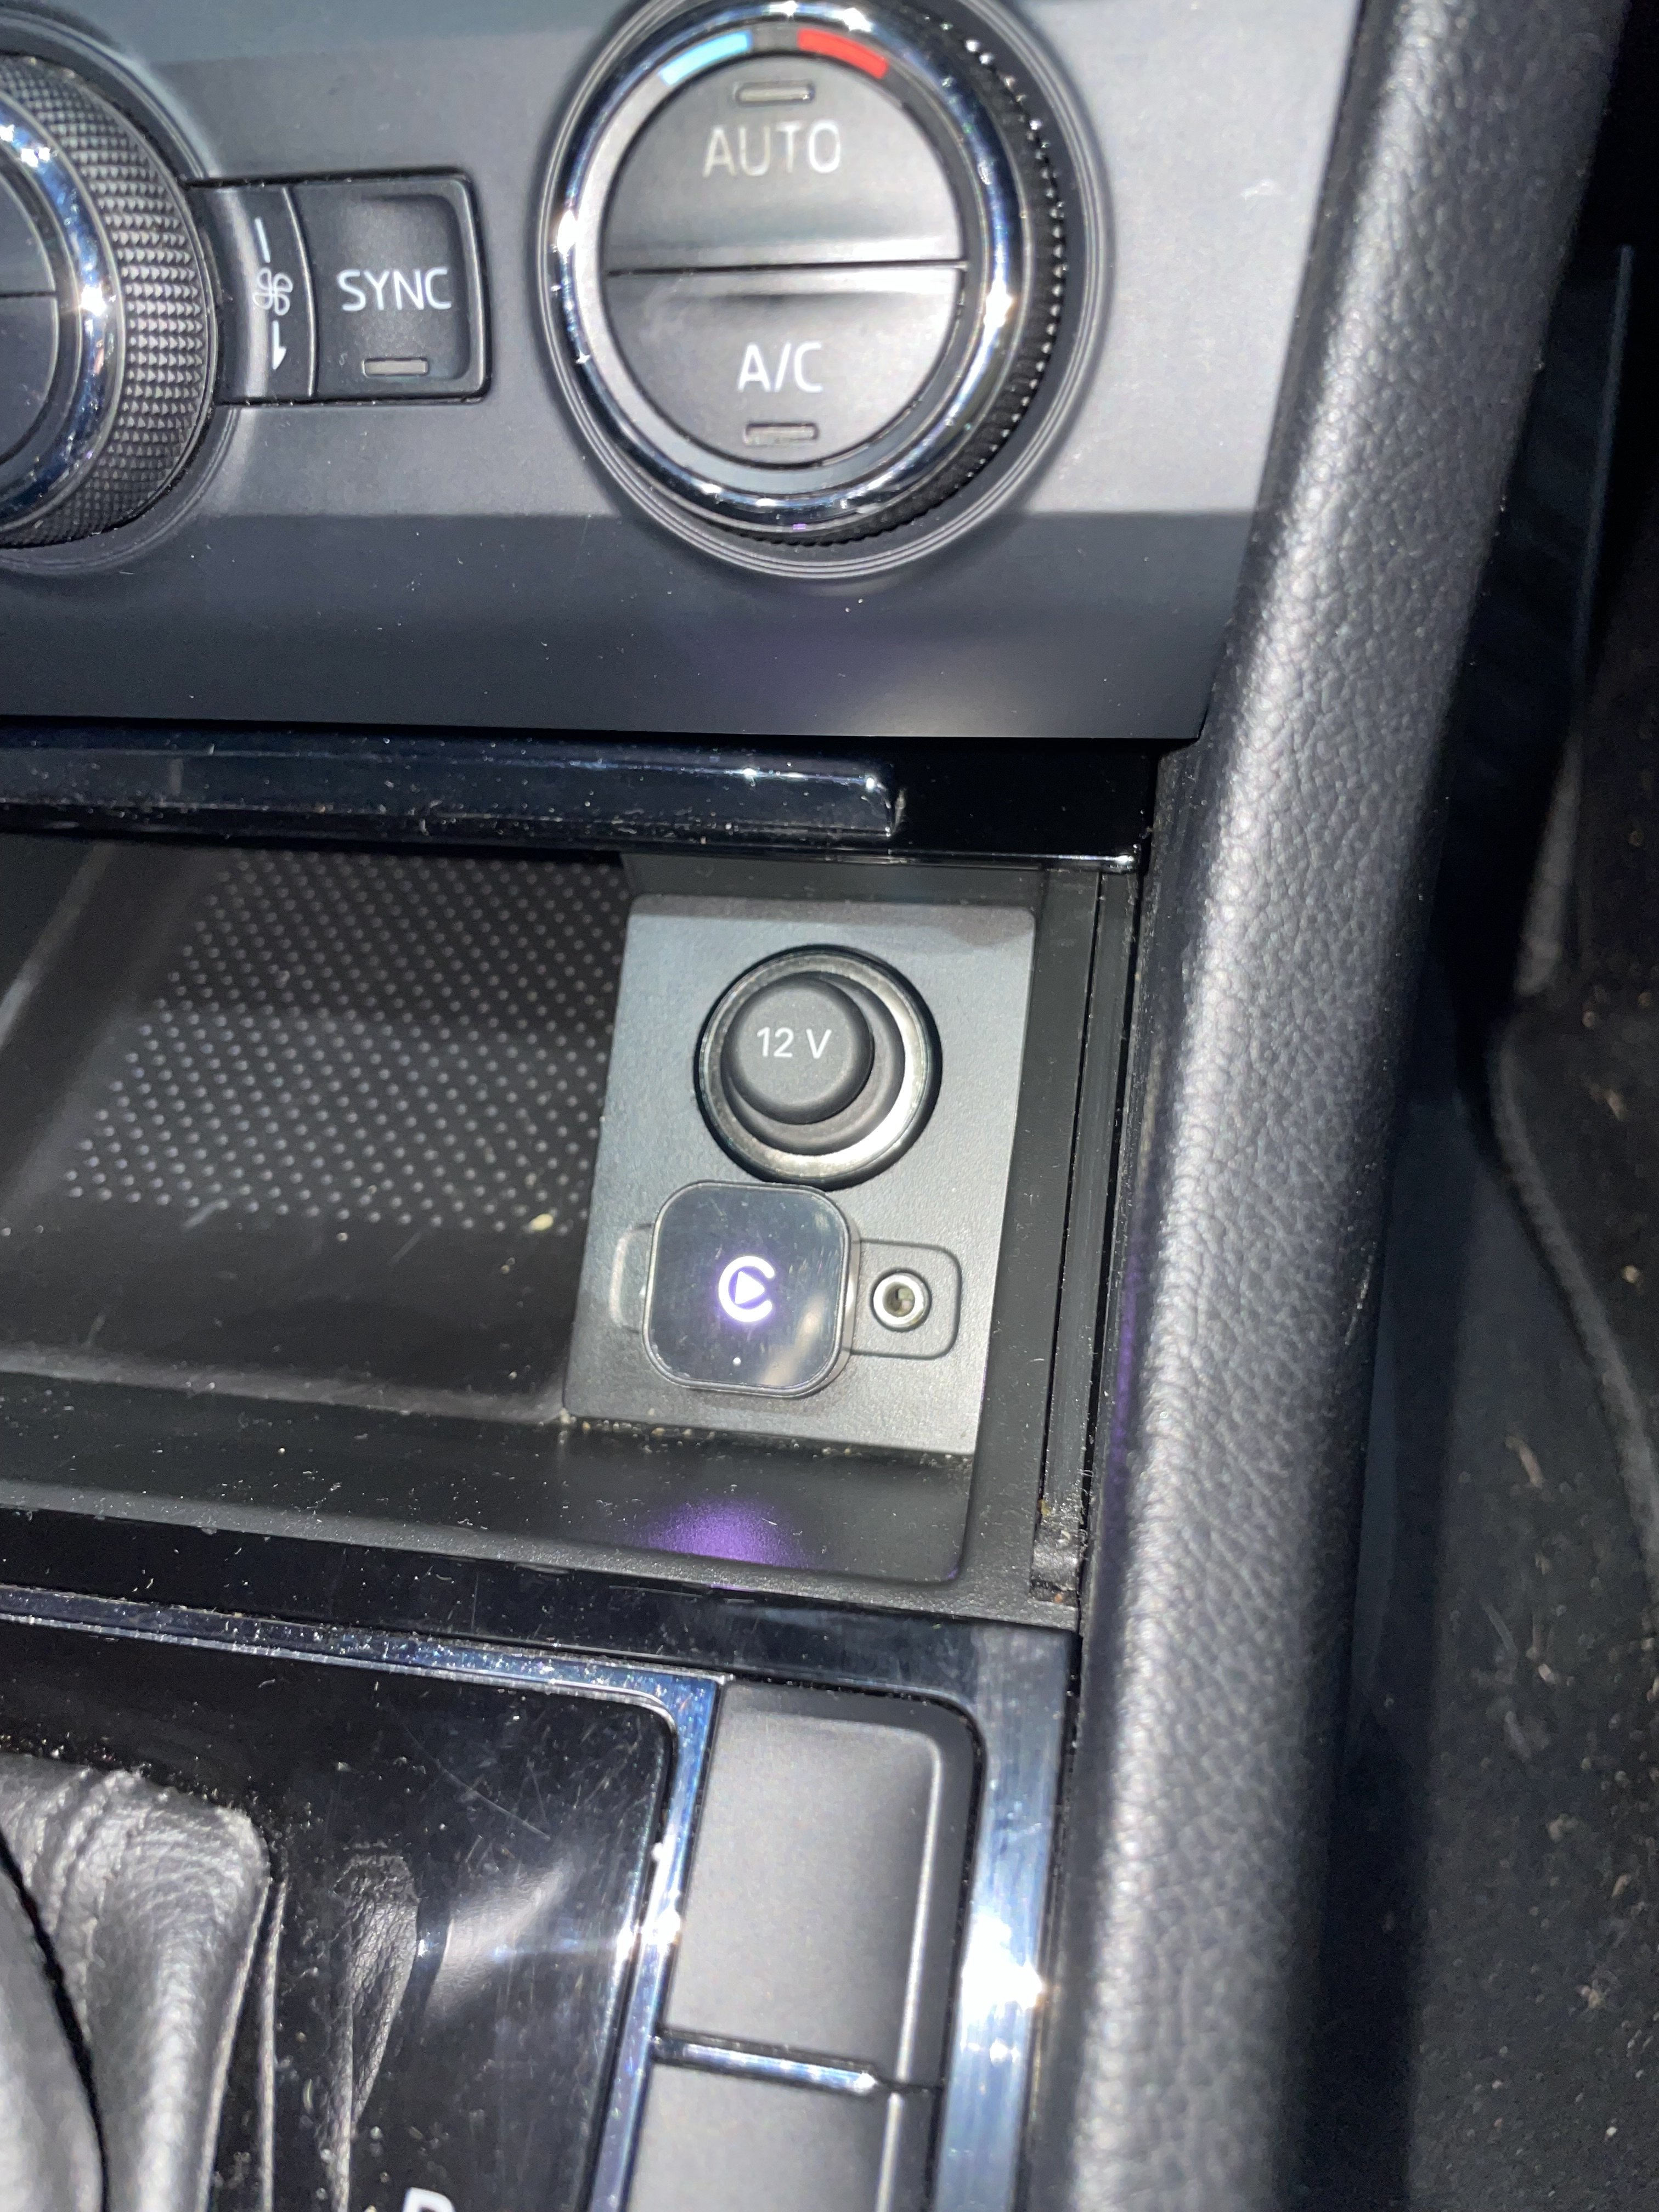
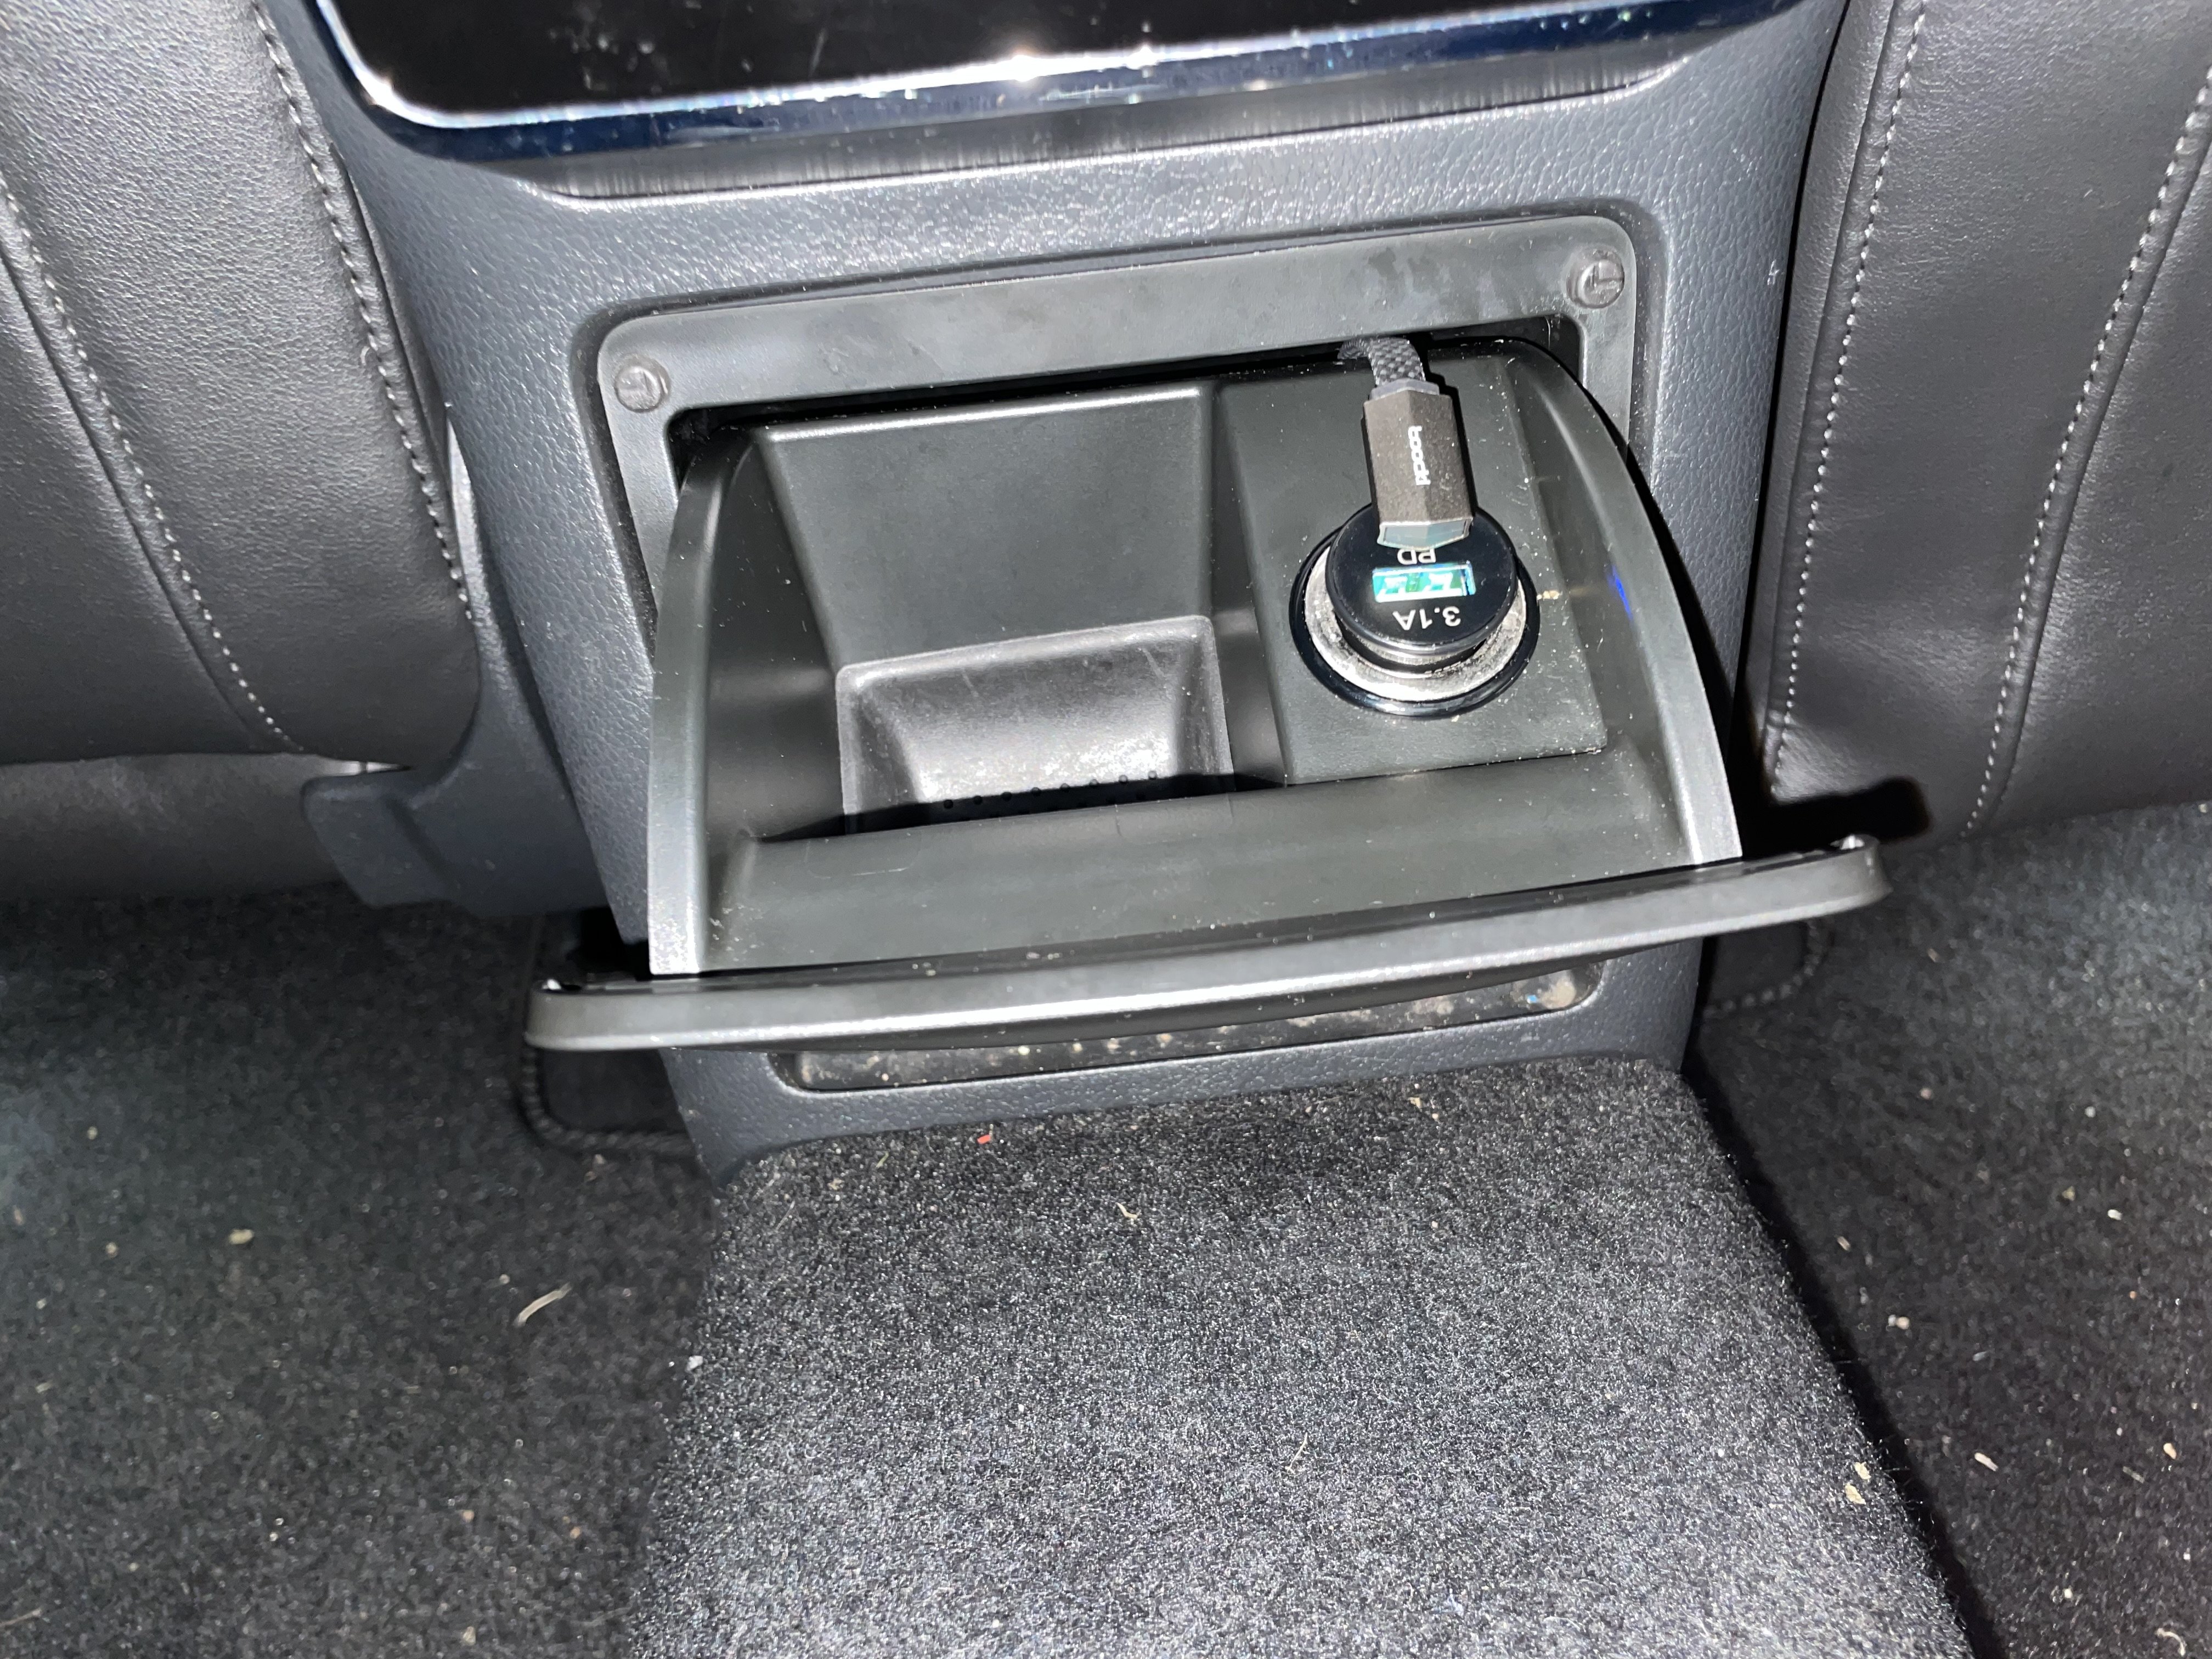
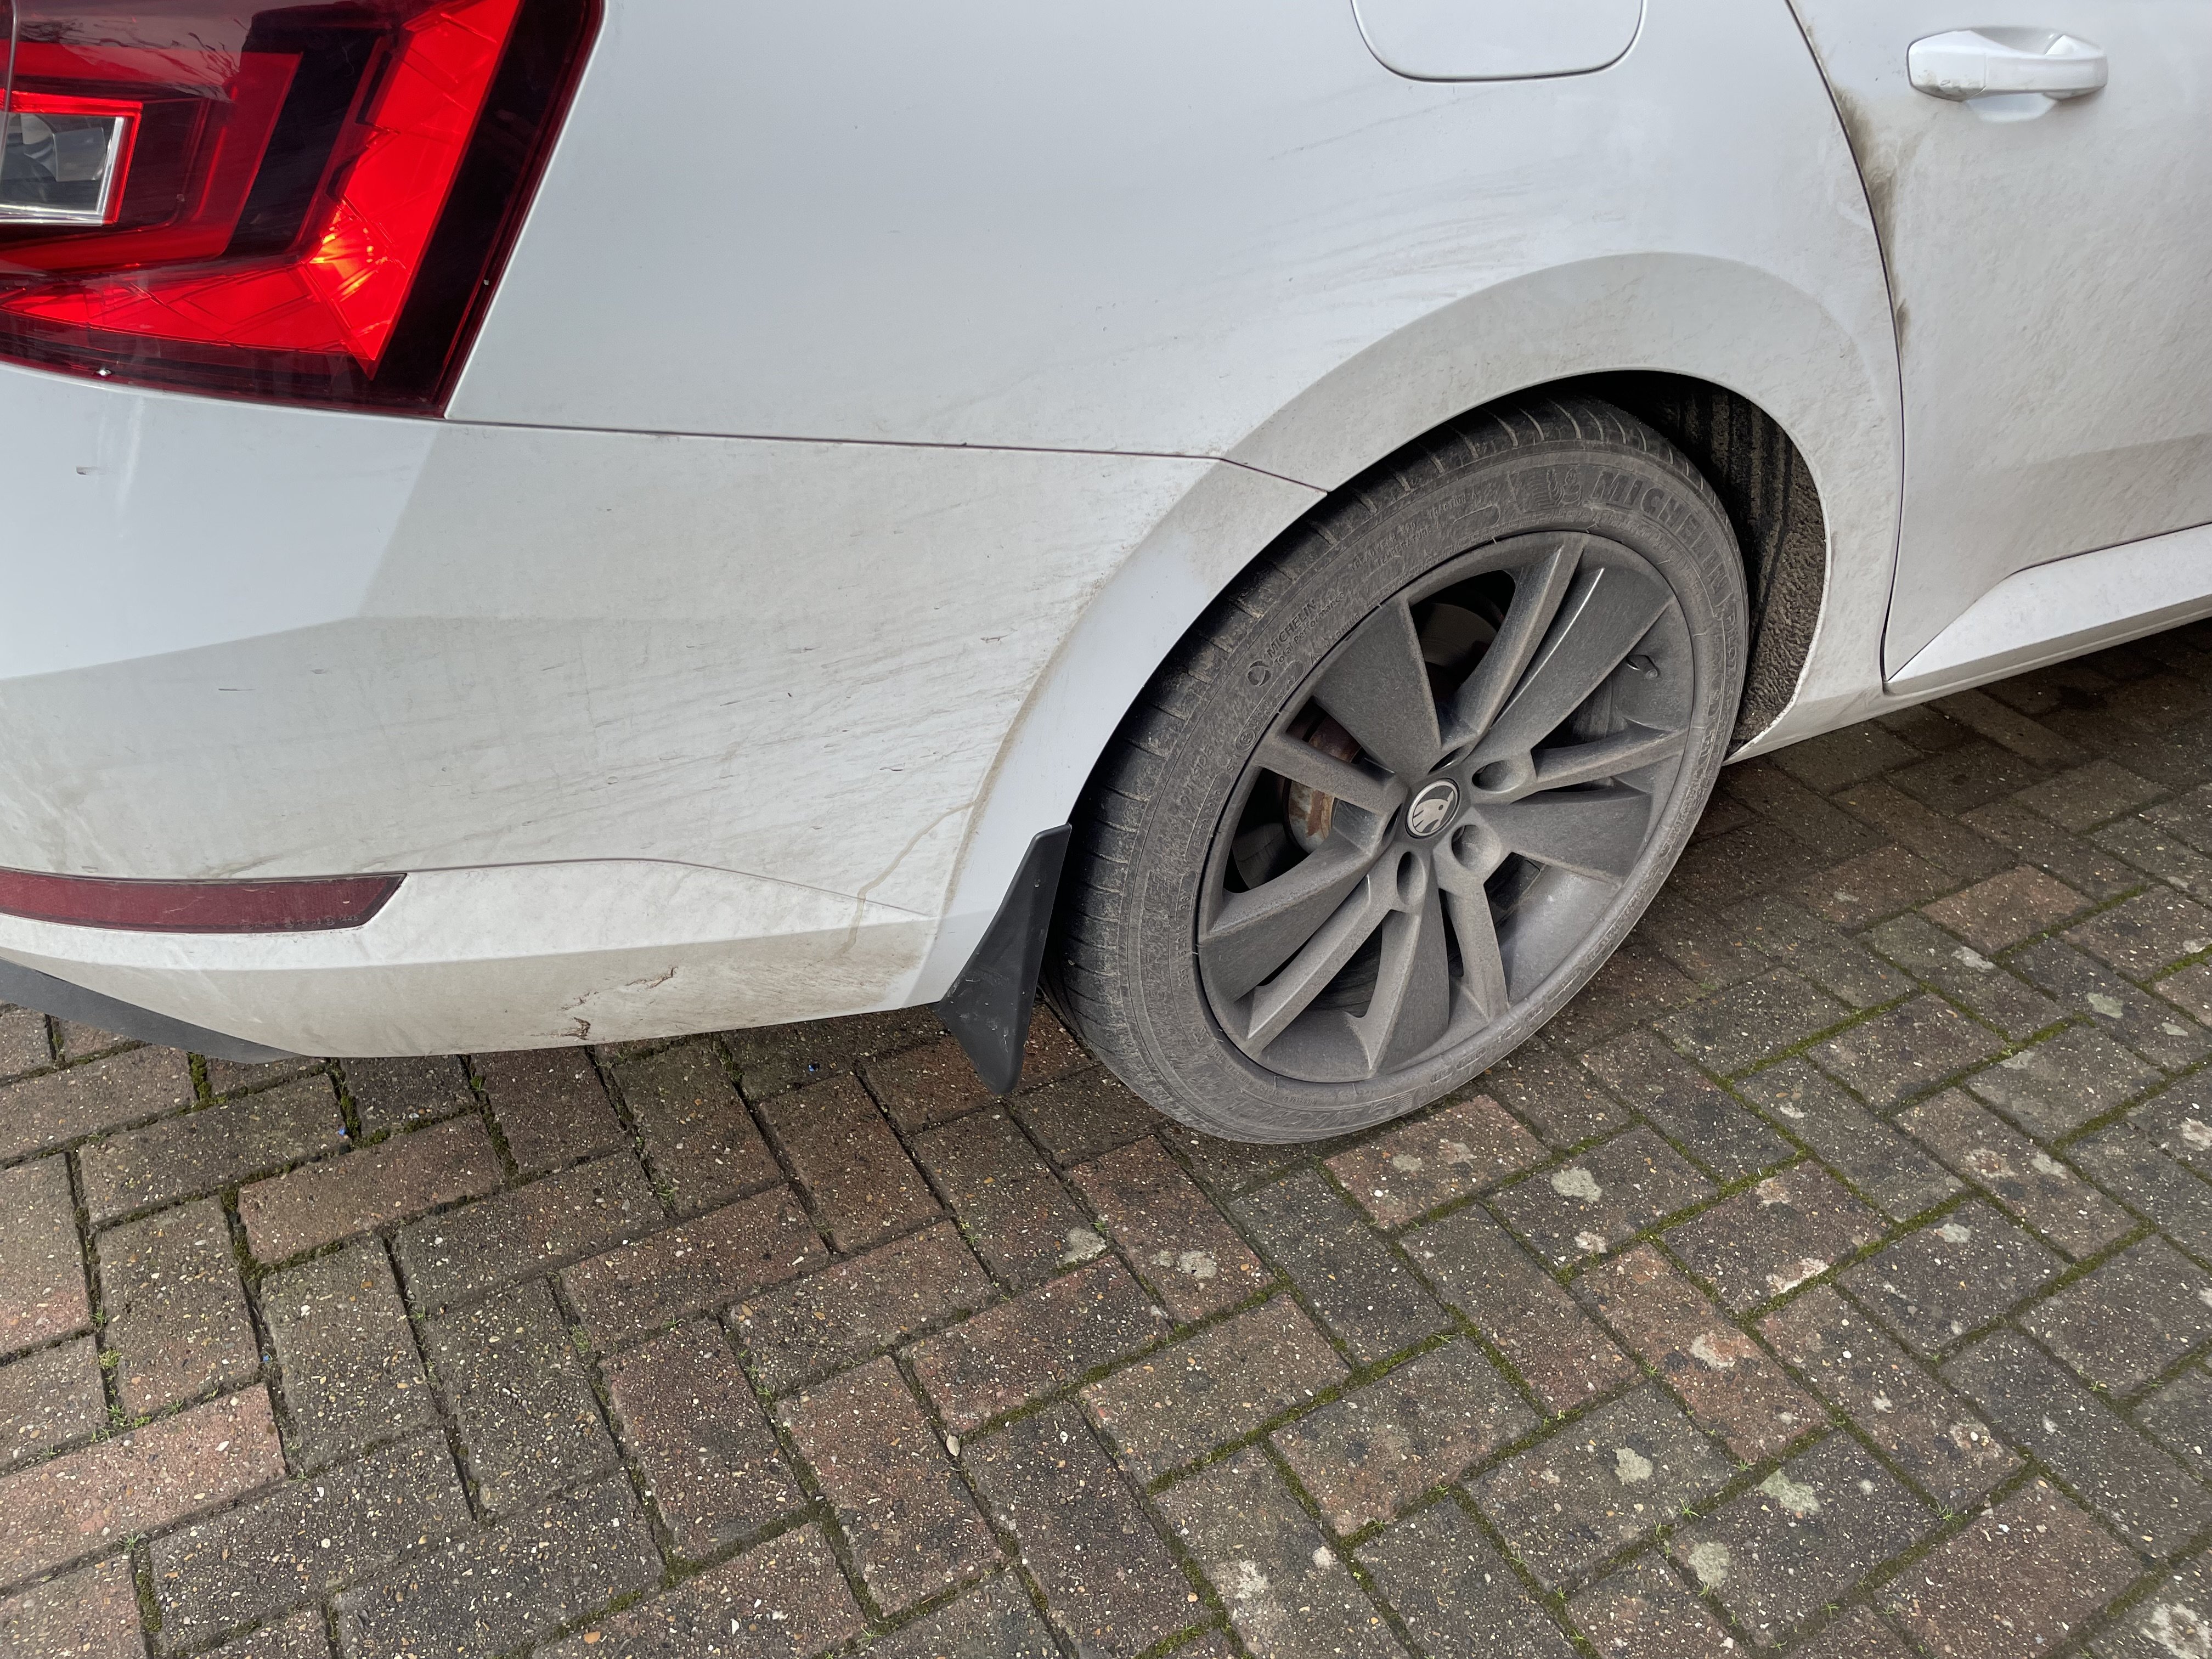
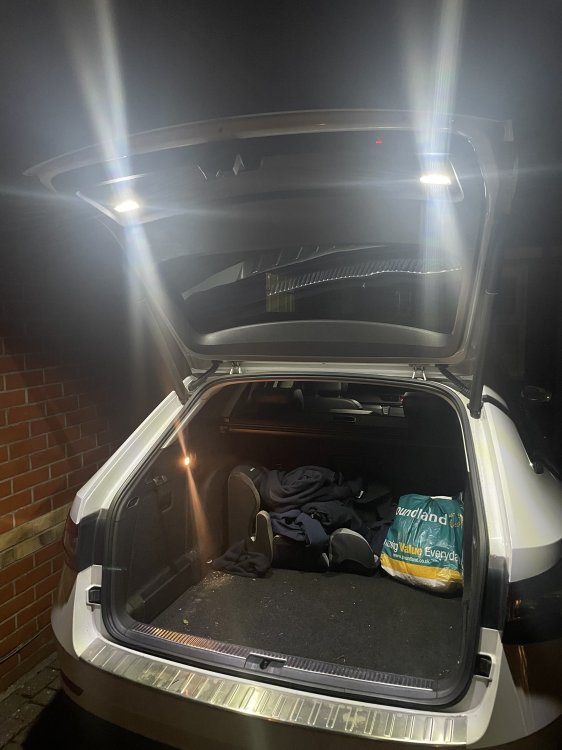
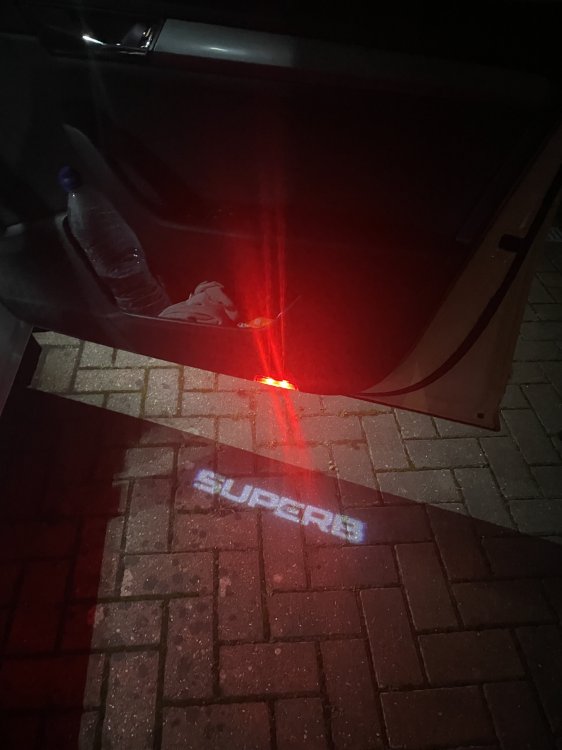
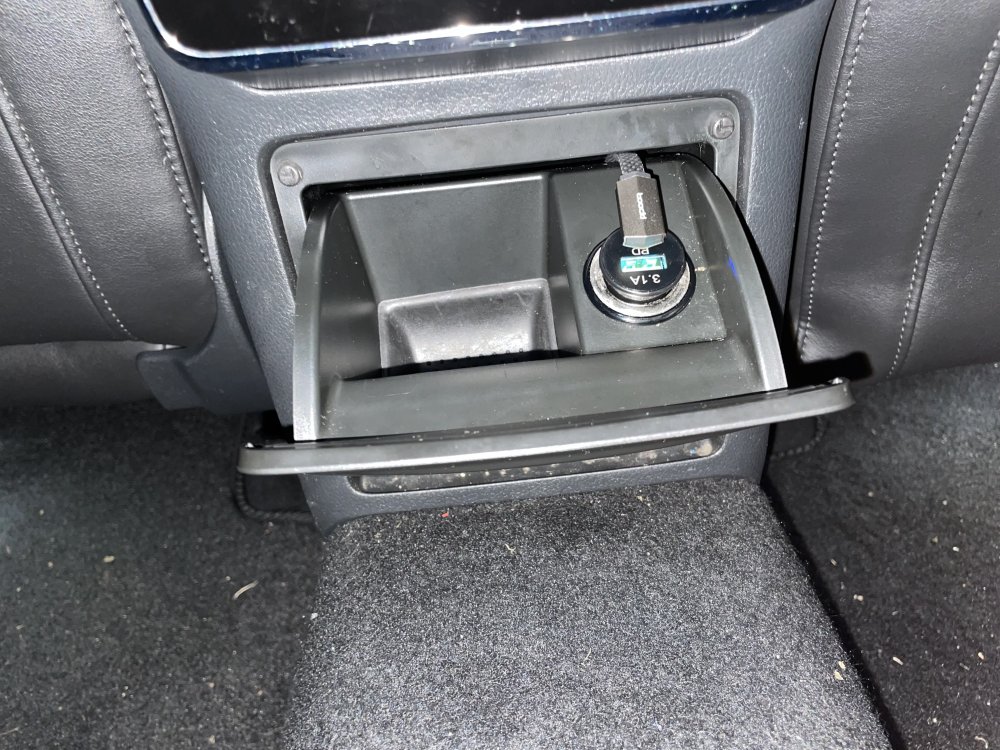
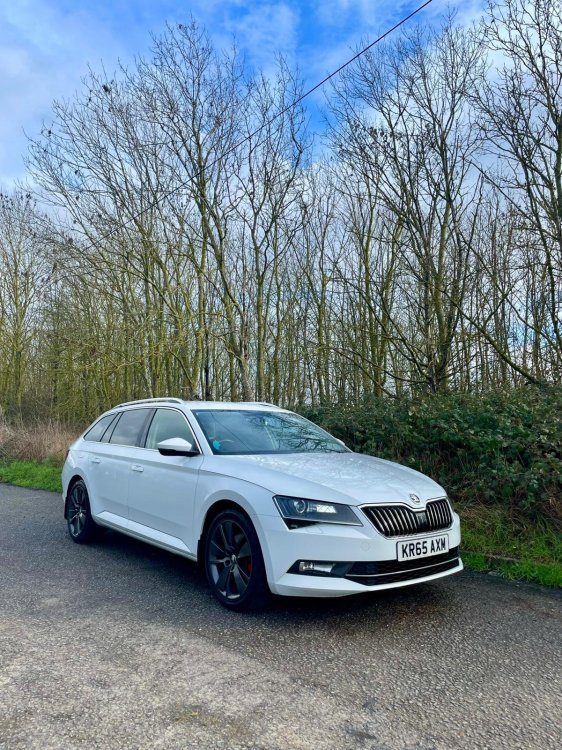
When I got the car back in November I was trading in a 21 Plate Fabia wanting an upgrade in terms of spec and size. I had previously had a 150PS TDI Superb 3 so knew thats what I wanted again. It had 123,000 miles and a few age related tatty marks and body marks. Most of the interior lights had been changed to White LED, AdBlue had been coded out and it had some hideous quilted floor mats. The wheels had been refurbed in dark metallic grey and the calipers painted red. The reversing sensors were not working and the dealer fixed those before collection. It also had a glow plug fail which was replaced under warranty. As the list on my phone of minor changes is getting longer and longer I thought its about time I started a thread on the projects page. Nothing major, just tarting up and simple improvements. Most of these things are well documented here already by others but I'll provide links for those wanting to do similar changes. Gear selector switch - To fix intermittent "Return to workshop" error www.aliexpress.com/item/1005009808126126.html Number plates and frameless holders - Existing ones were faded and I hate screws through number plates https://mr-plates.co.uk/ Floor Mats - To replace the hideous quilted ones it came with https://www.amazon.co.uk/dp/B0FP5WPKVL Bumper protector trim - To cover some scratches and cracks on top of the bumper, and to protect from future ones https://www.ebay.co.uk/itm/374297644198 Stop start memory module - I've never had an issue with start/stop previously but on this DSG version it seemed to be quite agressive and stop the car too much for my liking. https://www.aliexpress.com/item/1005009424334938.html DSG lever top chrome - Original had chips in the chrome https://www.aliexpress.com/item/1005008748111292.html Reversing camera - Not something I particularly needed but for the price and ease of install felt like a nice addition https://www.aliexpress.com/item/4000230897829.html Front speakers and fittings - Originals had the issue with the magnets falling off and there was a severe lack of bass! Speakers - https://incartec.co.uk/product/pioneer-ts-g1710f-6-5-g-series-dual-cone-car-speakers-280w Fitting kit - https://caraudiocentre.co.uk/products/blam-sfku-sko01-165-front-or-rear-door-speaker-upgrade-fitting-kit-for-skoda-165mm-6-5-inch Foam rings - https://www.aliexpress.com/item/1005007457007431.html (To direct sound through door card and mimic the OEM speakers) Superb puddle lights - Because why not! https://www.aliexpress.com/item/1005009118825485.html LED tailgate lights - It already had LED bulbs in the original holders but these are significantly brighter and really light up the whole boot area. https://www.aliexpress.com/item/1005006419747360.html While fitting the rear camera I managed to break a wire for the interior lights where it goes through the rubber gaiter to the tailgate, and everytime the tailgate opened to full height all the interior lights would flicker and go off. So, the next task was to replace this cable. I pulled in a new 22AWG cable and connected it into the wire close to the plug within the tailgate, and the other end at the plug just below the D pillar. Lights all working again and no further issues. Washer bottle funnel lid - I really like the one we have on our Kpdiaq so this is a nice addition https://www.aliexpress.com/item/1005009730287325.html Boot torch batteries - Original removable torch was working in when in situ but didnt work when out of the car. Please to find they are 3x standard AAA rechargeable batteries. https://www.amazon.co.uk/dp/B00HZV9XKU Wireless CarPlay adaptor - I love the wireless carplay in our Kodiaq. Its so handy when jumping in the car quickly and not needing to plug the cable in. I was sceptical of such a cheap unit but I have to say it has been flawless. A slight lag between changes on the screen and changes in audio, but no worse lag than the OEM wireless in the Kodiaq. It is also small enough to allow the cover to be closed with it in situ. https://www.aliexpress.com/item/1005010493905846.html Route usb from rear charging port to armrest - as the front port is occupied with the wireless dongle, and to have the wire coming out in the armrest and allows the rear ashtray to be closed with it in situ - Based on the solution by @JR RS Slimline 12v to USB adaptor - https://www.aliexpress.com/item/1005007463964127.html 90 degree USB C to Lightning flat cable - https://www.aliexpress.com/item/1005009346861759.html (I also bought the USB C version in anticipation of the next phone upgrade being USB C not lightning) Parking ticket clip - Its amazing how I didn't notice this was missing until I went to put a parking ticket in it. Having had Skodas for the last 6 years it was such a natural thing to stick the ticket into it. Had to go OEM for this one. I am sure I could have got it cheaper from a local dealer, but for the convenience I ordered from Skoda Parts. https://www.skoda-parts.com/spare-part/3v0867333-parking-ticket-holder-skoda-15521.html Wheel nut caps - There were none on the car when I got it and they just looked a bit shabby. I haven't fitted these yet as the ones for the locking bolt are a bit tight and need the ridges sanding off fromthe inside. https://www.aliexpress.com/item/1005007215903363.html Mud flaps - I fit these to all the cars I have. UK countryside roads make for a very dirty car and I feel they save the sills a lot of grime. These ones are significantly cheaper than OEM and not a perfect fit, but good enough. https://www.aliexpress.com/item/1005001393849257.html Not sure on the limit for length and photos for a single post, so will continue with a part 2.


 1 point
 -
1 pointFwiw, hopefully a regas will recover it. I have my AC serviced roughly every two years by an really good mobile independent. He checks gas weight, vacuums it out to remove any moisture, adds fresh PAG oil too as required. I do 12k miles per annum, use the climate all the time and it looses about 10% of the gas naturally between service visits. It's not leaking. Got my wife a 2019 Seat Ateca last year that only had 11k miles on it from new, full dealer history but AC had never been serviced, gas weight was at ~40% of what it should have been when he came to do service on it for mE. Best thing for any AC is use it regularly and service it, my cars now at 120k miles and the AC is still excellent.1 point
-
1 point
-
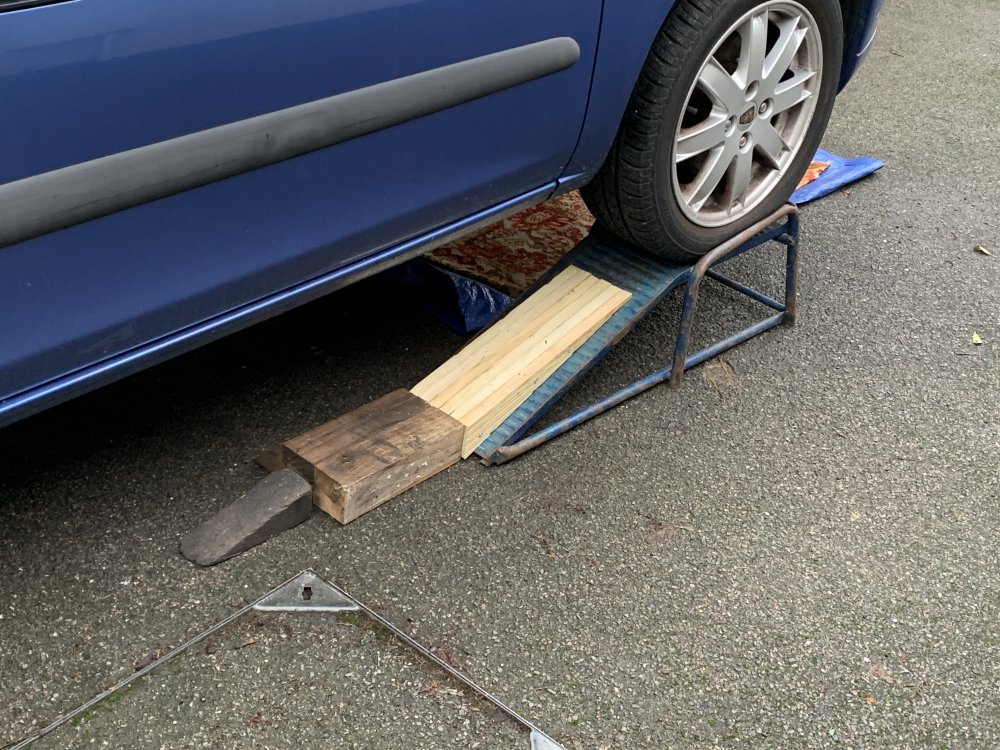
I'm using my father's 1970s Halfords ramps. I made some wooden adaptors which I use together with some other blocks of wood. The photo shows my other half's Rover 25, but they work equally well with the Octavia.
 1 point
 -
1 pointSounds like a corroded earth somewhere thats causing voltage drop when car electrics are under more load. Not sure if the fan and ECU share same earth point. Check the earth nearest battery first under battery tray and check if you can where I think brown wire goes from ECU. Alasdair1 point
-
Just found myself wondering if this is an electrical noise thing, rather than a marginal power/voltage thing. The dirty connection might be causing a kind of arcing situation which may be upsetting some of the circuitry in other things. Pull the fuse (#42) for the lighter socket (to prevent shorting while you work on it), and give it a clean up to improve the reliability of the contact.1 point
-
1 pointA comprehensive, good reasoned argument for the Varioflex - however, it seems that not enough 2024 and beyond purchasers were prepared to cough up the £1k and thus Varioflex got the chop. Our former 2019 Karoq only had the rear seats removed once (small removal job) and our current model, a 2024 built during the facelift period came with Varioflex but they've never been out.......! I will say though, Skoda could lose the rear seat trays, I once put one up just to 'see', but then couldn't get the thing back down........dealer quickly sorted it, seems you have to be heavy handed.1 point
-
1 pointI remember an older topic for Felicia engine start button which i wanted to install. https://www.briskoda.net/forums/topic/520850-skoda-felicia-with-engine-start-button/#findComment-5836781 The very next month that company (Chinese usually) may close and there is no way to find spare parts plus when a problem show-up and go to the electrician the most common answer is: ''i don't know this, there are no diagrams so i can not do anything about it". So you have to remove it or if you are possessed with that function you buy from another brand, you pay to install it and after few months or years again the same. The tragedy is when the problem show-up in a trip to the country or in National Highway, the solution is a tow truck and back home and your vacations are ruined.1 point
-
Hi Neil and welcome, a great car with a spec to match. My daily car is a Karoq 1.5 SEL which I had ceramic coated as it lives outside and well worth the cost in my opinion. I also have a 2017 Focus RS [also ceramic coated] which I treated myself to when I took early retirement. Same problems as your Golf, turning circle,small boot etc and agree what you mean about the 4WD. I couldnt live with the RS as an everyday car at my age as its far to hard but a great toy to enjoy when the weather's fine1 point
-
1 point
-
1 pointAre you certain it doesn't come on at reduced intensity as a second tail light?1 point
-
I only have a microsd reader, so the original card doesnt fit in. Also, newer maps are more than 16GB.1 point
-
The rear brake cylinders are not expensive as are the front calipers if needed. Last rears I bought were around £13-00 each and front calipers were around £40 each. Those were for a MK1 but stick your reg into https://www.partsinmotion.co.uk/ and check prices. Alasdair1 point
-
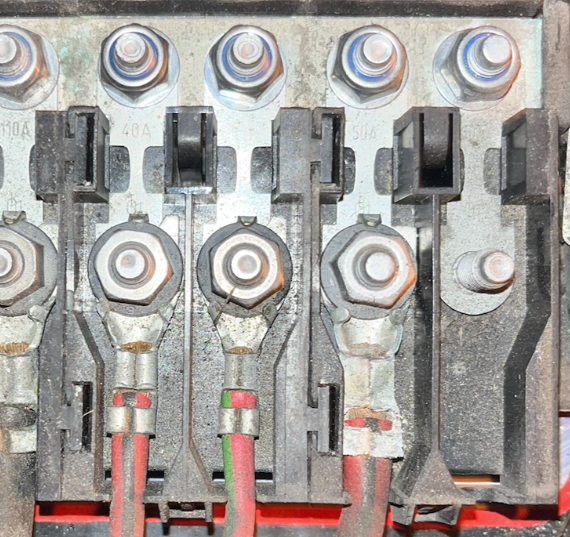
Good effort but not quite sharply focussed enough for good scrutiny. Can you try for a closer shot of this subset of your previous image. Looks a bit like there are three newer fuses in there, for L-R; Fan full speed 40A red/black thinner, ABS 40A red/green, and PAS, 50A red/black thicker Also looks like there's a spare 50A fuse in position 6. If the PAS wire will reach there, try moving wire onto that one. If it won't, try substituting that fuse into position 5 (with a gentle clean up of surfaces with something like a bit of wire wool).
 1 point
 -
1 pointTo be fair, I also find Waze far more convenient to use on a daily basis. However, the real advantage of the factory navigation system becomes apparent with hybrid and electric vehicles. An interesting observation from my Octavia RS iV : On longer journeys, there is a noticeable difference in fuel consumption when using the built-in navigation instead of Waze. With a route entered into the factory navigation, the car clearly makes use of predictive hybrid management — it already knows: - where descents are coming; - urban areas; - motorway sections; - speed limits; - traffic conditions. As a result, it manages the battery far more intelligently: - where to use electric power; - where to preserve charge; - when to regenerate energy. With Waze, this behaviour is much more limited, and in my experience the fuel consumption is noticeably higher. Honestly, I initially assumed it was mostly marketing jargon, but it turns out the factory navigation genuinely makes a difference in a PHEV. I often have to leave the office in the morning, drive 200–300 km to another city, and return the very same day. At first, I simply entered the destination city as the final stop, and I would almost always arrive with the battery sitting at around 0–3%. Presumably, the system assumes charging will be available at the destination, but in reality I rarely have time to charge during the day. After a bit of experimenting, I discovered a rather interesting trick: instead of setting the city as the final destination, I enter it as an intermediate stop and then set a final destination roughly twice as far away. The system then starts preserving battery charge for the “remaining” route. The result is that I arrive at the intermediate destination with around 20–35% battery remaining. For the return journey, I simply set my office as the destination again. Using this method, I consistently see a real-world fuel saving of around 0.6–0.8 L/100 km compared to driving with Waze alone. And to avoid losing the convenience of Waze, I still keep it running in the background without an active route — that way I continue receiving alerts for traffic, cameras and road incidents.1 point
-
1 pointWell done. Good strong results there. When mine (FWD 220) was Stage 2, it was making (at the flywheel) approx. 360 hp & 560 Nm. Galano ECU & TCU tune, IE intercooler, Racingline R600 intake, TIP elbow and APR TIP.1 point
-
1 pointCould be the bulb (always my first choice!), wiring, fuse, switch, and of course nowadays possibly even a tick not in a box in the software! I'm still looking at the bulb first.. dunno if it gets flagged up for you in a 2016.1 point
-
1 pointTo me all these immobilisers and alarms are nothing but a bloody nuiance, particularly on a car of this age, as they do go wrong and pack in and then you either need to search high and low for the exact replacement or work out how to wire in another model of alarm/imobiliser or work out how to get the wiing back to factory standard. This might be easy if the installation was done correctly but often someone who claimed to know how to fit the alarm either didn't or done the work incorrectly. A mate's just had this issue on a 1996 car, of an entirely diffent sort of car, that would have had a factory fitted imobilser but not the silly alarm. After two failed replacement alarm/imobilsers he had them disconnected and just used a remote controled battery disconnect as an immobiliser but just recently has had wiring issues that highlited the worse bodge of wiring and multiple unecessary connectors I have even seen. A good auto-electrician also said the same as me, I knew he would, and has just made safe and sorted the non-working essentials with a major part-rewire to correct colours, connectors and standards later. With cars (and home) I've often seen electrical bodges on top of previous electrical bodges which just compounds the complexities of getting it right for full confidence of fully sorting things to all correct. Note: I'm not an electrician of any sort.1 point
-
I see. I know nothing about these engines, but if it runs nicely just keep the oil changes regular and don't ignore warning lights or strange noises. Sounds like you got a good one. 👍1 point
-
1 pointThis is what you have: Code Alarm Remote start and keyless entry system with 2-way LCD remote Code Alarm Security and remote start system with 2-way LCD remote It's not factory, this is the genuine:1 point
-
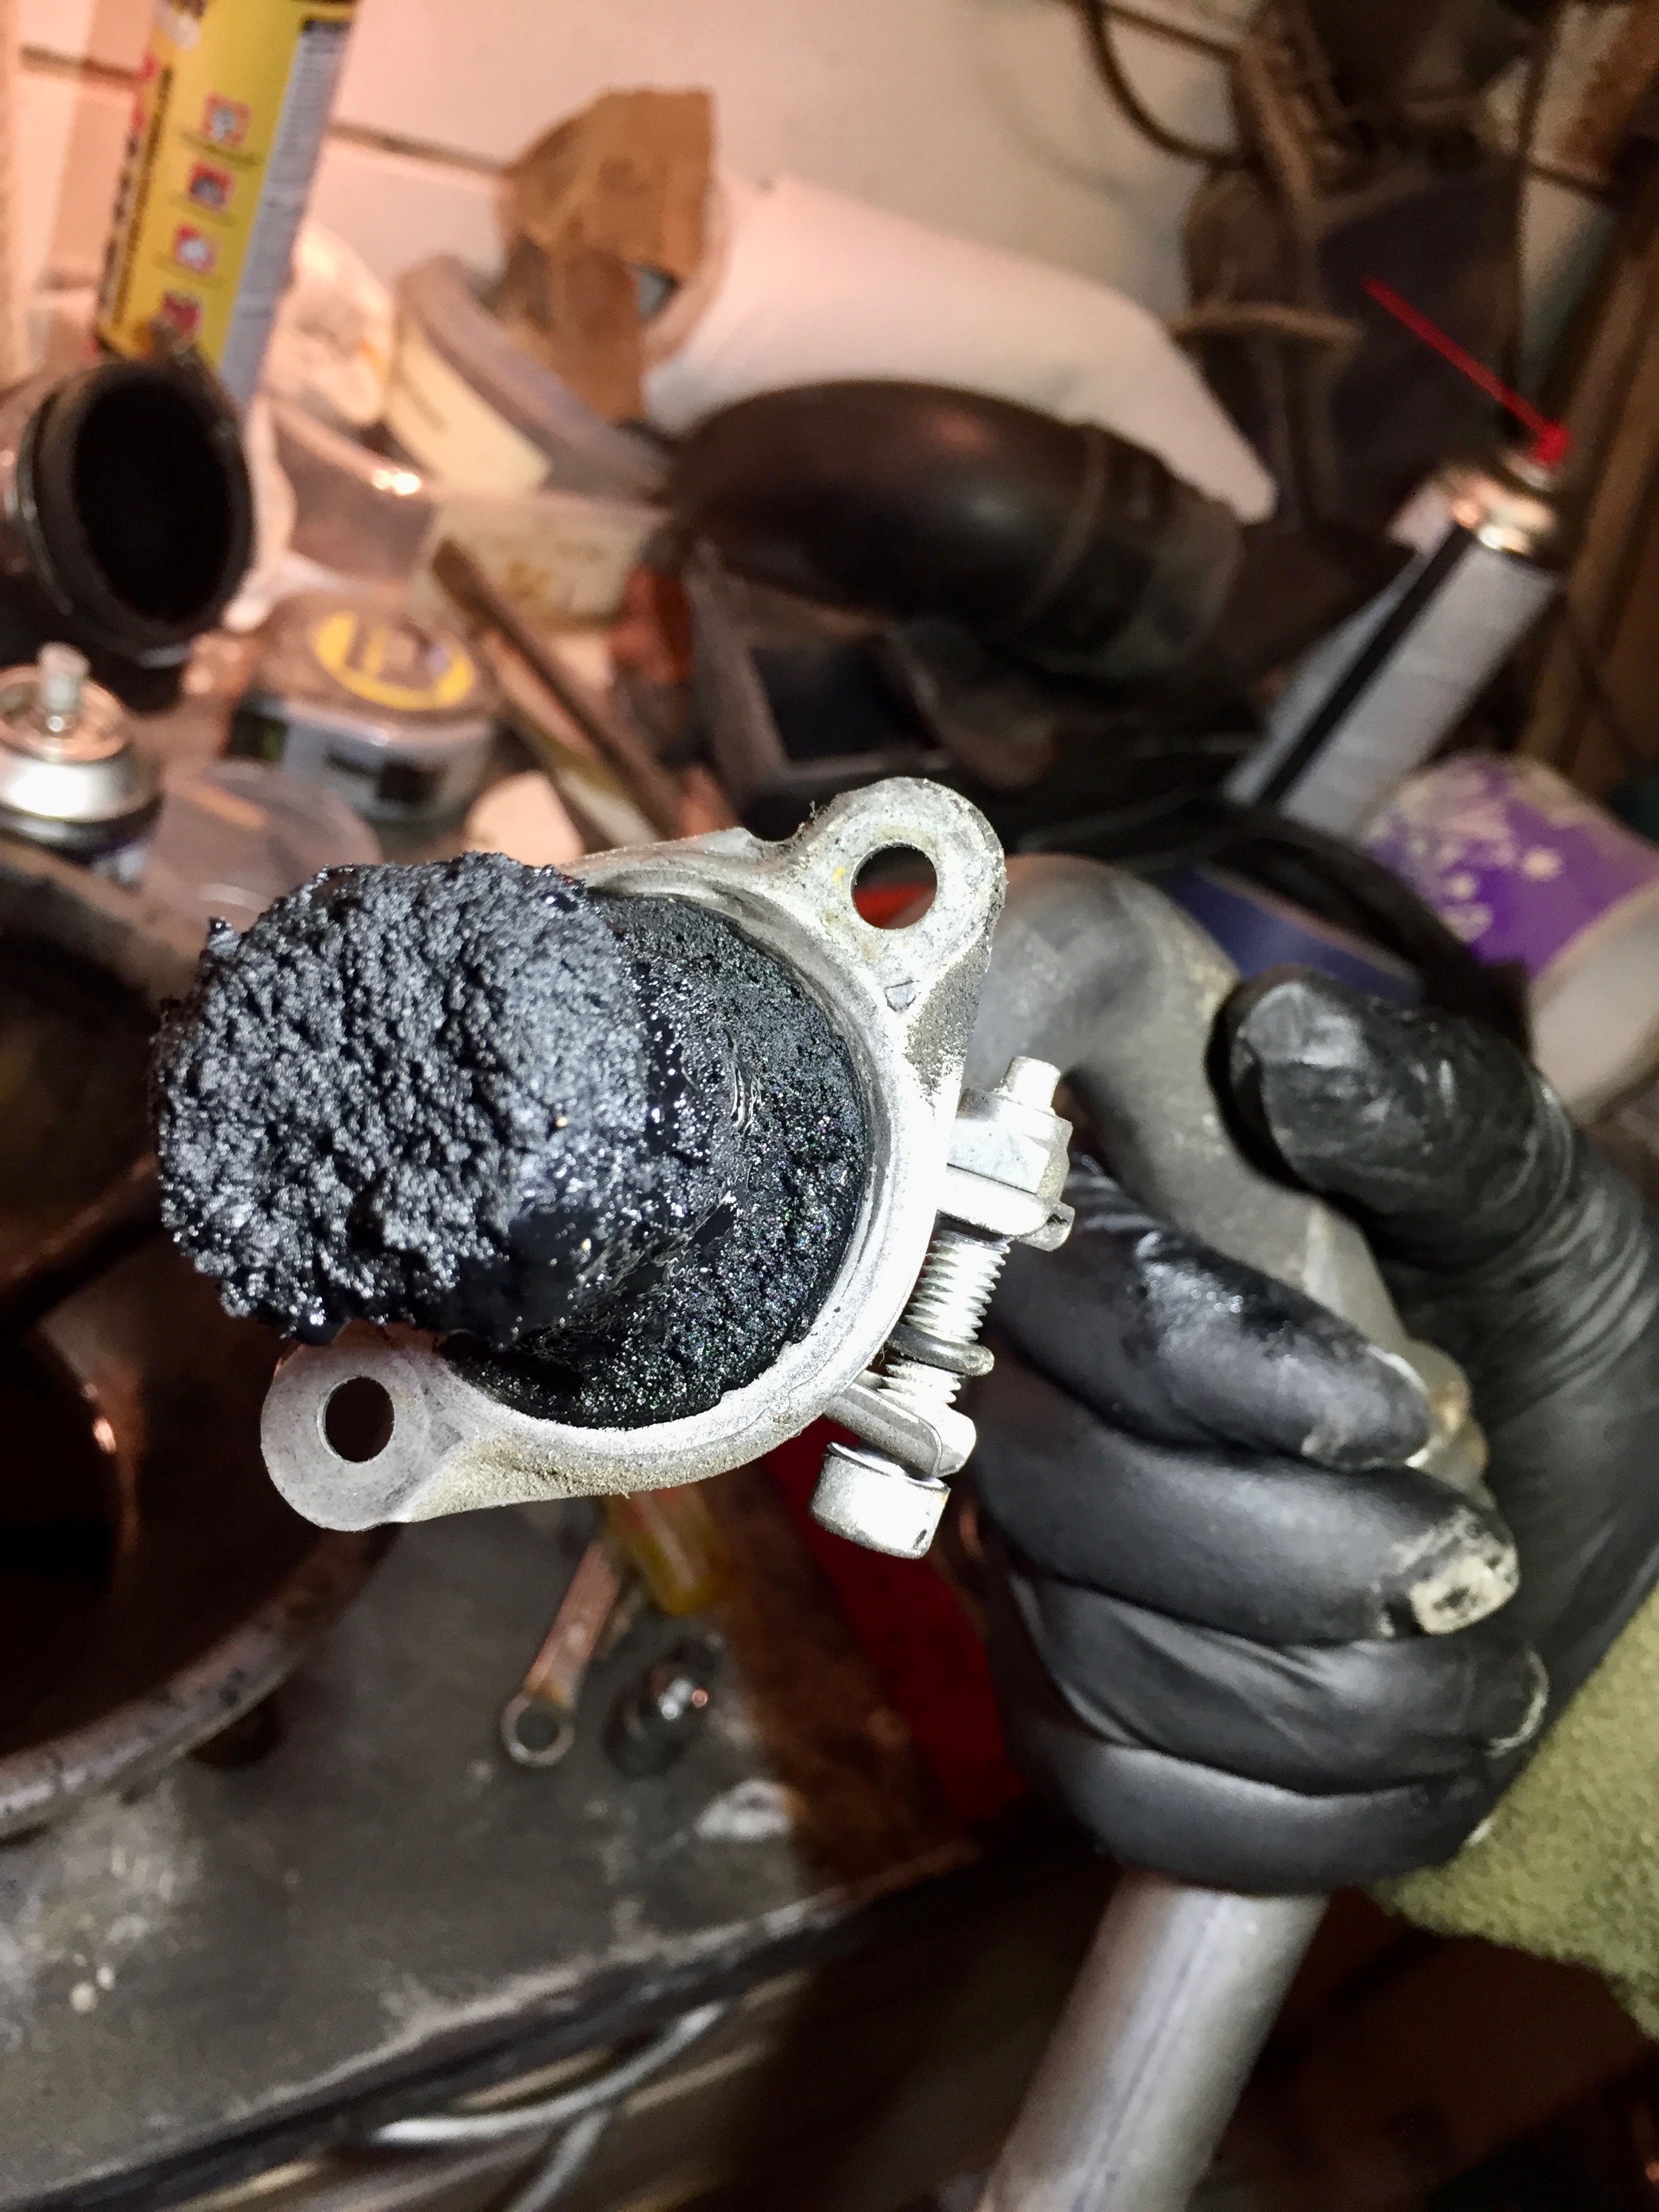
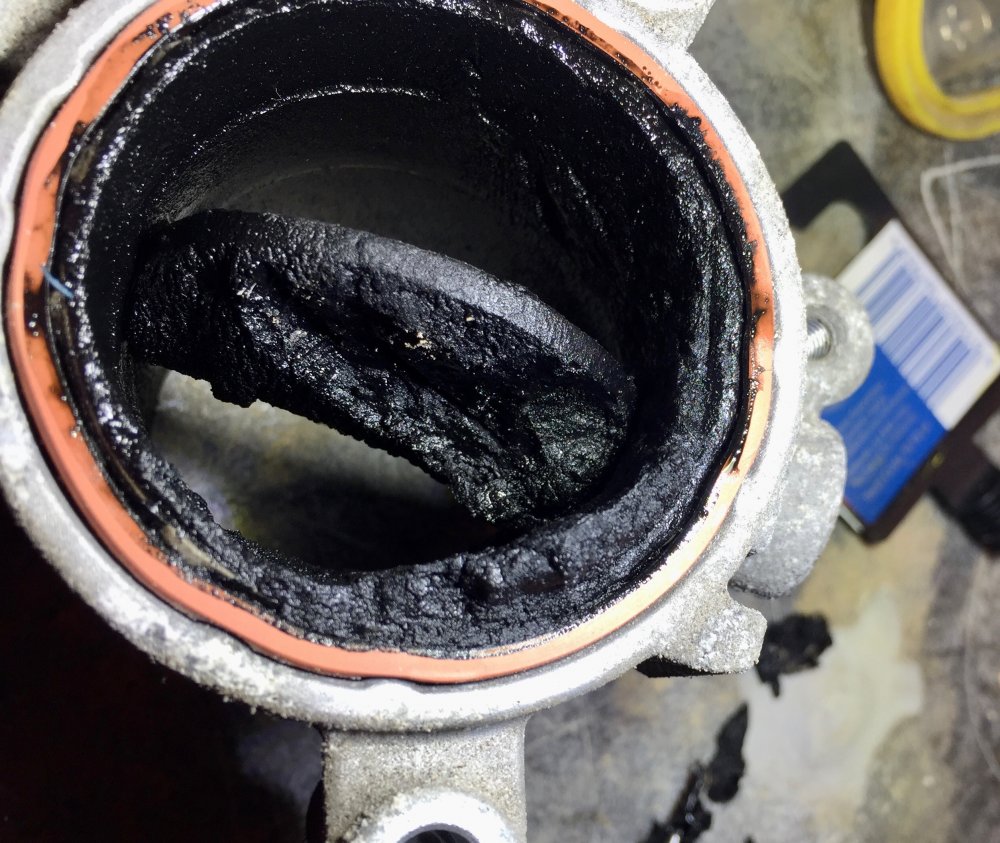
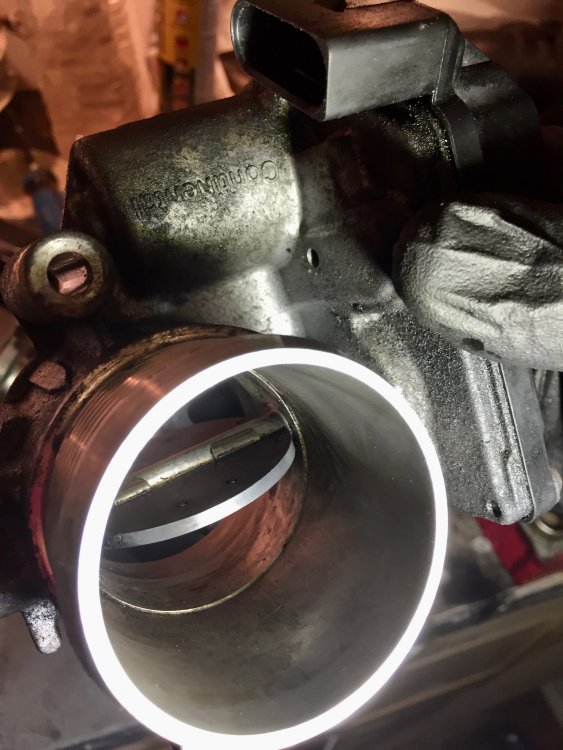
1 pointFirstly, many thanks to the posters on here and elsewhere who have documented the EGR issues, and solutions. My 2010 2.0 110 Yeti 130k miles started showing the management light and some times heater plug light. Car always drove very fine, but this is MOT fail. It started to go into limp mode occasionally, so I thought the end was near. Garage quoted £1k to scare me, but did diagnose EGR "failure". I followed the advice on removal and cleaning, including reversing exhaust gas pipe orientation. Four very oily hours later I had finished. Lots of white spirit and toothbrush. My wife was astonished car even ran! The flap valve was not able to open or close fully, causing the management lights. Car passed MOT, low emissions, runs fantastic. No Cost. Car even did a regen, which it hadn't done for ages. Now, several months and 100s miles later, all is still good. Just goes to show a DIY fix is sometimes more than good enough.

 1 point
 -
1 pointJust followed the directions posted by others. I wasn't in a hurry, and accept that you have to get quite physical with rubber hoses at times! Nightmare jobs are always relative, but I wouldn't consider this one in that category at all.1 point
-
Our 85 edition, is our second EV. First was a French tin box, and was great as an intro to EVs. OTOH it really made us appreciate it when we got our Skoda late last year. For us, it has just worked fine since the day we got it. Tyres: not sure what you have, but we have no problems with the 19" ones from the factory. Being RWD poor tyres could cause squeaky bum but never have. The Michelins on our tin box were way worse, and were actually improved massively going to Goodyear 4 season (after a puncture wrecked a Michelin).1 point
-
1 pointIt seems you are not alone. This thread is from a couple of weeks ago.1 point
-
Because in 2012 suffix should be definitely higher that "B"1 point
-
Hi all, As many VAG cars, my Superb Mk3, is fitted with a DSG6 (DQ250) gearbox. Here is a tutorial to change its oil and filter on your own. You'll probably tell me: What's the point with it? Just have a look on Google or YouTube and you'l find plenty of them! That's true, but having done this exercise, I could see that it is very rare to have all information in a single tutorial. I will therefore try to be as exhaustive as possible. Here a list of some Skoda models also DSG6 equipped (I nevertheless let you check on your own, since depending on engine type or MY, some may be DSG7 fitted⚠️ instead of DSG6) ! - Octavia 2 - Yeti - Kodiaq - Superb 2 - Superb 3 First of all, here is the DQ250 gearbox: We're going to focus on the following items: #17: Filter housing - Tightening torque : 20Nm #18: O-ring - P/N N910 845 01 (normally sold with the filter) #19: Oil filter - P/N 02E 305 051C #26: Oil pipe - Tightening torque: 3Nm #27: Seal ring - P/N N 043 089 2 (normally sold with the sealing plug) #28: Sealing plug - P/N N902 154 04 - Tightening torque: 45Nm Not shown on this pic: DSG Oil - P/N G 052 182 A2 - 6l - Difficulty : 2 - Time needed : approx. 2h - Number of person needed : 1 - Necessary tools : ¤ VCDS software (or similar, To be confirmed) ¤ 24mm socket ¤ 8mm and 14mm Hex ¤ Torx 25 and 45 ¤ Ratchet or classic wrenches for disassembly ¤ Torque wrench(es) to apply specified torques (3 / 20 / 45 Nm) ¤ Short and intermediate extensions for ratchet or torque wrenches to enable easier access to screws ¤ Small flat screwdriver ¤ Filling hose VAS6262 ¤ Wooden toothpick ¤ Small fork ¤ Slip joint pliers ¤ Oil drip tray ¤ Twine (about 80cm long) or an old metallic hanger (wire one) ¤ Wide masking tape ¤ Rags ¤ Lifting means Concerning VAS6262, you can find one on numerous website at various prices. Without switching to a much more expensive pump model, I suggest taking a filling hose with a 1/4 turn shut-off valve close to the adapter on the can side. These ones are less widespread but still at affordable price and of course easier to use, since you can work without being 'showered' with oil. I've chosen this one on toolstogo-uk.com https://www.tools2go-uk.com/13664247/gear-oil-filling-hose-for-vag-dsg?g…=&Lng=en Dealing now with the DSG oil kit, you really have to be careful on the kit content ⚠️. Indeed some kits only content DSG oil and oil filter, but no sealing plug nor seal ring! ⚠️ Warning: Prices can really be different from a website to another (starting form 90€ up to ~200€ !) Chose the right one! After hours of searches and checks, I finally bought the Febi-Bilstein kit, which can be found on autodoc.co.uk for 100€-ish https://www.autodoc.co.uk/febi-bilstein/15821763?search=FEBI BILSTEIN Transmission oil change kit (171762) It effectively contains: - 6l of gearbox oil - DSG oil filter (#19) and its O-ring (#18) - Sealing plug (#28) and 2 seal rings (#27). By the way, I still don't understand why 2 rings?🤔 Note: I did not take time to ask for OEM spare parts prices by my local dealer. Step #0 : Preparation You need to lift the car high enough to get under the car and to get enough space to move your arms comfortably around the gearbox. Note: Though you've lifted the car, it needs to remain horizontal to make a proper filling with right oil level (see step 7). Step #1 : Air system removal Start with removing the air box. You first have to remove the 2 T25 Torx screws (#1), then unclip the cover on the rear face (#2) and lift it by rocking it as shown by arrow to avoid breaking the 2 lugs at the front side of the cover (#3). Finally simply push to the rear to release the lugs (#3). You now have to unclip the 2 lugs, where the 2 torx screws you have just removed where tightened (#1). Be careful for this step, since these 2 lugs may break. I've seen 1 or 2 pics of broken lugs on this forum. ⚠️ Then, you need to push the airbox backwards, so that its front side can 'rip' other the bonnet slam panel. Then unclip the hose (#3) and with a rocking motion back and forth, release the front side so that the airbox can be fully removed. However, do not hesitate to put one hand on the back of airbox to be able to pull forwards more easily (#4) and take the airbox out, which is quite large. This being done, you need to remove the air filter housing. This is simpler. Start with unplugging the small hose (#2) at the air filter housing outlet and unplug the air flow meter connector (#3). ⚠️Be careful: There's a small grey latch on the connector (if equipped) to unlock before pulling the connector off, otherwise it won't come out or you risk ripping it off. Now, remove the metal collar (#4) on the large air hose downstream the air flow meter. Use a slip joint plier for this. You can now unclip the air filter housing, which is simply fitted onto 3 shock absorber pins (#1). Pull vertically upwards. Don't hesitate to pull hard (continuously and not jerkily), it holds up really well! The 3rd pawn is under the air box (dotted circle), but it comes out quite easily when the other 2 are already out. Once the air filter hosing has been unclipped, all you have to do is disconnecting the large hose, downstream from the flow meter. Be careful to 'close' the hose to avoid any foreign object damage or even just dust towards the engine. Masking tape will do do the job! Step #2 : Battery removal To take it out, you need to remove a 13mm hex screw, which tightens a retaining bracket et holds the battery in place. This screw is on the front of the battery (#5 on previous pic). Then remove both battery terminal covers (by lifting vertically) to access the clamping nuts of both battery terminals posts (10mm Hex socket). Warning⚠️: Start disconnecting the "-" terminal post before disconnecting the "+" terminal post! For more safety, wrap them with masking tape as well if you want. Battery can be then removed easily, even if it weighs! Step #3 : Battery fixing plate removal You can now access the battery fixing plate, which is held by 2 10mm Hex screws (blue squares) and one 10mm hex nut. Sorry, the latter is out of the pic, but it can be found easily (just follow blue arrow). Be careful don't be too quick at this step, several fixing staples are indeed attached to the battery holder. You might be tempted to cut the tie-wraps, but these are attached to small brackets, which are simply stapled (red circles) or clipped (orange circle) to the battery fixing plate. Staples can be removed by simply pushing them with a flat screwdriver, while the clip-on holder can be pulled out with a small fork. There is now a small Control Unit attached to the battery fixing plate. Unclip the small lug (red circle) and pull the control unit vertically (as suggested by arrow) to remove it from the battery fixing plate: The battery fixing plate can now be removed. Step #4 : Oil draining You can finally access the DSG oil filter housing: A 24mm hex socket is necessary to remove it. Once done, protecting the filter location against foreign object damage or dust is necessary. Aluminium foil will do the job. FYI, here is the difference between a new filter and a filter with 60,000 km on the clock. Now remove the sealing plug with the 14mm Hex. Once done, the oil flow will be very thin, due to the oil pipe. Remove the oil pipe, using a 8mm Hex. After that, the oil flow is more important. Step #5 : Oil filter replacement Once the gearbox is empty, you can put back in place: - The Oil pipe (still using the 8mm Hex. Tightening torque = 3nm). If you don't have a torque wrench complying with such a low range. Take it easy! Just to give an idea, it is roughly the same order of magnitude as for closing a jam jar lid. (Sorry, this is the only simple image I found quickly ...). Well just keep in mind, it's light !! - The new DSG oil filter (don't forget to moisten the O-ring in its hole) - The new O-ring on the filter housing (don't forget to moisten this one too) - The filter housing, which must be tightened at 20 Nm (with the 24mm Hex socket) Step #6 : Reassembly Steps #1 and #2 can be processed in the reverse order to reassemble : - The battery fixing plate (and the small control unit) - The Battery - The air filter housing and the hoses - The airbox. Step #7 : Oil filling The filling hose can now be screwed in the sealing plug thread At the other end, donc forget to shut the 1/4 turn valve, before screwing it onto the oil can. To make it easier, you can attach the can to the bonnet with a 80cm long twine or an old metal hanger (wire one), that you can shape to transform it as a can holder. If you want to fill the gearbox faster, you just need to make a little hole in the can bottom (now upside down ) to enable air getting in the can. Of course, don't forget to open the 1/4 turn valve. http://img.xooimage.com/files1/b/e/c/whistle-1bb1.gif You have to fill approximately 5,5l. Once again, don't forget to shut the 1/4 turn valve upon each oil can change http://img.xooimage.com/files1/b/e/c/whistle-1bb1.gif. Warning: Do not make a hole in 6th can, otherwise there could be some side effects... http://img.xooimage.com/files1/3/e/0/33-2bc7.gif When the 6th can is half empty, shut the 1/4 turn valve, remove the can from the filling hose. Put now the free end of the filling hose into the dip tray. You can now open the 1/4 turn valve to start adjusting the oil level Step #8 : Oil level adjustment ⚠️ Now, start the engine and keep your foot pressing the brake pedal. Move the gear lever in accordance with the following sequence: P to R, wait 3s R to N, wait 3s N to D, wait 3s D to S, wait 3s S to D, wait 3s From this point, most other tutorial suggest getting back directly to P. I personally rather got back step by step, still waiting 3s after each step. Once back to P, you can remove your foot from the brake pedal, but keep the engine idling. Now, connect your VCDS cable and select the gearbox controller (02 Auto Trans): Once in the gearbox controller menu, there are 2 options: 1) Either get into "08 Meas. Blocks". then in the new window, get into "Group 019" and check the Temperatur cell of "ATF (Auto Tranmission Fluid)" parameter. This is at least what I've found in several other tutorials. But though owning an official VCDS cable, the "08 Meas. Blocks" is greyed on mine. (may be my Micro-CAN version starts reaching its limits). Hence I had to use option #2 below. 2) Or get into "Adv. Meas. Values" menu: From this point, type "trans" in the search cell to find all parameters related to the gearbox. In the results list, tick "ATF temperature - Transmission fluid temperature": Now with the engine still idling, just wait for the oil temperature to get between 35 and 45°C. It may take several minutes. Be patient. When oil temperature is close to 35°C, you can remove the filling hose completely. Don't worry temperature is increasing really slowly. The oil flow from the oil pipe starts decreasing. Once the oil temperature is within the 35-45°C range, you can observe that a slight amount of oil flows out via the overflow tube every 30 seconds, independent of the oil level. This is caused by oil pulses, which cool down the coupling. According to workshop manual, this oil quantity is not a criterion to determine the correct oil level. Therefore, they must not be taken into account when assessing oil level. You can now screw back the sealing plug (with 14mm Hex). Tighten it at 45Nm. From this point, you only need to stop the engine, disconnect your VCDS cable and put the soundproof housing back in place under the engine, and... That's it! Well, non counting the specific tools, you've just saved ~200€! Note: I'd also like to write special Thanks to @J.R., who helped me to translate some technical words I was missing! Much appreciated.👍 _1 point
-
1 point@BigAndyGreen Nobody can email you the file, but can you burn a CD?1 point
-
1 pointCan you PM him a link please to 5274 so he has this? Edit: I do have 5274, if not in your hand. 5274 as suggested by @pab567 S00.1000.03.99 #Integrationphase: Delivery cw45/12 C10/C12-samples #VwSwPartNumber:1T0035680L/3T0035680G/7F0035680B #/7E0035680B/1T0035680P/1T0035680Q/3T0035680K/3T0035680L/1T0035686/1T0035686C/1T0035686D/7F0035686/7E0035686/3T0035686/3T0035686C/3T0035686D/7N5035686/2H0035680 #VwSwIndex:5274/5274/5274/5274/5274 #AppsBuild:C_EU_13.274_t2 C10/C121 point
-
1 pointI have sent you a forum private message, link is in message top right. email address are not allowed, and forum will blank them out, for your own safety1 point
-
1 point
-
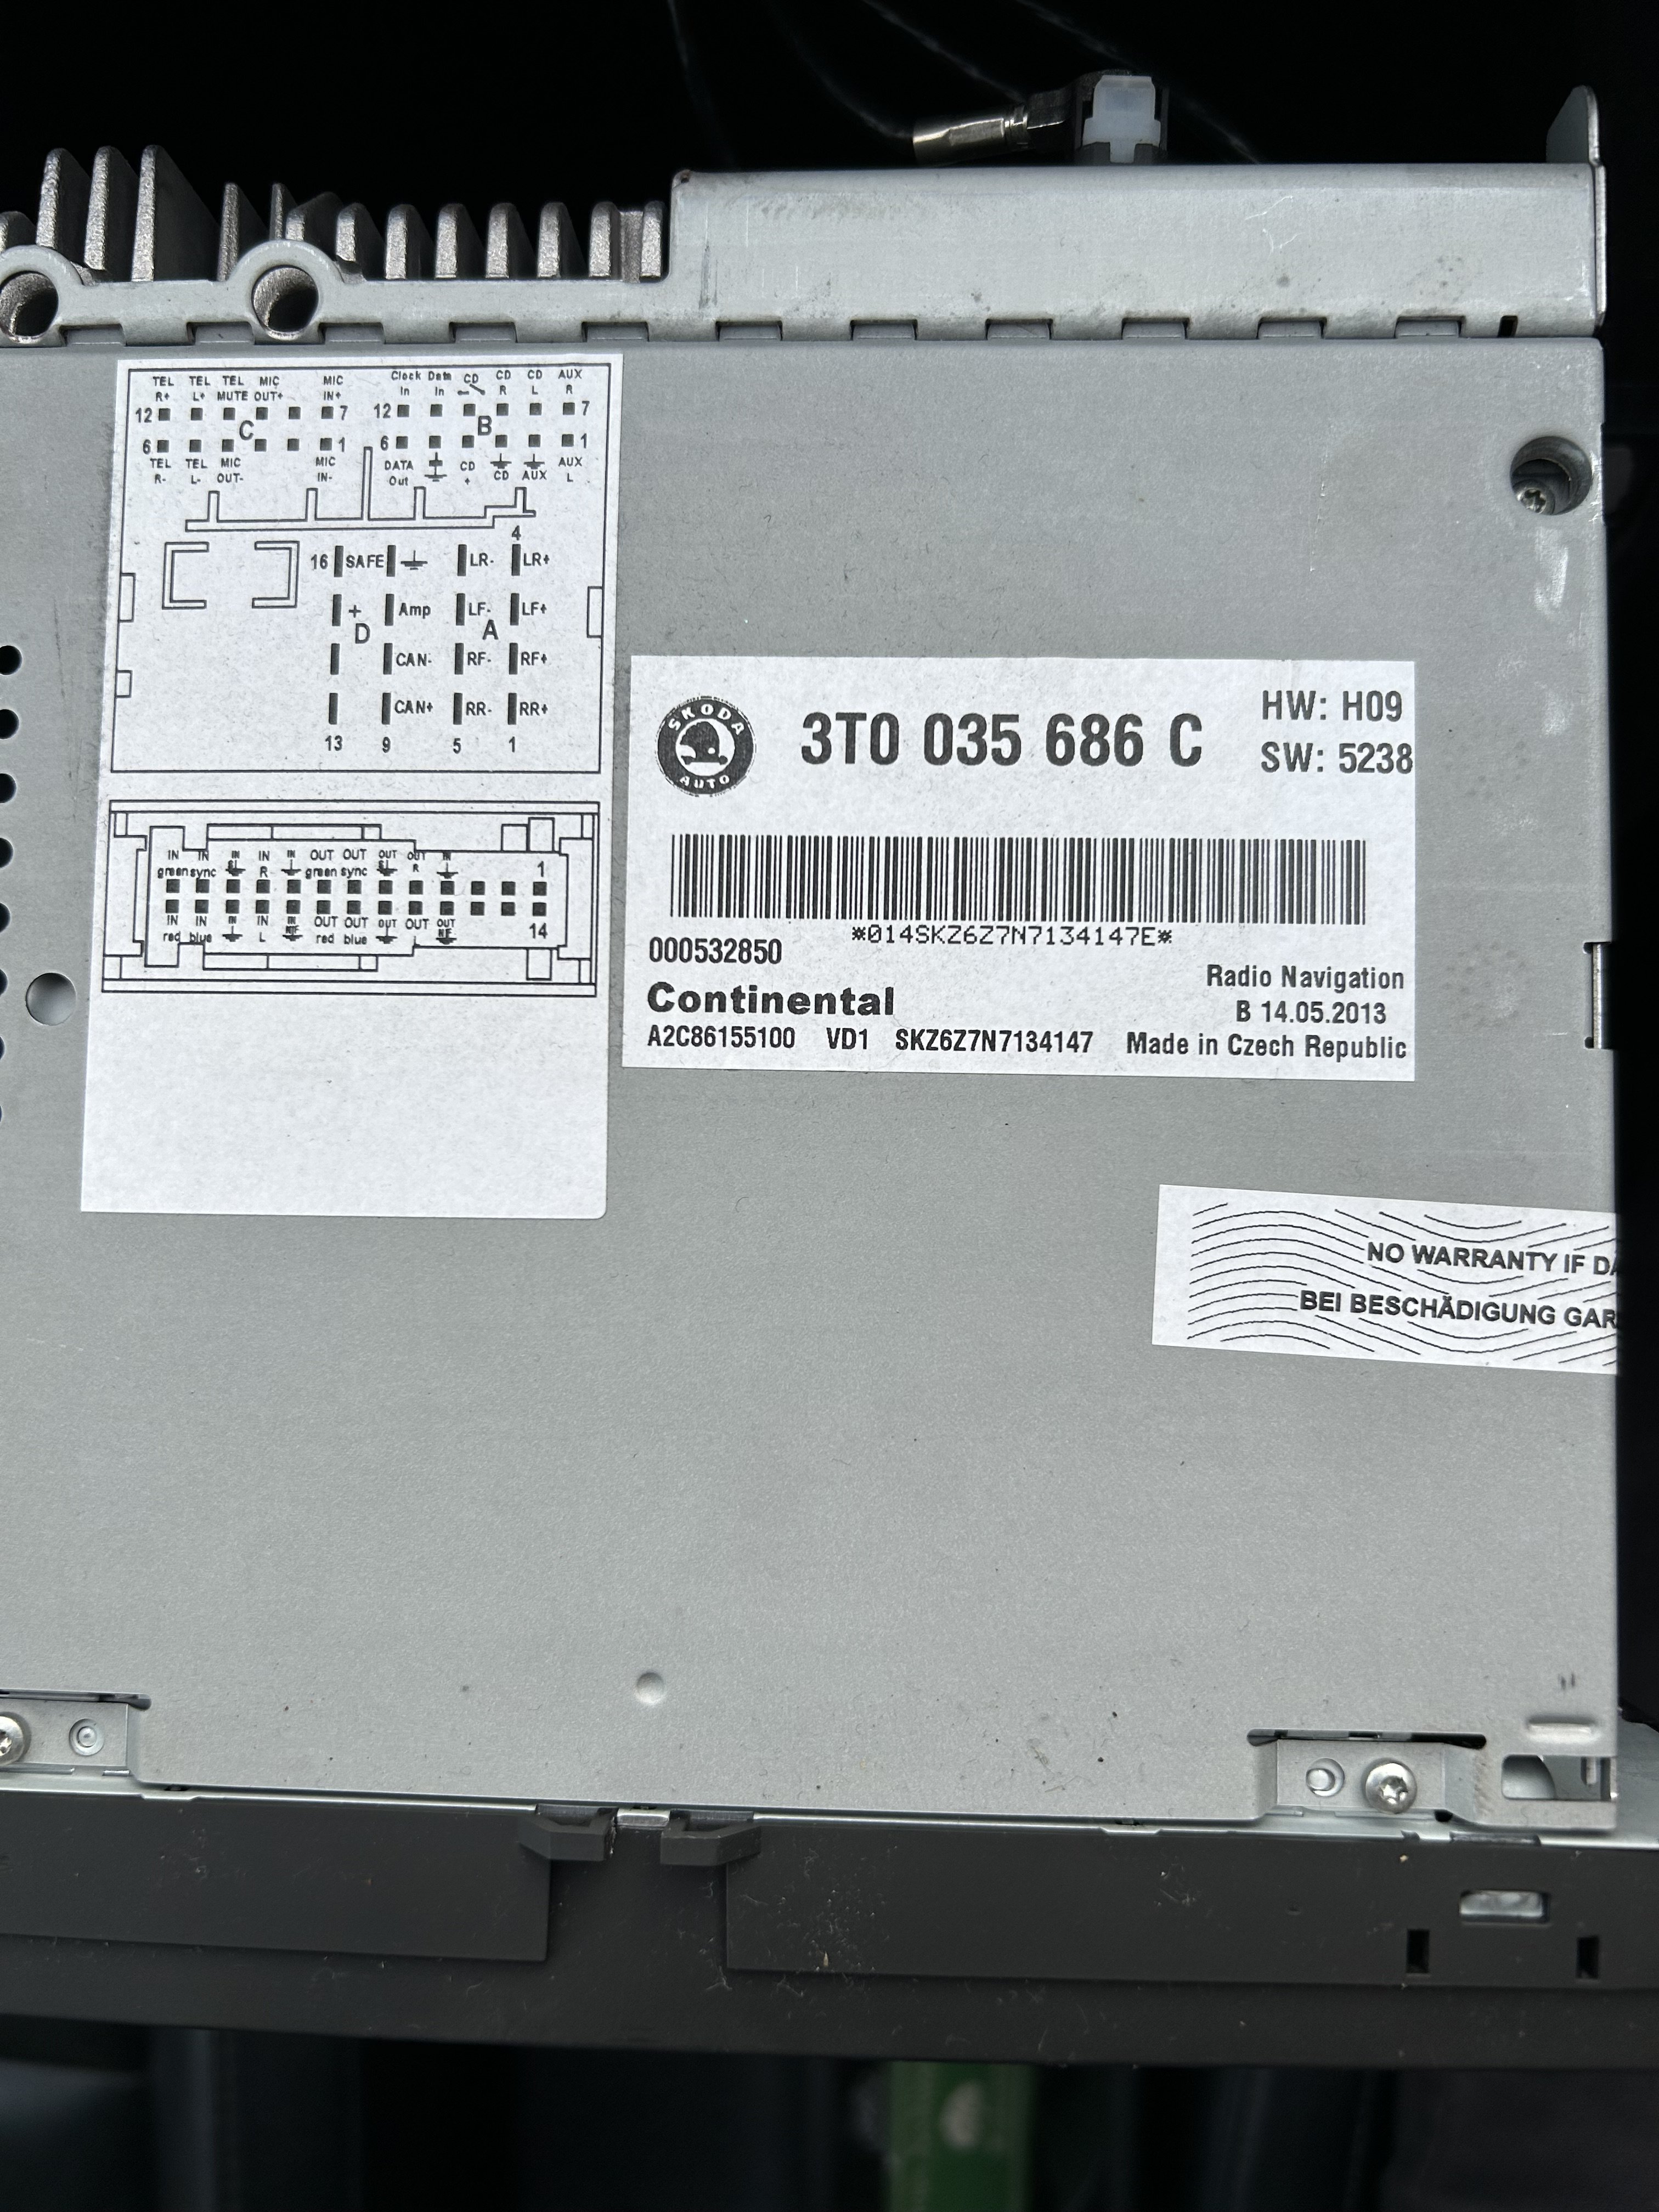
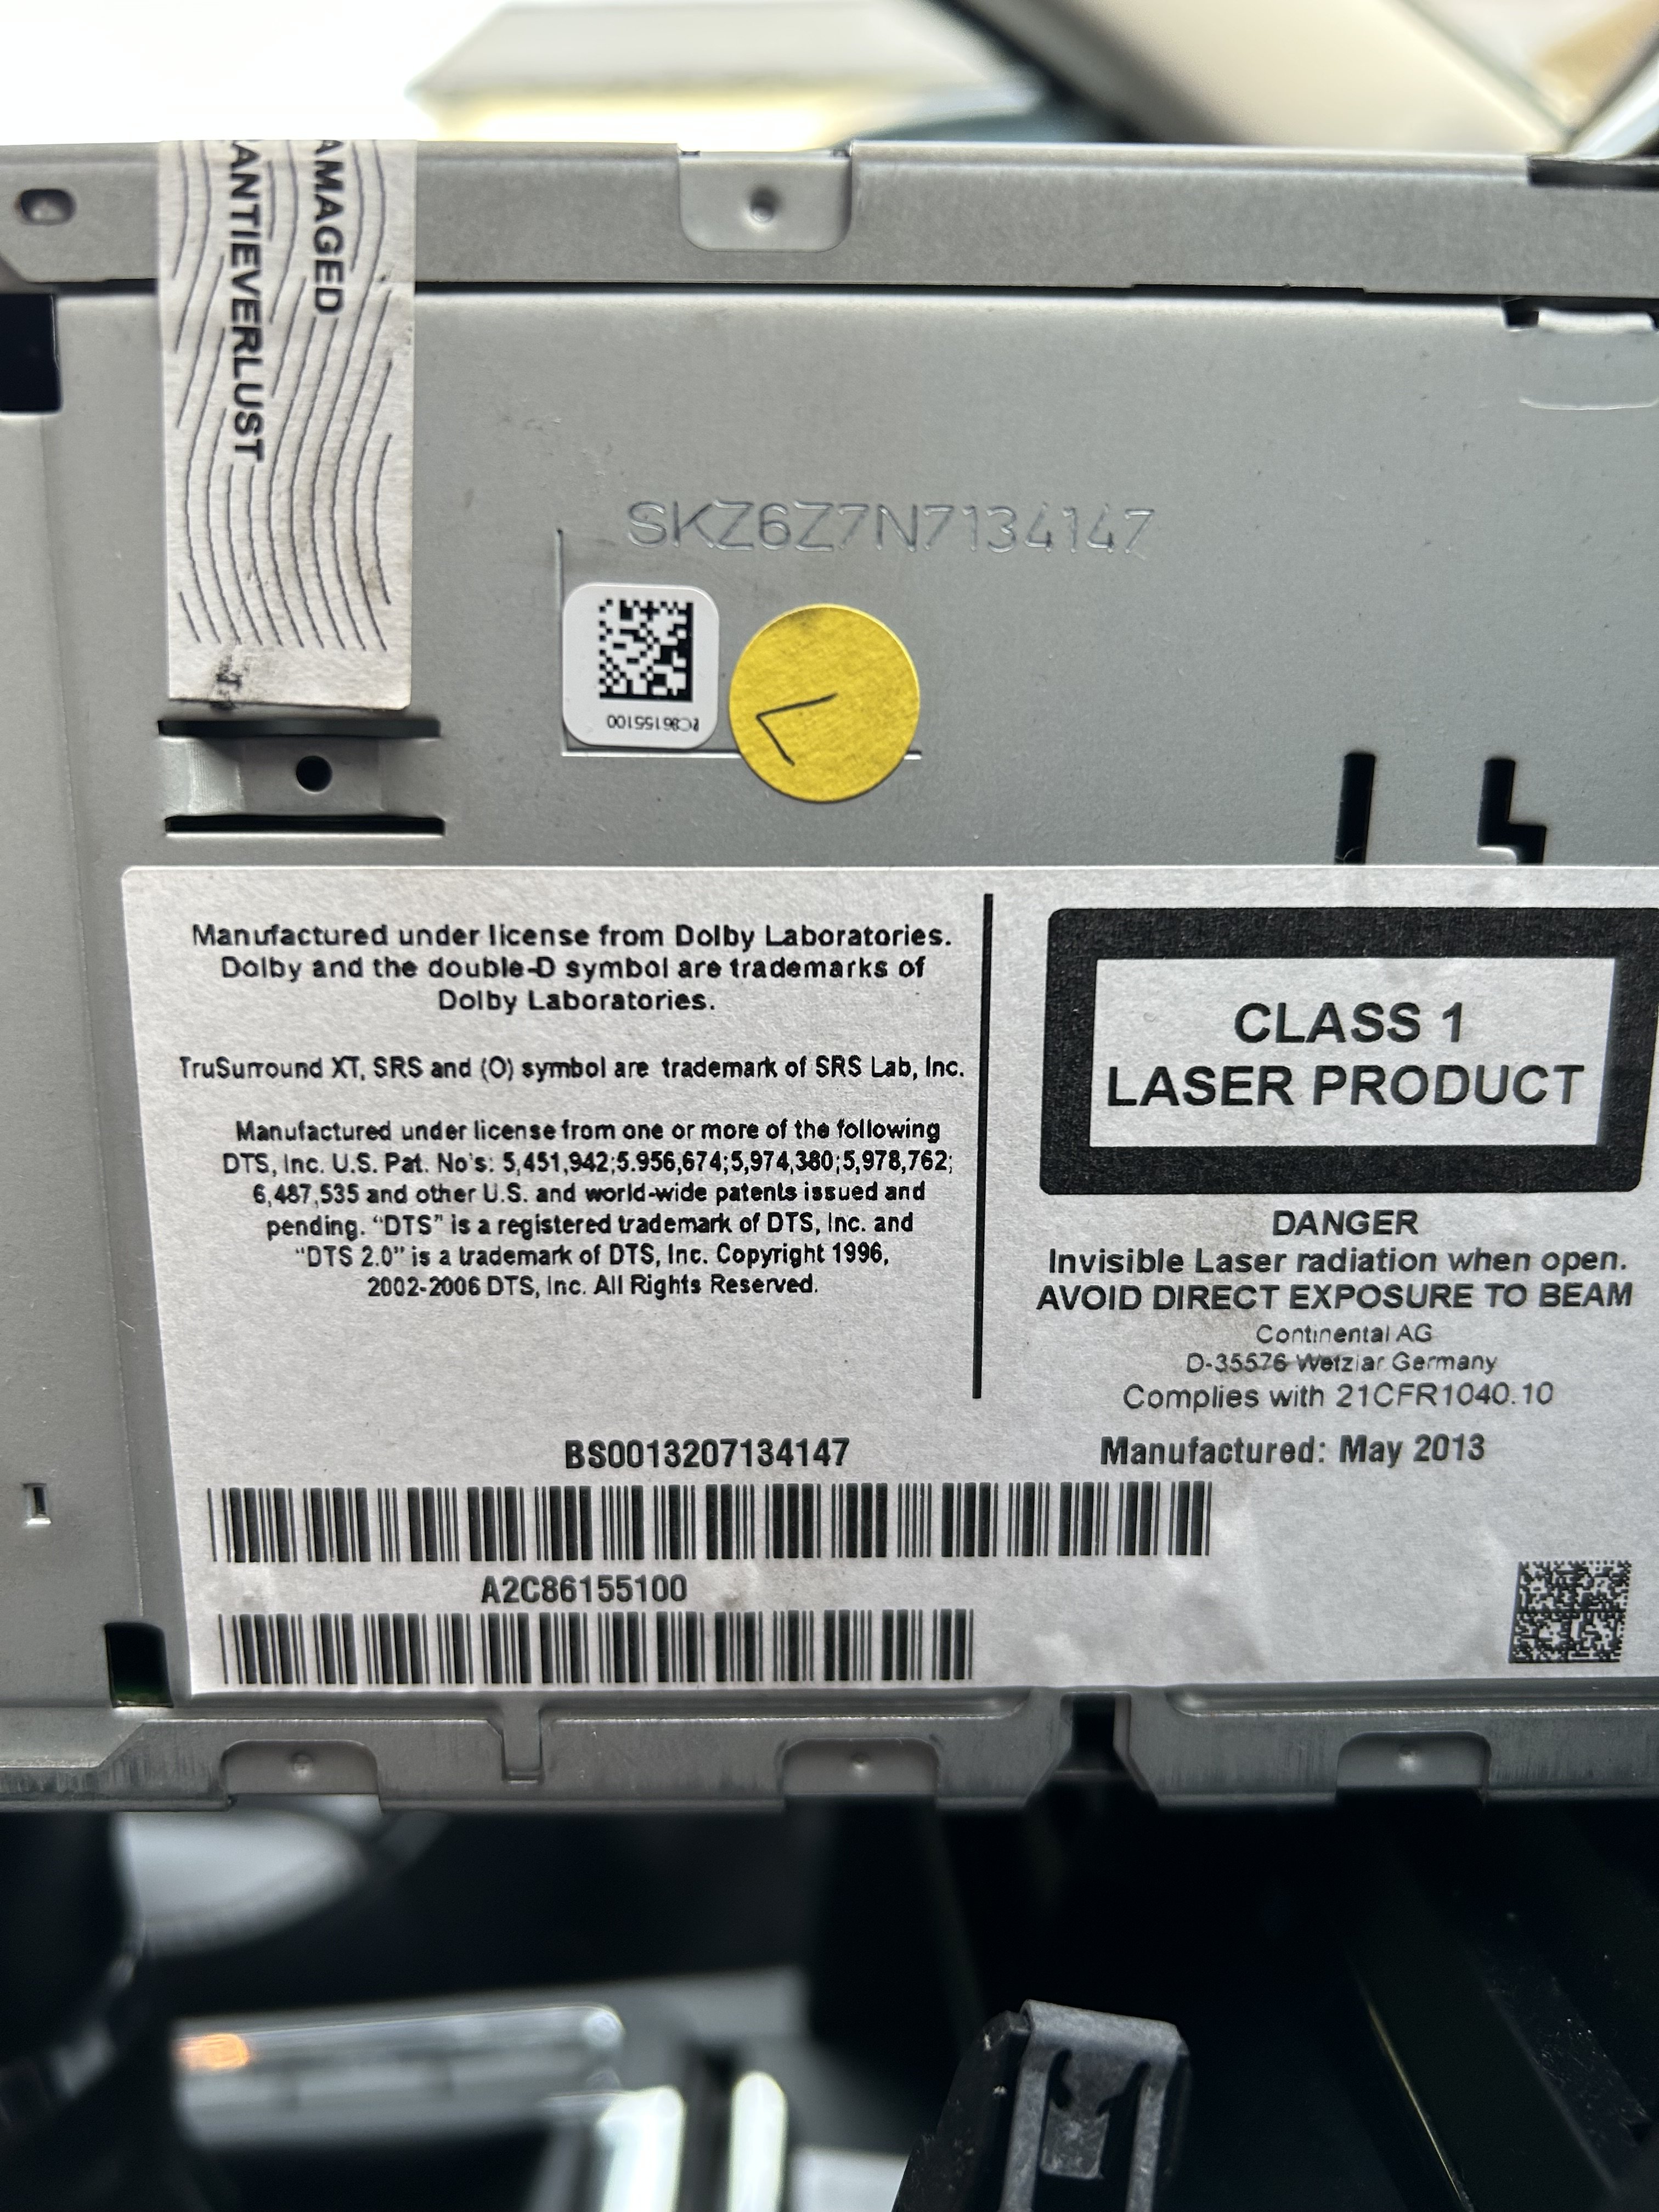
1 pointOk, you have this value on your image 3T0035686C, which you can see in the following and the firmware matches with 5238 RNS510 SW5238 #Integrationphase: Delivery cw45/12 C10/C12/C6-samples #VwSwPartNumber:1T0035680L/3T0035680G/7F0035680B #/7E0035680B/1T0035680P/1T0035680Q/3T0035680K/3T0035680L/1T0035686/1T0035686C/1T0035686D/7F0035686/7E0035686/3T0035686/3T0035686C/3T0035686D/7N5035686/2H0035680 #VwSwIndex:5238/5238/5238/5238/5238 #AppsBuild:C_EU_13.236_t3 C10/C12/C6 There is an update available to increase your version (recommended) to 5270 version RNS510 SW5270 #Integrationphase: Delivery cw45/12 C10/C12-samples #VwSwPartNumber:1T0035680L/3T0035680G/7F0035680B #/7E0035680B/1T0035680P/1T0035680Q/3T0035680K/3T0035680L/1T0035686/1T0035686C/1T0035686D/7F0035686/7E0035686/3T0035686/3T0035686C/3T0035686D/7N5035686/2H0035680 #VwSwIndex:5270/5270/5270/5270/5270 #AppsBuild:C_EU_13.270_t2 C3/C4A/C5C/C6/C10/C12 As just mentioned, this can be sent as an ISO file, and you just need recording software (Windows itself can do it) to burn this to a blank CD-R Additional information in text, similar to above video. https://paulroberts69.wordpress.com/2015/10/01/upgrading-firmware-and-maps-on-vw-rns-510-satnav/1 point
-
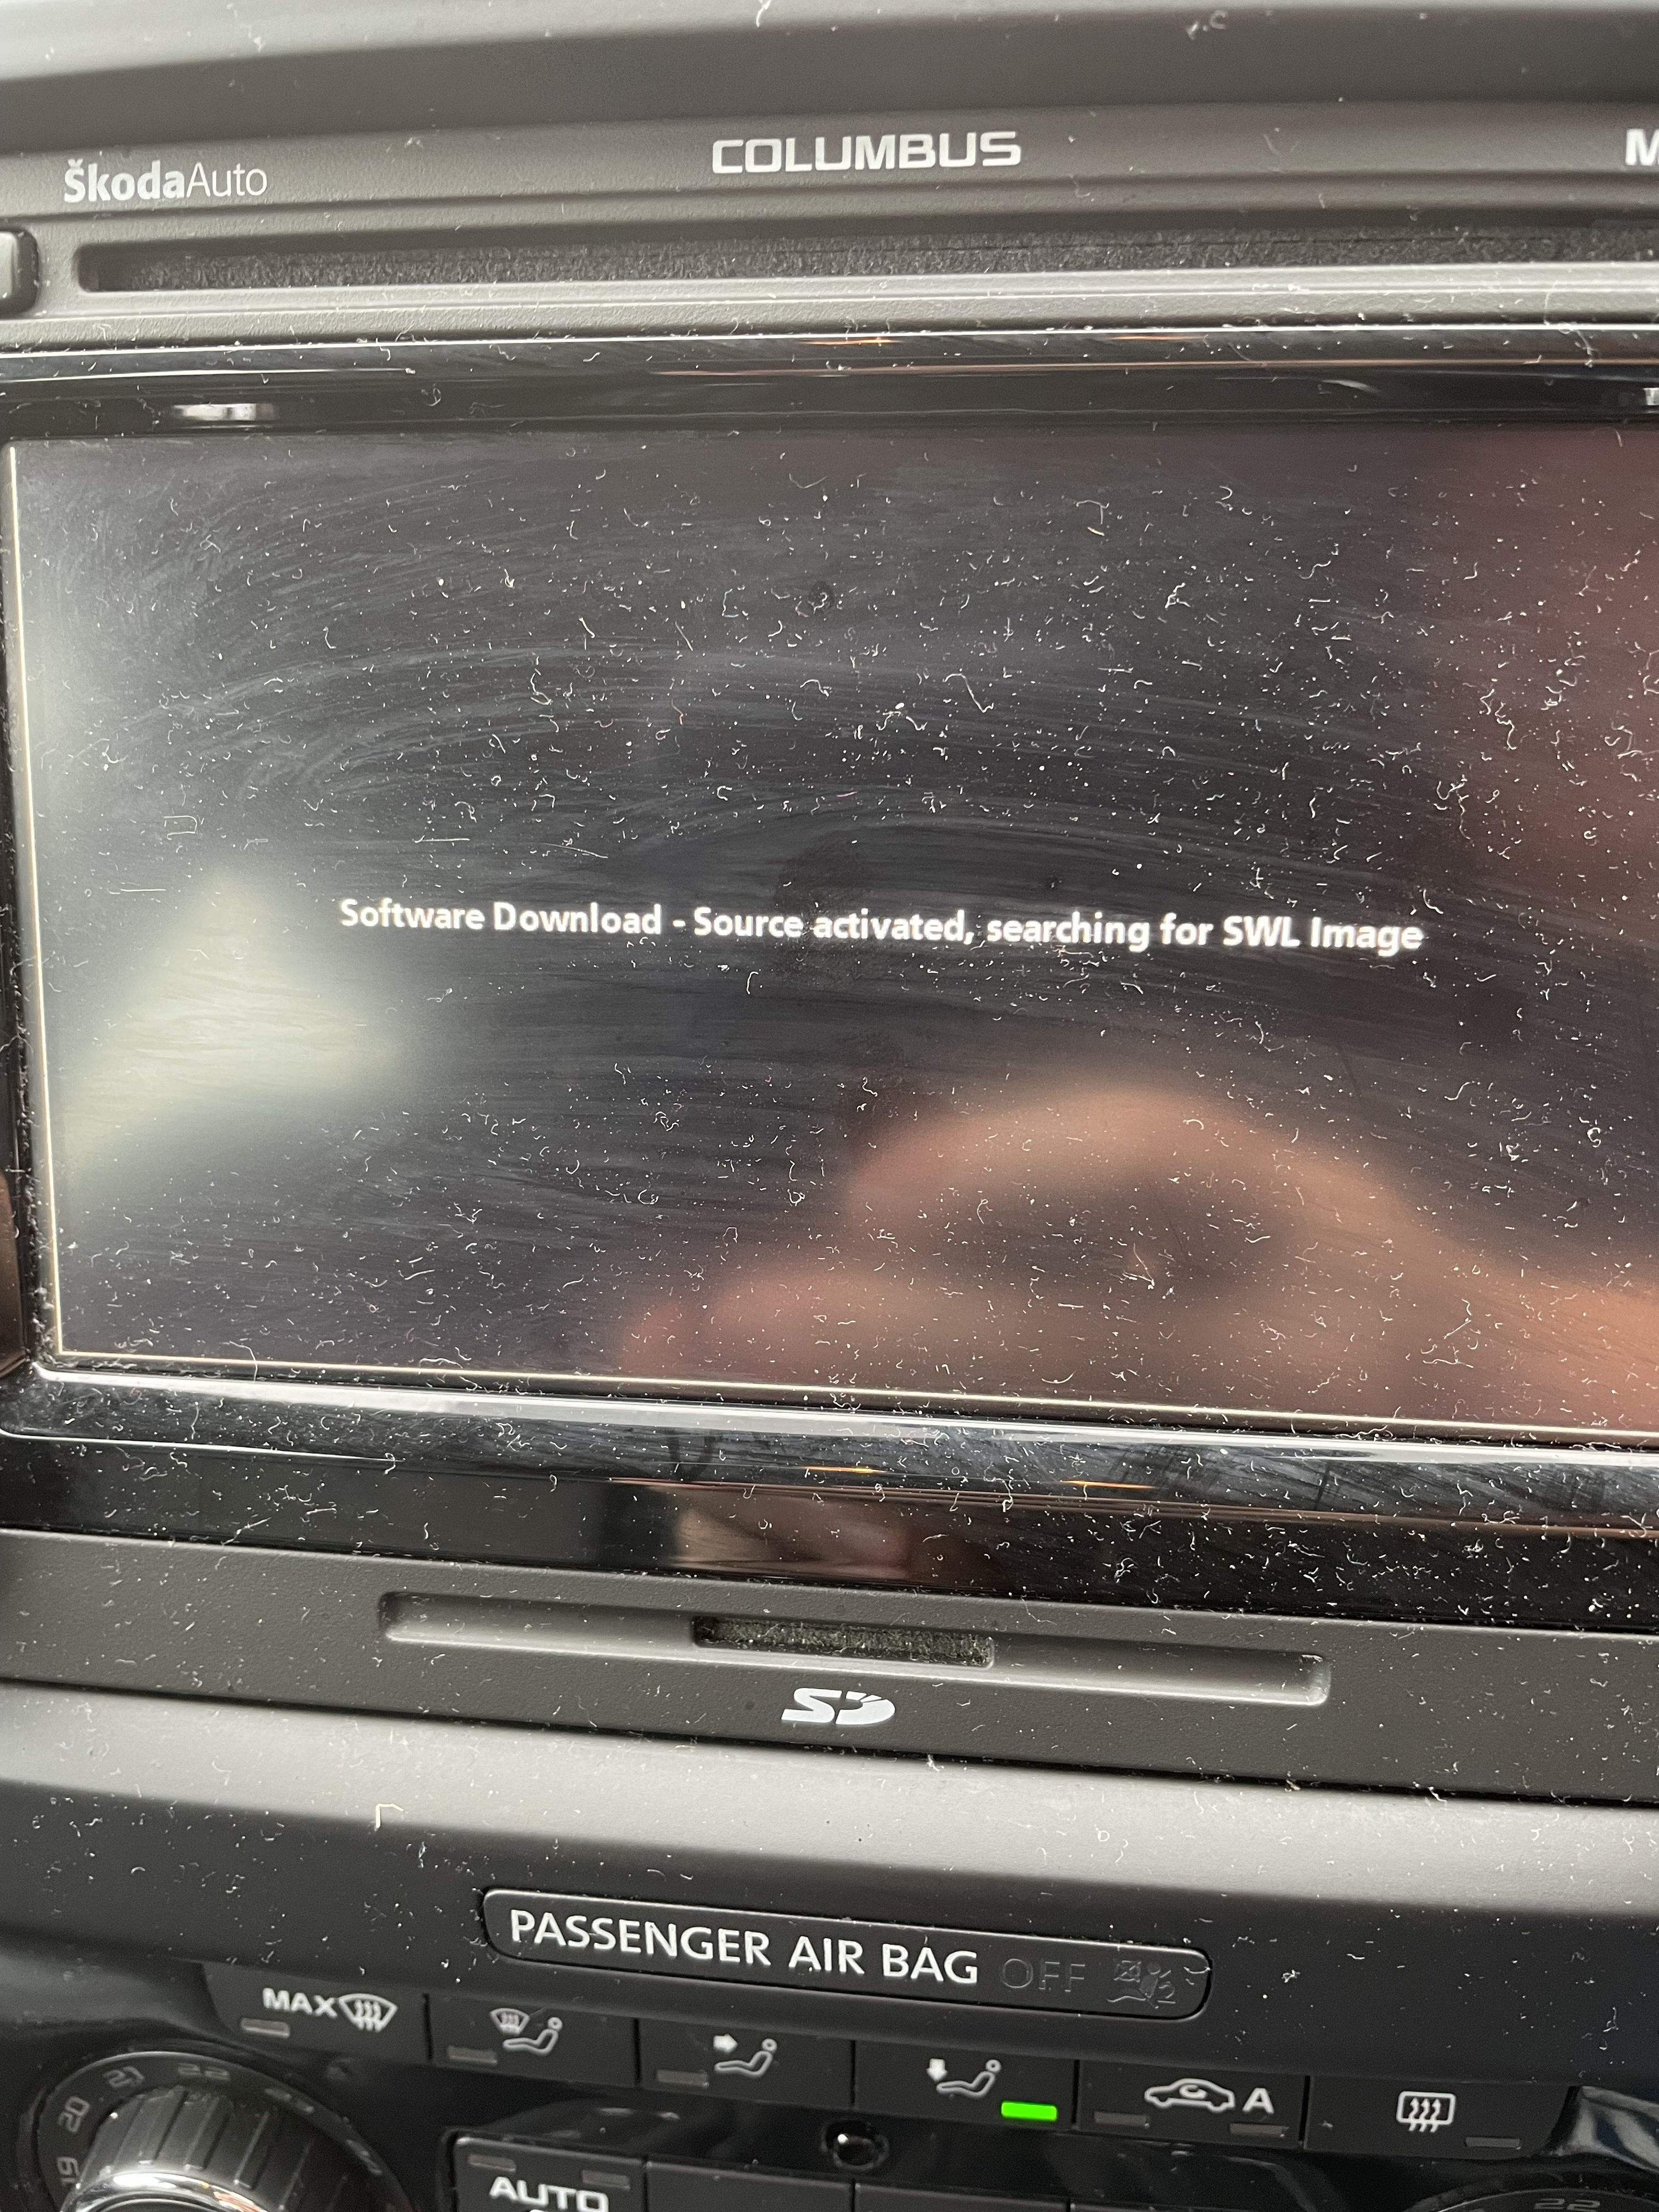
1 pointI've answered this before, me or @pab567 are able to send you the file you will need to burn to a CD-R disk yourself. Can you/someone you know burn a CD? It's not "frozen" it's waiting to be fed with a firmware CD, and then it will take over the boot code and the buttons should work.1 point
-
1 point
-
1 pointCannot believe the dealers just condemn unit 😤 easy money for them.1 point
-
Brilliant post with all the information and can’t really go wrong! only thing I’d add to it is if you are doing the work outside and it’s a bit windy, as the stream of oil starts to thin out, the wind will catch it and it will by all luck flick it all over you, the undertray, the wheels and the floor. Just be warned, I put a cardboard shield up to stop the cross winds 😂😂1 point
-
interesting, is there any instructions how to create custom update files mine Mib2H with 1433 contains Radio stations logos database 1.8.3 Mib2.5 1440 contains 1.9.7 on VW portal found 1.10.10, but that weren't accepted by Columbus1 point
-
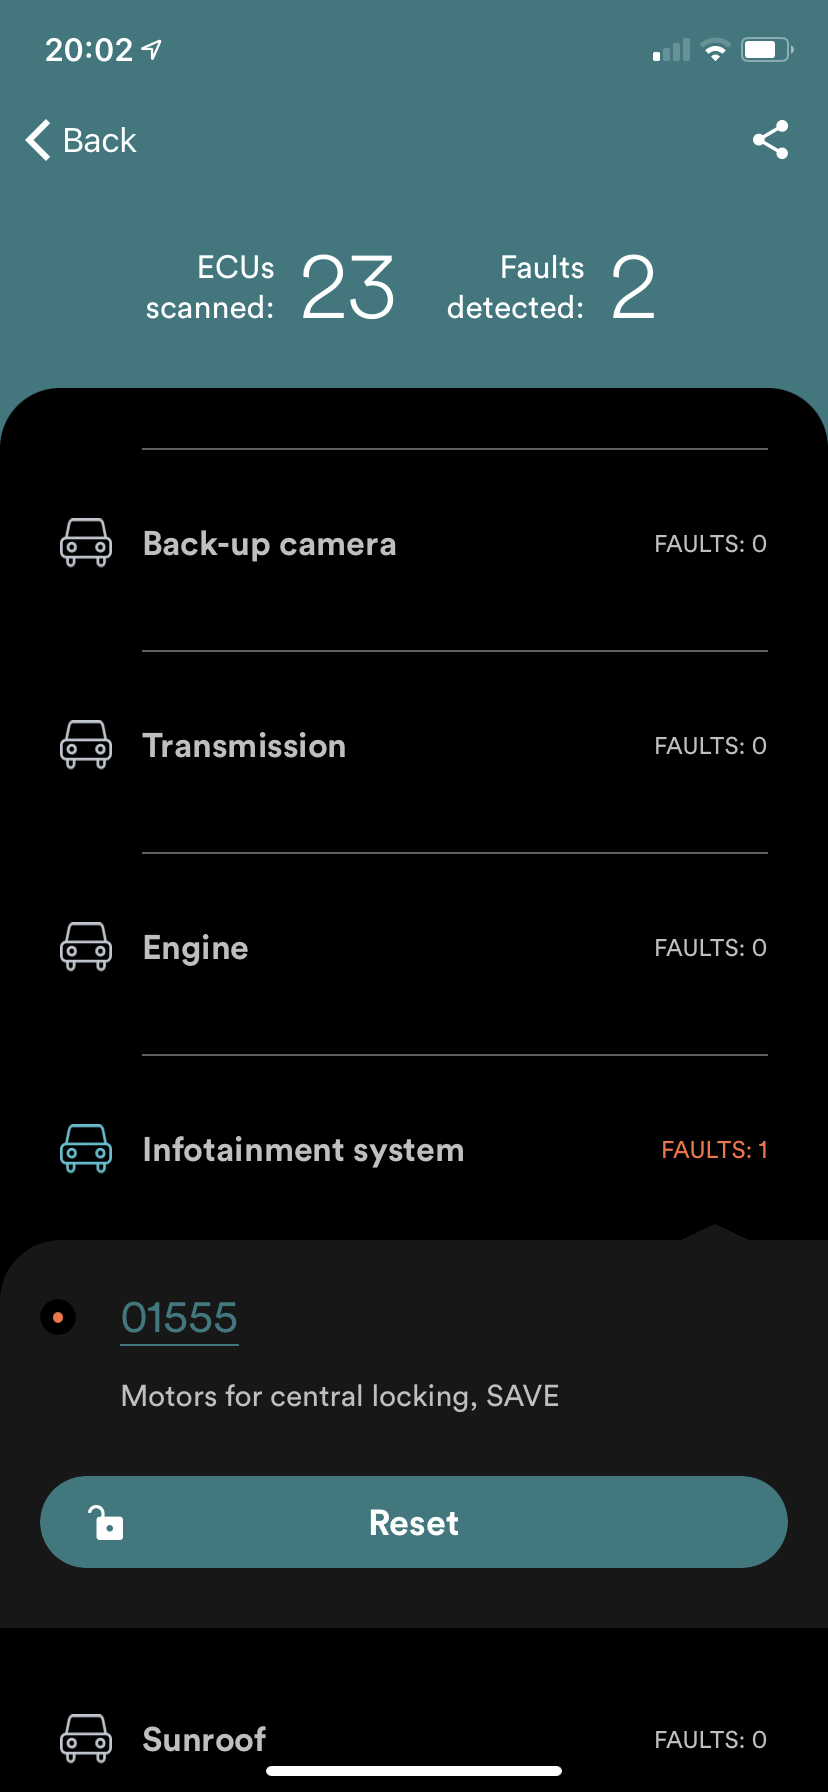
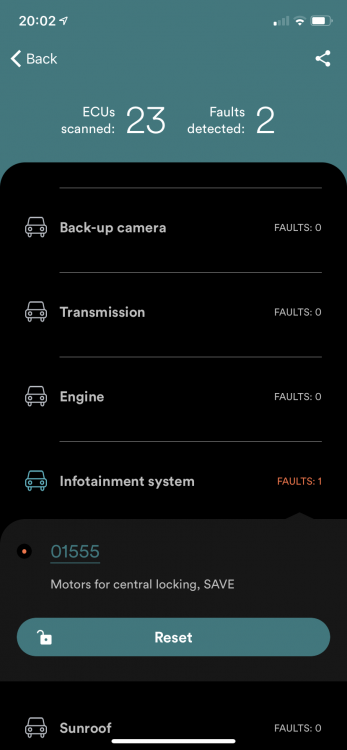
Just a word of warning to anyone here doing a diy firmware upgrade, it seems it’s possible you may end up with a fault code logged that cannot be cleared afterwards (Carista lists it as “01555 motors for central locking SAVE”) which research has led me to believe is actually a flag the dealers use to see when hardware or firmware has been changed and it looks like VCDS is needed to calculate a hex value and enter into the adaptions to clear the flag. Carista screenshot below and link to the info I found when searching the code from within the Carista app (links to a web search for vag fault code 01555) https://www.golfmk7.com/forums/index.php?threads/strange-fault-after-fitting-8”-screen.361269/ Appologies if this turns out to be a red herring - I’ve got VCDS on order now so will update if / when I am able to clear my fault
 1 point