Leaderboard
.jpg.1006585dfe4e2977315b67c3d642e37b.jpg)


.thumb.jpg.9dd3f612ba7f13d10be5c518d3c8d255.jpg)


Popular Content
Showing content with the highest reputation on 02/12/20 in all areas
-
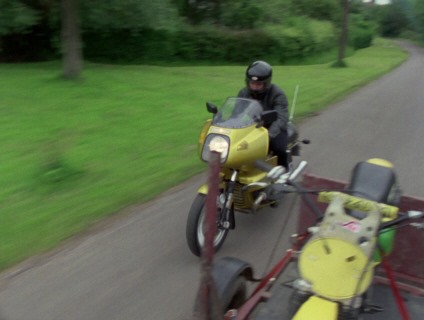
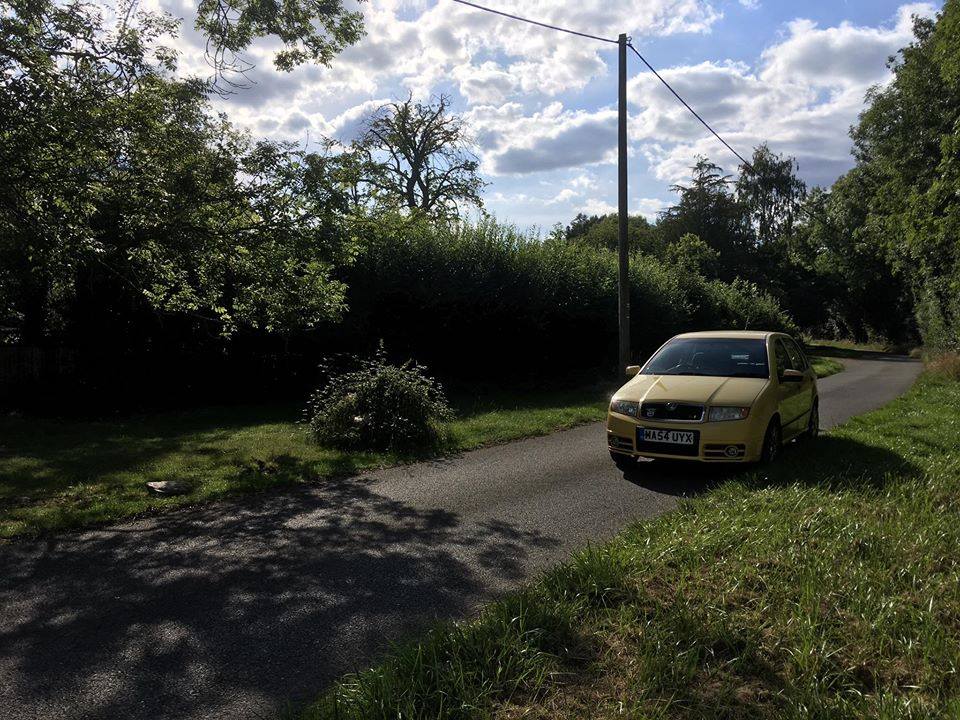
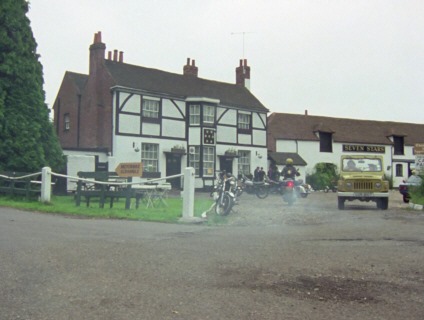
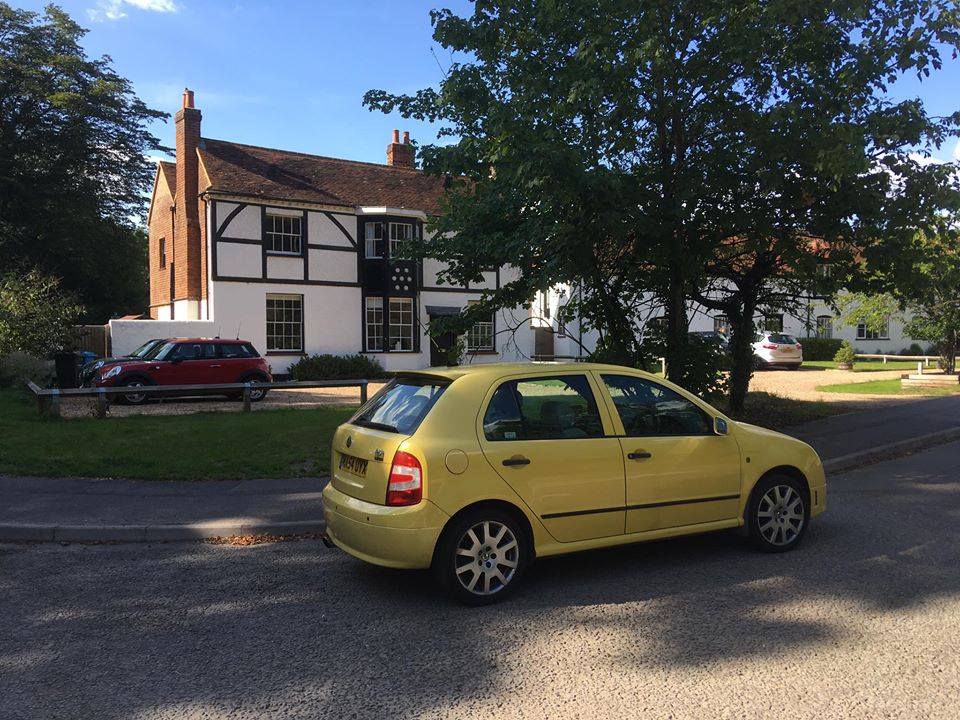
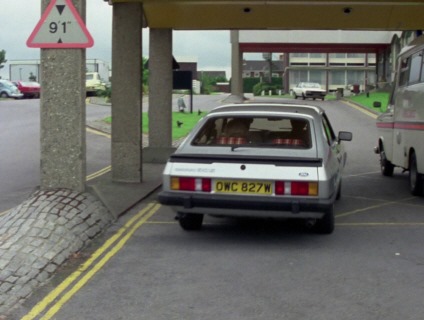
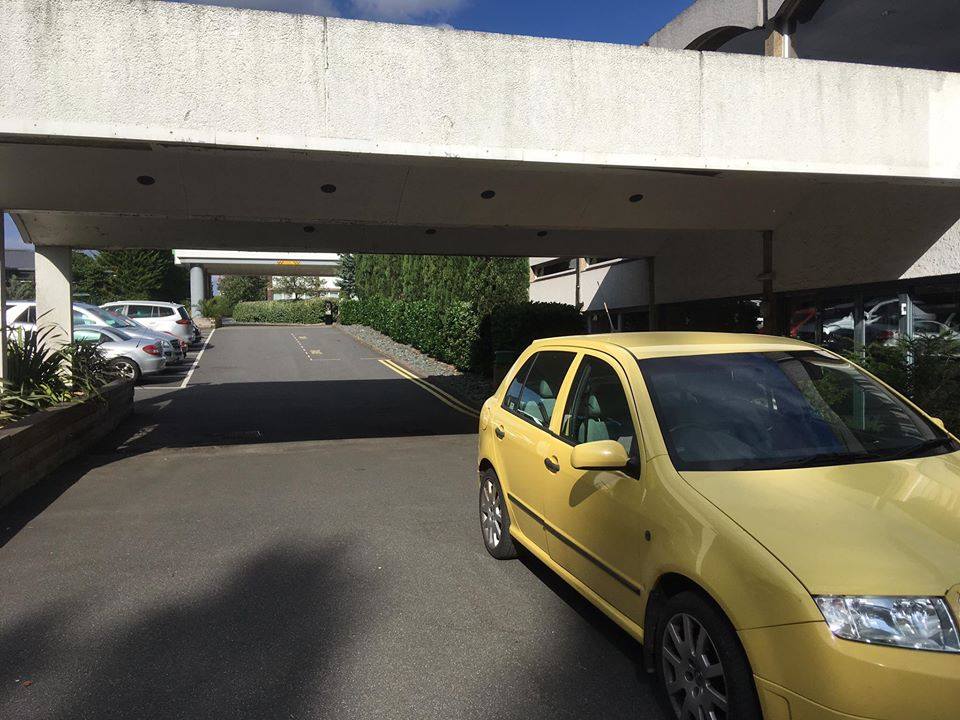
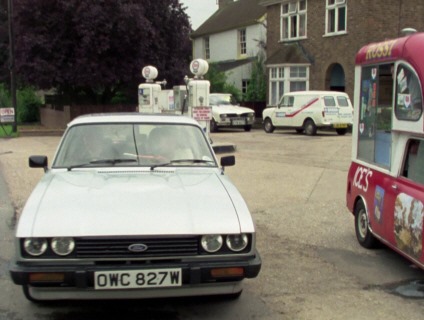
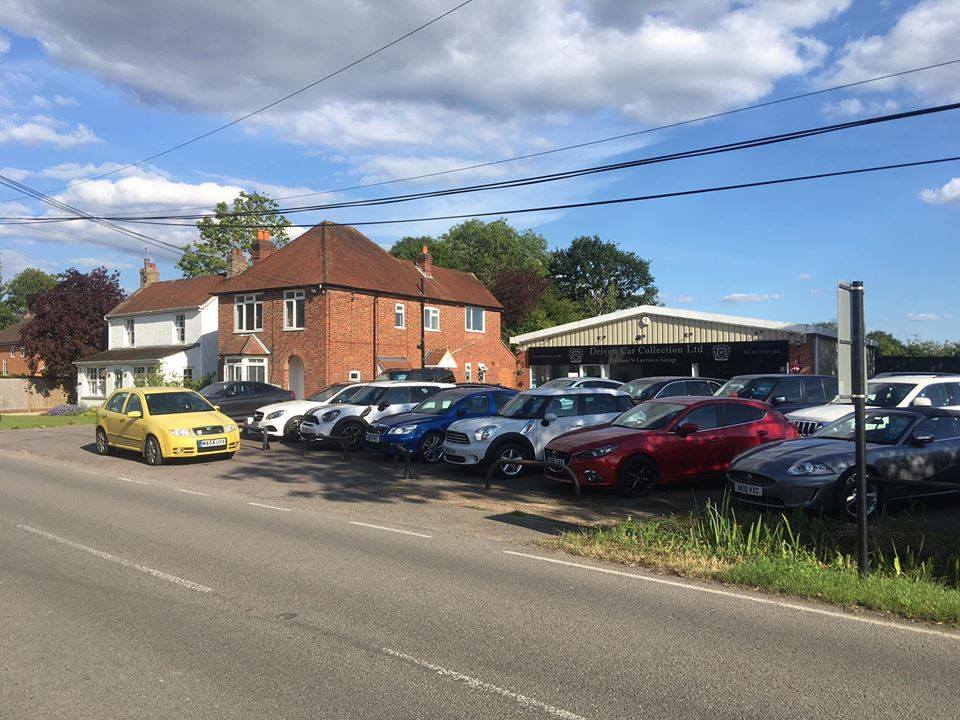
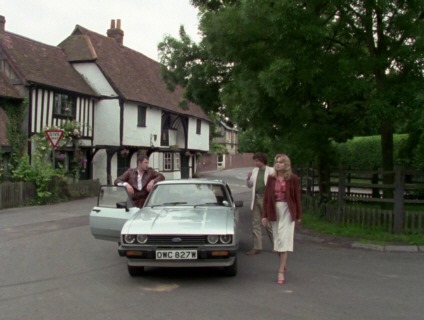
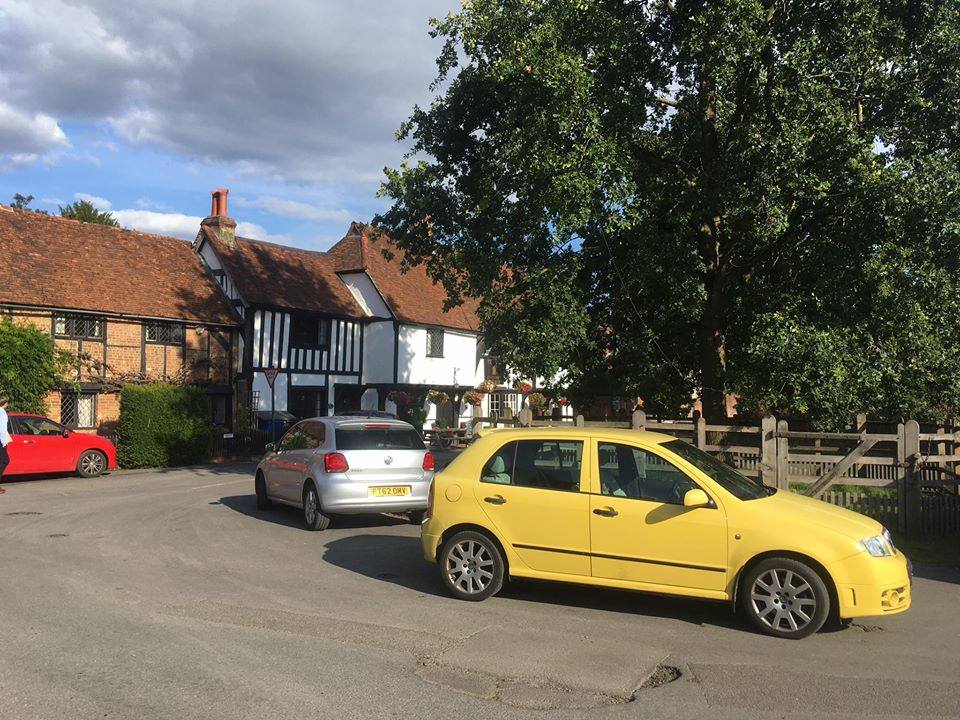
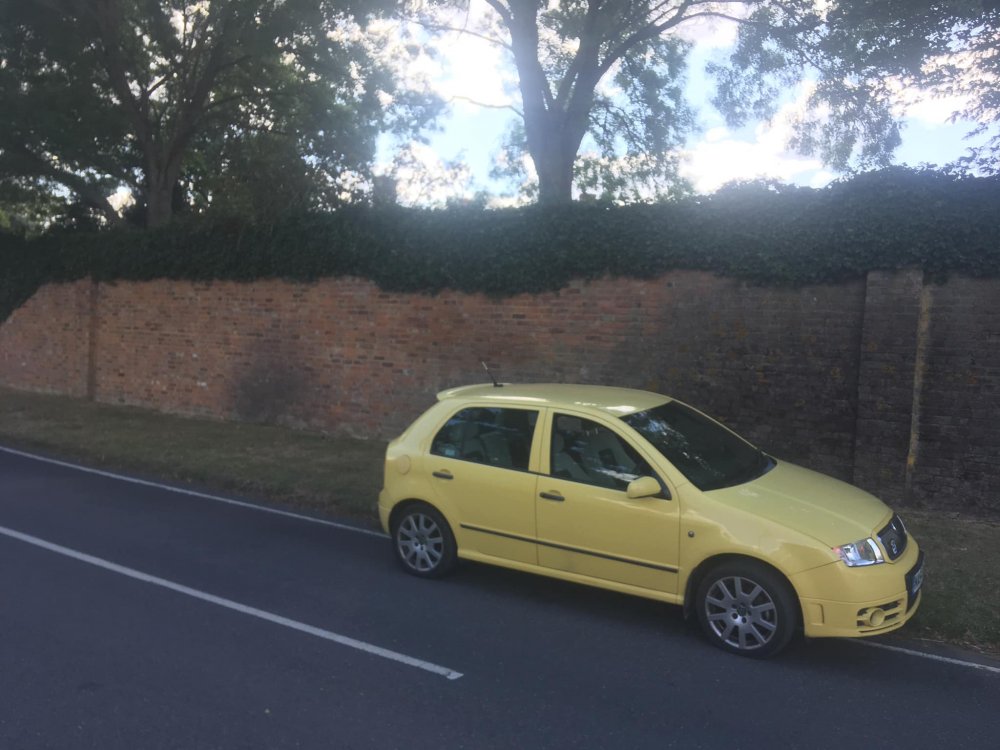
3 pointsDuring lockdown I went back to my favourite go-to TV show and watched all 57 episodes again from start to finish. When we got eased a bit in July I thought I'd go and have a scout out for some of the filming locations, and the results are here with my Fabia standing in for the CI5 Fords wherever possible! I shan't put any of them without the car up as that might be stretching the point, but I've now got about 5 days out mapped and ready to go before we even think about going into London. Lutman's Haven is a little side road that was used for a shot of Bodie and Doyle heading to a motorcycle scramble in the episode Wild Justice... Just around the corner from this spot is the old Seven Stars pub in Knowl Hill, where the bikers met in the same episode, Wild Justice, before going off to the competition. It's now a private residence. One of my all-time favourite episodes is Blackout, where a girl with amnesia may have information to help prevent a terrorist attack. They take her to a 'hospital' which was - and remains - the Holiday Inn at Maidenhead! In the same episode, Blackout, the CI5 boys take the girl on a road trip to see if anything triggers memories about the planned terrorist attack. They stop at a little garage for ice creams and innuendo. Fuel pumps have gone and a dealership is on the property now. About half a mile away in the village itself, the girl in Blackout lets out a squeak and they stop. She remembers the timbered house on the green. Makes things easier to spot! And the last one with the Fabia for now, at the end of the episode 'Foxhole on the Roof' they discover that there has been a 'Mr. Big' involved in the plot to hold a hospital to ransom. Doyle goes off to raid his house, which is on a farm near Fairoaks airfield... Yes, it's probably a bit batty. I should probably limit my emissions and stay at home. But these lovely spots were all within a few miles of where I live and I've done less than a third of my annual mileage this year! Hope you like them, anyway.

 3 points
 -
3 points
-
3 pointsKudos I drove up to Scotland in the early noughties for hols, but also to find some of the places they filmed one of my favourite films, Local Hero. Due to a complete lack of research or planning, I failed miserably (Fab holiday though). Gaz3 points
-
I would take their measurements with a pinch of salt. Might be just sloppy work or finger trouble on a keyboard. If you have a micrometer or digital tyre depth gauge, go and measure them carefully yourself. Measure at inner, centre and outer band of the tread and at more than one point on the circumference. Its vitally important to use a careful consistent technique, pushing the gauge down or measures to the side of a groove can easily throw the reading out far more than a millimeter. Tracking problems will usually show as uneven wear across the width of the tread or feathering which you can feel by running your hand lightly around the tyre circumference in opposite directions. Be very wary about dealers ability to do tracking, my experience of four such tracking sessions (using VW official gear) were they were hopelessly not right leading to dramatic and rapid uneven tyre wear issues, which were never satisfactorily resolved. In one instance I can prove they just photocopied an old results sheet from a previous session of more than a year previous, conveniently obscuring dates and other info and passing it off as having done the job. Clearly not the case, before and after figures to multiple decimal places and other telltale info identical. Useless. I'd prefer to go to my local F1 autocentre and insist on sitting in on the tracking session, observing and 'helping' them with any adjustment decisions and checking results. I did this with my Alhambra and they were ok with me checking as they did the stuff.. Check the measurements carefully first. Don't fix something that isn't broken.3 points
-
3 points
-
3 pointsIn response to johnboy999 & MJ1's request for an update / review of my e Niro, here goes ; I still find the whole experience impressive, although still finding out something new every day ! The car has great acceleration, runs smoothly and quietly, is seemingly very well built with, in spec 4+ trim, every possible "toy" I could wish for. Almost a month in now, less than 250 miles covered but apart from the £3.16p spent when testing my wall charger, my costs have been NIL (thanks Tesco & Pod Point !). I plug in when out shopping, & once completed, unplug to find any mileage covered prior has been replaced. I've decided that now I know the score, to let the battery run down to about 60% before charging again (from home this time) as advice seems to be keeping the high power battery between 60-80% as the ideal. I'll still use Tesco's but maybe alternate chargers between theirs & home. Space inside is plentiful, but the boot is smaller than the Karoq's was - loads of decently sized cubbys in the cabin and under the boot "floor" (where the charging cables reside) but no spare wheel, which I regret. I've always carried out weekly checks on every car I've had, but the e Niro only needs tyres ( screen shows each wheels pressure anyway) and windscreen wash check ups. I've got full maintenance / servicing in my lease agreement but am wondering what service they'll need to do ( no oils, anti freeze, filters etc) !?! Probably just an inspection I reckon - even the brakes shouldn't need attention as the re gen braking (very effective in both slowing down whilst re charging the battery) means I can practically come to a stop without touching the brake pedal. The car rides the broken tarmac of our scarred roads much better than the Karoq ever did ( I didn't have DCC fitted) and the range is equally impressive - I don't think I need fear range anxiety with this car, it will easily do 250 miles even in winter it seems ( mine shows 276 miles on leaving Tesco). The quality inside is good too, JBL infotainment system is spot on, and the DAB radio does not drop out like the Karoq's did quite often ! The Karoq DID have a CD player and more importantly, an SD Card slot for my music collection - the e Niro has neither, although does play through a USB memory stick, so all is not lost ( even displays music video on the screen !). Fit n finish seem great, no rattles or panel gaps inside or out, and the quality of the materials inside seem good to me. So overall, am I happy with the eNiro? Most definitely, and whilst it's still early days, I reckon I'll remain so. If there's anything I've missed reporting on, or you have any Q's, please feel free to ask - I'll keep looking into the Karoq forum for a while yet - Stay safe & stay well. JKW3 points
-
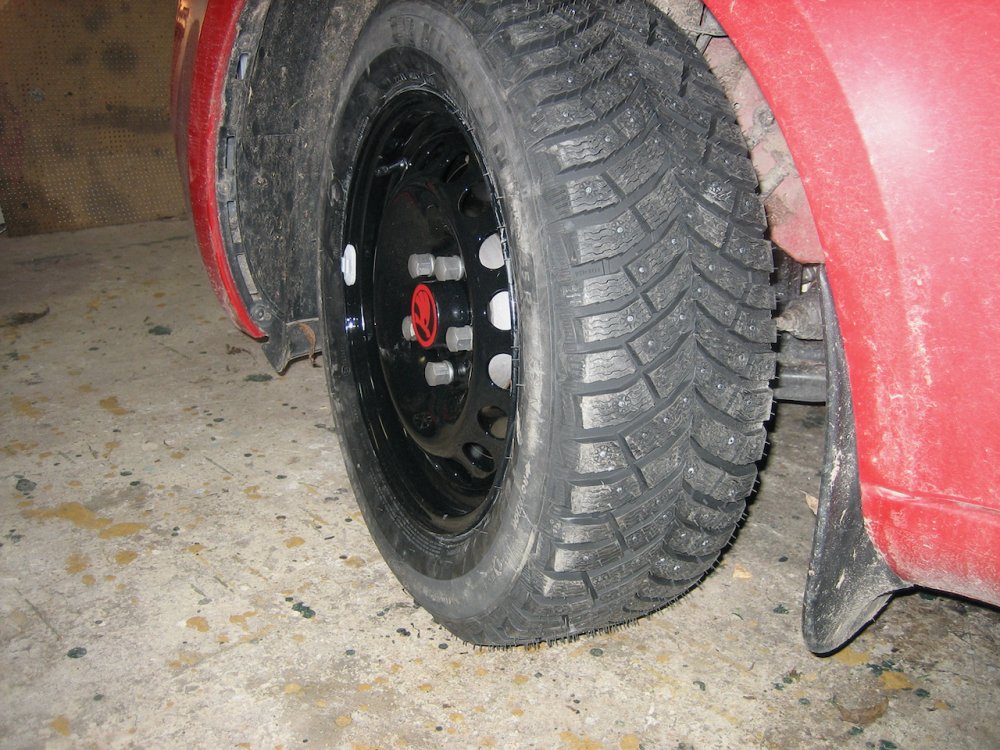
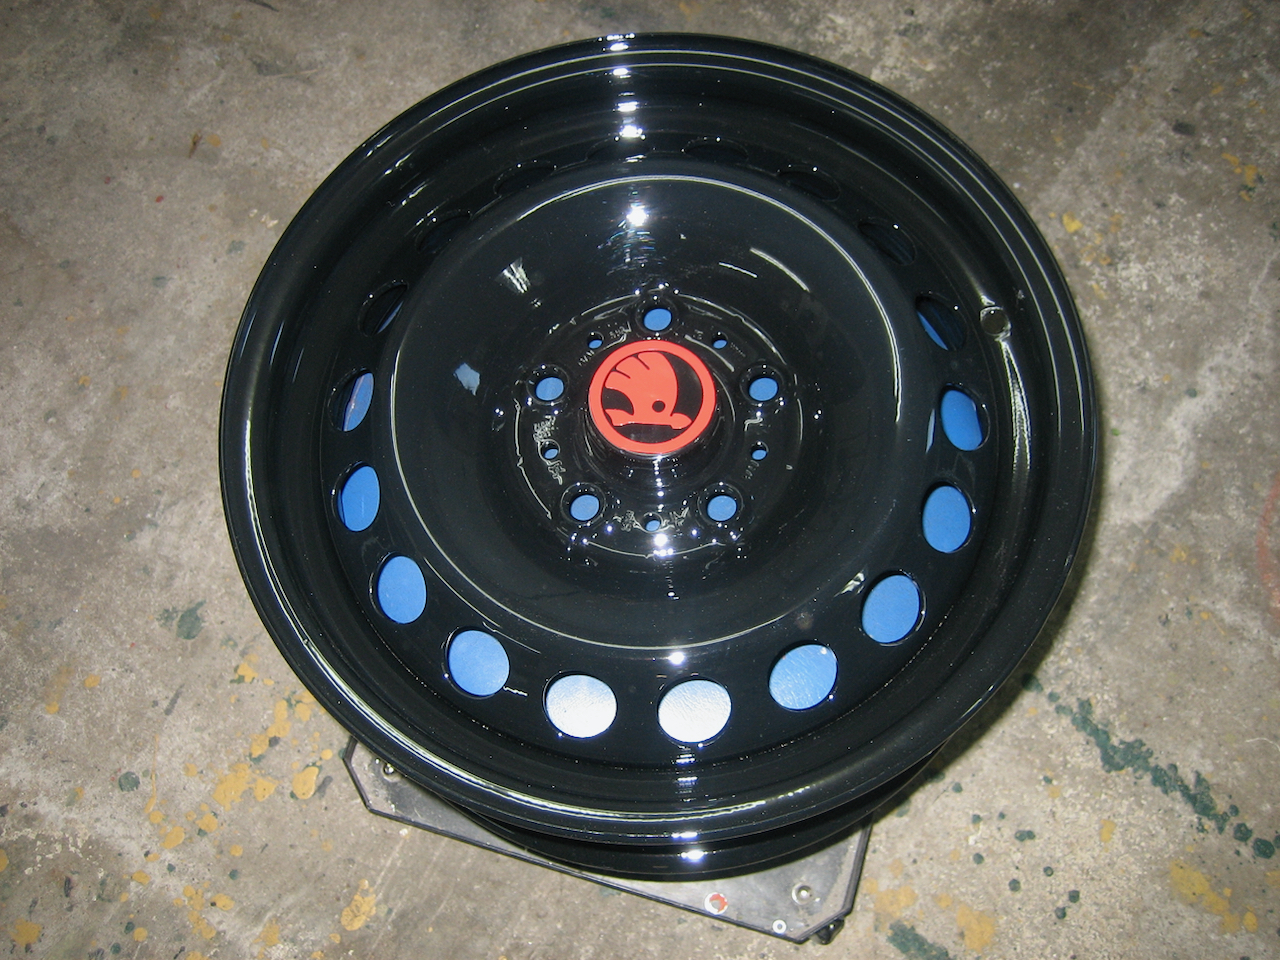
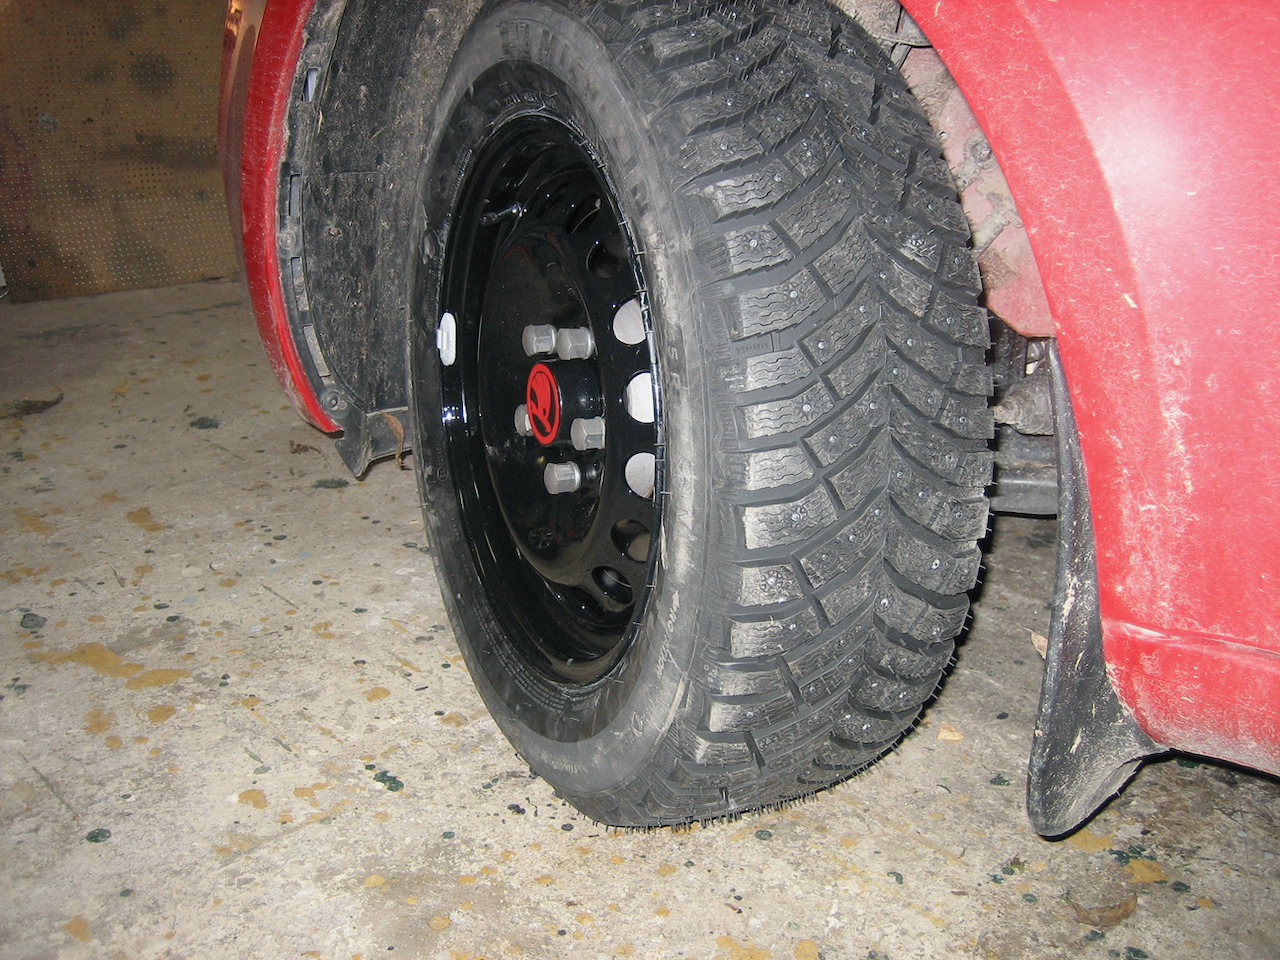
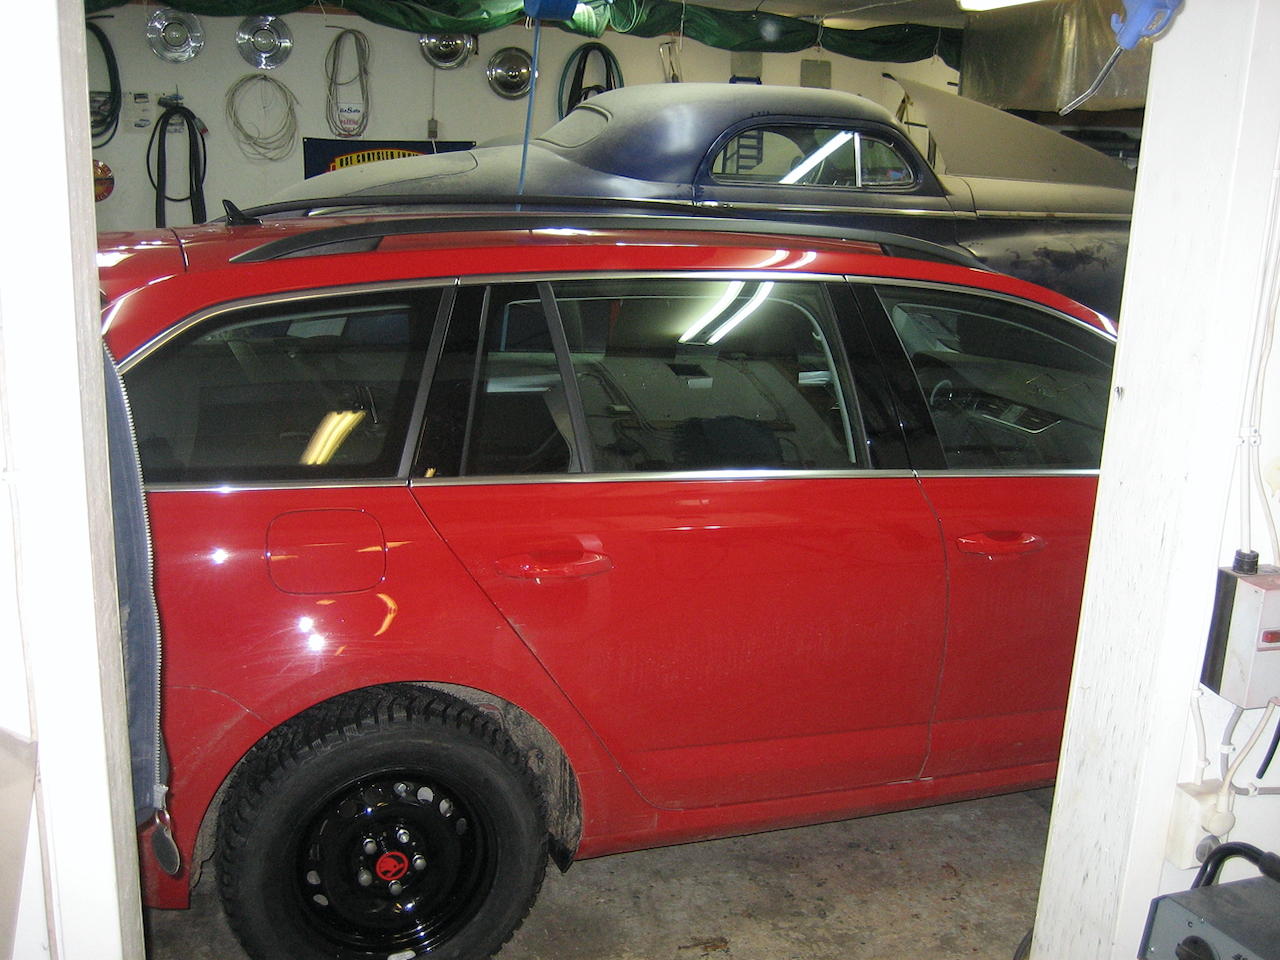
2 pointsHi guys. Greetings from Sweden. I do not know if you use winter tires? But here it is a must,I bought ordinary steel rims (wheels) powder coated them and made some hubcaps. Put on the best studded tires,,,,,,,now I am waiting for the snow

 2 points
 -
I think Darkside give customers what they want and relieve them of their money in return, anyone who wants a popcorn limiter is an idiot anyway and deserves whatever they get.2 points
-
2 points
-
2 points@Gaz_If you get the change to watch the Drama Stonemouth that is a real mixture with the filming done at Macduff & that being near the Forth Bridges and then some of Macduff is Gourock.2 points
-
Welcome. You have chosen well, they are not really wanting a Skoda, even a L&K Kodiaq. Then, leave nothing of value in it, insure it and do not fit a tracker. If they want it they will take it and really you do not want it back.2 points
-
2 pointsWe've got a 12-year-old Terrorist called Newby. Deaf as a post but still pulling like a train! Enjoy the car.2 points
-
2 pointsAlso had to do a battery change in October so purchased this exact one from Tanya batteries website, very prompt & 1st class service, used OBD11 to code the battery, just change the rated battery capacity should the new battery be a different in (AH) change battery manufacturer to the correct brand & serial number to the following (1111111112) & that's it...Job done.2 points
-
The MOT info is superb, Game, Set and Match as far as I can see. Claim denied.2 points
-
2 points
-
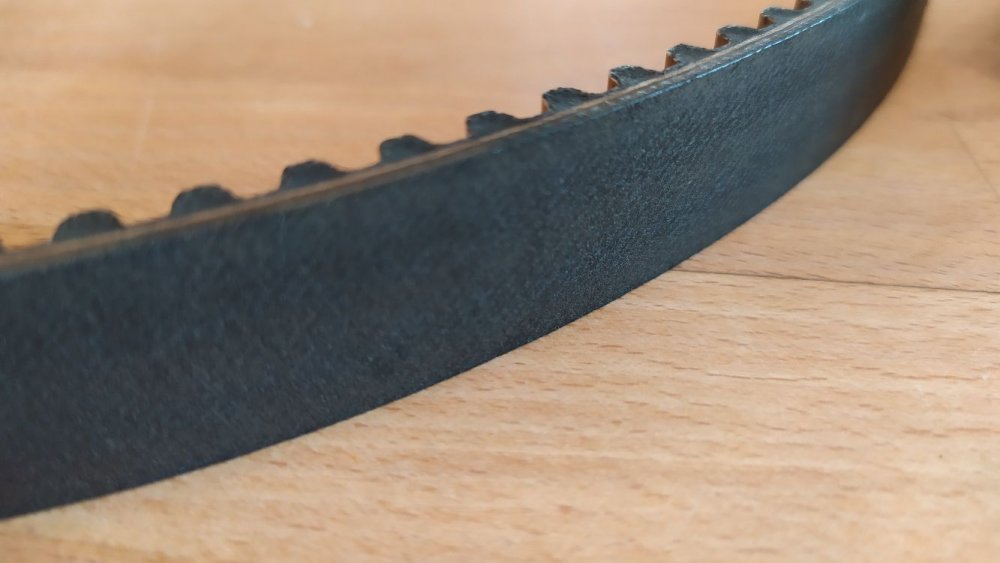
My car is now 5 years old, and while it has low mileage it was time to get the belt done. Unlike diesels they don't change the waterpump at the same time, as that resides on the other side of the engine, and is actually quite a complex and expensive unit so is only replaced if leaking. The upside is that it is a bit cheaper than a diesel, €500 from Skoda. The kits includes the belt and 2 pulleys and bolts, and was itemised as €300 on the bill. I asked for the used parts afterward and found that the belt looked like new, and both pulley bearings were butter smooth and play free. I'd say there was a LOT more life in them, but I'm holding onto the car for a while so was happy to get it done for peace of mind. The car also had an oil, pollen and air filter service, and they also removed the wishbone bushings and packed them with lithium grease to hopefully cure the dreaded suspension creak. They seemed well up to speed on the creak and did not charge for this. Free wipers also under special offer, €200 for the above was very fair. Happy customer.
 1 point
 -
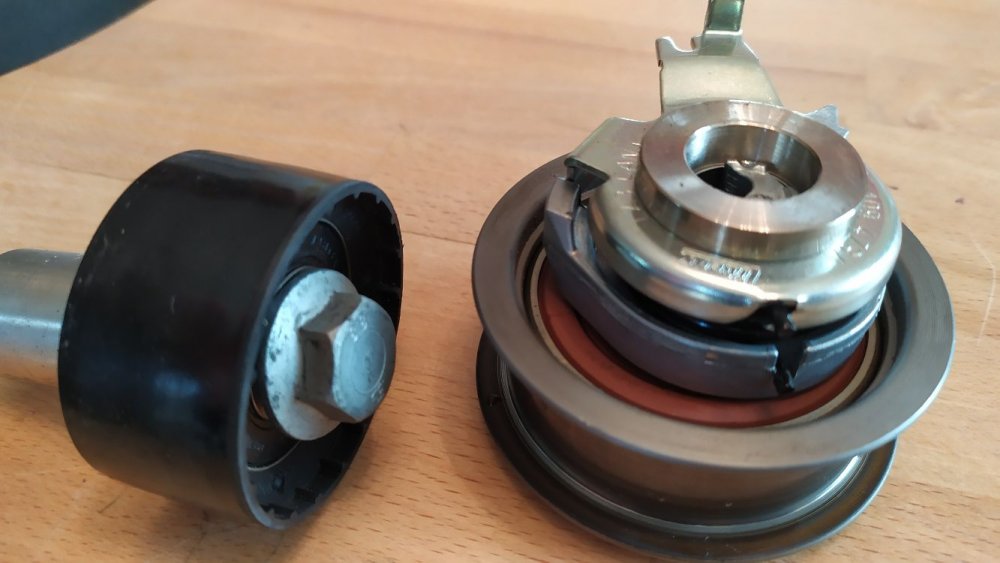
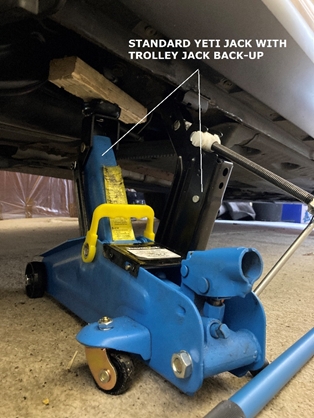
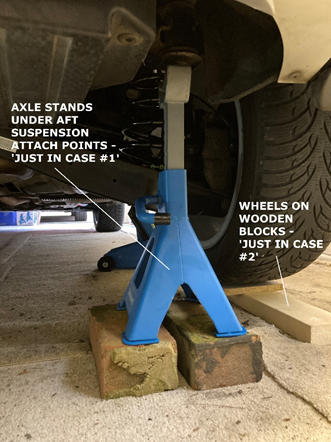
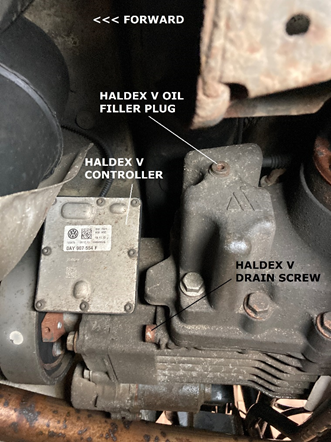
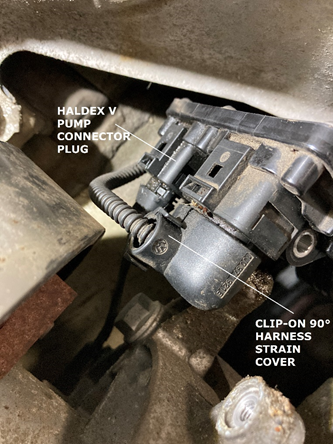
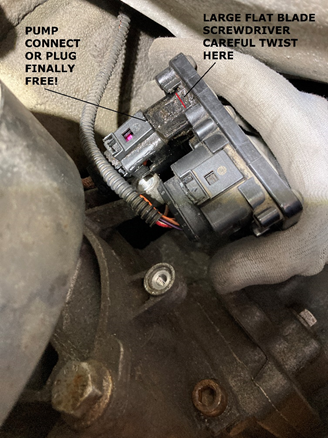
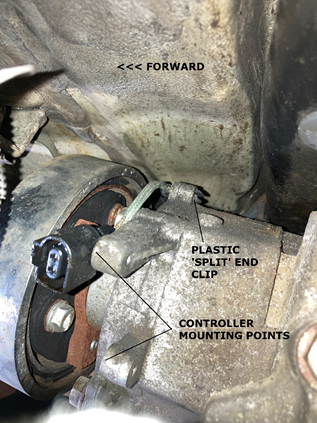
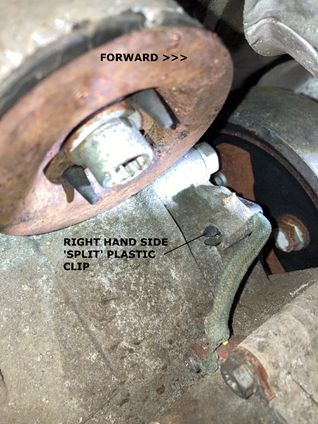
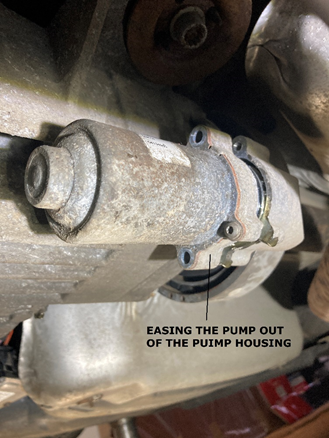
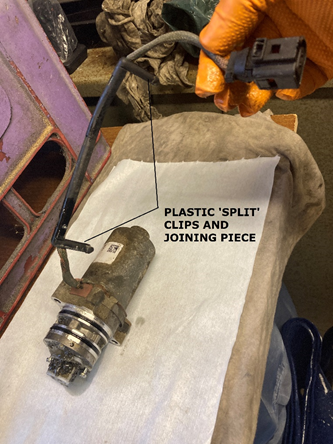
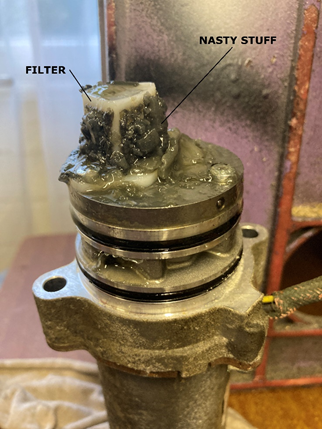
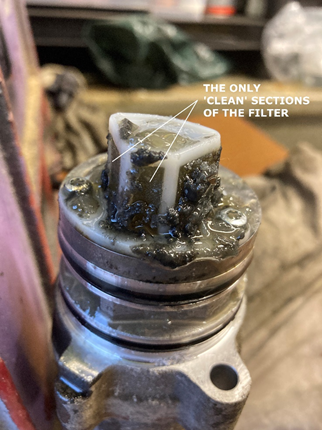
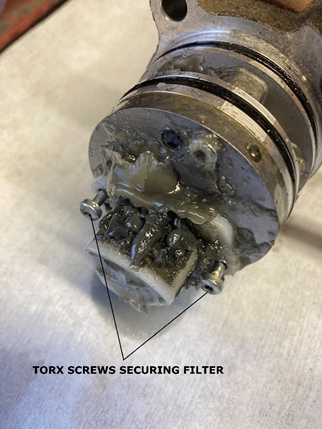
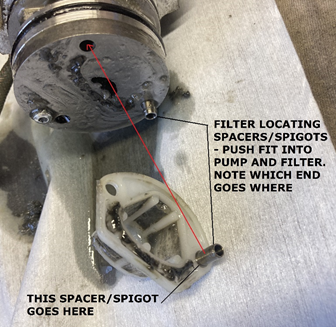
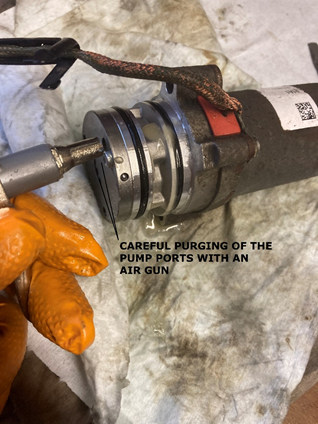
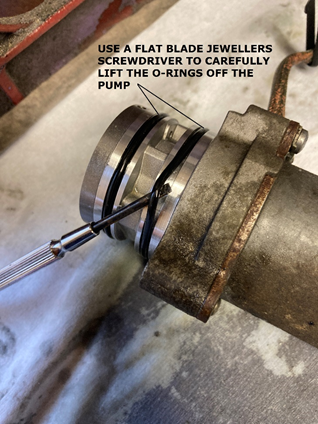
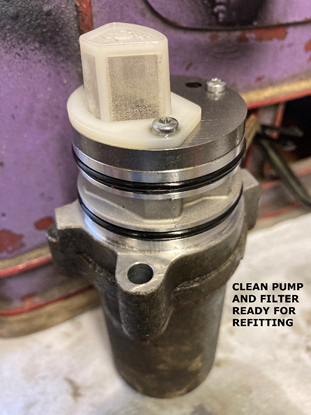
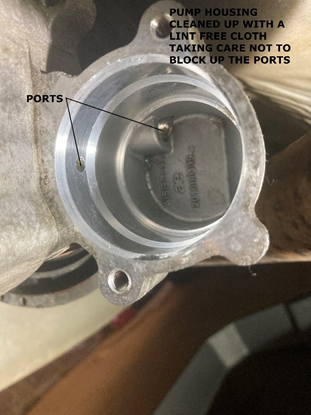
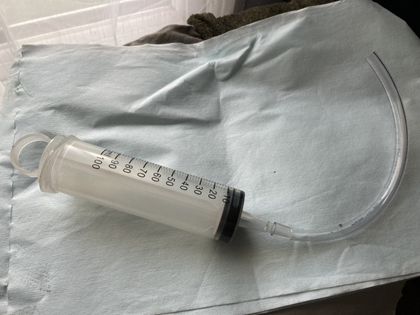
Coming soon when I get the pictures to appear... INTRODUCTION As I mentioned previously in another thread, I decided to have a go at changing the Haldex oil and clean the filter on TIBET III’s Haldex V unit after reading the threads on Briskoda. The idea of this guide is simply how I did it, based on advice from others but it maybe, that I did things slightly differently to others or perhaps I had a problem that others haven’t encountered and which someone else might find useful to know about. It is also Yeti-specific. SERVICE HISTORY After reading about the pump filter issues on the Haldex V and having lost faith with the MK dealer for various reasons, I decided to do it myself. Experience level – I’ve maintained my cars over the years (I’m an aircraft engineer by trade) but more recently, with the cars being under warranty, I’ve let the dealer do it. I reckon anyone who is competent at basic servicing tasks (oil and filter changes etc) can cope with the Haldex V oil change and filter clean. JOB PREPARATION One of my concerns was jacking (safely for me!) the Yeti giving me sufficient room underneath to do the job without struggling for access. I’ve never really trusted the drive on ramp idea so it was going to have to be jacks and axle stands. To jack the Yeti up, I used the standard car jack on one side and a straight lift mechanical pillar jack on the other (actually a 4.5T Land Rover jack). I prefer to rely on mechanical lifting but had in addition a trolley jack on the jack pad inside and aft of the Yeti jack. The LR jack had the good old slotted ice hockey puck to protect the sill flange. The axle stands I positioned at the rear suspension attach points just forward of the bumper behind the wheels. They weren’t taking any weight as such but were there in case the world moved from under the jacks. This may not be an ‘approved’ support point but their role was one of protecting me in the worst-case scenario. I also had wood blocks under the wheels which meant I wasn’t going to get squashed even if someone nicked all the jacks and axle stands whilst I was looking the other way… Perhaps this was all a bit OTT but I had the kit, it doesn’t take long to do and you’re a long time dead. The service kit came from haldexrepairs.co.uk – an excellent and useful website, lots of good info and tips and a good service. The kit was complete including everything from the oil and replacement drain and filler plugs to a pair of gloves. Brilliant. ON WITH THE JOB DISCONNECTING THE CONTROLLER The first thing was to run VCDS to check for any errors but everything was fine. It also warmed the car and everything up. No idea if the Haldex system likes being warmed up but it won’t do any harm! I knew one of the most ‘difficult’ tasks was accessing the pump harness to enable the pump to be removed. In actual fact it wasn’t too bad but even with a torch and mirror, once again the adult-proof VAG plug on the controller was impossible to undo. Yes, I’ve watched all the ‘how to guides’ but it didn’t push further on, the locking tab wouldn’t budge and the plug stayed fast. Plan B was to remove the controller from the Haldex unit to allow better access to the plug. This worked a treat. It’s held in place with two 10mm bolts but it still needed a gentle prize to free the controller from the Haldex unit mount after removing the bolts. This meant I could now get to the plug although it didn’t budge until a subtle and careful twist with a large flat blade screwdriver provided just enough force to ease the plug clear. The other connector plug on the controller has a clip-on 90° cable strain relief cover on it. Removing that enabled more flexibility to access the pump connector plug. The harness is held into position on the top of the Haldex unit above the drive shaft by two plastic split clips. It was easy to do one from the lefthand side (above where the controller was) and the other from the righthand side. The trick is two squeeze the end of the clip together from the aft side and then push the clips forward and out of the locating holes. The two clips are actually joined together by a length of split plastic. The workshop manual says to lower the main final drive unit down for access (7 turns) but I’m not sure why you’d need to. DRAINING THE RESERVOIR & PUMP REMOVAL Delighted with getting the pump electrically disconnected, I slackened the filler point plug and the drain plug - both are Allen socket head screws (8mm for the drain plug and 5mm for the filler plug). The drain plug must be more than just a drain plug as it’s pretty long and torqued (according to the Yeti workshop manual) to 40 Nm. The filler plug is much smaller and shorter and torqued to 15 Nm. I gave the area around and above the drain and filler points a good clean to prevent any crud getting inside the unit. With the drain plug removed, the oil drained into the drip tray and removing the filler plug allowed a full flow. I was impressed as the oil looked pretty clean. Perhaps my filter was going to be okay… DRAINING THE RESERVOIR & PUMP REMOVAL Delighted with getting the pump electrically disconnected, I slackened the filler point plug and the drain plug - both are Allen socket head screws (8mm for the drain plug and 5mm for the filler plug). The drain plug must be more than just a drain plug as it’s pretty long and torqued (according to the Yeti workshop manual) to 40 Nm. The filler plug is much smaller and shorter and torqued to 15 Nm. I gave the area around and above the drain and filler points a good clean to prevent any crud getting inside the unit. With the drain plug removed, the oil drained into the drip tray and removing the filler plug allowed a full flow. I was impressed as the oil looked pretty clean. Perhaps my filter was going to be okay… Whilst the reservoir drained, I set about moving the pump. The first thing to do was to give the pump and the housing a good wipe down to prevent any dust and dirt from unduly contaminating the pump. This was easy with two Torx screws to undo followed by a very gentle tap with a nylon hammer and then a wriggle and out it came, releasing a bit more fluid. FILTER AND PUMP CLEANING I couldn’t believe just how blocked up the filter was – and the congealed mess left inside the pump housing on the Haldex unit – exactly as others had found. It’s strange – almost like grease with little substance when you touch it. It didn’t seem to be water/moisture contamination. The next job was to remove the filter which is held in place by two Torx screws. Then it was a case of gently easing the plastic filter clear. It sits on two locator bushes that also act as spacers and should protect the filer from being crushed when the Torx screws are tightened. I used warm water and a small paint brush and some washing up liquid to clean the filter and then once rinsed, left it to dry off whilst I cleaned up the pump. The pump cleaned up easily and I used a small blast of air from my compressor to clean the old fluid out of the ports. It was then a case of replacing the O-rings, removing the old ones carefully with a very small flat blade screw driver being careful not to damage the pump. Incidentally, there was a couple of patches of light corrosion on the pump (on the mounting flange). This was easily removed with a Scotchbrite pad – don’t use wire-wool as this can cause dissimilar metal corrosion if stands of the wire-wool get embedded in the aluminium pump. I also use lint-free cloths for the cleaning to avoid fluff and stuff getting into the bits where you don’t want fluff. With the O-rings replaced, I blew air through the filter to ensure it was dry and refitted it to the pump. There seems to be two ports in the pump housing – presumable an inlet and an outlet. I scooped the gunge out being as careful as I could to avoid pushing any of it into the ports. REFITTING THE PUMP AND FILLING THE RESERVOIR As with all good Haynes manual advice – installation is the opposite of refitting. Before fitting the pump, I gave the O-rings a good coating in fresh Haldex oil to lubricate them as the pump is refitted. It slipped in a treat and I secured it in place with the two Torx screws. I made sure the harness had the correct routing before I fully pushed the pump home. Once the pump was properly installed, I locate the right and then left harness clips and then reconnected the pump connector plug to the controller, the 90° harness stain relief cover to the other controller plug and refitted the controller to the mounting points on the Haldex unit. I used the airline to give a light blast through from the filler point after putting a very small amount of fluid into the reservoir to help flush it through. I had a small syringe to do this with. A big 100 ml syringe (and a length of plastic hose) comes with the service kit from Haldex Repairs for the main filling. Next job was to fit the new drain screw. The service kit came with new drain screw and filler plug but the original ones could have been reused – there was nothing obviously wrong with them. The new ones obviously have new sealing washers on them. As mentioned, the drain screw is torqued to 40 Nm according to the workshop manual. With everything secure, the next task is to refill the reservoir. The big 100 ml syringe with the service kit works a trat with a plastic hose that just fits in the filler point. I found you had to be careful not to block the filler point completely and that made it pretty much airtight and difficult to operate the syringe. The reservoir took most of the fluid and some started to over flow out so I refitted the filler plug. FINAL CHECK AND VCDS ERROR CHECK AND PUMP RECALIBRATION Next job was to check everything was clear and I lowered the Yeti pretty much to being off the jacks. I started the engine and let it run for 5 minutes. I then used VCDS to run the ‘learn pump’ program as suggested by Haldex Repairs. You could clearly hear the pump running through a specific cycle. The tone changed as the pump filled up. A quick jack up again enabled another oil level check of the Haldex reservoir. What I had initially thought to be fluid flowing showing the reservoir was full but with a more concerted effort on the syringe, I found I got a fair bit more into the reservoir and when it was really full it really did flow out! Unfortunately, I forgot to get a picture of the refilling but that’s a pretty simple job – just be careful not to put too much effort into operating the syringe and end up blowing the plastic pipe off. I used probably 800 ml of the 850 ml supplied in the bottle. Although the car was jacked up at the back, it probably wasn’t that much of an angle so I think the reservoir is pretty good on the level. Another good look round was done as a final leak and security check. I then ran the engine and again went through the VCDS error code check and ‘learn pump’ program. All appears good. I am at a loss as to how the system worked with about 80% of the filter blocked – perhaps it wasn’t. I haven’t been in any snow for three years now. Anyway, job done and as others have said – it is a job that has got to be done. If you’re not up to it then it shouldn’t be too costly to get a garage or dealer to do it – you’d just better point the dealers to Briskoda or the Haldex Repairs website to find out how to do it! Next job will be to take the Yeti out for a road test this weekend. Forecast for snow on Friday…. PS Apologies for the low res pictures, haven't got time this evening to suss why they didn't load - if anyone needs hi res pictures (or a PDF of all of the above) then PM me.


 1 point
 -
When I shared a workshop with others I had a collection of random unidentifiable bits segregated by having traces of engine oil/carbon deposits, transmission oil, electrical parts, odd fasteners & plastic bits like that, they key thing was they had to be unidentifiable but look important if not critical. When someone else had something stripped down that was causing them a lot of head scratching I would select one or two pieces from my collection to add to the parts & fasteners that they had removed If you kept a covert eye on them often after scratching their head they would look around to see if anyone was looking and then hide the evidence!1 point
-
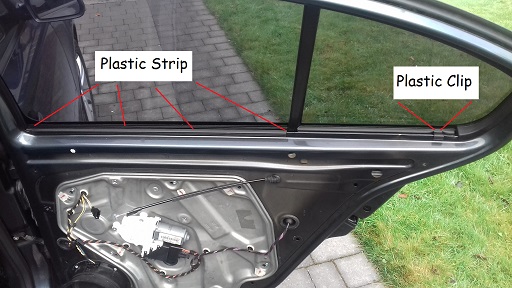
What Does The Plastic Clip Do:.. There is a metal edge that the top of the door panel sits in over. Part of the metal edge is covered with a plastic strip, it is the length of the window glass that goes up/down. The plastic clip is like an extension of the long plastic strip. It acts to hold the panel in the same line as the long plastic strip. If the clip was not in place the end of the panel would be loose. So that’s the end of this story. A happy ending thanks to the help of MicMac, StickyMicky and mac11irl.
 1 point
 -
1 pointAnd you can swap the Vredestein Quatrac5 's from side to side to stop the sawtooth inner edge appearing and creating a noise. Thanks, AG Falco1 point
-
Today mine was an R-reg Rover 100 in Burgundy I followed it round the Ring Road and it looked tiny - even compared to what we class today as a small car...1 point
-
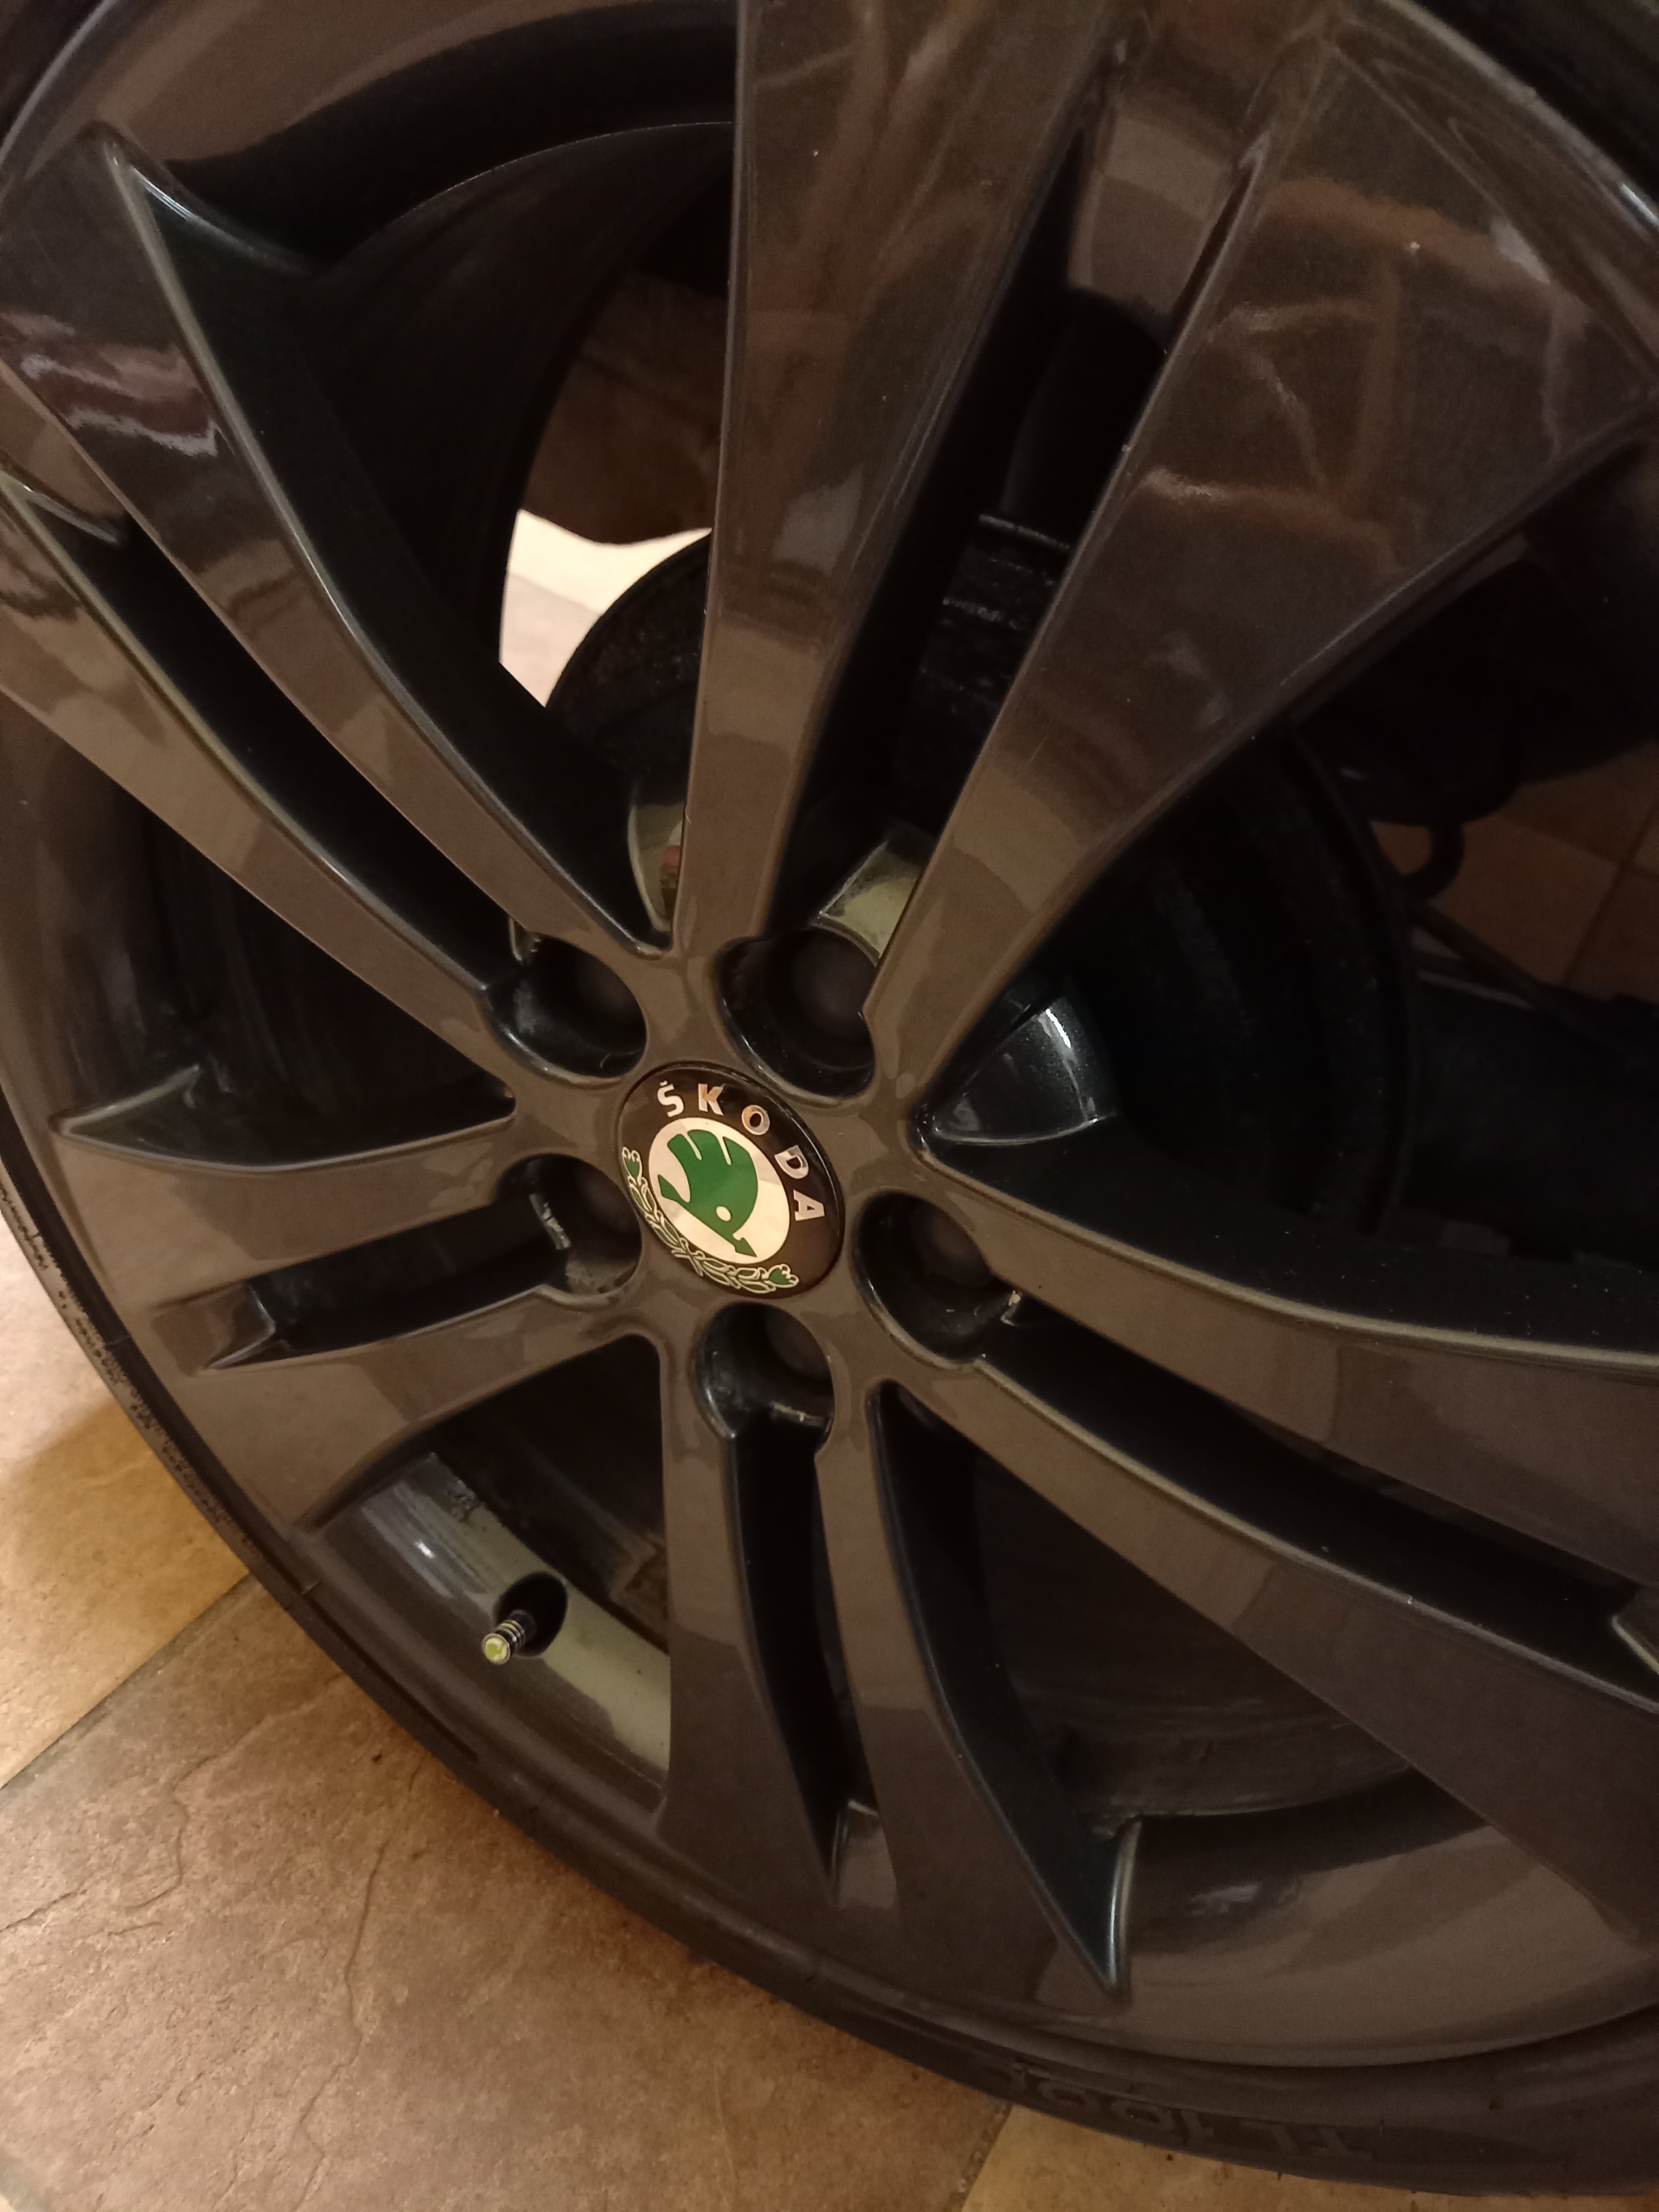
1 pointHeres some pics of the stick on jobs for reference. Much better than the mottled old badges beneath and well worth the few euro I paid for them on Wish. Pic of the old badge too for comparison.

 1 point
 -
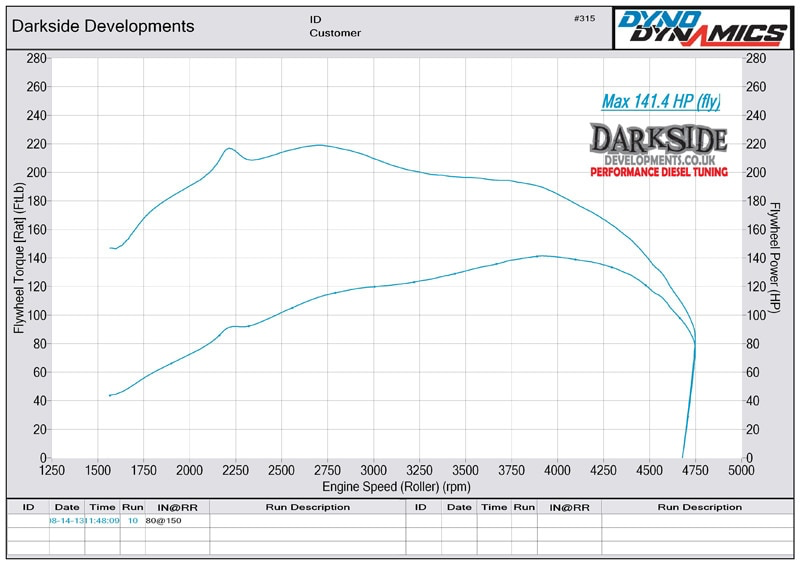
I wouldn't go to Darkside. They aren't such good tuners, great hardware, but bad quality tunes, terrible torque spike that kills clutches and DMFs. They also set an aggressive popcorn limiter/launch control that reduces the lifespan of the turbo and injectors. At 60K miles your Fabia holds quite a bit of value, so you'd want a safe, reliable tune I'd check Celtic Tuning, they can come to your door and map it. PD Hereford also seem to know what they're doing judging by their Youtube comments. Spike at 2240RPM which makes no sense.
 1 point
 -
It could be phone related? My pixel 2 is running Android 11 and has no issues with AA on the Amundsen in my '18 plate vRS. There might be a software update. Pab is super helpful if you post a picture of the current software version to this thread:1 point
-
Interestingly, the new V5 does not name the previous owner...It just states No. of former keepers , no other details. I have a very basic printout of oil changes done...its a 2018 car, so only oil changes needed to date. I don't have any warranty history. I am awaiting further paperwork for the 12month warranty etc from Skoda head office.1 point
-
1 point
-
Do you even know that the immobiliser can be overcome via the OBDII port? Do they even have steering locks these days? Even the dodgiest geezers on Ebay that can clone keys need the original key with transponder in the ignition in order to clone it via the OBDII port, if they have that then they will simply be driving off & not faffing around programming, they can do that later. Pretty much all car theft since the mid 90's when RFID immobiliser keys were introduced has involved the theft of the keys or spare key or the collusion of the owner, the crime rates should by rights have dropped massively but the last category has always been a high percentage & the thieves simply started breaking into houses & stealing keys or pinching cars off the drive at this time of year where owners leave them idling to warm up & then deny it, the figures always shoot up in the winter. Nowadays there is also the capture & retransmission of the keyless entry signals but thats nothing to do with stealing a car via the OBDII port. So back to my original question, is it even a possibility on current new model Skodas?1 point
-
@Gaz_ i lived and grew up near Pennan where the phone box was. The Ship Inn is in Banff. The thing is the beach is on the West coast of Scotland at Camusdarach.1 point
-
1 point
-
1 pointI think the rear deflectors are on backwards on yours.The big part should be facing the front.
 1 point
 -
Hold your finger on small screen until popup menu appears.1 point
-
1 pointTo be honest, you may be reading too much into this. It hasn't left the drawing board, if it was on the drawing board to begin with. Probably more of a side note in a list of tax revenue ideas. It could be like VED, where after a certain date, all new cars sold will have to have telemetrics that report miles driven automatically. At the same time, all those new cars will have zero/cheap VED but expensive per mile tax. Implementing this retrospectively? I share your view, it can't be done effectively.1 point
-
That gave me the biggest laugh for a very long time! Keep the photos coming please! I watch the Sweeney and marvel at all the derelict & run down London (presumably) locations they had in those days to film in, they will all be gentrified & unrecognisable now. Did you notice how much the trees had grown in the various photos? Obvious really but I recently visited the council estate where I lived from 1967 & from where I have most of my childhood memories, it was a new estate and had saplings planted, now they are massive mature trees where the upper foliage meets those the other side of the road and the overall impression now is that the trees have taken over and in most places you cannot even see the sky line. It could be that they have cut back on the pruning & maintenance in recent years.1 point
-
1 point
-
1 point
-
1 pointYou just need to get a non branded set of round black bolt covers to avoid these silver/grey summer ones getting wiped/ripped off by the snow/slush/ice? Like on VW Polo etc that have a hole in the centre to place a hook on to remove when they are recessed? Or a set of chemi blackened bolts and security bolt? Certainly getting them powder coated should avoid what quickly happened to the first steel wheels I bought for my wife's 2002 Polo, the paint disappeared very quickly and they rusted badly, but I covered that up by buying a cheap set of Golf trims for them - easier to clean in winter!1 point
-
Check the tread yourself - most tyre gauges dealers use have 2-3 mm ground of the end so they can upsell worn tyres. My last Superb still had an original rear tyre on when it went back at 65k miles. Still 3-4mm of tread on it. It had been repaired 3 times though.1 point
-
I hope your insurance is not up for renewal any time soon, I agree that it has to be the most obvious claim to repudiate but I was once in a similar situation and it took me 18 months of constant pressure on my insurers to resolve. In the meantime my NCB was reduced because of a claim pending and I could not go elsewhere, well I could but with an even bigger loss of NCB and then no leverage against my insurer for them to resolve it. I presume that the Shogun is your current vehicle with the personal plate, if so someone must have seen it somewhere to be able to match the reg to the vehicle or they have a bent copper or civil employee with access to the P.N.C.1 point
-
We have a resident expert on here always willing to help @Rustynuts. Hopefully will be along soon to advise.1 point
-
This is fairly simple job! Gas struts from the regular Octavia without electric bootlid fits plug&play on the same bal-joints. 3T9827721 will plug the holes where the cables came out. Then you have to disconnect the cable to the lock mechanism-motor on the chassi (not the bootlid). And apply 12V to it so the motor pulls back the metal rod to locked position. After that you don't need to connect the cable back or else it will release the metal rod to open position which you don't want. Just let the cable be unplugged. You won't need that function anymore. After that your bootlid will lock flush! Otherwise your boot will rattle a bit and the alignment will be a bit off, but it will lock properly. Feed the 12V to the lock-motor it will be worth it! No need for any programming. It will beep like it did before and no warning lights will appear.1 point
-
Please update us, can you request the official bulletin code from Skoda?1 point
-
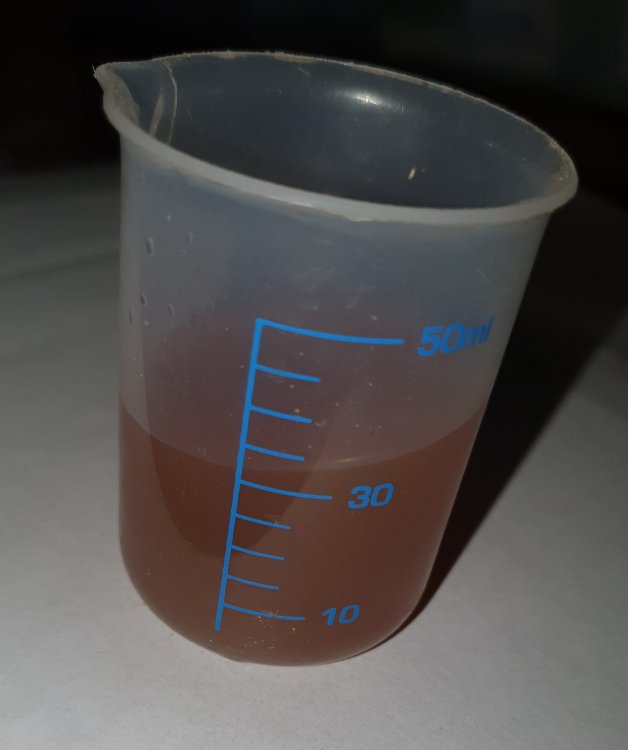
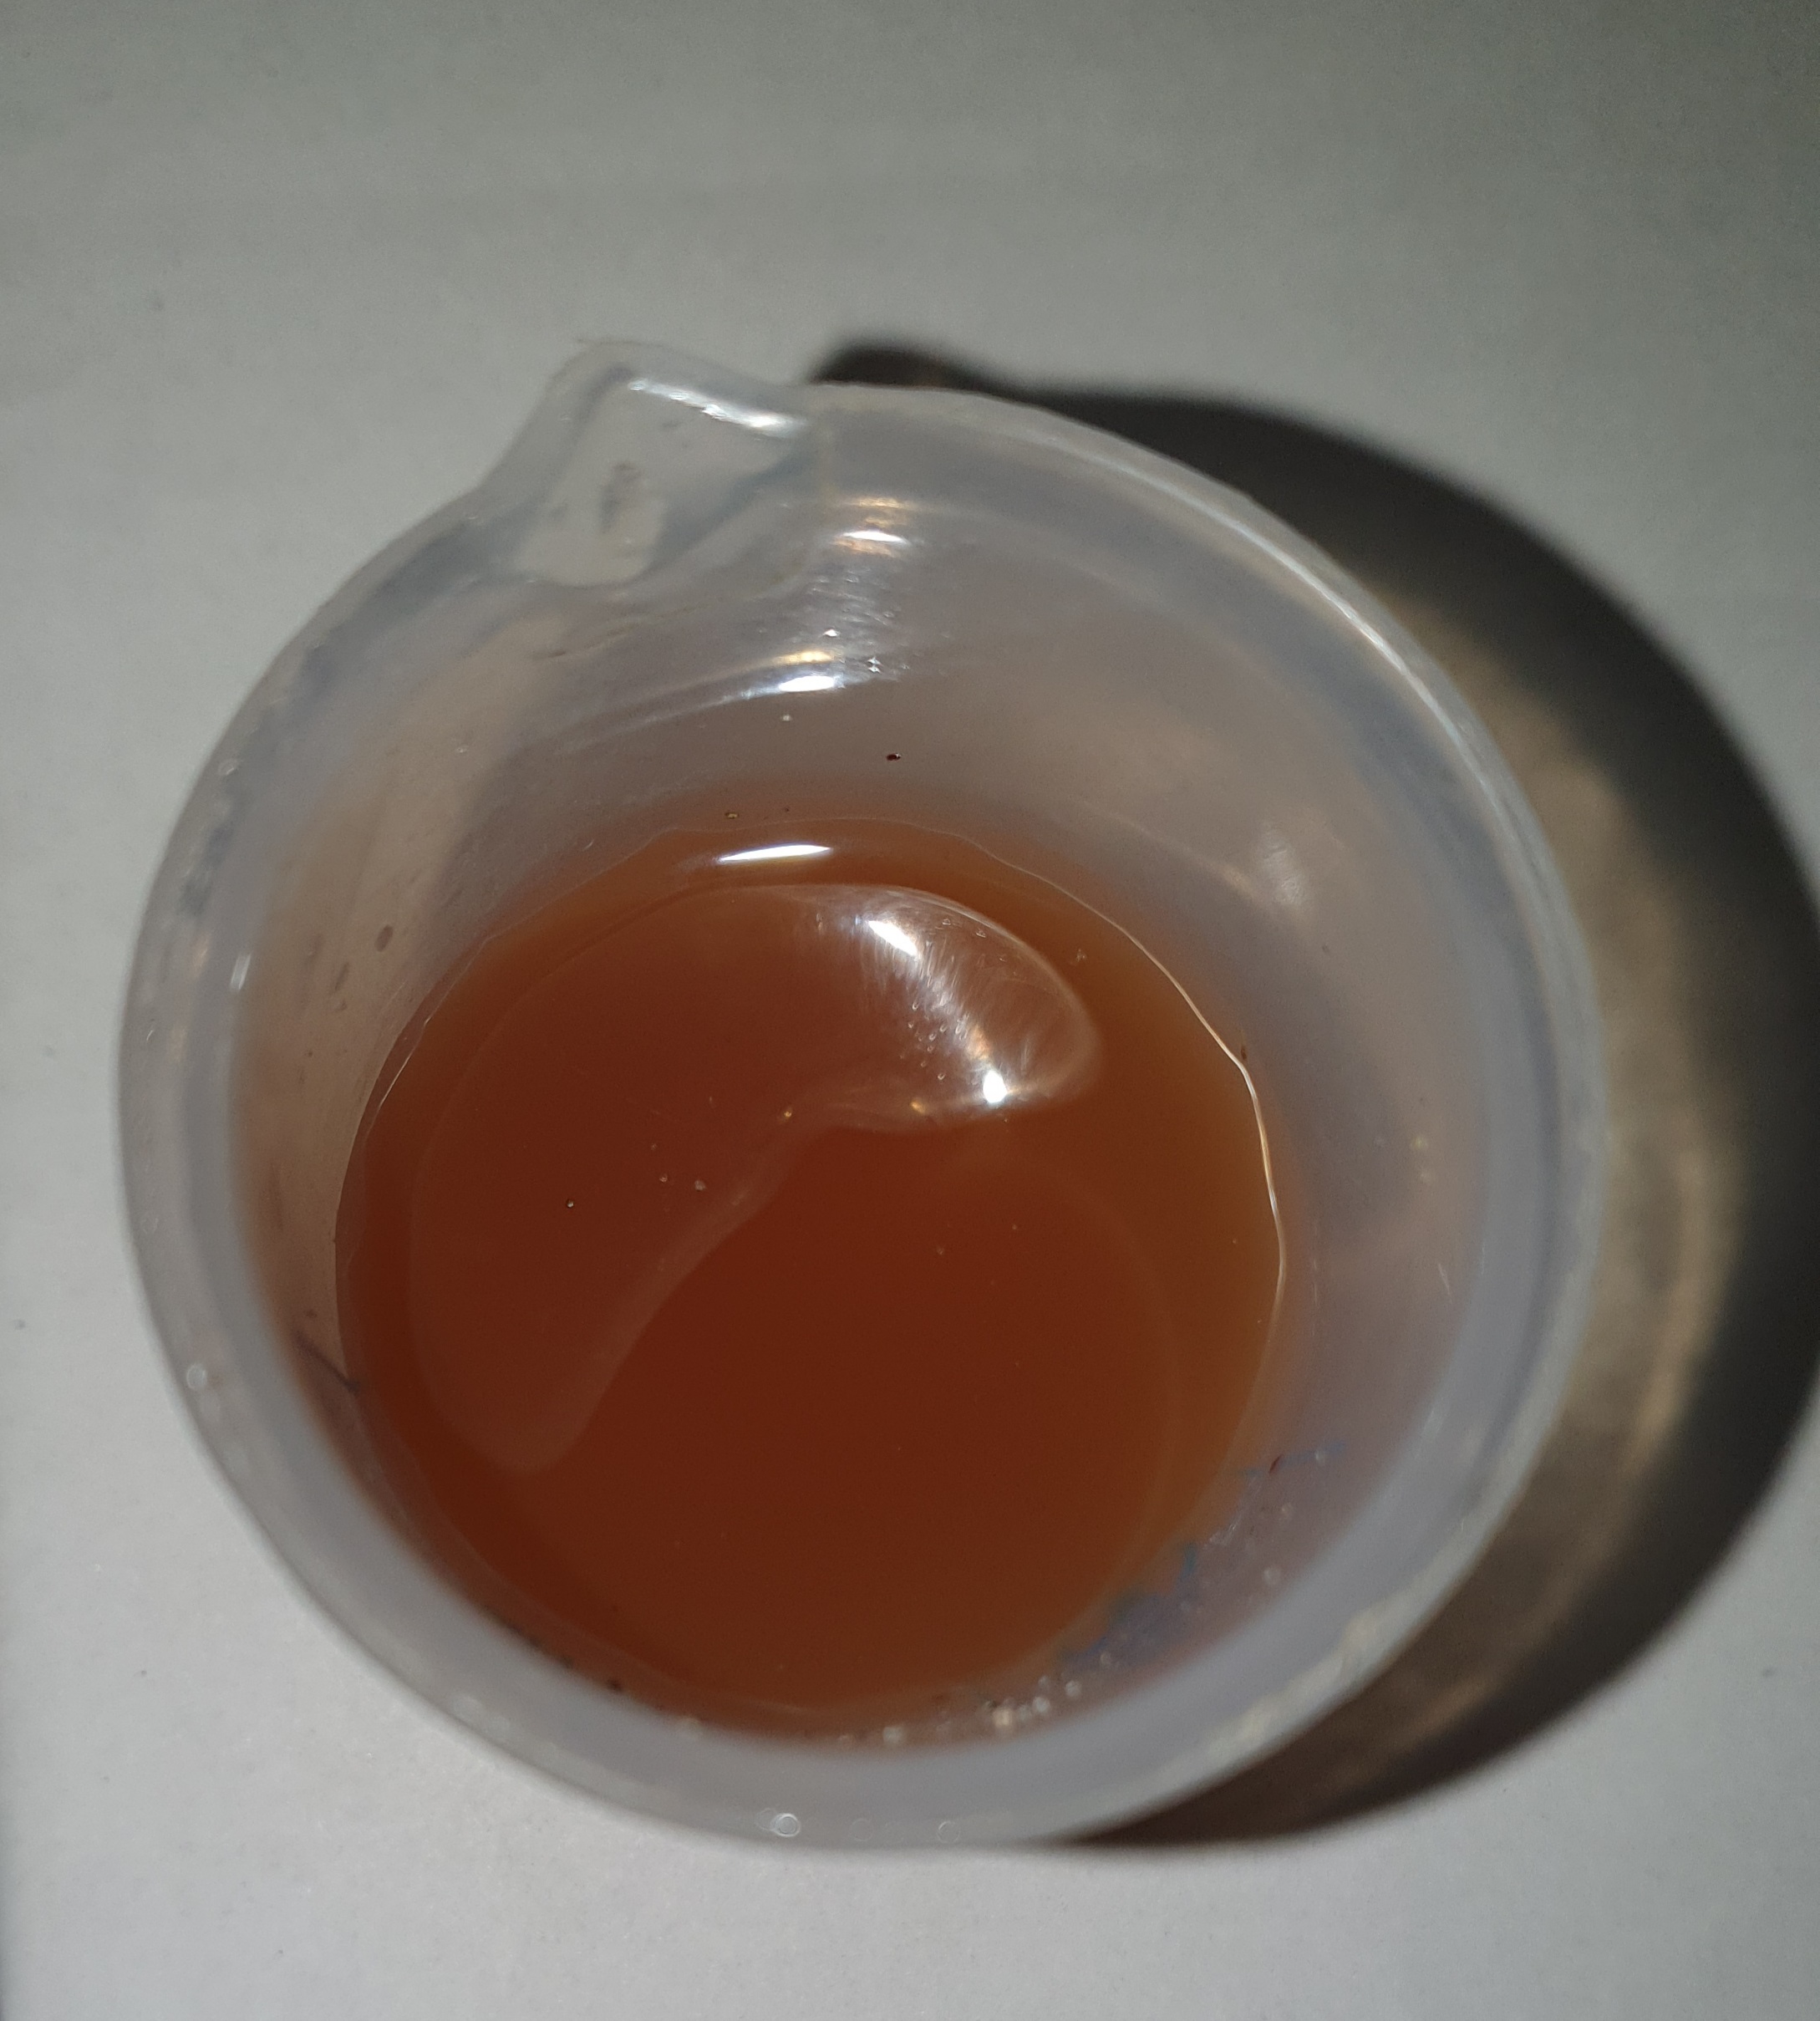
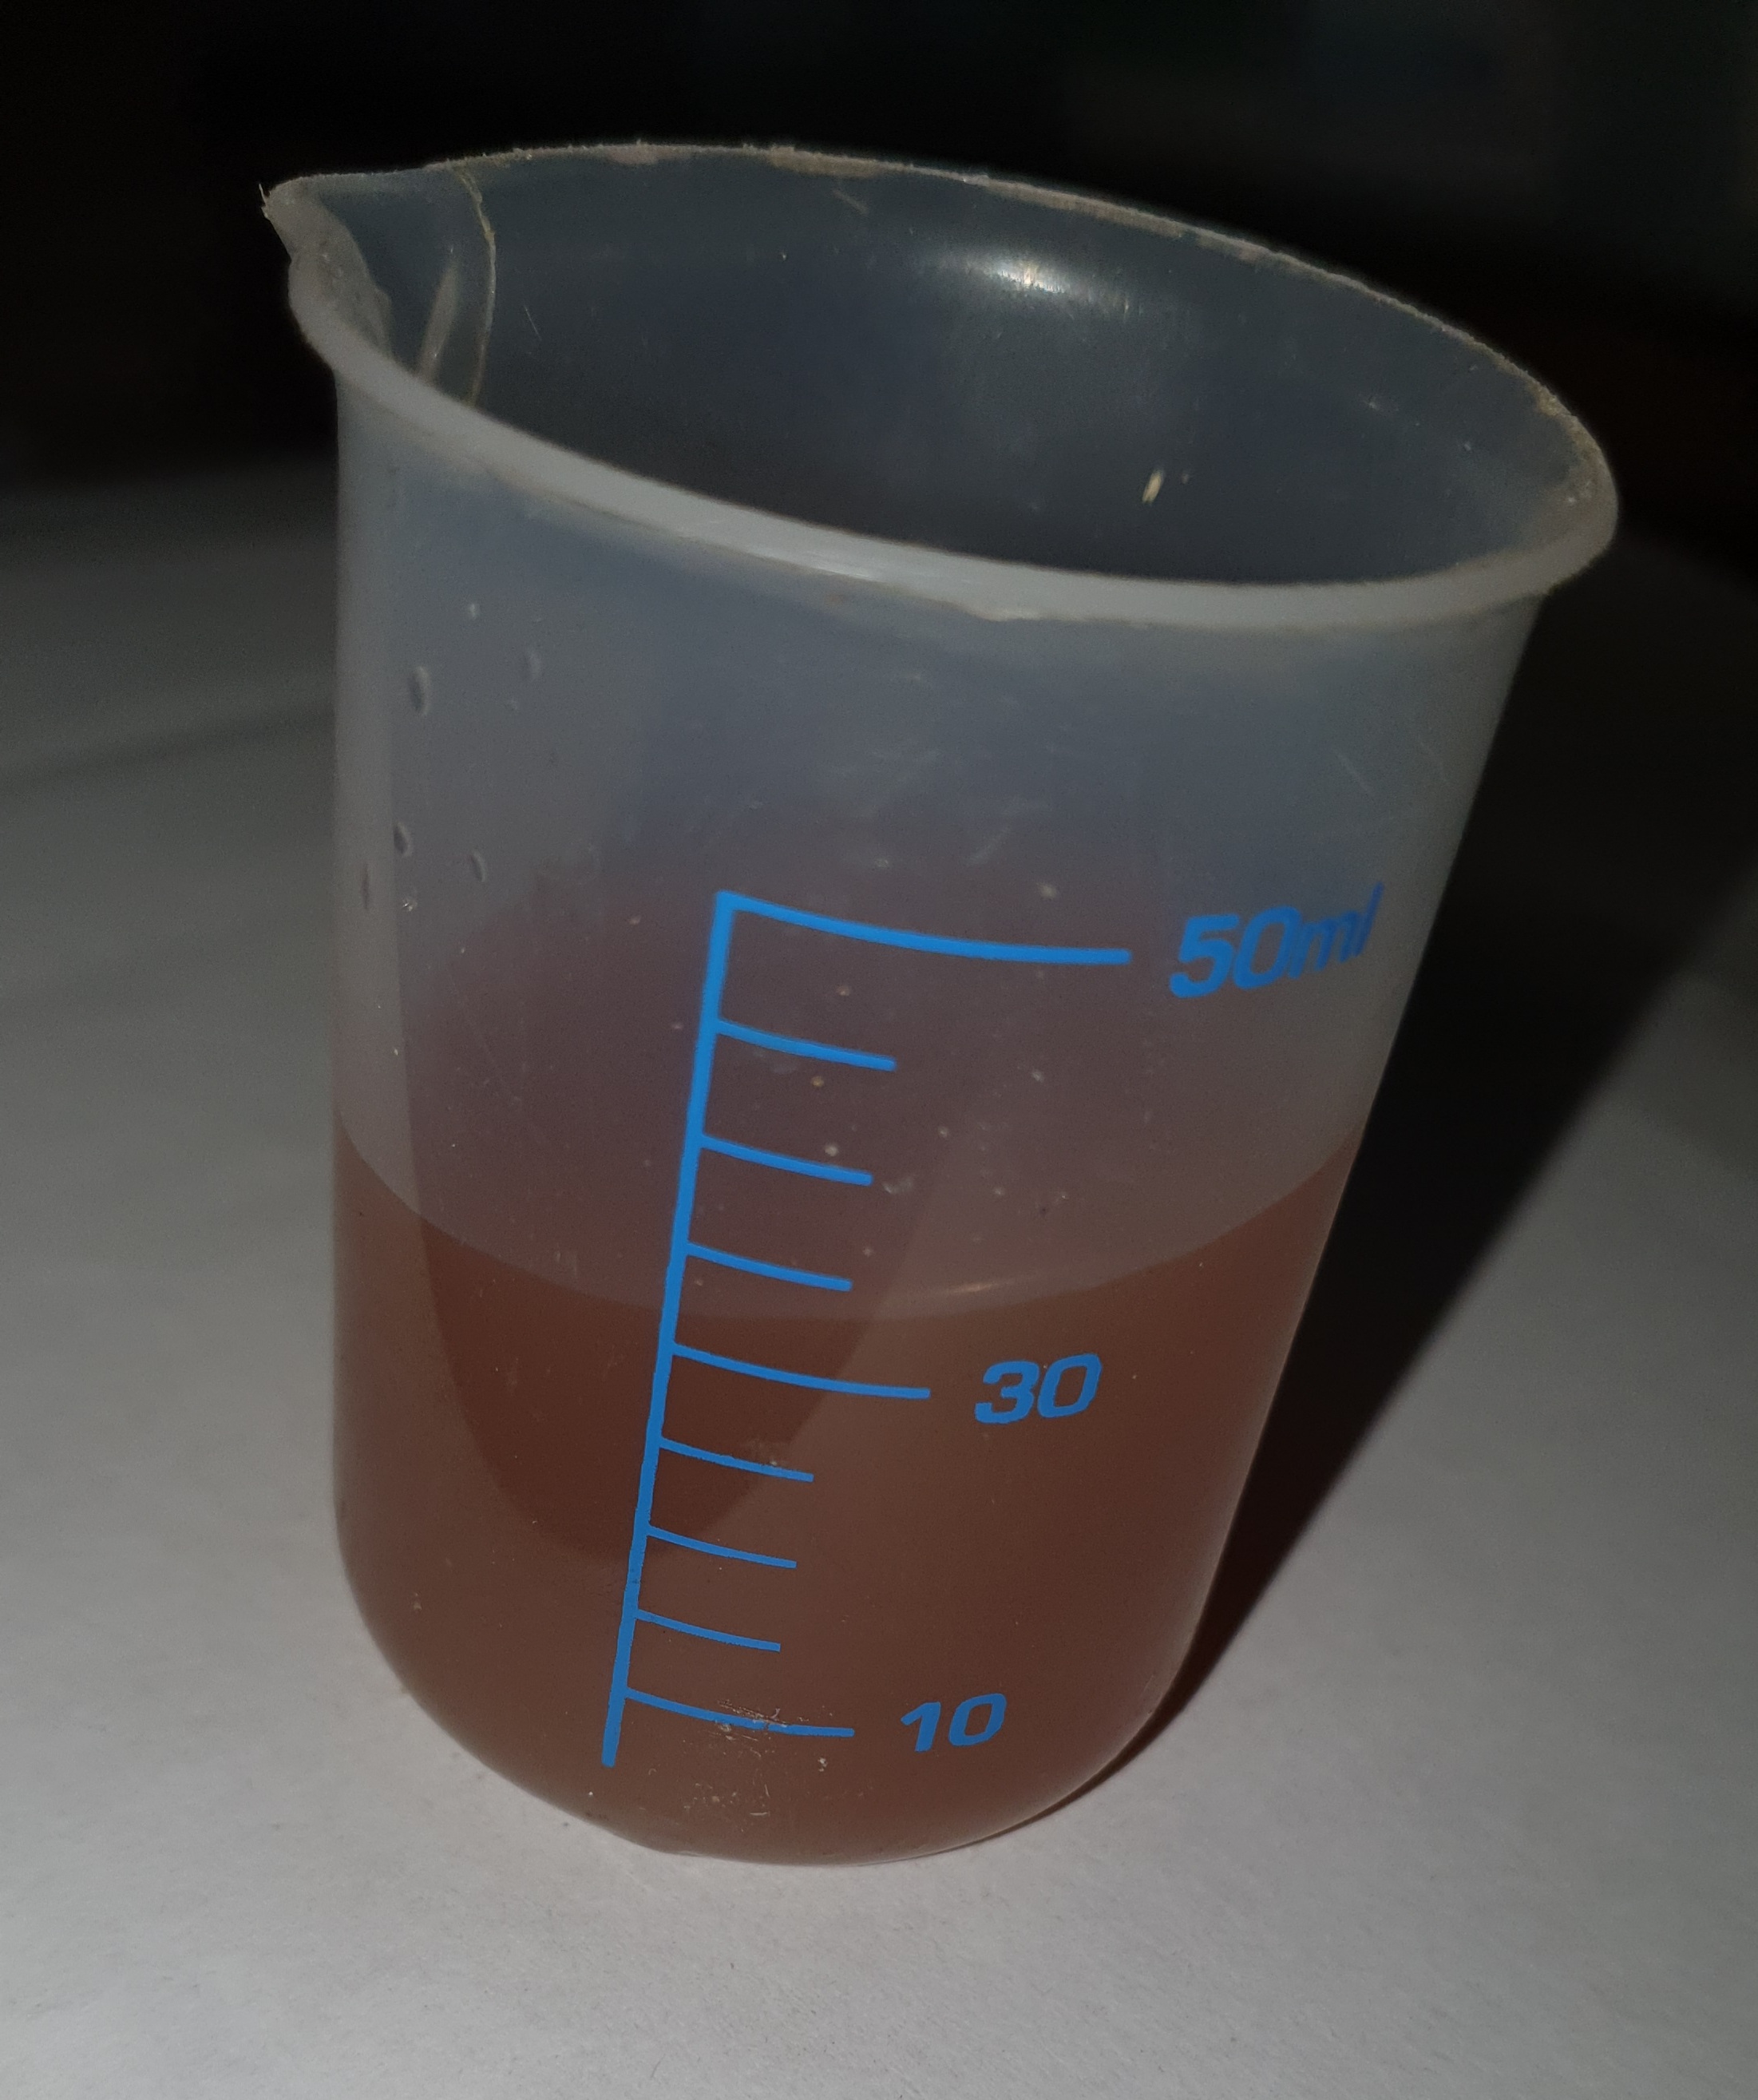
1 pointWell after driving home (10 miles) and instructed to check coolant level this am its pretty damn cloudy. Not really what I expected for £1345! Should this be so?

 1 point
 -
1 pointOrdering Kamiq, I asked the dealer about the possibility of replacing summer tires with all-season tires. Unfortunately, the seller said that this isn't possible. When I picked up the car, another seller said that he can sell me this type of tires , but it is a local offer (not authorised by Skoda Poland) and it is cheaper to buy it yourself (ca. Oponeo price with 25% dealer's margin). The next day after delivery, Kamiq had already changed tires to Dunlop, and I will try to sell a Goodyear EfficientGrip Performance summer tire soon.1 point
-
1 pointThank you. I've just bought a new rain sensor from the link as mine has just started playing up too.1 point
-
1 pointAnother small update. From initial checks, the engine seems fine. There is a little bit of oil left in the engine which is good, but there's still the chance of bearing damage if the engine has been starved of oil/pressure. They won't know until the new turbo has been installed and the oil system sealed as that's when they can start to turn the engine over. New turbo has been ordered, waiting for it to come in before booking a technician to fit it, which is looking at the early part of next week.1 point
-
1 pointWhen ICE cars are no longer available and revenue from petrol/diesel tax on fuel starts to fall it is obvious that EV owners will be targeted by some kind of stealth tax.1 point
-
1 point
-
1 pointGot the car finally to show you how it looks in night & and here is cold vs warm start plus pass by. Enjoy!1 point
-
1 point
-
1 point


.thumb.jpg.06721e8c8b33ed0eea16572ff131b291.jpg)


.thumb.jpg.04def9af2236b4f436f86f6401e0a4b5.jpg)