Leaderboard
-
.jpg.1006585dfe4e2977315b67c3d642e37b.jpg)
Guest_
FREEDOM36Points83,824Posts -
pinkpanther
FREEDOM17Points3,913Posts -

Lee01
FREEDOM15Points36,174Posts -
Gaz
FREEDOM11Points7,751Posts


.thumb.jpg.9dd3f612ba7f13d10be5c518d3c8d255.jpg)

Popular Content
Showing content with the highest reputation on 15/07/24 in all areas
-
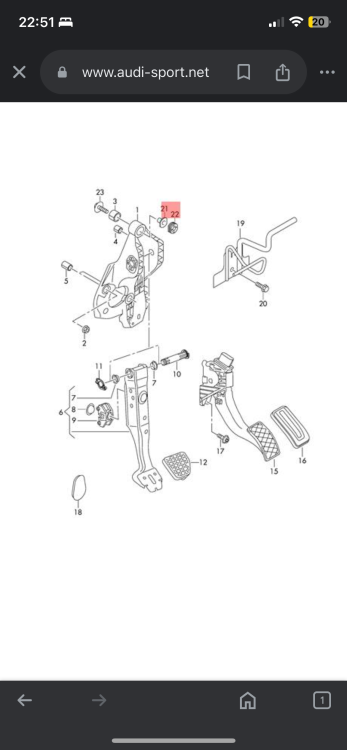
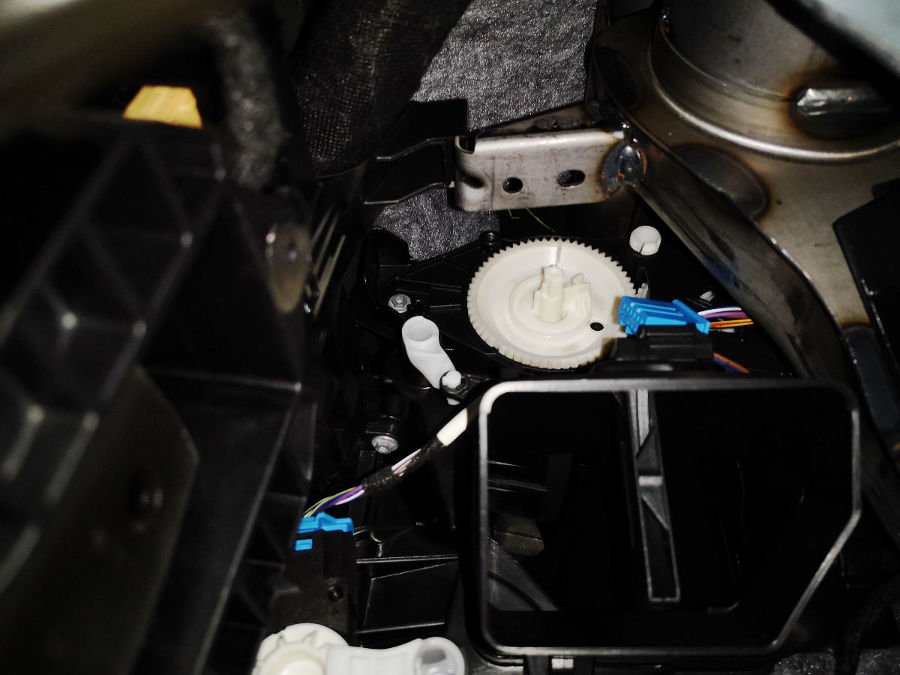
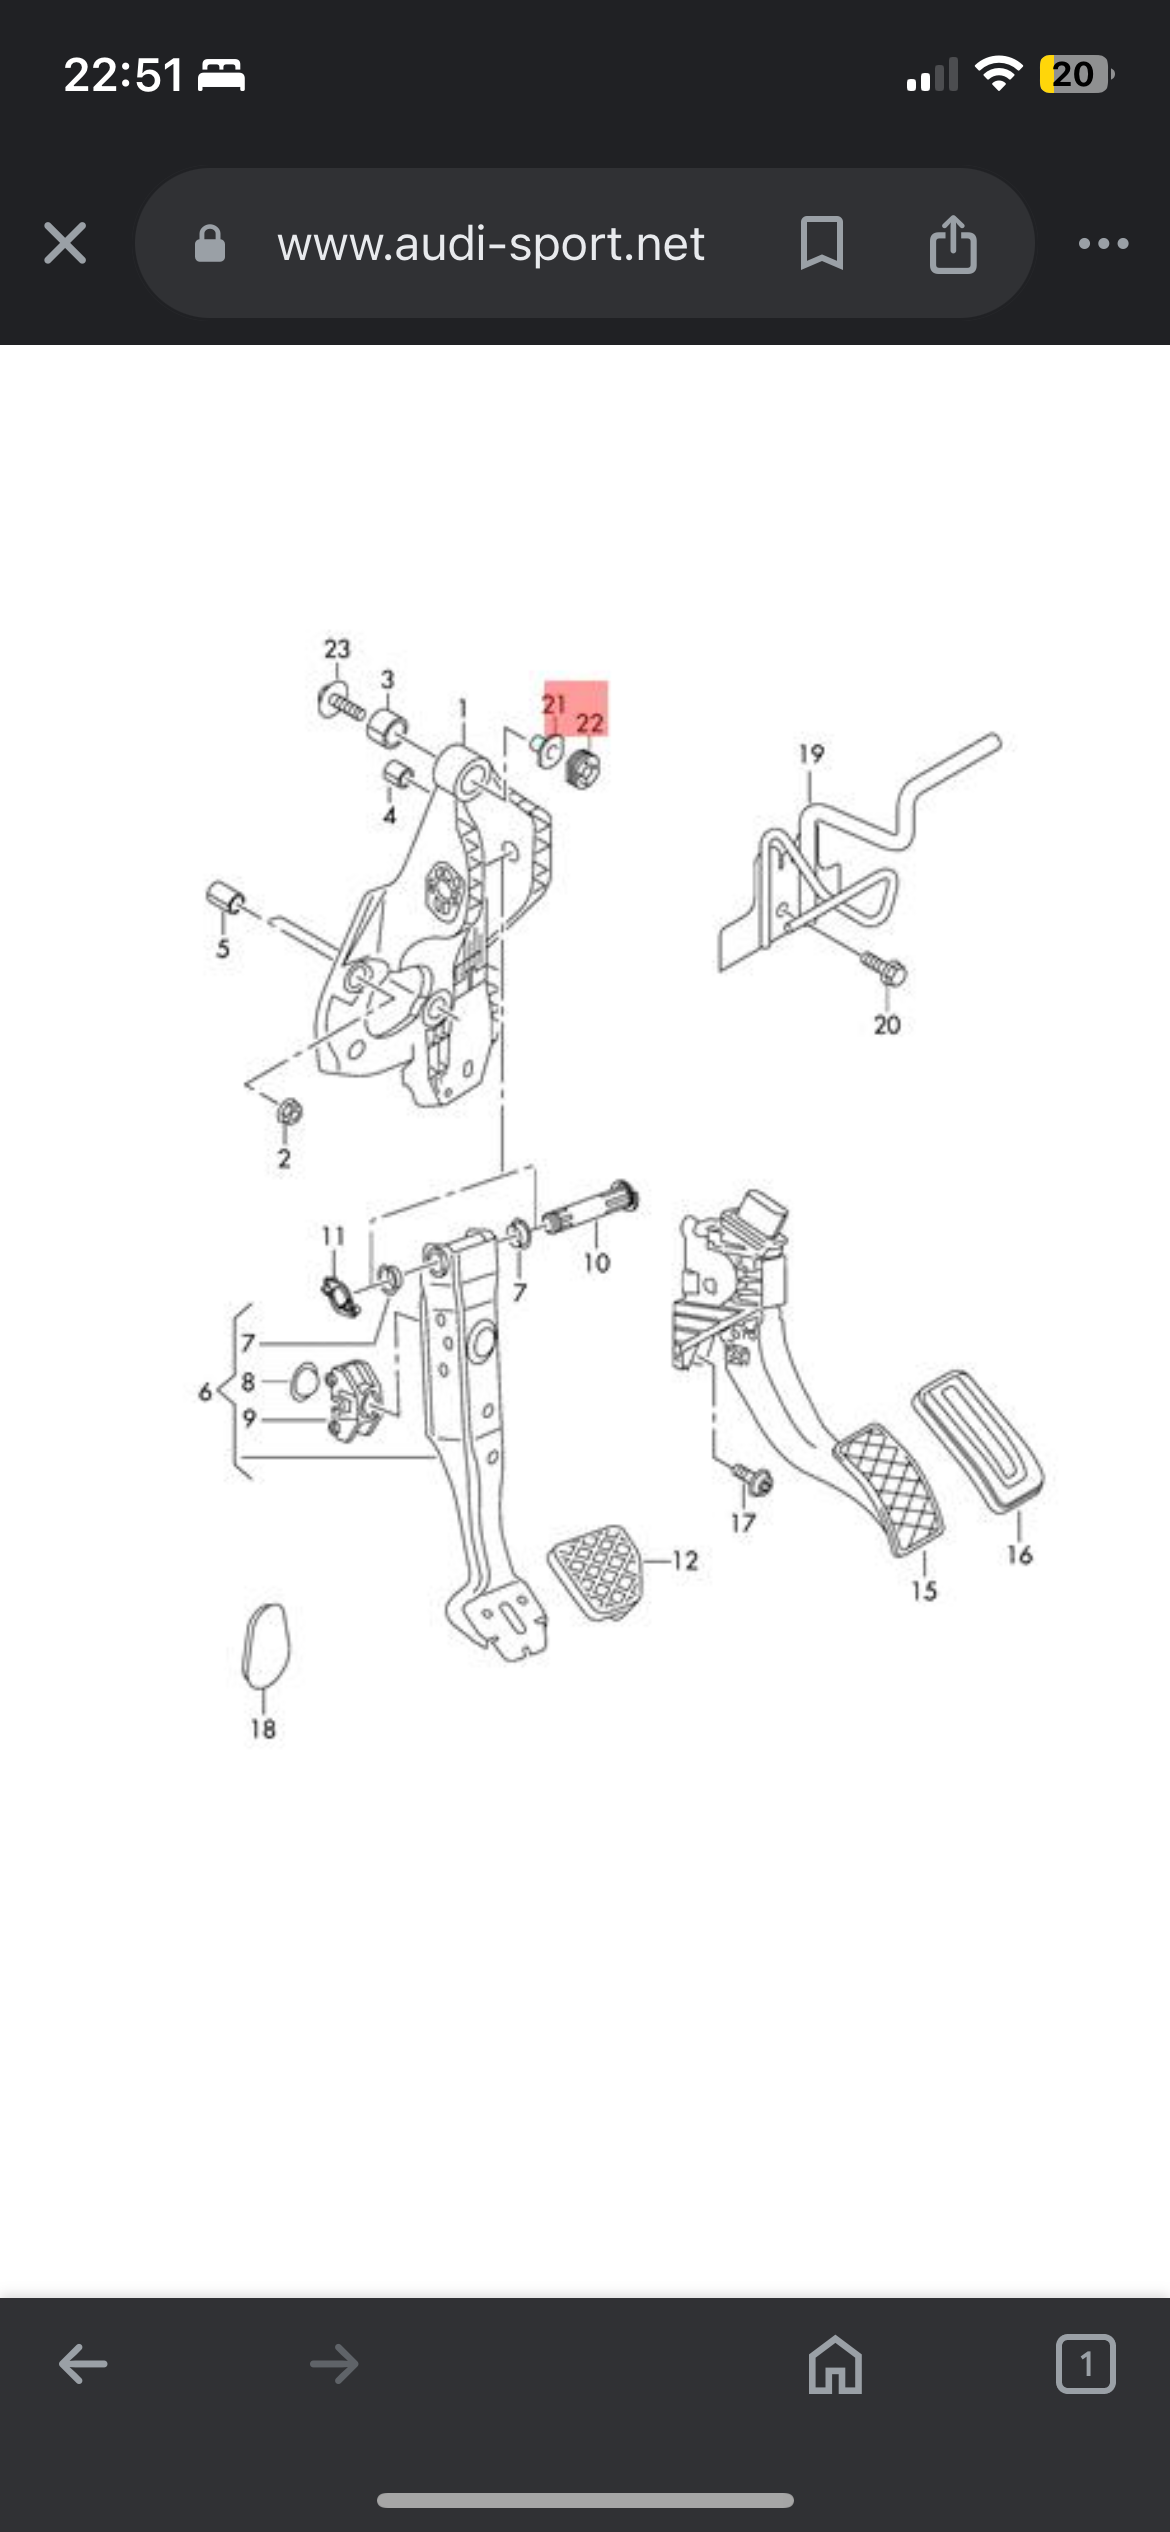
5 pointsThanks for the replies from everyone. I finally got to the bottom of this. There are lots of posts on here when you look closely, all with the same issue. The part is a spacer which fits at the top of the pedal assembly. I managed to put it back but having seen what it does it real has very little use and could be left out. I’ve attached the schematic for anyone who comes across this in future, and a photograph of it in place. People have said it’s a nightmare to get to but if you remove the little coin holder drawer to the side of the steering column it’s easy to see and get to. I hope this helps someone in the future.
 5 points
 -
You'll need a fault scan to confirm but I'd be willing to bet you have an issue with one or more ABS wheel speed sensors, either a faulty sensor or damaged wiring. All of the systems you describe in your post take speed information from the ABS using the wheel speed sensors.4 points
-
3 pointsOne thing you could do to prove the @J.R. theory is to put the fan speed to max and close all the other vents and see if the flow of cold air gets worse. Which HVAC system do you have? I'm not sure if the Octavia ever came with 3 Zone climate but if you have, check the rear zone is in sync with the front 2 zones. I imagine if the rear was set cold you would feel the cold air from the rear footwell vents that are under the front seats. The opposite happenned to me a few years ago in the middle of summer, had the front blasting cool air and kept getting a woft of warm air and the kids had put the rear temperature up to 28 Degrees!3 points
-
2 points@Kamiqaze06 Welcome. Useful if you said were you are and what sort of temperatures /weather. United Arab Emirates being rather different from Ireland, sort of thing. The temp should be at --- before getting to near the indicated 50*oC then to the 92*oC and rising and when things are working right bring the oil back down lower. As an aside. ......................... re GPF,s. Clearing them is different from a DPF.
 2 points
 -
Any fully VW Group compliant scan tool will point to what it thinks is causing the fault, so yes, if a ABS wheel sensor, it will identify which one. You could check the "VCDS locator map" to see if anyone close to you is reg'd and ask to make contact. Where, roughly, in Scotland are you located?2 points
-
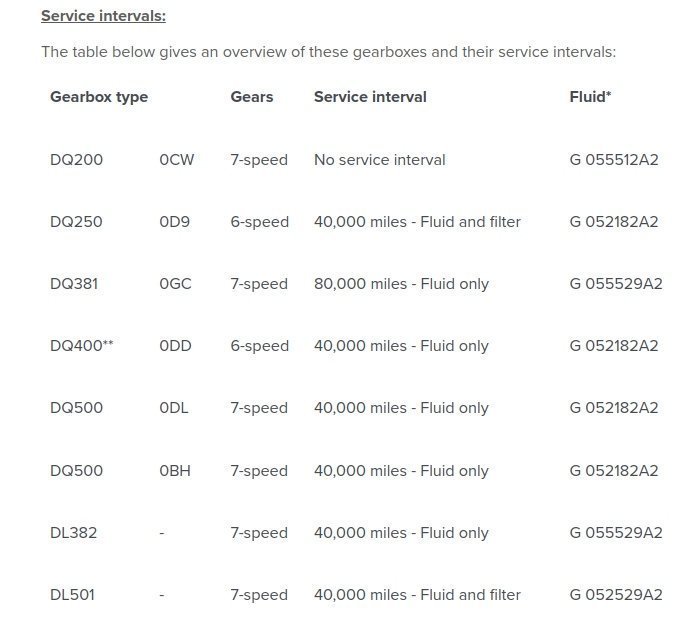
2 pointsThe DSG does stay in a higher gear than some might stay in with a manual, but then the gearing is 7 gears and nobody is driving a 1.0 TSI or even a 1.5 TSI with a 7 speed manual. 1st gear is a lower and changing up sooner / at a lower RPM than you might with a manual. The Engineers do know what they are doing as they have had since 2008 to gain experience with them and then by 2018 know what they need from them and the engines for the WLTP certification. so a decade and now 6 years further on. (We will maybe gloss over the World Wide Recall in 2012 that exclude Europe (2009-2012 DSG,s), then the Service Campaign 34F7 2014, then again 34H5 in 2017 (2013-2015 DSG,s) , then the TPI,s 2015-2018 (software updates and upgraded clutches) , and the issues with 1.5 TSI ACT,s including with a DSG 2018 from the WLTP, software updates.) Long and short is if they are not as good or reliable as they might be by 2024 then that is how VW Group roll. The Mild Hybrids have what is called the DQ200-e which is just the same really but with the battery assistance involved with moving. Other World Regions where the WLTP cheater testing / results do not matter just having a good car you can get a 1.4 TSI non ACT and an 8 Speed Automatic. A great drivetrain.
 2 points
 -
2 points👋 And I wouldn't be without them. Different strokes etc etc2 points
-
1 pointIndeed. The giant company Air Products behind it. Thought they might be in to producing hydrogen by using excess wind energy maybe rather than extracting hydrogen from ammonia.1 point
-
1 pointWhat J.R is getting at is if there is a sensor reading 10 degrees lower than it should be, the control module won’t know this is a bad reading and may output air significantly hotter than it needs to, to compensate for this. To self diagnose these issues you need a complete set of data for the car, all the temperature sensors, flap positions etc. maybe some cheap thermometers for comparison.1 point
-
1 point
-
Yes, the best way for the lowest reading unless the car has been standing in direct sunlight. On recirc the temperature will continue dropping until either the AC can no longer overcome the radiant heat gain or the evaporator temp drops below IIRC minus 4°c. A couple of minutes should be enough to get a sensible reading, garages dont waste much time waiting.1 point
-
1 pointThe owner/pilot of a Spitfire was putting on their own show over the airfield. Fantastic to watch from the free car park 👍1 point
-
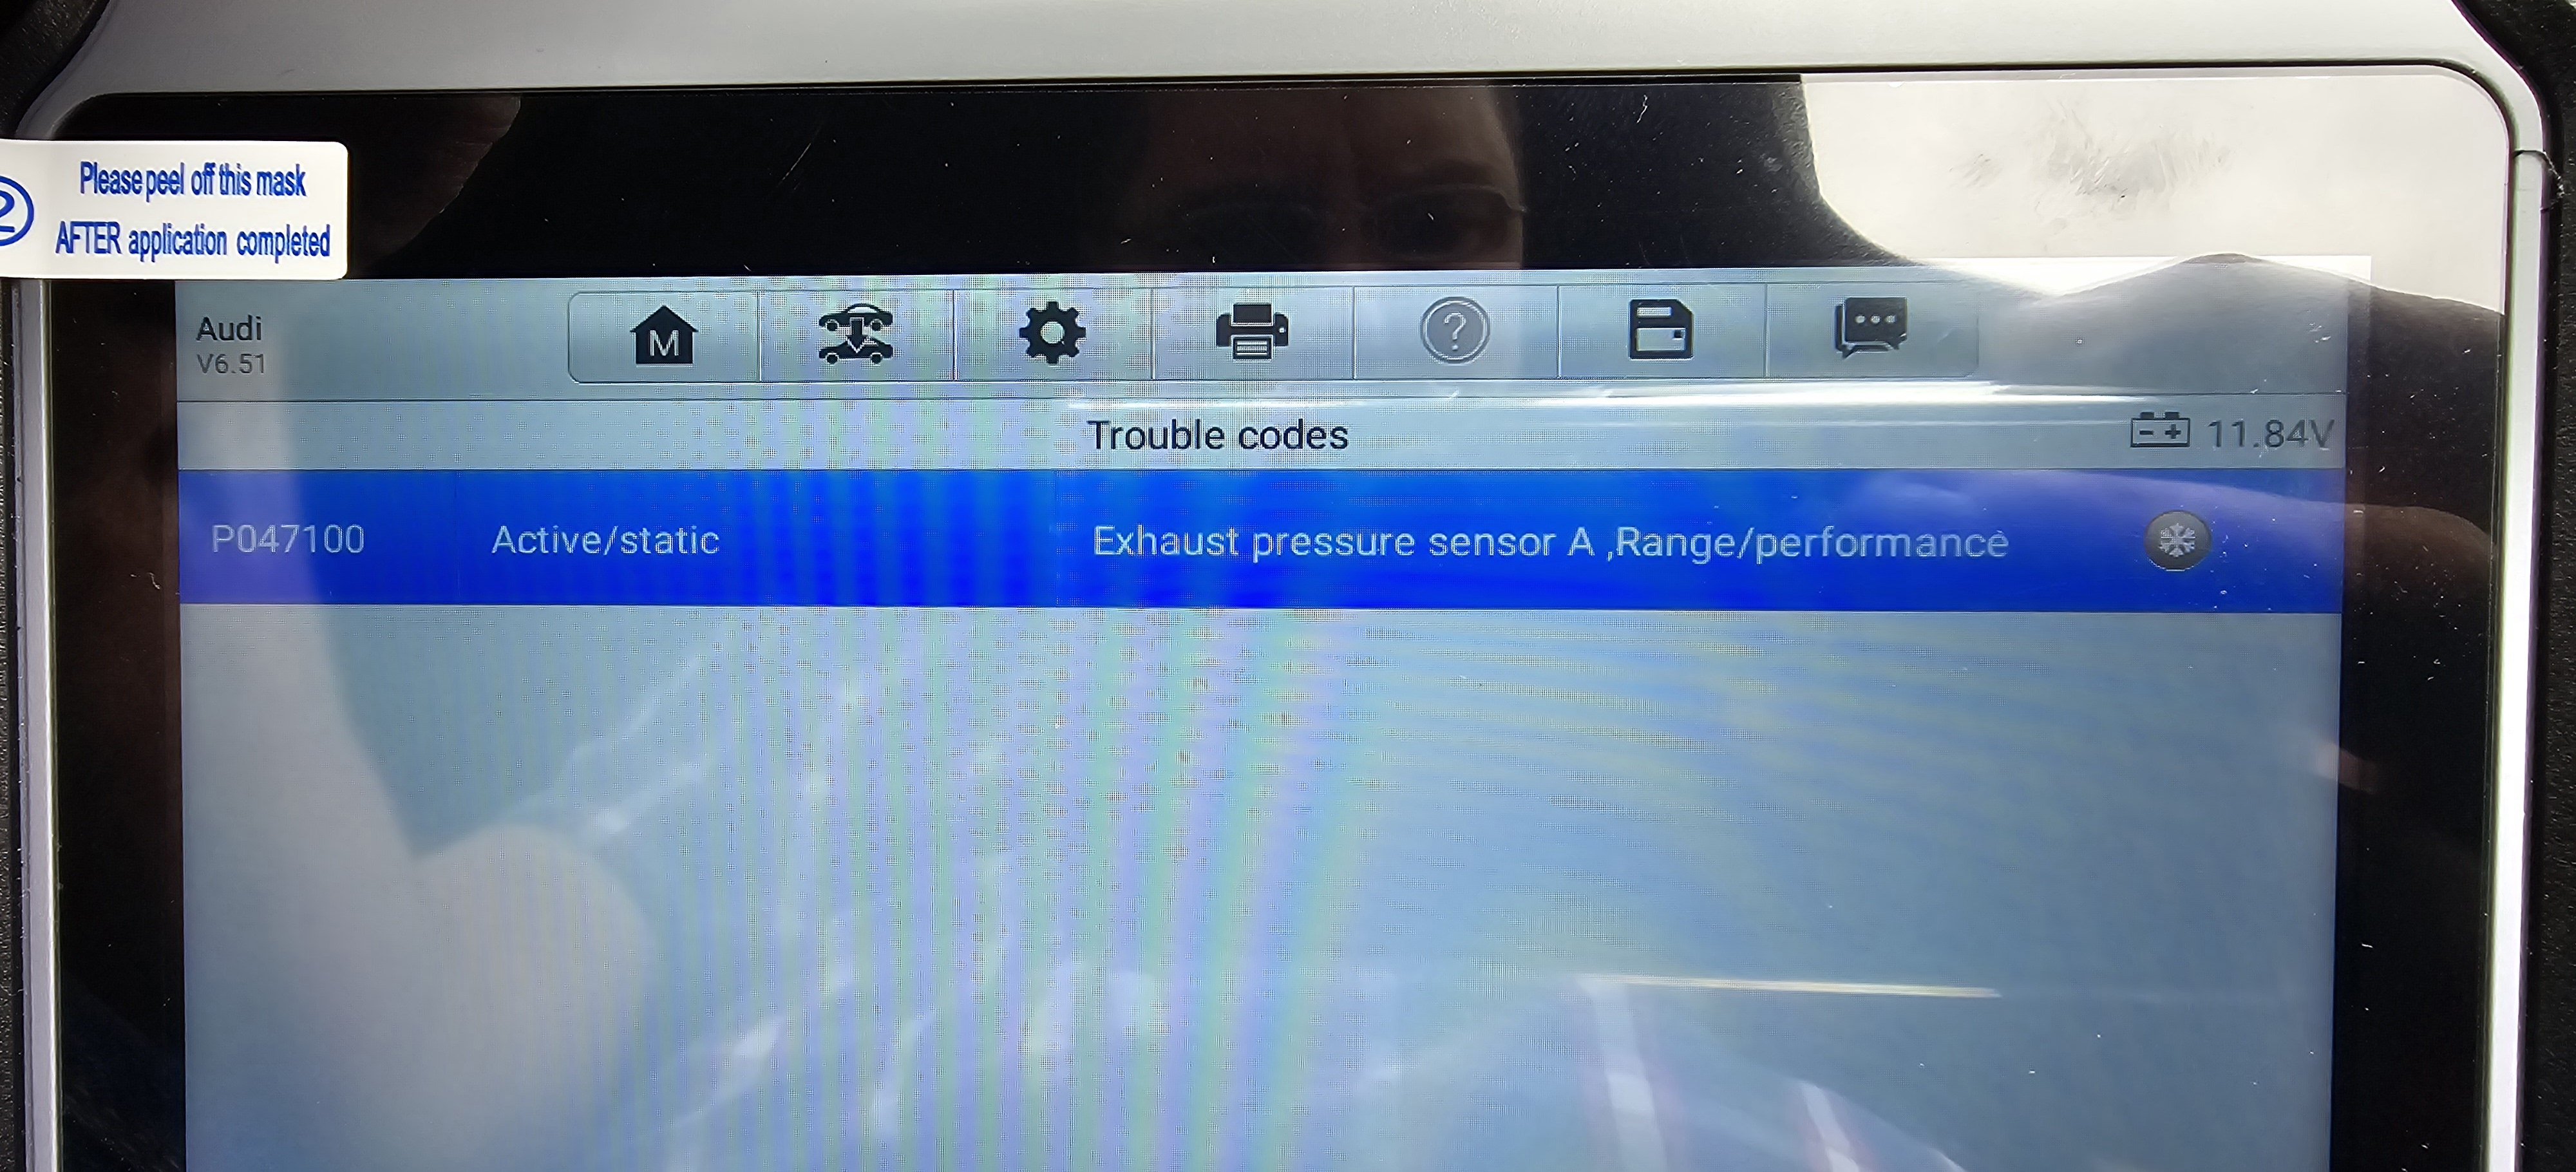
1 pointHi, My Autel maxicom generates this code and so does my Bluetooth obd dongle using the torque diagnostic app on my phone. Both say P0471 exhaust pressure sensor. Might have to book the car in with a dealer as i've ran out of ideas what to look into next.
 1 point
 -
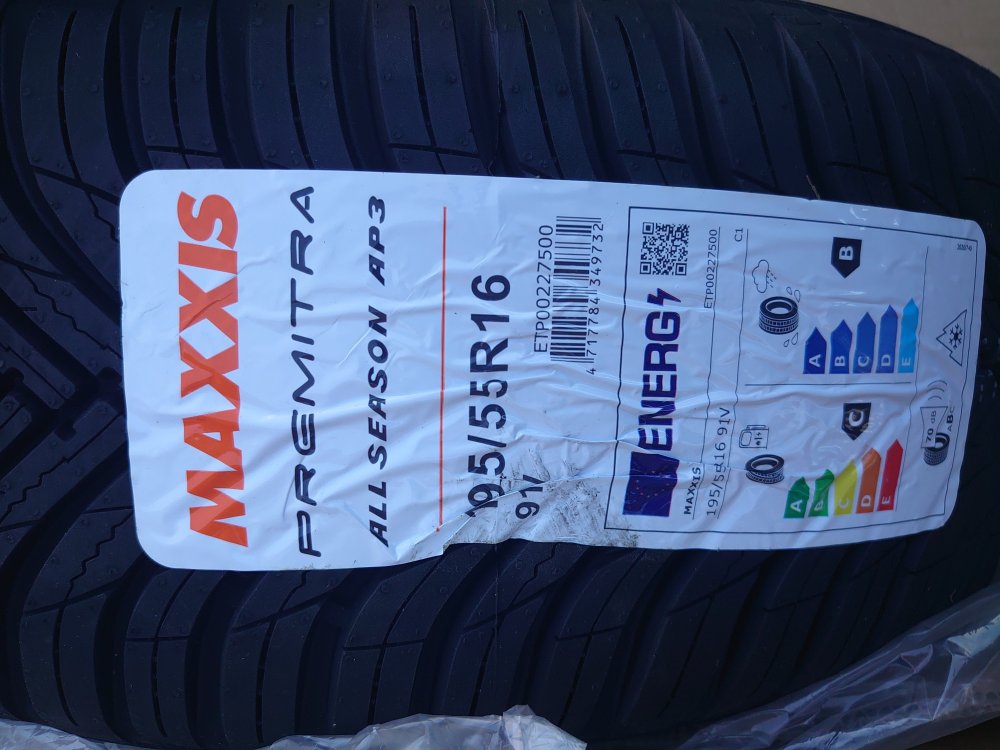
1 pointThey are hardly aggressive, just really rather effective as All Season tyres and even work well on wet roads & not a hit on the fuel economy. These are aggressive yet quiet and not causing less efficiency.

 1 point
 -
Dont be tempted, I started out that way before investing in the correct kit at considerable expense (manifold gauge set, vacuum pump, R134a cylinder, weight scale) and am still learning 4 years later and still have a lot more to spend. Most of the supposed R134a disposable canisters are in fact "R134a Substitute" if you look carefully and are no more than butane gas, definitely not something to be added to your existing refrigerant and even if it were the right stuff (but how would you know?) you have no way of knowing if you have the correct weight of refrigerant in the system. With my kit I used to judge the correct amount by the high and low side gauge readings corrected for temperature and humidity but it is in no way good enough, I risked having significantly too much or too little refrigerant in the system both of which have bad consequences. Contrary to what I have written in the past the only correct way to refill is a complete system evacuation and refill by weight, the stages and the reasons why are explained below. Test system pressure, if none then proceed to vacuum test and then hold full vacuum for an hour to remove any water vapour which may have got in. If system does not hold vacuum with pump off and valve closed then abandon procedure or go to Nitrogen pressure test and use a spray foam leak detector to find leak. If the system has pressure then remove the refrigerant gas using a transfer pump and transfer cylinder. Then pressure test with Nitrogen to full high side system pressure, a vacuum test will not necessarily reveal pressure leaks and is at minus 1 bar, the nitrogen test will be at 18 bar positive, 26 bar on my home AC system. If pressure test OK (valve closed and no pressure drop over 20 minutes) then pull vacuum again and proceed to gas recharge. Connect R134a cylinder to manifold set and then purge connection pipe of air. Cylinder must be on weigh scale that has no cut out timer (so cheap ones are no good) and set to zero Tare. Open valve and commence charging with cylinder upright, inverted filling risks fluid locking the AC pump (dont ask me how I know 😒) Release valve and allow one third of the charge weight (probably 525g whole charge) to enter the system, initially it will flow quickly due to the vacuum. Start engine and observe high and low side gauges when compressor cuts in. Cease charging when the cylinder has discharged the correct weight. Check high and low side pressures against chart corrected for temperature and humidity. Check temperature of cold air from face vents on maximum cooling.1 point
-
I'd recommend getting it done professionally, least that way if you have a leak you won't be wasting your money on gas.1 point
-
1 point
-
I've always been happy with "A for Audi", who charge about half Henry's labour rate.1 point
-
I’m in Glasgow. Servicing has always been done by Henrys Skoda but I’m inclined to use an independent garage for this repair instead.1 point
-
Yes if using a dealer level tool like VCDS, it may require more than scanning fault codes and using live data or output tests to highlight the anomalous sensor. Very cheap to DIY, less than €2 including delivery from China, paying a garage? the sky is the limit, someone reported recently a garage wanting £1800 to replace a cambelt on a standard TDi engine, the world has gone crazy!!1 point
-
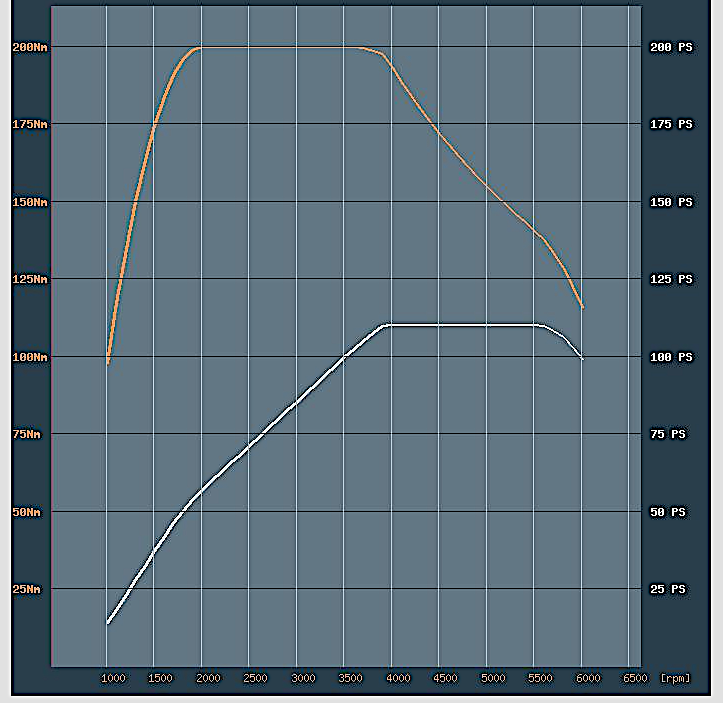
1 pointThis 2017 .pdf file provides Fabia gear-ratio data - and I'm guessing that current Fabias have similar ratios. https://cdn.skoda-storyboard.com/2016/05/FABIA-en.pdf The power/torque curves for the 1.0TSI motor are shown below It should be apparent from the graphs that (unlike the non-turbo 1.0MPI motor) there is a large chunk of torque at 1000rpm, rapidly increasing to peak at 2000rpm. Regarding JFrankMiller's comment about his car's DSG gearbox changing down lethargically from 7th to 6th when the car was slowed from 50mph to 40mph on a motorway, I'm a mite surprised that the transmission did not remain in 7th at a steady 40mph speed, with a downwards shift only taking place if the driver pressed the accelerator pedal.
 1 point
 -
1 point@nta16 Sorry no, but there was a thread here with them a while back and also in the Mk2 sections. The DSG mapping (DQ200,s) is different for the different power outputs. Just with the Mk3 Fabia there was the 1.4 TDI or 1.2 TSI,s or TDI,s. There was the limited edition R5 with a 1.4 TSI 125 ps, and now the 1.5 TSI ACT. EDIT. From a google.


 1 point
 -
1 pointIn Serbia, official service time, under warranty, for all Skodas is 15k km or one year. I think that is better for engine than 30k km or two years.1 point
-
1 point2003 was a very different 6 speed DSG in an Audi TT though. Saying that, 21 years on the DQ381 7 speed wet Cluch that would now be fitted are having their own whole horror show reliability. PS. There are MY24 & MY25 Skoda models with DSG,s that do not show which gear you are in unless you go into Sport or Manual.1 point
-
Hello Breezy Pete, thanks for your swift reply, I will contact them, best wishes.1 point
-
I'd suggest having the oil level sensor replaced as a first choice. Is the warning you get the yellow/amber indicator?1 point
-
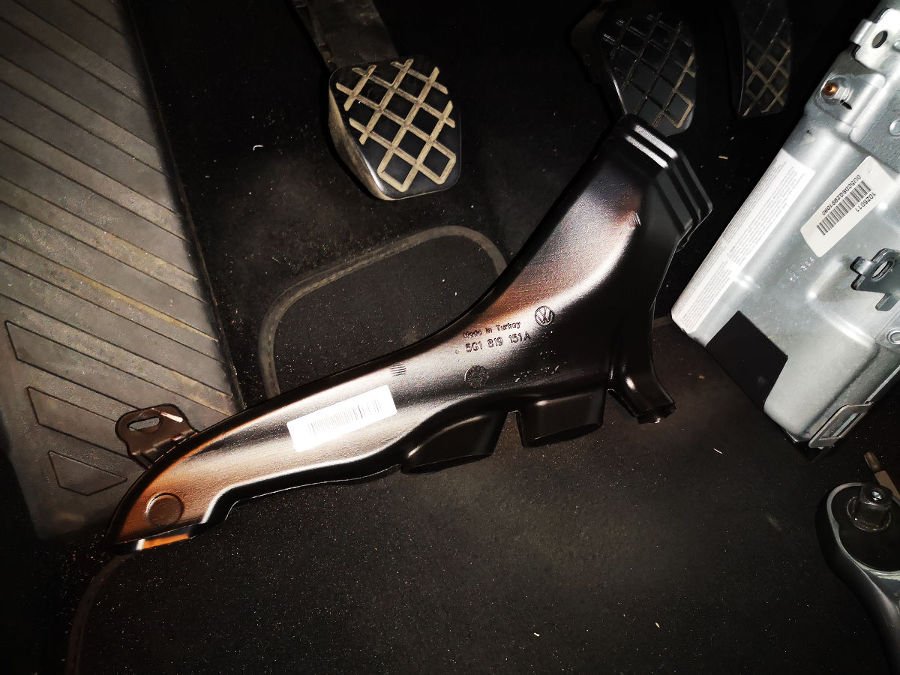
1 pointProbably what the factory robot uses to fit and align the pedal assembly1 point
-
1 point
-
1 pointIt does absolutely nothing. Part 21 is a type of female sex bolt that sits deep in a hole on part 1. The nylon bush just covers it up. It isn’t threaded internally but the external groves help hold it in place. It’s little more than a fancy grommet. just an example of over engineering I think.1 point
-
1 pointI knew that I recognised it !!!!!!!!!!!!!!!!!!! Thinking hard I (wrongly) surmised that it must have been the part numbered 9 that retains the ball ended plastic master cylinder pushrod, now I recall that the first time I removed the whole pedal assembly including the bracket which was not needed. I reckon I found the part after that and its in the storage cubby amongst other random unidentified parts which regularly reveal themselves. What does it actually do, I cant tell from the diagram or photo, is it a retainer for the threaded top hat insert?1 point
-
I've just done this on my 2015 and it worked on mine, changed the value from 15 to 14 and rebooted unit (long press on power button). Used my old OBDeleven dongle, into multimedia control unit, into adaptations and typed TMC in search bar to find setting. I bought OBDelven dongle years ago so quite an old unit but found setting - not sure why taff_b can't find it. Guessing his OBDeleven app on phone/tablet was up to date???1 point
-
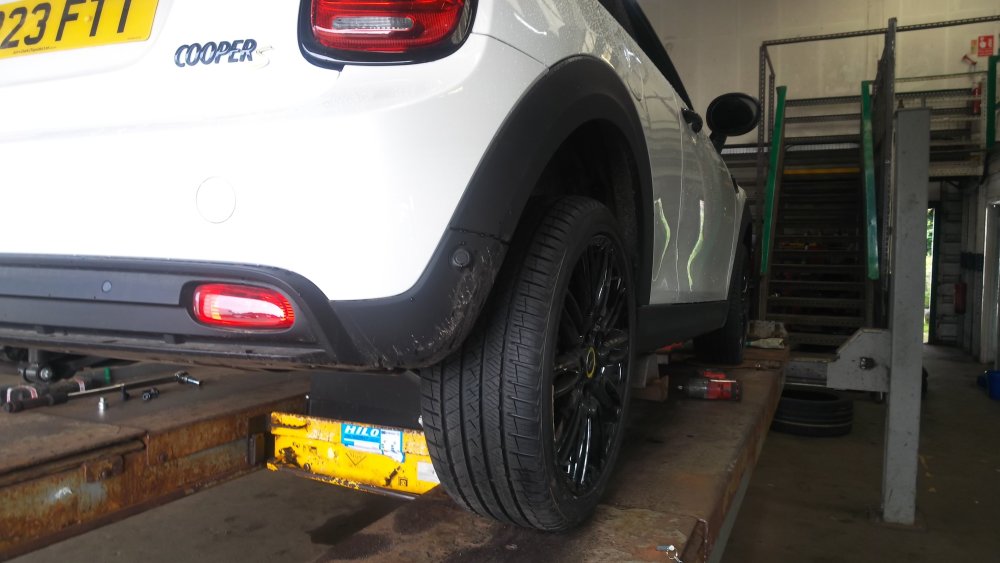
1 pointOk so I’ve now swapped in the 215/40 18 Goodyear eagle F1 sport so all tyres match size again. Body control has returned. No rebound. I even put the dampers in sport mode and chucked it quickly around some tight B roads. Full confidence at limits again. While it’s no sports car it grips and holds a corner better than an economy compact car really should… and not as far off my partner’s Mk7.5 GTI as you might think. lesson to self and anyone reading this… never have different diameter tyres, even if slightly so and even if the axles match. I just dusted $800 replacing the 215/45 front set which had been on for less than two weeks. A pricey lesson. happy driving!1 point
-
1 point
-
MHI2_ER_SKG13_P4526 (1440) - I sent you download link on PM1 point
-
1 pointHi thanks for the reply. I think that I may have only used the horn a couple of times before this happened. strangely, it happened yesterday, but this time it didn’t give any dash warning lights. Also Carista didn’t show any fault. This time I was at traffic lights and it took nearly 5 mins before the engine eventually started. i am due a service and mot in the next month so I’ll get the garage to have a look as they have VCDS.1 point
-
Jane and her late husband were offering various cars for our club's Sporting Bears Dream Rides from before we joined the club in 1997. Her husband, along with the Honda NSX Mk2, often favoured small cars like the three wheeled Grinnall Scorpion and they had a grey import Daihatsu Copen before my wife got her very early official UK car. First 500 got Momo steering wheel and heated leather seats, 659cc triple turbo. As mentioned that engine is in the tilt Carver which was taken to NEC SBDRs a few times, and the Vanwall and Jane driving the Jag 220 all around the highways and streets outside the NEC complex, the 220 was always popular. Jane must have finally sold the lime green Lambo Miura that Twiggy once owned. Obviously not all cars were shown or mentioned, some very interesting ones to those that don't have to drool over popular mass appeal favourites. I also liked the vids from our Club Patron Mike Brewer, yes he has put on a lot of weight over the years but no as far as I've ever noticed he's never had a wig. Ant wasn't too bad in the end but a bit of a peacock when he first started on the Discovery stage, probably didn't help when I asked him were Ed was, Ant really made sure he made my knuckles ache with a very over-firm handshake as I asked, muscles not just for show. 😆1 point
-
Could possibly be two things together or separately, something is draining your battery and/or your battery though showing as fully charged is not really fully charged and the charge is only as full as it can get but not fully charged. If a plate(s) are still sulphated or perhaps buckled then that will reduce what the battery is capable of. Did you remove the plugs to each of the 6 cells to check the electrolyte "water" levels on each cell and top up as required before charging the battery, did you also check to see if each cell looked buckled or sulphated or just take what a battery charger or tester told you. Did you take a voltage reading with your multimeter directly on the battery terminals on the battery out of the car or when fitted to the car 24-48 hours after chagrining the battery. What were the voltage readings immediately after stopping the battery charging and again 24-48 hours later. Just starting the car to move it and back again, to cut the grass, does the battery, the engine and the car no favours at all.1 point
-
1 pointThey are for interior lamps. I Swapped mine from standard to LED & found them to be a lot brighter. PS going from the photo It's doubtful they would fit ( too long ).1 point
-
1 pointYes, so is the manual, this all goes back to the earliest days of Blue Motion? start/stop when VW had it as 'look at us we 'care' about fuel economy' (I won't mention emissions of course 😄). As long as the engine makes it passed the longest warranty available that's all that really matter to them, hence them also not pushing more frequent engine oil and filter (and air filter) changes for vehicles under what used to be termed "serve" conditions (I think, might be wrong, other manufacturer(s) might mention these but not VWŠkoda that I've seen). I am of course biased as I've never liked VWs (Mk1 Golf being the exception),1 point
-
1 pointI have barely any recollection, it may have been a pull ring handle in front of and to the right of the handbrake. Whilst my current vehicle has AC it is poverty spec without Climatronic, it may have the glovebox cooling system, it's not something I would use but did not have the Big Box armrest so I cannot look for you, hopefully someone else will advise. I believe that the ducting is in place even if the optional equipment is not fitted, it runs in exactly the place you describe the cold air coming from so I reckon the end has not been plugged.1 point
-
1 point
-
These? Mixture - water/coolant concentrate! Observe concentration ratios according to repair manual and climatic conditions. • The frost resistance of the coolant must be guaranteed down to -25°C, • in countries with arctic climate conditions -35°C1 point
-
The 350 will if it's still live. On the tablet so can't check. Any of the files with 350 on them whatever the brand for Europe, they are all interchangeable between brands. All the same file.1 point
-
1 pointUpdate on my water woes. I support technical forums, so I know that things you try might help others, so here's what I did. Unclipped the drivers side, outside windscreen strip - it came away easily. Cleared out the channel beside the screen and wiped it with meths. Cleaned around a hole which was at the bottom of the windscreen corner. This is where I suspect the water is getting in as when it was raining, I placed a towel on the floor and watched. I was tempted to go for Puraflex from Toolstation, but last time I tried to buy something, they wanted my blood group and NI number - well almost - so I went to Halfords and got some black windscreen sealant. Applied same to the windscreen edge and plugged the hole. Refitted the strip. Left to set overnight. Put towels on the carpets - which I can't find a way to remove as they are molded in somehow - and left it. Following day, no wet on the towels from above, even though we had rain. Drivers side rear floor still damp, but from underneath. So, there had to be water sitting in the floor pan and wicking into the towels. How to get at the floor pan? Well, there is an ECU cover under the drivers seat which you can pull off. The ECU is raised enough for you to get a thin tube between the edge and the bottom of the pan. This is where it gets fun Using a small syringe from and unused catheter (not mine, a friends) and a length of thin pipe, I was able to get a lot of water out. I have left well enough alone and may be disappointed, but at the moment, I am hopeful. What would be nice is an easily removable plug which you could get at without removing the under car trim, where you could drain any liquid off.1 point
-
1 pointWhich description makes me think of the already mentioned "YingTong Ditchfinder" or its relative the "Woosung Dark Horse". A mate of mine bought a Vauxhall Omega 3.0 (close relative of a Holden Commodore) with one Woosung on a rear corner. The first time he needed out of a tight turn with the tyre on the inside he accelerated and it it broke traction. Said tyre was ever after known as the "Woosung Dark Spin".1 point
-
I have copy but have reached my data limit on here so cannot share on the platform. DM me your personal email address and I'll share. I'm not sure if you've read through all the comments on here but United232 disappeared after some time. That makes it difficult to know how successful his treatment was long term. Others have tried it with varying degrees of success, myself included. In a nutshell 232's approach is to remove the fly catcher/windbreaker net (call it what you will) from the sunroof and appear a low viscosity sealant to the gaps in the structure of the frame. It's incredibly difficult to work with, has the potential to drip through and stain your seats and people are generally over-eager to apply more than is required. 232's report also fails to address the possibility for multiple ingress points. Whilst I followed 232's suggestions, I did not have real joy in eliminating water ingress. Water can make its way past the main roof seal and bypass the a-pillar drains regardless of using the 'miracle' sealant. I suspect these are real points of ingress and you should inspect the adhesive between your car body and the main seal. If it's compromised, it'll let water in for sure. Ultimately you need to know what you're dealing with (i.e. where your leak is coming from) before you can tackle solving it. That may mean gutting your interior. That's how I fixed mine. I found an addition leak path and have since prevented ingress. It's been leak free for months in all weathers. I still haven't replaced my headlining though and will monitor for as long as I feel necessary. 232's report is good for highlighting a few key hurdles in taking your car apart. It seems daunting but once you start, it just becomes a logical progression of taking more and more out. Very much like a jigsaw.1 point
-
1 point
-
Update: Orders from Monday the 8th of July will include the Webasto so then my car will finally be ordered. Expected delivery early October1 point
-
I just had a look at the Romanian configurator and there i cant seem to find the option for the Webasto but i can find the panoramic roof for 1224 euro for L&K 2.0 TSI1 point
-
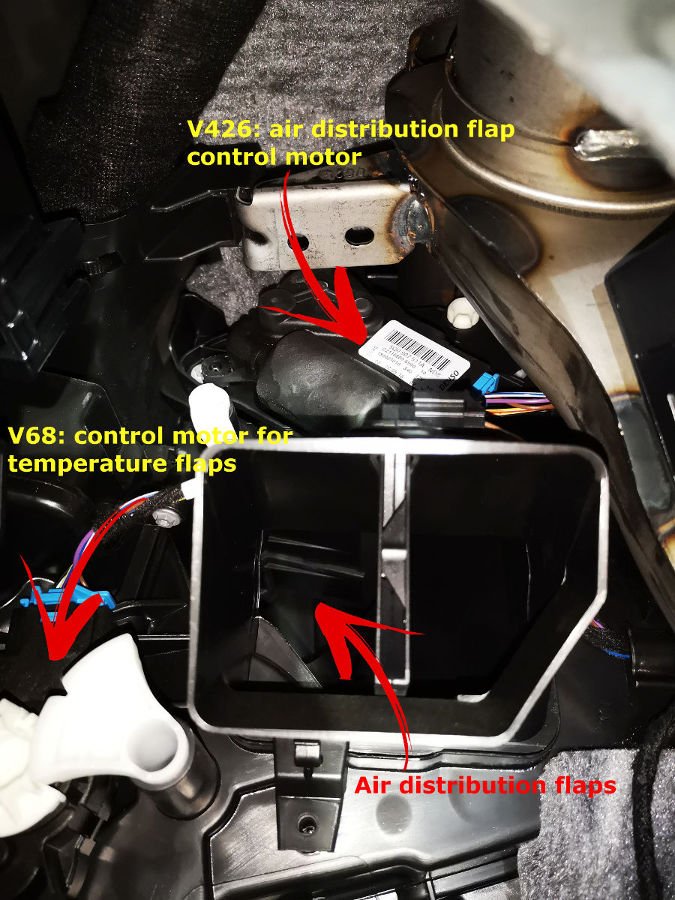
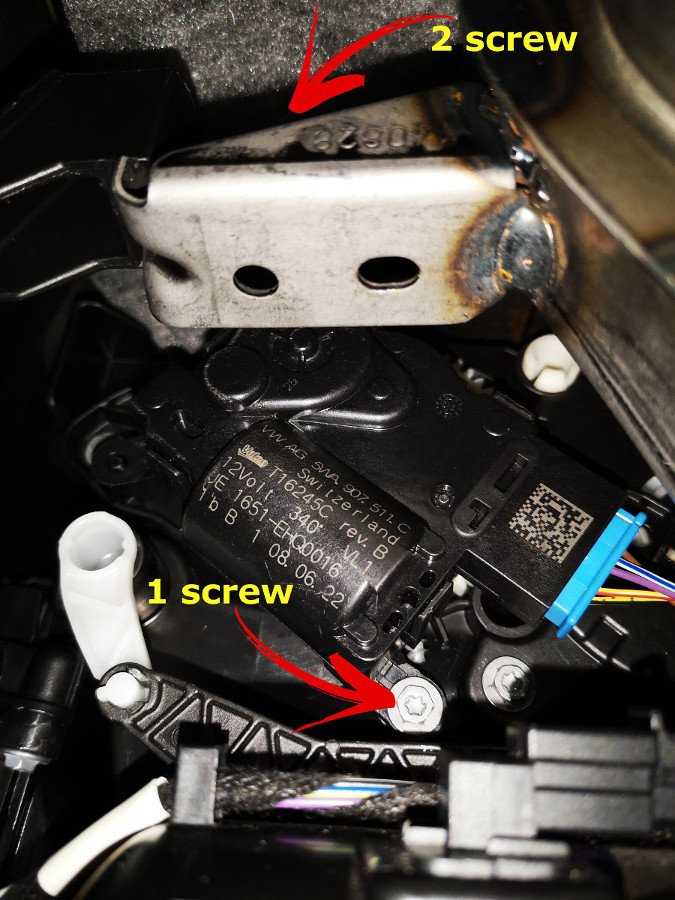
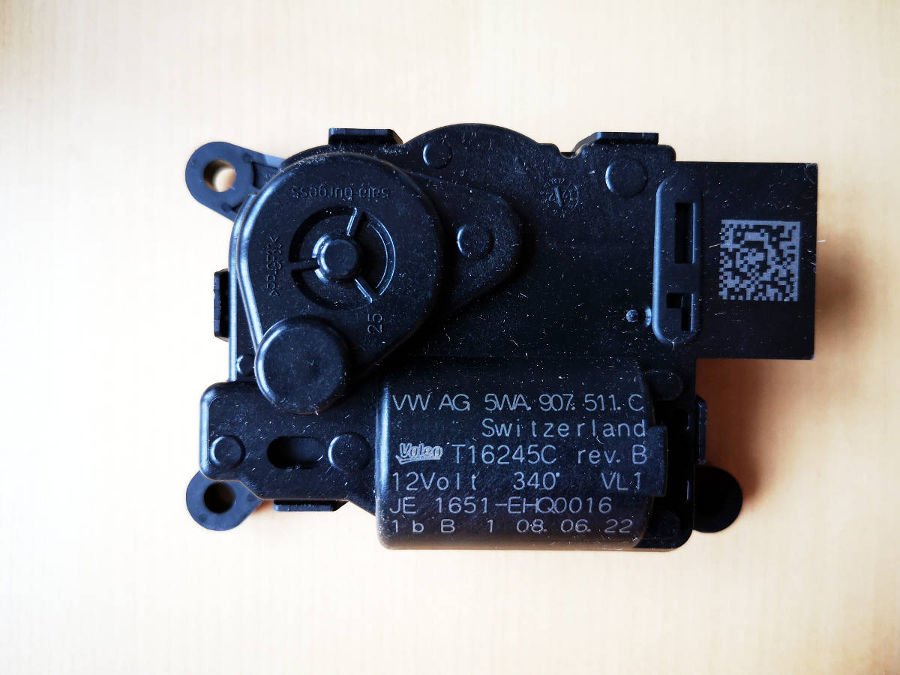
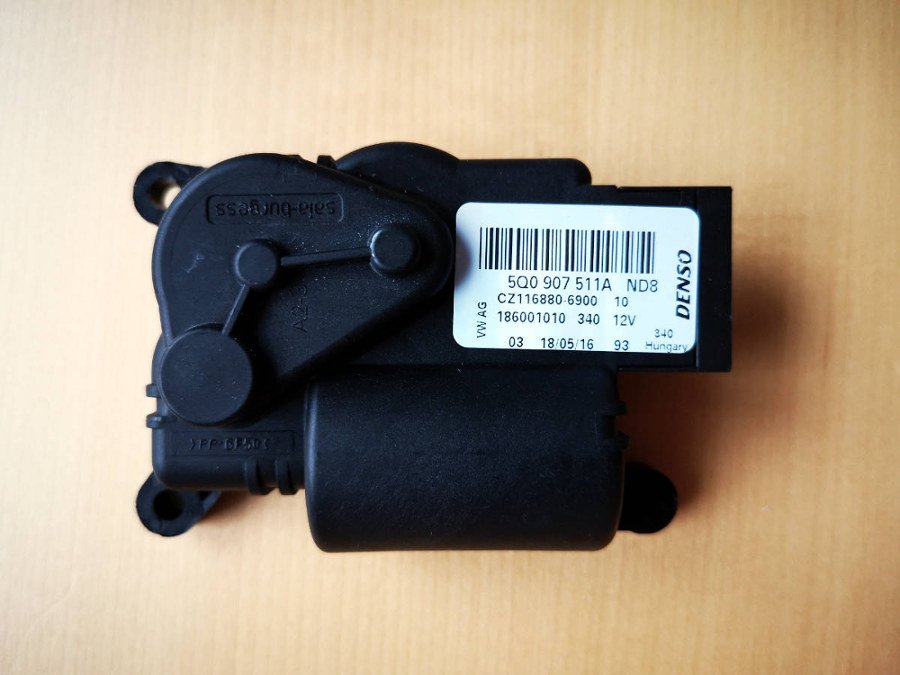
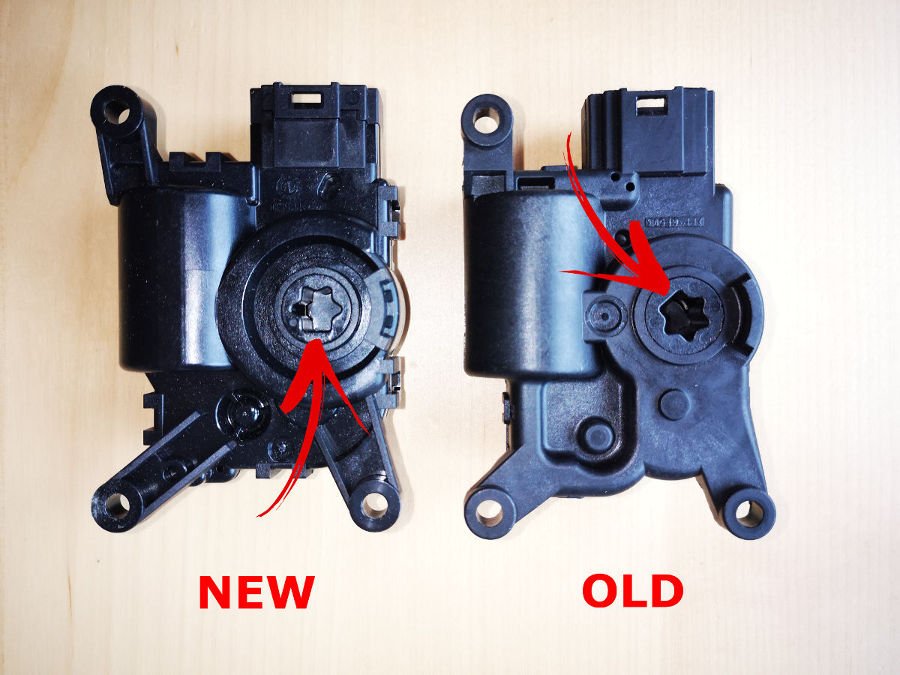
So I fixed the issue and I want to share how I did it 😁 I bought new part. Factory installed module V426 was number 5Q0907511A but part available in official distribution currently has new number 5WA907511C (note, that I write about part for Denso HVAC unit). Removing the dashboard is not required to replace V426/V428 module (in LHD vehicles) although the official service manual begins with this step. Access to this part is possible from the bottom - under steering column or as you prefer: above pedals. If you want to do that without removing the dashboard you should remove knee airbag (mounted on 3 torx screw) and next: remove left footwel vent (mounted on only one torx screw). You don't must unplug knee airbag, you just need to unscrew it and rest against on the center tunnel. When you remove this two parts, you get access to problematic servomotor. Be very careful when removing screws from V426, because when they fall, it will be very difficult to locate and remove them. With the screws removed, you remove the module from the climatronic mechanism axis, and then you need to unplug the plug - a small screwdriver may be useful, but there's not much space to work with both hands. In fact there is no space, so you have to work in a truly paralytic position. When you disconnect the plug, the module is ready to be removed. I have one advice for you: before you start unscrewing the module, restore power to the car and turn on the ignition. Next, turn on the ventilation and switch the airflow directions (face, feet, windshield) looking in front of the removed footwell vent, watch if the flaps inside the HVAC unit moves when you click the buttons on the air conditioning panel. In my case, the flaps were dead. Mounting new part - now the true play starts. Step one: connect the plug to new module but not try to mount it yet. Next: turn on ignition and try to choose combination of climatronic switches to set up new module in position which allows to to mounting its on axle of HVAC unit (in other words: you have to set the new motor in the same position as the old, disassembled module was in) When the axle and new part is synchronized, you mount servomotor on the place. Then you screw the motor with two screws: at the bottom and top. Installing the top mounting screw is dramatically difficult. Putting the top mounting screw is so heavy because there is no space at all to grab it with even two fingers. A moment of inattention and the screw drops, and its find is another challenge. When you screwed the motor with the two screws, turn on the ignition and check the flaps again during switching the airflow direction on the air conditioning panel. In my car the flaps came to life. You will also need to perform adaptation and read errors from the HVAC controller. The adaptation can be started on the air conditioning panel - turn on the airflow: to the windshield, to the legs and to the face vents, and then press "AC" + "front vents" buttons at the same time for 3 seconds. When its finish again check errors in HVAC module and clean them. If adaptation was finished correctly errors shouldn't back. During adaptation you can observing via left footwel vent that flaps are working right. At the end you mount again footwell vent and knee airbag and are you going for a test ride to testing that HVAC works right. If you unplugged battery you should also make test ride for few km's, next check and clear faults in all car modules. In authorized Skoda service center in Polad repair of this issue costs about 450 EUR (with dashboard and central tunnel removing). I repaired myself this fault for the price of about 70 EUR 🤭 However a lot of self-denial is required for made it. Good luck 😁 and sorry for my English...


 1 point


.thumb.png.26e4ef1cd991d7943ece4e7bf5baf72f.png)