Leaderboard
-
Graham Butcher
FREEDOM22Points6,642Posts -
Dean
Administrators10Points1,609Posts -
skomaz
FREEDOM6Points11,173Posts -

Tilt
FREEDOMLite6Points3,939Posts


Popular Content
Showing content with the highest reputation on 01/03/25 in all areas
-
2 pointsFarmers/ land owners will usually go for the best paid crop. If that crop is sunshine then they will go for some of that. With the UK increasing population over the last decade and a half, more than 10M I gather, we will probably need to learn from countries like the Netherlands who produce so much from little land using green houses, poly tunnels etc. Look as bad if not worse than solar perhaps.2 points
-
2 pointsFor me the key thing is to keep top grade farming land for farming and only site solar on land that is either unsuitable for farming or has yields that are so low it's unproductive. For me an example of getting it wrong is the proposed Lime Down solar park in Wiltshire which would be largely place on productive farming land. Lime Down Solar Park consultation Lime Down Solar Park2 points
-
2 pointsCarslton, Karhunik – many thanks. So very helpful. Order placed.2 points
-
It might I'd charge the battery at the very least2 points
-
2 pointsHello All, just joined as I am looking to order soon. I just had a test drive today, maybe one of the first in the UK? It was an 85 Edition with MAXX package and DCC, with Suite trim, coincidentally what I am looking to get. For those who ordered sight unseen I can reassure you that you won’t be disappointed! I absolutely loved it. Plenty of headroom, enough oomph for anyone, very comfortable ride, especially with DCC set to Comfort, and yet felt very nimble through corners. Excellent audio system too. I guess I just need to decide on a colour. Any thoughts on which looks best?2 points
-
Thanks for all the responses. Sent the car to my dealer for investigation. The battery was fine. The problem was traced to a faulty speed sensor on one of the wheels! Everything back to normal now.2 points
-
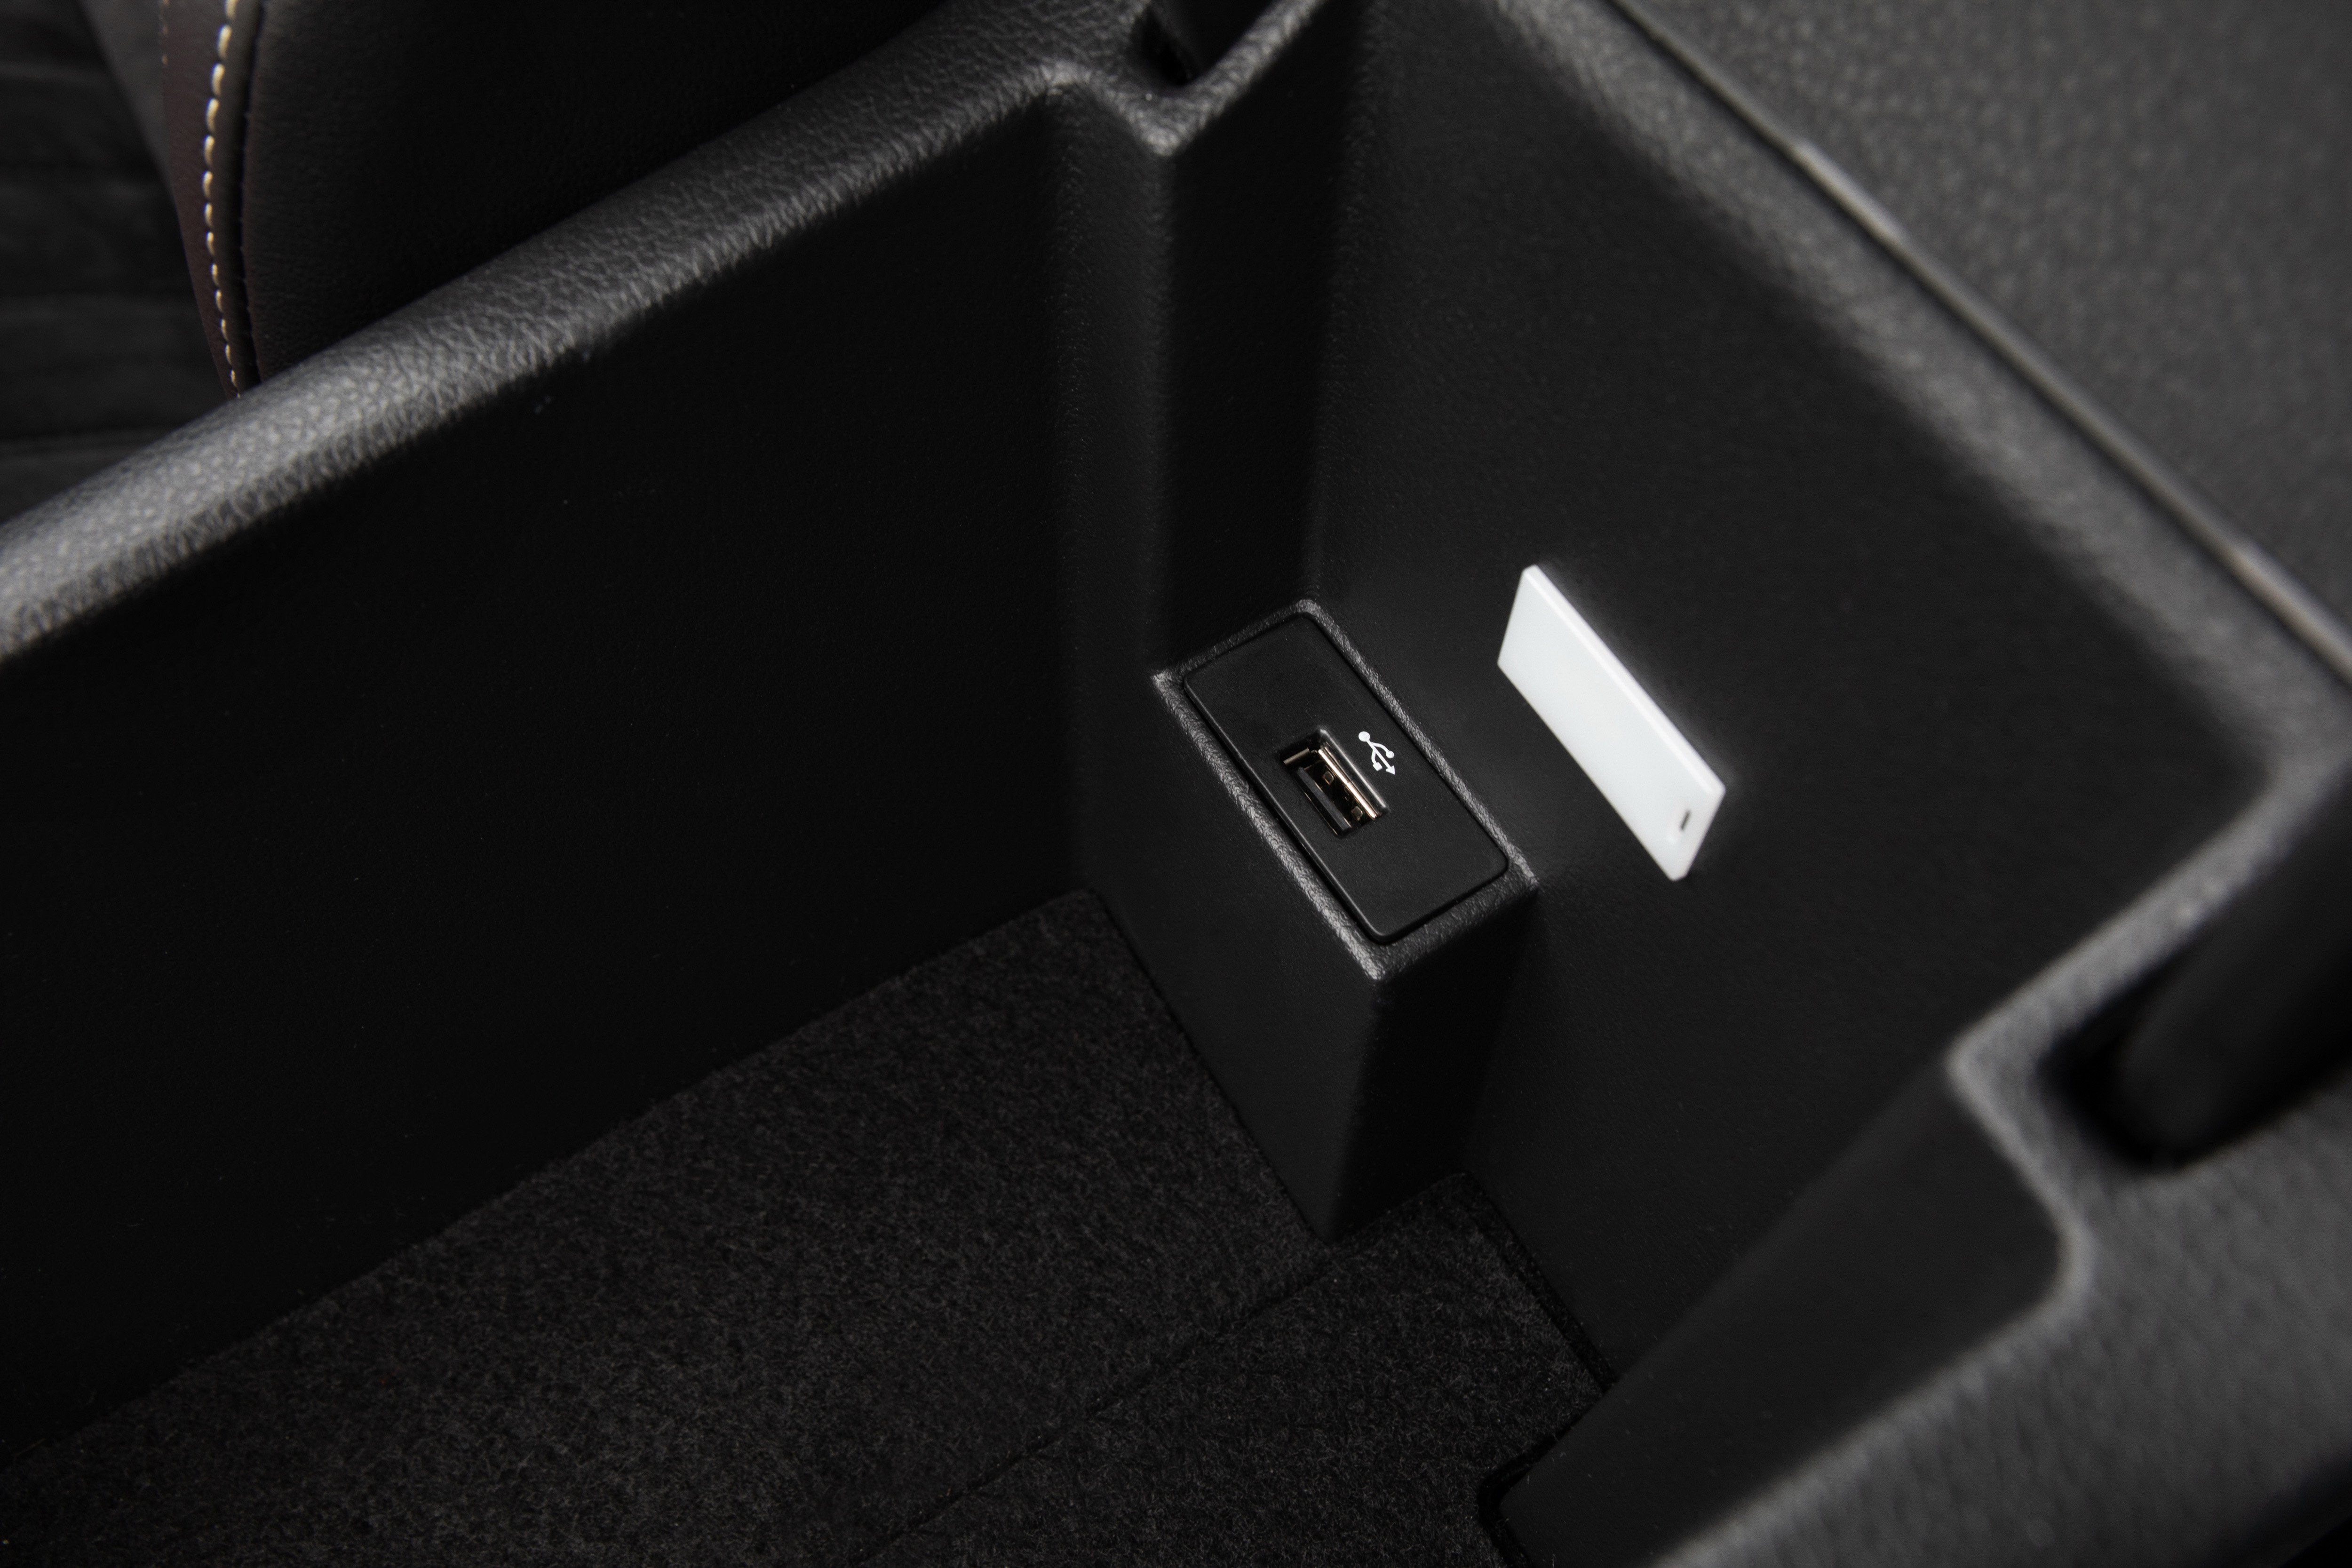
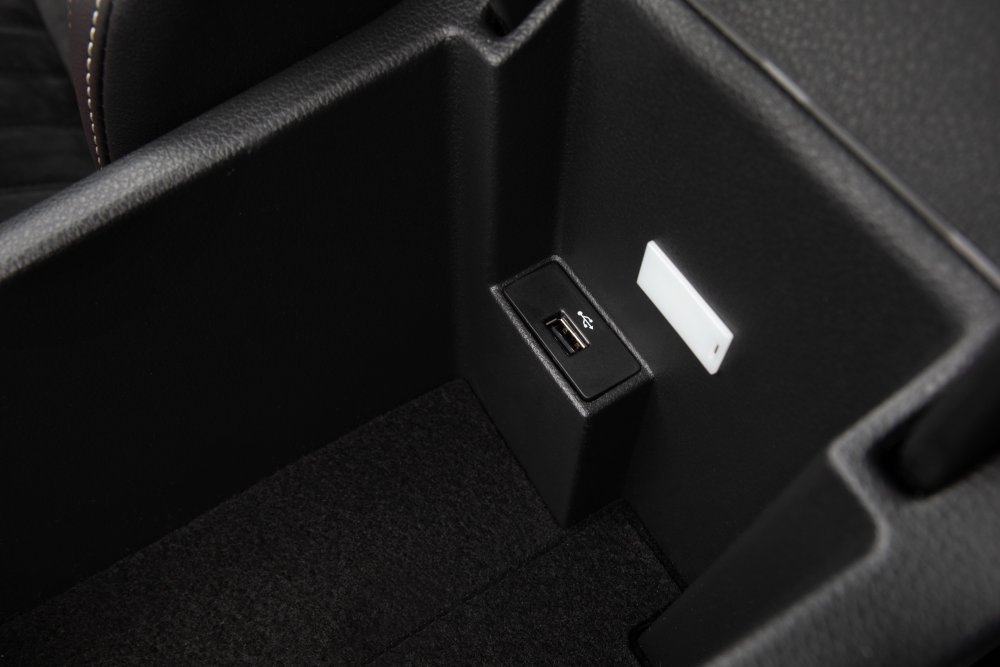
@SomeOfTheGear - it is possible to retrofit an additional USB data port in the storage under the armrest, however it's no easy task. it was available as a factory fit option in some markets, even on pre-facelift Superb. I contemplated doing, did all the research and figured all the bits and bobs needed - but i didn't end up doing it cause too much effort. Instead I went down the much easier route and got an AAWireless device (been flawless, no issues, and no lag), as well as converting my rear 12v port to a USB QC port. this way I can connect wirelessly and charge my phone if I need to. if u do want the actual additional USB port, then u will need a USB Hub, USB socket, and wiring. Part numbers:- 5G0035953C - USB HUB to 2 ports 3G0035643 - holder of the HUB 5G0035222E - MIB2 Carplay USB/AUX Port Audio Input with Socket Harness 8E0973754 - Connector for USB HUB The HUB itself is powered by a separate power supply, which u'll need to source/tap from somewhere. u'll need to remove the glovebox headunit so u can access behind it. u'll need to remove the centre console, plus centre arm storage area to fit the USB hub and additional socket. This is how it looks when fitted from factory... The wiring....... this is my setup in my Superb MY17. the AAWireless is connected to the existing USB port. Fits nicely as i can still close that lid. the 12v socket at the rear is now a dual quick charge USB ports. i've connected one wire to it and routed it in and up into the centre storage area. again, the rear compartment can b closed as the USB cable and socket are small/flat enough. the second QC port is free so the kids can charge their phone or tablet, if needed.

 2 points
 -
1 pointI think the reported wear is not very accurately measured. The slight mismatch is probably within the limit of error in the measurement. Wait till they are really worn and I think you'll get a more accurate result. Of note, the rear pads on the landcruisers I used to run always wore about 3 times more than the fronts. They were smaller pads by a long shot and simply didn't have enough meat on them to last as long as the fronts1 point
-
1 pointItsinteresting that they let you drive an 85 Edition with Maxx and DCC. DCC is in the Driver Pack which is only available on the Sportline in the UK. We ordered an 85 Edition with Maxx and Suite trim. If it comes with DCC and the 3 spoke steering wheel, there'll be no complaints from me, but I'll not hold my breath. We settled for Velvet Red metallic. An extra £400 I know but in the scheme of things it's less than 1% of the purchase price. There'll not be that many about which will make it easier to find in the Tesco carpark. We had a Karoq in Velvet Red and it looked stunning, or at least, I thought so 😃1 point
-
1 pointI revert to the original topic of this thread: the 1.5 TSi engine cutting out when the car is in motion, usually while changing gear or slowing down at a junction, and then refusing to re-start. The effect is total loss of power and a resulting situation that is often dangerous. If you are lucky, the car may still have enough momentum to bump-start it. If you are unlucky, you come to a standstill in the middle of a busy junction, repeatedly getting a dashboard message to use the start button, but finding that the engine repeatedly cuts out again immediately after it re-starts. To avoid repeating a fuller description of the problem, I refer to my post (above) of 11 January. I set out there, with reasons, why this is not about an operation of a correctly-functioning stop-start system. It is not about coasting mode (on those cars that have it). It is not about some difference between DSGs and manuals, as both have suffered from it. It is not about stalling. It is not about 95 versus 98 octane. It is not about driver error or driving style. When the engine cuts out, it cannot be re-started by dipping the clutch, or releasing the clutch, or touching the throttle. It is a fault in the engine management system allowing the revs to drop too low and then refusing to allow a re-start. I described my attempt to tackle this problem by 'Italian tune-up', as thamestrader aptly called it: that is, working the engine very hard for a while. It has been sixty days now since I first tried it, and I've repeated it a couple of times since. This is a report on what happened. Before the Italian tune-up, our 2023 Karoq Sportline was cutting out every day or two. Since then, in sixty days, it has cut out once while in Normal driving mode and zero times while in Sport mode. So for us, the problem has gone away, after being a serious and dangerous nuisance. I say 'for us' because I do not promise others will have the same results. A trial with a sample size of 1 is not science but anecdote. Correlation is not causation: I am not in a position to prove a causal connection, only to report on the correlation. As I now do: I did the Italian tune up, and subsequently, for whatever reason, the problem has almost completely gone away.1 point
-
1 pointHonestly Briskodians... Can we give it a rest with these petty arguments and reports. Play nice or I'll have no choice but to lock the topic.1 point
-
1 pointHi Guys...i had my Elroq test drive today ..i have posted a long review of it on my reddit group....i am newish to reddit so took me a while to sort it but for some reason i had to have another post just for the images. Spoiler alert : I loved it! Test drive : Photos :1 point
-
3Q0 -> 2Q0 camera retrofit with all SWaPs and TravelAssist with KLR now work As a bonus, I installed a frameless mirror
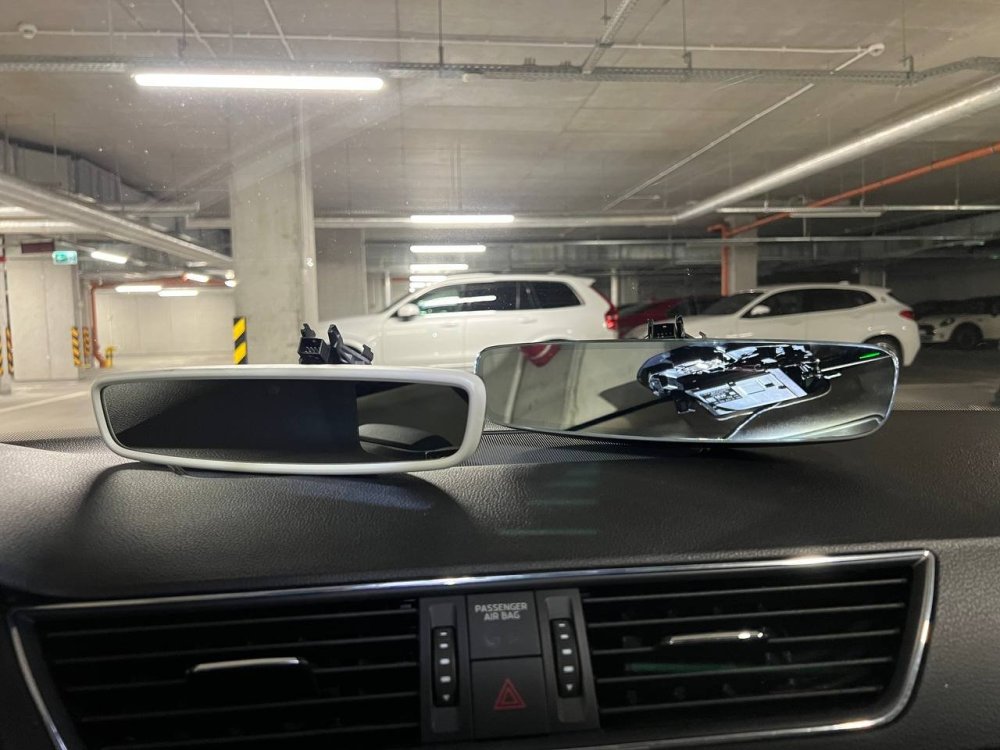
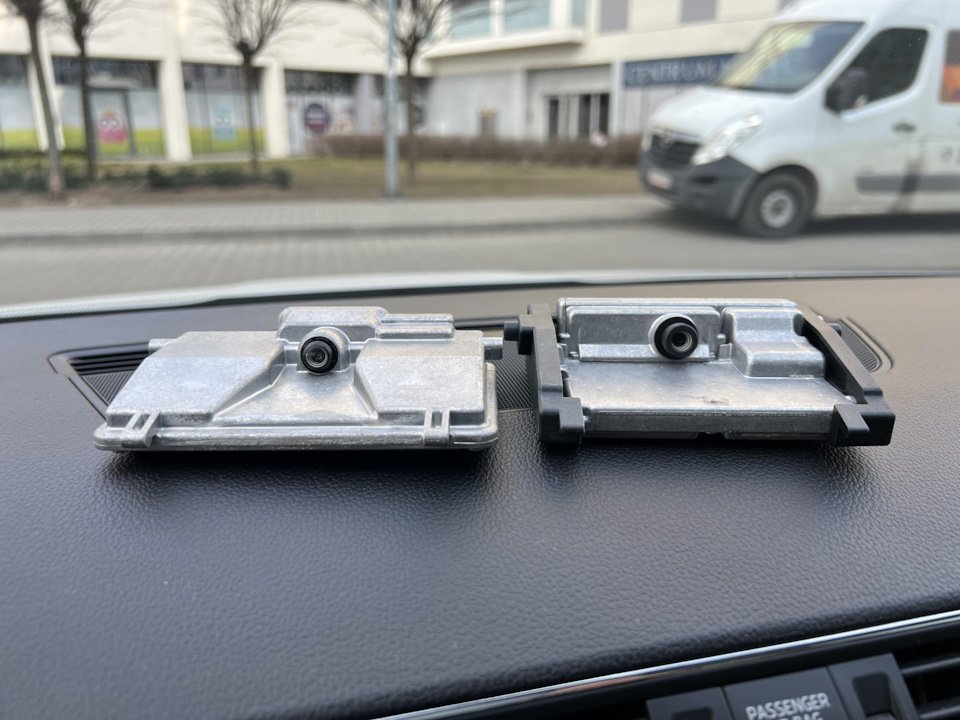 1 point
 -
1 pointI second that, all I can seem to find is a tuning company rather than a component, is that correct?1 point
-
1 pointAnd there is plenty of examples of solar farms springing up on good arable land that has traditionally been used for crops, of which there are plenty of such locations around my home city. Or as one Vlogger puts it, the pursuit of Net Zero trumps all sanity.1 point
-
1 pointwouldn’t be surprised if that’s what Škoda supply for the price they quote, even if they last a year and work well, it’s worth changing every year at that price, good find 👍🏻1 point
-
1 pointPerhaps if you had the honesty to actually quote me rather than paraphrase me you might get a more considered response?1 point
-
1 pointMy point was that most of the crops we need to survive by, need sunlight in order to mature and produce the desired harvest. They need sunlight for the right level of photosynthesis to take place to produce the crop and in the case of fruit ripen it. Hence why plants grow tall and leggy as mum used to say, when they can't see enough sunlight in order to reach a height to get the sunlight. Solar farms are arranged to maximise the amount of sunlight hitting the panels, thus limited amount for critical crops.1 point
-
@Dabber2024, from what you say about the dash display correctly showing door open/closed status I'd imagine there's nothing wrong with microswitch or its wiring. Rather, when you go to enter the car, the interior monitoring sensor is picking up your movements and triggering the alarm, assuming you have 'locked' the car and so set the alarm. Unfortunately, I don't expect VCDS lite will work on a mk2 Fabia built from March 2010 onwards. Can't remember exactly why not, but never heard of anyone trying and succeeding with a Fabia younger than this.1 point
-
I stopped using denim on leather years ago, especially as I have a knack for light interiors, most of my past and present rides are such.1 point
-
1 point@Graham Butcher everything is fine for something's and not others. A balance of stuff is required. Negative on everything is an issue that gets things no place fast.. nimbus. Those that can not see the wood for the trees and want to build houses in the trees after cutting g then down1 point
-
1 point2023 7-speed should be DQ381 (wet clutch) as far as I know, but could be DQ200 (7-speed dry clutch) according to wiki. Maybe not in Superb. Googling whether either of them have a filter is a yes. Unless there’s another 7-speed I’ve missed, it sounds as if Rainworth Skoda don’t know what they’re talking about. No great surprise when @numskull was told his camchained engine needed a cambelt change. Exactly the reason forums like this are goldmines of info. Like @Ootohere said; oil change is scheduled to be every 80k miles and the filter only changed every other (ie every 160k miles). To me that’s bonkers but they’ve obviously decided that’s all that’s needed as a compromise between lifetime and owner-maintenance costs. I have a DQ381 and I’ll likely do it every 40k and have the filter done every time. Personal choice but preventive maintenance pays dividends in my opinion.1 point
-
1 pointI went for the moon white as loved the contrast with black bits etc. Second choice would have been the race blue. My last 2 cars have been silver and grey so wanted something fresh.1 point
-
1 pointI think what Ootohere is saying is that with such high Mileage, if you re map it and up the power you will hasten it's death. In standard form it may have another 100K in it. Once you up the boost and fuel you may only see 10-20K before the donk, clutch or turbo bite the dust. Entirely up to you but you may end up spending alot of money on a car which is then dead in a few months. I'd just fix the things that anoy you for a minimum cost and run it out for a few more years in standard format.1 point
-
As with most things, preservation will keep it looking better for longer. Clearcoat can be put back yes. This is always applied when there is restoration work done by leather professionals so there are products out there. When you get jeans dye transfer (classic on light leather colours), it can usually be cleaned off quickly. If left, the dye eats through the clearcoat and into the colour layer. At that point, the clearcoat needs removing, the colour layer re-dyed and then clearcoat put back over. Some higher end vehicles use aniline or semi-aniline leather - this is much more like the real stuff and I think more porous. Volvo have used it, and I’ve seen a C5 RS6 with it but I don’t have much knowledge of it. Whether it’s real or PU, the layers are the same though. Geist restoration - go to 10:58 - this shows clearcoat. Sprayed on and then heat-treated to dry.1 point
-
1 point
-
That is the problem with so many of todays cars, software and with over the air updates, how many times do our computers throw their toys out the pram and it seems after each OS updates, there is something else that fails and needs patching to get back working again.1 point
-
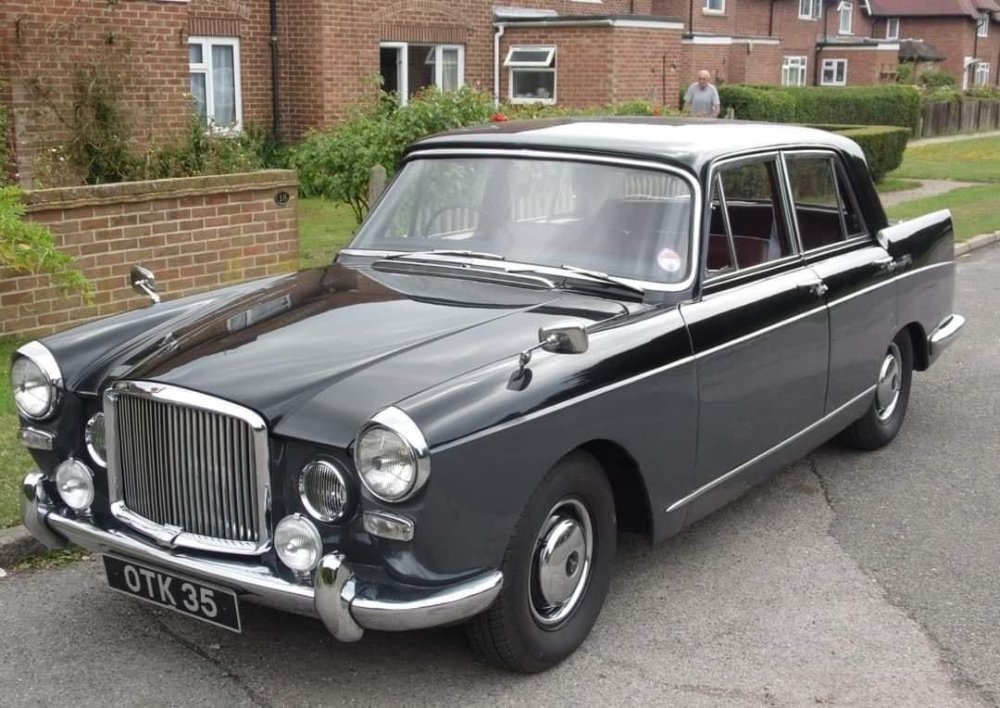
What nice anecdotes! Graham, Colin, it is a pleasure to read and let me mind wonder and wander about those things ... That Vanden Plas, looks magnificent! Years before I was born, my mom recalls my granpa had an Argentinian-built Siam DiTella, which I came to understand later on it was a licensed Riley, which looks very similar to the VP in the photo.... nice link on the facility. The Isetta was Italian stroke of genius ... great little car. Today fairly out of place. Incidentally, there is an electric car called Microlino which is very based on the Isetta. A friend that has an electric car showroom has a couple on display, and it feels really like a toy of a different age. Unfortunately, the quality is very very low. Already bits and pieces of the trim are broken and awaiting replacement, and today when I quipped "when do we go for a ride" he answered "when I get it to work, some software is failing" Oh well1 point
-
Hi there, ive just been searching for "skoda fabia part number nomenclature" I spent 3/4 years working in the engineering department at Bentley as the go to man for parts and tools etc, the naming structure (nomenclature) of the VW system was adopted when they took over the company just after I started. The link below will get you started. https://www.darksidedevelopments.co.uk/Blog/vw-part-numbers-explained/ There is also a full skoda parts list which you have to pay to access, you can run a parts list by VIN number apparently from this : http://www.partslink24.com/ I have just discovered (thank you @Breezy_Pete ) that the horn to fit my fabia was part 1K8951605B, which has been superseded by 1K0951605F. Which is interesting as the first three digits 1K8 indicate: 1K = Volkswagen Scirocco (2009 - 2014) 8 = Coupe from https://vagupdate.com/blog/vag-part-number-structure This has been superseded by the 1K0 1K = Still VW Scirocco 0 = Not specific to LHD or RHD models Things to consider here, and this comes from my years working within engineering at Bentley This is an alarm siren, it has no reason to be handed i would say. Also VW group will not allow engineers to create new part numbers on a whim, there is a strict part release process (3 stages in TEVON system? ) which ensures no new parts are designed when one exists already across the VW group. Its costs many thousands of pounds to revise a BOM, Drawing, Stock holding, part number etc, so they wont do it if possible. Providing the designation 1k as a VW Scirocco is correct from those other sites I am guessing that at design phase of the MK1 fabia the designers were given a packaging space within which they could use the VW Scirocco siren and told to get it fitted. Given there was no requirement to make a handed part (which in practice generally means a model specific part like a wing for example) they did exactly that upto at least Rev B on the MK2 possible later. Then along came the need to supersede the original part number to 1K0 which I am thinking means the part has been moved to another area of the BOM not specific to LHD or RHD models and will be used going forward as the standard VW alarm siren until the physical shape or function is forced to change by outside design factors. good luck Dabber1 point
-
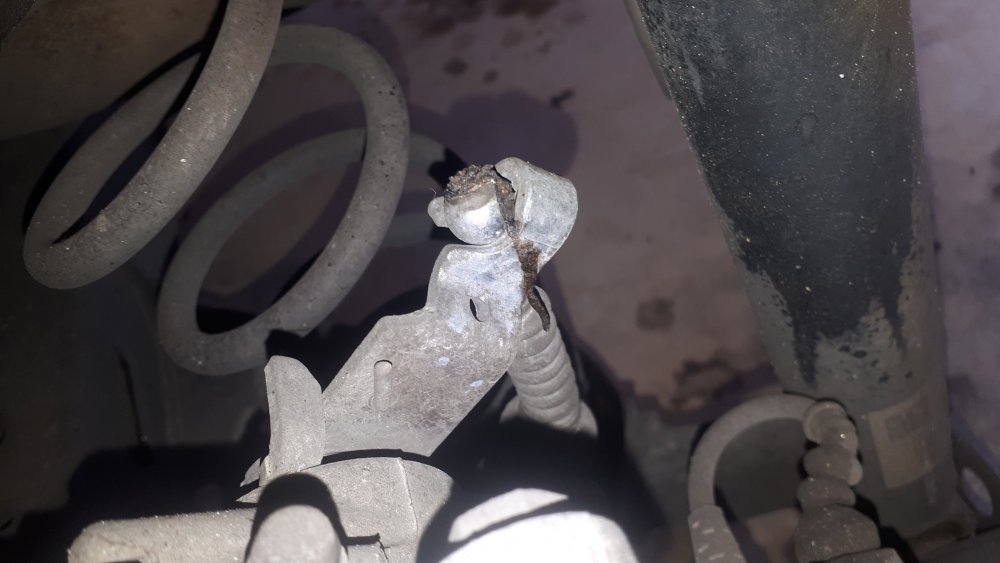
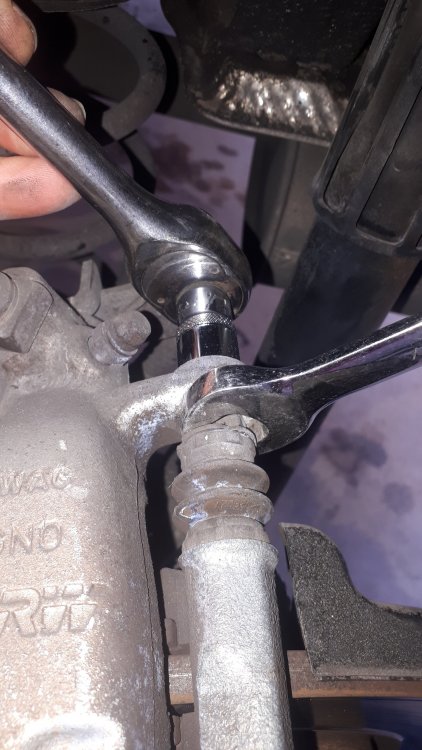
I would go with the spring equal to either 1K0511115CT or 5Q0511115AN. I think this will give the best load capacity, and match the front. I don't have a straight dimension or sidepicture from my car, but here is one picture with the above mentioned setup together with 225/55R17 wheels which eliminated the speedo error and gave approx 11mm more ground clearance. Edit. Here is also a comparison picture of the oem rear shock vs. the bilstein I installed. In the oem shock there is a plastic part which basically limits the piston rod movement. It will not fit to the bilstein shock, in theory one could install ca. 25mm thick nylon washer etc. to imitate the functionality. I didn't put anything to the shock and never had any issues bottoming out etc during my 40,000km with the new parts.
 1 point
 -
The 1.0tsi when coupled to DSG box works brilliantly. The free revving tsi engine can accelerate well, but can be rather hard work changing through the gears quickly to keep engine at sweet spot However I would caveat that if you live in a very hilly area, or regularly load the car with lots of passengers or heavy goods then the bigger engine could be better choice.1 point
-
This is not a new problem but possibly made worse with long oil changes and low friction piston rings - all makes. Back in the day I used to try squirting in copious plus gas into each bore and leaving overnight before oil change. I used to then squirt in a touch of oil into each plug hole , turn engine over a then a thimble of petrol into each bore before starting. This same procedure was good for waking up gummed up or long dormant engines,1 point
-
New genuine stat and temperature sensor ordered from a VW dealer, and a new stat pipe/housing bit from aftermarket/ebay seem to have finally put the cool running fiasco behind me a few weeks back. That was a ballache! In other good news, I took a punt on the cheapest of 3 MAFs GSF were suggesting for my reg (Hella branded), and it seems to have ended the driveability problems I was having. Smokeless and smooth now. Much more enjoyable drive.😎1 point
-
Its costing you £300 in parts to replace a cam belt? I have spent £8 in the last 26 years, probably half a million miles driven. No that is wrong, it was 2 belt changes so say £20 allowing for inflation for the second belt.1 point
-
I've had 2 1.0 karoqs since 2018 and they have been brilliant for me. They are easy to drive in the city and on the motorway. On holidays I have driven with 4 adults, a full boot and a full roof box and still had power to accelerate and overtake vehicles on the motorway. I calculate that in 54 years of driving and owning over 20 cars, my 21 reg karoq is the best car I've had!!1 point
-
No, we never ever used the ration books, but petrol was very scarce and expensive, and I had just got married and moved to Haverhill and I discovered in the garage I rented from the council was an Isetta 300 in bits, which I stripped down and reconditioned it and rebuilt it again and the VP was stored in the garage and I used the Isetta as a daily driver for a number of years and was getting around 90mpg, it was noisy, cramped and not very comfortable, but it did get me about. I was of course in those days pretty slim (can't say that today) but at the time, it was the right car to have and if rationing had been enforced, I would have been laughing all the way to the garage 😄 Isetta - Wikipedia1 point
-
1 pointFine for some livestock, but of very limited use for growing crops like wheat, root crops etc, difficult for machinery and very limited sunlight.1 point
-
@Colin170CR indeed their cars were fine, I loved that car, it started out in life as a car owned by United Biscuits, and was chauffeur driven for the directors and VIP guests at the biscuit factory and the chauffeur loved that car and when he retired they presented the car to him as a retirement present. I was doing my time as an apprentice at the Eastern National bus garage in Chelmsford, and the old chauffeur lived a few streets away from me. I used to see the car at the garages under the railway viaducts next to the bus garage and I would go and admire the car on my way to and from the staff canteen and one day the owner of the garage told me that the car was for sale as the owner had recently died, and his widow was keen to get rid of the car as it was a source of stress for her. I went and saw her I brought the car for a song and I had that for years, and it never missed a beat and I reluctantly sold it a few years later when the 1973 recession hit really hard and crude oil tripled in price almost overnight, and we had petrol ration books issued. Here is some history about vanden Plas Vanden Plas Kingsbury Works - the home of the Daimler Limousine and also United Biscuits United Biscuits - Wikipedia.1 point
-
That is where the old steel wheels were far better, you could have them painted, fit plastic wheel trims or have chrome hubcaps and some even with chrome rings like these on my old Vanden Plas car which was a large and heavy car with a very soft ride.
 1 point
 -
1 pointI serviced the dq381 by myself,there are plenty tutorials on the yt. Removing the filter will drain another 600-700ml of oil...is making a big mess on the subframe. That was 52k km ago.At 60k I'll do it again.1 point
-
take one of the drain grommets out of the wheel well it wont cure the water leak but will stop the build up of water1 point
-
As mentioned drilled a small hole in the wheel plug area just to stop water building up then went to find the cause, on mine it turned out to be the whole rear lens cover that was leaking ,there's a sponge type seal / gasket under the whole lens and this was perished, dealers do not sell these they come with the new lens trying to get a good used one is nearly impossible not advisable to use sealer as if you need to remove lens to do a bulb change you won't get it off withouy breaking it, I did manage to make a gasket out of 2mm thin rubber spent ages cutting the shape out and just before fitting covered the gasket with vaseline first fitted the gasket to the light then fitted to the car did both sides put them both back on and any surpless wiped away with alcohol or WD for me this stoppped the leaking but I did keep the hole open just in case, the flap seals under the bumper are also a leak problem but the bumper needs to be removed first, I did take my mk2 estate bumper off a few years ago to replace a dodgy reverse sensor its not a job you want to do on your own as getting the bumper sides to engage with the clips you have to be at both sides at once, also came across someone who had a leak from the tank seal rubber the drain hole to the underneath was blocked and rainwater in the fuel flap area was going inside instead of dropping down under car1 point
-
1 pointThe Fabia MK2 1.4TDI engines weren't common rail, they were PD (Pumpe-Düse). According to the Fabia MK2 entry in Wikipedia, the only Fabia MK2 1.4TDI engine with DPF was the Greenline...so check the car's CO2 emissions. The 1.4TDI 80HP Greenline has CO2 emissions of around 109g/km whereas the non-Greenline version of the 1.4TDI 80HP has CO2 emissions of around 120g/km. Fabia (wikipedia) https://en.wikipedia.org/wiki/Škoda_Fabia1 point
-
1 pointYou want sometimes the car react immediately, specially in urban traffic. The default setting for throttle response is ridiculously slow, even dangerous in some occasions. Nothing to do with sports car feeling.1 point
-
Mine, the official Škoda ones, didn't, and they came sealed in a plastic bag. Perhaps I just didn't notice. Also, they certainly don't smell like my BDSM dungeon, but then the slaves do keep it smelling nice......... One other thing I got was the vent covers for the air con there is under the front seats that warm the rear foot wells. They should have been a standard fit, in my opinion. The lip on the rear rubber mats come up to just below the holes. Small stuff rolls around the rubber mats far more easily than carpet. So if you have children or carry stuff in the back, they are worth having. Otherwise, you can get things rolling round in the ducting under the front seats.
 1 point
 -
BTW if you are going to get rubber mats in the back it is worth getting one of these covers for the tunnel in the back. Especially if you have [grand]children or old people in the back. Also, the proper Škoda mats fit exactly and have a raised lip round the edge that stops mud and liquid coming off the mat and onto the carpet. You don't want to find that after the winter you had a damp soggy mess under the mat for the last few weeks/months
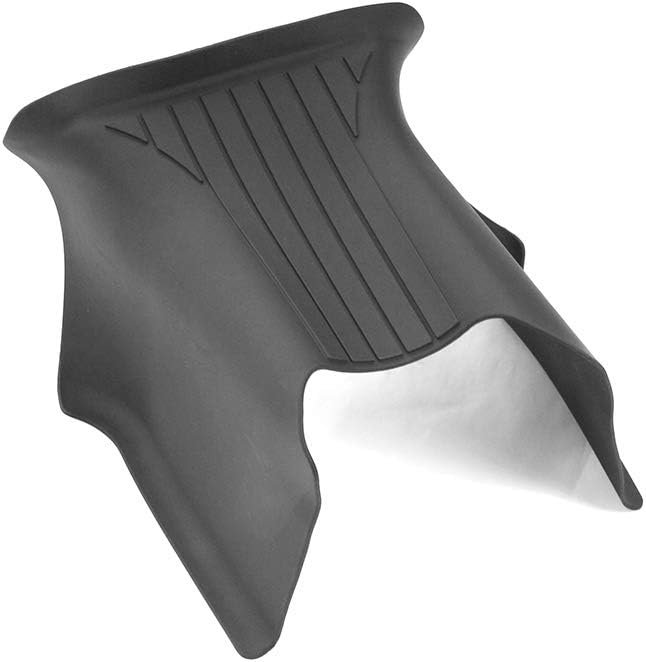 1 point
 -
1 point
-
1 pointYou sir are a gentleman and a scholar, I managed to repair my daughter’s car this morning after seeing this, thank you so much! Chris1 point
-
1 pointJust wanted to publicly thank you for the thorough instructions with which I solved the same issue in my wife's 2013 Citigo. Found (on eBay) and ordered the part (1K8 919 237 from a totaled 2016 Audi Q3) from Ireland for 30 €, installed it a couple of months ago in less than 5 minutes and after my local garage reset the diagnostics all has been fine.1 point
-
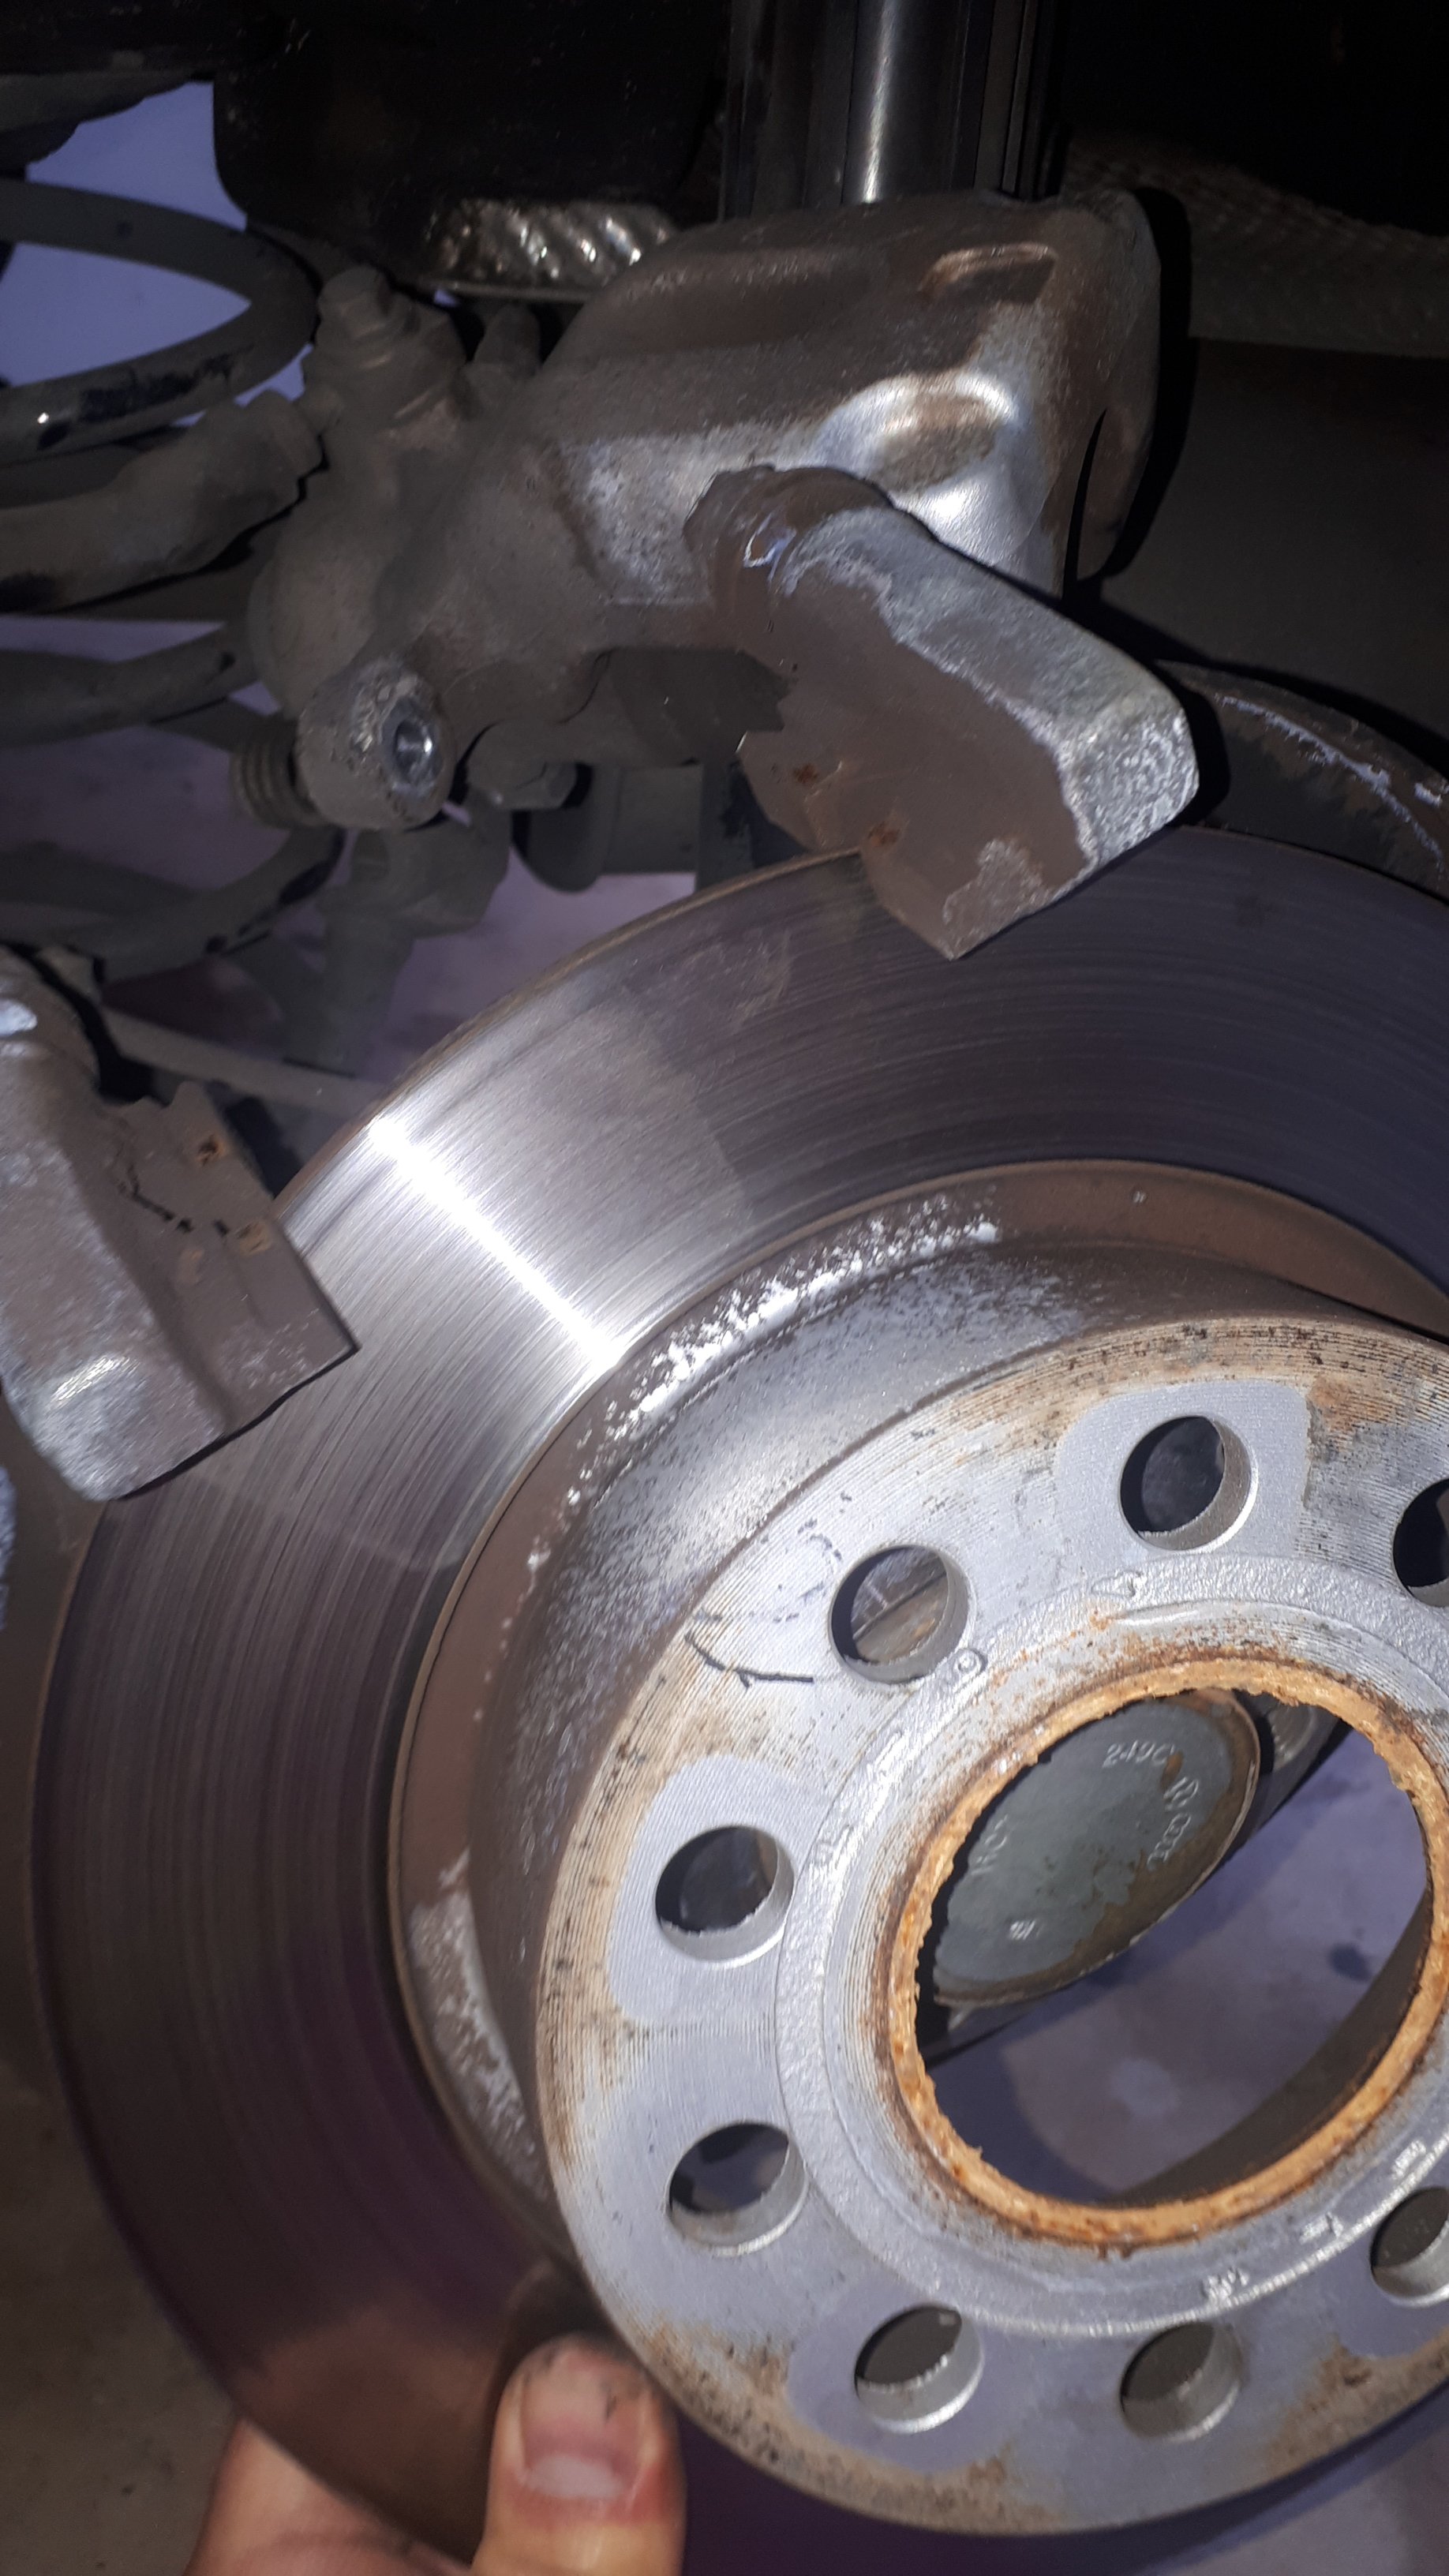
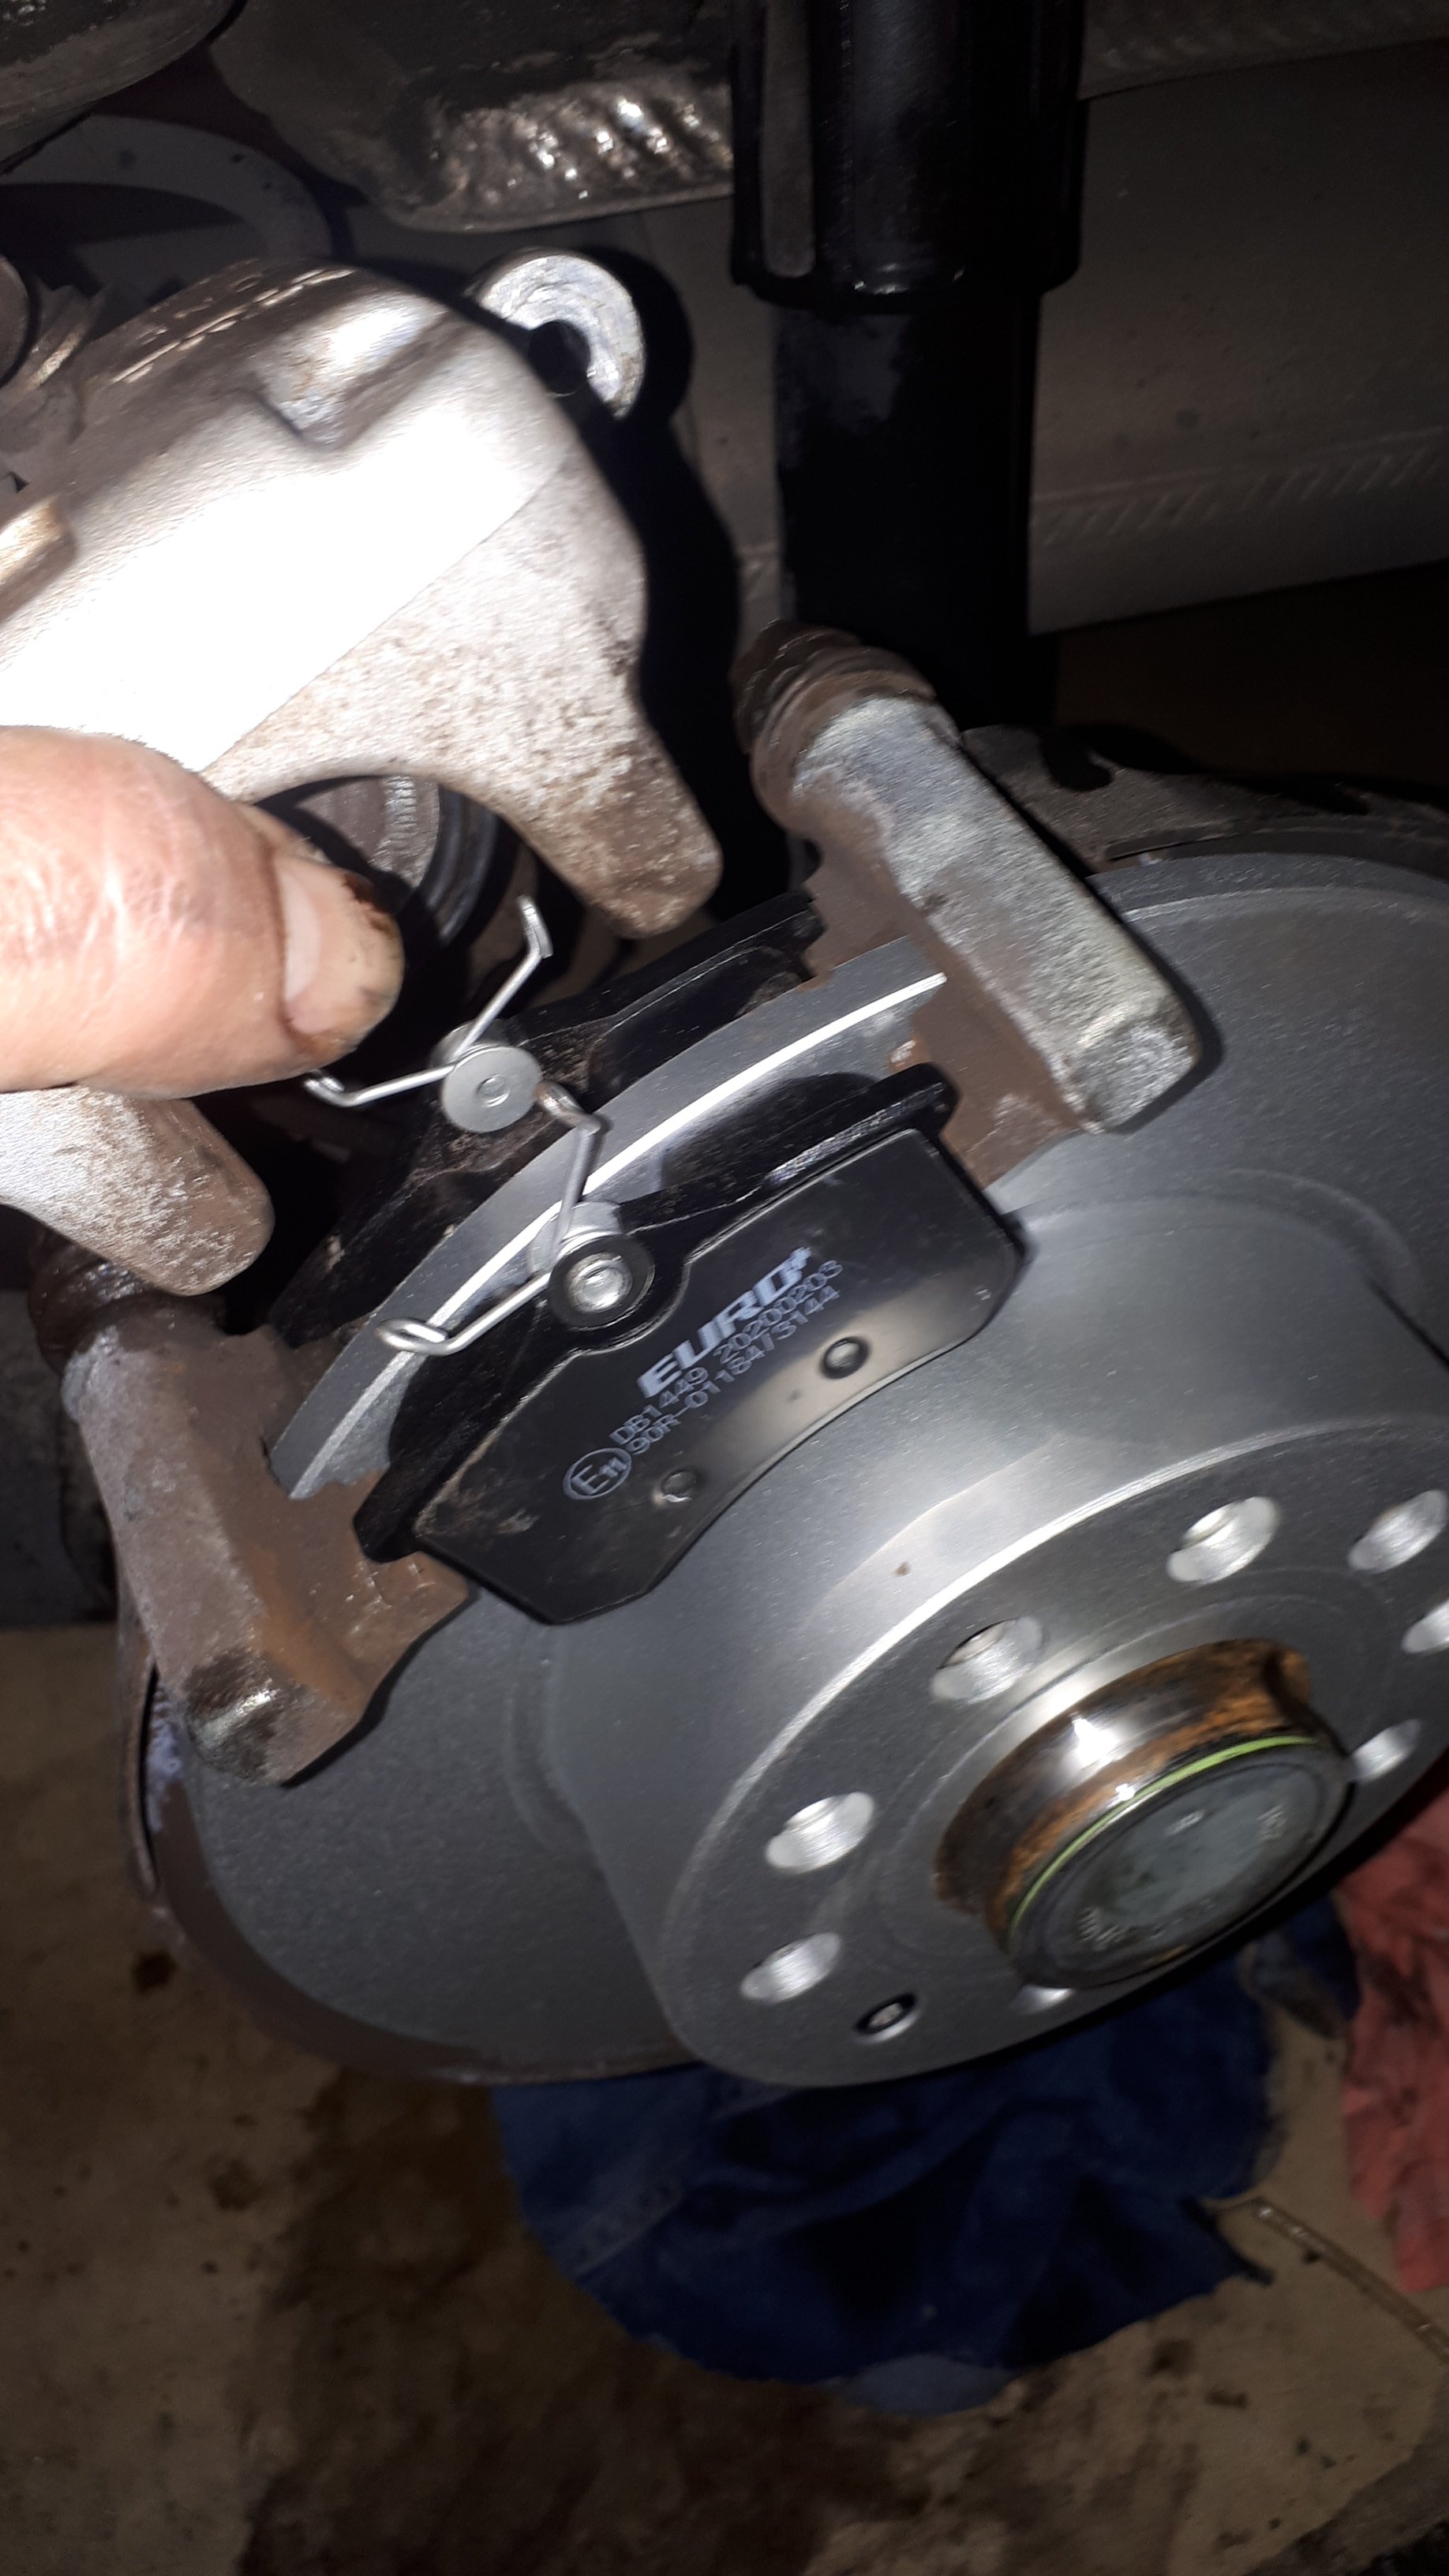
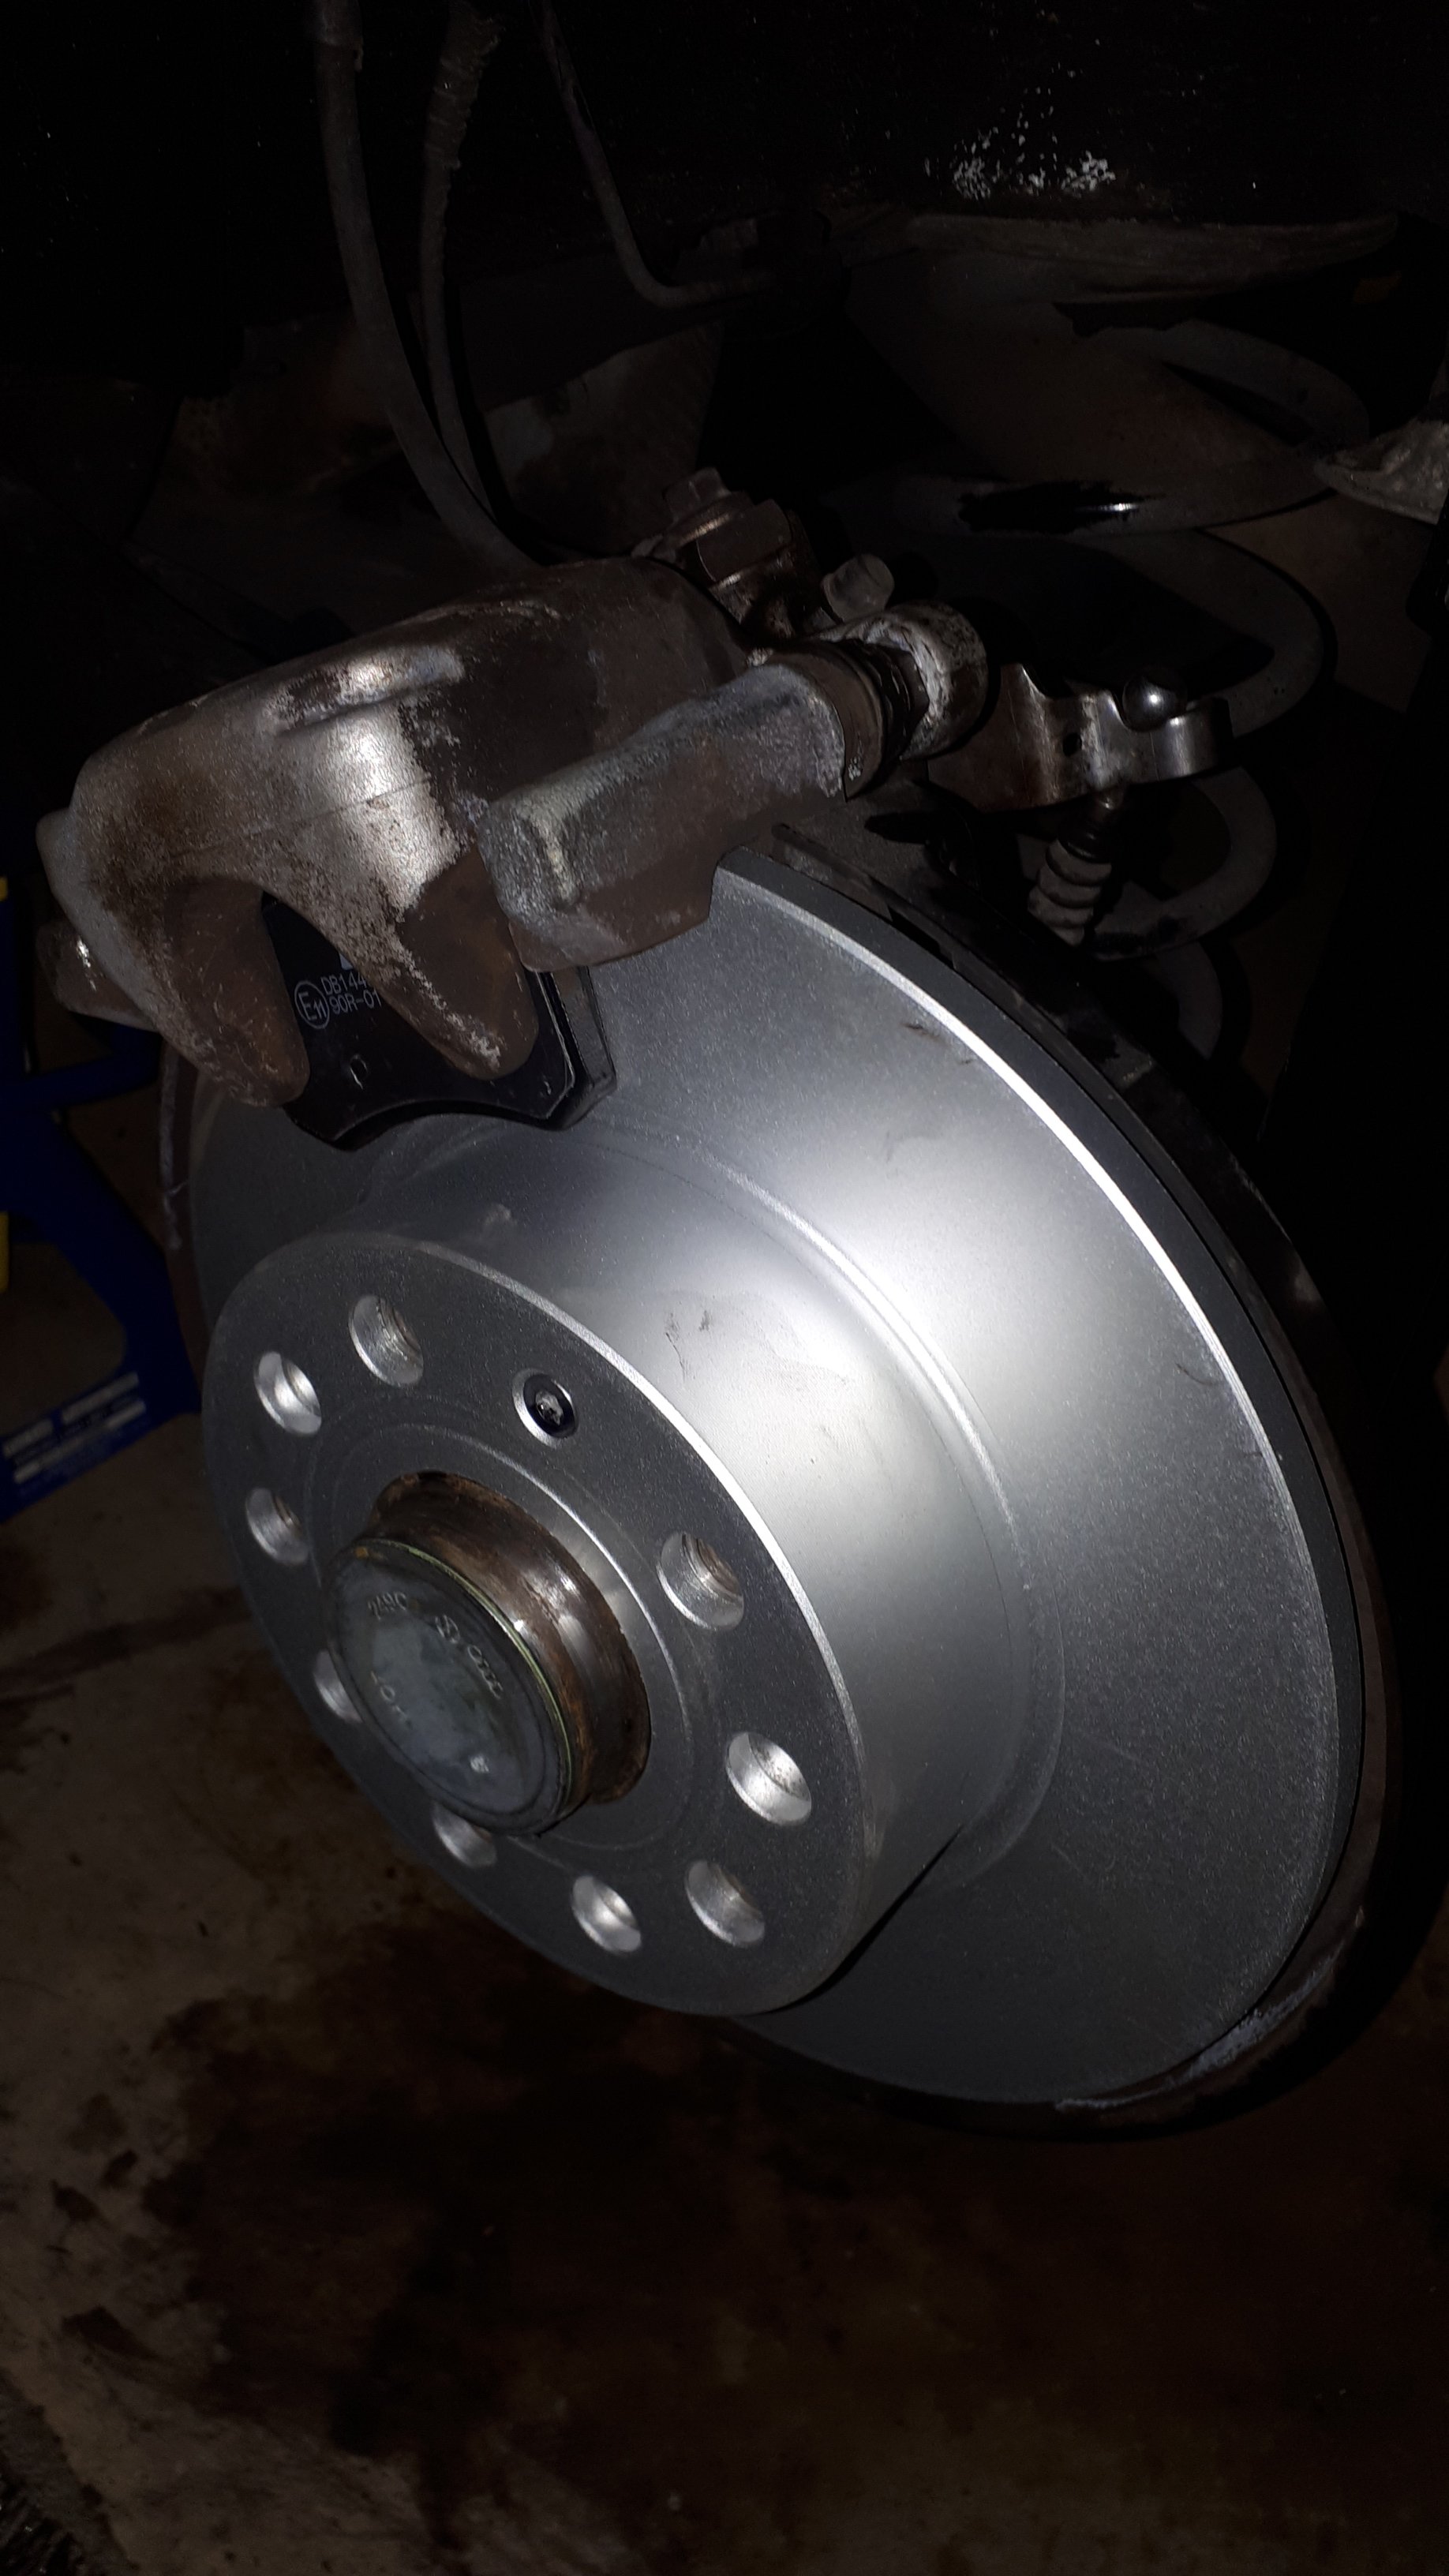
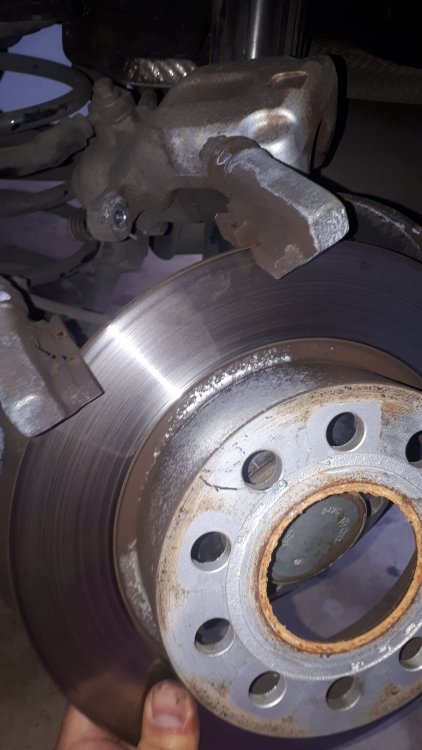
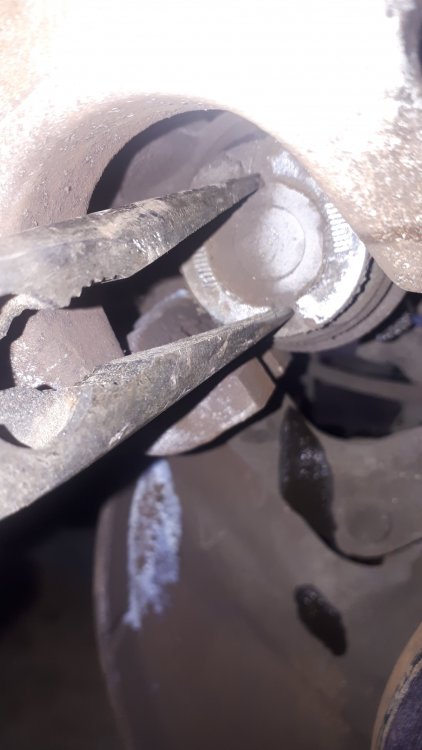
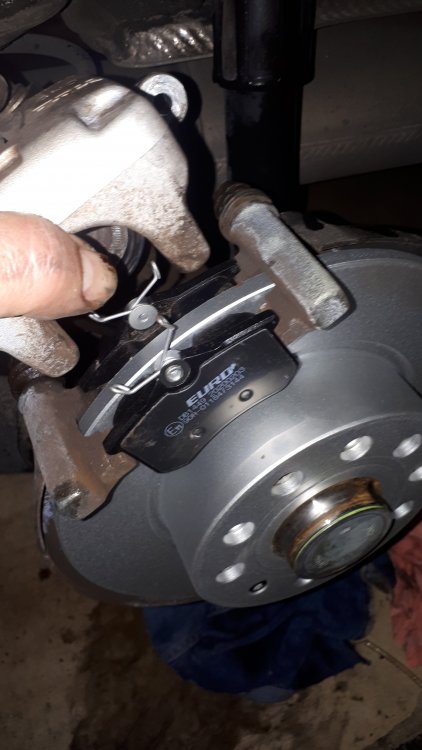
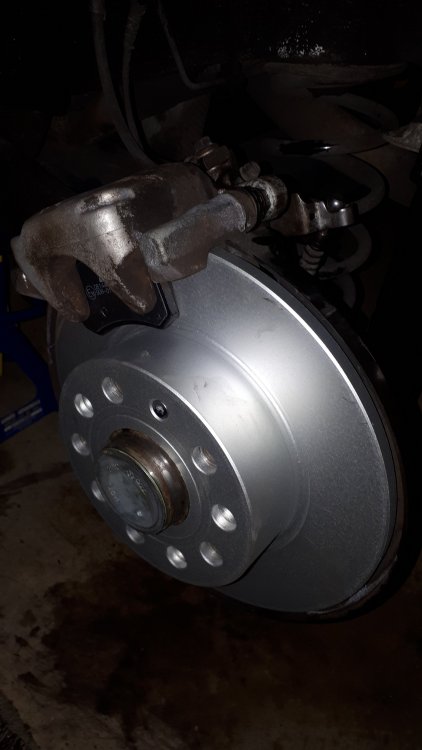
I spent the day swapping the rear pads and rotors on my 2015 1.4TSI Estate and thought I would put a little write up on here. 1KD Rear Brakes Rear Rotor DBA2811 253mm Rear Pads DB1449 Tools: Wheel Chocks (block of wood or brick) Jack 2x Jack Stands Lug cap removal tool Tire Iron Brake Cleaner 11mm (optional), 13mm, 15mm Wrench T30 Torx Key Rubber Mallet or block of wood and small hammer Wire Brush Needle-Nose Pliers or socket adapter or piston pressing tool Brake Bleeder hose and tray (optional) 1. Park car on a firm, level surface. 2. Chock the front wheels. Put an auto transmission in "Park", leave a manual in gear. Release the park brake. 3. Jack up rear of car slightly to take weight off rear wheel. 4. Remove lug caps (if present), then loosen the lugs. 5. Raise rear wheel completely off the ground, place jack stand under a strong, stable point, and lower car onto the stand. Ensure the car is stable. 6. Remove the lugs and the rear wheel. 7. Repeat steps 3-6 on the other side. Work on one side at a time. That way if you have any questions you can reference the other side. 8. Open the hood and loosen (but don't remove) the brake fluid reservoir cap. You want to leave the cap on top to prevent any debris or water from falling into the reservoir. 9. Check the fluid level. It should be about halfway between Min & Max. The level will rise as you install the new pads and you do not want it to overflow. If it is near Max, you may have to remove some with a clean, dry syringe or medicine dropper, or pump a small amount out of a bleed screw. 10. Spray the brake caliper down with brake cleaner to settle any dust. Do not use air. You don't want to risk breathing the dust. 11. Disconnect the park brake cable from the rear of the caliper by pressing the lever down and pulling the cable ball out of its cradle. 12. Use a 13mm wrench or socket, and a 15mm wrench to remove the bolt at the back of the two caliper sliders. The 15mm nut is quite narrow so it may be difficult to get the wrench fully on it, but as it loosens there will be more room. 13. Once the slider bolts have been removed you should be able to pull the caliper up (may have to wiggle it a little). Do not let the caliper fall or stress the rubber brake line. It could easily damage the line resulting in potential failure. 14. You can now remove the old brake pads. If you plan to reuse the old rotor, skip ahead to step 19. 15. To remove the rotor, use a T30 torx wrench to remove the small retainer screw. It should come loose easily. 16. Use a rubber mallet and/or block of wood and small hammer to gently tap the rotor off the hub. Using a hammer directly on the rotor could cause cracks resulting in failure if you plan to reuse to old rotors. 17. Once the rotor is loose, you should be able to pull it off without removing the caliper carrier. 18. Use brake cleaner and a wire brush to clean and smooth the hub face. A dirty face can result in a misaligned rotor resulting in warping, pulsing, and poor performance. 19. Now you need to retract the caliper piston back into the caliper to create enough clearance for the new, thicker pads. On front calipers you can usually just use a clamp to press it in, but on rear calipers you need to twist the piston clockwise while pressing it in. There are tools you can buy to make this faster and easier (a ratchet adaptor, or a special tool just for twisting and pressing rear pistons), but I just used a set of needle-nose pliers inserted into the two recesses of the caliper piston. It may take a while before the piston retracts (I have spent more than an hour on one piston). If it doesn't seem to be retracting, opening the bleed screw with an 11mm wrench can help relieve pressure (attach a length of hose draining into a pan to avoid a mess). I have also found that turning the piston counter-clockwise for half to a full turn can help free it up. 20. Now that the piston is retracted, you can install the new rotor and secure it with the T30 set screw. 21. Install the new pads into the caliper carrier firm against the rotor. 22. Slide the caliper over the pads (you may have to wiggle it a little or give it a thump). Line up the caliper and reinsert the caliper slide bolts. Tighten them firmly with the 13mm and 15mm wrench. 23. Reattach the hand brake cable. 24. Inspect your work against the other side to ensure everything is back in the right place. Spin the rotor to be sure it moves freely (light rubbing from the pads is fine). 25. If everything looks good, repeat steps 10-24 on the other side. 26. Now that you have new pads and rotors installed, apply the hand brake, mount the wheel back on the hub and tighten the lugs in a starfish pattern. Double check to be sure all the lugs are evenly tightened. 27. Jack the car up and remove the jack stands. 28. Take the car for a spin around the block. Accelerate to a moderate speed, check that traffic is clear, and brake firmly to a stop (not a panic stop, but firm). Do this a few times forward and a few times in reverse to bed the brakes while listening for grinding or squealing, and feeling for pulsation, shaking, or pulling. 29. Visually inspect the brakes to be sure everything is still in place and there are no signs of uneven braking. 30. Get yourself a beer or vice of your choice and bask in the glow of a job well done.
 1 point

.thumb.jpg.f83a46b9b3c0d976b9dbffbb523c9874.jpg)