Leaderboard
-
Lady Elanore
FREEDOM10Points24,912Posts -

Lee01
FREEDOM9Points36,450Posts -
Carlston
Resident Member4Points3,162Posts -
Cairus
Members3Points1,640Posts

.thumb.jpg.9dd3f612ba7f13d10be5c518d3c8d255.jpg)


Popular Content
Showing content with the highest reputation on 03/08/25 in all areas
-
Wanted to share my issue and fix with the Forum On my Sportline 272 4x4 Estate at around 60,000 miles it developed a knock from the driver’s side rear when driving slowly over uneven surfaces, block paved car park was a good test. I do have extended warranty but thought wearing components were not covered I had changed the rear dampers to KONI at about 50,000 miles. The sounded was like an ARB link so I changed both side (Lemforder units), still there. Baffled I went to the dealer and demonstrated the knock. Under warranty (surprised!) they changed the driver side ARB link (why?) Still there. Then they loosened and re-tightened it which appeared to fix it??? None of this made any sense to me. So, I took the car back and of course the knock came back. Booked it in again, but this time they wanted to swap the rear dampers over at a cost to me of £430. I instructed them to disconnect the ARB of the driver side and test drive. The knock was still there. At this point I took the car back and decided to fit new dampers bump stops and top mounts, all Bilstein, at a cost £170. This fixed the knock, but I was still puzzled why so I stripped down my old dampers and by chance spotted the issue. The mounting plate that is held into the top mount by the elastomer was off centre by about 1mm. As the damper rod passed through the mount clearance hole there was only a 1mm clearance on one side and closer inspection showed a witness mark on the damper rod. I can only assume the top mount elastomer allows movement over time. The top mount could easily have a larger clearance hole. PS I had two front struts change at 3 years (30,000miles) under warranty when it failed its 1st MOT. Originally, I had been told it was assembly grease, and they cleaned it off (LOL), and now one of those is leaking which I hope gets done under warranty. VAG do have quality issue with dampers so worth checking. Hope this helps someone.
 2 points
 -
2 pointsSkoda don't produce front seat covers, not practical with the in seat airbags, at least that's what they told me. I had planned to carry some old generic ones but once I discovered it might impact my safety I chose not to. I so rarely used them I have forgotten about the idea. Not sure about the situation with the rear seats though.2 points
-
2 points
-
Please no spam only post new coding that is not here... if you like the manual give me a like thx OCTAVIA IV CODING tested working coding obdeleven To verify 3 steps unlock SFD, 1 is registration add name ... which was normal, then parking brake must be on, hood open, ignition on... SFD unlock each module in aplication , not only 1 , u need to unlock all... Lane Assist to "Last setting" (asistent jazdného pruhu na "posledné nastavenie" ) EN- driver assistance (module A5) > long coding > Configuration for lane departure warning KI15 > change to "last setting" SK- asistencia vodiča (modul A5) > dlhé kódovanie > Konfigurácia upozornenia na vybočenie z jazdného pruhu KI15 > zmena na "posledné nastavenie" VRS CLUSTER THEME: Control unit 17 - Adaptations - view activation (Zobraziť aktiváciu) - all which are OFF should be ON (Set all views to active) Speed warning: Control unit 17 -long coding-speed warning take off or on G-meter: Control unit 17 - adaption- configuration of displayable contents -set G-Meter -> active Charging pressure ( turbo boost show) (zobrazenie turba): Control unit 17 - adaption- configuration of displayable contents -set charging pressure to active (bost pressure) Engine torque and Engine power: Control unit 17 - adaption- configuration of displayable contents- engine power and torque set active Oil temperature Control unit 17 -long coding-oil temperature display-set active, this function factory set on.. Automat transmission temperature , oil temperature and coolant (water) temperature: Control unit 17 - adaption- configuration of displayable contents- Transmission temperature set active Disable seat belt warning: Control unit 17 -long coding- seat belt warning verison1, version 2 or off- set off to turn off warning Show Volume to be Replenished (zobraziť kolko l dotankovať): Control unit 17 -long coding: volume to be replenished set active or on Laptimer: Control unit 17 -long coding- lapcounter set to active or on, other activation: Control unit 17 - adaption- configuration of displayable contents -set lapcounter-active Control unit 17 - adaption- personalization- display_laptimer to active Staging, Needle Sweep, indicator celebration: Control unit 17 -long coding-Staging set yes Rear DRL Lights (rear daytime running lights) (zadné svetlá ako denné) 1.Module 09 - Electronic control unit 2.Adaptation 3.Daytime running light 4.Tagfahrlicht-Dauerfahrlicht aktiviert zusaetzlich Standlicht: - (Change value to On) CONFIRMED WORKING ADD Enable / Disable daytime running light in menu radio: DRL In lighting menu (Attivazione e disattivazione delle diurne da menù) - Select control unit 09 - Select Adaptation - Select Daytime running lights ( Per gli italiani, Luci Diurne) - Select Tagfahrlicht Aktivierung durch BAP oder Bedienfolge moeglich, Set to Active Lock when car engine runs: Control Unit 09 Adaptation ZV allgemein funk bei klemme15- set active Menu of control door locking view : Menuesteuerung Tuerentriegelung: or in English Menu control door release: -Select Multimedia 5F ecu -Adaption - Vehicle menu operation menu_display_central_locking > not activated ( original is activated and where is off take on)menu_display_central_locking_over_threshold_high > not activated (set activated)1 point
-
Since I had a really hard time gathering some popular options to be coded on my Octavia MK4 while avoiding one click apps, I figured it would be nice to post a summary of my findings so far. Some I haven't tested so please do let me know if they work. Would also appreciate if some can be added. It really sucks there is not a big list of features for this car to be coded, one click apps are too expensive. Driver Assistance Systems Lane Assist - Remember Last Setting Description: The car will remember whether you had Lane Assist turned on or off between ignition cycles. Control Unit: A5 - Driver Assistance Path: Long Coding Parameter: Configuration for lane departure warning KI15 New Value: last setting Enable Standard Cruise Control Option Description: Adds a menu option in the infotainment screen to switch between Adaptive Cruise Control (ACC) and standard "dumb" cruise control. (note, this does not work with first gen OBD11 device!) Control Unit: 13 - Adaptive Cruise Control Path: Long Coding Parameter: Cruise control mode New Value: Activated Lower ACC Minimum Speed Description: Lowers the minimum speed for ACC engagement from ~10 km/h to ~1 km/h. Control Unit: 13 - Adaptive Cruise Control Path: Coding Parameter: Operation_moden Value Change: From Mode 1 to Mode 2 Disable Overtaking on the Right Prevention Description: Allows the vehicle to overtake cars from the right-hand lane while ACC is active. (Use responsibly and check local laws). Control Unit: 13 - Adaptive Cruise Control Path: Long Coding Parameter: overtaking_right_prevention New Value: deactivated Lighting & Displays Fan Speed Display in AUTO Mode Description: Shows the current fan speed level on the climate control display even when it's in full AUTO mode. Control Unit: 08 - Air Conditioning Path: Adaptation Parameter: Blower display in auto operation New Value: activated High Beam Assist - Remember Last Setting Description: The car will remember your last setting for the automatic high beam assistant, so you don't have to re-enable it on every drive. Control Unit: 09 - Central Electrics Path: Adaptation > Fernlicht_assistent Parameter: Fernlichtassistent Reset New Value: not_active Pulsating Start Button Light Description: Makes the engine start/stop button pulsate with a "heartbeat" effect before the ignition is turned on. Control Unit: B7 - Access Startsystem Interface Path: Adaptation > DeveloperCoding: Search lights Parameter 1: ZATillumination_concept_mybeat_clamp58xt New Value: activated Parameter 2: ZATillumination_modus_mybeat_clamp58xt New Value: activated Enable Rear DRLs (Scandinavian DRLs) Description: Activates the rear taillights to stay on with the front Daytime Running Lights (DRLs). Control Unit: 09 - Central Electrics Path: Adaptation > Daytime running light Parameter: Tagfahrlicht-Dauerfahrlicht aktiviert zusaetzlich Standlicht New Value: aktiv Change Tachometer Style Description: Changes the visual style and max speed value of the tachometer in the virtual cockpit. Control Unit: 17 - Instruments Path: Adaptation Parameter: Tachometer end value New Value: Choose a different version number (e.g., from Version 2 to Version 6). Requires ignition cycle to apply. Deactivate Headlight Washer System Description: Prevents the headlight washers from activating when you use the windshield washers. Control Unit: 09 - Central Electrics Path: Adaptation > Scheinwerferreinigung Parameter 1: Anzahl Betaetigungen Frontwaschanlage pro SRA Aktivierung New Value: Change from the default (e.g., 10) to a very high number like 255. Parameter 2: SRA bei waschwassermangel New Value: not active Fade In/Out Interior Lighting Description: Adds a smooth fade effect when the interior lights turn on and off. Control Unit: 09 - Central Electrics (Security Access Code: 31347) Path: Adaptation > Suchbeleuchtung allgemein Parameter: KL58 einschalten mit rampe New Value: aktiv Audio & Sound Soundaktor (Structure Borne Sound) Volume Description: Adjusts the volume of the in-cabin fake engine noise generator (Soundaktor). Setting to 0 disables it completely. Control Unit: A9 - Structure Borne Sound Path: Adaptation Parameter: Volume of structure borne noise actuator New Value: A value between 0 (off) and 100 (max). Some models go to 255. Enable Alarm Beep on Lock/Unlock Description: Activates a short horn beep when locking/unlocking the car and adds a toggle menu in the infotainment system. (Only works if vehicle has OEM alarm system!) Control Unit: 09 - Central Electrics Path: Adaptation > Response signals Activate the following: Akustische rueckmeldung entriegeln: active Akustische rueckmeldung verriegeln: active Akustische rueckmeldung global: active Akustische rueckmeldung signalhorn: active Menuesteuerung akustische rueckmeldung: active (This adds the menu toggle) Dauer der akustischen rueckmeldung vom einfachhorn: normal (or kurz if you have the factory alarm siren) Disable Trunk/Deck Lid Closing Sound Description: Mutes the beep/tone that sounds when closing the power trunk/deck lid. Control Unit: 6D - Deck Lid Control Path: Adaptation > Ausstattungen aktivieren Parameter: tone sensor New Value: not active1 point
-
Hi all, I have just replaced the recirculation flap motor on my 2015 Fabia MK3. I looked all over the web to find any useful instructions and only found some for the Ibiza here which are actually pretty good, but thought I'd add a few additional comments from my own experience. The symptoms were a loud clicking from behind the passenger side dash when the recirculation button was turned on In short it can be done by removing just the glove box although it's a bit fiddly. The glovebox is retained by 6 screws. Three on the top edge (visible when you open it. One inside to the left hand side just above the bottle storage and two underneath (one left and the other right hand side). Be careful when you remove the glove box as there are three wiring connectors (glove box light, glovebox light switch and airbag passenger switch). I found the easiest option is to remove the airbag connector only, and pop out the whole light assembly from the glove box and similarly with the light switch - remove the plastic pin that attaches the damper and light switch to the door and then twist off the assembly the is like a bayonet fitting to the side of the glove box. To warn you, the light switch assembly is quite fragile (the retaining cover of mine pinged off and several small bits fell out). Once you have the glovebox off, you will find the recirculation flap motor to the left hand side of the blower assembly. It is housed in a plastic cradle retained by two silver T10 torx bolts. One on the underside of the cradle and a second one on the front vertical edge facing you . The vertical edge one is just behind the retaining bar to which the glovebox inner screw attaches. Once you've removed both of those, you can push the cradle and motor assembly to the left. It will still be held in place by a tie wrap at the upper part, but there is no need to cut this as the motor assembly can be pushed out of the cradle in-situ Next, there is a blue wiring connector on the top of the motor assembly which when you push the cradle left should become visible. Use a small screwdriver to gently push the retaining clip inwards while pushing the connector up and off the motor. Once the connector is off, you can now remove the motor assembly from the cradle. There is a plastic pin on the top left of the cradle (nearest to you) which retains the motor. You should be able to push the motor assembly to the right which will detach it from the upper part of the cradle. The assembly can then be lifted upwards to clear the lower part of the cradle. The motor assembly will have a part number like v326800390.25844 (for a non-climate controlled version). I found some original parts on the web and brand new, they look to be around £150 or more. I didn't check with the local dealer to confirm, but found a number of reproduction parts on eBay and Amazon for around £15. Clearly not sure how long these will last, but I thought it was worth a go. There are a lot of these sorts of motors around as they are used for different air/heating controls. Ensure that the one you purchase has the same large plastic gear as the one you have removed. To test and set up the position of the motor and flaps, I found the best way was to first connect the new motor to the blue connector outside of the cradle, switch on the ignition, and then press the air recirculation button, which should drive the motor to one position. Then I switched off the air recirculation button to see the motor go back to it's open (fresh air ) position. Now, having turned off the ignition, and removed the connector, I put the new motor into the cradle and refitted the blue electrical connector. Next, I positioned the two flaps. The one in the passenger door well needs to be fully closed, and the fresh air flap needs to be fully open. You can see the fresh air flap by opening the bonnet, and then removing part of the rubber seal that holds the passenger part of the scuttle in place. You can then gently lift up the scuttle and see the flap. I think the flap defaults to fully open, but it's worth double checking. Once you're happy the flaps are in the right positions, you need to reposition the cradle back into place ensuring that the new motor gear pivot aligns into the side of the air blower assembly, and that the fresh air and footwell vents mesh with the motor gear. Once in place, you should be able to refit the two T10 screws . At this point I tested that it was working properly by turning on the ignition and turning the recirculation on/off checking that both flaps moved freely to the correct positions. Once that was all done, I put back the glovebox. One final warning, by having the airbag switch disconnected, and turning on/off the ignition a few times, it will log an error and likely you will see an airbag fault come up. You'll need something like Carista, or Carly to reset the fault. I don't think it's possible to leave the glovebox in a position with the airbag switch connected without it being in the way as the wire is very short.1 point
-
With a lot of information already available on the forum about travel assist retrofit but nothing about heated steering wheel for our mk4 i decided to post my way of retrofiting both of them along with a video of showing how to do it along with the codings For this retrofit to be able to work on your car you need to have already ACC and Lane AssistFor some modules will need SFD unlocking to be able to do the codings Parts Requirement -5E3419093AT heated steering wheel with travel assist button -Heated Cable adapter for the combination switch https://www.aliexpress.com/item/1005003791804873.html -5Q1953507GF COMBINATION SWITCH For travel assist: 20103 security code Select Driver Assistance A5 - Select Long coding - Select KLR - Set to Coded - Select Point of intervention - Set to Early - Select HC Warn Intensity - Set to Setting_over_menu - Select HC variante - Set to Variante_2 Select Adaptive cruise control 13 - Select Long coding - Select Capacitive_steering_wheel - Set to Installed - Select Travel Assist - Set to Activated Select Gateway 19 - Select Adaptation - Select Specified installation of sub-bus users - Select Control module for sterring whell touch reconition - Set to Yes Select CU44 - Select Long coding - Select Lane Assistance - Set to ACTIVE For Heated steering wheel: Select Gateway 19 - Select Adaptation - Select Multi-function steering wheel control module-Steering wheel heating button - Set to Active Select Air conditioning 08 - Select Adaptation - Select Steering wheel heating - Set to short_push - Select Long coding - Select Heated steering wheel and heated steering wheel automatic mode - Set to Installed As well i will post a link with the KLR module from aliexpress that make the take over steering message to disapear and the car to drive without your hands on the wheel unlimited time (not recommended)The KLR module is sitting on the bottom of the steering wheel and is quite easy to swap the boardshttps://www.aliexpress.com/item/1005008795628656.html If admin think this topic is useful you can pinned it Good luck and enjoy driving your Skoda1 point
-
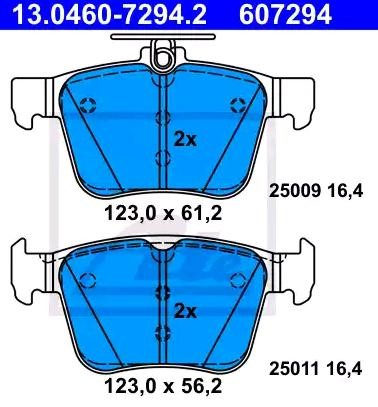
DPX2153 in that kit are Karoq rear brake pads. DPX2173 would have been the correct rear brake pads. Just keep using Karoq rear brake pads until those rear discs are replaced. I would consider EBC's entry level Ultimax brake pads (for normal road use) if they were price competitive with ATE ceramic (low-dust) brake pads...and sometimes they are.1 point
-
Official is 0253T. You can go to 0480T but it requires unit to be patched, e.g. with MIB STD2 Toolbox.1 point
-
If you've got a Superb MK3 with 300x12mm rear brake discs, then EBC have sold you the wrong rear brake pads, ie. Karoq rear brake pads and not Superb MK3 rear brake pads. Karoq and Superb MK3 rear brake pads are almost identical, but the friction material on the Karoq rear brake pads doesn't go all the way down to the bottom of the metal backing plate...as shown in the below two diagrams. EBC can't correct their mistake, because the smaller area of friction material on the Karoq rear brake pads wears a narrower groove on the rear brake discs...and if EBC started selling the correct rear brake pads customers who used part worn rear brake discs that had used the Karoq rear brake pads would notice a problem. If you want the correct EBC rear brake pads for your Superb MK3 300x12mm rear brake discs, purchase the rear brake pads that EBC sell for the Superb MK3 310x22mm rear brake discs and NOT the rear brake pads that EBC sell for the Superb MK3 300x12mm rear brake discs...if you don't want to be supplied with Karoq rear brake pads. Karoq rear brake pads (for 272x10mm rear brake discs) Superb MK3 rear brake pads (for 300x12mm and 310x22mm rear brake discs)

 1 point
 -
Bought them a few months back and only got round to 'fitting' them today and its a 28day return policy - ill see if anyone on FB marketplace or ebay is interested and if not ill turn them into functional sculptures or something1 point
-
1 pointThe 18" rims on the Superb MK3 are at least 8" wide. The Superb MK3 parts catalogue shows most are 8Jx18 ET44, but there's a couple of BRAGA alloy rims listed at 8.5Jx18 ET41.1 point
-
1 point@OccyVRS is spot on with this, it’s common on this part. It’s just very rubbish painting on the rears. It’s just a bit unfortunate that the chunk of paint didn’t fall away from the caliper. Otherwise nothing wrong with them so don’t worry.1 point
-
1 pointOf course, but there is no clear intent to defraud (in this instance, it appeared to be quite the opposite). I’m not a far nicer person - when it comes to cars I don’t trust people as far as I can throw them. I just go on what I can see!1 point
-
On the steering column control unit, it's connector T14e/1, which is terminal 30 for the Z36, with a cross-section of 0.5 mm². Then, T14e/2, which is terminal 31 for the Z36, with a cross-section of 1.0 mm².1 point
-
To be honest, it's best to avoid Halfords like the plague, they jave always been a sad joke (the equivalent of Curries for cars). There's so many reputable, knowledgeable suppliers out there, who would most likely provide equivalent, or superior items at lower cost.1 point
-
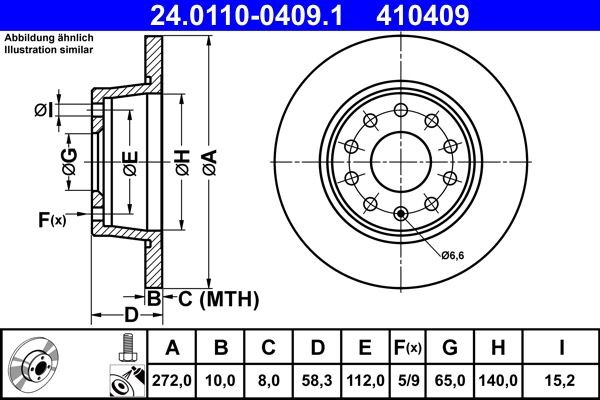
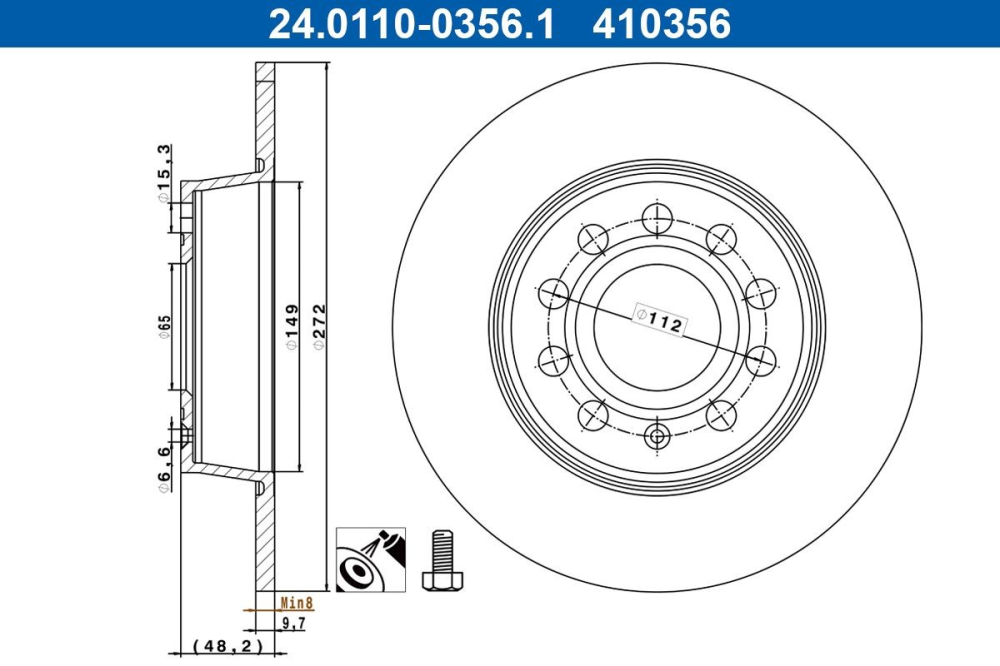
The Karoq parts catalogue lists two versions of the 272x10mm rear brake discs: 5Q0615601B and 5Q0615601D. 5Q0615601B is the 58.3mm version, whereas 5Q0615601D is the 48.2mm version. According to TRW on autodoc, the rigid rear axle Karoq uses the 58.3mm version, whereas the multi-link rear axle Karoq uses the 48.2mm version. 5Q0615601B (D=58.3mm) https://www.autodoc.co.uk/ate/15801924#brake-disc 5Q0615601D (D=48.2mm) https://www.autodoc.co.uk/ate/7008517#brake-disc
 1 point
 -
It's also worth mentioning that the pin assignment changes, which is what the adapter does. Many people don't use an adapter, though. Then you have a problem. SC39 with 10A wire, color red/blue, designation Z361 point
-
Samoht26 Hi there I am not the world expert in any way regarding this problem I had with my car. Breezy Pete was a big help to me and after much thinking and theorising on my problem I came to the conclusion that it was indeed the wiring. When I connected up my very, very cheap obd2 reader it showed the temperature at -39 degrees which was obviously not correct. Both the fans would start about 10 seconds after turning the ignition on and the tick over was slightly raised and the car never felt as though it was running "easy". Also, the temp gauge was very unpredictable in that it mostly didn't work at all but would occasionally make it way towards normal but never get there and then eventually fail again. The fans remained on all the time I was using the car. However the car was obviously running at the correct temperature. If your G62 temp sensor is the two wire type the the circuit for it is simple. The two wires come straight from (via the wiring loom) to the coolant sensor and the straight back again with no junctions or connections involved in the wiring. With the fantastic help of a local mechanic we actually made the repair together by cutting both of the wires near to the sensor, identifying the other end of the two wires at the ECU, cutting those near the plug and simply replacing the wiring. We never identified EXACTLY where the wiring fault was but the theory was that one or both of them had shorted to earth and/or to each other This instantly cured the problem and as I type this message the car has behaved perfectly ever since so for me this was a definite fix. I hope this helps you Good luck Regards Tom1 point
-
1 pointHi folks, I'm a proud owner of a 2007 Octavia 1z5 RS tdi, (BMN), driven already ca. 200000 miles. (I also own a 2013 Sharan 7n CFGB and a 2018 T6 CXFA) See ya! Tom1 point
-
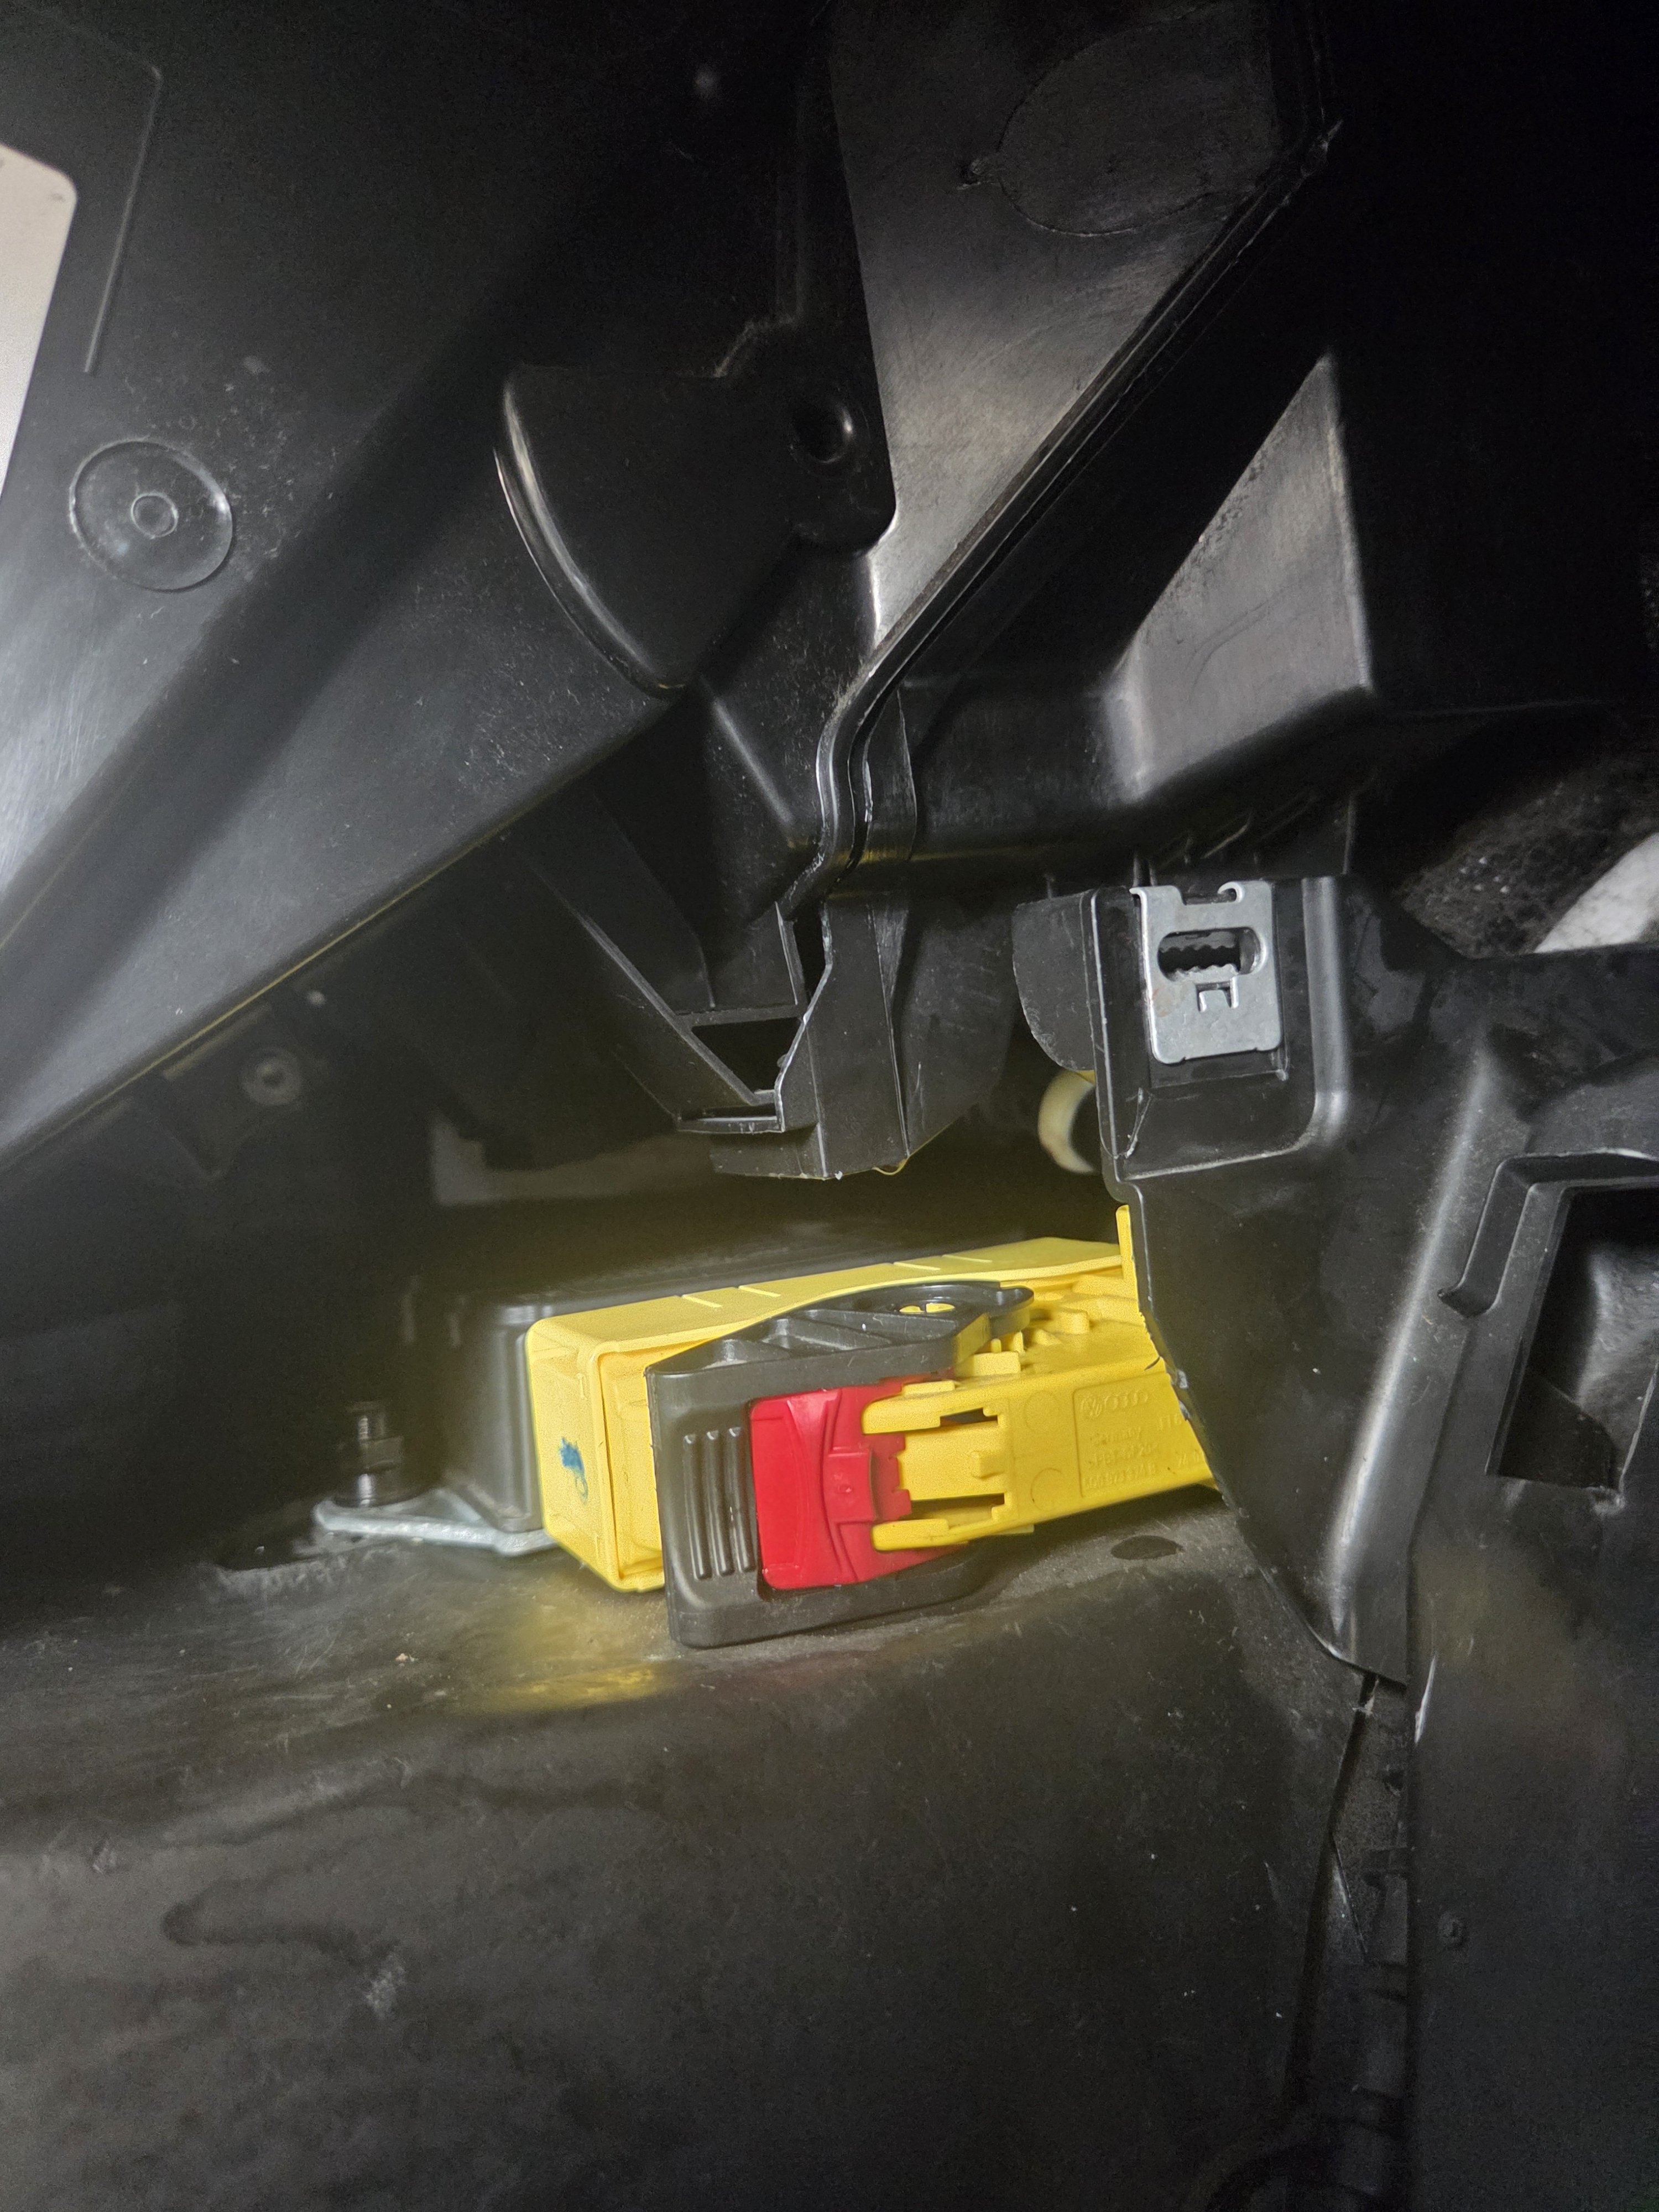
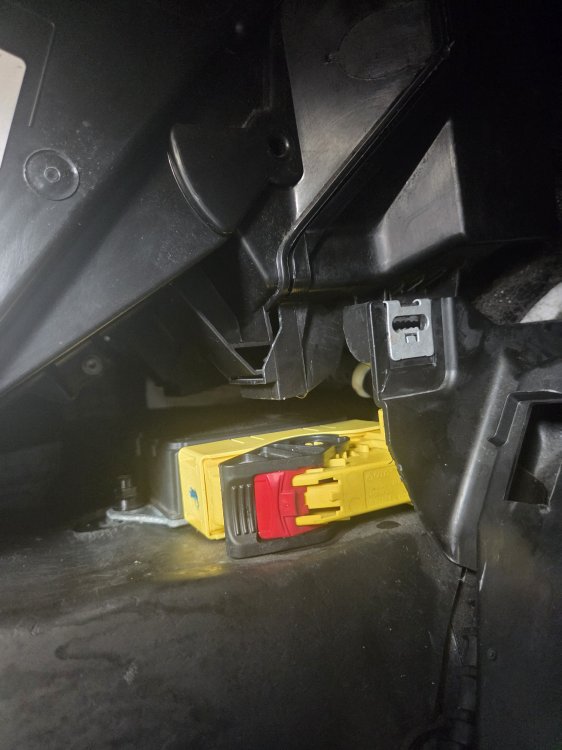
Good afternoon I'm putting my car to skoda garage In 3 weeks as the problem wasn't solved by me 😀 I did what i was capable on my drive Water still leaking on to the module from pipes above. I clear drain for aircon, dry out footwell Clear ground wires I think airbag module is damage and need replacing. Thank you all for all support and ideas Leaking is somewhere above yellow box but I con not put my fat hands there to locate this leak photos add I will prepare my wallet for skoda visit and let you all know what was it and the total cost Just praying it's less then £1000 Please don't corect me in the price as I want to keep my dream alive unless it's less then that you can cheer me up
 1 point
 -
1 pointI have just received an invitation to a Skoda VIP event at a dealers in the north west. I can have a specific appointment time and a lanyard to show I am a VIP! I have had them before and binned them. What a load of twaddle. Call me a cynic but as far as I am concerned dealers can't shift their cars so invent these events to drum up sales. They are simply marketing ploys that some people fall for. For me, I will replace my car when it suits me provided the deal is acceptable at the time. Walk round the showroom wearing a lanyard to make me feel important indeed! Wouldn't it be better if dealers just reduced their prices to sensible levels to attract customers?1 point
-
Hi @nta16 The first pic is the nearside front, which is the one binding, the second is the offside rear, third and fourth is the nearside rear and the last is the offside front. I have already read your linked posts (a good read) and watched a couple of Youtube videos and i am considering doing some of it myself, I was just going to get the binding issue resolved first and probably the front discs, pads and brake fluid by a professional and then do the rears myself. All the tyres are in good nick apart from the wheel that is binding where there is excessive wear (still very legal) in the centre of the tyre compared to the other tyres and will get both fronts changed before the next MOT. From what i have read the hand brake issue is linked to the rear discs, the handbrake in mk3 fabia's are very flimsy feeling in the hand, which car reviewers have noted, and is an issue on mine. I have had a couple of garages tried to change shocks as part of the MOT and service that were in good knick on my previous car as they had recently been replaced, seems like a goto tactic to syphen extra work out of you. If anyone knows of any decent garages in the berkshire, west surrey area please recommend.1 point
-
1 pointWe get that from time to time. The wife goes off to do a supermarket shop. When she gets back home I go out to open the boot to bring in the shopping bags but it won't open. Maybe this is "simply clever" and secures the shopping while the supermarket trolley is wheeled back to retrieve the £1 coin.1 point
-
@ose my concern, other than braking issues of course as they're always number one priority on any vehicle, is the front, nearside (nearest the kerb) wheel slight binding is this because of the brake at that point or is the cause something else. If new pads and discs are fitted and the slight binding continues this will cause more rapid additional wear so it needs to be established what is causing the slight binding, You haven't labelled the photos of the discs wear but three of the photos show rust over half of the pad sweep area which isn't the way it should be. The very clear disc maybe on the wheel that's binding or just showing the work the brake at that wheel has had to do. Also bear in mind the tyres are a very important and significant component in the car's braking system. If I assume (often not as good idea) that your handbrake is the "traditional" manual lever type then I also wonder why it needs adjustment but I've never seen your car and the garage has (and would know more than me anyway). The brakes (unless yours are different) were very simple to do on my wife's 2015 Mk3, and I'm not that mechanical, the simplest of the few sets I have ever done on a few various cars, I did some notes if you want to see them to get an idea. - https://www.briskoda.net/forums/topic/499752-front-brake-pads-and-discs-fitting-tips https://www.briskoda.net/forums/topic/517740-changing-rear-brake-discs-and-pads-notes-and-tips The current front dampers ("shock absorbers") on my wife's car were a distress purchase, when the car was 6 years old, because factory ones failed that MoT failure, bought from and fitted by the VWŠkoda Dealership, the replacements were "misting" 11 months later and are still misting and MoT advisories, now out of their 2-year warranty. Finding a good and decent garage or mechanic (or auto-electrician) is very, verry difficult, unfortunately, and if you can then they often have more than enough work for themselves, the one we eventually found the staff don't work weekends at all and have lunch breaks, both are very good signs to me for such a business.1 point
-
1 pointThe Millers Oils website has a link to this VOLKSWAGEN OEM APPROVAL LETTER confirming that the XF Premium Engine Oil C5 V 0w20 oil meets the VW 508 00/VW 509 00 VW standard. https://www.millersoils.co.uk/wp-content/uploads/2020/11/VW-508-00-509-00-0w20-OEM-Approval-Millers-Oils-XF-Premium-C-V-0w20-8049.pdf and there's a TECHNICAL DATA SHEET here https://www.millersoils.co.uk/wp-content/uploads/2020/11/8049-XF-Premium-C5-V-0w20.pdf This doesn't automatically make the Millers Oils product superior (or inferior) to the other oils I mentioned in my last posting and it may be less widely available off-the-shelf than the Castrol Edge equivalent. (A Millers Oils product with a slightly different name Millers Oils XF Premium C5/C6 0w-20 (note the "C5/C6" instead of "C5 V") is advertised on-line, often more cheaply priced. This oil does NOT have the VW 508 00/VW 509 00 approval.)1 point
-
You have Amunden MIB2 with DAB, part number 5Q0035874A. You can swap display unit to 5E0919605M or 5E0919605N or 5E0919606 but in case of 5E0919605M and 5E0919605N button APP will not work unless you upgrade the firmware to 03xx or 04xx which requires unit to be patched.1 point
-
1 point1) When you look at the virtual cockpit, you can see that it's not a Skoda, so that's off topic. 2) I deal with retrofits. 3) To accuse me of manipulation or fraud is very brave. Do you know that such insinuations can backfire?... on the topic of the immobilizer, with the mqb generation 5a was introduced, key id48. In 2019, approximately 5C key id49. In both cases, the speedometer is the master. In the MQB EVO, 5H there is no longer an immobilizer in the speedometer according to my information. The mileage can also be adjusted on the 5C and 5H. As far as the immobilizer is concerned, as far as I know, the 5C and 5H have not yet been cracked.1 point
-
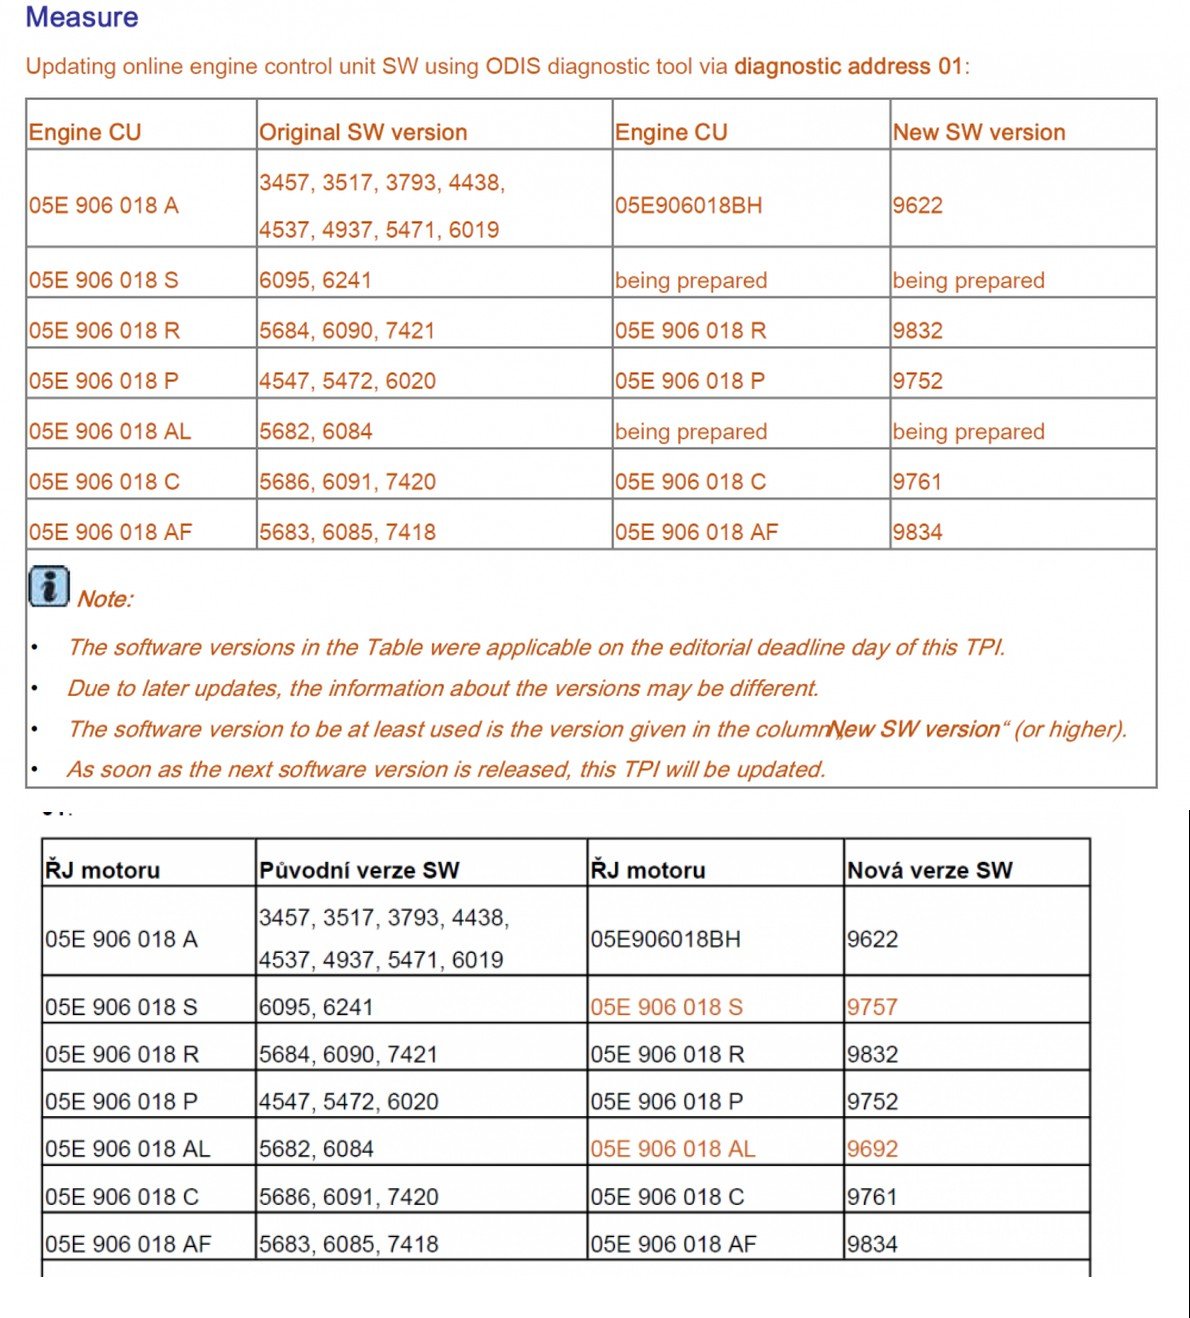
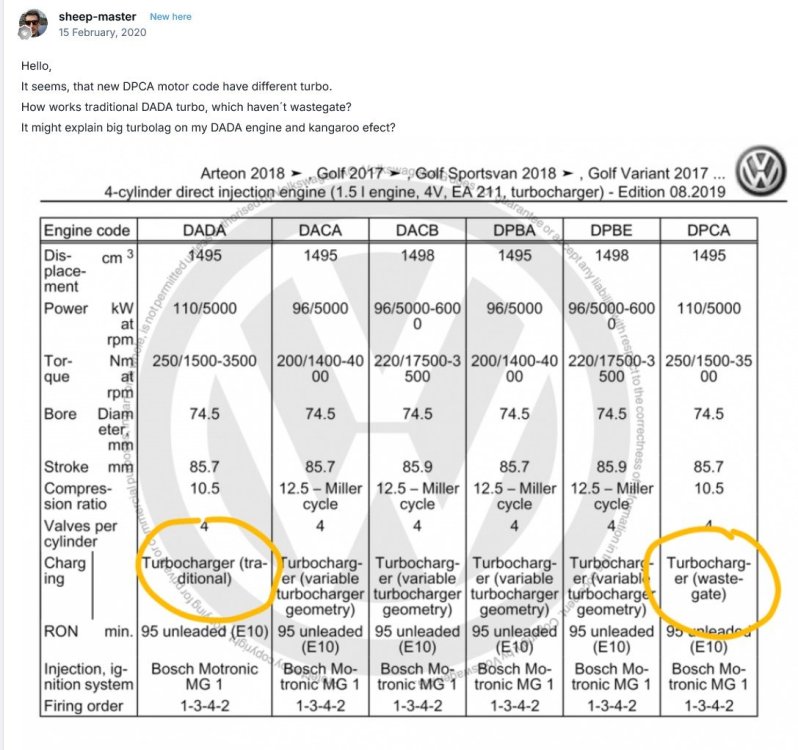
1 pointI have gradually worked my way through most of this very long (!) thread and have found some useful information which I summarise below together with some comments on my experience for what its worth... It may save someone having to trawl through the last 117 pages! Firstly, I think that perhaps some posters expect a little too much perfect running with a cold engine and are therefore disappointed. (I know some said they had problems warm as well). In 'the old days' you really did not expect any engine to run perfectly smoothly before it had warmed up fully. You pulled out the choke (or it had an automatic choke) and it stuttered along for the first five minutes or couple of miles until it settled into its operating temperature and designed performance parameters. I still wait a couple of minutes before driving off and this also has the essential advantage of getting oil circulation up to full pressure before stressing the engine. This has served me well as I have run several car engines to 180-200,000 miles without major problems. I can never understand those who start their car and then drive off within literally a second or two. My recently acquired 2nd hand Karoq [1.5 tsi manual, DADA code, manufactured Mlada Boleslav circa ?end2017-early2018] when it is started, first idles at 1250rpm, drops to 1000 after 15sec then to 750 after about another 30 sec. I never drive off before then. Switching on the aircon makes the idle rise to 900rpm as the ECU automatically compensates for the increased power demand. I have not experienced any marked 'kangaroo-ing', ...not any more than a slight hesitancy between 0-10mph before the engine fully warms up and therefore not far off what I might expect from a 'coldish' engine. Albeit measured in the current warm summer weather. It did seem however to lack progressive power delivery between 1000 to 2250rpm and I had to slightly over-rev to achieve smooth upward gear changes. Again some might say this is what you expect with a turbocharger that only kicks in from about 1500rpm upwards. (I do not seem to have the Variable Turbo Geometry in my DADA engine as others have.) Nevertheless, after an ECU software update at my local dealership, the car has improved quite markedly. The drive feels much smoother and specifically: (a) the power delivery between 1000-2250 is more progressive and consistent; (b) there is no jerkiness in 2nd gear even at low rpm such as 1000-1250 and I can accelerate smoothly from there; (c) I can actually trickle along in 3rd on level roads at 1000rpm without problem; (d) some damping action has been applied in the software to stop accidental over-revving on gear changes -- whereas previously when accelerating hard I had to be very careful in synchronising clutch depression and easing off the accelerator, but now, even when deliberately pressing the clutch 1/2 sec before easing the accelerator, the revs are held at the last peak value before dropping as you ease off. One or two minor bugs in the software also seem to have been ironed out. For example, long pressing the 00-Set button on the dash should bring up the Service Interval info but it never did. It now behaves as specified in the Handbook. The most useful tables I have found in this thread (from other posters) are below: Dealers do tend to deny the existence of ECU updates but armed with the software version table I managed to persuade my Skoda dealer to at least check which version I had. I was fortunate enough to talk to the technician while he was doing the update and I had my original yr2018 05E906018P ver5472 updated to 9752. They download it from the Skoda servers on demand and it is probably best to bring both your keys along when you do an update as I believe it may require your keys recoded if it affects the immobiliser module. Good luck if you decide to pursue this update path but I certainly found an improvement.

 1 point
 -
1 pointExcellentand I hope you enjoy it, mine should hopefully be built in next couple of weeks and then hopefully here mid Sep Very nice spec and identical to mine ,I went for hyper green which is going to be interesting. Hopefully mine will be built in the next couple of weeks and shipped for mid Sep, nice to see another person who has ordered a VRS1 point
-
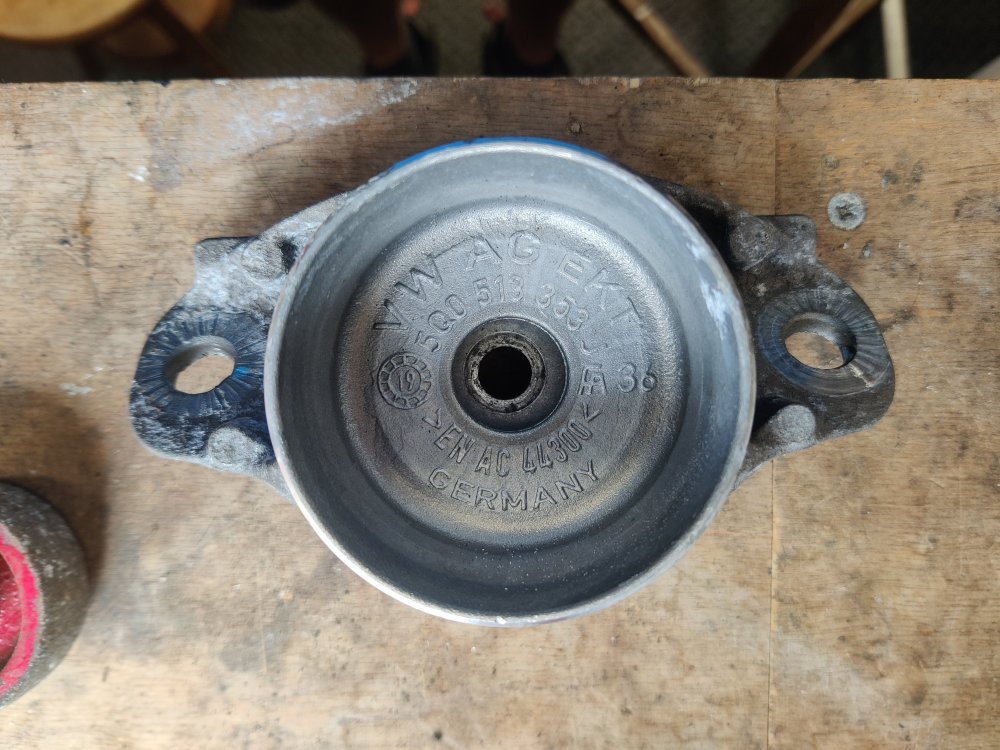
1 pointjust rust time has taken its toll 27 years is a long time for steel to stay free of rust here in wet UK. Has been repaired mainly the rear on both sides replaced with new steel.1 point
-
I agree with brakes. First pic is ok but the others are poor. Replacing discs and pads as said is easy and shouldnt cost a lot. Been using APEC discs and pads for a while now and no probs. Fairly reasonable price wise as well. If your fabia is like my sons the discs come off once the caliper is removed. No need to take carrier off. Last time took about an hour to do both fronts which included cleaning up carrier and calipers etc. Good luck with finding a decent garage. Might be worth puting a post up on here in case someone local to you can reccomend one. I found a new garage that can do MOT same/next day as I forgot. Was reccomended it by my local motor factors. Seemed pretty decent and not too fancy. Checked car over, put in for MOT, passed with no advisories and charged me £50. I left £20-00 for the coffee jar. Proper garage without carpets!! My go to garage when I dont have time to do it myself has retired. Its a bit of a mine field trying to find another decent honest one that doesnt cost a fortune. Alasdair1 point
-
I am sorry. I wasn't able to find any version numbers and the dealer did not provide any information. HOWEVER, I have good news. After installing the new software, I went away on vacation for over 2 weeks and when I came back, the car started without any problem. That was never the case before. I always had issues when leaving the car without running it for so long. This time everything worked really well, so I am happy (so far).1 point
-
1 pointIn the Latest UK Kodiak Brochure it lists as options: Electric tow bar with adaptor. Electric tow bar with adaptor and trailer assist. Only available in combination with Driving Assistance Plus Package. But the UK Karoq Karoq doesn't mention it however the latest Karoq owners manual explains how to use it but you must have park assist ,I was trying to find out if anyone knew if it was available as an option on UK vehicles ? Tom Trailer assist helps when you reverse with the trailer.1 point
-
Getting the brakes serviced, or doing that yourself if you are able, is something that too many owners avoids getting done, and ending up with brake issues tends to be the norm, this s is made worse typically by servicing is centred round the engine only - and a quick safety check around the car - and maybe highlighting any potential for "more business". If you feel brave enough to check how hot things have become, you could check the centreish wheel surface with the back of your hand or even a quick poke of the calliper, but the discs could be a bit hot to contact!1 point
-
No idea why or how people smoke in a car, bloody grim!1 point
-
Episode 41 is out today. Apparently according to their Facebook page, it's their penultimate episode. Ending on 42 must be special, they must be a fan of Douglas Adams.1 point
-
This takes me back to over 50 years ago after my father retired at 65 in 1973. He'd had company cars for many years that were supplied to him from new, so they were never smoked in. After he retired, they asked him if he'd come back and work for a couple more years as they couldn't fill his place, which he agreed to, and they gave him a Ford Cortina MkIII that a female rep had used, but she was a heavy smoker and the windscreen was cover with scratches inside where she'd wiped the glass with her hands and not bothered about the damage her jewellery was doing. My father had an injury from WWII, so he wasn't able to do too much physical work, so I said I'd give it a good clean. I couldn't do much with the screen, but I cleaned the inside as thoroughly as possible, the metal ashtray being coated in grimy brown that I took out and soaked to get it clean. There was even ash inside the instrument cluster which I couldn't get to, but I've no idea how it got in there in the first place. Like your Superb, the Cortina wasn't completely clear of cigarette smells, but it was 95% better than it was. I even bought him a Feu Orange to hang from the dashboard to eliminate the last 5 % of the smell!1 point
-
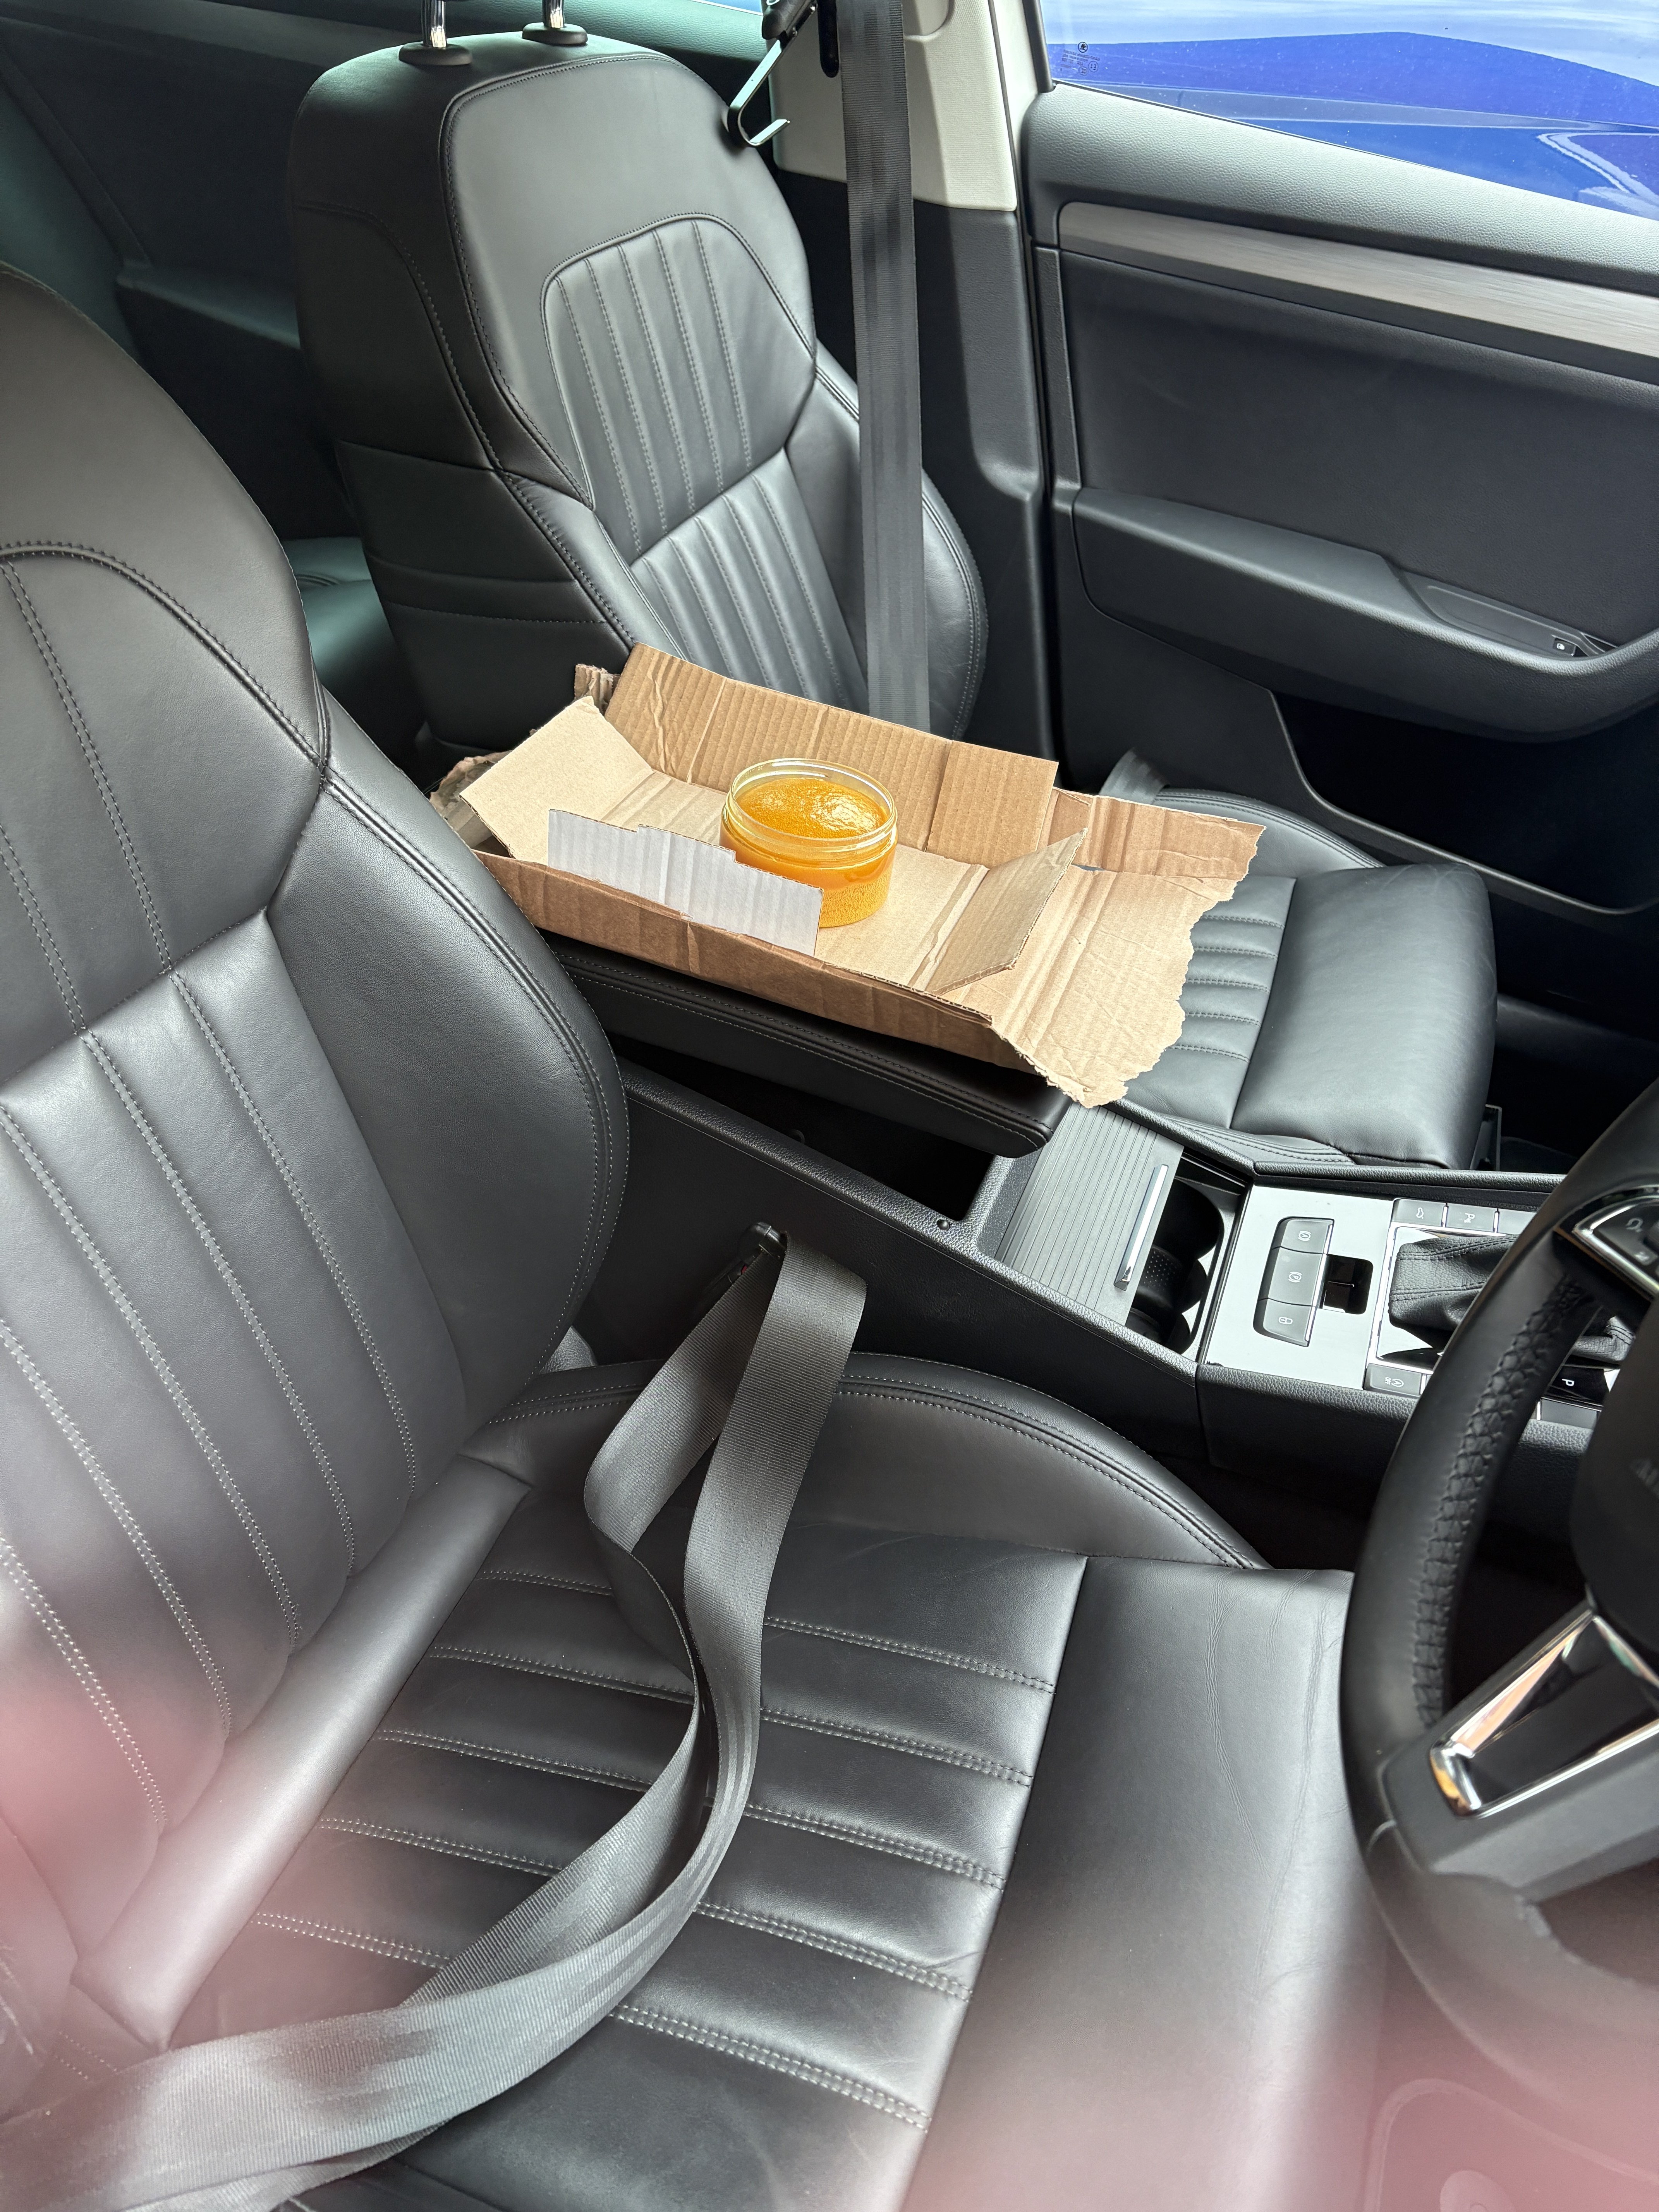
After a quite some hours, a fair few quid and a few different attempts at getting rid of the previous owner's smoking habit, I dropped an Airvidox chlorine bomb in the car for the best part of 8 hours on Sunday...the results are good so far. I've already used a mix of Autoglym high foam shampoo, Auto Finesse Total interior cleaner, an Autoglym air con sanitiser, new pollen filter, Dr Leather wipes, and the smell kept on returning, especially on hot days, and especially from the steering wheel and passenger soft trim/pleather between the window and handle when the sun hits it...it's grim...I even unbolted the front seats and vacuumed quite a lot of debris from the hard-to-reach places...The irony is that the interior is pretty much immaculate, apart from the smell, and one small burn/melt on the USB port, which I'll replace at some point. So far, the interior smells fresh and the chlorine smell is gradually going (which I'm happy for it to stay as it doesn't smell of fags!), The steering wheel still has a faint whiff of smoke, but nowhere as bad as it was, so I may leave it a few weeks and do the treatment again. I spent the time pre-cleaning with Airvidox' own interior cleaner (a solution you mix into a bucket of water), and even after I thought I'd cleaned the interior to 'as new' previously, the water had gone from golden to a grim brown once I'd finished, so it obviously picked up even more grime the other cleaners hadn't. So far it's done a lot more than the other cleaners I've used, and cost a lot less...I don't think it's completely eradicated the problem yet, so if required, I'll give it another go a in a few weeks...for around £20, it's certainly been a lot cheaper than the other options I've tried, which in all fairness only clean what you can reach and touch, whereas the gas gets in everywhere, the same as cigarette smoke. Hope that helps any other owners of cars which have been smoked in! Cheers, Nick
 1 point
 -
1 point
-
0 pointsWow, now that is something I’ve not seen before. Looks like there is a further hairline crack running down on that last photo, too. I would be worried that the pad backing will potentially snap. My advice is don’t drive it and get a new or used caliper on there as quick as you can. That caliper is a throwaway. You can probably still use your current pads and rotors. For the replacement part on a RS245, Red TRW rear left part number is 5F0 615 423. Rear right 5F0 615 424. (For the 310mm discs)0 points