Leaderboard
-
.jpg.5f5908b5afb5ed410c43d763df801089.jpg)
Evolution13
FREEDOM21Points2,499Posts -
Warrior193
FREEDOM7Points6,428Posts -
skomaz
FREEDOM5Points11,173Posts -

Lee01
FREEDOM5Points36,451Posts


.thumb.jpg.9dd3f612ba7f13d10be5c518d3c8d255.jpg)
Popular Content
Showing content with the highest reputation on 28/11/25 in all areas
-
3 points
-
3 pointsBloody hell... They can't even get the dates right... That consultation says it closes in March 2025!!!... I assume they meant to say 2026.3 points
-
3 pointsWe made our annual trip to Donna Nook earlier this afternoon 🦭 https://www.lincstrust.org.uk/get-involved/top-reserves/donna-nook/weekly-update Literally a few minutes old............


 3 points
 -
2 pointsDon't do it...when I had issues, the same happened to me...no possibility to lock the doors....just leave it, hoping that it will "recover"... I passed it, for a week now, everything works ok, so, cross fingers and go on2 points
-
2 pointsShe was absolutely clueless in that interview and once again looked like a scared rabbit in headlights2 points
-
2 pointsEven Rachel, when interviewed on TV after the budget did not have the faintest idea as to how the mileage was going to be recorded in the first 3 years of a cars' life, in fact it looked that she was not even aware that MOTs were not required until the car became 3 years old. In the end she came up with that being the reason as to why it would take them 3 years to implement the tax. We so desperately need to stop accepting these politicians who are in politics as a full-time career choice and start electing them with some real world experience and knowledge of how the world actually works, and they see their job as being to improve things both the population and the country during their period in office.2 points
-
2 points
-
2 points
-
2 points
-
2 points
-
2 pointsNow I am thrown in disarray ... this subject is more than what it seems ... A link to illustrate that this what you are mentioning is really more under the surface: Not to hijack too much, probably in the case of a car wheel we might never reach a lever of catastrophic failure ... there are 100s of other things in a VAG product that will probably fail earlier! 😁 But now I am really re-thinking the approach ... Hex TechnologyBolt Lubricant and Torque: A Comprehensive Guide - Hex Te...Bolt lubricant plays an important role during both the assembly and disassembly of a joint. Learn proper lubrication techniques and how they affect torque2 points
-
Trip to the Uk was brilliant, 10/10 experience, honored to have been involved in some small way. Fella is probably the best driver i know, just got caught out at the worst time. Hope I can get invited back again. Nearly 183000 miles on my car now. Going pretty well. Suspect i damaged a boost pipe as its a bit more whistly now. Easy sorted if i can find the bugger.1 point
-
PS, correct oil is not dependent on vehicle model, as same engine can be fitted in different models - use engine code for correct oil spec.1 point
-
Hello, welcome to the forum. Check the first 3 or 4 characters of the engine number on your V5 document - this is the correct engine code (probably DTS-)1 point
-
I bought mine from Lidl in France years ago and I've lived to tell the tale. They were/are TUV rated.1 point
-
There is a 5W-40 which is a C3 low saps fully synthetic oil. I use it on three of my cars which is VW 502 VW505 graded. Thanks. AG Falco1 point
-
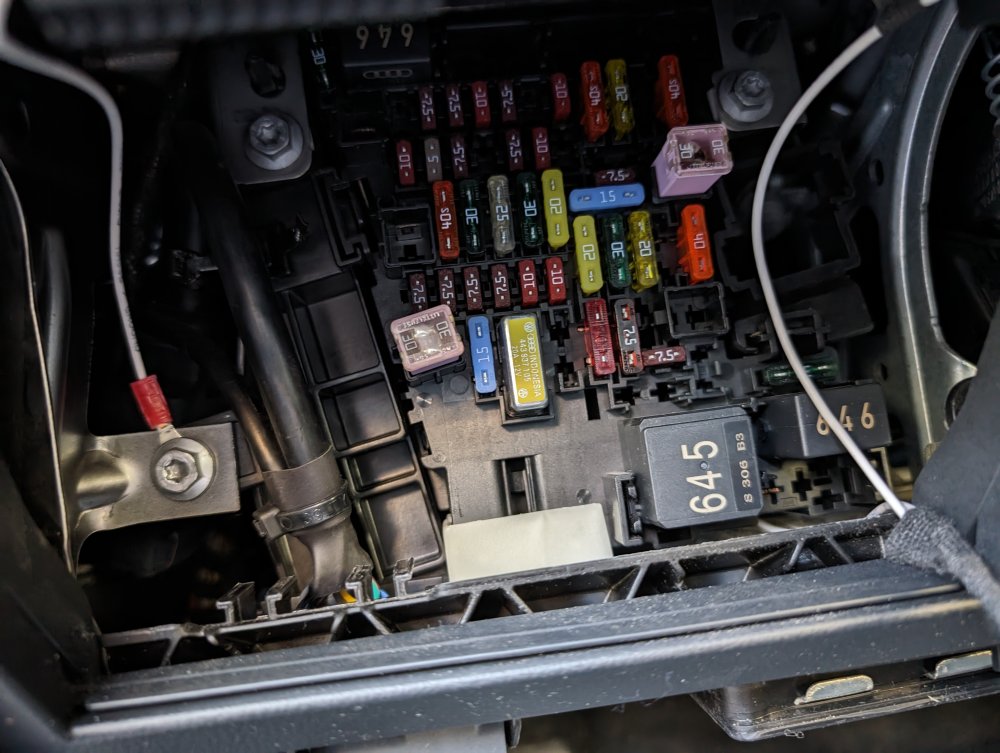
Hi Lee01 Thanks for that, fuse 42 under dash. Somehow I missed that in my book, however rear doors lock/unlock so its not the fuse.1 point
-
1 point
-
1 point
-
1 pointFor anyone still looking for some good leds, there's sinoparcel d3s on amazon. They happen to match the led drl strip pretty well and they were £45 2 years ago when i put them in my superb. Smart light assist works just as well in cutting out the beam for the cars ahead, no beam pattern issues and passed every mot1 point
-
In here Finland, weather 0 to -5 its about 10k miles if steady highway at 50-55mph speed and you got thermostat open and +87c. Using 6th gear on manual. -10-15 using 5th gear, maybe some miles more. I use always cardboard to block radiator when outside temps are +5 or lower. It gives nice boost. All kind of grill covers which comes outside are worth of nothing in here. Maybe good for middle europe winter.1 point
-
Before you get into expensive repairs, have you tried replacing the Coolant Header Tank lid? These have a known weak point; the pressure relief spring sticks and causes over pressure in the header tank which then dumps the coolant down inside the engine bay and onto the floor. Get a new style lid and see if that fixes the problem first. https://www.amazon.co.uk/febi-bilstein-103522-Radiator-expansion Febi-Bilstein kit is generally quite good - £8. Typically you will be looking at 30-40UKP for an OE part - speak to the parts team at TheSkodaShop in Lincoln for a price.1 point
-
Shell V-Power or any decent brand Super Diesel (Esso, BP or Texico) - Tesco fuel is the same as Esso fuel if that helps. I used standard diesel with 10-20ml of Cetane improver from Hydra Int - https://www.hydra-int.com/DPB000K.html1 point
-
Well I will continue to have a tiny smear of copper lube on the threads. With totally dry bolts from new, if left dry long term, I find the bolts/ threads will somewhat slightly corrode and stick. What I mean by sticking is that when tightening to torque, the bolts will stick for a moment then creak or crack and “ jump” a good few degrees. Makes it difficult to be sure they are at the same or correct final torque. With one tiny smear of lube initially ( generally no need to repeat for several years) its a smooth “transition” to full torque and I trust the bolts are all equally to the same setting. Very much one of the principles in the article Leolito posted. By the way, handbook states 140 Nm ( for facelift mk3 at least), not 120.1 point
-
1 pointSo much of the painful stuff announced in this latest budget is not applicable until 2028 / 2029. I suspect there being a General Election called early anyway. The Government & Cabinet Ministers do seem very detached from the day to day real world and how it is for many workers or non workers of whatever earning levels who do not get their days to day living expenses and travel and accommodation, utilities etc paid for because of a job they got elected into for a while.1 point
-
1 point
-
1 pointSome confusion may arise from the oil pump drive being, apparently, a wet belt on some engines - but the cambelt is dry.1 point
-
1 pointYesterday i read the article in 'This is money' and mention in the first 3 years the BEV would still be taken to a MOT Test Center to have the mileage checked, and the government / Tax payers would cover the cost. Yesterday almost every comment i read from EV drivers being asked about the cost of EV,s and would the 3 pence matter, were home chargers or business drivers. Discussion now on BBC Scotland Radio. Nobody seems to mention the 20% VAT at Public Chargers and the cost of charging possibly 10 times those home charging at offpeak. PS. Yesterday my trip cost £4 from the home charge & £6.50 public 50 kW charging. It will be a minimum £30 for the return trip if i do 7kW AC charging @ 50 pence a kWh. or £42 if i Rapid / 50 kW charge in South Ayrshire.1 point
-
1 pointI can recommend a VAG specialist over in Doncaster. German Car Specialists, Unit 6 guildhall industrial estate, sandall stones road, kirk sandall, Doncaster. A good friend of mine works there called Rob; they service Audi, BMW, Mercedes as well as Skoda and Seat cars.1 point
-
1 point'They' do just say just anything lots of times. & you are not tied to Main Dealers. There are Independents with Licensed equipment, even ones that are Ex VW Group Master techs. So not just the gear and no idea like many Techs / Fitters. ? Who told who @ Skoda. Was this Customer Services or just some Dealership Employee?1 point
-
I asked the dealer to switch it off permanently which solved the noise issues in the cabin, but leaves the car very very quiet due to the exhaust being so restrictive.1 point
-
1 pointMy cd player doesnt have aux option but , BUT i saw on a forum some months ago that it is possible to have aux . A button for aux i dont have , idk how can i verify if it has. Its the Skoda Symphony from a 2003 skoda octavia that it has the option for a cd changer . Oh and i will verify one more time how i connected the bluetooth adapter to the 12v I will atach a photo of the cd player here:
 1 point
 -
1 point
-
1 pointYou’re in luck: Read all of this and the files needed are in the links. Hope this helps!1 point
-
1 point
-
1 pointDo you mind sharing link/how to sign up to this? If it's open to the public? On mileage checking, I suppose Tesla could do mileage checks remotely on the cheap. It's been over 3 years, my Tesla has only ever been seen by MOT tester at almost 3 years old. Apart from initial niggles sorted out by warranty, it has not need any servicing and I've only spent £20 on wipers and £50 on MOT over the 3+ years of ownership. There's no chance in hell I'm wasting time visiting + wasting money paying a garage just to log my mileage in order to pay tax. Although both electricity comes from battery. 1 kWh of heat from resistive PTC heater need 1 kWh of electricity. 1 kWh of heat from heat pump only need ~0.3 kWh of electricity. Heat pumps make energy go a lot further. Opposite of hydrogen conversion, carbon capture and ICE, where energy are wasted.1 point
-
1 pointAh but they do over 700 mpg, ha ha. 20 kwh should get you 70 miles or so even for a fat / heavy PHEV with two whole traction systems !1 point
-
1 point
-
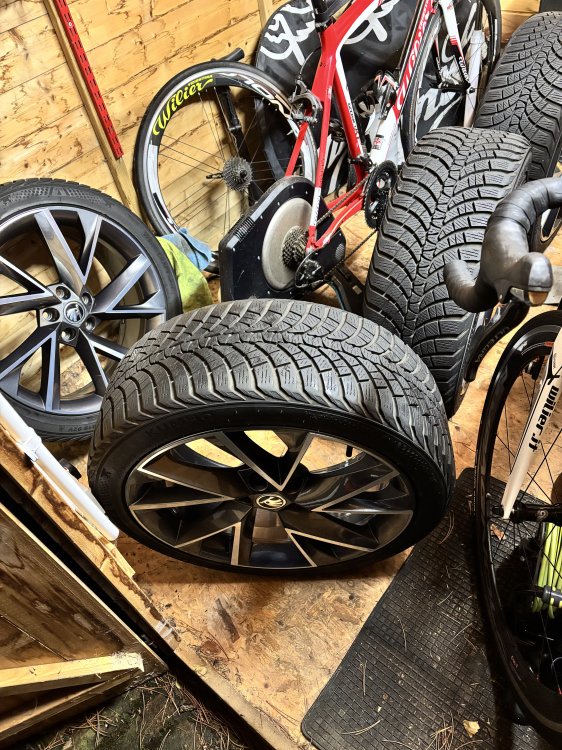
Winter wheels coated with Carpro CQuartz and left to cure in the shed pending switchover this weekend. Not fussed about the job but anything that makes them easier to keep clean is good by me. Now to dig out time to polish the whole thing and get some on the paint.
 1 point
 -
1 point
-
Probably should be covered by the warranty - but entirely depends on what is covered and what is not, especially in the small print. I'd suggest a thorough read-through of your warranty.1 point
-
1 pointWhile this is connected to the CD changer plug, I don't think these use the CD changer option. It should be using the AUX settings? However, I could be wrong... Either way, make sure you connect the red wire to 12V+, the black wire to 12V-. Then try the CD changer (as I guess it's meant to mimic a connection) and, also try the AUX option too.1 point
-
1 point... even longer for me - although the Combi tailgate only releases, not 'pop open' I guess due to the extra weight.1 point
-
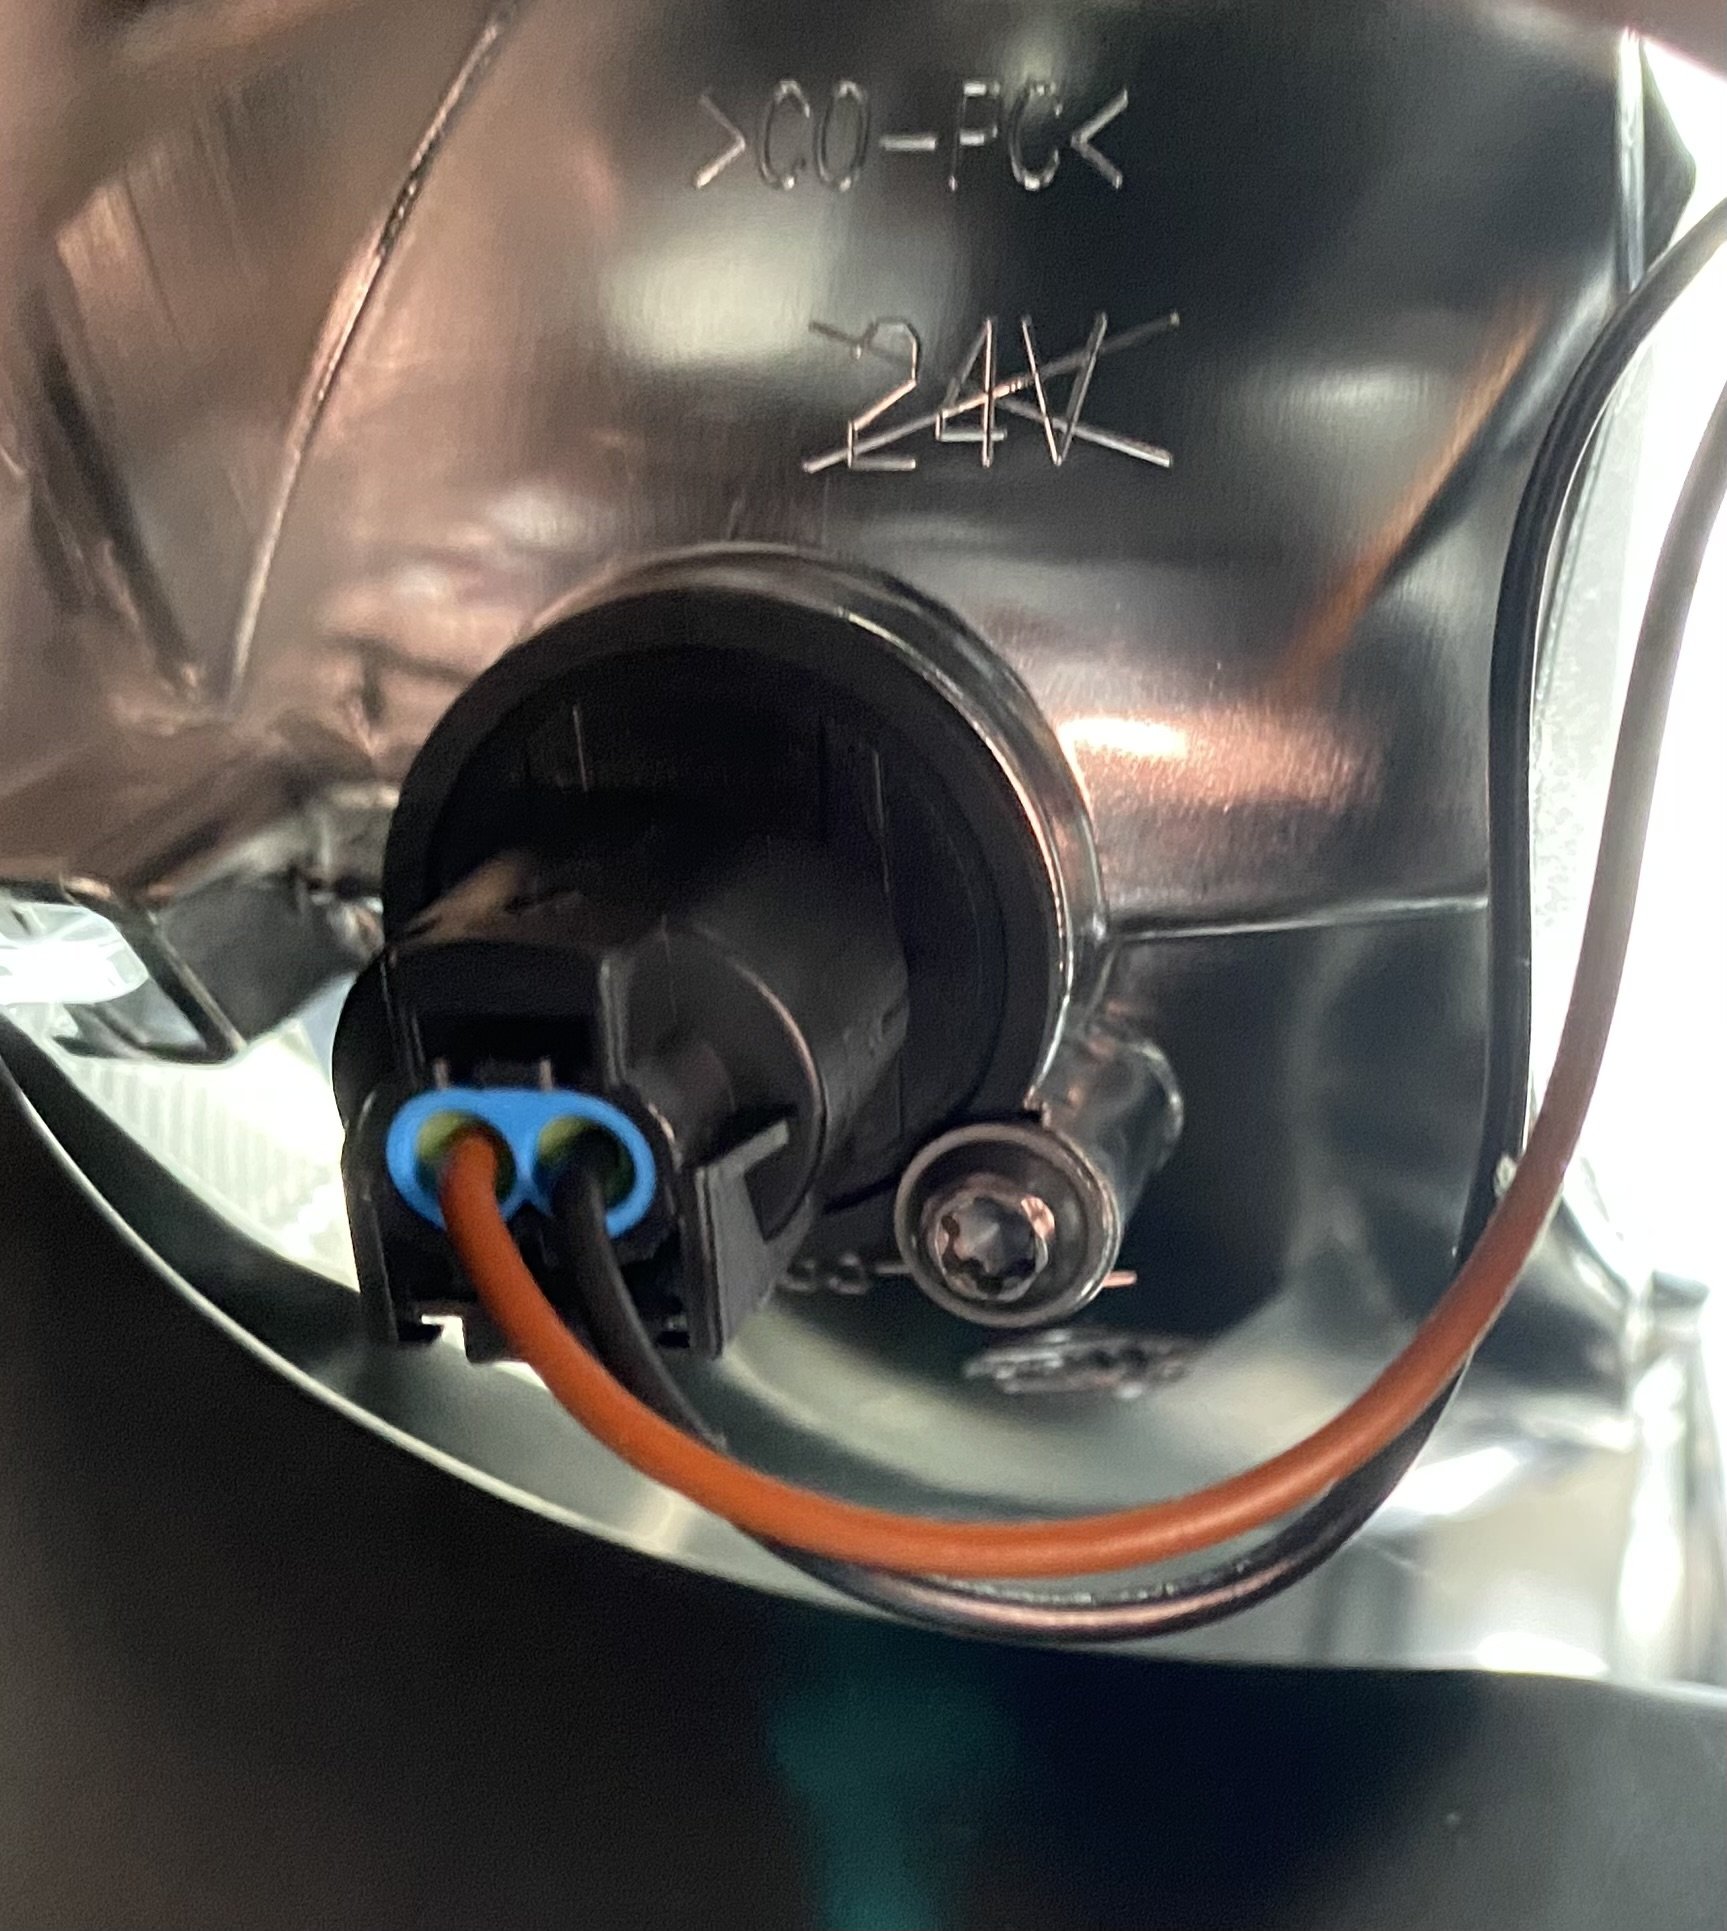
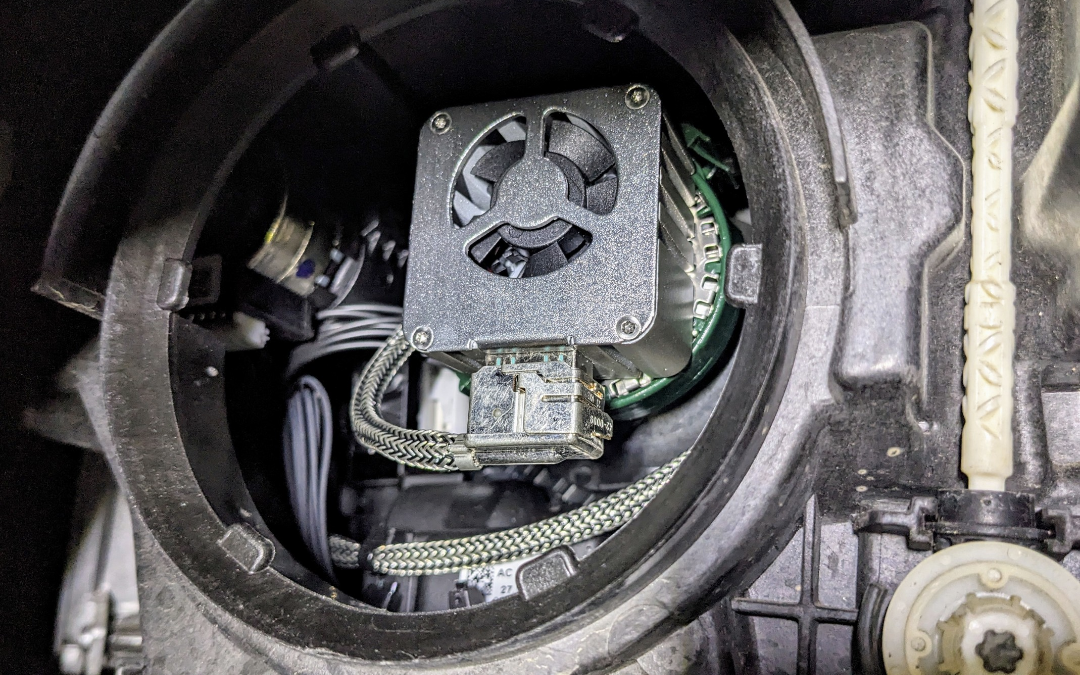
With apologies for spamming this thread again, but here’s another update from me. Hopefully this may be useful to people searching for this kind of info in the future. So I was unsuccessful with the PH24WY front indicator LEDs from CarModShop, because the pins didn’t correctly engage with the holes in the connector. However, I have tried a different pair: https://www.ebay.co.uk/itm/274963723745?var=575243879512 I have just fitted them, and they appear to work without bulb faults, for the time being at least. They’re quite nice and bright, too. And of course they have a nice crisp on-and-off. Removal and refitting is a right pain. In hindsight it would probably be easier to jack each corner up, remove the wheel and the arch liner - and then I think you’d have access to the indicator fitting from behind. But I did it the hard way, working from above. As you can see from the picture I’ll put at the end of this post, there’s a single torx T20 screw holding the plastic collar of the bulb. Someone on another thread has said that you only need to loosen this; I was sceptical but he was right. Slacken it about 4 or 5 millimetres (careful not to lose the screw altogether!), turn the bulb anticlockwise to release it from its bayonet-like fitting, and you have just enough wiggle room to persuade the plastic collar to go past the screw head. Refitting is “the reverse of removal”, but it was quite hard to turn the bulb to re-engage it. I don’t think I managed to turn it more than a few degrees, but at least the screw should hold it. Note that one of the plastic lugs on the bulb is different from the other three - the different one needs to align to the right (as viewed from the driver’s seat), then you try and turn it clockwise. Here’s that picture of the back of the PH24WY fitting. The screw “inboard” on the left-hand side and not too difficult, but on the right-hand side it’s between the light fitting and the inner wing and is hard to access. Probably less so with the wheel arch liner off…
 1 point
 -
I purchased a new model year 2023 SE L (with winter+) and found this had the film type heated windscreen, which I had no issue looking through and was extremely effective in the cold weather. I then then traded this for a pre-reg Sportline Edition (June 2025) and was disappointed to find the heated screen in this car was the wire mesh type. I eventually adapted to it but found the wire mesh was a detriment to visual clarity. I guess Skoda just fit whatever is to hand/available at the point of manufacture?1 point
-
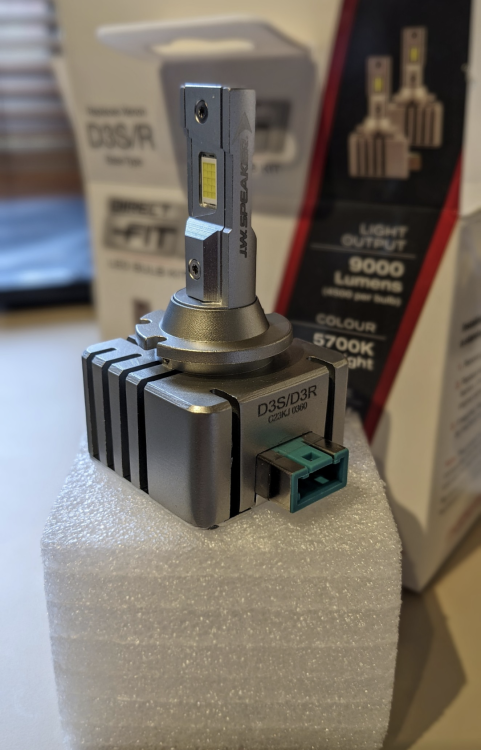
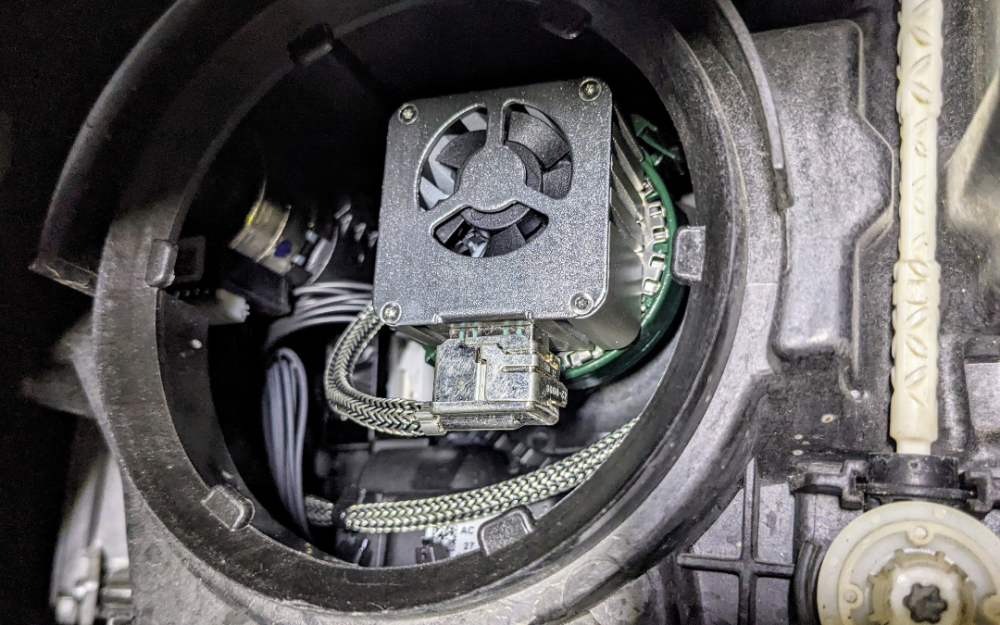
1 pointI replaced the D3S xenon bulbs with D3S LEDs about 1.5 yrs ago - no issues, no errors, no coding needed. Mine is MY17.
 1 point
 -
1 pointPS Just seen above it’s to protect the battery from the engine heat, that makes more sense. Must read all the thread before scratching noggin.🥵1 point
-
1 pointI think that's a bad idea in view of styrofoam being highly combustible. You're aware of the danger from a hot engine, but there are other possible sources of combustion, especially when the styrofoam gets some grease and oil on it. You'd probably get away with it and avoid an engine compartment fire, but if you were unlucky, your insurer would reject your claim.1 point
-
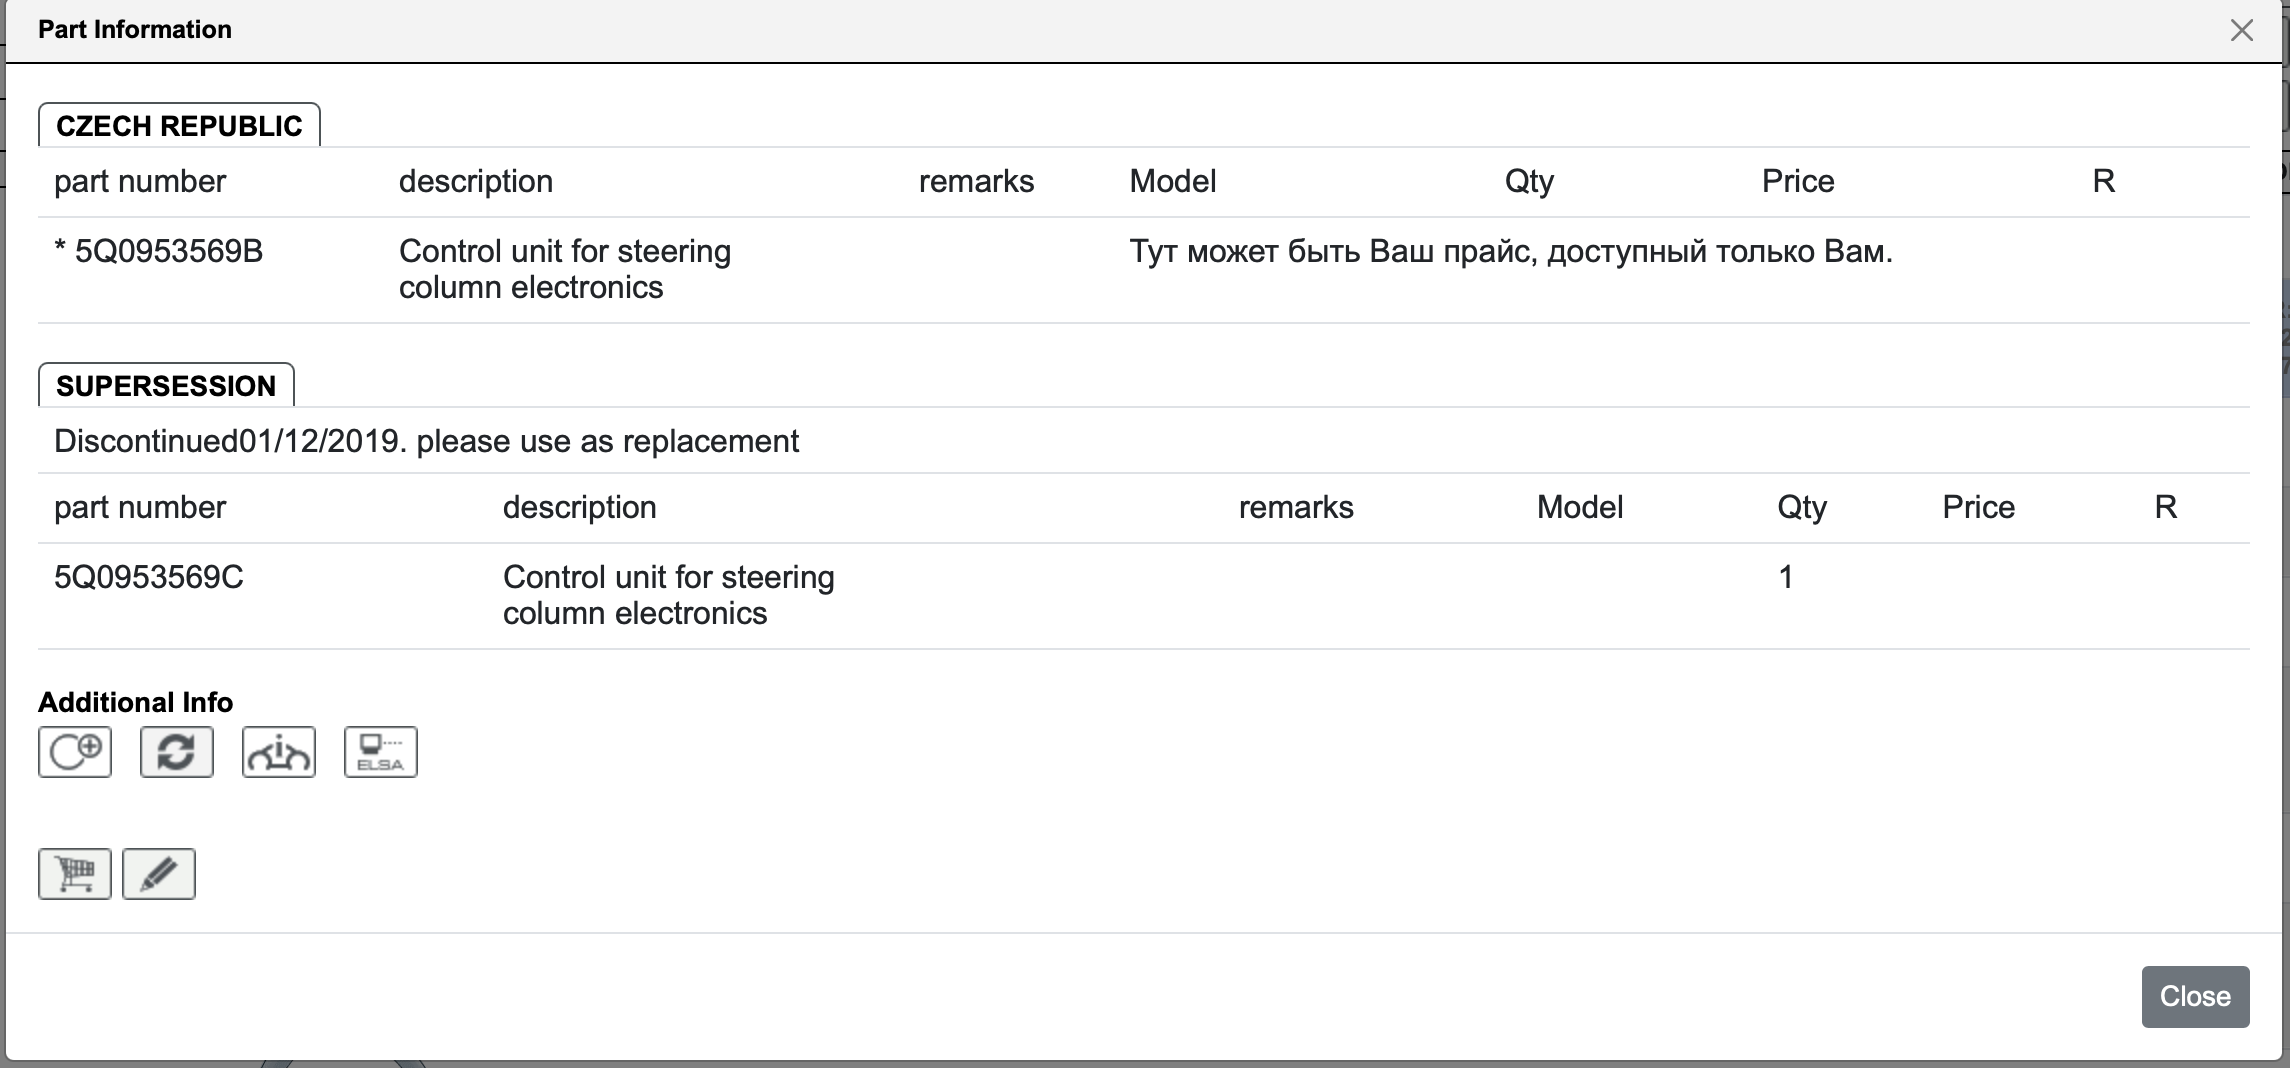
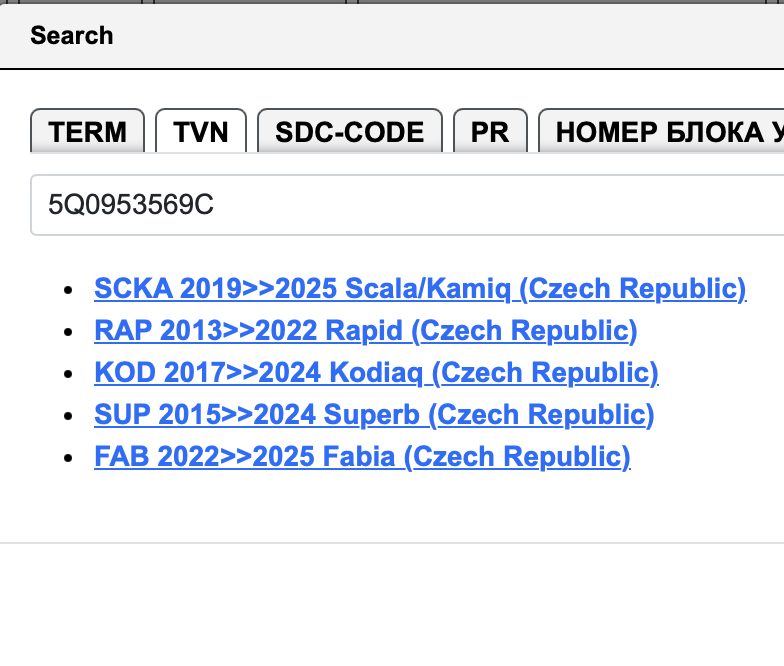
1 pointOk, here’s the result of my research: I ended up installing the 5Q1. 5Q0953569B — This variant is ambiguous. If the module is from VW, it does not include components for the third ACC stalk. The same applies to 5Q0953569A (this also concerns both A and B). It might be possible to solder the necessary components, but to be sure, it's better to get it assembled with the stalk. 5Q0953569C — Starting from 01/12/2019, the 5Q0953569B modules were replaced with 5Q0953569C, which were installed exclusively on Skoda. Apparently, this confusion became a problem for everyone, so they created a dedicated module for Skoda with support for the third ACC stalk. Transition to the new 5Q1 module — These began to be installed on facelift models and are no longer standalone "16 modules" but rather a "submodule" of the BCM. In the catalog, the stalk and the steering column module are listed together under a single part number. After spending some time on the diagrams, the following differences were identified: The 5Q1 module no longer receives the CAN Comfort connection. An additional LIN bus is added to the BCM module at T73c/54. Airbag contacts are now combined into the same connector as the others. The transmission lock switch is now routed to BCM T73a/24. This variant is possible only with newer BCMs. Visually, the necessary pins appear starting with version 5Q0937084CQ (installed from 01/06/2017). Whether it supports all functionality 100% — I cannot confirm. Will add more details later
 1 point
 -
1 pointSummarizing the install here to hopefully help someone do this in the future on their Superb 3. The entire installation is based on @ApertureS' wonderful and informative guide for the Octavia. I will try to fill in with some details that may be useful for those who like like to have everything planned out in advance such as myself. I've listed the required parts just above, quote below: Motivation: - I initially bought a steering wheel off an Octavia 4 and I discovered the install would require a new airbag and a special LIN adapter for the scroll wheels to work so after having been through that hurdle, I decided to tone down my expectations and just stick to a wheel matching this car's generation to ensure minimum compatibility issues. Additionally, I had a hard time finding a heated steering wheel which was also flat bottom, had white stitching, had DSG paddles and was not in a terrible state so I splurged on the new OEM one. This one also allowed me to reuse my airbag as Skoda seems to have changed the models at some point (fortunately, being an early 2019 model, I had the latest one (which is flatter on the top) - I found a Superb 3 owner online who had the heated steering wheel equipped from the factory so I asked him to check what clock spring he had. Combining that information with what ApertureS mentioned in his guide, I decided to go with the one ending in 569C as it was proof enough they would work. - Got the Kufatec adapter to make things a little easier. Process: 1.VCDS backup Take a VCDS backup of the coding on your Address 08: Auto HVAC and your Address 16: Steering wheel and do a full auto scan to ensure you know what errors are new and which ones are old. My old steering wheel coding was 6014. 2. The power feed I have replaced the clock spring before on my old O2 so I was quite confident that part of the installation would be easy so I focused my attention on how to wire the new circuit. I only started taking things apart after having managed to plug the terminal in the fuse box as I knew this would be the hardest part due to very tight spacing behind the fuse box. Inspecting the fuse box I found a few that had battery feeds that led nowhere (missing equipment of some sort I suppose) one of which being fuse 47, normally used for the rear wiper, which I don't have. The fuse was ignition switched and led nowhere so I figured I stick the Kufatec terminal in there. I tried removing or dislocating the fusebox slightly with no luck... I found a guide on how to do it on a seat but it seems it is further secured on the Superb and moreover it's wrapped around more plastics and bolts that were in the way... the fuse box would not budge so the only way in was through the back... Thankfully, Purpletom had a really good tip to help with finding the right way in from the back of the fusebox - many thanks @Purpletom for this once again - it did ease things up a lot! The ground wire got hooked up to one of the securing bolts around the fuse box and the new circuit was secured with a 10A fuse (similarly to how Skoda does it in the factory - 10A fuse on the top right of the fuse box on port 2) I got the info off a guy who had a factory fitted hsw. 3. Clock spring and new wheel Removing the old bits: - turn the wheel 90 degrees right, pop the airbag from the back. - turn the wheel 90 degrees left, pop the second latch off and free the airbag. - straighten the steering wheel and disconnect the battery - give it a few minutes for safety. - lift the airbag, lift the white tab on the yellow plug and pop it out. - push the black tab on the left that connects to the steering wheel controls and push that out as well. Set the airbag aside. - Check the size of the securing bolt.... To my surprise mine was a 8.8.... I only had a 10.2 that would fit my old Octavia... Don't ask how I found the right size... This is something you can easily check before the installation by just popping out the airbag without disconnecting it. - Unscrew the bolt and remove the steering wheel. - Release the steering wheel adjustment and pull down as far as it goes then towards you as far as it comes. - Use plastic prying tools to release the top plastic cover. - Unscrew the 2 bolts securing the bottom plastic trim that are in plain sight and the 3rd one on the bottom side of the steering column - The clock spring is secured by 3 small torx bits, remove them. - Unplug the stalk connectors , airbag and steering wheel controls form the clock spring and remove the thing completely. (try not to spin it around if you plan to sell it onwards after this) Refitting the new parts: - Put the new clock spring in place and secure it with the 3 torx screws. - Connect the Kufatec T16 plug to the car's T16 plug then the Kufatec T14 plug to the clock spring - Connect the rest of the plugs to the clock spring and release by removing the red securing tab - place the bottom plastic trim over the steering column agian carefully, be mindful of the start button and how the plastics fit together and secure it with the 3 screws. - push the top plastic trim back into place nicely (first slide it in the back then click it down in place. - Place the new steering wheel on top, make sure the line markers align and screw the nut back in to secure the entire thing together. - connect the airbag to the steering wheel controls on the left. - connect the airbag to the main slipring and push the white tab back in. - push the airbag back into its place. At this point you are ready to reconnect the battery and enjoy a marvelous sight of errors, beeps and flaws. Code the new steering wheel according to this: Code your new steering wheel controller the same way as your old one. Clear all errors and see which ones come back. In my case it was the start/stop system error (with no VCDS error) and ACC error every time I push the acc stalk (with one error in the Address 13: Auto Dist. Reg) Give the car a few hours of sleep (I gave it 5 hours or so) Apparently, the ACC module goes in some sort of sleep a few hours after the car shuts down... The long hours of sleep will let the car also figure out you installed the same battery and not a new one and your start/stop system error will also disappear. Take it for a drive and test all the systems that presented errors after the retrofit: - Park assist - Lane assist - Front assist - ACC - Hill assist - Start/Stop - and of course... the heated steering wheel. Park it up agian, clear the errors wit VCDS again and at this point, you should have the same amount of errors as you had before the retrofit. I hope I covered everything here - the forum won't allow for more than 10MB of pics so I will stick to a single picture upload. Happy to help people in the future with details I may have missed when you find this relic post.
 1 point


.thumb.jpg.06721e8c8b33ed0eea16572ff131b291.jpg)