


Leaderboard
-
StealthRS245
Members12Points212Posts -
.jpg.1006585dfe4e2977315b67c3d642e37b.jpg)
Guest_
FREEDOM8Points83,824Posts -
.jpg.68c7823d355ff3e5b20e82ddbf78398c.jpg)
PetrolDave
Resident Member7Points8,197Posts -
Lady Elanore
FREEDOM7Points24,873Posts


.thumb.jpg.f83a46b9b3c0d976b9dbffbb523c9874.jpg)

Popular Content
Showing content with the highest reputation on 29/09/20 in Posts
-
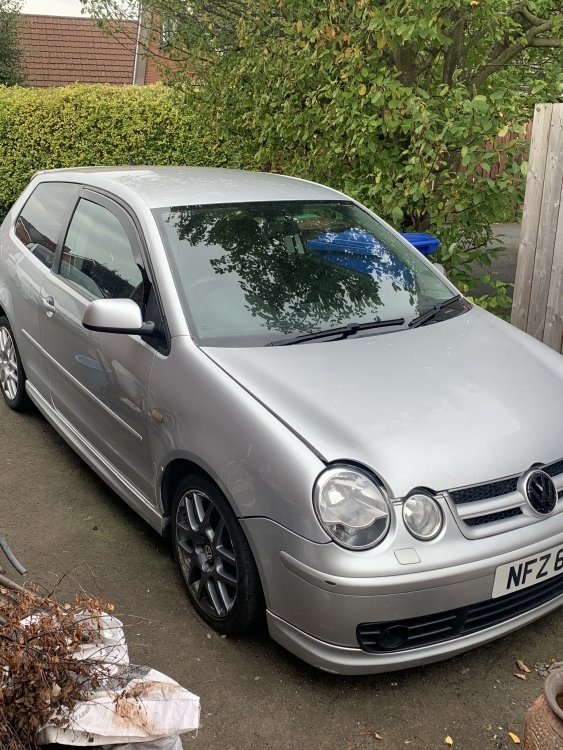
Well that’s the Fabia vrs sold have owned two furbs over 5 years first one being a silver one with mild map which owned the longest. The last one I had owned for just over a year and a half with all the bells and whistles 250bhp 500nm. But picked up a rare vw polo gt tdi 2005 3 door full votex kitted absolutely stole it aswell got big plans for it just in the middle of fitting all the handling parts for It brakes polybushes coilovers etc etc then I’ll move onto the power side of things. But I’ll say farewell to the page I might keep yall posted on the none Skoda topics
 3 points
 -
3 pointsAnother Race Blue Sportline, only the little engine though. I picked it up in Saturday and very happy so far.
 3 points
 -
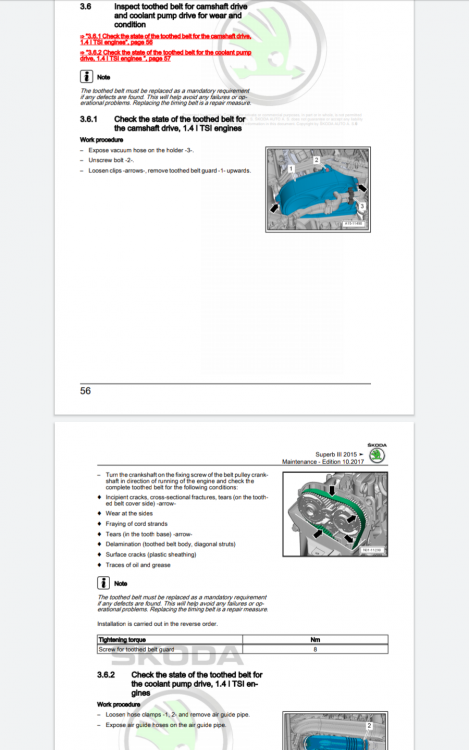
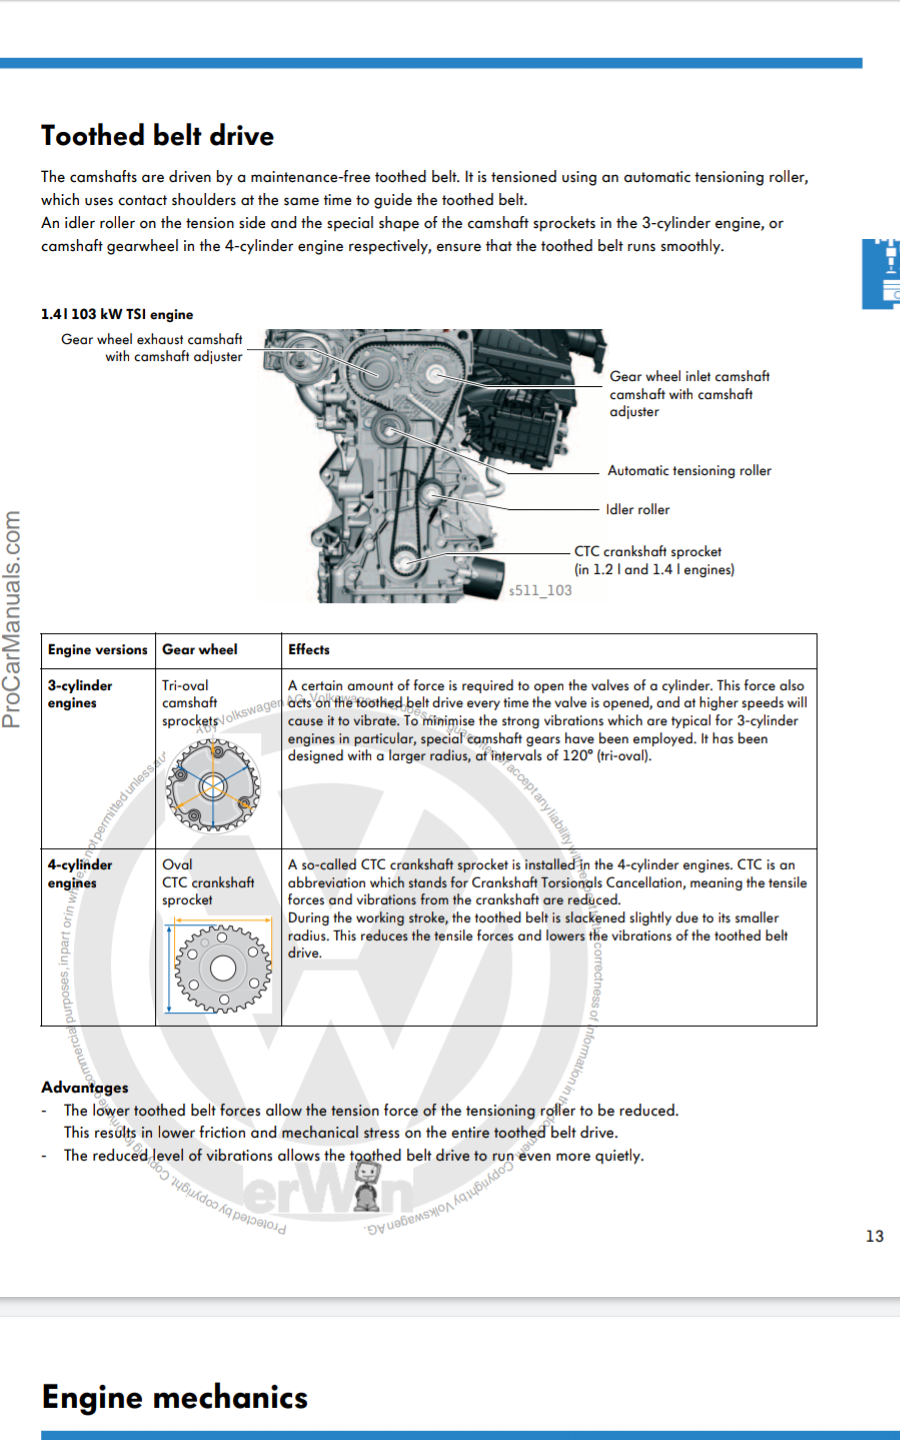
Calm down ladies......let me explain Firstly the belt does not run in oil, someone is confusing this with Ford Ecoboost engine designs. There is no MUST about cambelt changes, they are recommendations only, in any case any car over 5 years will normally be out of warranty so no claim would be possible. But heres some detail...... The 5yr/60000 mile recommendation is a Skoda UK (official importer) thing. Lots, but not all dealers will follow that, except some try it on at 4yrs/40,000 miles. Skoda factory maintenance manuals on the other hand state that its recommended the cambelt is examined at 5yrs/120,000 (iirc) miles and give a detailed procedure of how to examine and what to check. Then take appropriate action, change the belt or leave it for another 2 years/20,000 miles and re examine. Until the mileage limit of 120,000* is hit then change it regardless of condition. A number of design innovations supposedly make this possible. Firstly the belt drive is quite simple, no driving the water pump directly, which is now driven by another much smaller belt at the opposite end of the camshaft. The sprockets are of a CTC oval design which reduces repetitive tension stress. The belt material and construction used are now much more long lived and its now quite a beefy wide belt . The valves are actuated by low friction roller rocker fingers again reducing load. SSP-511_The_New_EA211_Petrol_Engine_Family.pdfpdf Both Continental, who came up with this innovation over many years of development and VAG have stated at various times in promotional and technical papers that the belt is now a "lifetime" part, but its also obvious that when it dies its life is over. There is also the other vacuum cleaner size toothed belt at the other end of the camshaft that drives the water pump, but its not so instantly disastrous if that were to break. Hope this help you all understand EA211 cambelts and make informed decisions. *120,000 is my recollection, but it may be 110,000 or even 130,000 miles. In my experience its unlikely a UK skoda dealer would carry out such an inspection even if asked.

 3 points
 -
2 points
-
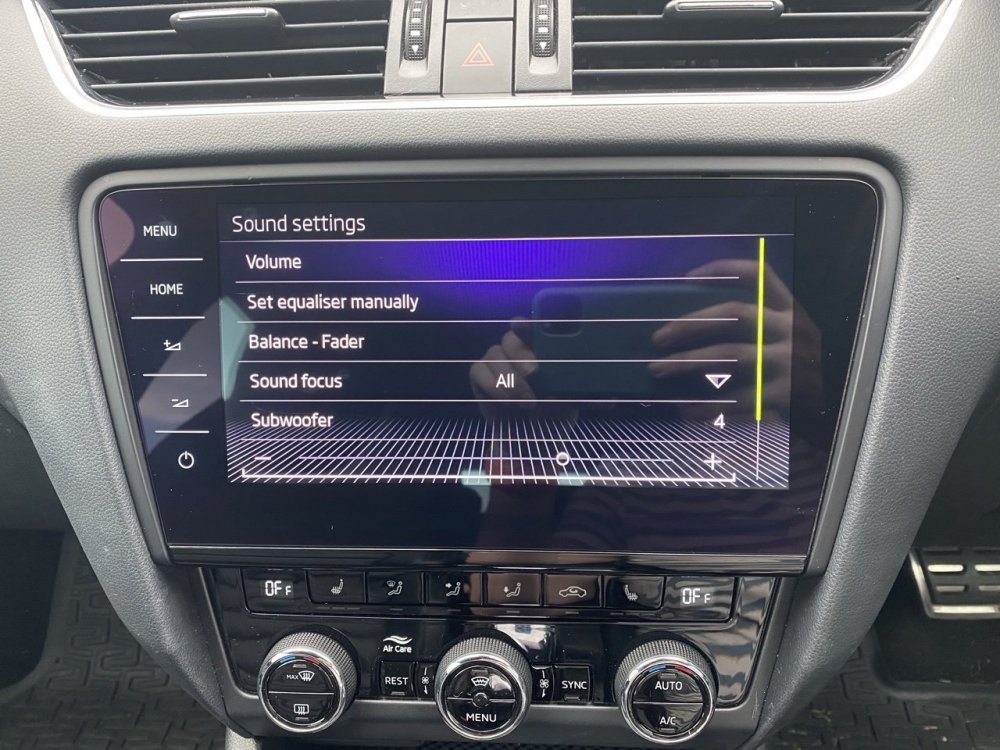
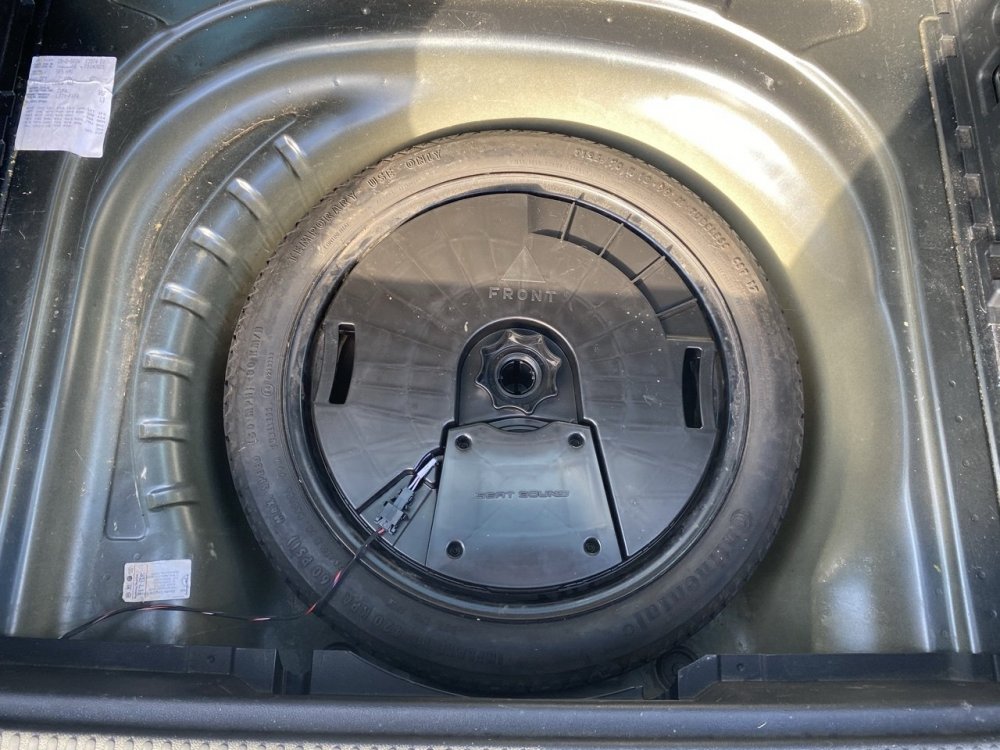
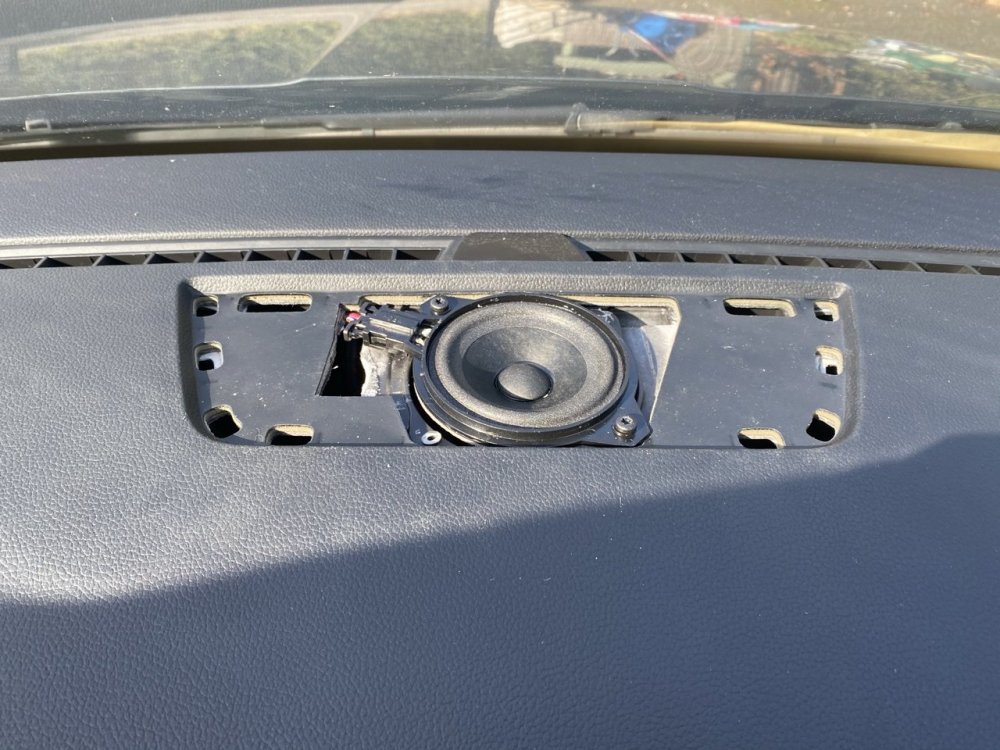
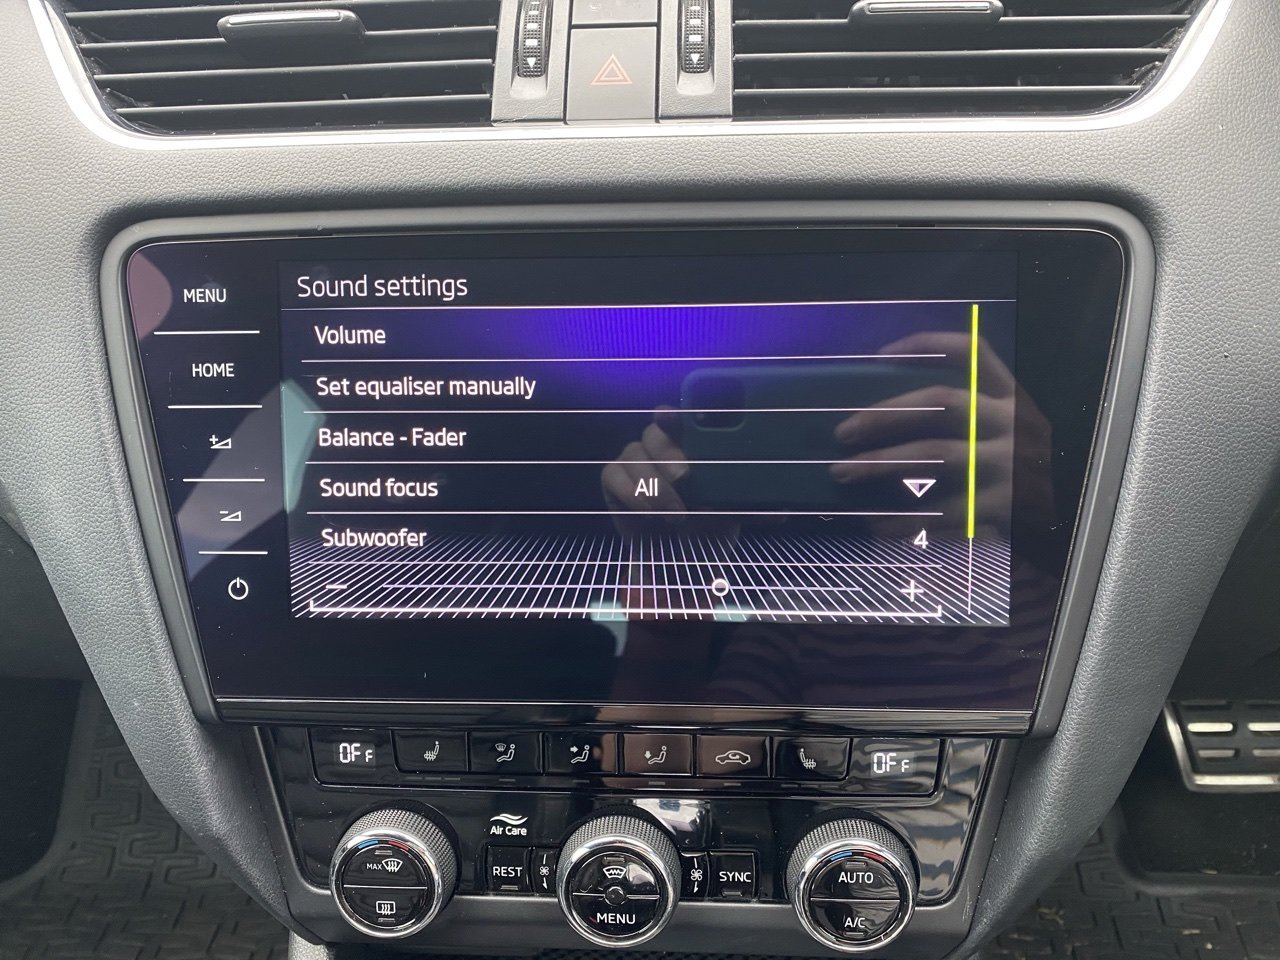
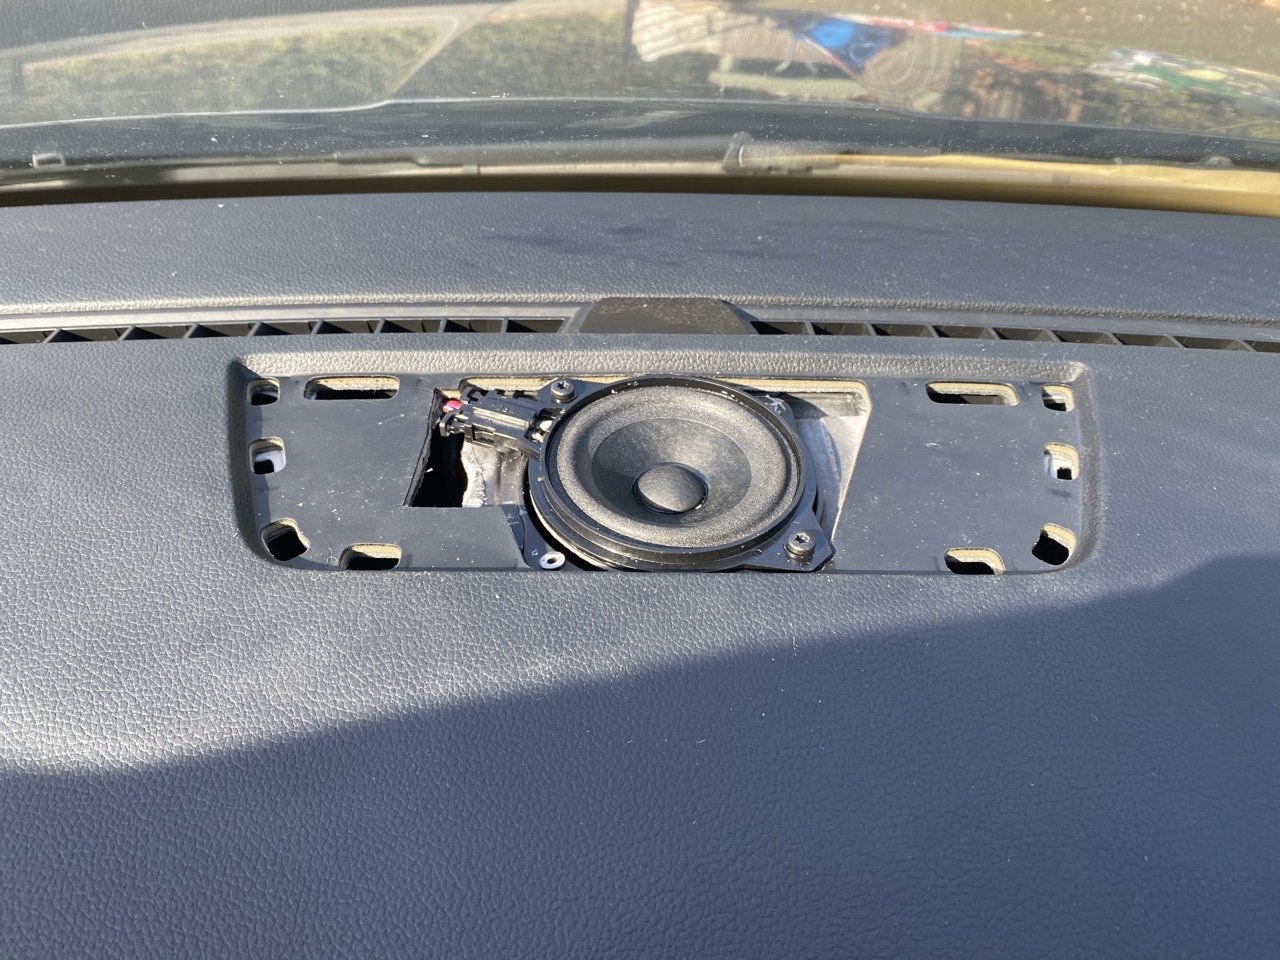
2 pointsFinally added the hardware to complete the 9VD Audi/SEAT Sound System retrofit. This isn’t a config Skoda ever offered and I’m very sure this is unique in an Octy so far. With some VCP magic it’s possible to load the 5 channel EQ and activate sub and centre speaker pins on the Columbus radios so I did it and with the extra speakers added I’m really happy! It’s no custom build and it’s not quite as powerful as the CANTON system (though I also have the cheeky ‘Sound by CANTON’ splash screen 😬 but I’m really happy. YouTube will compress the hell out of this but hopefully you can hear the centre speaker and sub working. That needs time to bed in a bit but I’m happy it’s added some low end for now. I need to adjust the grill a bit as it’s not gone back in quite perfectly but that’s a job for later. For now I’m happy the stereo system finally has some decent punch and all for under £130.
 2 points
 -
2 pointsAre they doing software updates over the air, a la Tesla? But doing it in the Microsoft 365 style whch is to fk up all your other hard won settings in the process?2 points
-
2 pointsDon't mix all-season and 'normal' tyres. If you have to drive in snow, the car could spin. Goodyear all-seasons are very well reviewed. All-season plus summer tyres is even worse.2 points
-
2 pointsYou can watch how tyres go on rims in a factory on Youtube. Tyre Fitters in a Tyre & Exhaust centre clamp the wheels differently. Some are hashy and damage the wheels, or clamp not in the centre bore only. Some are hashy just moving wheels / tyres from the car to the Tyre Fitting Machine, then the Wheel Balancer, and back to the car.2 points
-
2 pointsVW Group have a partial solution for the 1.5TSI EVO and issues with DSG's. They are going to have the 1.5 TSI with a DSG as a Mild Hybrid only and also do the same with the 1.0TSI's with DSG. So pulling away will be in Electric mode, and much smother and will do very nicely for the WLTP & RDE2. That is the future, if you can not sort it then bodge it. As to the Manuals, then VW keep on about super efficient new gearboxes. No idea if they are now fitting these or not and if they can 'fix' the issues that have the cars perform poorly when cold or starting off while still cheating the WLTP / RDE2 results.2 points
-
2 points2 pointsI've said pretty much the same more than once myself. A very unpopular sentiment with the total fans and the newer is automatically better brigade. This thinking is precisely why VAG have gotten away with so much for so long, that and a motoring press too easily impressed by infotainment systems and 'assists'. For me the particular annoyance is that the 1.5 TSI is the important engine. 1.0TSI - Gutless, vRS iV - too dear, too complicated and DSG All Diesels - Great Torque...... but - regen, regen and more regen with a side order of regen So unless they fix the 1.5 it's not a case of an Octavia with a different engine, its a case of a different car altogether in future.2 pointsBoth myself and my son have Octavias with the 1.0 litre 3 cylinder engine. They are fine for us and will cruise at 70 mph all day long. The engine is much nippier than you think. Why not have a test drive in one so you can see for yourself.2 points2 pointsHi all The Superb Mk3 AWD is fitted with a 5th generation Haldex. Regarding VAG Group, and Skoda in particular, it also equips: Octavia 3, Superb 2, Karoq, Kodiaq. It may also apply to Scala and Kamiq, unless they're equipped with 6th generation. I actually don't know for these latter. Since I have limited trust in garages in my neighborhood and because I like 'DIYing' on my car, I've decided to change the oil of my Haldex system on my own. If one follows Skoda recommendations, workshop manuals (see cardiagn.com) only mention a simple oil replacement every 3 years and that's it! But when you start diving into documentations or in youtube videos about 5th gen Haldex, you can notice that the oil pump has an intern strainer, which trends to get really dirty, whereas it's never cleaned ! Hence, here is this humble tutorial ! I apologize, if there are any vocabulary issues... I'm French. Firstly, here are all elements, that we're going to look at: #13 : Bleeder screw (M10x30) - P/N N 910 827 01 (tightening torque 38 Nm for Superb Mk3, but on other VAG model it may be 32Nm - Have a look to the workshop manual corresponding to your car. See cardiagn.com) #14 : Filler screw (M10x1x10) - P/N N 902 818 02 (tightening torque 15 Nm) #3 : Retaining screw (M6X35) for the Haldex Control Unit - P/N N 105 540 05 (tightening torque 9,5 Nm) #11 : Retaining screw (M6X35) for the Haldex hydraulic pump - P/N N 105 540 05 (tightening torque 9,5 Nm) #9 : O-rings for the pump - P/N 0CQ 598 305 (⚠️Note : This P/N is a kit, which includes both O-rings, but also both retaining screw #11! Don't by these screws twice!) Gear Oil : According to ifinterface.com: P/N G 065 175 A2 or According to what dealer sold me: P/N G 60 175 A2 - 850 ml (~29.9 fl oz) By the way, don't forget to check that the oil can actually contains 850ml through the gauge on the side of the can. Indeed, just for the short story, the oil can I had bought only contained 750ml, though brand new and still crimped . I had to go back to the dealer to exchange the oil can. The requested volume for the maintenance operation is usually around 700-720 ml (24.6-25.3 fl oz), thus it leaves little room for error (and even less if the can is not filled correctly). The total bill was ~75 € for all parts (without screws #3, which you don't need to change). - Difficulty : 2 - Time needed : 1h30 approx. - Number of person needed : 1 - Necessary tools : ¤ Screws #3 and #11 : Torx T30 or 10mm Hex socket, if you don't have Torx ¤ Screw #13 : 8mm Hex ¤ Screw #14 : 5 mm Hex ¤ For Hydraulic pump strainer screws : Torx T10 ¤ Ratchet or classic wrenches for disassembly ¤ Torque wrench(es) to apply specified torques: (9,5 / 15 / 38 Nm) ¤ Short and intermediate extensions for ratchet or torque wrenches to enable easier access to screws ¤ A small flat screwdriver ¤ Oil drip tray ¤ Rags ¤ 1 wooden toothpick ¤ Lifting means ¤ Syringe for oil filling Dealing with the syringe, I've bought this one for 20-25€ on Amazon. It makes the job perfectly! Step #0 : Preparation You need to lift the car high enough to get under the car and to get enough space to move your arms comfortably. In my case, 370mm (~14.5") of ground clearance were enough. Note: Though you've lifted the car, it needs to remain horizontal to make a proper filling with right oil level (see step 5). If this case, I had to compensate the natural slope of the ground. Step #1 : Oil draining Start with the filler screw (#14 / blue square) removal for more safety. Indeed, if it's stuck, you won't be "snooked", with a completely empty Haldex oil tank and no way to refill it. Once you've removed the filler screw. Don't get rid of it immediately. You'll need it again temporarily for Step #4! Now, you can remove the bleeder screw (#13 / red circle). There's no difficulty to remove these 2 screws. There are 2 good news for this step: - The drain screw is long enough, so that you won't get surprised, when the thread gets totally disengaged from the housing. - Even if the drain screw has an horizontal axis, there's only a small quantity of oil, and since it is very fluid, it flows well vertically from the edge of the hole. Little chance of getting trapped with the oil, which flows suddenly and farther than the drip tray. Phew! However, it takes several minutes to really let all the oil drain: Step #2 : Hydraulic pump removal Whereas oil is still dripping, start removing 2 retaining screws (#3) for the Haldex Control Unit. They are quite easy to access with a small 1/4'" ratchet. After that, you can rotate the Haldex Control Unit, to bring the connectors on the top upside down. This simple operation will help you saving a huuuuuuge amount of time ! But this tip is explained / told nowhere!!! Otherwise, you will have to disconnect the pump connector 'blind'... And if you do this operation for the first time, You hardly understand how to proceed. Decency leads me to shut up the time that I spent trying to remove this µ%£$@&# connector before I changed my mind on the operating process. Pump connector before Control Unit removal : Once the 2 retaining screws of the Control Unit have been removed, you can easily access to the connector: Now simply insert a small screwdriver in the notch (red circle) and push in the arrow direction. Very simple... Then, you need to unclip the black plastic wire protection, which keeps the pump wiring away from the propeller shaft. It's clipped in 2 locations on each side of the shaft, You just need to pinch the 2 lugs at their end to make them go back through the hole in the housing. Left side (Control Unit side) : The upper red circle in the mirror shows what you hardly see in the lower dotted circle... It's clearly the circled part, that has to be pinched and then pushed/pulled in the arrow direction. Right side (pump side), just proceed the same way : The pump wire is now fully free. You can now remove the 2 retaining screws (#11) of the hydraulic pump (#10). Very easy too. Warning from this point, it will be 'Apocalypse pump' ! Please keep children and sensitive souls away from following pictures! Pull in the pump axis direction, while rotating it around its axis in one direction and then the other to ease the removal. Be very careful, when the pump is about to get out completely, not to strike the contact surface of the housing, nor to strike the pump strainer. FYI, the strainer is not sold alone. It's sold with the pump, which approximately costs 180-200 € (w/o VAT) ! And there, under your dumbfounded eyes , here is the sinister spectacle that awaits you: A strainer almost entirely clogged with sh**t! And the pump housing is not even better... FYI, this Haldex is only 2.5 years old and has only 45000 km (~28000 mi) on the clock. And considering the way I use my car, I don't think the Haldex faces a heavy duty use. Therefore, as I already mentioned somewhere on this forum, one can only notice that the oil replacement process in the maintenance manual for the Haldex 5th generation is clearly incomplete ! By the way, look at this video below from ~28 mn, you'll see the impact of the strainer cleaning on the pump demand signal ... It's clearly a proof that w/o a strainer cleaning, the pump unnecessarily faces severe conditions and that sooner or latter there's a risk of pump failure... Step #3 : Pump cleaning and reassembly Since the pump is now removed, you need to remove the strainer. Use a Torx T10 for both screws: Then wipe the pump dry with a rag, being careful not to get the dirt into the ports. Fort the strainer, a cleaning with some white spirit and a soft paintbrush. But be careful, not to brush to hard to avoid tearing the strainer mesh, which is very thin!!! Eventually, a simple soaking in a small glass of white wine ... sorry , I mean... White Spirit should help removing most of the dirt and finishing finely with the paintbrush. Let the strainer dry, while you remove both O-rings around the pump, using a wooden toothpick as a lever. It will avoid hurting the grooves. You can now, clean the area between both grooves with white spirit. Once everything is clean, you can mount the strainer back onto the pump. Be careful ⚠️ ! I didn't find any information about their tightening torque. Thus be sure to tighten enough to firmly place the strainer on the pump body (to make a good seal against dirt), but not too hard to avoid risks of cracking the plastic. Shall I remind you the price of the pump, just in case ?!? Now, pour some drops of fresh oil in a small container. By the way, FYI : Haldex used Oil 2.5 years old & 28000 mi on the clock / Haldex fresh oil Put few oil drops on both O-rings to lubricate them and install them onto the pump. Keep using the wooden toothpick if needed. The pump is now ready to be mounted back onto the car : Now, you can clean the housing with rags before putting the pump back in place: Don't forget the bearing surface, where the threads of the retaining screws are located. Here you can see some dirt left, that I removed right after taking the picture... You can now put the pump back into the housing. Be careful, not to pinch both O-rings . Once there's only 5-6mm (1/5 -1/4") between bearing surfaces of the pump and the housing, it gets a bit harder to push in by hand. This is probably caused by O-rings, which may act as a slight "bead" to efficiently seal. You now realize how clever it is, to lubricate both O-rings to prevent them from rolling inside out and to make this operation even more difficult. When the pump stops into the housing, you can put 2 retaining screws back in place (#3 - tightening torque = 9,5 mm) Put the black palstic pump wire protection in the correction position and clip it into both holes. Be careful, you still work 'blind' (unless you have a small mirror) . Reconnect the pump connector on the Haldex Control Unit and rotate the Haldex in its normal position. Watch out to rotate the Control Unit in the correct direction not to twist unnecessarily the pump wire. Put both retaining screws to fix the control unit (#3 - tightening torque = 9,5 Nm). For the lower screw, the propeller shaft flector is slightly in the way and leads you to put the bit with a small angle. But you can still manage to have enough grip with the bit to tighten. You can now install the new bleeder screw (#13 - tightening torque = 38 Nm). Step #4 : Oil filling According to the workshop manual, the filling shall be performed with an oil temperature between 20°C and 40°C (68°F / 104°F). If the ambient temperature is to low, put the oil can in a bucket filled with hot water for a while to bring the oil at the right temperature. You can now inject fresh oil in the filling hole (see blue square, on the 5th picture) with the syringe. You have to fill with oil, until it overflows. This should be approximately 650ml (~22 fl oz). Put the OLD filler screw back in place temporarily and tight it slightly. Yes, you've been told to keep it upon removal at step #1! Do you remember? ! Etape 5 : Oil level adjustment and ending Start the engine and let it run for ~1mn, to let the hydraulic pump fill with oil correctly. Shut the engine down, then remove the old filler screw again (#14 / still the blue square on the 5th picture ). Top up with oil until it overflows again, and you can put the new filler screw to finalize the operation (#14 - tightening torque 15 Nm). That's it! Fresh oil! Clean pump strainer! Happy Skoda owner! ... You can put the car back onto the floor now ! Now it's up to you!1 point1 pointFirst, just to comment that the VAG got their cooling systems right, I have never, across 3 hard worked VAG vehicles seen the temp needle go past plumb vertical. Second, the exhaust started to blow, on the 10 year old car, a quick pH call to JW down at Castleroe, Coleraine, diagnosed the problem, instantly, the sliding SS component that links the front and rear sections had failed, in that the mild steel clamp had rusted through. BUT everything else was as sound as a bell and very very fresh looking, for a comestically neglected 10 year old car. Just wanted to say sommat positive. Marcus1 pointI’d call the dealer first and see what they say, another option, is to try the skoda customer support help, though be warned that they are either brilliant or useless, depending on who answers the phone.1 point1 point1 pointHolding parking tickets and alike. To remove it, you need to remove the A-pillar and then I believe there is a single bolt holding it in place1 point1 point1 point1 pointI find the base of the seat is a bit narrow alright (if you're in anyway portly) I'm sure if my waist was a few inches thinner and my weight a few stone lighter they would be fine.1 point1 pointYou are more than welcome. The Cupra console bushes should be fitted with the flush side towards the back of the car and with the hexagon hole flat at the top and bottom.1 point1 pointI don't have a vRS but found the same. The cars have a strong FARB of 24mm (same as a Golf 7R) but a weak RARB (18mm vRS, 16mm standard) when Golf sizes are 20mm and 22mm. I found the rear did wallow so changed the RARB to a standard Golf 7R one of 22mm. (you would need a GTi PP one if you are FWD) It fixed the problem. I would have said before that it was done to compensate for the wheelbase length difference between the Octy and the Golf but the problem with that is the handling has been spot-on for years since the change so at a loss for doing it other than cost and weight.1 point1 point1 point1 pointIt honestly sounds like whoever did the work on your car is a bloody cowboy.1 point1 pointFew other threads on this topic including the one below, as well as some suggestions for brand options if you scroll up. Would also consider a dogbone (lower) engine mount to tighten up the engine chassis connection which adds to the 'feeling' of tighter handling, if you haven't already. Not only reduced wheel-hop under load, but when cornering on mid/higher throttle, it works well with a tighter suspension setup too1 point1 pointThis link on national tyres is the Continental AllSeasonContact in size 185/55R15 86H. It's a good all-season tyre. Not the same as the TS860 which Continental classify as a winter tyre. Both tyres do well in tyre reviews. https://www.national.co.uk/tyres-search?width=185&profile=55&diameter=15&rating=H~&loadindex=&pattern=allseasoncontact However, Vredestein has just brought out a new all-season tyre called Quatrac. It replaces the Quatrac 5. Some sizes are being released now, other sizes won't be available until 2021. It came 2nd out of 32 all-season tyres in this month's autobild all-season tyre review. Goodyear G3 came in 1st place. https://www.autodoc.co.uk/tyres/vredestein-8714692358241-ap18555015hqt6a00 autobild September 2020 all-season tyre review https://www.tyrereviews.co.uk/Article/2020-Auto-Bild-All-Season-Tyre-Test.htm1 point1 pointAll seasons can be the best of both worlds or compromised in both summer and winter. If you are not the type to drive your car to its full capability then an all season on the UK is a good fit and forget. If you are likely to push a bit harder then a dedicated set for each half year is a much better option. As commented above, winter tyres are not snow tyres. They are just more suited to colder average temps and clear water much better. Yes they are more suited to snow compared to a summer tyre but a full snow tyre they are not. If you go to a tyre shop in the UK asking for winter tyres they will offer you rubber suited to driving on UK roads in the winter unless you ask for specific snow tyres.1 point1 point1 pointI think it has. But I’m also keeping it mind that these rumours fly around every time an iOS update comes out and that I may just be seeing something that isn’t there. A placebo if you will.1 pointAll right, thanks for that information. I'll look at the cutting tool as it would definitely achieve a best finish to the hole and that's something I want. I have bought the pads already and they are really cheap, but I keep in mind that I can use the araldite adhesive as well! I also have found out that there is a genuine kit including all necessary parts for this retrofit - 6V0 054 630 - and i've found it really cheap on eBay, but too late! I've already ordered all the parts and going through all orders to cancel would be awfull. So I'll keep my orders and just wait to receive them all Thanks1 point1 pointSome autoboxes had a similar issue. Jeep used the same gearbox on the big 5.7V8 Petrols and the 2.8 diesels. The petrol pushed out more torque and considerably more power but the gearbox was failing on the diesel. This was found to be the pulse loading from the 4 pot diesel that would shred the lockup clutch and destroy the torque converter splines. V8 with more power and torque no problems. On subsequent boxes they fitted a "Torsional Damper" basically a DMF that the lockup clutch mated to to protect the lockup clutch, torque converter and splines. On a manual it's whatever is the weakest, clutch or gears? If you fit a SMF in place of the DMF and fit an upgraded clutch then the gears will see that pulse load. The 5 speed box is weak to begin with, I wouldn't fancy it's chances with a remapped engine, SMF and upgraded clutch.1 pointArh the dreaded mirror shot Hey at least you remembered to wear your kegs. Glad they fit and you approve. I'd missed that they had a thigh pocket, that is indeed handy, I tuck my phone... well it works for me No I have a little bag which to be honest I hate with a passion. I'd toyed with one of these wrap/cummerband things. I tried the arm sleeve things and the wires just snag on brush, I have a common behind me and I like the lesser trails as they are roots and earth over tarmac. I've also got to get a top as I've lost my quite old mountain hardware base to SWMBO. I also use flat, or zero drop shoes like these from freet: https://freetbarefoot.com/product/freet-respond/ For me, as mentioned before they got me off the couch and running didn't feel as hard, yes a bit more painful on gravel but once moving, ok. I have a pair of normal runners too for when I'm going on the fells as they aren't for running then, just light grip over boots.1 point1 point1 pointhttps://www.briskoda.net/forums/topic/482795-looking-to-improve-grip-handling-of-20-tsi-220-ps/?tab=comments#comment-5426375 i posted some stuff in the thread above, also strut brace - subtle effect cutting down chatter through the wheel when cornering on bumpy roads front and rear arbs - brilliant upgrade bilstein spring/shocks moderateimprovement although fitted at the same time as my arbs michelin ps4 tyres (im running 18s) and get a proper hunter 4 wheel alignment - this is what i would do first!1 point1 pointMy 2019 came with OEM-fit Goodyear Eco Somethings; 185/50/16. They seem perfectly good - grip, turn in, aquaplane resistance, emergency braking in the wet all seem perfectly fine. I run comfort pressure settings as the 50-ratio is arguably a bit stiff on ride. I have tried loads of brands and types in the last 45 years on many, many cars, but while stuff changes all the time, it's all swings and roundabouts and endless consumer marketing..... The thing is, when you replace old, worn-out tyres with new ones, they always feel amazing, no matter what they are. These days, I tend to just look at the wet grip rating and the price, as I'm no longer driving on the limit of lateral adhesion or doing 4-wheel drifts so much. Unlike quite a few people entering supermarket car parks at peak times, or on narrow roads where they can't see a thing ahead.... Just look for a good deal unless you are being bankrolled by Mercedes F1....1 point1 pointI've a few brochures that may be of use, one from Nov '17, one from Jan '18 and a final one from July '18. I've also got some from '19 if needed (I was toying with buying a Superb for entirely too long...) 11-17 superb_pricing_specs.pdf 1-18 superb_pricing_specs.pdf 7-18 superb_pricing_specs.pdf1 pointMine is worst between 1st and 2nd. And in reverse. I’ve just performed a new “basic setting” of the DSG via VCDS tool, and performed the proposed test drives. it seems to have helped. time will show if it is only short term.1 point1 point@richard999, and if you have any question regarding the DIY process, then let me know.1 pointFor my two pence, I had a loan 1.0 Fabia when my Octavia was in for a warranty repair (engine auto-stop fault) To me, the 1.0 was like a bag of nails compared to the 1.4 - this may be down to the Fabia not being 'run in' yet, but it was like chalk and cheese between the two engines. As a comparison, I drove a 3-cyl. Daihatsu charade many moons ago - that was a rocket in comparison to the Fabia - and the Charade engine felt much more refined too.1 point1 pointMy friend is being told that the judder/hesitation is a characteristic of the car. Km issue still there, no fix yet. Headlights blinding oncoming driver can't be tested...until it's dark...1 pointWhich is NOT what Skoda UK say - they say the cambelt on the 1.4TSI should be changed every 5 years regardless of mileage. I also have a 1.4 TSI Octavia (Elegance spec) and agree it's a great engine - having come from a 4.2litre Audi RS4 I do miss that level of performance but in reality it's perfectly adequate to keep up with the traffic flow even on the steep hills in north Devon!1 point1 pointIf you're curious and don't know what this intake sounds like, here you go1 pointThis is what I got from ebay Skoda brilliant silver 2011 alloy wheel & rim paint repair kit for scuffs £12.95 from Aceparts-uk1 point1 pointA few weeks ago my 2019 build 1.5 TSI SEL had its first service at 13,000 miles ( 2 years) at Telfords Skoda in Carlisle. Without prompting they also updated the software to eliminate some hesitation when starting from cold, the first update last year corrected loss of power when e.g. approaching a roundabout. The hesitation never really bothered me as living at 1000ft starts were always downhill. The car now feels so much smoother so it would seem that the 1.5 TSI problems have finally been fixed. Full marks to Telfords Skoda for a job well done.1 point1 pointI’m dropping suspension (h&r springs 30mm rear 50mm front) and fitting 15mm wheel spacers all round shortly and will definitely be having wheel alignment and tracking done after that1 pointIf Ford can't guarantee the doors won't unlock then presumably they also can't guarantee the brakes will work or the airbags will deploy1 pointThis looks very similar. https://www.ebay.co.uk/itm/184035992419 Just make sure you choose the correct option on the drop down menu. The £12ish one doesn't look to be wifi app control, the "Non Touchscreen" option is the one I'm thinking of which is similar to mine.1 point1 point


Important Information
Welcome to BRISKODA. Please note the following important links Terms of Use. We have a comprehensive Privacy Policy. We have placed cookies on your device to help make this website better. You can adjust your cookie settings, otherwise we'll assume you're okay to continue.
Account
Navigation
Configure browser push notifications
Chrome (Android)
- Tap the lock icon next to the address bar.
- Tap Permissions → Notifications.
- Adjust your preference.
Chrome (Desktop)
- Click the padlock icon in the address bar.
- Select Site settings.
- Find Notifications and adjust your preference.
Safari (iOS 16.4+)
- Ensure the site is installed via Add to Home Screen.
- Open Settings App → Notifications.
- Find your app name and adjust your preference.
Safari (macOS)
- Go to Safari → Preferences.
- Click the Websites tab.
- Select Notifications in the sidebar.
- Find this website and adjust your preference.
Edge (Android)
- Tap the lock icon next to the address bar.
- Tap Permissions.
- Find Notifications and adjust your preference.
Edge (Desktop)
- Click the padlock icon in the address bar.
- Click Permissions for this site.
- Find Notifications and adjust your preference.
Firefox (Android)
- Go to Settings → Site permissions.
- Tap Notifications.
- Find this site in the list and adjust your preference.
Firefox (Desktop)
- Open Firefox Settings.
- Search for Notifications.
- Find this site in the list and adjust your preference.