Leaderboard
-
.jpg.1006585dfe4e2977315b67c3d642e37b.jpg)
Guest_
FREEDOM23Points83,824Posts -
MikeTheThinker
FREEDOM15Points8,484Posts -
shyVRS245
Locked8Points0Posts -

moley
Resident Member8Points10,120Posts


Popular Content
Showing content with the highest reputation on 26/01/21 in all areas
-
2 pointsIt is pretty hopeless with the tyres that are not allowing the systems to do as explained. That being the OEM tyres that the car arrive in the UK with. Sadly people believe they have bought a SUV, or a Crossover, even a 4x4 so they are sorted as they get the car from the dealership.2 points
-
2 points
-
2 pointsThere are millions of cars now running around Europe with 1.0, 1.2, 1.4 and 1.5 TSI engines and some might be getting driven near the red line on long journeys and not siting roadside with seized engines. Just do your regular checks and enjoy the car.2 points
-
£500 does sound like a lot of money to honest. If it were my car, I would lift the carpet up, remove the foam from the car, and then dry it indoors. Removing/lifting the carpet will be straight forward. Then use a dehumidifier left running overnight to dry out the carpets after having first removed as much dampness as possible with towels. HTH2 points
-
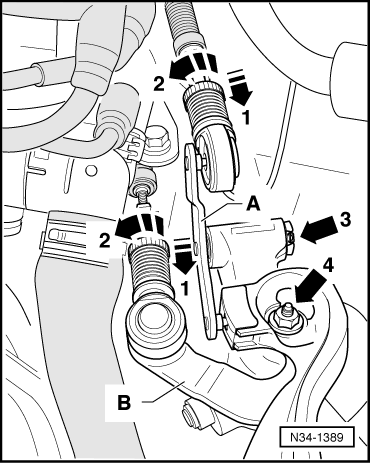
My 2005 Fabia Mk1 was suffering with a stiff gearstick not returning to the centre position. Other than that the gearbox is fine. Fix. I pulled open the gearstick gaiter and could see that the spring was not broken. I then unbolted the battery and removed. The battery tray was unbolted and swung to the right and over the cars wing so I could gain access to the gearbox selector cables etc. On Top of the gearbox you will see the two gearbox cables coming from the car and connecting via swivel connectors to the gear selector arm on top of the gearbox. If you take hold of the large alloy arm (point 4 in picture ) you can move it right + left and up and down and it should be smooth. Take note of the white plastic guid which slides back and fore on the large alloy arm Not easy but if you use a large screwdriver and pry off the gearbox cable connectors from the knuckles on the gearbox arm on top of the gearbox. Marked as number 1 in the picture below. Now take hold again of the alloy selector arm on top of the gearbox and push down to see if it pops back up of its own accord. If it does not or slow/stiff then here is the simple and cheap fix. If you look at the bracket with the two swivel ball joints on it. This has a metal arm (top swivel joint number 1 is connected to the arm and it fits into the cst allow point A in the picture) which fits into a cast alloy section of the gearbox. To remove you will need to look to the right and unclip a retaining clip (number 3 in picture) which simply pulls/slides off by hand or long nose pliers. As this metal arm is stiff going into the cast alloy (part A in picture) , then gently pry out to your left and towards the engine. Once out clean up the metal bar which now should be obvious. Now go back to the cast alloy section (point A in picture ) where the metal bar came out of. On either end take a flat screwdriver and pry out the two plastic sheaths which have been pushed into the alloy cast at either end. of alloy cast A. Order two new ones from the internet or TPS part number 1J0711067L at a cost of £2.20 + vat each. When they arrive coat them with a very thin layer of vaseline inside and the metal bar/rod. Very thin! Now start to refit the bracket and the retaining clip. Be Careful making sure that the white plastic guide fits correctly over the large alloy arm on the top of the gearbox. Once done, then push the alloy arm downwards and when you leave go its should pop back up on its own. Therefore not stiff anymore. If you are at this point and all is well then brilliant. Refit the gear cable swivel joints back onto the knuckles. For the left one I used a hammer to knock a screwdriver (upside down) so the handle pushes the joint back together. The other one I squeezed back together with large pliers. Once done just revisit and test the return to centre of the gearstick in the car. If all is fine then put the battery box back on and refit the battery. The light bulb moment came once I disconnected the swivel gearbox cables. At that point it allowed me to form the opinion that it was the bearbox arm and not in the car and the spring being tired. Hope this cheap fix has been some help for someone before you start to consider more expensive issues.
 1 point
 -
1 point
-
1 pointThere's an option somewhere in the settings to have them turn on when it's cold.1 point
-
1 pointI'm loving the automatic heated seat and steering wheel when it's cold.1 point
-
1 pointMight well be a waste as as my 4x4 doesn’t have the selectable snow mode malarkie and is managing perfectly fine on proper snow and ice on winter tyres. I was going to look into getting the module, fitting it and getting it coded in but now not going to bother. Not saying it’s a gimmick but it’s deffo not essential/important when it comes to winter driving.1 point
-
good idea,ill buy a pair thanks for the help1 point
-
1 pointI think everyone managed to get around during winter in the olden days, but tyre construction then was completely different to today’s fuel saving and “summer “ low profile efforts that are totally inadequate in winter conditions.1 point
-
1 point
-
what i found so far is the liqui moly 75w oil has both listed as an alternative so if i wont find the genuine oil,ill probably go with that the quantity is less than 2L right?1 point
-
1 pointHi Pilot, its the petrol version in 245hp , Been out in her today , lovely. System though. on screen , loads to learn on where things are. Things like the fan speed but all will become apparent soon.1 point
-
1 pointOkay. We had a 2018 Octavia TDI VRS which we took to European Skoda Tour 2019. Bombing along at 100mph/160kph was fantastic on the Autobahns from Hook van Holland to Pilsen and the oil temperature even in the height of Summer didn't go above 110C. 8hrs of continuous motorway driving all was good. Even when it got to 43C one day at Pilsen in Czechia, the car didn't sweat too much. Mpg went down (more fueling needed) and traveling through the centre of Prague (an experience) with the outside temperature at 38C didn't phase the car. I think the throttle response got a little fluffy when we were in traffic otherwise all was good.1 point
-
Many years ago I used to work as a consultant for a company that provided IT systems to Linn. Marcus Tiefenbrun the then Finance Director was a real character. When he heard that he was getting a new salesperson he asked for a meeting. His introduction was “Do you know I’m a salespersons worse nightmare? Because A I’m Scottish and B I’m Jewish” The poor guy was looking white as a ghost till Marcus burst out laughing 😆1 point
-
1 pointThere's a definitive audible click when its secured in place. As mentioned above it looks like someone has tried to lever it out previously.1 point
-
100% agreed. And please GovUK, do not contract the job out to the likes of Serco or Capita. It'll end up in a call centre in a far off land............. If it does become law, will it not make owning a car with above about 100 bhp all a bit pointless?1 point
-
Mines has been off since it ate the pads at Donington. Love having a properly LSD now though.1 point
-
How do you maintain your speed going down a hill in snow, I’ll give you a clue, you don’t use the brakes. @e-Roottoot imagine if we brought xds into it that will really confuse them.1 point
-
1 pointHowever, I'm beginning to find that Briskoda is clearly the lord of internet forum help when compared to Ford... All I can find in relation to technical knowledge is "wil dese weels fit mi fiester anyone no" sort of crap.1 point
-
https://www.rac.co.uk/drive/news/motoring-news/mandatory-speed-limiters1 point
-
1 pointGaz.... Just, NO. Shy, you're aiming sort of in the right direction, but it's more exciting than a C Max.1 point
-
Swings and roundabouts I guess, that's the issue when these groups get too big there are always going to be some bad ones. As mentioned this other garage who are part of Arnold Clark have so far been faultless, returned my calls and done everything they said they would. My only concern is how long it takes for the car to get to me as they obviously wait for a transporter full of cars before they send them down and at the moment I am not sure when that will be... There is actually a lovely black one for sale at Marshall Croydon but I have fallen in love with Dragon Green and once bitten did cross my mind when I was thinking of getting in touch with them about it1 point
-
1 point
-
If you are going rear discs know that discs arent as good for handbrake turns in my experience. Saying that, Both of my fabias have ****e handbrakes as is.1 point
-
1 point
-
1 pointI believe it is just held in with clips, you should be able to lever the chrome surround away from the grill with some trim removal tools. I haven't done it as I have a MC which comes with the black surround as standard. You can also get an OEM black surround from superskoda.com, but at €80 I'd personally go for a rattle can.1 point
-
1 pointAgree it's very subjective and everyone will have their own preferences. It seems in other European markets, there is an option for half leather/half alcantara centres which seems ideal. I'm hoping this will be offered here too. More choice can only be a better thing.1 point
-
They "only" have a normal 1.6 tdi. Am I right in saying that only monte carlo tdis got 288mm brakes and regular tdis were 256mm?1 point
-
1 pointThe usual problem is that it seems impossible to take the mirror out! You have gouges in the plastic and other damage that suggest someone had previously tried to remove the mirror, with difficulty, using a lever. Yours appears to be a facelift mirror. The mirror should go back in with a click when pushing centrally on the plastic "glass". You may have it in place now and it will not fall again, but if it does the post pictures of the back of the mirror and the inside of the mirror housing so we can compare it with others. If yours has two long tangs that engage with sockets at the back of the housing, the also press on the glass front in line with the tangs.1 point
-
1 pointHi ChrisMG. After about 15 minutes the engine controll module should be in closed loop state. From this point the engine will start using the sign of the front oxigen sensor. If your oxigen sensor is not working at all, i think the engine will probably stop, but I'm not sure. According to your fault codes linked before your front oxigen sensor isn't working. I suggest you to check the cables and wiring before buy a new one. I attached for you a schematic for this engine. You can find the oxigen sensor on the page three, with the mark of B72-I. I suppose the label of the wire colors are in german language. In the schematic you can see that the sensor heater circuit supply is on the Fuse 9. You should check this fuse first. Have a nice day! elshemecu1416v.pdf1 point
-
I never even managed to cook the brakes once doing super lap Scotland, god knows now many track days and top speed runs at elvington 😂1 point
-
1 pointthank you so much for the quick reply, too kind. it almost goes without saying that within about 10 minutes and much scrolling I found a short video showing my model! it's the only one I'd found after much searching,and it confirms you are absolutely correct. I thought this had to be the way, 'couldn't really be anything else, but it is rather tight. I'll give it a go once it warms up a bit, no point in getting cold! thanks again. really appreciate it, best wishes JD1 point
-
I was only joking, can only imagine how good it must be to drive your 1.8t,can't understand why they were never factory made.1 point
-
Part only (from Skoda) £160 with £30 off for taxi drivers -- £130 inc vat waiting on cost to fit1 point
-
Didn’t think the interior lights were monitored hence the ability to replace without tweaking the settings.1 point
-
@Carlston The OP has a 1.6tdi Monte Carlo so what is the point of going through the history of Fabia and brake sizes ? What car is it you drive and is this in the UK, Is it still a MK1 Fabia estate? Do you fill your Fabia with friends or loved ones and drive like an idiot on the wonderful driving roads where nobody else went out that fine day. Where is this parallel universe in which you drive where a Fabia Monte Carlo with serviced brakes and a remap is cooking the brakes? Just a Sunday drive someplace in Germany with someone in a 220ps Fabia with DSG. Appropriate brake hardware and fluids will be getting used obviously. This member is Smokin!1 point
-
To find out what springs were factory fitted, check the build codes or the coloured dots on the springs (if they are original). For example, if you had build code PR-L30 or 1 grey dot and 1 violet dot, that would mean that the front springs have OEM number 5Q0411105HR. For the front springs, you are looking for a number between L02 and L35. For the rear springs, you are looking for a number between 1JB+0YB and 1JB+0YE. Some of the build codes are on a white label attached to the car somewhere in the boot area. You can use this "VW Group Option Codes Decoder" to make sense of what the build codes mean. http://igorweb.org/equidec.aspx For example, in the above link the build code 1JB = Rear shock absorption for rough-road design front axle, steering | Skoda Octavia 2016, coil spring 1 5Q0411105GF coil spring 1 paint mark 1 paint mark blue orange (1) 5Q0411105GG coil spring 1 paint mark 1 paint mark blue red Model data: PR-L02 (1) 5Q0411105GH coil spring 1 paint mark 1 paint mark blue violet Model data: PR-L03 (1) 5Q0411105GJ coil spring 2 paint marks blue Model data: PR-L04 (1) 5Q0411105GK coil spring 1 paint mark 1 paint mark blue green Model data: PR-L05 (1) 5Q0411105GL coil spring 1 paint mark 1 paint mark blue brown Model data: PR-L06 (1) 5Q0411105GM coil spring 1 paint mark 1 paint mark blue grey Model data: PR-L07 (1) 5Q0411105GN coil spring 1 paint mark 1 paint mark green white Model data: PR-L08 (1) 5Q0411105GP coil spring 1 paint mark 1 paint mark green yellow Model data: PR-L09 (1) 5Q0411105GQ coil spring 1 paint mark 1 paint mark green orange Model data: PR-L10 (1) 5Q0411105GS coil spring 1 paint mark 1 paint mark green violet Model data: PR-L12 (1) 5Q0411105GT coil spring 1 paint mark 1 paint mark green blue Model data: PR-L13 (1) 5Q0411105HA coil spring 2 paint marks green Model data: PR-L14 (1) 5Q0411105HB coil spring 1 paint mark 1 paint mark green brown Model data: PR-L15 (1) 5Q0411105HC coil spring 1 paint mark 1 paint mark green grey Model data: PR-L16 (1) 5Q0411105HD coil spring 1 paint mark 1 paint mark brown white Model data: PR-L17 (1) 5Q0411105HE coil spring 1 paint mark 1 paint mark brown yellow Model data: PR-L18 (1) 5Q0411105HF coil spring 1 paint mark 1 paint mark brown orange Model data: PR-L19 (1) 5Q0411105HG coil spring 1 paint mark 1 paint mark Model data: PR-L20 (1) 5Q0411105HJ coil spring 1 paint mark 1 paint mark blue brown Model data: PR-L23 (1) 5Q0411105HK coil spring 1 paint mark 1 paint mark brown green Model data: PR-L24 (1) 5Q0411105HL coil spring 2 paint marks brown Model data: PR-L25 (1) 5Q0411105HM coil spring 1 paint mark 1 paint mark brown grey Model data: PR-L26 (1) 5Q0411105HN coil spring 1 paint mark 1 paint mark grey yellow Model data: PR-L27 (1) 5Q0411105HP coil spring 1 paint mark 1 paint mark grey orange Model data: PR-L28 (1) 5Q0411105HQ coil spring 1 paint mark 1 paint mark grey red Model data: PR-L29 (1) 5Q0411105HR coil spring 1 paint mark 1 paint mark grey violet Model data: PR-L30 (1) 5Q0411105HS coil spring 1 paint mark 1 paint mark grey blue Model data: PR-L31 (1) 5Q0411105HT coil spring 1 paint mark 1 paint mark grey green Model data: PR-L32 (1) 5Q0411105KM coil spring 1 paint mark 1 paint mark 1 paint mark white orange green Model data: PR-L33 (1) 5Q0411105KN coil spring 1 paint mark 1 paint mark 1 paint mark white orange brown Model data: PR-L34 (1) 5Q0411105KP coil spring 1 paint mark 1 paint mark 1 paint mark white orange grey Model data: PR-L35 http://www.oemepc.com/skoda/part_single/catalog/sk/markt/CZ/modell/OCT/year/2016/drive_standart/753/hg_ug/411/subcategory/411030/part_id/2543614/lang/e rear axle | Skoda Octavia 2016, suspension impact padding SCOUT 4wd PR-0N4,1JB (1) 5Q0511115L coil spring Model data: PR-1JB+0YB 1 5Q0511115AL coil spring Model data: PR-1JB+0YC (1) 5Q0511115AM coil spring Model data: PR-1JB,0YD (1) 5Q0511115AN coil spring Model data: PR-1JB+0YE http://www.oemepc.com/skoda/part_single/catalog/sk/markt/CZ/modell/OCT/year/2016/drive_standart/753/hg_ug/511/subcategory/511010/part_id/2563429/lang/e1 point
-
The Fabia has come with 239mm, 256mm, or 288mm diameter front brake discs over the years. If you go out on a fast A road with lots of bends on a hot summer's day (perhaps a heat-wave) with a fully loaded Fabia with the smallest 239mm diameter front brake discs and standard front brake pads (ie. not fast road use brake pads or track brake pads...which can get hotter before they fade), then you might experience brake fade. Diameter and thickness and weight of front brake discs that have been fitted to the Fabia over the years 239mm x 18mm 3.6kg https://www.autodoc.co.uk/brembo/8713550 http://www.oemepc.com/tvn_result/search/tvn/6Q0615301 256mm x 22mm 5.1kg https://www.autodoc.co.uk/brembo/1657152 http://www.oemepc.com/tvn_result/search/tvn/6R0615301 288mm x 25mm 7.2kg https://www.autodoc.co.uk/brembo/7015044 http://www.oemepc.com/tvn_result/search/tvn/6R0615301A Notice that as you go up from the 239mm diameter front brake discs to 288mm diameter front brake discs, the weight doubles. That's a lot of extra metal to first of all heat up, and secondly to help with heat dissipation. Here's the weight of the 312mm x 25mm front discs from cars such as the Octavia MK1 312mm x 25mm 7.9kg https://www.autodoc.co.uk/brembo/1657272 http://www.oemepc.com/tvn_result/search/tvn/8N0615301A As you can see, there's a big difference in weight between the 239mm and 256mm front discs and the 256mm and 288mm front discs, but not much difference in weight between the 288mm front discs and the 312mm front discs. In percentage terms, the 256mm front discs are about 40% heavier than the 239mm front discs and the 288mm front discs are about 40% heavier than the 256mm front discs. However, the 312mm front discs are only about 10% heavier than the 288mm front discs. From the Brembo technical diagrams on autodoc, it looks like the 239mm, 256mm, and 288mm front discs have 36 cooling fins, whereas the 312mm front discs have 45 cooling fins.1 point
-
1 pointWell, after many months, and lockdown, along with trying to find somebody who is really on top of these engines I finally have the car 100%! To update and close the whole saga I eventually found a real VAG Specialist Garage! The guys there really know the ins and out of all VAG vehicles and totally up to speed on the engines. First off they looked at the DPF being the problem, they initially used a chemical cleaning system they use on a regular basis which actually got the vehicle running, on it's own with all sensors and exhaust intact. However it would not run properly, so, they removed the sensor and put a camera down into the DPF and found that it had partially melted this being the main reason, along with the quick build up of soot which stopped the engine running. Result, 1 new DPF fitted, car ran better but lacked power with a loud 'induction' noise from the air filter. Quick run on the diagnostics showed "EGR Valve Excessive Flow", followed by a call to Skoda Technical who suspected the rear part of the system so new Low Pressure EGR Valve & Cooler fitted but still lacking in power and induction noise. They then replaced the EGR Valve at the intake manifold with little improvement so they left that on at no cost to me and decided to look further on the engine side. They removed the cam cover and found the real culprit of all the issues! 2 cylinders rockers on all 4 valves had snapped and therefore it was basically running on only 2 cylinders, even they were somewhat amazed the car ran as ii did with no miss fire, knocks or bangs. They came to the conclusion that the timing belt had slipped, pistons hit the valves and snapped the rockers. The original garage had replaced the timing belt, not very well apparently as there were 'tippex' markings meaning that no special tools to lock the camshaft were used and the belt had been over tightened. Top end was stripped, all genuine new parts were fitted along with oil and filter change now all is good. MOT passed, taxed and insured all set for another 100k+ hopefully?1 point
-
No chance silly prices, 1.8t’s ample for me1 point
-
My karoq key transponder was ok up to this morning but today it just died and I couldn’t start the car in any mentioned way, no response and just a message to say no key detected, fitted a new battery (CR 2025) now back in service 👌 there was no warning at all, i will be keeping a spare battery in the car from now on so I don’t get caught out in the future. This has been my first problem with the car from new.1 point
-
Yes. I’ve been caught out a few times, where I’ve been in terrible road conditions and having to lower the window at a tool booth on the motorway, and it’s trapped a bit of grit and marked the glass. If it’s reasonably light, you can get most of it out with a glass polishing pad and a glass cutting polish. you could also use a horsehair detailing brush and some all purpose cleaner, and just go around them from the outside when washing the rest of the car, to avoid any buildup getting trailed down into the channel when the windows going down.1 point
-
1 pointYes,thanks nam. Still left to grind a little cylinder coil 4 to stay in Line With other coils,and to Mount back tfsi wire plastic cover so they are not so ugly exposed. But yesss I Like it more and more With time pass. Definitelly my choice of engine bay With all the respect to all other tastes1 point
-
Wow, some top bodging there! I'd recommend replacing the sump.1 point
-
1 pointoooohh I want to swap my Tesla Model 3 for an Enyaq so I am reall interested in this. What is the economy like in the winter? I once drove my Skoda Favorit to Mlada Boleslav from Scotland so maybe I can repeat that in an Enyaq one day. I have friends in Podebrady so want to go and see them some time! Interested to hear al about your enyaq @Masternet1 point
-
1 pointI doubt those from the dealer would have worked too well as they'd appear to be made out of gold.1 point
-
Well, I did the job this afternoon, but it did "fight me a bit", and thus some tips for anyone who has to something like that: The tools you'll proef bably need: - at least 1set, definitely preferably 2 sets, of trim tools like these - you need the larger ones to get enough leverage on the door trims to get them away from the seal - a soft-headed hammer like this one to hammer the seal firmly back in place (would have been very difficult without it) and you'll need to use it quite a lot - a large flat-bladed screwdriver, and the right size of Torx bit, to remove the front lower door trim The "process" I used: - Starting at the old seal on the B post (the most accessible), lever as long a length of the trims as possibe back to so you can get a grip on the seal and put a trim tool behind it to pull/lever it off as far as you can (and then stick some trim tools behind it to stop it snapping back in place - that's another reason for having 2 sets of trim tools as you may need quite a few). - then work around the top, and then the bottom, of the door opening, gradually easing back the trim panels and pulling/levering the seal out - remove the cover over the fuse box unit, and then the trim on the upper A post to allow you to pull the upper part of the seal off down about as far as the fuse box - Pull the bonnet release lever off its "spindle", and then release the two fixings (1 large-headed plastic "screw" and 1 torx screw) that hold the front sill trim in place - Lever that trim up so you can pull the rest of the seal out - my trim piece was a pig to lever up so I jammed large trim tools and the big screwdriver in below it and gradually moved them forward as I pulled out the seal as far as the A post - at which point you should be able to pull the whole seal out from the door opening Now comes the even more difficult part - fitting the replacement seal: - Again starting at the B post, lever/hold the trims back and gradully feed the seal over the chassis flange and then hammer it in place with that soft headed hammer - if you don't do that, then it'll probably not fully seat right down over the flange - Again, gradually do the same thing along the top and bottom of the door opening, and work you way forward until you to the front top and bottom edges of the opening. - work your way down the A post from the top - the section next to the fuse box is a pig because there is very little space between the flange and that fuse box - do the same up from the bottom corner until your have nearly completed the fitting of the seal - and then be prepared for a "fight" to get that small stretchy bulge that occurred in my case to fit down snugly over the flange - again a lot of hammering! - make sure the seal is firmly seated all around door frame and then refit the loose or removed trim panels - take your time with the trim panels (especially the A post one or you may break something). NB: I didn't find any loose/removable trim clips, but I did find several metal "brackets" welded to the chassis, and I assume they are there to hold some of the trim in place against the seal - so make sure you get the trim firmly reseated over those. - make sure the seal overlaps the trim all the way around the door frame (check the opposite doorframe seal as that should be correctly fitted if it's never be removed/replaced) At this point it should be, or at least it was in my case, "job done" as the door should then close easily and firmly over the replacement trim Total time taken (including several trips to the garage at the other end of the garden for various tools :( ) was about 90 mins, but you could probably do it quicker as I'm "not young" and I have a somewhat debillitating sinus infection ATM. FWIW: the replacement seal must have been from a later vehicle because it had a "Yr 2012" label but it fitted my 2007 car - and the P/N was 0000366601 (this is the driver's door seal).1 point


.thumb.jpg.06721e8c8b33ed0eea16572ff131b291.jpg)