Leaderboard
-
Lady Elanore
FREEDOM12Points24,875Posts -
sepulchrave
Resident Member8Points12,534Posts -
.jpg.1006585dfe4e2977315b67c3d642e37b.jpg)
Guest_
FREEDOM7Points83,824Posts -
AnnoyingPentium
FREEDOM6Points5,646Posts


Popular Content
Showing content with the highest reputation on 04/01/22 in all areas
-
3 pointsBring back Chains, no reason to have cam belts other than keeping the service sector happy.3 points
-
3 pointsDefinitely sounds like the clutch needs bleeding, what you're effectively having to do is pump the pedal once before it will disengage properly.3 points
-
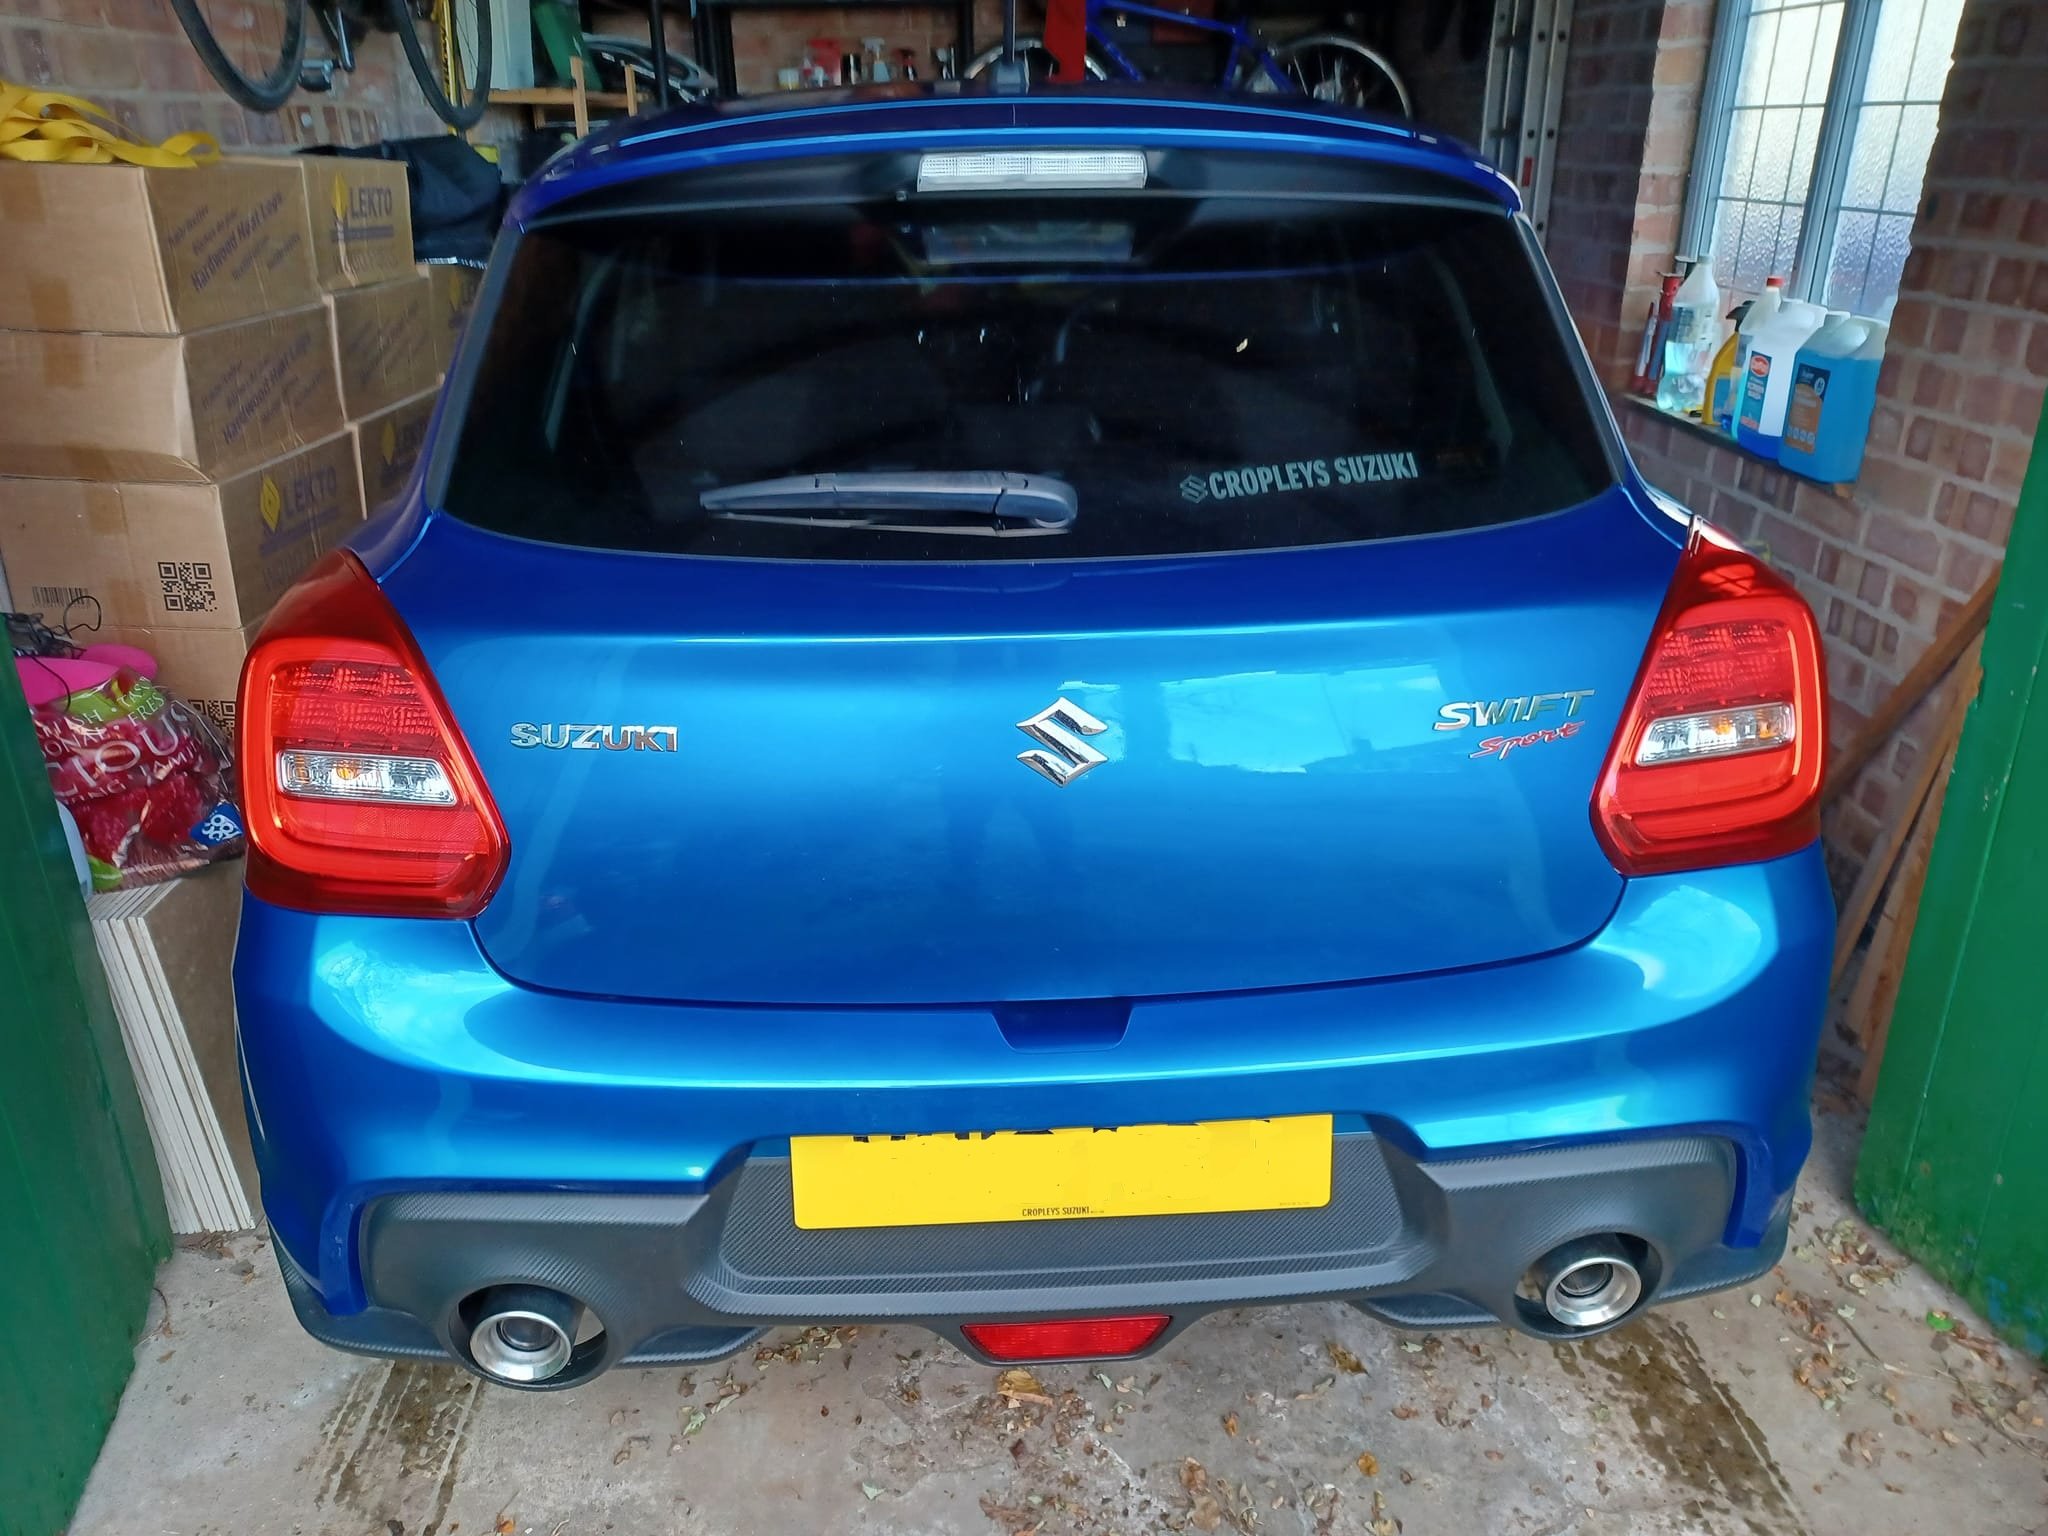
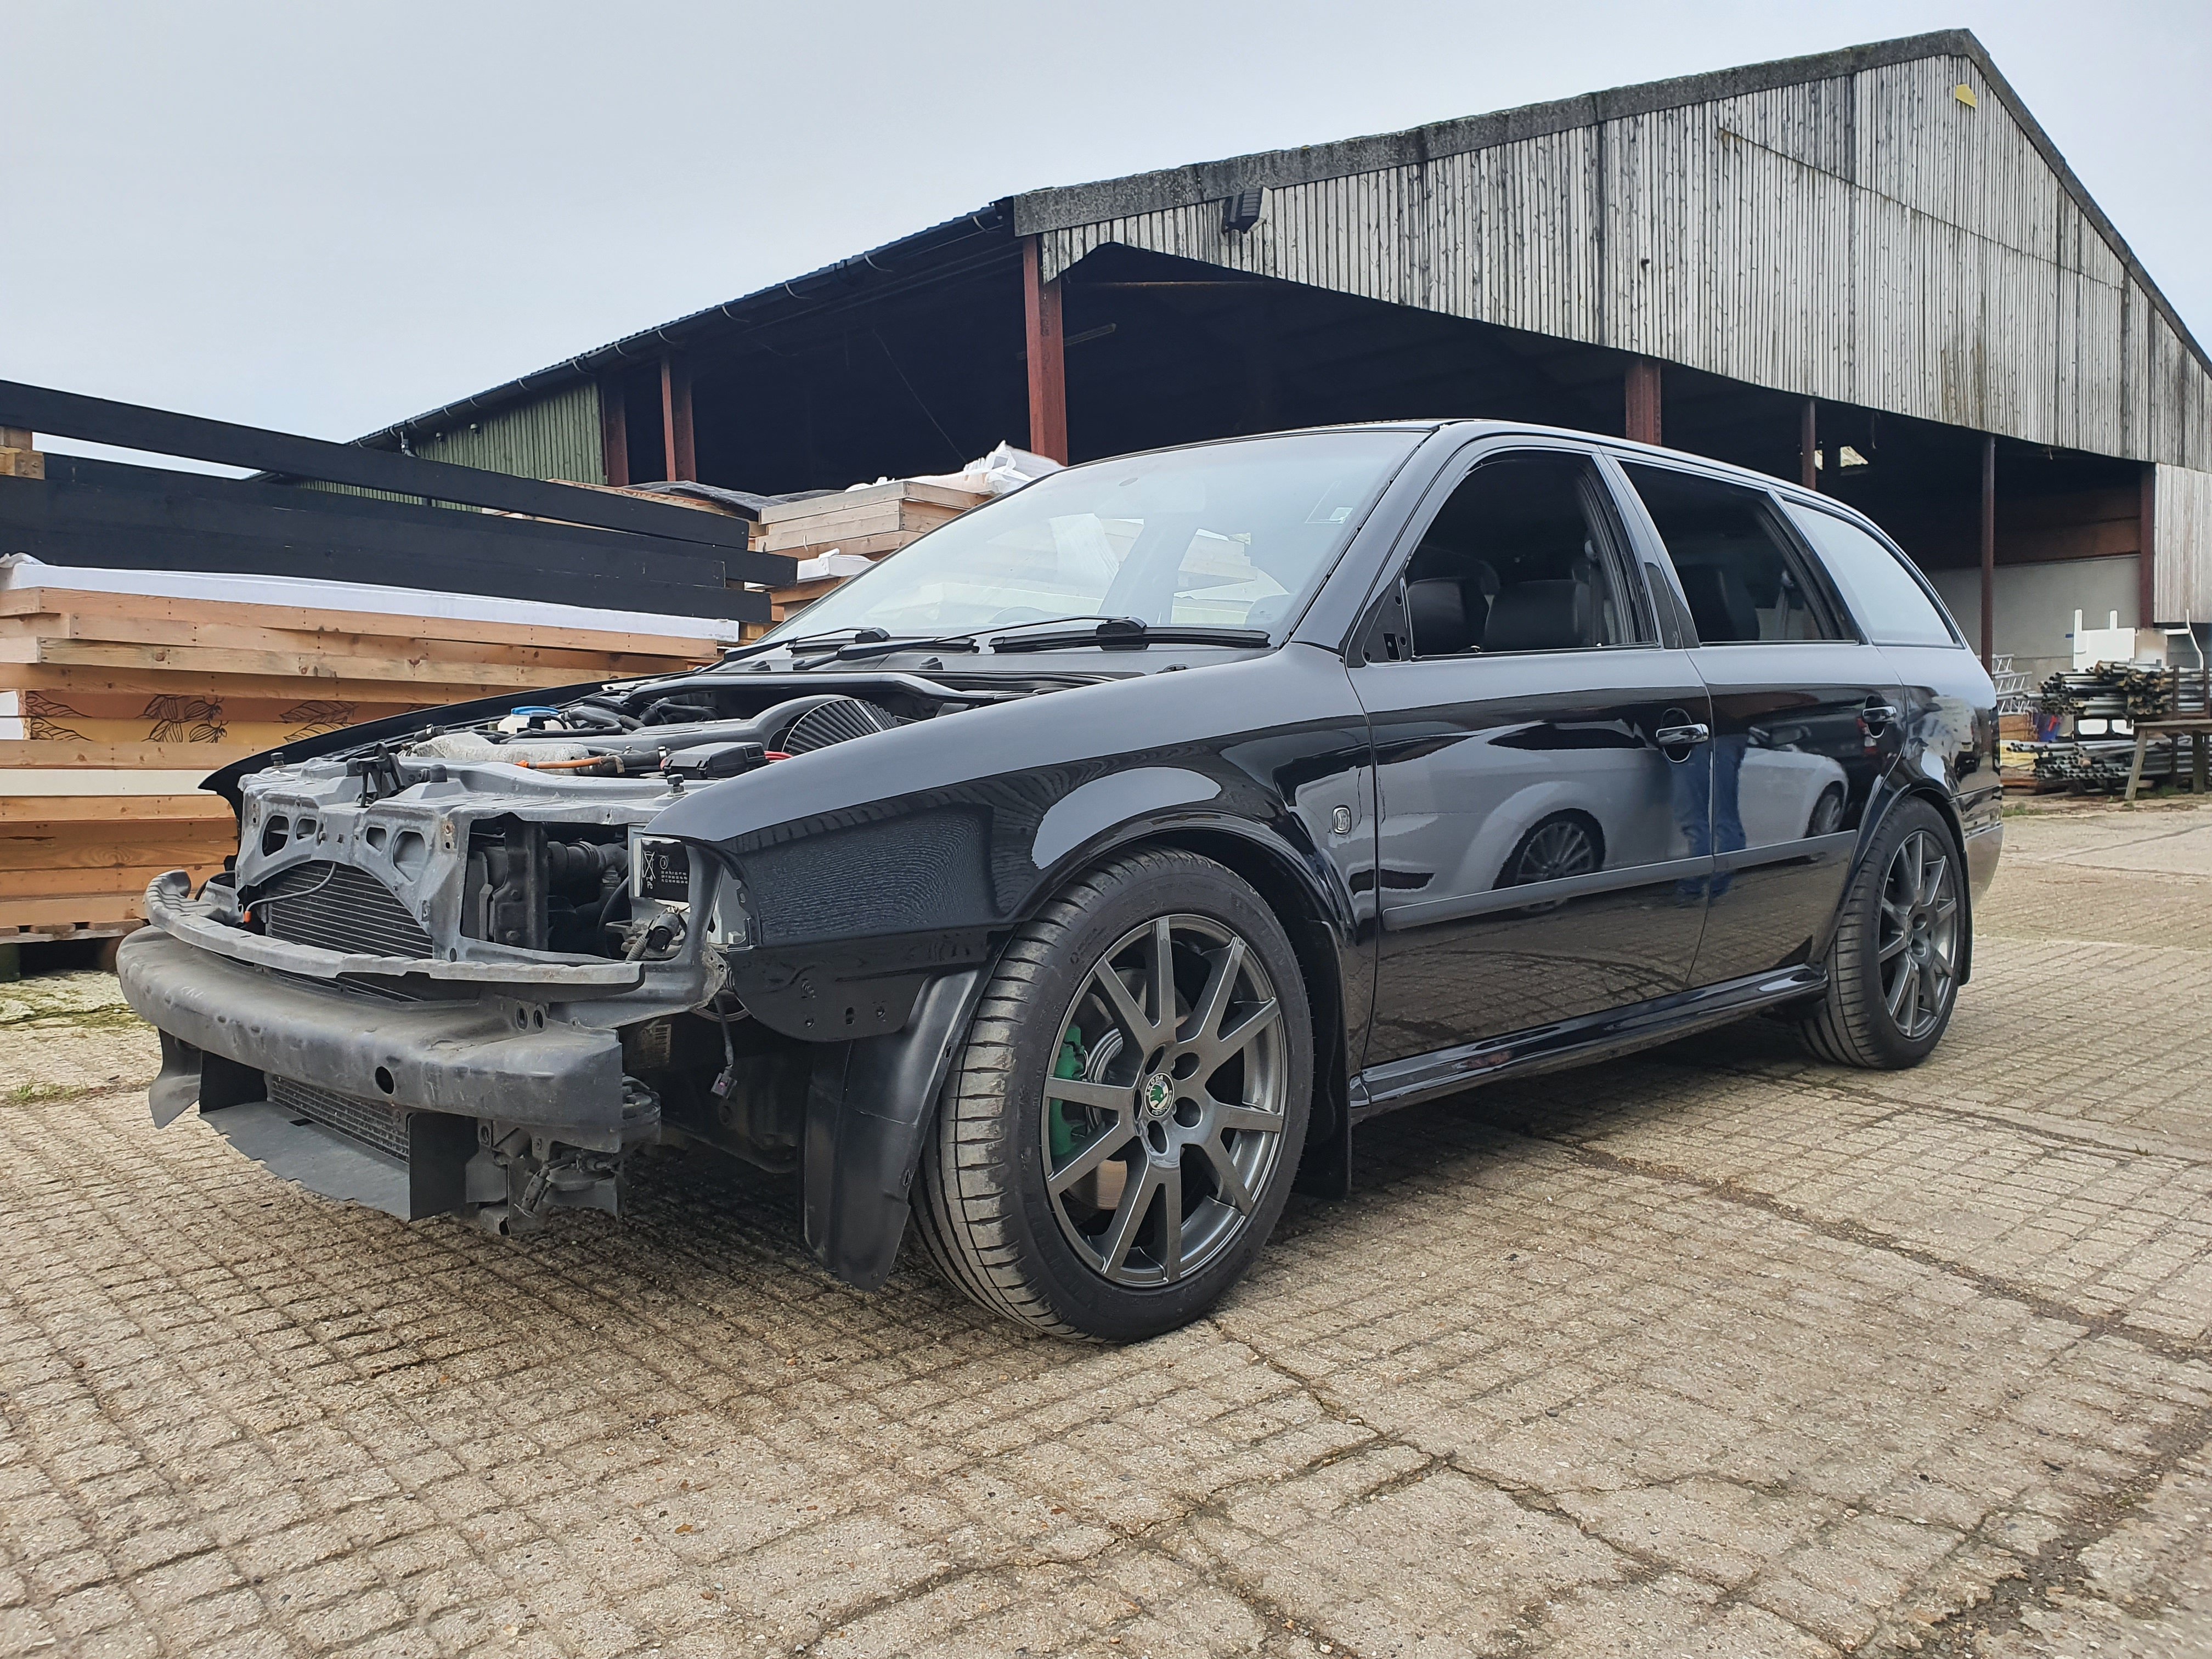
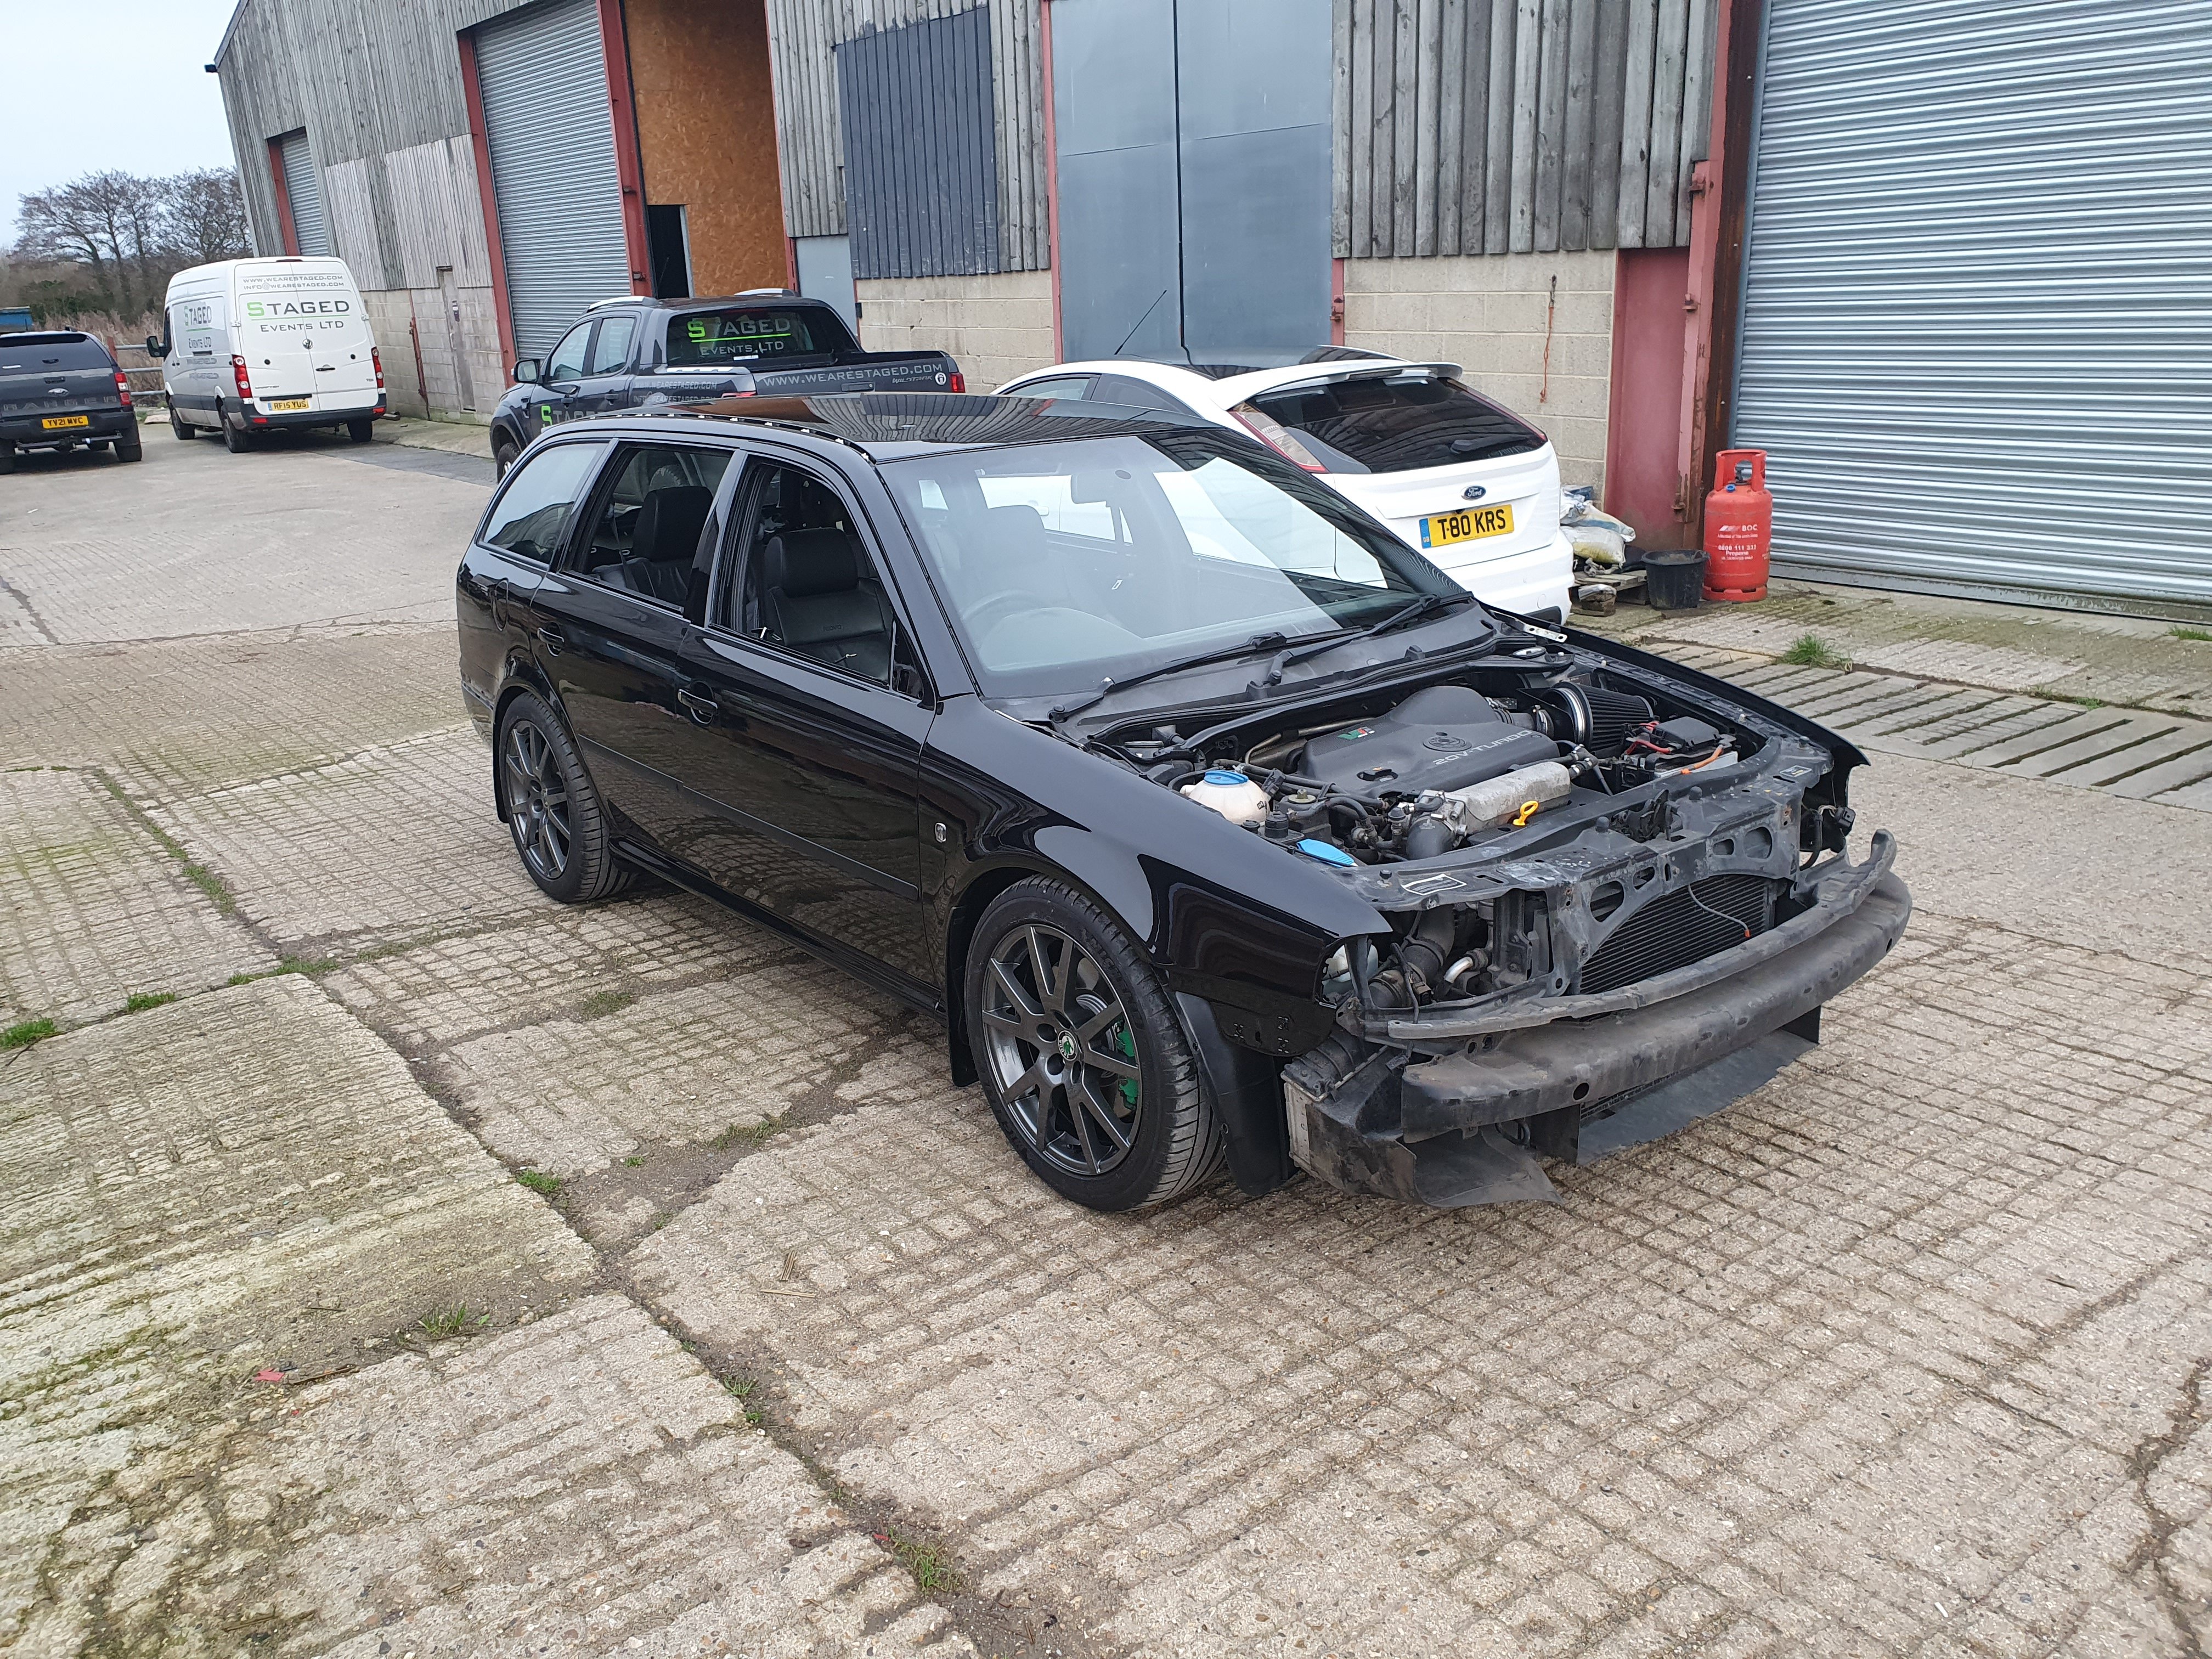
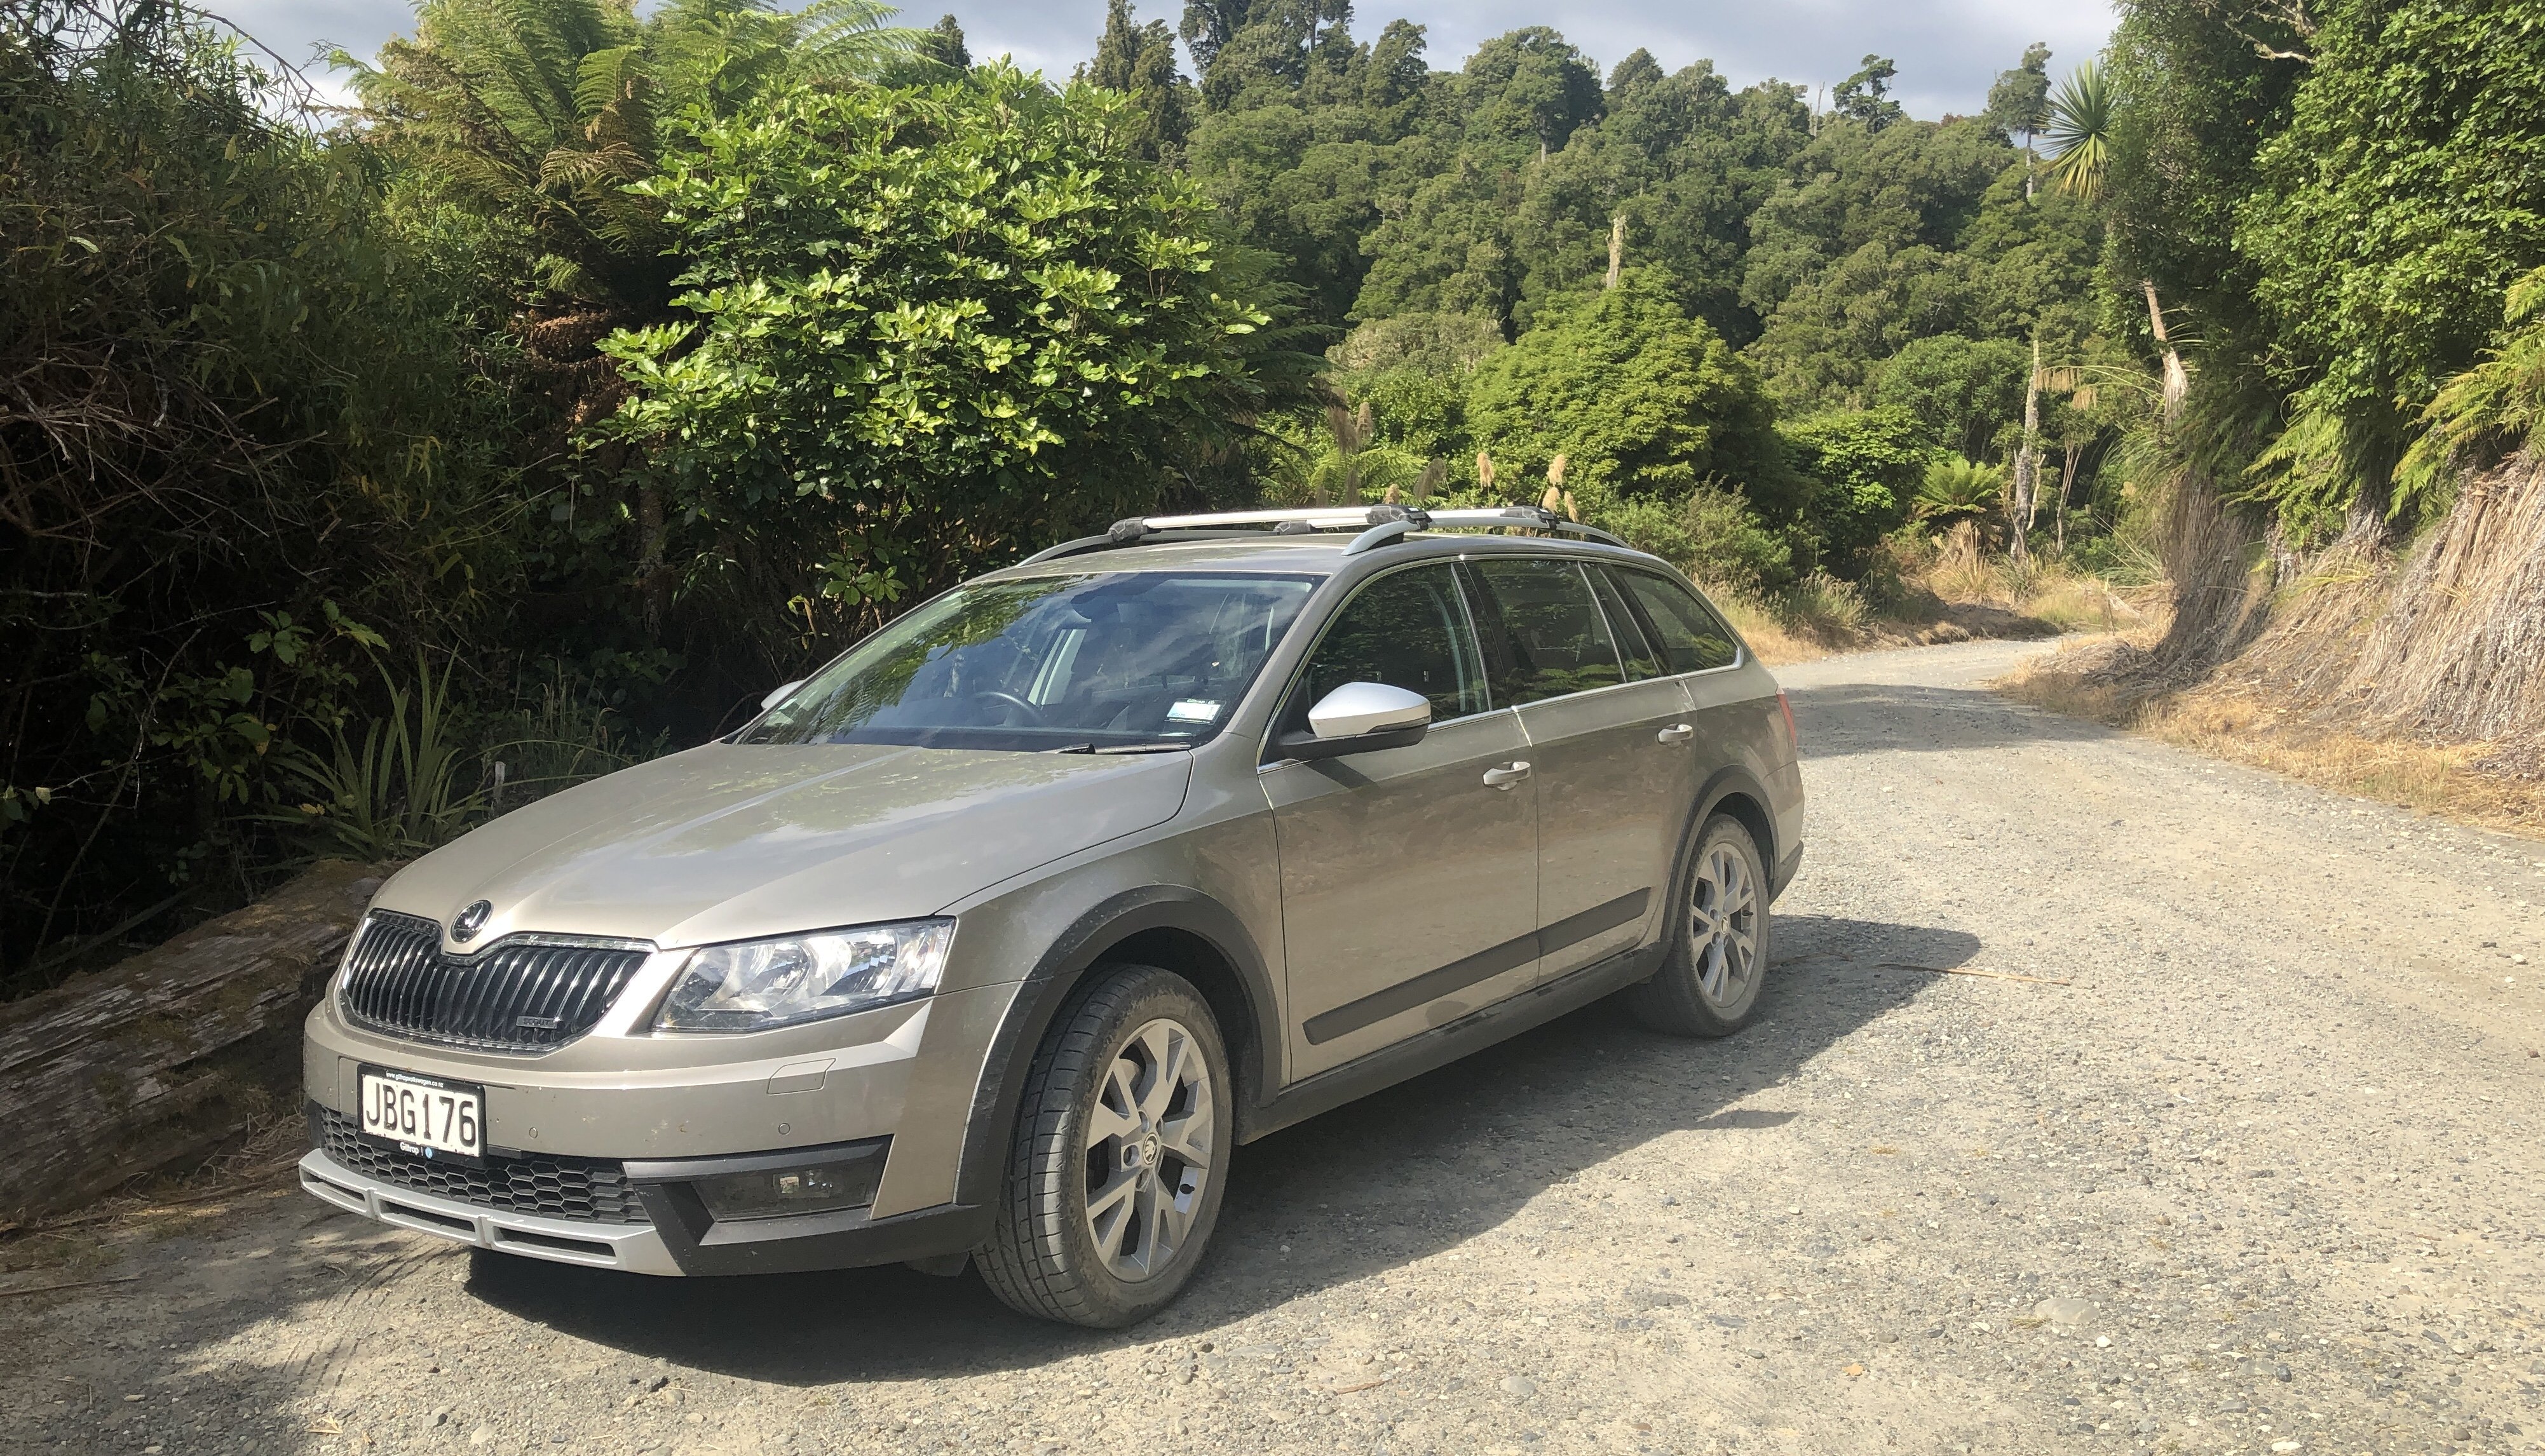
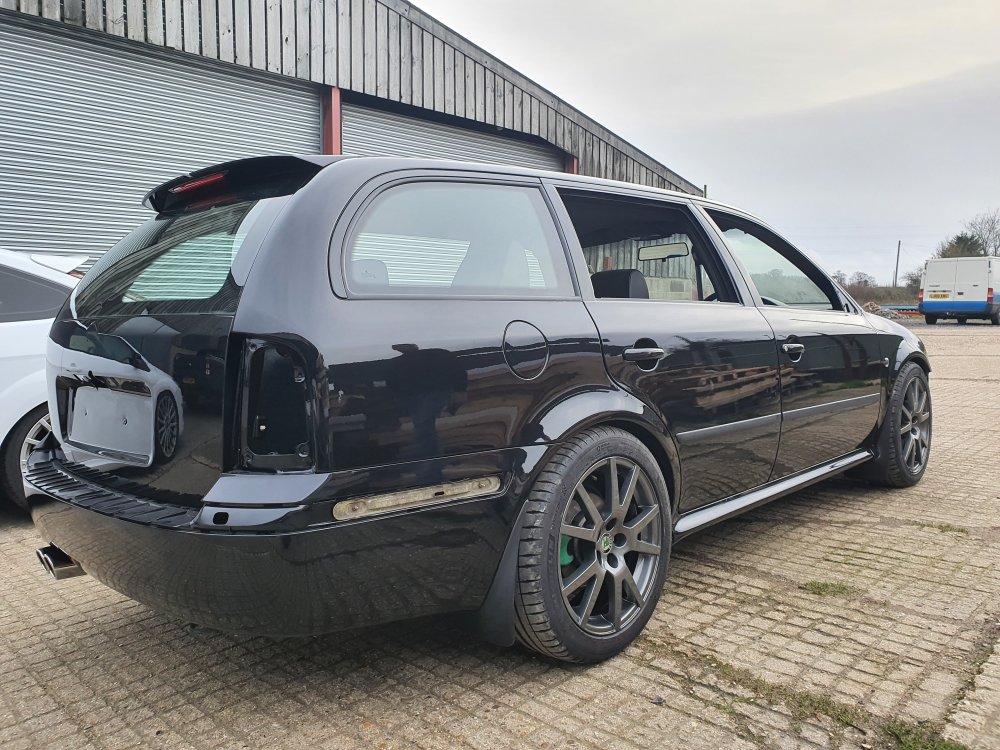
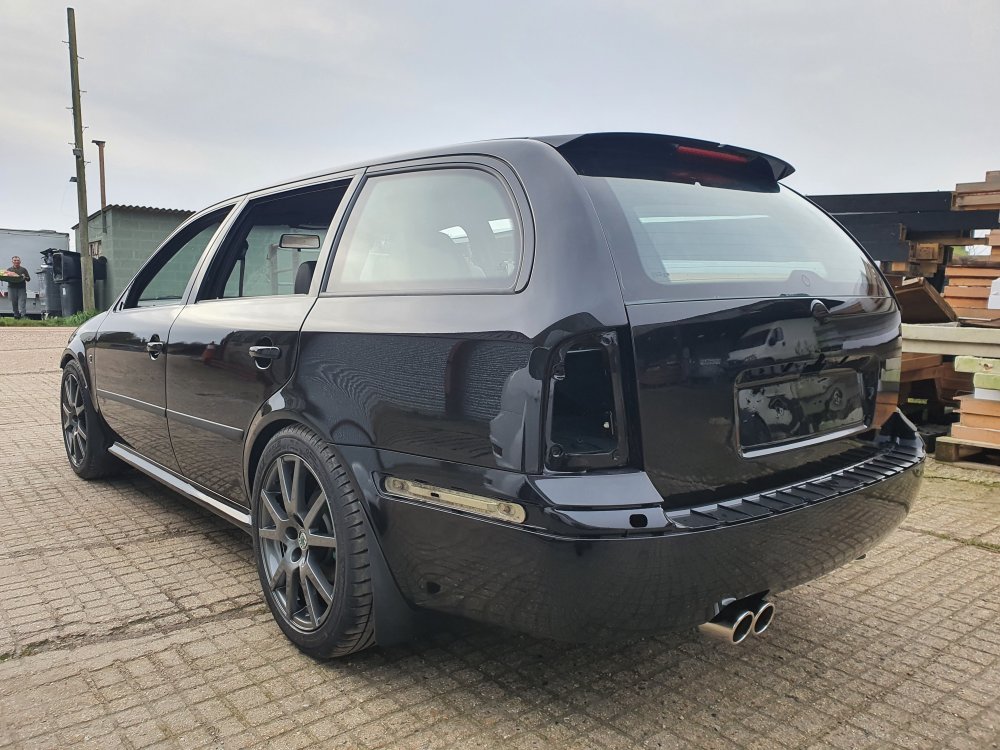
2 pointsSneak preview of the new car; only managed to drive the 10 miles or so home today as I was working. And yes, I do need to tidy the garage!
 2 points
 -
2 pointsHello and happy new year to all . For me it started very well since I received a call from the dealer today that my car arrived at the port on the 30th of December. ( octavia hatchback mhev 1.5 dsg graphite grey ) . With this note I would like to give notice to many of you that wait for their cars that something is moving lately in Skoda . For sure no priorities are kept and nobody understands the plan of car deliveries they have , if they have one. The car was ordered beginning of September ,accepted by skoda on the 10th of September. Produced on the 8th of December , arrived in Piraeus port Greece on 30th of December . Forecast of receiving the car from dealer 20th of January. So I feel like winning the lottery reading all the stories on the forum , but I realy believe something is moving quicker in Skoda lately . Best of luck to all.2 points
-
Can confirm they work amazingly with H&R springs but that will lower the ride. Very nice shocks 👍🏻
 2 points
 -
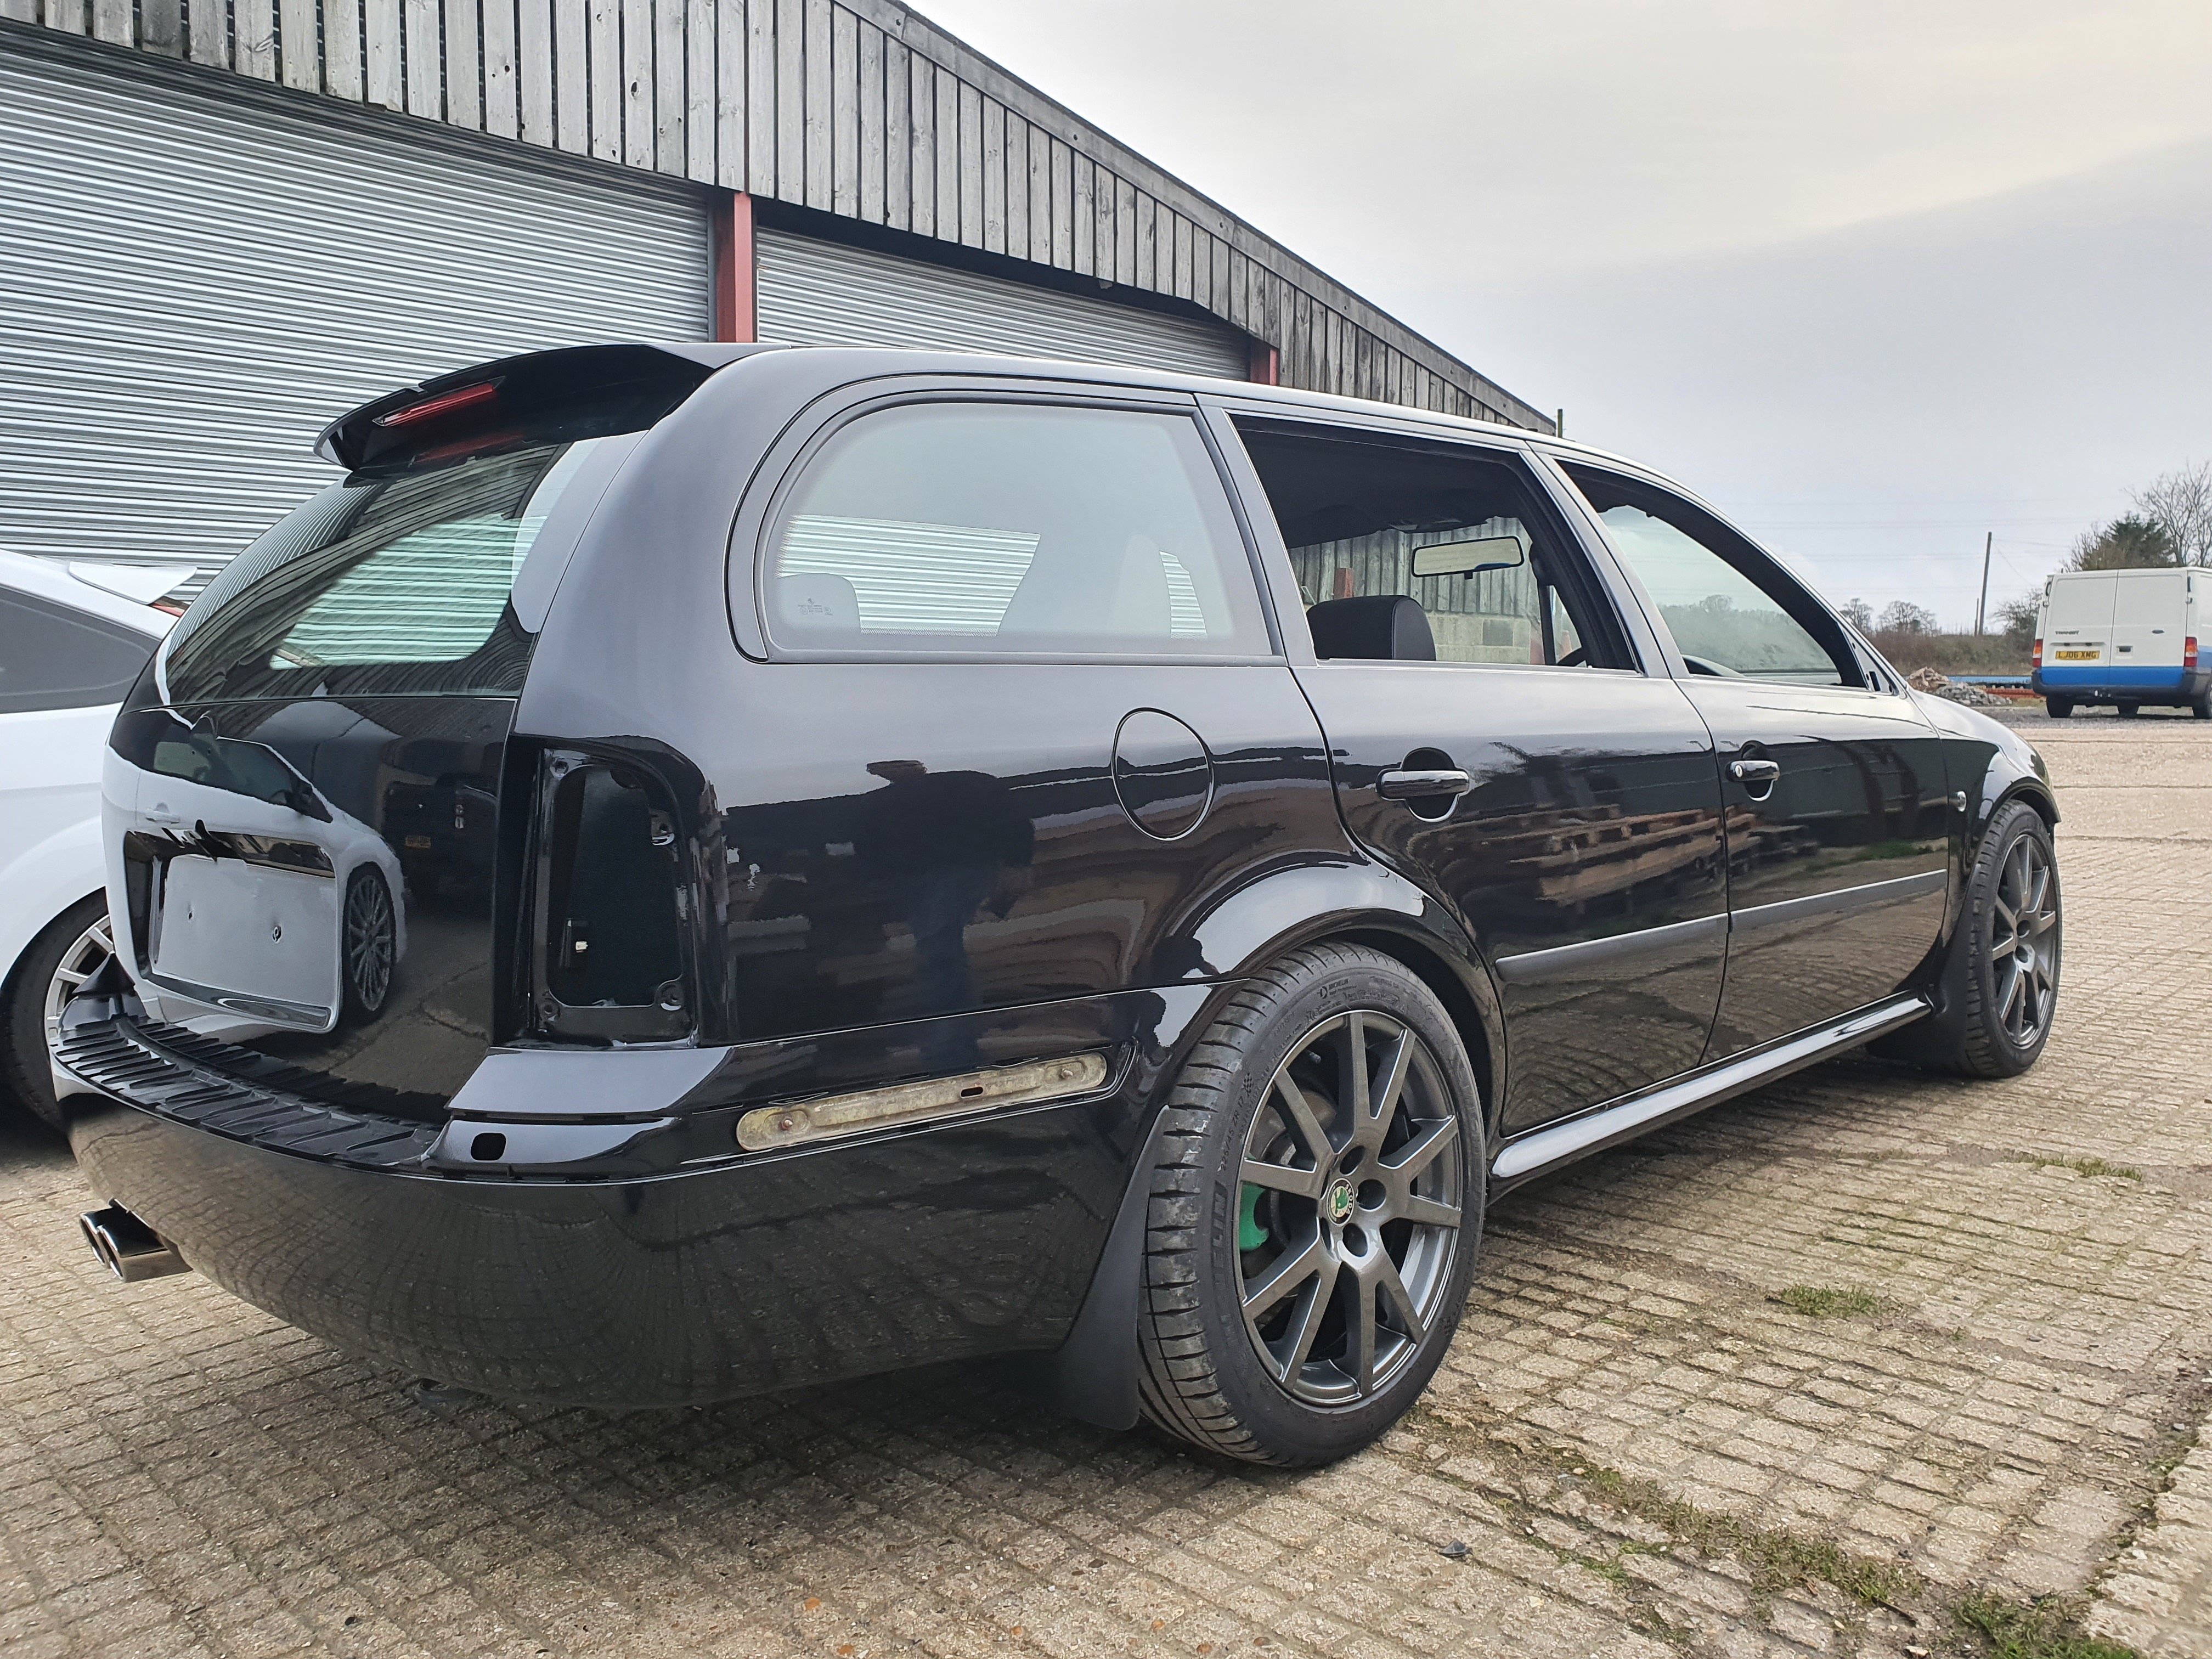
2 pointsGot a few bits fitted, and out of the paint booth... First time it's seen daylight in 3 months! 😍

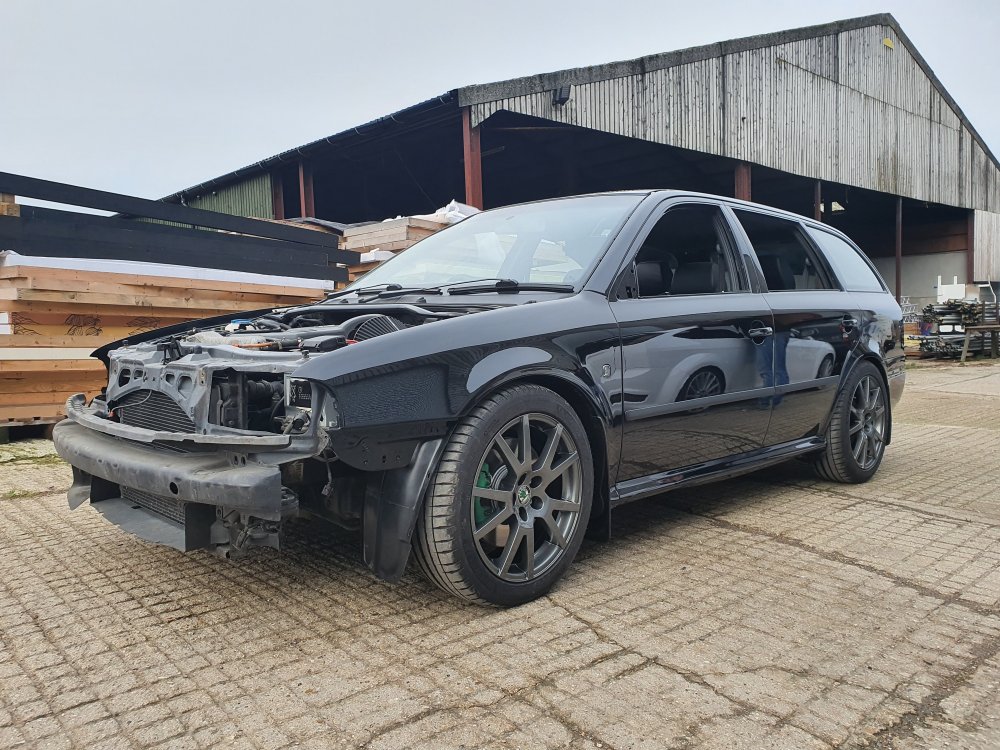
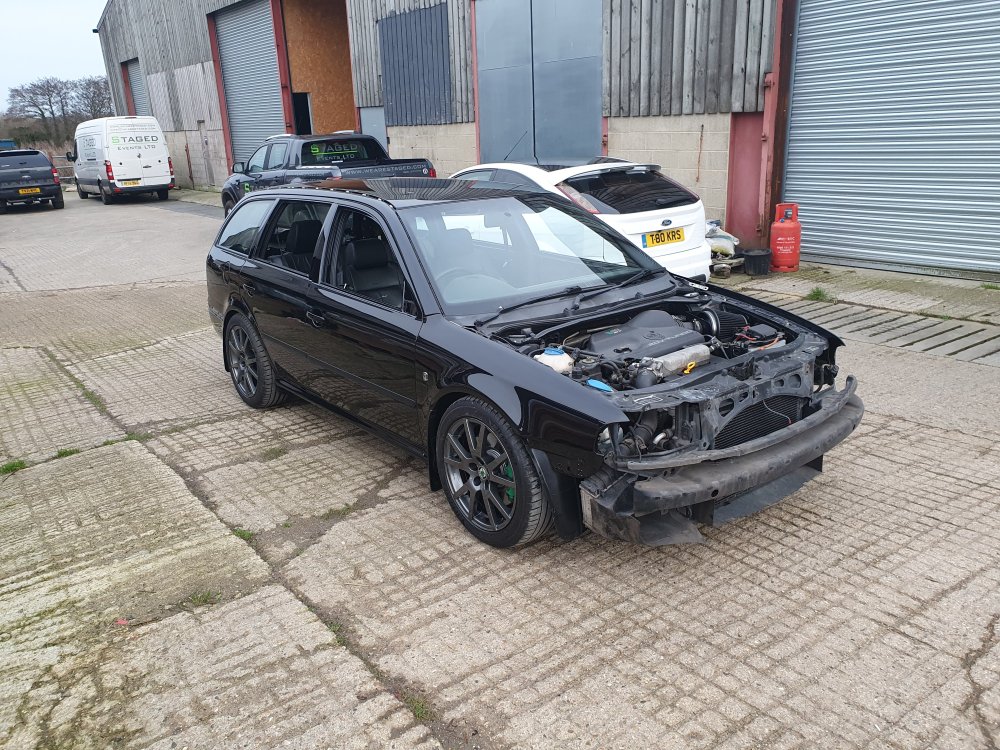 2 points
 -
2 pointsI was informed in August that there is a new pricing for the new model year and that Skoda doesn't guarantee that price will stay the same, but they didn't commit to the exact amount then. It was an estimate, subject to possible changes, as the date of delivery was totally unknown. I could argue I should've known the exact amount earlier, but I feel they had been relatively transparent, granted they knew as little as everyone about what's going to happen.2 points
-
Love all the modifications. I think we have a similar taste. Hehehe... 😅 Only disagree on the suspension, I would have opted for coilovers to be able to adjust the height if I want 😉 Really interested about the Up GTI engine/brakes conversion, but here in Spain it's impossible to get a wrecked Up GTI 😔 I'm thinking about a TSI... 🤔😅 Congrats and keep it up with this cool stuff. Miguel.2 points
-
Compare and contrast the RPM that 125NM comes in at, high revs on the petrol engine means the gearbox is splashing oil about enthusiastically when it's under the greatest load. A manual gearbox specifically designed for a high-torque low RPM diesel engine would use a different type of oil and have a functionally higher oil level, this is not cost effective in most automotive applications and early gearbox failures on the diesel variants are often the result, in fact it's commonplace on many small city cars with diesel engines due to packaging constraints. Most of the Fabia SDI's on here will have had at least one gearbox failure by now, secondhand gearboxes are getting very rare indeed as one recent poster remarked. Coincidence?2 points
-
2 pointsI never thought somebody would compare a Golf & a Superb....the Golf's interior (especially the rear seat space & boot space) is way smaller than the Superb....the cars are in two completely different class/size categories....regardless if they have both been fitted with the same or similar powertrain...2 points
-
2 pointsHatch RS 2.0 TSI DSG, the normal non-iV one. Almost no extras - just heated windscreen, heated steering wheel and phone box for wireless phone charging. 143 000 -> 146 000 in Polish zloty, so +3k (2%) after dealer discounts. They said it's due to model year change. I also had to change the colour (Steel/Meteor Grey to Mamba/Hyper Green).2 points
-
Legacy car makers probably haven't even thought of this, just using a standard design paradigm that worked in the past. I suspect my ID.4 will have similar issues despite heated nozzles, if it ever gets cold in tropical Wales. I've already taken a leaf out of your book to put in -20C screen wash.2 points
-
2 pointsAs above, if it's shared with the brakes it might be a good time for a fluid change or if done recently it might be why the clutch needs bleeding. I must admit for whatever (no good) reason I didn't think the clutch was hydraulic. If it's too cold to consider doing right now you know what to do to get the gears. This is ancient stuff, even my old car has separate reservoirs for brakes and clutch and I don't need to *double-declutch. 🤣 * I would if it had standard box as that was non-synchro 1st2 points
-
Many are because they are just driven at speed bumps.2 points
-
2 points
-
2 pointsIf you have one bulb that does dipped and main beam, you need H4. If you have separate bulbs for dipped and main, it's not H4.2 points
-
2 pointsAnother adventure out in the middle of nowhere. Very rough road which the scout just shrugged off.
 2 points
 -
Why don't you get the tyres fixed so they stay properly inflated for a start.2 points
-
2 pointsGoing back to the OP’s original query, the tyre size stated by Kenny R is the approved Skoda optional factory fitment. You would need a complete kit including new storage boxes and boot floor, to install properly, if you are currently using a canister system. The whole kit is available for around £260. There are two versions, 4wd and 2wd versions. The tyre size is the same, the difference is the boxes to accommodate the differences in the boot floors.2 points
-
2 pointsIn a nutshell that's excellent advice from Silver1011. This will sound so weird, but if they can change the belt at the same time, you just may have saved you many hundreds of pounds within the next few years. You'd be covered by consumer law to reject the car but if it proves it's just the water pump then as I say, look at it as a money saving. Used cars from every manufacturer typically undergo a pre sale check but unless there were some weird noises or the engine was running at a high temperate, there would be no indication the water pump was about to fail. You can't blame the garage if that turns out to be the only problem. "However, I am now worried about the safety and overall reliability of this car". Even if this issue is fixed, I will constantly be thinking when will it break again/how long until the next problem arises? That's certainly not how I'd look at the situation but If that really is your mindset, then simply contact the supplying dealer a.s.a.p. and let them know you're rejecting the car.2 points
-
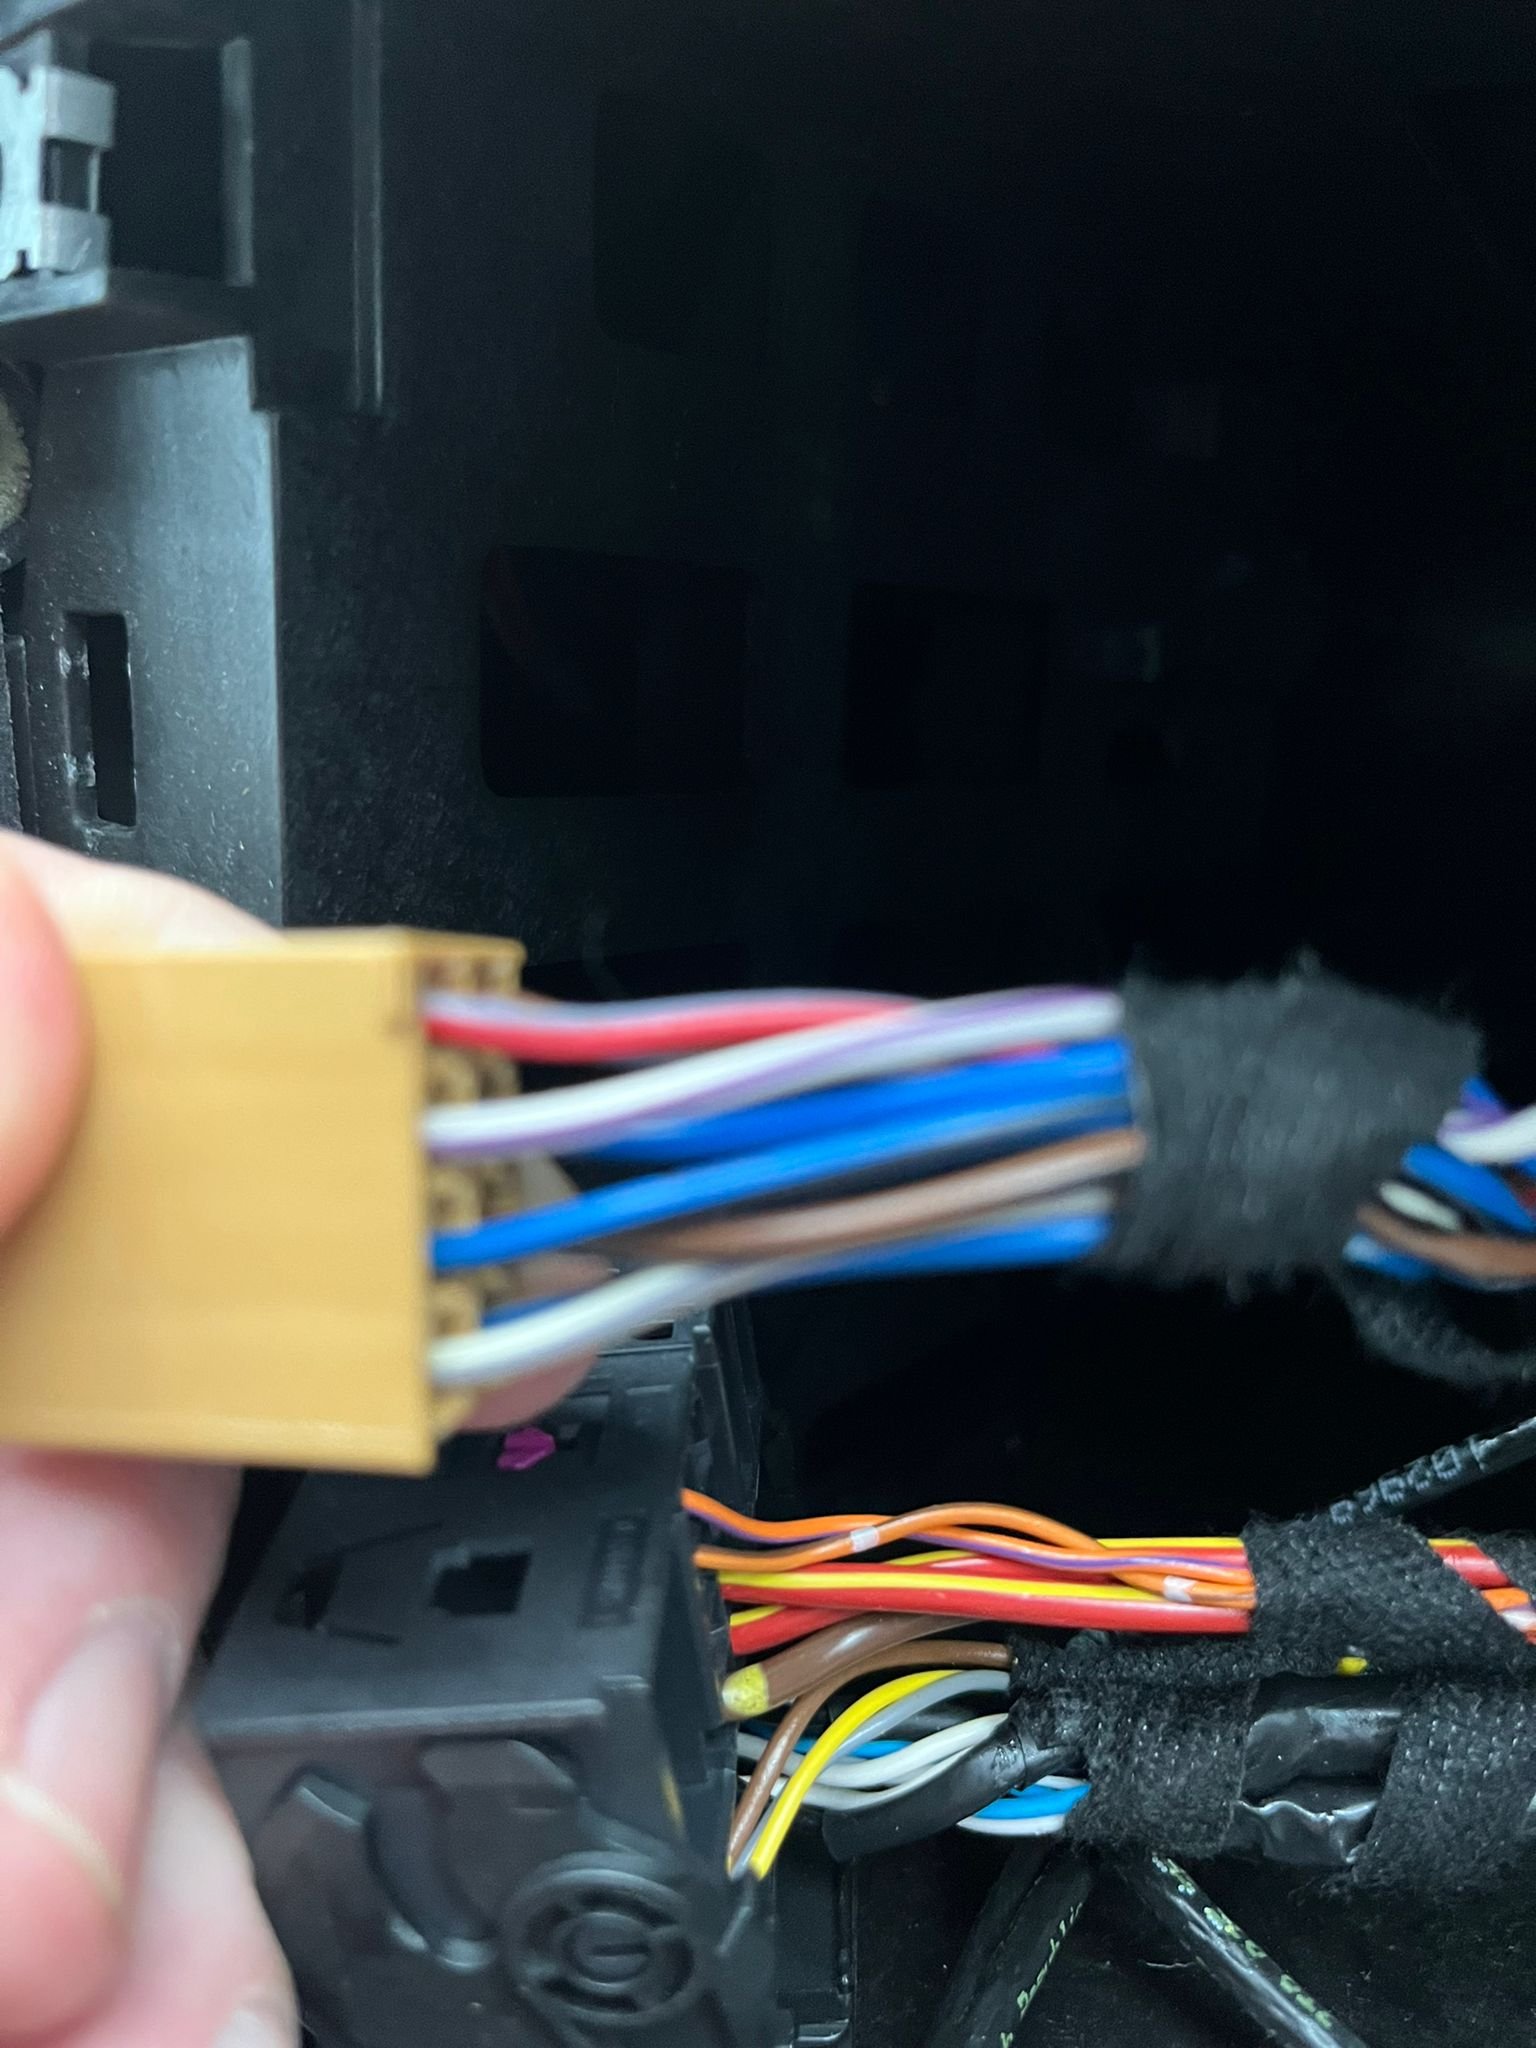
A Very Happy New Year to all, Some closure on this post at last: tested all the wiring and every part of it is 100%, was really past the scratching head point.. got hold of another rns-510 head unit and it was only when powering it up whilst the head unit to test and it was still dangling out the fault cause became clear. The brown speaker plug block looked as if it wasn't sitting properly in the radio harness connector - it was sitting a bit proud, closer look at it the top clips had snapped off and it was moving, not a lot but enough it seems to impact on the entire driver side (the rear had started flaking out as well during December). the loom for connector that isn't very big either and perhaps when pushing the radio back in it has inadvertently strained it. I've pulled it out here to show what one it is: for a fix I've hot glued it to the black connector block with the lock arm, should keep it from trying to run away. Hallelujah I have all round sound Thanks for all the comments and help - I still can't believe the state of that drivers door loom - 100% problems waiting to start happening..
 2 points
 -
On my auto Kodiaq I use the manual park brake button for two things: when stopped in traffic for a while at night I manually activate it, which then switches off the brake lights - it seems a kind thing to do; when I know the car is going to be parked on the level for a while (or after washing it) I manually deactivate it - it helps reduce the chance of the pads seizing to the disks.2 points
-
As you would've seen by now, we have reverted to using the forum for posting in the marketplace. To make things easier and, to make selling your items a breeze, we've added a 'For Sale Template'. On your editor toolbar, you'll now find a 'Lightening Bolt', this is called stock replies. Clicking this will bring up another box. Clicking the 'For Sale Post Template' and, the editor pop will be populated with an editable template. Please try to add as much detail to your for sale post as possible.

 1 point
 -
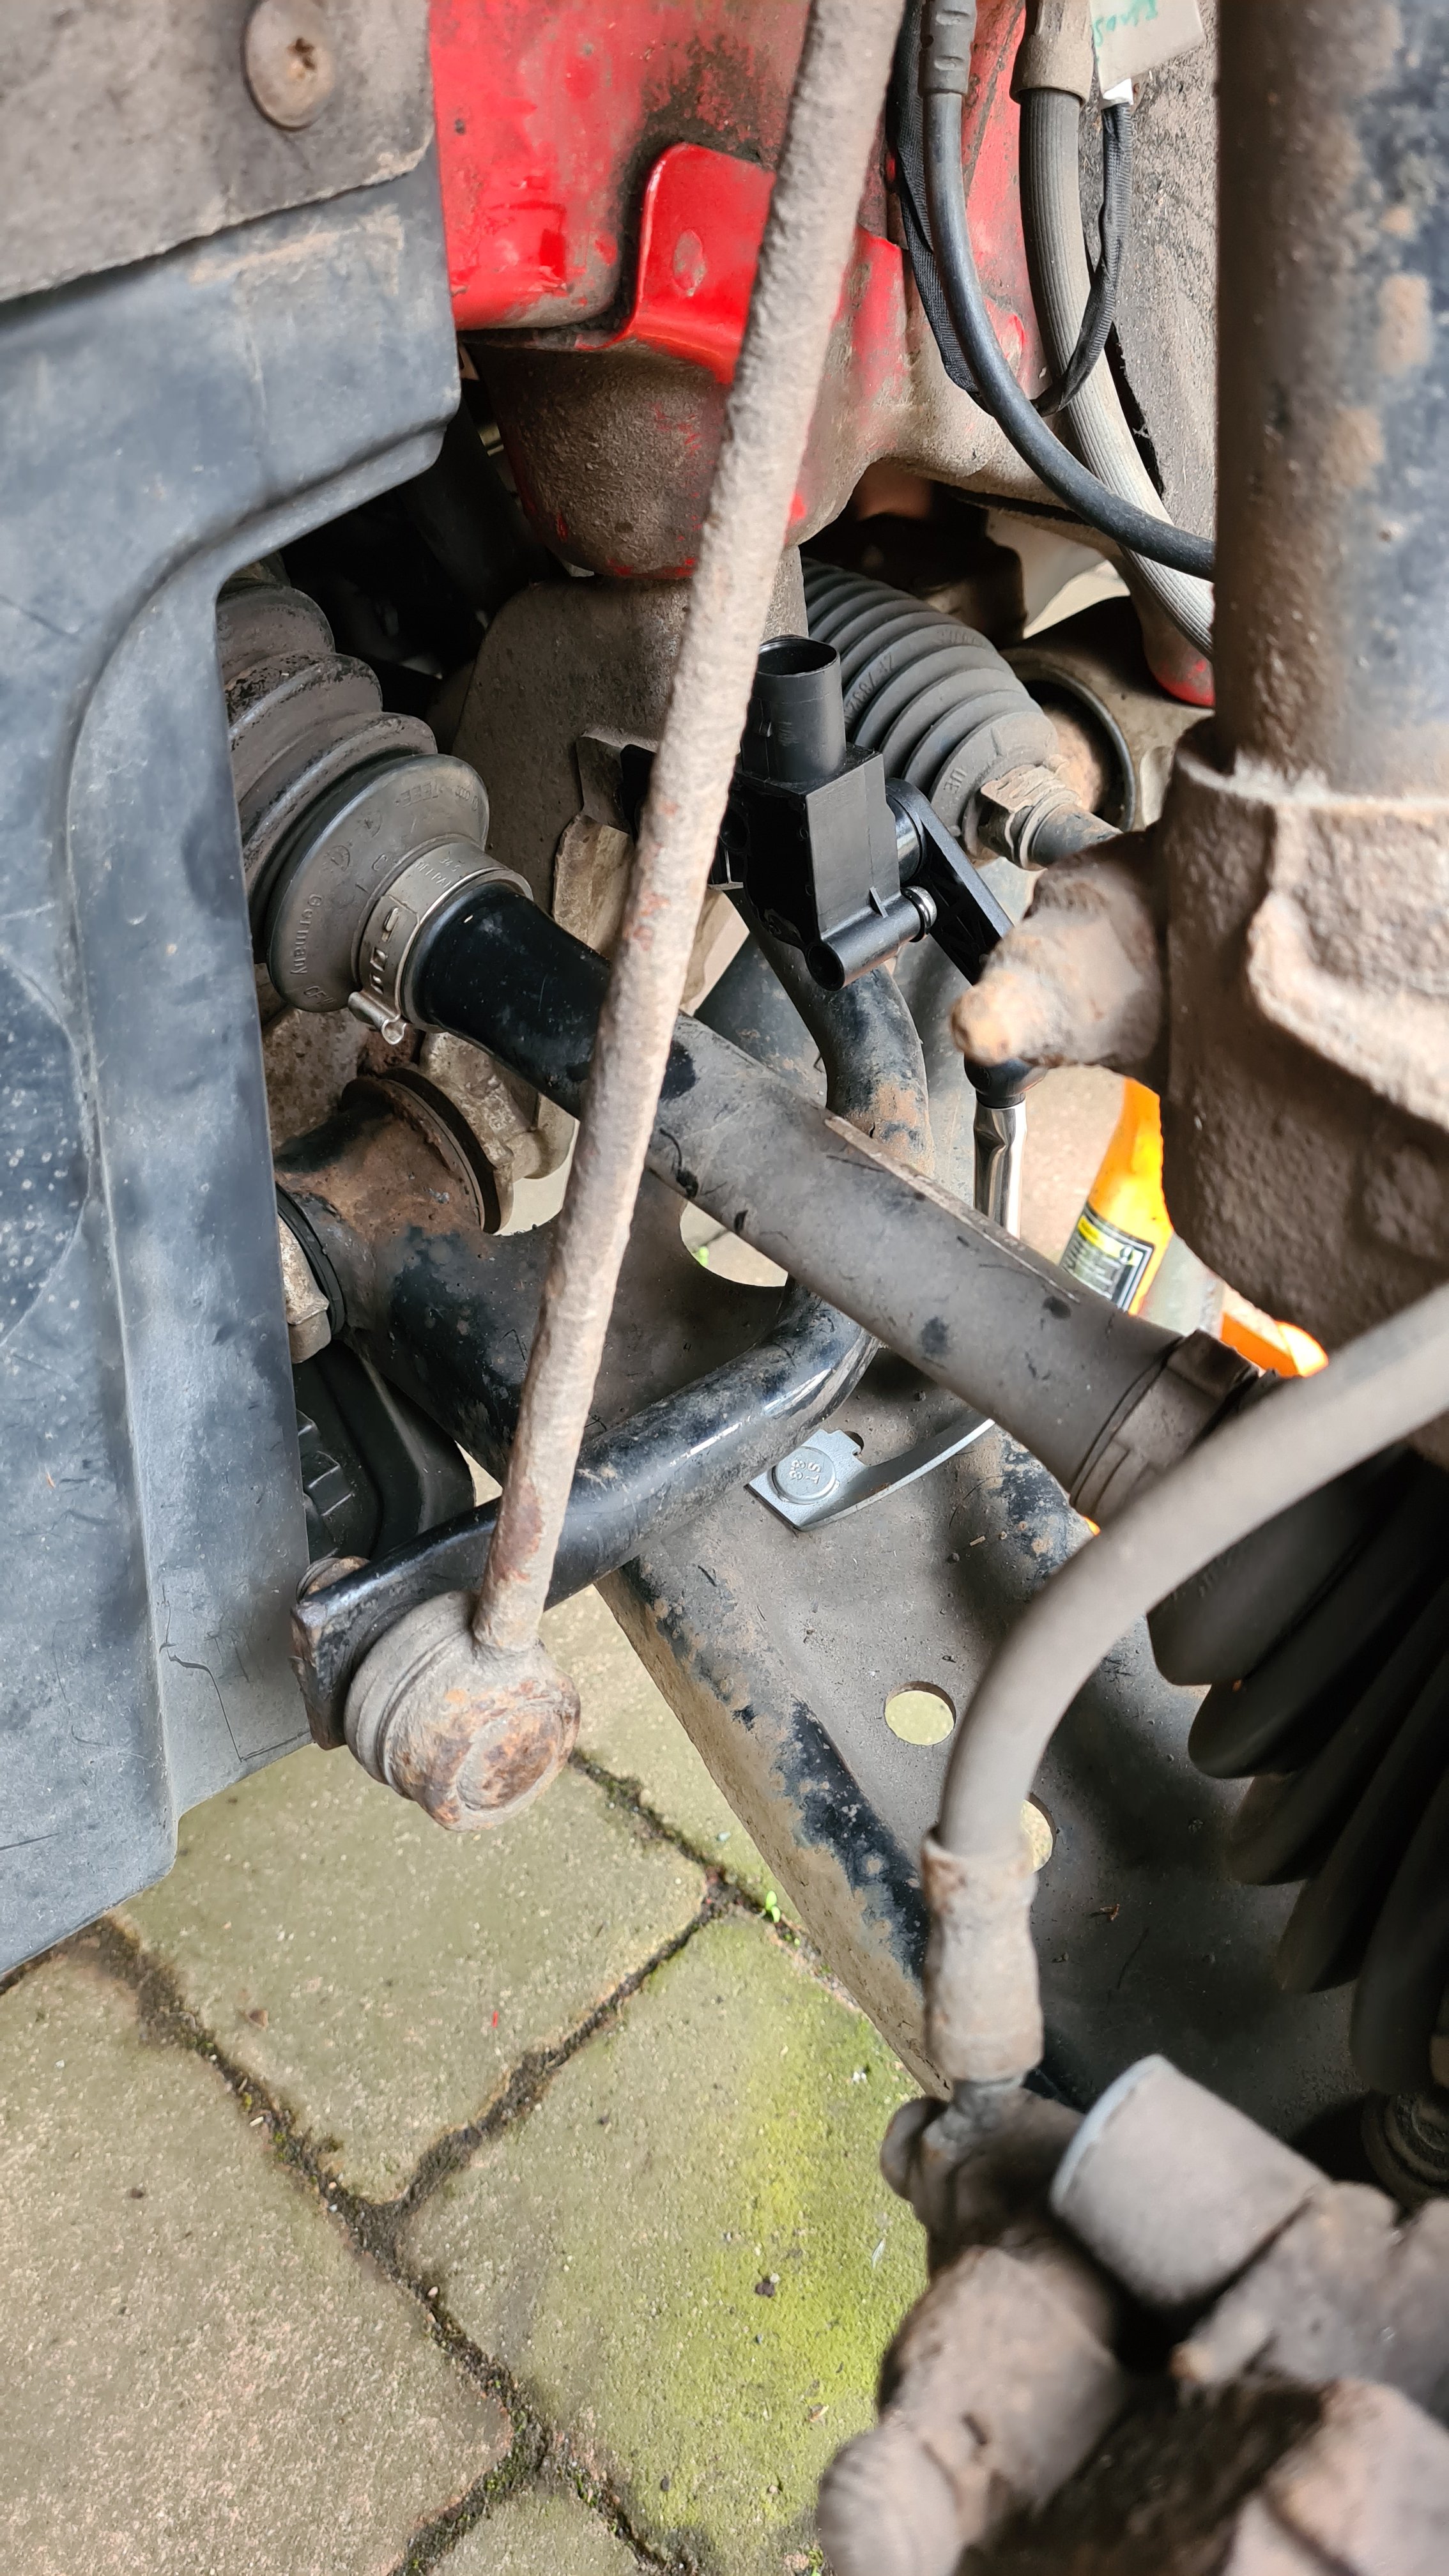
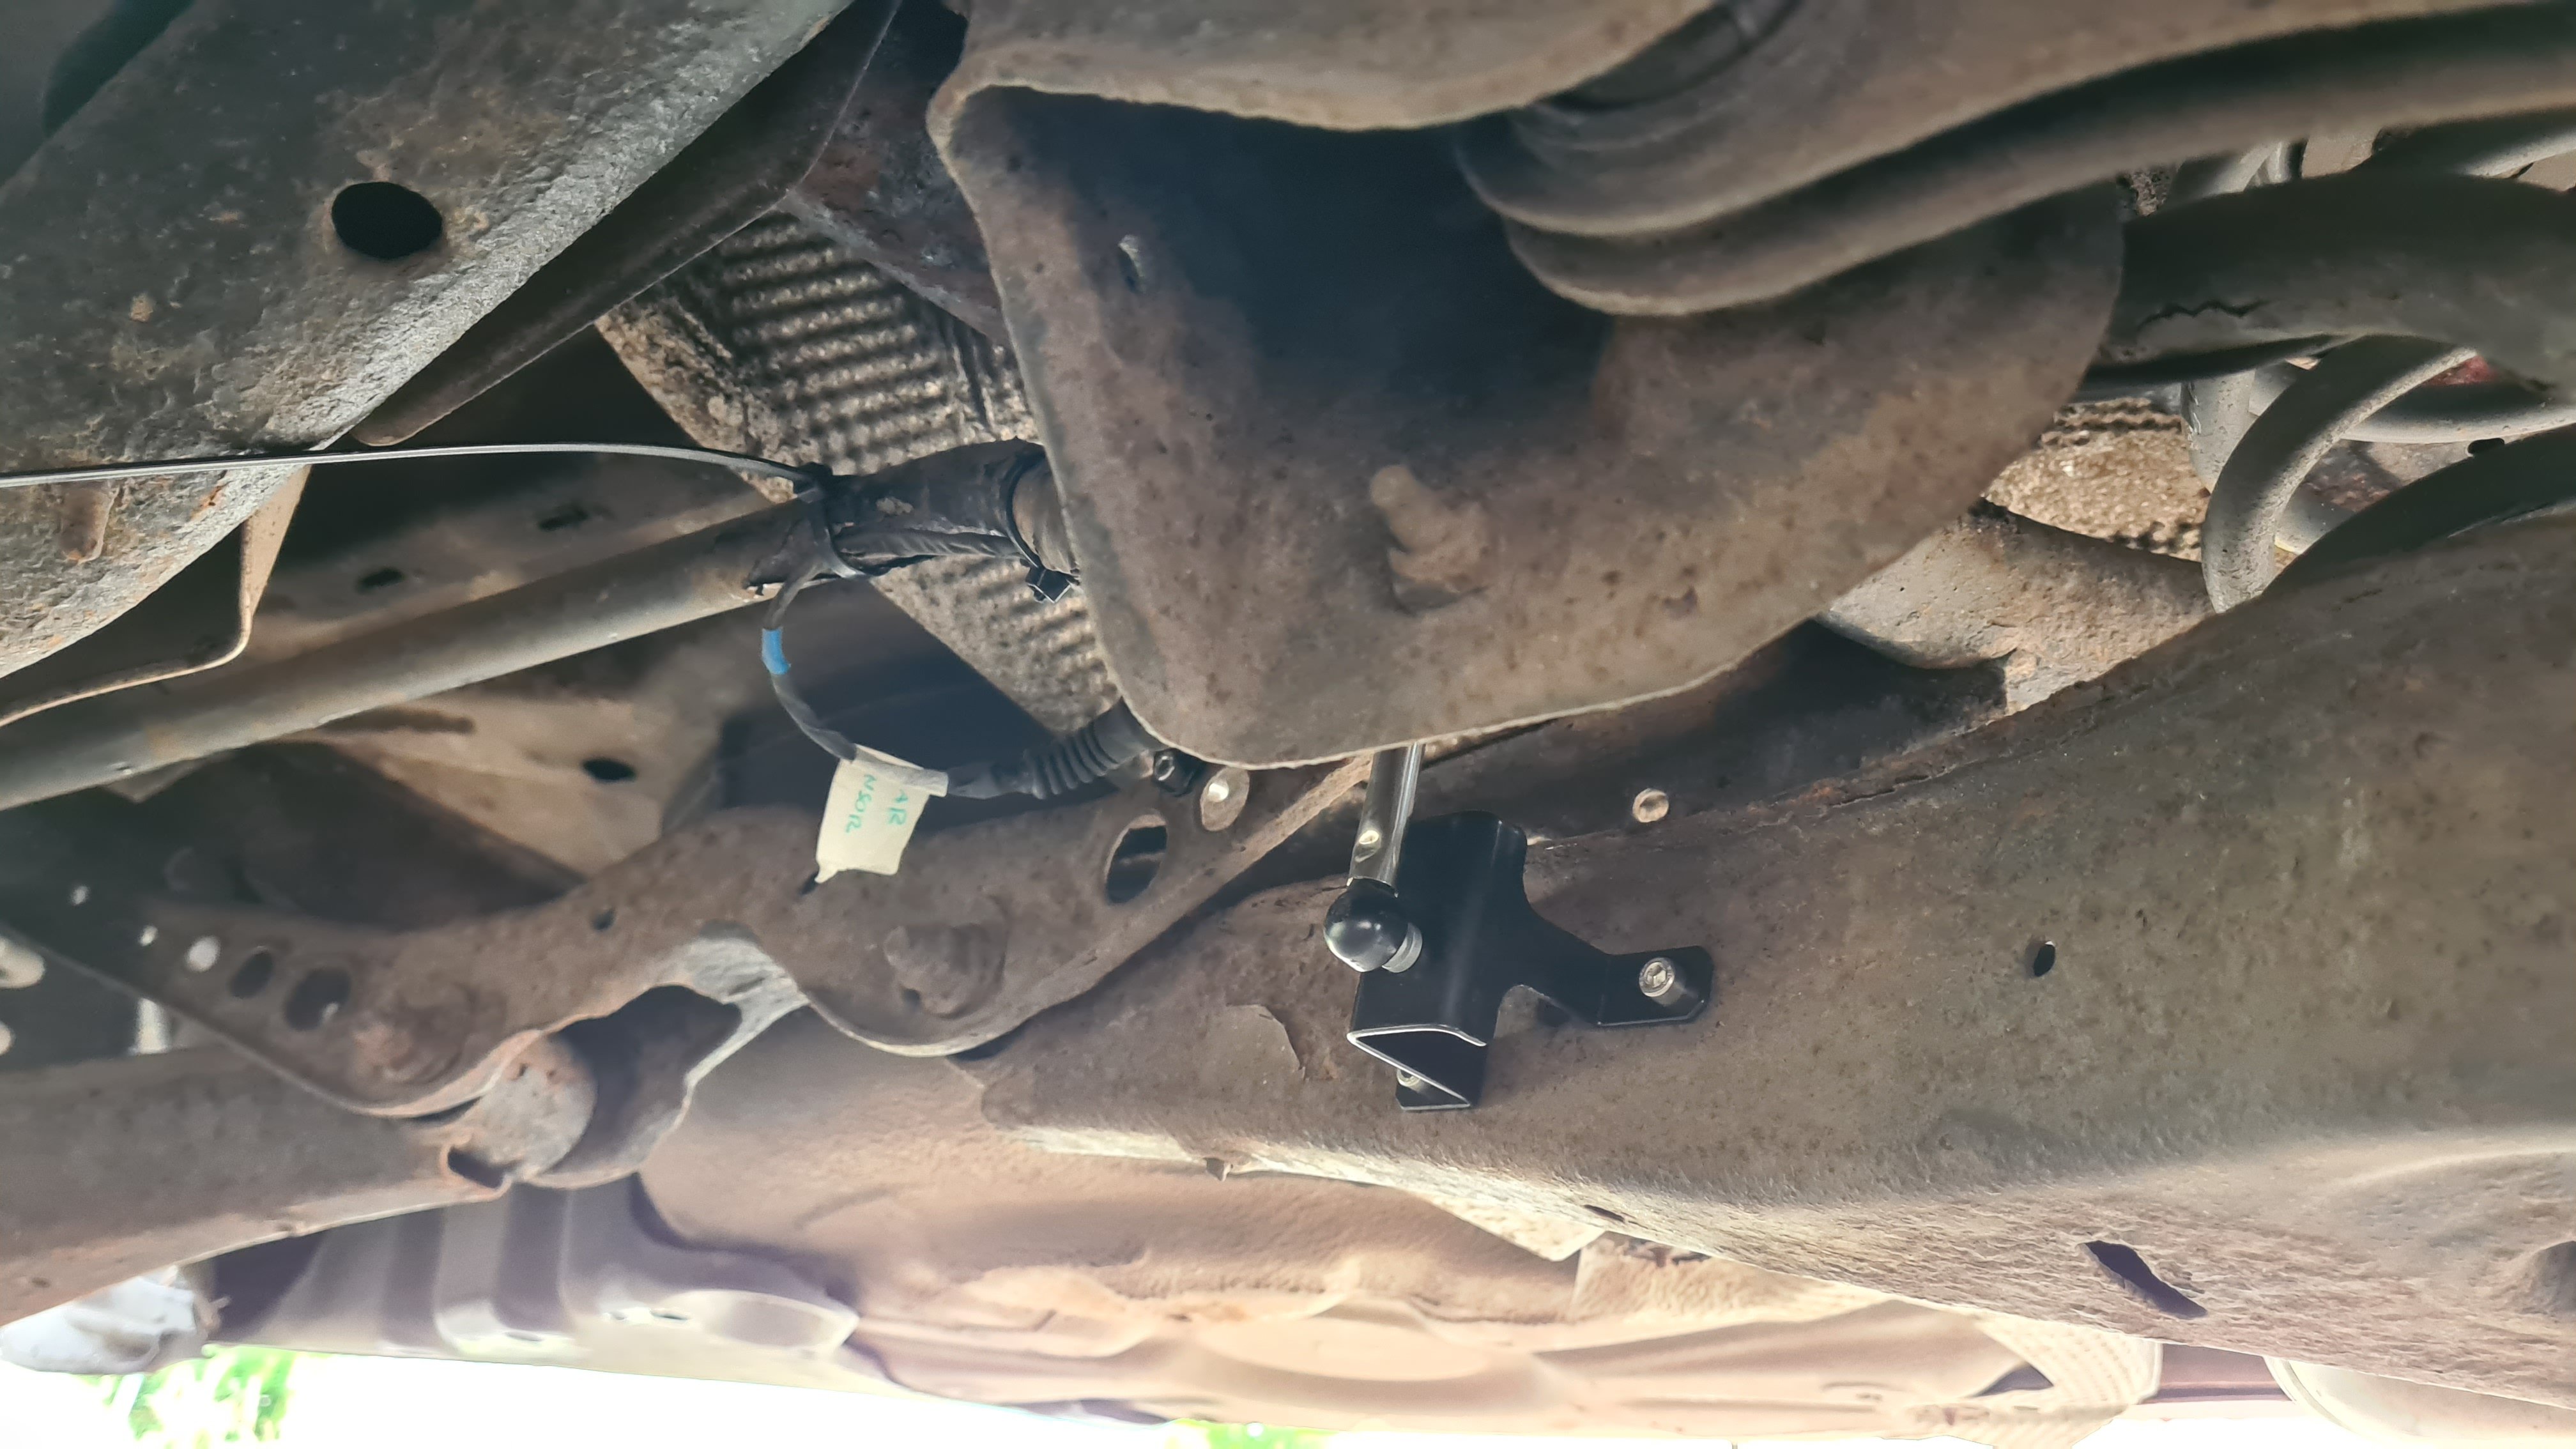
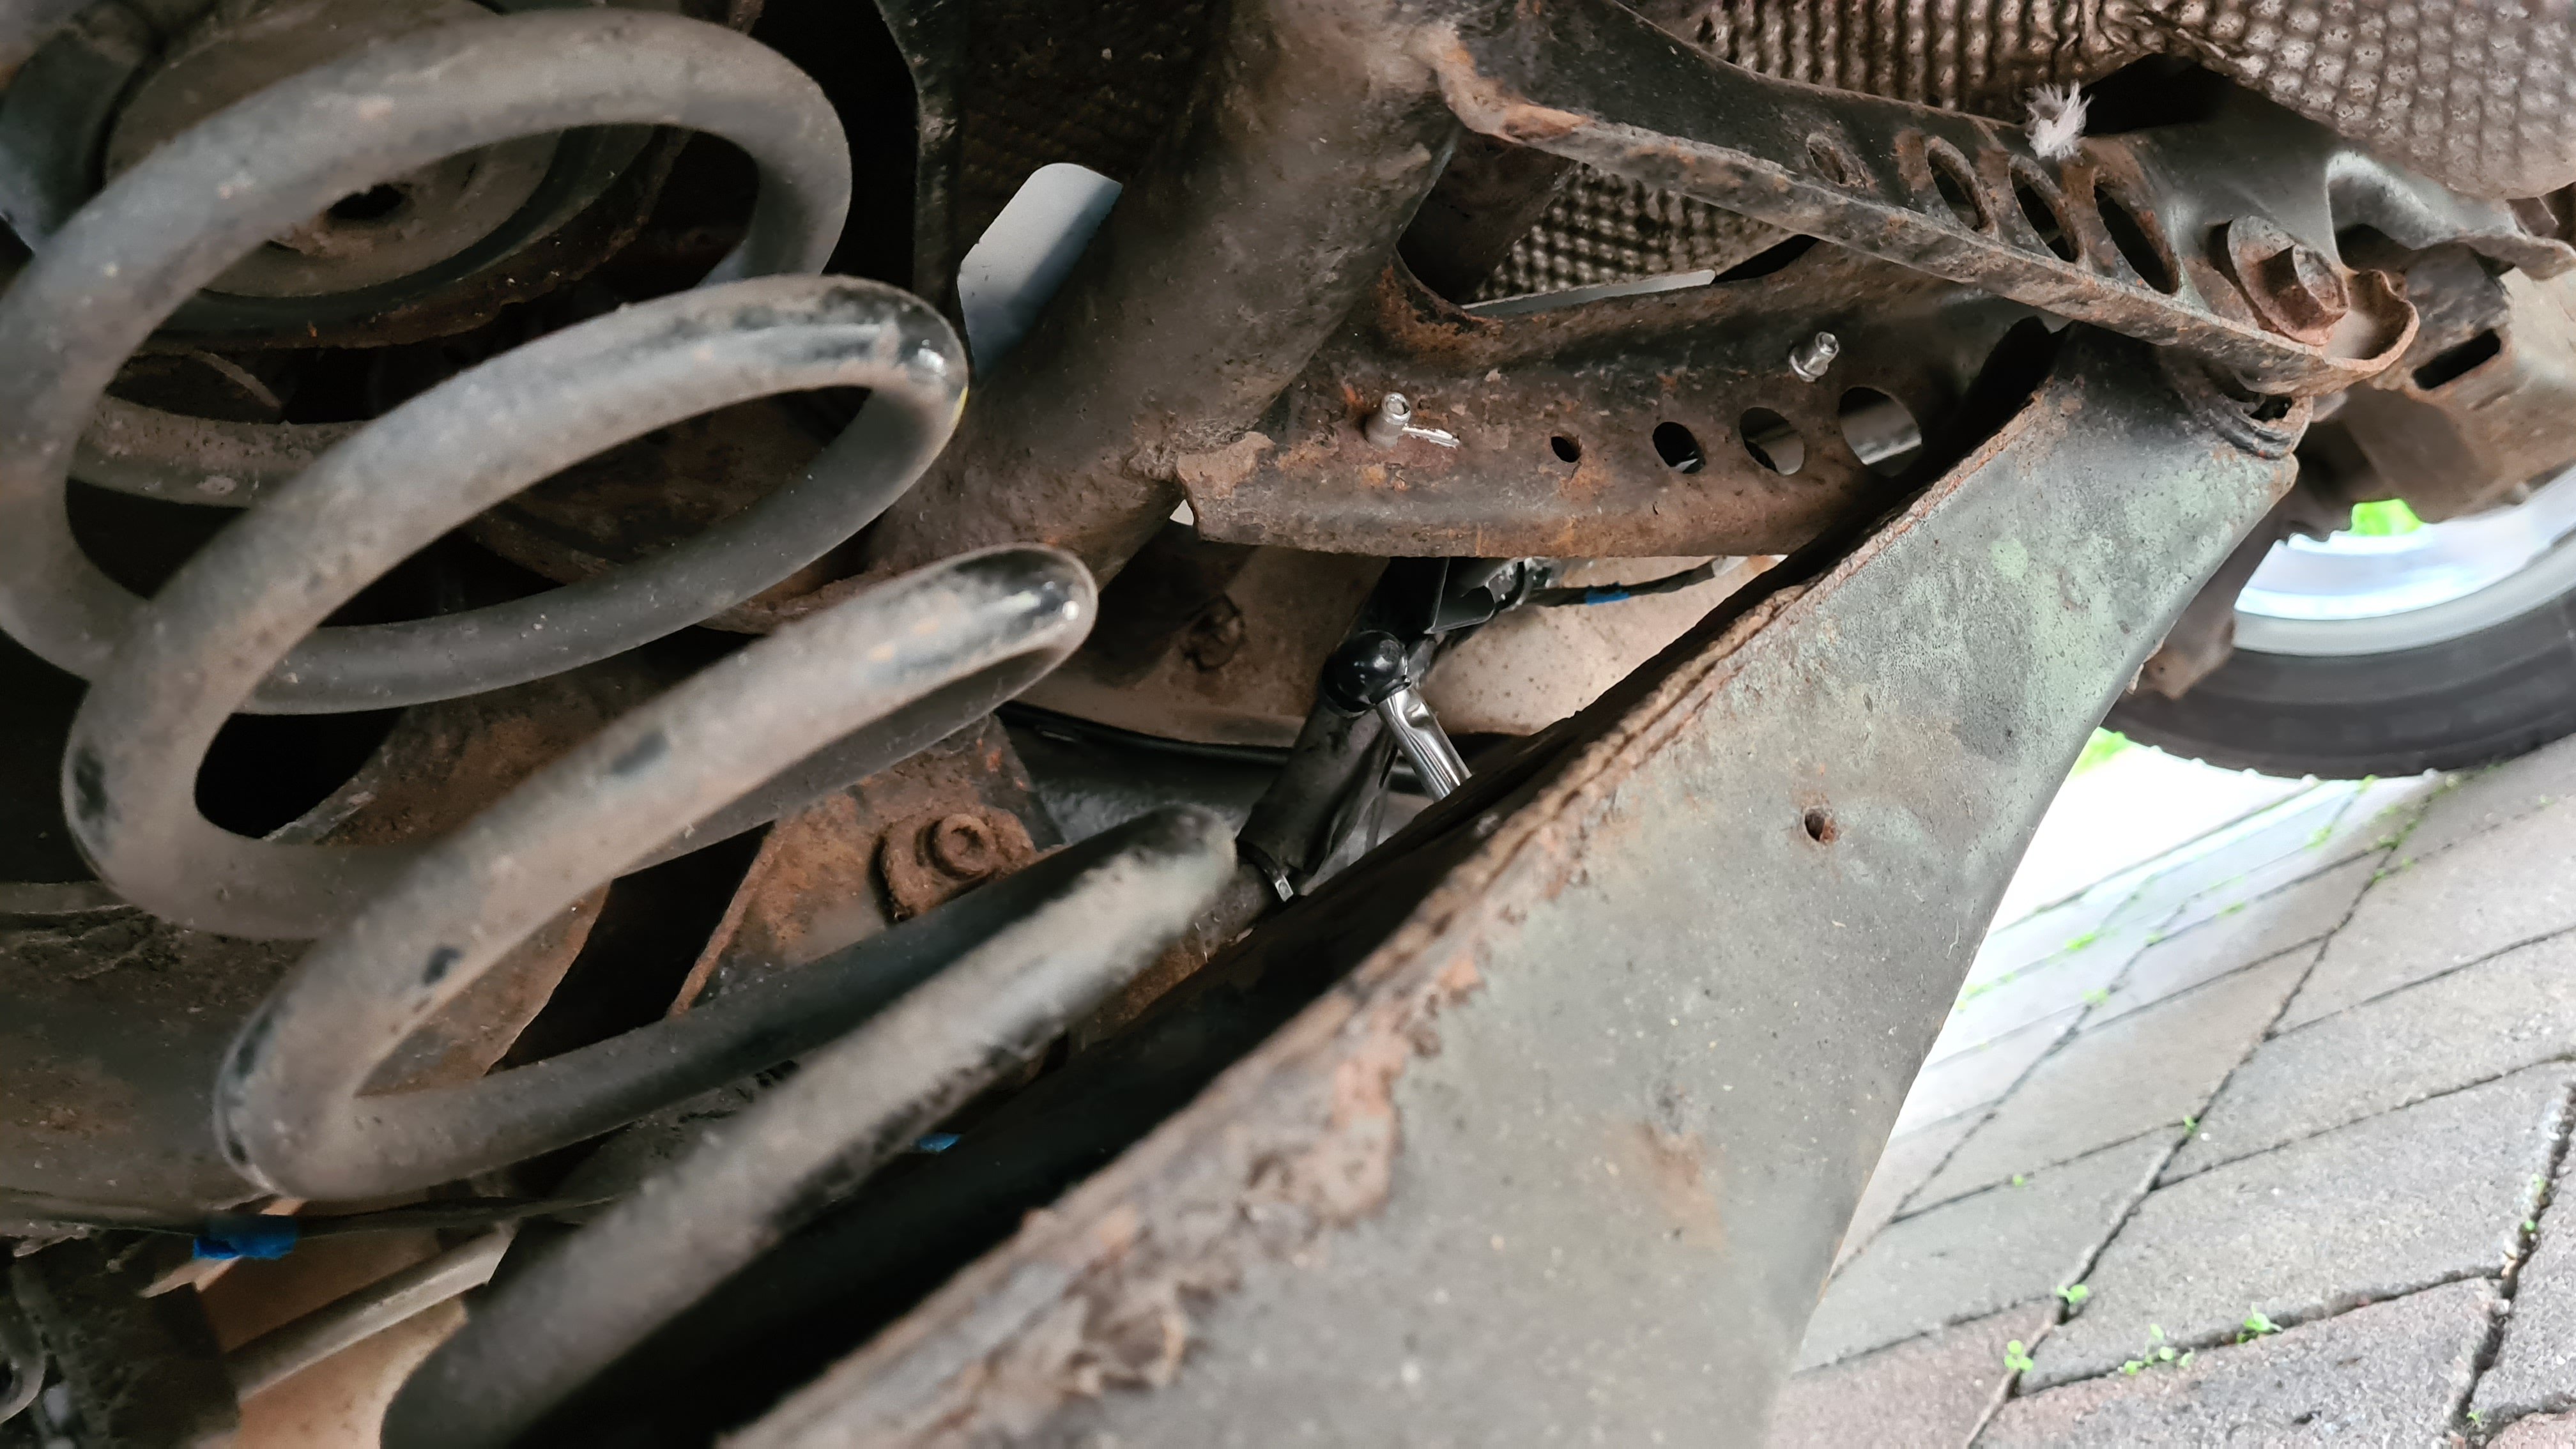
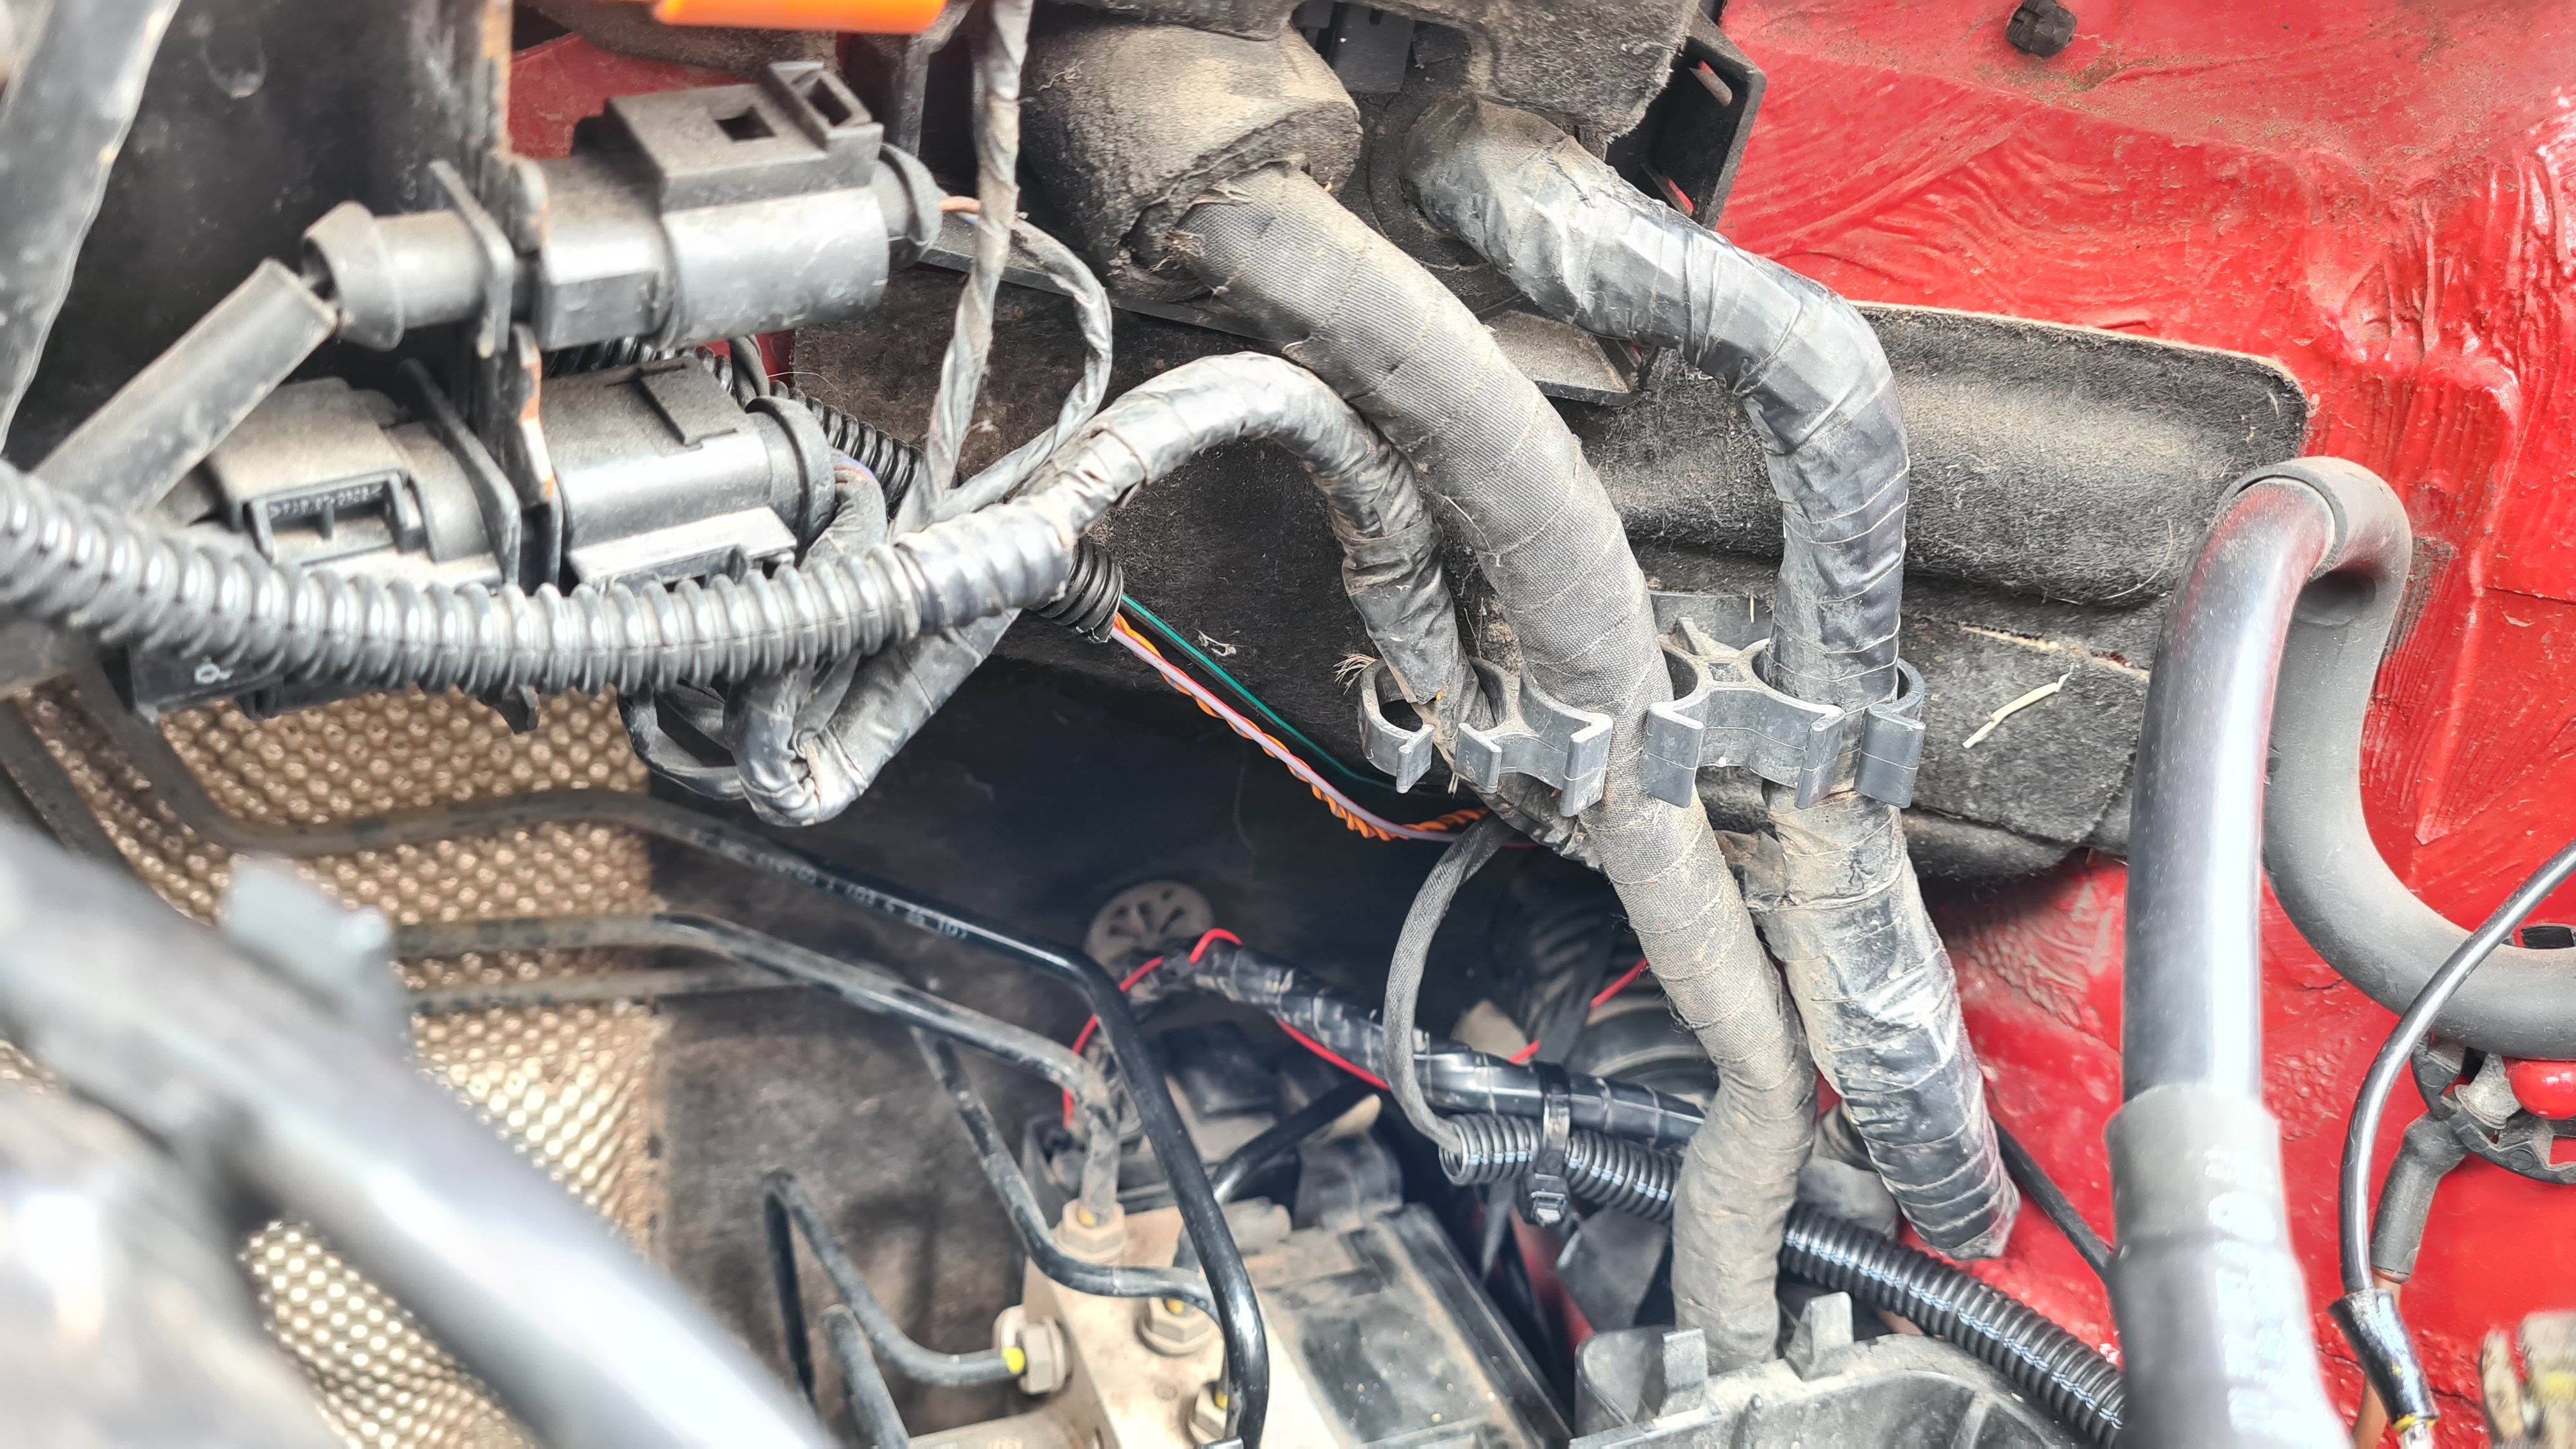
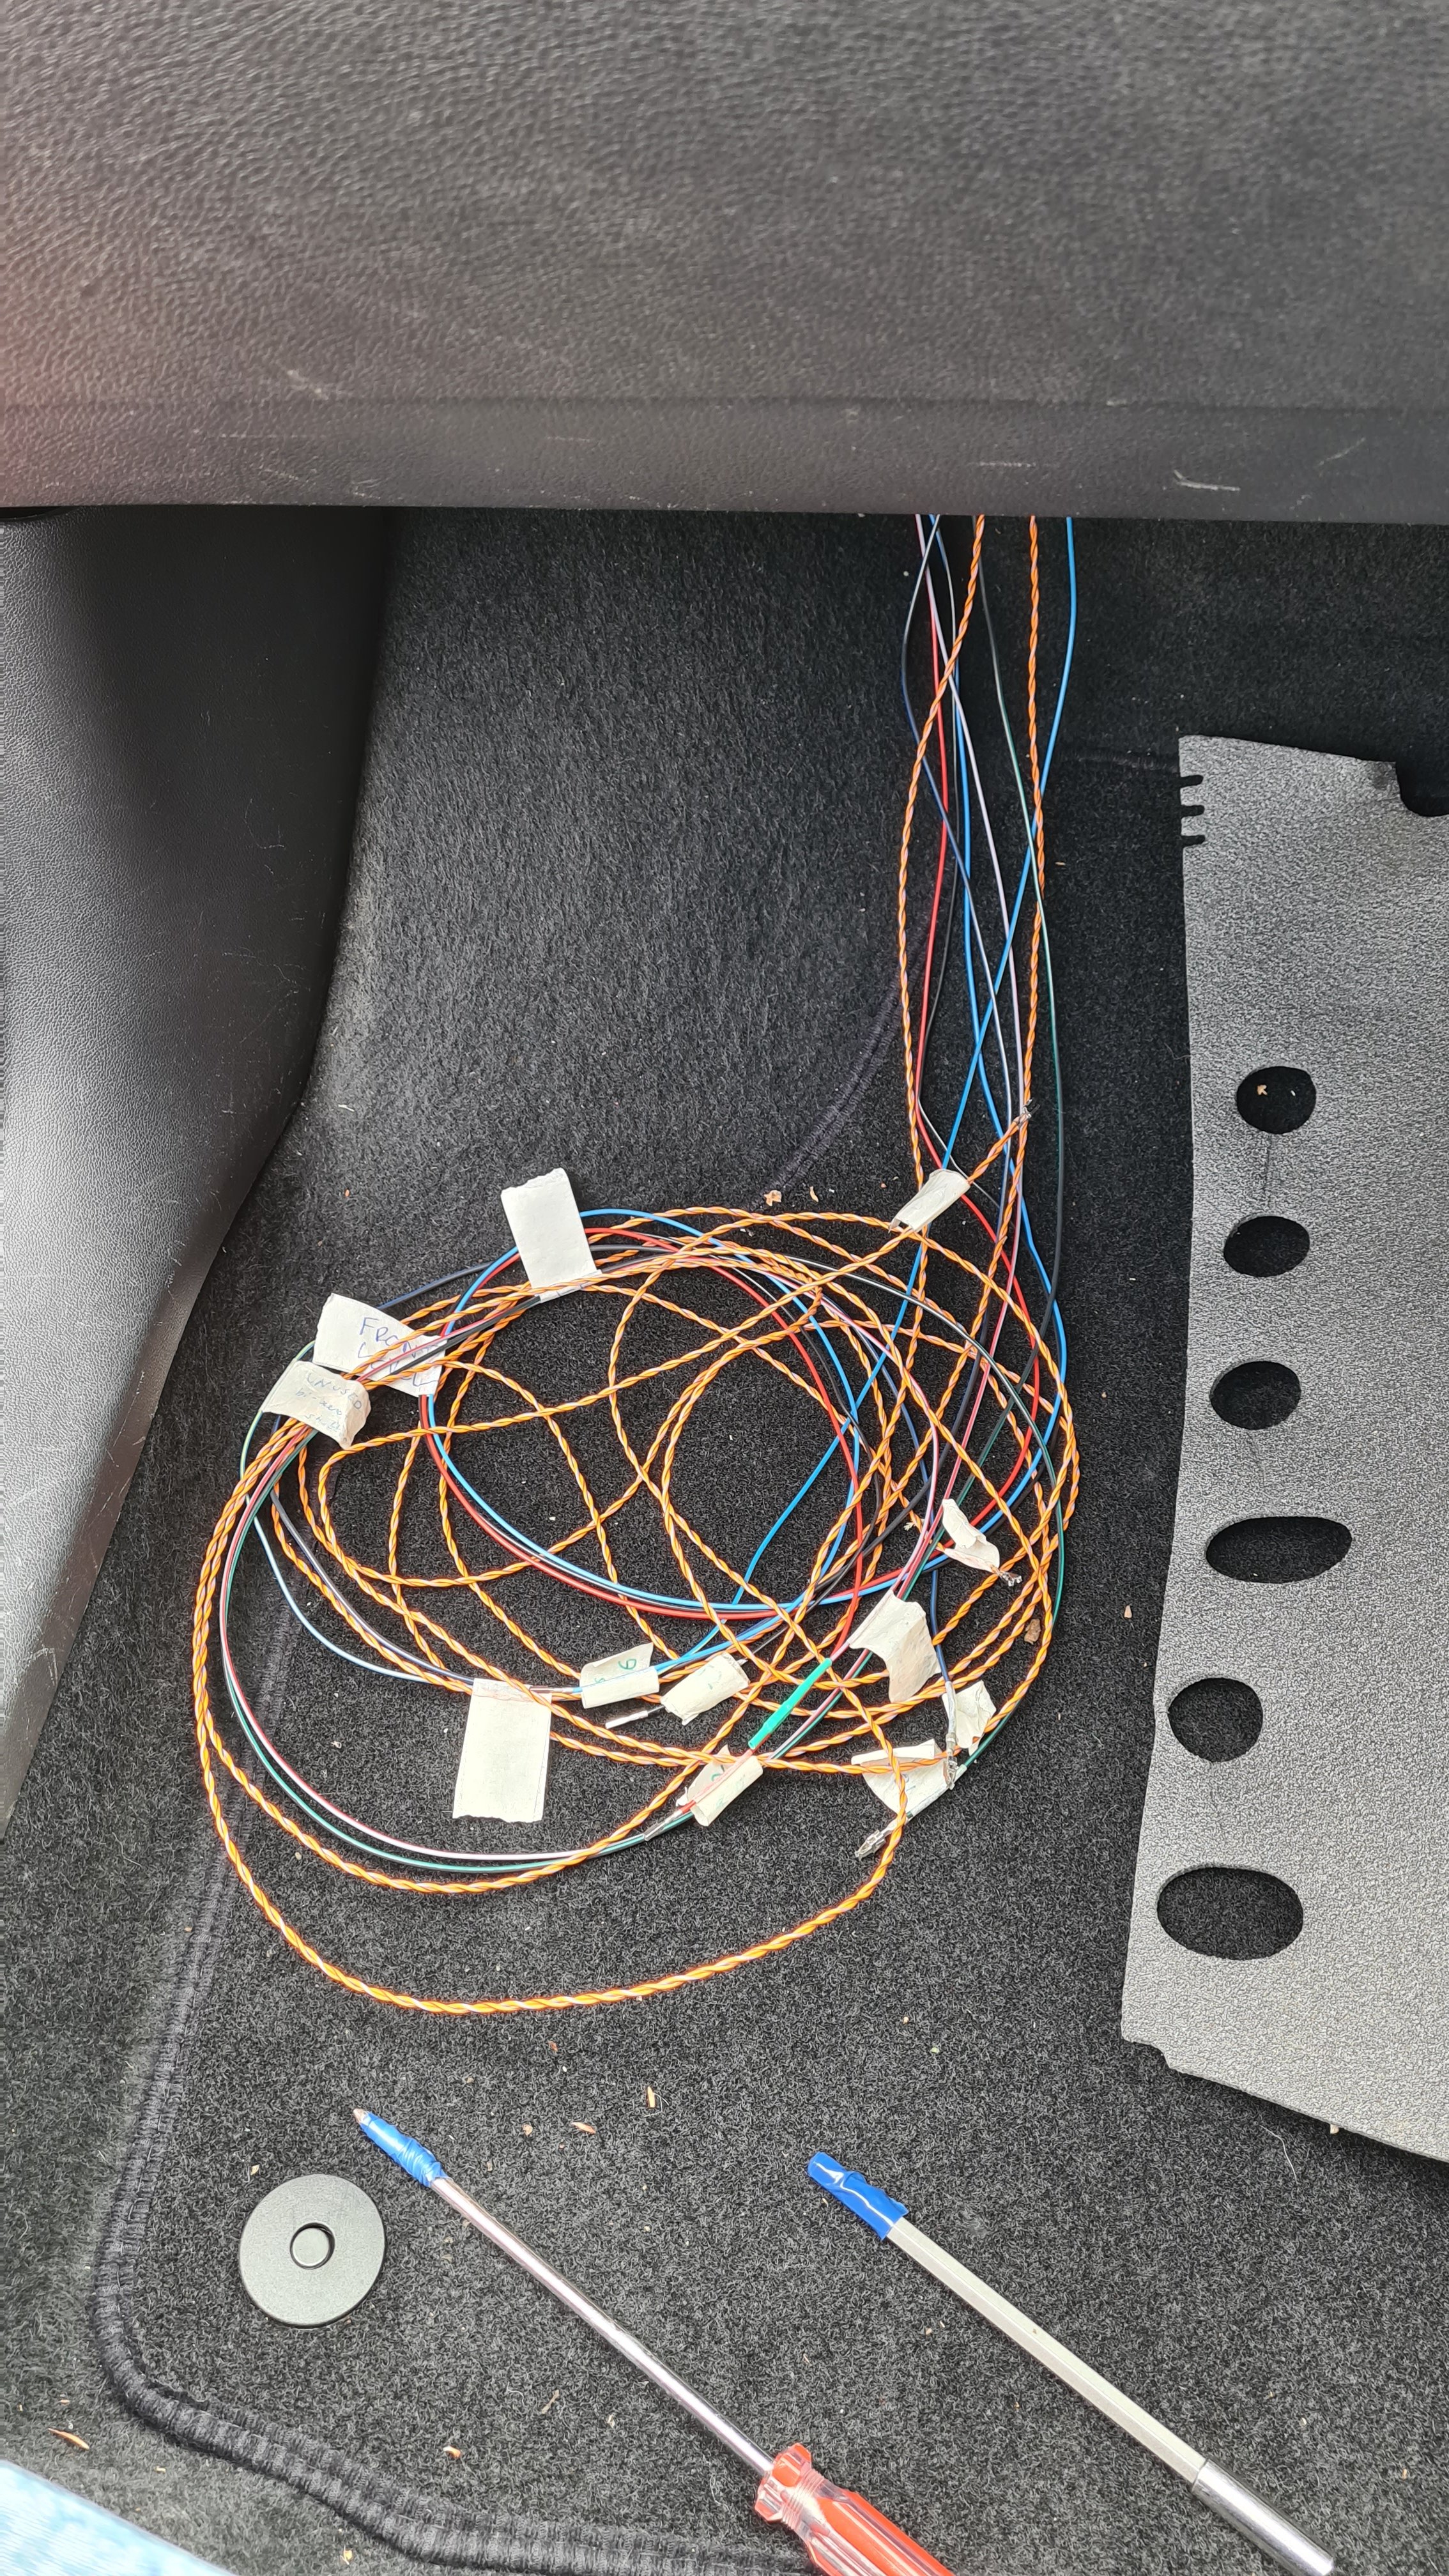
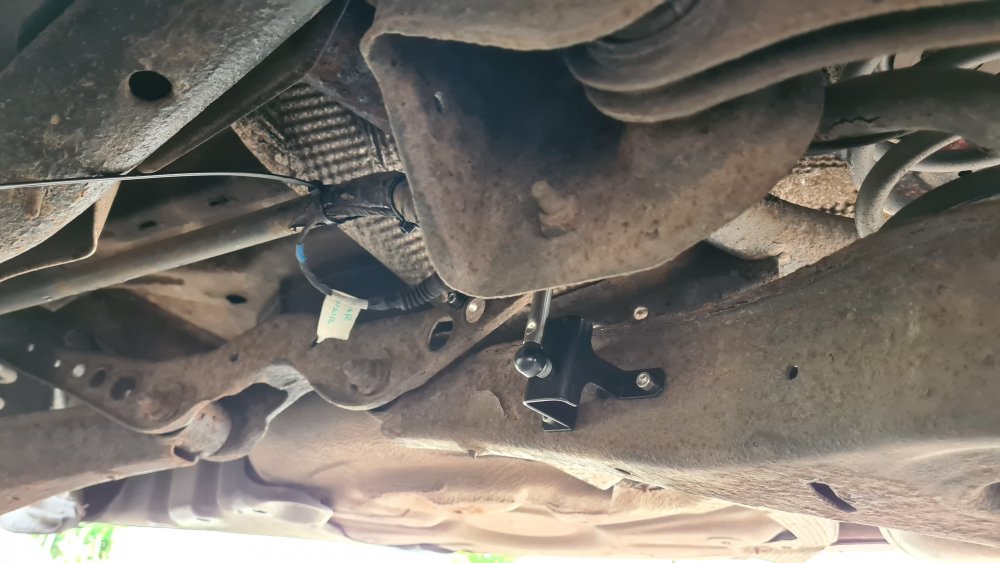
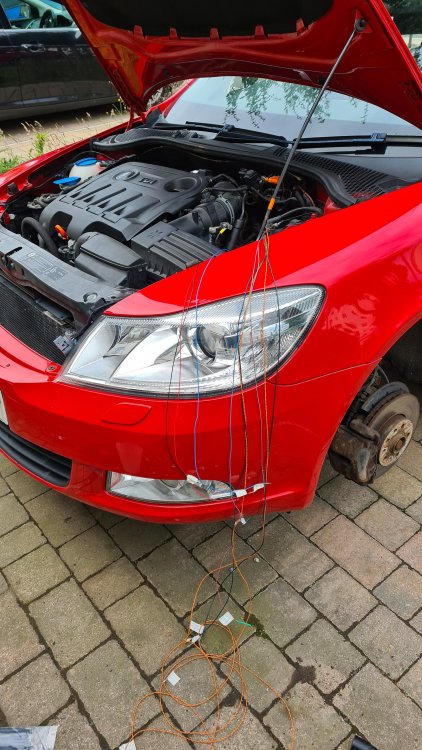
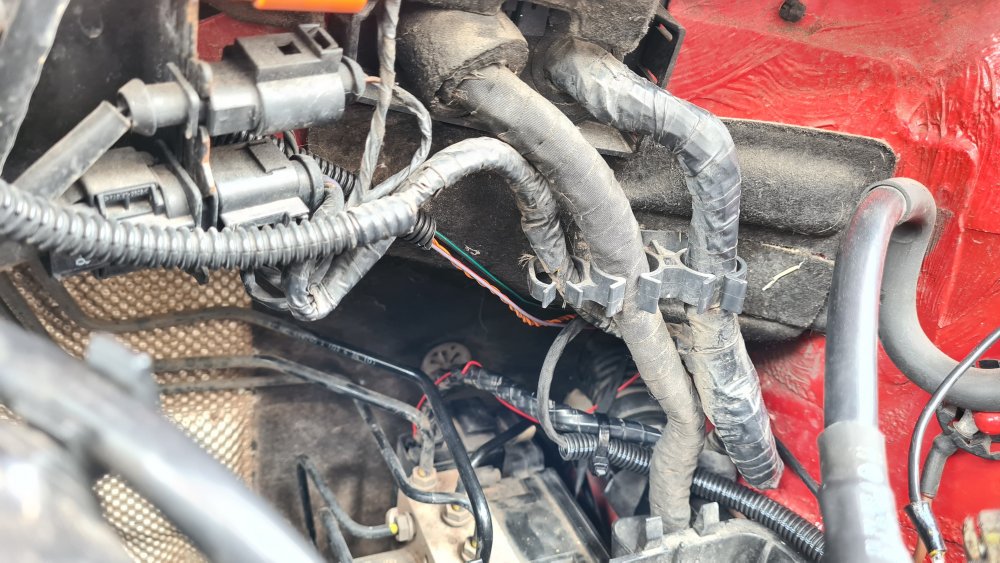
This retrofit is not substantially difficult depending on the vehicle you do it on. You should have good amount of technical ability (be able to understand wiring diagrams and work with 12V electrical systems) and a small amount of mechanical knowledge. I consider myself a fairly competent technician and I still got a lot of help doing this. Any part numbers I quote are for a UK spec Octavia in RHD, but should be identical for LHD (other than the headlights which are obviously different). Prerequisites that I know of: A BCM and CAN gateway which support xenon headlights. I cannot give a definitive list of part numbers which are compatible, but I know that BCM 1K0937087J and CAN gateway 1K0907951 are compatible. Headlight washer jets - fitting this is a major job in itself and is outside the scope of this guide. UK MOT rules require all cars first used after 1 September 2009 with high intensity discharge headlights (any dipped beam light source with an output greater than 2000 lumen) to be fitted with a headlight cleaning system. See https://www.gov.uk/guidance/mot-inspection-manual-for-private-passenger-and-light-commercial-vehicles/4-lamps-reflectors-and-electrical-equipment#section-4-1-6 My car is an Elegance spec so had headlight washer jets fitted as standard, I believe the Scout is the same. This saved me a lot of work. Quite a lot of time and money. The conversion cost me about £500 in total, but this heavily depends on how much you end up paying for the headlights, which are by far the most expensive parts of this conversion. Parts required: Nearside xenon headlight 1Z2941015G Offside xenon headlight 1Z2941016G If your headlights do not come with the ballast/driver and AFS slave module, the part numbers are 1Z0941641B and 7L6941329B respectively. AFS master (range control module) 5M0907357C with software SW 0142 or later Front suspension level sensor 1K0941274C Rear suspension level sensor 1K0941273N Fasteners for level sensors: Front 1x M6x16mm bolt N10653201 with washer N0115477 1x M6 nyloc nut N10205802 Rear 5x M5x16mm bolts hex head N10430104 2x M5x3.8-6.5mm XL rivnuts N10601701 3x M5x0.5-3mm rivnuts N10597701 Dashboard dimmer switch without manual headlight range adjustment 1Z0941333A Wiring loom - I used this one from Aliexpress which was designed for a mk6 Golf and required some adaptation as the pinout is not exactly the same as the Octavia. I also had the seller include an extra level sensor cable, as the Octavia uses two level sensors as opposed to the single one in the Golf. Step 1 - install level sensors. The front sensor is very easy to install. Take off the front left wheel and have a look at the subframe immediately behind the CV gaiter. There are two holes; the left one is a simple hole which is where the guide pin on the level sensor bracket goes, and the right hole is threaded, so put your M6x16mm bolt with washer in here. The bottom part of the sensor goes into more existing holes on the lower suspension arm, near the anti-roll bar. Make sure the arm on the level sensor is pointing outwards. The rear sensor is a little more tricky as you have to get fully under the car. You also need to set 5 rivnuts in the left suspension - 2 in the upper arm, and 3 in the lower. The holes already exist, there should be 3 in a triangle at the bottom and 3 in a line at the top. You only need to set rivnuts in the outer 2 holes at the top. Unfortunately I forgot to take decent photos of mine, but you should get the idea. Mount the sensor using your M5x16mm bolts, once again making sure the sensor arm points outwards (it will not work if it's pointing inwards!) Step 2 - install wiring. This is probably the most time consuming part of the conversion. I tried to make mine as neat and OEM looking as possible. You will ultimately end up with wiring running between the following locations: nearside headlight and centre of dashboard (behind climate control panel) offside headlight and centre of dashboard front level sensor and centre of dashboard rear level sensor and centre of dashboard centre of dashboard and CAN gateway (buried at the back behind the steering wheel) centre of dashboard and cabin fuse box (or other suitable power source) The looms for the headlights themselves have a short section which converts from the 10 pin halogen headlight connector to the 14 pin xenon connector, and also a CANBUS twisted pair and power wire for the AFS slave which needs to go into the cabin. I used some flexible conduit cable tied neatly from both headlights to near where the grommet in the bulkhead behind the battery is located as this is where I'd be passing the wiring into the car. I got the wiring for the front level sensor into the engine bay through the hole that the brake pipe goes through. The rear level sensor wiring enters the car through the same rubber grommet the ABS cable goes through, and runs down the passenger side of the car up to the front. Once all the wiring is in the front, you need to get it into behind the climate control panel. This is pretty easy as you can just push it through the gap between the carpet and the plastic surround of the centre panel.


 1 point
 -
1 point
-
You could factor that in if you wanted for trip to TC-6 or just ignore it as it makes such little difference. I originally thought you were running 40% or 50% antifreeze then removed it to almost all distilled water to run as a flush but I get it now. Come the summer if you have access to a hose pipe I would do a clean, full flushes and refill of the three parts of the system as I put before, as a thorough cleaning of the cooling/heating system on older cars is one that is one of my hobbyhorses. I watch Scotty Kilmer but bear in mind he's entirely USA (you might recognise the following) and I recognised the Judge in the jive talk clip.
 1 point
 -
1 pointTo be fair with the projector setup on the Octavia, as long as the bulbs are installed correctly, you won't blind anyone In fact I'm fairly sure that the projector is identical for both halogen and xenon on the mk2 Octavia1 point
-
1 pointHi All,Update, changed the oil level/temp sensor in the bottom of the sump and alls OK 👌 just bought a cheap one off Amazon 1J0907660C reperio auto parts £16.99 !1 point
-
1 pointHappy for you man! Mine is still unfinished, since the beginning of September. Ordered a week after you.1 point
-
All that fuel being used on the regens, some of it will be finding its way past the piston rings and into the sump oil, I recommend you keep a very close eye on the dipstick level and change the oil if you see any increase or a decrease in oil comsumption if your car was a drinker before. The fuel is injected during the exhaust stroke and does not combust until it reaches the bonfire in the DPF, some will find its way to the sump, thats the reason I am looking at all avenues to reduce the frequency of my regens, an emissions fix roll back will be the most effective I feel but since covid my journey profile has become short local trips, that will soon change with my moving to another area.1 point
-
Info added in bold If your car is dated 2006 as per your profile, then you need the first picture...1 point
-
1 pointWhat the hell, so did they stop production or not? Mixed messages from Skoda every hour of every day 🤣1 point
-
1 pointThanks Delboy, looks like I could have saved some serious cash 😪. I'll have to investigate why my music and nav isn't making it to the maxidot, Could be to do with using Agama instead of the native Xtrons launcher. I'll test it out as it would be nice to get that back.1 point
-
1 point@Ado12345 No - been back a couple of times and they say Skoda are aware of it and will release a fix in due course - could be 2 weeks, could be 2 years. Not impressed as it really is spoiling what is otherwise a nice car1 point
-
1 pointYou have to have a Skoda SD card with Amunsden Infotainment as data is read from the SD card to use the SatNav. The Columbus units I believe download the data to store internally so you can use any SD card. They can be updated at home from the internet. I bought a 32GB off ebay for £29 with the 2021/2022 maps and it works fine for my Amunsden unit. But yes the dealer should provide one to start with. Updates can be downloaded here https://updateportal.skoda-auto.com/en-GB Thought the Cam belt was 5 years irrespective of mileage.1 point
-
1 point
-
The washer nozzles are really hopeless where they are on the back edge of the bonnet and with the pipe running up by the hinge and under the insulation on the bonnet of a car with no heat in the engine compartment.


 1 point
 -
1 pointThe main point is that the aftermarket spring manufacturers (and Skoda) supply stiffer front springs for the DSG automatic gearbox than the manual gearbox. You can check that for Optimal, Sachs, Spidan, and Suplex on autodoc. As you can see in the links below, the standard ride height front springs for the manual gearbox have a wire thickness of 11.5mm, and for the DSG gearbox it's 11.75mm. Optimal https://www.autodoc.co.uk/car-parts/coil-springs-10213/skoda/octavia/octavia-combi-5e5/128420-1-5-tsi?supplier[0]=32&criteria[100][1]=VA Sachs https://www.autodoc.co.uk/car-parts/coil-springs-10213/skoda/octavia/octavia-combi-5e5/128420-1-5-tsi?supplier[0]=129&criteria[100][1]=VA Spidan https://www.autodoc.co.uk/car-parts/coil-springs-10213/skoda/octavia/octavia-combi-5e5/128420-1-5-tsi?supplier[0]=1&criteria[100][1]=VA Suplex https://www.autodoc.co.uk/car-parts/coil-springs-10213/skoda/octavia/octavia-combi-5e5/128420-1-5-tsi?supplier[0]=10708&criteria[100][1]=VA1 point
-
@28five http://briskoda.net/forums/topic/500356-alloy-spare-wheel The Yeti Guide section is handy. http://briskoda.net/forums/topic/407451-diy-space-saver-wheel-assembly http://briskoda.net/forums/topic/156798-spare-wheel-assembly http://briskoda.net/forums/topic/148948-yeti-tyre-and-rim-guide1 point
-
@Bap33 Once again thanks for the help. Got the reverse bulb and fog lights you recommended. Big improvement in terms of visibility in the dark and color matching in the front. I also did some obdeleven mods, but realized it's quite limited.1 point
-
For fuel consumption calculations your tank capacity does not matter, it is just distance covered over fuel consumed. Once you have refilled the tank on auto and no more, immediately reset tripometer to zero before starting the car and leaving the petrol station. Drive the car for say 5 (6?) days of your home to work and back, so 40-45 km (48-54 km), then refill the tank on auto and no more, note the amount of fuel this took from the fuel pump, and your distance from the tripometer. Dividing these two figures will give you a very reasonable accurate fuel consumption figure. If you want you can compare it against other method to confirm how accurate the other method is, or not.1 point
-
1 pointFor the fuel indicator , that “bubble “ will turn red when you are on low fuel 😁1 point
-
1 pointThe waterpump is a very common issue, Skoda UK are well aware of it. Most 2.0 TDI engines are affected. Your Kodiaq is under warranty and presumably now at your local Skoda franchised main dealer. They'll likley replace the waterpump and all will be well. You should however consider paying a little extra and have them renew the cambelt at the same time. It needs removing to access the waterpump, and personally I don't agree with Skoda's policy of refitting a tensioned belt. The recommended cambelt interval is 5 years so you only have a year before it's due. You might want to consider asking them to quote for a new cambelt and tensioners.1 point
-
Also @JFJ Based on @akshayb photographs, those trims are alluminised plastic, not chrome. Just warning that if you really want chrome, that is not it.1 point
-
1 pointThere is a known issue with the 2.0TDi engine water pumps of that age - mine a Jan 2018 2.0tdi 190 has also had the problem and has been fixed by my local dealer under warranty. It requires the water pump to be replaced which in turn requires removal of the cambelt. Mine was at 45k miles and is all good now.1 point
-
1 pointProblem found, nice easy fix; Brucie bonus - new pads were £9.99, but Sally had a £10 Halfords voucher from one of my Christmas pressie purchases (wash mitt and microfibre towels), so cost me n'owt. Gaz
 1 point
 -
1 pointHi All, Today is the time that i move away from lurking since 2011, to become a little more active on Briskoda. The simple reason that i was lurking is that there is a great dutch skodaforum as well and yes you can find me there to. Since 2011 i had 2 octavia's, a Passat GTE and my previous was a VW Arteon, but all were getting old (and since gas prices became insane) i sold my Arteon and went for a 2021 Vrs Ocatvia, yeah the hybrid one... It came fully specced, because it was a demo car with 3k miles on it, thats the reason to why it is lowered, has black accents and what not. Now this is a great car and all, but some things are bothering me and want to get fixxed, like no cigarette lighter in the front to charge all my mobile devices, no 12V in the rear for the kids their screens during vacation. I know its (in holland) a 50k car, but hey we dutchy's can complain about everything. So that is something i need to get fixxed, and i hope that i can gather some info here or share some knowledge on these projects.
 1 point
 -
1 point
-
There can be more than one break in a wire. also could it be the system has shut down the faulty circuits and a battery disconnect may sort it now?1 point
-
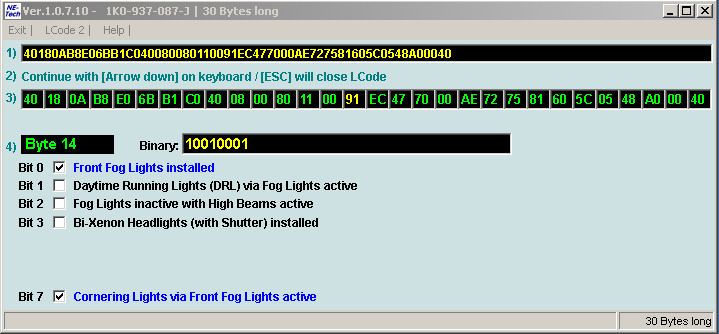
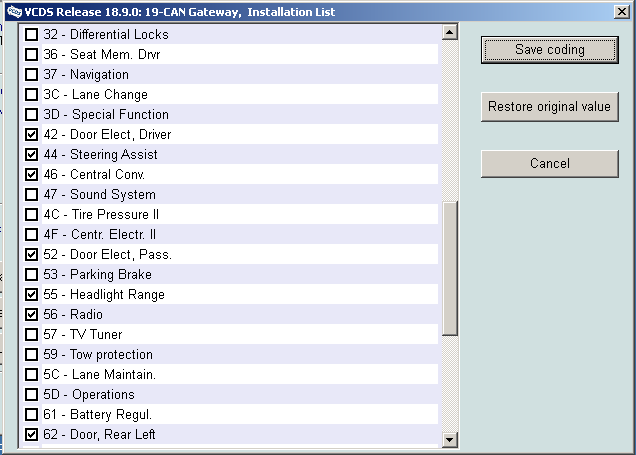
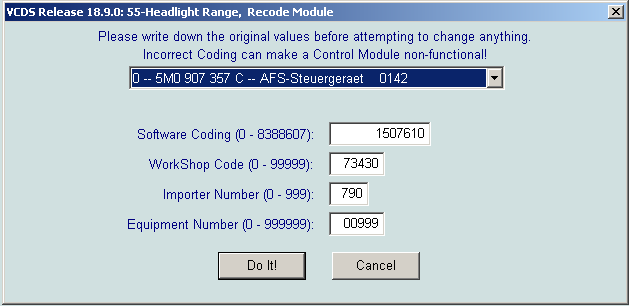
Step 4 - VCDS coding: Enter control module CAN Gateway, click Installation List and check the box for 55 Headlight Range. This will tell the car you have level sensors and a range control module installed. Enter control module Cent. Electrics, go to byte 14 and check bit 4 "Bi-xenon headlights (without shutter) installed". If you don't see this checkbox in your VCDS (it wasn't there for me), do it manually in the binary coding by changing the fifth digit from the right from a 0 to a 1 Enter control module Headlight Range, click on Coding, enter 1507610 and click Go. This should automatically re-code the AFS slaves too. Go to Basic Setting, select Group 01 and click Go. Align the headlights using the manual adjustment screws on top of each headlamp unit. Check for any stored fault codes (there shouldn't be any) and clear if so. Once there are no fault codes left, exit VCDS and cycle the ignition. You are now ready to test if everything works. Step 5 - testing: Every time you start the engine, the headlight motors will perform a self-test routine where the vertical motors will go to their lowest level, the horizontal motors will go to their farthest outwards and back in, and then the vertical motors will return to the correct height. You should also have some new options in maxidot: Under "Assistants" there will be an option to turn Bend Lighting on and off Under "Setup" and then "Lights & Vision" there will be an option to turn Travel Mode on and off. Go for a drive! Once moving, you should notice the headlights will move laterally with the steering. Step 6 - bonus round if you have auto wipers! Try changing the Headlight Range coding to 1311190 - this should unlock AFS II functionality, which the mk2 Octavia was never sold with in the UK. You will need to perform the Basic Setting again after changing the coding! With AFS II, you should also notice that at speeds under ~30mph, the offside headlight will be quite low and pointing quite far outwards. Once you go over ~30mph, you will see it move back towards the centre and slightly upwards. This is the AFS II transitioning from "city light" to "country light". The beam shape will also change slightly at higher speeds (such as on the motorway) where the level of both lights will adjust slightly upwards to extend the range of the lights. There is also a different beam shape that will activate when the rain sensor detects rain. Congratulations - you now have completely safe and legal retrofitted xenon headlights which will pass MOT! Ps. massive thanks to @langers2k for the immense amount of help he gave me at almost every step of the way, including doing the adaptations to my wiring loom as I am colourblind and had trouble with it! I'm certain I would not have been successful with this conversion without all of his advice
 1 point