Leaderboard
-
MikeTheThinker
FREEDOM11Points8,483Posts -
AnnoyingPentium
FREEDOM10Points5,646Posts -

Lee01
FREEDOM9Points36,163Posts -
numskull
FREEDOM7Points3,501Posts


.thumb.jpg.9dd3f612ba7f13d10be5c518d3c8d255.jpg)

Popular Content
Showing content with the highest reputation on 16/07/23 in Posts
-
I’ve said for a long time that the 5 year thing has always been a uk rip off on these tsi engines. I can understand anyone being worried and getting the belt changed, but the every 5 years age thing doesn’t make sense and was never in the official service manuals but dealers and many specialists have quoted it for years. Thank goodness they are officially saying it isn’t needed.3 points
-
Ours is 7 years old and still on the original too. Given the four 1.8 miles journeys a day it does during term time (I drive a school bus) it gets a pounding, what with the AC on 365, the heated seat, screen often both on in the Autumn and Winter when needed together with full lights always on during that time of year, I think it’s done pretty well. I do shove it on the CTEK charger daily overnight in the winter though so that could be helping.3 points
-
Biggie lighter plug, is that switchable ? In case you didn't know, they are always on. Not sure what you are plugging in but don't want to flatten the battery...3 points
-
Yes, I have to admit i did my fare share of stupid things when I was a kiddo. I would say that the meme below sums it up nicely3 points
-
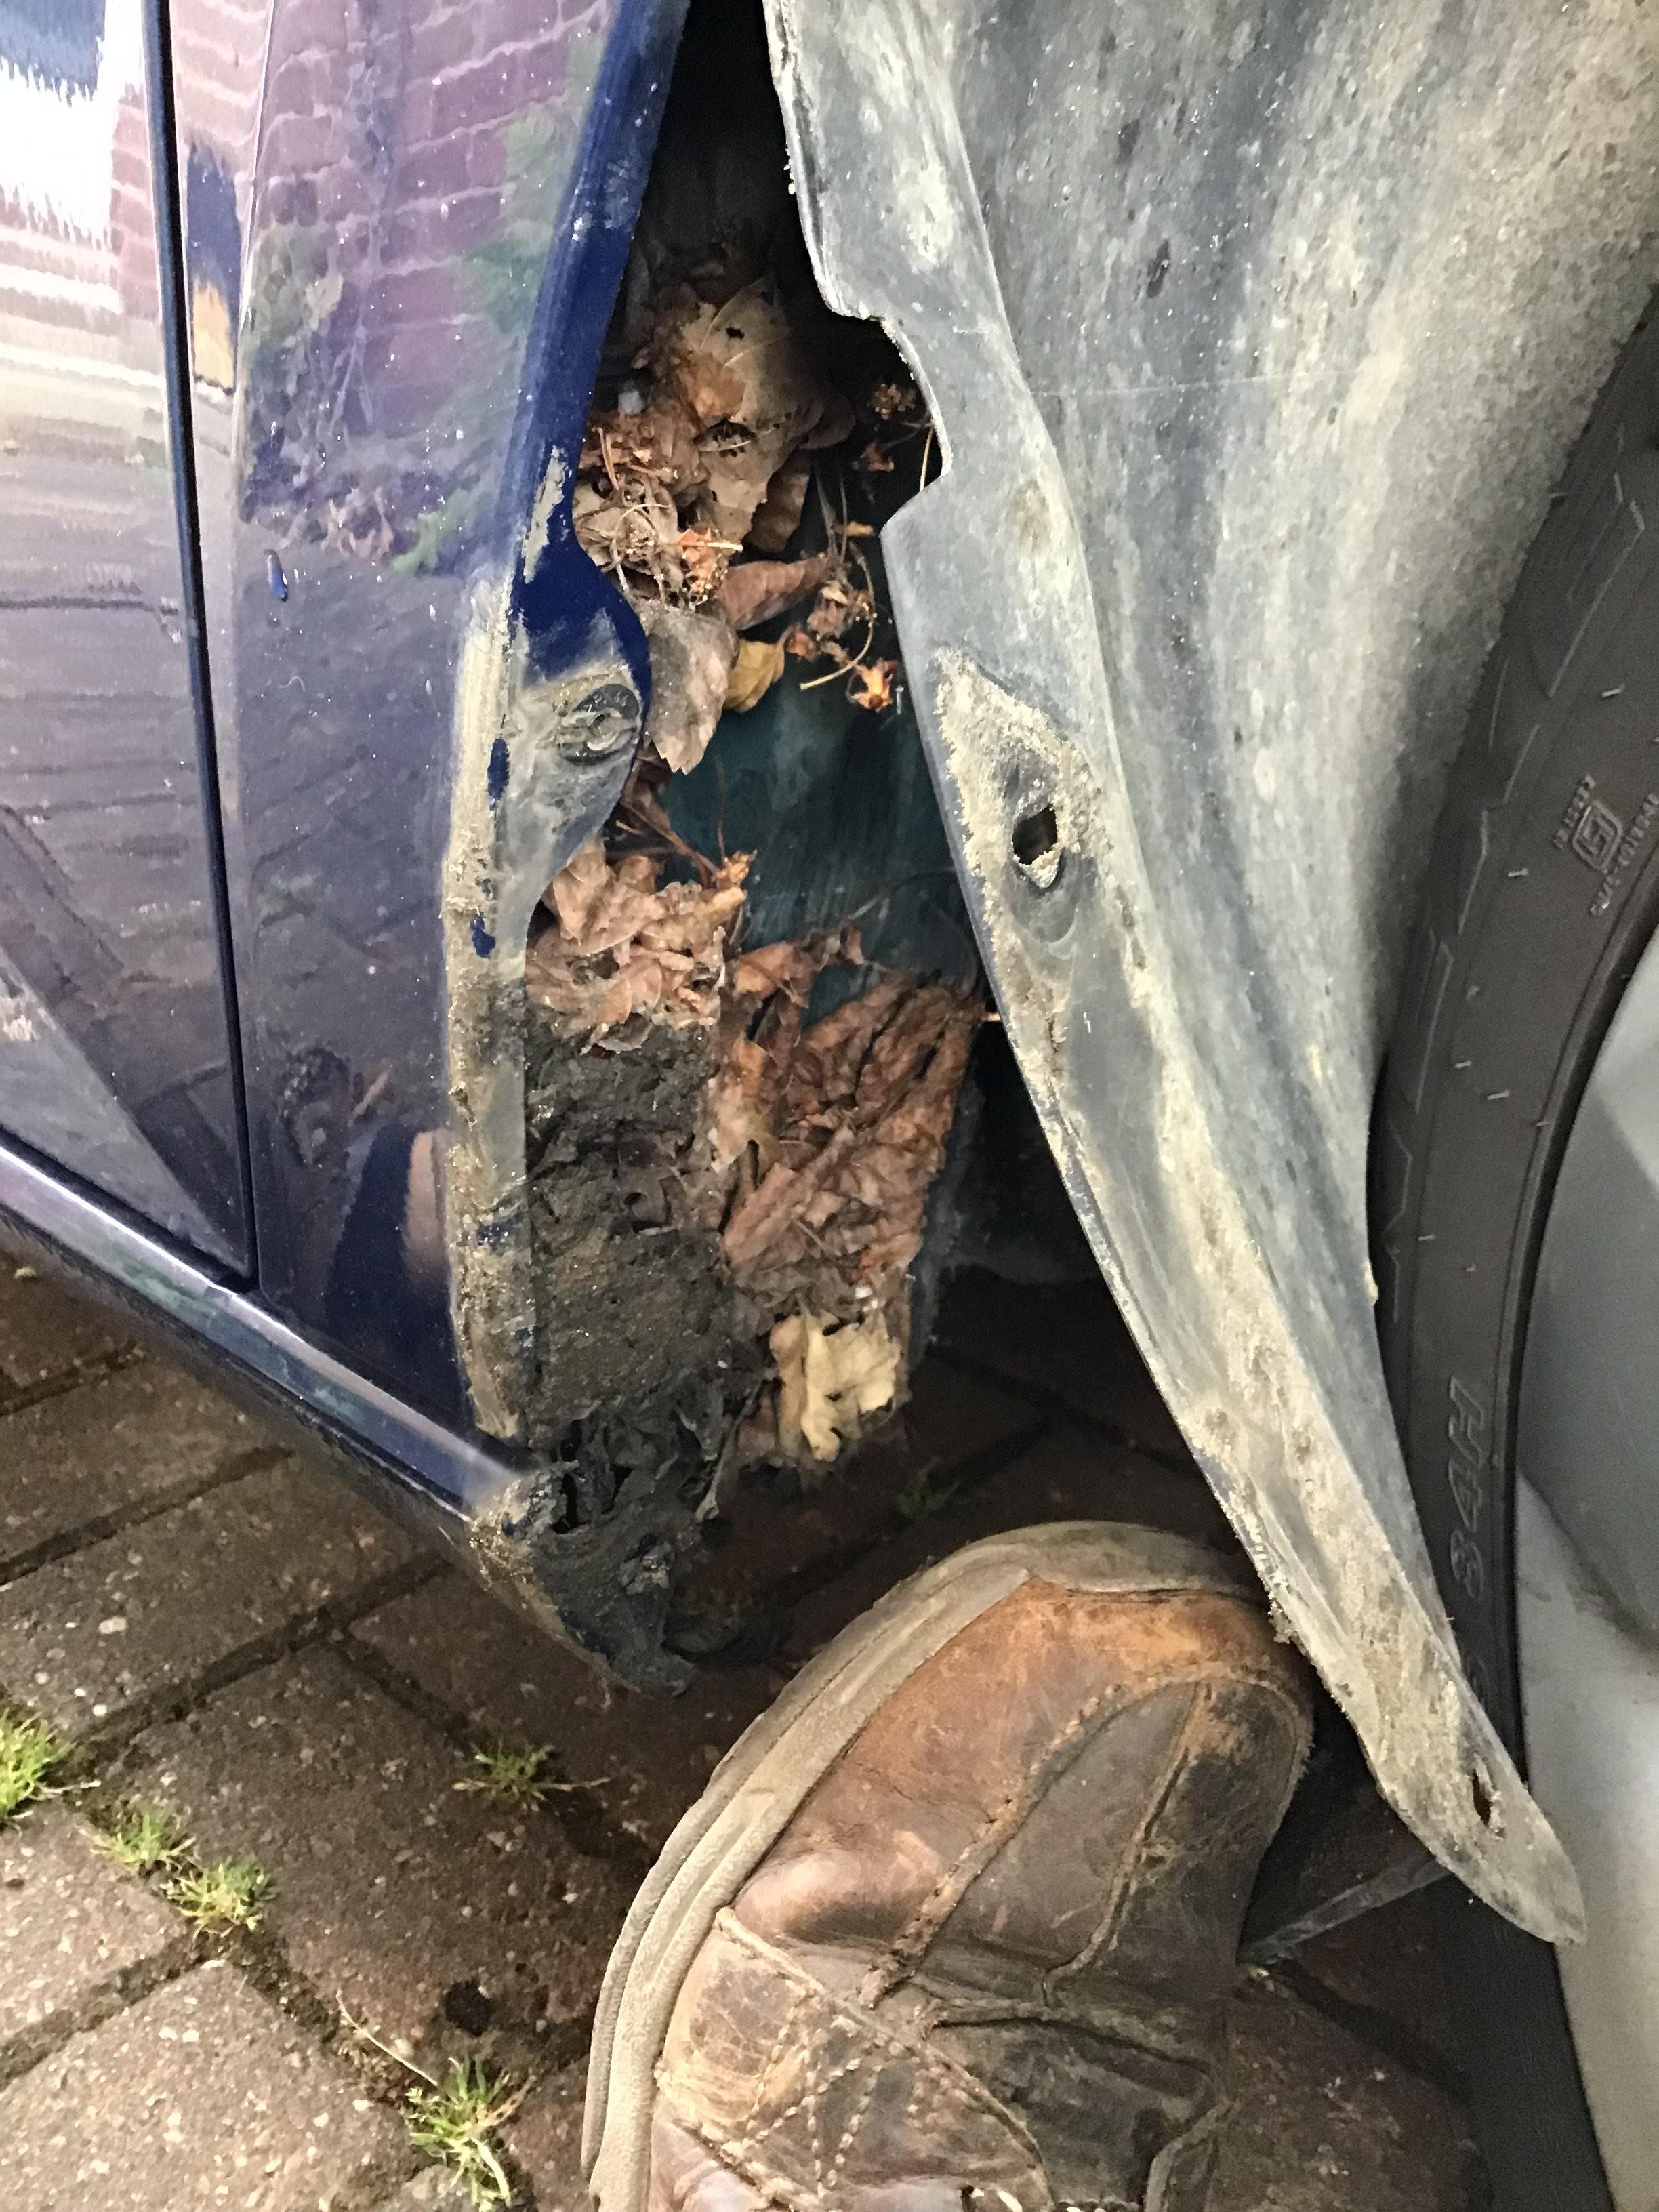
Hi , just thought id draw attention to this, i removed my front mudflap and wing liner to try and get access to the back of a dent i thought i might be able to push out from behind. Anyhow thats by the by, however i found a big pile of wet muddy crap which had built up against the bottom of the metal wing , which wont help with future rusting . If anyone keeps their cars a long time like me , you might want to check yours out. 5 mins . Easy just remove the 2 or 3 torx screws holding the mudflap and peel back the liner , you will be able to remove it all then.
 2 points
 -
2 points
-
2 pointsI don't drive for a living but it is my work car. Think of me being a bit like a service engineer who gets sent to a different customer every day, with potentially a few hundred miles between each customer, so I might be in Cornwall one day, followed by Hampshire the next day, then Essex, up to Cambridgeshire, back to Wiltshire etc and you'll get the idea. Sometimes the customers can be quite close together but it varies wildly depending on customer requirements. Usually I spend several hours on site with my driving being early morning and late afternoon to early evening. If I'm in the car at 6:00am you only have to average 40mph so by 9:00am you've done 120 miles, then back in the car by 3:00pm and drive for 3-4 hours at an average of 40mph and you've done another 120-160 miles. Do that for a week and you've got 1200+ miles, so over a month it quickly adds up. I think one month earlier this year I did 2500 miles, the following month 4800 miles, every month is different, and if I'm working abroad the car sits in an airport car park for a week or two. The UK really isn't that big when you get used to driving around it on a regular basis, the key is to avoid the morning and afternoon rush hours, and at this time of year try to stay away from holiday hot spots such as the M5 south of Bristol.2 points
-
Also, maybe a little over budget, but have you looked at the e-Up/Mii electric/Citigo-e? The prices of 3 year old cars are just over budget, genuine 120 winter range and 160 in summer, CCS charging which is more common than the Leaf Chademo and recharges relatively quickly on AC thanks to 36kWh battery and 7kW charging. Might be worth taking a look.2 points
-
2 pointsCan you share where it says 50k? Certainly seems too soon and not one I've heard before.2 points
-
That's not the timing belt in the photo. A timing belt is toothed or if you prefer castellated , no way in the world would it slip . Very important for a timing belt. Your photo is the multi V belt to drive alternator ( top right hand corner) and Air con compressor (Below it). The smallest pulley is the tensioner . The timing belt is hidden underneath a cover. PS I dont know if the 1.2 TSI has a belt or a chain.2 points
-
2 points
-
2 pointsWe have done a LOT of full rebuilds on these PQ35/46 rear ends and to reduce downtime we often buy in a used system to rebuild. Cars with the ally hubs rather than cast iron are more stressful as the bolts rot solid in the ally and are a sketch to get apart. We have the frame powder coated and order in a big pile of Febi, Meyele, genuine and Sachs/Boge bits, build the unit up and fit it in a day. Induction heating a seized bolt in an ally hub2 points
-
2 points
-
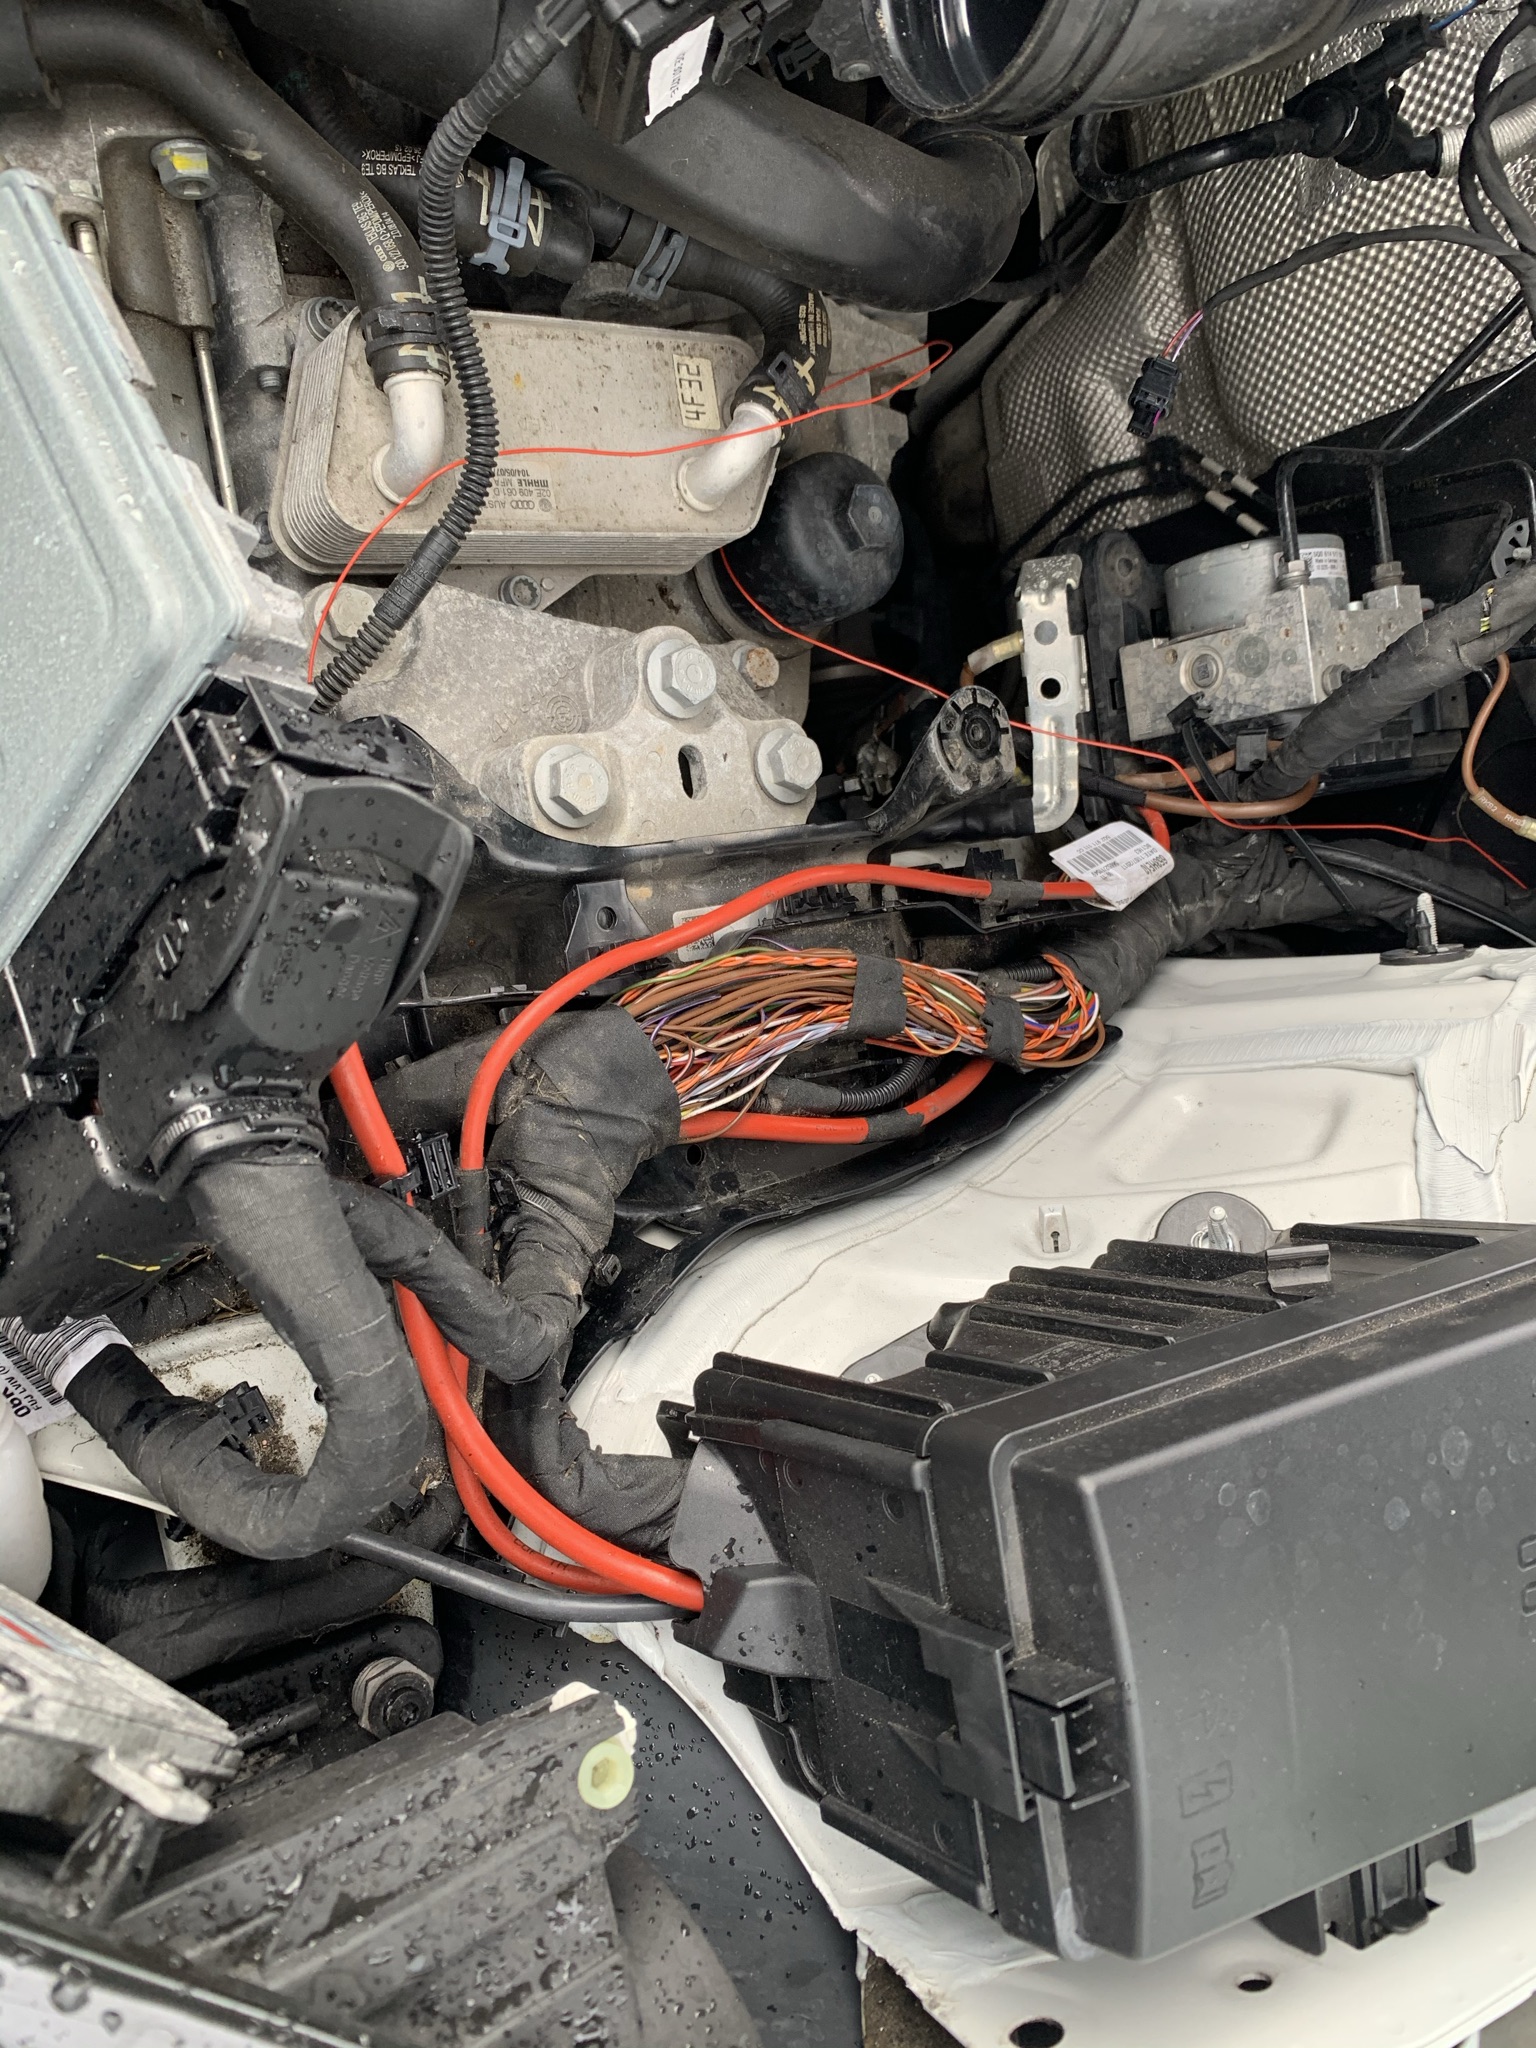
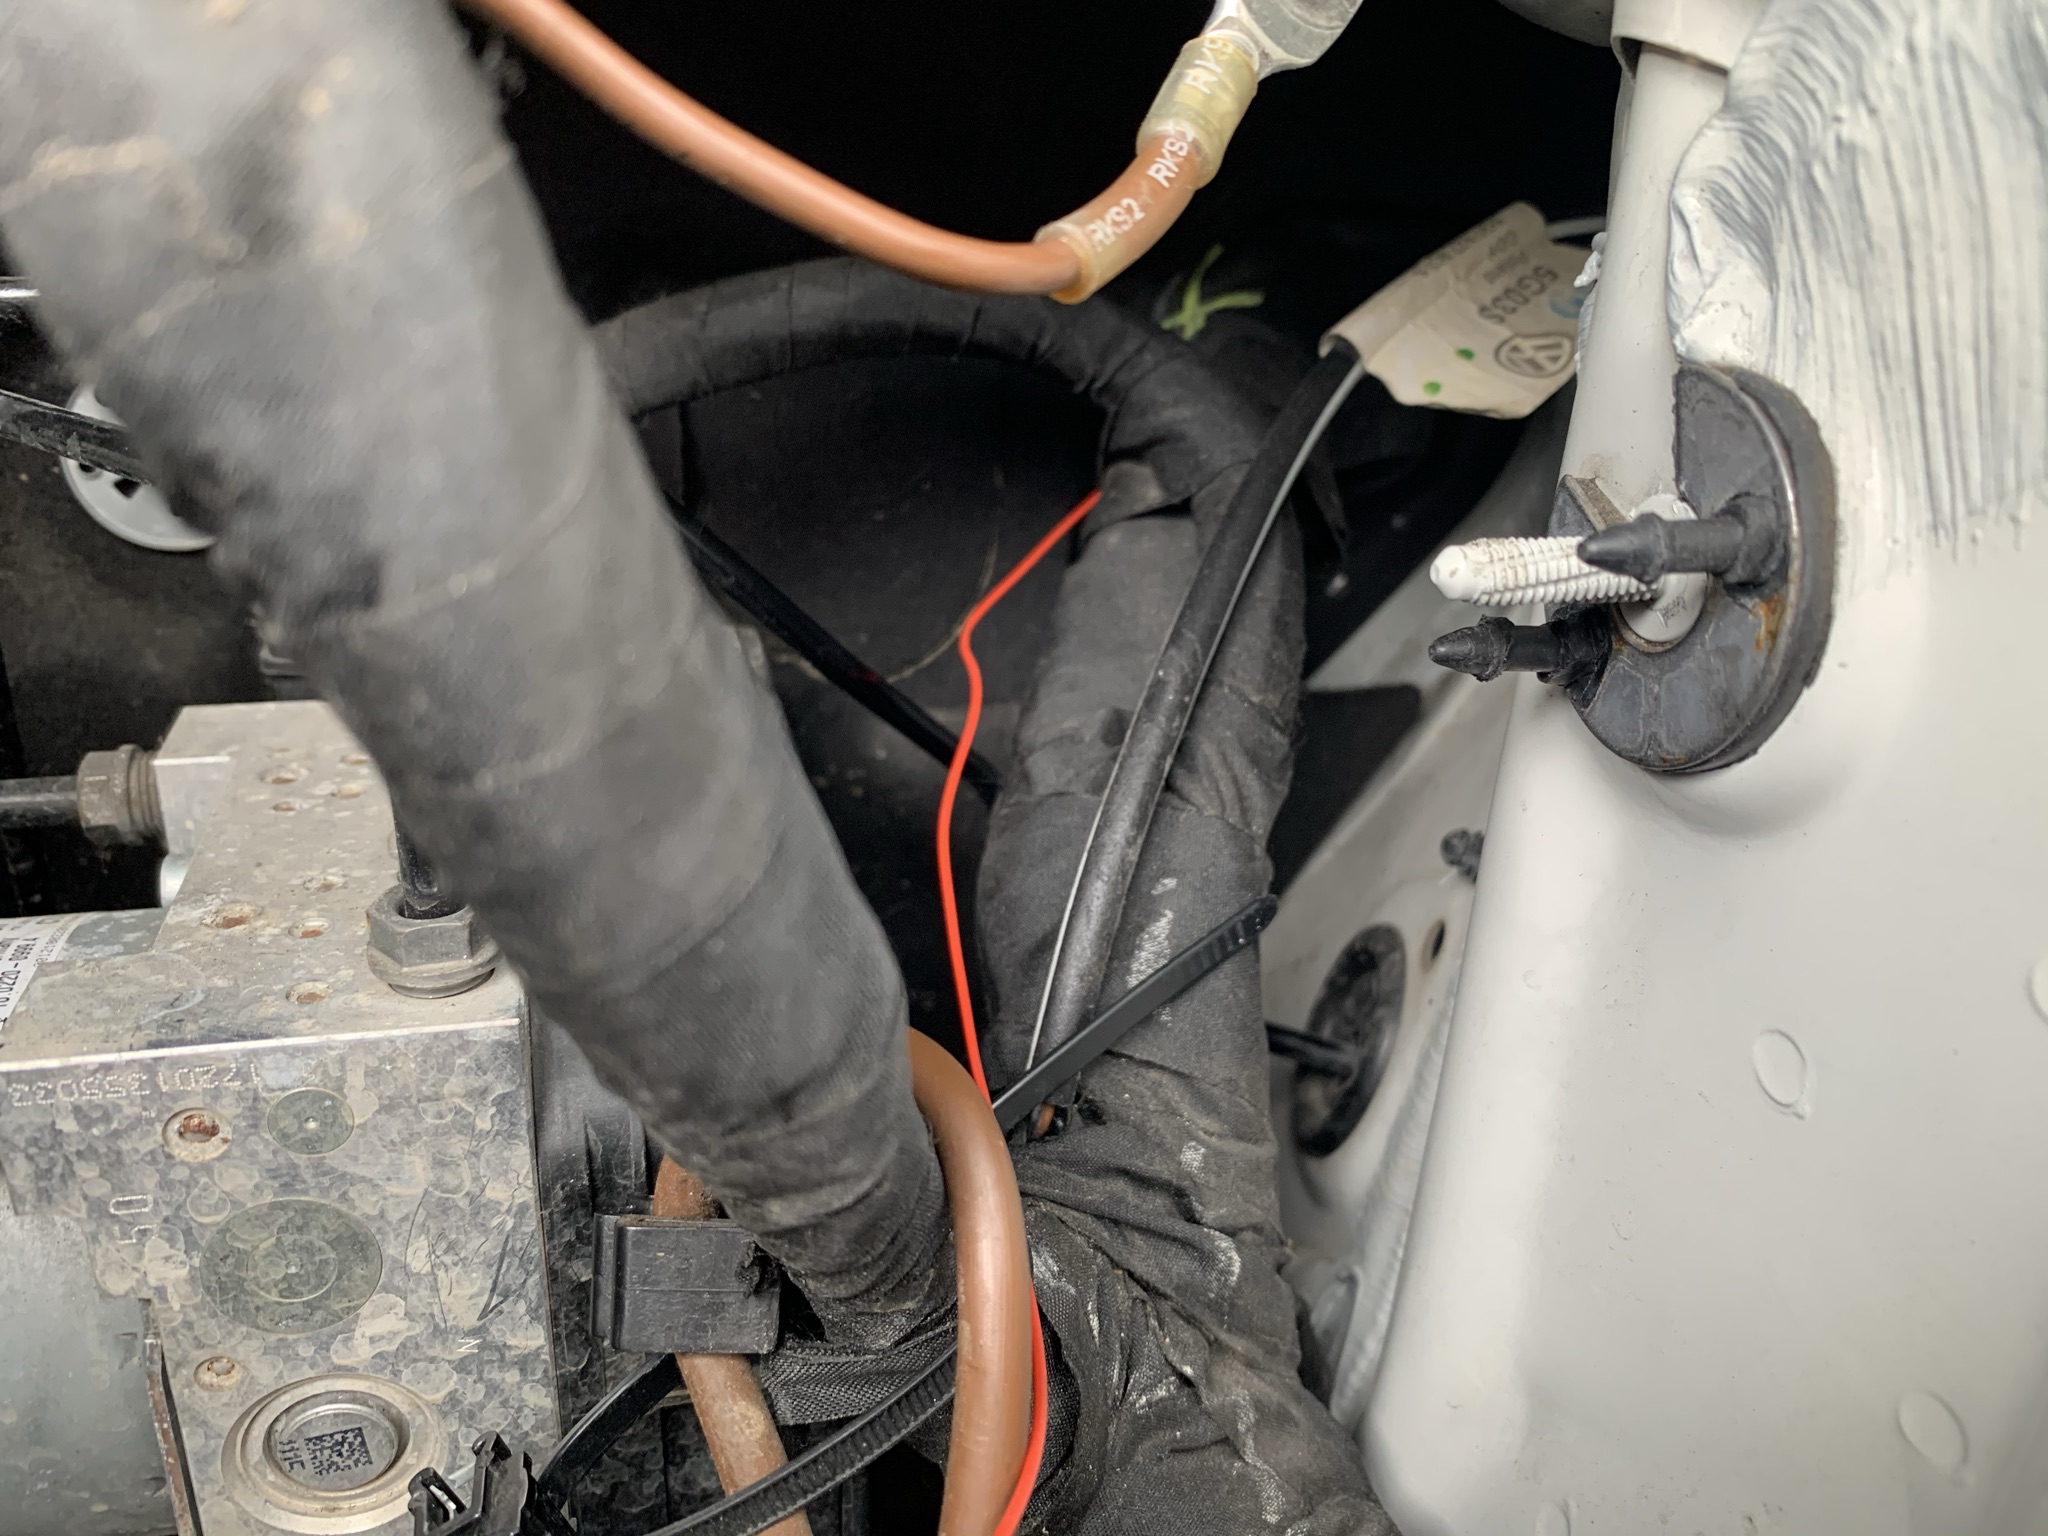
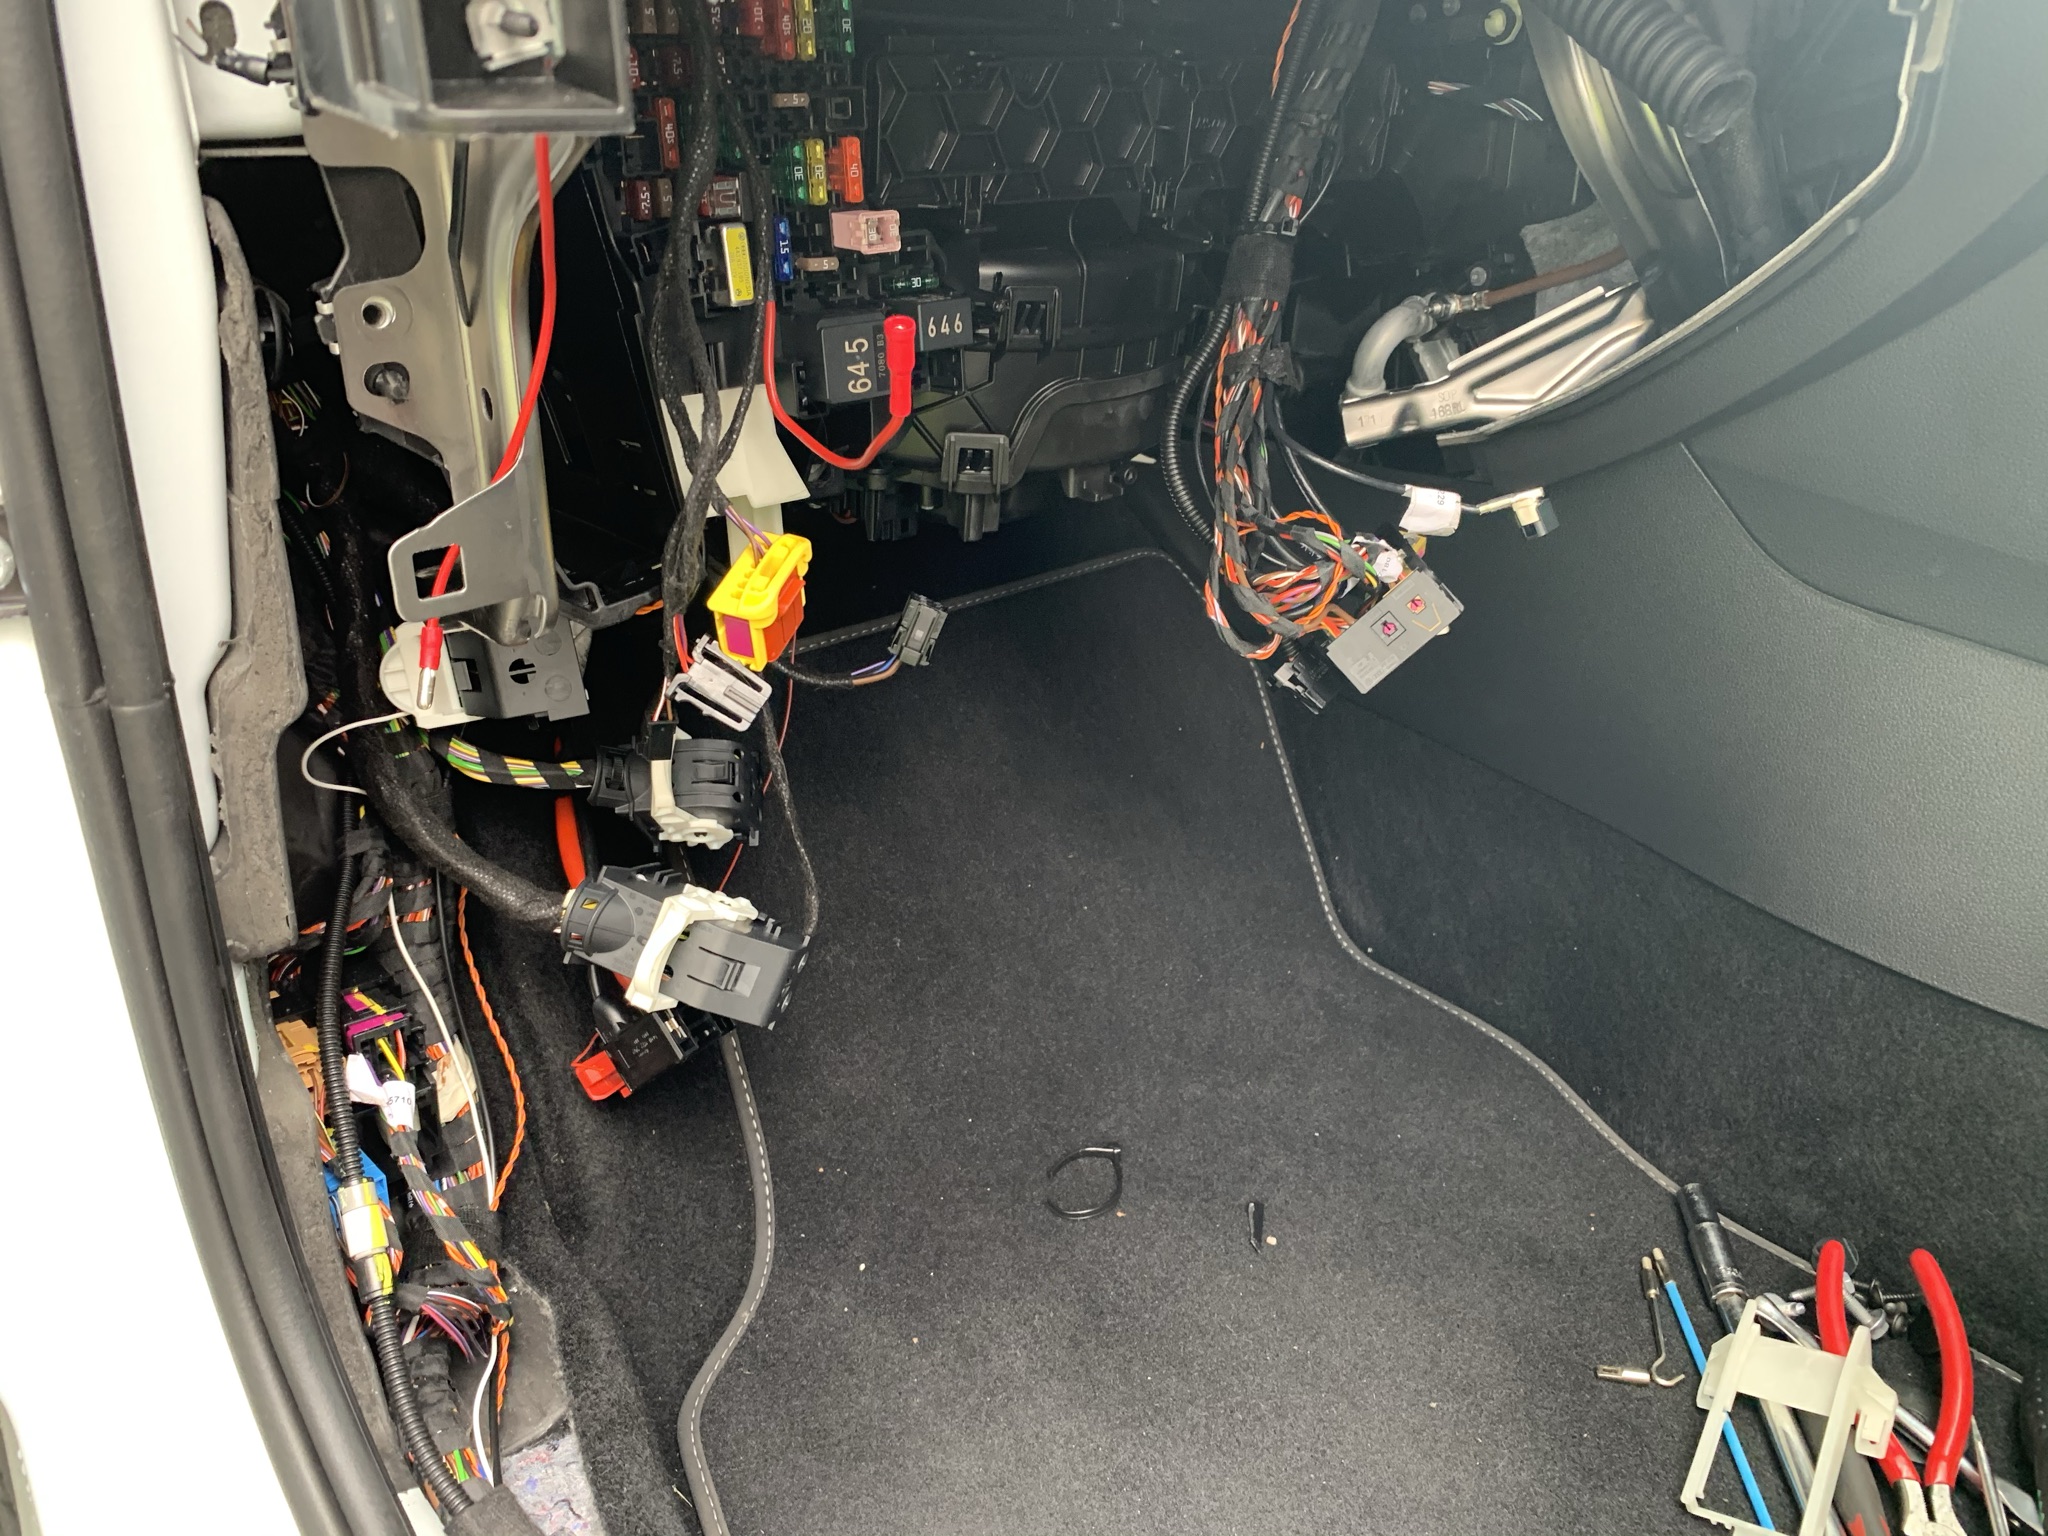
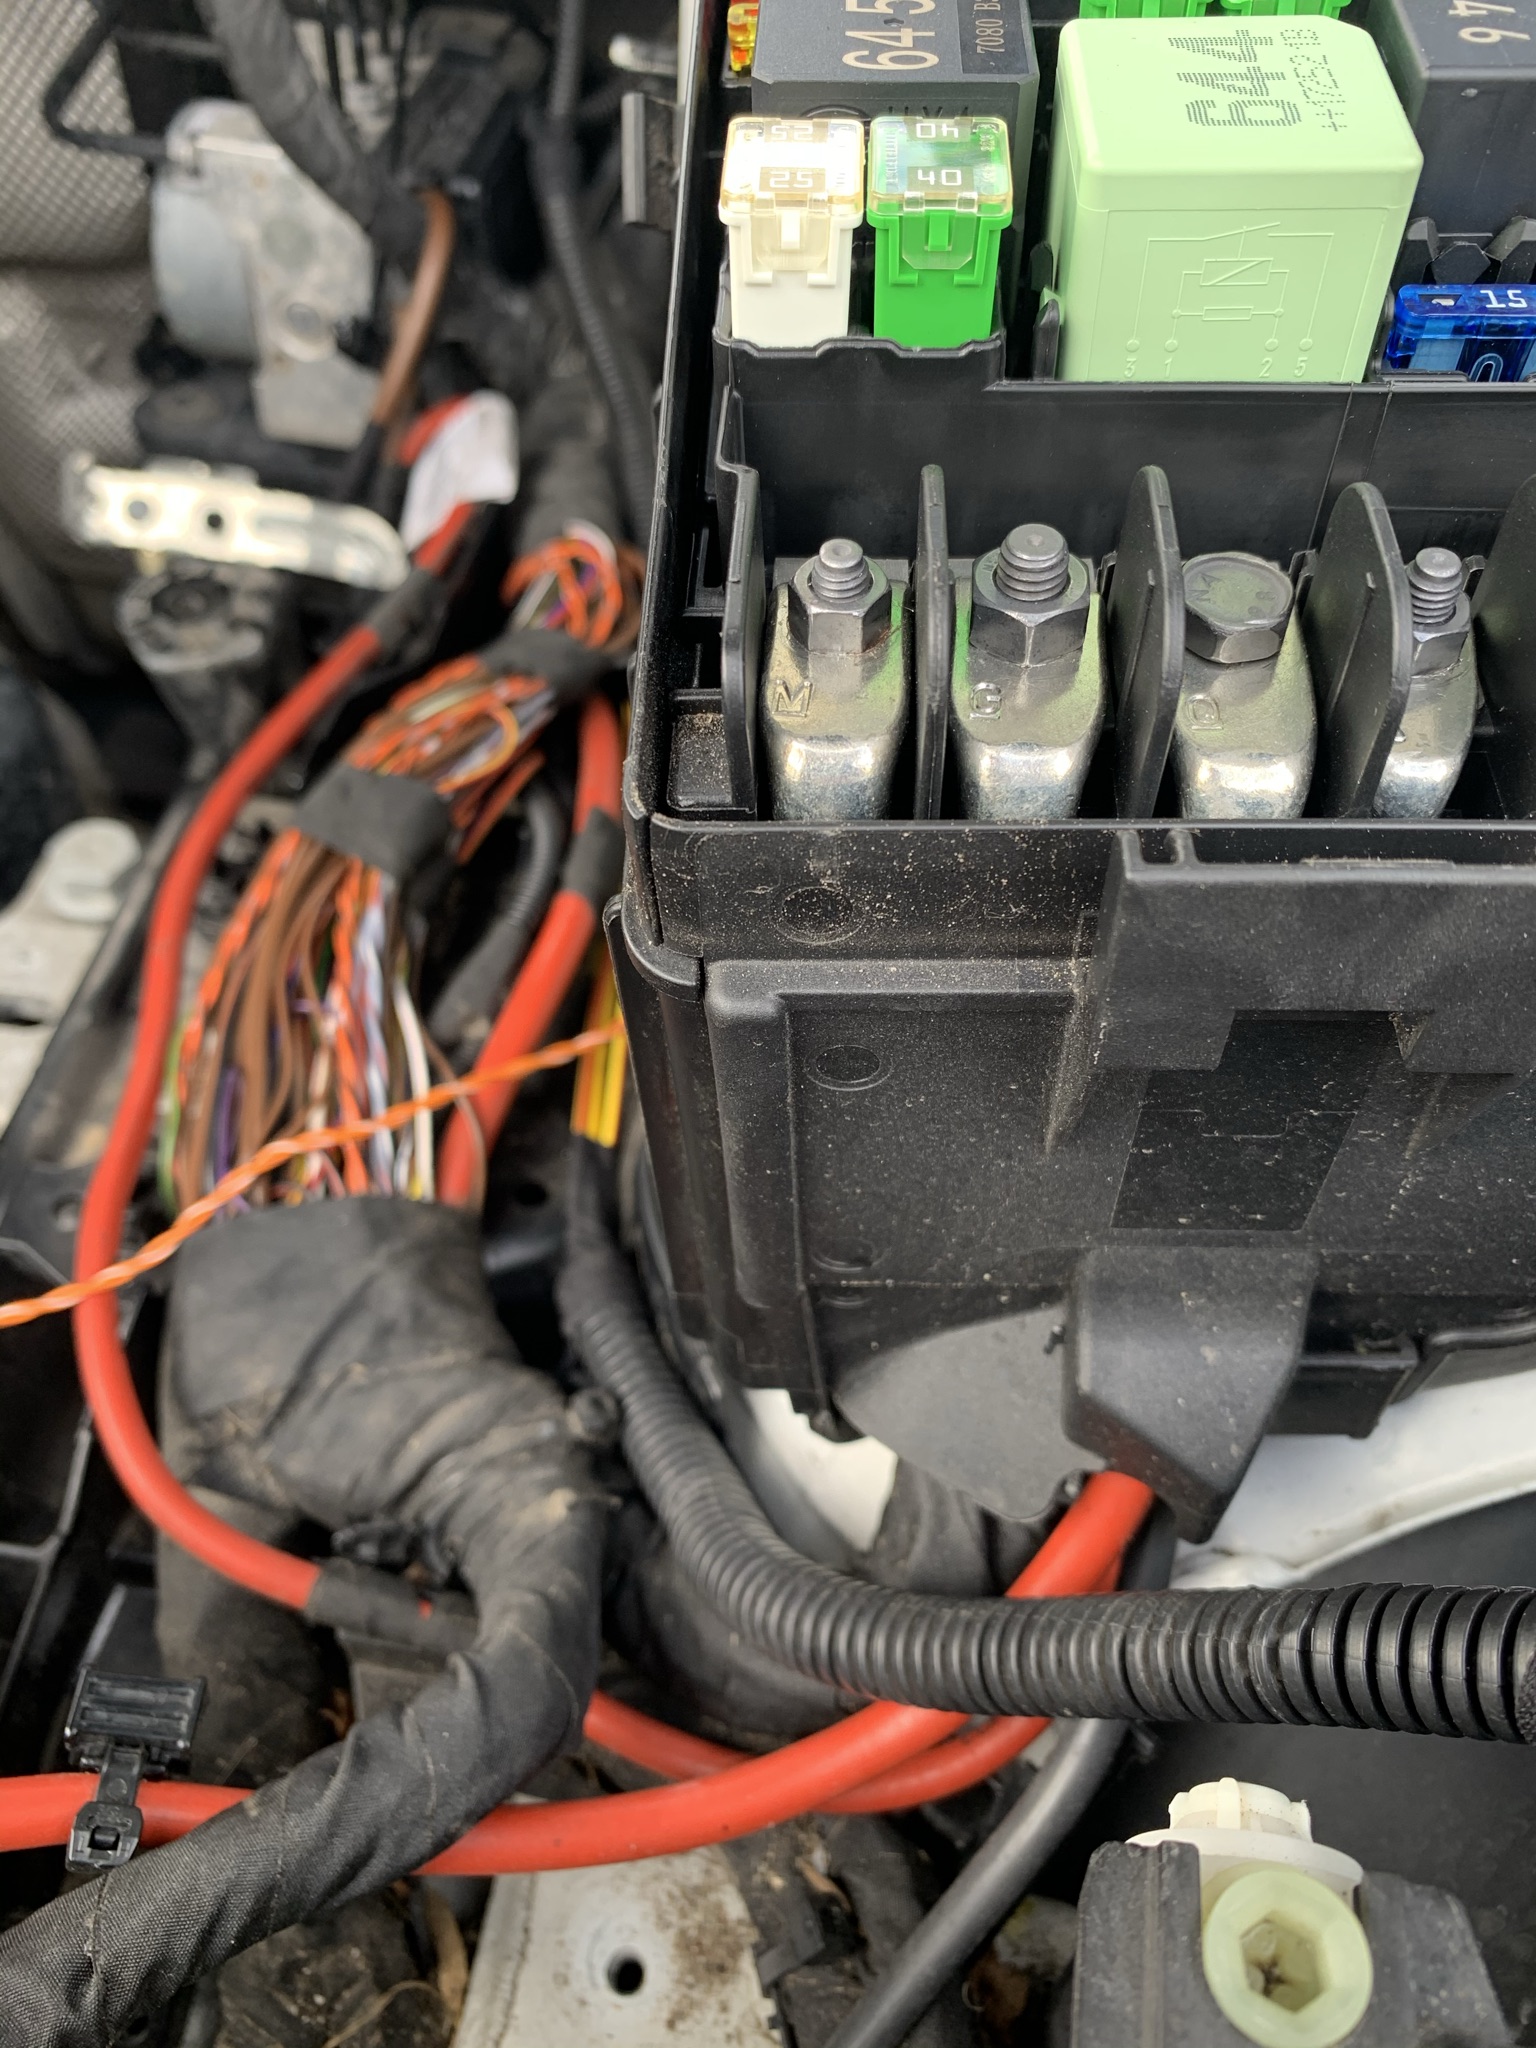
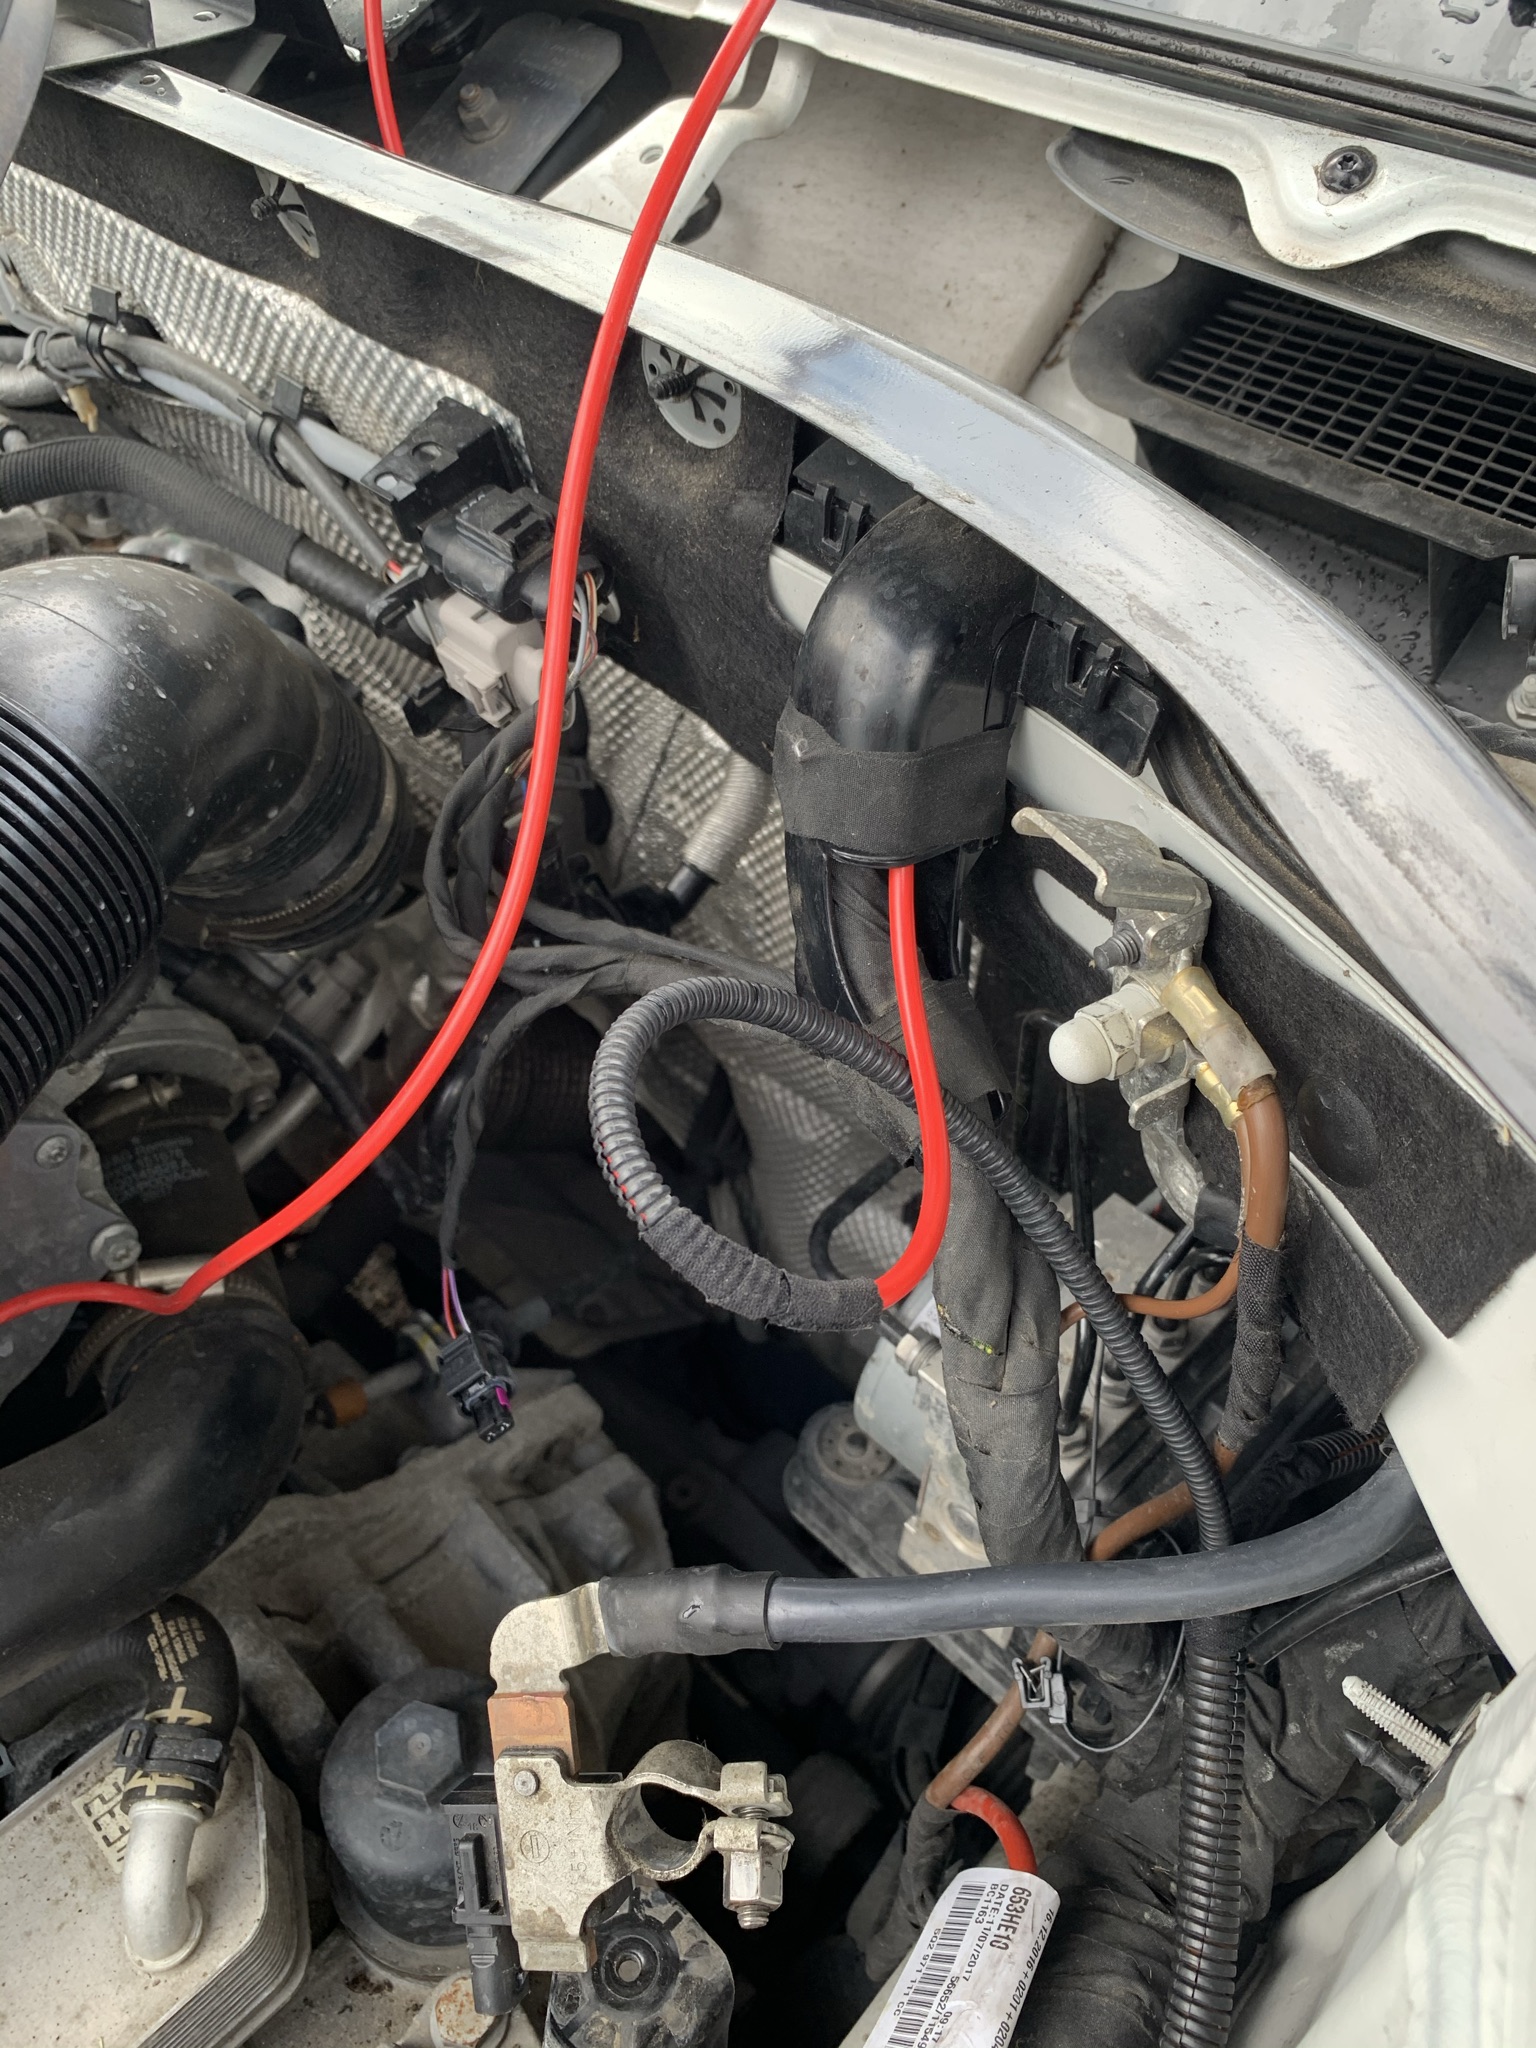
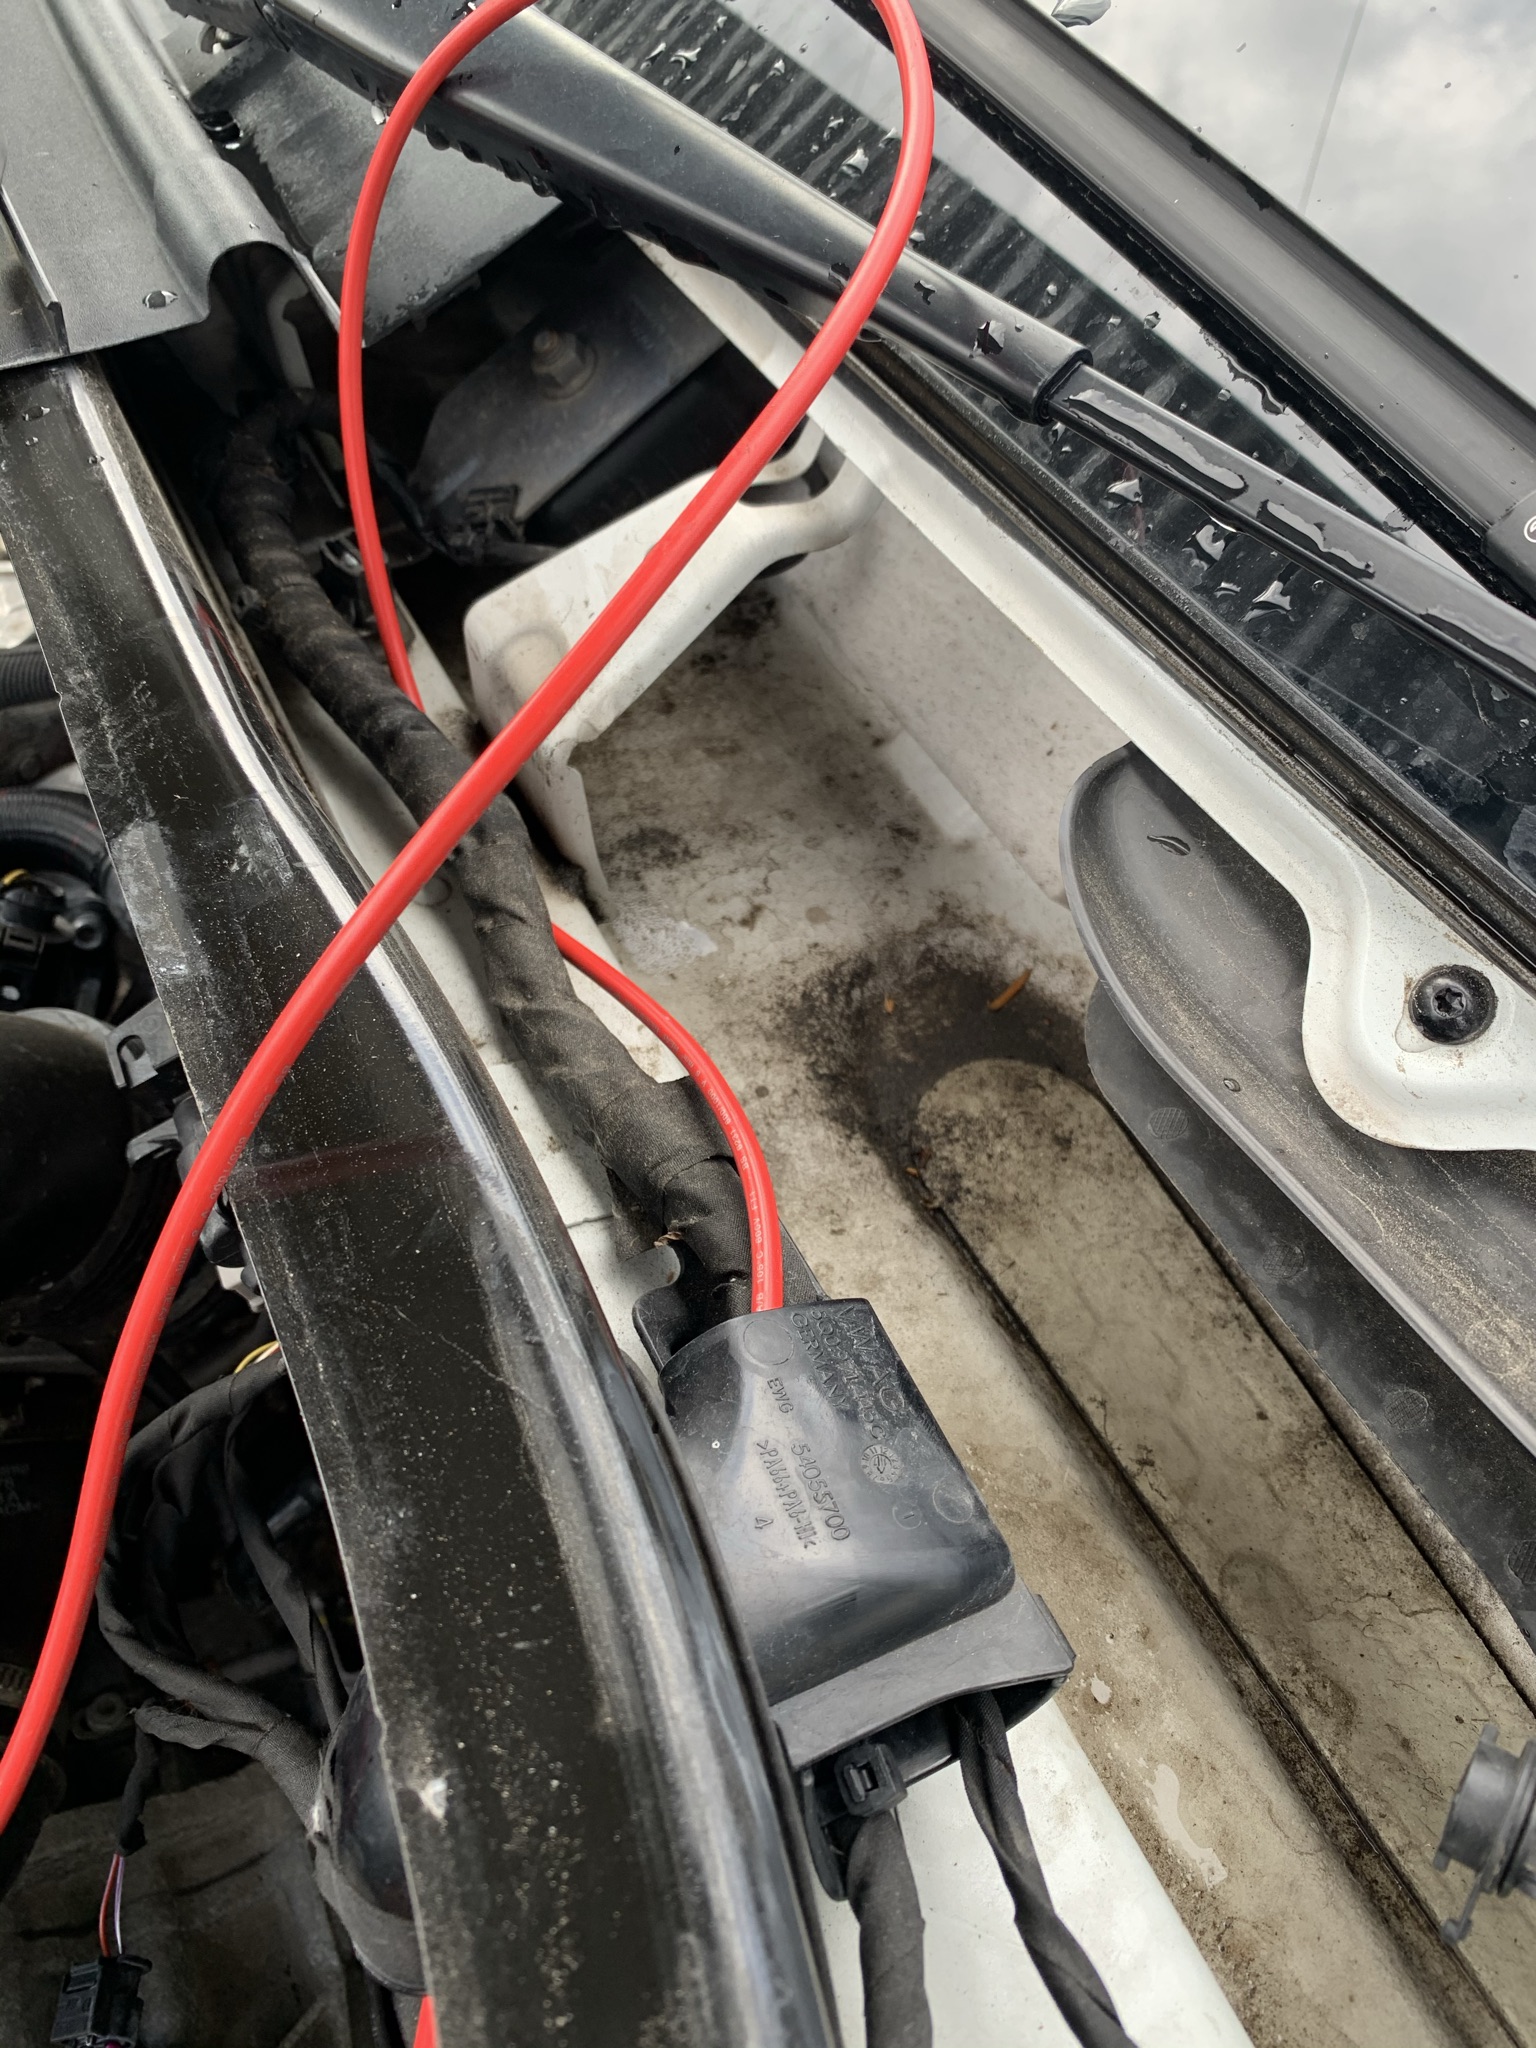
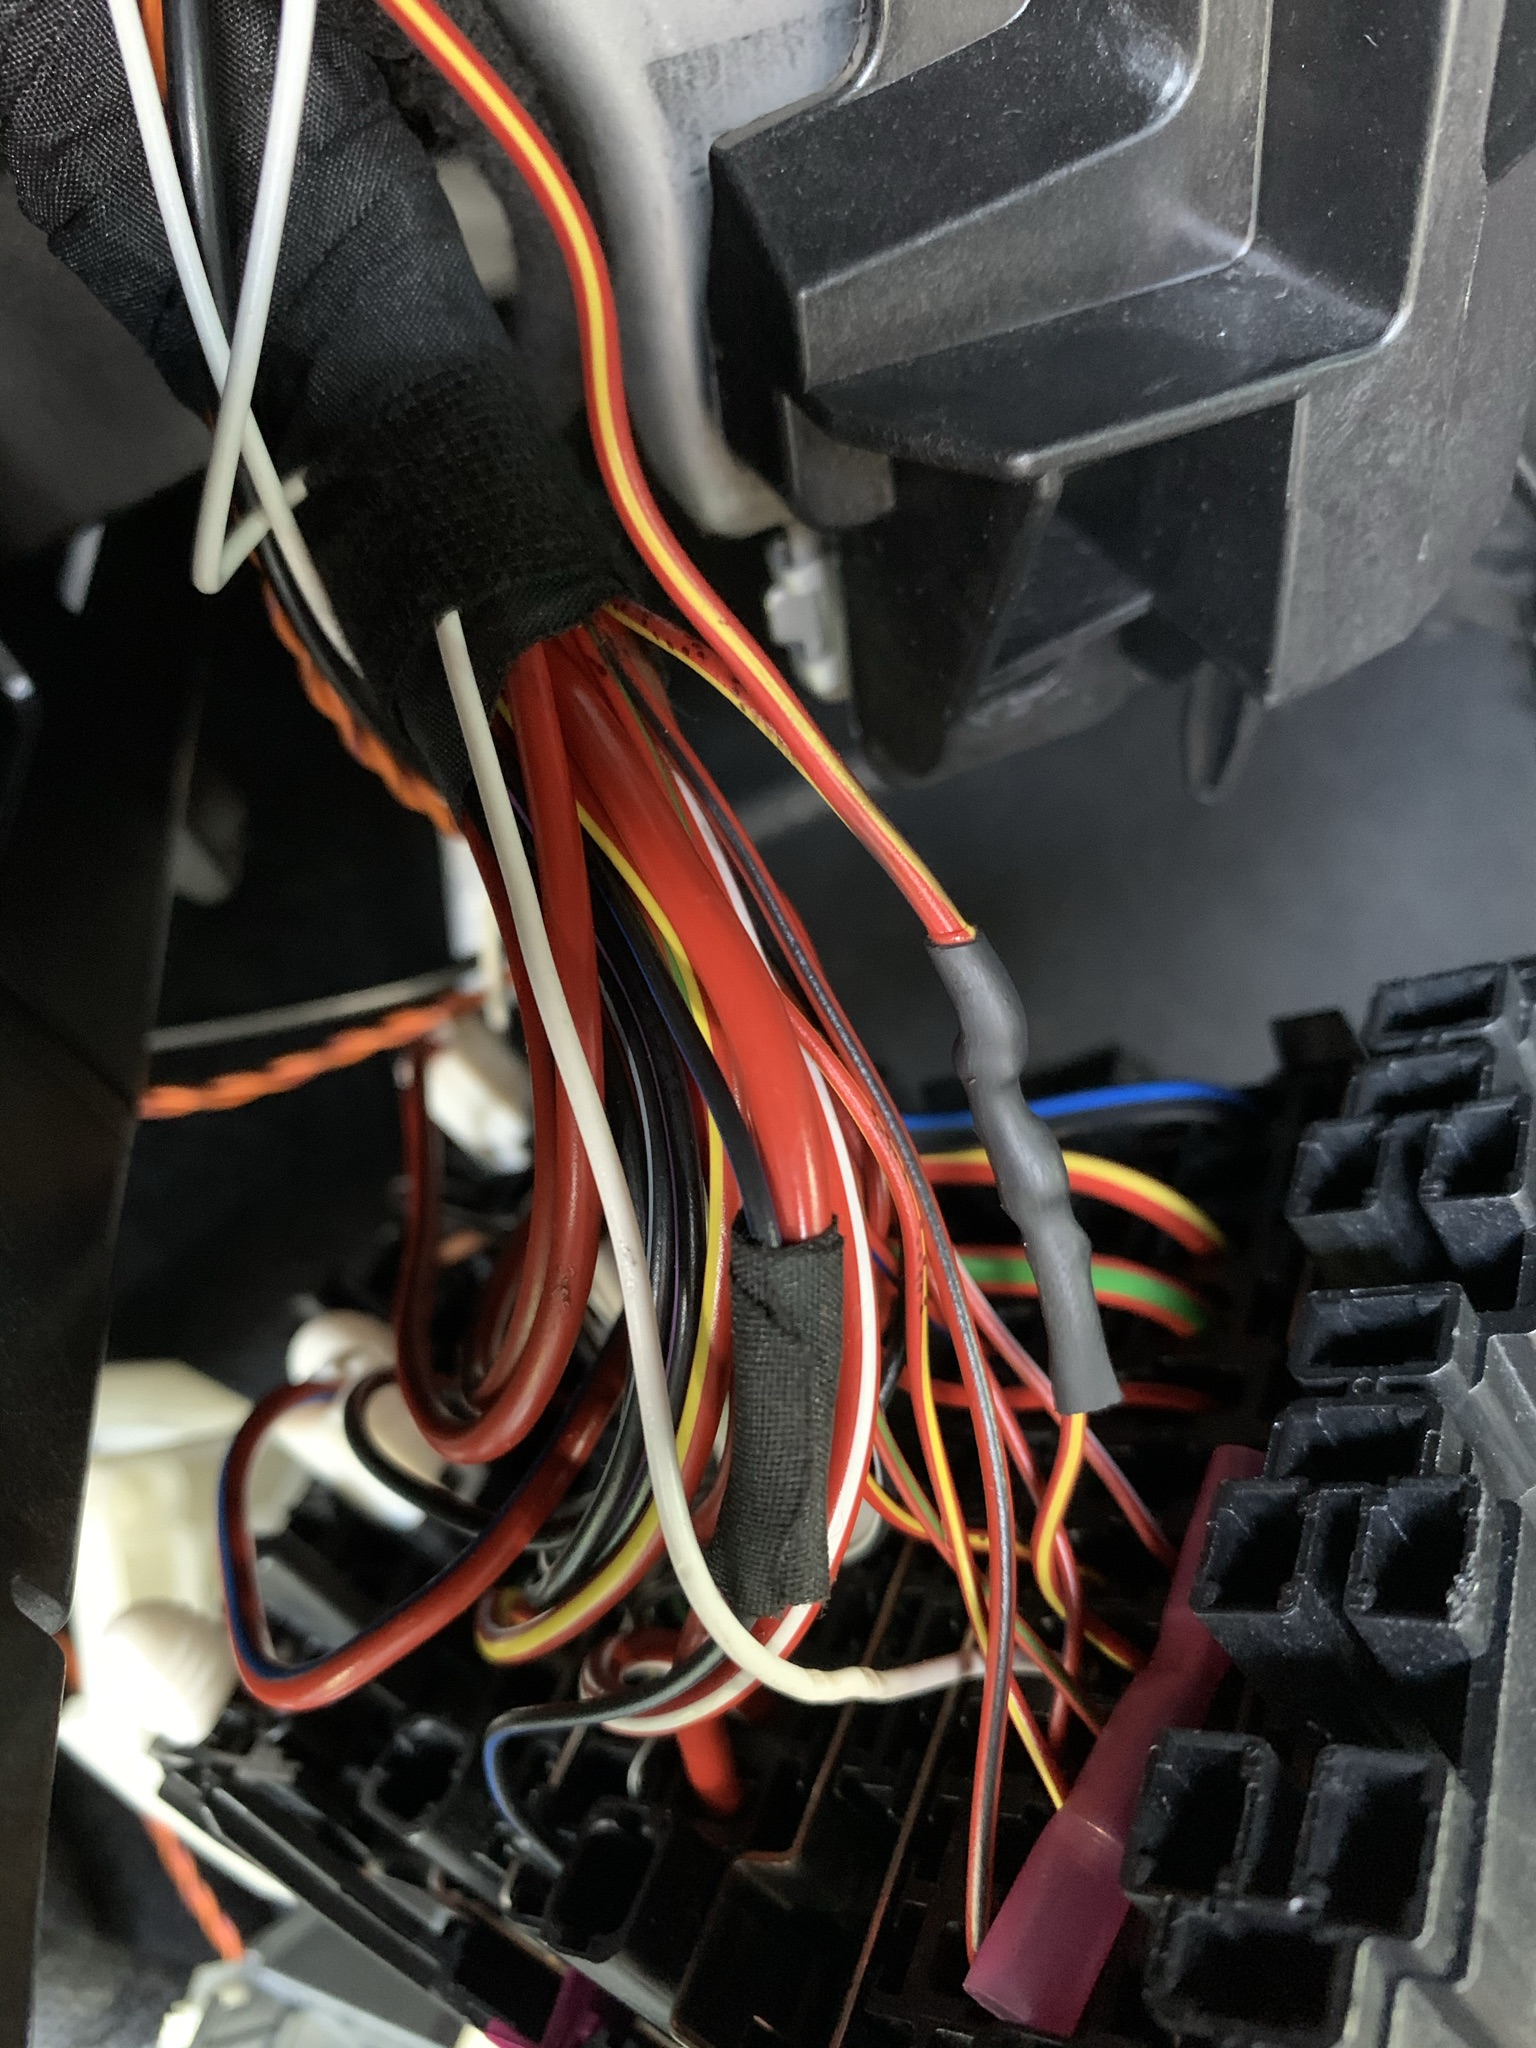
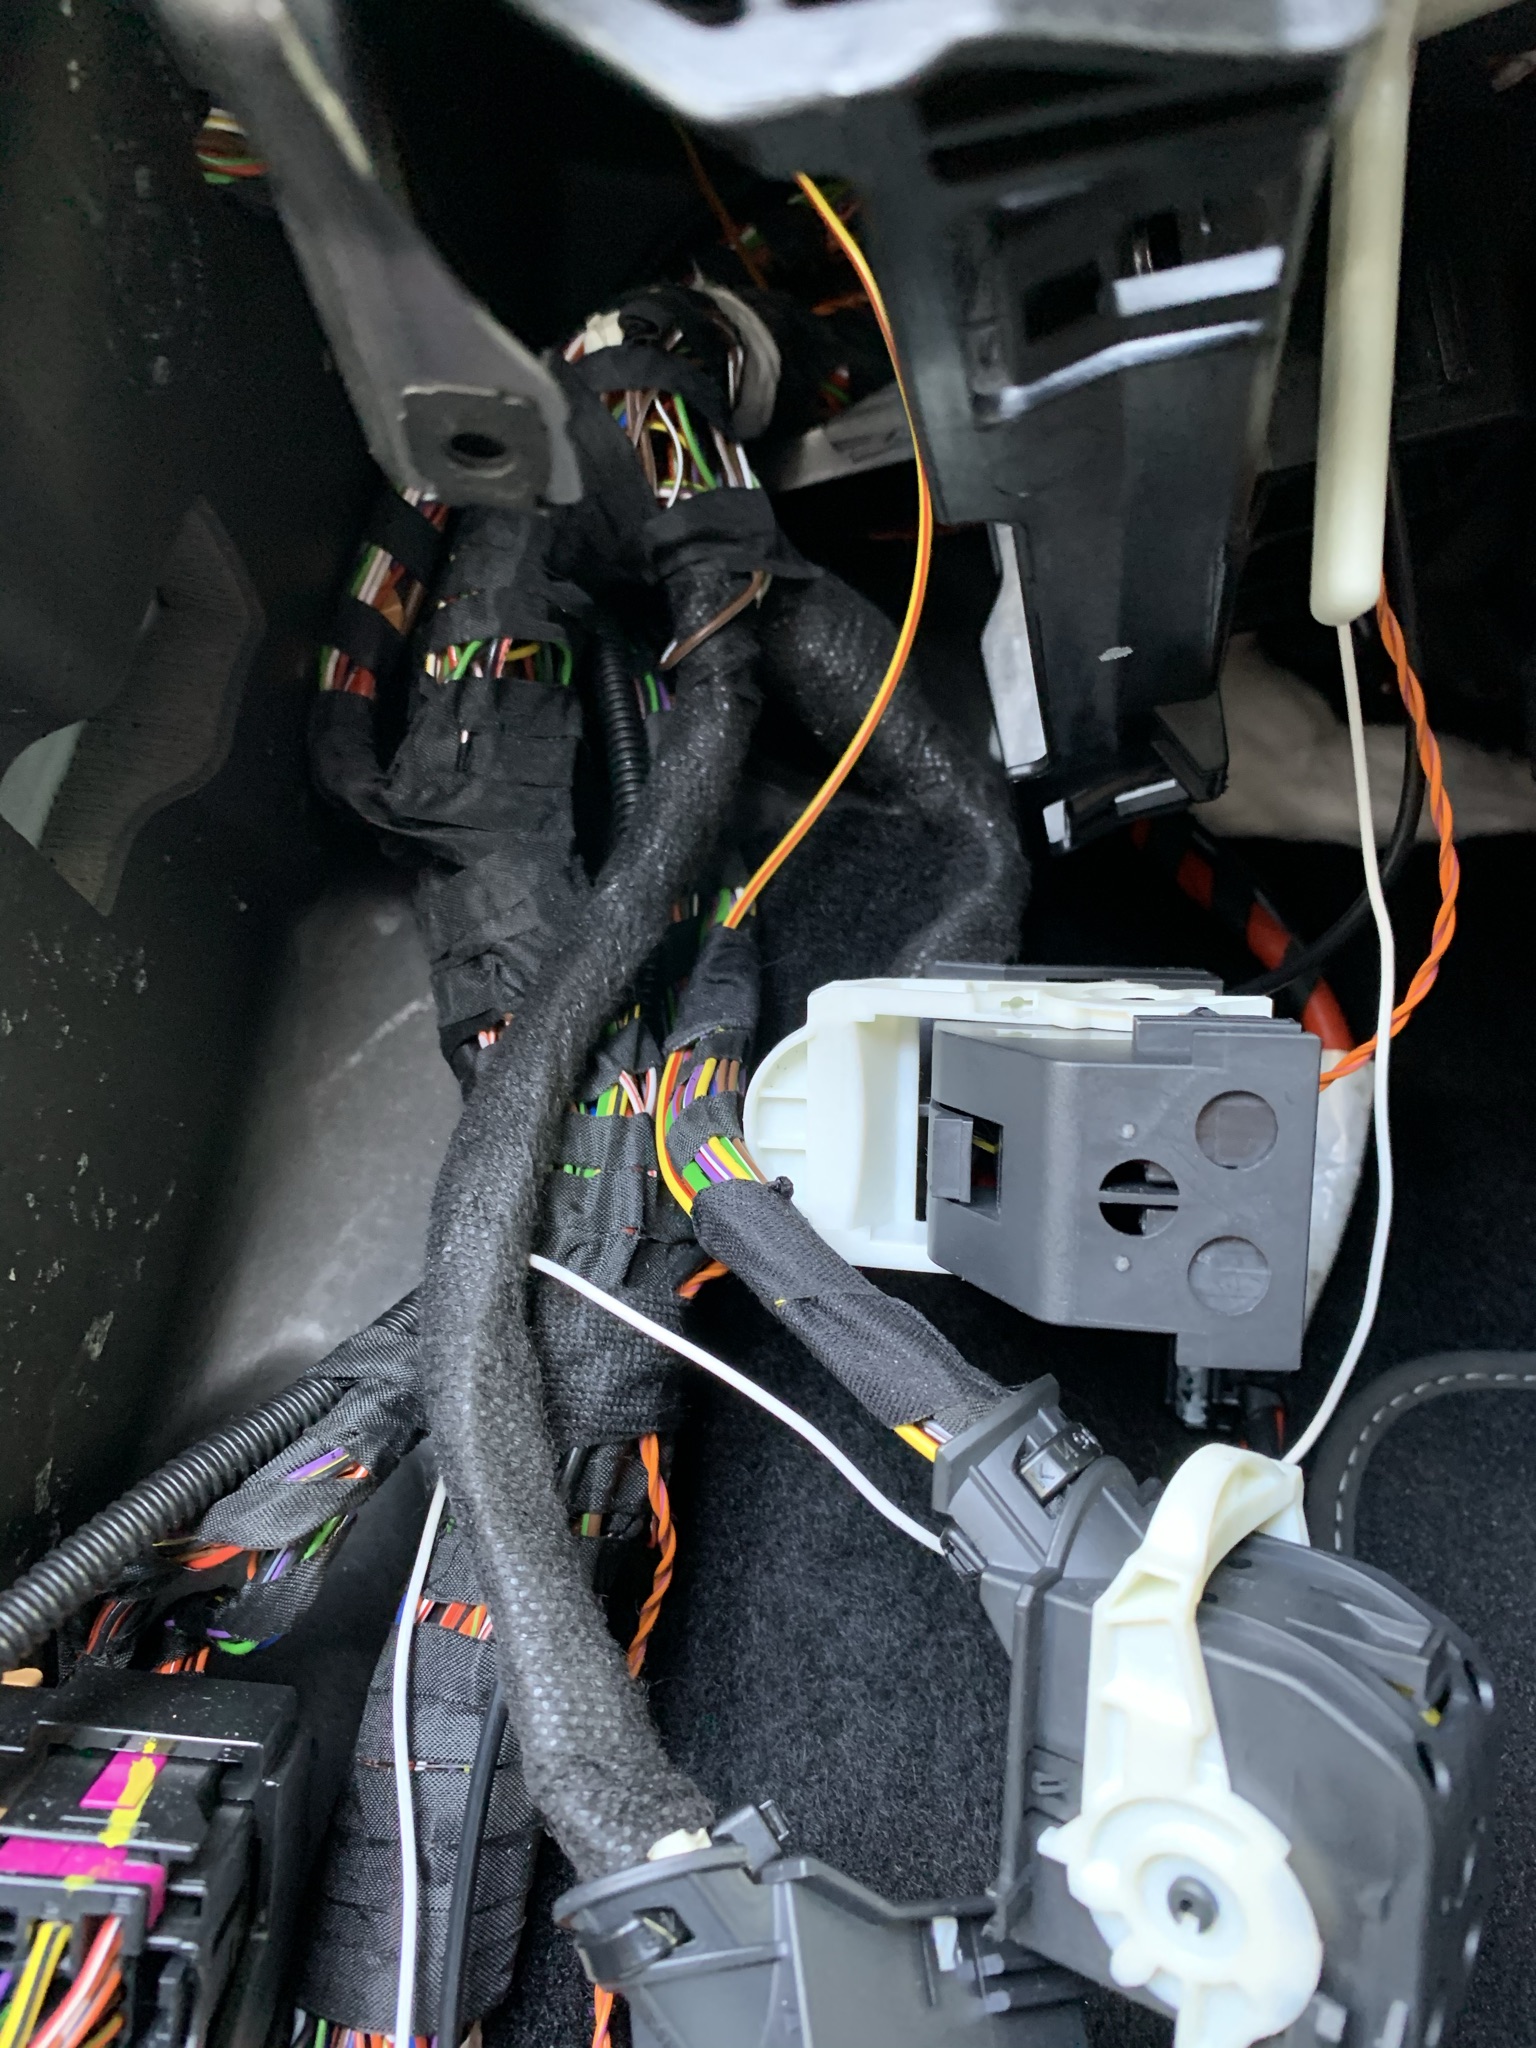
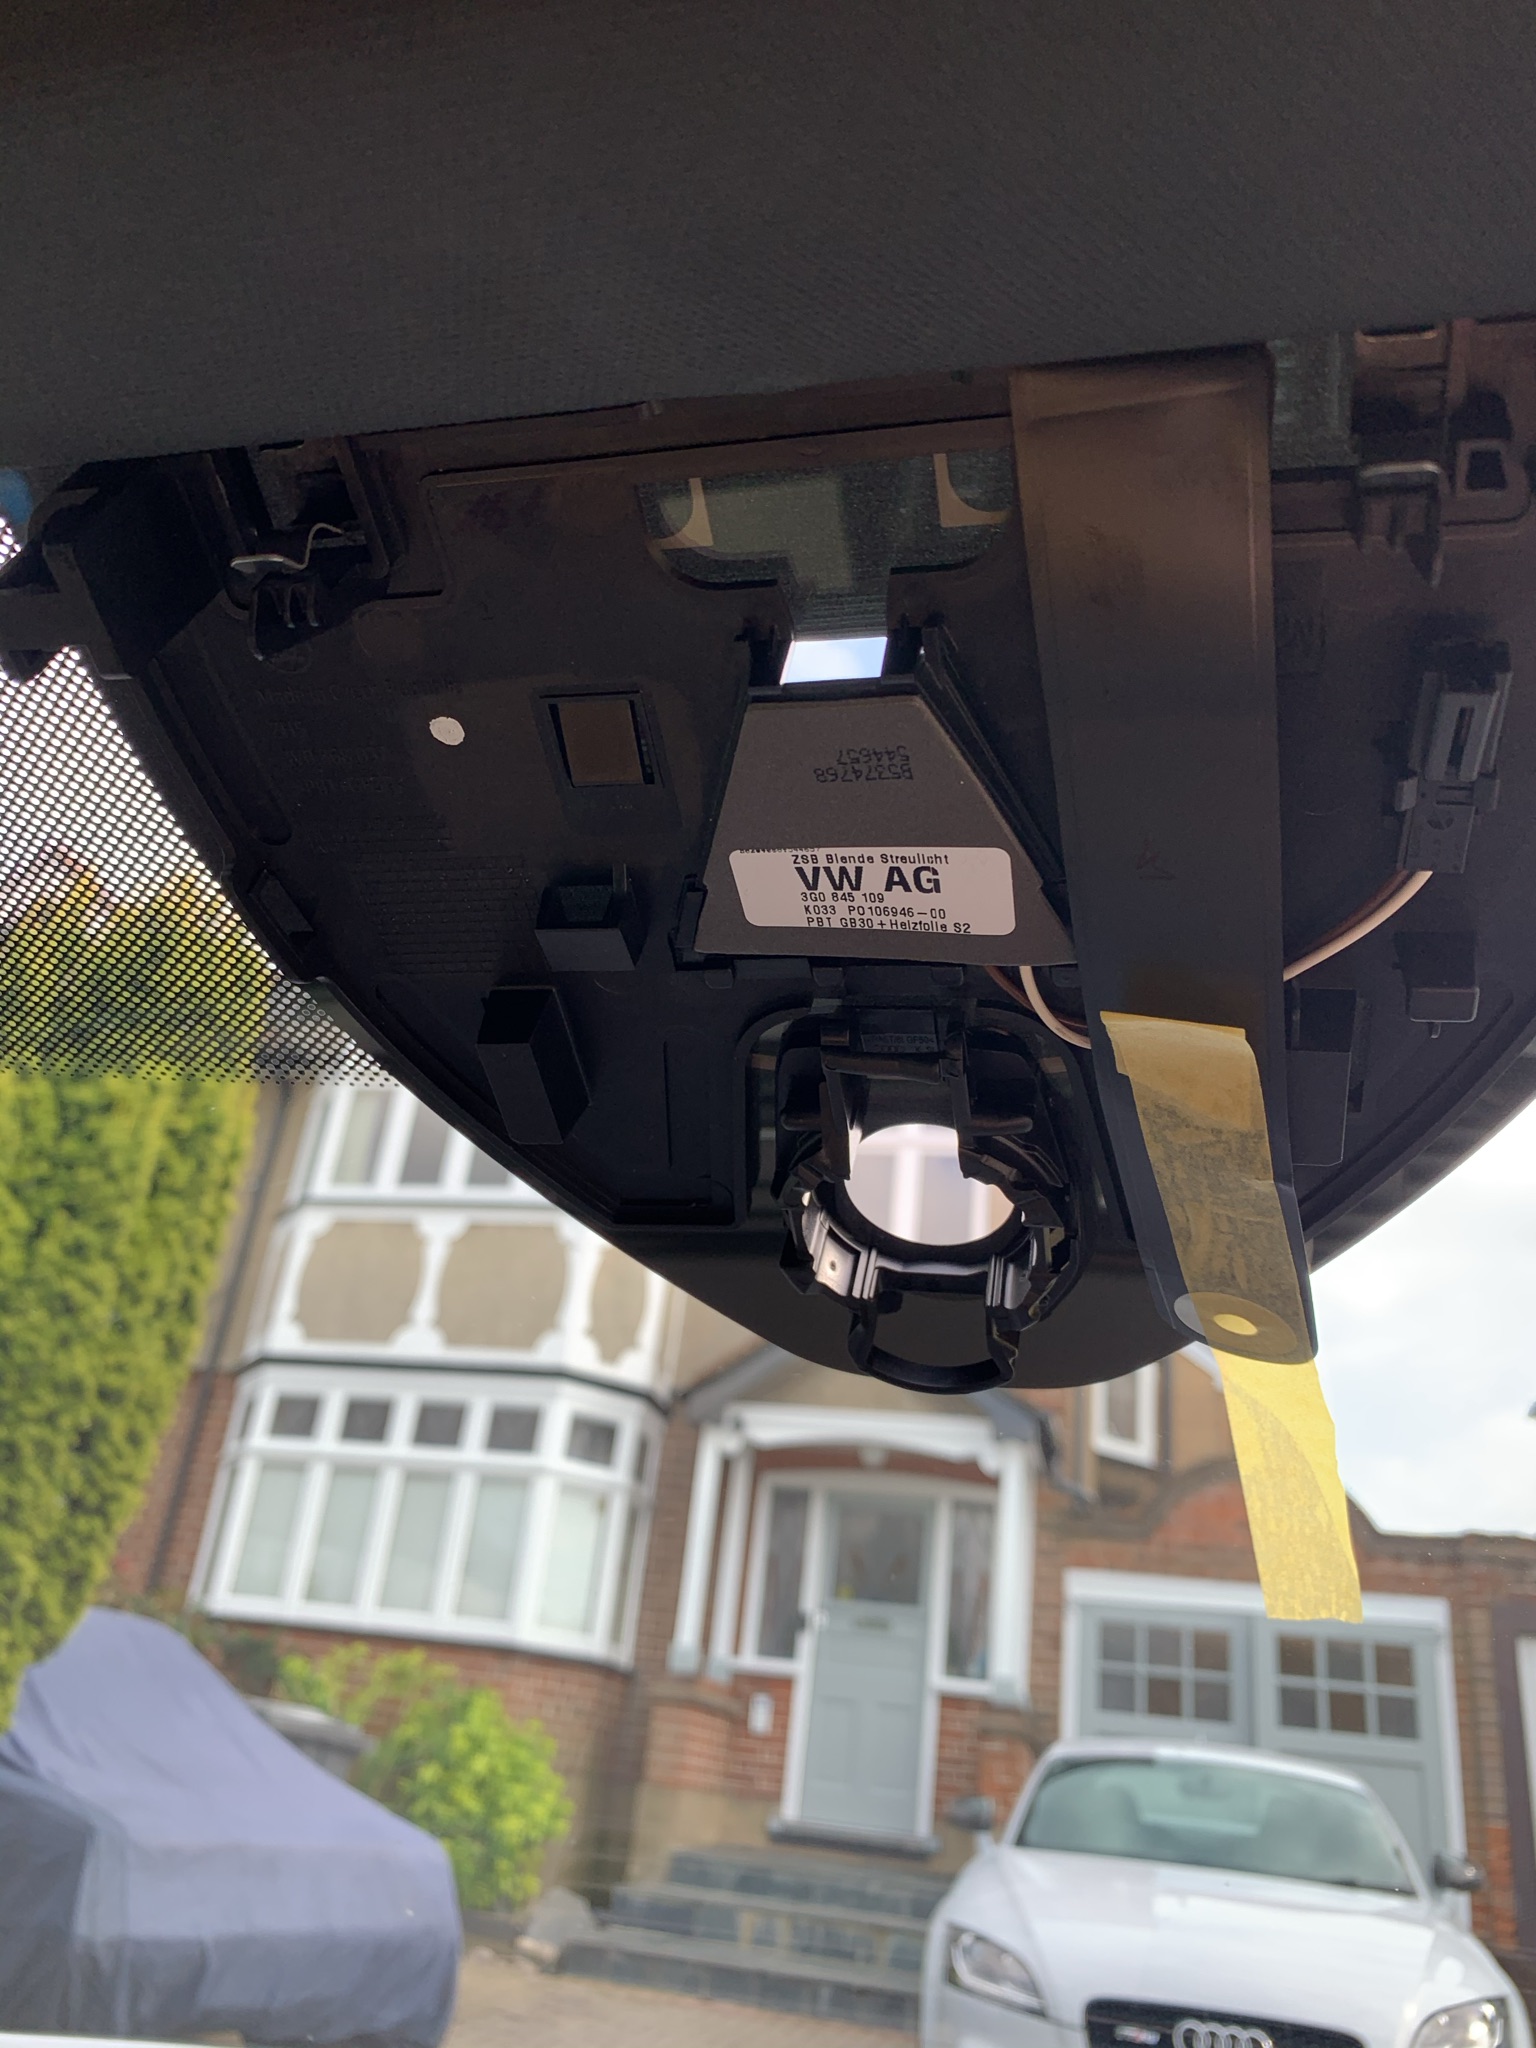
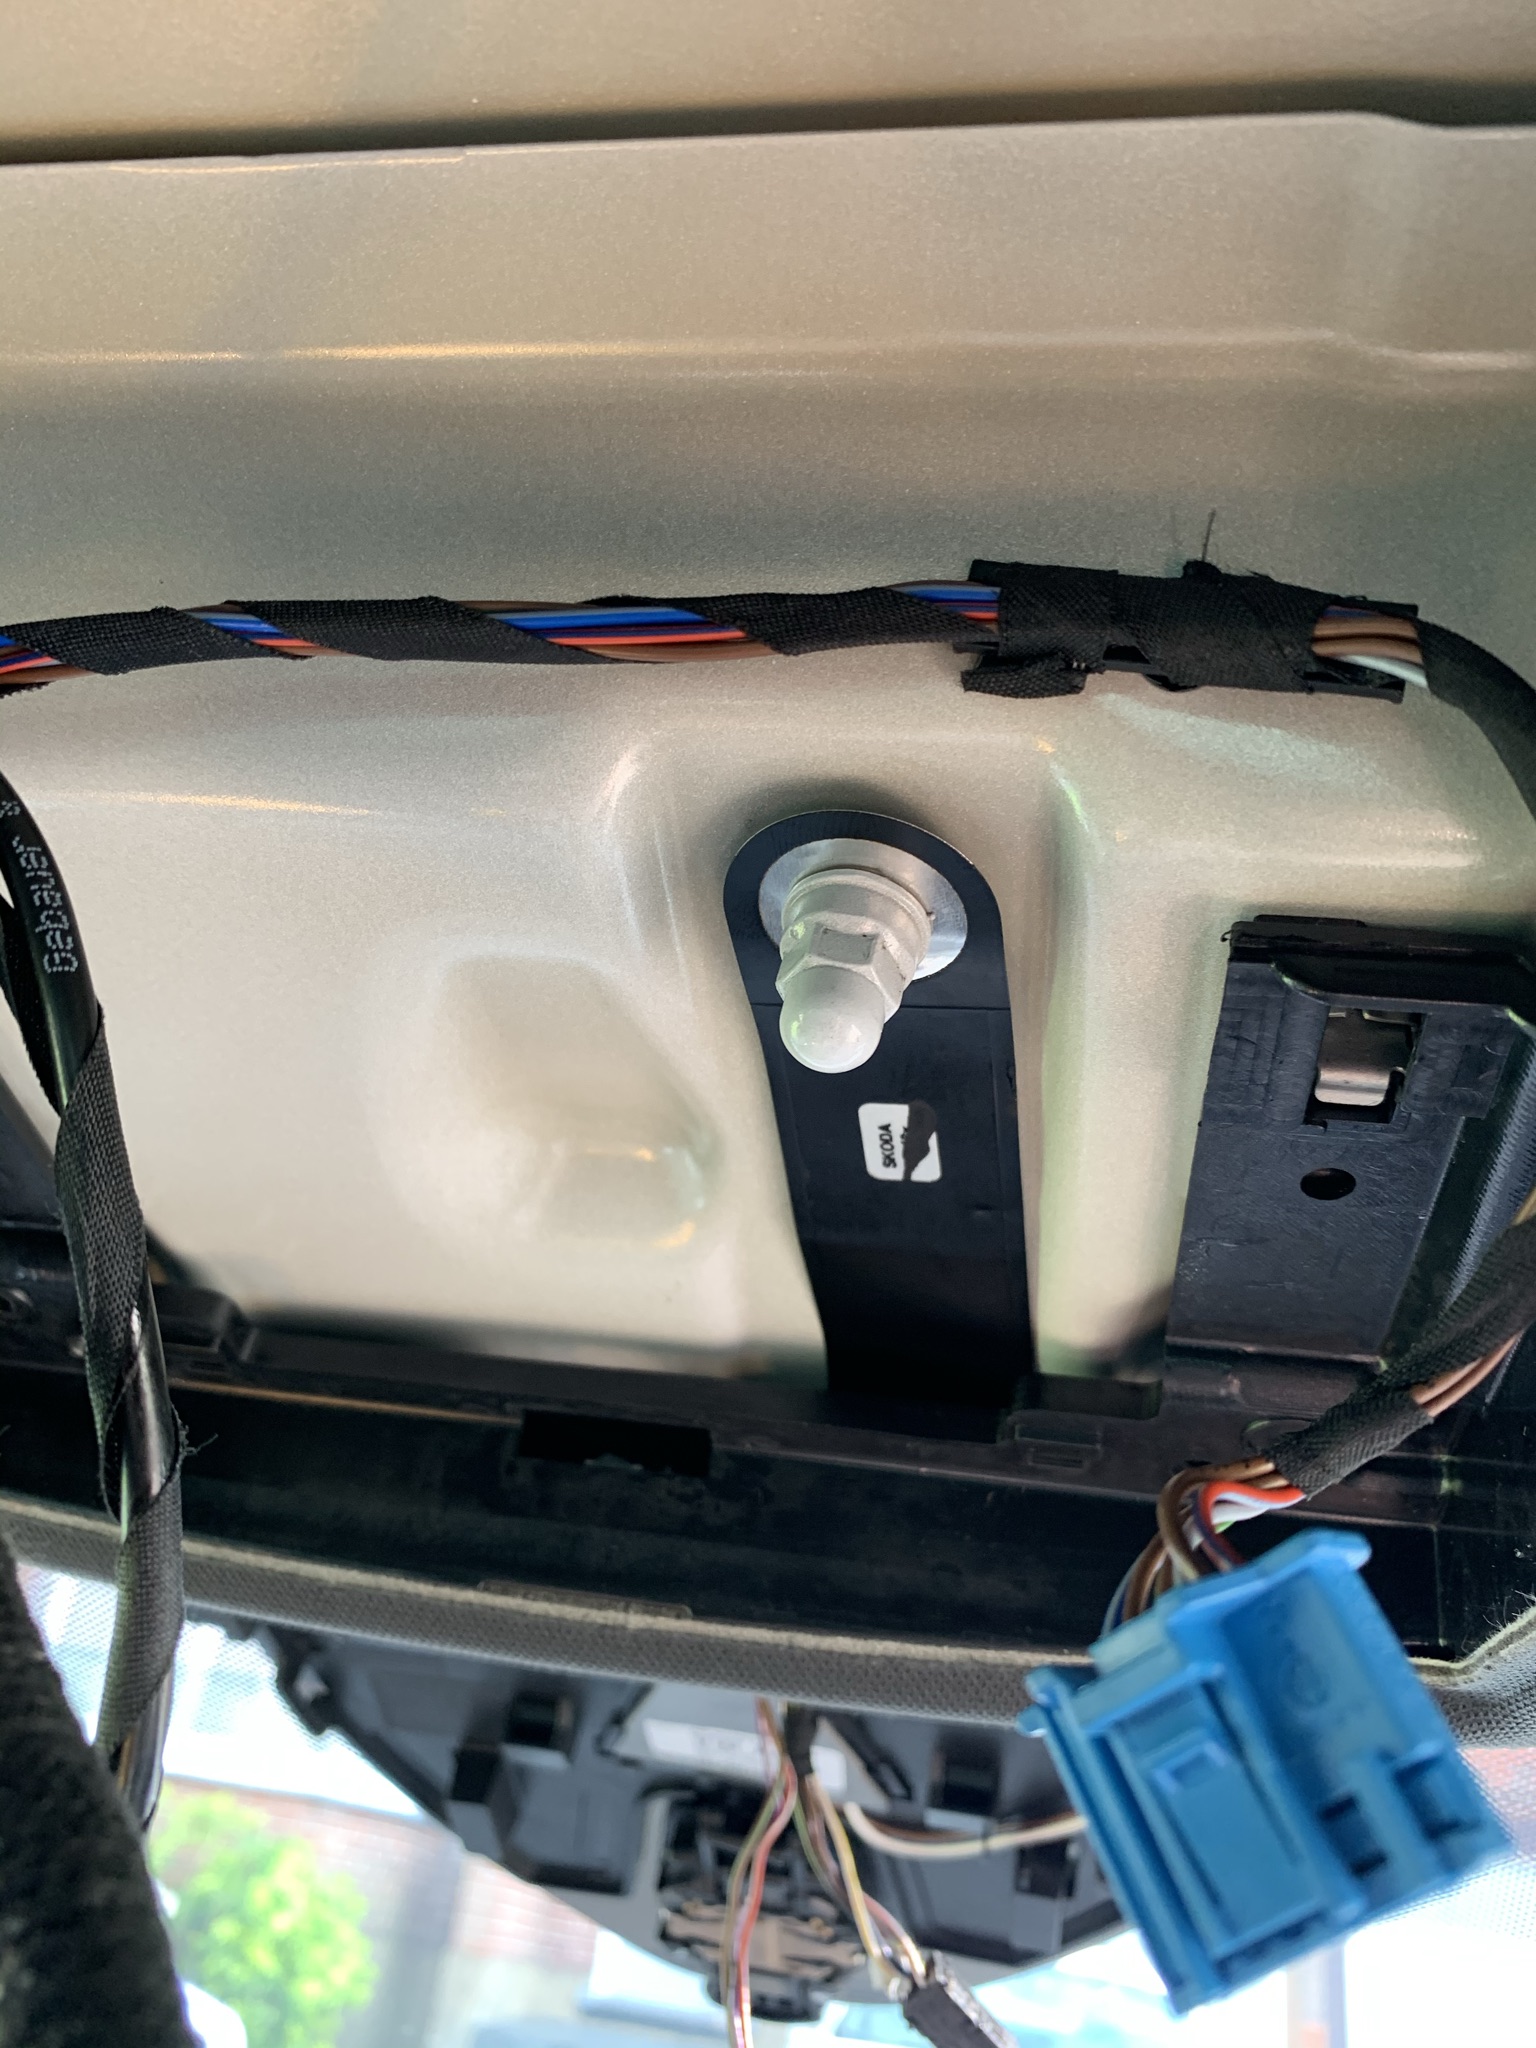
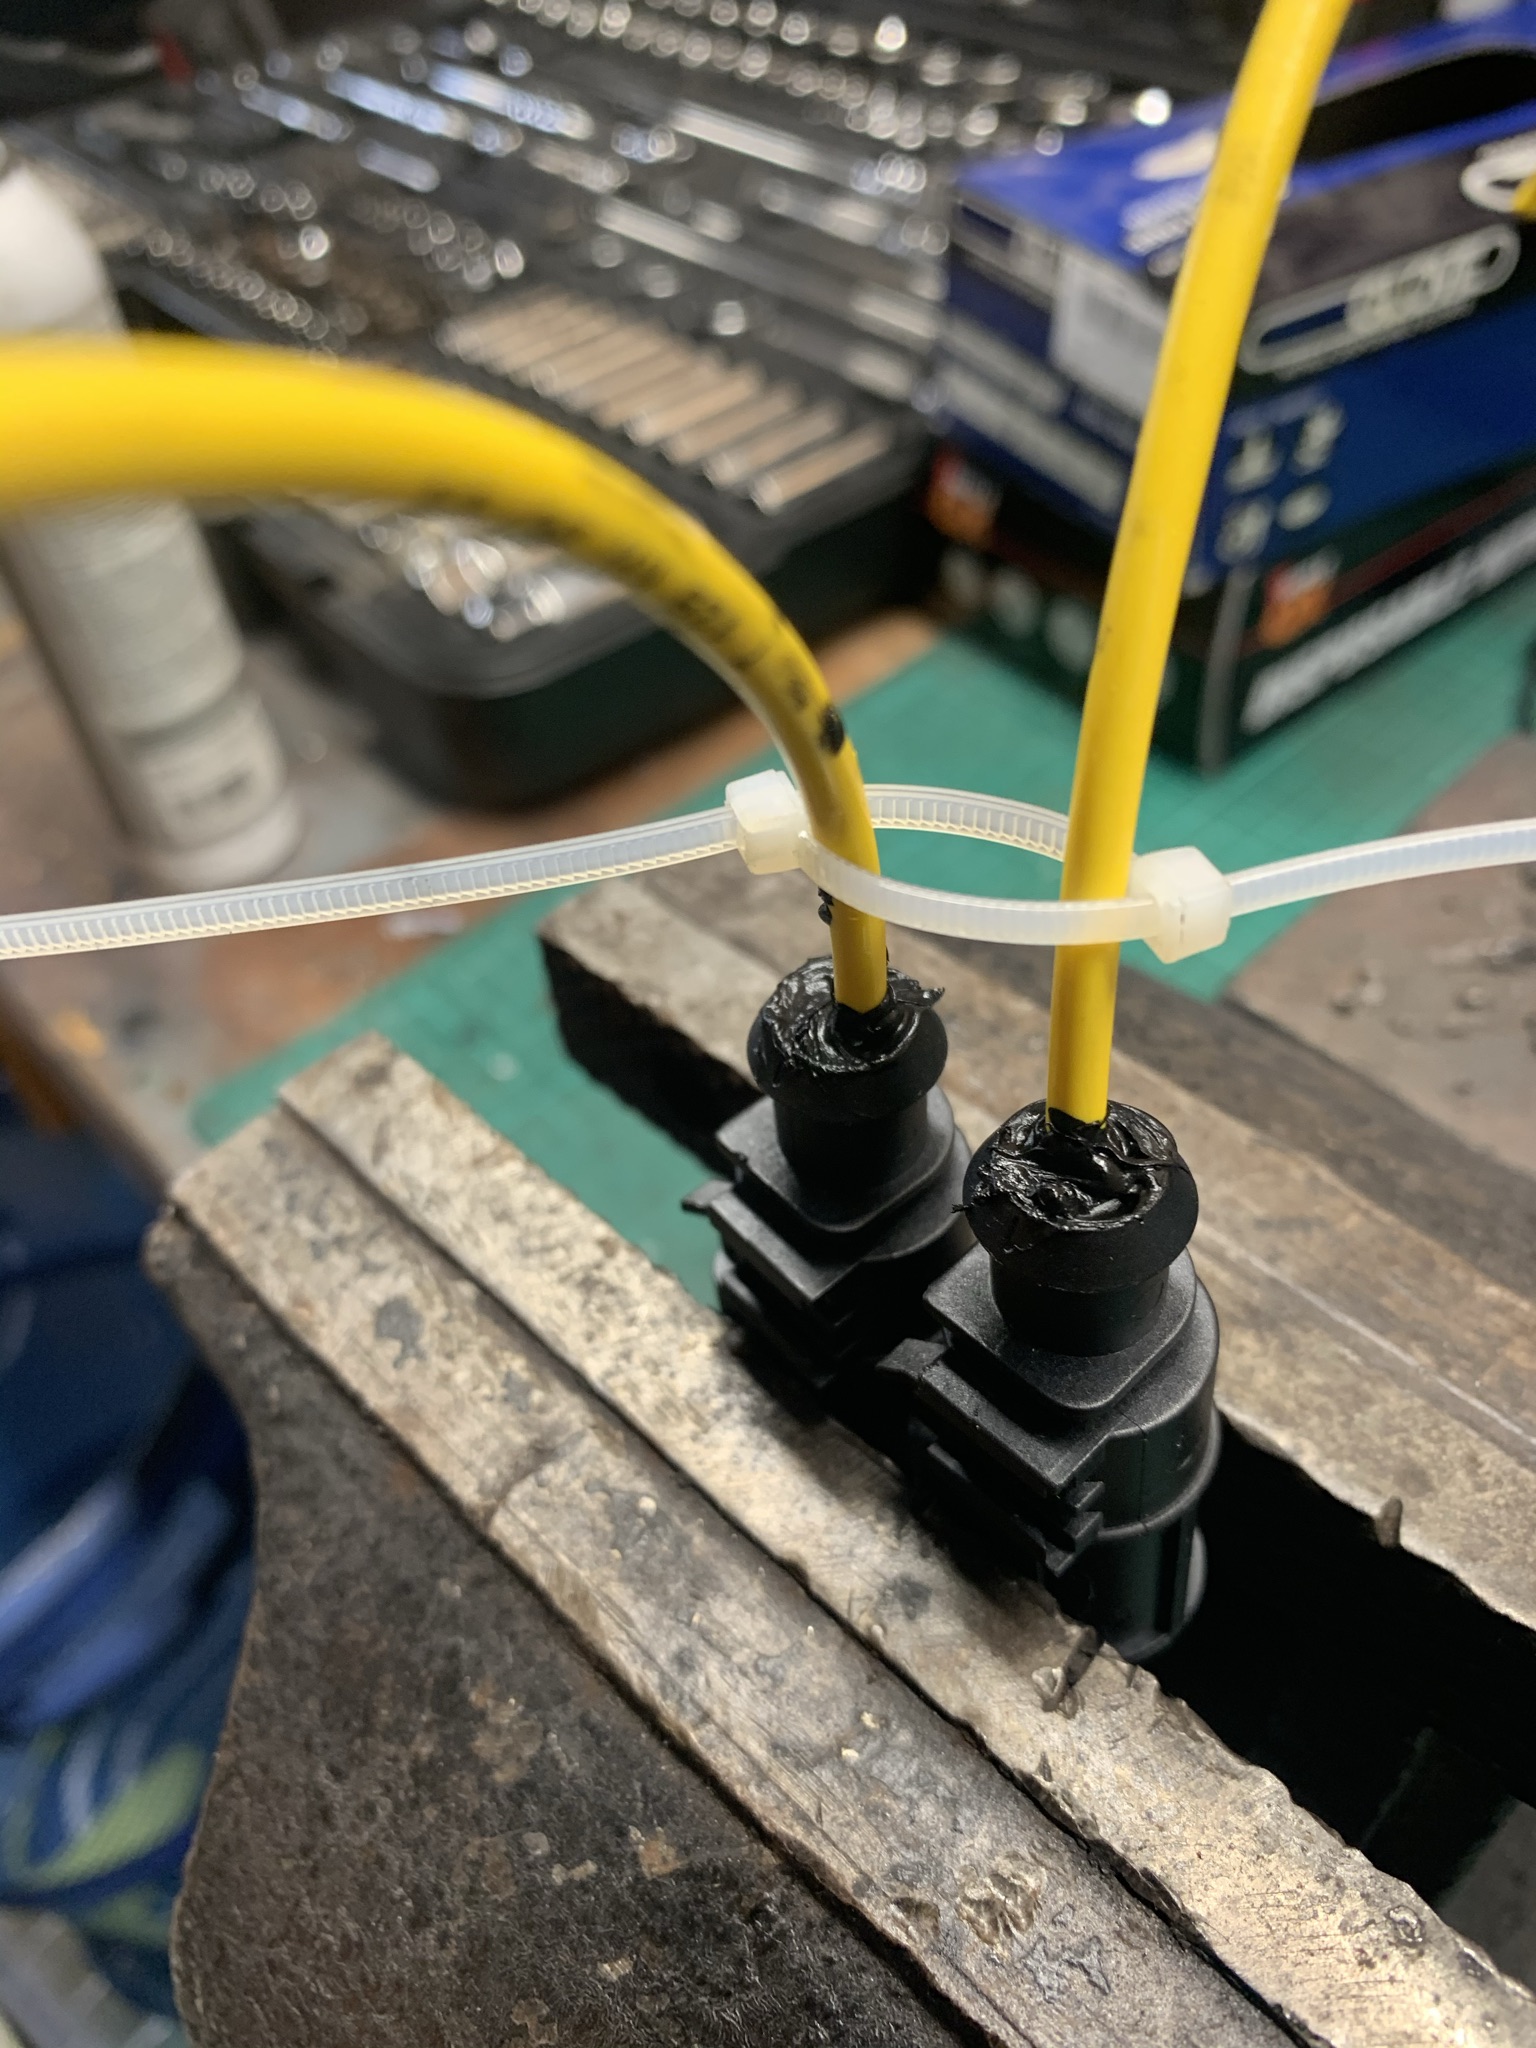
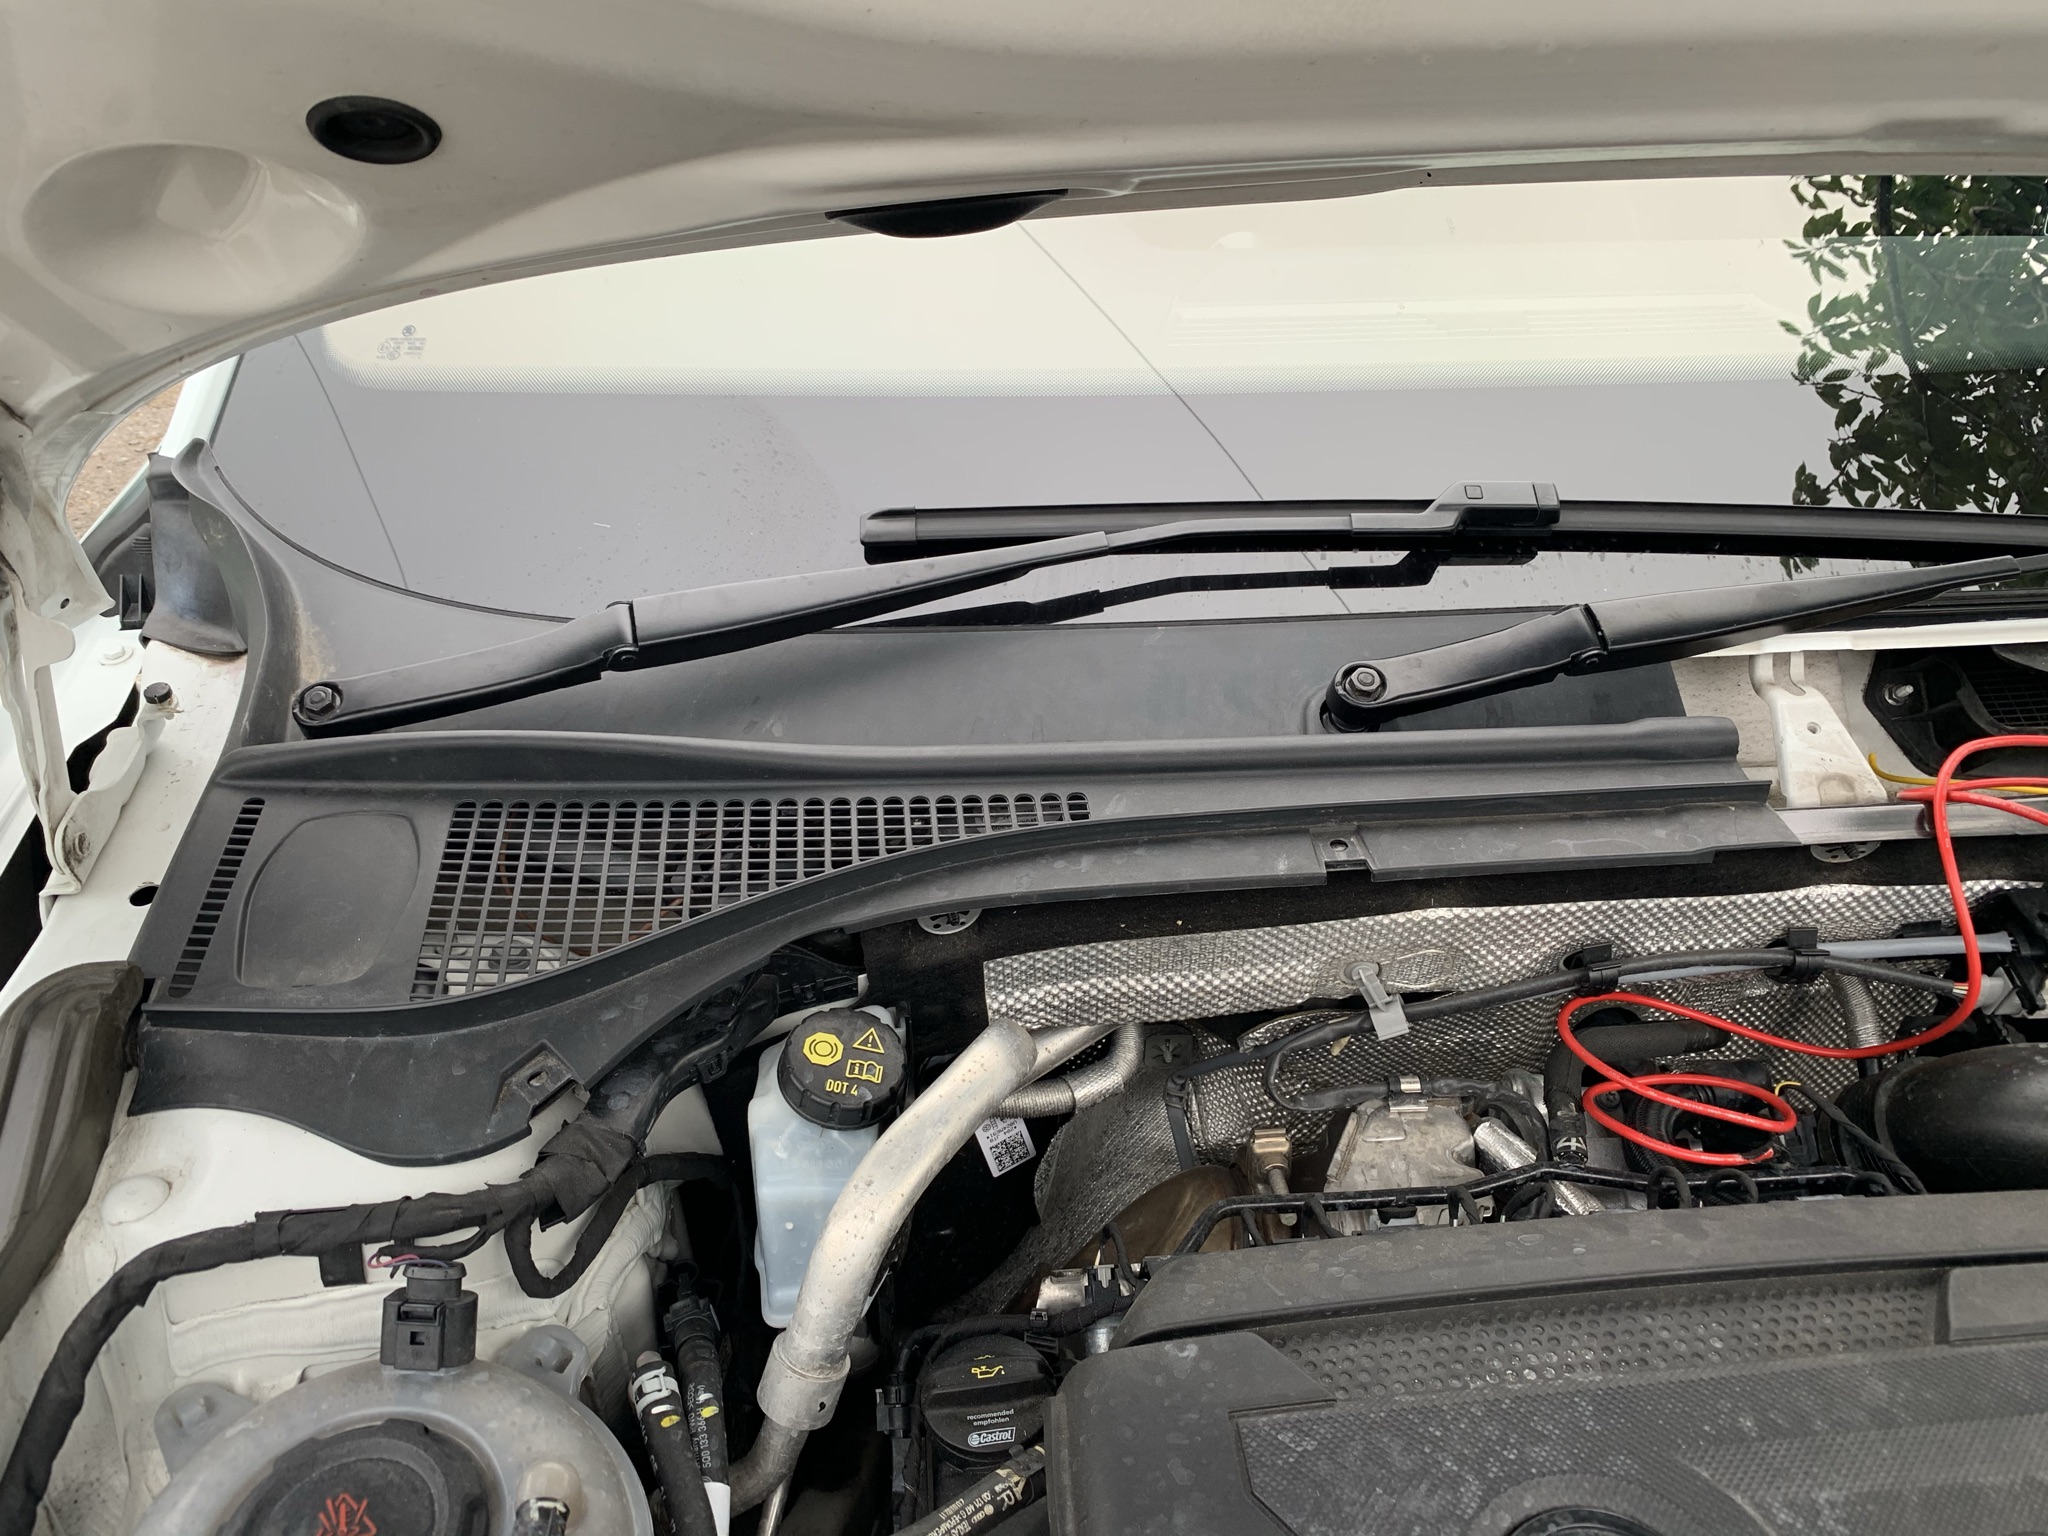
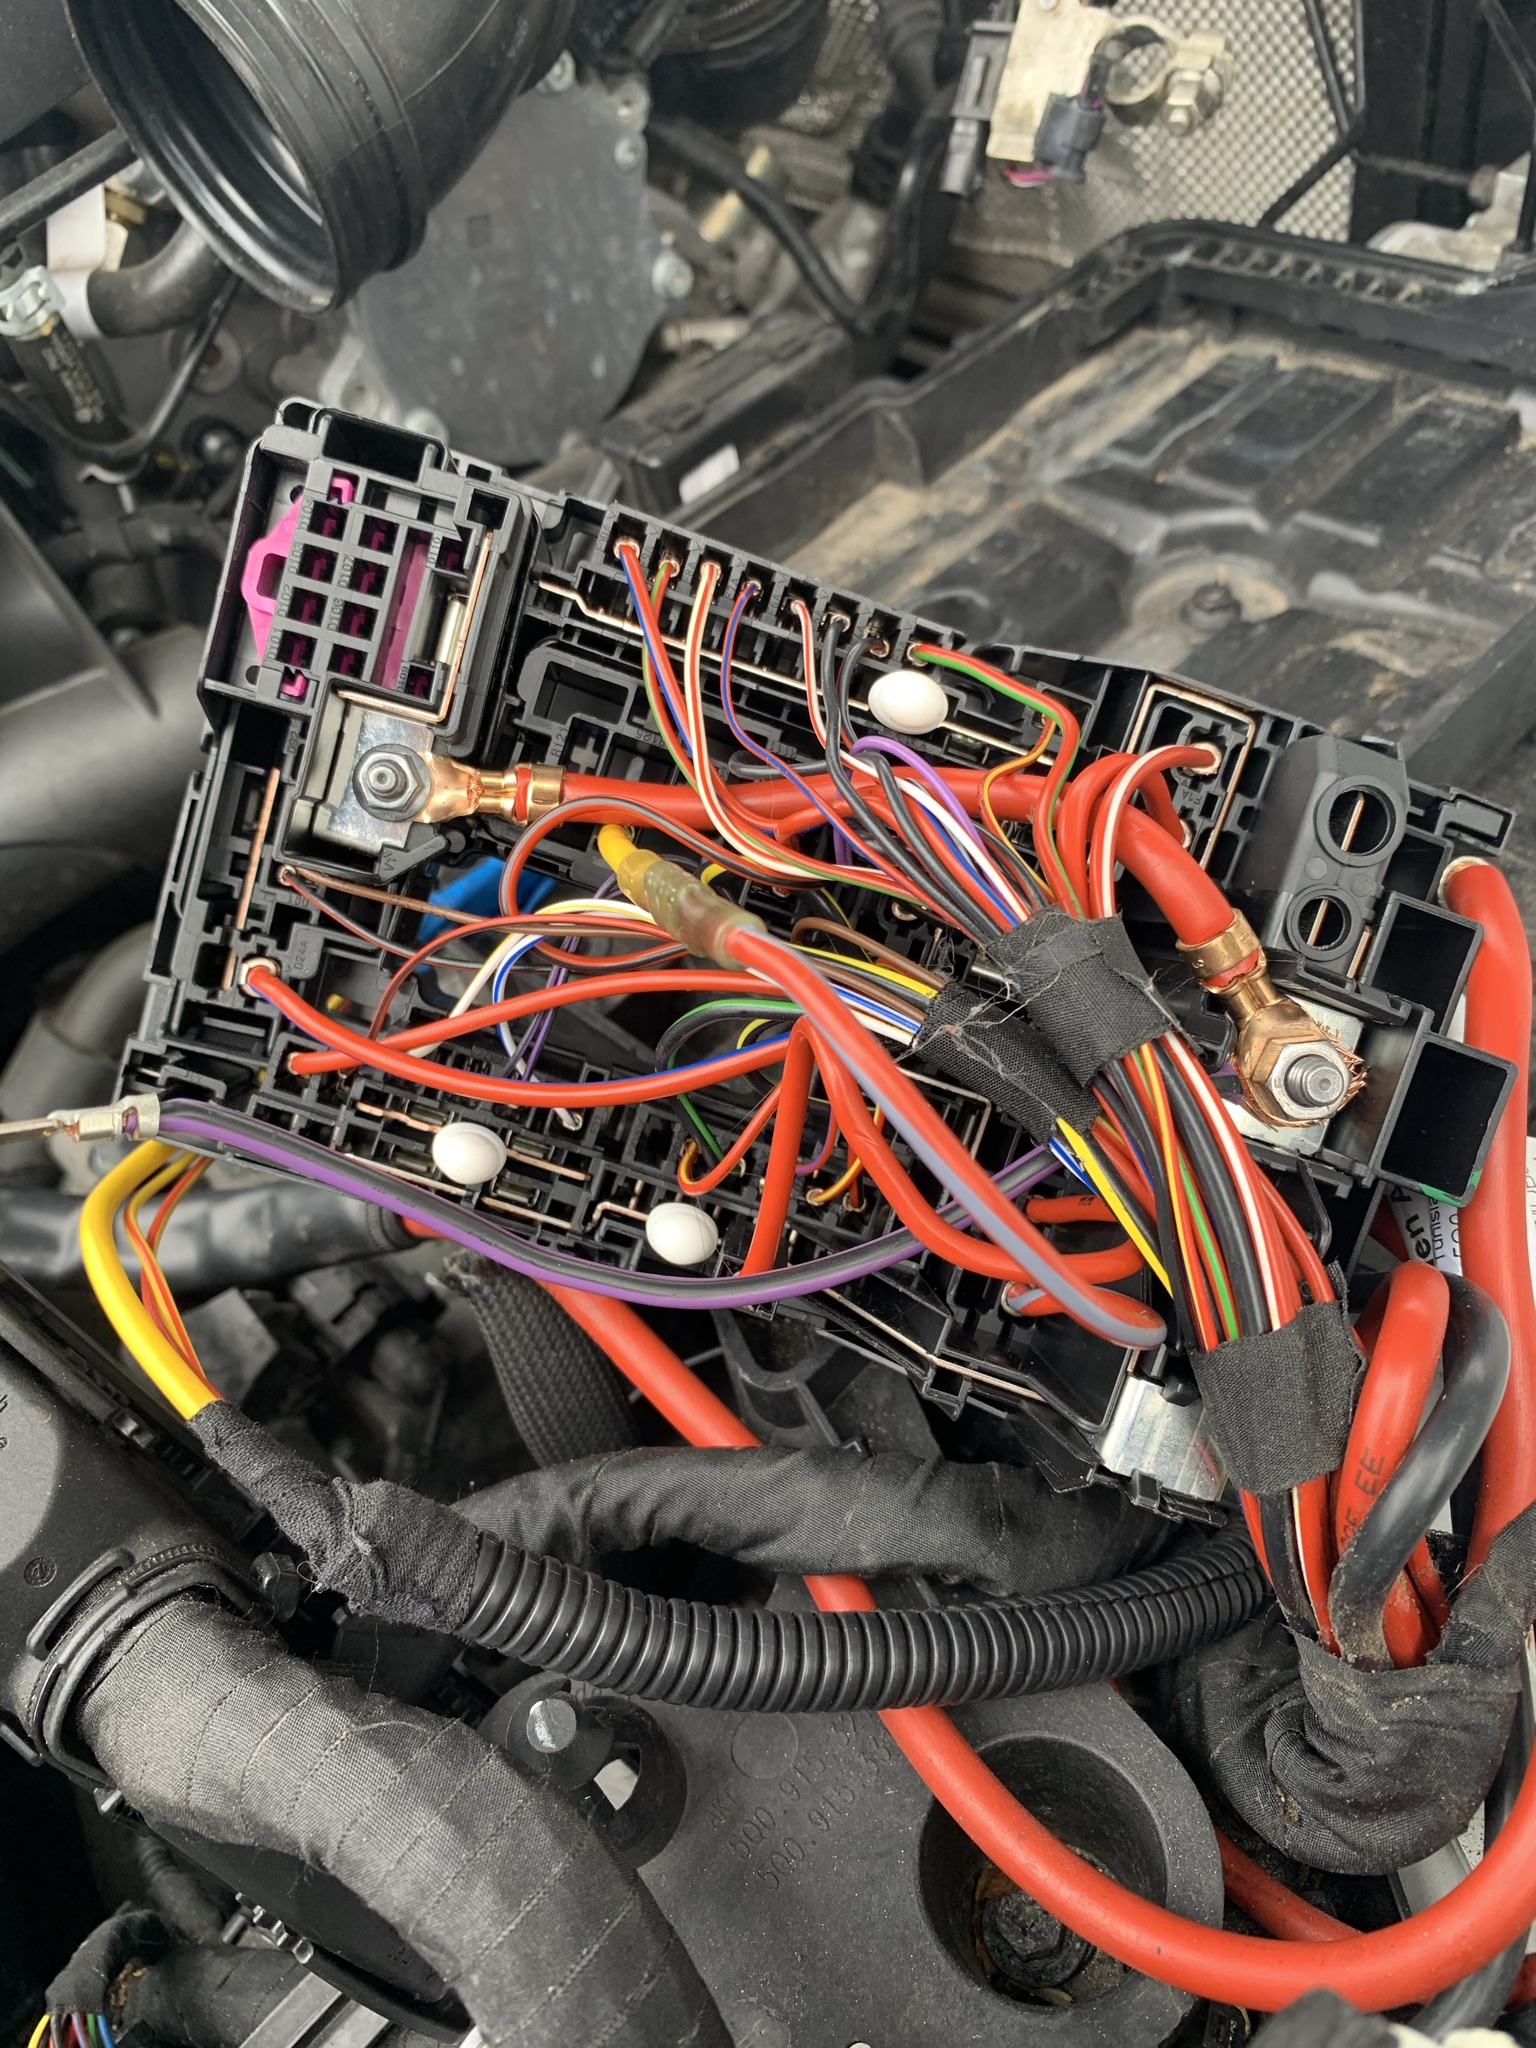
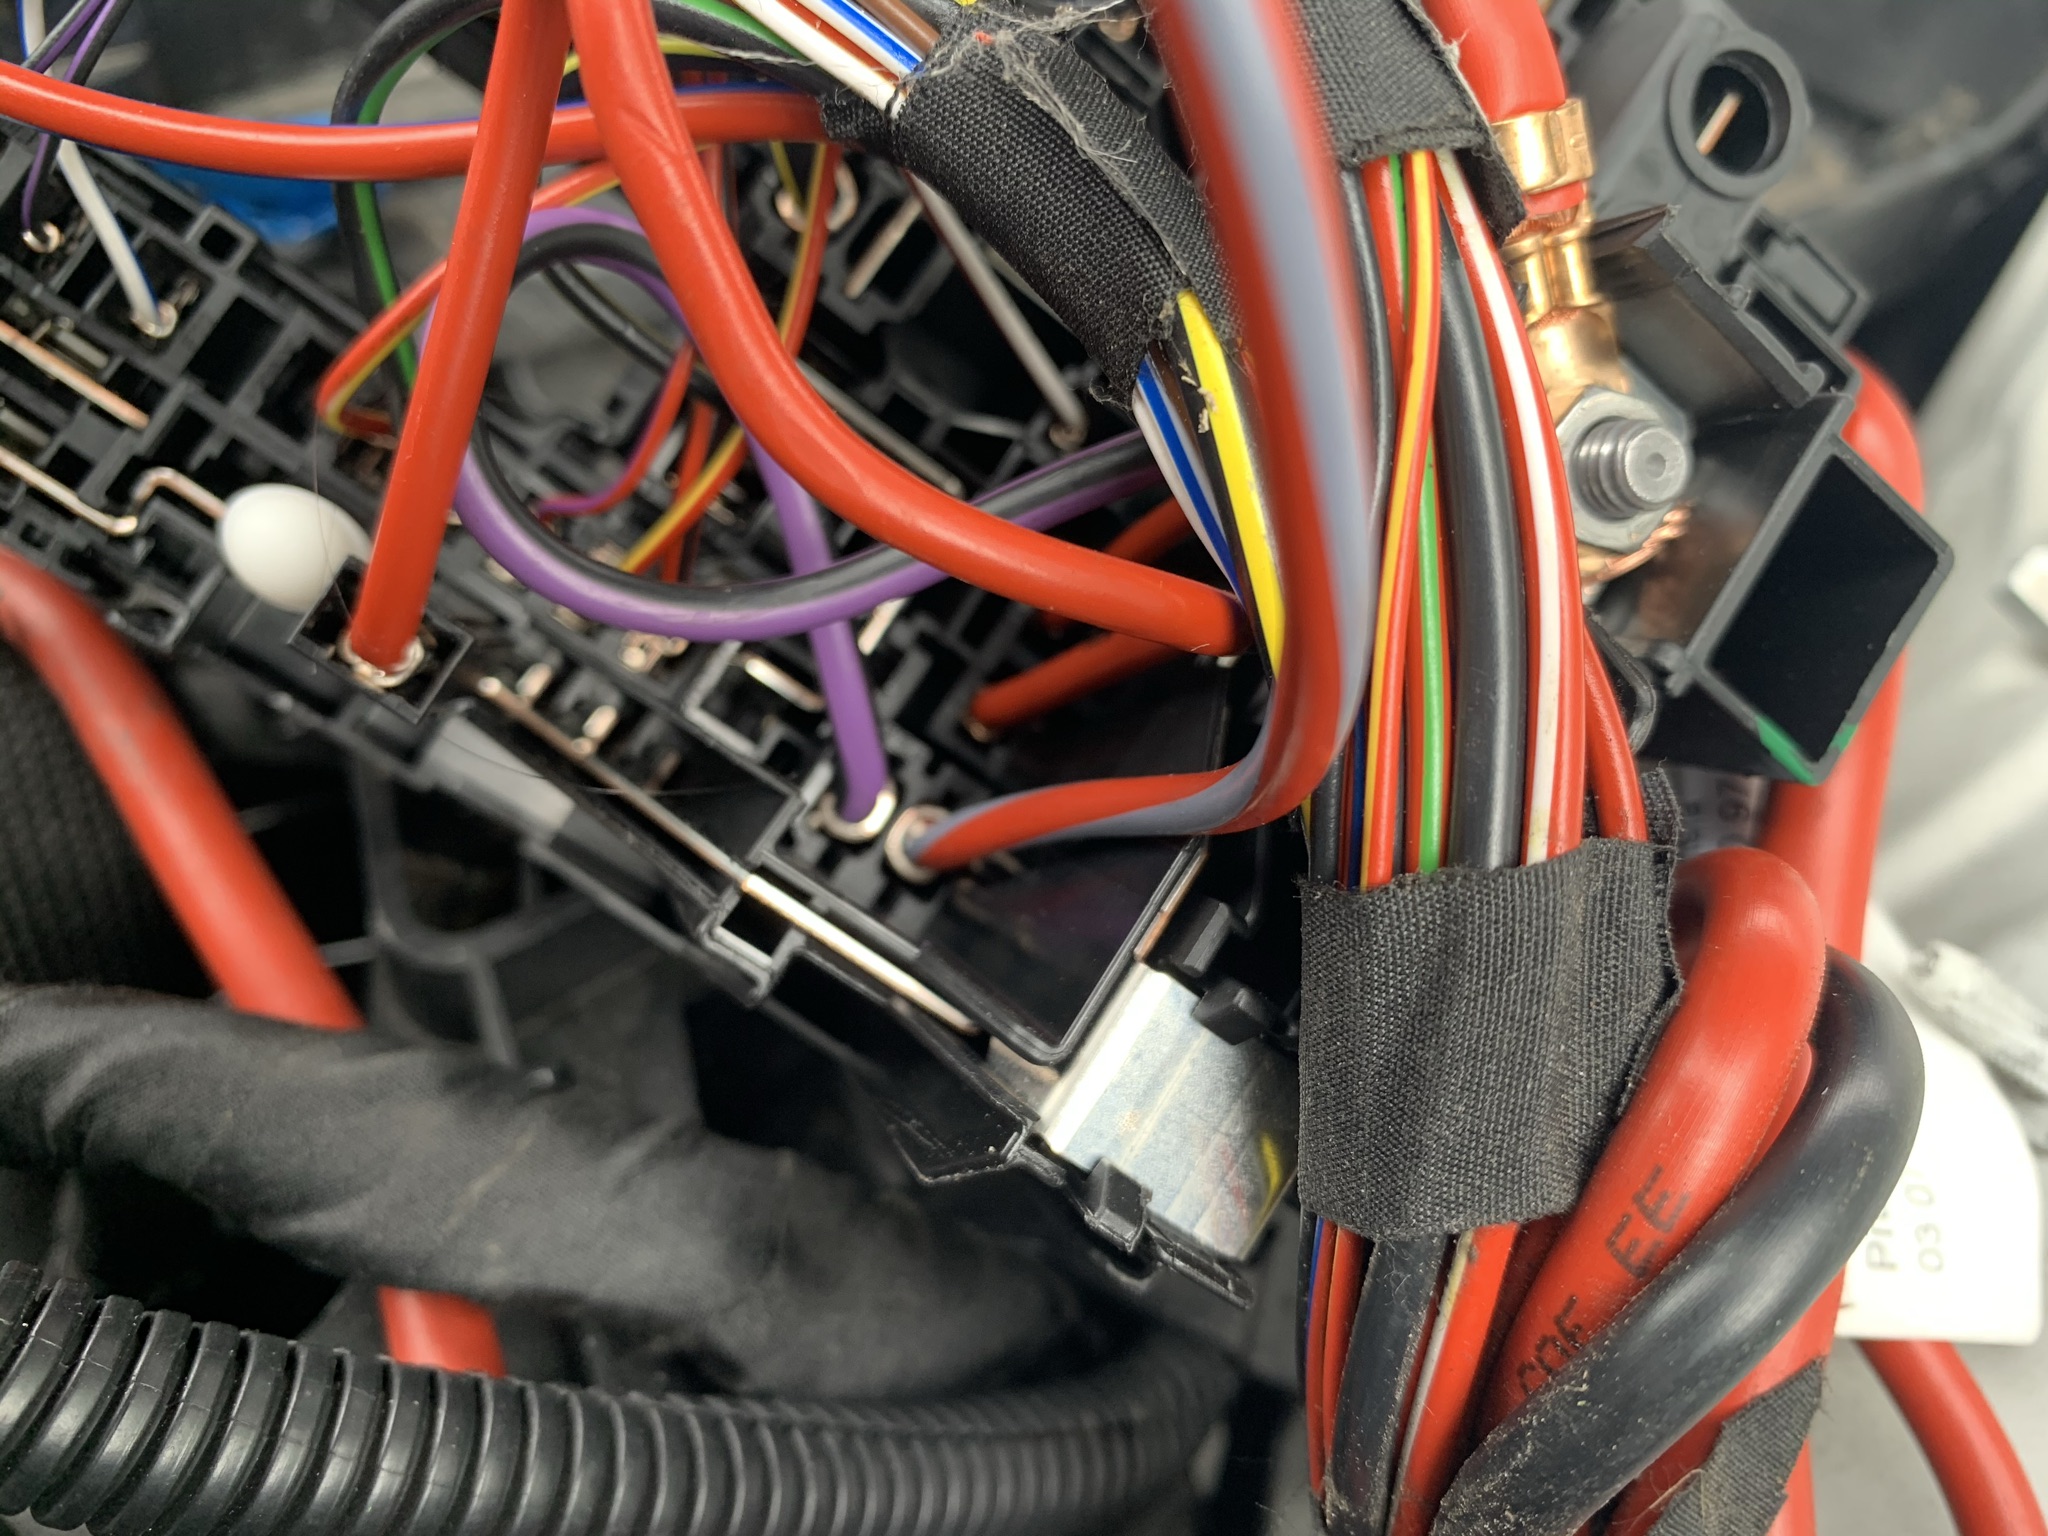
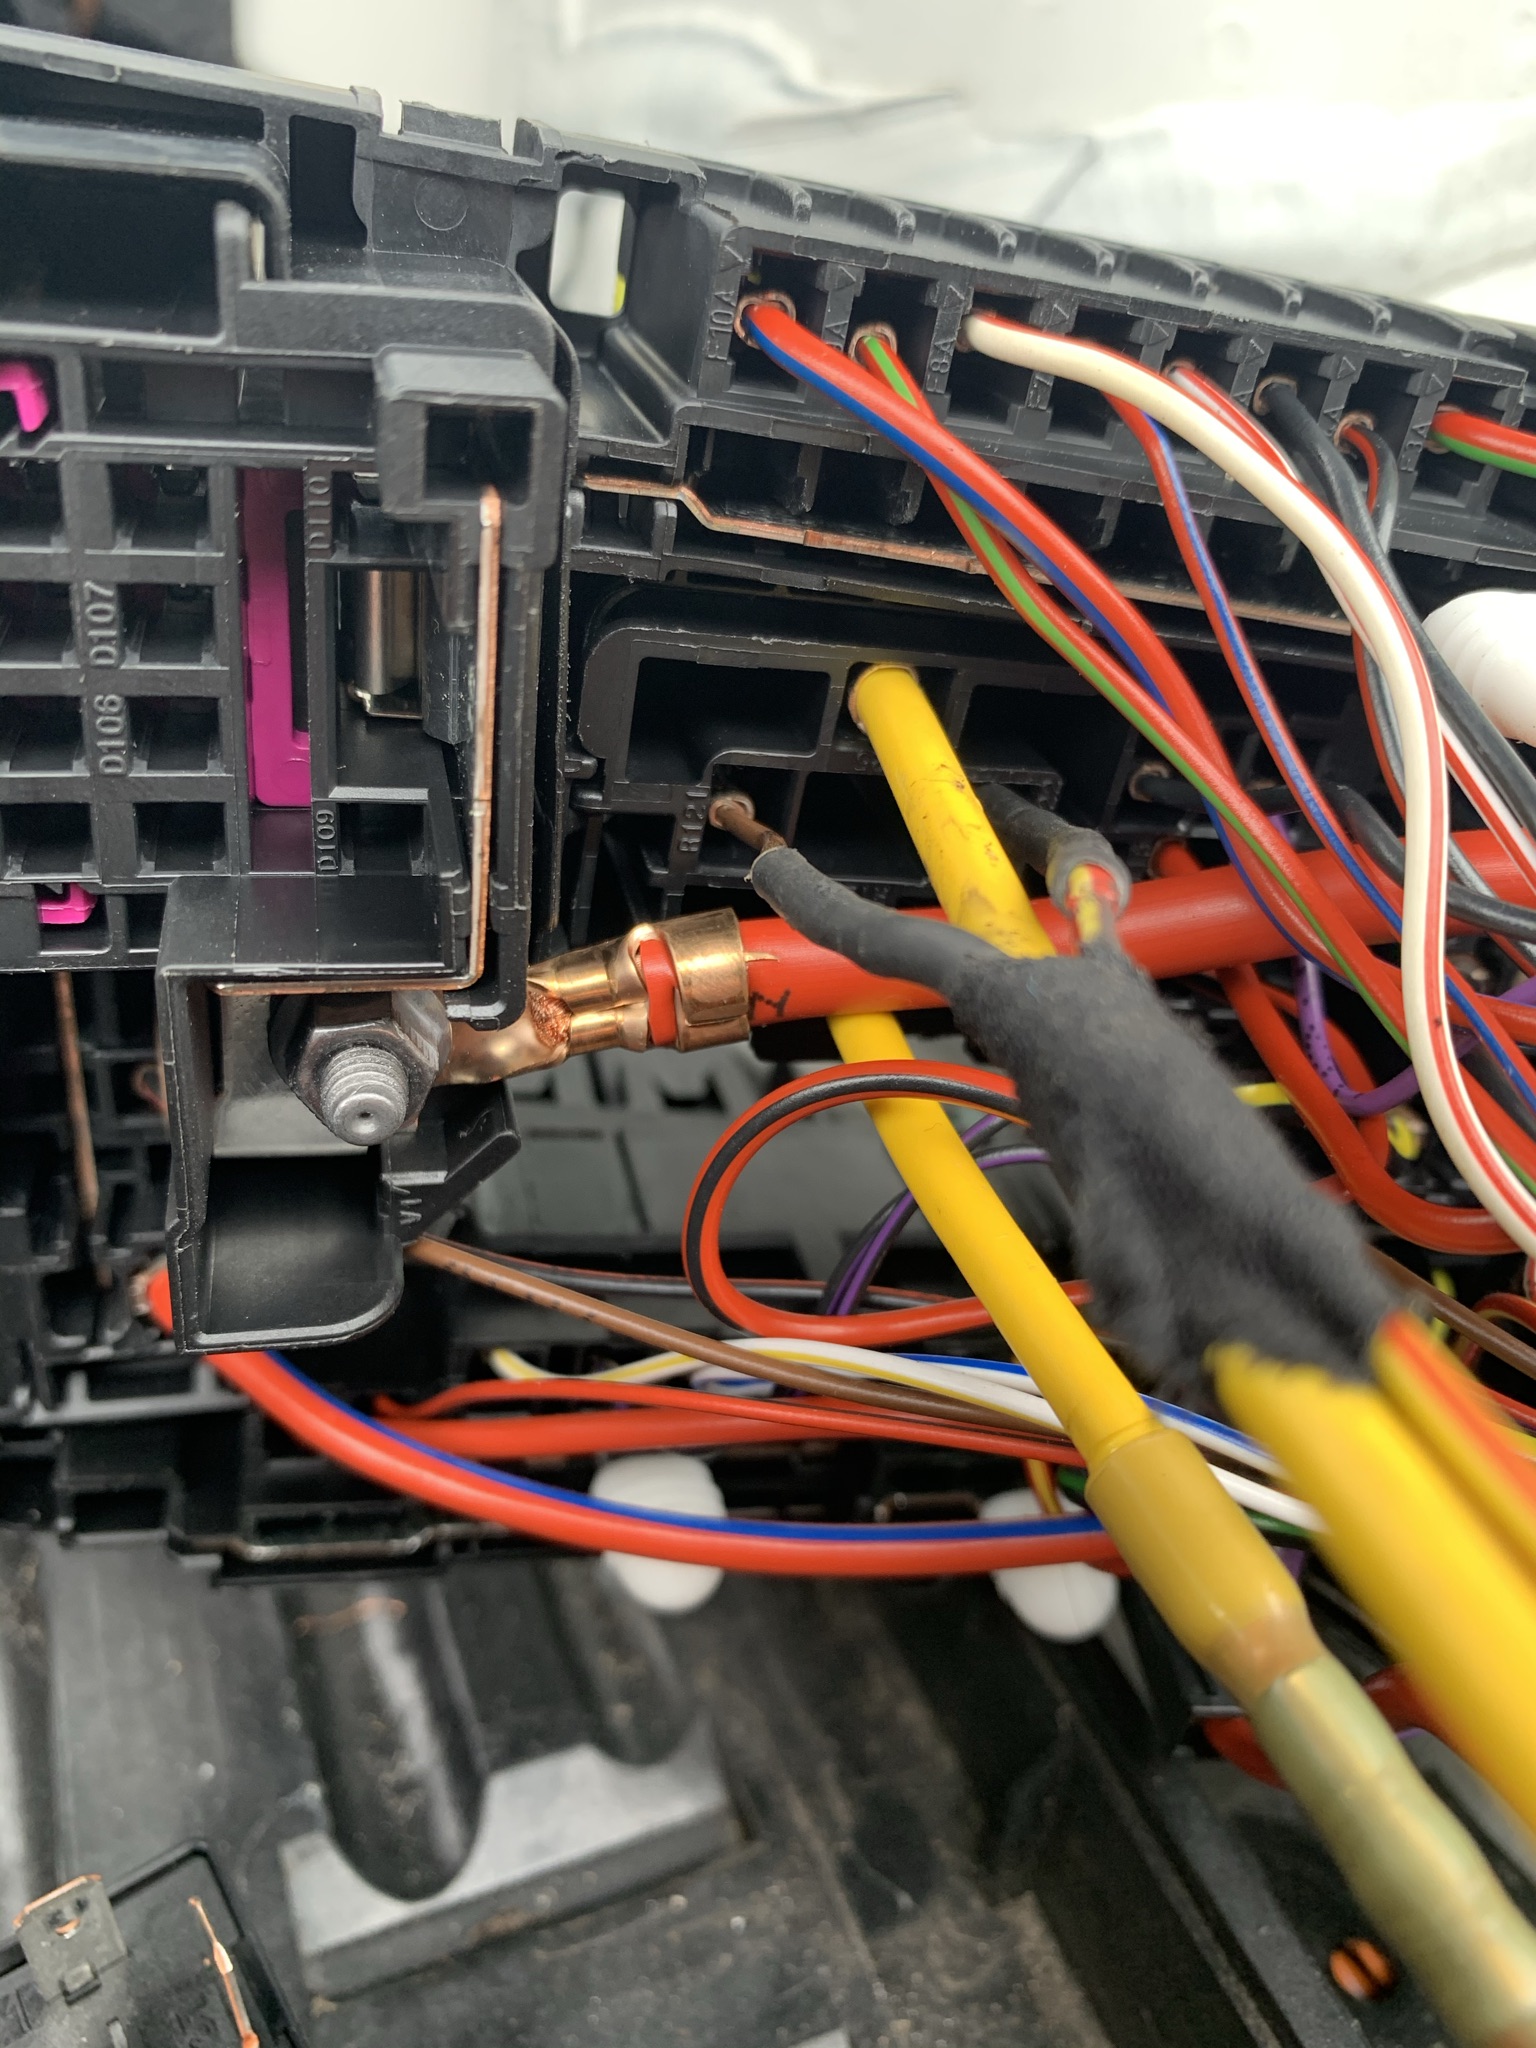
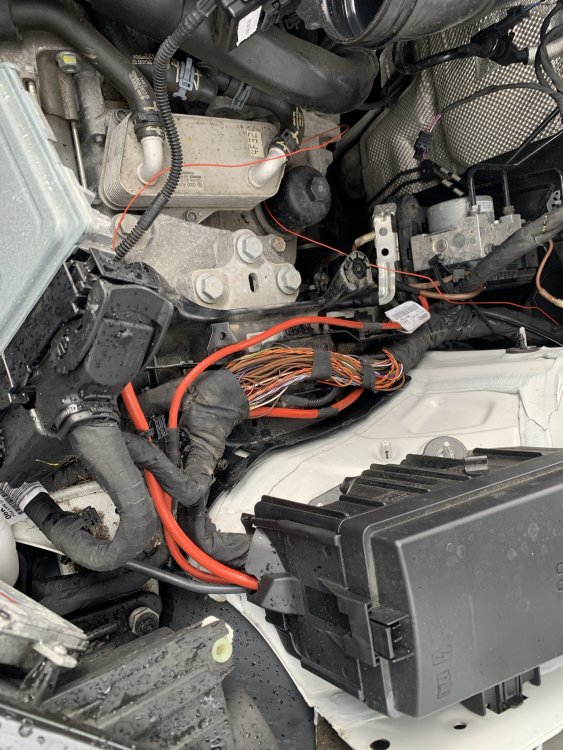
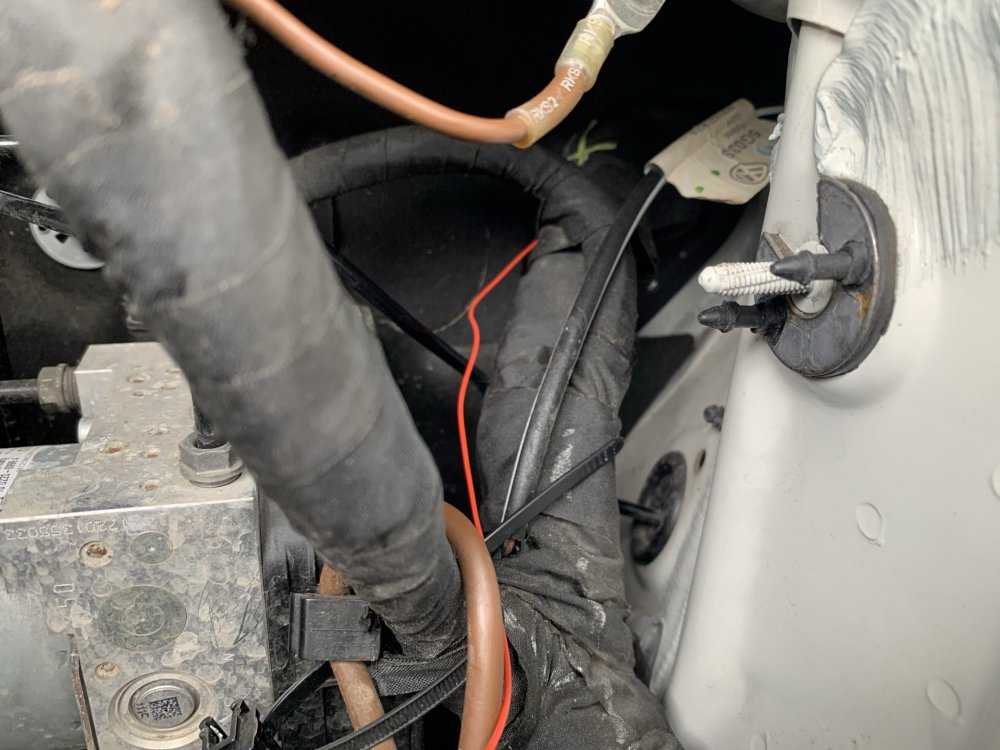
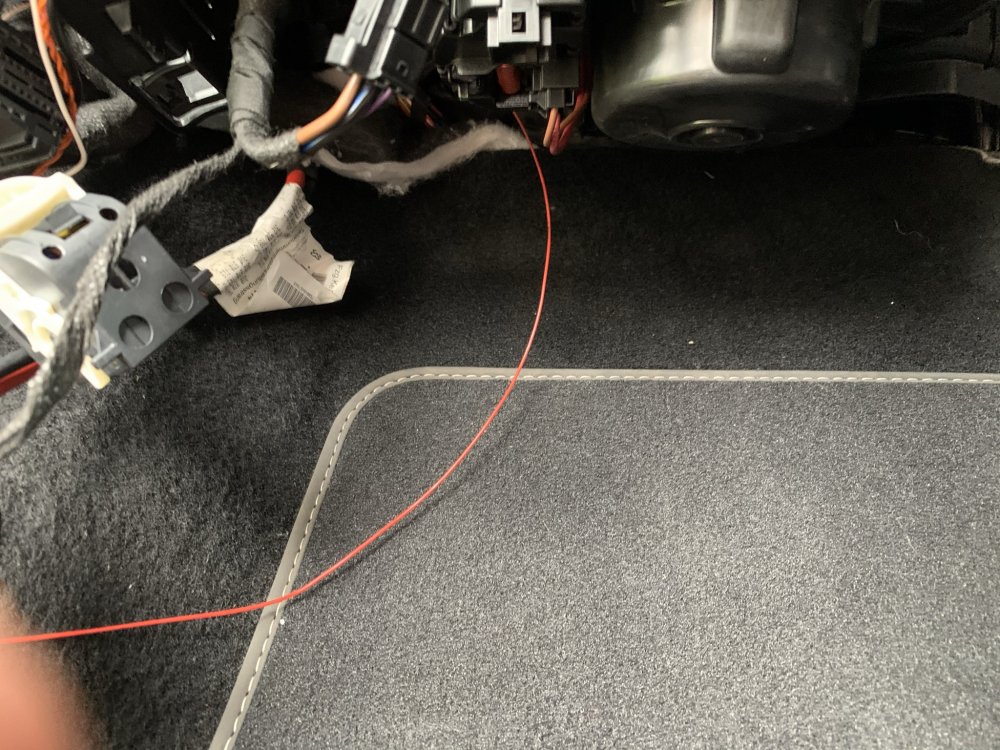
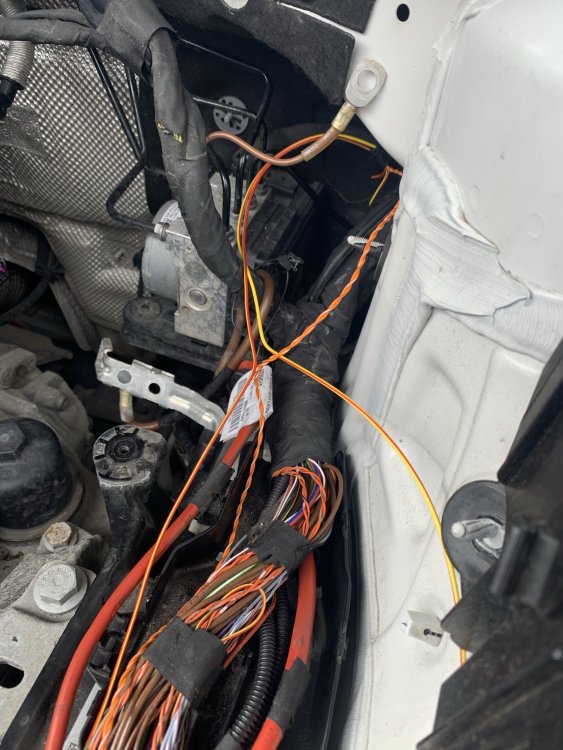
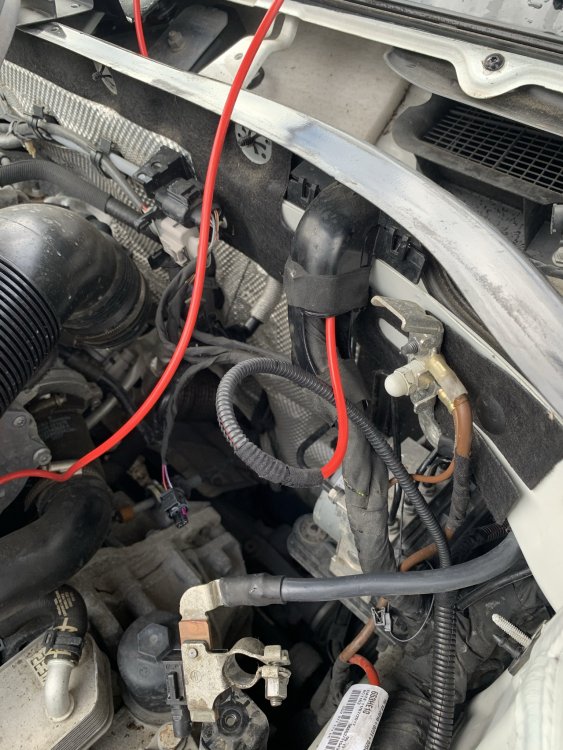
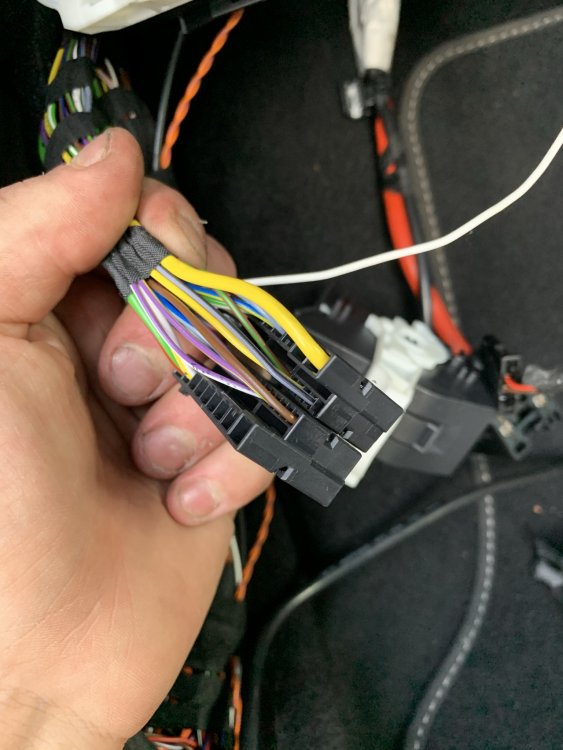
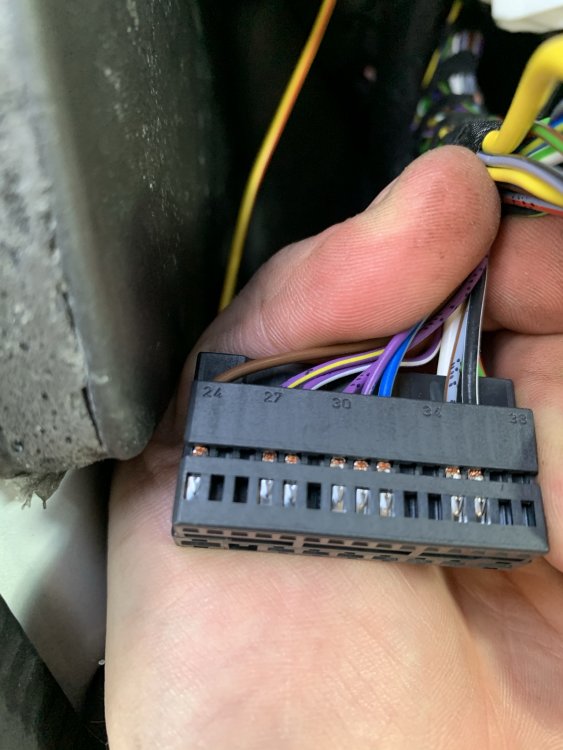
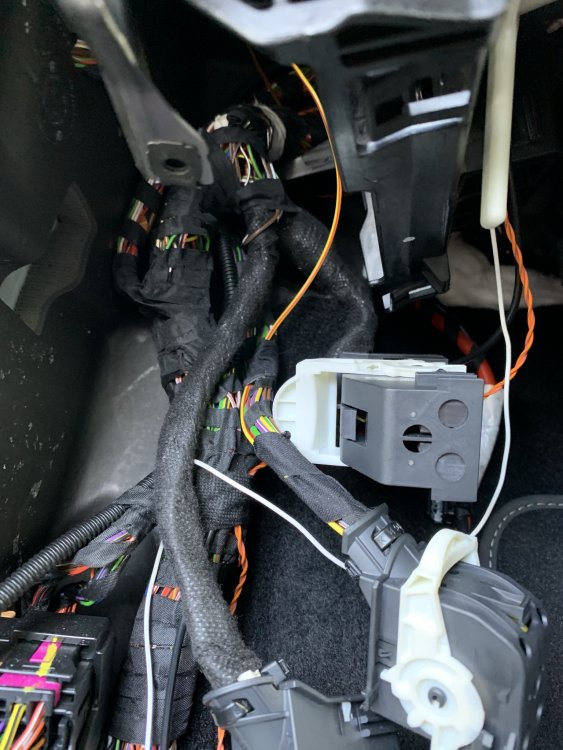
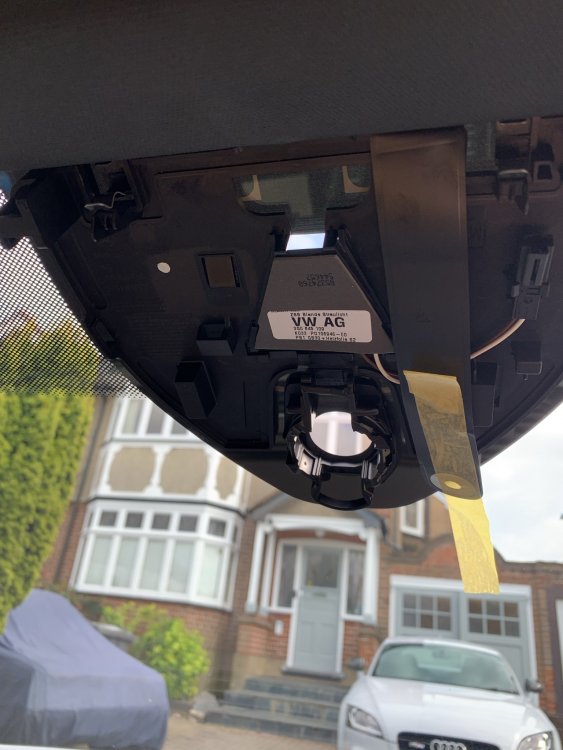
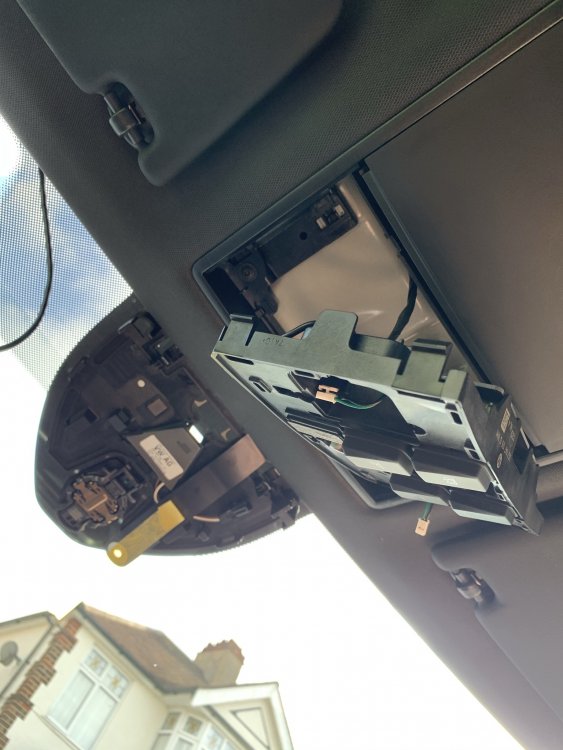
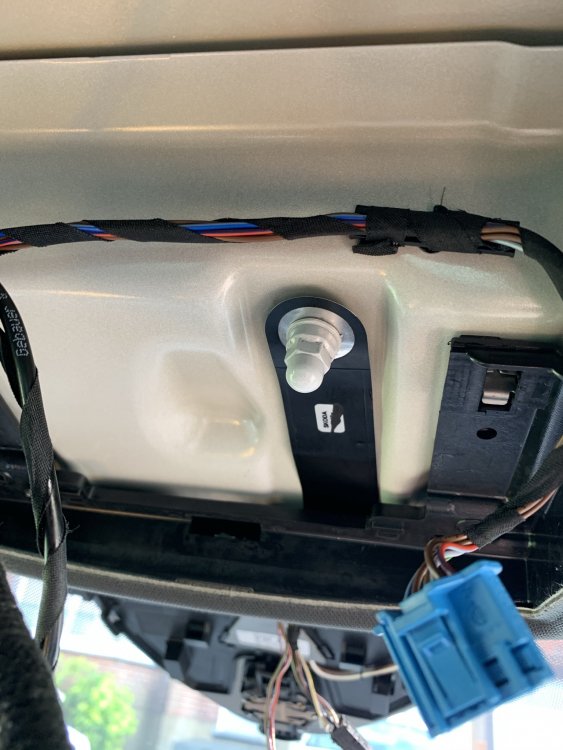
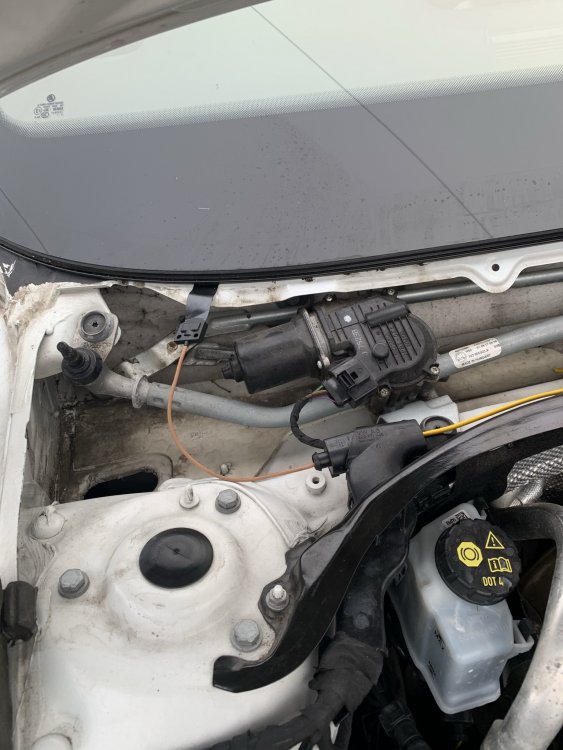
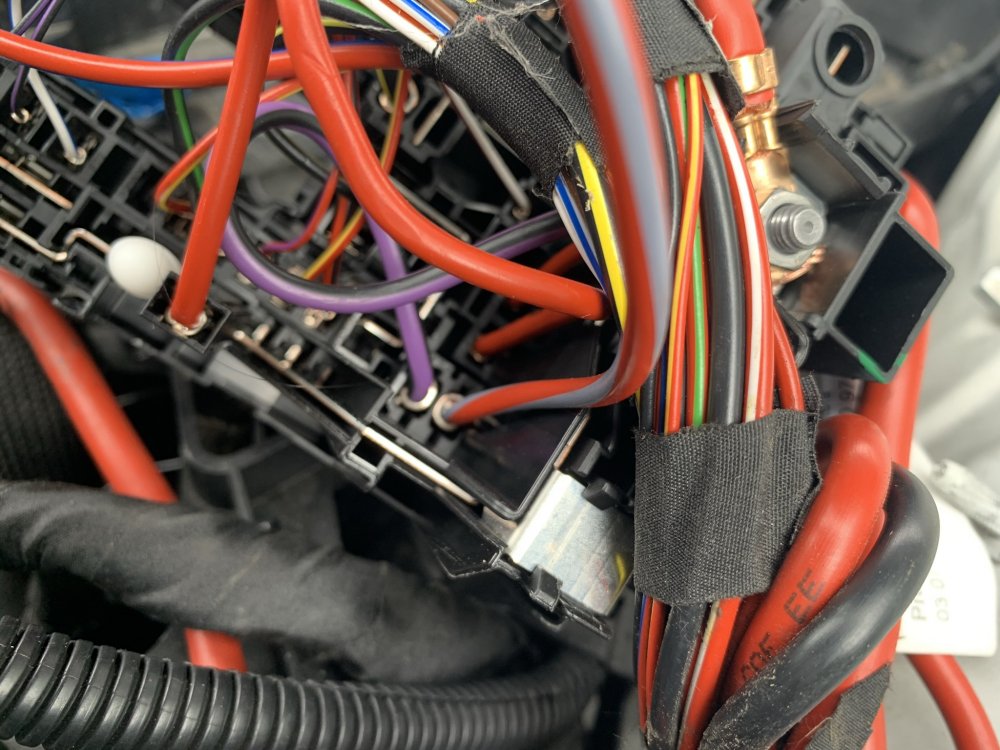
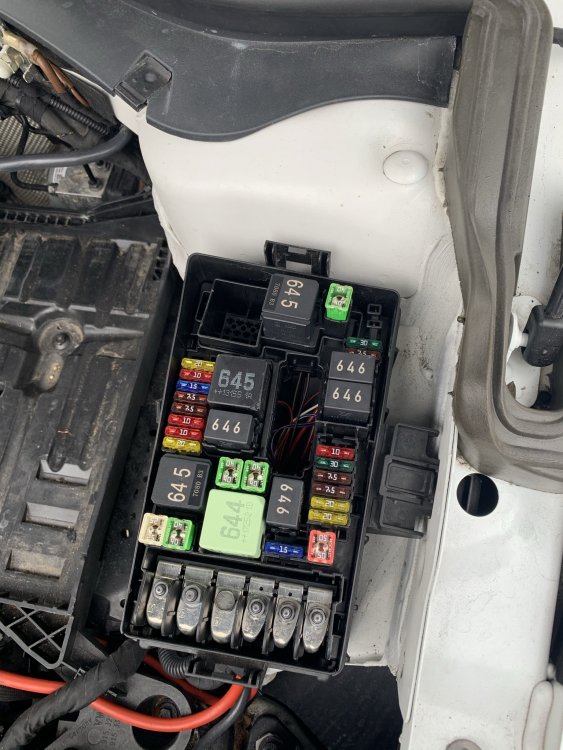
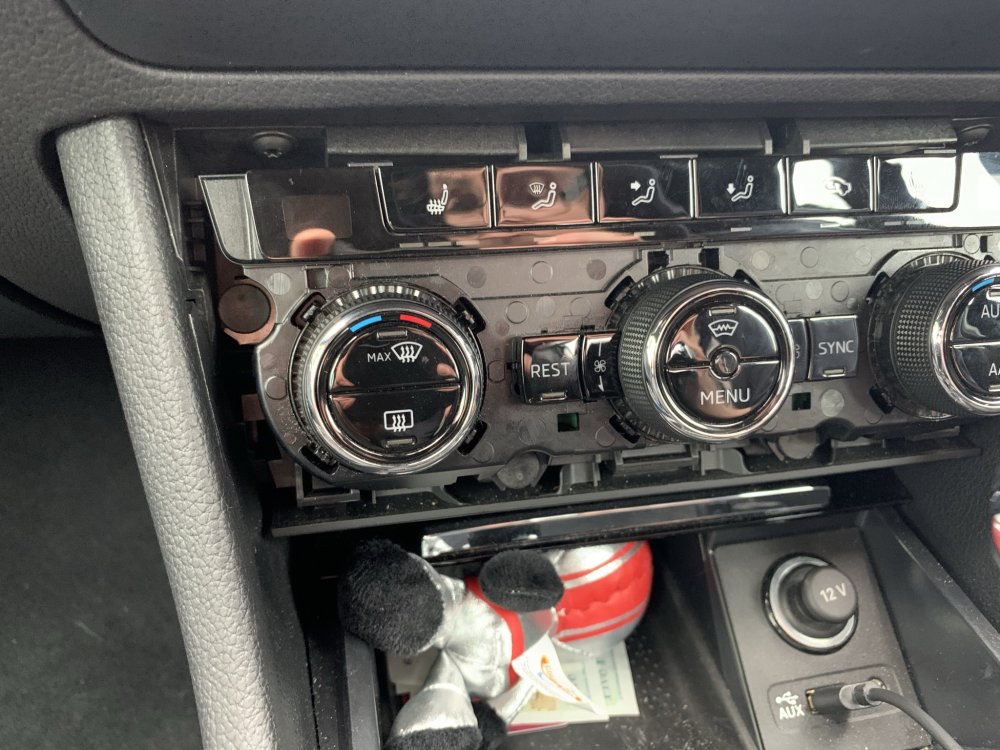
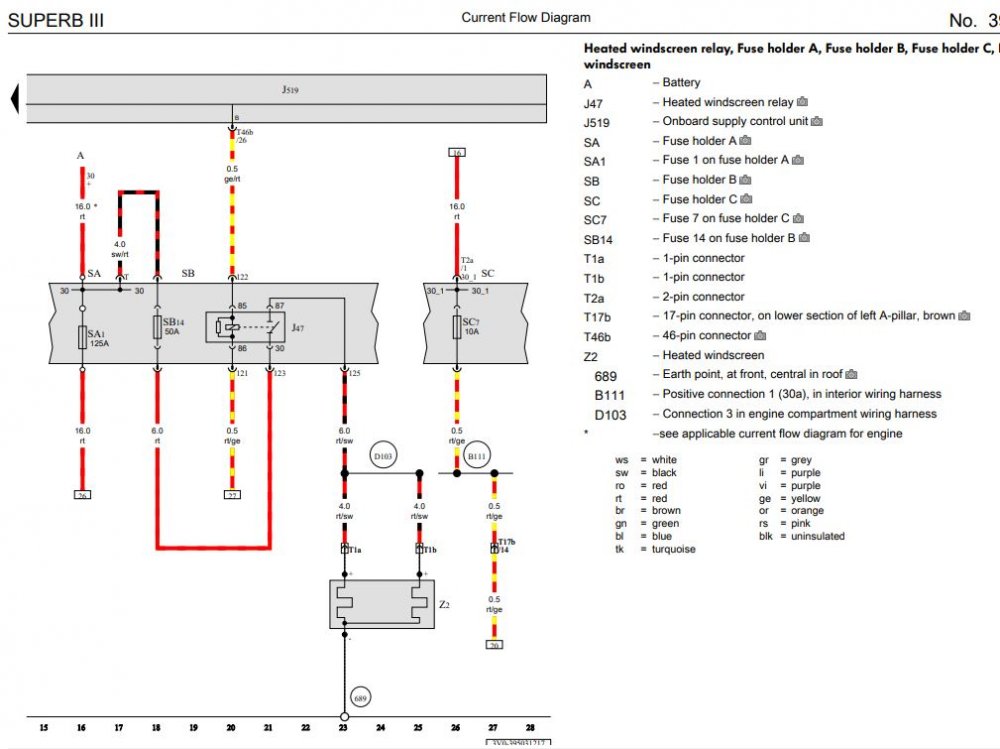
How to: Heated Windscreen Retrofit All of this is done at your own risk and is just meant as a general guide, not a full instruction manual. Just cause some things may work for my car may not mean the same for yours. Parts List 3V0845011AE - Heated Windscreen WITH A5 camera support - Will be different for everyone so confirm it first! 3V0907044DA - Dash Control Panel with heated windscreen button - Will be different for everyone so confirm it first! 071973851 x2 - Large Plug Housing for Heated screen connector 000979307E - Pins for large plug, comes with 2 pins so only order 1 000979425E - Pins for relay with 6mm wire attached, comes with 2 pins 000979027E - Pins for relay with 0.5mm wire attached. comes with 2 pins 4H0951253A - 645 Relay for main current flow 5Q0937507D - Relay holding plate, my car already came with but heres the part number 000979424E - Pins for Jtype fuse in engine bay fuse box with 6mm wire attached, comes with 2 pins N91186305 - 50A Slow blow fuse for heated screen 6mm repair wire - Only required 2 meters to be on the safe side (red) 0.5mm repair wire - Yellow/red repair wire 5m 0.5mm repair wire - Red/yellow repair wire 5m Fuse box terminal - Was not required as it splices into already used OEM pin for climate control 000979009E - Small pin for BCM plug with wire attached Varied Conduit - For wrapping the under bonnet looms to give an OEM feel and protect them Loom tape - for wrapping wiring and securing inside and outside cabin Heat shrink crimp connectors - These are genuine repair methods so order both 1mm and 6mm versions Silicone - For sealing the exterior connectors You will need VCDS & ODIS for this or equivalents. Once you have your parts together and your screen is fitted you will have 3 additional connections, 1 in the headliner, 2 at the base of the windscreen. Wiring Diagram For anyone that fancies going alone and doing the wiring themselves, here is the only wiring diagram you need. Fitting ground wire To start you'll need to drop the front interior lamp, this is done by opening the sunglasses holder and pulling the trim off around the SOS button and around the interior light buttons. Pull the interior light unit out of the housing and if need be remove the torx screws to drop the entire assembly out of the way. Here you will see the 10mm ground stud with a nut on it, remove the nut and fit your ground strap before tightening back up - DONT go crazy as it will tear the strap. Run wires through bulkhead You'll now need to run your 2x 0.5mm wires through the bulkhead, this can be fiddly so a coat hanger of some kind makes the job a lot easier, to start, remove the battery and battery tray to expose the main wiring loom which will be under a plastic cover and disapear into the passenger rear most corner of the bulkhead, the best way to do this is to poke a small hole from the outside in with the coat hanger, then from inside the car, go up under the glovebox and behind the blower motor, you will just see the end of the hanger, attach a wire to it and pull it back through. It might take a few tries to get right and just make sure you don't tear the boot or damage other wires. These 2 wires will be going from the interior fuse box area to the under bonnet fuse box so run them either inside the original loom or use some small conduit to keep them protected under the bonnet from road grime and heat. Whilst you are here, get your 6mm red wire and run it from the under bonnet fuse box area, through the plastic casing under the battery, then up the loom which heads into the scuttle panel area. Again, protect this wire with conduit or run it inside the original loom. Wire up windscreen power supply Now you have the large 6mm wire in the scuttle area, you need to remove the wiper arms which is done with 2x 13mm nuts under plastic covers, once the nuts are off, gently press on the pivot point of the wiper arm to release the entire arm making sure not to damage the screen. There are 4/5 metal clips holding the plastic scuttle covers down, these just pull off. Then starting at the outer most edge of the screen where it meets the plastic, slowly lift to remove all the plastic covers. Do this on both sides to fully expose the lower screen/scuttle area. You should now see your 2 large connectors with brown wires running into the windscreen. You will need to run your 6mm wire to both of these. You may choose a different method but mine was; place the 4mm wire with male pins inside the connector and push the purple tab inside the connector across till it clicks, I then placed the connectors in a vice and filled the rear with silicone to prevent any water getting in. The yellow wire was then cut in half. I ran the red wire all the way to the drivers side of the screen and used a OEM crimp connector to attach the 4mm wire to the 6mm wire. For the passenger side, I cut some of the insulation off the red 6mm wire near the passenger side and soldered the wires together. You will need a big soldering iron for this as the wires are massive. Both connections should be water tight. Secure the new wiring to the original loom and play close attention to making sure the drivers side connector will not make contact with the wiper motor as this will rip the wiring apart. Also make sure the connectors are not sitting in the lower section of the scuttle panel as this gets full of water, the flat part of the connectors should not be kinked either as it will damage the flat wires. Refit all the plastic trim and wiper arms - Use the dirty marks on the windscreen to line the arms back up, short wiper always goes on the passenger side. Wire up interior fuse box Next we are back inside the car and need to remove the glovebox to access the rear of the fuse box. This is done with around 8 torx screws both under and inside the glovebox, slowly lower the glovebox and make sure to disconnect all plugs. I also disconnect all plugs for the infotainment system and move the glovebox completely out of the way to give yourself more space. Now you should see your 2 wires that came through the bulkhead, we only want the red with yellow trace wire right now. Run it neatly towards the fuse box, pull the fuse box forward using the small plastic tabs giving enough room to access the back of it. At this point remove fuse 7 which is a 10A one. Find the red/yellow wire behind the fuse box that goes into fuse slot 7 it will be on the top row, this is where we want to splice our own red/yellow wire to. Make sure to use heat shrink and solder or OEM crimp connector. Place the fuse box back but DO NOT refit the fuse yet. Wire up body control module This will be our last wire under the glovebox area which is our yellow with red trace wire. You will be able to see the body control module (bcm) on the left hand side of the fuse box, it will look awkward to get to but the trick is, it doesn’t need to be fully removed. Where the lower foot well trim meets the side trim you will want to pull up on the side trim, this means you can tell pull the footwell trim out of its clip and remove it fully, once this is out the way you will see a big group of connectors we don't need any of these but instead, you should be able to see the BCM plugs directly above this group of connectors, 3 big plugs, we want the centre one, once the white locking lever is pulled down, you can pull the connector out of the unit then down a track and it will come out under the BCM area, cut the cable tie on the plug if there is one, press the 2 locking tabs in and release the inside of the plug. You will now want to run the yellow/red wire neatly to the plug you have just stripped down, attach the very small pins wire to the end of the yellow/red wire using solder or an OEM crimp connector. The plug you now have will be numbered for each pin hole, you are looking for pin location 26. Insert your pin into this until you hear a click, put the plug back together, secure your new wire to the loom and refit the plug in the opposite way to what you took apart. Refit all the trim at this point, including the glovebox unit but NOT THE FUSE - if you put the fuse back in with exposed wires under the bonnet you will blow it. Wire Up Under Bonnet Fuse Box You will now have your 3 wires at the under bonnet fuse box, you want to cut the cable tie where the wires run into the fuse box and then remove the inside section of the fuse box, this is fiddly as the little clips around the outside are a very tight fit. Once you are in and you can access the underside of the fuse box. In your parts pile you will need to find your 2 sets of repair terminals, all 4 ends will have the same terminal but 2 will be thick wires, 2 will be thin. Cut these in half so you have 4 individual wires with terminals. Attach the thin wire ones to the red/yellow and yellow/red wire. These need to be inserted into the correct relay points. Refer to the photo below which is the brown wire and yellow/red wire you see in the photo, they can go in either slot. This leaves us with 1 more red wire which runs to the windscreen, crimp one of your last 2 big terminal repair wires to it and insert into the LOWEST yellow wire point you see on the relay. Youre nearly there now! You now need to take your 2 large flat male pins with 6mm wire and you will need to cut this in half, this will leave you with 2 large male connectors and 1 large female connector all with 6mm wires. Join one of the large male and female wires together with a wire length of about 10cm. The female end will need inserting into the top relay connector which is pictured with a yellow wire. The male end will go to the fuse holder, this is shown in my picture with a red wire with grey trace and it shows where it must go, take note it will only go in one way round. The final wire which is 1 last big male terminal will need inserting next to the one you just inserted, this will give you your 2 pins for the fuse. The other end of this wire I placed securely under one of the large nuts with a red wire already attached to it. This is to supply the 12v constant supply required. This is shown pictured as a purple and black wire. Make sure all wire strands are secured and none are left to short out anywhere. At this point you can now insert your 645 relay and your 50A fuse. Put all the fuse box back together making sure no wires get caught anywhere, refit all trim, battery and everything else you took apart. You can NOW fit the 10A fuse back inside the car by just dropping the glovebox down, release the hinge on the side and with the 2 clips inside it it will lower to access the fuse board fully. That is all the wiring done! Only 2 more things to do now. Change display unit At this point you should have your new climatronics panel with the heated windscreen button. If you couldn't work out which one you needed, drop me a message. The key is 4GW = Heated front screen. First you will want to connect your VCDS to the car and SAVE YOUR CURRENT LONG CODING for module 08. If you don't do this, you'll run into trouble. Now remove the old unit, pull the plastic trim from underneath to remove it, then do the same with the actual unit no screws, just clips, remove the 3 connectors on the back and fit your new unit in the reverse order. You will notice that you cant turn the fan on or do anything with the heating yet. Don’t panic. Coding Once this is all done you can relax and just do the coding side of things now. Connect ODIS/VCDS to the vehicle and run the basic settings on the unit, this will teach the new unit your heater flap positions. Now put your old long coding back into the unit to save time and make sure everything is how it should be. You now want to open the long coding to make your modifications as follows: Byte 5 bit 0-3: 04 Windshield Glass A/C Comfort Glass [PR-4GW] Byte 11 bit 0: Windshield Defogger/Heater installed [PR-4GW] At this point, clear codes, turn the car off and lock it up for 15 minutes to allow the car to reset the canbus network. Get in, start the car and just confirm the heater is all working again as it should be. The windshield heater will not turn on but the button will flash at this point when pressed. Go to module 09 which is your BCM, Enable security access and go to your adaptations, you are looking for IDE04927-ENG142021-Window heater-Heizbare_Frontscheibe this needs to be changed from Not installed to installed. And that is it. You are all done, heated windscreen fully working. Some of you may notice the empty ADAS A5 camera spot, hopefully another guide for that will be coming in the near future as i fit it all up. Any issues with the guide or comments, let me know.


 1 point
 -
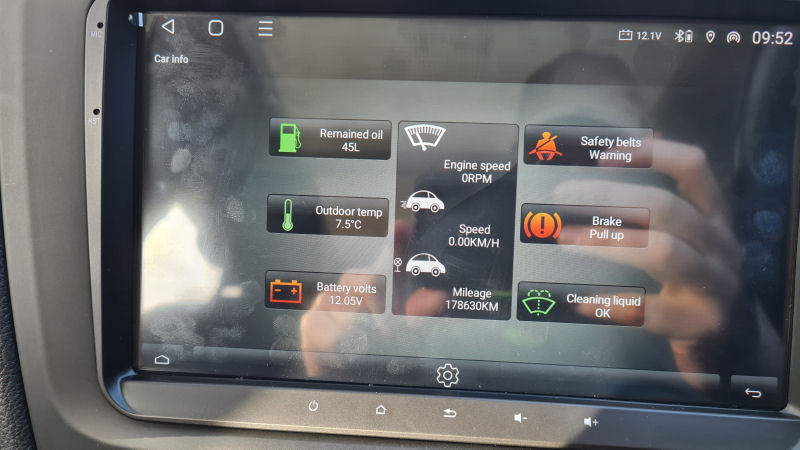
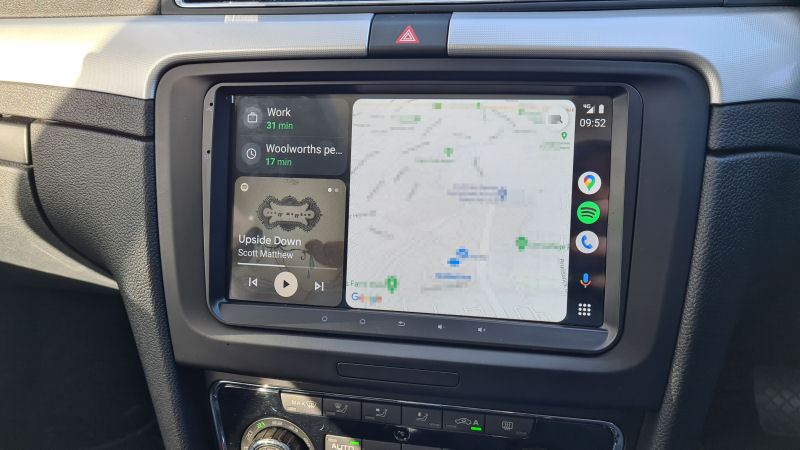
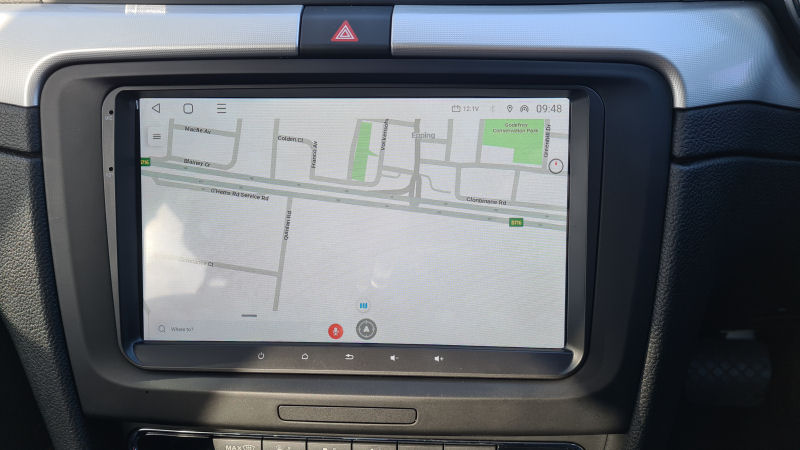
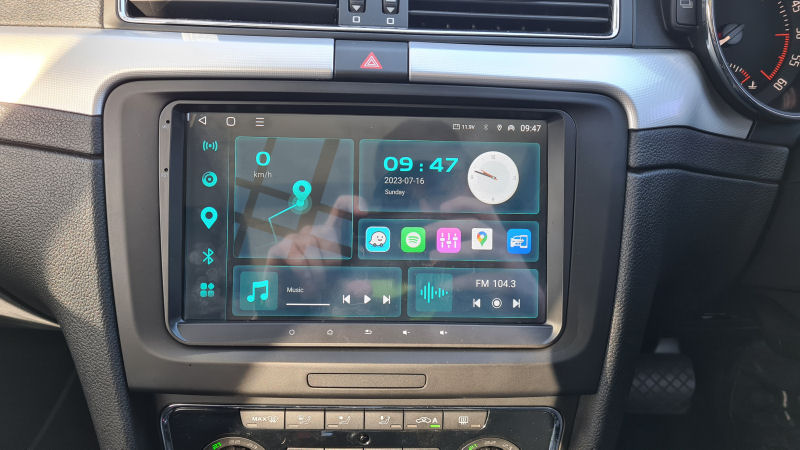
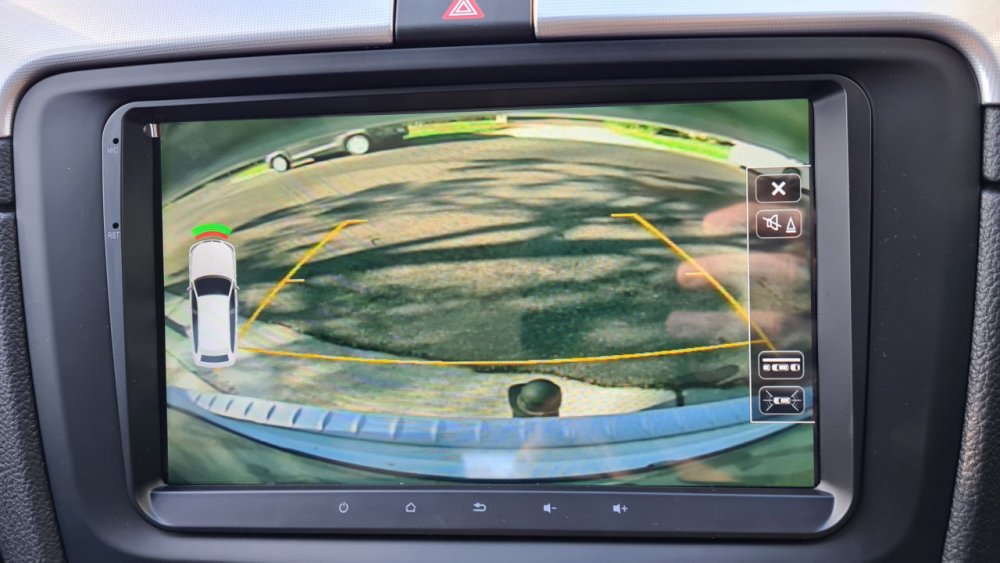
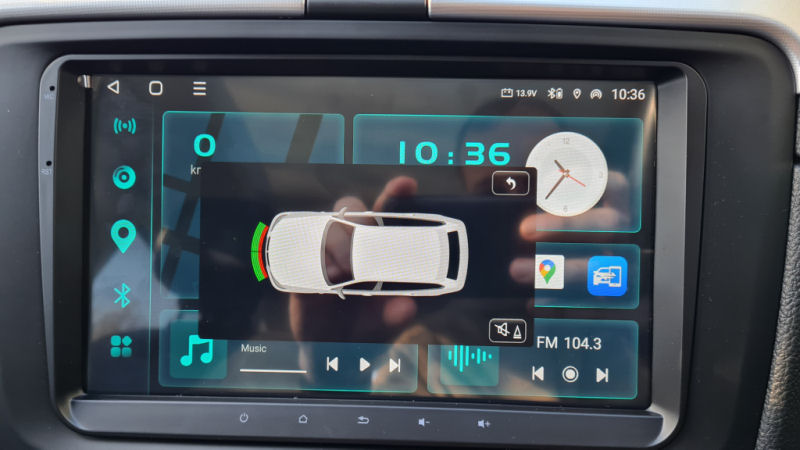
Our 2013 3T Superb Elegance Combi came with the RNS-510 (Columbus) and the amplifier under the passenger seat. I added a Tiguan handle reversing camera about 6 months into ownership. The RNS-510 is really showing it's age so it seemed like time for an update. I gambled on the Eonon Q53Pro as it claimed to 'Work with Fender Audio' which in some markets is what Volkswagen calls the amplifier package. Turns out, yes it does, with no config needed. The unit works well: - Android Auto and Carplay work fine, flawlessly in wireless mode. The Android Auto seems to be a bit flakey in the wired mode but Carplay was fine in wired mode. - Worked with the amp, no special wiring or adapters other than what was supplied needed - Came with a dual-fakra socket to handle the dual radio antennas (some reviews mentioned that it needed a diversity adapter as it had only one antenna socket, my unit came with the adapter) - It has configurable sleep. I set it to 1-day, so as long as the car is driven within 24 hours start-up is instant. Otherwise startup takes around 30 seconds - The reversing camera, I got the A0580 converter and it just works. The old camera looks low-def on the large screen of this unit when it looked fine on the (comparatively) tiny screen of the RNS-510. I might install the supplied Analogue High Def camera as that should have a better picture and in theory will be able to show maneuvering lines. - Steering wheel controls work fine. The volume can be a bit laggy some times but it does work. Skip forward and back are fine. - Ultrasonic sensors work fine and have the car-info on screen, both front and rear - Bright/dark etc works automatically with headlights. Unfortunately this unit only has red-button illumination. I understand the newer unit has configurable button color - The mic that came with it for hands-free is ok but not great. I'll probably make a near-field cancellation circuit and replace with that. - Sound quality is fine and super-configurable. The tired 10 speakers in that car sound way better than they did on the RNS-510. An oddity is that there is no working front-rear fader. Fading to the rear results in no sound at all. It's not a deal-breaker for me. Yes, rear speakers are working. Bonus is there is a sub-out which I might make use of as I have a Blaupunkt active sub from two cars ago sitting in the garage. It came with a GPS patch antenna, but I got a Fakra to SMA adapter so I could use the inbuilt roof antenna. It works 100% I used VCDS to code out the old nav unit and bluetooth unit. This wasn't needed for correct operation, it was just flagging fault codes in the logs. Downsides (but none are deal breakers for me): - You can't turn it on without ignition being on. Once ign on, it will stay on until drivers door is opened. - Interface is wildly inconsistent both with styling between functions and some odd translations - Charging from the car-play USB port is very slow. I don't use it now, I use a proper QC capable charger and let Android Auto/Carplay be wireless - No 4g modem in this one. The newer unit does have this. - No SD card slot, although it has a spare USB port and you could plug mass-storage into this if you wanted. - Bluetooth data sharing: It seems to be capable of using the data from my phone via bluetooth, but it stops when the Android Auto connects and then to get it working again needs to be toggled and reconnected. - Fuel remaining is mistranslated as "Remained Oil". This is technically correct I guess as Diesel is fuel-oil - It does support pop-up of HVAC settings, but it randomly pops up when no adjustment has been made. I turned it off as the HVAC panel shows everything you need to know anyway - It supports a pop-up for door-open status, but it shows a generic drivers door open picture regardless of door and covers up the interface so you can't do anything else. I turned it off - The row of capacitive buttons below the screen are super-sensitive and easy to mis-press if you're trying to hit an on-screen button near the bottom of the screen. - I've not figured out how to set the AM radio to 9kHz channel spacings yet. Have emailed support to ask. - The old AUX port and the weird iPod connector thingy in the centre storage obviously doesn't work any more as it's not connected to anything. I don't think I ever used this anyway. Oddly, my iPod classic 160GB was still in there, plugged in and still worked. I forgot about it probably 5 years ago. - The volume control is a bit coarse. This may be an artifact of having the under seat amp, but the jumps between levels are significant. Some pics of the unit installed. It does poke out a bit around the edges but not obnoxiously so. So the point of this post is, if you're sick of your RNS-510 but like me were worried about the under seat amp, don't be. This unit was around $500 Australian Dollarydoos including the GPS antenna adapter and the camera adapter.
 1 point
 -
Not to my knowledge - on this range of tsi engines - and I’ve been on here a few years. One or two have had issues from timing belts not being done properly at dealers…1 point
-
1 point
-
I'm new to the Skoda world, and was unaware that this could have been an expensive problem that I may have bought myself into a month ago. It's a relief that I probably won't need to splash out a grand or so this year on a cambelt change. I would imagine this Karoq forum is maybe 5 years old, about the same as my 18 plate - in the history of this forum, has anybody posted first-hand that they have had a cambelt fail and consequently suffered the massive bill it entailed?1 point
-
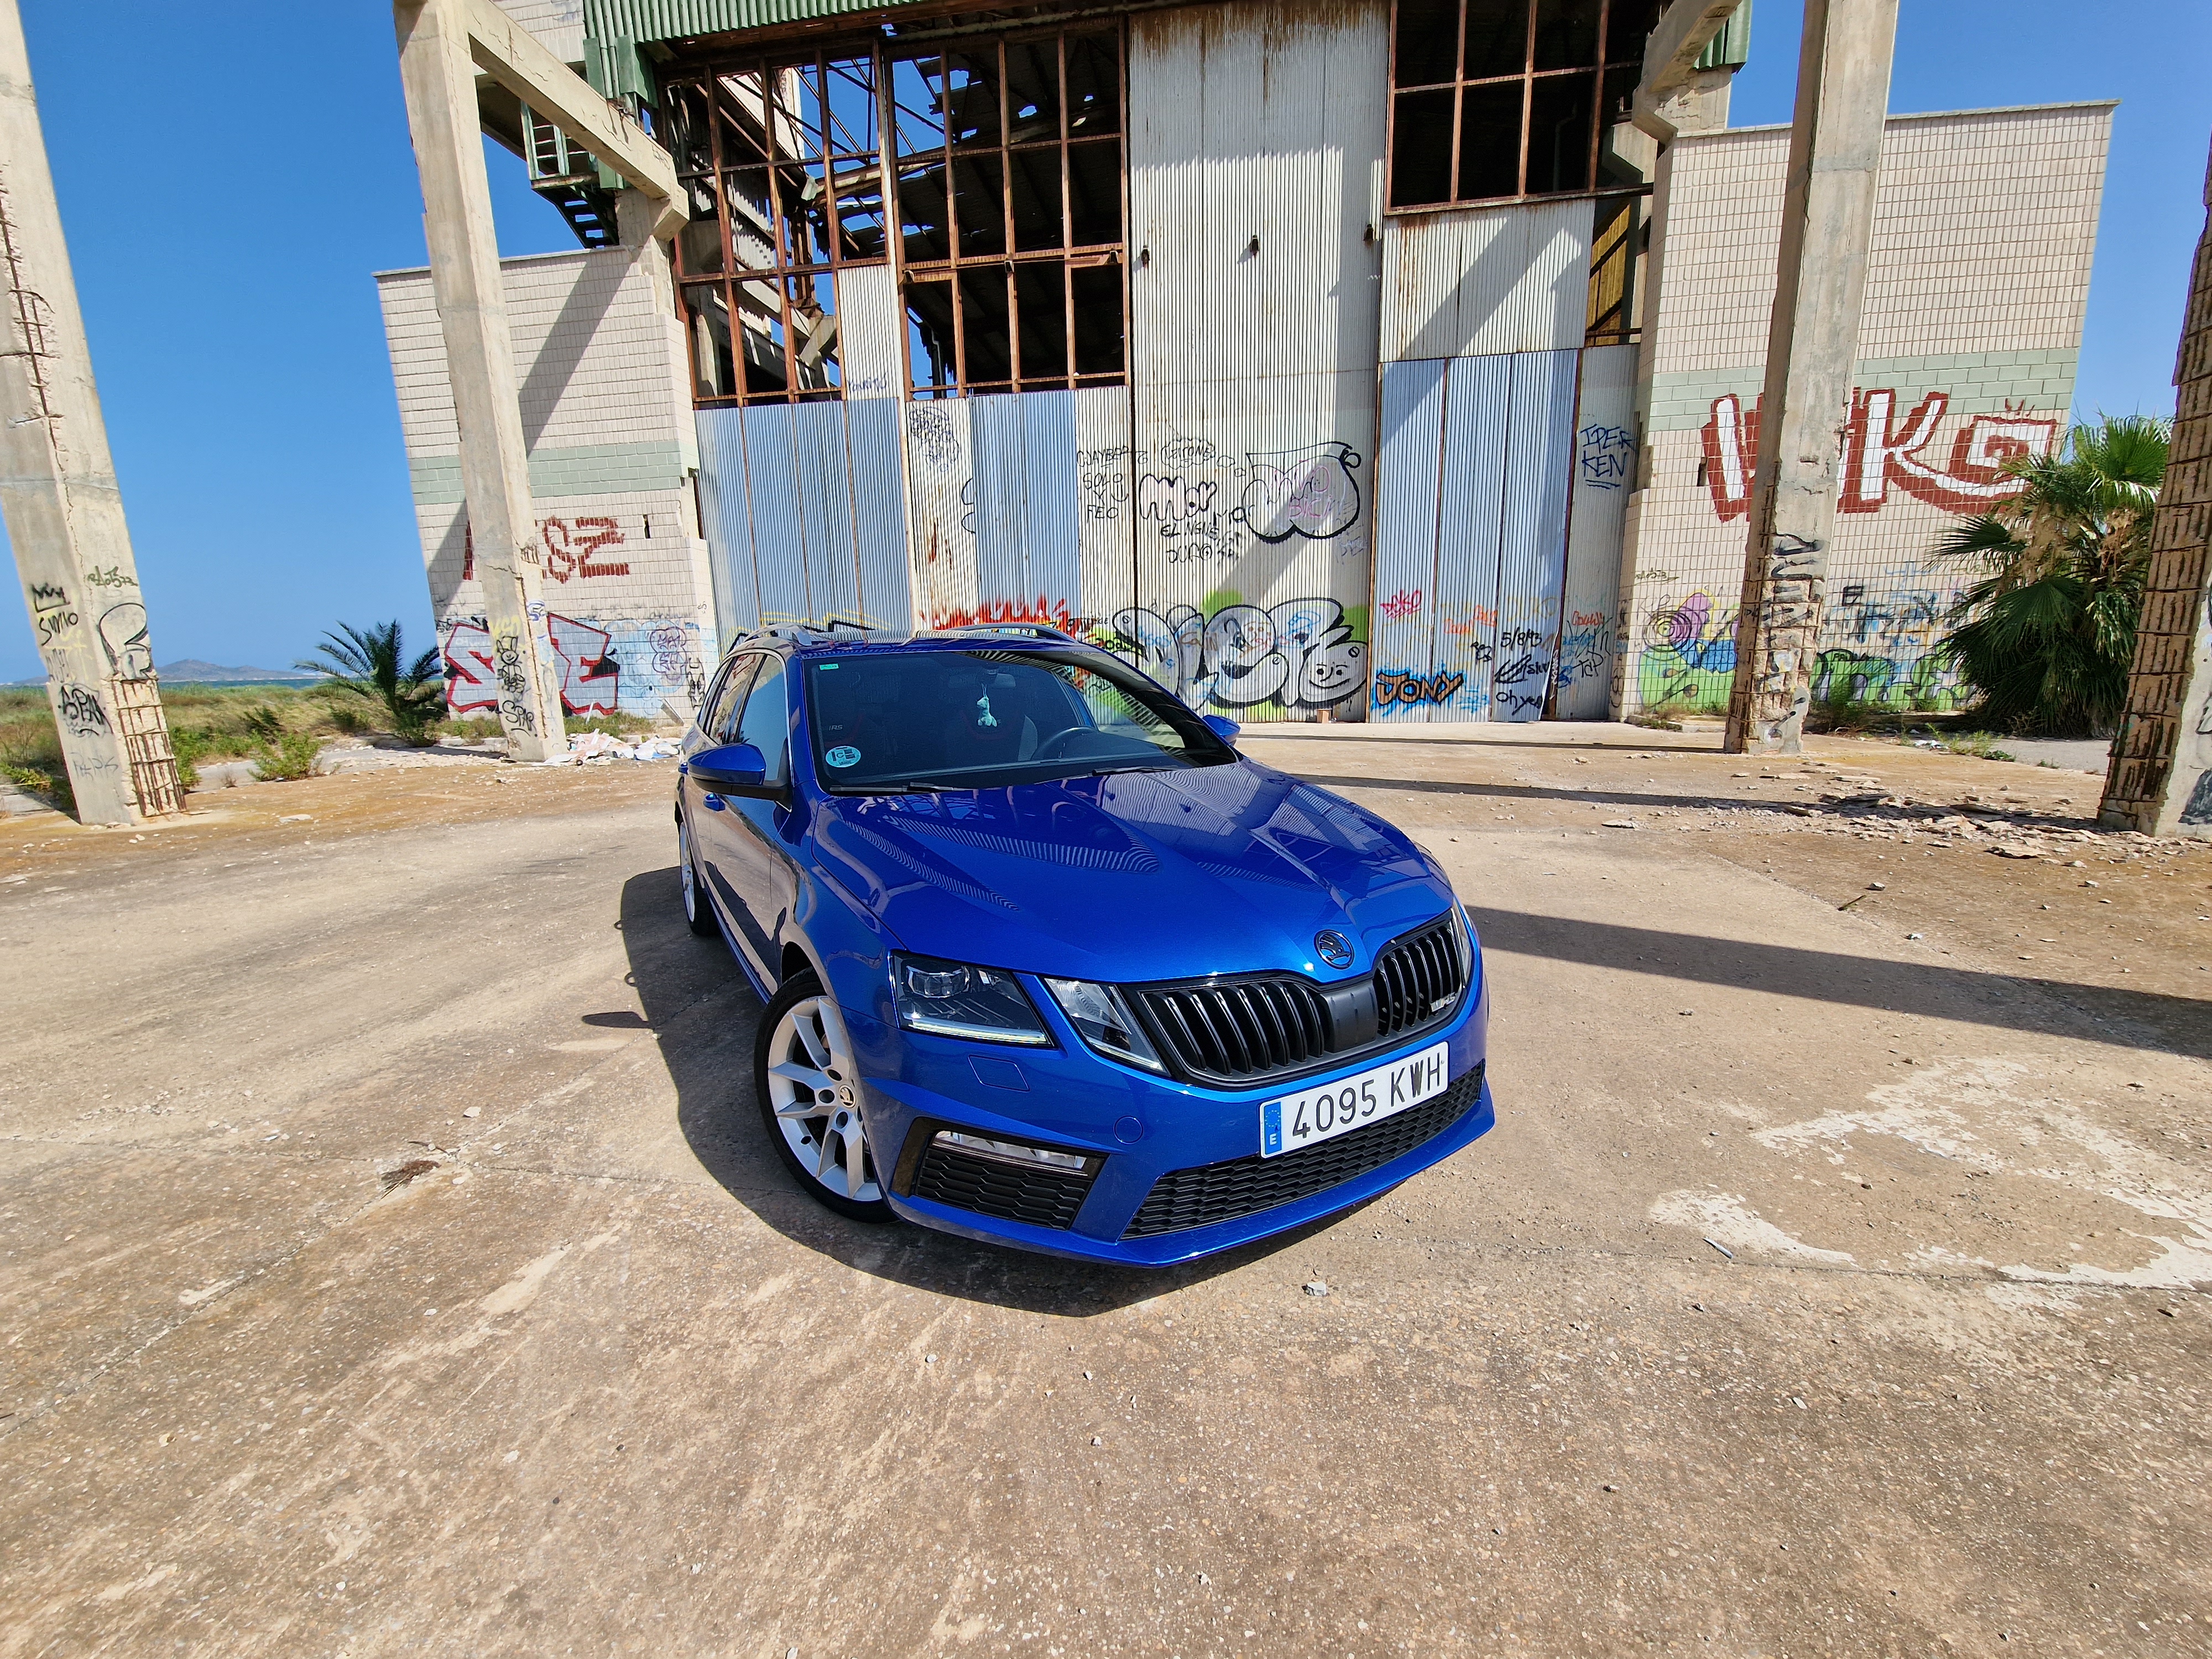
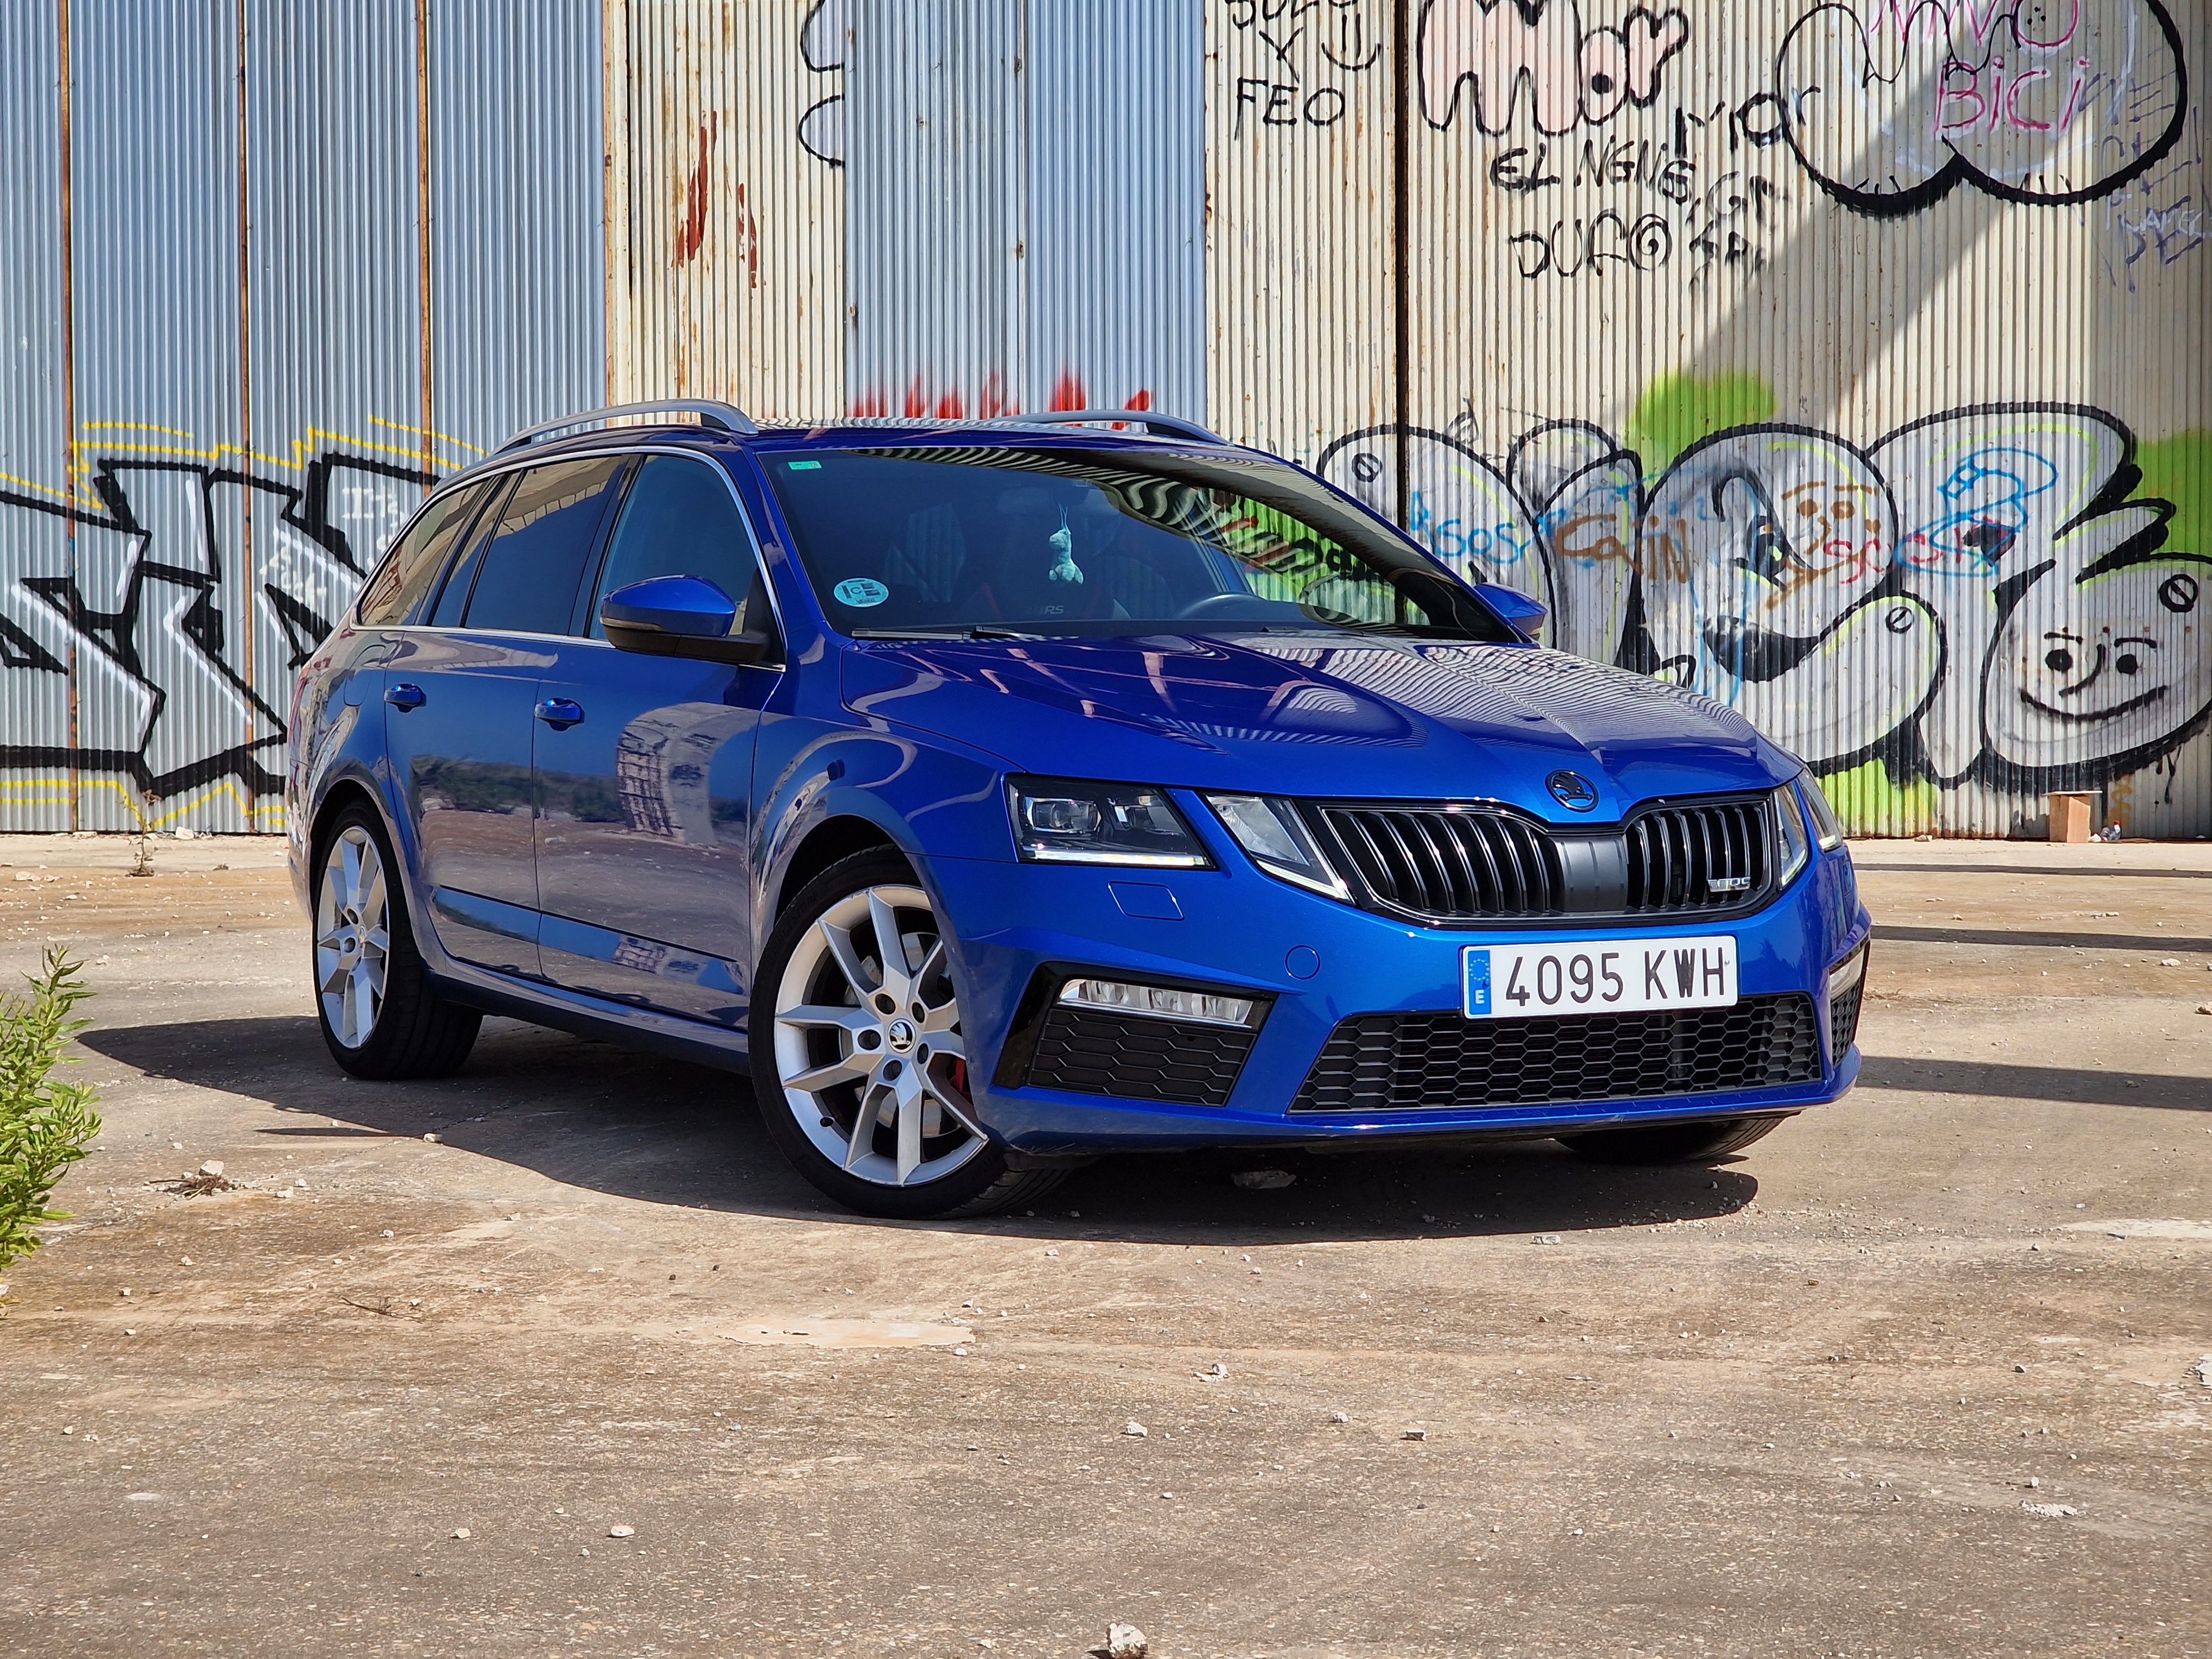
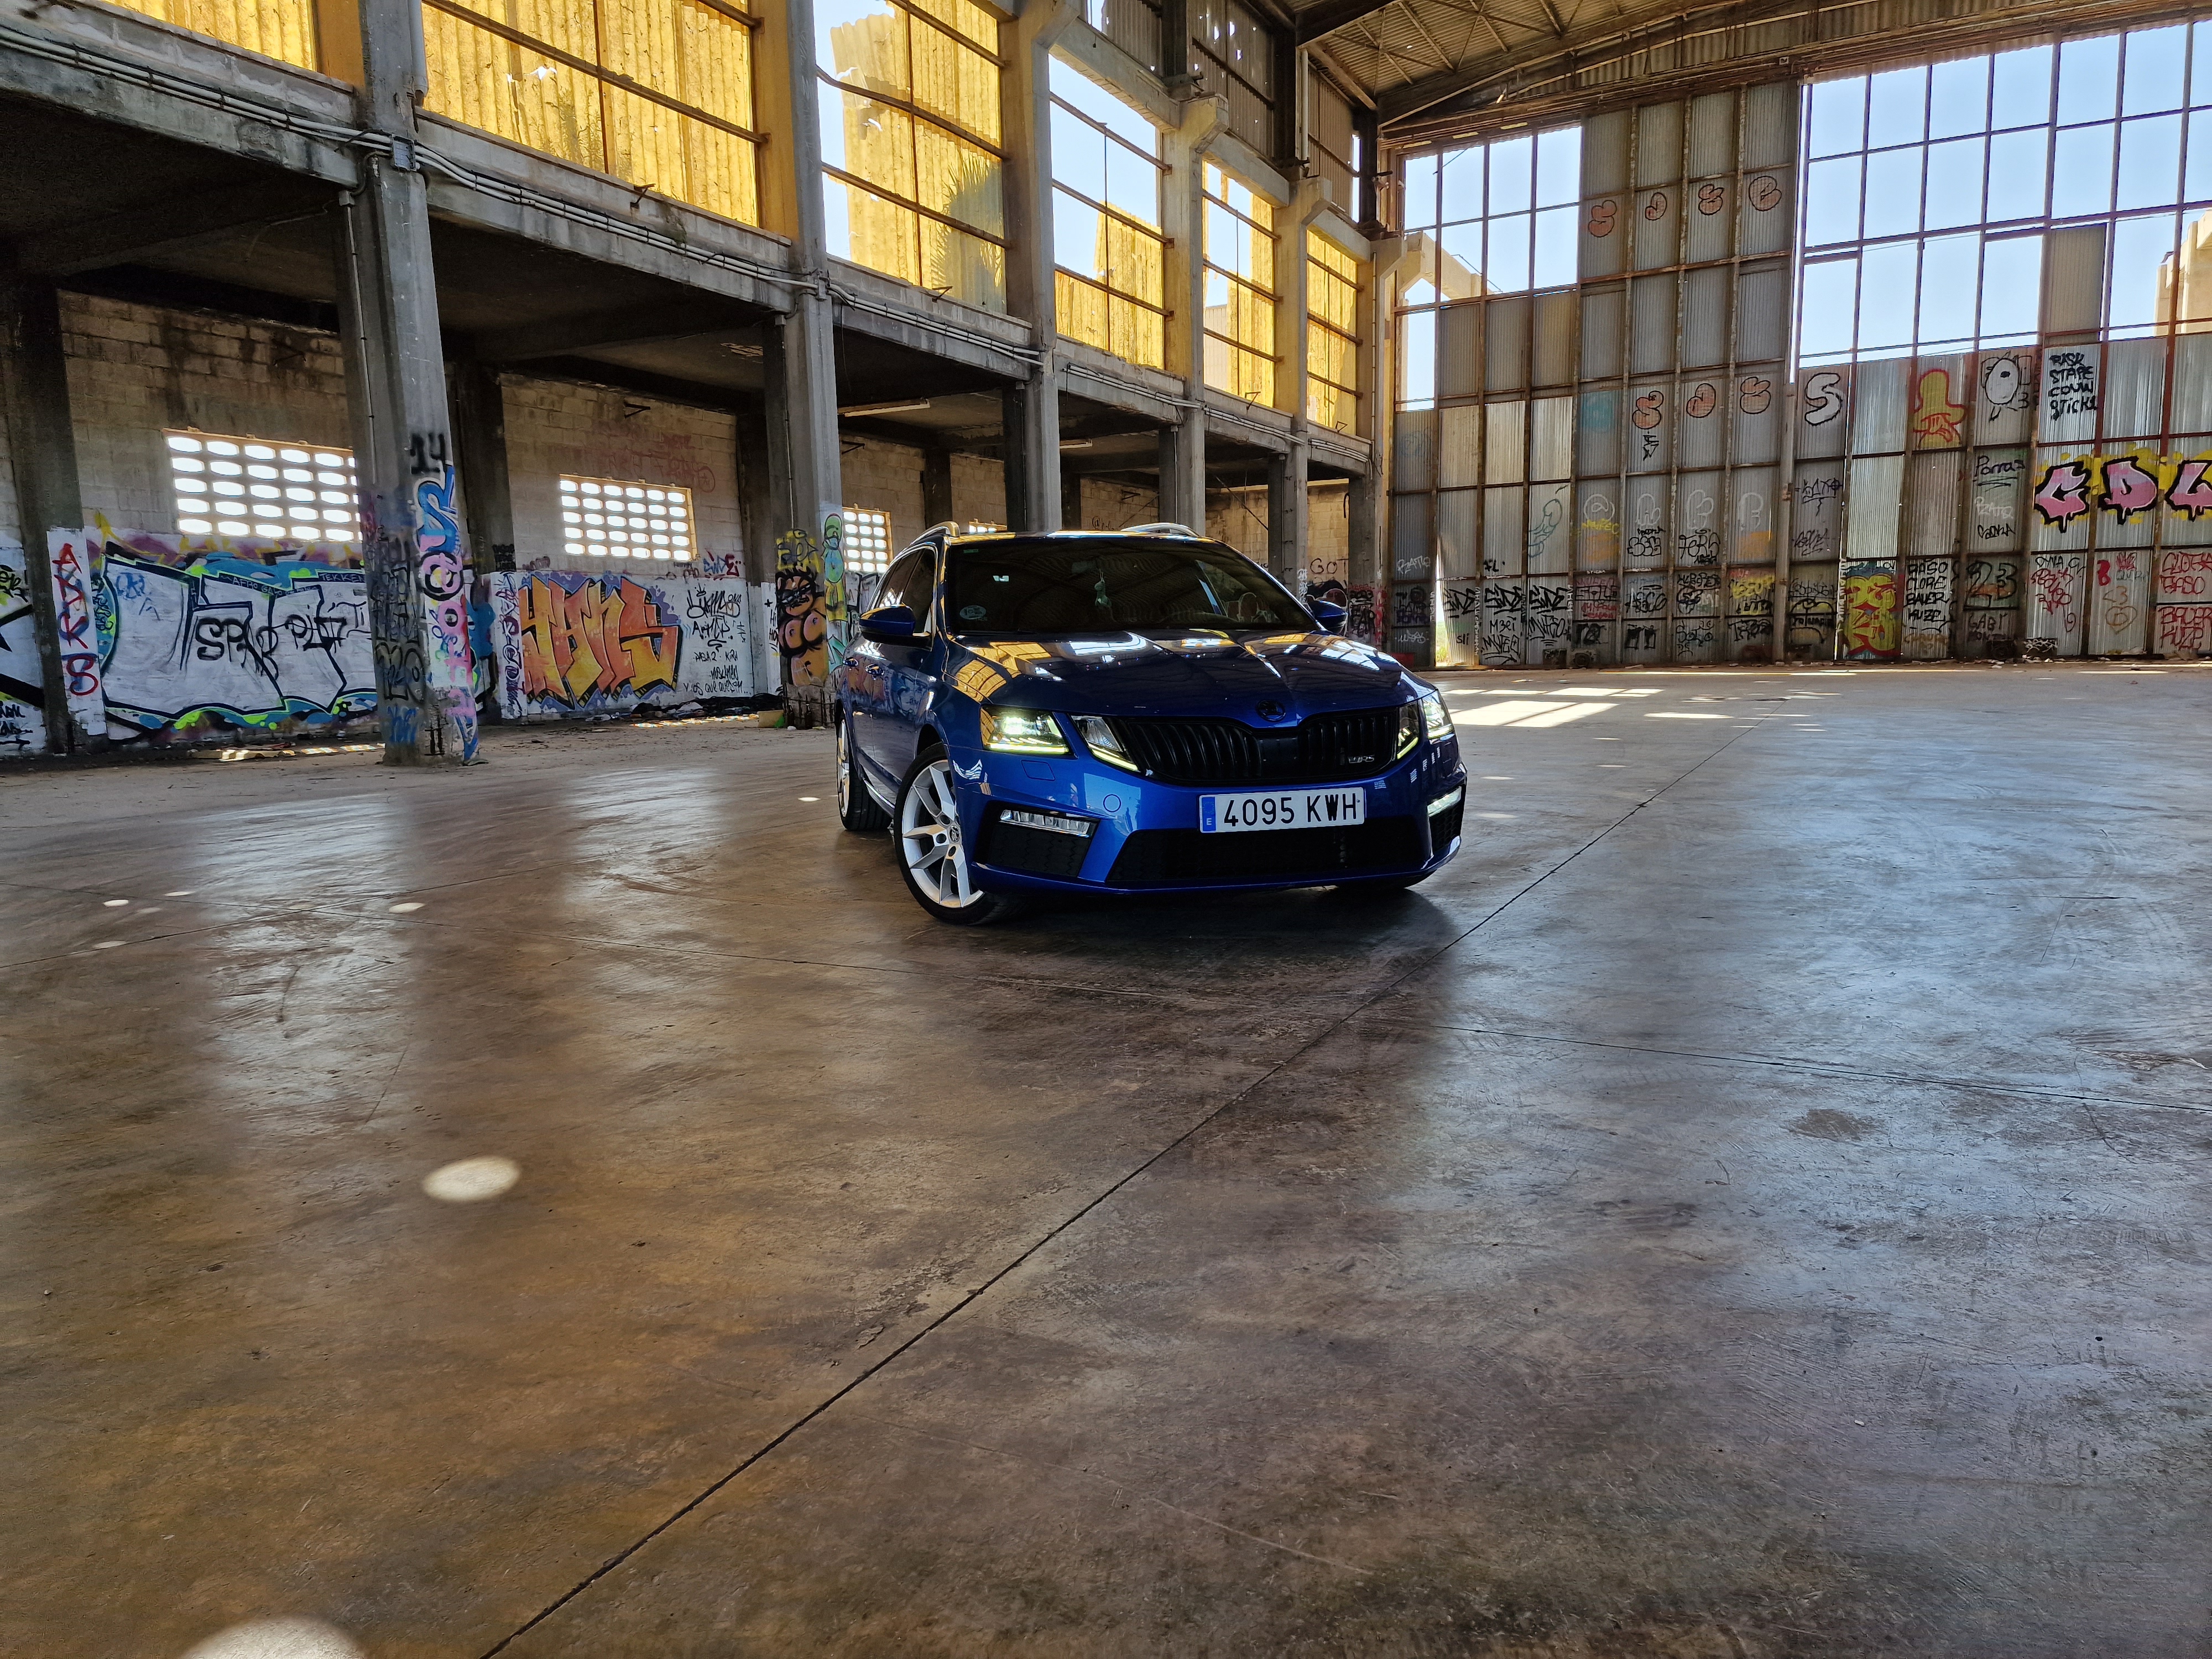
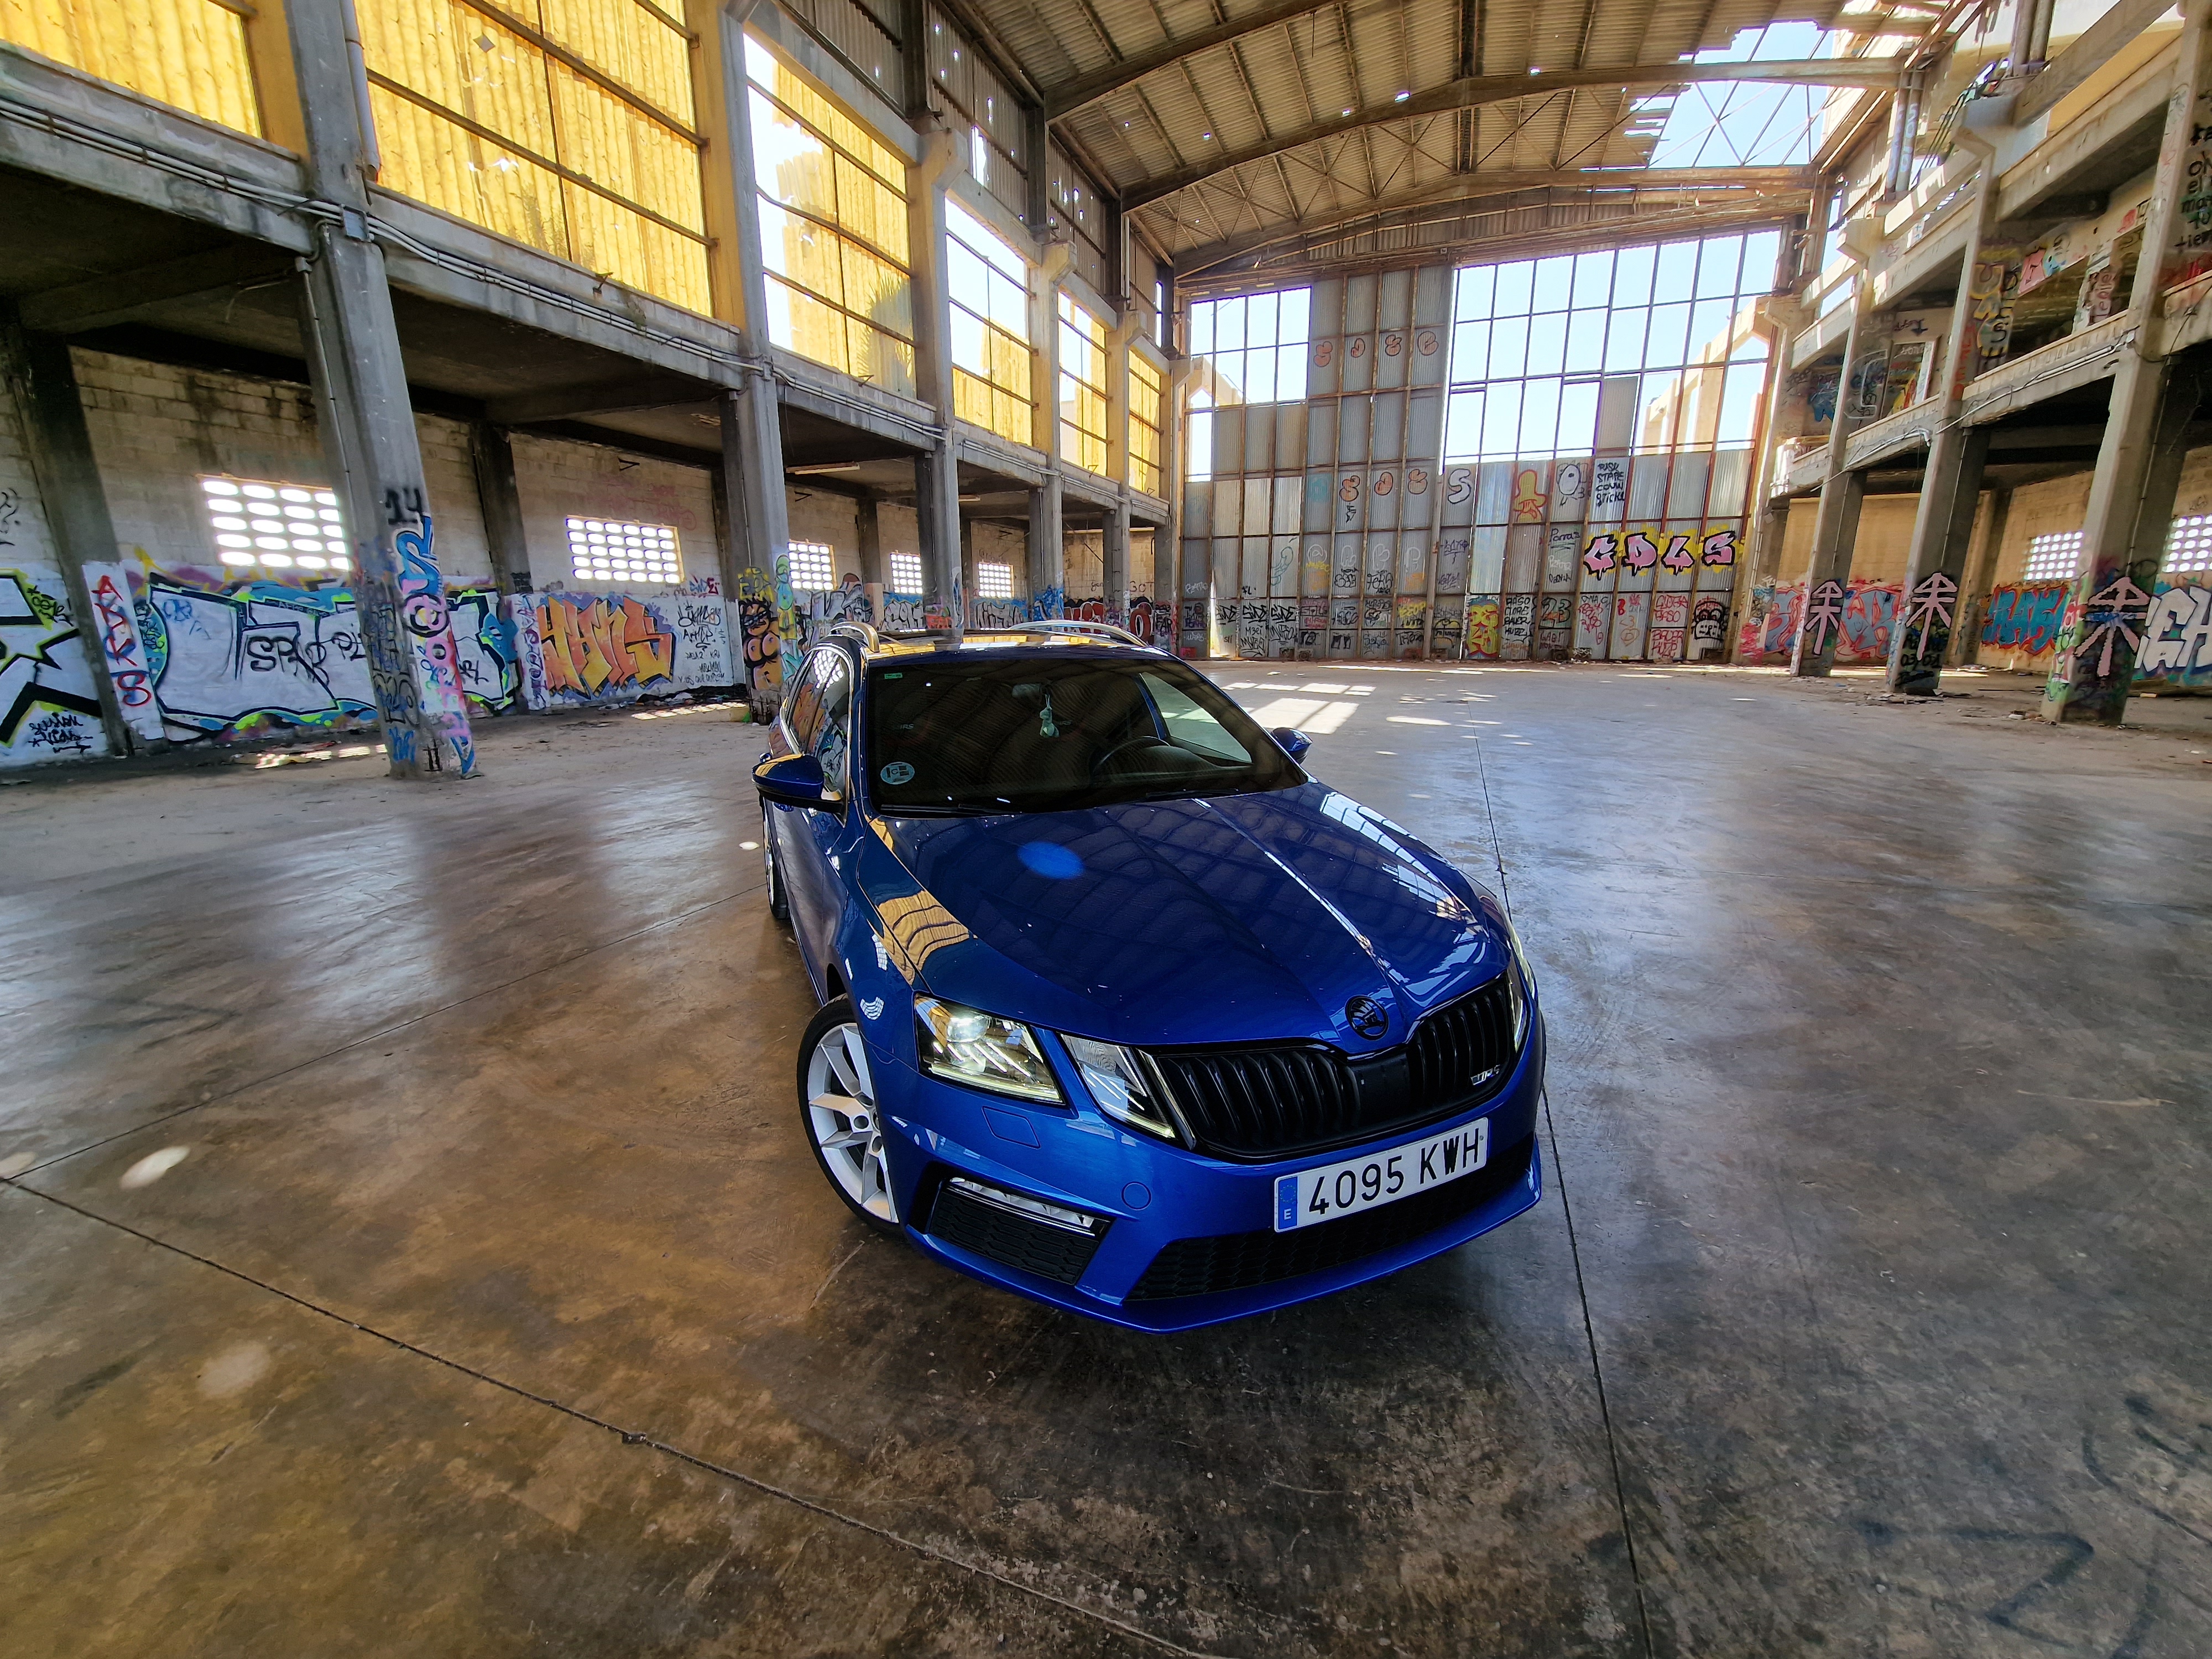
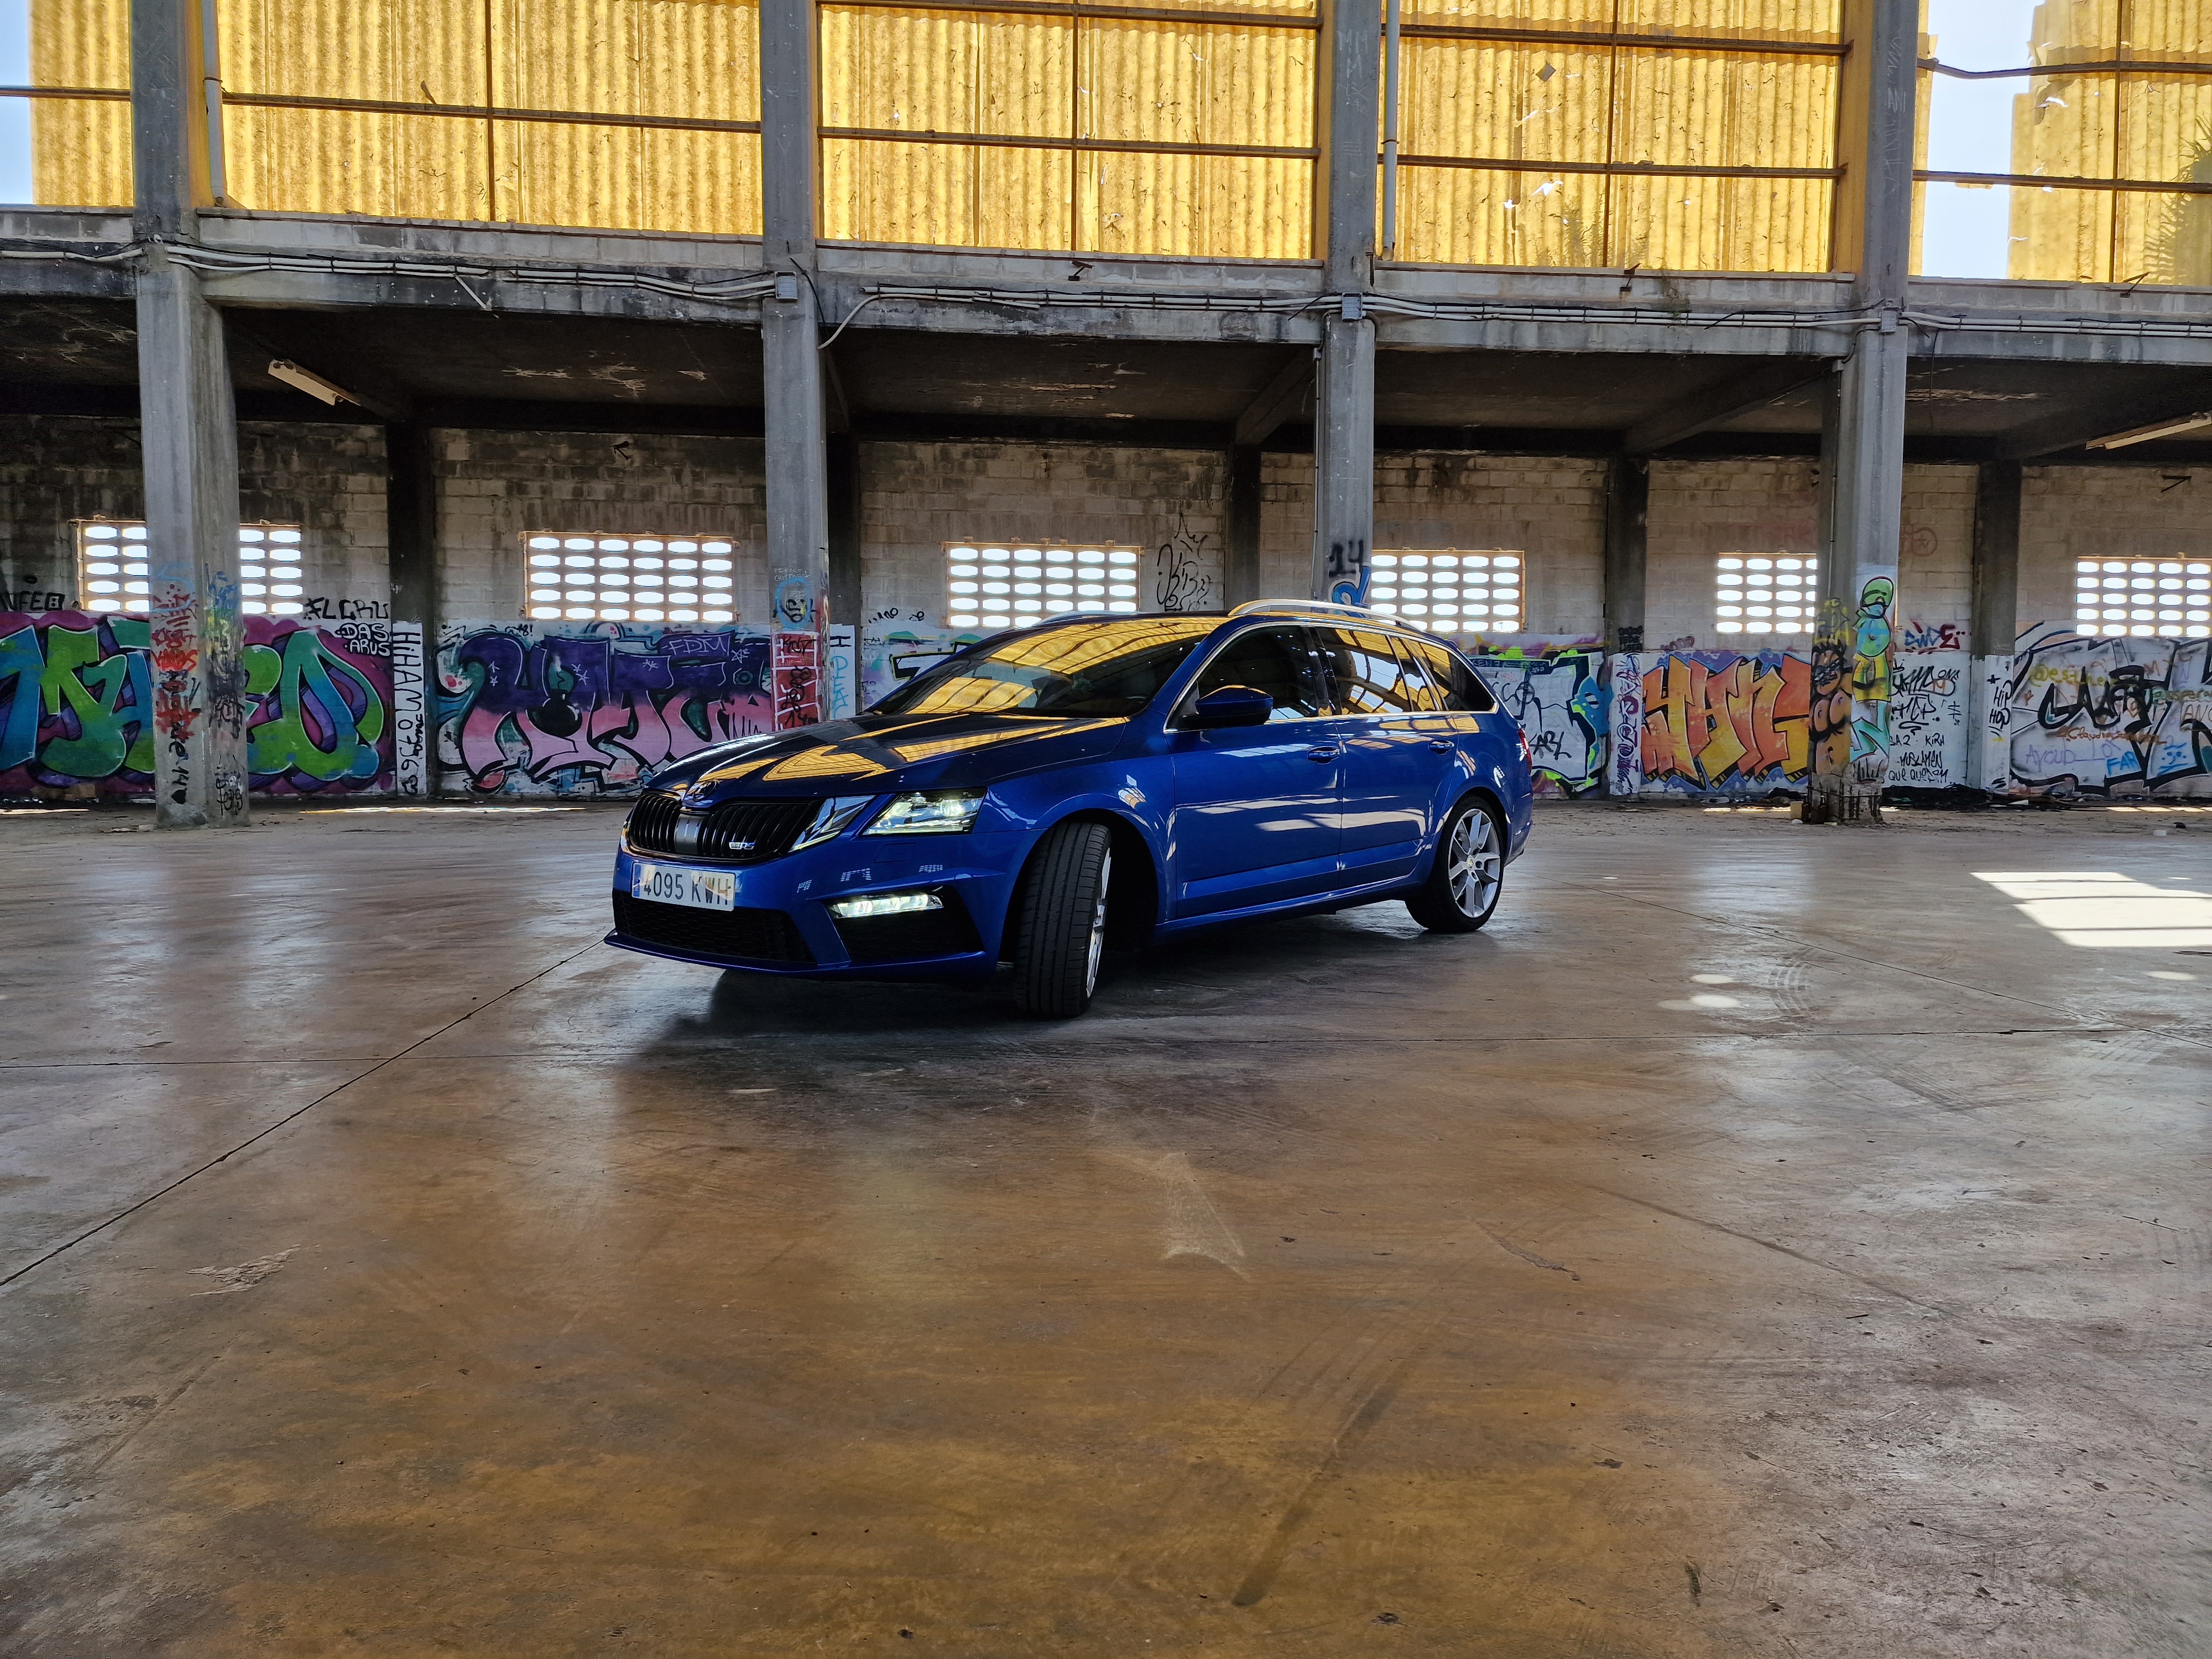
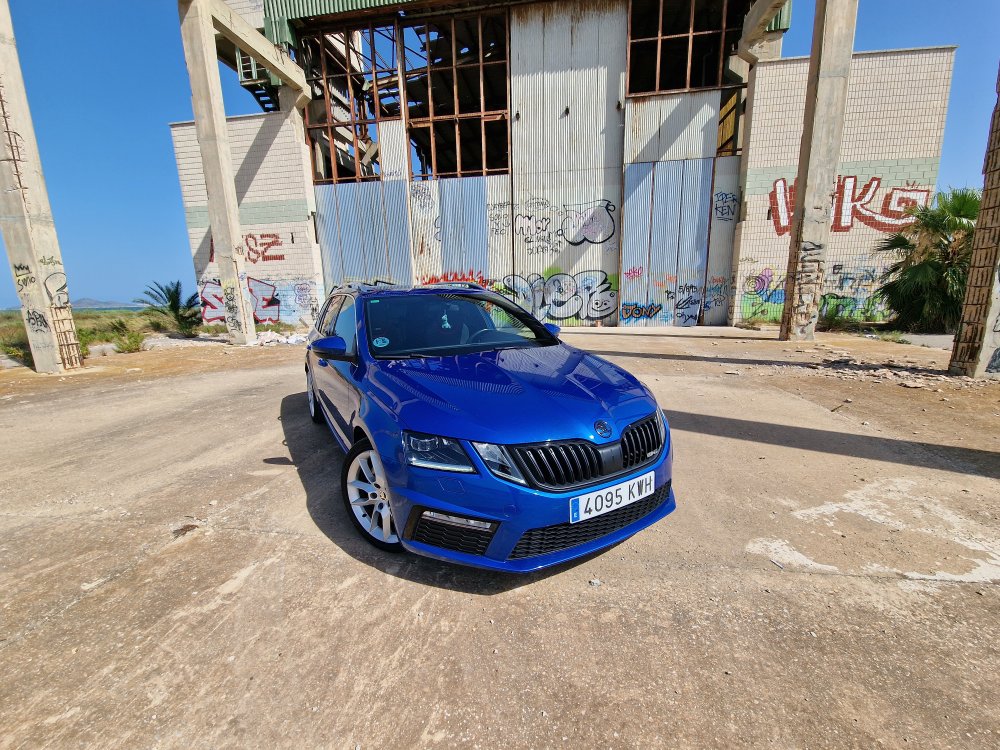
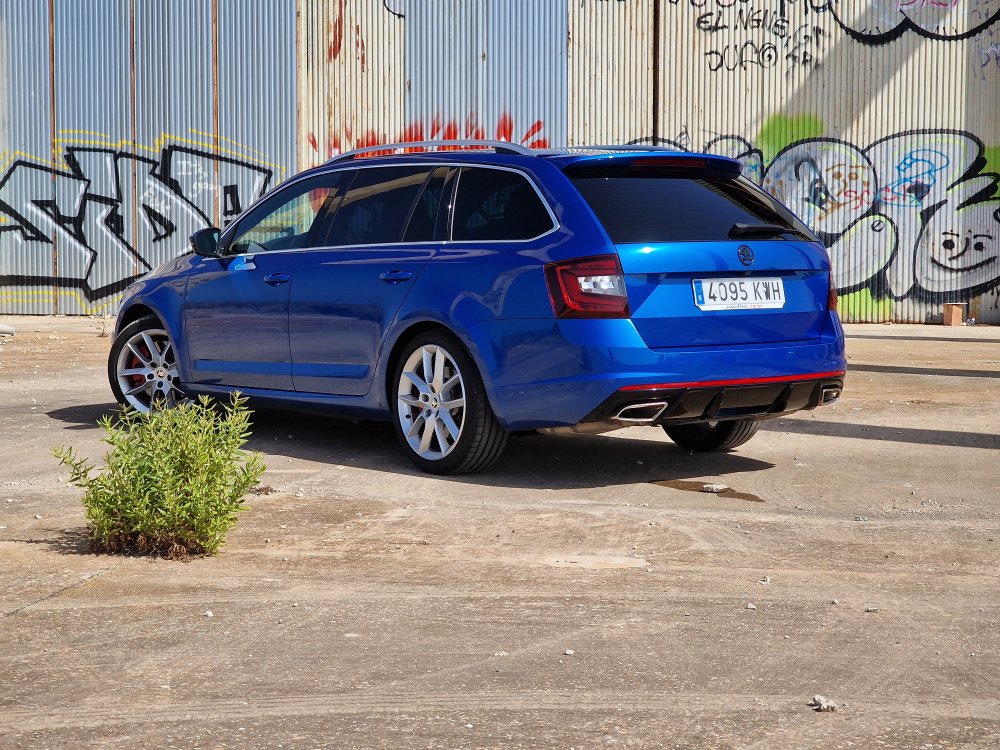
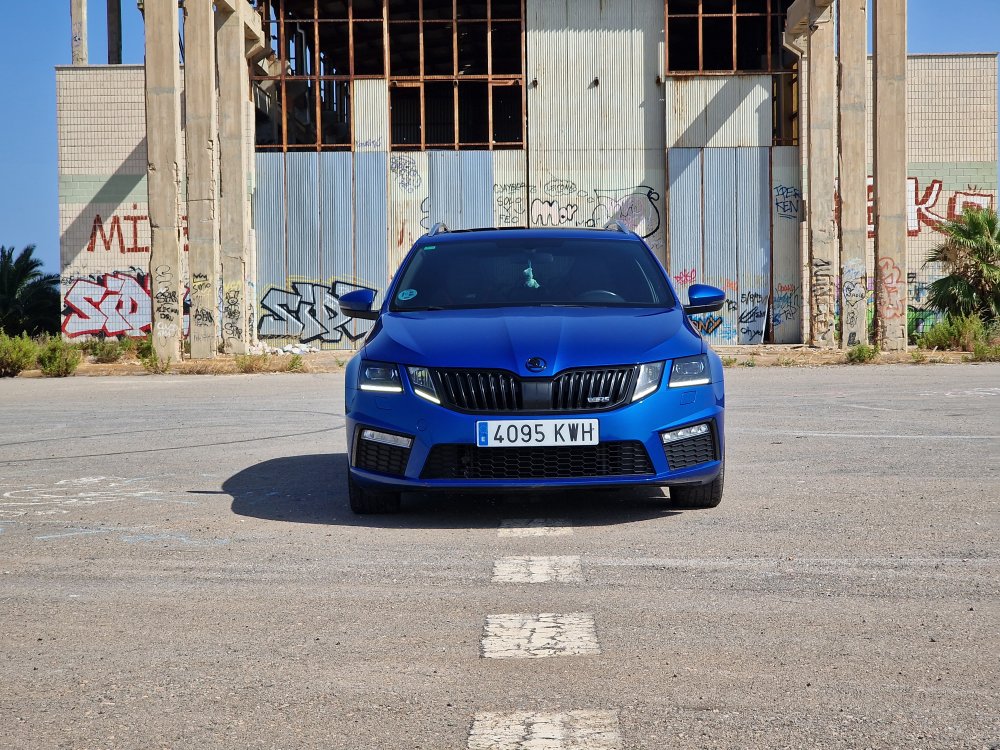
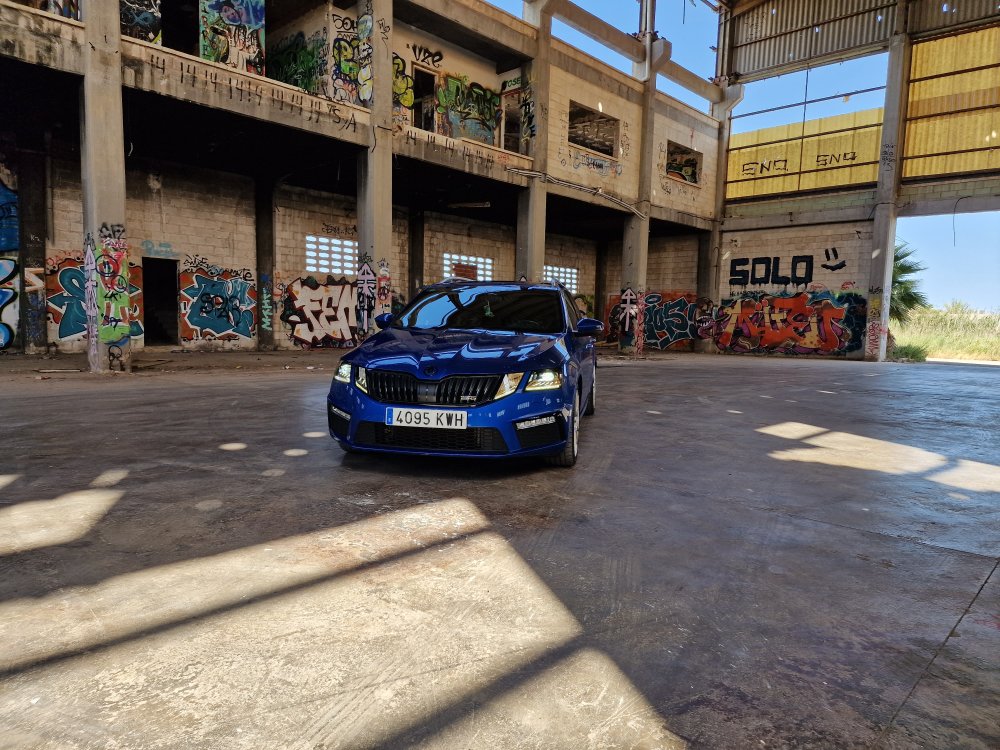
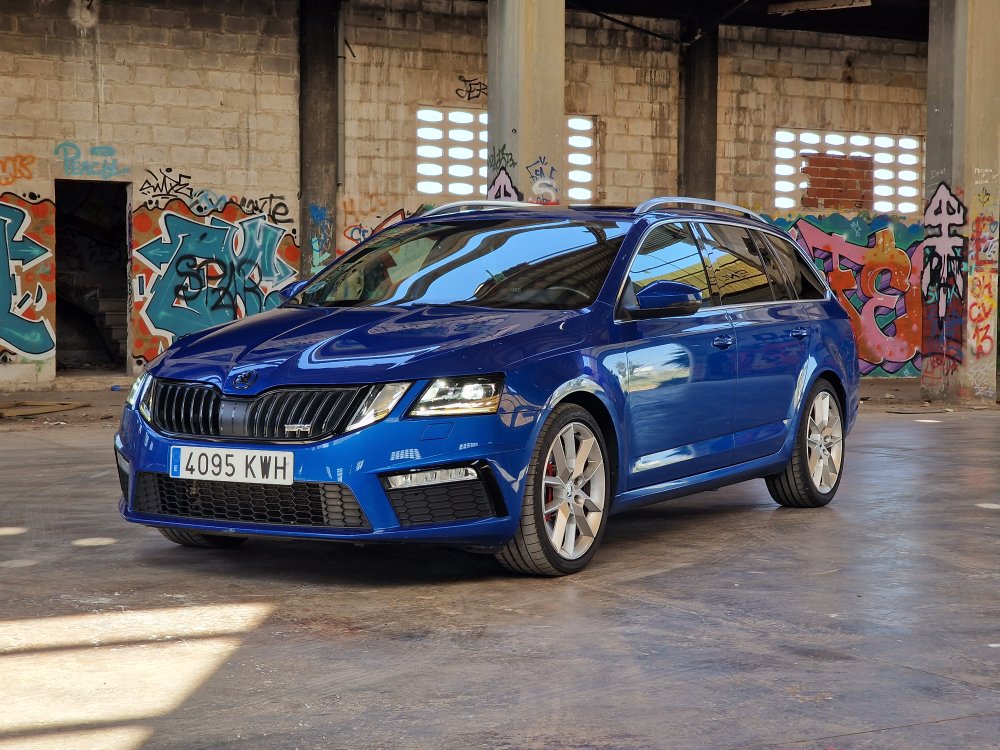
I'm not a professional photographer, and I'm not really sure this is the right place to post, never been on forums before. I drove past this abandoned military helicopter hangar and thought it would be a nice backdrop for some pictures of my new love, nicknamed Blue I (Blue the First), she goes like stink and is so nice to drive. Best car I've ever had and I've had a few. Thinking about some upgrades, want to put some black rims on her and some other cosmetic things. Also looking into if it's possible to retrofit stuff like memory seats, get satnav in the digital gauge cluster (for now stuck with android auto on the infotainment screen), maybe radar guided cruise control, but I imagine that would be expensive if even possible. I have some friends in Germany that has offered to tinker on it for me, maybe get some more oomph out of the engine, but I'm not decided on that yet. They have long experience tuning VAG products so it's not like some sketchy back alley thing. I feel 245 horses are plenty but why turn down close to 300 if it can be done relatively easily. Also want to put an exhaust system on it, inside it sounds nice but outside it sounds like a vacuum cleaner on steroids, not very exciting compared to Leon Cupra or Golf GTI. Probably because it's more of a family car than a sports car, but a little bit more emotion from the tailpipe wouldn't go amiss I think. Looking for new rubber for it as well, it has 4 year old Bridgestone Potenza Sport all around right now, but I feel that the car struggle a little bit with grip sometimes. Mainly when accelerating, first and second gear is not worth dipping into the throttle, but 3rd onwards it just goes. In turns it is planted like nothing I've felt before, accidentally took a hairpin at Mach Jesus and it just dealt with it, really surprised. So I've been looking around for maybe some more grippy rubber, but know very little about it, so if you know something that would be an upgrade to the Bridgestones then please let me know. Wanting to keep it under 175ish € a wheel. I looked at the Pirelli P Zero and Michelin Pilot Sport 5, but as I said don't know much or if it will be an upgrade to the Potenza Sport. I live on the coast in Spain, very little rain and too many hot days, so don't need all seasons, only summer tires. The car has some weird specs from the factory, but it was such a good deal for what it was that I felt I couldn't pass it up, clean title, 2019 model, done a little more than 60k kilometers, good service record, timing belt has been changed as well, which I've heard could be a problem for these engines. Anyway I'm rambling, here's the pictures if you wanna see.


 1 point
 -
1 point
-
1 pointTo be honest, in car maintenance terms, £2k ish for that amount of parts and work is pretty good in my opinion.1 point
-
Hello Lee, if you have Amundsen, other members have said correct format should be FAT32 with 4K clusters.1 point
-
Hello Lee, welcome to the forum. 32Gb (rather than 64) should be enough space for all Europe maps. I seem to recall from somewhere that 32 is max SD accepted on MIB2 - although your version might actually be MIB2.5 if you have facelift model. I understand that non Skoda SD card can be used if formatted correctly - will have a search and come back to you.1 point
-
£4400, that is a bargain. Will be interested to see the current range after any degradation but generally Renault batteries do not lose much especially if only AC charged, I would expect 5 to 10% so hopefully not far off 100 miles summer range and 70 miles winter range, note sure if these had heat pumps.1 point
-
That’s a crying shame, I wish I had the room to take it off your hands ☹️1 point
-
1 point
-
Hello! If you're in doubt, can I suggest you re-frame the issue. So now the car has 90K miles. How many miles do you intend to put on the car? How long do you intend to keep it? If you do a low annual mileage, and intend to run the car into the ground, then I see no reason for the mileage to discourage you. If you do a lot of annual miles and intend to sell the car in a few years, maybe that high mileage will either cause some serious depreciation or make the car difficult to sell. (You're already hesitant about it at 90K miles.) Cars wear out, and cars get old. Personally, I prefer a young, high-mileage car to an old, low-mileage car, but I keep my cars for many years and don't do many miles. Plan ahead and make your decision based on what your ownership use is likely to be. EDIT: No idea what Car Giant is like as a vendor, but as a rule, expect pretty much next to no support after you've parted with your cash. Good luck!1 point
-
1 pointA school day for me too. I was under the impression that the majority of vehicles had a clutch of some sort connected to the the compressor. I always noticed when my 1.8T Golf's A/C was switched on/off, as well as the R53 Mini we had, but never notice it with my 330d BM and assumed the A/C compressor made little difference to the power o/p of a 3L diesel whether it was on or off. Hopefully I can get the issue sorted as it's not a bad little car (the ASG box takes some getting used to - I find coming off the gas a tad just as its about to change gear helps quite a lot!) and suits mum's little runs to the shop etc, but she really wouldn't mind the A/C working to take the edge off the summer weather. I'll have to dig my VCDS laptop out from my old Golf/Polo days and see if that can shed any light on the problem before a visit to the garage. Cheers, Larry1 point
-
1 point
-
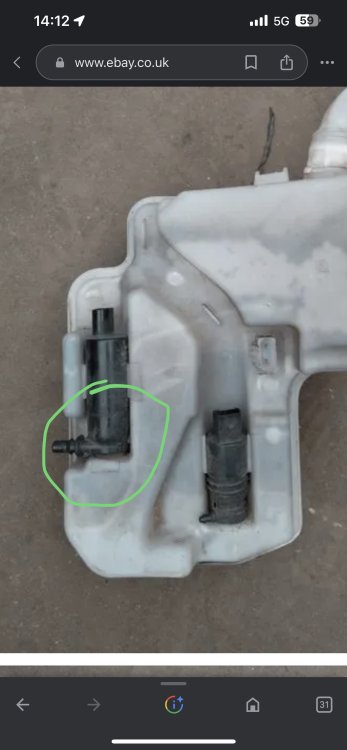
Well, I’m guessing the clue that something is missing, is the huge hole in the tank where the upper pump should be?
 1 point
 -
1 pointIt sounds like the smaller bearing has gone and as you have driven 47K miles since the Haldex was serviced it wont be due to them mixing up the drain holes, it also means that its not going to go bang and will just get progressively louder. I cant see that you have any claim against Skoda for a noisy bearing on a 6.5 years old vehicle with 120000 miles. It's an easy and cheap repair for the very few people that are undertaking it, otherwise its a very profitable one for the dealers.1 point
-
1 pointThe UK update (issued about 3rd July) changed timing belt (cambelt) interval to 210,000km (130,000 miles), consistent with most of Europe. However it is now supposed to be checked at major services (ie every 18k miles or 2 years) for wear, and if showing signs of wear an appropriate advisory given. There is no set time interval, although suggestions of 10-15 years seem to be doing the rounds, so I would suggest budgeting for it after sometime after 9th year1 point
-
The Renault Zoe is the best selling EV in Europe over the decade and I think for good reason. Yes the Zoe is only a B segment car so not as roomy as the LEAF but as a consequence, and some better tech choices its range has been the best of small EVs. Not much room for tall rear seat passengers, boot is OK at 330 litres. Currently getting 240 miles of range, this reduces to as low as 160 miles in the depths of winter. Lack of seat height adjustment bit of a pain on longer journeys. Fastest AC charging of any EV, DC charging on those Zoe's that have it is slow compared to other EVs. Done 14k miles in my ZE50 Riviera and only did my first DC charge yesterday which was a breeze. Worcester to Southampton with full luggage for a cruise. Renault might survive Chinese/TESLA domination with its new relationship with Gelly but it looks like all other European HQ car companies are toast and unlikely to survive another decade without extreme EU protectionism.1 point
-
We owned a 40 kWh MK2 Leaf Tekna for just under 3 years. Real world range driving normally (rather than @ 50 / 60 mph to get a few extra miles) is just over 100 miles in the winter, we used the 1% of battery to 1 mile and it was pretty accurate. They are a decent car and if 100 miles will be enough then the Chademo network won’t be an issue, depending on the daily commute you may even get away with the supplied ‘granny charger’.1 point
-
The engine must be running message is usually because cabin temperature sensor requires the air conditioning Does you car have the grey bar which pops up at top of the screen with a short message. If so it can be dragged down and usually gives more details.1 point
-
I can't add to the knowledge base right now as we're thinking on similar lines - just a little further down the track. Thanks for the post; I'll be following with great interest.1 point
-
1 pointWhere are you finding these intervals that say 50k? there has been a recent change to timing belt intervals to bring us in line with the continents intervals. But even so, before or after the change it was never 50K1 point
-
Finish the diagnosis. Chances are high that valves will have been bent if chain has slipped on crank sprocket, so I doubt it's worth repairing. Get quotes for this scenario to help you decide. I think @Crasher may be near or in Nottingham, and might be prepared to give you a ballpark idea.1 point
-
1 pointAppreciate your help bud, but defo not the level sensor. Rear one got knocked out a few years back after having some suspension work done, never got the no bend lighting message up, and didn't affect the level with such severity ( if i recall, lights stayed up a tad too high?) I'm hoping it's a bad earth, but finding where the damn earth is is a nightmare.1 point
-
1 pointIf it's the standard VAG sump plug then the washer comes with a new sump plug as the washer is captive (I've never had one fall off on me anyway). I believe you could get it off if you wanted though. I have never bought a new sump plug for any VAG car I've ever had and never had one leak yet.1 point
-
Thanks Chimaera and Pete for advice. So Check TDC myself (and perhaps see if I can get a photo down plug hole to see if any damage). Then tow to garage to check diagnosis and put new timing kit on as its not worth not replacing if stripped down to reset timing. Then fingers crossed...?1 point
-
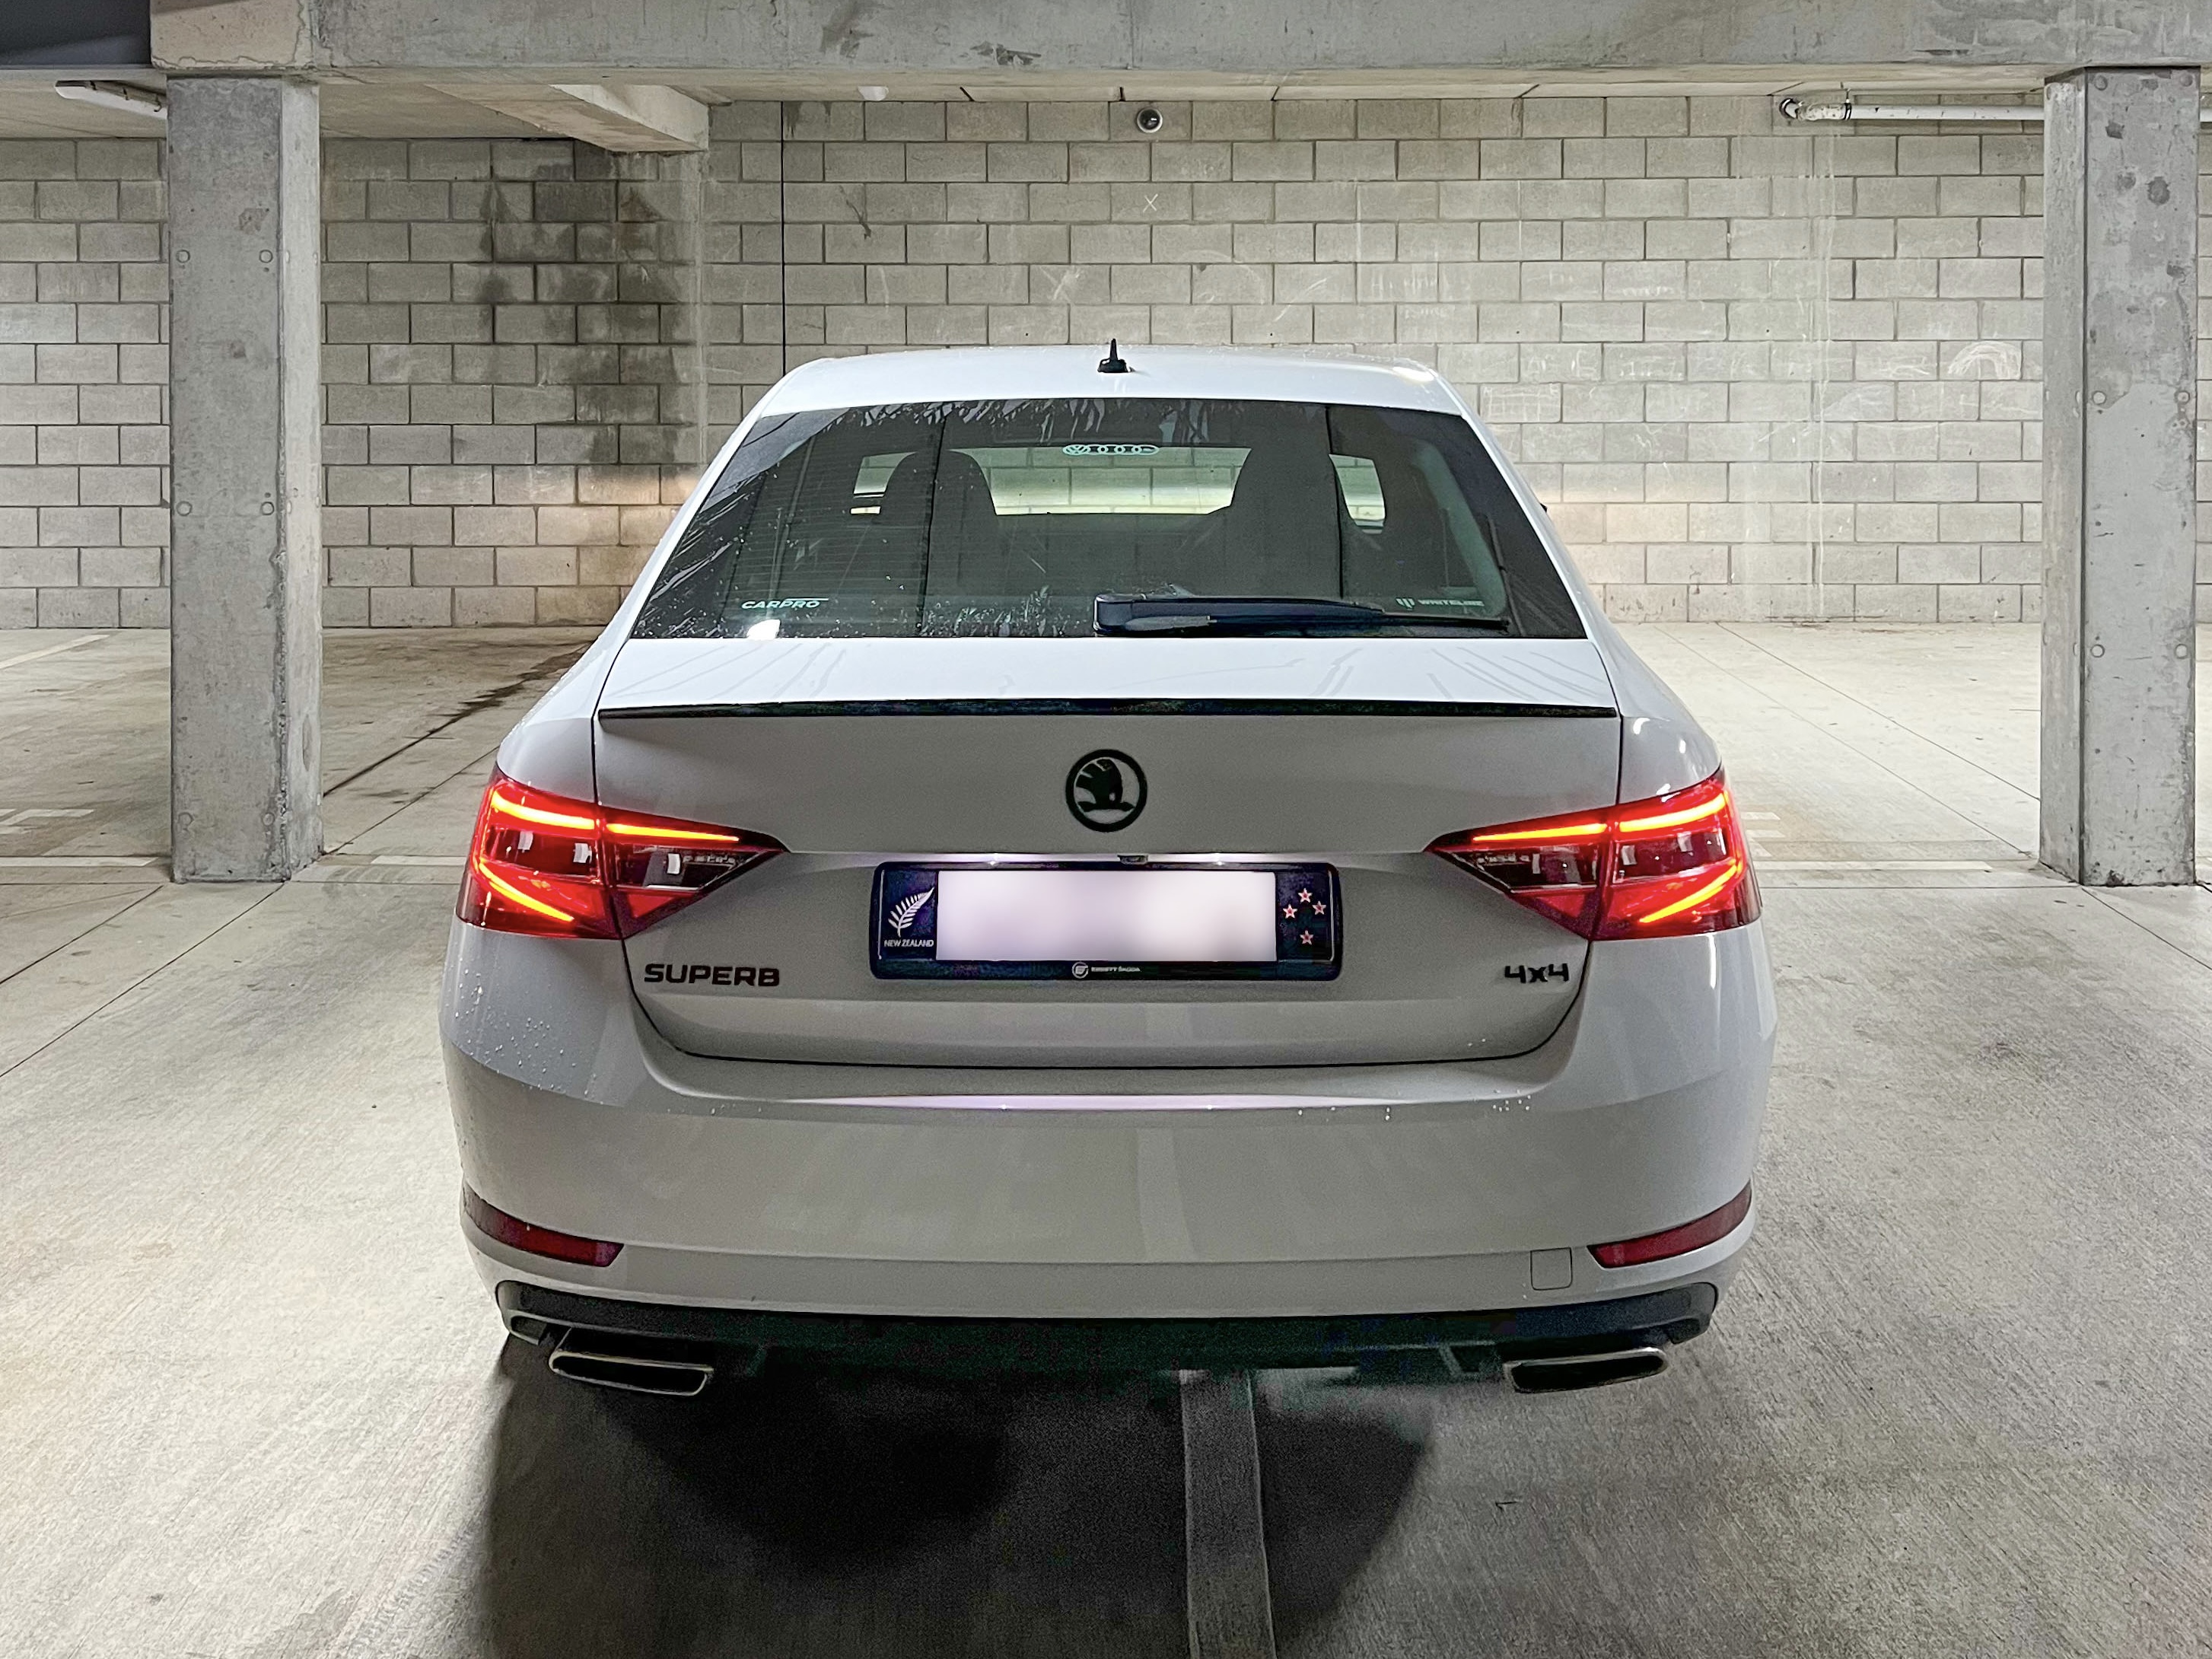
I removed the Skoda lettering from my Superb and just had Superb and 4x4 there so it’s more symmetrical
 1 point
 -
Real world UK. Much cheapness. Not great range, but not everyone needs lots of range, or just deals with what things have.1 point
-
Lubriplate 105 will do the job; it’ll never dry-out nor become sticky or hard.1 point
-
Notes. After it has finished updating the system, give it a couple of minutes to ensure that all is well and like it shows on video press resume an wait for about 90s or so and the system will restart just, like in the video. DO NOT START THE CAR UNTIL THE SYSTEM HAS RESTARTED After the update the built-in manual is unlikely to be available for about 48hrs, it does come back! You will more than likely receive another OTA update, it's OK to accept it. Ultimately if you are at all worried about doing it, take it to a VW Independent or Skoda dealer and ask them to do it for you Once it has been updated, there should be no more random restarts or crashes on the infotainment system, the pop pop issue should be gone too.. You may have an issue with Android Auto if you have a VPN installed on your mobile phone or tablet. This is resolved by turning off the VPN and restarting Android Auto.1 point
-
Right. All you do is create a temporary folder on your PC or Tablet for example MIB3 UG. Then find the zip file and then right click on it or press and hold on it, so the menu appears and it should offer you the opportunity to Extract here or elsewhere, tell it to extract the files to MIB3 UG folder and let it get on with it. When it has finished, format a usb memory stick so it's completely empty, then go to the folder MIB3 UG open it and copy the 2 folders and other file directly onto the memory stick. When it has finished copying the files to the memory stick it should look something like this... THERE MUST BE NO OTHER FILES THAN THIS. Once your memory stick looks like this, remove it and take it to the car. Insert it into a USB port, press and hold the menu button for about 10 seconds and the update menu will appear. At this point it's vital that you have a full or very well charged car battery or a battery charger attached so that the car doesn't shutdown halfway through the process. Ignition needs to be ON, the Engine needs to be OFF (NOT RUNNING)! DO NOT START IT DURING THE PROCESS. Here's a video that shows you what to do, albeit in German, you'll get the English version! If you watch it carefully you'll get the gist of what to do. UNDER NO CIRCUMSTANCES MUST THE PROCESS BE STOPPED ONCE IT HAS STARTED OTHERWISE YOU'LL MORE THAN LIKELY NEED A NEW INFOTAINMENT SYSTEM.
 1 point
 -
1 pointI see 2 (TWO) new topics for a single question?!?! Actually, the navigation database can be upgraded offline using a USB memory and downloading the new maps from here: https://updateportal.skoda-auto.com/ I have the Infotainment Online package and even though I received the OTAs, the navi database didn't update by itself. I had to download to USB and leave in into the car for a while. You'll find all the instructions in the above link. BTW, I had an appointment on Monday for the MiB SW update to 1941 - they did it, but didn't bother to update the Navi database which is still v.22.12 that I updated myself 1 or 2 months ago. The latest version is already on the USB inside the car, but I had no long drive recently, so it didn't have time to update.1 point
-
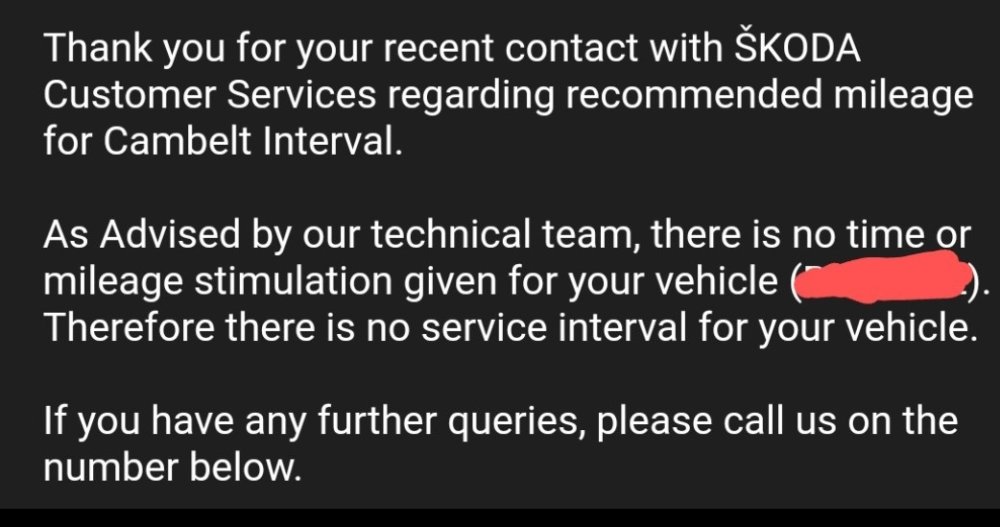
1 pointI called Skoda....the helpful customer service desk sent me email below (told me the recommended intervals were removed July 1st 2023), which says both time and mileage based intervals are no longer given. The website still says 5 years. Wow.... So it's not even 10, 15 years, or 200k miles.... What about the people who spent £1k on this....or all those who spent anything on this? If I had the money I would have done it. Relieved but not happy tbh, or am I missing something.
 1 point