


Leaderboard
-
Lady Elanore
FREEDOM23Points24,875Posts -
Brian15
Members10Points190Posts -
Gaz
FREEDOM8Points7,748Posts -
Graham Butcher
FREEDOM8Points6,512Posts


Popular Content
Showing content with the highest reputation on 08/08/23 in all areas
-
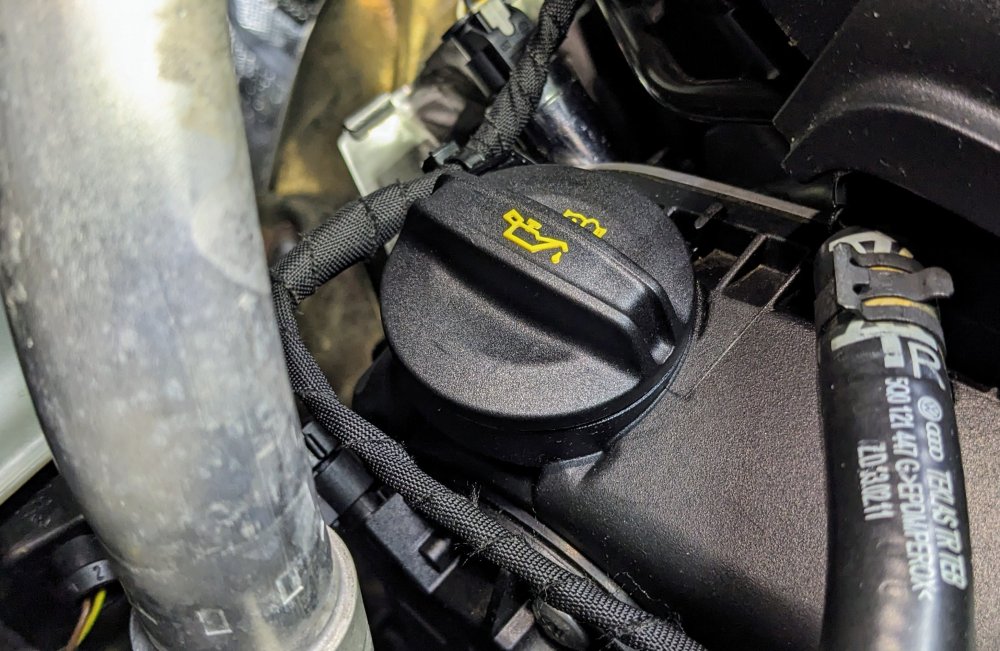
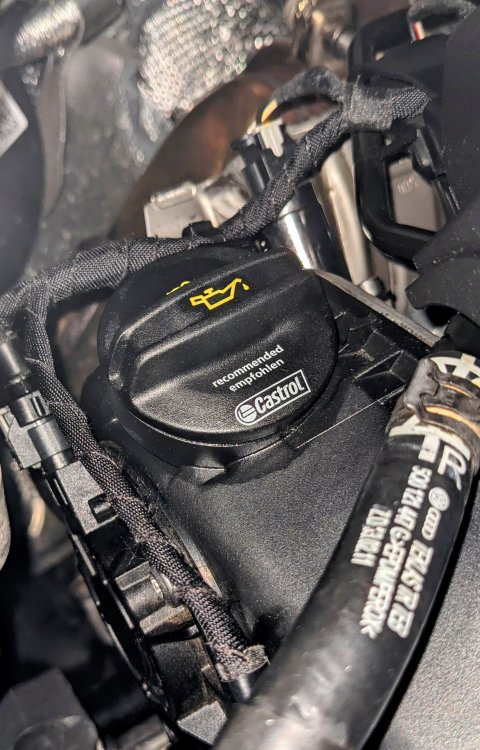
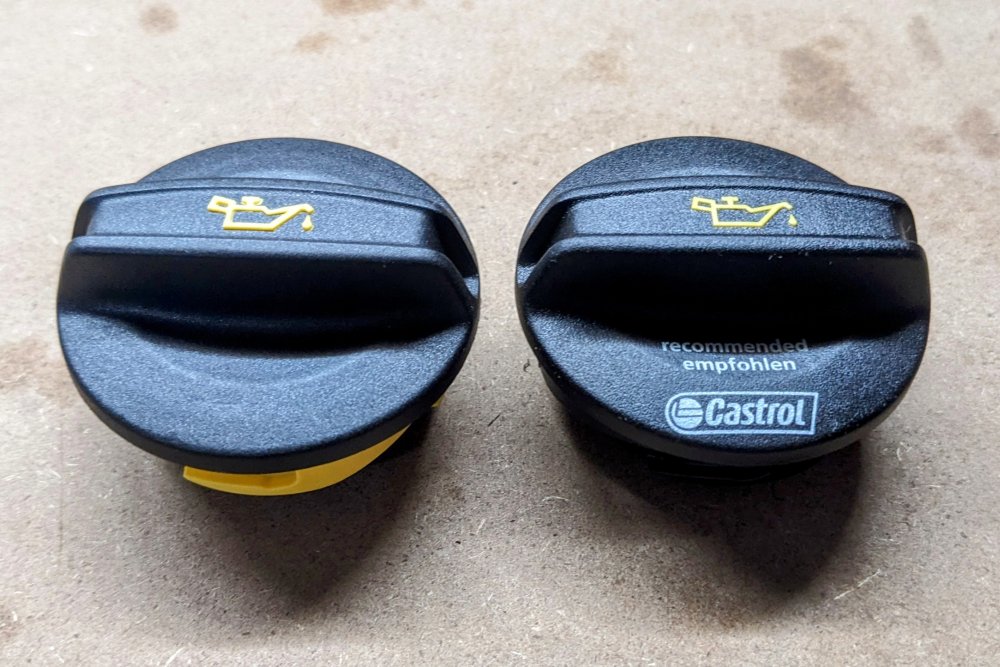
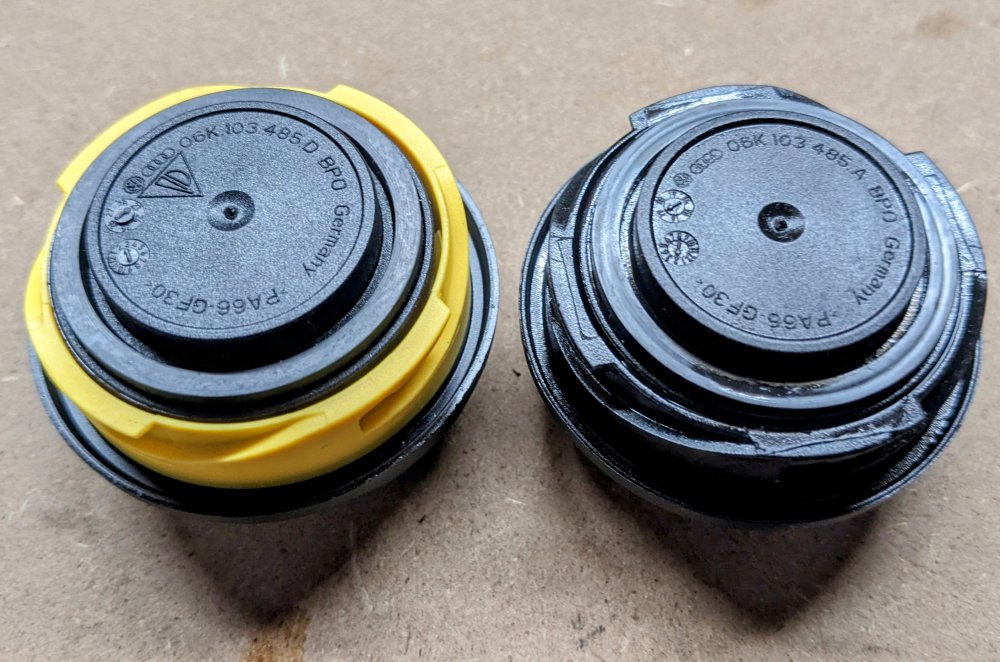
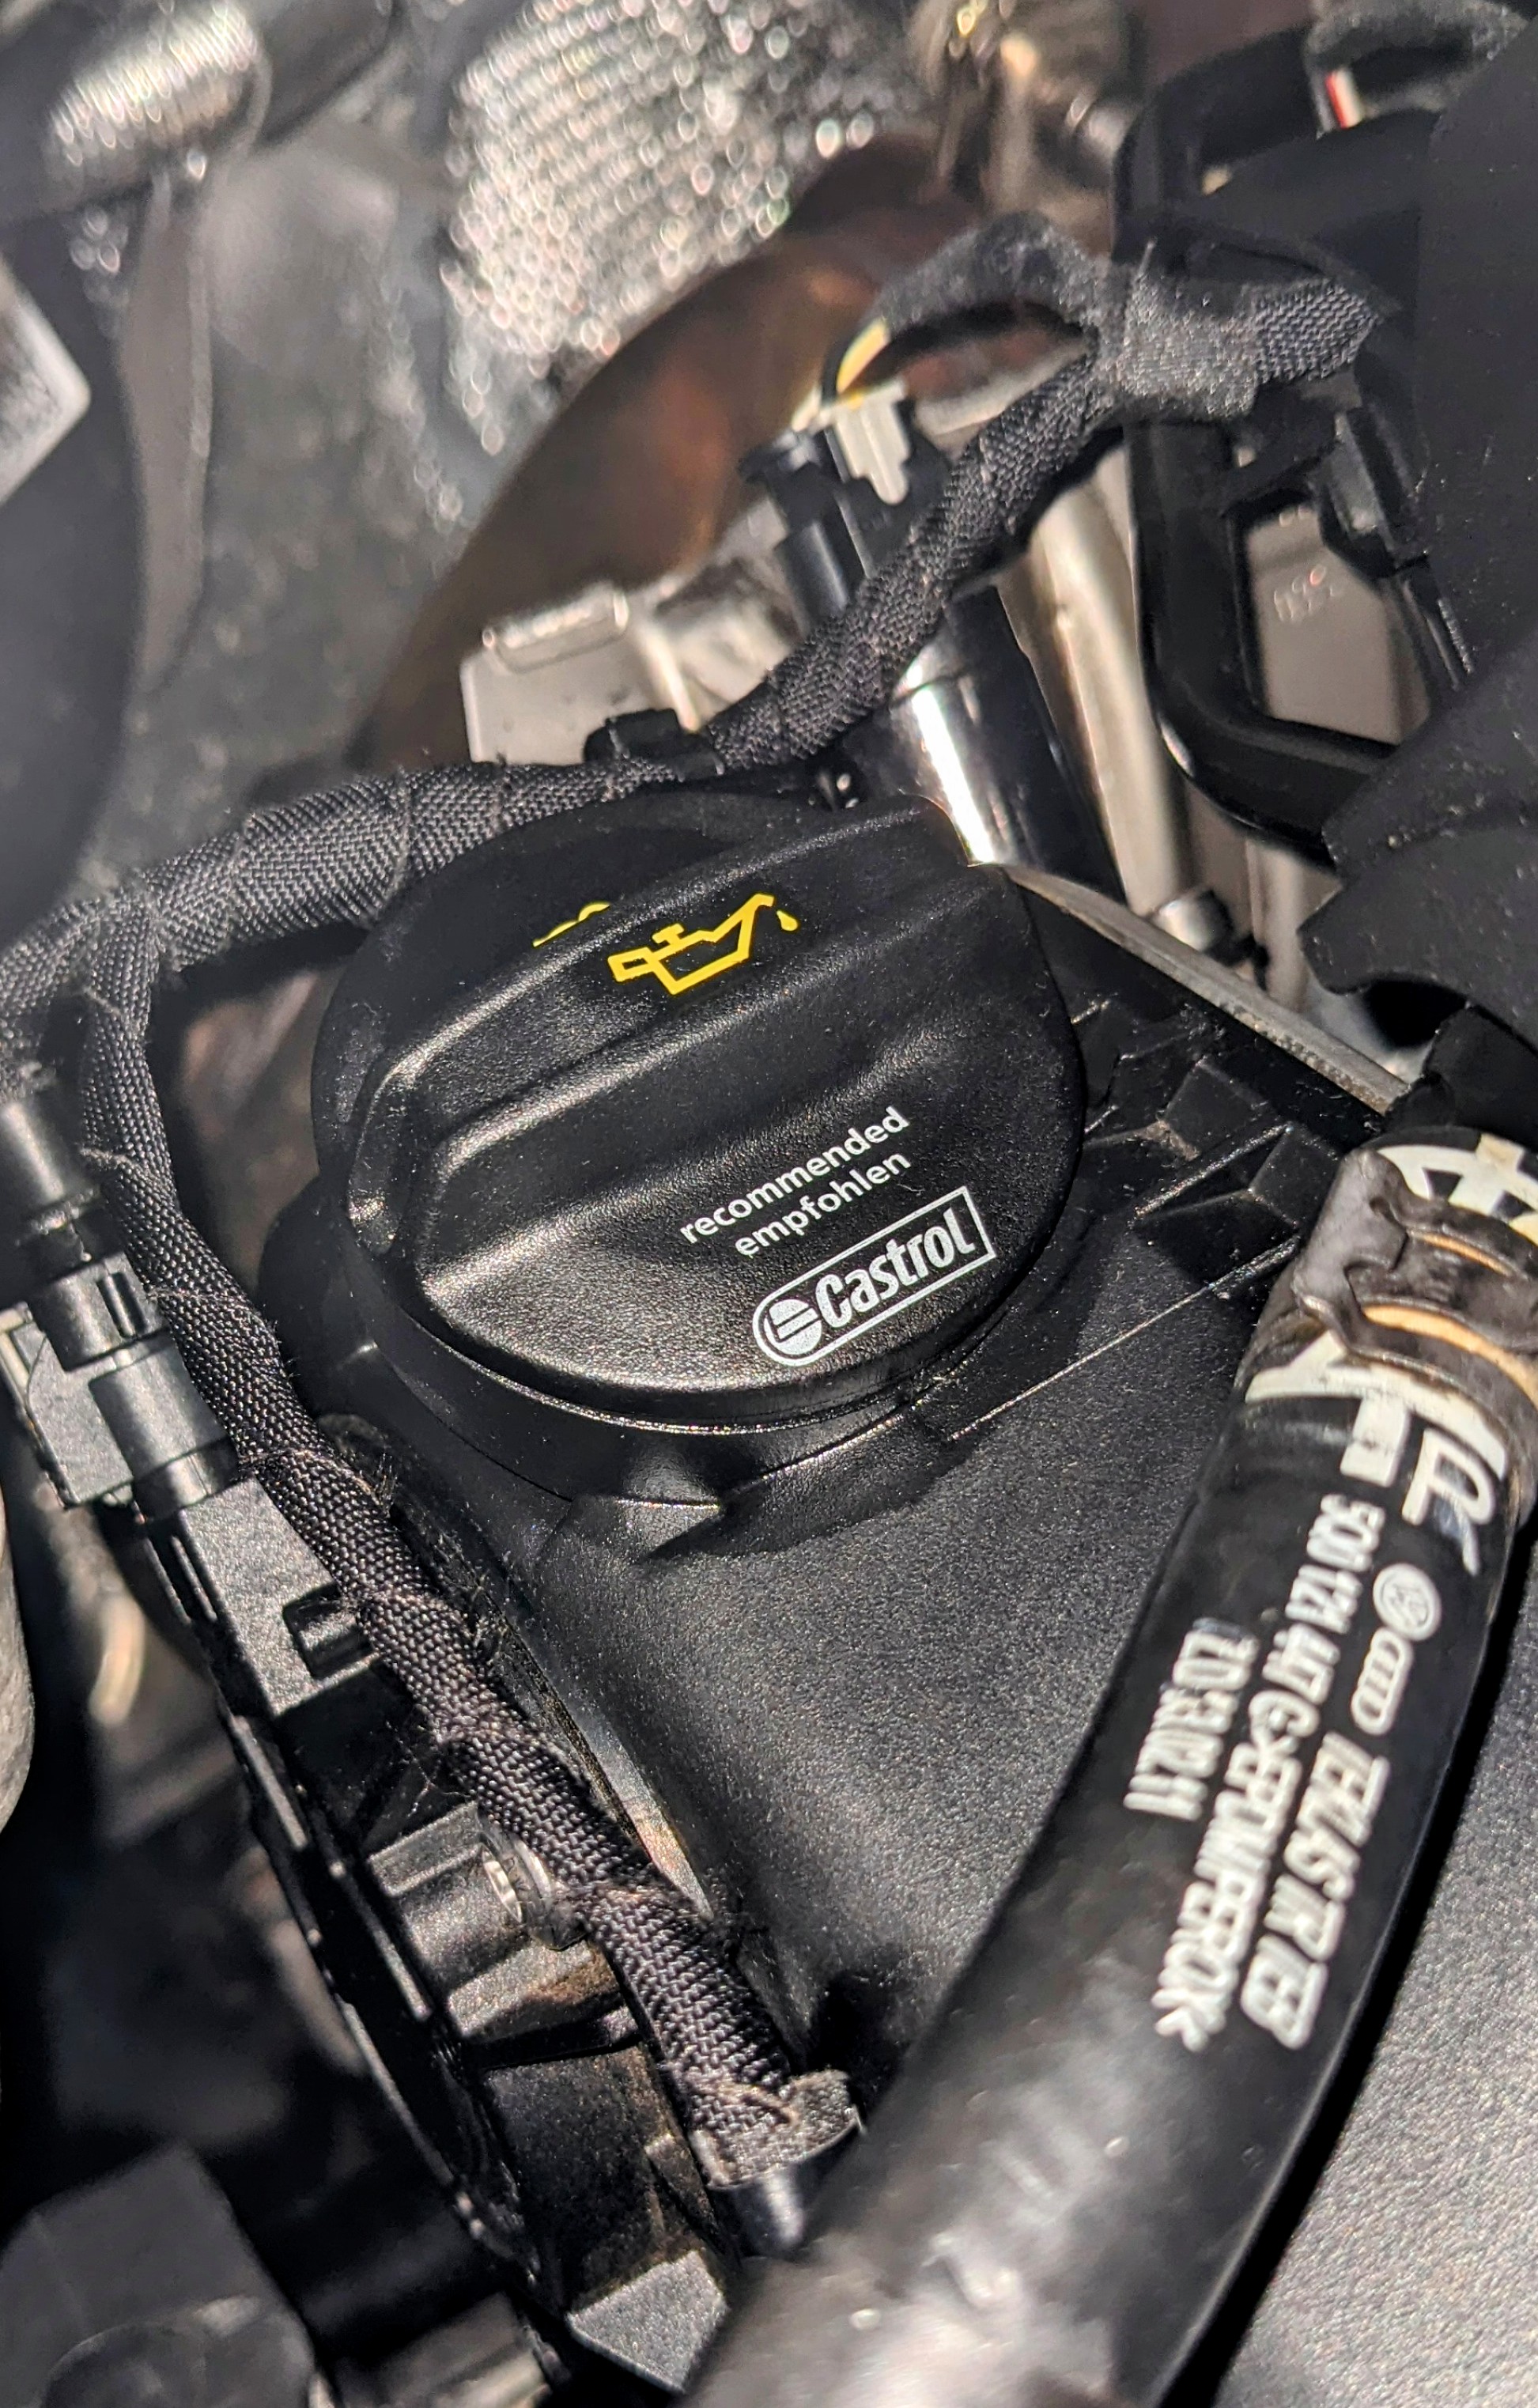
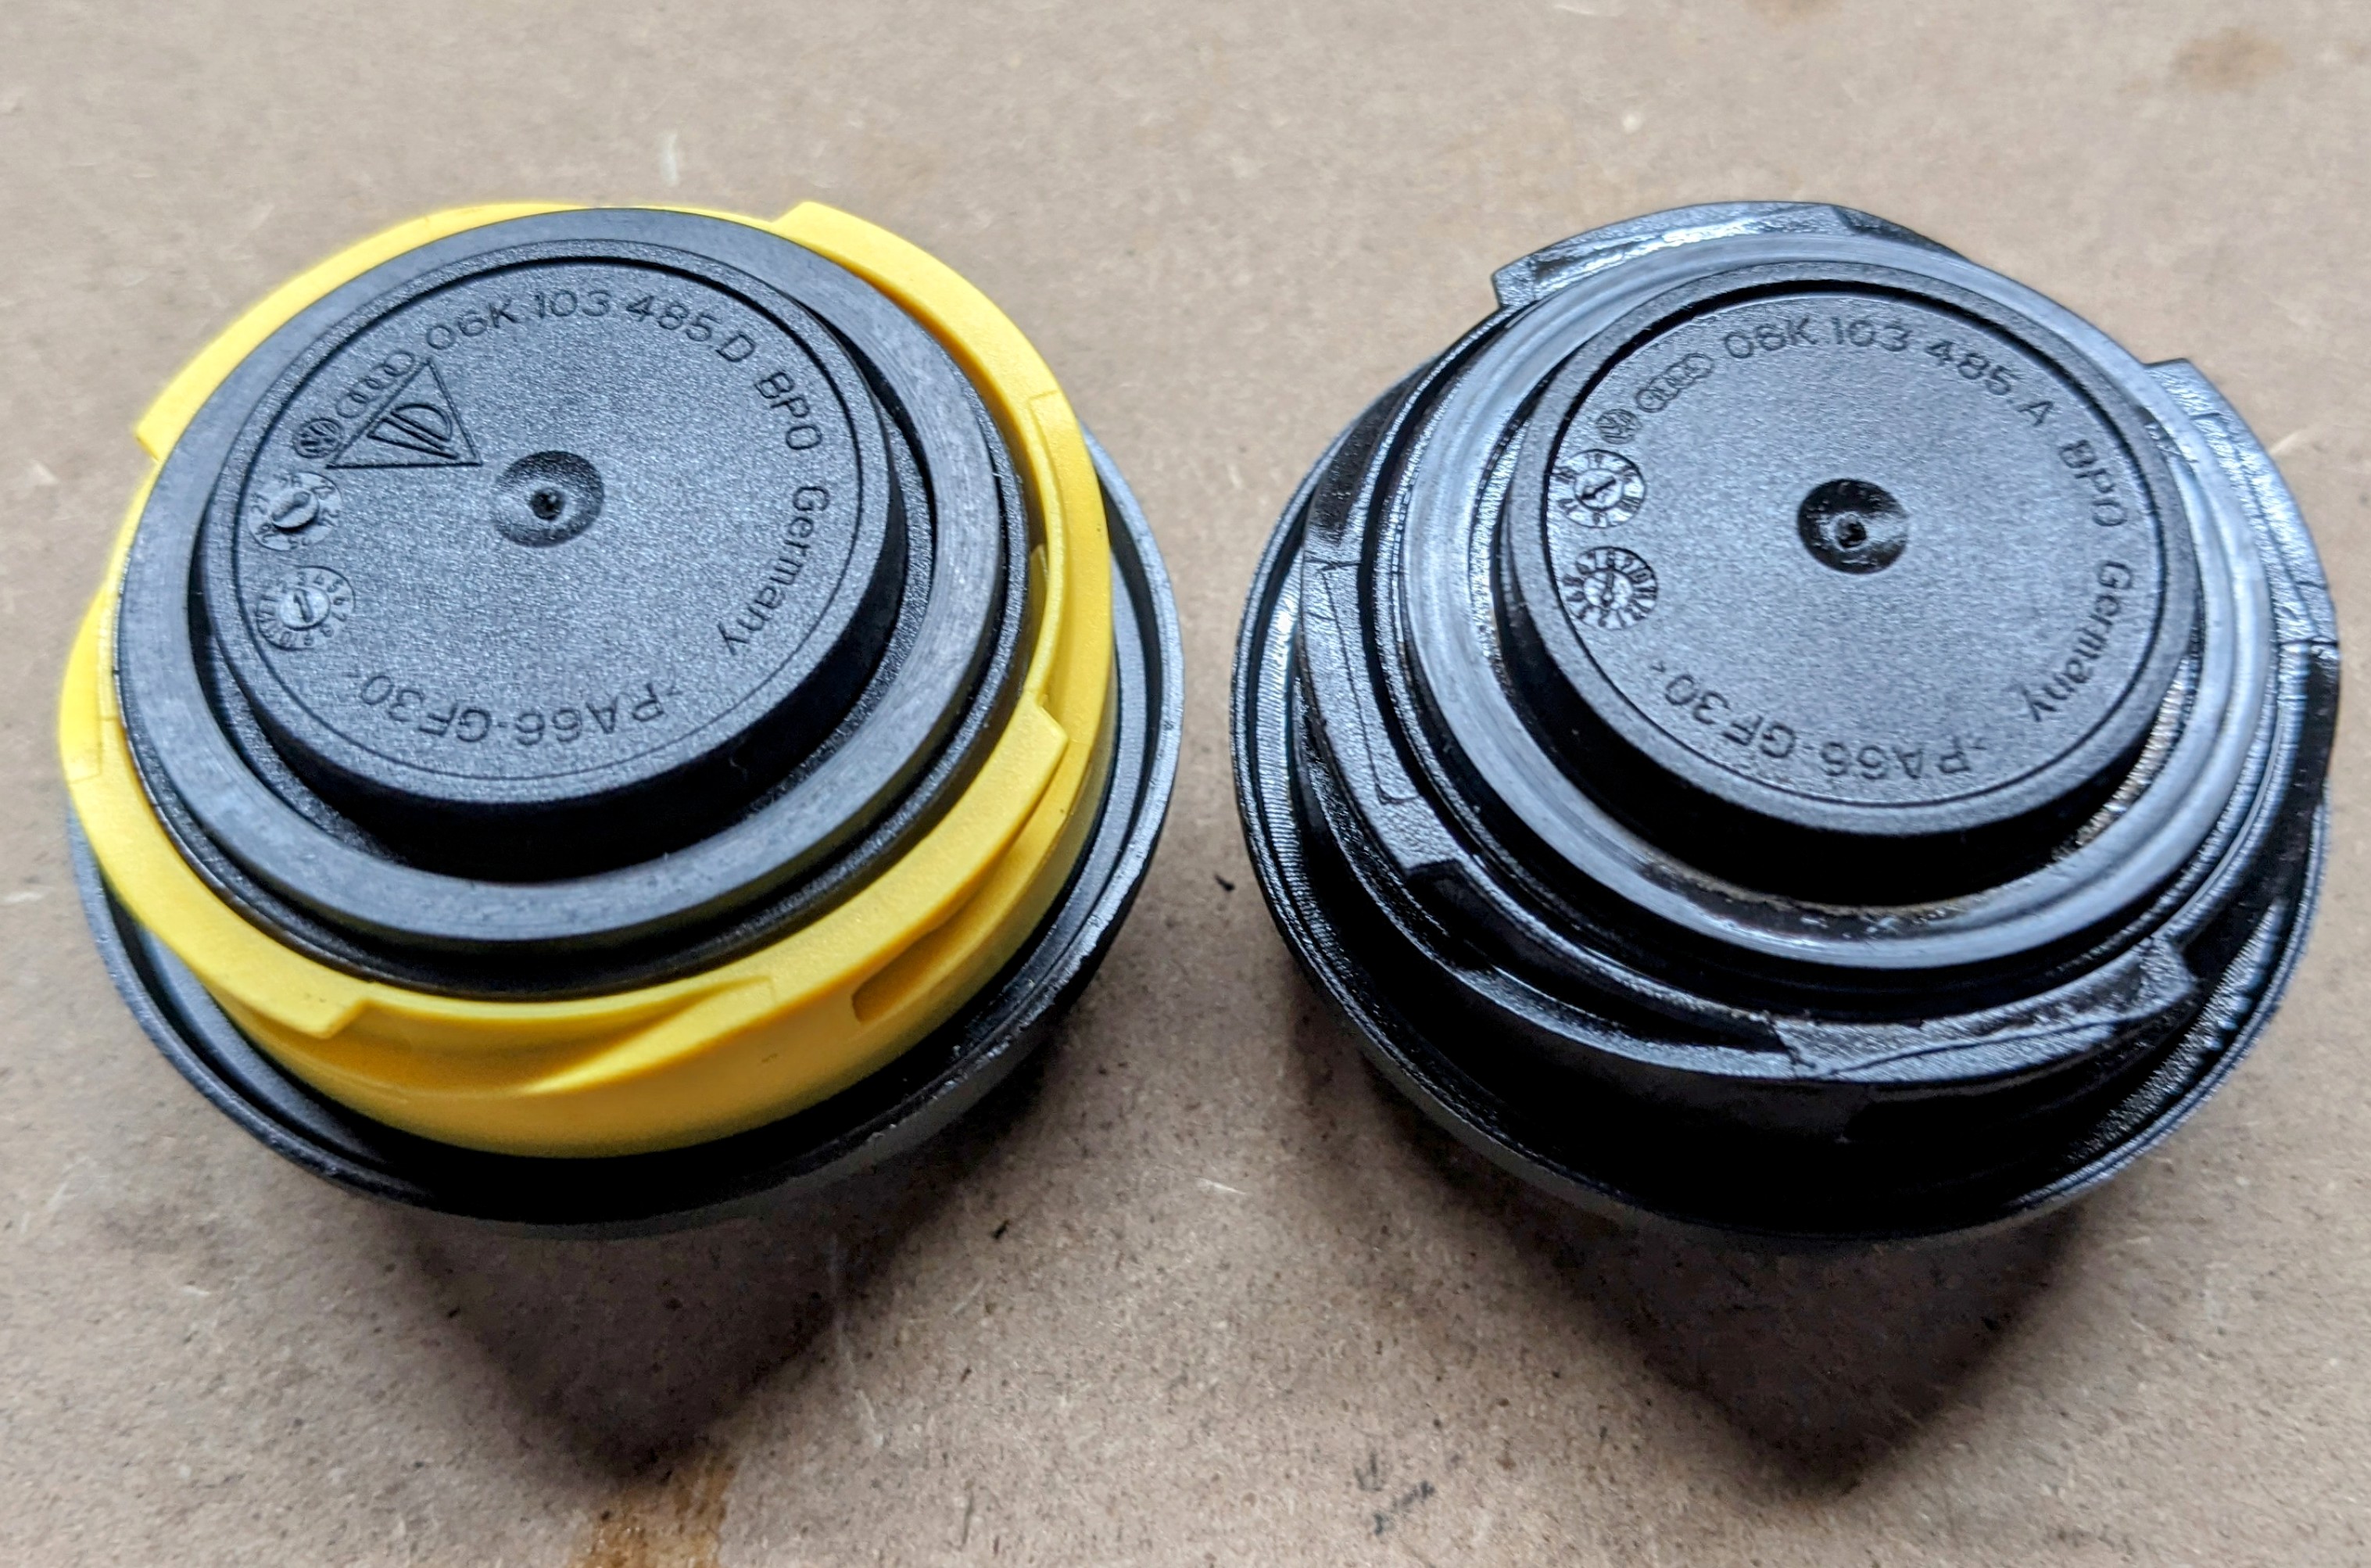
At my last 90k service, it was noted that the upper timing cover was sweating/misting oil, which requires a new replacement upper timing cover assembly with new seals, as well as replacing the camshaft adjuster magnet with an updated unit. In the meantime, I changed the oil filler cap on my 220 Superb to a newer revision cap (yellow bottom) as the sweating/misting oil seemed to b concentrated around the cap. Old: 06K 103 485 A New: 06K 103 485 D After a week of use, there is no more oil misting around the oil cap. Don't know if it's because the new oil cap has fresh seals/rubber, or because it is indeed a revised version, though I couldn't pick out any design changes between the two caps.
 5 points
 -
4 points
-
@Bap33 yes it is always a concern with blind corners. Every second on the ring is a risk, even going slow as someone could still go into you. Still as a car enthusiast, I think it's a risk worth taking (with mitigation) to at least do a lap and live through it. I would definitely do it again, even with my current not for that purpose car. If you love Belgian beer...Fill the car up on the way back. I got lucky and managed to get some Westvleteren Trappist beer. Happy to share tips/my experience further with anyone. Just DM to avoid going way off topic here😂3 points
-
2 pointsPosted just now Changed my Octavia 4 Estate for a Karoq 1.5 edition in black last week. Polished yesterday and was surprised to see that it wasn’t Black Magic in colour but Black Crystal which pops blue metallic in the sun. That was a bonus it’s a lovely colour. I am impressed with the Karoq it’s fully loaded apart from wireless android auto which is a pain I suppose I will get used to that though!!2 points
-
Pull the steering wheel towards you/push away the steering wheel that is....(just clarifying)2 points
-
@KeteCantek Thanks. I would love to do the same one day. I don’t know whether I´ve seen too many videos of crashes at the Nurburgring or if it’s real life. I would fear discovering a crashed car at the exit of a blind corner and being unable to avoid it… As you say, first victory is to exit the ring without damage on the car. 😉2 points
-
2 pointsI went to the local Halford store today. Yes they confirmed that the new battery should be coded in. They checked the new battery and coded it in. It was via an IMAT device. Can only hope this coded it correctly.2 points
-
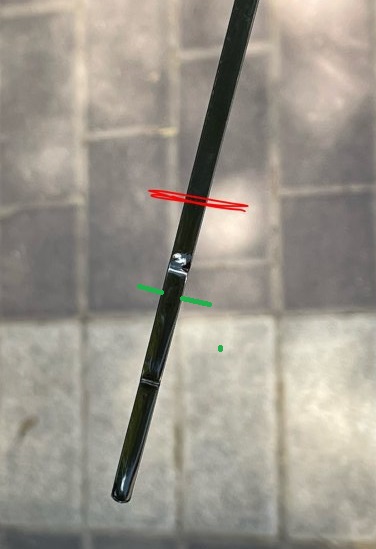
2 pointsCheck it again with a warmed up engine (e.g. at the end of a journey) 2 or 3 minutes after you switch the engine off. Hope to see the level somewhere closer to my green lines here:
 2 points
 -
2 pointsOh, that's far too high if it's the true level. Did you pull the dipstick out, wipe it clean and then re-insert it, to get that reading? Following this procedure is important.2 points
-
Unlock the steering wheel with the lever on the underside. Pull/push to adjust. If it's never moved since new, it might be quite stiff but should free off quickly2 points
-
2 pointsThe battery swap idea on ships is the same as cars such as the Nio ET5. I think it makes sense on ships as the number of ships needing this service will be smaller than car numbers and also the TEU batteries work wonderfully with infrastructure already in place. with cars, if 20 cars turn up for a battery swap, its the same problem as not enough chargers at a location, there will be queueing. If a car swap station runs out of charged batteries, we'd be back to the not enough chargers scenario we have now.2 points
-
2 points@sharkys - ur missing the bits underlined.... What I did : - lifted car - Control Module 14-Adaptive Suspension - Entered security code 20103. - Go to Adaptations, Select “Adapting with deflected wheels” - Acknowledge by pressing and holding the green tick, or swipe right. - Go back to Control Module 14 - Go to Basic Settings - Select “Adapting with deflected wheels” - Start by pressing and holding the green tick, or swipe right.2 points
-
2 pointsIn addition to it being something "sensinsible" to smooth out demand spike it also makes incredibly good sense for EV charging providers to add the mega-battery packs so the charge station operator can get lecky from the grid at a few pence per kWh and then sell it to punters at tens of pence per kWh, what a business model. Good to see Gridserve, who some regard as the pioneers with their EV charging stations with 30 plus charging points plus facilities, they not only put these on motorways but A roads as well and now we have the one in Cornwall at the Cornwall Service with 1 MWh battery and solar canopy. Additional battery packs presumably can be added as cars with higher charge rates use the 350kw chargers and not only the AC charge points. 3 other charge points for LEAF connections making 15 in all. https://www.cornwall-services.com/gridserve/ GRIDSERVE ACCELERATES HIGH POWER EV CHARGING AT CORNWALL SERVICES WITH UK-FIRST BATTERY AND SOLAR POWER INNOVATION Innovative solution, which includes solar canopy and 1MW battery, delivers EV charging years ahead of new grid connection availability GRIDSERVE Technologies software optimises available grid and solar energy to maximise charging speeds with dynamic load sharing Planning permission submitted for adjacent 1 MWp solar farm to deliver zero carbon energy from the sun directly into electric vehicles GRIDSERVE, the technology market leader in EV (Electric Vehicle) charging, has delivered another UK first at Cornwall Services with a new solution that combines the latest innovations in batteries and solar energy to supplement the existing grid connection to deliver ten times the charging power. Thanks to this innovation, GRIDSERVE and Cornwall Services have been able to open a 12 charger Electric Super Hub on the A30, complete with a state-of-the-art solar canopy. Six High Power 350kW-capable chargers provide a quick top up for people passing through on their journeys, along with six Low Power AC chargers for overnight guests at the onsite hotel.2 points
-
2 pointsThe spark said it could sustain the load, but it was most efficient to share it with the batteries2 points
-
2 pointsWell the Main Dealer replaced the front Monroe shocks with Skoda shock absorbers today. Now back to a very comfortable ride with all the sharpness when going over pot holes or speed bumps gone. Dealer replaced the top bearings/bushes at same time because when it is all stripped down thought it was sensible to do it. Main difference, apart from riding smoother over rough roads, is just a more relaxed comfortable ride over normal UK roads i.e. not smooth but slightly broken up at best. The road “vibration” I got with the Monroe’s is completely gone which improves the driving experience. So now back to a new car feel. Great result and hats off to the dealer who did the work totally free of charge.2 points
-
Hi there Yes!! It was a faulty wheel bearing and some magnetic disc thing (no idea of name) around the bearing. All fixed under warranty by skoda. Bearing fixed on front right wheel and all fine codes went away!2 points
-
2 pointsNo need to even drive the car to clear the errors simply start the engine slowly turn the steering lock to lock back to centre with the steering ignition off ignition on sorted Spot on with the battery adaptations being required though2 points
-
Hi all, As many VAG cars, my Superb Mk3, is fitted with a DSG6 (DQ250) gearbox. Here is a tutorial to change its oil and filter on your own. You'll probably tell me: What's the point with it? Just have a look on Google or YouTube and you'l find plenty of them! That's true, but having done this exercise, I could see that it is very rare to have all information in a single tutorial. I will therefore try to be as exhaustive as possible. Here a list of some Skoda models also DSG6 equipped (I nevertheless let you check on your own, since depending on engine type or MY, some may be DSG7 fitted⚠️ instead of DSG6) ! - Octavia 2 - Yeti - Kodiaq - Superb 2 - Superb 3 First of all, here is the DQ250 gearbox: We're going to focus on the following items: #17: Filter housing - Tightening torque : 20Nm #18: O-ring - P/N N910 845 01 (normally sold with the filter) #19: Oil filter - P/N 02E 305 051C #26: Oil pipe - Tightening torque: 3Nm #27: Seal ring - P/N N 043 089 2 (normally sold with the sealing plug) #28: Sealing plug - P/N N902 154 04 - Tightening torque: 45Nm Not shown on this pic: DSG Oil - P/N G 052 182 A2 - 6l - Difficulty : 2 - Time needed : approx. 2h - Number of person needed : 1 - Necessary tools : ¤ VCDS software (or similar, To be confirmed) ¤ 24mm socket ¤ 8mm and 14mm Hex ¤ Torx 25 and 45 ¤ Ratchet or classic wrenches for disassembly ¤ Torque wrench(es) to apply specified torques (3 / 20 / 45 Nm) ¤ Short and intermediate extensions for ratchet or torque wrenches to enable easier access to screws ¤ Small flat screwdriver ¤ Filling hose VAS6262 ¤ Wooden toothpick ¤ Small fork ¤ Slip joint pliers ¤ Oil drip tray ¤ Twine (about 80cm long) or an old metallic hanger (wire one) ¤ Wide masking tape ¤ Rags ¤ Lifting means Concerning VAS6262, you can find one on numerous website at various prices. Without switching to a much more expensive pump model, I suggest taking a filling hose with a 1/4 turn shut-off valve close to the adapter on the can side. These ones are less widespread but still at affordable price and of course easier to use, since you can work without being 'showered' with oil. I've chosen this one on toolstogo-uk.com https://www.tools2go-uk.com/13664247/gear-oil-filling-hose-for-vag-dsg?g…=&Lng=en Dealing now with the DSG oil kit, you really have to be careful on the kit content ⚠️. Indeed some kits only content DSG oil and oil filter, but no sealing plug nor seal ring! ⚠️ Warning: Prices can really be different from a website to another (starting form 90€ up to ~200€ !) Chose the right one! After hours of searches and checks, I finally bought the Febi-Bilstein kit, which can be found on autodoc.co.uk for 100€-ish https://www.autodoc.co.uk/febi-bilstein/15821763?search=FEBI BILSTEIN Transmission oil change kit (171762) It effectively contains: - 6l of gearbox oil - DSG oil filter (#19) and its O-ring (#18) - Sealing plug (#28) and 2 seal rings (#27). By the way, I still don't understand why 2 rings?🤔 Note: I did not take time to ask for OEM spare parts prices by my local dealer. Step #0 : Preparation You need to lift the car high enough to get under the car and to get enough space to move your arms comfortably around the gearbox. Note: Though you've lifted the car, it needs to remain horizontal to make a proper filling with right oil level (see step 7). Step #1 : Air system removal Start with removing the air box. You first have to remove the 2 T25 Torx screws (#1), then unclip the cover on the rear face (#2) and lift it by rocking it as shown by arrow to avoid breaking the 2 lugs at the front side of the cover (#3). Finally simply push to the rear to release the lugs (#3). You now have to unclip the 2 lugs, where the 2 torx screws you have just removed where tightened (#1). Be careful for this step, since these 2 lugs may break. I've seen 1 or 2 pics of broken lugs on this forum. ⚠️ Then, you need to push the airbox backwards, so that its front side can 'rip' other the bonnet slam panel. Then unclip the hose (#3) and with a rocking motion back and forth, release the front side so that the airbox can be fully removed. However, do not hesitate to put one hand on the back of airbox to be able to pull forwards more easily (#4) and take the airbox out, which is quite large. This being done, you need to remove the air filter housing. This is simpler. Start with unplugging the small hose (#2) at the air filter housing outlet and unplug the air flow meter connector (#3). ⚠️Be careful: There's a small grey latch on the connector (if equipped) to unlock before pulling the connector off, otherwise it won't come out or you risk ripping it off. Now, remove the metal collar (#4) on the large air hose downstream the air flow meter. Use a slip joint plier for this. You can now unclip the air filter housing, which is simply fitted onto 3 shock absorber pins (#1). Pull vertically upwards. Don't hesitate to pull hard (continuously and not jerkily), it holds up really well! The 3rd pawn is under the air box (dotted circle), but it comes out quite easily when the other 2 are already out. Once the air filter hosing has been unclipped, all you have to do is disconnecting the large hose, downstream from the flow meter. Be careful to 'close' the hose to avoid any foreign object damage or even just dust towards the engine. Masking tape will do do the job! Step #2 : Battery removal To take it out, you need to remove a 13mm hex screw, which tightens a retaining bracket et holds the battery in place. This screw is on the front of the battery (#5 on previous pic). Then remove both battery terminal covers (by lifting vertically) to access the clamping nuts of both battery terminals posts (10mm Hex socket). Warning⚠️: Start disconnecting the "-" terminal post before disconnecting the "+" terminal post! For more safety, wrap them with masking tape as well if you want. Battery can be then removed easily, even if it weighs! Step #3 : Battery fixing plate removal You can now access the battery fixing plate, which is held by 2 10mm Hex screws (blue squares) and one 10mm hex nut. Sorry, the latter is out of the pic, but it can be found easily (just follow blue arrow). Be careful don't be too quick at this step, several fixing staples are indeed attached to the battery holder. You might be tempted to cut the tie-wraps, but these are attached to small brackets, which are simply stapled (red circles) or clipped (orange circle) to the battery fixing plate. Staples can be removed by simply pushing them with a flat screwdriver, while the clip-on holder can be pulled out with a small fork. There is now a small Control Unit attached to the battery fixing plate. Unclip the small lug (red circle) and pull the control unit vertically (as suggested by arrow) to remove it from the battery fixing plate: The battery fixing plate can now be removed. Step #4 : Oil draining You can finally access the DSG oil filter housing: A 24mm hex socket is necessary to remove it. Once done, protecting the filter location against foreign object damage or dust is necessary. Aluminium foil will do the job. FYI, here is the difference between a new filter and a filter with 60,000 km on the clock. Now remove the sealing plug with the 14mm Hex. Once done, the oil flow will be very thin, due to the oil pipe. Remove the oil pipe, using a 8mm Hex. After that, the oil flow is more important. Step #5 : Oil filter replacement Once the gearbox is empty, you can put back in place: - The Oil pipe (still using the 8mm Hex. Tightening torque = 3nm). If you don't have a torque wrench complying with such a low range. Take it easy! Just to give an idea, it is roughly the same order of magnitude as for closing a jam jar lid. (Sorry, this is the only simple image I found quickly ...). Well just keep in mind, it's light !! - The new DSG oil filter (don't forget to moisten the O-ring in its hole) - The new O-ring on the filter housing (don't forget to moisten this one too) - The filter housing, which must be tightened at 20 Nm (with the 24mm Hex socket) Step #6 : Reassembly Steps #1 and #2 can be processed in the reverse order to reassemble : - The battery fixing plate (and the small control unit) - The Battery - The air filter housing and the hoses - The airbox. Step #7 : Oil filling The filling hose can now be screwed in the sealing plug thread At the other end, donc forget to shut the 1/4 turn valve, before screwing it onto the oil can. To make it easier, you can attach the can to the bonnet with a 80cm long twine or an old metal hanger (wire one), that you can shape to transform it as a can holder. If you want to fill the gearbox faster, you just need to make a little hole in the can bottom (now upside down ) to enable air getting in the can. Of course, don't forget to open the 1/4 turn valve. http://img.xooimage.com/files1/b/e/c/whistle-1bb1.gif You have to fill approximately 5,5l. Once again, don't forget to shut the 1/4 turn valve upon each oil can change http://img.xooimage.com/files1/b/e/c/whistle-1bb1.gif. Warning: Do not make a hole in 6th can, otherwise there could be some side effects... http://img.xooimage.com/files1/3/e/0/33-2bc7.gif When the 6th can is half empty, shut the 1/4 turn valve, remove the can from the filling hose. Put now the free end of the filling hose into the dip tray. You can now open the 1/4 turn valve to start adjusting the oil level Step #8 : Oil level adjustment ⚠️ Now, start the engine and keep your foot pressing the brake pedal. Move the gear lever in accordance with the following sequence: P to R, wait 3s R to N, wait 3s N to D, wait 3s D to S, wait 3s S to D, wait 3s From this point, most other tutorial suggest getting back directly to P. I personally rather got back step by step, still waiting 3s after each step. Once back to P, you can remove your foot from the brake pedal, but keep the engine idling. Now, connect your VCDS cable and select the gearbox controller (02 Auto Trans): Once in the gearbox controller menu, there are 2 options: 1) Either get into "08 Meas. Blocks". then in the new window, get into "Group 019" and check the Temperatur cell of "ATF (Auto Tranmission Fluid)" parameter. This is at least what I've found in several other tutorials. But though owning an official VCDS cable, the "08 Meas. Blocks" is greyed on mine. (may be my Micro-CAN version starts reaching its limits). Hence I had to use option #2 below. 2) Or get into "Adv. Meas. Values" menu: From this point, type "trans" in the search cell to find all parameters related to the gearbox. In the results list, tick "ATF temperature - Transmission fluid temperature": Now with the engine still idling, just wait for the oil temperature to get between 35 and 45°C. It may take several minutes. Be patient. When oil temperature is close to 35°C, you can remove the filling hose completely. Don't worry temperature is increasing really slowly. The oil flow from the oil pipe starts decreasing. Once the oil temperature is within the 35-45°C range, you can observe that a slight amount of oil flows out via the overflow tube every 30 seconds, independent of the oil level. This is caused by oil pulses, which cool down the coupling. According to workshop manual, this oil quantity is not a criterion to determine the correct oil level. Therefore, they must not be taken into account when assessing oil level. You can now screw back the sealing plug (with 14mm Hex). Tighten it at 45Nm. From this point, you only need to stop the engine, disconnect your VCDS cable and put the soundproof housing back in place under the engine, and... That's it! Well, non counting the specific tools, you've just saved ~200€! Note: I'd also like to write special Thanks to @J.R., who helped me to translate some technical words I was missing! Much appreciated.👍 _1 point
-
1 pointNo. You simply won't be able to drill it out by hand because you cannot consistently apply enough force to the workpiece. Your only hope now is to slice the head completely off the bolt using an angle grinder, then you can remove the driveshaft, remove the bolt stub using grips and refit using a new bolt.1 point
-
1 point
-
1 pointCan't help with whether a screen change will help fix the issue. I do know that the screen does not need any coding. They are quite easy to change. Should be standard mib keys and it just pops out. Then just the cables to unplug. Maybe find a friend with the same system and swap the screen out so you don't spend on a new screen unnecessarily?1 point
-
1 pointWhere there is a will. I would have the EVs fire blanket wrapped as each one is loaded with a blanket that wraps the car up right underneath. Straps then over the wrapped car. As car transporter ships have no segment fire breaks they should adopt better anti fire systems. Needs a reset look at this new paradigm. Stats should EVs are about 20 times less likely to catch fire but chemical fires need more thoughtful solution than just using a 3 inch water hose.1 point
-
1 pointi have noticed more and more diesel jettas getting the boy racer treatment around here recently too.. nothing like a bog standard 1.6tdi dragging its arse around and rubbing tyres on wheel arches1 point
-
Superb 1.4tsi ACT SEL exec Hatchback 6 speed manual To Heathrow and back. Done this a few times with similar figures always reported. Son recently drove it non stop from north of Manchester to Hamburg via Dunkirk snatching a couple of hours sleep waiting for and on ferry on one tank of supermarket 95 petrol. Never brimmed, always only filled to 1st click (to avoid ruining the EVAP system) Distance travelled 815 miles on the tripmeter he said. Travelling at legal limit plus perhaps a bit more. Also confirmed he cruised at 216 kph in Germany on several occasions, where ot was allowed. Something I don't approve of. Don't know if that was car speedo or google maps speed. Did however confirm it was in 6th gear I am inclined to think our car has a 72 or 75 litre tank rather than the 66 litre standard, something I discussed on another thread in the distant past.
 1 point
 -
1 pointYou wont see any visible errors. The battery still needs to be coded correctly. The errors relating to steering are different and are expected. Regarding your charger - where specifically are you connecting the terminals of the battery charger? I hope not directly to the battery negative post.1 point
-
If that is a true level for the oil, I'd suggest a trip to your local garage and ask them if they can suck about 1/2 a litre of oil out through the dipstick.1 point
-
Also be aware that holding the dip stick in an upward angle as shown in your image can give a misleading, high reading as the oil flows up the stick.1 point
-
It will be very loud all the time, I would say.1 point
-
Putting to Park never applied parking brake in my car. Only switching ignition off puts both in Park and on parking brake. If the button below parking brake is activated, car holds brakes whenever it is stopped, but I think it is not parking brake though.1 point
-
Whilst my car is a manual I’ve driven a couple of DSG mk4 Octavias over just shy of 9000miles. In both of those, turning off the engine automatically put the ‘box in P and applied the parking brake. I didn’t have to change any settings but I think there is one in there somewhere.1 point
-
Yes Putting it in park does also put the handbrake on, but don't get confused with "Hill hold" which only cuts in when you come to a stop (if it is switched on, switch just at the back of the handbrake). No there is no setting for the handbrake to come on. And also don't forget you don't have to take the handbrake off when you set off, as soon as you start to move off it comes off on its own1 point
-
1 pointSachs 992103 matches 5Q0511115AN. However, 1K0511115CT from the Octavia MK2 Scout appears to be identical to 5Q0511115AN but is often less than half the price. If you look on autodoc, you can see that Kilen/Lesjofors are selling the same rear spring to replace both 1K0511115CS and 5Q0511115AM. Hence, the Octavia MK2 Scout and Octavia MK3 Scout having the same rear springs...just using different OEM part numbers for the same spring. Bilstein 36-199570 (matches 1K0511115CT so should be identical to 5Q0511115AN) https://www.ebay.co.uk/itm/334134786357 Eibach R10494 (matches 1K0511115CT so should be identical to 5Q0511115AN) https://www.autodoc.co.uk/eibach/13828886 You have three choices of rear Scout springs. They will all give you about the same unladen ride height. The difference is in the compression rate. The 13.00mm version is about 8% stiffer than the 12.50mm version, and the 12.75mm version is about 4% stiffer than the 12.50mm version. Wire Diameter 12.50mm, Weight 2.45kg 1K0511115CR (from Octavia MK2 Scout) 5Q0511115AL (from Octavia MK3 Scout) These two springs appear identical and interchangeable. The MK2 springs are sometime cheaper than the MK3 springs. Wire Diameter 12.75mm, Weight 2.6kg 1K0511115CS (from Octavia MK2 Scout) 5Q0511115AM (from Octavia MK3 Scout) These two springs appear identical and interchangeable. The MK2 springs are sometimes cheaper than the MK3 springs. Wire Diameter 13.00mm, Weight 2.75kg 1K0511115CT (from Octavia MK2 Scout) 5Q0511115AN (from Octavia MK3 Scout) These two springs appear identical and interchangeable. The MK2 springs are sometimes cheaper than the MK3 springs. Octavia MK2 4x4 Scout Rear Springs (1) 1K0 511 115 CR coil spring 1 paint mark 2 paint marks red green 2 PR-1JB+0YK (1) 1K0 511 115 CS coil spring 1 paint mark 3 paint marks red green 2 PR-1JB+0YL (1) 1K0 511 115 CT coil spring 1 paint mark 1 paint mark rear red brown 2 PR-1JB+0YM https://skoda.7zap.com/en/cz/octavia/oct/2012-663/5/511-511012/ Octavia MK3 4x4 Scout Rear Springs 1 5Q0 511 115 AL coil spring 2 PR-1JB+0YC (1) 5Q0 511 115 AM coil spring 2 PR-1JB,0YD (1) 5Q0 511 115 AN coil spring 2 PR-1JB+0YE https://skoda.7zap.com/en/cz/octavia/oct/2016-753/5/511-511010/1 point
-
1 pointThink they had a fire in Norway too, oops. As to EV fires the fire blanket seems to work well, or foam maybe, not so much water. That what I was taught I recall, red water extinguishers for normal inflatable material, foam or co2 for electrical, fire blankets are good too.1 point
-
1 pointAs an ex Merchant Navy Engineer, and in international logistics now I do like to follow these matters. All parts of the revolution in motive power. aerospace is a different matter as no electrical equivalent to jet engines or rockets so that needs a rethink. Back to propellers to replace jet engines as to rockets not seen a solution there other than ion drive.1 point
-
Thanks for summarising. I have updated maps to V12, but did not change the fee based traffic value and TMC is working again! Value is set to original, 32771.1 point
-
That's the one where Pcbbc gave two options. Get your coding back to how it was. You need to overwrite those modules. If we had the photo earlier 😉. 1410 gives it away as a mib2 standard (Amundsen). I have nicely documented the brilliant work done here on the Seat board: https://www.seatcupra.net/forums/threads/updating-the-inbuilt-mib2-satnav-mib2-tricks-and-lost-mib1-card-solution.388586/page-136#post-5037297 So you are one release I reckon before V12. Probably best to upgrade to that then you need option a. or b. Mib2 high (Columbus) I put here: https://www.seatcupra.net/forums/threads/updating-the-inbuilt-mib2-satnav-mib2-tricks-and-lost-mib1-card-solution.388586/page-136#post-5035425 Saves me referring to the back posts here.1 point
-
I'd assumed we were on the right route from the start. If the maps are on an SD card on that year then it's a Amundsen (which is a mib2 standard) then it's the other route without coding using the Pcbbc posted fix of old maps with revised module (development of bigade1 method) in the posts above. If no SD card and you got maps on the system, that year then it's just coding. The Pcbbc method for the Columbus (which is a mib2 high) shown above as well that is just the coding method you have done, that splits into two, 14 code you use if your car didn't come with connect services and the head contained 15 as the TMC code or the revised 5 character code if it had the 5 character code (connect services). That latter solution fixes VWs mib2 high units which can have a different 5 character code starting point. Turned up on the thread. Older mib1 high units can be fixed with the 14 coding, that turned up on the thread as well. A photo of the map release used in the system, firmware release code etc also allows people familiar with the units to quickly resolve whether it's a mib2 standard or mib2 high or anything else. I did bring these together for Seatcupra forum in the link above in the posts. All the same solution except for the mib2 standard you have to deploy the "workaround" of copying the overall.nds file if "updating" mib2 standards maps. Seat didn't bless the cars with unlimited mapcare until the final year of mib2s in them... an additional wrinkle. Why I harp on about this in case Seat readers don't do that as well. There is a recovery file I posted up if you fall into that trap which Seat drivers continue to do, not reading the small print. The "workaround" works around not having unlimited mapcare on mib2 on Seats. Mib3 they have fallen inline now. Other than that it's not toggling some basic parameter or having the station in memory. Nb. There is one other mib2 standard unit which I think was never fitted to Seat or Skoda where the fix doesn't work. That's signposted above on the thread. You see someone ask for that fix in the text but no follow up.1 point
-
Value of second hand Zoe's seems to be stable now but that is an absolute bargain in some cases. EVM buying a ZE22 for £4.4k, very tidy and battery life still very good but only 80 miles or so range but mega for a cheap commuter car for someone. ZE40 are hard to find and I think owners are holding on to them as a car with that 160 mile or so range for 10k or less, negligible running costs. It is the ZE50s like mine which we £30-34k cars 18 months ago and now are valued around £13k is a bit massive. But then it is too easy to forget that many of us got massive government subsidies, thousands for the car and £500 for the charging point plus Renault and dealers were giving thousands discounts and finance terms were good. Also when running the car one can be claiming 45p per mile whist it actual probably costs less than 10p per miles with energy, servicing and tyre costs quite low. Just have to accept it, Zoe will cease production in March 2024 after about a third of a million having been made to make way for Renault 5 and 4 and Dacia Spring. If they all help clean up our air and slow down climate change then that is a win and values are nominal but I would be worried for Renault getting back numerous Zoes back from PCP which are worth thousands less than the balloon payment, not good for their balance sheet.1 point
-
1 pointI agree with your last sentence, what I wrote above was diametrically opposite to how I am but if you are dealing with recalcitrant muppets who are not honouring their obligations then you have to swing to the other side, MOT fail = unsafe to drive on road = fix it you *****rds or I'll get it done and the court will make you pay.1 point
-
Brought myself a dragy to do some testing before and after I get her remapped next week , book 0-60 is about 8.5, mine sure feels quicker then that with abit less weight then the gti and with the bolt ons so time will tell1 point
-
1 pointFrom what I can understand, that 250 kw rating is most likely peak output. It would be interesting to see how long that lasts and what is guaranteed continuous output from the fuel cell generator. Just like hydrogen fuel cell cars, battery are always needed to act as buffer between non-constant power requirement and constant fuel-cell power output. Key is getting the right matching for the application.1 point
-
1 pointI don't know how to take it apart, but just checking the obvious..... you have opened that cover and there's nothing inside the little storage / phone holder part?1 point
-
1 pointYes, especially as you have gone from an EFB to an AGM type. Maybe don't use Halfrauds again. Thanks. AG Falco1 point
-
Like most of us, you probably learnt very quickly why it was orange. Ouch.1 point
-
1 pointI've been working with a chap who looks after the mobile generator trucks we use at work. Turns out they have been bought be a much bigger company (so serious investment is now available) and are now looking at hydrogen fuel cell gennies! Already some golf and tennis events have had a Hydrogen genny on site and I believe they can produce around 250kW from a cell that is surprisingly small. He described a cell area of around 3 x 4 feet, or there abouts, which seem tiny for something that can produce 250kW (I have no idea about the actual molecular science involved in this technology of course ). They also use a huge amount of conventional battery technology to supplement this generator, with a sort of topping up process going on continuously I gather, but the fuel cell can run full tilt as a pure generator if needed. They do have to redesign the truck/generator body however, so if it goes 'BANG' then the roof blows off and the sides stay intact. I might not be parking next to one of these though...just to be sure SKY TV are looking to go full hydrogen/battery for all their OBs by 2030, although I gather the costs at the moment mean the electricity bill will go up 3 or 4 times. I may well be still in the industry long enough to see these things appear I'm super interested to see one in action1 point
-
1 pointDCC or non DCC suspension? I replaced the terrible Monroe shocks with Bilstein B6 damptronic’s on my DCC equipped car, as have several others. I refitted the original springs as they were in perfect condition and I had no interest in lowering the car. These completely transformed the drive and comfort of the car and removed the bangs and uncontrolled knocks and bounce that you are describing. I then recently replaced the bottom front arms with superpro upgraded items to remove the roll from the bushes (which had actually allowed the arm to rub) and completely annihilated the creaking and grinding these factory bushes cause. At the same time I installed H&R front and rear roll bars. The car now drives unbelievably well. Actually not only retains the factory comfort levels but improves apon them in a way that can only be described as transformative. The car glides over road undulations that would have felt like a crater before, without even noticing they are there. The handling in corners is on a level with my wife’s ST250 and no longer try’s to push wide on roundabouts and tight bends. The handling and ride comfort now feel controlled and safe. I’m no longer concerned about manhole covers or the front end washing out on me, especially in the wet, and winter driving in the dark is going to be so much more relaxed than it ever could have been before. This isint so I can drive around like an R plater on coke either, it’s genuinely nice to just know everything is controlled and safe on leisurely drives and day trips out with my family, without having it ruined by what felt like the front end collapsing when driving over the slightest thing at all.1 point
-
I don't like having the seat low. Pulling the steering wheel towards you has a similar effect to lowering the seat as the wheel rises as you pull it towards you. You may find its an acceptable compromise without having to take the seat right down. You should also experiment tilting the seat back a bit and move the seat rearwards (if your legs still reach the pedals comfortably) and your eye line to the dash would be better.1 point
-
Hello all, I recently replaced my parents car with their 3rd Fabia, a very nice 21 plate SEL DSG estate. Cracking bit of kit. So I've "inherited" their old car a Navy Blue 2011 Fabia 2 1.2 "S" 60. I needed a runaround as I was waiting for my new car to arrive, so took it on, and thought I'd fix the niggles and get it ready to sell on. But to be honest, it's a cracking little car, been parked by touch over the past few years by my ageing parents but with only 50k miles, but drives great, is totally anonymous, and the perfect antidote to the other cars in the household and known by all as the Super Skoda. So far its had...... A new spare key - the original blade had snapped A replacement fuel filler cover - my dad had walked in to the original and snapped it Drivers door loom - windows and central locking weren't working, snapped wires in the hinge area. Drivers door window switch - my mis-diagnosis of the above Fan resistor pack - common fault on VAG cars of this age. Fan had 2 speeds off and full tilt, now all 4 work Service pack - plugs, oil, fuel, air and pollen filters New Bosch aero wipers 2 rear tyres (how much!) Failed MOT New front pipe and flexi Gaskets, rubber mounts and copper nuts for above New Mot Will give it a machine polish to try and remove some of the grazes it has and to clean it up a bit - but it won't get any paint, it's too honest a car. Hope that's it for the time being, let's see how long it lasts before its moved on, but at the moment its fitting in quite nicely into the routine of the household! the forum so far has been invaluable to fixing the issues so far - a great reference point. Keep it up all!!1 point
-
1 point
-
I took my 280 round the ring. First in real life lap for me. Elevation changes is nuts. Busy session. Win because car still in one piece.1 point


.thumb.jpg.9dd3f612ba7f13d10be5c518d3c8d255.jpg)