


Leaderboard
-
J.R.
Resident Member12Points15,266Posts -
Brian15
Members10Points190Posts -
Stonekeeper
Resident Member10Points2,849Posts -
ApertureS
Resident Member9Points2,678Posts


Popular Content
Showing content with the highest reputation on 21/01/24 in all areas
-
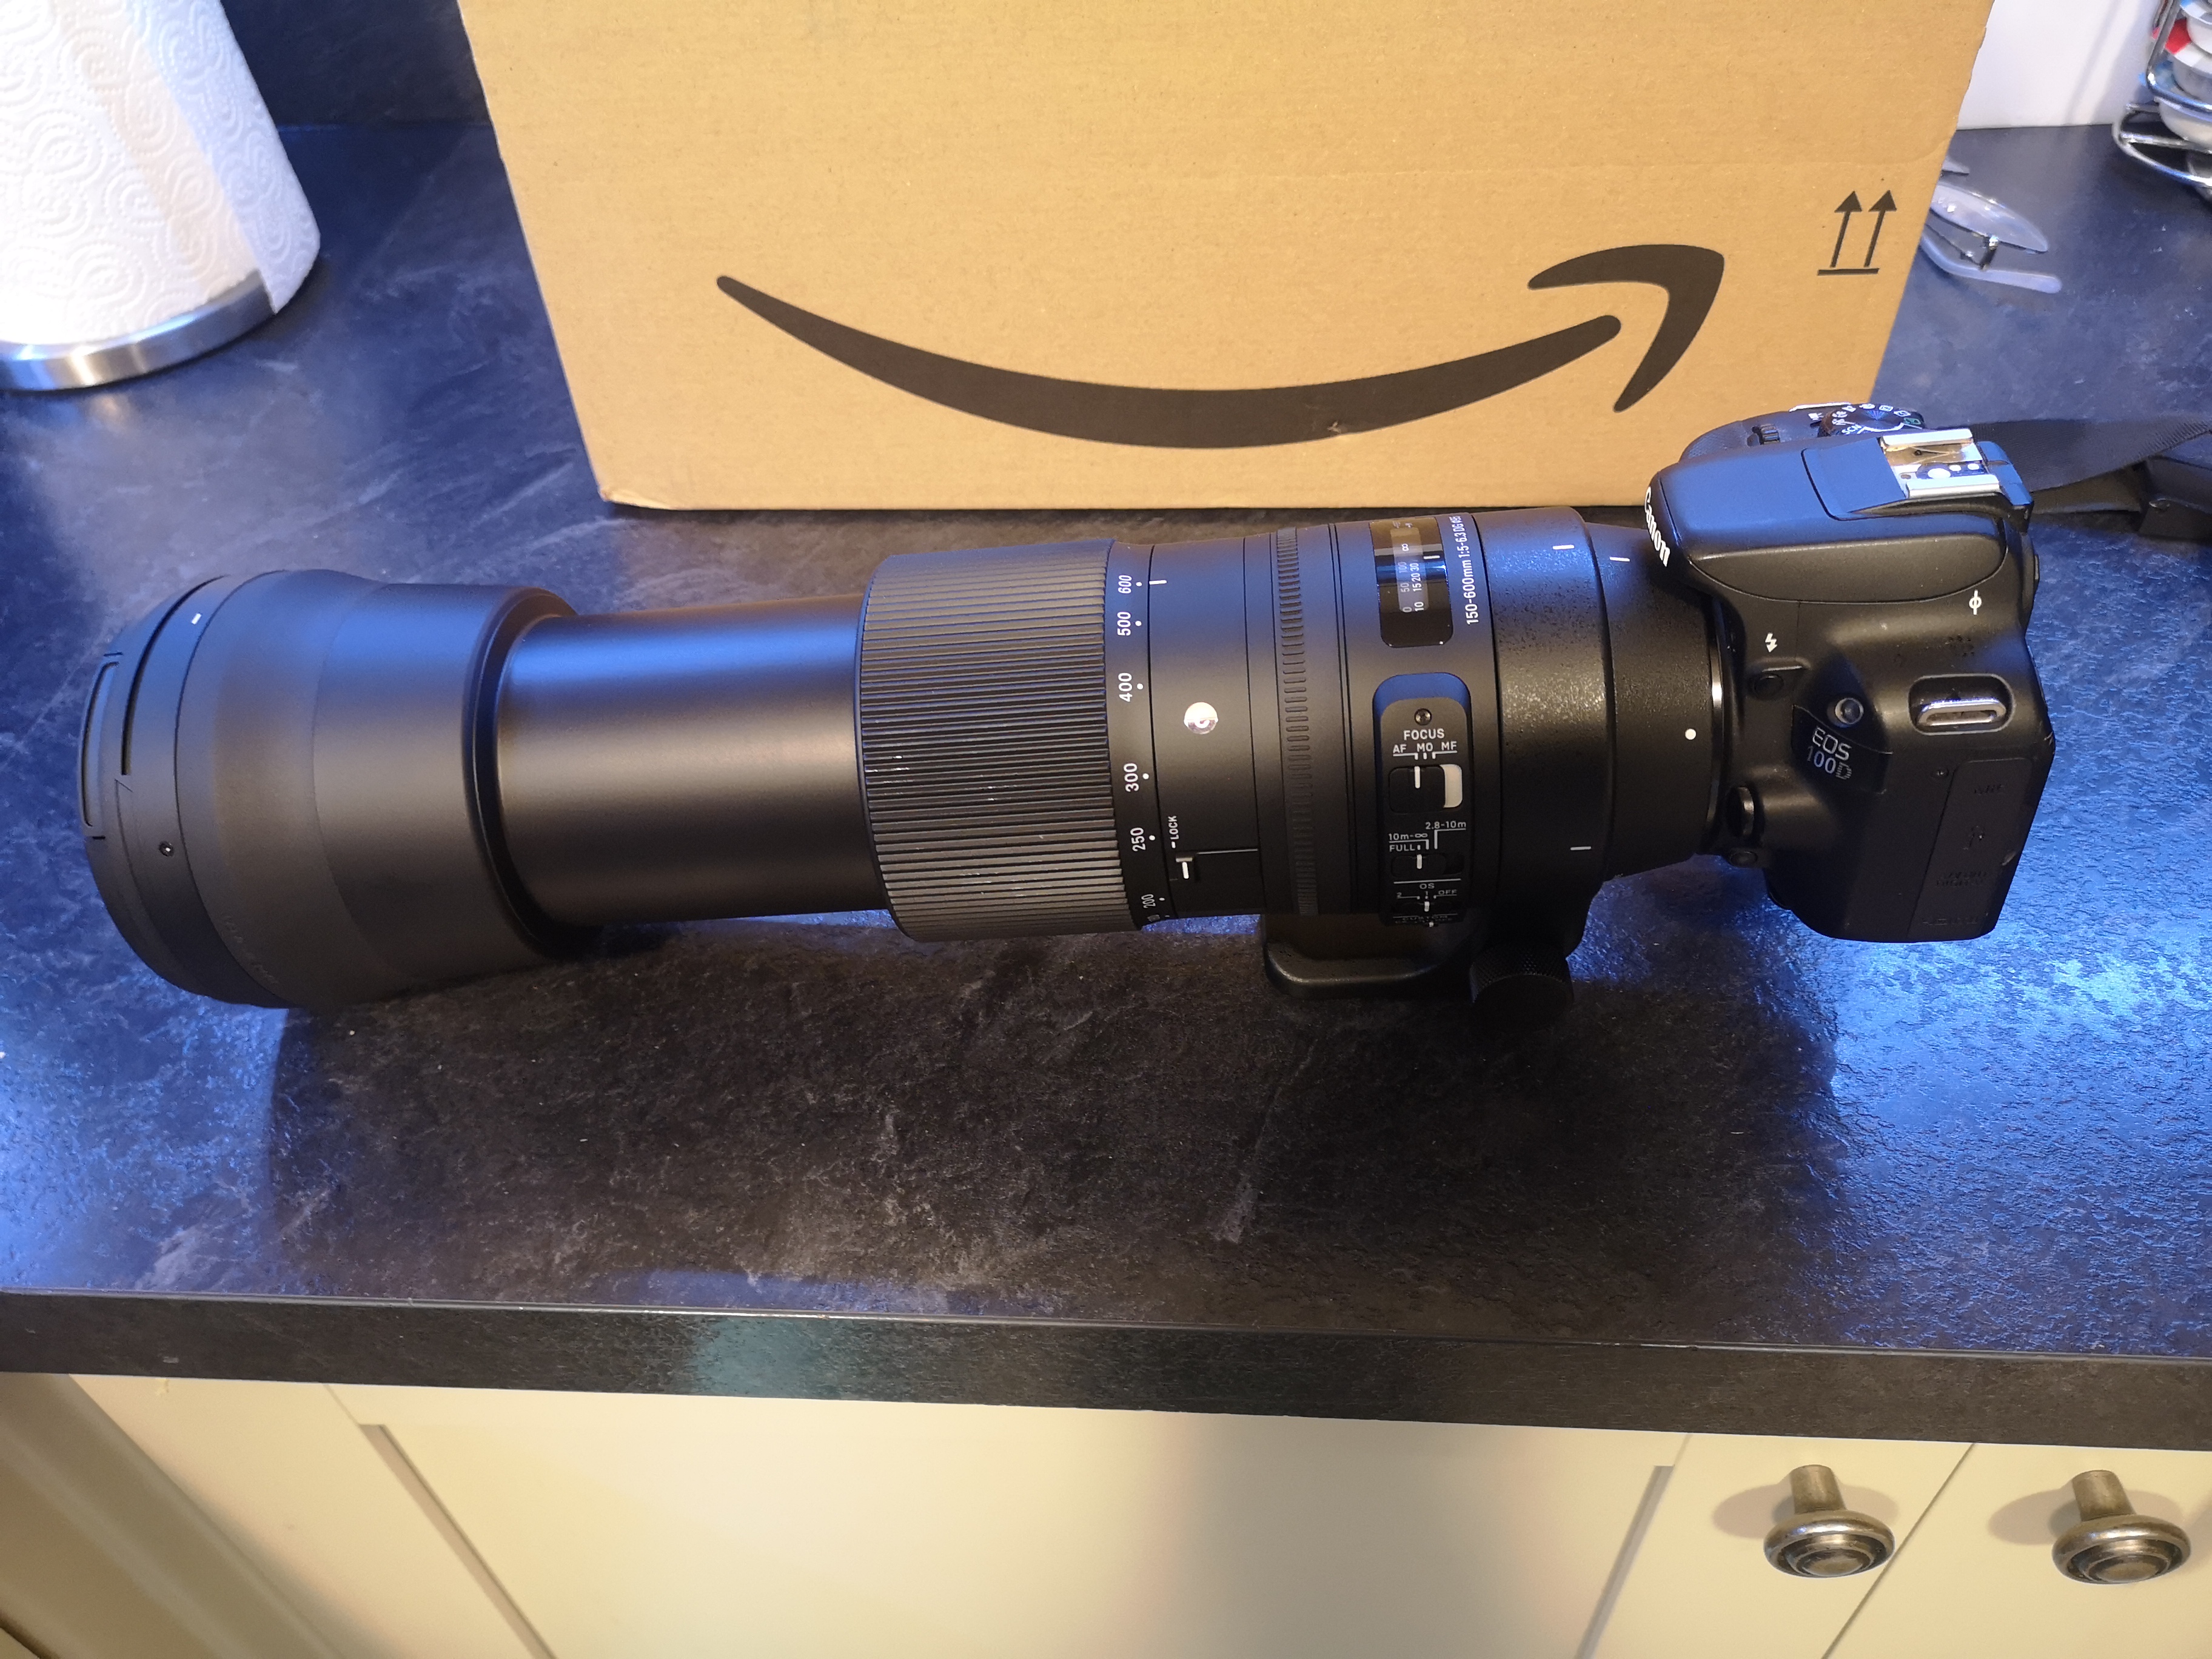
3 pointsNew 600mm lense arrived today birrhday gift from the missis ,just need some good light now 😁
 3 points
 -
2 pointsI've hired the Canon 300mm F2.8 II from Calumet and it's a great deal. Pick the lens up on Friday and return it Monday morning, total cost including insurance that Calumet sort is around £60 (not hired for a couple of years so it may have gone up a little). Still great value for 2.5 days on a lens that cost around £6k when new2 points
-
2 points
-
2 pointsMine too, I am stuck with Gendarmerie Blue on this my hopefully final vehicle, looks dirty all the time, no surprise as its never washed but the silver predecessors always looked good with 18 months of grime on them. I am surprised about black and white being the 2nd and 3rd "most chosen" colours, surely they would be at the bottom of most peoples list, I suspect those colours are chosen by the financially driven lease companies & PCP selling dealers who probably order the majority of the new vehicles or buyers not wanting to wait longer for delivery. I wonder what tiny percenteage of new car sales are from buyers who have specified the colour that they want rather than accepting what is offered and being willing to pay the premium and wait for its production? In France it would be a fraction of one percent, if you went into any dealer and said I want to buy a new Turdmobile they would say you can have this one here or that one there, if you said no I want mine in such and such a colour they would just laugh at you like if you asked for a vegetarian meal in a resto or a coffee or non alcoholic drink in a bar.2 points
-
On the tsi it always was lifetime with visual inspections after about 210,000km (130000 miles) but Skoda uk put a 5 year time interval on so there was still some maintenance money to be had from the cars in aftersales. As the tsi engine has developed, changing the belt has become more and more of a technical job and even more complicated and expensive special tools have been needed. I wouldn’t mind betting a good few engines have been made worse by incorrect timing belt installation, and the hybrid cars need ev qualified technicians which are in short supply or even non existent at many dealers. No doubt the engineers at VAG said why are you messing with these belts which have been designed to last and the drive system for them designed to reduce belt stress ? Personally I wouldn’t worry about a timing belt on a ea211 tsi engine before it was 10 years old unless it had starship mileage. Within our family I have also maintained a Vauxhall (10 year/100,000mile interval) belt changed at 10 years on 110,000 miles and a Ford (8 year/80,000 mile interval) belt changed at 9 years on 60,000 mile. Both those manufacturers engines have water pumps driven off the timing belt which is a weak point. The ea211 tsi’s have the water pump driven by a separate belt at the other end of the engine so the main timing belt is unaffected by pump failure.2 points
-
You were true to your word Sir! Thanks for recoding my Skoda Columbus (Mib2 High) from Trafficmaster to INRIX and restoring TMC function. It only took five minutes! Thanks again.2 points
-
2 points
-
2 pointsIt is an M8x35 (1.25mm pitch) and is collard so has a built in washer. The VAG number is N 106 756 02 and they retail at £2.34 inc VAT.2 points
-
2 points
-
1 pointThere is absolutely no chance that VAG will ever admit there's any issue with the chain drive on that engine, it would open them up to a recall and another class action lawsuit. You say the chain isn't noisy yet you think it should be replaced? Since there's no recall and the chain isn't noisy then if you want it replaced you'll have to pay a garage full price to do the work. Lifetime means 10 years or 100k miles so I would change the chain and tensioners on that basis, most chain driven engines from most manufacturers are like this, my brother has just had the whole lot changed on his Citroen DS3 which is fitted with the ghastly Prince engine, that sounded like a bucketful of steel washers in a tumble dryer on startup! If you want peace of mind it's probably best to stop reading anecdotal rubbish on the internet.1 point
-
1 pointThe Timing Chain noise/issue was highlighted by the Skoda dealership mechanics not by me. My thinking is why did they not replace it then as previous owner was a valued customer?The car had been regularly serviced from new and i will alsi continue with this.Hence why i need clarification from Skoda Uk re the chain issue, why it was not replaced and where do i stand if: 1. It fails when it is supposedly fitted to last the lifetime of the car 2.If i replace it for peace of mind will Skoda Group UK contribute to the cost which is far less than a new engine.And remember this is a well known fault which means for me the Chain was not fit for purpose re the Lifetime Statement All i am looking for is some fairness and understanding by Skoda Group UK regards my situation.1 point
-
Fairy snuff, sorry to have brought you in. And you're surprised, Hotmail, good thing they bother with such stuff, pity it's against honest users but they, and others, have to be so careful the internet can be marvellous for all including those it shouldn't be. I've no real idea but I very much doubt it as I think, but can't remember, they have a commercial set up too, didn't seem snake oil to me but I could be well wrong as the some of the English motor trade has ripped me off and fooled me over the decades since the 1970s. I hope I've got smarter since but I might be fooling myself and forgetting a lot. To me in English it looks like a flag on a pole but that's just my interpretation and you and others may see differently and that is fine I didn't intended to get into any argument about such. The three dots in an arrow is media. Lots of stuff has been pushed out before and gets nowhere for many reasons but if you think it's a goer then go for it and as long as you can be honest with the results (some people are unable to admit to mistakes, including me easily sometimes) let us know the results of how you find it in the short term, medium term and long term.1 point
-
1 pointNo history AFAIK. You can view the maps version in the settings to see if they are being updated (usually there should be a release each month). Besides maps, OTA is only doing some really non essential updates to the shop etc. The main MIB software will not update via OTA, it has to be done manually.1 point
-
1 pointYou are also right. The handbrake mechanism can be struck if the handbrake is left on or the cable/mechanism is not occasionally lubricated.1 point
-
1 pointWelcome to the forum! Your Kodiaq looks a similar colour to mine, business grey, albeit yours has more snow on it than mine 🤣1 point
-
I don't want to change the ENEOS synthetic 10W-40 now that i have ''broke'' my fuel consumption record in Highway and Mountain Roads plus City traffic. Every single day the ''crank ang go'' habit gives me more fuel consumption. Specification -20 'C to +70 'C Battery 2+ years old, charged at December, i have Voltage gauge in the console and shows normal indications.1 point
-
1 pointIt has a service book? I have a Fabia III but with the 1.2 TSI engine. I also have two cars with the 1.0 MPI engine. A Citigo and an UP. One which my Daughter drives. The insurance might be cheaper in the smaller Citigo/UP than the Fabia. The MPI engine is good and willing but not fast. Does she plan to drive a lot on hilly roads? My Fabia III is a lot faster and better on fuel but is in a much higher insurance group. Thanks. AG Falco1 point
-
@Rooted will probably know about stuff like this. This gets good reports but AFAIK isn't available in UK so I doubt for France also. - https://www.atschemicals.com/ I didn't know what this meant so I used Google Translate but then I saw the flag looking icon, top right of page, and it gives a drop-menu of French or English.1 point
-
1 point
-
Hello Malc, If you are hearing a 'hiss', it is probably a leak from the EGR or from the turbo - neither of which are terrible fixes to sort out. Can you update your profile to show what your latest car is please? It is also worth getting a code scan done to see if the car is throwing a code. Check out the VCDS owners list to ask somebody closeby to scan your car with VCDS or Odbeleven. We might be able to comment more fully then.1 point
-
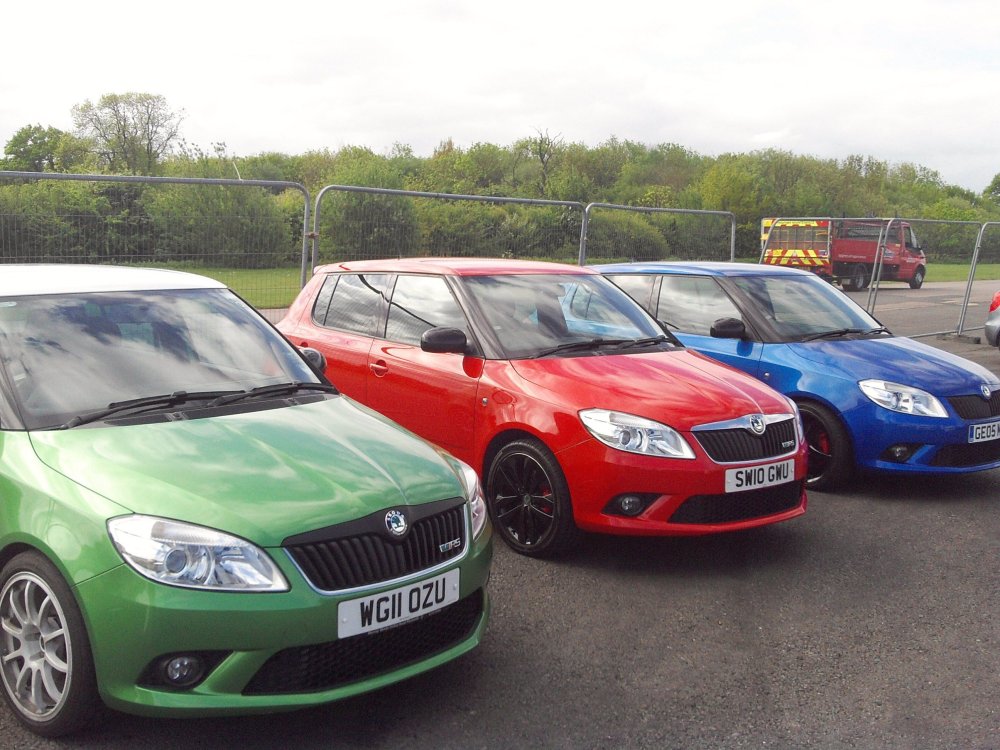
1 pointYes i know. I read the post. The Green Car is Standard. There was no Option, just Facelift to Black Pack. An answer to the question is what is needed.
.jpg.bc1729f1fd9ad3a43851d4c674a5a28d.thumb.jpg.ee0d8450ed36c2234b33f1f98cafb02a.jpg)
.jpg.bd67281767456fadf690272ece265774.thumb.jpg.49adec3202421cbf0fd672c2dabc249d.jpg)
.jpg.a6446f1250c711e4b3b4e48ba339b823.thumb.jpg.4cc8f5138d0613c8e4441a30042e0348.jpg)
.jpg.f1cf557eb7fcf49a16889e39f31b02e8.thumb.jpg.0b4cb42f56e3976ee4c52048b6a8d530.jpg)
 1 point
 -
Eggshell Blue, which is greenish. I feel sorry for any floorboards that get distressed. Like the Floor boards at George Osborne's wedding venue. I remember mention of Farrow & Ball in an article about that.1 point
-
1 pointOn the Seat side of things on Mib2 people have replaced the screens where they are broken. The question is whether that mess is generated in the screen or in the box in the glove box. Reckon that will be in the screen. It's just taking a gamble. The person who replaced the Seat one got one without the navigation button ie. They bought the wrong one without navi. It worked fine they had to get navigation via the main menu. So the pin out of the screen is common just the buttons are different. It lacked the navi button. You could see from the launch materiel the range of screens and boxes. As long as the screen fits in the gap the screens were interchangeable least in that case on the mib2 line of things. So least at a pinch you can fit a non matching screen without navi. Pass on the j and m thing. I'm wondering whether yours is really mib2 but you'd tell from the map card. If say they changed the data flow between mib1 and mib2 then the screens may work differently. The ssp 163 for an Ateca if you Google it shows the slots where you put your keys to take it out. Page 46. Page 44 and 46 on what was fitted on that model. You need something equivalent for your model or erwin. As said the data flow into the unit and pin out was the same. Just the buttons different to the with and without navi but it worked. I told them they had bought the wrong screen after finding the right screen... You pull it out. Disconnect the cables and put the replacement in. Component protection is in the box not on the display screen.1 point
-
1 pointWell, I don't know what happened in detail. I just had the warning on the dashboard twice and found the issue on this brilliant forum! I just then understood about what the system aims at. Problem was confirmed by the dealer.1 point
-
1 pointThe indicator lamp will be lit up in response to one or more of scores of potential fault codes, the very first thing that you should do is to have the fault codes scanned, even a cheap generic OBDII reader should give you a code(s) that causes the MIL light to illuminate, asking what problems others had is pointless unless you like playing parts bingo.1 point
-
Well I was guessing lol it’s a pre made up 5 liters container and there’s some left after it’s full1 point
-
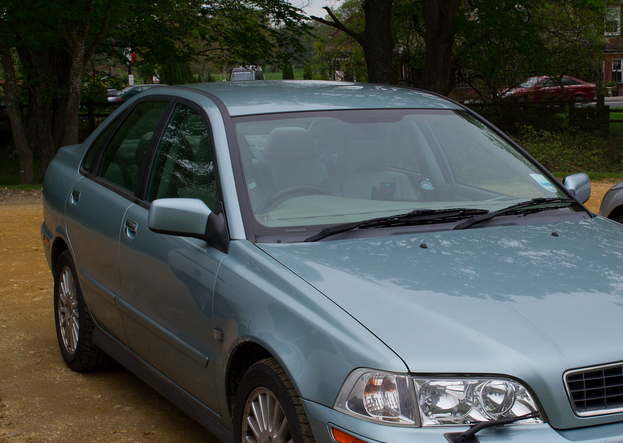
That seems to have a very slight hint of green in it.1 point
-
That's definitely a blue grey... No green in it at all... Blue again from where I'm sat1 point
-
1 pointYou may be surprised on that one... Many people who change cars regularly such as those on a PCP will be the type of people who are also likely to be influenced by 'trend' and black and white have been 'on trend' for a few years now which has probably influenced car colour choice recently too. Personally I don't like white cars... Black is slightly better but not much.1 point
-
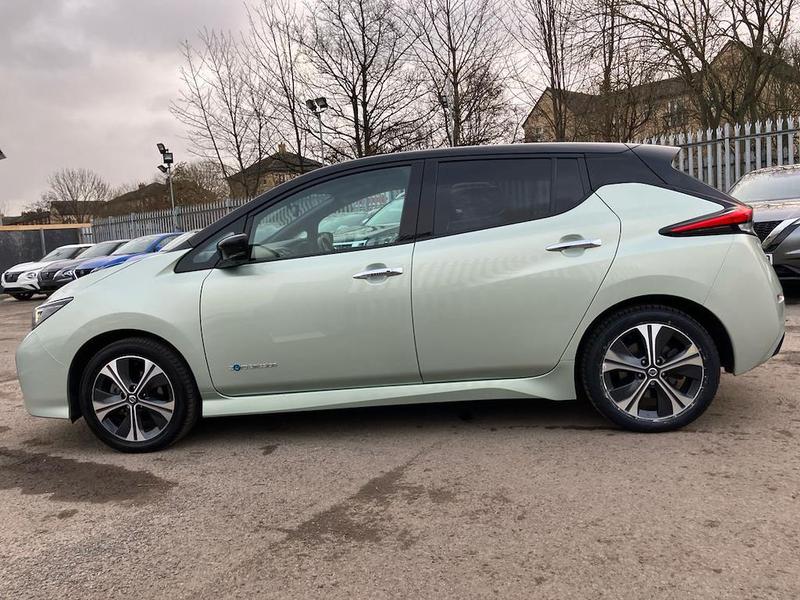
I doubt that children will be able to understand the rules of the game or have the attention span to listen to them, I am still scratching my head. @Gizmo 1st picture looks blue to me but I could accept it is green as I am Green/Blue colour blind which pun intended is not Black and White! 😁 The second vehicle is Blue to me all day long.1 point
-
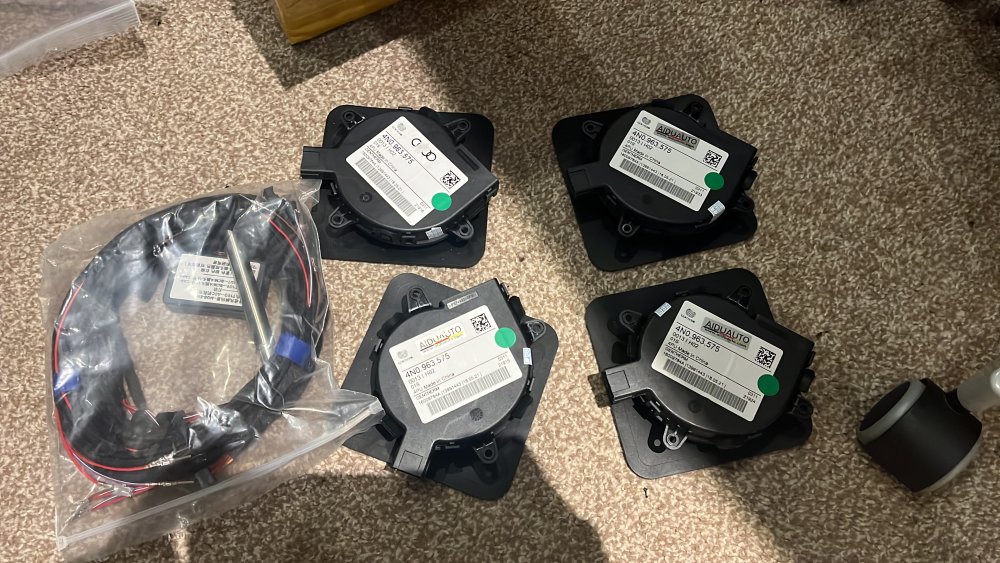
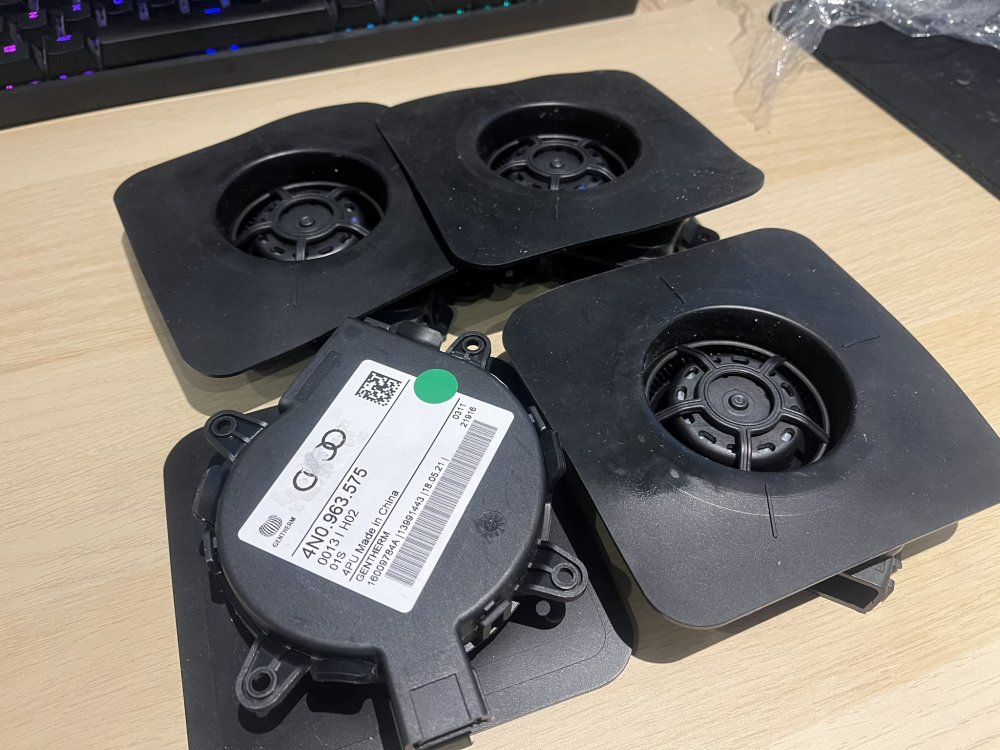
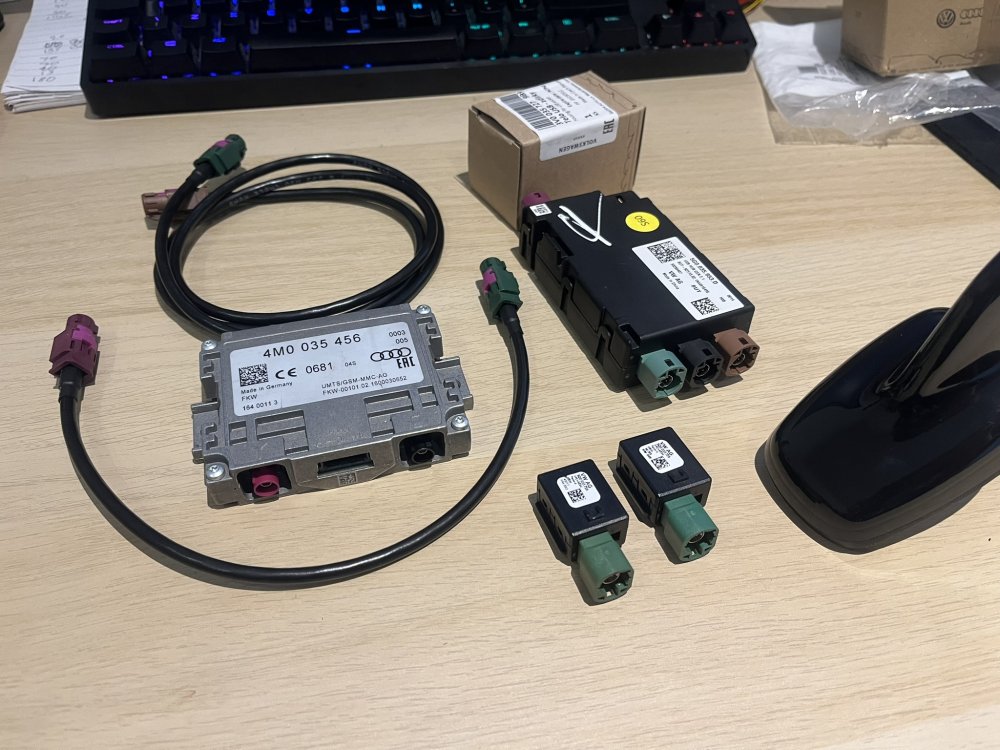
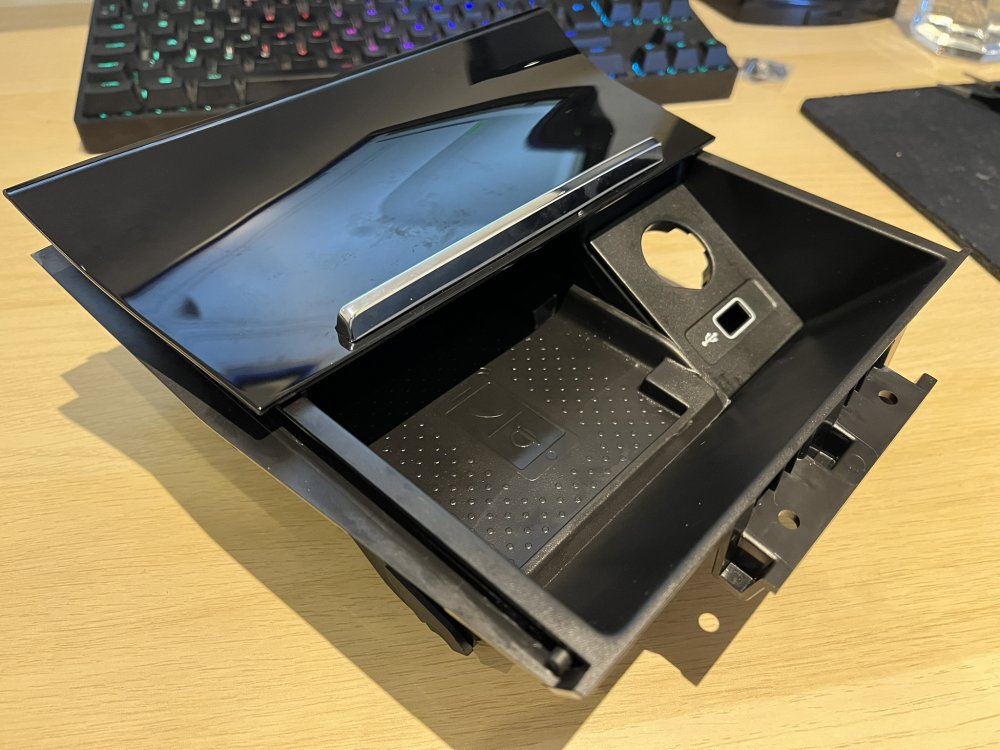
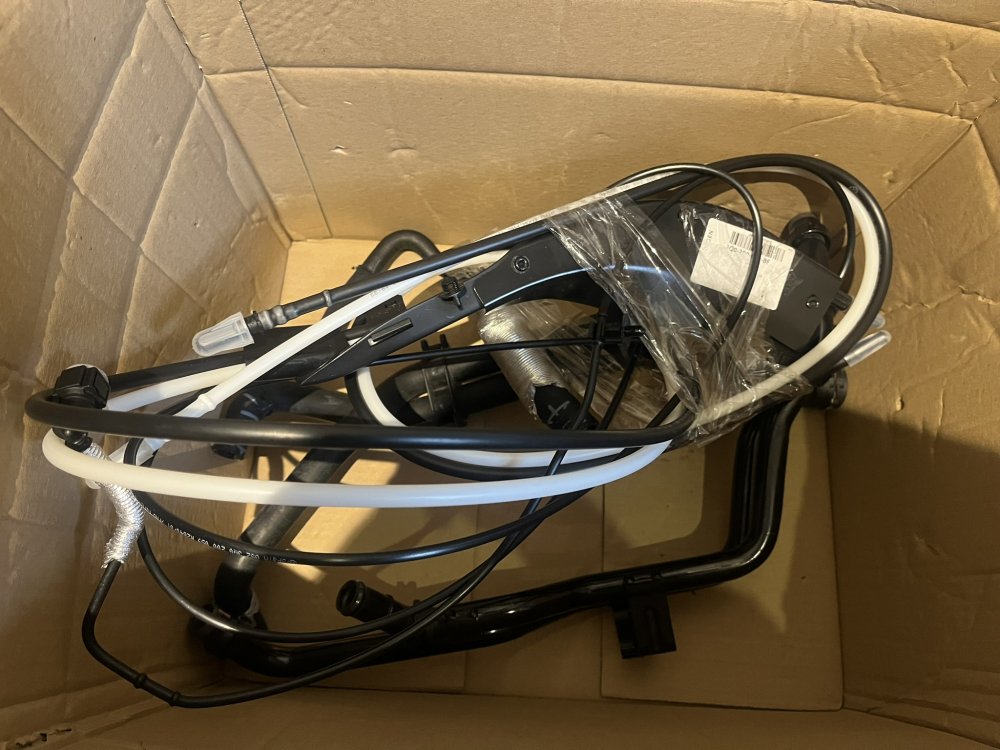
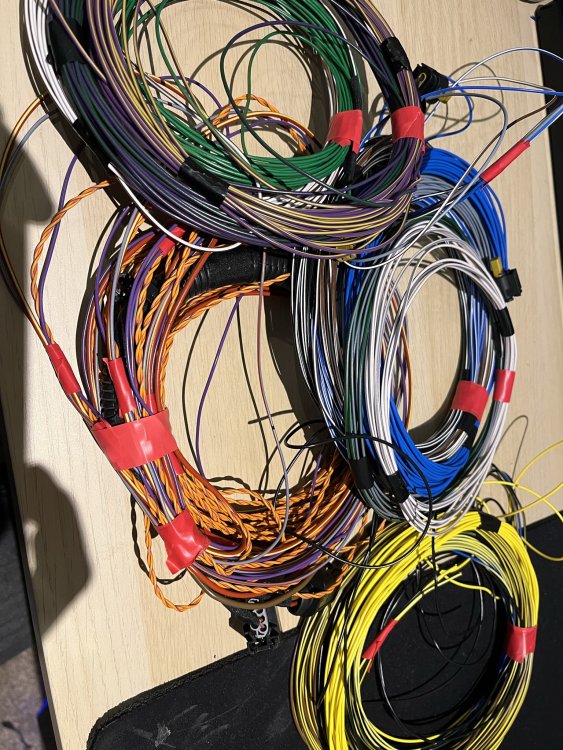
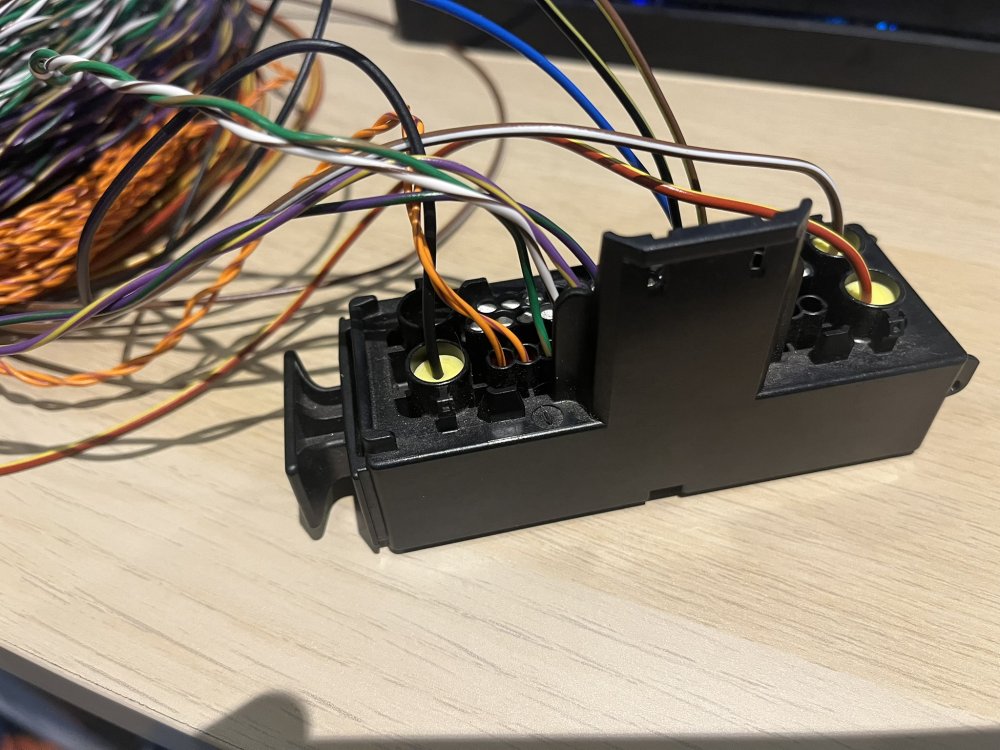
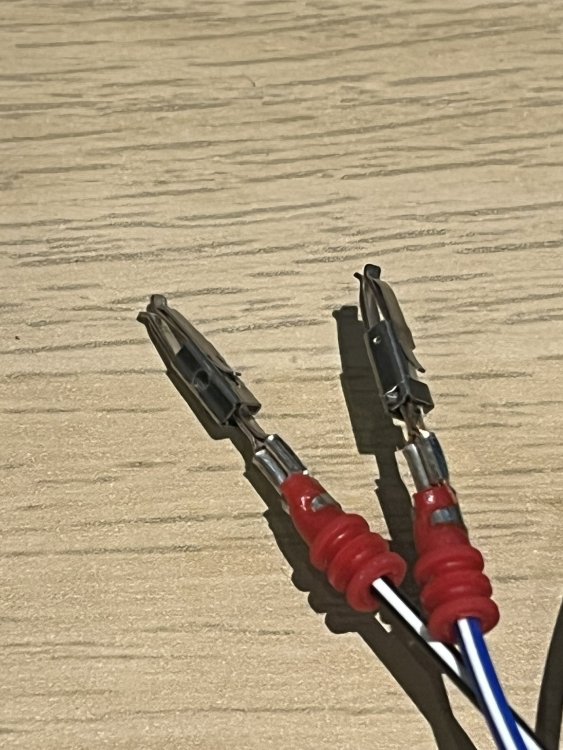
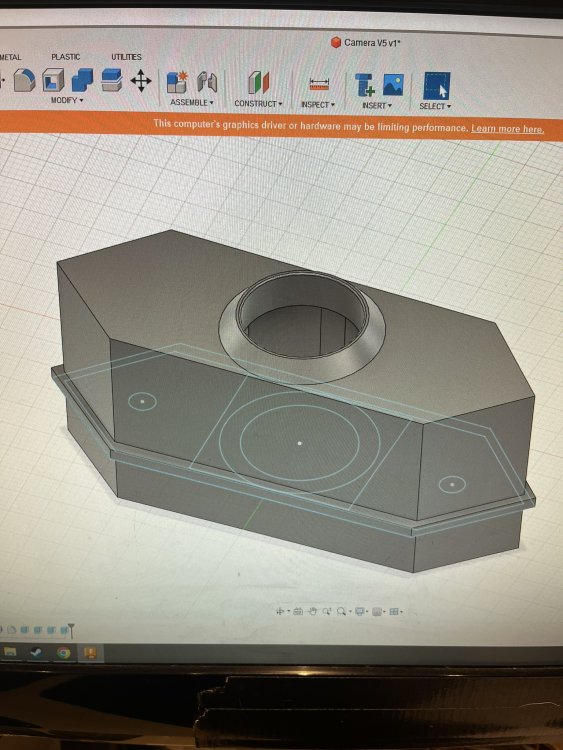
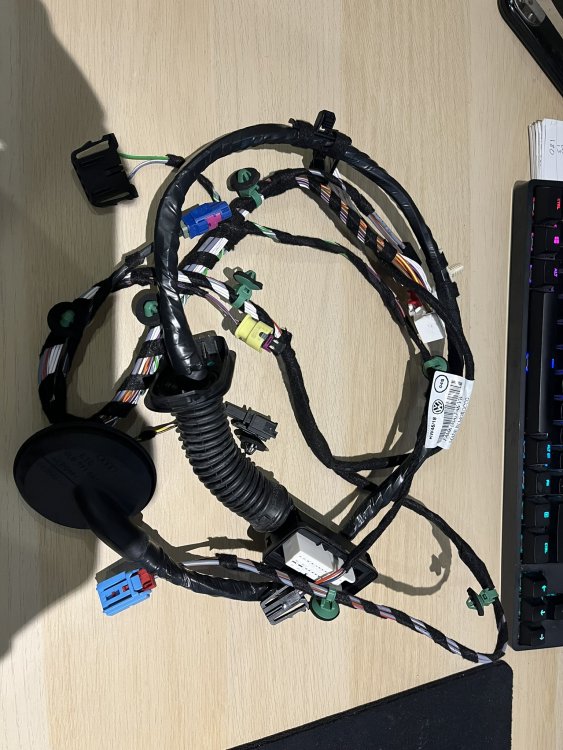
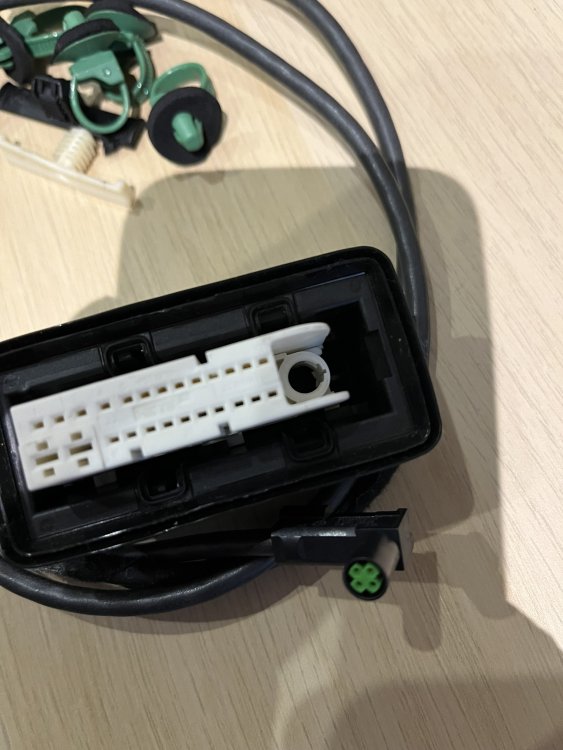
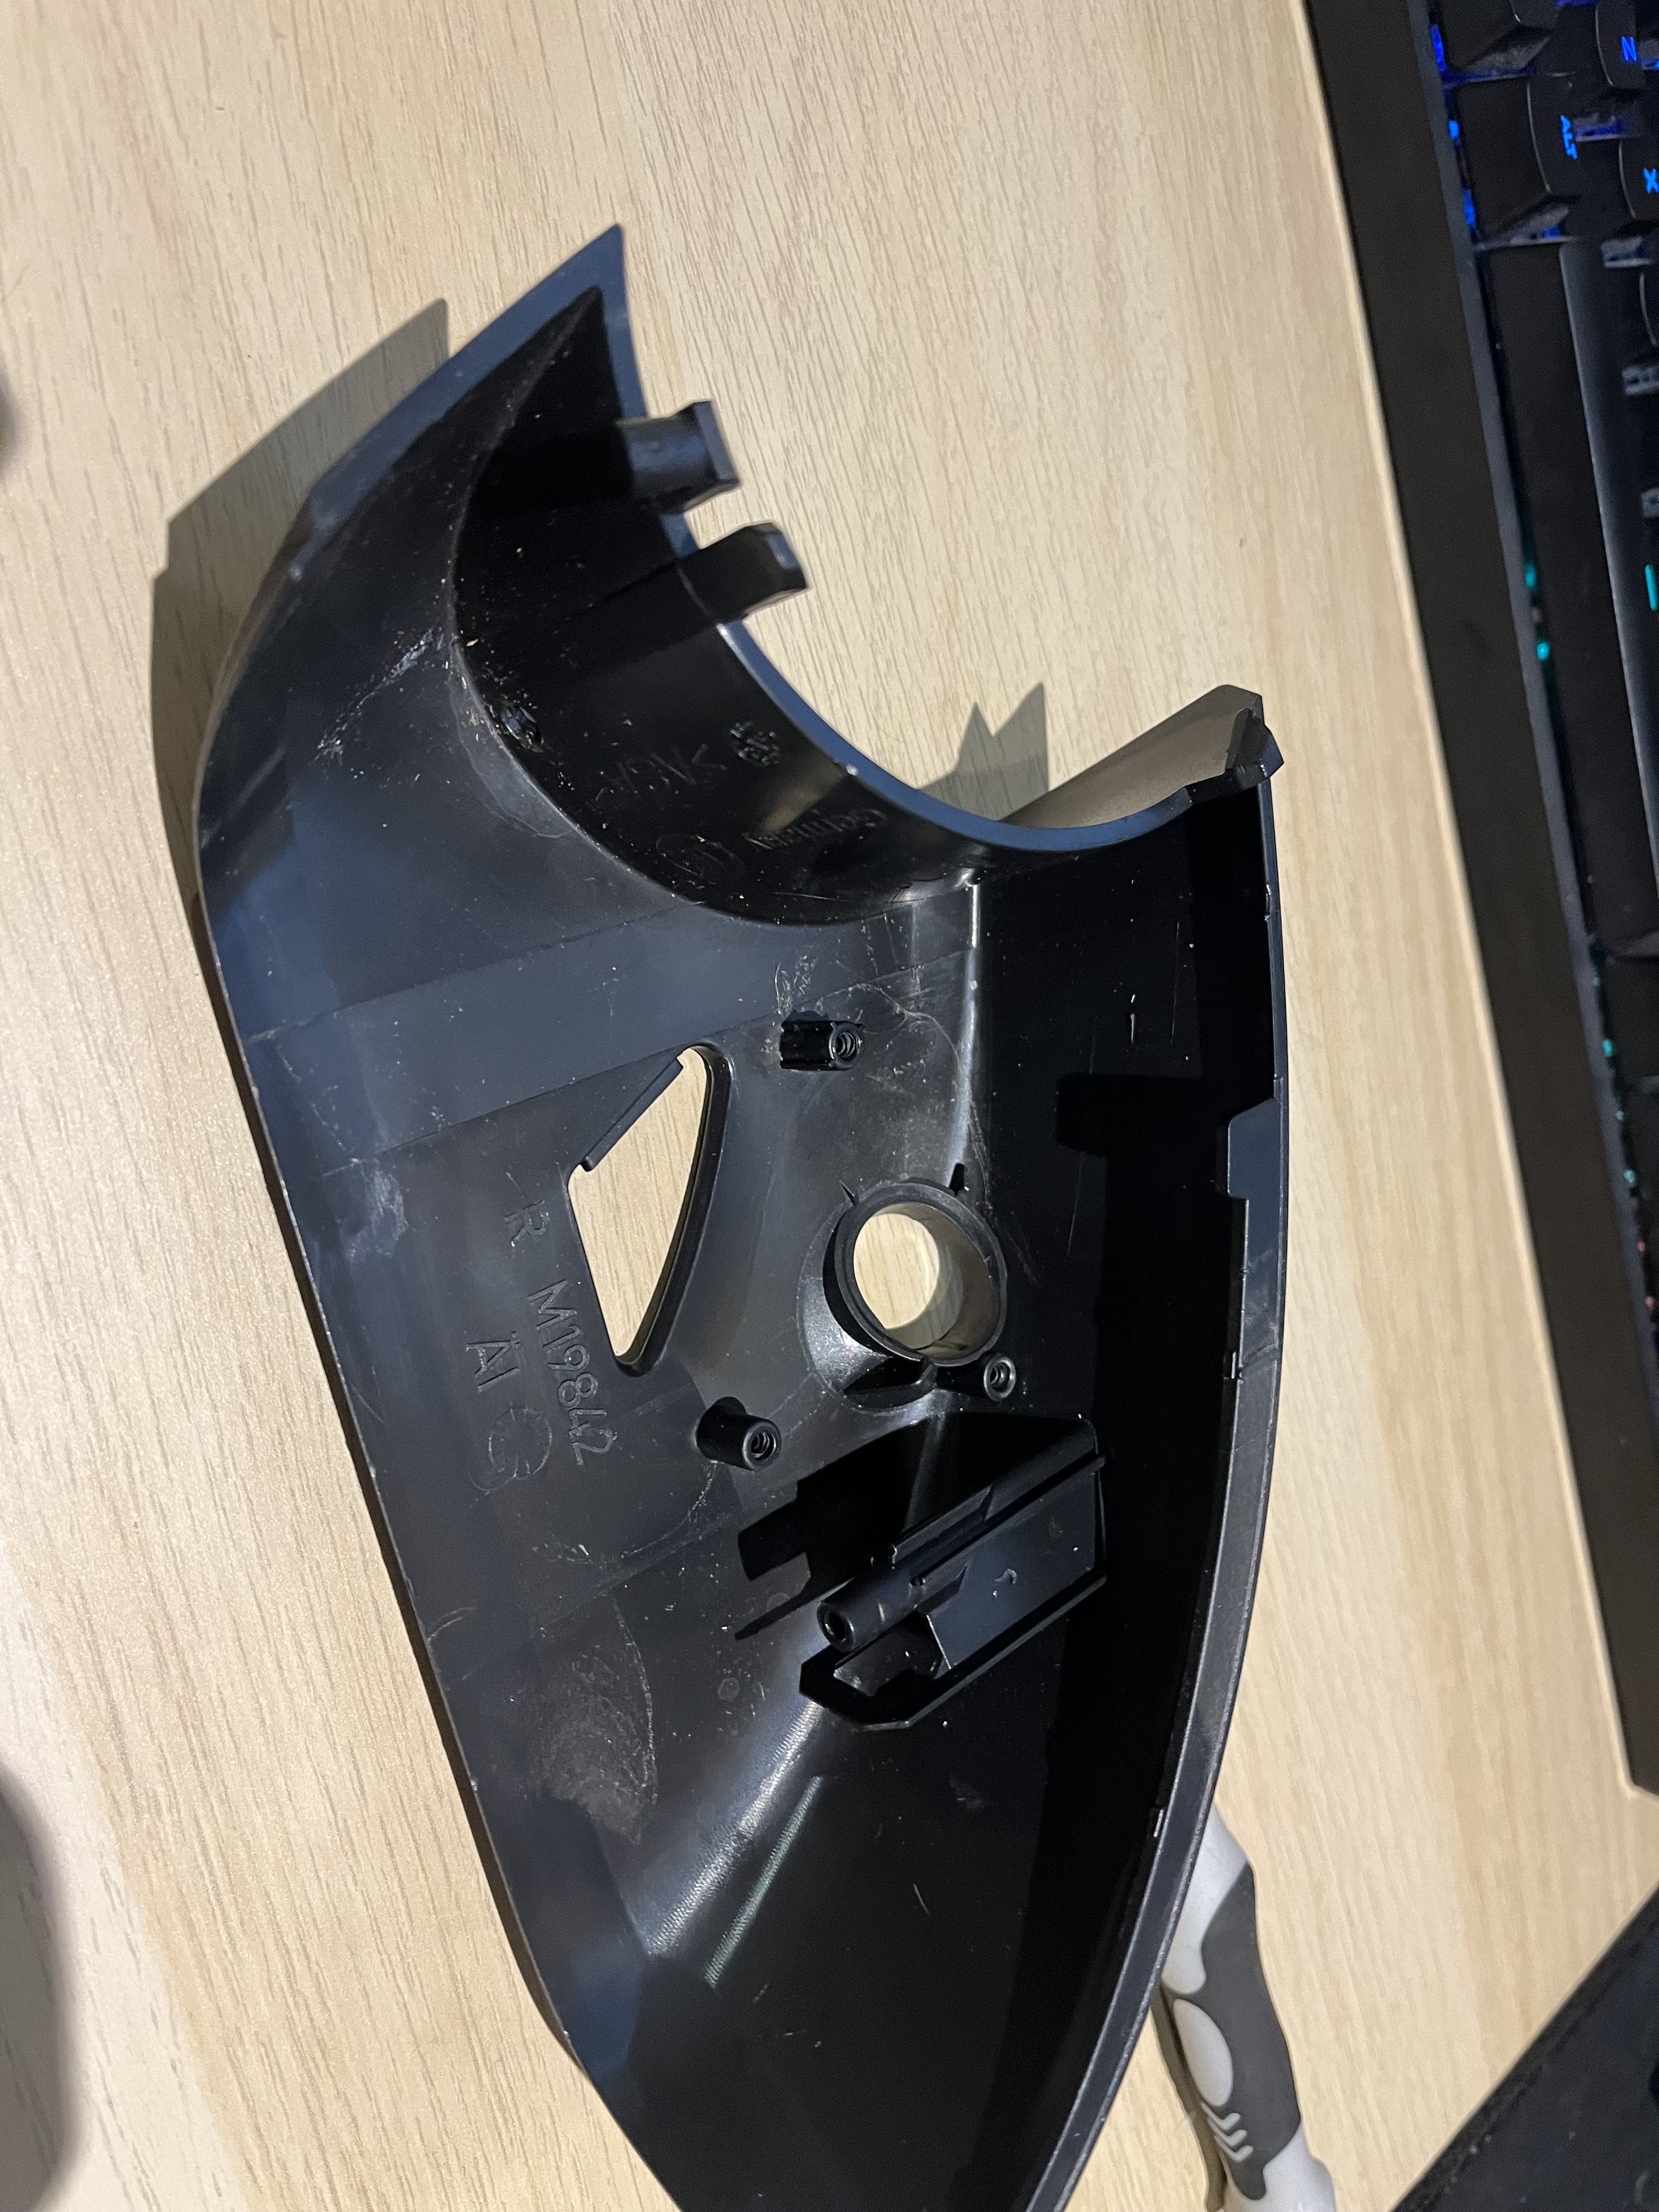
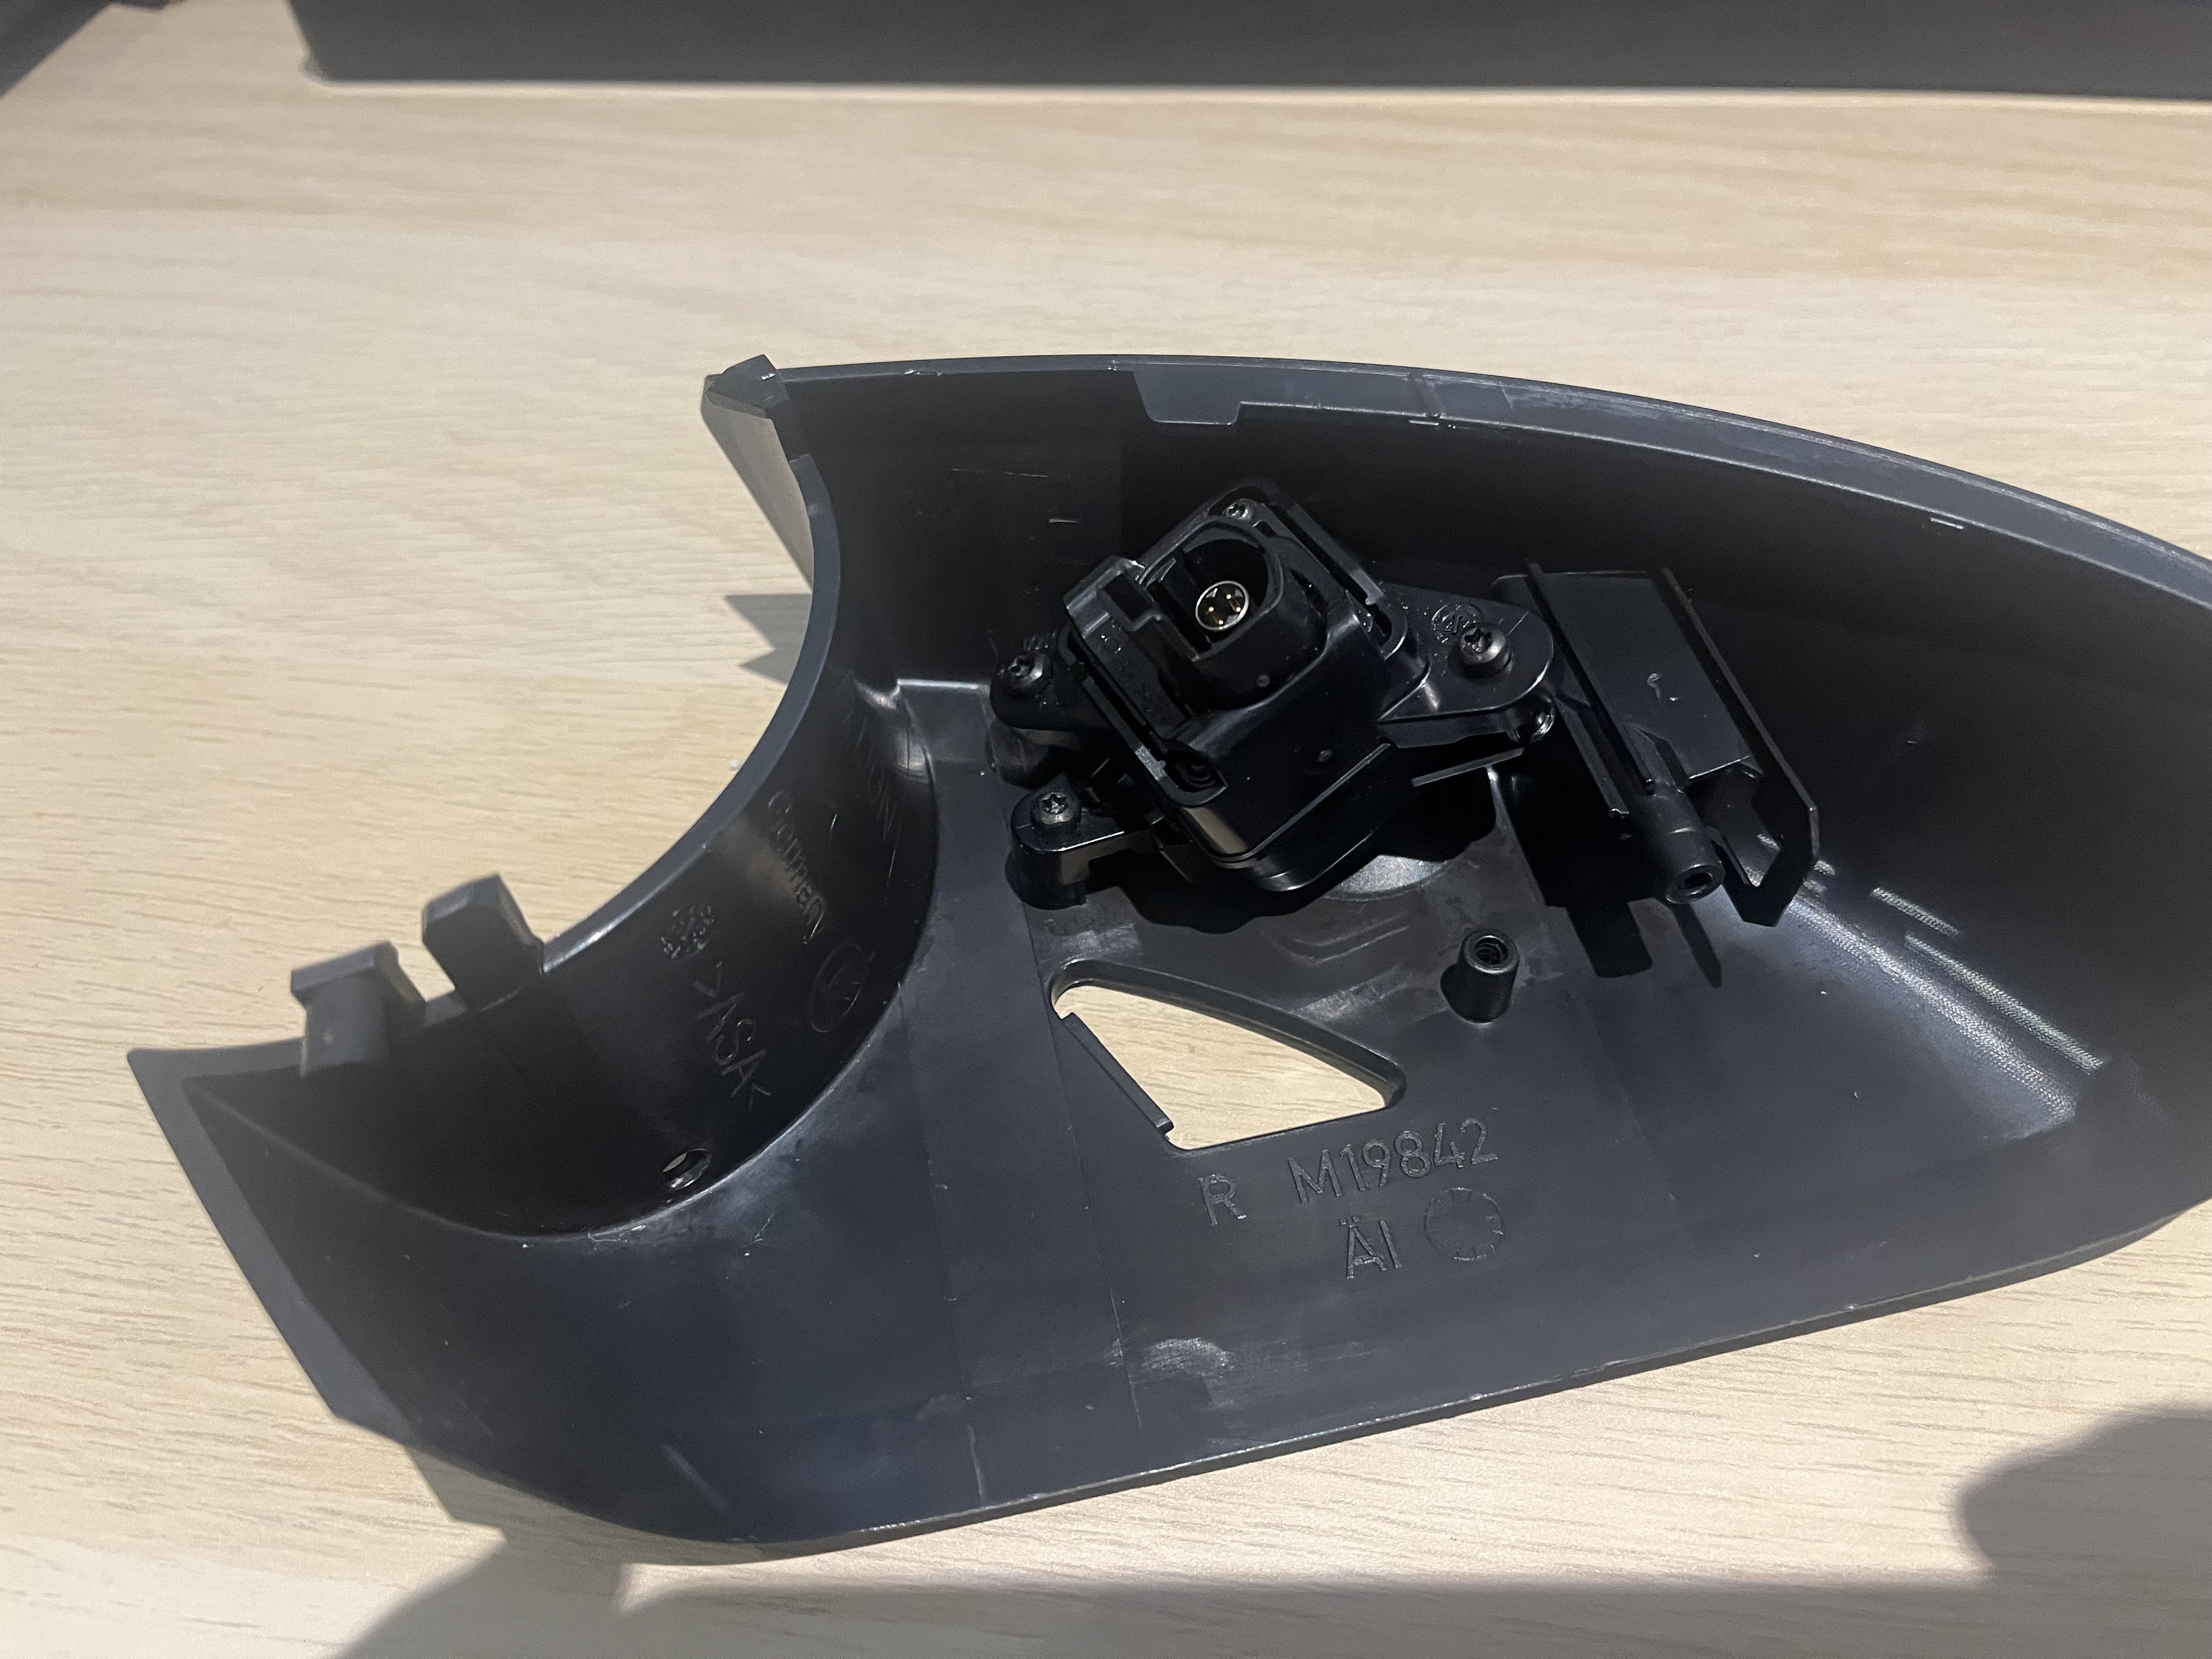
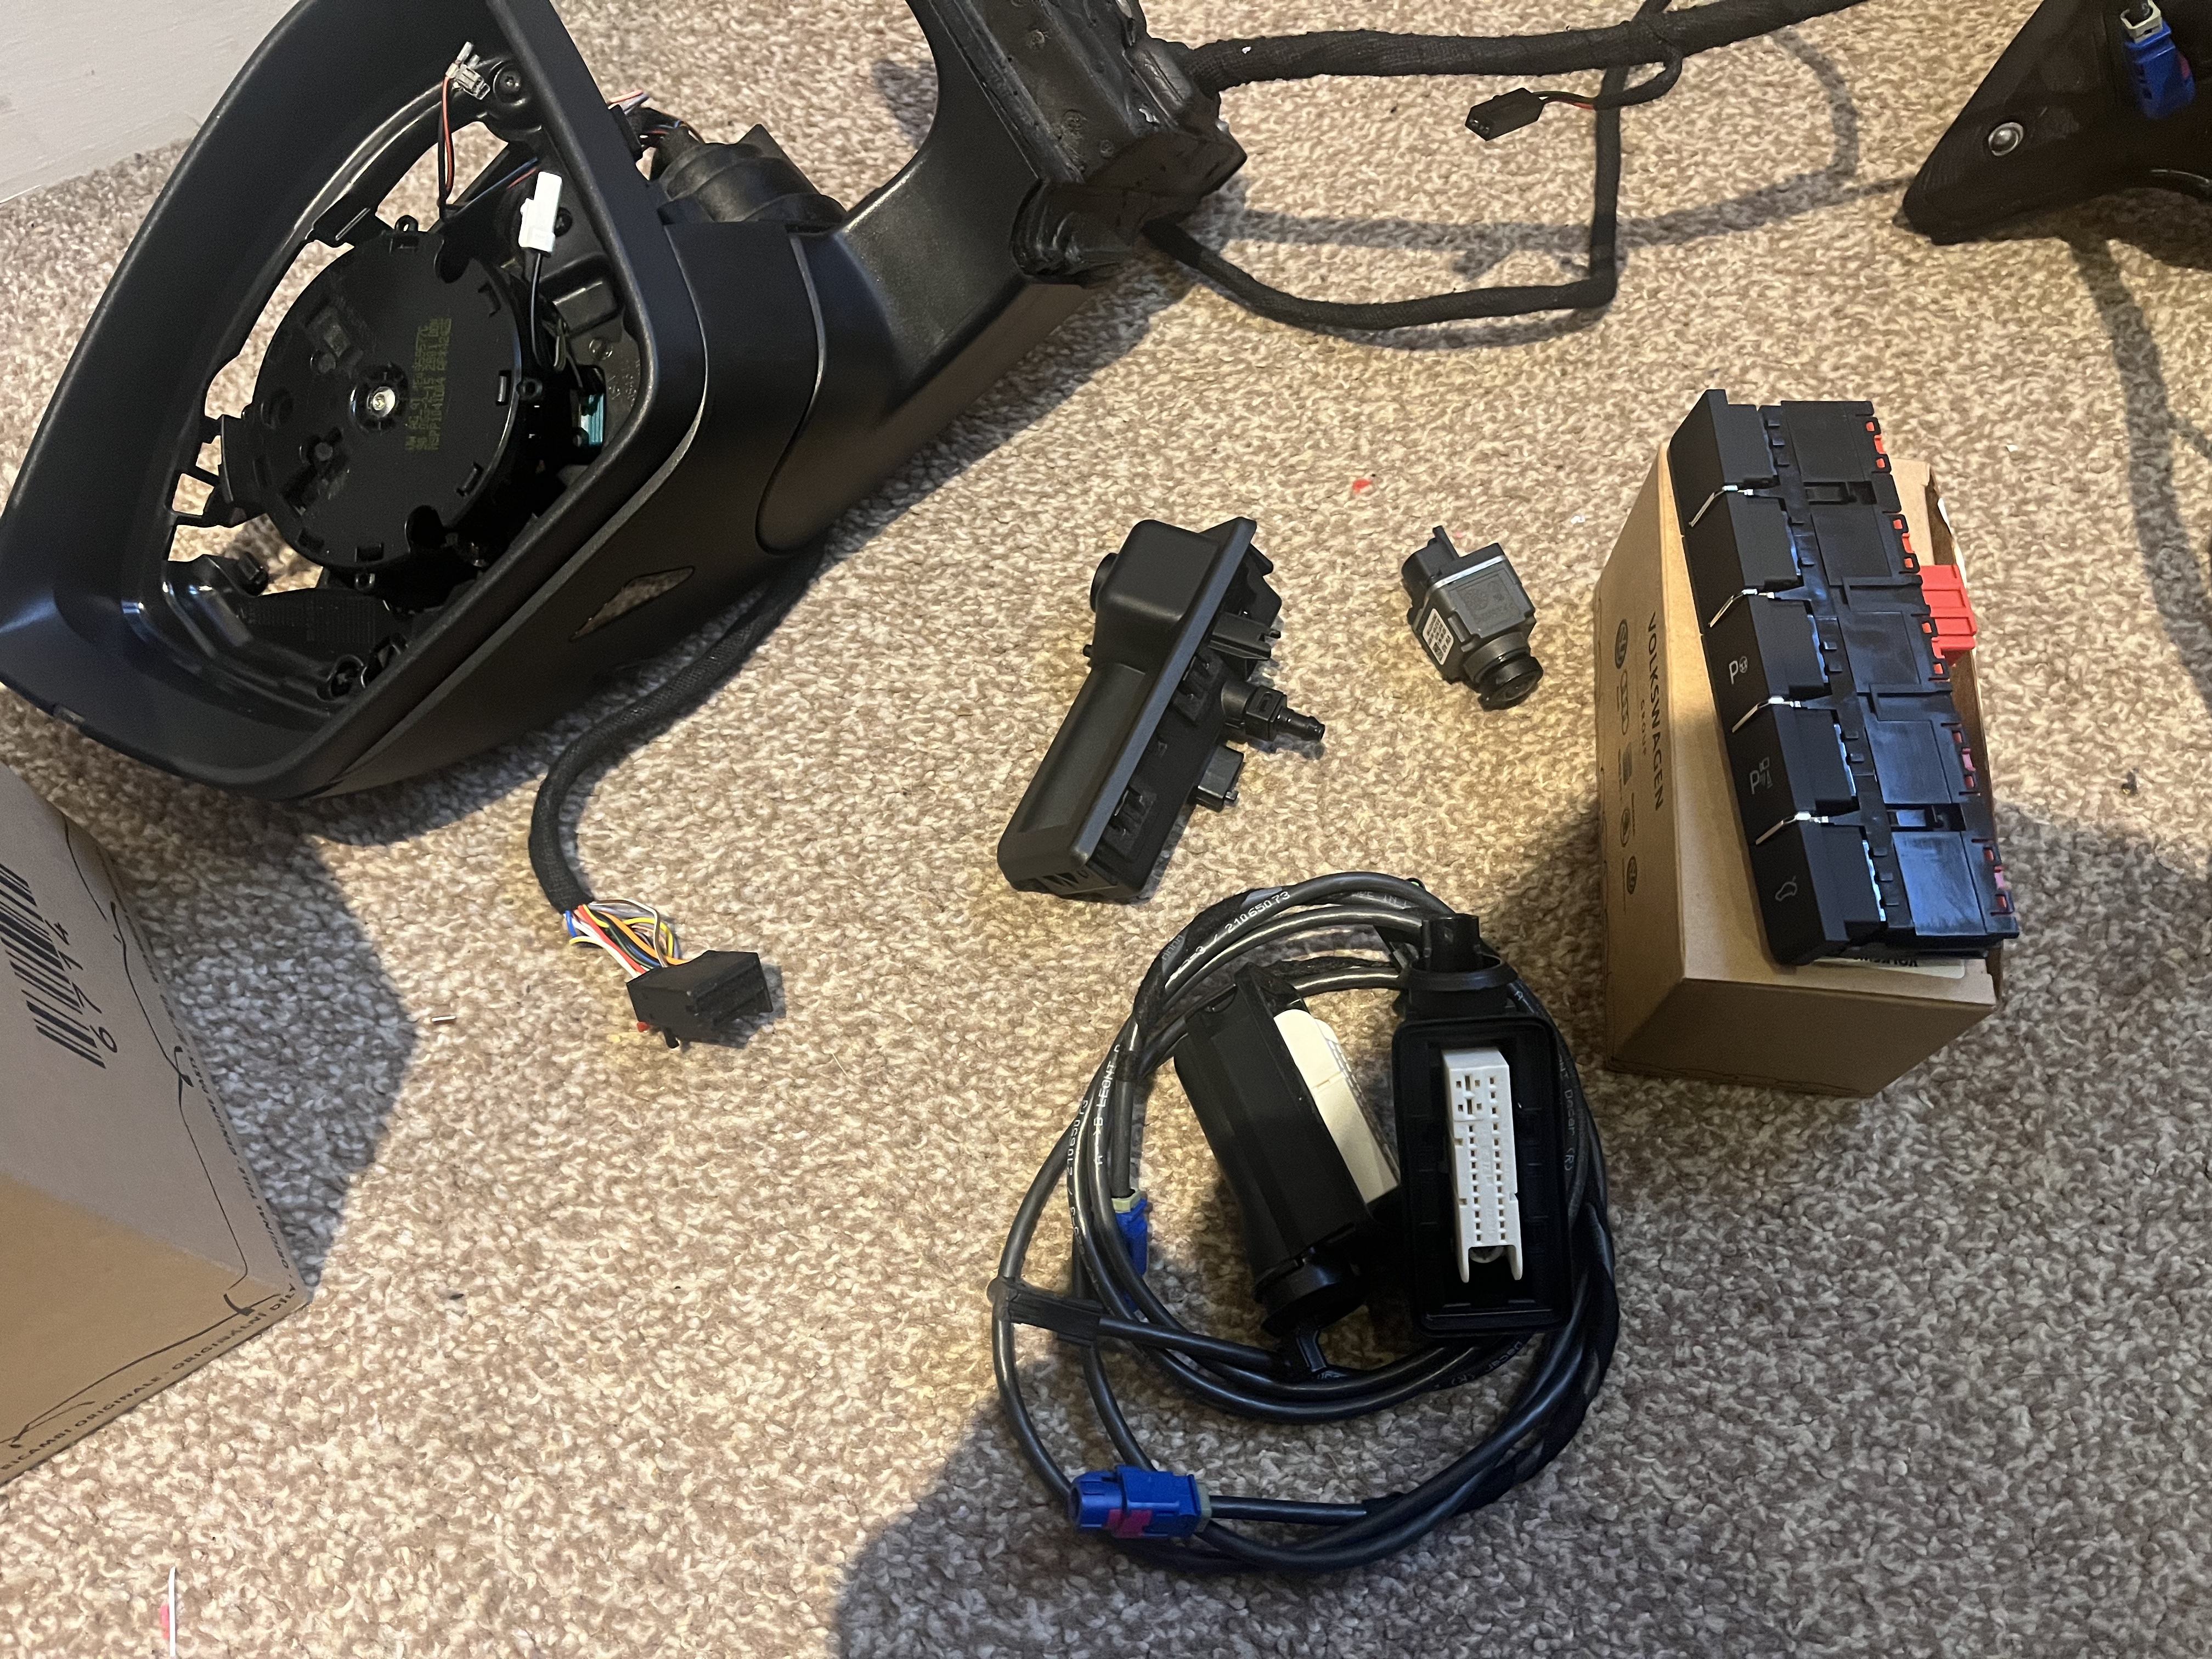
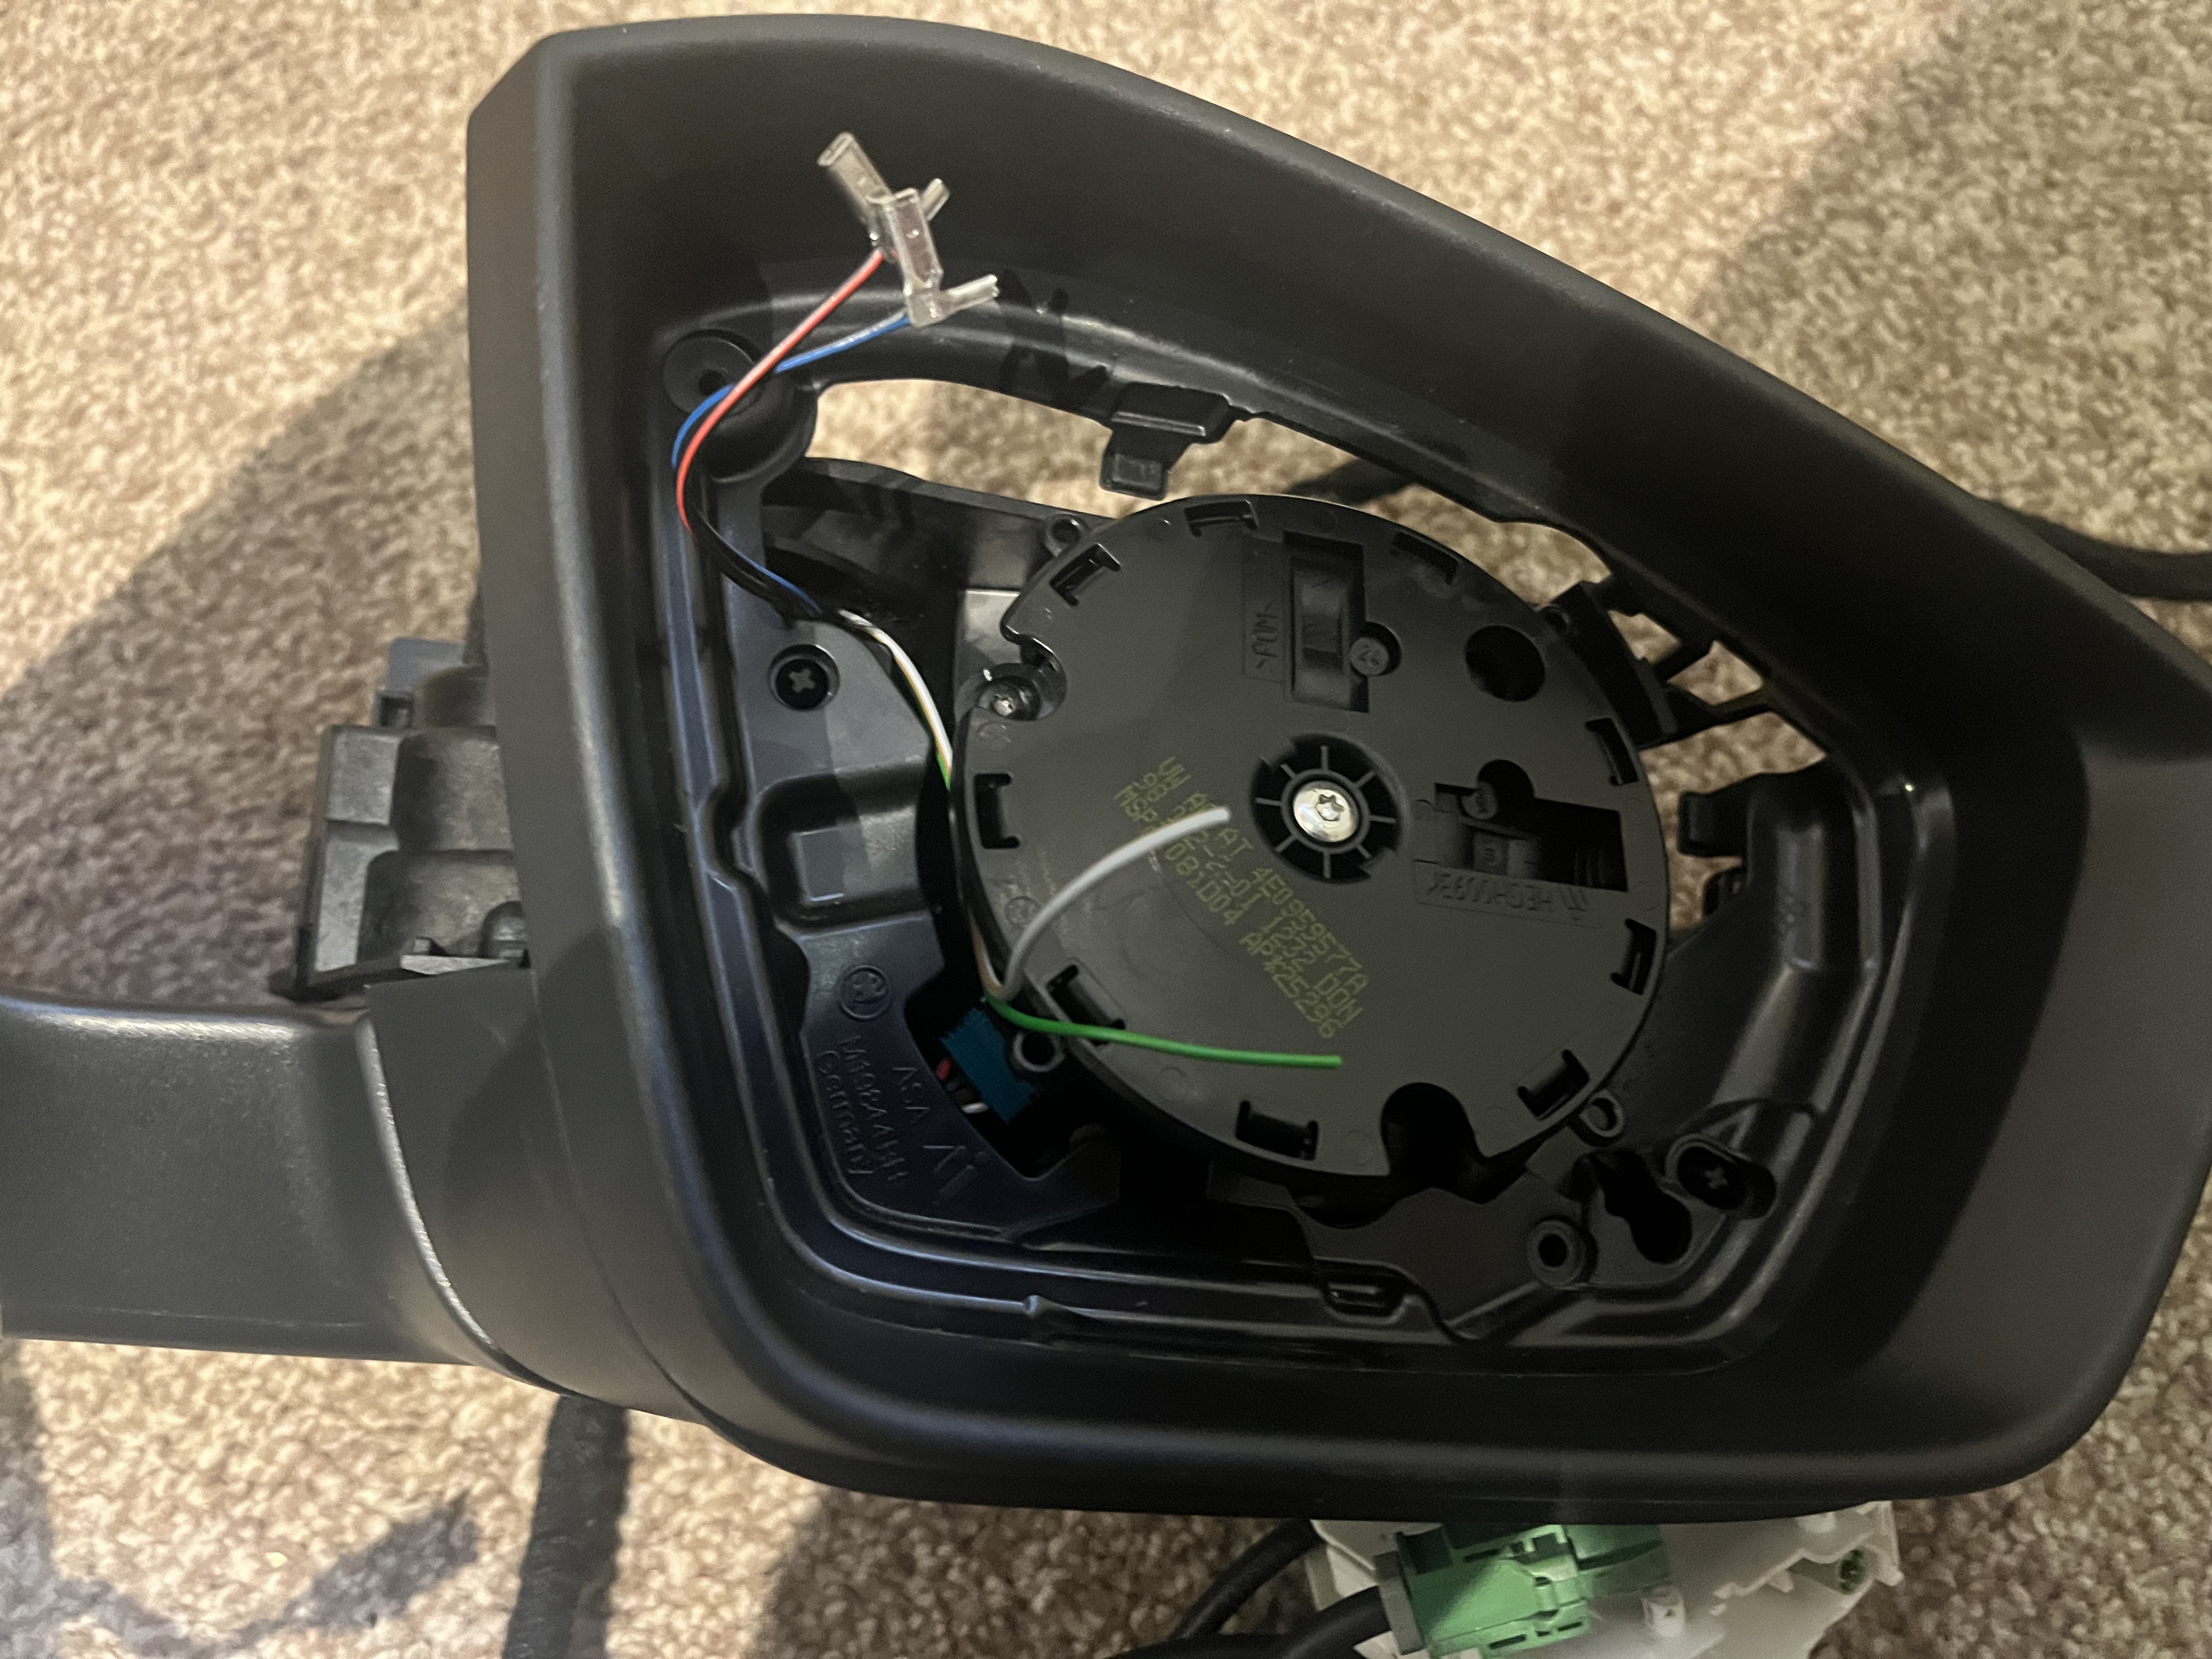
A lot of parts turned up for the areaview. The wings mirrors were hard to source without brand new ones at £1200 for both! So the best i could find was lhd ones (one without dimming). First i stripped and cleaned the mirros (including the stupid paint pen on the face of one) then I ran 2 new wires for the dimming on the non dimming one (awaiting plug). Next I have to extend the blind spot connectors, on the FL the blind spot LED is in the elbow of the mirror on the cover, and not wanting to buy 2 new mirror glasses at £300 each, I will extend the blind spot wires to the mirror glass. The centre console button cluster arrived, the difference between this and the one with no camera symbol - absolutely nothing except the little picture - you could use the old one just fine. The part number for this one is 3V2 927 132 R IHA (with electric tailgate and self park) The camera for the front has arrived and I can now get dimensions for this and start making a 3d printed bracket - 5Q0980546A is the part number. The rear camera is 8W8827566C and the version I have bought seems to be a dodgy version as the lens sticks out the camera body way too far, not an issue but the lens washer wont do anything. For now, this will do, if it all works, ill replace the camera with another one. The door wiring is a big issue, there are 4 methods to doing this: 1 - pin the 5 HSD wires to normal terminals and run them through the door plugs like normal wires. 2 - purchase new door connectors and the complete interior and door looms as skoda dont sell the data cables on their own 3 - purchase new door connectors and get the data cables new from a passat as VW sell the data cables on their own. 4 - purchase used loom sections from a breakers car and use these - i found a passat with the wiring complete. Why did I go for number 4 and not make the cables myself? Well the rosenberger HSD connectors that go in the plugs arent standard Fakra connectors and cant be purchased in quantities less than 10,000.... Part number time: Left mirror RHD - 3V2857507F Right mirror RHD - 3V2857508F Door connector - 3Q0972702 Body connector - 3Q0972701 HSD cables - Estate only! Mirror to door connector - 3G0971158C Left door to module - 3G0971158AE Right door to module - 3G0971158AC For the rear camera I will be making my own HSD cable as the standard one comes in 3 pieces at £80 each! Ill do in 2 pieces with a join just after the tailgate The front camera cable I will be making my own again, it comes in 3 pieces and at £80 each, no thanks. Ill need one waterproof connector at the camera and then a join just inside the car, then to the module. Cables and connectors will be arriving tomorrow for me to make the HSD cables. The mirror covers are also different for areaview as the entire mirror is chunkier. Stay tuned to find out what is different on LHD and RHD mirrors - I really hope these dont bite me in the ass, As I cant return them.


 1 point
 -
Boring grey is bound to be the most popular colour, we’ve been guilty of that trend so insisted on a proper colour for our cars this time. Although it’s a bit wishy washy Nissan (used to at least, not sure if it’s still available?) offered the Leaf in this silvery green:
 1 point
 -
Hey. No not from using it it seeming to empty by itself. The weather is terrible atm so I’ll need to check it when it’s not so wet. How easy is it to access the bottle it’s a 2017 Skoda Superb S.1 point
-
1 pointhttps://www.golfmk7.com/forums/index.php?threads/retrofitting-heated-steering-wheel.396953/ https://www.seatcupra.net/forums/threads/how-to-retrofit-a-heated-steering-wheel-to-a-mk3-leon.470860/ https://www.briskoda.net/forums/topic/515572-how-to-retrofit-a-heated-steering-wheel-to-a-mk3-octavia/ 3 seperate threads with guides for you1 point
-
On similar topic, what colour do you guys call this? Wife insist it's blue, V5 and I say it's green. Interesting game, but I think white will win simply because this is Tesla's no-cost colour and it's multicoat metallic, very acceptable. Green also isn't offered for Nissan Leaf as a colour option. Green is just not a commonly available to begin with. What's the next best selling BEV's after Tesla's? Do they offer green?
 1 point
 -
1 point
-
Certainly greenish.
 1 point
 -
1 point1 point1 pointThe only part on the vehicle that gets hot and is under a tenner 😃 You are barking up the wrong tree, you do not diagnose an overheating engine by looking for the hottest part which will always be the exhaust or DPF. Your problem is a common one, the sliding sleeve on the water pump, it will go away of you disconnect the connector from the actuator but you will have to drive a lot further before getting heat from the heater. At 3°c today from a cold start I had good heat from the heater vents within one mile, on my previous TDis it could take 8 miles. If you are not able to remove the connector or want to retain the fast warm up function (its great while it works) then you will need a new water pump.1 point1 pointA slight clunk is not uncommon after moving off when the car been stood for a while. If you were parked on level ground, you could always leave it in 1st gear with your handbrake off it it bothered you that much. You could also try reversing it back a few inches slowly before then moving off again, may reduce the noise.1 point1 pointYas its the sigma one amanda ,done the moon before ,trouble is it never changes tho 😁 the moon from 8 years ago
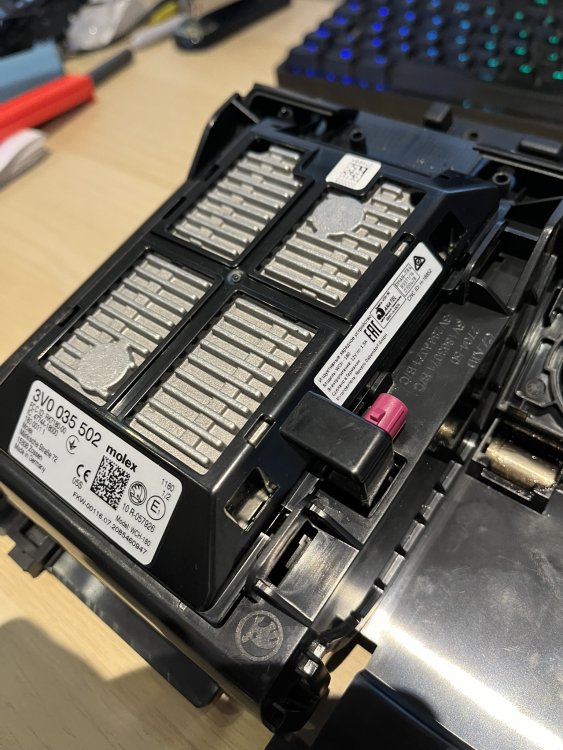
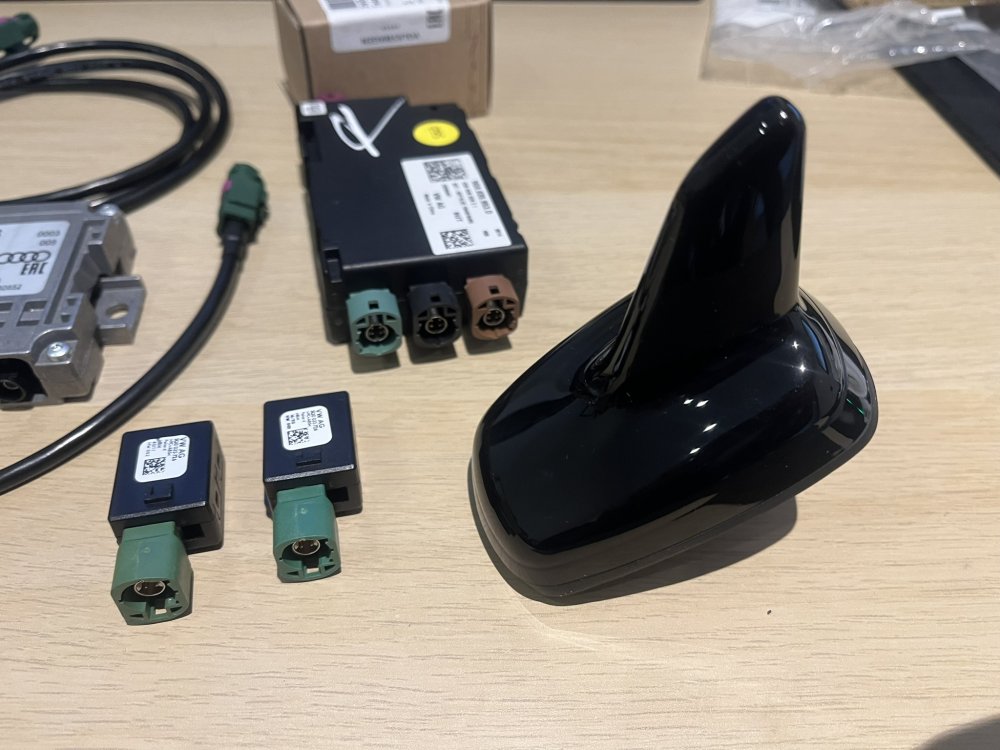
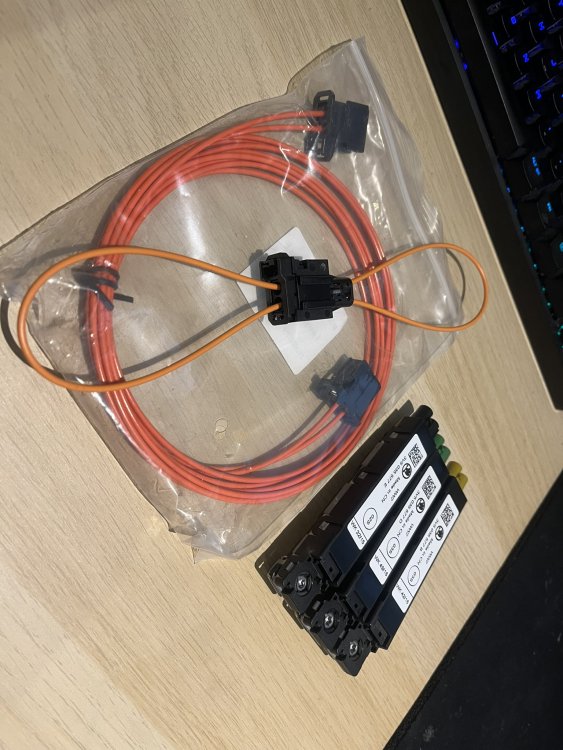
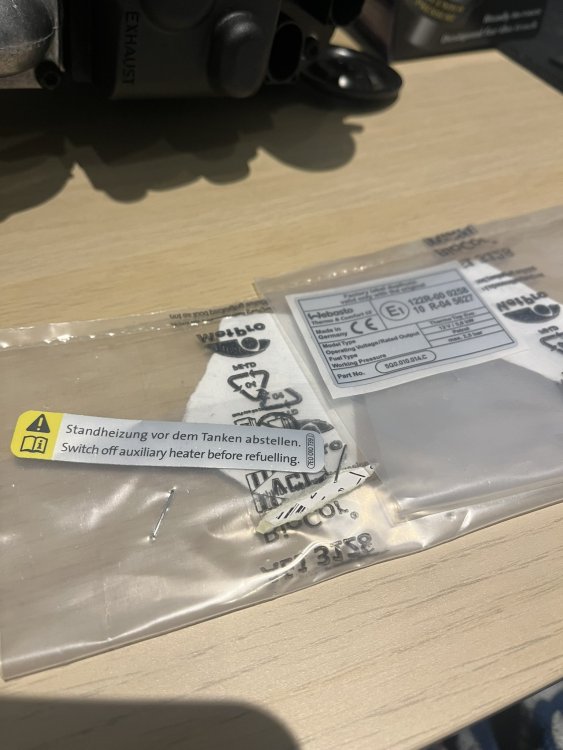
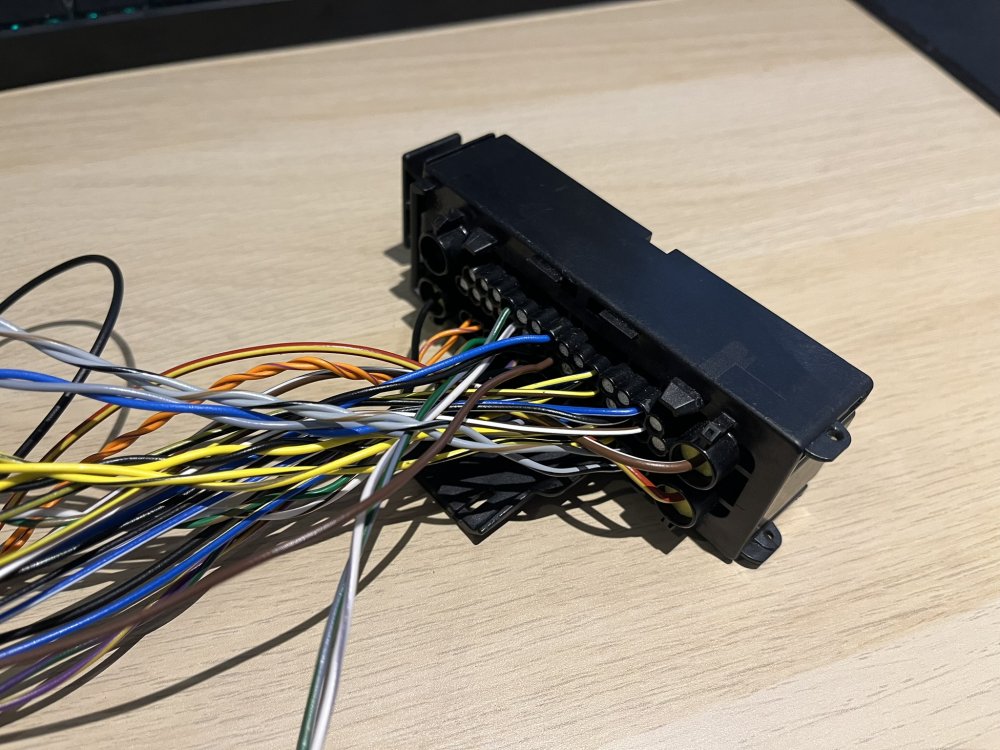
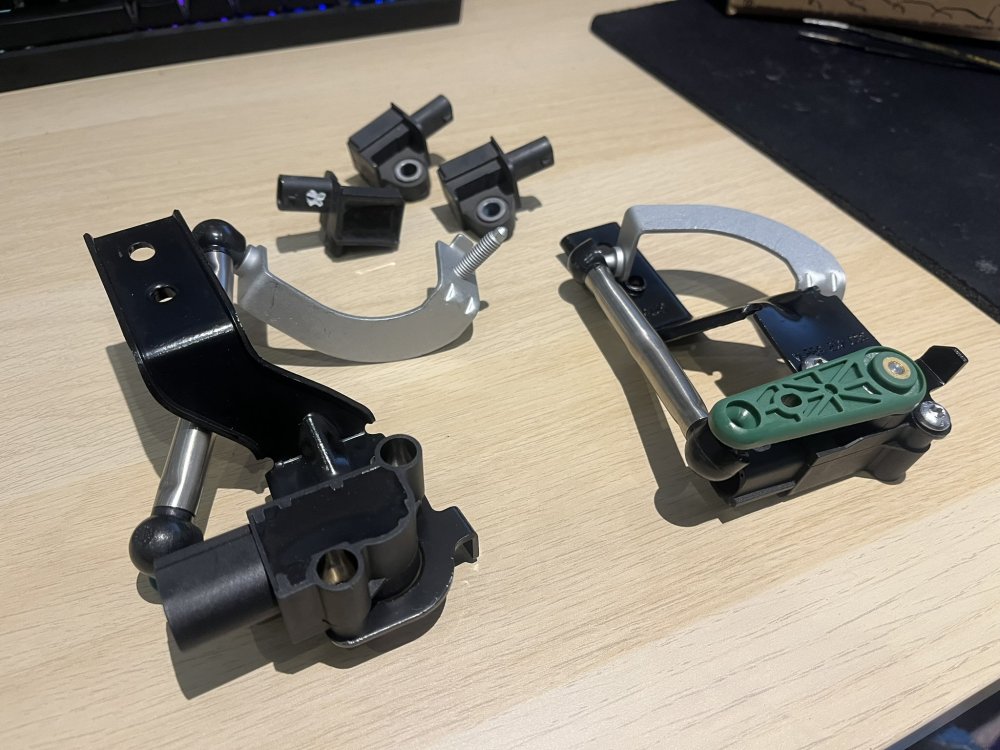
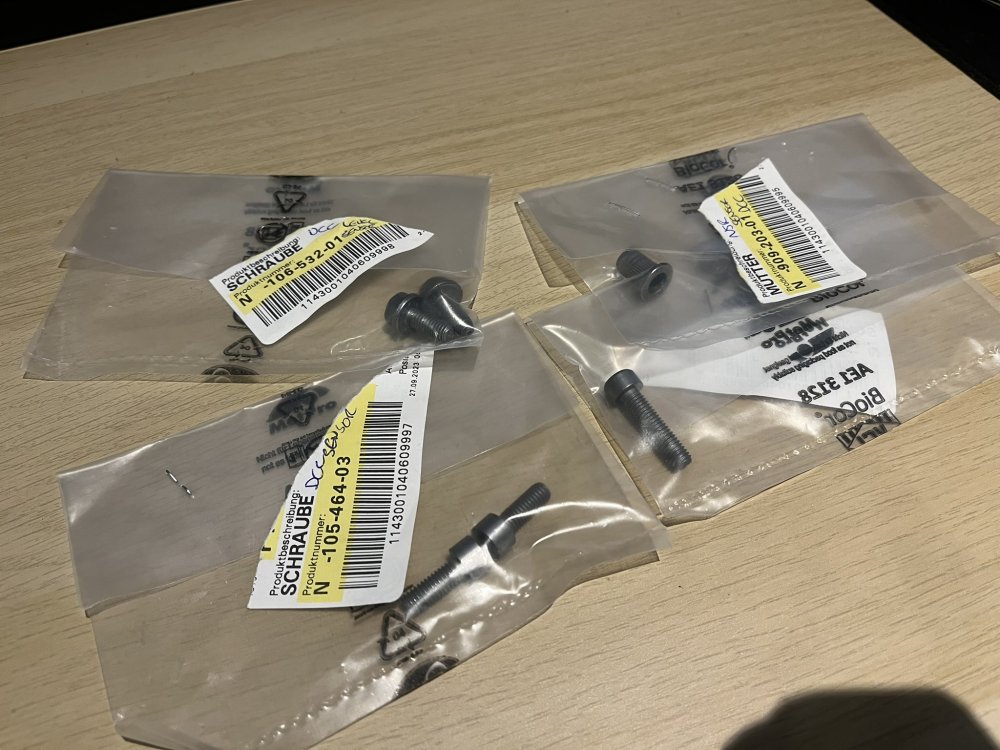
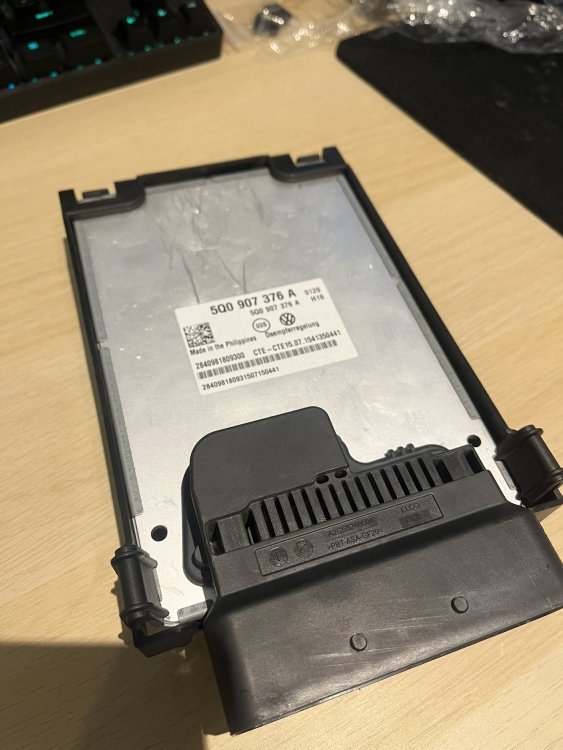
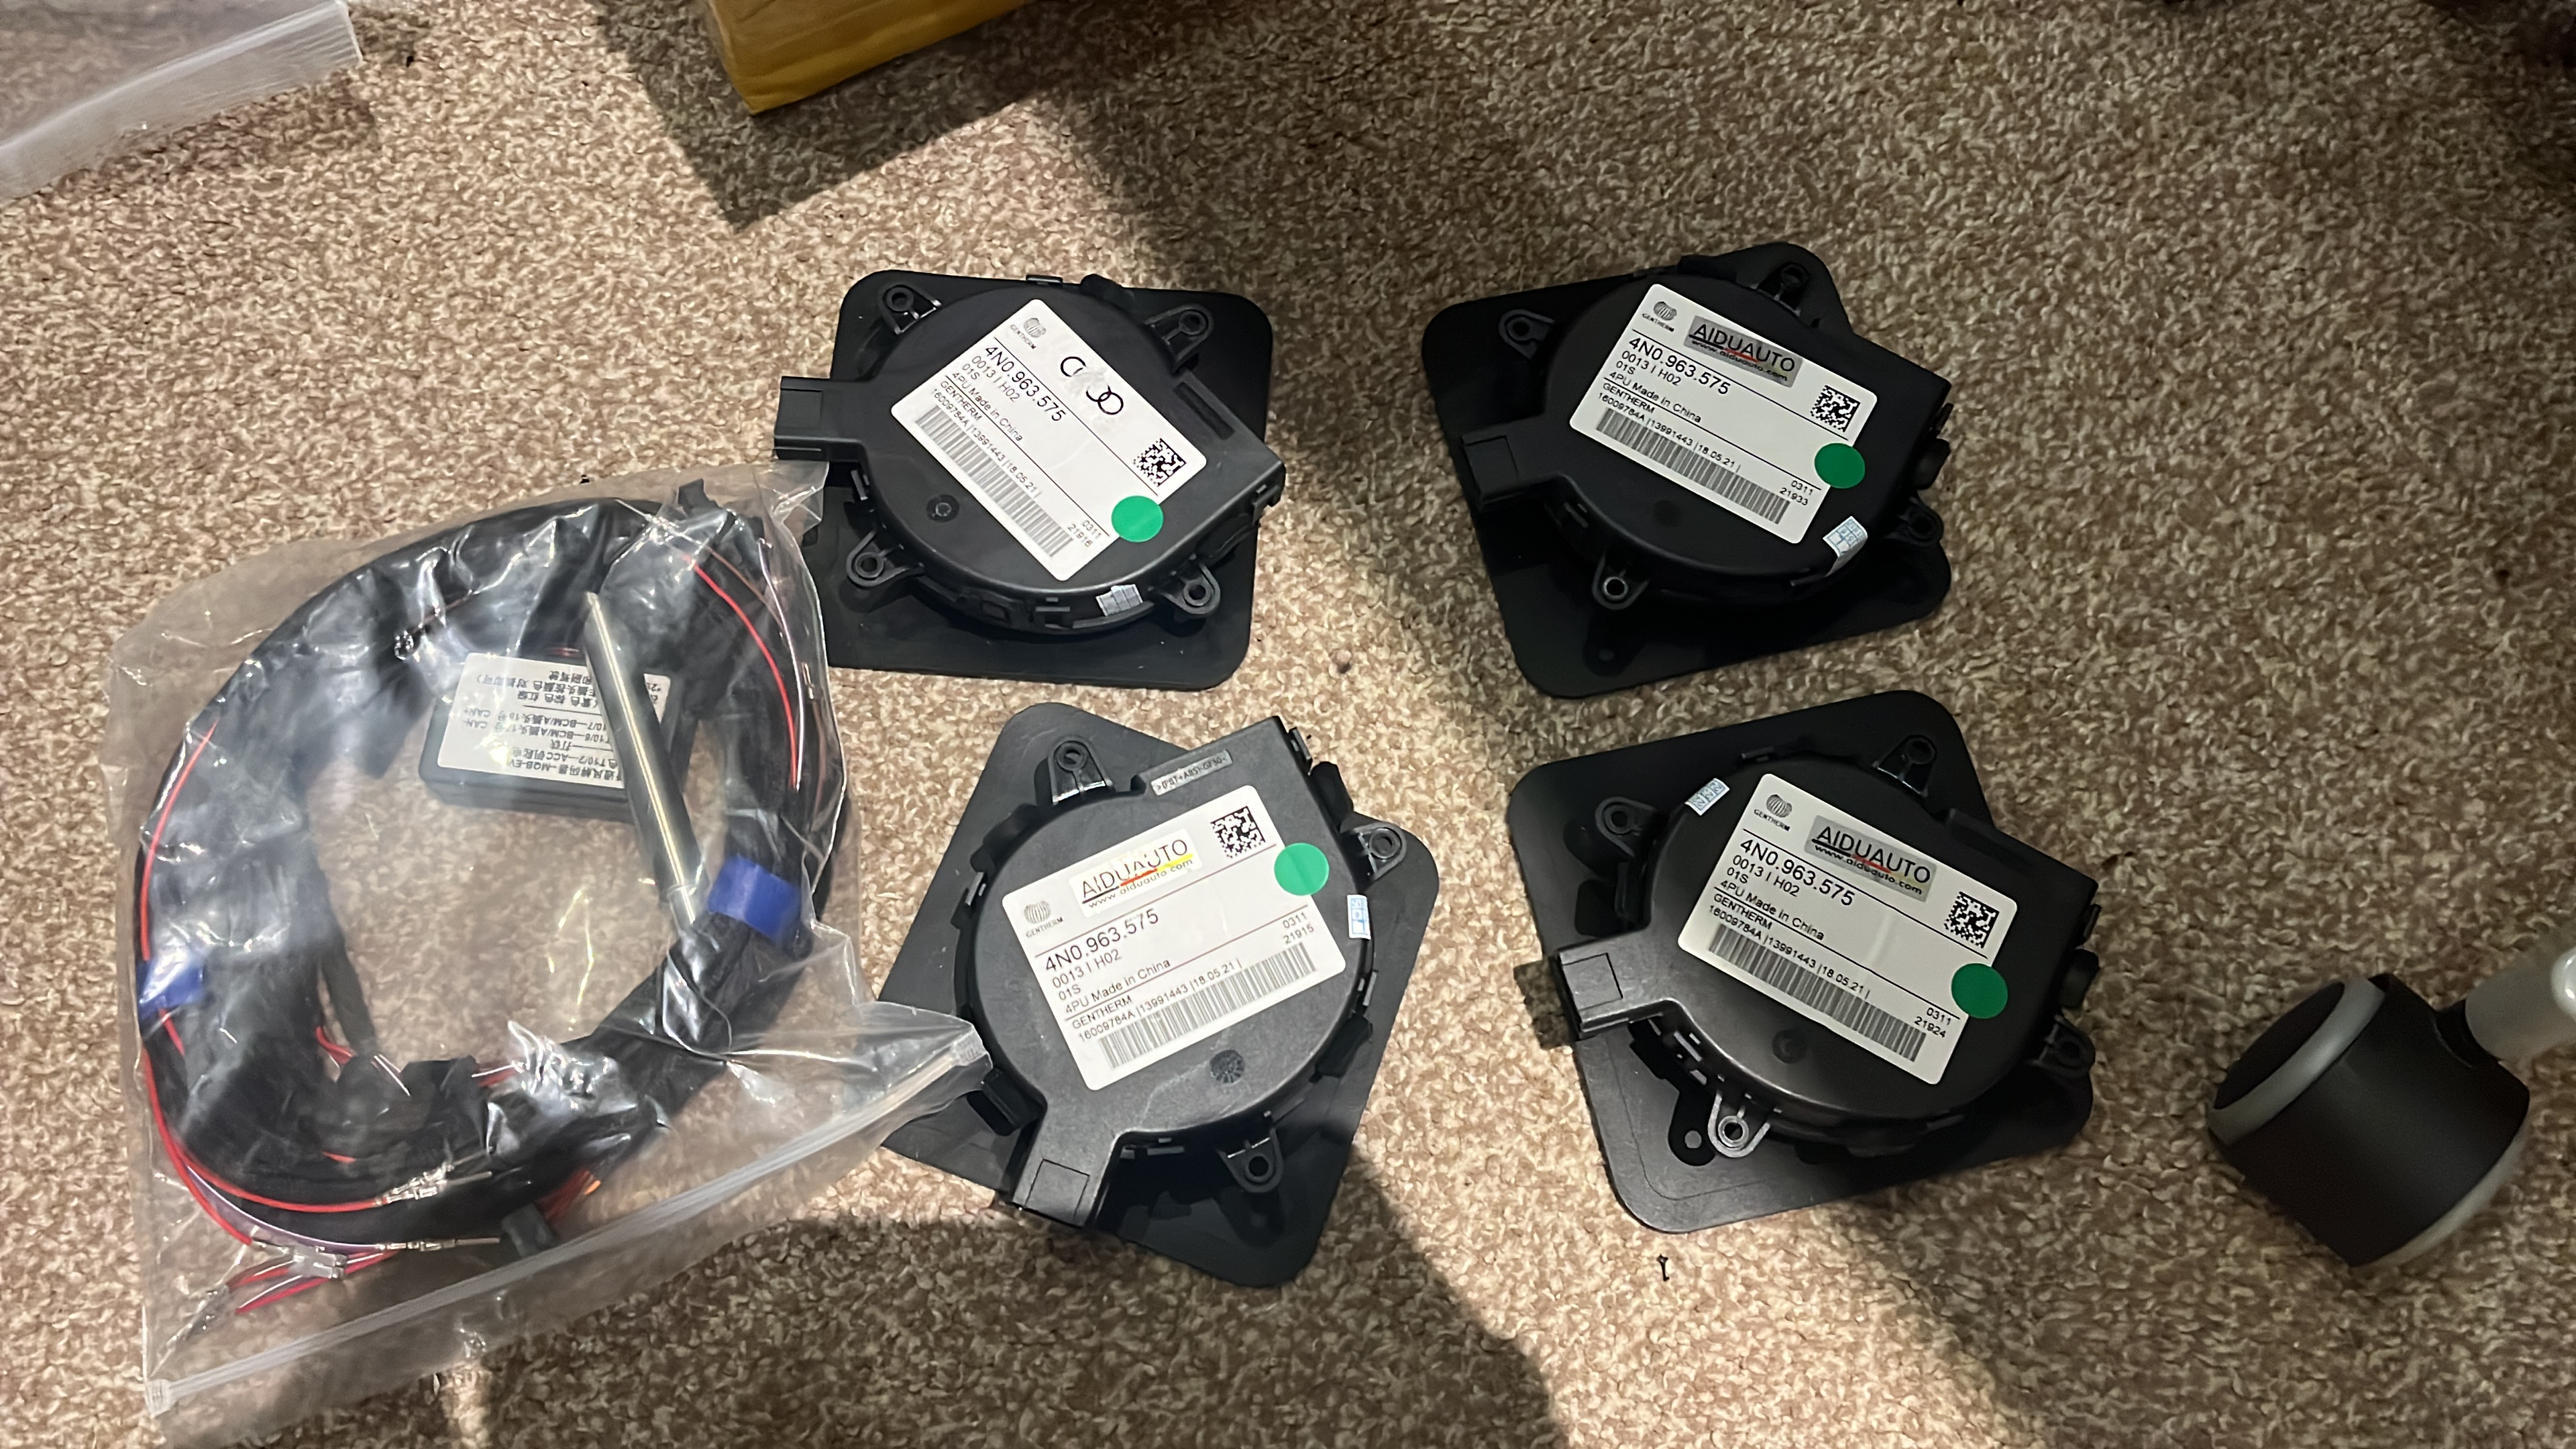
 1 pointI had problems with a rear brake dragging, I fitted these from eBay which fixed the problem. Easy to fit. Caliper Return Springs https://www.ebay.co.uk/itm/3335212994281 point1 pointConfirmed today I have an 80x Sportline Plus Coupe on the way - delivery in the next couple weeks. Hopefully I can sort a charger by then - otherwise I’ll have to go have my pants pulled down at the local fast chargers a couple times a month - which will eat into the planned cost savings. Looking forward to it having only driven the standard 80 so far1 point1 pointQuoting my post to update : I emailed Skoda CS a day or so ago asking about the cambelt change interval as a few other threads on here have said it is now in line with the EU dealers. I got a phone call in repsonse yesterday and the chap confirmed for my car its 15 YEARS or 180,000 miles. He added it's wise to get it checked yearly. I'm now on 99,000 miles so just over half way there1 pointAny bulb that uses a blue filter to achieve whiter light is not an upgrade. They are blocking part of light. And any H4 with higher wattage is not street legal and may damage the headlamp. Osram bulbs achieve whiter light by pushing the filament to limits - this is why they are much more sensitive with a shorter lifespan, but they actually produce a bit more light in the visible spectrum. How much - who knows, it'd be interesting to see actual measurements.1 pointThis part of the thread is for whats up next, including photos, whats involved and a fair bit more We are now moving into the wider territory (with some of the below) of very broad 'factory' retrofits and some of these youll see arent even options for the superb either for that model or that age. Heated washer jets Not a big retrofit and will probably make next to no difference, but this retrofit is as simple as 2 washer jet nozzles, 2 plugs, 4 terminals, a ground and a power wire to the BCM and only 1 adaptation change. Heated steering wheel I managed to source a steering wheel from sweden at a bargain price that matched the spec I wanted, After importing that and changing the airbag and clockspring assembly out, we then had to rewire the plug that goes into the clockspring, all well documented on other forums so no need to go into it too much. Most of the photos are above already but when the wiring is done, ill post more photos. Ventilated front Sportline seats Now this is where things start to get interesting, Ventilated seats were an option, but never ventilated sportline seats, and with the perforated fabric it looks perfect for the job. First it was near impossible to actually find a set of any ventilated seats for sale, let alone a set of stripped seats to see the internal workings. This means im working completely blind so i began doing some research to find out exactly how these work and what would be required. So the first part is the fan itself, you'd think these blow into the seat, but they actually suck out of the seat. So the fabric itself is perforated, below this is the heating element with all excess fabric removed, then the sponge has a lot of holes through it, below this is the spacer mesh which looks like a rigid spiders web, the last part is a sealed layer, the fan then pulls a vacuum through the entire seat. This is controlled by a LIN channel to the BCM which is the easy part. The hard part will be modifying the seats. I now have all the required parts, now its just finding time to strip the seat down. Door pocket ambient lights Another fairly easy and straight forward retrofit, 4x lights 4K0919390A/B/E/F and 4x plugs 8K0973754, these simply link into the ambient door light strips and need a few adaptation changes to turn them on. Wireless phone charger/booster Most would call this a fairly pointless retrofit but my plan is to add the USB hub, fit wireless carplay to the centre console, then the front pocket will be free to charge my phone. Lots of people complain about overheating from inductive charging so a small idea I had was to T off the glovebox cold air feed, run a small 3mm silicone pipe to the back of the phonebox and connect it to a 180 degree irrigation nozzle to blow a very small amount of cold air into the cubby area. Now the actually charger and booster, although it looks fairly straightforward, the entire front cubby area gets changed, then a fakra cable is ran to the NSR corner of the car where the signal booster is, another fakra is then ran to the roof antenna which also needs changing. This all links into the infotainment system and the kessy system even. USB Hub The photos above and below show this quite well but this basically transforms your single front USB port into a USB port at the front, and in the centre glovebox - both Apple and android compatible too! All thats needed is the USB hub and 2 low level USB ports (DONT use high spec ports) A very good guide is located here TV Tuner Another fairly pointless retrofit, but having spent a lot of hours sitting in my car, the TV would be lovely! This is quite the retrofit and the process varies a fair bit between estate/hatchback. The parts required are the tv tuner, 3 new antenna boosters, the trim panels and then the fun part of the wiring. Fakra cables need to be ran to both rear quarters and into the tailgate for all the new antennas, the new antennas dont always have wires to connect to the glass so this often needs to be soldered to the glass carefully! You also need a MOST cable but luckily I have the virtual cockpit so I can loop off of that. Webasto Parking Heater I wish I had this one ready for winter already, but sadly not - this would serve 2 purposes - the cold winter mornings going to work, and also when we sleep in the car on long road trips to keep it warm without the engine running. The parts involved in this are: External fuel pump, Fuel lines to front of car, Webasto unit, A whole bunch of coolant pipes, Remote control module, Remote control and then a whole bunch of wiring and plugs running all across the car! This allows you to either set a timer or use the fob remote to turn on the heater from a fair distance away! It also allows the ability to ventilate the car on very hot days to drop the internal temperature. (I even went to the added detail of ordering the 2 stickers that the car would have left the factory with.) Dynamic Chassis Control (DCC) With two of my shock absorbers leaking - the smart thing to do would be to replace them at £100 each. But no, I decided to spend a huge sum of money on brand new genuine DCC shock absorbers. This isnt an easy task and the wiring required is absolutely massive! 4x new arch looms, 2x level sensors, 3x accelerometers, 1x control unit and all the wiring to go with it. Not to mention custom datasets for a few modules. Custom twisted pairs were required for this to match all the factory wiring perfectly. As you can see from the photos - A LOT OF WIRING Areaview/Panoramic View/360 This one I think will ***** a lot of peoples ears up - Areaview was never an option for the pre facelift superb so a lot of parts dont fit, this means a fair bit of creativity is required. 4 cameras are added to the car, the rear camera is for 2019 onwards tailgates but luckily as I fitted the FL trim, I can fit the rear camera with no issues. The front camera on the facelift is in the grill, this is a problem on the pre-FL as we have a large radar there and it would interfere. After looking at how a lot of other cars do this, It seems that the pre-FL passat had theirs in the lower front grill, So with a bit of 3D modeling I am creating a bracket to secure the camera in the same place as a passat. The next issue is the wing mirrors - a brand new mirror is £700 each side and there are no used parts available. So the next best thing, LHD versions. These are yet to turn up and i'm sure ill be bitten in the ass when the LHD cant be used in some way on RHD cars (I believe the unit sits at different angles) so may have to get creative. Next is getting the HSD wires through the door into the car, many people just turn them into pins and use spare pin holes, but this isnt OE enough for me. So I purchased the correct door connectors and wiring from the FL which have a cut out for the HSD connector - these connectors are not standard so sadly I had no choice but to buy from Skoda. After I've made all the custom HSD cables and ran them into the car, next is where to mount the control unit, on the factory cars it is under the drivers seat (where my TV tuner lives) and even if not, it is only held in with a ugly piece of polystyrene, I plan to mount it under the TV tuner in a cut out, directly against the car body and held down by the TV tuner bracket. As more parts turn up, ill update this further.


 1 point1 pointHi, Yes, turns out it was the Lambda (oxygen) sensor. After resetting the errors it was this code that twice returned, Mark1 point1 pointIf this is 2015 then it's probably C14 version. I sent you download link on PM.1 point1 pointFind attached my notes page for the BCM 09 adaptations. It may vary as you have lowline lamps and mine were originally highline. The numbers are related to the leuchte settings in 09 - 18 is leuchte18 which is rear left indicator for example. Type is LastTyp which sets the type of bulb you are fitting Dimmwert requires changing for a few from halogen 100 to LED 127 " is same as the one above Leuchte27 found at the bottom is only relevant if you are trying to add the animation and also the associated wire and adaptations. If you add Leuchte27 then you need to adjust 09 adaptations ENG141649-ENG122211,210,214,213,204,203. These control the dynamic indicators Make sure to leave ENG122204 inactive else the unlock animation will not work!
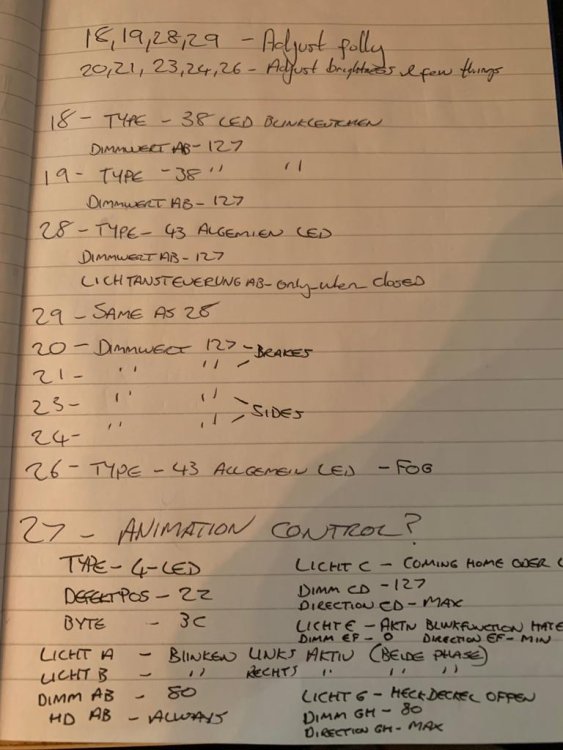 1 pointYou might want to check out BlueHarvest... (available direct from the author as well as through the App Store): https://apps.apple.com/gb/app/blueharvest/id739483376?mt=12 Automatically keeps removable drives free of dot files, which macOS still insists on polluting things with. Been using it for years (not the App Store version) and it's brilliant - a must for ensuring things like a Skoda SatNav system doesn't get confused by lots of extra files it wasn't expecting! You could... but I'd try the USB route given the state your system is in. If that doesn't work, I'd find another dealer who should be able to reload the system software completely.1 point


.jpg.bc1729f1fd9ad3a43851d4c674a5a28d.jpg.24b4ab5ad42760d104574e4121c0ab56.jpg)
.jpg.bd67281767456fadf690272ece265774.jpg.fbb72b7535bb04699aed7403b56059a3.jpg)
.jpg.a6446f1250c711e4b3b4e48ba339b823.jpg.8c3ba31d946b683c486e809d738ef847.jpg)
.jpg.f1cf557eb7fcf49a16889e39f31b02e8.jpg.4ca9d87187ca559f1f4ea575186db8d4.jpg)


Important Information
Welcome to BRISKODA. Please note the following important links Terms of Use. We have a comprehensive Privacy Policy. We have placed cookies on your device to help make this website better. You can adjust your cookie settings, otherwise we'll assume you're okay to continue.