


Leaderboard
-
Arkaig
Members9Points1,039Posts -
Lady Elanore
FREEDOM8Points24,909Posts -
MikeTheThinker
FREEDOM8Points8,509Posts -
J.R.
Resident Member7Points15,266Posts


Popular Content
Showing content with the highest reputation on 28/10/20 in all areas
-
You haven't got the air recycling turned on have you? (That closes off the air intake and prevents fresh air - and smells - from outside the car, but will make the car mist up more quickly.) If you also have the air-con turned off, turn that on as it dehumidifies the air (as well as cooling it in summer.) I always leave my climate control set to Auto Air Con for this reason. It prevents nasty smells and problems in the air con that can arise when it is turned off for long periods, and the effect on fuel consumption is pretty negligible.3 points
-
3 pointsUPDATE: FIXED. Cheap outside temperature sensor from the scrap yard. Wired in, temperature immediately popped up. Cleared codes down using cheap OBD tool and nothing came back. Many thanks to everyone for all the help and advice.3 points
-
3 pointsNo lock with one press on the remote, then touch the door handle to disable unlocking when close to vehicle with key. Can only unlock with remote so no risk of a scanner picking up key and opening vehicle via a transmitter.3 points
-
2 pointsHi, There is no switch fix for the superb unfortunately (at least according to my dealership and Skoda UK who acknowledged the fix exists for other models). The total bill for the gearlever replacement was to be an eye watering £900. That said, two, possibly helpful, points: 1. Because our car is under 5 years old and has a full service history, Skoda UK offered to cover 40% of the bill. 2. Most importantly though, the repair is technically unnecessary. Provided you are seeing exactly the message I originally posted the total impact of the fault is that you will periodically see the warning message. It does not in any way affect the drivability, safety or MOT status of the vehicle. Ultimately it is simply the car saying: 'I have two switches that detect when I'm in Park (one is in the gearbox itself and one in the lever). Occasionally, these switches momentarily disagree with each other (it's always the one in the lever at fault if you are seeing the message in question). As a result, please be totally sure you have left the car in Park when you exit the vehicle because I'm not going to be 100% sure and so might not warn you if you forget to put the lever into 'park' before leaving the vehicle.' Because the switch in the gearbox is the one that actually determines the functionality of the gearbox when driving, the one in the gear lever does nothing. Only when the car is stationary and the engine switched off is the switch in the lever actually used and, even then, only to check that you've left the car in P before exiting the vehicle. So, it's up to you, but the 'unofficial' advice to me from the dealership and Skoda UK representative was simply to ignore the warning and live with it. In most cases it only occurs infrequently and does not deteriorate over time. Hopefully that is helpful.2 points
-
2 pointsI can think of a good reason for not fitting a bull bar especially one that picks up on the front bumper beam mounting points, and there is nothing else to fix to on the front of the car. Any impact transferred directly to those chassis longeron mounting points, that is to say metal to metal without a plastic/rubber/foam cushioning structure will set off the dashboard airbags, the drivers knee and steering wheel airbags and the seatbelt pyrotechnics, this alone is enough to write off an almost new vehicle. I know because that is exactly what had happened to mine, I dont know what it hit but the only visible damage was some cracked slats in the radiator grille and a couple of scratches and stress cracks in the paint of the bumper. The impcat had been transferred by the bumper & the inner polystyrene filler to the inner metal bumper beam, this has 2 short longerons that form the primary sacrificial crumple zone, one side was deformed so I can understand the shock sensor deploying the airbags, the bumper and polystyrene infill were both reused without any repairs and you would never know, thats how effective they are. With a bull bar the vehicle structure has none of that protection and more importantly neither does a pedestrian unfortunate enough to be hit by it.2 points
-
2 points
-
One bothered to do exactly that on the last car I had which had a same-sized steel spare (so not the Superb); the steel wheel weighed less than the (thick cast OEM) alloy ;-) Did you do the same? And don't get me started on the apparently unstoppable fashion-driven trend for bigger diameter wheels, which together with the tyre usually weigh (and cost) more than smaller diameter ones because air is much less dense than aluminium... (go and talk to a suspension engineer before arguing that big wheels are not a style choice)2 points
-
Cheap alloy wheels (i.e. most of them) are cast, have to be thick to get enough strength, prioritise looks over function, and as a consequence are usually heavier than steel wheels and no stronger (and easier to damage). They're a styling option, not a driving one. Expensive forged and machined alloy wheels are lighter and stronger than steel especially if designed for strength not looks (remember the original Minilites?), but this isn't what most cars are fitted with as OEM or what most aftermarket wheels are.2 points
-
2 pointsThere will be a voltage drop caused by the length of cable. You will need to go 50mm2 on the positive side and a really decent short run earth strap will need bolted really well ! An anchor plate from a set of seatbelt harnesses welded to the floor is an ideal solution ! This sort of cranking current in the passenger compartment needs careful consideration - ideally a battery box and make sure the battery is secured correctly Last thing you want is a battery breaking loose in an accident - if you go see an agricultural vehicle spares outfit they will supply proper cables and earth straps ! The RAC MSA Blue Book is very handy Good enough to race/rally good enough for the road !2 points
-
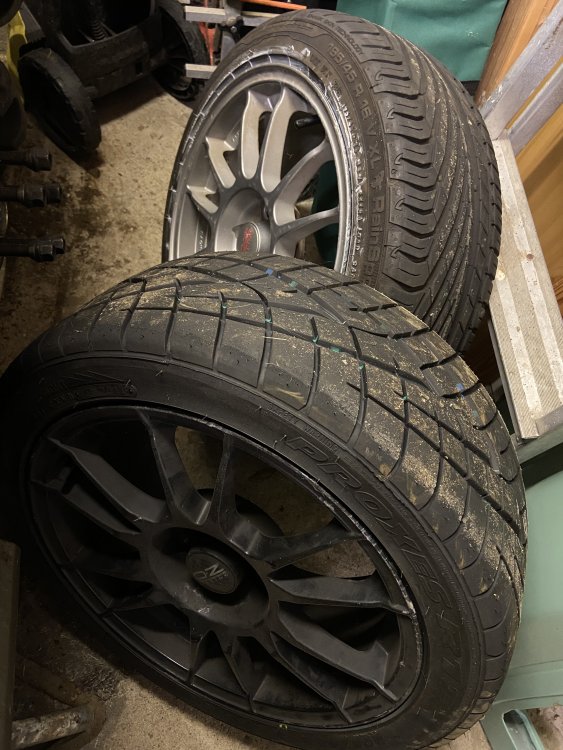
Also swapped tyres round and sold a load of wheels/tyres i didnt really need. Just two sets of OZs now, Ultra and Super Leggeria 😆
 2 points
 -
Hi all, After much procrastinating I collected a Superb 280 Sportline Estate at the end of January. I was toying with getting a new Skoda Superb and found the posts on this forum really valuable. I've been on here quite regularly as a guest, reading your experiences, hints and tips and am very thankful for all the useful info. I've only just registered an account so by way of giving something back here are some details of a 2-channel dashcam I've just fitted to my Superb. Hope this helps anyone considering a similar install. I decided I wanted a good quality but discrete 2-channel dashcam system recording front and rear simultaneously and ideally one which would do a little stealth recording whilst parked and switched off. I wasn't worried about a built-in screen as I'd take videos off with a smartphone or simply pull the memory card out when necessary. I've tinkered with car audio in the past and am not afraid of a little wiring if required, but I wouldn't call myself an expert by any means. Enthusiastic amateur if you will... I first looked at the Nextbase Duo (https://www.nextbase.co.uk/dashcams/in-car-cam-duo/) which has a screen, but decided against it due to the fact the Superb estate is such a long beastie, I doubt it would see much out of the rear window. In addition the front and rear cameras do not pivot up and down so once you've set the front angle best to see the road ahead, some people had found the rear camera recording more of the headlining or interior. It was quite a sizable thing and the inclusion of screen made me think I'd feel nervous about leaving it in the car. I decided against. Blackvue models looked good, in particular the DR650S (http://blackvuehd.co.uk/product/blackvue-dr650gw-hd-2ch-2) however for "parking-mode" recording it needed an additional "Power magic" adaptor thing, or a very expensive battery pack which added additional cost and complexity. Definitely looked the best in terms of aftersales support though. After much research I settled on one from Lukas/Qvia. A relatively unknown company I found initally, with very few reviews on the web, but with most of these things being made in China, Taiwan, South Korea etc, being from the latter didn't particularly concern me if there was a knowledgeable UK distributor. TTW were the guys and I found the one I wanted here: https://lukashd.co.uk/product/qvia-ar790-wd-2ch-dash-camera/ I chose the snappily named Qvia AR790-WD. It looked very similar to the Blackvue above, being quite small and with no screen included. It came with a very small front and rear camera and the inclusion of a super-capacitor (rather than a battery) meant it would last better in hot sun / cold weather and because all the power "smarts" were built in, no additional battery packs or adaptors were required. Once fitted, the super-cap charges up and holds some current and the camera has a built-in fail-safe setting to shut down if it detects the car's battery voltage drops below a certain level. The cameras can then be set to record when motion is detected front or rear, or to continually record on a kind of timelapse mode. So far I've opted for the former and it's worked well. Fortunately the only thing it's picked up so far are cars coming and going and the odd late-night wheelie bin deployment by myself and the neighbours. Anyway, on to the install. You can see enough pics of the camera itself at the lukashd link above, so here's how it went for me: First of all, the installation instructions provided are not that great. Enough to give you an idea, but given the breadth of cars out there, clearly not enough for your average novice in a specific vehicle. Proceed with caution and if you're not comfortable pulling bits of trim off your shiny car, get a friend to help or professional to do it for you. The instructions said to mount the front camera first and run the wires behind the headlining. This dashcam has two wires - one to supply power and one to connect the rear dashcam. Both cables would be run across the headlining to the passenger side of the car. The power cable would run down the A-pillar to the fuse box behind the glove compartment and the rear-camera cable would stay at the headlining level, running to the rear of the car. Fortunately the front lip of the Superb's headlining had a nice recess into which cables can be easily tucked (it's like the expect them all to be used as taxis...) What you see behind the rear view mirror - i.e. not very much: (and the eagle-eyed of you will see I took this picture after I'd finished as you can see the rear camera in the mirror) Next task was the remove the front left A-pillar trim. Not complicated, I had some cheap trim removal tools but this one was easy enough to prise away with fingers. Pull outwards away from the pillar at the top edge and continue pulling away from the pillar down the windscreen side. Eventually you can pull upwards slightly away from the dash and it should come free. Behind you can see the airbag and some other wiring. I chose to run the power cable above all this keeping well away from the airbag: Power cable secured with some cable-ties: (I wanted to avoid anything rattling around after all the trim was back in place.) Cable tucked down through the same hole through the foam insulation. Next, open the passenger door and remove the side dashboard trim. No screws, just find a leading edge you can get a trim removal tool under and prise outwards. Note: the trailing cable is still laying ready to be tucked down through the foam insulation at this point (previous pic). Close up of the side panel removed. Get your hand in there and fish out that power cable poking through the foam insulation: Again, once fished through I decided to cable tie to something solid in order to prevent rattles: At this point I removed the glove box, which the manual explains fairly well and I see others have covered in other articles. What comes next depends upon your specific vehicle and the fuse you have. This dashcam requires a permanent 12v supply and a ignition or "accessory" fed supply, along with an earth connection. The dashcam came ready for hardwiring, but I understand a cigarette lighter kit was an option. I opted to use 19x19mm piggy back fuses: https://lukashd.co.uk/product/fuse-holder-adapter-ato-19-x19-mm/ but you might prefer using the mini 11x16mm fuses https://lukashd.co.uk/product/fuse-holder-adapter-mini-111-x16-mm/ The idea with these is that they're a simple way to extend an existing circuit. They come with two slots for fuses - one for the original circuit and one for your new added dashcam circuit. You remove an existing fuse, place the removed fuse into the unoccupied piggy-back holder fuse slot, ensure your 10A dashcam fuse is seated in the other slot and then press the adaptor into the position you removed your vehicle fuse from. I used a tester to find the 12v and accessory feeds, with a little trial and error turning the ignition on and off. Fuse 38 (Trailer electrical socket) was live with the ignition on and Fuse 48 (Blind Spot detection) was a permanent 12v. This is what I ended up with: (Fuse 38 is the top piggy back and Fuse 48 the bottom one) In my case both fuse positions were empty - no fuses present as I have neither of those options on my car. So I had to buy another couple of 10A fuses to complete the circuits. The ground wire was easy to attach, but I didn't take a picture of it. There's a convenient earth screw position just under the glove box to the left hand side. Easy to find. With wires in place it was on to running the cable to the rear camera; by far the most time consuming part of the job. I didn't bother taking pictures of tucking the cable into the headlining across the front left passenger door and rear left passenger door, as it was fairly trivial to feed the cable behind. Just remove a little of the headlining tuck the cable behind and replace. It's very tight around the b-pillar, but again with a bit of help from the trim removal tool, it wasn't too hard. Once you get the cable to the C-pillar that's where the fun starts. In a saloon I guess you have it easy and run straight across the rear headlining. However in the estate (and hatchbacks as well I guess) you get the quandary of how to get the cable through to the rear window properly. Ideally you don't want a loose cable spanning the gap between the headlining and the boot, especially when the hatch opens and closes. This is the cable tucked just into the headlining, optimistically thinking there'd be some easy way to go from here to the boot lid. Nope. The only way to go is through the c-pillar, out through the connecting boot grommets and up into the tailgate. So C-pillar trim needs to come off and cable threaded through into where that top grommet meets the left side of the car. Here's the C-pillar with the trim removed (comes off much like the A-pillar one). The cable needs to come down from the headlining into here: Enter stubby oaf-like finger to tell you where to run the cable. I chose the C-pillar to hold all the surplus cable. Don't do what I did and thread it all through to the tailgate, only to find you there's no room for all the surplus up there. Don't pull it all through to the tailgate like I did, only to have to pull most of it back through again... This was not fun. With one hand poking the cable up through the c-pillar, somehow you have to feed it to the hole where that rubber grommet was. I opted for cable ties and insulating tape. If you can get the cable ties through to your cable, tape the insulating tape to the cable (carefully protecting the metal plug on the end) and pull it carefully through the hole: Now we're on one side of the grommet ducting thing. The cable needs to go through that and there isn't much room in there. Enter the cable-ties again to pull the wire through: Note: those grey plastic bits hold the rubber grommet ends tight to the body panels. They are easy to get off and a right pain to get back on again - especially if you have chubby fingers like me. Deploy the missus or someone with small fingers to help. Now the cable's ready to be threaded into the boot lid. My worst fears - the whole boot interior trim has to come off. Lower section has to come off first, then the upper section around the glass. First of all, pop out the electric boot release button (if you have one) and the two interior lights. Remove the plugs from all three of them and poke the wiring back into the holes inside the boot lid. The lower interior trim section just pulls free now - again like before pop out one section (I started near the very bottom of the boot lid) and work your way carefully around, popping out the trim panel with a trim removal tool. The clips are much harder than the interior trim and I was quite worried about damaging the panels. Everything went OK for me, but go careful! Bottom panel removed: One the lower panel is removed, you can start on the upper panel around the glass. This time I started around the sides near the gas struts. Again, level and pop them out carefully working your way up each side first, then across the top. Once free the whole lot pulls downwards away from the raised boot lid. The upper panel removed and laying in the boot: (just so you can see all the clips) With both trim panels removed, the top edge of the boot lid looked like this: You can see the cable hanging out from the rubber grommet. Use the cable-ties again, threading one through from the left hole in the boot lid above to the grommet hole. Tape the camera cable to the cable tie again and pull through. This whole part took me a couple of hours to do tidily and safely but it was worth it. The camera can then be mounted where you choose on the rear window and the cables will be tucked safely out of harm's way. I wrapped the cable in a little extra insulating tape to protect it where it passes under the rear trim. Up to you. Test the camera, make sure everything works OK then refit all your trim panels. Here's the rear cam. There's a little raising of the interior boot lid panel, which I guess could be solved by cutting a small notch into it. However it doesn't bother me that much. The rear camera cable would've been better with a right-angle plug in my opinion, but again, not the end of the world. Hope this helps. Any questions, feel free! Roy.1 point
-
1 point
-
No idea. That is completely normal behaviour for a speedometer though. Anything to do with the instrument cluster probably means it's a good idea to reflow all the solder joints on its connectors though, unless already done.1 point
-
Firstly, thank you Wino, I've prised that grey shroud away and I think I found that airbag ECU. At this stage I'm not going to disassemble any more as I have some resistors and a second hand airbag arriving and will re-test. I've taken a photo and added an arrow in case that helps someone else. I've also encircled the yellow connector which goes to the Steering squib/clock spring.
 1 point
 -
Does it have TUV certification or does it just have a TÜV sticker on it? In reality a sticker means nothing.... In the same way I see CE markings on many items. Then I go on Amazon and find someone selling CE mark stickers for pennies and realise that maybe not all (or even some) cheap ****e stuff is actually CE marked, and is simply "chinese tat" with a 2p sticker on it. Add to that the fact that the Chinese have enterprisingly produced their own China Export logo (and sticker) which is strikingly similar and can be stuck on anything exported from China it seems, and there's nothing reliable in a sticker or marking.1 point
-
1 point
-
1 point
-
1 pointthe removable films which protect the screen have a white tab on them to assist in taking them off, my Kamiq looks the same after i took the factory protective films off .1 point
-
1 pointIn Europe, the emissions scandal/diesel gate only effects the older EA189 engines. You have a EA288... All I can suggest is finding a similar but 'good' car and then making similar drives in both to compare various sensor output.1 point
-
1 pointOk.... its going to cost twice what I expected, add weight, get hung up on green lanes, be dangerous, may not even be legal, may cause more damage to the car in a small prang,.... I think you guys have persuaded me against the bull bar. The front of the Yeti is handsome enough as it is.1 point
-
1 pointYou are correct in saying that the keys stop transmitting, but it's 5 minutes, not 15. This from Skoda's own press release: "and the new version of the optional KESSY keyless vehicle entry system, in which the transmitter signal is deactivated if the key is not moved for five minutes." I believe it applies for all new (Model year 21 on) KESSY equipped Skoda's. I first had it on my Karoq and It is on my new (MY21) Scala and can confirm KESSY works very well, and that so does the signal deactivation and is 5 minutes after the key last moves. Personally, I like the KESSY system. It's simple and (certainly for me) trouble free. Hope this helps...............Tony1 point
-
Aircon needs to be used regularly otherwise the seals dry out. Mine is on all year. tom1 point
-
1 pointHave you checked that the pipes to the pressure sensor are clear? It's not unknown for them to become blocked.1 point
-
You might need to recode or replace the parking sensor module I know I switched to a newer version from a Yeti but I can't remember what issue caused me to swap it.1 point
-
Considering the OP has a budget of 800 euro for 4 wheels, all this the talk about exotic wheels is moot. My advice is.....stick to OE, no need to worry about compatibility, PCD, ET etc.1 point
-
Well I fully stand by that statement. I believe it was evident (or maybe not) that I was not comparing steel alloys vs OEMs but against some decent aftermarket options which are all significantly lighter. The Superb and all Skodas in general come with awfully heavy stock alloys (In particular 19" Supernovas on my 272 were 14.7kg...) so yes, if one cares about driving feel even a little bit, the improvement they can get from a set of decent, lighter aftermarket wheels is not to be ignored as they can get rid of several kg per wheel, and that's not something you can get by any steel wheel. Speaking of which, does anyone have any idea what those ID.3 18" or 19" steelies weigh? For the second part, I strongly oppose to cheap replicas in general so we agree there. I also don't consider the Ispiris (1340EUR for the 19x8.5) particularly expensive. One should be easily estimating at least 1200-1500 EUR for a quality 19" alloy set and that's actually a good price. As I said I consider wheels of almost equal importance as tires. Those 18" V1 I suggested above, coming in at 10.4kg costed 600EUR. Yes, they lack the attention to detail the Ispiris have, the finishing on the inside of the barrel and some transitions in some areas are not very refined but no-one would ever notice and all that is still perfectly acceptable I believe for a TUV certified wheel that will not break over the first pothole you drive over, especially when people buy alloys of unknown origin/quality on ebay for that price. AND they will considerably improve steering feel too as opposed to a set of steels (even if there was any acceptable design at 18" the OP is looking at)1 point
-
1 pointThe ECU uses the DPF pressure sensor to estimate the amount of soot in the DPF. Perhaps your DPF pressure sensor is faulty & giving false data back to the ECU.1 point
-
You said "and definitely not for steel wheels if you care about driving even a little bit" so yes I was replying to you. You obviously didn't read what I said, which is that *high quality expensive* alloys (like yours) are lighter, stronger and better than steel wheels, but this is often not true for *cheap lower quality* ones -- which is most of the wheels on the market when you include OEM (which are almost all cheap made-in-China ones with a manufacturer's badge stuck on), and very likely what the OP will end up with if he gets the "relatively cheap" wheels he's looking for. You yourself said that your (expensive) Ispiri alloys were 4.2kg lighter than the OEM ones, so we're not disagreeing here...1 point
-
1 pointthat's it mate. Before it went in the other week for the service, I took the air filter out, cleaned it itself and wiped up any crud at the bottom of the filter housing.1 point
-
1 point
-
1 point
-
1 pointIt is still 'Simply Clever' to remove a Pollen / Cabin Filter of a vehicle not getting used much and vacuum it and wash around the area and dry and refit the Filter'. & with Kerry & Norma Filters, still look in the Air Box to see if it appears nice and clean. They get dirty just as easily if not more than a 'Disposable filter' but might not be as obvious that they are until an increase in fuel consumption is noticed.1 point
-
1 pointGot them yesterday, Only cost 1 euro for the two of them, Thanks again Will!1 point
-
1 point
-
1 point1 point1 pointI changed all badges to the gloss black. The only bit of chrome left was those fake exhaust tips but I wasn't sure could I replace them with a suitable Superskoda part. (Mine is a Sportline 190 diesel) So I ended up removing the trims on the existing diffuser and repainting in gloss black. I'm happy with the result (I think)

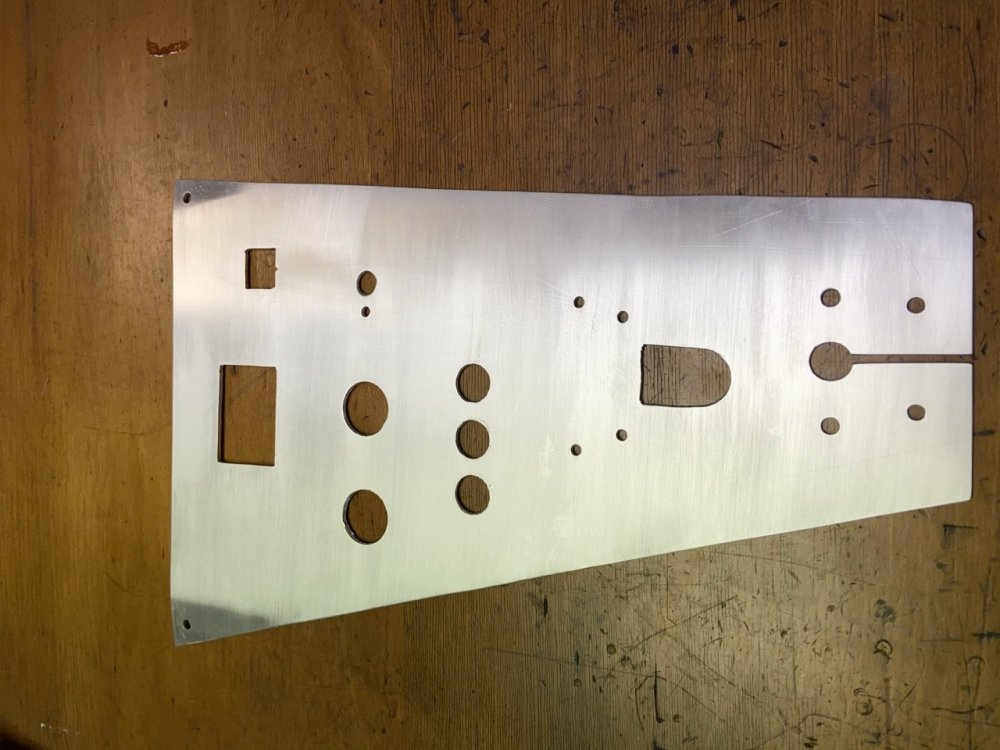
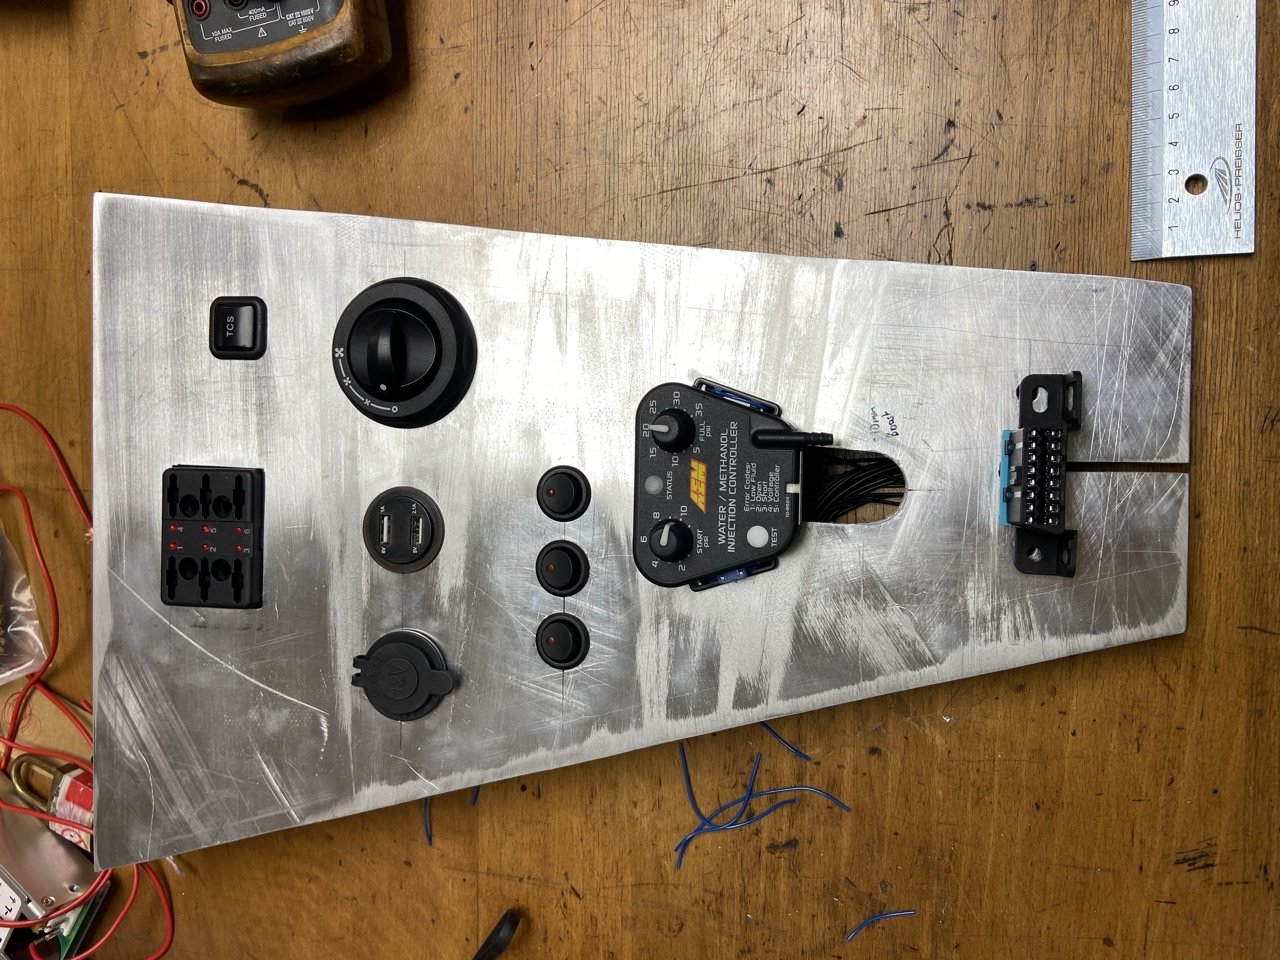
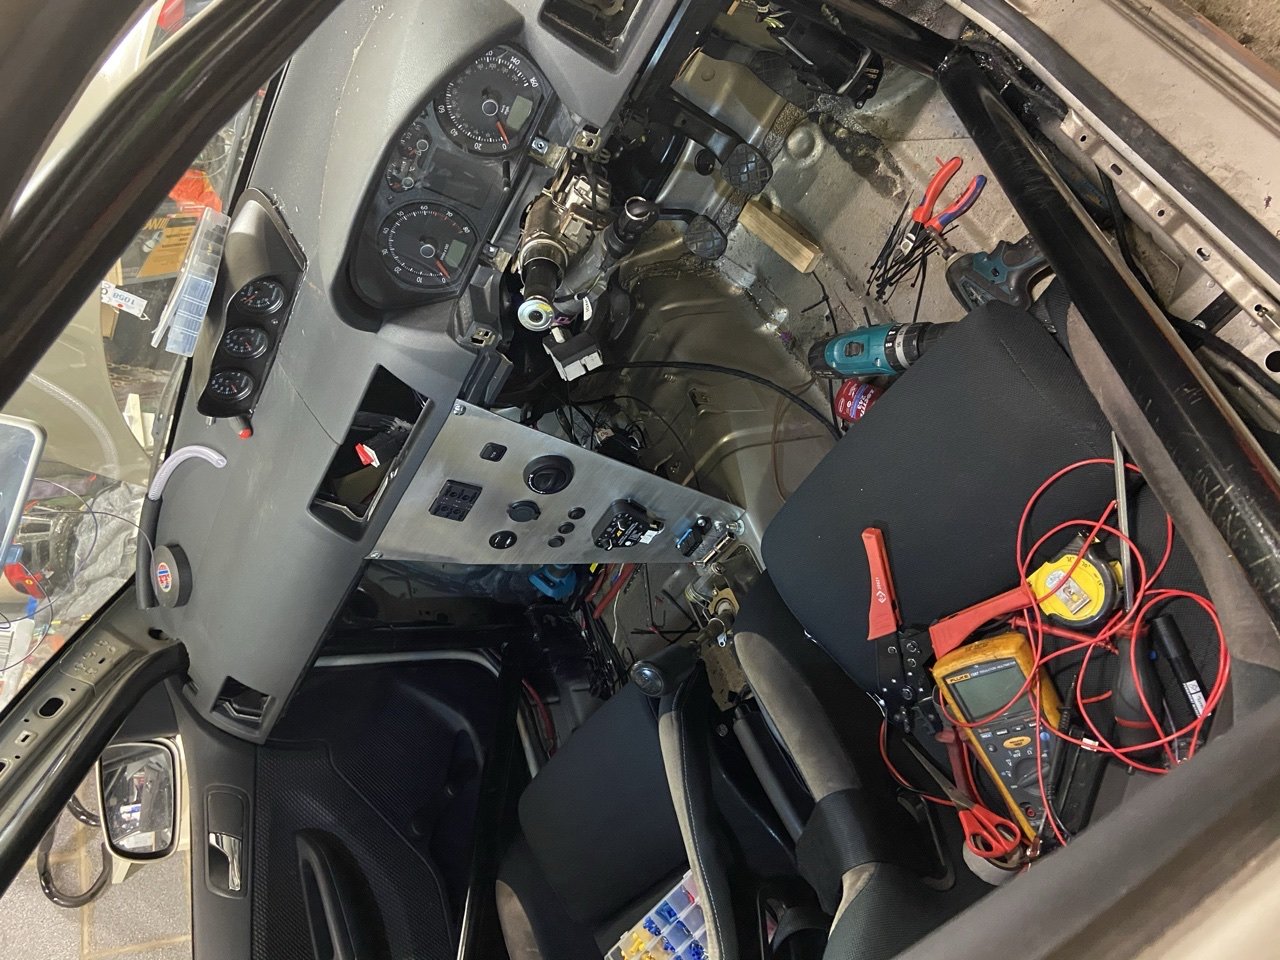
 1 point1 pointTenuously on topic in relation to bodge jobs on seat belts and the RAC blue book. I saw an enclosed glass fibre kit car racer presented for Scrutineering at Lydden Hill once, either a Ginetta or a Marcos, one look at it told you it was a shed and the closer you got the more embarrassing the bodges you saw, the scrutineer had a fit when he saw that the 3 point harness upper mounting was attached to the roll cage by a jubilee clip I kid you not!1 pointMade a new centre console, also holds the dash in place as ive removed all the supports. Not perfect but not too bad.


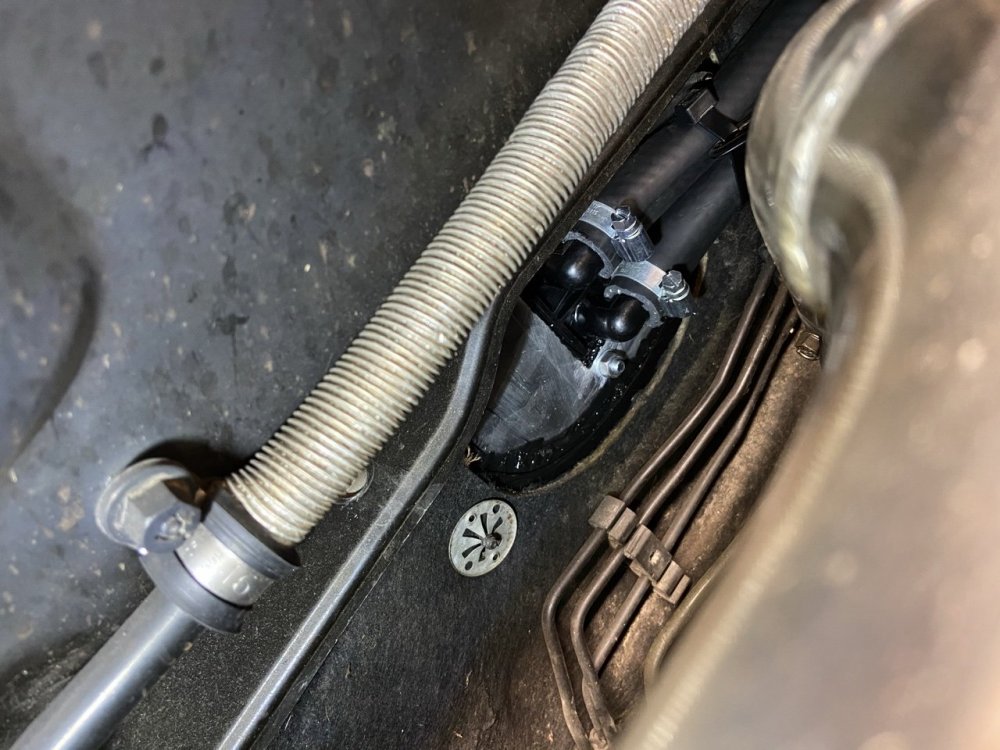
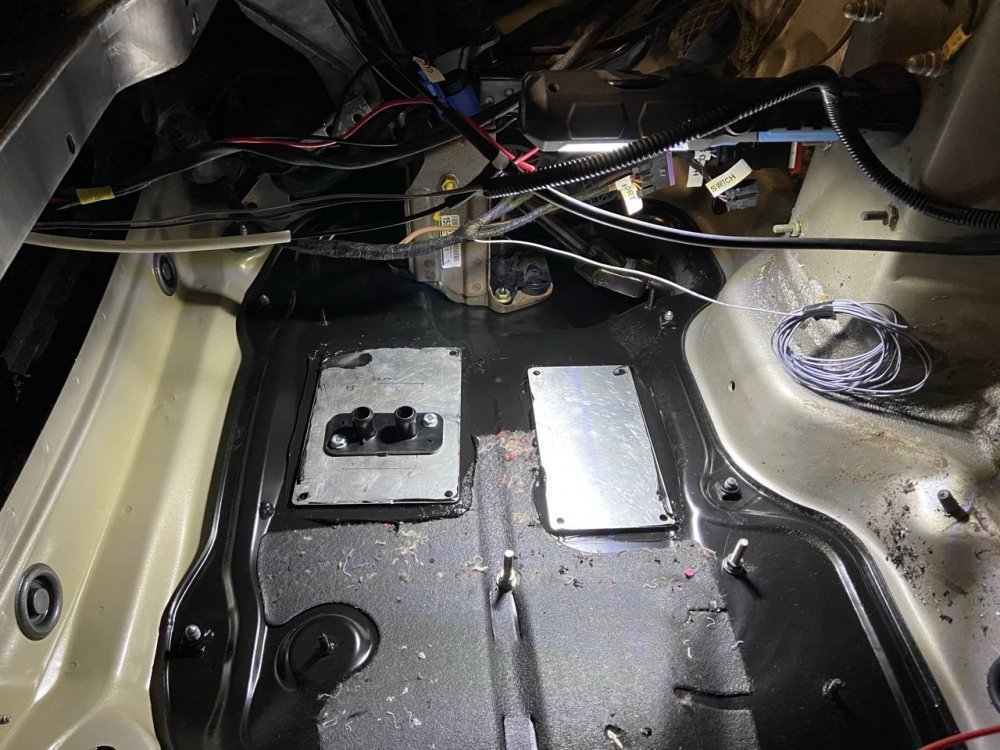
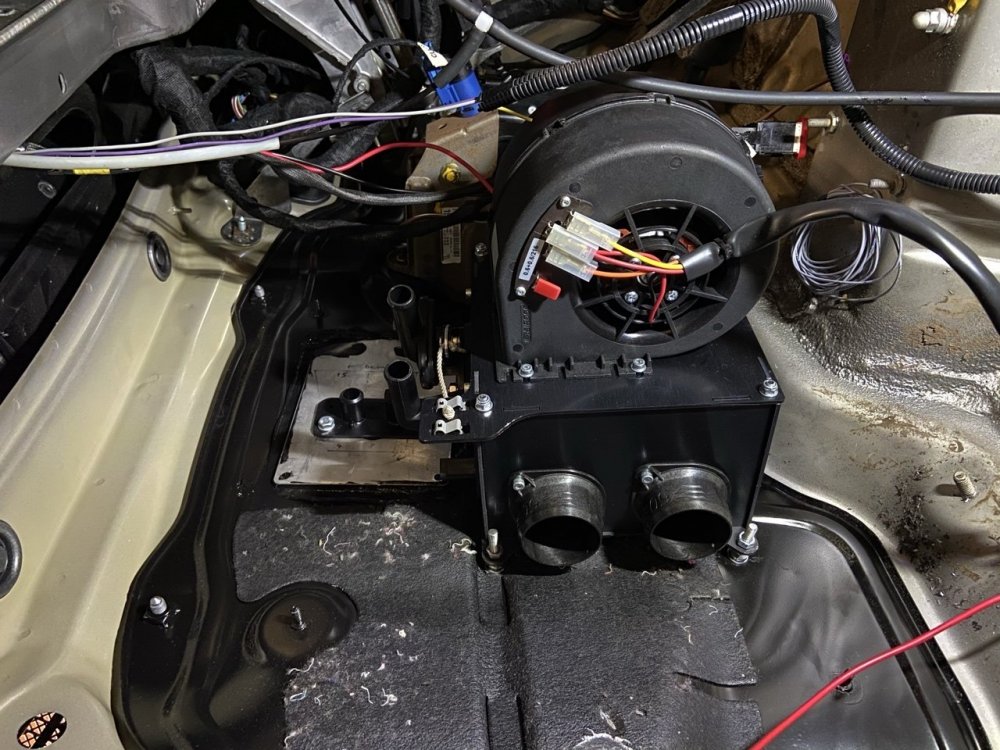
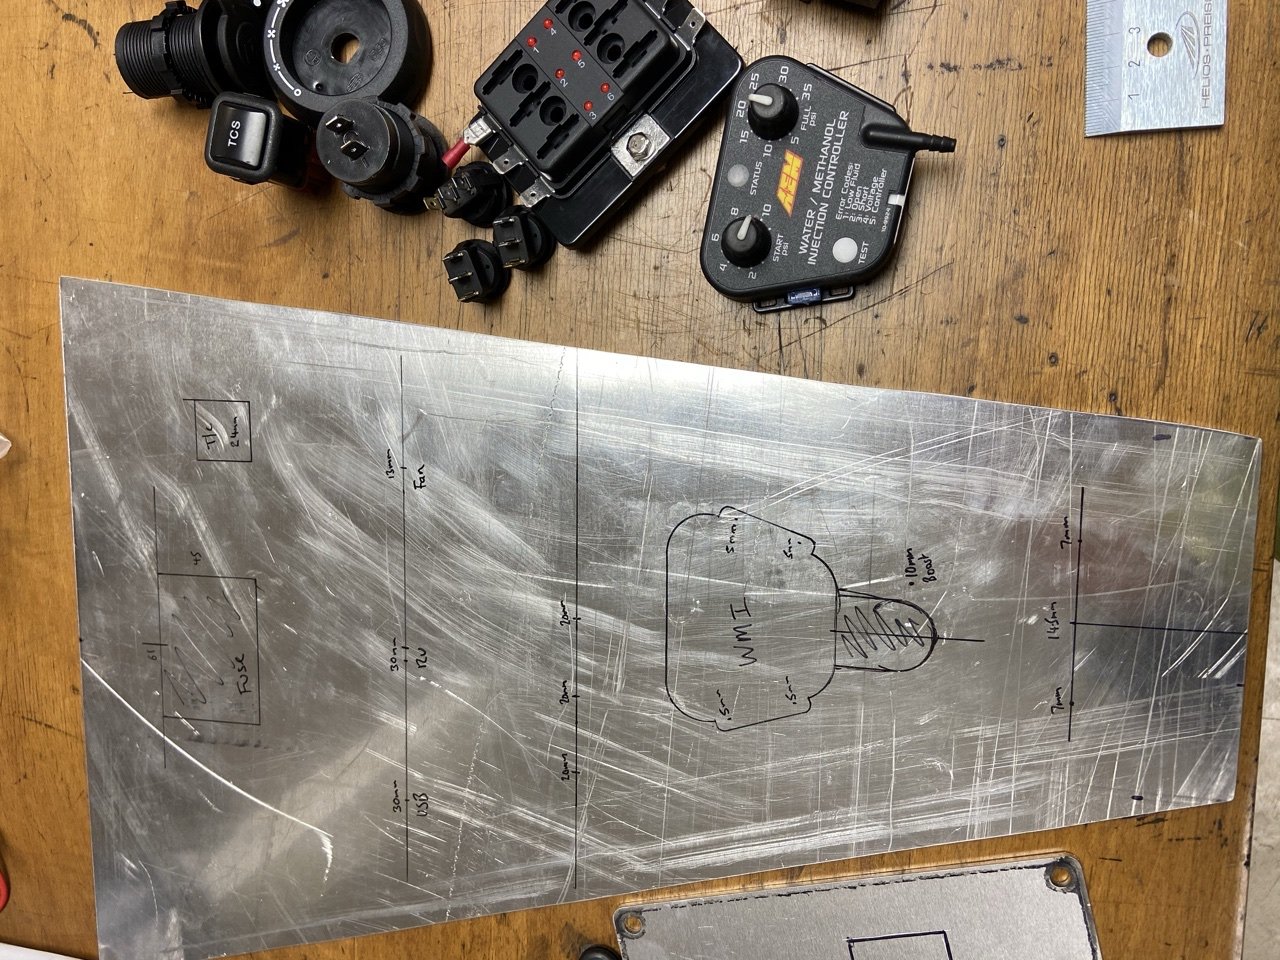
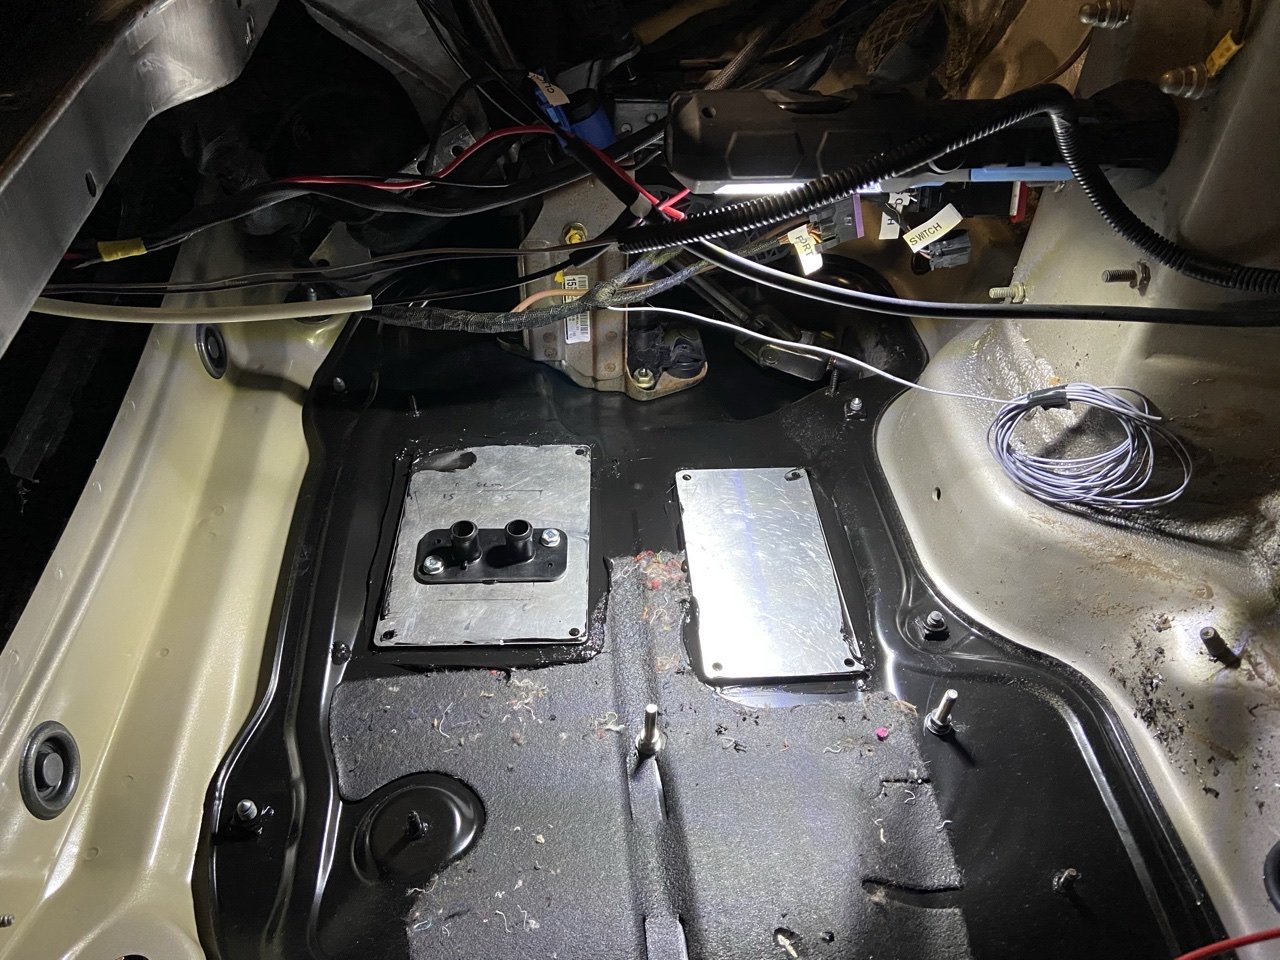
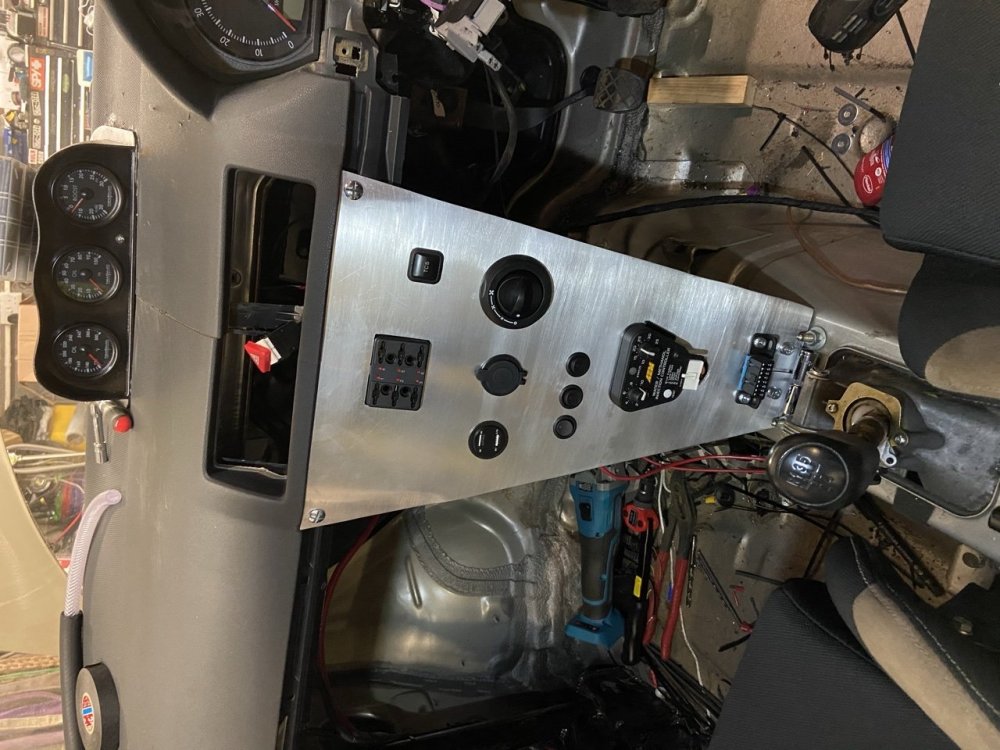 1 pointJust need to cable tie wiring neat, bit its all there now. Heater plumbed in inside and through bulkhead. Just need to split a hose to allow it to flow through heater.
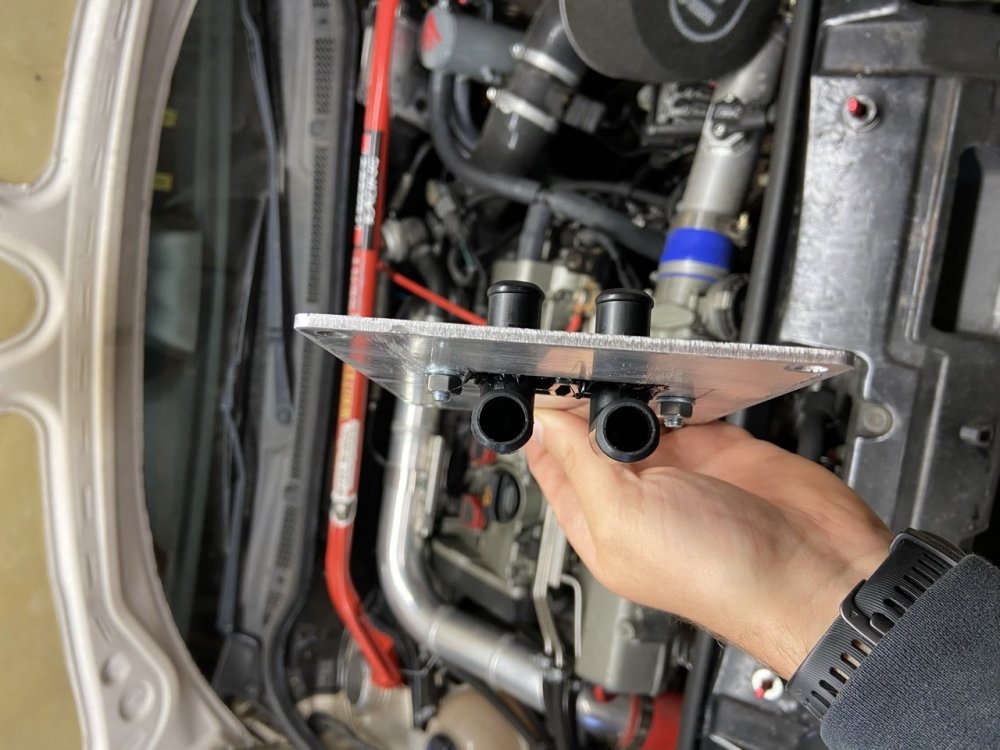
 1 point1 pointBasically when you make up your mind whether Skoda uk are right (5 years) or sometime a long way in the future (official Skoda Workshop manual).1 point1 point1. Standard: purely a filter 2. 1+ With Carbon: filters particulates and the activated carbon "absorbs pollutants" but given the surface area of a cabin filter debatable as to how much they can absorb and a cost bit more. 3. 1+2 plus Inpregnated with fungicide to stop the fungal spores entering or being able to grow on heater matrix that cause odours. Air Con Bombs kill off bugs and sanitizes the heater matrix that goes hot and cold /moist and is the perfect growing ground for bugs and fungi. But as said do both both and smell should go away.1 point1 pointI'd take out the pollen / cabin filter and do a clean with one of the air con cleaning bomb products ... https://www.holtsauto.com/holts/products/air-con-cleaner/ first before fitting the new filter. Any new filter will do.1 point1 point1 pointIt's always good to receive car parts. Great service as always from Classic Quattros That missing accelerator cable clip, proper door pins and seals, temperature sensor and a few other bits.1 pointThanks for info. Was just reading through your detailed guide. Mine is currently completely standard but do have plans for it in the near future.
 1 pointFew issues with wiring. Apparently the fuel pump needs an earth. Luckily the loom from fuel pump to rear of the car isnt taped up yet so easy enough to sort. Dash are all wired up and engine running. Just need to tidy wiring for gauges and WMI. Then plumb in T5 heater. Tried to remove rear beam but couldn’t undo carrier bolts, so sacked that off untill after track day in November.
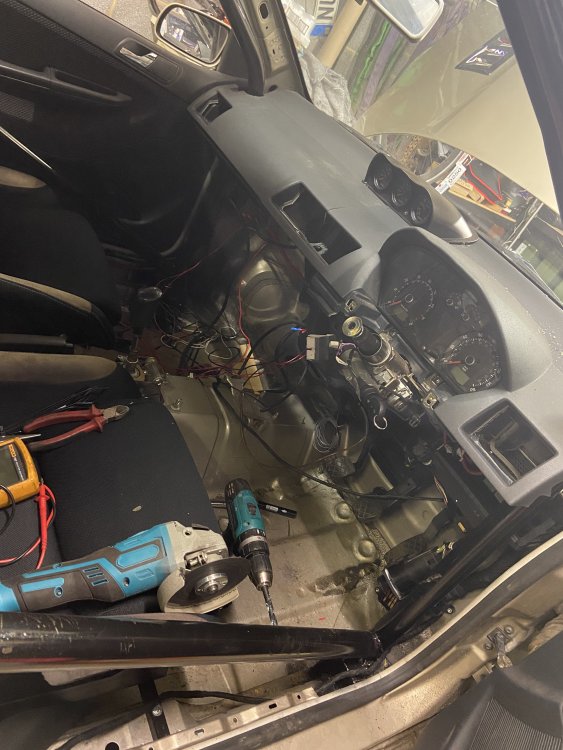 1 point1 pointAfter learning from another Australian member here (Ope126 ) that Fulcrum Suspensions (SuperPro) in Qld had used his Sportline 206tsi 4x4 as a test bed for certifying the fitting of the Golf R rear arb. I ordered the SuperPro rear ARB kit and had it fitted this week and I'm looking forward to going for a good drive this weekend to see the difference this makes.1 point1 pointAs strange as it sounds, if you fix the temperature sensor, that might sort the TPMS errors for you. Just as an example of a outdoor sensor playing havoc with other systems: https://forums.ross-tech.com/index.php?threads/12542/ It'll probably be behind the front grill somewhere at a guess1 point


.thumb.jpg.f83a46b9b3c0d976b9dbffbb523c9874.jpg)


.thumb.jpg.06721e8c8b33ed0eea16572ff131b291.jpg)
.thumb.png.26e4ef1cd991d7943ece4e7bf5baf72f.png)


Important Information
Welcome to BRISKODA. Please note the following important links Terms of Use. We have a comprehensive Privacy Policy. We have placed cookies on your device to help make this website better. You can adjust your cookie settings, otherwise we'll assume you're okay to continue.