Leaderboard
-
shyVRS245
Locked43Points0Posts -
Greenliner1
Members24Points2,090Posts -

moley
Resident Member24Points10,120Posts -
Westbury63
Members19Points1,199Posts


Popular Content
Showing content with the highest reputation on 01/01/21 in all areas
-
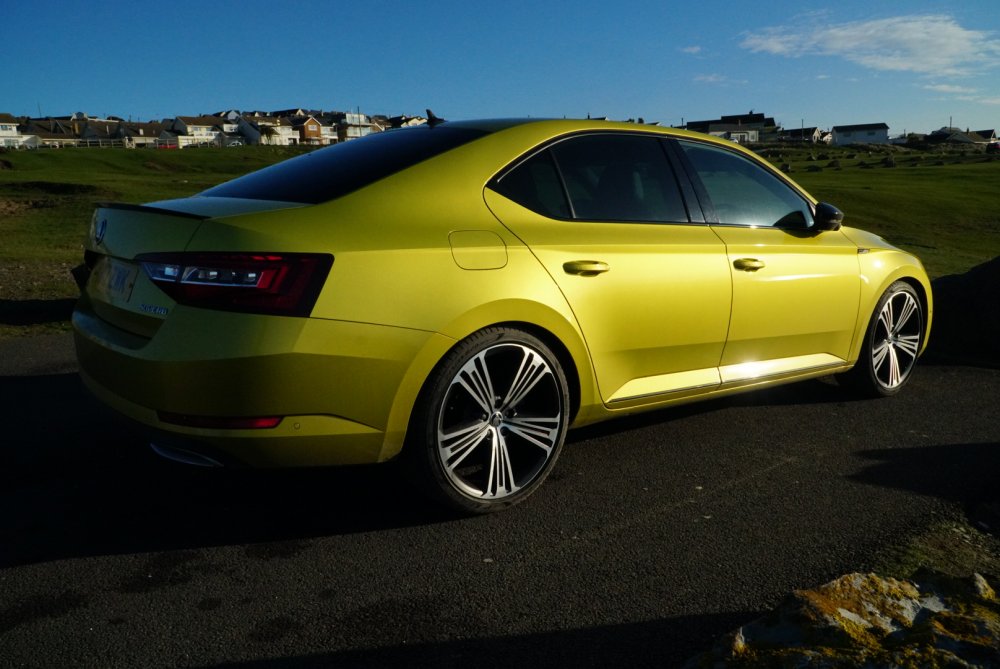
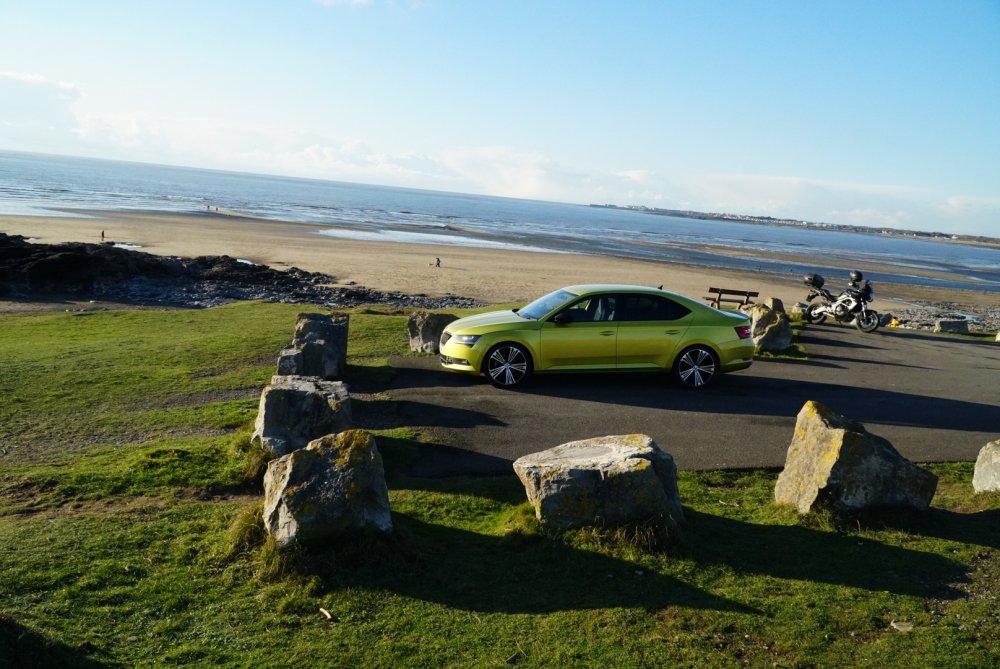
Hey all. Firstly let me start by saying i'm over the moon with the Skoda Superb. What an under rated vehicle. So i PX from a BMW 5 Series GT for a variety of reasons. But it's safe to say, what a good decision thus far. As much as a like the Vega wheels, they were just a little under sized for me. So i went for a 20 inch set and can say for sure, that the ride is no worse. The car has taken to them effortlessly. PS the dragon skin colour is fab!

 6 points
 -
3 pointsUpdate: Skoda Dealers (Derby) were excellent Battery replaced under warranty and rang me an hour after leaving it there to say all sorted And even cleaned the car Cant fault that! Thanks for all advice n3 points
-
I'm with you on this one, for sure. Last summer, the main dealer that supplied my Citigo carried out the service and MOT and the cost was £386 for not a lot of parts or indeed labour - oil, oil filter, brake fluid and I had the rear drums 'cleaned and adjusted'. Admittedly, the brakes were transformed after the adjustment but I came away less impressed than I should have been... It failed its MOT at the first look as both headlamp beams were too low... Then they obviously realised that I have them on the lowest setting as most of my commute is on narrow (slow) back roads so I have them set to illuminate the near road as much as possible. More worrying was when one of the after sales people came through and said there was a problem with my car as, because I'd smeared copper grease on the wheel bolts (winter/summer tyres so the wheels get swapped), 'the bolts won't tighten - they just keep turning'. I asked to speak to a higher authority and suggested at this point they fit the rear wheels as best they can, drive it out of the workshop and I'll pay for what they've done and tighten the bolts myself. In the end, they allowed me into the workshop to use the spare wheel brace in the boot and hand tighten the bolts.... Then I signed a disclaimer on the paperwork saying I'd tightened the rear wheel bolts myself. Okay, I get HSE and 'we must adhere to what the workshop manual' says' against potential liability but it gave me no faith in the technician being able to deal with anything slightly 'outside the norm'. I've used copper grease on wheels and bolts for over 40 years without an issue. As a light aircraft engineer by trade , one gets used to having to think about the job you are doing as not everything is in the manual and you certainly can't plug a computer into 95% of them to look for error codes. Most light aircraft labour rates are around £50/hr depending on where you are in the country. End result, is I won't be taking either the Citigo or my Yeti back there and in fact have spent a couple of days over the Christmas break servicing the Yeti - all in accordance with the servicing requirements from the official Skoda workshop manual. I bought the Yeti one and found the Citigo here. Strangely, for the first time in years, I wasn't asked to complete a 'how well did we do' survey after the Citigo visit.... What is concerning is the lack of adherence to the intervals for replacing parts in accordance with the intervals specified in the workshop manuals. Even though this dealer knew that Allams had changed the diesel fuel filter on the Yeti (it was in the service record that they printed off), they changed it again after 35k miles when it is due every 56k miles. I wasn't asked if I wanted it done and I assumed that I could trust these people. The result is that the dealer has lost the business of two cars as whilst I like having a full service history on relatively new cars, I don't think it makes that much difference to the trade in value when the time comes. I'll service both cars myself and have a local garage carry out the MOTs. When the time comes to change car(s) then this dealer will not be on the list. I never had an issue with Allams, by the way.3 points
-
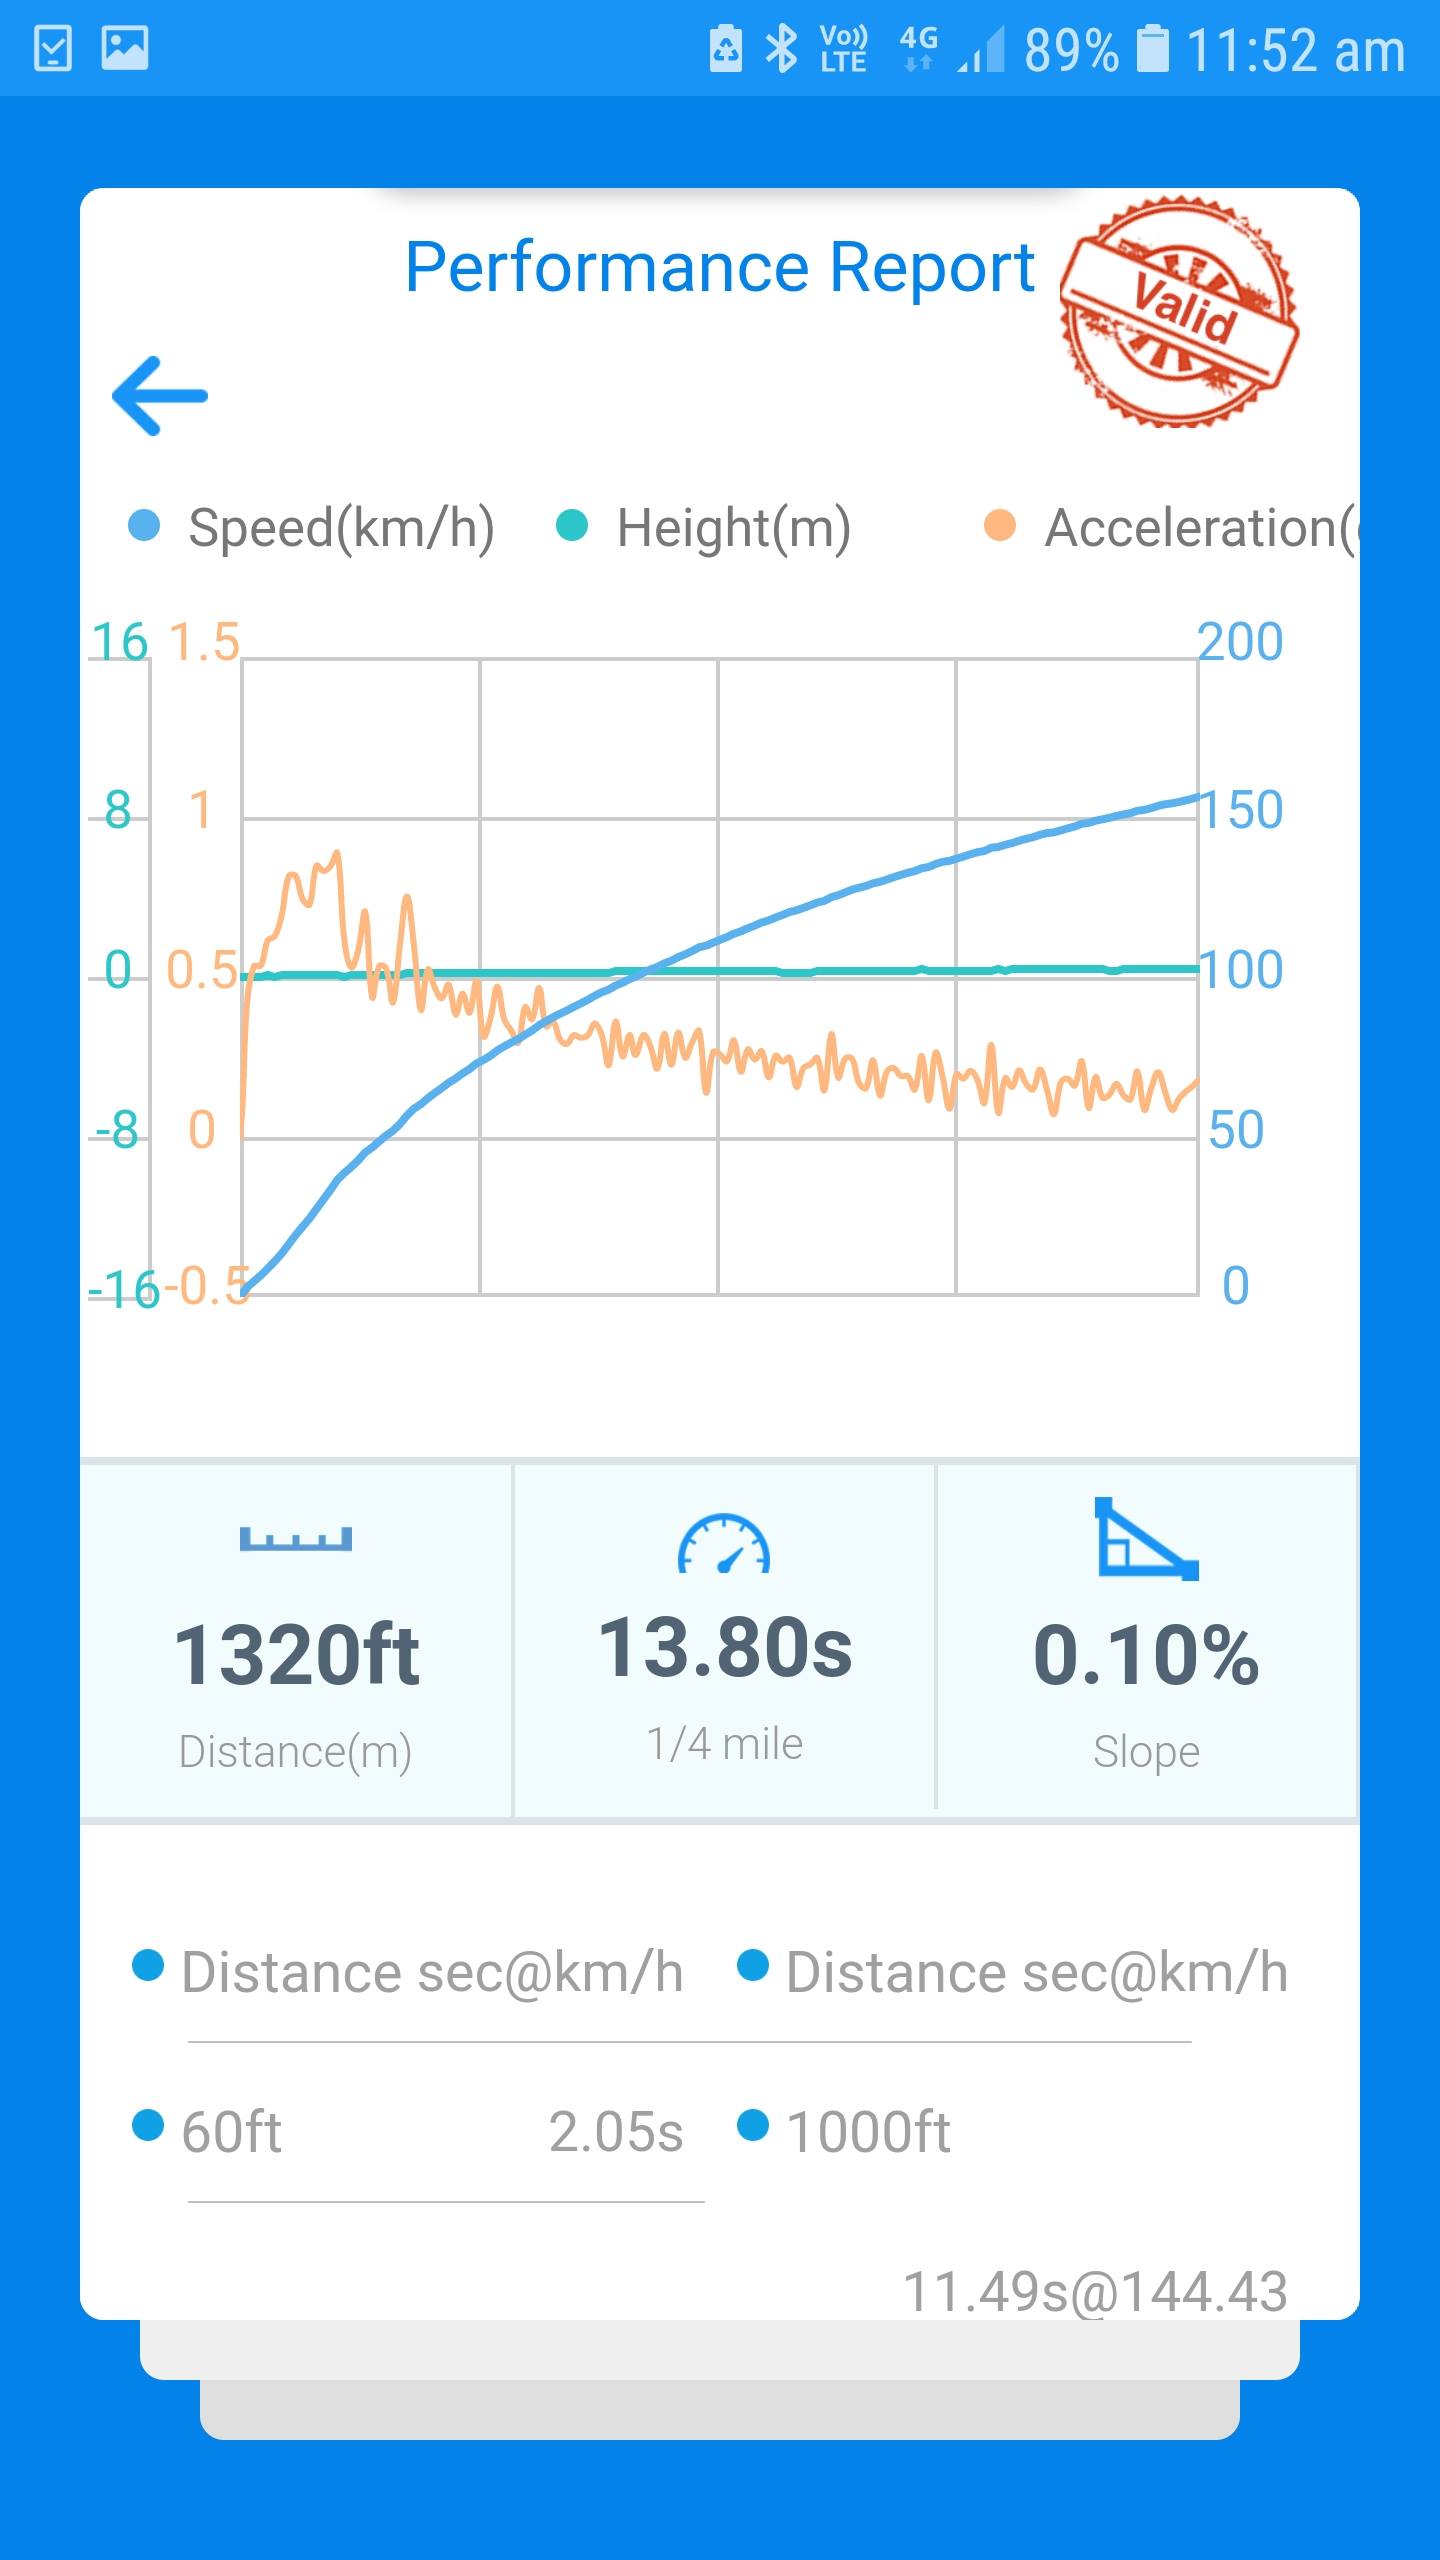
Happy New Year to all. Recently had my Sportline 190 TSI 4x4 tuned and wanted to share my experience. The ECU tune was provided by TVS Engineering who are based in the Netherlands. There are tuning shops/garages dotted around the world (including several in the UK) that are outlets for TVS. This tune from TVS was chosen after a good deal of research and reading of reviews from others who have installed their tunes. Based on what I’ve read they have a very good reputation when it comes to ECU and DSG tunes. I chose their Stage 2 ECU tune - this is their maximum performance tune available for a stock engine. They claim up to 280hp and 450Nm, compared to the stock 190hp and 320Nm. The engine installed in this car is an EA888 Gen 3B with a Bosch ECU. The tuning shop I took the car to needed it overnight to unlock the ECU, flash the base Stage 2 tune onto the ECU, and then do some performance runs and logging. They then send these logs/data to TVS in the Netherlands for assessment where the necessary tweaks are made to fine tune the file. This back and forth can occur several times until both TVS and the tuning shop are happy with the results, and the final tune is flashed to the car. So they effectively take a ‘base’ tuning file and fine tune it to your individual car. They can also do a custom tune – ie - you can specify the increase in power and torque (within limits of course). The engine in my car is stock except for the ECU tune. I’ll probably add an aftermarket cold air intake in the future for some increased induction and turbo spool sound. My car wasn’t put on a dyno, but rather data logging was completed on closed circuit roads. There was the option to dyno the car, however the tuning shop didn’t deem it necessary unless I wanted a readout of hp and torque gains. I was mildly curious to see what the car would pull on the dyno, but already had a good idea what the final figures would be based on previous tunes TVS had published on their Facebook page. The attached performance figures were recorded using a Dragy GPS Performance Meter. Using launch control the car ran consistent 0-60 MPH (0-96 KM/H) times of 5.2 to 5.3 seconds over several runs. From a standing start (no launch control) the car ran 6.1 to 6.2 seconds. This is in comparison to a stock 0-60 MPH time of 6.9 seconds using launch. Temperature was 18 degrees Celsius with high humidity at time of testing, on a dry track. 1/4 mile time was recorded as 13.8 seconds. The Sport Information readout in the car’s infotainment screen now indicates maximum power of 248hp, but unsure of how accurate this is. However using an OBDEleven scanning tool ‘Nominal Torque’ is now rated at 470Nm, with a live data readout showing a peak of 480Nm. I’m yet to find a maximum power readout using the OBDEleven tool. Obviously the car feels significantly quicker than stock. It seems to accelerate just a quickly in third/forth gear as it does in first/second gear, leaving me wondering if torque/power is being limited in first/second gear. Third/forth gear acceleration seems especially rapid. The engine feels stronger in both Normal and Sport driving modes, with Sport mode feeling particularly more lively. There is still a small amount of low rpm lag until approx. 1800rpm, but this is followed by a rapid and smooth power delivery all the way to redline. The car is deceptively quick at times because of the linear way in which power is delivered. The car was also flashed with the TVS Stage 2+ DSG (TCU) tune to handle the extra torque and power that the engine now makes. I’ll post up some thoughts on the DSG tune shortly. In brief it has improved gear shift times, stops the transmission upshifting too soon, and provides a smoother low speed driving experience compared to the jerky and frustrating stock DSG tune. Overall I’m happy with the gains and how the car is performing so far. Happy to answer questions. 0-60 MPH: 0-100 km/h: 1/4 Mile:


 2 points
 -
2 points
-
2 pointsNo it provides no notification, other than a noticeable increase in revs on idle.2 points
-
2 pointsNo. Mainly for privacy and/or blocking out light. As well as providing extra insulation for winter and blocking out sun in the summer. They're actually not secure at all since you can just lift them up even the electric ones (safety I suppose in case of fire). But they do provide some security I suppose since you have to open them first to get to the door/window and they're pretty noisy when you just push them open like that.2 points
-
Hi Xman (and others) why not just simply block notifications from posters who wind you up?2 points
-
2 pointsThe VAG part number is N10292201, which is common across most of the group's vehicles. There are some listed here on fleabay or here on skoda-parts.com and I've included a Brisky thread below which discusses the general issue:2 points
-
The OEM number of the rims is 5E0071498E HA7 So the last three digits is the paint code, ie. HA7 HA7 Touch-up paint 50ml bottle https://www.ebay.co.uk/itm/Lackstift-Skoda-HA7-Anthracite-Metallic-schnelltrocknend-Tupflack-Autolack/254744479381?hash=item3b4ff44695:g:WB4AAOSwfaZfgXfD HA7 Touch-up paint and lacquer 50ml bottles https://www.ebay.co.uk/itm/Touch-Up-Skoda-HA7-Anthracite-Metallic-Clear-Coat-Je-50ml-Car-Paint-Base-Se/254787059679?hash=item3b527dffdf:g:wLAAAOSw22Zfe5zo2 points
-
So my Citigo will turn 4 years old next month. Normally by now I would have chopped it in for another new car, but due to the continuing covid carry on and economic uncertainly I've decided to hang onto it for another year or two at least. Which brings me on to the cost of getting the next service done at the main dealer. Oil and service inspection £184, Pollen filter £35, Spark plugs £99, Air con service (lol) £139 and finally MOT £39. £496 all in. Seriously? That's about a sixth of the part ex value of the car that is now out of warranty anyway. I'll be getting an oil and filter change, new plugs and the MOT done elsewhere and will probably still have change from £150. I guess enough mugs must still be happy to pay whatever and allow them to charge their extrotionate sums.1 point
-
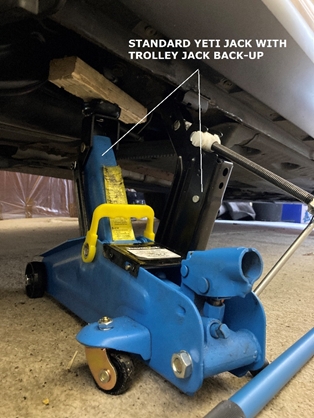
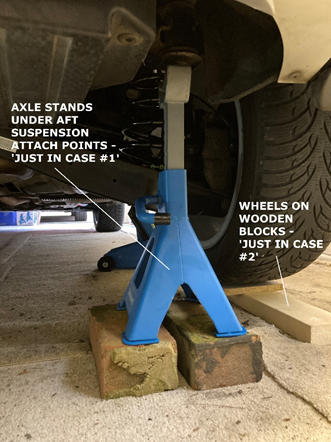
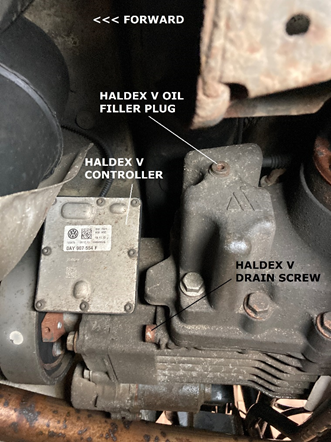
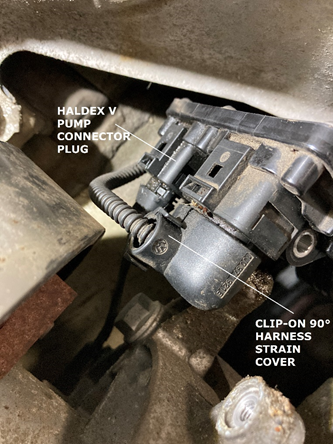
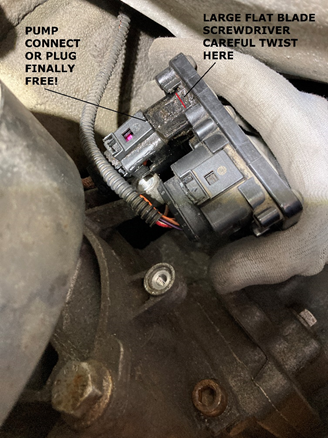
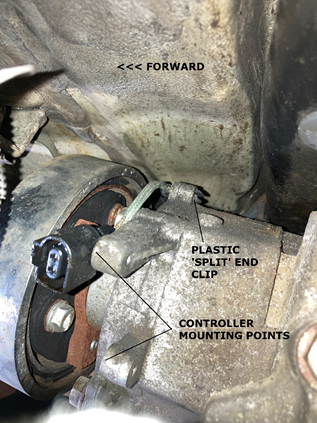
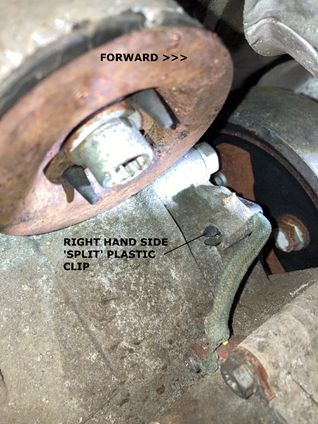
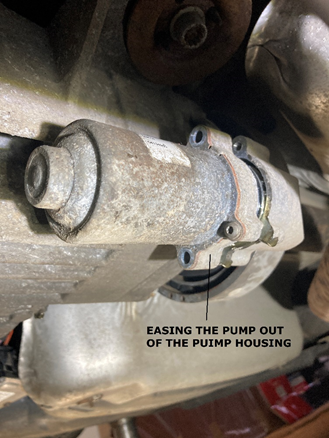
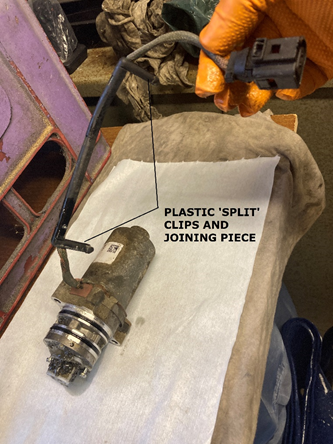
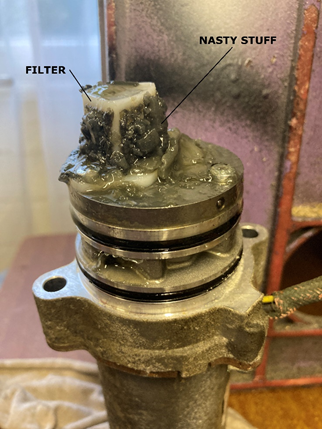
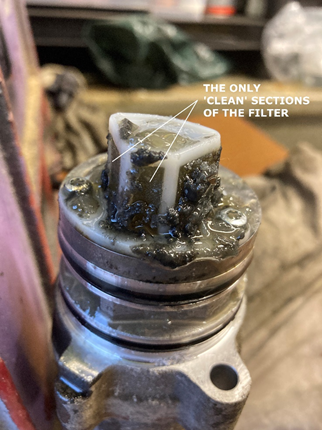
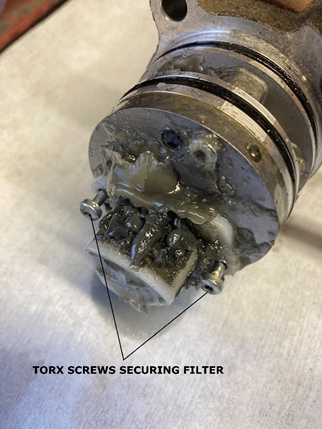
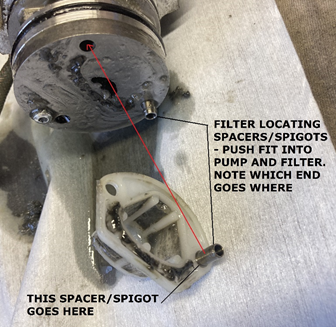
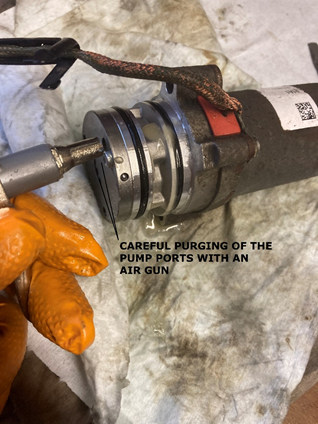
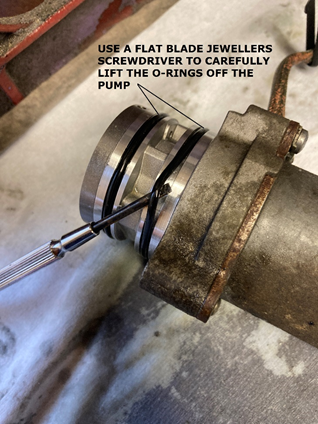
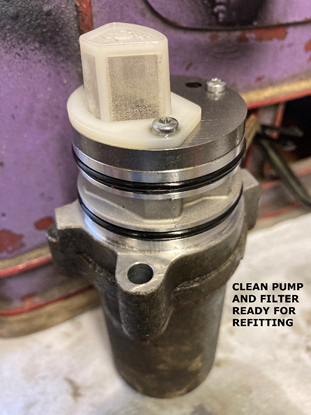
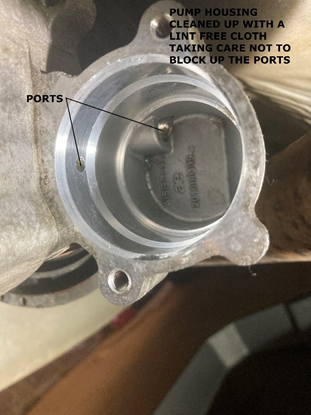
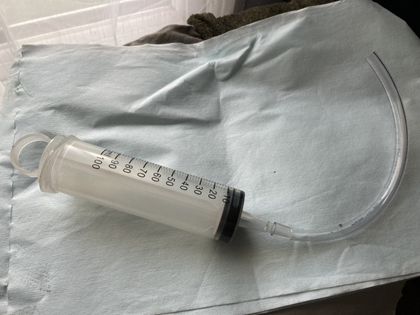
Coming soon when I get the pictures to appear... INTRODUCTION As I mentioned previously in another thread, I decided to have a go at changing the Haldex oil and clean the filter on TIBET III’s Haldex V unit after reading the threads on Briskoda. The idea of this guide is simply how I did it, based on advice from others but it maybe, that I did things slightly differently to others or perhaps I had a problem that others haven’t encountered and which someone else might find useful to know about. It is also Yeti-specific. SERVICE HISTORY After reading about the pump filter issues on the Haldex V and having lost faith with the MK dealer for various reasons, I decided to do it myself. Experience level – I’ve maintained my cars over the years (I’m an aircraft engineer by trade) but more recently, with the cars being under warranty, I’ve let the dealer do it. I reckon anyone who is competent at basic servicing tasks (oil and filter changes etc) can cope with the Haldex V oil change and filter clean. JOB PREPARATION One of my concerns was jacking (safely for me!) the Yeti giving me sufficient room underneath to do the job without struggling for access. I’ve never really trusted the drive on ramp idea so it was going to have to be jacks and axle stands. To jack the Yeti up, I used the standard car jack on one side and a straight lift mechanical pillar jack on the other (actually a 4.5T Land Rover jack). I prefer to rely on mechanical lifting but had in addition a trolley jack on the jack pad inside and aft of the Yeti jack. The LR jack had the good old slotted ice hockey puck to protect the sill flange. The axle stands I positioned at the rear suspension attach points just forward of the bumper behind the wheels. They weren’t taking any weight as such but were there in case the world moved from under the jacks. This may not be an ‘approved’ support point but their role was one of protecting me in the worst-case scenario. I also had wood blocks under the wheels which meant I wasn’t going to get squashed even if someone nicked all the jacks and axle stands whilst I was looking the other way… Perhaps this was all a bit OTT but I had the kit, it doesn’t take long to do and you’re a long time dead. The service kit came from haldexrepairs.co.uk – an excellent and useful website, lots of good info and tips and a good service. The kit was complete including everything from the oil and replacement drain and filler plugs to a pair of gloves. Brilliant. ON WITH THE JOB DISCONNECTING THE CONTROLLER The first thing was to run VCDS to check for any errors but everything was fine. It also warmed the car and everything up. No idea if the Haldex system likes being warmed up but it won’t do any harm! I knew one of the most ‘difficult’ tasks was accessing the pump harness to enable the pump to be removed. In actual fact it wasn’t too bad but even with a torch and mirror, once again the adult-proof VAG plug on the controller was impossible to undo. Yes, I’ve watched all the ‘how to guides’ but it didn’t push further on, the locking tab wouldn’t budge and the plug stayed fast. Plan B was to remove the controller from the Haldex unit to allow better access to the plug. This worked a treat. It’s held in place with two 10mm bolts but it still needed a gentle prize to free the controller from the Haldex unit mount after removing the bolts. This meant I could now get to the plug although it didn’t budge until a subtle and careful twist with a large flat blade screwdriver provided just enough force to ease the plug clear. The other connector plug on the controller has a clip-on 90° cable strain relief cover on it. Removing that enabled more flexibility to access the pump connector plug. The harness is held into position on the top of the Haldex unit above the drive shaft by two plastic split clips. It was easy to do one from the lefthand side (above where the controller was) and the other from the righthand side. The trick is two squeeze the end of the clip together from the aft side and then push the clips forward and out of the locating holes. The two clips are actually joined together by a length of split plastic. The workshop manual says to lower the main final drive unit down for access (7 turns) but I’m not sure why you’d need to. DRAINING THE RESERVOIR & PUMP REMOVAL Delighted with getting the pump electrically disconnected, I slackened the filler point plug and the drain plug - both are Allen socket head screws (8mm for the drain plug and 5mm for the filler plug). The drain plug must be more than just a drain plug as it’s pretty long and torqued (according to the Yeti workshop manual) to 40 Nm. The filler plug is much smaller and shorter and torqued to 15 Nm. I gave the area around and above the drain and filler points a good clean to prevent any crud getting inside the unit. With the drain plug removed, the oil drained into the drip tray and removing the filler plug allowed a full flow. I was impressed as the oil looked pretty clean. Perhaps my filter was going to be okay… DRAINING THE RESERVOIR & PUMP REMOVAL Delighted with getting the pump electrically disconnected, I slackened the filler point plug and the drain plug - both are Allen socket head screws (8mm for the drain plug and 5mm for the filler plug). The drain plug must be more than just a drain plug as it’s pretty long and torqued (according to the Yeti workshop manual) to 40 Nm. The filler plug is much smaller and shorter and torqued to 15 Nm. I gave the area around and above the drain and filler points a good clean to prevent any crud getting inside the unit. With the drain plug removed, the oil drained into the drip tray and removing the filler plug allowed a full flow. I was impressed as the oil looked pretty clean. Perhaps my filter was going to be okay… Whilst the reservoir drained, I set about moving the pump. The first thing to do was to give the pump and the housing a good wipe down to prevent any dust and dirt from unduly contaminating the pump. This was easy with two Torx screws to undo followed by a very gentle tap with a nylon hammer and then a wriggle and out it came, releasing a bit more fluid. FILTER AND PUMP CLEANING I couldn’t believe just how blocked up the filter was – and the congealed mess left inside the pump housing on the Haldex unit – exactly as others had found. It’s strange – almost like grease with little substance when you touch it. It didn’t seem to be water/moisture contamination. The next job was to remove the filter which is held in place by two Torx screws. Then it was a case of gently easing the plastic filter clear. It sits on two locator bushes that also act as spacers and should protect the filer from being crushed when the Torx screws are tightened. I used warm water and a small paint brush and some washing up liquid to clean the filter and then once rinsed, left it to dry off whilst I cleaned up the pump. The pump cleaned up easily and I used a small blast of air from my compressor to clean the old fluid out of the ports. It was then a case of replacing the O-rings, removing the old ones carefully with a very small flat blade screw driver being careful not to damage the pump. Incidentally, there was a couple of patches of light corrosion on the pump (on the mounting flange). This was easily removed with a Scotchbrite pad – don’t use wire-wool as this can cause dissimilar metal corrosion if stands of the wire-wool get embedded in the aluminium pump. I also use lint-free cloths for the cleaning to avoid fluff and stuff getting into the bits where you don’t want fluff. With the O-rings replaced, I blew air through the filter to ensure it was dry and refitted it to the pump. There seems to be two ports in the pump housing – presumable an inlet and an outlet. I scooped the gunge out being as careful as I could to avoid pushing any of it into the ports. REFITTING THE PUMP AND FILLING THE RESERVOIR As with all good Haynes manual advice – installation is the opposite of refitting. Before fitting the pump, I gave the O-rings a good coating in fresh Haldex oil to lubricate them as the pump is refitted. It slipped in a treat and I secured it in place with the two Torx screws. I made sure the harness had the correct routing before I fully pushed the pump home. Once the pump was properly installed, I locate the right and then left harness clips and then reconnected the pump connector plug to the controller, the 90° harness stain relief cover to the other controller plug and refitted the controller to the mounting points on the Haldex unit. I used the airline to give a light blast through from the filler point after putting a very small amount of fluid into the reservoir to help flush it through. I had a small syringe to do this with. A big 100 ml syringe (and a length of plastic hose) comes with the service kit from Haldex Repairs for the main filling. Next job was to fit the new drain screw. The service kit came with new drain screw and filler plug but the original ones could have been reused – there was nothing obviously wrong with them. The new ones obviously have new sealing washers on them. As mentioned, the drain screw is torqued to 40 Nm according to the workshop manual. With everything secure, the next task is to refill the reservoir. The big 100 ml syringe with the service kit works a trat with a plastic hose that just fits in the filler point. I found you had to be careful not to block the filler point completely and that made it pretty much airtight and difficult to operate the syringe. The reservoir took most of the fluid and some started to over flow out so I refitted the filler plug. FINAL CHECK AND VCDS ERROR CHECK AND PUMP RECALIBRATION Next job was to check everything was clear and I lowered the Yeti pretty much to being off the jacks. I started the engine and let it run for 5 minutes. I then used VCDS to run the ‘learn pump’ program as suggested by Haldex Repairs. You could clearly hear the pump running through a specific cycle. The tone changed as the pump filled up. A quick jack up again enabled another oil level check of the Haldex reservoir. What I had initially thought to be fluid flowing showing the reservoir was full but with a more concerted effort on the syringe, I found I got a fair bit more into the reservoir and when it was really full it really did flow out! Unfortunately, I forgot to get a picture of the refilling but that’s a pretty simple job – just be careful not to put too much effort into operating the syringe and end up blowing the plastic pipe off. I used probably 800 ml of the 850 ml supplied in the bottle. Although the car was jacked up at the back, it probably wasn’t that much of an angle so I think the reservoir is pretty good on the level. Another good look round was done as a final leak and security check. I then ran the engine and again went through the VCDS error code check and ‘learn pump’ program. All appears good. I am at a loss as to how the system worked with about 80% of the filter blocked – perhaps it wasn’t. I haven’t been in any snow for three years now. Anyway, job done and as others have said – it is a job that has got to be done. If you’re not up to it then it shouldn’t be too costly to get a garage or dealer to do it – you’d just better point the dealers to Briskoda or the Haldex Repairs website to find out how to do it! Next job will be to take the Yeti out for a road test this weekend. Forecast for snow on Friday…. PS Apologies for the low res pictures, haven't got time this evening to suss why they didn't load - if anyone needs hi res pictures (or a PDF of all of the above) then PM me.


 1 point
 -
I live in the hills above Matlock in Derbyshire at 760ft above sea level so back in January when I bought the Octy, I invested in a full set of Goodyear Vector 4 Seasons Gen 2. I have experience of true winter tyres and I can conclude these aren't quite as good in snow as those but still offer a huge improvement on summer tyres. Plus I can keep them on all year. Today was the first true test of the tyres but I made a mistake going up the hill covered in compacted snow and ice. I forgot to switch the traction control off so it proved to be a real battle. Summer tyres would have seen me spin off on the corner altogether so still a huge improvement. No problem on fresh snow. https://youtu.be/2aZeC0q-6Dk1 point
-
Probably no revelations or nothing anyone hasn't heard before but here goes..... I’ve had the Scala SEL around 6 months now and thought I’d report back on what I think. Over all, I like the car a lot but there are a few things that annoy me. I’m just going to list these, and a few of them are personal preference. Assume that everything else about the car is great. Drivers seat. Can get a bit uncomfortable on a long journey. I wish it was a bit more padded. Drivers seat. The back always seems to move by a few degrees from journey to journey so I always have to pull it up a little bit. Lane detection. Hate it and personally don’t think it’s that safe. The first thing I do is turn it off. I wish I had the option to disable it on start up in settings. I understand it’s needed to get some sort of certification for Skoda. I’d argue that it’s not my problem! Having to go on the main screen to change heater settings. Ridiculously badly thought through. No wireless Android Auto. Not being able to upload radio logos via stick to the 9.2” Amundsen. A minor thing but drives me mad. The user guide says you can do this but you can’t via USB. I contacted Skoda Support who told me that I could upload it via SD card. I pointed out that the car doesn’t have an SD slot. They then told me that there was no need as the images reside on an internal drive. I pointed out that a load of logos are missing or some that get assigned are plain wrong – completely different station. They then told me that the incorrect logos would be sorted in a software update which I thought was just fobbing me off. I’ve had 2 software updates since I spoke to them and it hasn’t been fixed. I spoke to them again. Still absolutely no resolution and no explanation for not being able to upload (that probably annoys me most) but this time they added that they don’t have licensing for some logos. I reminded them that these logos aren’t missing on one of the company Octavia’s. They moved on swiftly and asked me if there was anything else they could help me with? Yes. Are you going to update the user guide to show that you can’t do this? Still waiting for a response on that. To sum up, no help at all. Spoke to the local Skoda garage. They understood to their credit and said it drives them mad too but there’s no solution and they can’t understand for the life of them why it’s been taken out. One wish. Being able to get Google Maps/Waze on the dashboard display as although adequate, I think Google maps are better than the Skoda satnav. But, other than that – and these are minor in the grand scheme of things, I love the car.1 point
-
1 pointGood evening Carlton, thank you kindly for the very thorough and very informative breakdown. I did have the option of getting some 205/55/16’s on 7J also but they are not VAG rather they are aftermarket that were fitted to an Audi A7. The aforementioned Passat alloys are already in my possession, I primarily wanted to ensure they could be used as opposed to extra financial outlay on another set of rims. I will see how she runs with them on and if I indeed find the ride quality to be harsh I will try to source ET50 6J 205/55/16’s. Thank you again for the information.1 point
-
That.Is great news.I think I may have to go back to the drawing board and strip out/start again and fit both tomorrow on hindsight I should take a proper gander at the mechanics front strut fitting and high passenger side...... as my rear original rear springs look fine- just thought to rule it out and I was fitting new rear shocks myself anyway really appreciate all of your help tonight a happy new year to you1 point
-
My MY20 Edition 2.0 TSi is 7-seat with a factory-fitted retractable towbar. No-one could in any way describe the ride as 'harsh' (and yes, I have been a passenger in the back on a few occasions)1 point
-
Ok, thanks for fast reply's, we will ofcourse test drive the car before buying, so we will know how stiff it feels, thanks for the heads up. It also comes with a towbar, pops out with a button in the boot.1 point
-
OEM number: 1K0511115BR Build code: PR-1JC+0YD http://www.oemepc.com/skoda/part_single/catalog/sk/markt/CZ/modell/OCT/year/2010/drive_standart/663/hg_ug/511/subcategory/511021/part_id/2561497/lang/e What part number are the KYB rear springs?1 point
-
1 pointHi, I have had my iV since Mar and could easily get 20 miles on a charge with the gauge still showing 25% left and that is on EV only. However as the weather has got colder and the evenings/mornings dark I would say that the range has dipped sometimes down to about 16 miles as have used the screen defrost without having it plugged in on the way back from work. I will be interested to see if I can get a software update that may improve range. However as during the winter months there are many more calls on the battery power so you cannot expect the same range as during tepid months. I am very happy with mine so far, there are niggles, the obvious anomalies with the infotainment system and a manual that does not represent the car's configuration. I would love the charge system to work above 3.6Kw so as to charge quicker but doubt this can be changed. As this is the first year I have connect and so the eSIM is active which means the maps auto update (you do not seem to get any indication they are doing it other that looking at the SW page, they seem to do it once a month. John1 point
-
My Superb is exactly the same. Earlier models had 2 pipes on that sensor that both connected to either end of the DPF. Now it is connected to the DPF by just the 1 pipe, the short stubby pipe senses atmospheric pressure.1 point
-
1 pointI suspect many of the readings are averages so except on longer journeys you don't see a true figure, on an 8 mile journey this morning the temp was 660, coming home a bit later it was 696. On a 100 mile journey it was up to 792. It's a similar story with coolant and oil temperatures. I have found Connect Lite to be flawless and my phone doesn't have any issues connecting to the data plug. I use an app called Hotspot Automatic which when it connects to the cars bluetooth sets up a hotspot which the car connects to to get the traffic. As the Connect Lite is sending back all the information to VAG I wonder if you also need a good connection back to their servers for it to work which if I'm hooked up to them for traffic I'm getting. My phone uses Vodafone and I've found the connection very reliable, I also have a usb dongle with a Three sim in it and that's very hit and miss, O2 is just hopeless and I live just outside the M25 in a suburb. Always fun watching the BT engineers trying to get a signal when they turn up to try and fix their appallingly slow broadband.1 point
-
Who knows what goes on in the mind of software engineers, I worked with them for 20 years and I never knew. I suspect the My Skoda app is designed to work brilliantly with the new models about to come off the line but alas not with anything even a few months old. I find the Connect Lite app works flawlessly on my Nov 18 build Karoq.1 point
-
Impressive! Are you upgrading the brakes too?1 point
-
1 point
-
Update on the fitment I spoke about. I wasn't massively happy with the flap on the back being not as tight and sturdy as I wanted, as it was only held on by the two outer clips, and it kinda bowed down in the middle, so I added two extra clips in the middle and drilled two extra holes. Now it doesn't sag in the middle and the fitment and sturdiness is 10 fold. So I'd advise anyone else to do the same as it fits alot better then.
 1 point
 -
So I changed the battery adaptation in OBD, so hopefully that sorts it. I'll keep you posted.1 point
-
1 pointJust a quick hello to everyone, I've come upon this site a few times over the years when I've had problems and thought its about time I stuck my toe in and joined. I currently drive a 2010 Octavia 2.0 TDI CR VRS which I've had for 8 years and covered 80K in. Prior to that I had a 2001 Octavia 1.9 TDI Elegance for 8 years which my wife still has to this day, which is on 208K now. I also own a couple of motorbikes which we won't go into. I have done all my work over the years and hope I can help a bit as well as learn a bit. One thing I'm not so hot with is forums and chat rooms so please go easy on me.. LOL . Thanks and a happy new years to all.1 point
-
I've got a low profile sgs trolley Jack but because the ground is unlevel (I like on a hill) the trolley Jack can be leveled out if it slips but the trolley Jack has no forgiven when it's gone as I found out when working on my civic whilst putting an axle stand, luckily I had put steel wheels under the sill already as there's no way I would have fit underneath it1 point
-
1 pointHaven't gotten any proper snow last 5-6 years It Doesn't obscure at all actually :-)1 point
-
Thanks! Planning to do it myself once the Haldex oil and O-rings arrive. Dealer changed the oil 6 months and 10k km ago, but filter wasn’t cleaned, that’s why I decided to do it.1 point
-
1 pointYou have to check the period from the last synchronisation on main screen. Sometimes it`s pretty old and you have to sync manually to get updated information.1 point
-
1 pointI have an Octavia III and have put sound deadening (both Dynamat and closed cell foam) on the floor from front to back, doors and the wheel wells. While it made a difference to general noise it didn't make much difference to the tyre noise. I'm more pretty sure that it is the suspension transferring the noise. I think this is because it is connected directly to the body without any insulation. Older cars with chassis had rubber mounts between the suspension and the chassis, modern cars like skodas don't have that same chassis so the suspension noises are just transferred straight into the body. I did my sound deadening myself so I didn't lose much. Knowing what I know now I wouldn't p pay someone to do it because it doesn't solve the main problem.1 point
-
I can recommend a cheap air riveter if you have access to a compressor, awesome and cheaper than lazy tongs.1 point
-
Happy new year! It's getting there bit by bit. Slowly but surely it's going to get there I promise1 point
-
1 pointI was reading the first post but didn't check who it was by. I got to the bit about 'we have shutters here in Germany' and thought 'his English is really good' (though not uncommon) and then saw who it was by1 point
-
1 point7.748kg 16" Steel Rims https://eshop.skoda-auto.cz/cs_CZ/plechovy-disk-16-/p/5Q0601027CJ03C 10kg 16" Alloy Rims https://eshop.skoda-auto.cz/cs_CZ/kolo-z-lehke-slitiny-castor-16-pro-karoq/p/57A071496++8Z8 10.5kg 17" Alloy Rims https://eshop.skoda-auto.cz/cs_CZ/kolo-z-lehke-slitiny-triton-17-pro-karoq/p/57A071497A+ZG6 12.9kg 18" Alloy Rims https://eshop.skoda-auto.cz/cs_CZ/kolo-z-lehke-slitiny-trinity-18-pro-karoq/p/57A071498A+HA7 13.9kg 19" Alloy Rims https://eshop.skoda-auto.cz/cs_CZ/kolo-z-lehke-slitiny-crater-19-pro-karoq/p/57A071499A+8Z81 point
-
1 pointAlthough I think LH is a bit of a pillock, he seems to have a good measure of integrity to him and I've never heard anything terrible about him. I work with a couple of guys that have worked with him quite a bit on the F1 circuit and even though they both think he is a bit of a knob, he is a decent chap underneath, means well and is obviously a supremely talented chap.1 point
-
1 point
-
1 pointIt measures the resistance on the sensor prongs inside the tank. These prongs are easily contaminated and give false readings. Especially when left stationary for a while. Weather conditions can also affect the sensitivity of the sensor (cold most noticeably) this has to do with the anti-freeze properties of the coolant. If it freezes and the coolant is not up to standard. It could damage the prongs. A new coolant bottle is required in that case. Same goes with contaminants (though you could try to rinse it out with a bit of brake cleaner as a dirty cheap solution to see if it fixes it.) If the problem returns its most likely due to contaminants like oil. And you should get your waterpump system / headgasket checked. I've had a lumpy idle problem with my fabia. A simple 'tune up' got rid of it (Cleaning the throttle body and air pressure sensor, and dump a bottle of wynns injector cleaner in the gas tank. followed by an italian tune up.) This was after i made sure i had no exhaust or vacuum leaks. (also a quick way to get a lumpy idle on a fabia) To be fair though the air pressure sensor was the only thing that was noticeably dirty so if i had to attribute it to 1 specific component it would be that. The wynns injector cleaner i use once a year. But to be fair. I've only noticed a significance difference the first time i used it. beyond that point it has just been a part of the yearly maintenance schedule and it has always responded fine. My AQW engine is lumpy by default. But you get a feel for it eventually what is normal and what not. I call them "hickups" It shouldn't be continues.1 point
-
1 pointAh of course you’re right no water circulation until ‘stat open! Hmm. Suppose might still be an interesting exercise. Could always fill the engine bay with expanding foam, that’d insulate the block nicely for quicker warm up (joking)1 point
-
Hi There quite right the bay do some real good deals in it infact there is deal ending tonight. I've bought 2 lots basically decided to buy the long life equivalent 504 507 from memory. At the price it is although long life I'll just change every 12 months. Used it last year in the misses focus and just changed again again always use a.good filter seems fine to me... Specs all seem to align. Hope that helps..? Have to agree the dpf light must be coincidence.1 point
-
1 pointWell deserved honour I suspect he won't be one of those celebrities, that we find all sort of horrendous things about somewhere in the distant future and then have to watch endless investigative tv shows about, before he is finally stripped of his knighthood.1 point
-
1 pointCheers for that Lucky pants - both meters seem to be working fine, although I'm delaying whether to switch to Octopus Go at this time. For the amount it's currently costing me using my wall box (£10 after 2 months & 480 miles) it's hardly worth the effort to switch (thanks to Tesco free chargers) , plus I've got solar panels so come the summer even charging at home should be cheap during daylight. Hopefully next year with more chances to drive, my charge requirements may alter & so I'll reserve my options to switch, but until then I'll stick with my Fixed 2 Year Tariff.1 point
-
Banging on about politics on a car forum has always struck me as an outstandingly pointless exercise. All the best xman.1 point
-
Using the current sensor in a negative feedback loop to control current and yes the voltage will vary, but because of good charge acceptance at the battery, it only takes a little extra voltage to increase current into the battery significantly. Most of the time e.g. when cruising at constant speed, if the the SOC is on target (say 80%) the battery will not be charging and the voltage will fall back to a level where only the active current consumers are being supplied. I have not looked at the alternators on these cars, but the inbuilt regulators must be completely different allowing the voltage and current to be controlled externally, maybe even via a digital channel.1 point
-
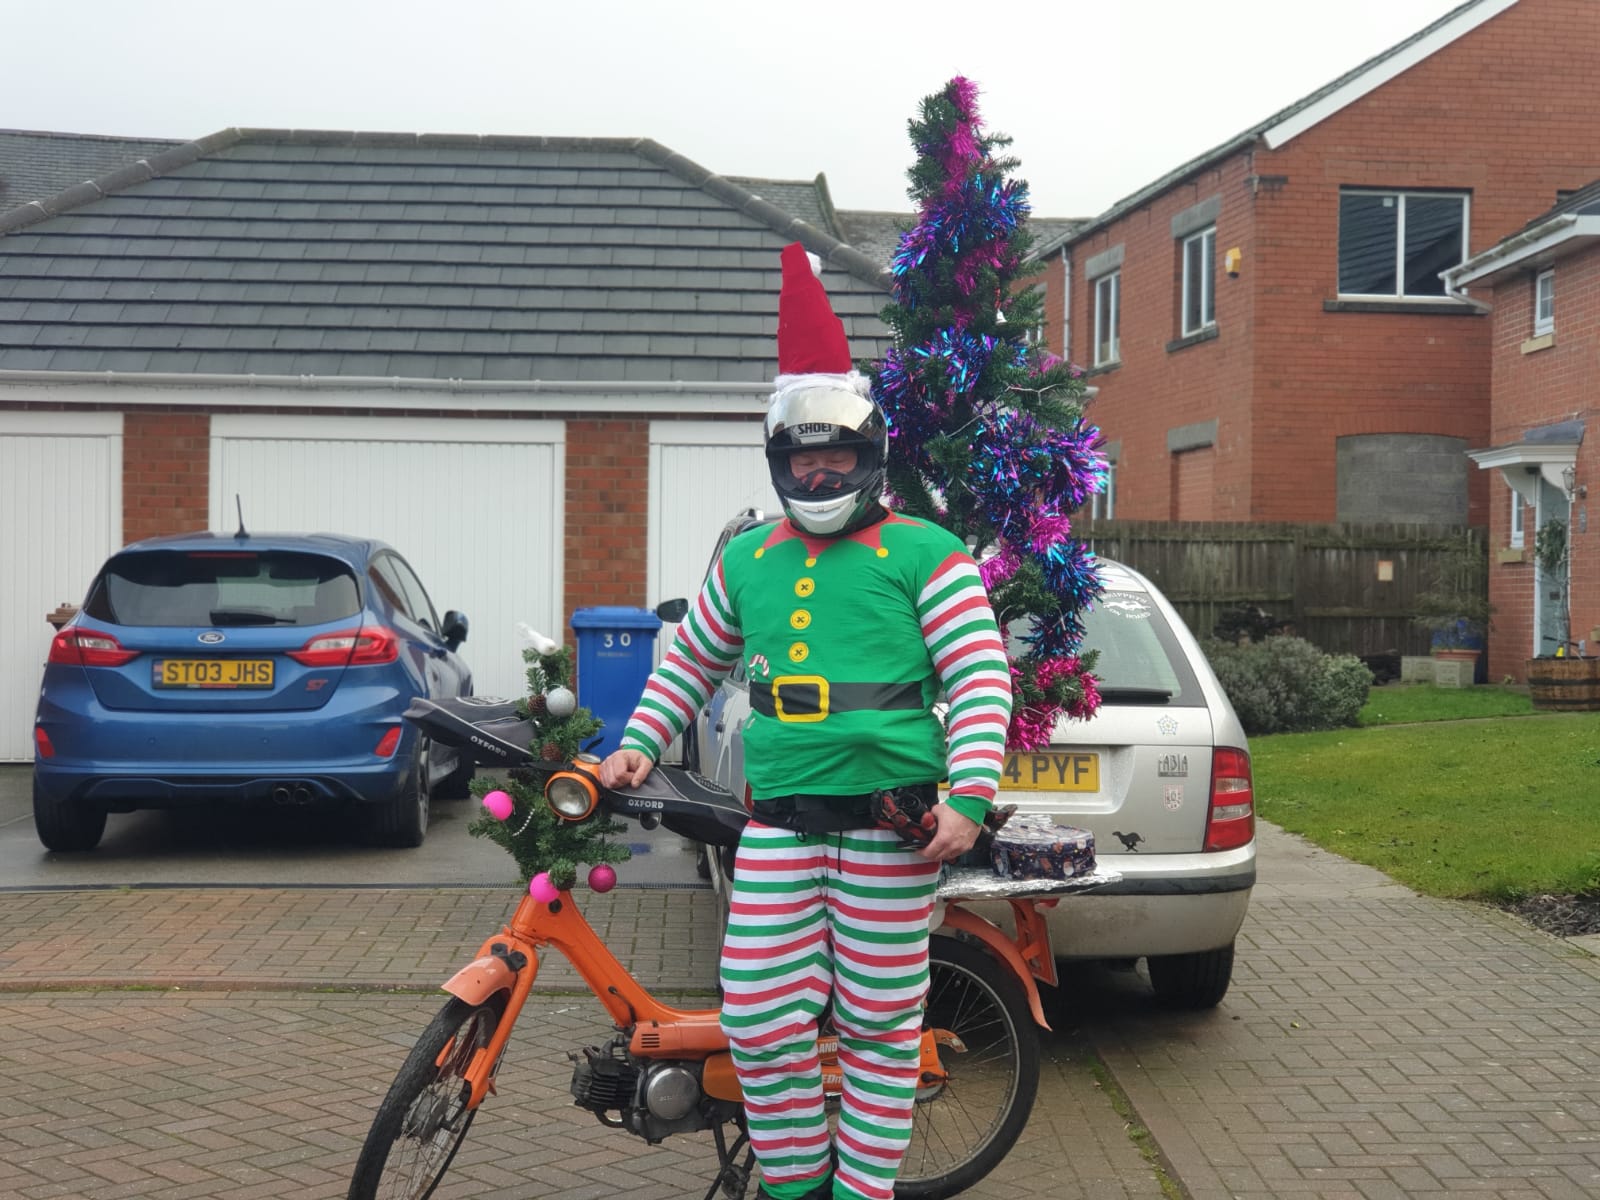
Xmas run on the pc 50s 4 of us all on 1970s honda pc50s was a good laff And yes that is a 6ft Xmas tree on the back ha
 1 point
 -
Bought a big drum off the Bay for something like 40 quid. Specs checked out on website and worked across three cars in the fleet. Done a change for each one and all running fine (as far as anything oil related).1 point
-
Yep 🙋 You'll need: Fronts. Calipers, carriers, back plates, discs and pads off an octavia VRS, S3, Leon Cupra, golf R. Some brake fluid. You need to have 18" wheels on the car and an 18" space saver. They are a bolt on upgrade, look better behind the wheels and stop on a sixpence. Don't waste your money upgrading the rears, they contribute very little to overall braking.1 point
-
@Lady Elanore You can take the Loon out of Forfar but not Forfar out of the Loon. He needs boots for going to the dancing.
 1 point


.thumb.jpg.9dd3f612ba7f13d10be5c518d3c8d255.jpg)