Leaderboard


.thumb.jpg.9dd3f612ba7f13d10be5c518d3c8d255.jpg)


Popular Content
Showing content with the highest reputation on 01/10/25 in Posts
-
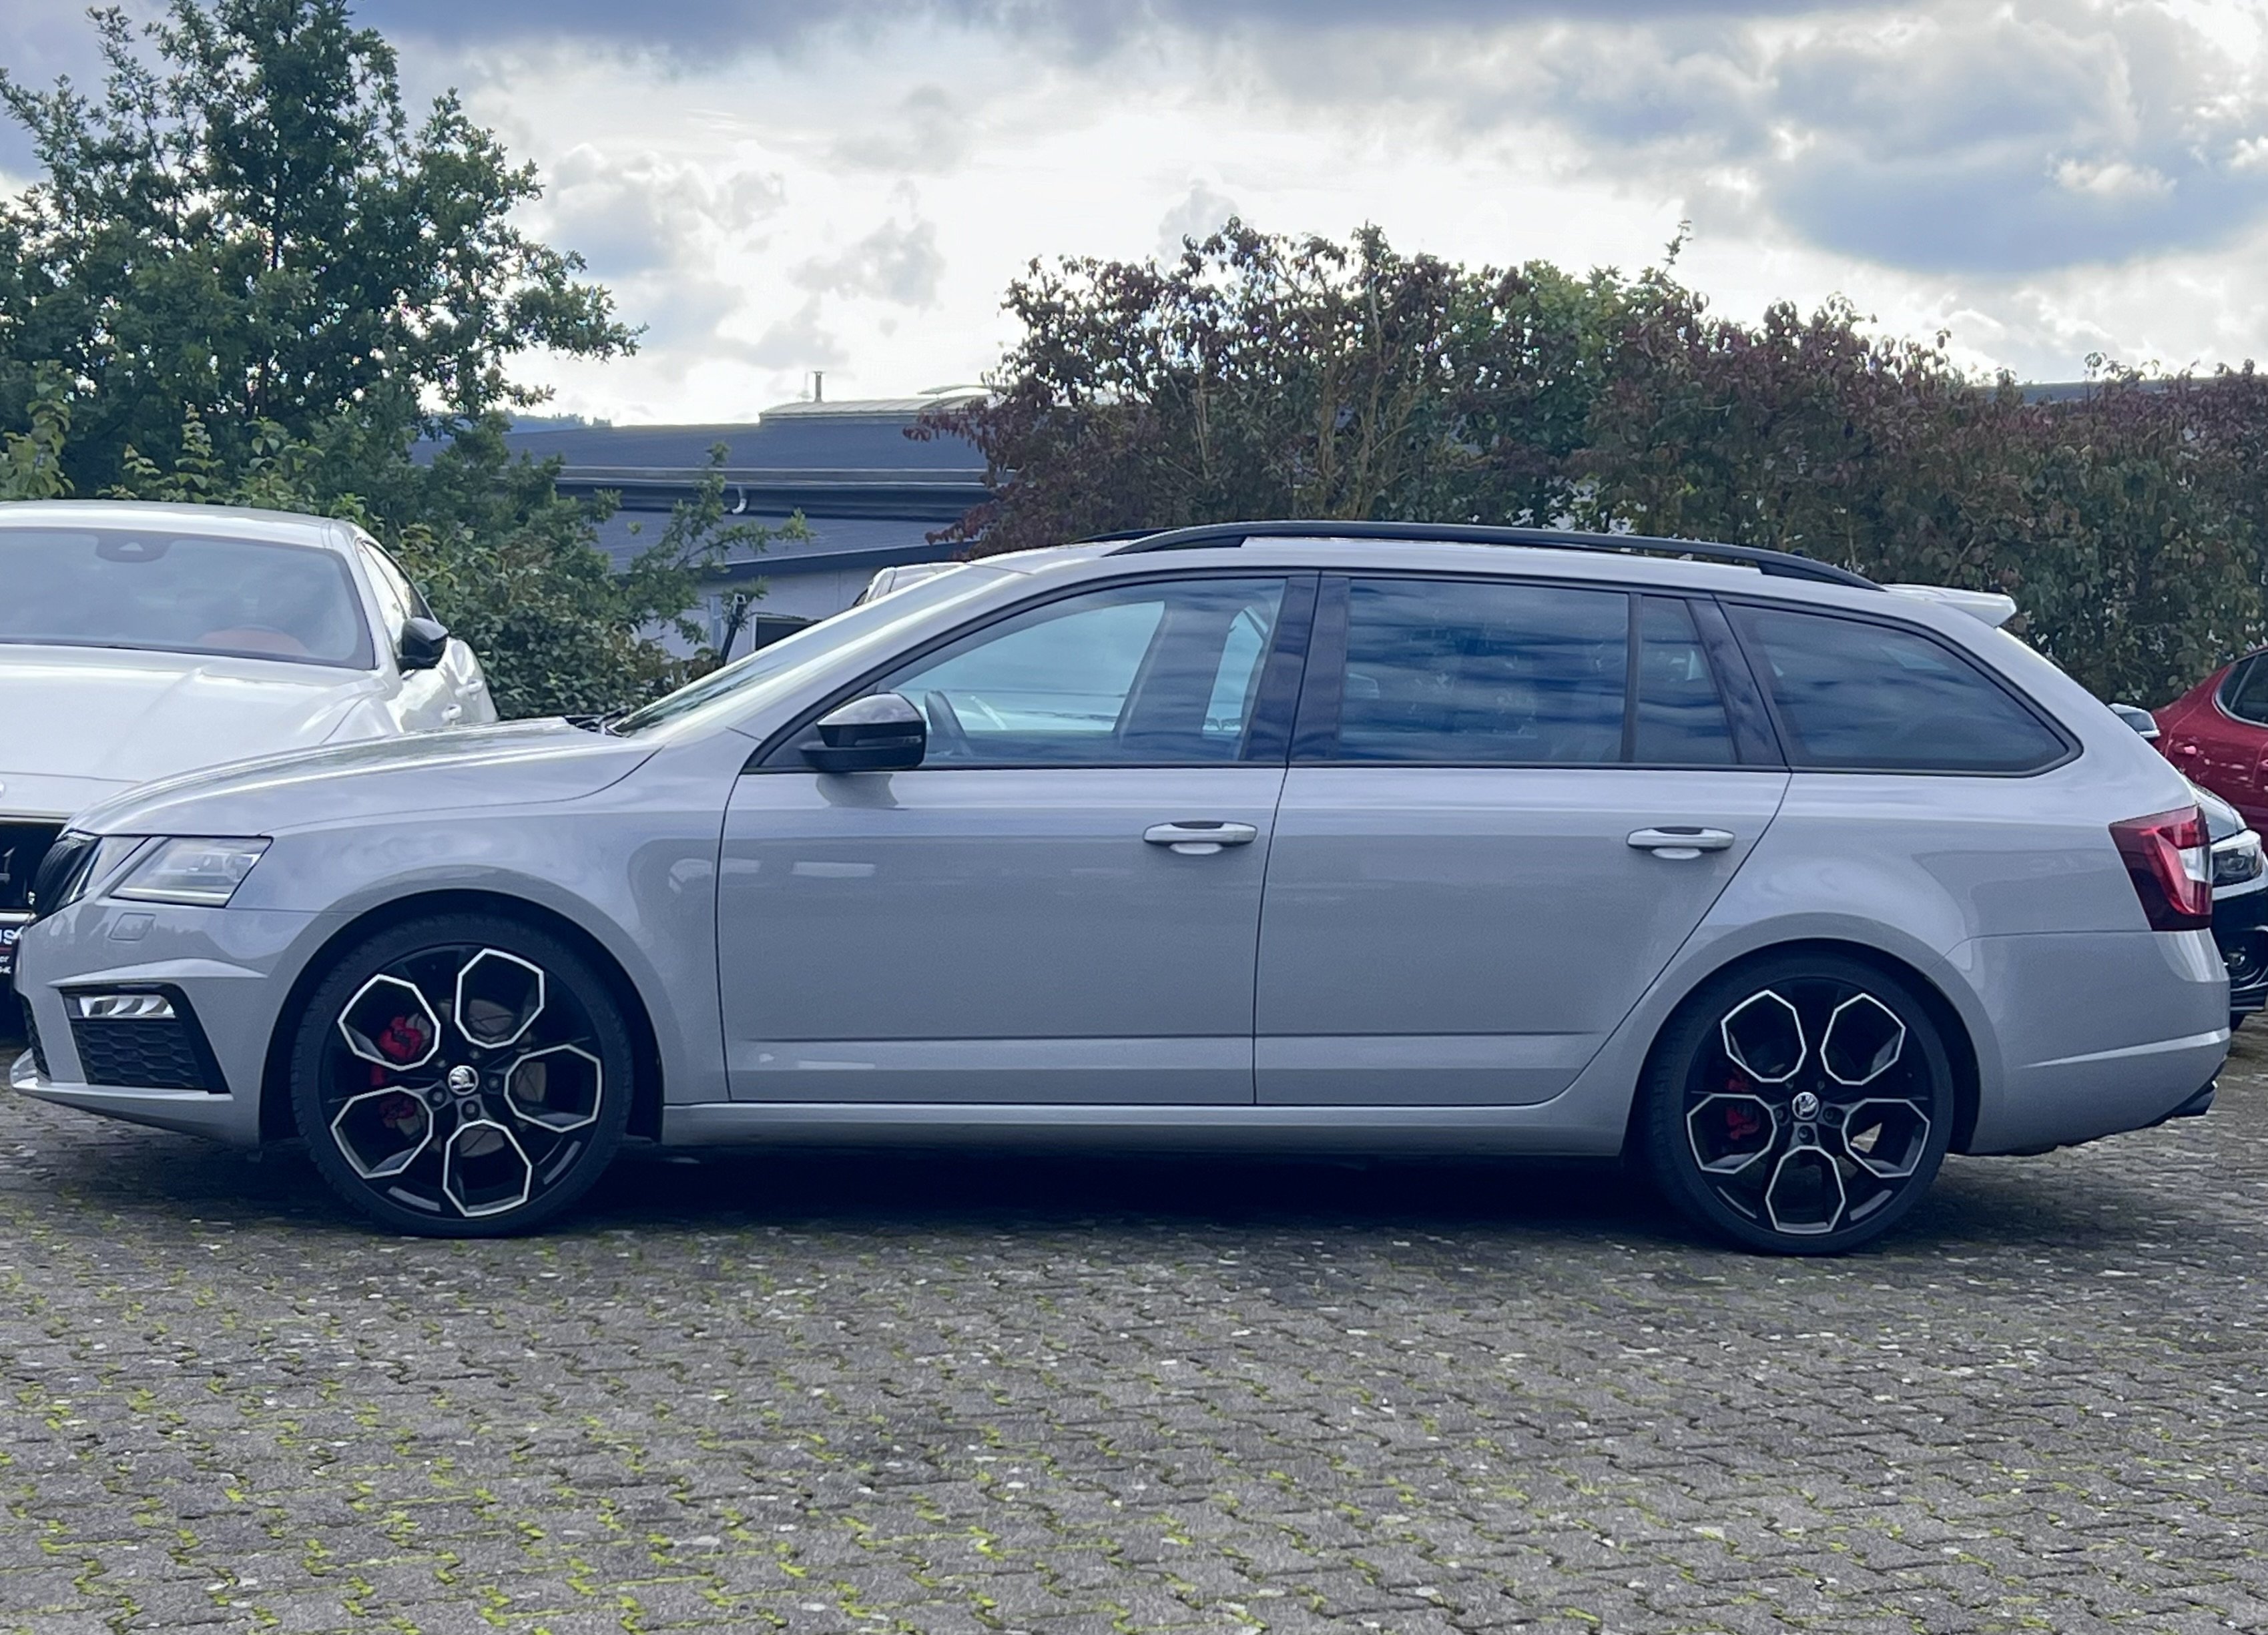
2 pointsHello there, Greetings from a Brit in Mainz. My love affair with Skoda is long and complicated. I’ve driven many different Skodas, everything from a VR6 Fabia to an Octavia WRC, but never ever owned one; until today. I take delivery of a steel grey 2020 Octavia Wagon RS60 in the coming days. Can’t wait. I’ve stalked this site for years, looking at the vRS and always wanting one; but always had company cars. Not any more! Happy to join the Skoda family, at last! Will be starting the upgrades asap; rear USB install, rough roads underbody (as much as I can as the RS60 is a 4x4), black badges and some little tweaks here and there. Looking forward to learning, sharing and getting miles under the belt. Danke danke!
 2 points
 -
Official service has installed a replacement battery for OCU (low version, meaning no updates possible/available) unit for free having still car warranty.2 points
-
The gearbox is well and truly capable of operating in much much colder conditions. That should not b the cause of ur limp mode.2 points
-
Credits to /EzioAdaFirenze (reddit) "FYI there is new update for Octavia's infotaiment units (FL '24 versions and newer). Solves a few bugs, there are new wallpapers (some unmerged from Ambient colors so you can have more options), UI is more refined and seems smother. Some cars did not get notification for update, but you can update it at dealers shops. This is the first infotaiment update since release of new Android based system. No engine updates for now." No OTA for me, also been at the dealership and there's noting to update (yet ?) or any kind of recall available. Let me know if you're getting any kind of updates for your FL and which infotainment unit you have installed, i have the entry level 10 inch version.1 point
-
1 pointMoin moin and viele Grùßue from a fellow Brit in Schleswig Holstein @Frankfurter Been driving Skuds since 2010 👍 Just be aware (in case you aren't already) they're a bit more strict on mods here.1 point
-
1 pointSuggest a compression test on all the cylinders - especially on Cylinder 1.1 point
-
1 point
-
Just to show you what i see in my software tools, below shows the speed on and off values, these were my modified values which were a bit too low.
 1 point
 -
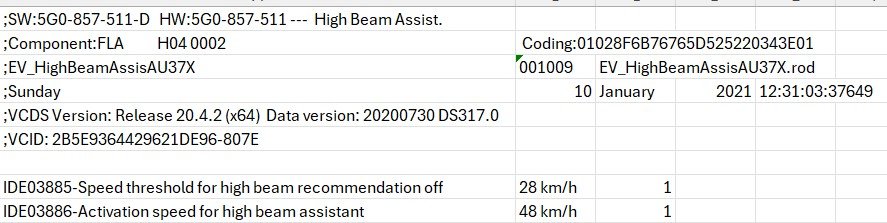
Correct there are no user interventions that allow the speed at which activation occurs to be altered via the dash menu's. However diagnostic software can alter the speed value if you can find somewhere that has VCDS that can help. @Warrior193 in my experience (MY16) it actually uses both, and using VCDS software I own, I know there is a speed value in module A5 at which it turns on and off as I've changed it (and back to factory as it was undesirable😀) It will not put high beams on until approx 40mph. (58km/h).1 point
-
Activation of the Mode button on the Skoda steering wheel Requirements: Gateway 3Q0 Drive Modes KLR module update the FPA dataset like for any VW R, configure the Voice button to Mode via Lin module and everything works.1 point
-
1 pointI’d recommend getting the battery changed and “coded” in Temperature seem odd but not sure what that’s about1 point
-
Is the globe not the car's connection and the place where the red cross is your phone signal?1 point
-
So now you have Bolero MIB1, with Bluetooth, with DAB, part number 5E0035842, with USB 5Q0035726B and fortunately you don't have CANTON sound system. You can install one of four different OEM glove box units: - MIB2 Bolero - MIB2 Amundsen - MIB2 Columbus - MIB2.5 Columbus You also need to replace display unit: - for MIB2 Bolero you can use either 6.5" model number 5E0919605H or 8" model number 5E0919605N - for MIB2 Amundsen and MIB2 Columbus you can use listed above display as well as 6.5" model number 5E0919605J, 8" model number 5E0919606, 8" model number 5E0919605M - for MIB2.5 Columbus the only display unit that works is 5E0919606D If you would like to use Apple CarPlay then you also have to replace USB port. The question is what is your budget and which of listed below features are "must have": - Video playback from DVD, USB, SD - CD playback - OEM navigation - displaying OEM maps in Virtual Cluster (Active Info Display). All units support SmartLink (Android Auto, Apple CarPlay, MirrorLink), rear view camera, voice command. features that differ them: - MIB2 Bolero - no OEM navigation, no CD/DVD drive, no video playback from SD/USB - MIB2 Amundsen - OEM navigation, no CD/DVD drive, no video playback from SD/USB, support for displaying OEM maps in Active Info Display (Virtual Cluster) - MIB2 Columbus - OEM navigation, CD/DVD drive, video playback from SD/USB, no support for displaying OEM maps in Active Info Display (Virtual Cluster) - MIB2.5 Columbus - OEM navigation, CD/DVD drive, video playback from SD/USB, support for displaying OEM maps in Active Info Display (Virtual Cluster)1 point
-
1 pointIt's a bit weird to think that the roads we drive on are made of oil, all the dashboards and steering wheels are made of oil, the tyres are made of oil, the fuel is oil, there's oil in the oil hole and the grease in the bearings is made of oil. Then we spray paints all over the thing which is made out of oil and then underseal everything with oil. It's a miracle the whole LOT doesn't catch fire tbh.1 point
-
1 pointSo two things, when was the battery last changed? An aging battery can cause this Have you had it scanned? I recently had all of these and it was right rear ABS sensor When I scanned mine it said there was a fault on rear left, but I also used measuring blocks in VCDS to confirm, in the measuring blocks I selected all the ABS sensors, went for a drive and all reported speeds apart from rear left, boom confirmed the issue, £40 later and fixed. The rear left seems to be the most common, but you need it scanned1 point
-
It’s the Nextbase rear-window camera that has a long cable we ran through the headlining to a mini-HDMI socket on the front-facing unit.1 point
-
Ah OK, the arrow points downwards on any car I've replaced the air filter. This indicates the air flows down.1 point
-
The newer one is mib3, all you can do is change current to sportline tacho and put speed numbers to 280kmh1 point
-
I had this problem in August. The car is being checked today and I have just been informed that there is an electrical problem and the garage is contacting Skoda to approve a warranty replacement of the infotainment module.1 point
-
1 point
-
If they follow the same approach as with pre-FL cars, which I think they do, there will never be an update available for you unless you come with some specific issue, for which update is prescribed.1 point
-
good morning infotainment problem had new module fitted just come back from holiday found worse than the original, had fuse out for approx. 2 days fine for trip to London o2 journey back would not play ball. have now battery disconnected will see what it's like later. did see a little while ago that Toyota recalled several thousand of their cars over infotainment problems, if they can do this why Skoda cannot do this.1 point
-
On multi-touch: Google Maps is gradually updating its app to introduce the necessary support. Waze may support it in a future release but doesn't do so at present. So your experience with those is what one would expect: you'll just have to wait. Apple Maps, however, claims to offer full support on iOS 26 CarPlay, so it's unclear why that is not working.1 point
-
1 pointHi, I have a 2024 Octavia 1.5 TSI E-Tec and have had occasional 'Low 12v' warnings even though the car had been driven for an hour or so the day before. I eventually worked out that it was related to the 'KESSY' system - The car is parked on our driveway only a few yards from where I sit in the house. Whilst carrying a set of keys in my pocket and moving around the house, the car kept on 'Energising' the doorhandles etc. Thus it never really 'Went to sleep'. I found that even after a full charge the 12v warning could appear after only a week of normal driving. The solution was to put the keys in 'Faraday Pouches' when not needed! A shame this is not mentioned in the Manual! I hope this helps, kind regards, Alan1 point
-
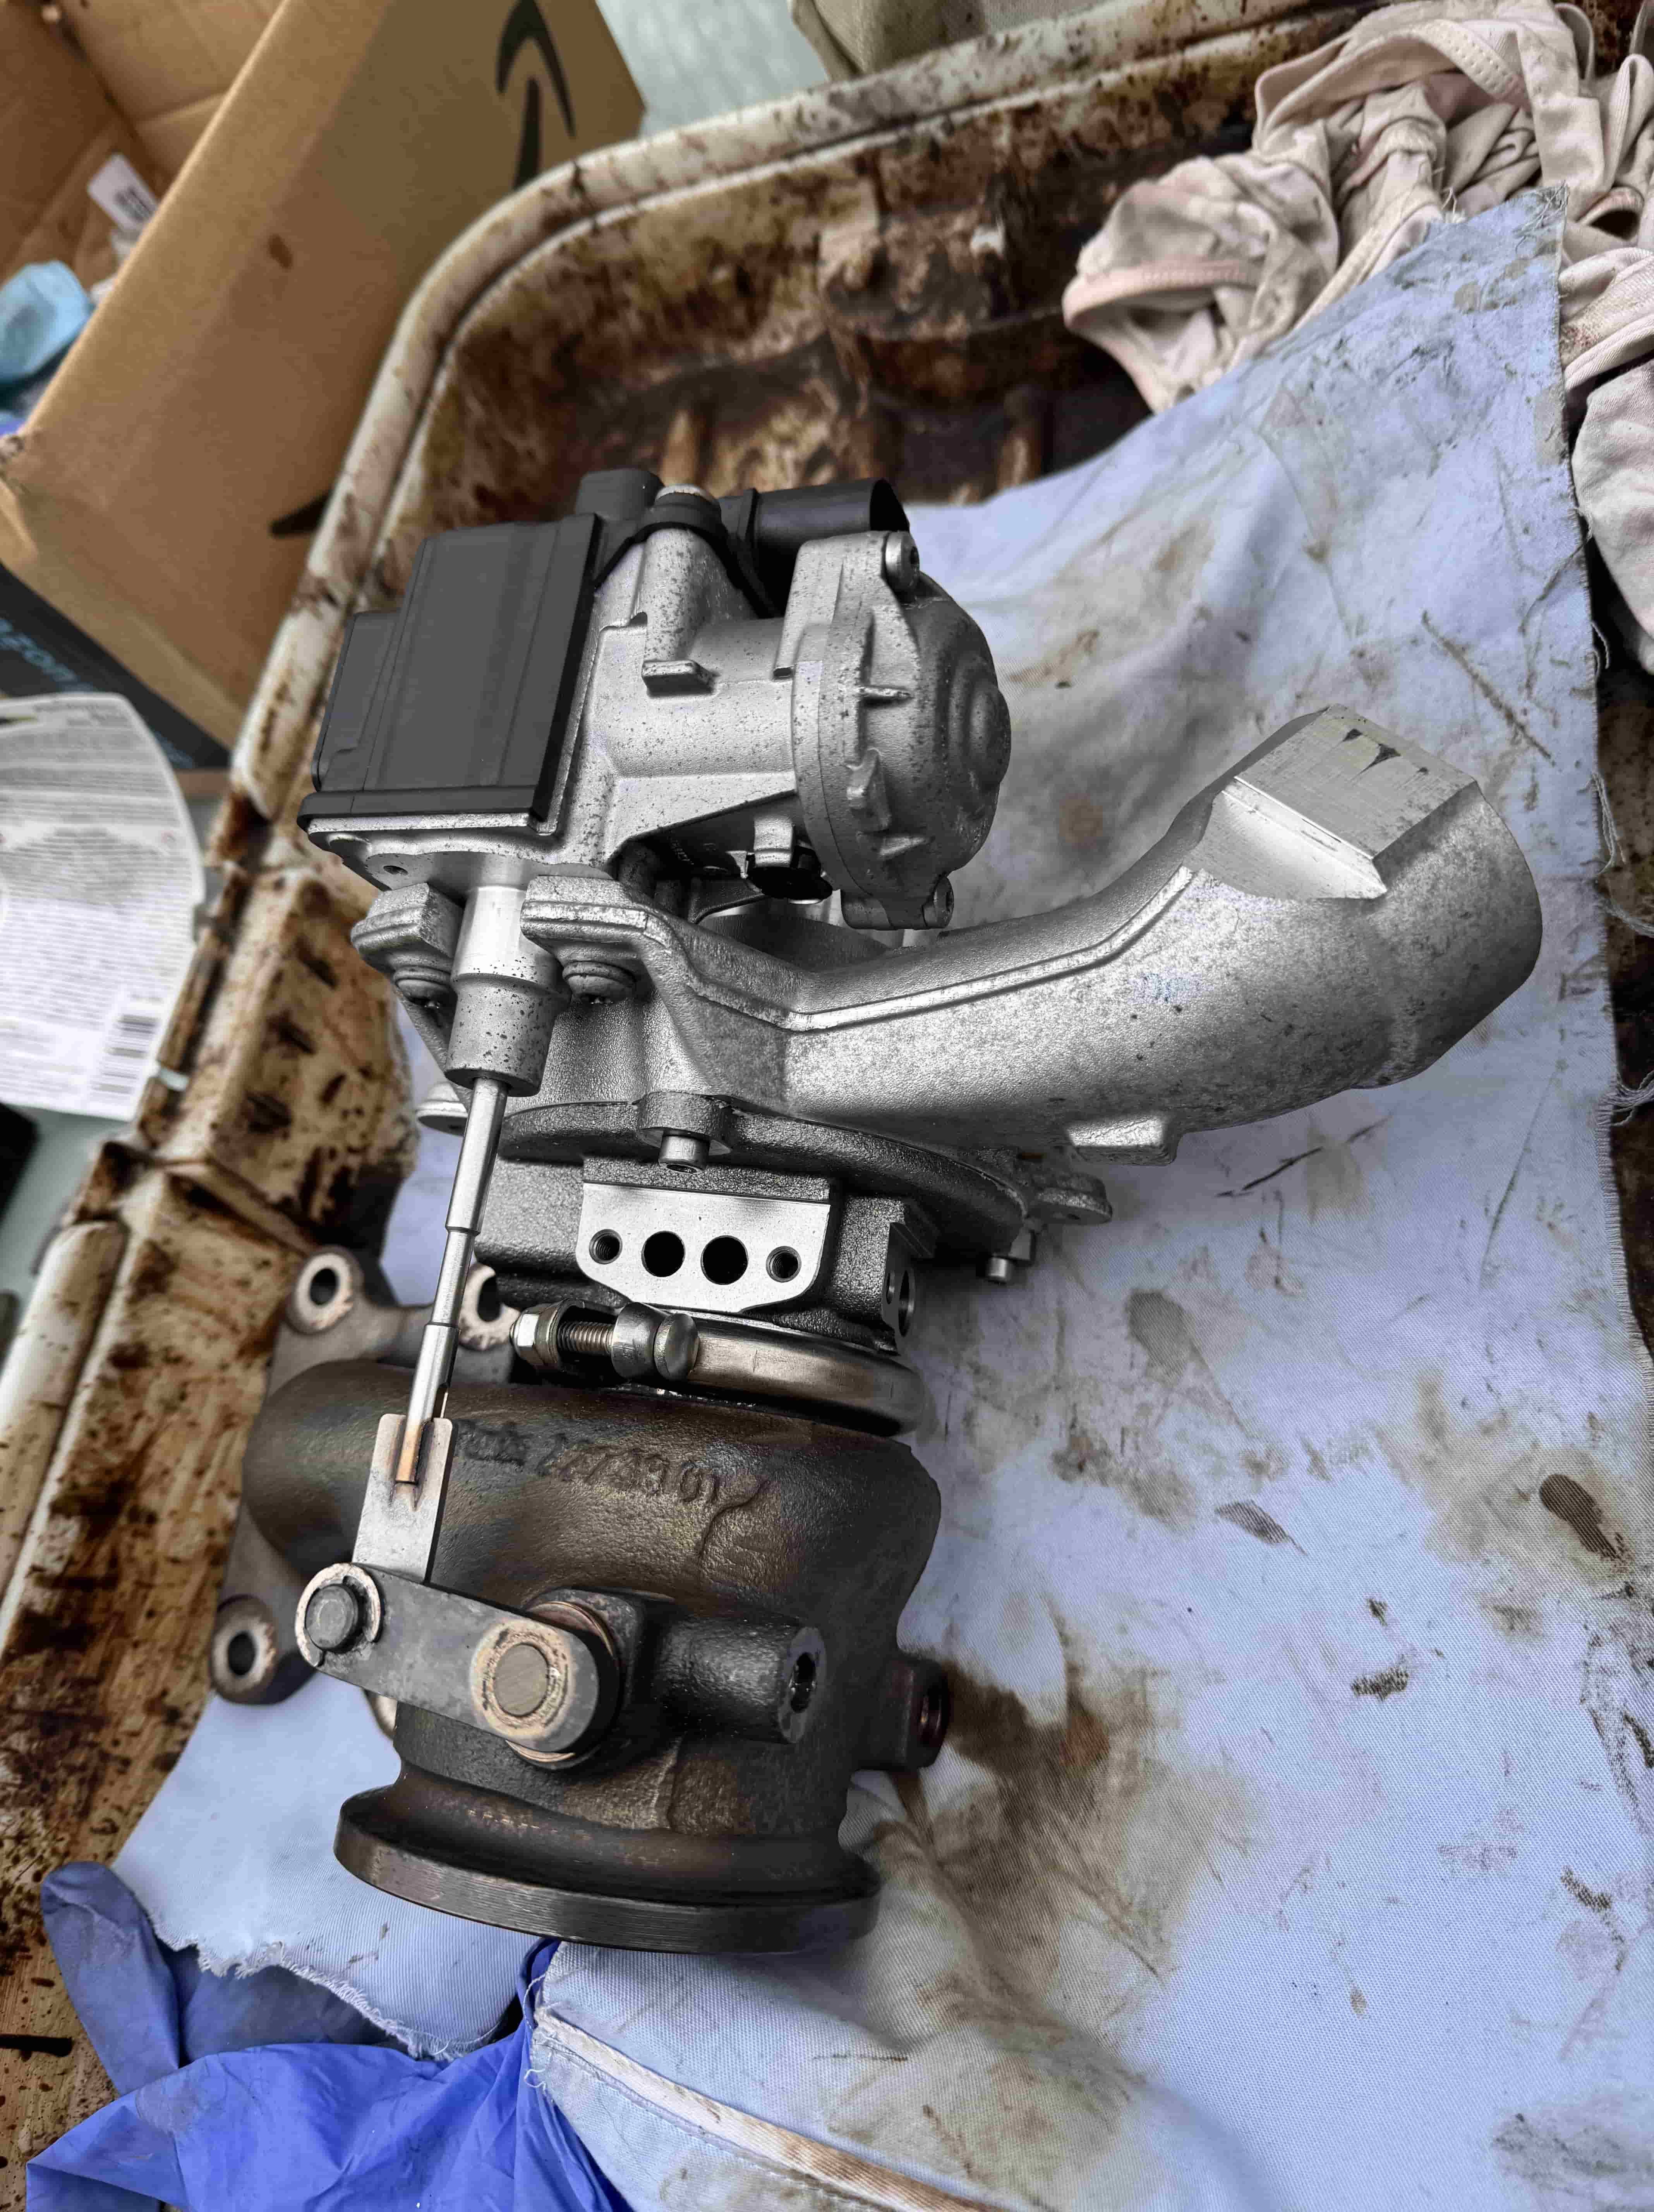
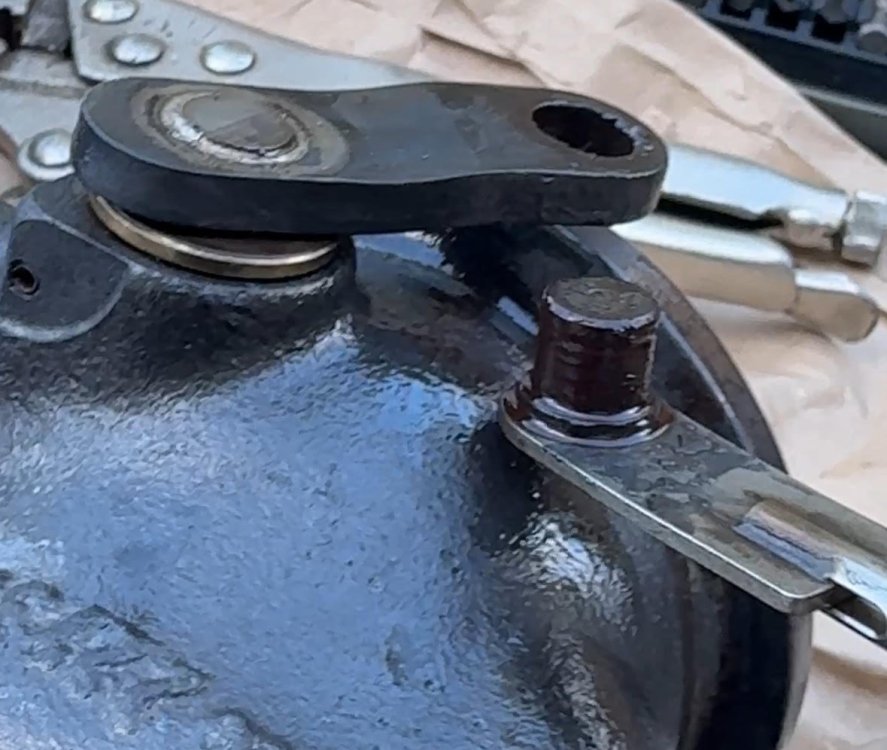
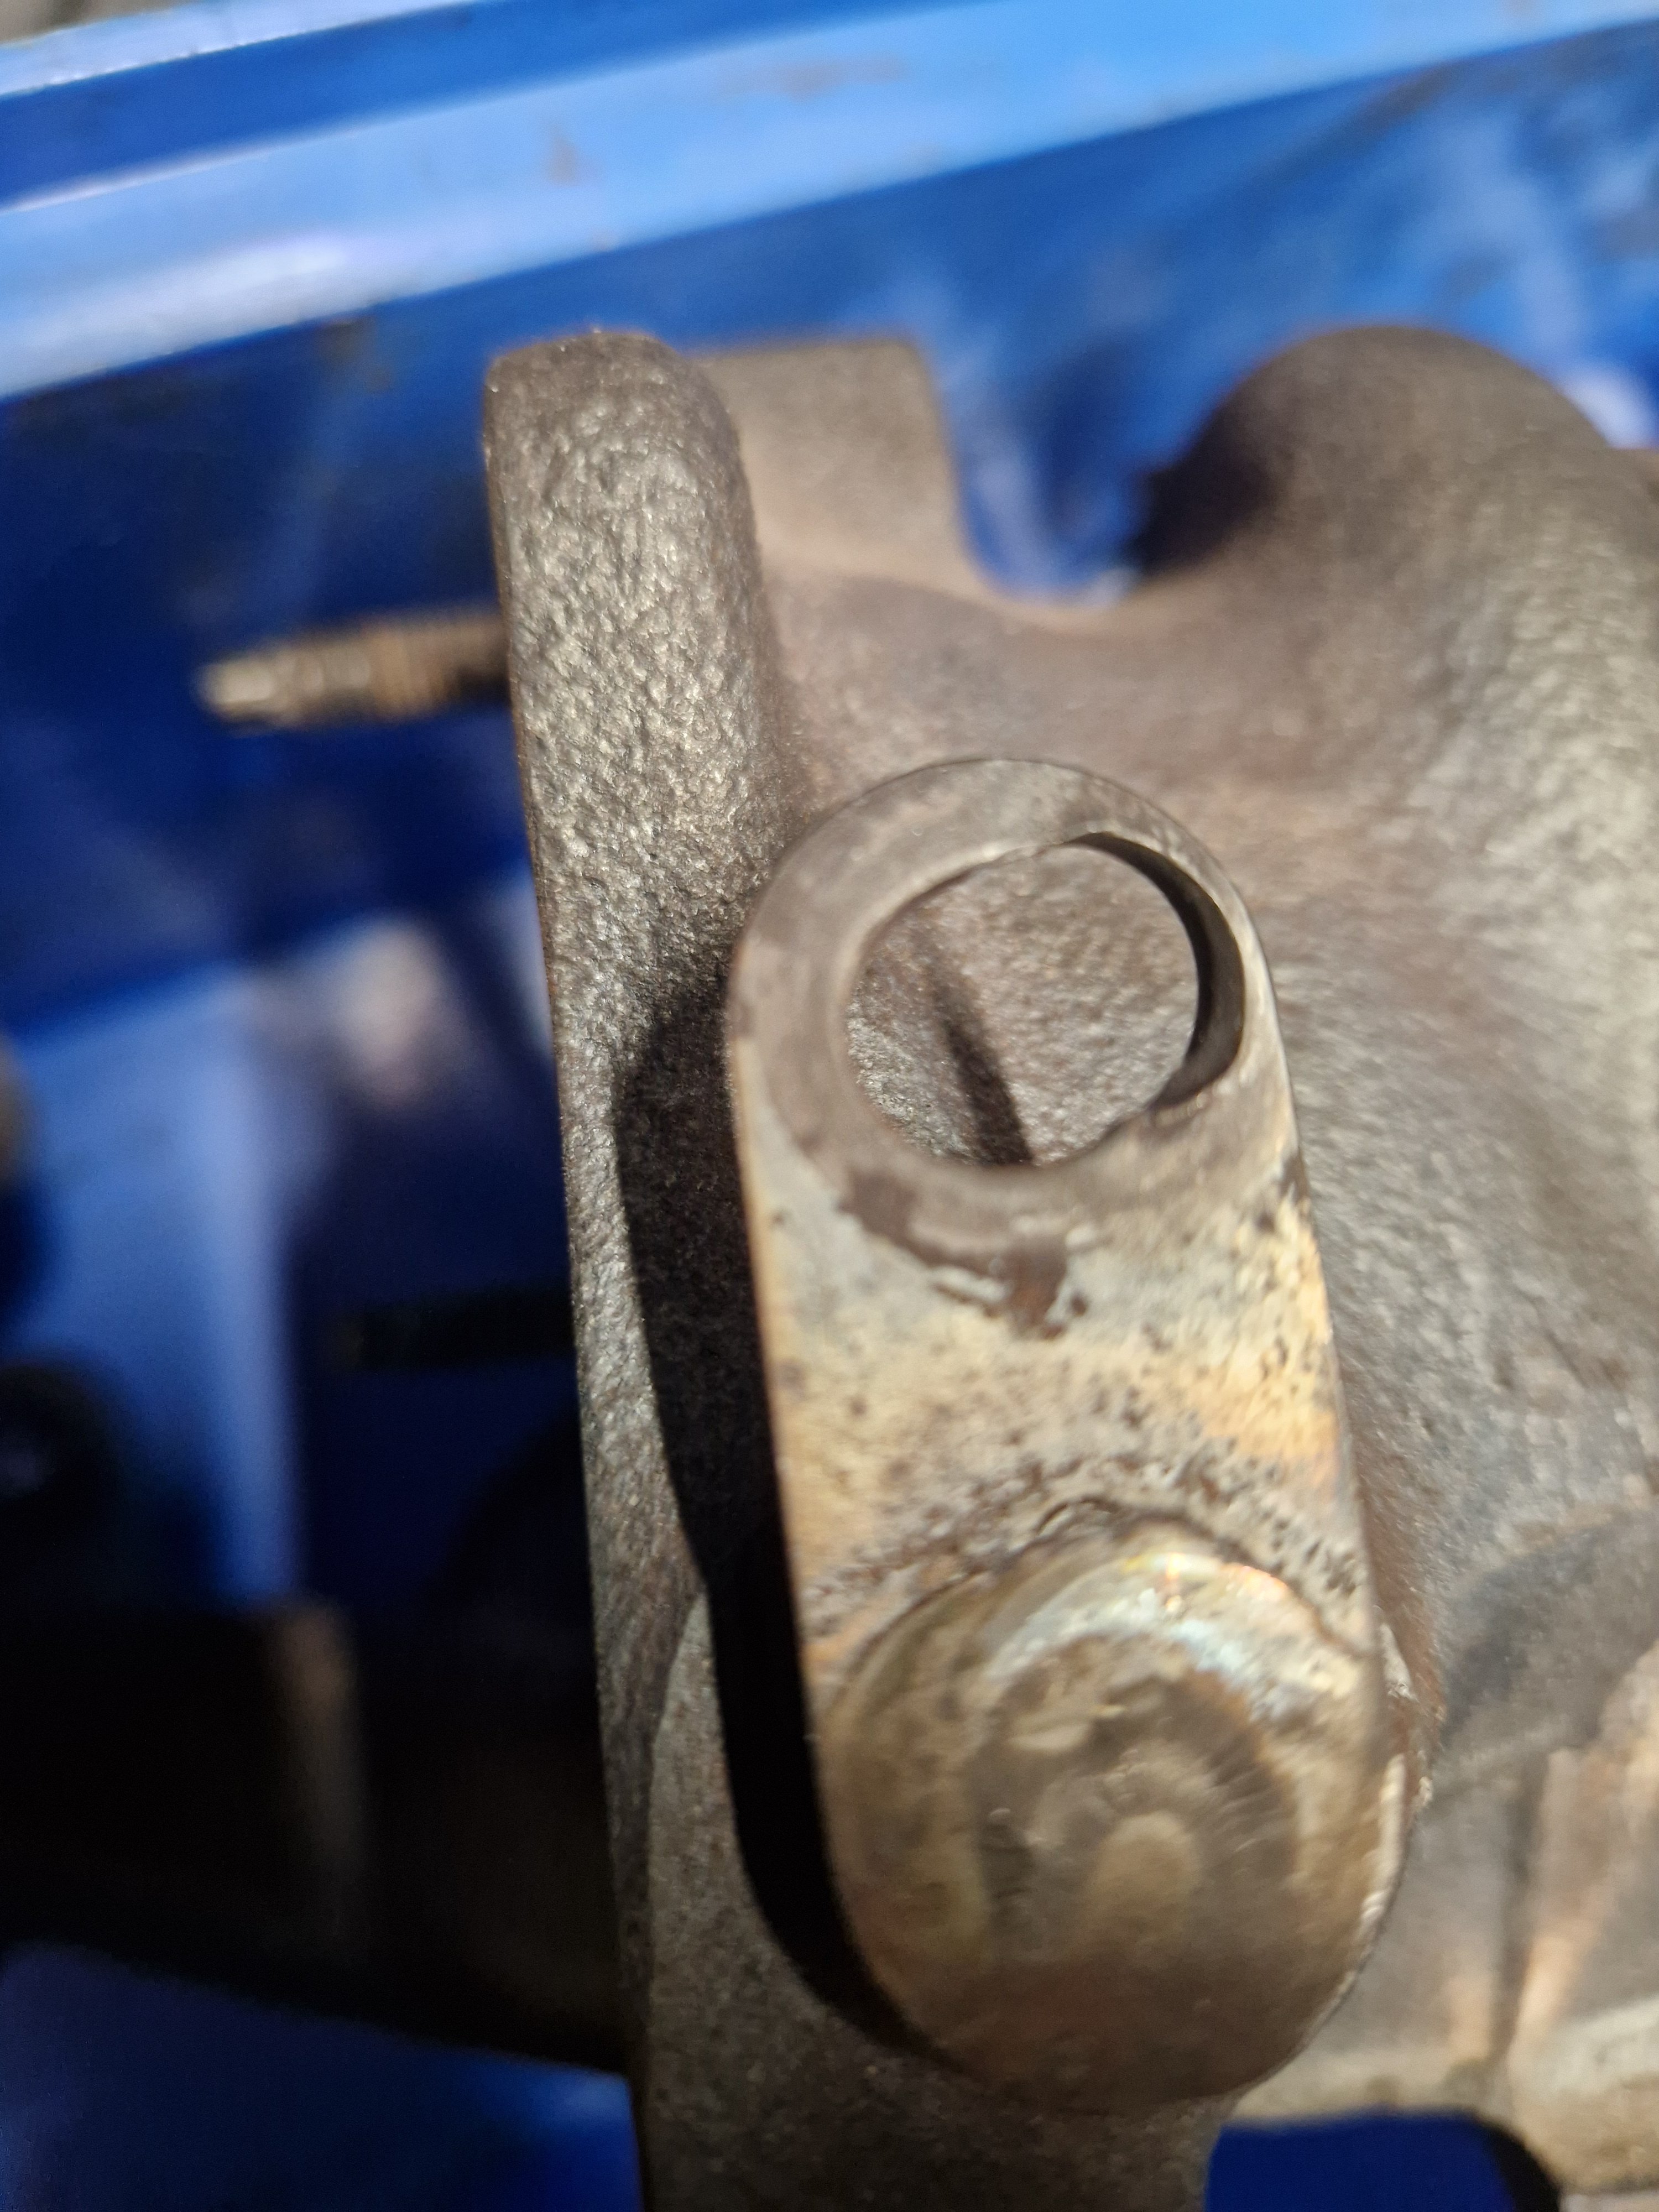
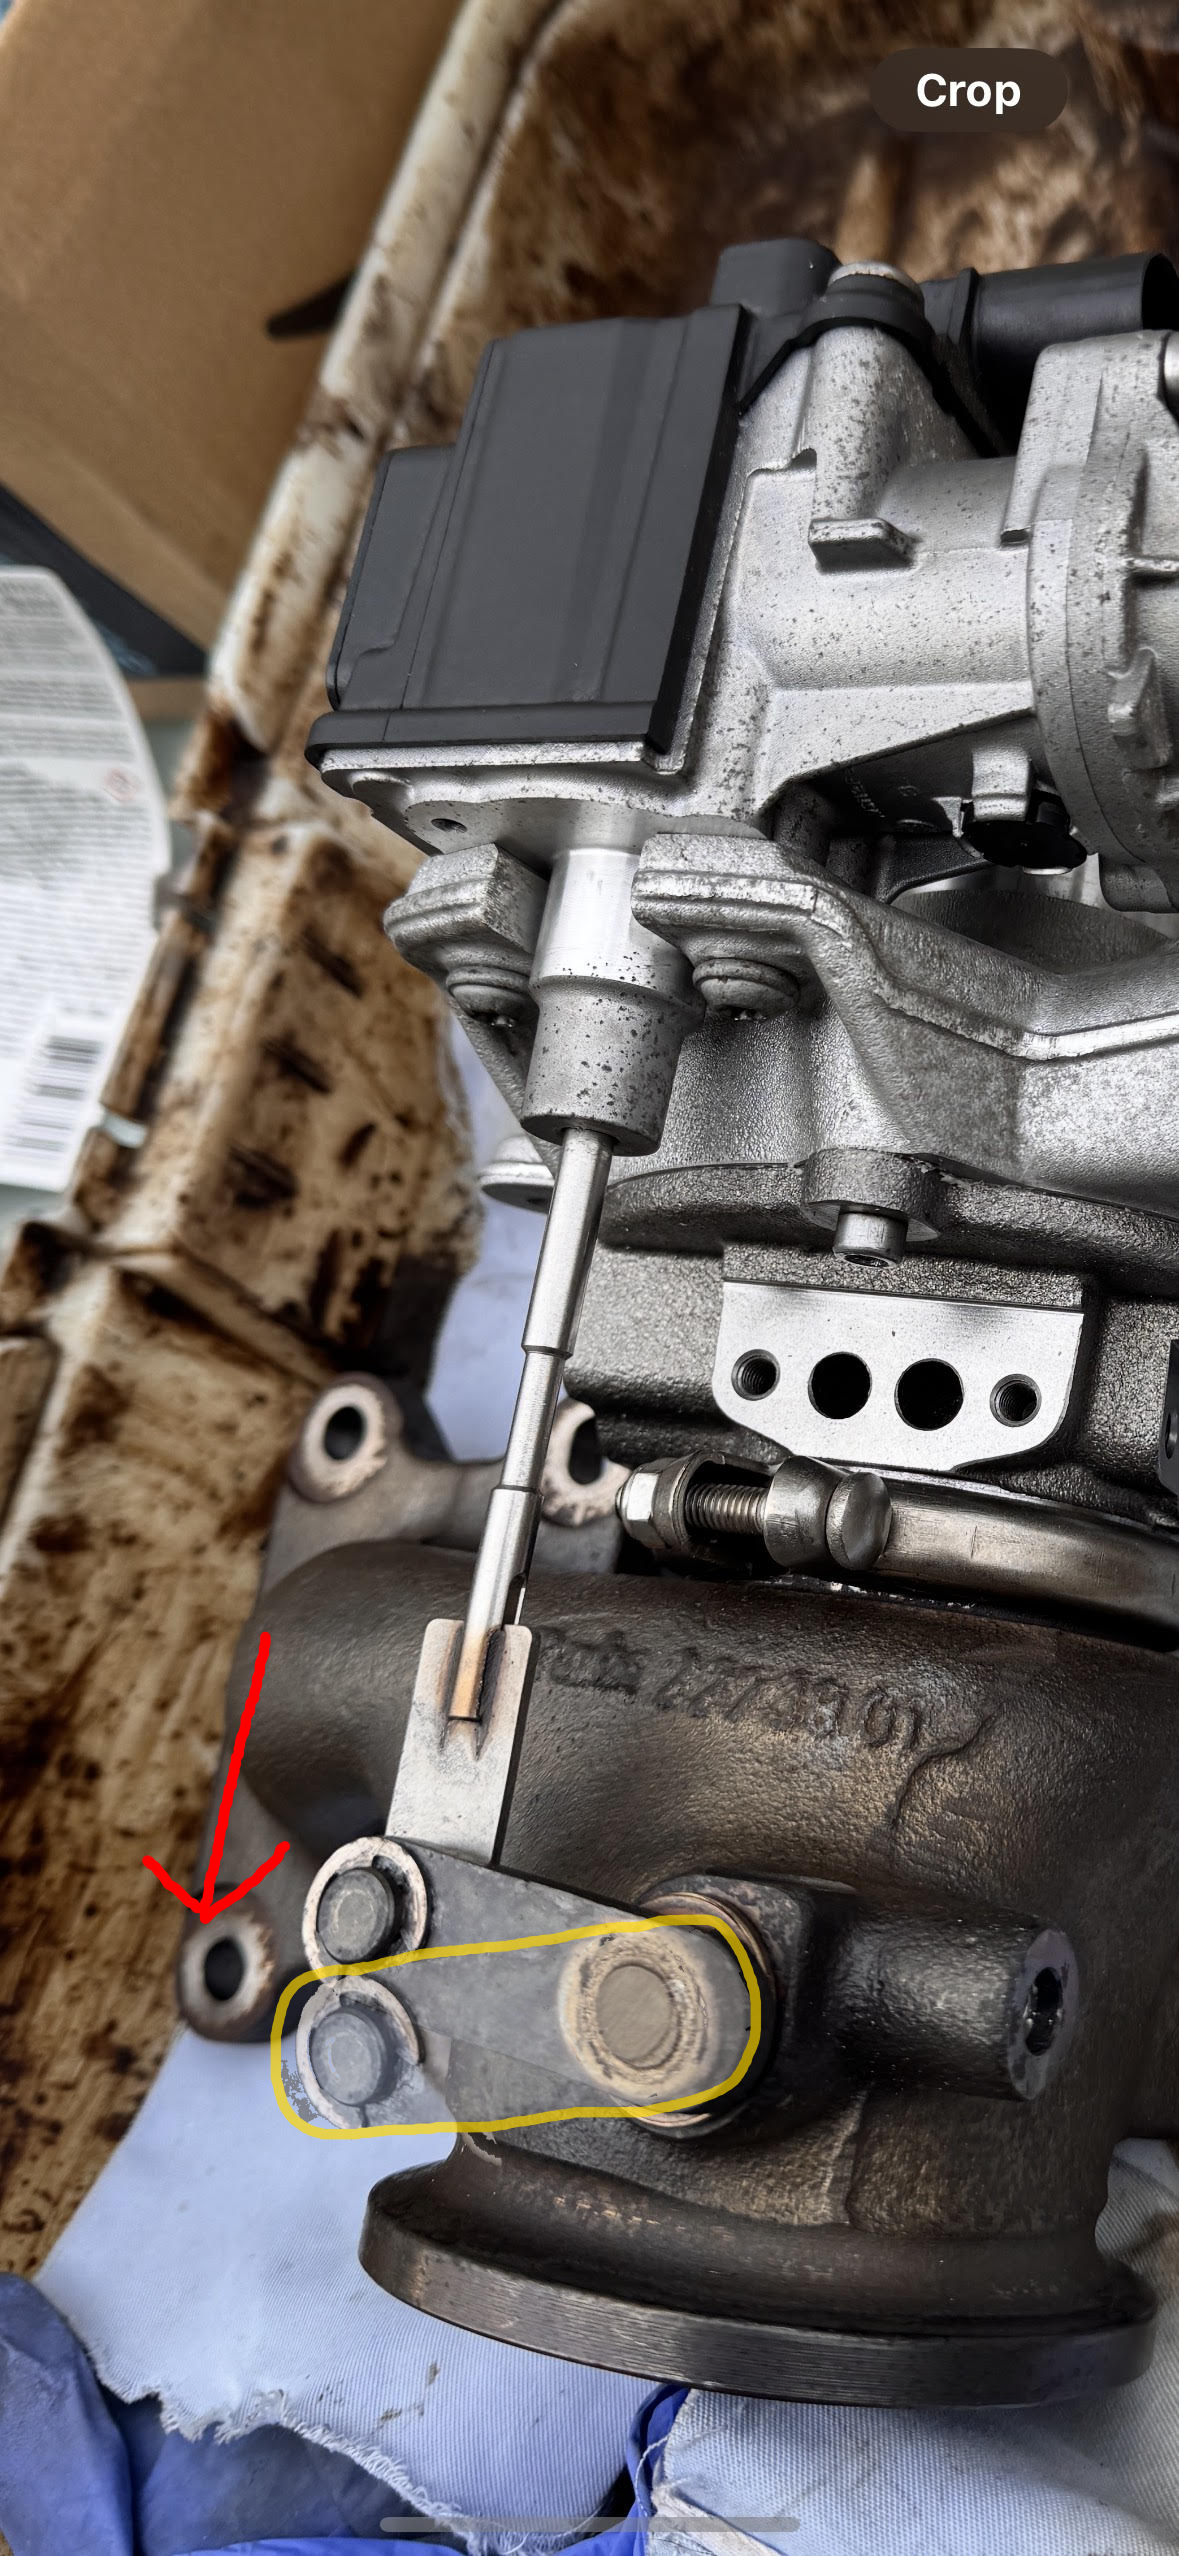
1 pointTook a pic just now of the elongation in the hole that the wastegate actuator attaches to on another manifold. A really extreme example I expect. I think the one on the car isn't as bad as this, but it's easy to imagine the electronics/electrics having a hard time trying to position the wastegate accurately with this degree of slop in the system.
 1 point
 -
Try again, I've changed the video to the correct one.1 point
-
yes i have OBD11 for VAG ver. 0.100.0 car is produced in september 2019, Mlada Boleslav. it have UDS protocol, now i see manual is on iphone, on android seems look different..1 point
-
Sorry I didn’t see this. Honestly Carpro Cquartz is fine. It’s older now but still does well. 2 coats and you’re golden.1 point
-
1 pointFor this version, I do it in two steps: 1803->1941->1989. 1. Download both files, unzip them on your computer. 2. Copy the contents of 1941 to a flash drive (preferably a good, branded USB-C) to the root directory. 3. Insert the flash drive into the USB-C port. 4. Open/tilt the hood. 5. Start the engine (it's best not to drain the battery). 6. Hold down the Menu button until the tablet enters service mode. 7. Select "Update" and select the USB-C port where the flash drive is (it will be highlighted). 8. Select "Install." 9. Wait, wait, wait - 2-3 restarts and it's done. The whole process takes about 15-20 minutes. 10. After a while, an additional fix will probably be released via OTA. 11. Repeat the procedure with the 1989 file. 12. Enjoy the new software. ;) If you need more information or help, send me a private message.1 point
-
1 pointLatest installment: After a week of looking, because I'm new in the area and know nobody, I found a guy who could look at it. Got a towtruck to bring it over to him two weeks ago today. He took it down off the truck and....it started first time. After probably at least 40 failed attempts for me. Anyway, he went at it with wiring diagrams and settled on a suspect - an engine management relay supplying the gateway module. (Not sure how precise this description is). Contacts were not showing any sign of damage but he opened it up and the contacts were badly pitted on both sides - very like worn points in an old car. Theory was that sometimes they had good contact, sometimes not. Replaced that and, over the following week or more, repeatedly started it successfully. So I have it back now. Total costs: Towing to house €100 Towing to garage €120 Labour €[email protected]% Relay €[email protected]% TOTAL €518 Hopefully, that'll be the end of it....1 point
-
1 pointThat's good news. Thanks for sharing. I've just done a 144 mile journey and have obdeleven scanned with ignition on / engine off. No gearbox error codes, so that confirms that the above error codes will be present if the engine is running. Many thanks for your help.1 point
-
There are two possibilities. 1) If only the high beam assistant is installed, then it works via the interior/rearview mirror, which technically doesn't have a camera. 2) The high beam assistant works via the assistant camera in the windshield. Regarding parameters: If you have control unit 20, then this is the method: Control unit 20 adjustment Activation speed for High beam assistant The activation speed for the high beam assistant is set to 58 km/h at the factory. If you don't have control unit 20, it's normal in the A5 control unit.1 point
-
1 pointYes a good idea I've been trying to promote this here for a few years now but some take offence to this idea for some reason(s). You don't have to do preventative recharges very often and best to have them get to full recharge for the sake of the battery, if not in one session then in more than one session. Having the charger remain in its box unused until the battery is very low isn't such a good idea. That sounds fine, possibly good or very good. Different places give different figures and they would depend on a few variables and circumstances - and state of charge is not state health for the battery, recharging the battery to full (100% of available) occasionally, or as required, will help to keep the state of health of the battery better and for longer. As put load testing is the real challenge - but then you'd want to recharge the battery to get it back to where it was before draining it. Figures from my ex-neighbour's Ring battery charger/tester. - 12.7v - 100% 12.5v - 90% 12.4v - 80% 12.3V - 70% 12.2v - 60% 12.1v - 50% 11.9v - 40% 11.8v - 30% 11.6v - 20% 11.3v - 10% VW Charge level No-load voltage 1.28 g/cm3 100% 12.7 V 1.21 g/cm3 60% 12.3 V 1.18 g/cm3 40% 12.1 V 1.10 g/cm3 0% 11.7 V In in a modern VW (and BMW I expect) you should be able to get more than 4 years out of a battery, possibly a reasonable amount more years - but some VWŠkoda owners only get 4 years or even 3 years but it's the same as some people use more (and/or more wasteful with) electric in their cars and homes and some can get through their income more, and more quickly and if a car has lots of toys and heaters and you like to use them and perhaps sit in a parked up car chatting on the phone or other entertainment - so many variables with owners/uses let alone the car, weather, etc. Do bear in mind batteries like 20c weather and at 30c discharge themselves twice as much, and twice as much again at 40c, and when it's hot most use their air-con more so recharging isn't just for winter. If you change from summer to winter tyres and back again those two points would be a good time for preventative recharges to full. Good luck.1 point
-
Probably the same types that go, Oooh, when are you getting married then ..... just cos you've been together for what they deem to be too long to not get married. You may not have even thought of marriage ..... Or Oooh, when are you having children ...... just cos there's nothing going on in their own lives they put pressure on others to give themselves something to talk about ...... 'Peer Pressure' .......... I hate it1 point
-
1 pointMK4 fully supports Android Auto wireless. I am using it in my 2024 L&K every day...1 point
-
Those are the worst services from a wallet-emptying point of view, but positive that there’s a good difference to the car…I hate those services where you spend a few hundred and nothing feels better…1 point
-
That's an interesting setup - I'd read a few stories on forums about aftermarket top mounts and Bilsteins, and Bilstein not honoring warranty with anything other than OE parts. Ironic given, as you have, Bilstein do one themselves. I'll bear the silicon grease on the control arm bushes in mind - but the sound really seems like it comes from the top, and, until last night, didn't seem to be over bumps, just turning the wheel. Last night I had a squeak over speed humps but from the driver side. The other problem is whether these things travel and sound like they're emanating from a different place. Seems like lots of hit and miss solutions on forums. TT Top mounts, over-torqued top mount bolts, various shims or rubber inserts into springs, spring orientation in the cup...feels like its all going to be trial and error.1 point
-
1 pointJust connect USB flash and live it there, it needs time to update and it is done silently in the background. After some time, check the navigation data base version number in System Info, when you se new version that you have on your USB, it is done.1 point
-
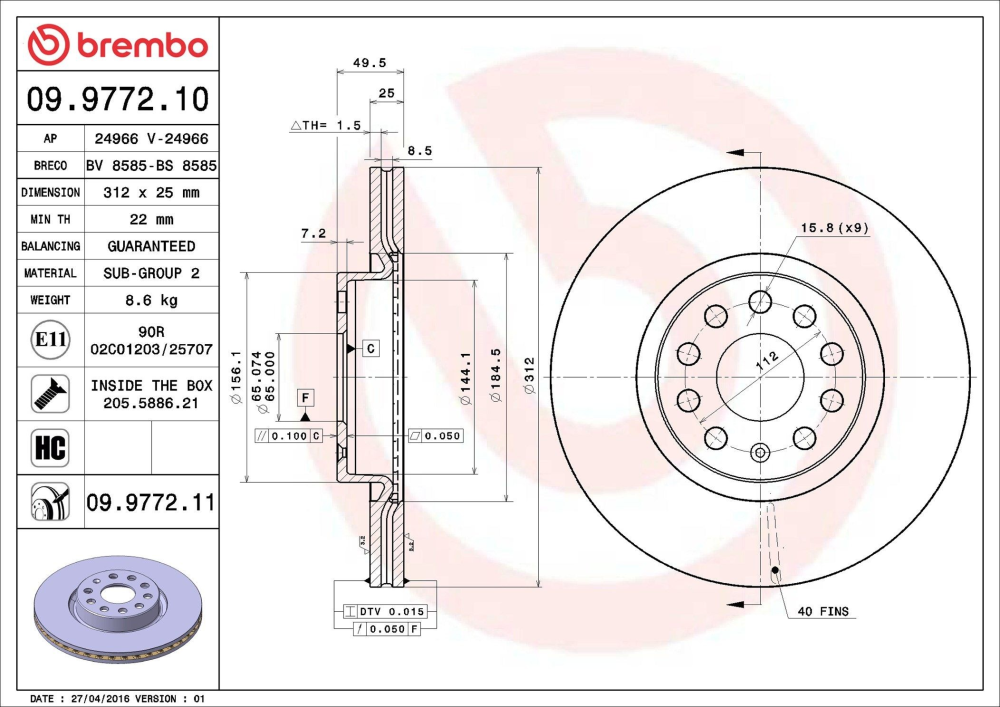
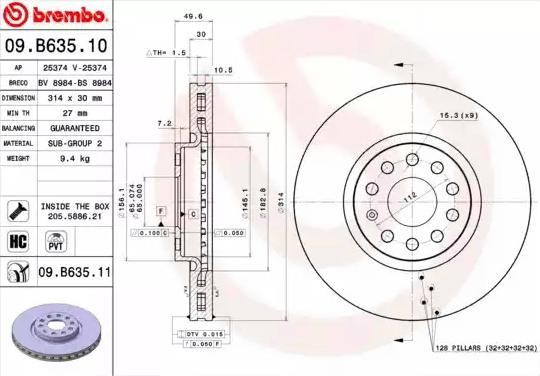
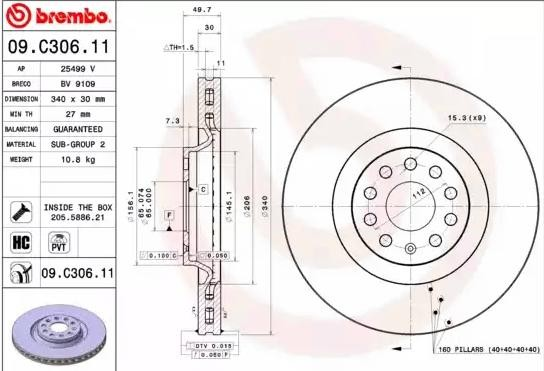
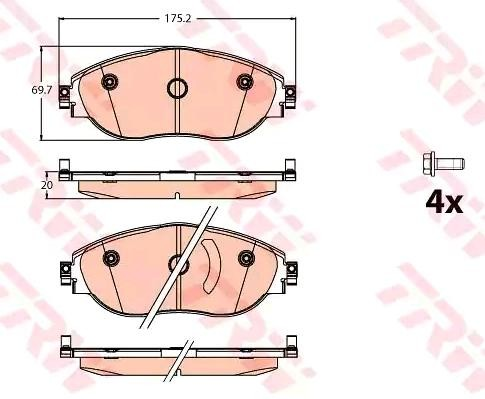
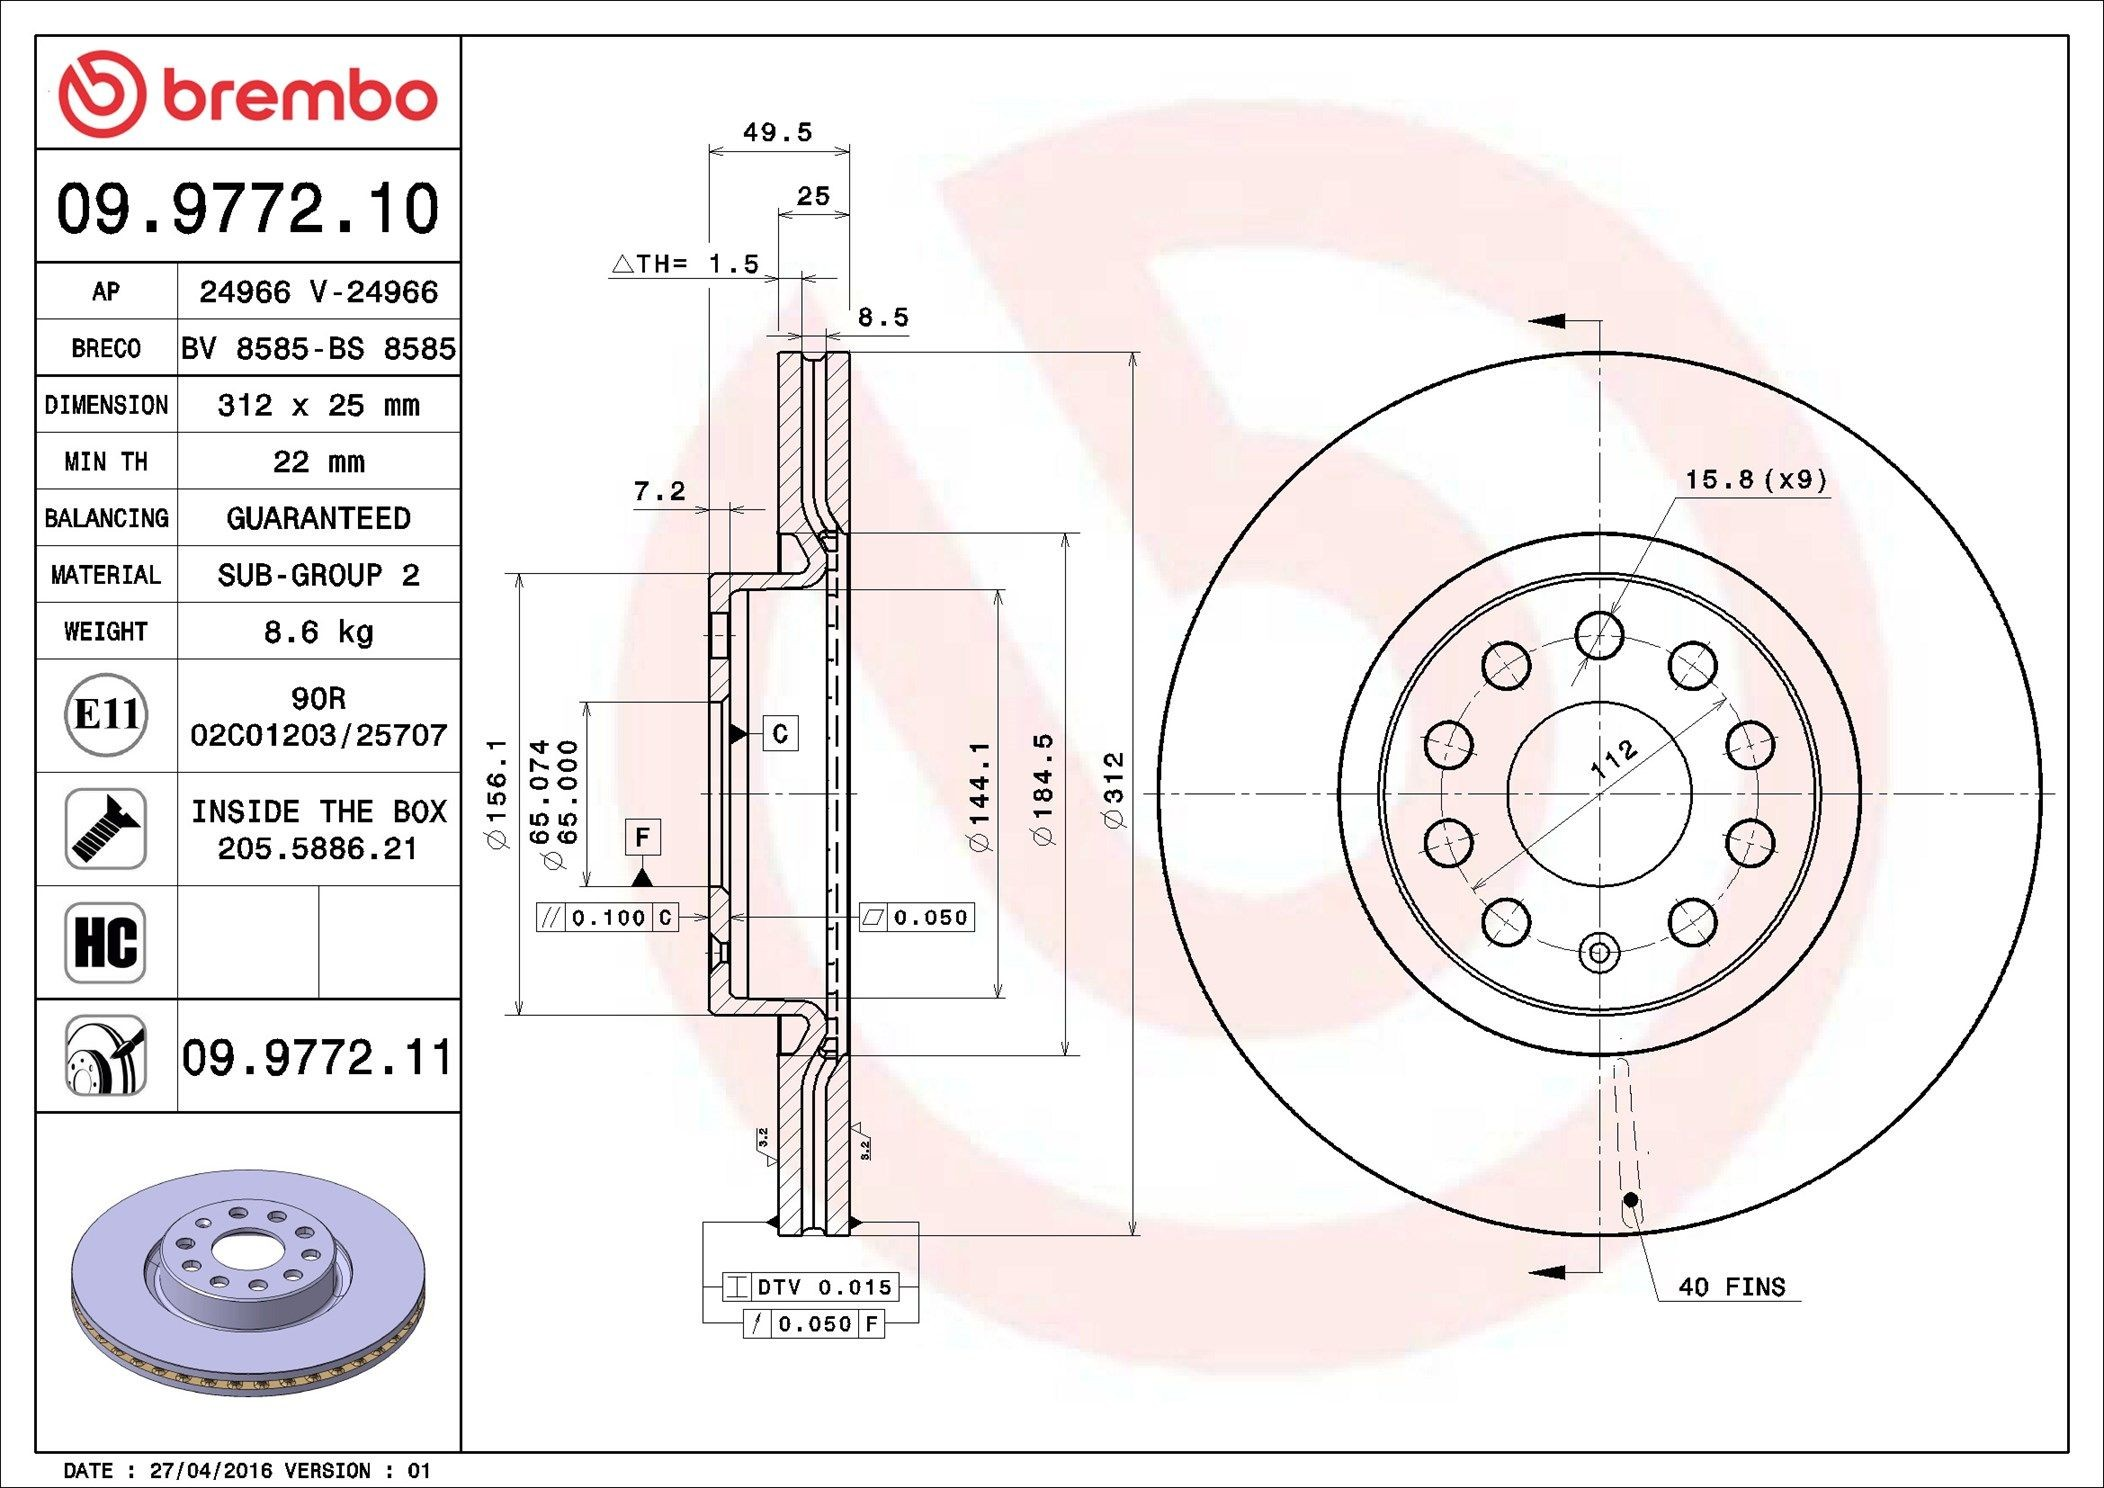
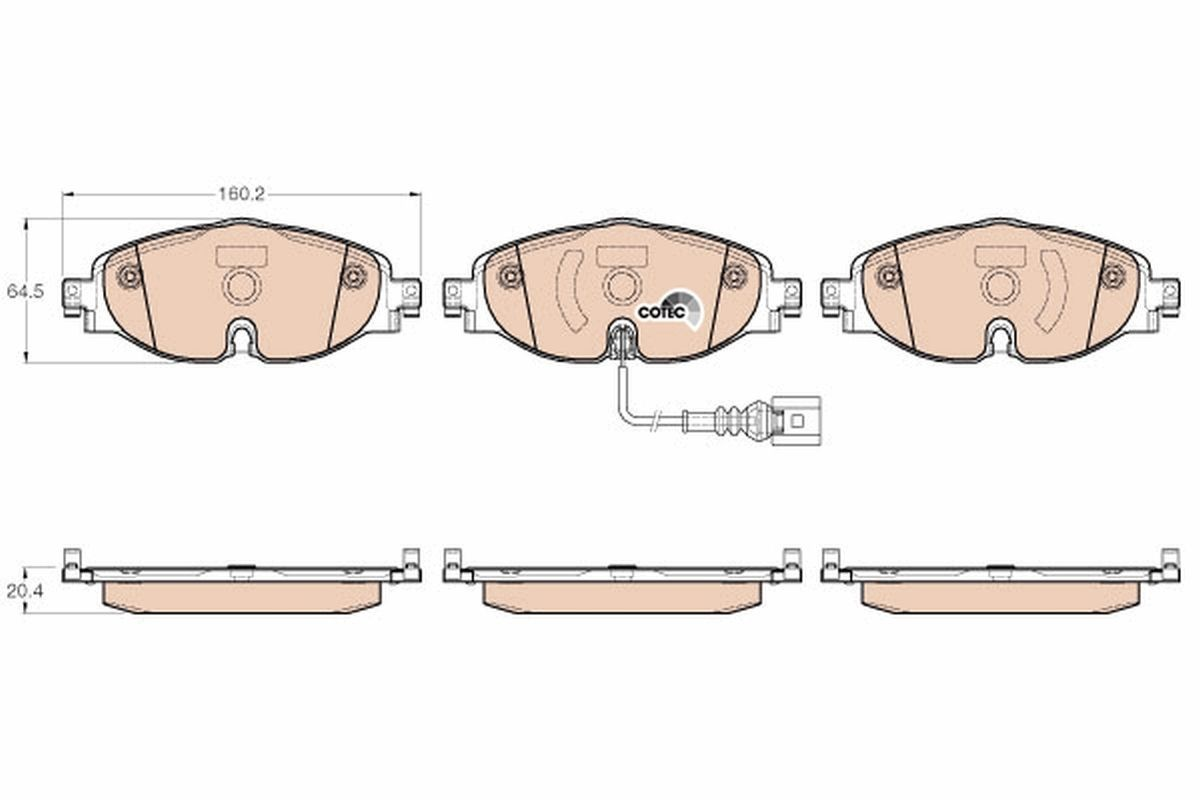
According to Jurid/Ferodo/Valeo on autodoc, the Superb MK3 1.4TSI iV 160kW/218PS has 312x25mm front brake discs and 300x12mm rear brake discs. All Superb MK3 models use the 312x25mm front and 300x12mm rear brake disc combination except for the powerful 2.0TSI 272/280PS 4x4 models which use the bigger 340x30mm front and 310x22mm rear brake disc combination. The 312x25mm front brake discs could be upgraded to 314x30mm from the Kodiaq. The Kodiaq uses these 314x30mm front brakes discs in combination with the 300x12mm rear brake discs. The 314x30mm front brake discs use the same front brake calipers as the 340x30mm front brake discs. 314x30mm front brake discs enable the use of 16" wheels, whereas the bigger 340x30mm front brake discs need at least 17" wheels to clear the front brake calipers. One owner reported that the 310x22mm rear brakes also need at least 17" wheels to clear the rear brake calipers. The increase in piston diameter of the front brake calipers when going from 312x25mm front brake calipers to 314x30mm/340x30mm front brake calipers will increase the pressure applied to the front brake pads by 10.8%, ie. (60/57)x(60/57)=1.108033241 The increase in the surface area of the front brake pads when going from 312x25mm front brake calipers to 314x30mm/340x30mm front brake calipers is about 18.2% (estimate only as based on outside lengths and outside heights of front brake pads), ie. (175.2/160.2)x(69.7/64.5)=1.1818018175 314x30mm/340x30mm front brake discs have more effective cooling than 312x25mm front brake discs. The performance of the 314x30mm front brakes is probably closer to the 340x30mm front brakes than the 312x25mm front brakes. On the Superb MK3, all the master cylinders use a 23.8mm (15/16"=23.8mm) bore for both the 312x25mm/300x12mm and 340x30mm/310x22mm brake disc combinations. Piston diameter 312x25mm front brake caliper 57mm 314x30mm/340x30mm front brake caliper 60mm 314x30mm front brake discs (Kodiaq build code 1LW) (TRW brake calipers) Left caliper 3C0615123 Right caliper 3C0615124 Left carrier 7N0615125 Right carrier 7N0615126 Disc 1K0615301AJ Brake pads 8V0698151C https://www.lllparts.co.uk/catalogs/skoda/CZ/KOD/804/6/615/615010 312x25mm front brake discs 8.6kg 314x30mm front brake discs 9.4kg 340x30mm front brake discs 10.8kg Front brake pads for 312x25mm front brake discs Front brake pads for 314x30mm/340x30mm front brake discs

 1 point
 -
I've no issues with a fair retest at any age. TBH why not retest every 10yr, doesn't need to be the full thing just a brief drive around with a qualified person to check you're safe and a few questions to cehck you're not mental. Drink drive limit can never be 0 because naturally your body produces a little bit, some food contain a tiny amount (apples for example) and testing below a certain level is unreliable. TBH the current levels are ok I think. People who are a danger are way over that or drug driving which is likely a bigger problem these days1 point
-
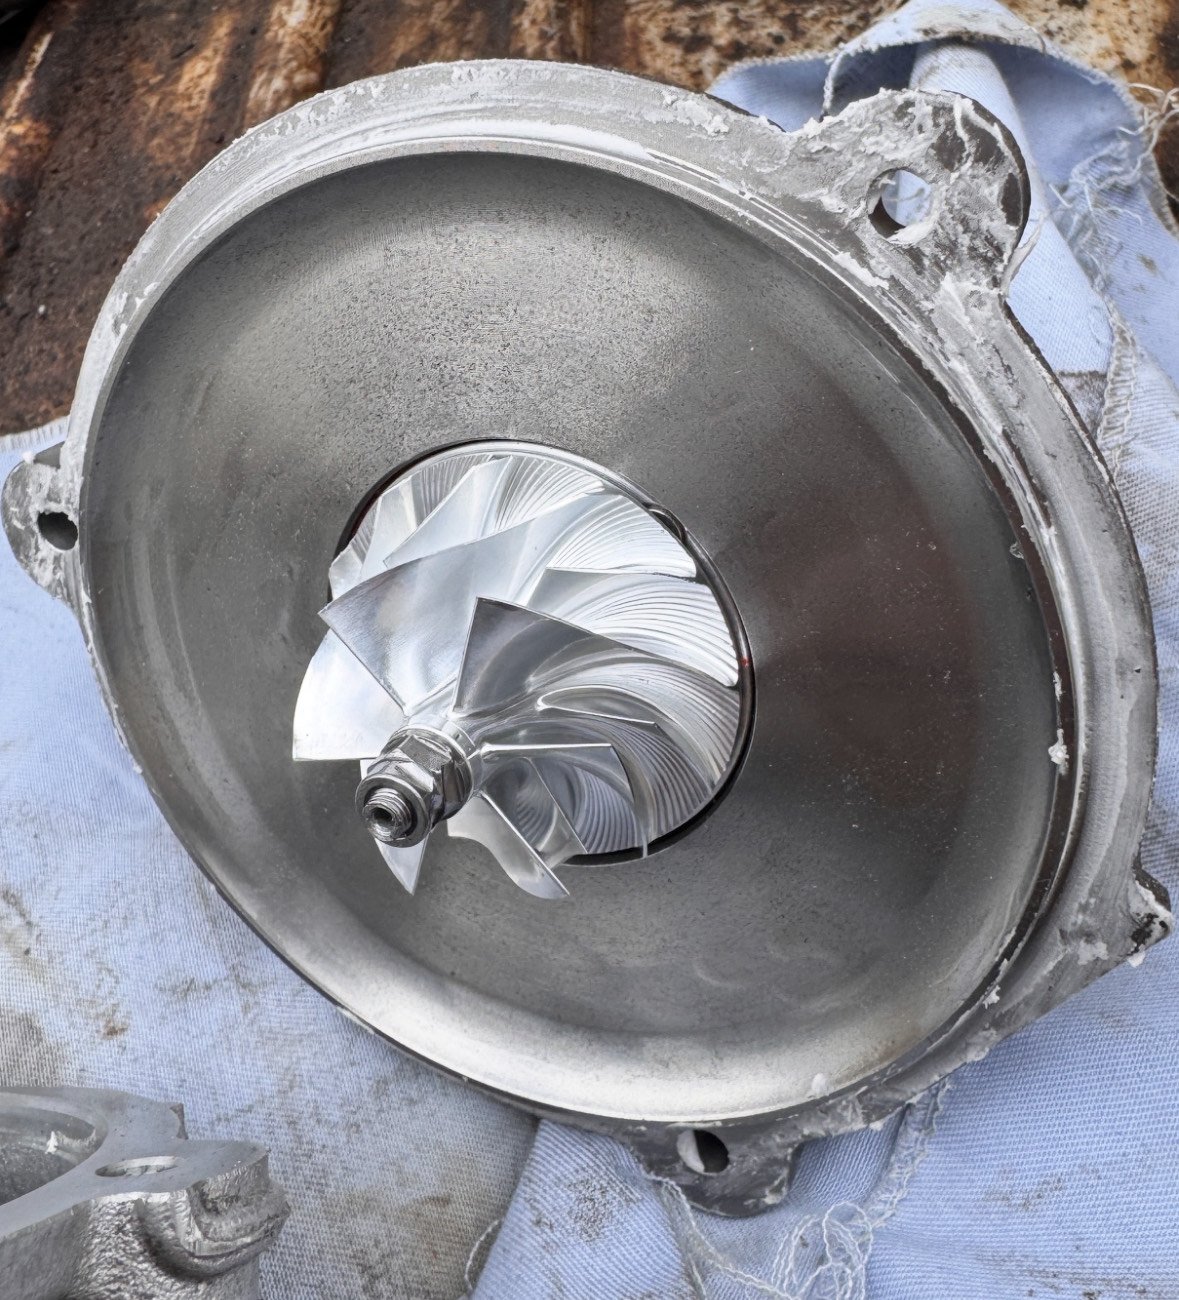
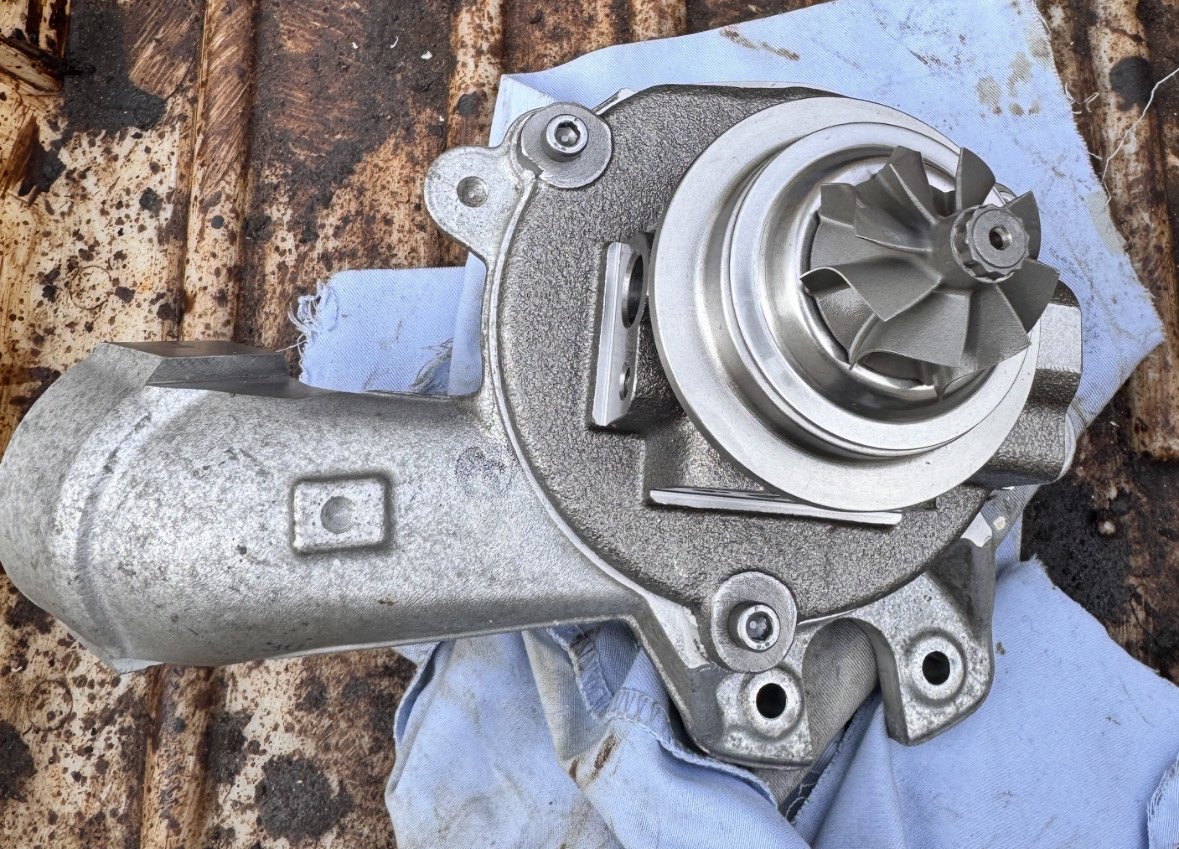
Upon deciding to keep my Mk3 Fabia until its death, I've decided I want some more power from my EA211 1.2TSI 110 and as such needed a larger turbo. This very handy guide linked below by @FabiaGonzales will tell you everything, except self refurbishment, that you need to know about fitting a larger turbocharger from the bigger sister engine 1.4tsi; https://www.briskoda.net/forums/topic/481489-turbo-swap-choices-for-ea211-12-tsi/ Now, I decided that I didn't want to fork out for a brand new turbocharger, and I didn't want to ship a turbo off to Europe for refurbishment, so I decided I'd do it myself. With limited resources online about how to do this, it was a slow job whilst I made sure I did it correctly. However, Hopefully this guide will be of use to anybody looking to replace the turbocharger core on their EA211 1.2 or 1.4TSI. I picked up a used turbo (04E 145 721B) from ebay for £87. Quite a steal if you ask me. Now, The turbo itself seemed fine, but i was not about to risk it exploding in my engine, so I picked up a new turbocharger core (the most important part) from London-2020-TurboShop for £100. This will come with a balancing sheet to put your mind at ease, and is also supposedly an upgrade from OEM as its wheel is lighter - whether or not actually proves real performance differences im not sure. You dont need many tools for this job, namely; T30 Torx bit 4mm Hex bit 10mm socket WD40 / GT85 Carb Cleaner a few rags Nickel Grease Exhaust Assembly Paste PLEASE NOTE: I am in no way a trained super mechanic or turbocharger extraordinaire, this guide is simply how I completed the job, and is in no way the definite, correct method. If you undertake this job, you do so at your own risk (Like I did), and I am not responsible for any damage caused to anything. If you are not mechanically sound, I would suggest letting professionals deal with the job. Turbochargers can spin up to speeds in the hundreds of thousands of RPM range, and an imbalance can destroy both the turbocharger, and your engine. Part one First step is to free off the actuator pivot. This may not apply to everybody. I found the turbo I bought had seized on the pivot, a common issue. If you can extend the actuator and thus open the wastegate, you're fine. If, however, you can't, with your hands, extend the actuator then its seized. You'll need to just go to town with some WD40 or GT85 and a wire brush to try and wiggle it free. Images - demonstrates normal movement of the actuator (yellow outline is wastegates open position) Firstly, Remove the circlip from the pin. Then, remove the two T30 screws holding the actuator to the turbocharger. You should then be able to push the pin DOWN and out of the arm. You can see this in the image above, on the right. Like a see-saw, this will raise the actuator away from the turbo inlet side. Now that that's done I gave the actuator pin and wastegate arm a good clean, ready to be reinstalled with some nickel grease later. Part two After removing the actuator from the turbo, I then proceeded to remove the exhaust side from the core. First job is to remove the clamp that holds the core to the exhaust side. Just use your 10mm socket to loosen off the bolt, then remove the clamp. You should then just be able to pull away the exhaust side with ease. Notice in the photo what i am pointing to. There is a little notch on the exhaust side that fits in to a groove on the turbo core. This is to ensure correct orientation when fitting. Images - Exhaust & Core Notch Excellent, Now we're ready to remove the core from the inlet side. Before doing so, please take images of the correct orientation of your core, as there is no groove to align it properly on this side. Images - Core Orientation Remove the 3x 4mm hex bolts from the face of the core. Once removed, you should just be able to pull the core off. It seems there was a paste used to seal this side, so I had to slightly twist and wiggle the core to break this, then pull it off. Now, your turbo should be fully disassembled into the 3 parts. I now cleaned up the cast parts. I used carb cleaner for the exhaust side and it did look slightly less black afterwards. I avoided using a wire brush on any internal, smooth parts, as I didnt want to introduce imperfections to the surface. Now, reassembly is mostly the same but in reverse order. Be VERY CAREFUL with your new core as it is very delicate. I applied some Exhaust Assembly Paste around the outer lip of the core (The surface that sits against the inlet side) before fitting back and bolting down. Just ensure that if any exhaust assembly paste sits ON or inside the lip you wipe this off. We only want it sitting outside, and not smushing inside when you bolt the core down. Images - Exhaust Assembly Paste & New Core Fitment Once completed, pop the exhaust side back on, minding the core & remembering to align the notch. Then, Tighten the clamp back down to hold it in place. Lastly we have to fit the actuator again. I applied Nickel grease to the pin and arm hole to ensure effective movement and to prevent it from seizing in the future. Then just bolt it back in. Hooray! Now you've completed the refurb, and your turbo should look beautiful, like the below. I hope this guide has helped, if anybody has any better tips/guidance feel free to leave them in the comments. This is by no means the "correct" way to do this job, just how I did it! Lew


.thumb.jpeg.c6a5781c36a4232ac5751e07c65cc4bf.jpeg)
.thumb.jpeg.abc1825d8963798323d5e84a4a481aab.jpeg)
 1 point
 -
1 point
-
1 pointI'm with you on that one... Black wheels do nothing for me and I think they look hideous but each to their own.1 point
-
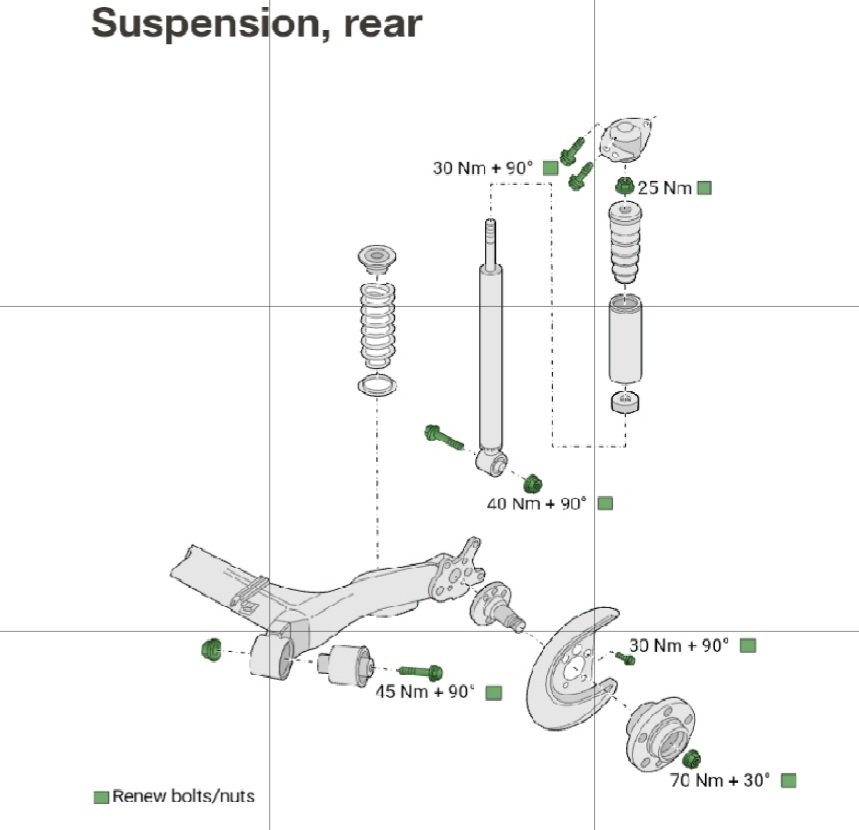
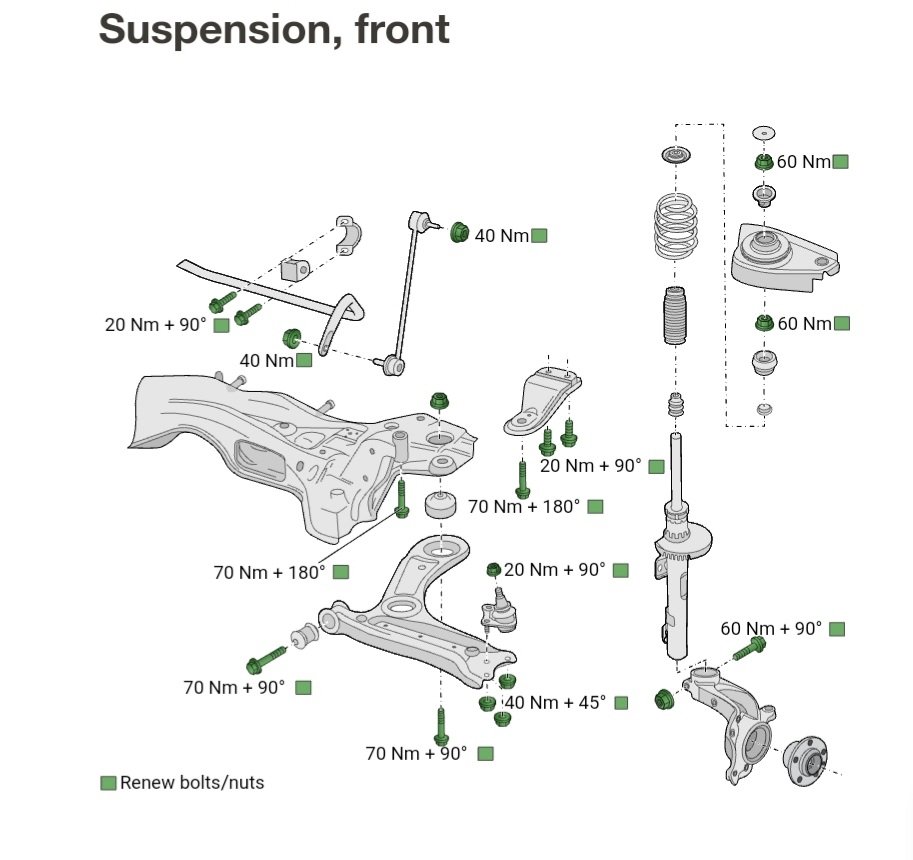
Hi all, Please see the attached torque figures for the various suspension components on Fabia Mk3 (NJ). Front and rear diagrams from workshop manual. Thought may come in handy for everyone.

 1 point
 -
0 points


.thumb.jpg.f83a46b9b3c0d976b9dbffbb523c9874.jpg)


.jpeg.f28a2e19103dc39fa31f676051b4c527.jpeg)
.jpeg.087aef71746b7681583d8d9d1b7df865.jpeg)