


Leaderboard
-
shyVRS245
Locked37Points0Posts -
Westbury63
Members27Points1,199Posts -
Greenliner1
Members22Points2,090Posts -

moley
Resident Member19Points10,121Posts


Popular Content
Showing content with the highest reputation on 02/01/21 in all areas
-
3 pointsThe service manual says an AGM battery can be charged while connected to the vehicle but the negative connection of the charger should be connected to an earth point on the body rather than directly to the battery's negative terminal.3 points
-
Yes, or alternatively you can program it into the drop down favourites menu. I added it and the esc in there. I just despise the system especially when coupled with the dsg. The infotainment can on occasion take a few mins to get up and running which I’m hoping will improve in the future with an update2 points
-
2 pointsAll mine! Still at the dealer! I hope I'll pick it up this week.
 2 points
 -
So you can probably prove that no-one else has buggered about with the injectors better than they can prove that someone has. Talk to a solicitor, a respectable one not a 'no win no fee' bottom feeder.2 points
-
2 points
-
Talk to that other specialist about what they did with the car, if you're not sure already. What was that visit to the specialist for? I suggest getting legal advice straight away if the other specialist can confidently deny having done anything to the injectors, and say that they will put that on record.2 points
-
2 points
-
2 points
-
Don't think you'd have any problems on the Cross Climates in the mountains after watching this. Although I live in the southern coast of England and its rare for it to snow, I took the plunge on Cross Climates due to extended tyre life compared to summers plus the reassurance that when the weather turns wet and cold they will still be a good performer. Its 4C now where I live and has been very wet with some horrendous driving conditions and I have been very pleased with them. They just grip like the road is dry and really are not at all upset where sheets of water occur that could induce aquaplaning Get the thumbs up from me.2 points
-
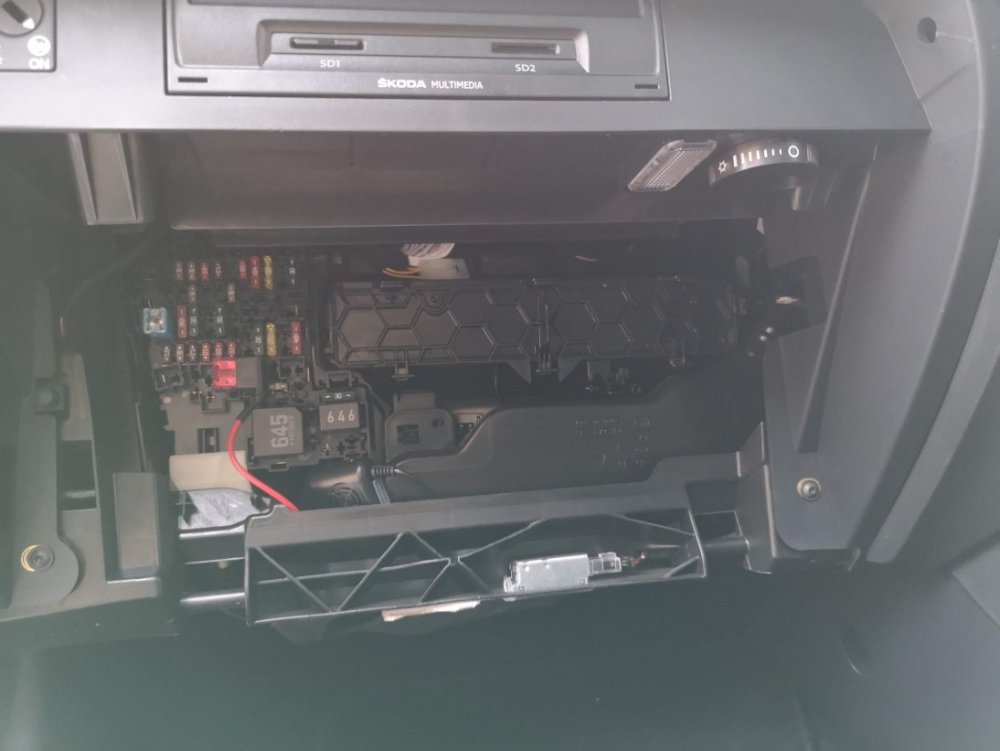
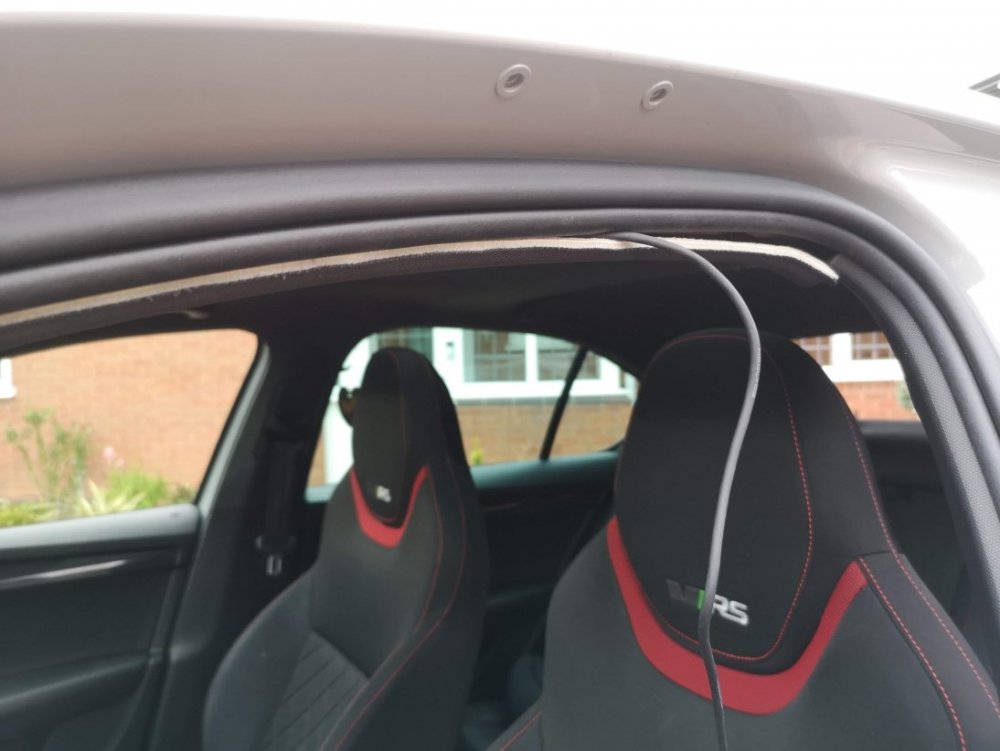
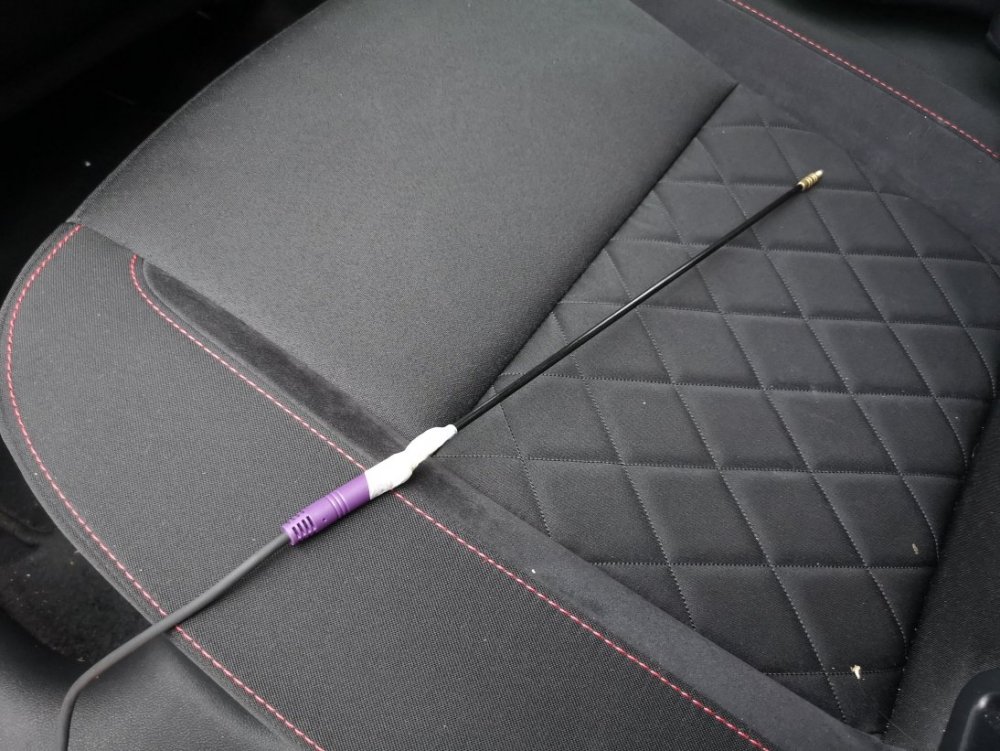
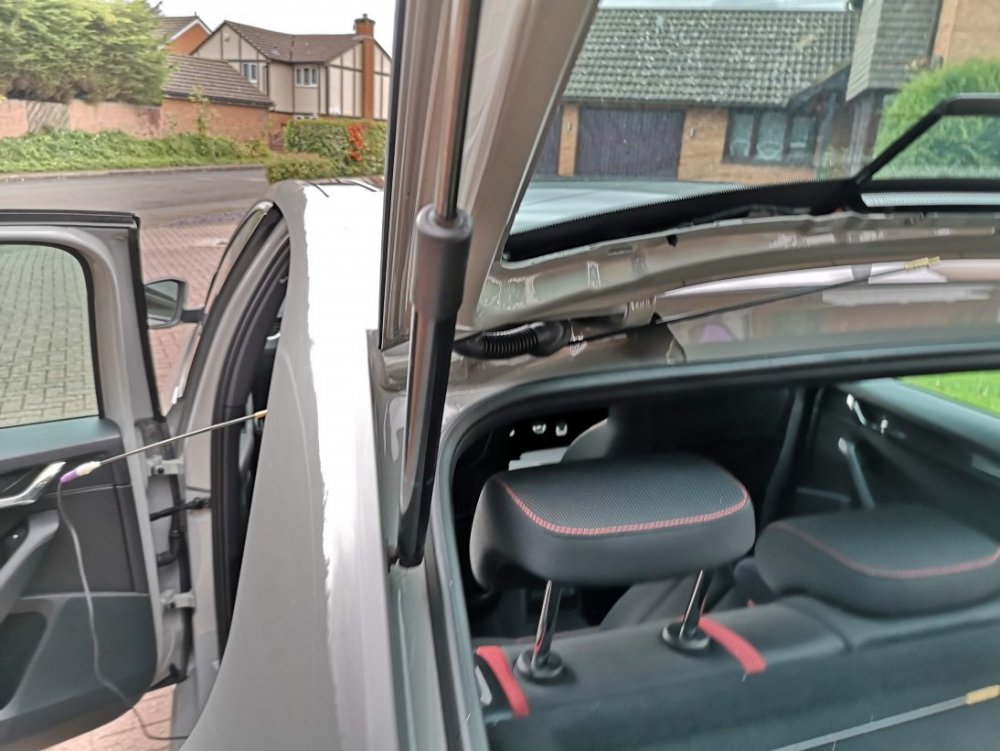
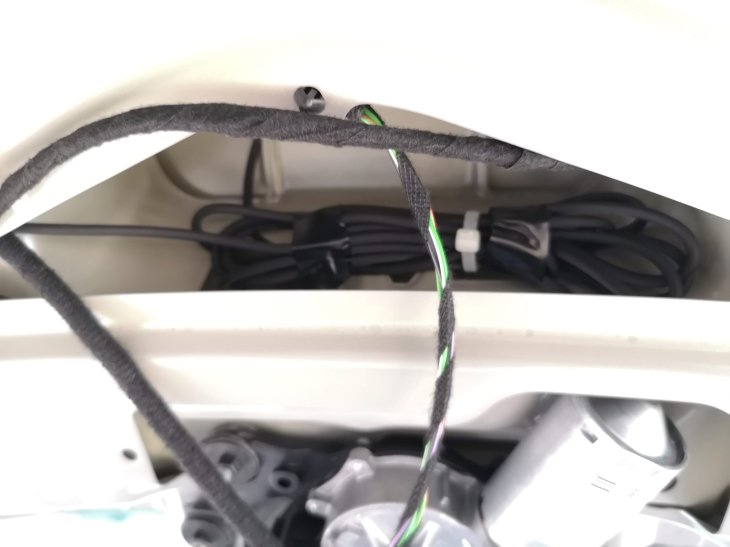
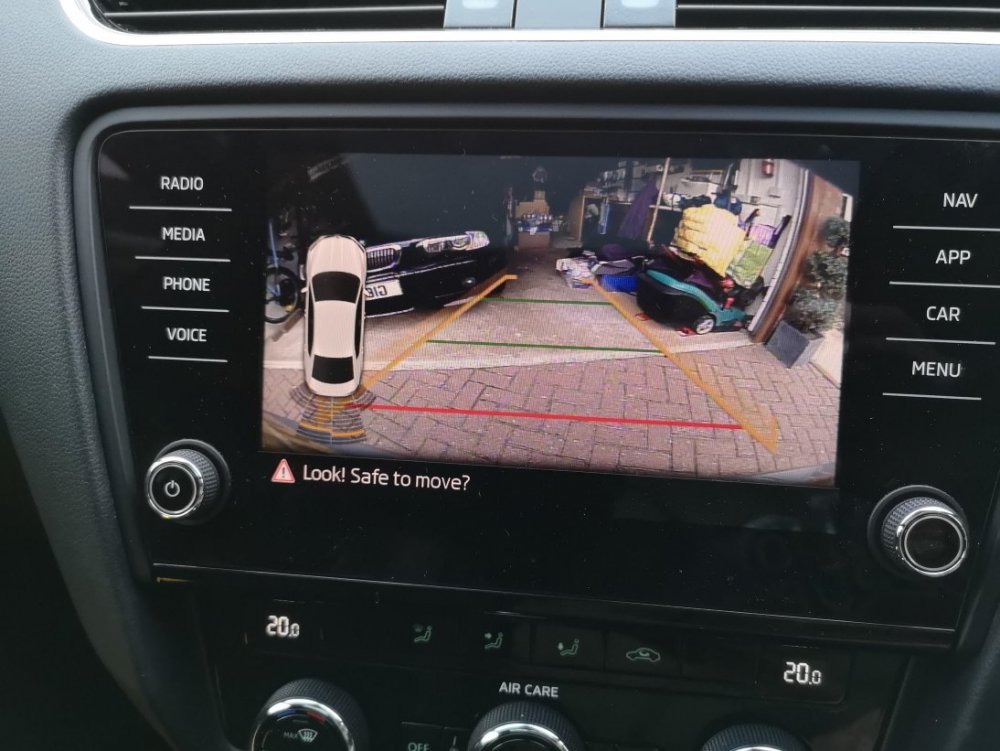
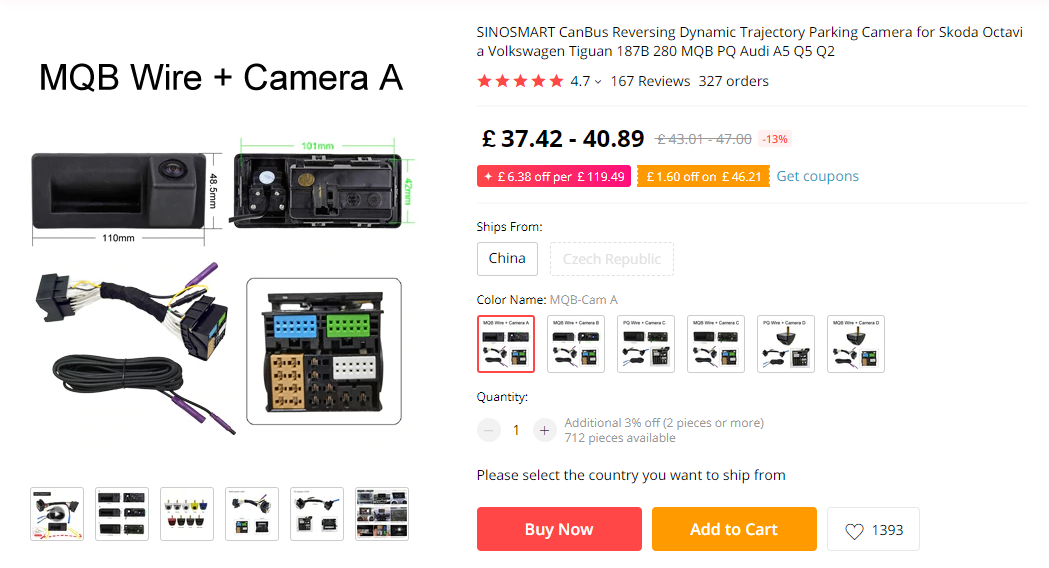
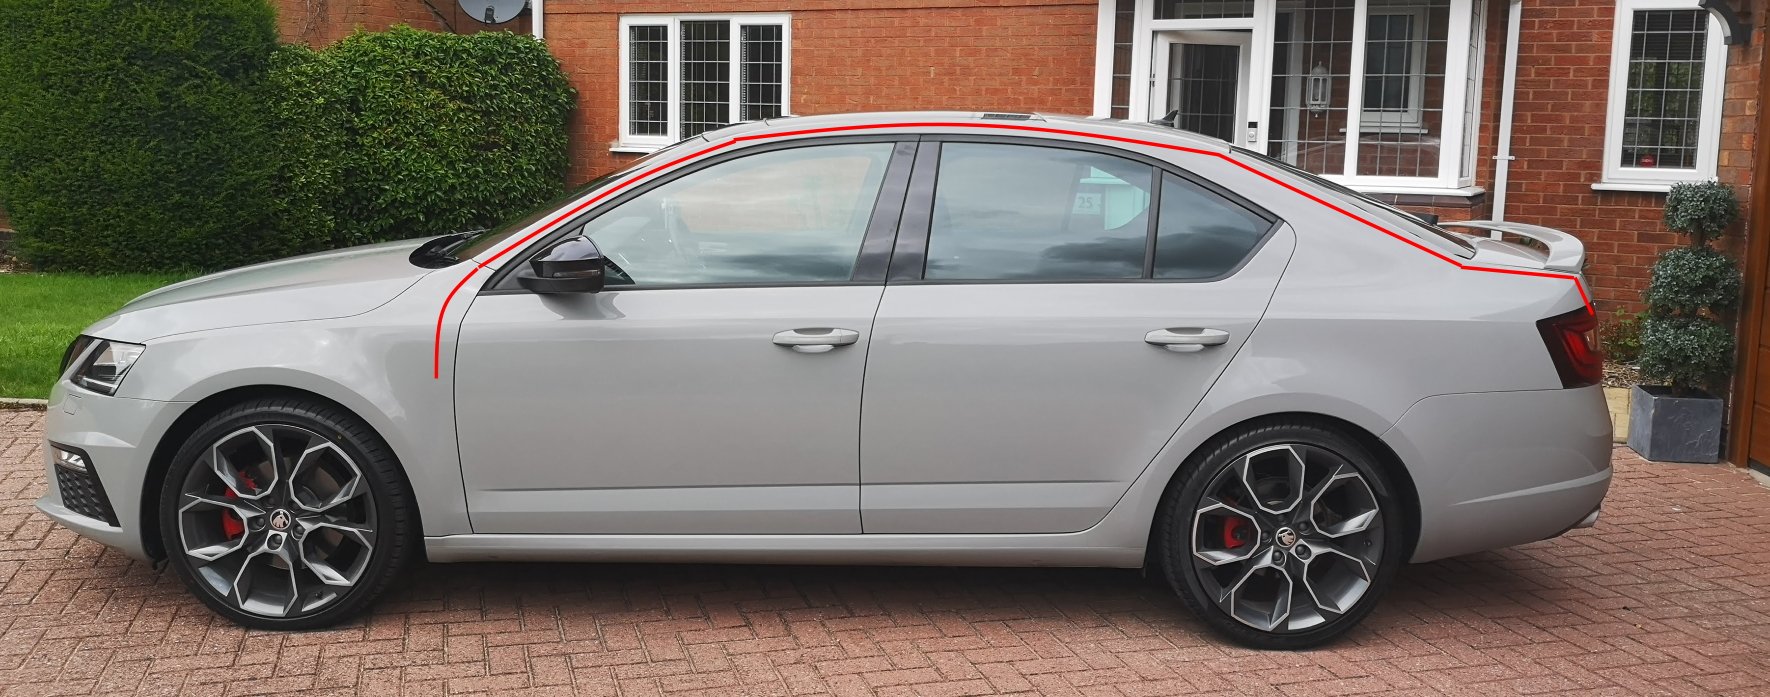
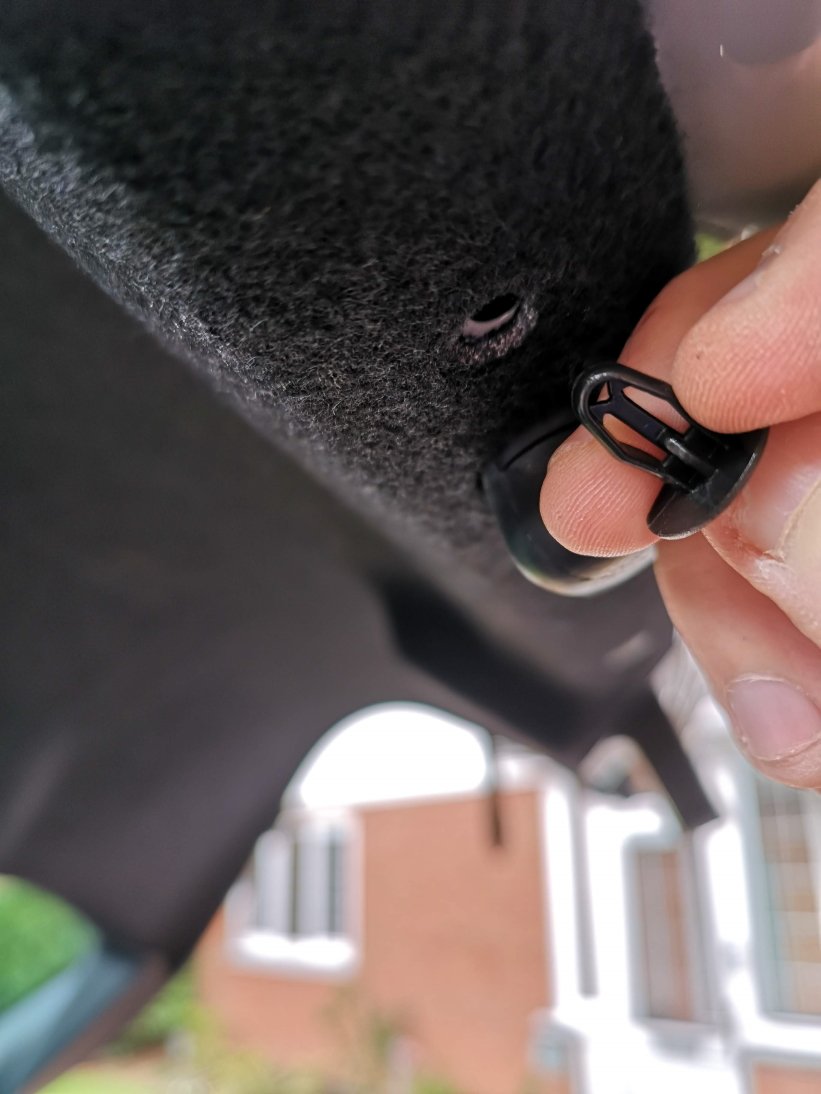
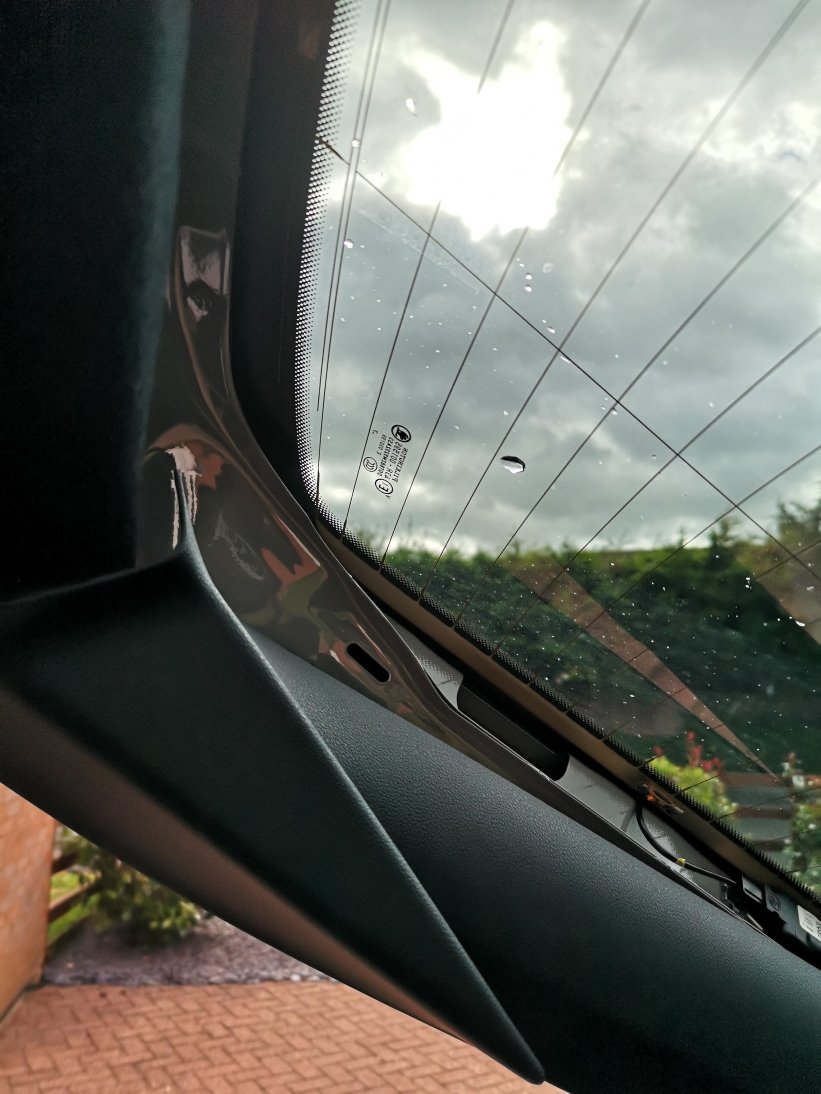
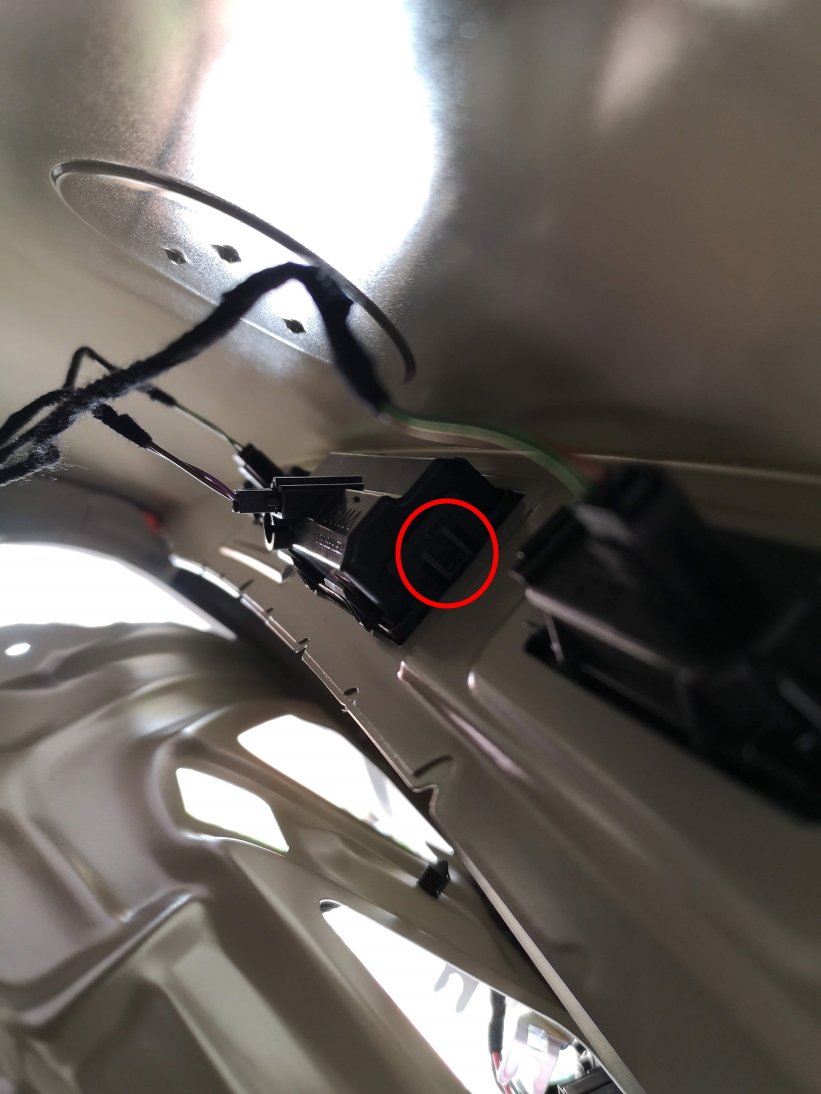
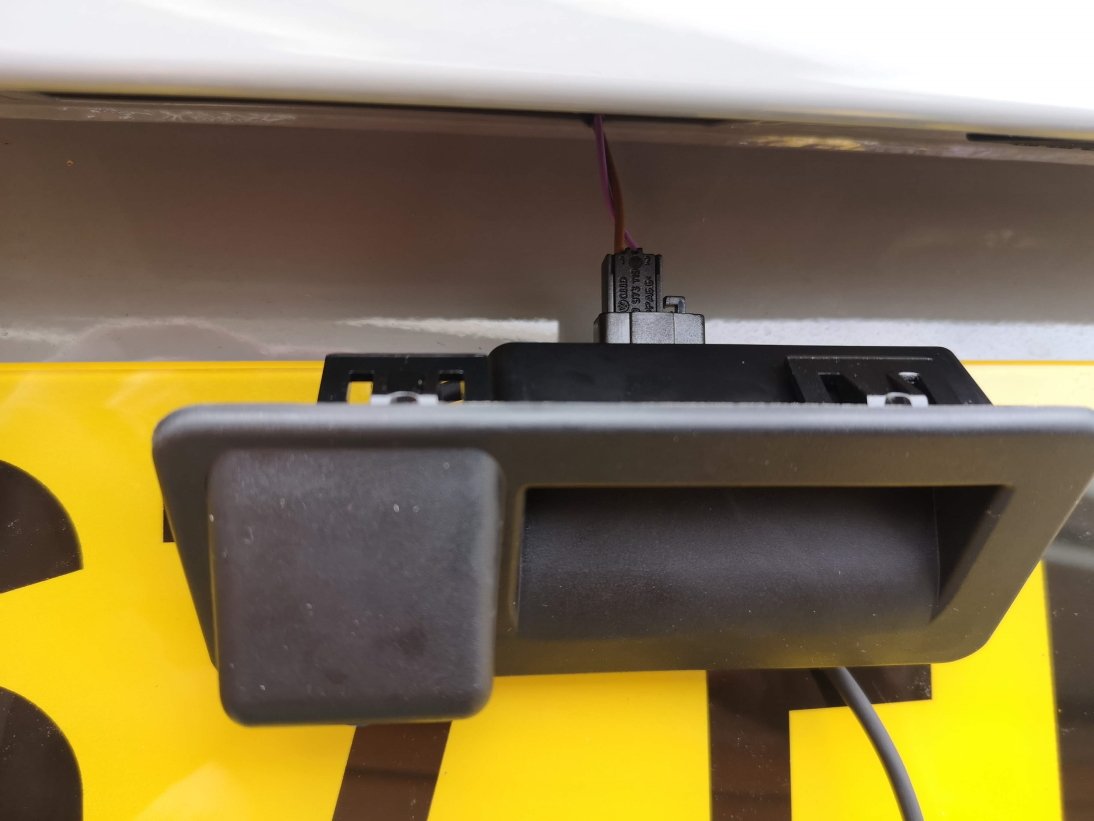
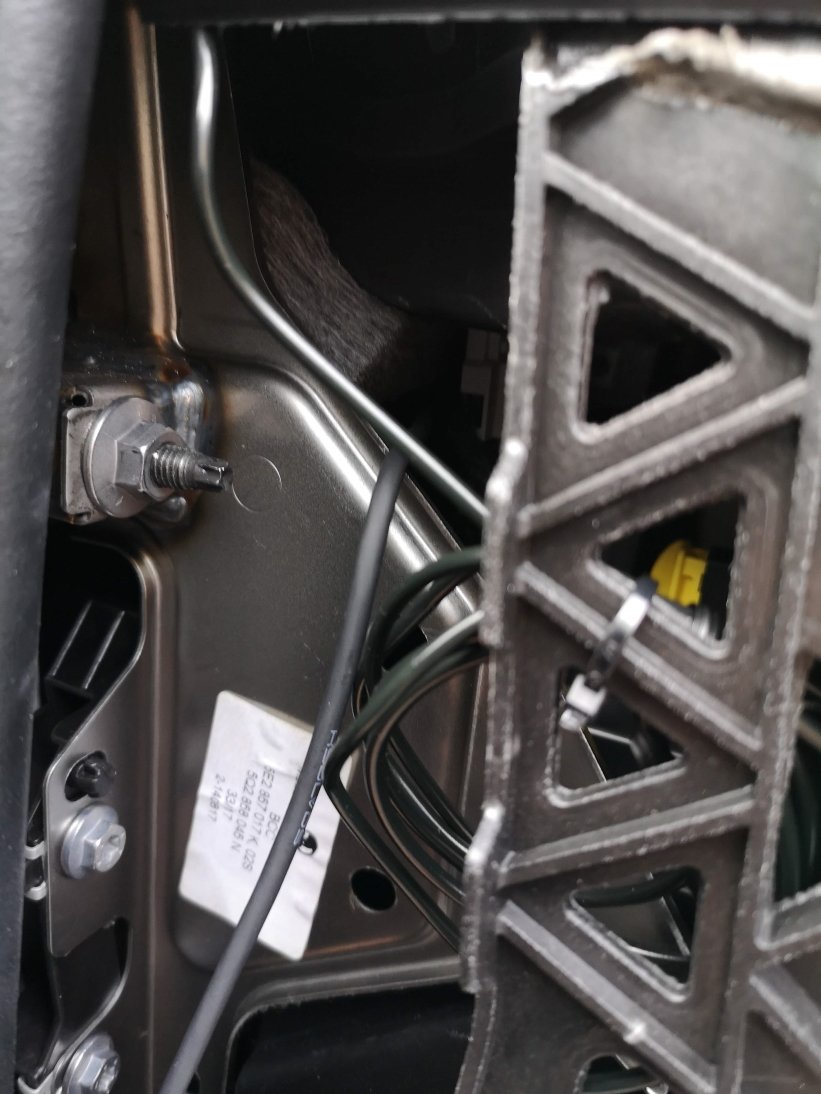
As there seems to be a lot of people asking questions about this lately, I thought I'd put together a quick guide showing how I fitted my reverse camera to a facelift VRS hatchback. They way that i've fitted this will apply to most models, with the key differences being the size of handle (based upon car model year) and whether hatch or estate (but this is just inside trim differences), there may also be wiring loom differences for earlier cars or none VRS models. I've benefited from info from these forums so hopefully this will be useful to others. I am by no means an expert & I won't be able to answer all of your questions, hopefully others will chip in and can add other info as well. First of all, this is the camera that I ordered for my MY 2017 VRS (Camera A/Handle A): https://www.aliexpress.com/item/4000230897829.html?spm=a2g0s.9042311.0.0.40694c4dTEPT93 (link may no longer be valid when you read this so screenshot below) No programming is required for this camera and it supports dynamic reverse guidelines Tools: Trim removal tools would be useful, but otherwise plastic tool that won't mark your car, or screwdrivers or similar with masking tape over the end. A T20 torx head tool is required if you have a hatchback to remove the pulldown boot strap Cable rods are very useful, I couldn't have fitted through the roof lining without. Stereo removal tools unless they come with your camera kit Cable route - I went with an OEM route for my cabling, following existing cables through the roofliner and out to the back as show by the red line below. The camera: The first thing that I did was to check that the boot release switch was working on the new unit - there's no way you want to wire this in and find it is faulty. You'll need to start removing the boot trim to access it. Remove the plastic clips from the lower boot trim- this consists of a few plastic clips which easily pop out with trim remover/screwdriver. There are 8 of these on the hatchback. After that start removing the upper plastic trim, this simply requires forces to release the metal clips. You don't need to remove all of this for now, but it will all need to come off later Remove the lower upholstered trim covering the tailgate. More metal clips - work your way around. You'll also need to remove the pull down strap with the T20 torx head. When this is down you should be able to drop the boot liner which will give access to the boot release handle. This can be awkward to remove, but can be done by pushing in the clip on one on the ends whilst also pushing down on the handle from the inside (ignore the clips along its length) - it should then pop out. Repeat for the other side. Unplug the harness and plug the new handle in - check the release switch works. You can either now push the new handle in until it clips, or leave it out to test the video connection later before fitting. To wire it in Remove the glovebox (open, rock left to right whilst pulling up & you'll hear the bottom clips release. Raise the glovebox lid up and inside the housing and reach in and remove the dampening on the left hand side) Use the stereo release keys to release the multimedia unit. The kit used here comes with a replacement harness that sits between the original one and the media unit & includes the video feed cable. Some people have removed the upper glovebox section to provide more access, be careful not to unplug the airbag connector if you do this. This can be fiddly, but I found the best way was to lie on my back with my head in footwell looking up at the unit from underneath. With the media unit slid fowards this gives access to the harness. It's the large one at the bottom and there is a locking connecting that needs to be pushed backwards to release. Check how it works on your replacement harness. Unplug old harness and plug it in to one end of the new one, push the harness in to the void and plug the new connector block in to the media unit. This took me a while to get it all to fit in. When done you can now test the video feed to the rear camera before your start wiring it in permanently. I took the camera cable over the top of the fusebox cage & out through the side panel I then ran the cable up the A Pillar to the roof lining and all the way to the end. Cable rods were really useful at this point, especially to get around the B pillar , and to go from the end of the roof liner through the cable exit point behind the rubber trunking where the original boot cables are. You can also run the cable in the trim above the sill and work your way back up to the roof lining on the C pillar. When you get to the end of the roof lining you'll need to unclip the rubber gator at the top of the boot so you can get the cable out of the roof liner and in to the boot via this gator. If you install the same way as me you only need to peel the roof liner down a few cm, being careful not to deform or damage it and you'll see the OEM cables behind. Once you've got the cable this far it's a case of feeding it through the rubber gator, up the side of the boot and over to the handle; connect the video cable and tidying up any spare cable. Everything should now be up and running. Retrace your steps to refit your trim. You now have a fully working reverse camera, activated when reverse is selected and with dynamic guidelines. The parking sensor guide now shifts to the left of the screen the same as an OEM reverse camera. I will come back and re-edit this tomorrow and resize pics as it's getting late. I'll tidy up any errors as I see them so please don't jump on me straight away!


 1 point
 -
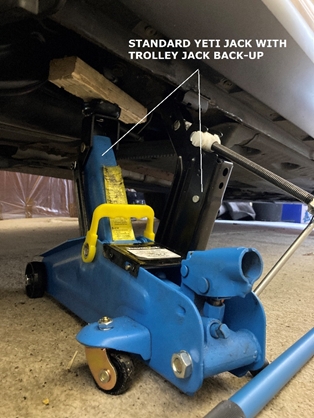
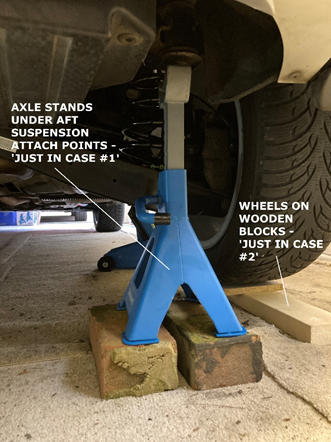
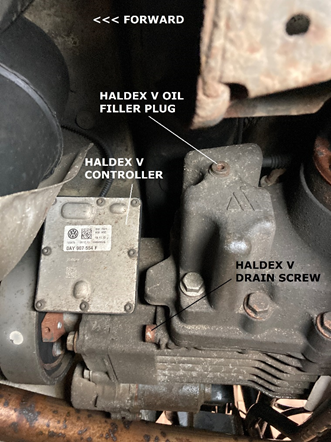
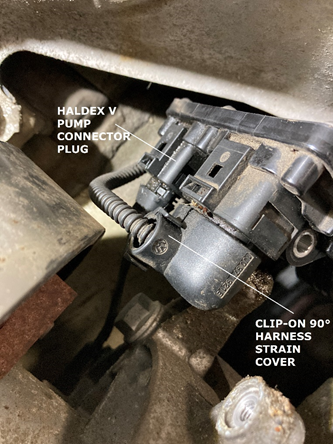
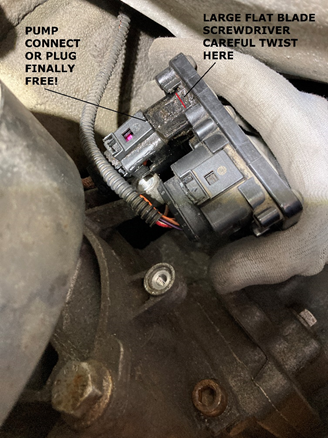
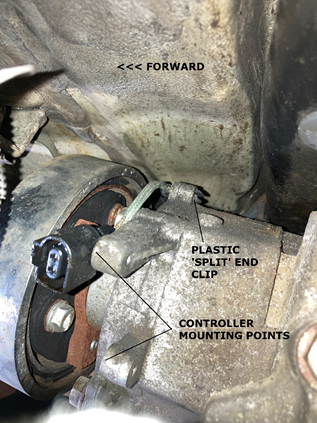
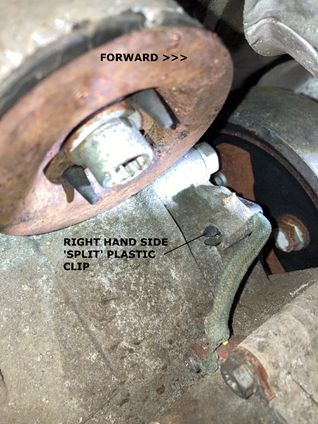
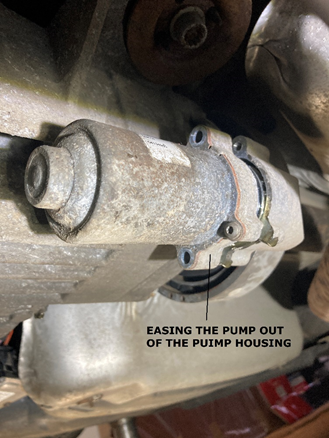
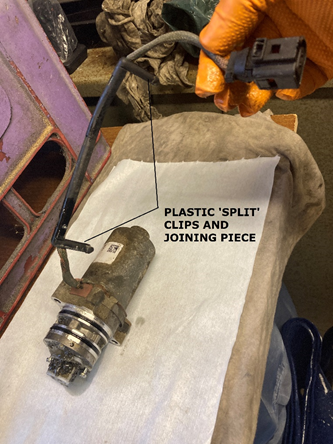
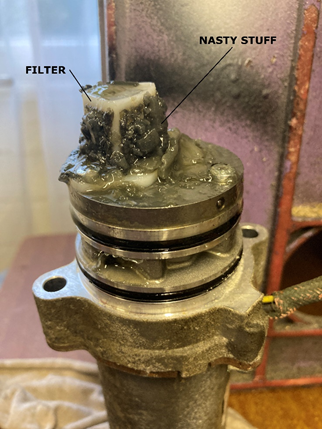
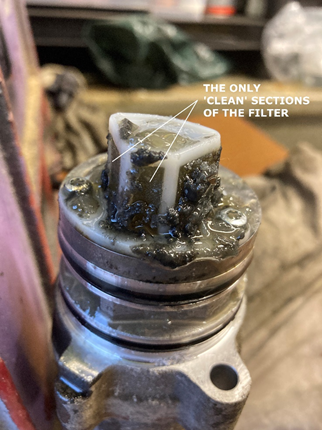
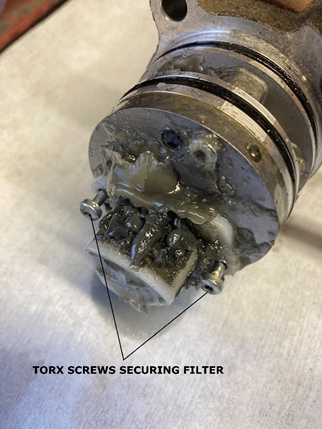
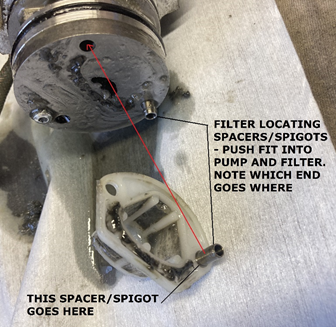
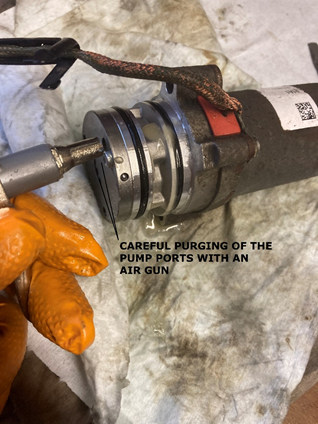
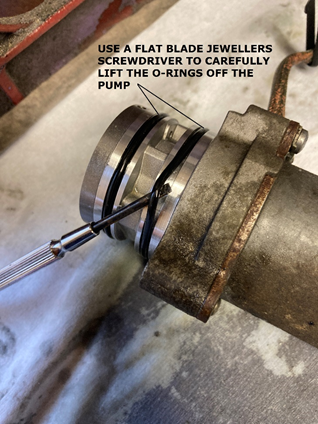
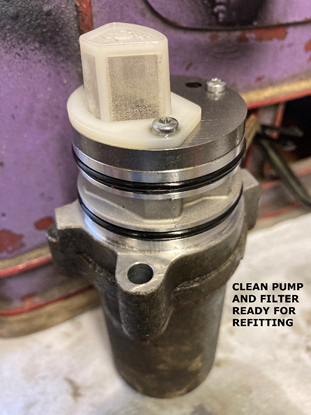
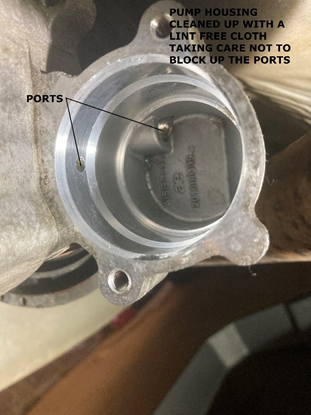
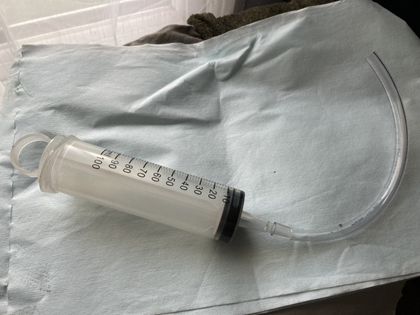
Coming soon when I get the pictures to appear... INTRODUCTION As I mentioned previously in another thread, I decided to have a go at changing the Haldex oil and clean the filter on TIBET III’s Haldex V unit after reading the threads on Briskoda. The idea of this guide is simply how I did it, based on advice from others but it maybe, that I did things slightly differently to others or perhaps I had a problem that others haven’t encountered and which someone else might find useful to know about. It is also Yeti-specific. SERVICE HISTORY After reading about the pump filter issues on the Haldex V and having lost faith with the MK dealer for various reasons, I decided to do it myself. Experience level – I’ve maintained my cars over the years (I’m an aircraft engineer by trade) but more recently, with the cars being under warranty, I’ve let the dealer do it. I reckon anyone who is competent at basic servicing tasks (oil and filter changes etc) can cope with the Haldex V oil change and filter clean. JOB PREPARATION One of my concerns was jacking (safely for me!) the Yeti giving me sufficient room underneath to do the job without struggling for access. I’ve never really trusted the drive on ramp idea so it was going to have to be jacks and axle stands. To jack the Yeti up, I used the standard car jack on one side and a straight lift mechanical pillar jack on the other (actually a 4.5T Land Rover jack). I prefer to rely on mechanical lifting but had in addition a trolley jack on the jack pad inside and aft of the Yeti jack. The LR jack had the good old slotted ice hockey puck to protect the sill flange. The axle stands I positioned at the rear suspension attach points just forward of the bumper behind the wheels. They weren’t taking any weight as such but were there in case the world moved from under the jacks. This may not be an ‘approved’ support point but their role was one of protecting me in the worst-case scenario. I also had wood blocks under the wheels which meant I wasn’t going to get squashed even if someone nicked all the jacks and axle stands whilst I was looking the other way… Perhaps this was all a bit OTT but I had the kit, it doesn’t take long to do and you’re a long time dead. The service kit came from haldexrepairs.co.uk – an excellent and useful website, lots of good info and tips and a good service. The kit was complete including everything from the oil and replacement drain and filler plugs to a pair of gloves. Brilliant. ON WITH THE JOB DISCONNECTING THE CONTROLLER The first thing was to run VCDS to check for any errors but everything was fine. It also warmed the car and everything up. No idea if the Haldex system likes being warmed up but it won’t do any harm! I knew one of the most ‘difficult’ tasks was accessing the pump harness to enable the pump to be removed. In actual fact it wasn’t too bad but even with a torch and mirror, once again the adult-proof VAG plug on the controller was impossible to undo. Yes, I’ve watched all the ‘how to guides’ but it didn’t push further on, the locking tab wouldn’t budge and the plug stayed fast. Plan B was to remove the controller from the Haldex unit to allow better access to the plug. This worked a treat. It’s held in place with two 10mm bolts but it still needed a gentle prize to free the controller from the Haldex unit mount after removing the bolts. This meant I could now get to the plug although it didn’t budge until a subtle and careful twist with a large flat blade screwdriver provided just enough force to ease the plug clear. The other connector plug on the controller has a clip-on 90° cable strain relief cover on it. Removing that enabled more flexibility to access the pump connector plug. The harness is held into position on the top of the Haldex unit above the drive shaft by two plastic split clips. It was easy to do one from the lefthand side (above where the controller was) and the other from the righthand side. The trick is two squeeze the end of the clip together from the aft side and then push the clips forward and out of the locating holes. The two clips are actually joined together by a length of split plastic. The workshop manual says to lower the main final drive unit down for access (7 turns) but I’m not sure why you’d need to. DRAINING THE RESERVOIR & PUMP REMOVAL Delighted with getting the pump electrically disconnected, I slackened the filler point plug and the drain plug - both are Allen socket head screws (8mm for the drain plug and 5mm for the filler plug). The drain plug must be more than just a drain plug as it’s pretty long and torqued (according to the Yeti workshop manual) to 40 Nm. The filler plug is much smaller and shorter and torqued to 15 Nm. I gave the area around and above the drain and filler points a good clean to prevent any crud getting inside the unit. With the drain plug removed, the oil drained into the drip tray and removing the filler plug allowed a full flow. I was impressed as the oil looked pretty clean. Perhaps my filter was going to be okay… DRAINING THE RESERVOIR & PUMP REMOVAL Delighted with getting the pump electrically disconnected, I slackened the filler point plug and the drain plug - both are Allen socket head screws (8mm for the drain plug and 5mm for the filler plug). The drain plug must be more than just a drain plug as it’s pretty long and torqued (according to the Yeti workshop manual) to 40 Nm. The filler plug is much smaller and shorter and torqued to 15 Nm. I gave the area around and above the drain and filler points a good clean to prevent any crud getting inside the unit. With the drain plug removed, the oil drained into the drip tray and removing the filler plug allowed a full flow. I was impressed as the oil looked pretty clean. Perhaps my filter was going to be okay… Whilst the reservoir drained, I set about moving the pump. The first thing to do was to give the pump and the housing a good wipe down to prevent any dust and dirt from unduly contaminating the pump. This was easy with two Torx screws to undo followed by a very gentle tap with a nylon hammer and then a wriggle and out it came, releasing a bit more fluid. FILTER AND PUMP CLEANING I couldn’t believe just how blocked up the filter was – and the congealed mess left inside the pump housing on the Haldex unit – exactly as others had found. It’s strange – almost like grease with little substance when you touch it. It didn’t seem to be water/moisture contamination. The next job was to remove the filter which is held in place by two Torx screws. Then it was a case of gently easing the plastic filter clear. It sits on two locator bushes that also act as spacers and should protect the filer from being crushed when the Torx screws are tightened. I used warm water and a small paint brush and some washing up liquid to clean the filter and then once rinsed, left it to dry off whilst I cleaned up the pump. The pump cleaned up easily and I used a small blast of air from my compressor to clean the old fluid out of the ports. It was then a case of replacing the O-rings, removing the old ones carefully with a very small flat blade screw driver being careful not to damage the pump. Incidentally, there was a couple of patches of light corrosion on the pump (on the mounting flange). This was easily removed with a Scotchbrite pad – don’t use wire-wool as this can cause dissimilar metal corrosion if stands of the wire-wool get embedded in the aluminium pump. I also use lint-free cloths for the cleaning to avoid fluff and stuff getting into the bits where you don’t want fluff. With the O-rings replaced, I blew air through the filter to ensure it was dry and refitted it to the pump. There seems to be two ports in the pump housing – presumable an inlet and an outlet. I scooped the gunge out being as careful as I could to avoid pushing any of it into the ports. REFITTING THE PUMP AND FILLING THE RESERVOIR As with all good Haynes manual advice – installation is the opposite of refitting. Before fitting the pump, I gave the O-rings a good coating in fresh Haldex oil to lubricate them as the pump is refitted. It slipped in a treat and I secured it in place with the two Torx screws. I made sure the harness had the correct routing before I fully pushed the pump home. Once the pump was properly installed, I locate the right and then left harness clips and then reconnected the pump connector plug to the controller, the 90° harness stain relief cover to the other controller plug and refitted the controller to the mounting points on the Haldex unit. I used the airline to give a light blast through from the filler point after putting a very small amount of fluid into the reservoir to help flush it through. I had a small syringe to do this with. A big 100 ml syringe (and a length of plastic hose) comes with the service kit from Haldex Repairs for the main filling. Next job was to fit the new drain screw. The service kit came with new drain screw and filler plug but the original ones could have been reused – there was nothing obviously wrong with them. The new ones obviously have new sealing washers on them. As mentioned, the drain screw is torqued to 40 Nm according to the workshop manual. With everything secure, the next task is to refill the reservoir. The big 100 ml syringe with the service kit works a trat with a plastic hose that just fits in the filler point. I found you had to be careful not to block the filler point completely and that made it pretty much airtight and difficult to operate the syringe. The reservoir took most of the fluid and some started to over flow out so I refitted the filler plug. FINAL CHECK AND VCDS ERROR CHECK AND PUMP RECALIBRATION Next job was to check everything was clear and I lowered the Yeti pretty much to being off the jacks. I started the engine and let it run for 5 minutes. I then used VCDS to run the ‘learn pump’ program as suggested by Haldex Repairs. You could clearly hear the pump running through a specific cycle. The tone changed as the pump filled up. A quick jack up again enabled another oil level check of the Haldex reservoir. What I had initially thought to be fluid flowing showing the reservoir was full but with a more concerted effort on the syringe, I found I got a fair bit more into the reservoir and when it was really full it really did flow out! Unfortunately, I forgot to get a picture of the refilling but that’s a pretty simple job – just be careful not to put too much effort into operating the syringe and end up blowing the plastic pipe off. I used probably 800 ml of the 850 ml supplied in the bottle. Although the car was jacked up at the back, it probably wasn’t that much of an angle so I think the reservoir is pretty good on the level. Another good look round was done as a final leak and security check. I then ran the engine and again went through the VCDS error code check and ‘learn pump’ program. All appears good. I am at a loss as to how the system worked with about 80% of the filter blocked – perhaps it wasn’t. I haven’t been in any snow for three years now. Anyway, job done and as others have said – it is a job that has got to be done. If you’re not up to it then it shouldn’t be too costly to get a garage or dealer to do it – you’d just better point the dealers to Briskoda or the Haldex Repairs website to find out how to do it! Next job will be to take the Yeti out for a road test this weekend. Forecast for snow on Friday…. PS Apologies for the low res pictures, haven't got time this evening to suss why they didn't load - if anyone needs hi res pictures (or a PDF of all of the above) then PM me.


 1 point
 -
1 pointHi guys, I've decided to sell my Skoda Octavia VRS 245 (just posted it up in the classifieds). It's been an amazing car, but with lockdown carrying on and working from home, It's sitting in my garage not being used... We are fortunate enough to have 3 cars in our household and the painful decision has been made to move on the Octavia. Eventually when things go back to some kind of normality, I'm going to hopefully pick up an electric car as I only work 16 miles (round trip) from work. Also I'm allowed too charge my car for free at work, so makes real financial sense in the long run. I'm going to miss the Octavia though... Hands down the best car I have ever (in my short time with it) owned. Just wanted to say thanks to everyone for all the useful advice I have picked up on here (even way before I bought her).1 point
-
Yeah. It looks great. Although I have the Estate/Combi version so no spoiler for me. But I plan to put a black Skoda logo in the front and paint the exhaust tips in black. It should look awesome. I also planned to switch the front VRS logo for the red-black one. But as parsey83 mentioned in one of his posts that the front VRS logo is plastiwelded, I guess this wont be possible. I thought it was screwed as on older models.1 point
-
I have done my last three cars, very simple and don't need a heat gun either. I use dental floss and then dab the left over residue with Auto Finesse tar remover, leave it for a minute to soak in and the left over glue literally wipes away. Get a pic on here when you have done it1 point
-
1 point
-
Bit of heat to soften adhesive then I use an old bank card or similar. Or dental floss. Usually only a bit of residue to be removed but will not mark paint or damage the badges1 point
-
YouTube is your friend https://youtu.be/C7v00DYEEK01 point
-
Meteor Grey! Or as it's called here...Steel Grey.1 point
-
Nice color! This one was my second choice!1 point
-
Its more like 3 click tbh.. Step 1 Press Set Up key Step 2 Press Start/Stop on Screen Step 3 Press Set Up key to return back to Home Screen Bit of a pain but getting used to it now...1 point
-
1 pointYou won't regret it. I had a mk3 vrs tsi for 6 years (longest I've kept a motor) and this is miles ahead. Takes a while to get accustomed to the infotainment but the build quality both inside and out has moved on leaps and bounds. I'm in and out of alot of different cars and Skoda has struck this perfect1 point
-
1 pointKnowing how to diagnose an engine involves a lot of knowledge, both about engine specifics and about diagnosis strategies. Swapping parts based only on errors stored in the engine computer is (sadly) a bad habit of many garages. I suggest letting a professional car technician diagnose the engine. He will look first at several basic variables, like short trim fuel trim (STFT) and long term fuel trim (LTFT). Then he will adjust the testing strategy accordingly.1 point
-
Find someone locally who can do a VCDS scan, without targeted information you could waste a lot of money1 point
-
1 pointThe flat part of the panel needs run over with a polisher to return the gloss. The scuff can be touched in after that, and then blended again with the polisher. Otherwise you could just get a smart repair carried out on that corner.1 point
-
1 pointHaving the best car has always been important, but the teams with the best cars make them even faster when they can by employing the best drivers. Williams managed to win titles with relative journeymen like Rosberg, Hill and Villeneuve, but they always hired the really fast guys when available; Mansell, Piquet, Prost & Senna all drove for Frank. You have to doubt that massive multi-nationals like D-B would employ any driver if they weren't convinced that he would gain more points over a year than anybody else. Clearly they don't think Max is worth the risk yet, or they would have prised him out of his RedBull contract long ago. Other claimants to the honorary title of "best F1 driver" have not only had access to top-level cars but many have had contractually subservient team mates too. Schumacher, Fangio even, had the good cars and team mates who were not allowed to win. Hamilton by contrast was pitched in to sink or swim against double champion Alonso in his first season, and has seen off his team-mate in what is it? 12 of 14 seasons since. The top teams tell the top drivers when its time to go for the benefit of the team. Ferrari dumped Prost, Schumacher, Alonso and Vettel because they were no longer top dog. Williams binned champions Mansell & Hill. Mercedes will move Hamilton out when its his time too.1 point
-
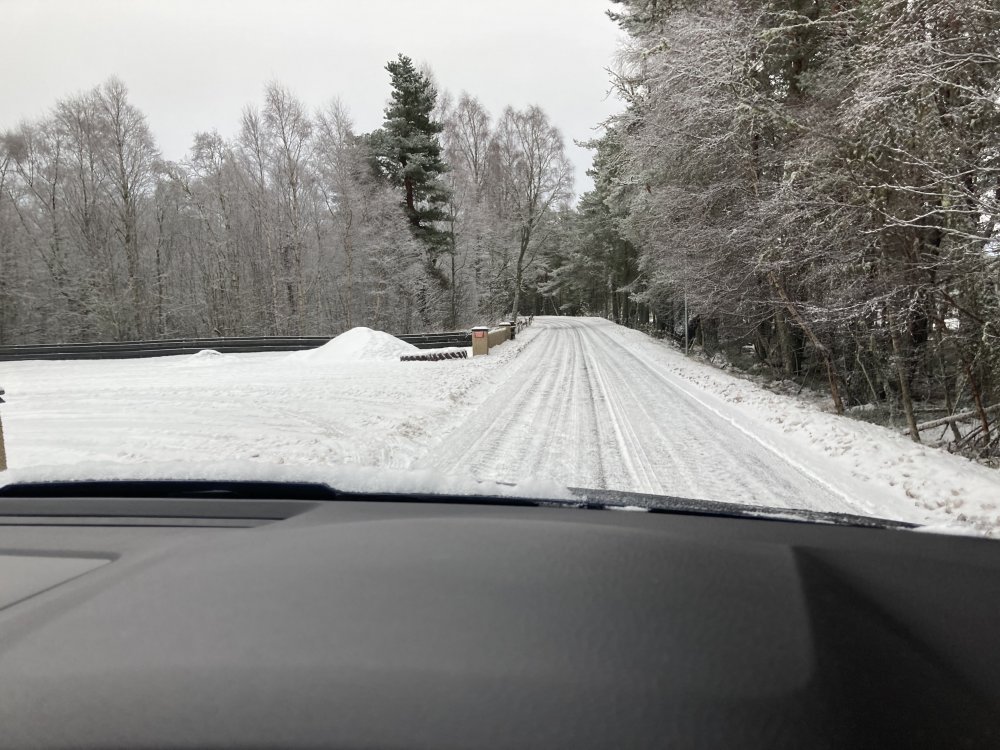
A surprise snowfall today out on Beeley Moor. I came across several cars belonging to folks who had been out walking and noticed they were parked on the edge of the ditch with summer tyres!! I stopped my car to assist a young lass and her friends who were trying to get their VW Golf DSG going. Luckily, I have some shoe chains which I simply attach to my walking shoes to give grip even on ice and went to give them a push. I told her to switch the traction control off and keep the revs at 2000 and with help from me, off they went. Next and just behind my car in the footage, a young lad was all over the place, over revving his Corsa. The problem was worsened by the Land Rover driver who just kept coming towards the hazard! Eventually he listened to me and reversed out of the way. I then gave the lad the same advice as the girl and pushed him away from the ditch until he got going ok. Following this, I went on my way and the all season tyres showed their worth! This time I remembered to switch the traction control off and it was no drama 👍1 point
-
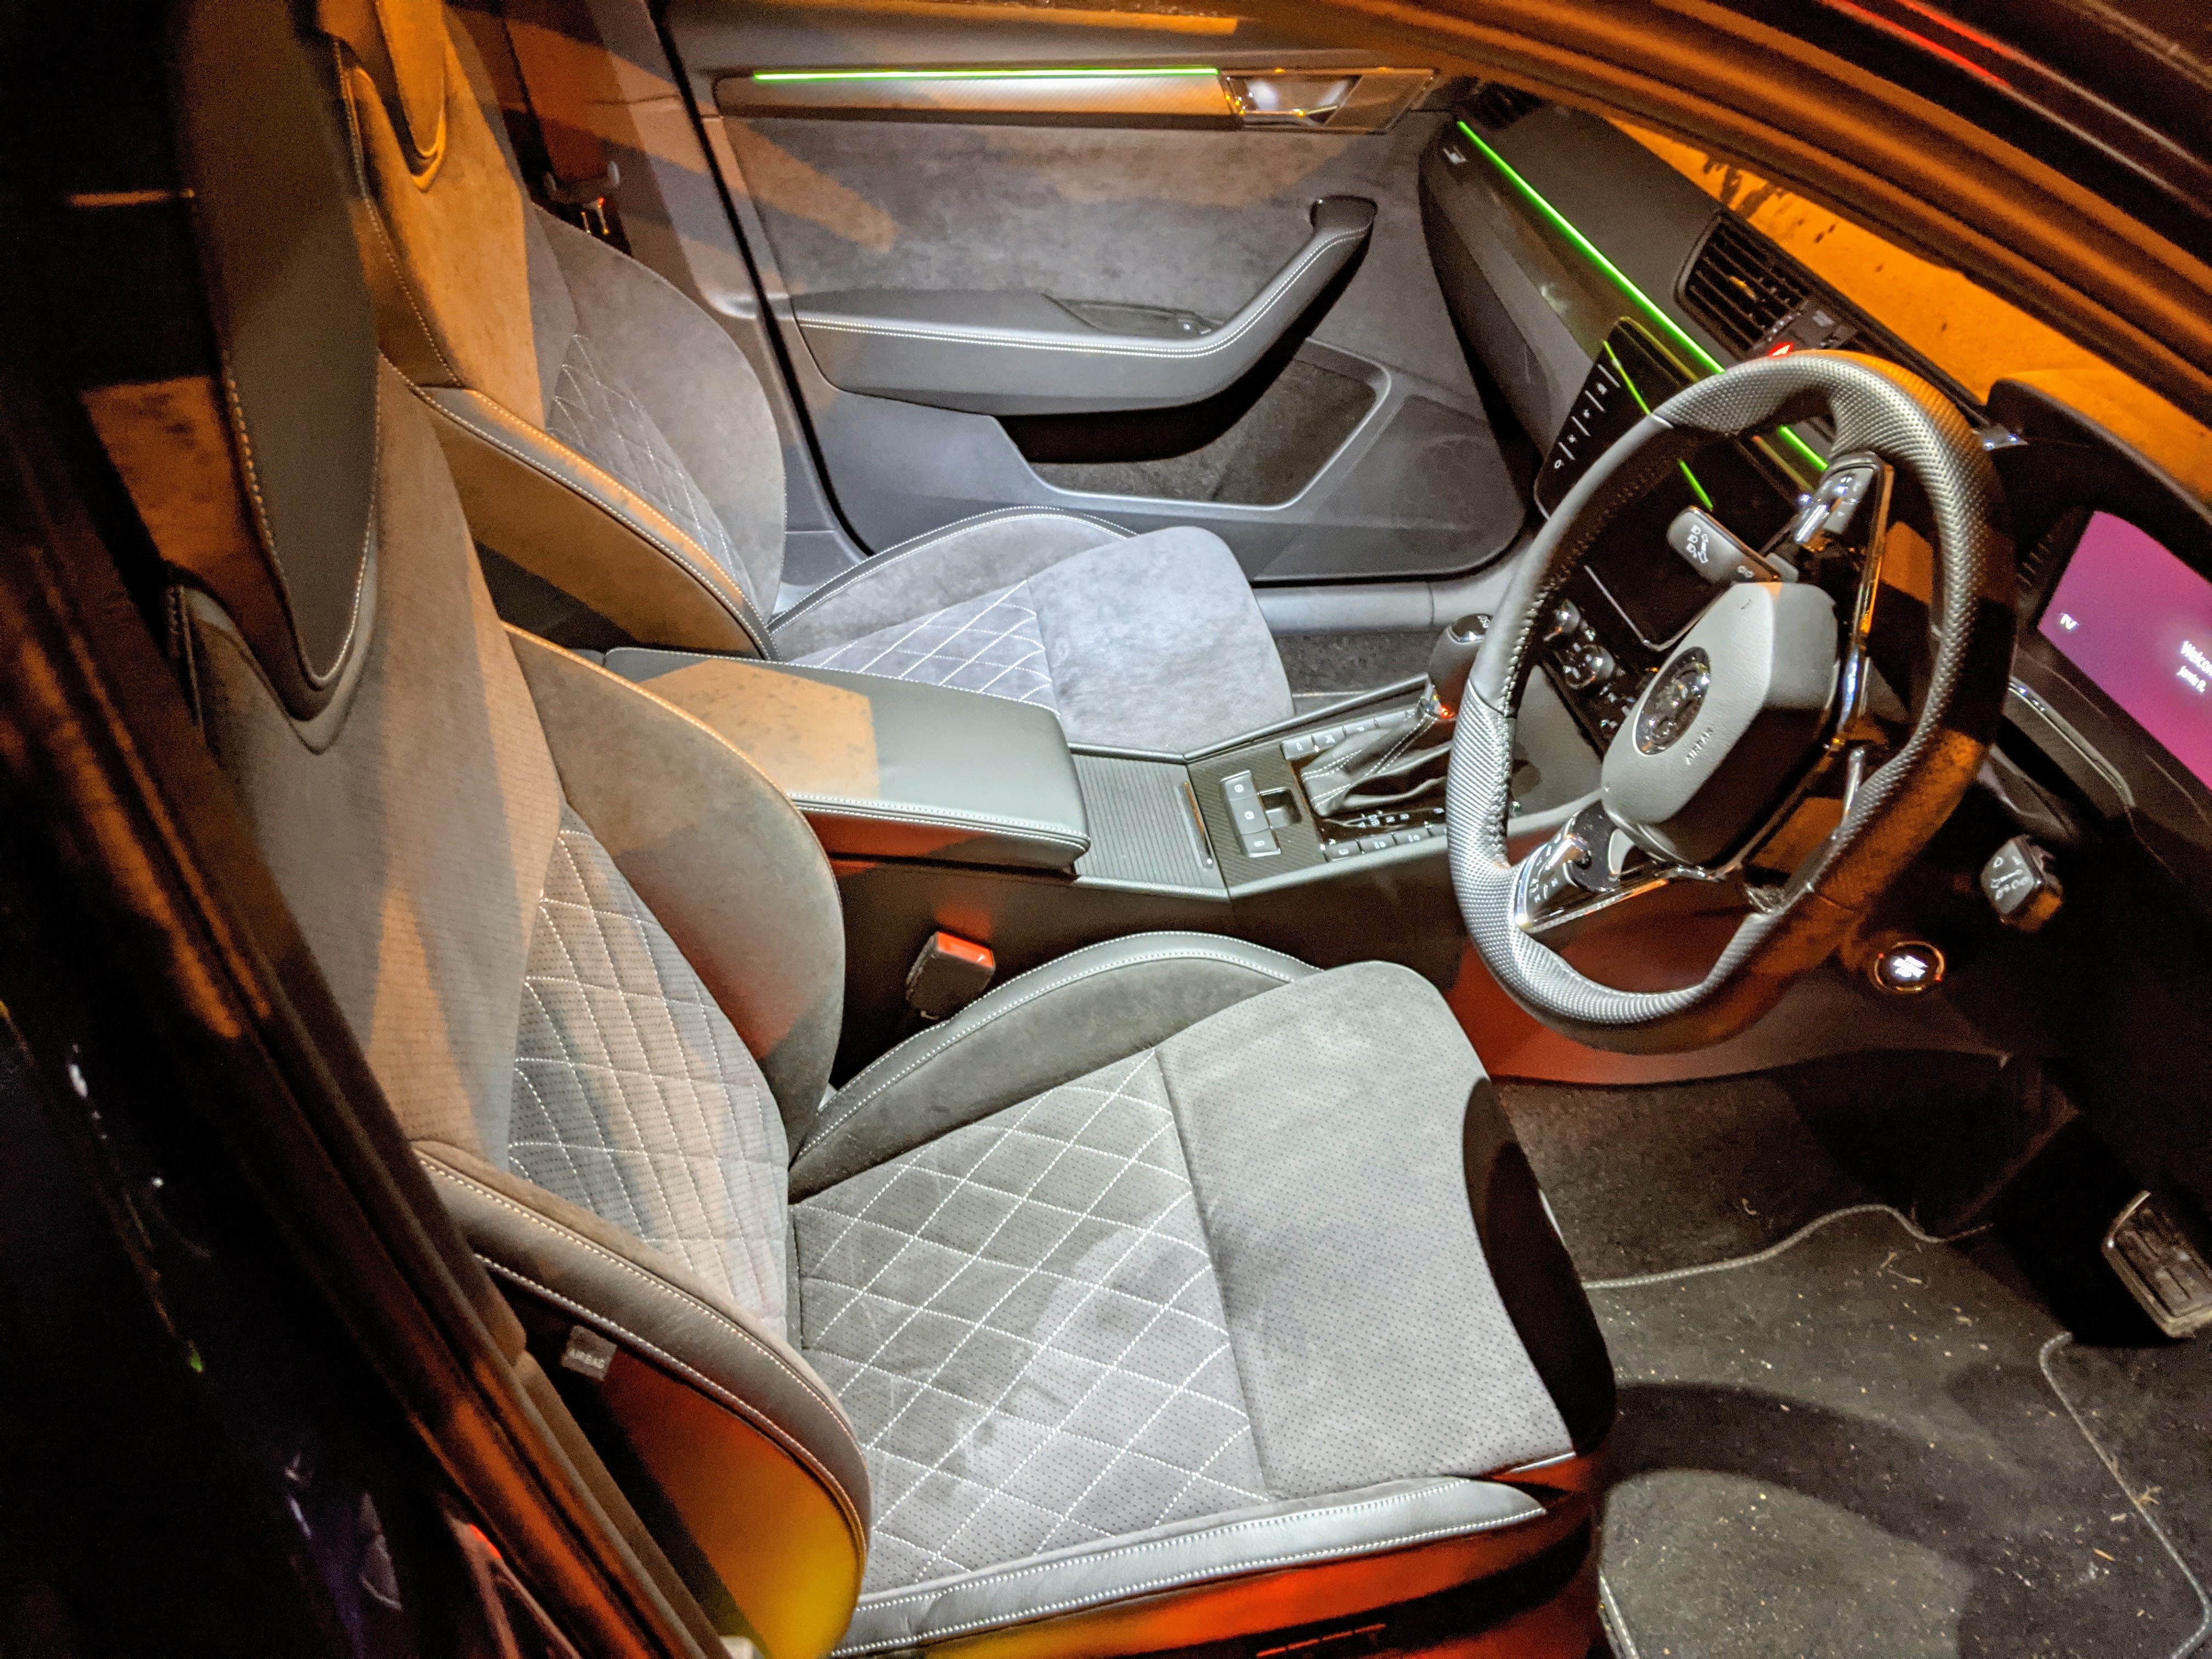
1 pointHere is interior of my MY21 sportline iv let me know if anything more specific you would like to see (Apologies needs a good vac out)
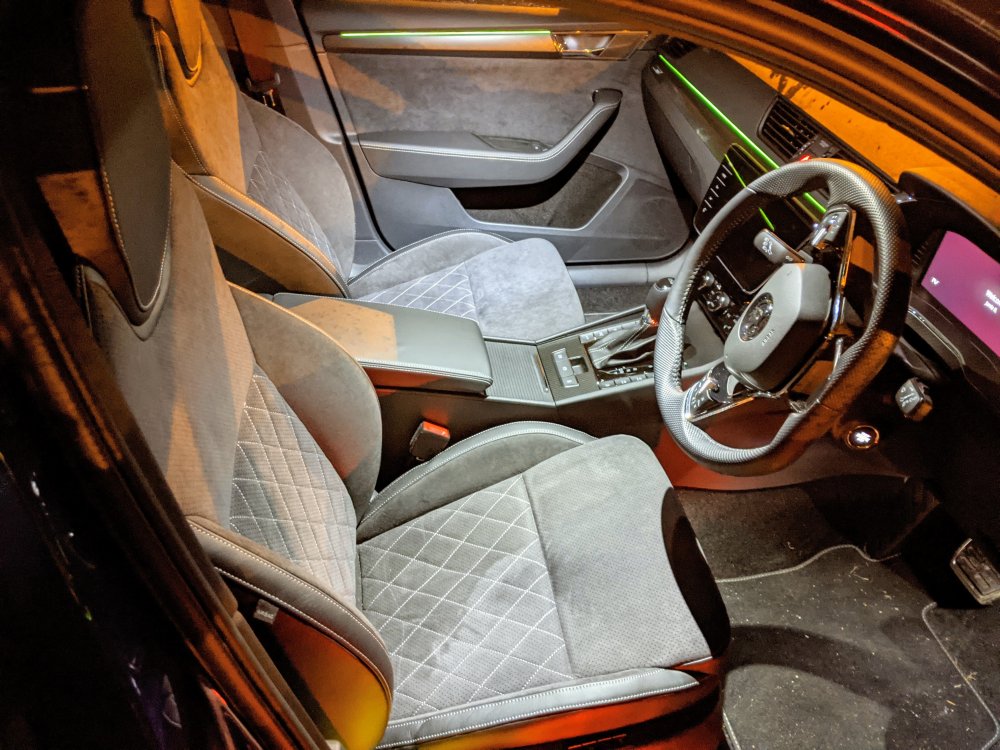
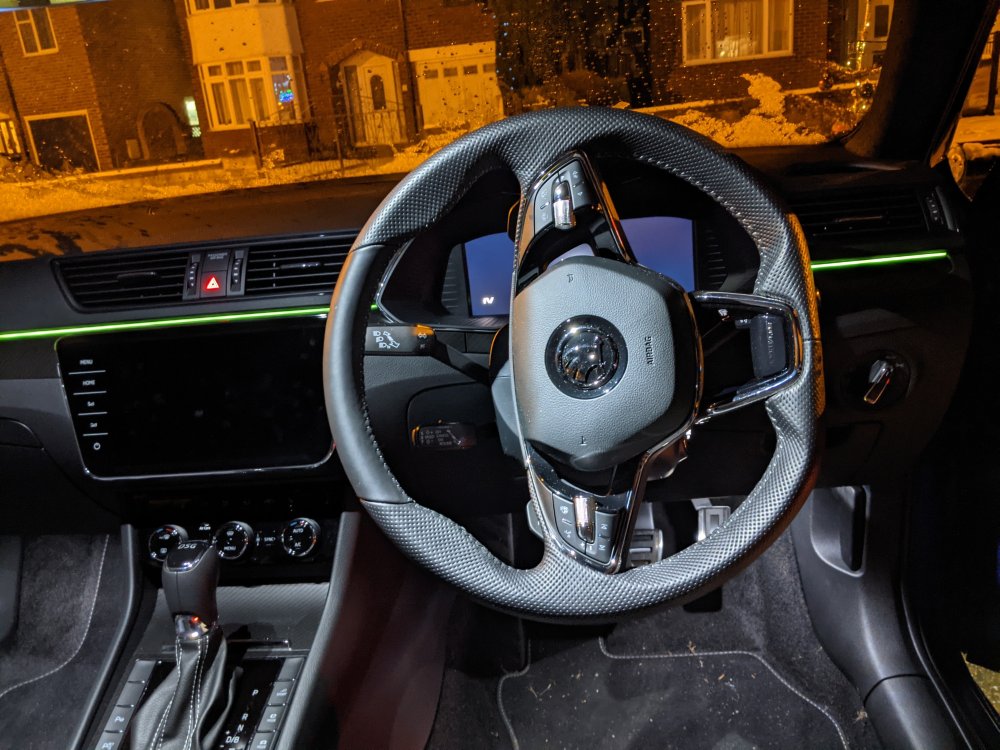 1 point
 -
1 pointI wish I could afford to get rid of mine, unfortunately got too much time left on the pcp, otherwise it would be gone like a shot. Glad you enjoyed your car.1 point
-
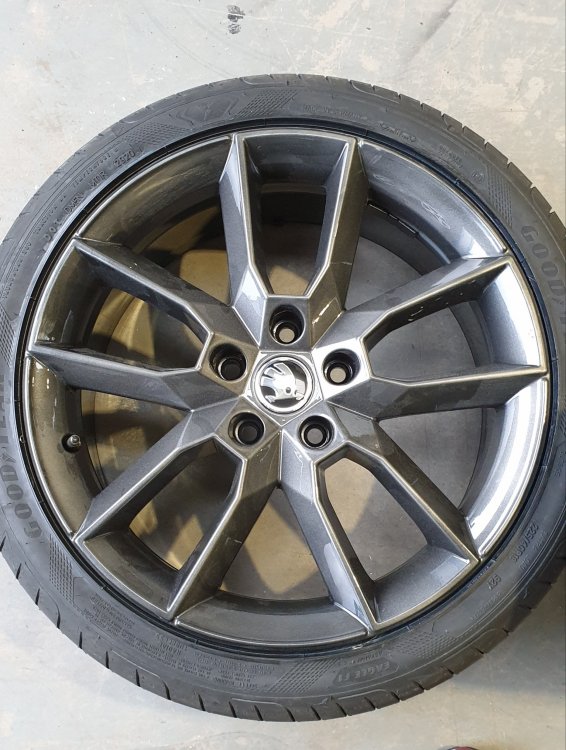
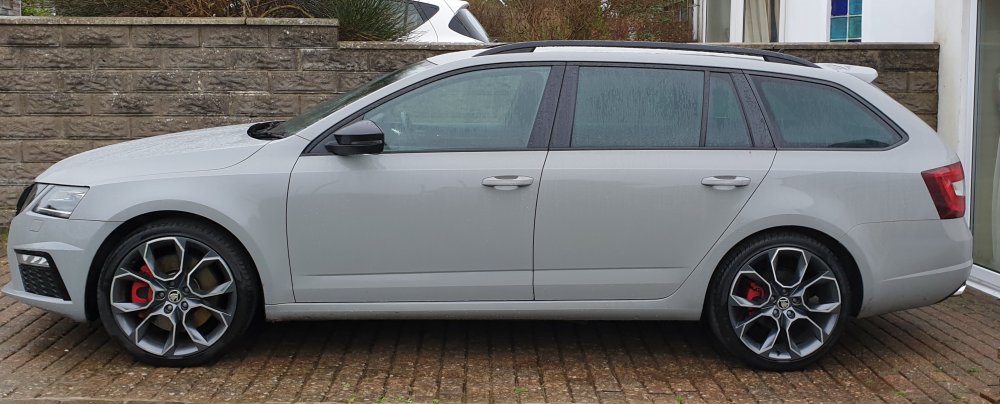
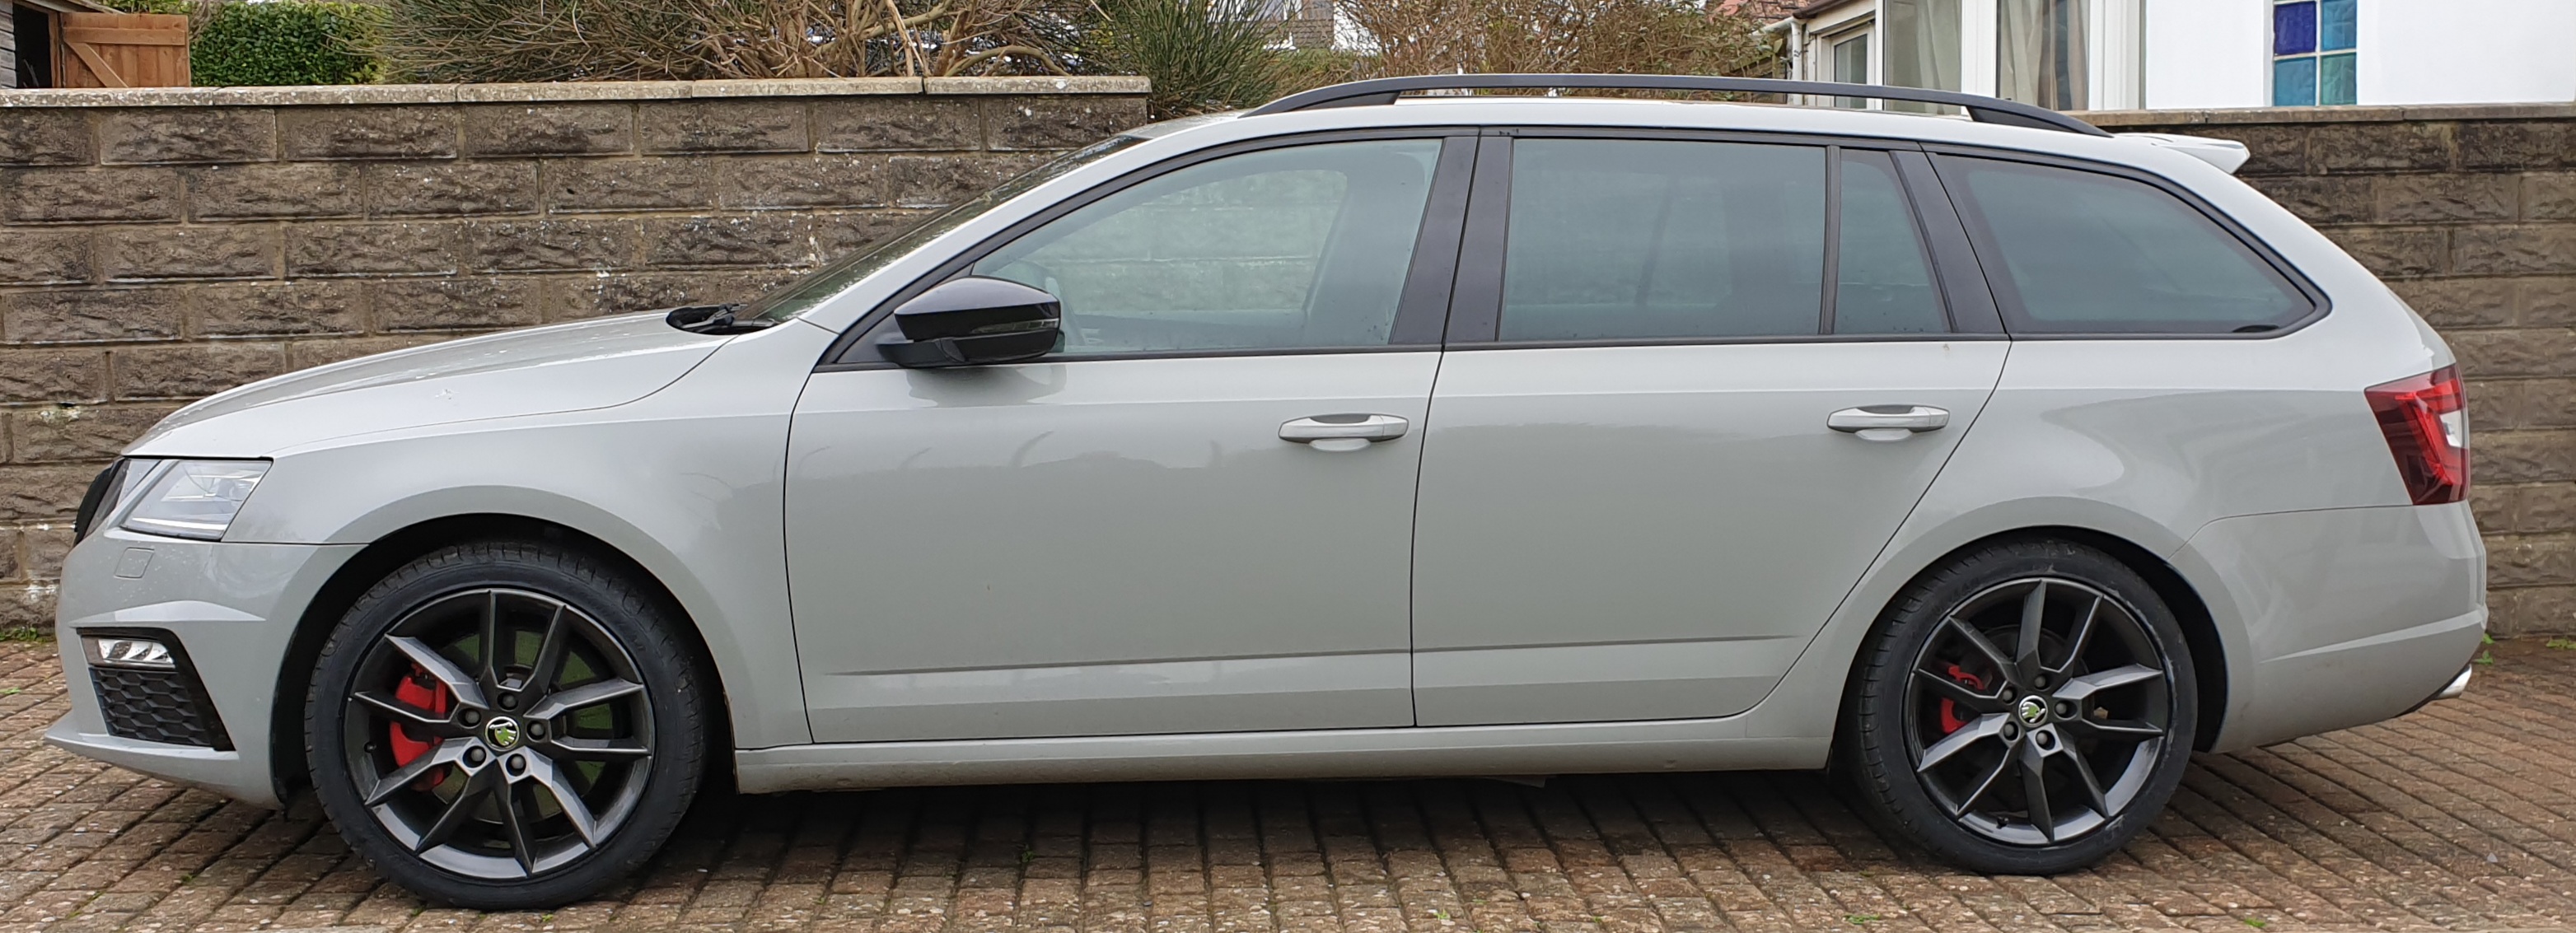
1 pointYes, was a very expensive trip home 😂 I actually picked up a set of 18" Geminis for £250 and had them refurbished in anthracite without the diamond cut edges. They were pretty rough so I'm delighted with the finish (they're a bit dirty in the pic below). I personally prefer the looks (subjective I know) and feel that the car flows with the bumpy roads more, if that makes sense? Some before and after shots below too.
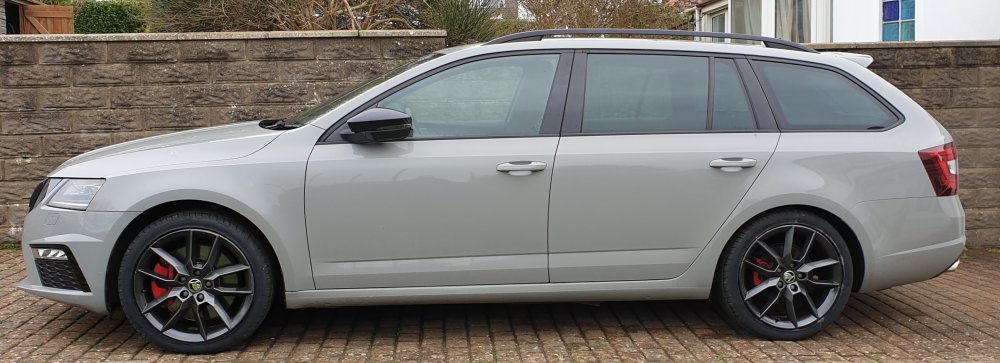
 1 point
 -
1 pointNot that I am aware of, I know that VAG-DPF is Android only as the writer only does Android, there may be something I just don't know, never having had an iPhone. To be honest a cheap secondhand android phone is less than £20 doesn't need a SIM as can be updated over WiFi and will give you a dedicated unit.1 point
-
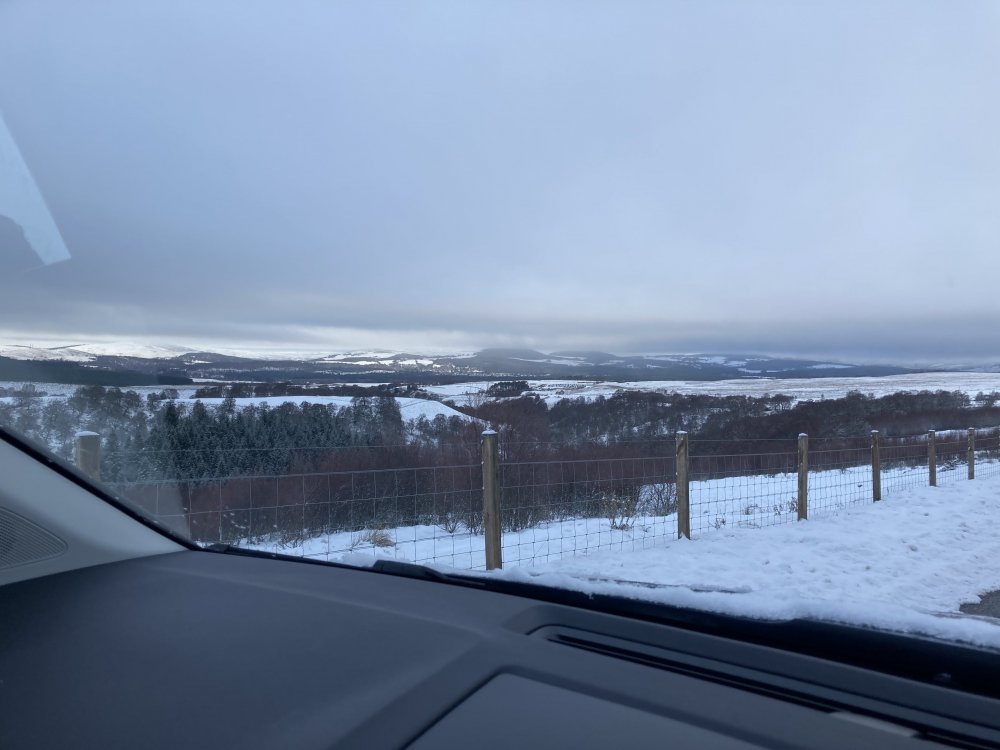
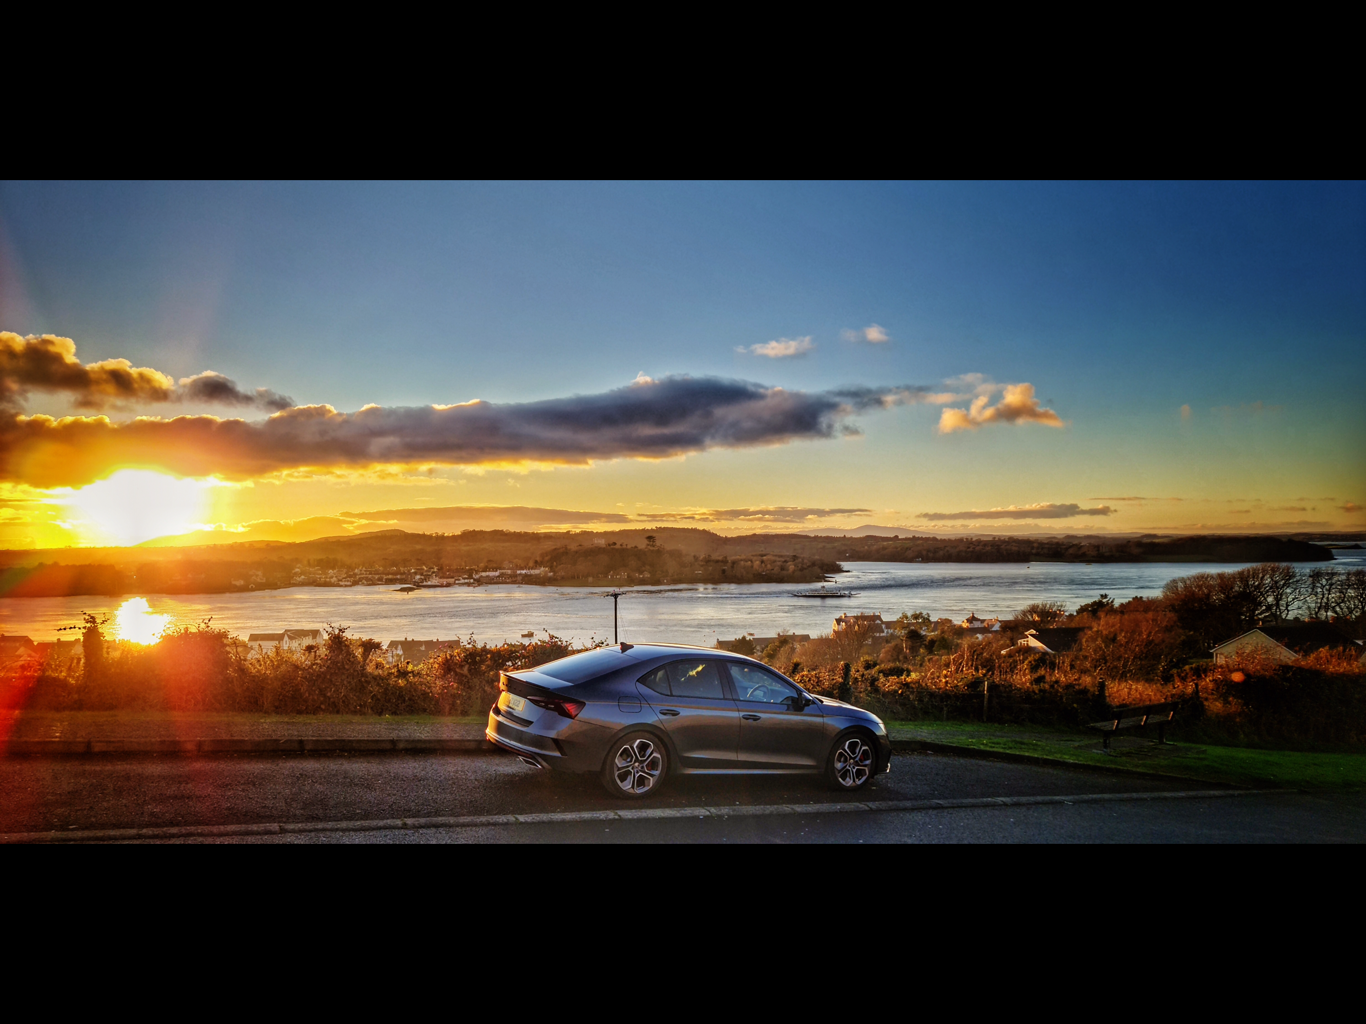
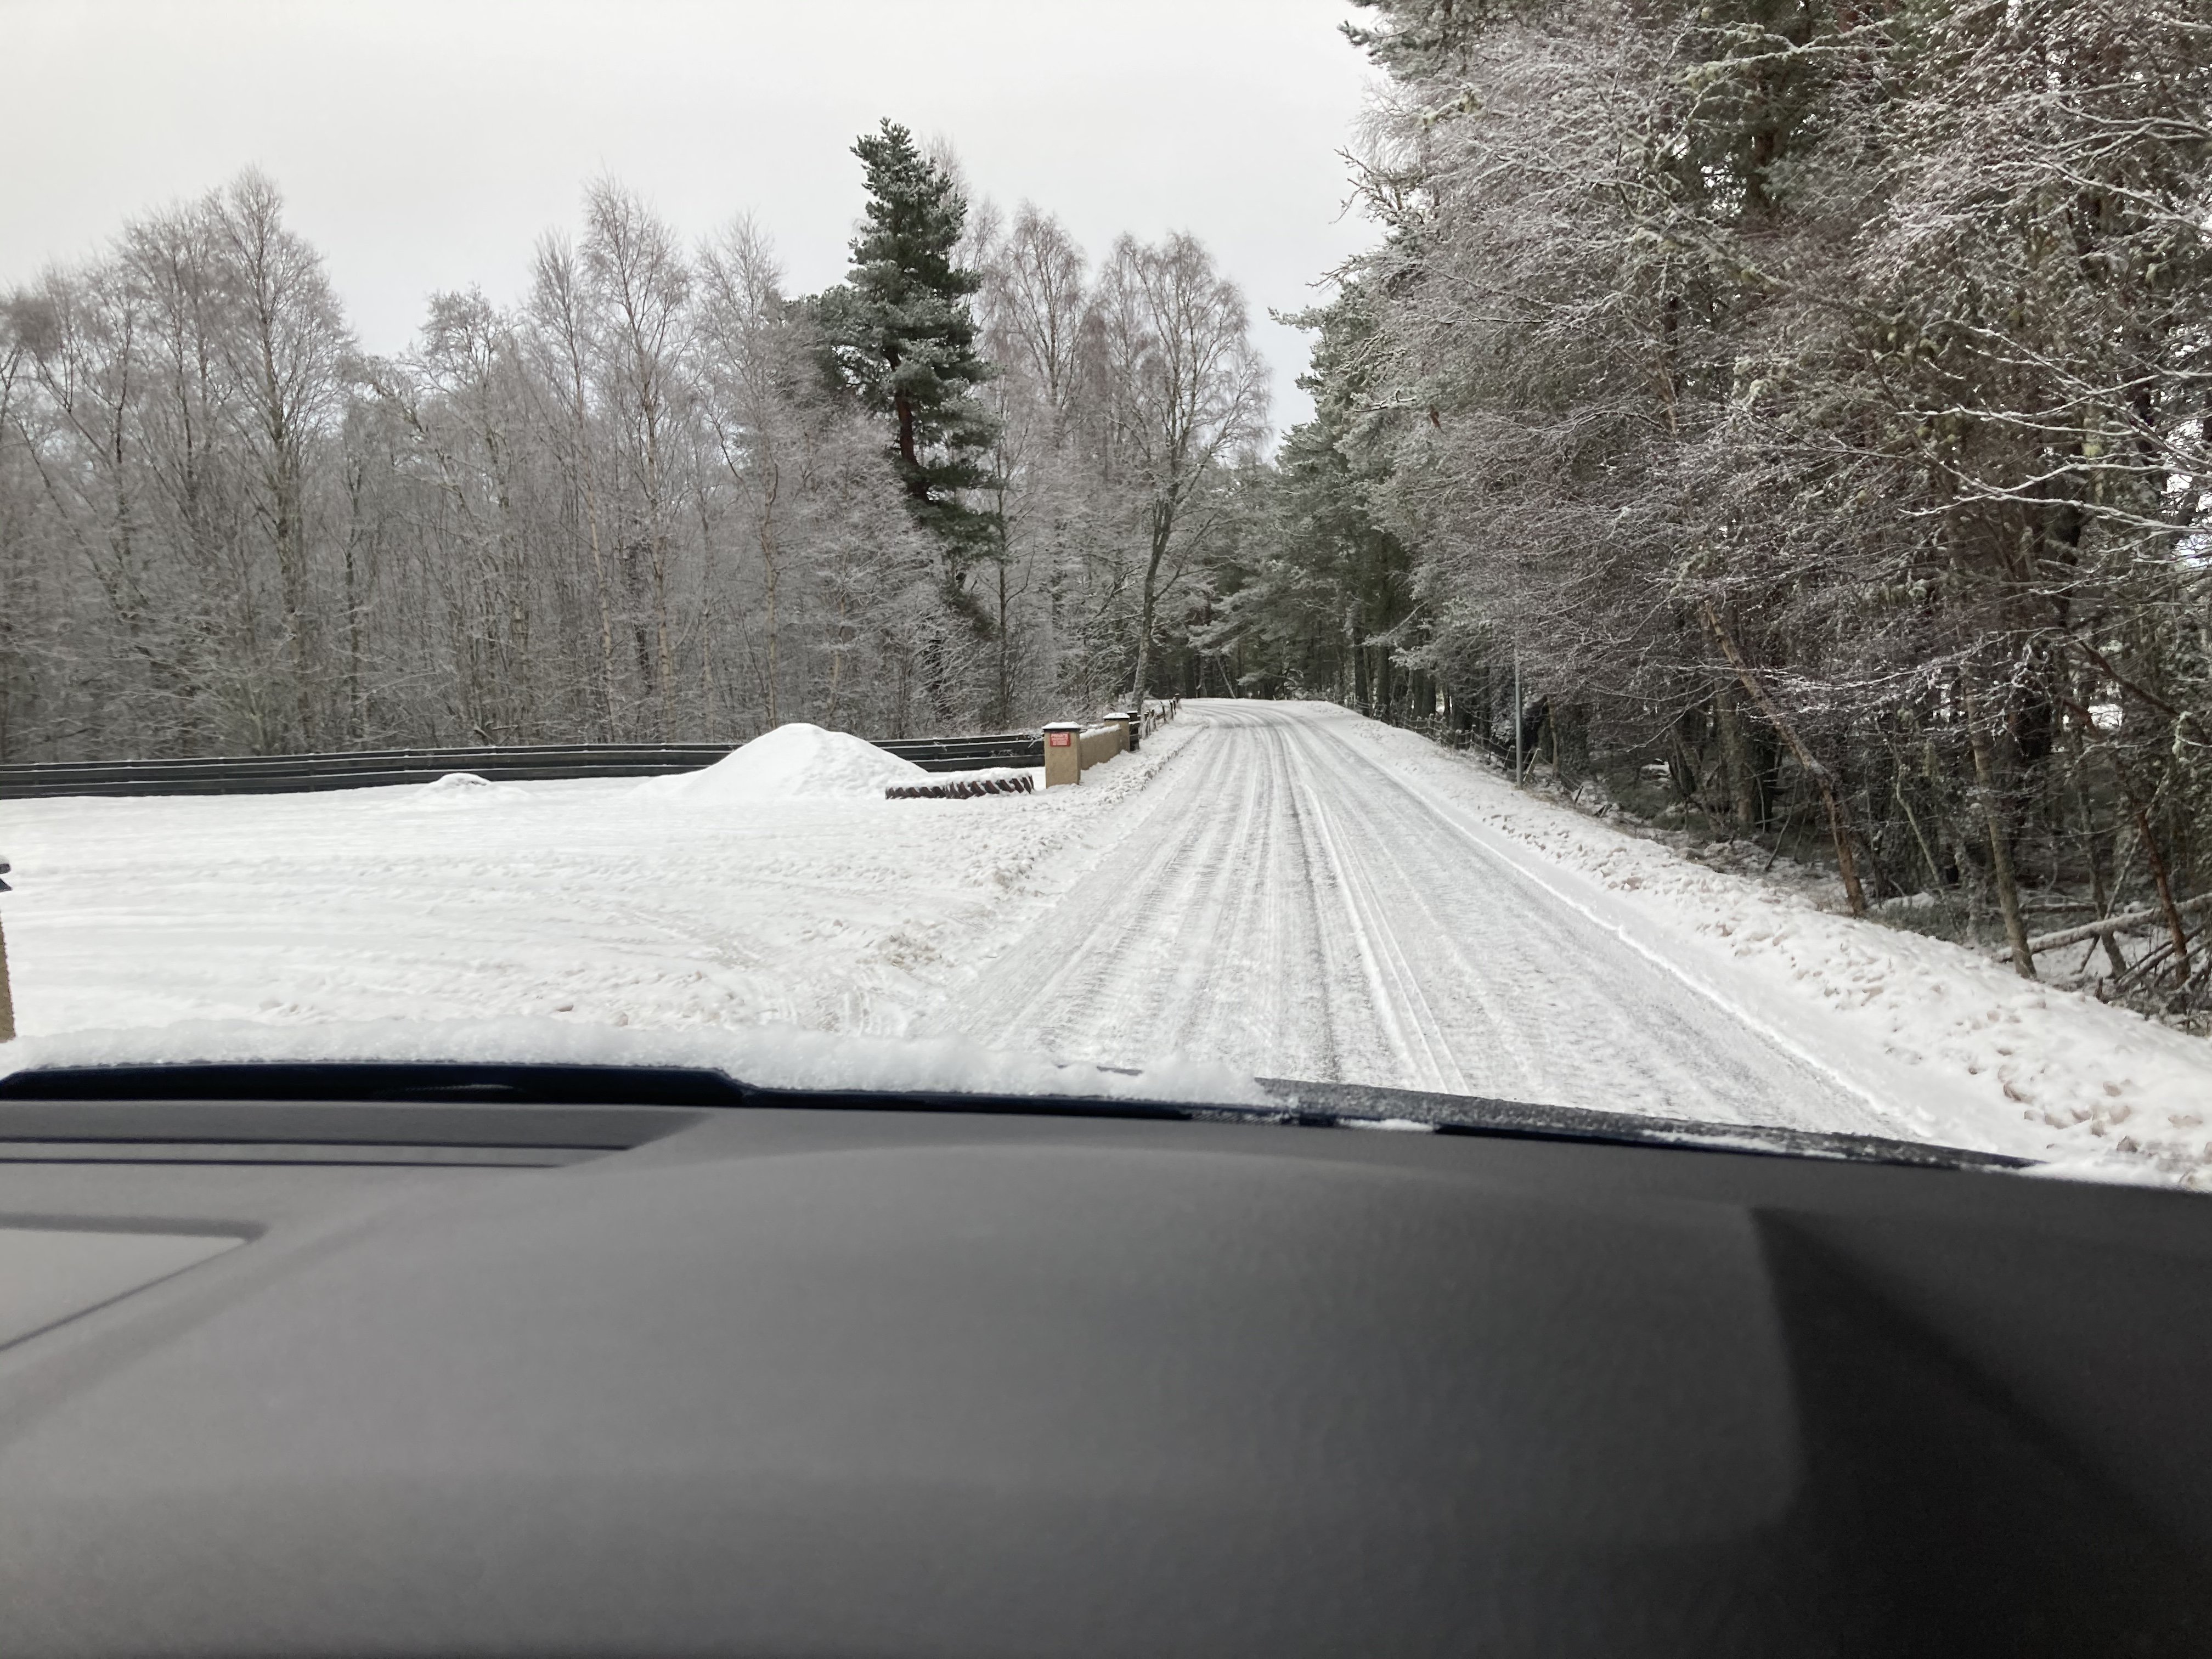
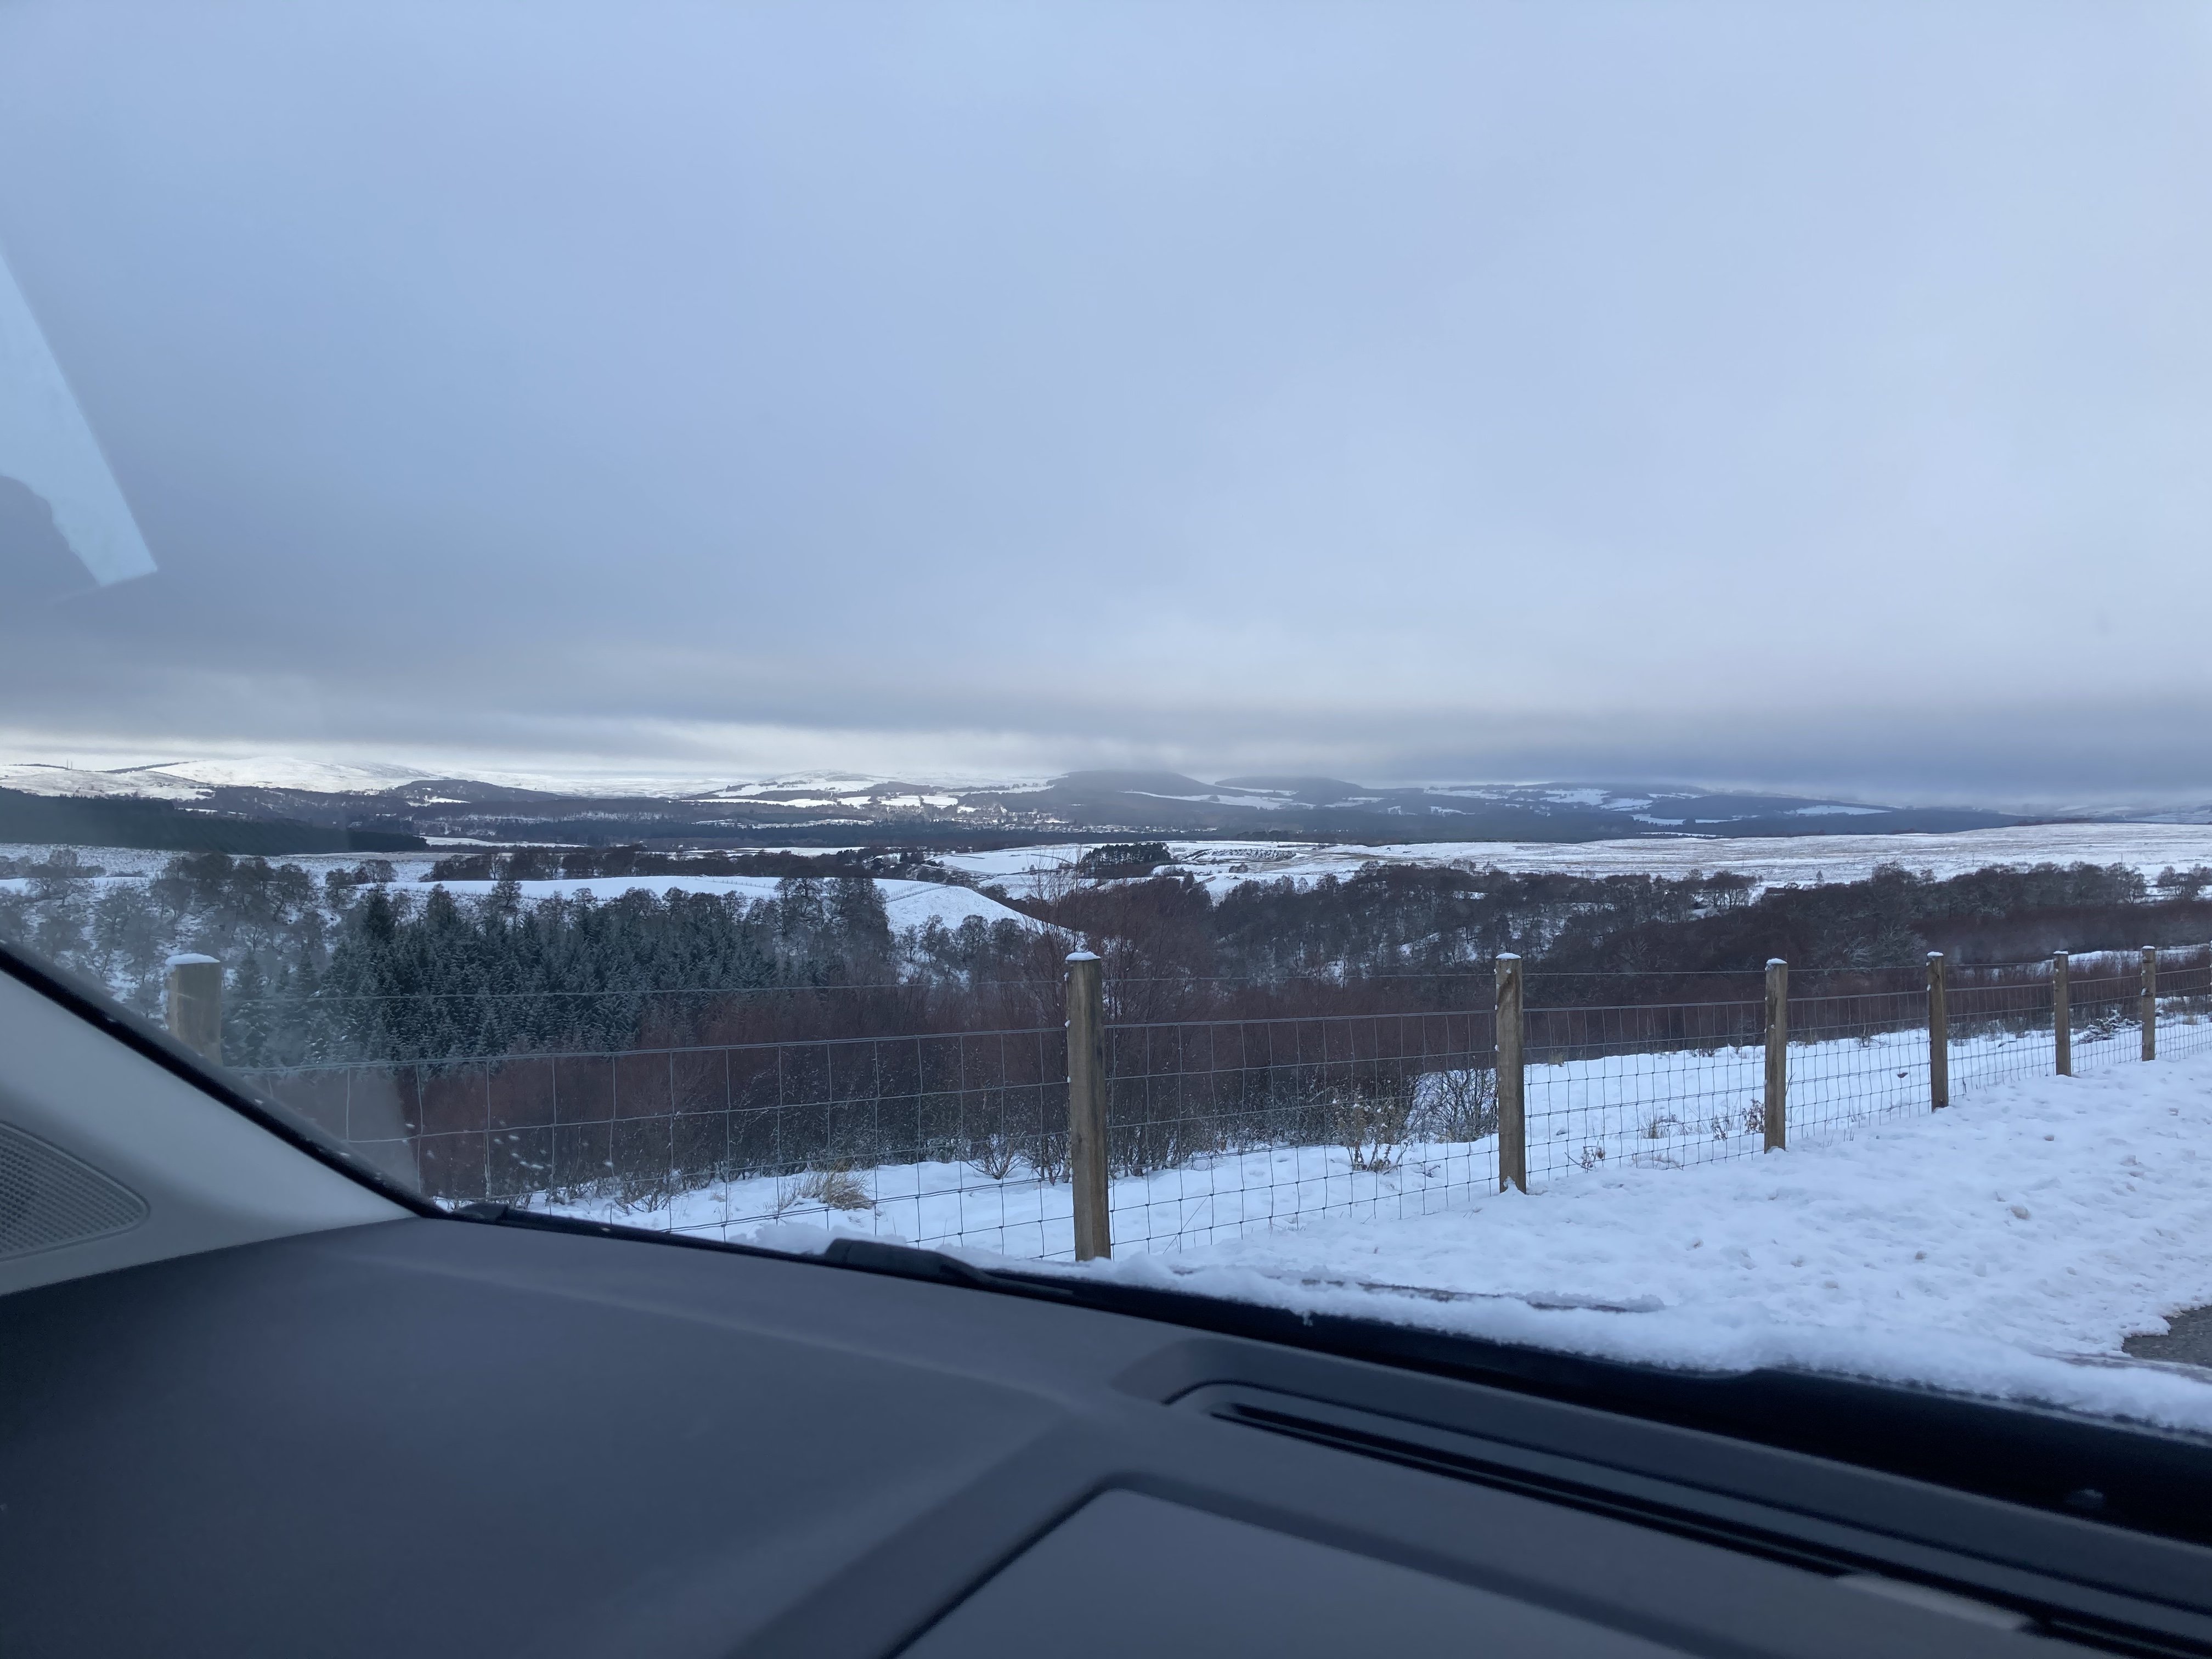
Just been out today to see what she’s like in more challenging conditions. Mostly ice, once off the gritted roads, with snow on top. This is typical. Temps just below freezing. All well, prob down to tyres rather than being 4x4, but driving and braking pretty good. Pulled into a few deeper snow areas, a forestry access and lay-by, both snow that has started to melt then refrozen so provides resistance that “normal” snow doesn’t. Even stop/starting in the deepest parts wasn’t an issue. I didn’t choose any areas where I knew there might be the slightest chance of not going out, at worst backwards, but getting going again wasn’t an issue with no sliding around or wheel spin. Even getting into my drive, which is mostly black ice (was lazy and didn’t clear the snow) with about 1” skin of soft snow was no problem at all. Gratuitous pic of Grantown on Spey area from the Tomontoul road. Oh, and again impressed how fast the front windscreen started to defrost. By the time I’d gone round and brushed the snow off the front screen was half done and slush was taken off with squeegee.
 1 point
 -
I use a AA trickle charger and don't disconnect , but clip the negative lead to the Tag above the terminal on my Karoq.1 point
-
works on my phone (must be settings on work computer)1 point
-
1 pointThanks, Tell! I just installed the VW-download "2021" and it obviously works. I also was happy that my 16 GB card was still big enough as you confirmed some days later.1 point
-
I would skip the 18 and go straight for 17 if you are looking for comfort. And cheaper rubber.1 point
-
Which ones buddy? I can see them all they do take a while to load some of them1 point
-
1 pointFew can sustain the effort. Mika Hakkinen, for instance, won 2 titles back-to-back, then his form fell off a cliff in 2000, burned out. Many drivers could potentially win races in the Mercedes and maybe the title, but to keep on doing it is something special.1 point
-
1 point205x55x16 gives a very close circumference to the VRS 225x40x18 for speedo accuracy. We have 205x55x16 winters (Conti WinterContact) on the VRS and the 16's fit over the calipers fine.1 point
-
Ok sir I will deffo do that- I can stop looking at bloody springs thanks to you!1 point
-
finally got the new discs and pads though from mtec chucked on a set of cheap ecp pagid pads for the time being while waiting for these to come and yeah they were pretty done fresh discs and pads Also darkside sent me some of the new stickers certainly been an interesting 12 months thats for sure.1 point
-
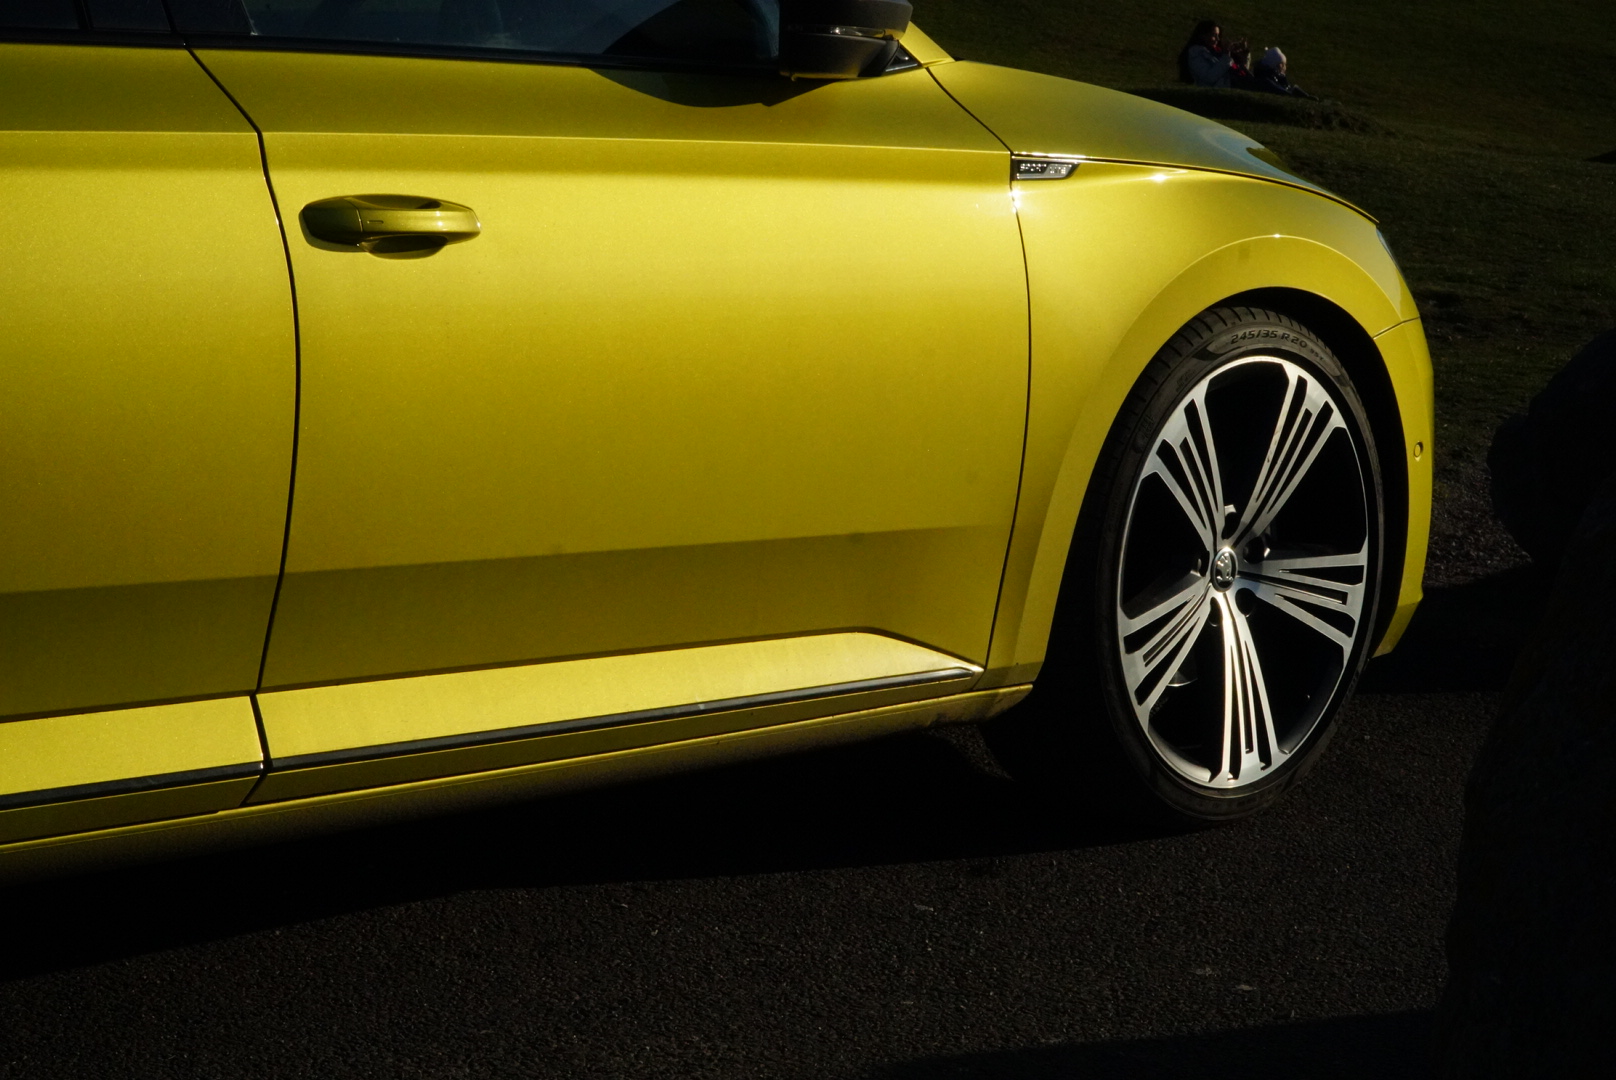
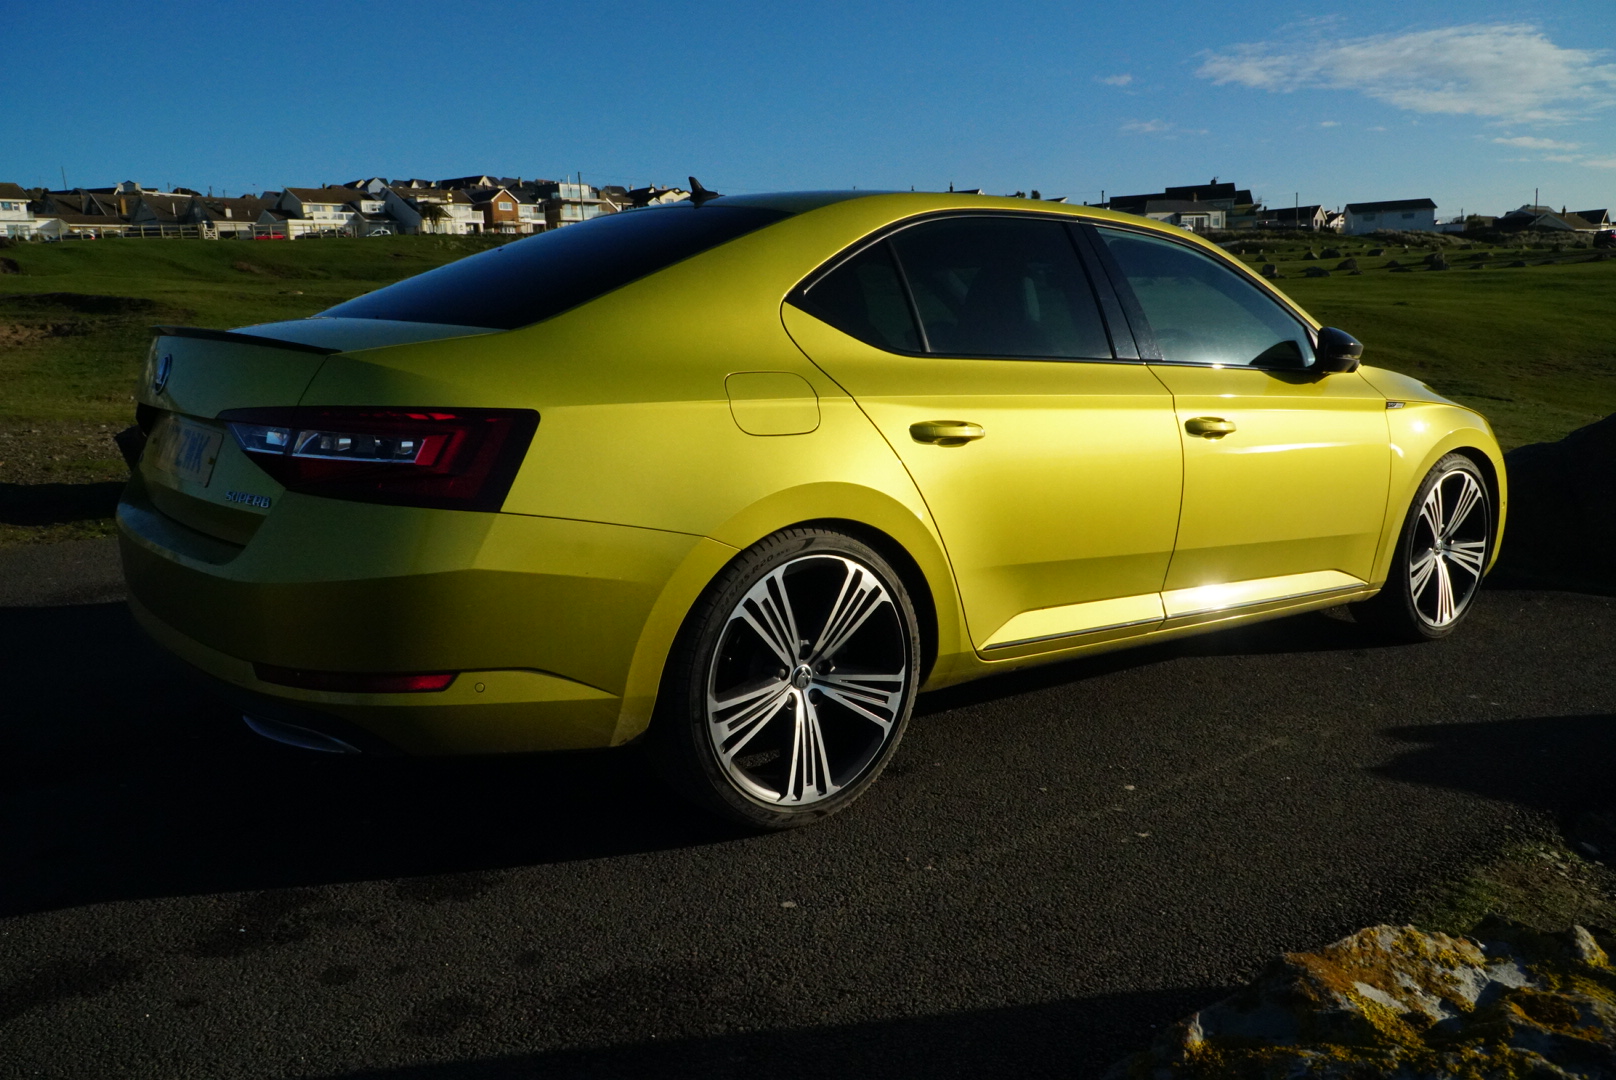
Hey all. Firstly let me start by saying i'm over the moon with the Skoda Superb. What an under rated vehicle. So i PX from a BMW 5 Series GT for a variety of reasons. But it's safe to say, what a good decision thus far. As much as a like the Vega wheels, they were just a little under sized for me. So i went for a 20 inch set and can say for sure, that the ride is no worse. The car has taken to them effortlessly. PS the dragon skin colour is fab!

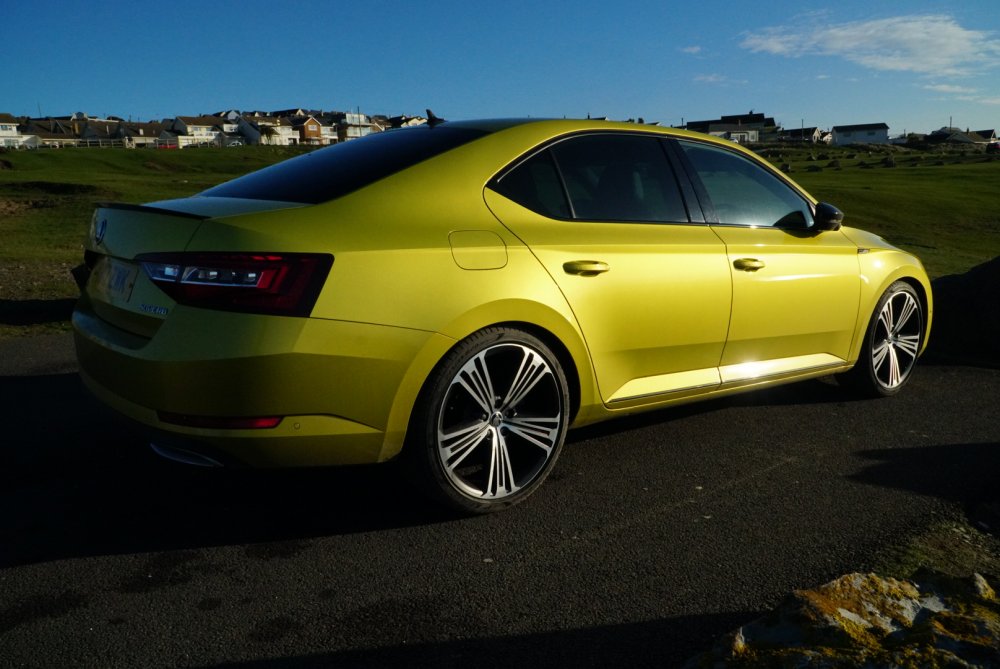
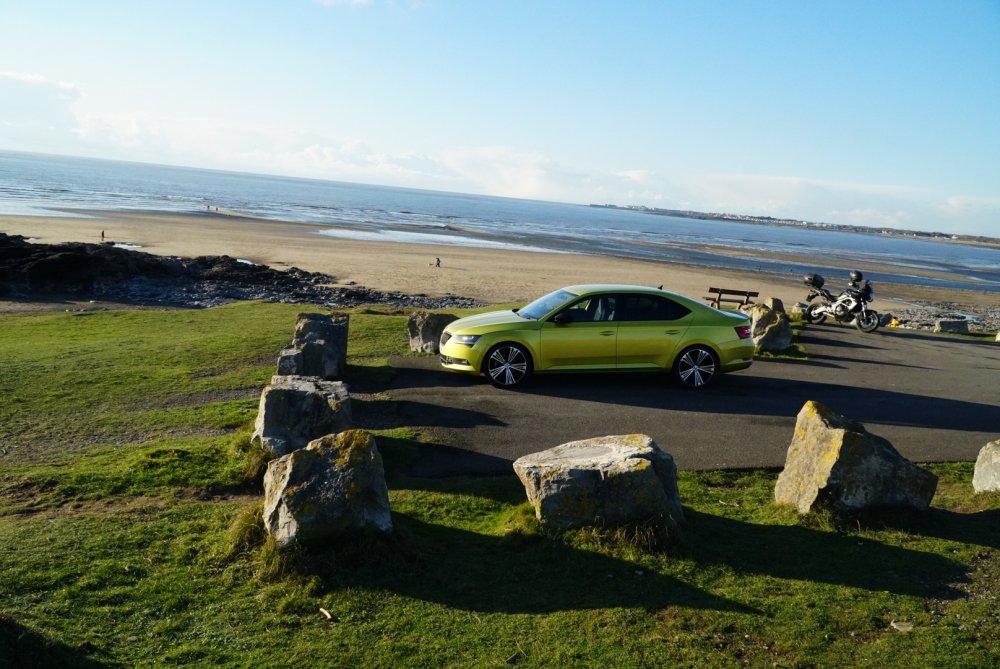 1 point
 -
Rural vehicle Porn? Behave! To get true rural atmosphere they even provided Doug, who is obviously missing from a village somewhere. That guy is more annoying than Mike Brewer, and that's a lot. But Oooh, a Unimog, Mmmm.1 point
-
I think it's time we resurrected the unofficial Unimog thread It's been Doug'd1 point
-
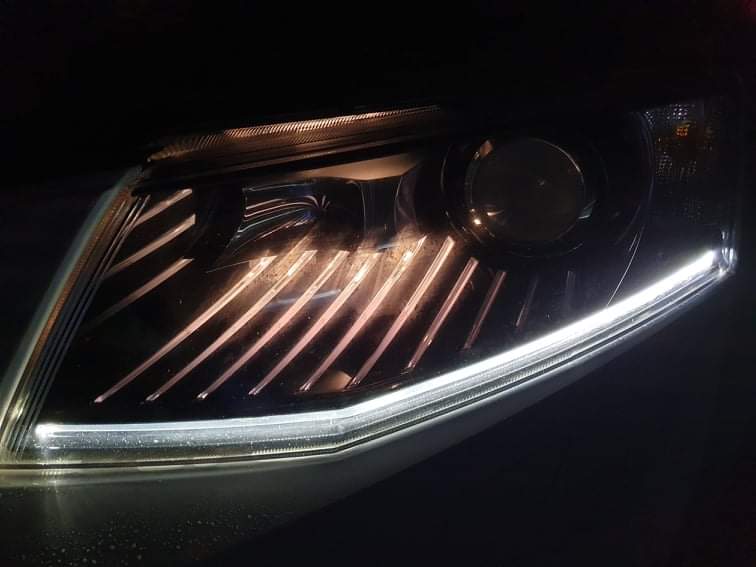
1 point1 pointAFAIK Cross Climate 2 will be even better and their price as well Currently CC+ can be bought for £135 each for 225/50/17 which is my original summer tires size on the Scout. CC2 will most likely be £150 or even £160 each.1 pointSo, exactly a week since it arrived on our driveway, I've now carried out my very first mod - led park light bulbs to enhance the eyelashes and also tie the front end together well all bulbs a similar light colour. 😁 The bulbs were actually ordered about 4 weeks ago for my other car, but between Christmas and Brexit chaos they only arrived today. 🙄 still, all that really matters is that they arrived, they also fit the Skoda, and they're canbus error free so no coding or dash warning. Yeah, it's only a tiny mod, but gotta start somewhere 😂 Before After And all tied together and matching

 1 point1 pointPersonally i would stick with the tyres sizes that are the standard OEM size for a Yeti. Maybe get 'All Terrain' tyres that are 3 peak and M&S marked rather than All Season / All Weathers or Snow tyres. Maybe see what your local tyre centre can supply. ATS Euromaster Elgin. or the others, or the places in Forres. Plenty choice of fitters. They are fitting others 'All terrain' tyres in your area, farmers / estates and others that will use their SUV's / Cross overs the same as you will. I have Michelin CrossClimate SUV's on my Shogun, nice strong sidewalls. (I am not going offroad other than on tracks, so 265 wide & 18" rims, and that is narrower than the standard 285 wide tyres) I would not recommend CrossClimate + for your needs and in the size you will be fitting, rather go for 'All Terrain' tyres. I would ignore the labels and the fuel economy figures if traction is important when the roads / tracks are not lovely and dry. They are going on a Yeti after all and they are not streamline. If you really want road use economy in good weather put more air in the tyres to an ECO pressure.1 point1 pointThe calculation on range left it based on your last few miles of driving and how that is economic or not. I would really never be going lower than 50 miles range showing before putting fuel in, and never trying to carry on with it showing 0. I hope you have a spare fuel can and filler carried with you.1 point1 pointGenerally Seat lags behind Skoda but this time round they got their act together. Skoda slipped a release back from last time round as I recall which meant they could offer something new which was old when VW didn't make the June release. Possibly the Skoda November release was going to be the June VW release but since it didn't happen in June, didn't happen for Skoda in November. All the same standard releases between brands. Skoda has a good library of back releases which has its uses, so not all doom and gloom. I'm not too sure how interchangeable the mib3 releases will be between brands. Needs someone to try it who has a mib3 and can find the import menu and takes a file off the VW server and report back.1 point1 point@shyVRS245Plug in hybrids are just a temp thing for kidology about being green and people travelling around in still big heavy and in many cases still liquid fueled cars with few people in them. They are among the ICE vehicles to be banned from sale new eventually.1 point


.thumb.png.26e4ef1cd991d7943ece4e7bf5baf72f.png)


Important Information
Welcome to BRISKODA. Please note the following important links Terms of Use. We have a comprehensive Privacy Policy. We have placed cookies on your device to help make this website better. You can adjust your cookie settings, otherwise we'll assume you're okay to continue.