Leaderboard
-
.jpg.1006585dfe4e2977315b67c3d642e37b.jpg)
Guest_
FREEDOM19Points83,824Posts -

Lee01
FREEDOM15Points36,174Posts -
Warrior193
FREEDOM4Points6,281Posts -

lol-lol
FREEDOM4Points15,587Posts

.thumb.jpg.9dd3f612ba7f13d10be5c518d3c8d255.jpg)


Popular Content
Showing content with the highest reputation on 22/05/24 in all areas
-
Welcome. An early vRS so tell more. How many miles has it done,? Is it still with the engine it left the factory with? Is it all good service wise. Good spark plugs, clean air filter, running E5 super unleaded? Brakes serviced, tyre pressures correct? How long have you had the car? Is it maybe the DSG that is the issue? What about in S, does it get any more of a move on, or if you drop a gear or 2 in manual mode? How high are you going. Like up the Cairn o mount or Lecht in Scotland or just a road in England,?3 points
-
2 pointsSo take one off a road corner and see it it fits in the spare wheel well.2 points
-
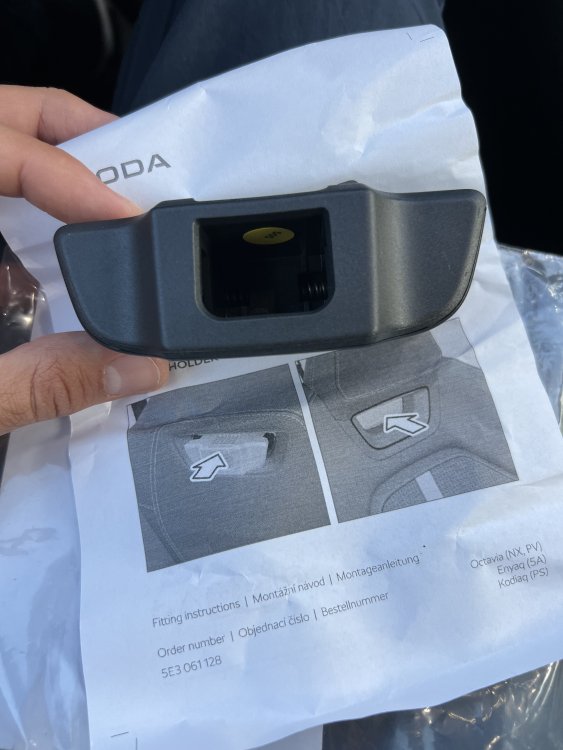
2 pointsThe adapter has arrived and fits perfectly into the seat. Finally, the search has come to an end.

 2 points
 -
1 pointPlaced an order for a Kamiq Monte Carlo and was quoted 20 weeks, just wondering if anyone has ordered and have build/ delivery dates, or indeed received their new Kamiq lately, just to gauge if 20 weeks is realistic or if it’s likely to be longer.1 point
-
That to me indicates either a damaged wire or unplugged connector. or the camera has completely failed. first thing I’d be doing is checking the connectors are all in: back of the camera in front grill left side chassis leg connector left side lower a pillar in car control unit under right seat if all of these are okay then next would be continuity tests for the wiring, which need very small pins and go as follows pin 1 to pin 4 pin 4 to pin 1 pin 2 to pin 3 pin 3 to pin 2 and these are pin outs at the camera connector and at the control unit connector.1 point
-
1 pointNo, mine were from a different company. Just ask him to check the hose position before he fits it. I fitted others in the past and never had any trouble.1 point
-
1 point
-
1 pointI have done that today and they have agreed to refund me. I am looking to leave the caliper on now though, as it appears okay. It's just a pain when wanted to replace the pads etc.1 point
-
1 point
-
Something is wrong because a healthy twincharger can blast up Hardknott pass. Even cocking a rear wheel. EDIT. http://www.topgear.com/car-news/fabia-vrs-extreme-drive Do not Punch the TC, hold it a few seconds. http://youtube.com/watch?v=GOz6UsJO9mY Maybe worth a watch. He has errors. No Front Fog Lights.1 point
-
1 point
-
1 pointI always keep a bottle of 'Sticky Stuff Remover' in the house. It comes in handy for hundreds of jobs like this. You can buy it from B&Q, The Range, Amazon, etc. Sticky Stuff Remover1 point
-
I'm wondering if your terminology is correct - you say the vehicle 'becomes sluggish when going uphill because the DSG shifts down too quickly" - Do you really mean that the DSG does not shift-down quickly enough?1 point
-
What did you do in the way of servicing. Is it a clean air filter, a standard one. When were the plugs changed? Is it super unleaded you use? When did you get the car and has it been like this since you got it. Good that the DSG ignores you if you go for to high a gear, but normally it will go to low heads and get the turbo and supercharger working. Together. Do you know how the engine does work and at what RPM. Is the car standard. No tuning box fitted or remapped?1 point
-
Elaborated one: The 2010 Skoda Fabia VRS Automatic becomes sluggish when going uphill because the gears shift down too quickly, which slows the vehicle during the climb. Additionally, if I switch to manual mode and then drive, the gears automatically revert to automatic mode, which causes even more sluggishness. The car has covered almost 74,000 miles. I have serviced the car, and there have been no warnings except for some tyre pressure issues. I faced this while driving through the Peak District.1 point
-
PHEV 1.4tsi is a totally different kettle of fish. A DQ400-e 6 speed DSG. Regeneration , hybrid mode, EV mode. Apples and pears!1 point
-
1 pointDoes one of the radiator fans come on when the a/c is switched on? (even on a cold engine)1 point
-
You can find the full TPI by signing up for an hours access to erwin: https://erwin.skoda-auto.cz/erwin/showHome.do That will probably tell you any extra steps required along with any symptoms you may experience due to the fault. A bad flash might mean your engine won't start. You may also need a dataset or immobiliser work afterwards. The latter will require genuine licenced ODIS install with online access. The last paragraph from the drive2 page states if the error remains after updating, the cluster should be replaced. Based on that alone, I would very much suggest getting a dealer to do this for you. Given it's a known issue it should be free and they can be responsible for a replacement cluster if needed...1 point
-
1 pointFirst try re-calibrate the flaps as per the video in this thread1 point
-
Overthinking it IMO. Just use the car. The DSG will last as long as it lasts. Millions of DSG,s are driven in many ways by many people. Maybe just do not leave a DQ381 to 80,000 miles before an oil change and if you ever notice an issue with it do not delay in having it checked out. PS With DQ200,s & DQ250,s in slower traffic putting them in S has usually been the thing to do to stop them hunting between 1st and 2nd. It was / is most annoying with a 7 speed twin dry clutch as 1st is so low, compared to a 6 speed. (So a bit more like a 7 speed DQ381.)1 point
-
Are you connecting with a cable? If so it is important that the cable is from a reputable manufacturer. I've has issues connecting my phone twice now, and in both ases it was a cheap cable causing the issue.1 point
-
Hello, multiple fault reports such as you have posted seem to be common with battery issues - have you tested battery while cranking the engine? Another possibility reported on some other postings is crankshaft position sensor fault.1 point
-
I will be honest we haven't ccs charged in months since we purchased the car last year as we charge at home. From memory I think it would CCS charge anywhere around 37 to 50 kw. But would need to get my wife to run it low and go to the local ccs charging point to check1 point
-
Check your oil temperature on arrival at each journey end, if that's something that can be displayed. My commute is similar and it never really quite gets to full operating temperature (coolant or oil), especially in winter. Coolant gauge might show normal temp achieved, but VCDS says different.1 point
-
I had this happen to me in a pub car park reversing into a spot where the grass verge behind went up hill quite sharply. Frightening at the time but the car is simply doing what it should and preventing you reversing into something you shouldn't. I would leave it switched on if I were you. A good safety feature.1 point
-
1 pointCan you not slacken the bolt and push in the sliding sleeve to disengage from it to remove the caliper? From the photo I am fairly sure that I have worked on them and thats what I do if there is an obstruction. Granted if the new pads come with new bolts and you want to use them.................................................1 point
-
Took the car out for a drive last night and unfortunately the cruise control stalk is still being a bit funny. Had an orange light when coming on, then when turned off and on again, nothing. Suspect the replacement stalks might be dodgy now, so will put the original back on to try and ascertain if that's a reason. Probably not today though with the weather. Car appears to be fine, the Bilstein's aren't super firm, less squidgy than before but can't tell as we're comparing relatively knackered OEM dampers. Front wipers are really smudging the windscreen, could be due a replacement, but could the fact that the car has been laid up for a couple months and all sorts of rust proofing overspray and whatever is probably on the windscreen, so need to give it (and the entire in general) a proper exterior clean. Looks like the front headlight washer totally misses and shoots straight up, which is sorta amusing. Maintenance: £2317.23 Upgrades: £1414.46 Miscellaneous: £697.201 point
-
1 pointThe thing is as with cars of not for you just do not do it. There is years yet for the transition and stuff happens. The point is stuff is happening now with people and millions had been thrown to some people by this government in the UK already.. There will be new transport hubs, low carbon transport hubs. Hydrogen filling stations for trucks and 350 kW chargers for ultra rapid and chargers for off peak charging. BHS no more and House of Frasers owned by the man who can with a Son in Law running the Business that owns so many household names that were in trouble and snapped up cheaply. People do know the transportation business and importation and household deliveries. The days of the clubbie were great and now there is home deliveries for anything any time anywhere. Qué sera Sera. The futures bright the futures not owned by Britain.1 point
-
1 pointi tested 1.5 TSI Superb L&K before i bought my current Superb 280 and while i can say there are definitely some improvements, but also lot of step backwards, which i personally really dont understand. one big improvement are seats, which are really nice and more comfortable for sure. also infotainment seems much smoother and improved, no hickups. i think there will be less rattle potencial in superb4 interior otherwise my personal downsides comparing to my Superb 2023 sportline : - armrest is not adjustable, which is pretty big deal if you dont have right arm length and body size. - whole dash grill was super dusty even after few days, it's hell to clean it up. it doesnt remotely look as good as on first renders. - virtual cockpit looks cheap even comparing to not so great virtual cockpit in Superb3. - dash tablet was enormous sticking out and i would almost prefer smaller cheaper size. - interactive dials seems very nice to touch and look, but in reality, i don't find them very ergonomic, keep pressing and switching between modes, I miss quick access to important features through specialized buttons. - whole interior was big letdown for me because it looked so nice on first renders, fake wood pattern looked especially bad. - subjectivelly i really dont like the exterior, like AT ALL, especially combi, but thats just personal taste. - i was hoping for big improvements in road noise / wind noise department as one of my biggest complains in previous generation, but i don't find any major ones, wind noise was slightly better, road noise was better comparing to my superb3 on 19 inch bridgestone tires, but superb4 had 18 inch wheels with goodyear performance grip 2, which are quieter. - 1.5 TSI in Superb4 was quiter and more refined, but it definitely felt slower than my previous Superb 1.4 TSI 150. - Laura is still unsuable TLDR: I was personally disappointed - for one improvement, there are three downgrades, so ended up with another Superb3. Really recommend doing proper long test drive before anyone buying this car.1 point
-
1 pointI remember having communication issues with CU03 when I changed brake pads as well, but I would say that the root cause of the issue is not the same, no popping noise from fuse box in my case. After several tries, the combination that was satisfactory to communicate any time with control unit was: - Bonnet opened and battery charger connected. - Driver door opened. - Infotainment turned on. Good luck!1 point
-
https://allstarcard.co.uk/resources/ev-insights/allstar-charge-place-scotland-network CPS have now turned on roaming with Allstar. Hopefully Electroverse next 🤞1 point
-
1 pointCrikey! I'm all in favour of strong passwords, TFA, etc but that seems a bit OTT to change a set of disk pads. Guessing it must be to do with the overall capability of ODIS type systems.1 point
-
1 pointah the Victors (maybe I'm biased as I worked on them but I think they were the best looking of the V Bombers) were painted all white at some early stage Also I think the last RAF aircraft with a bomb aimers position in the nose1 point
-
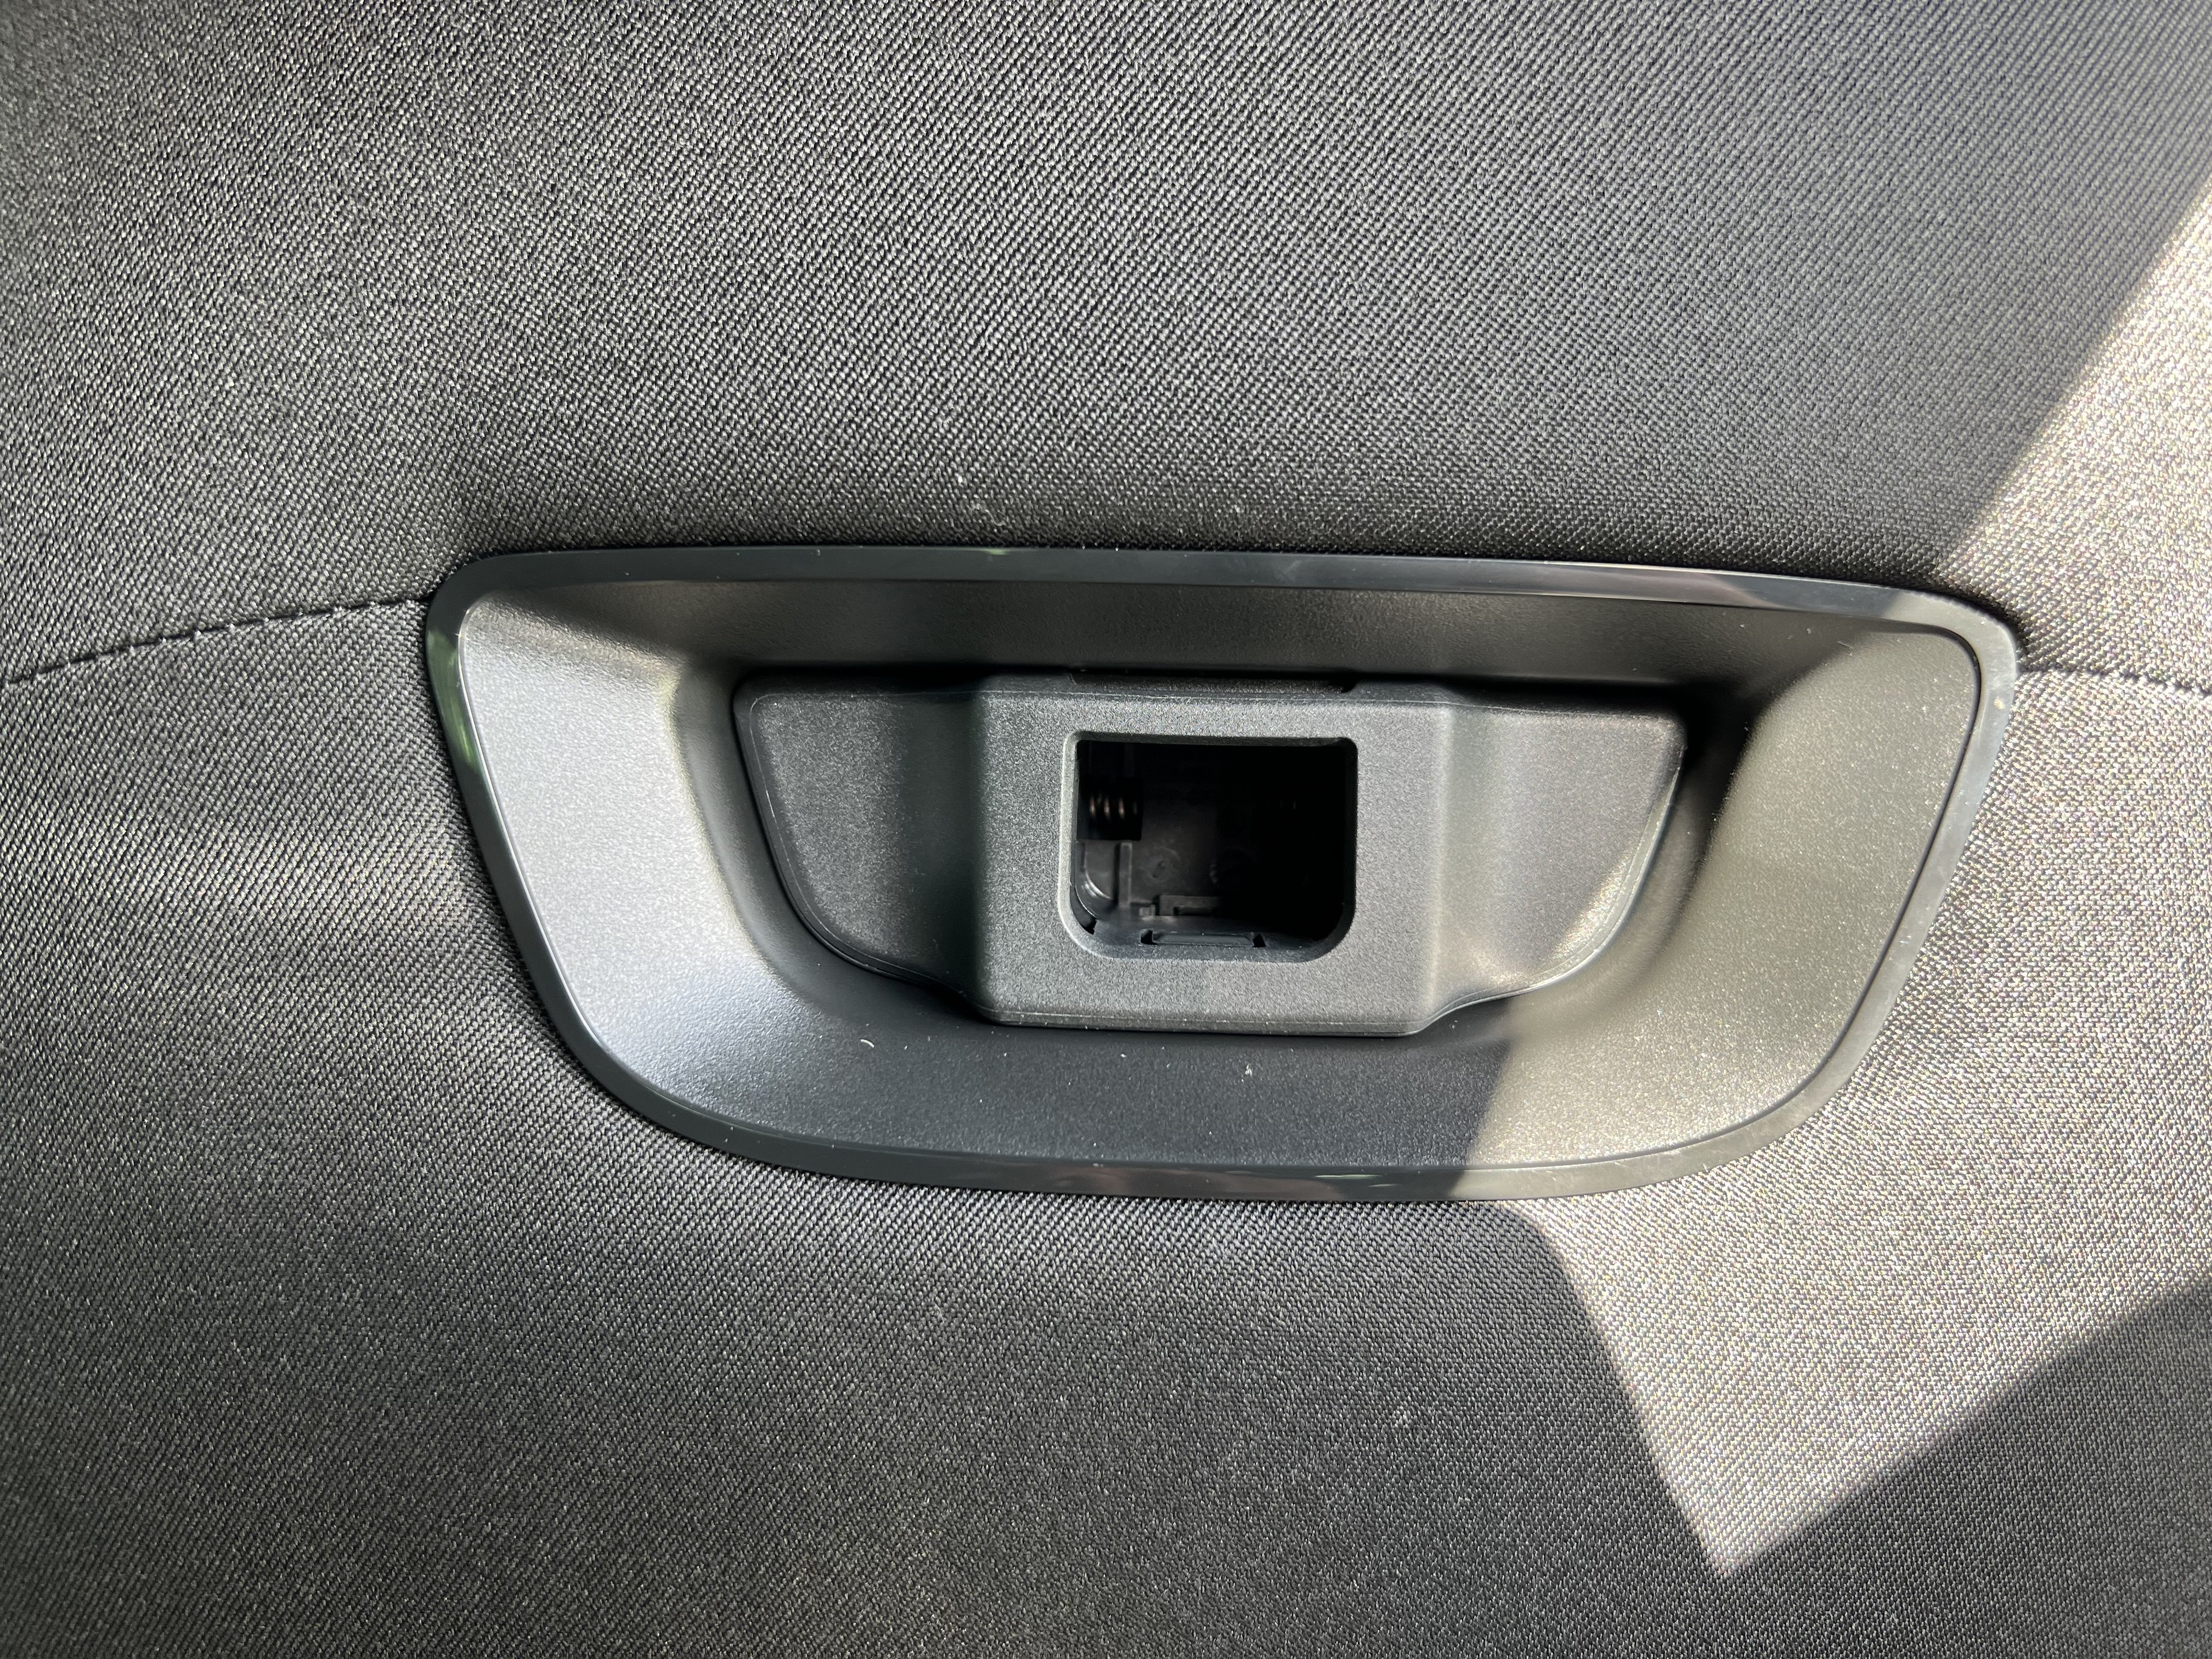
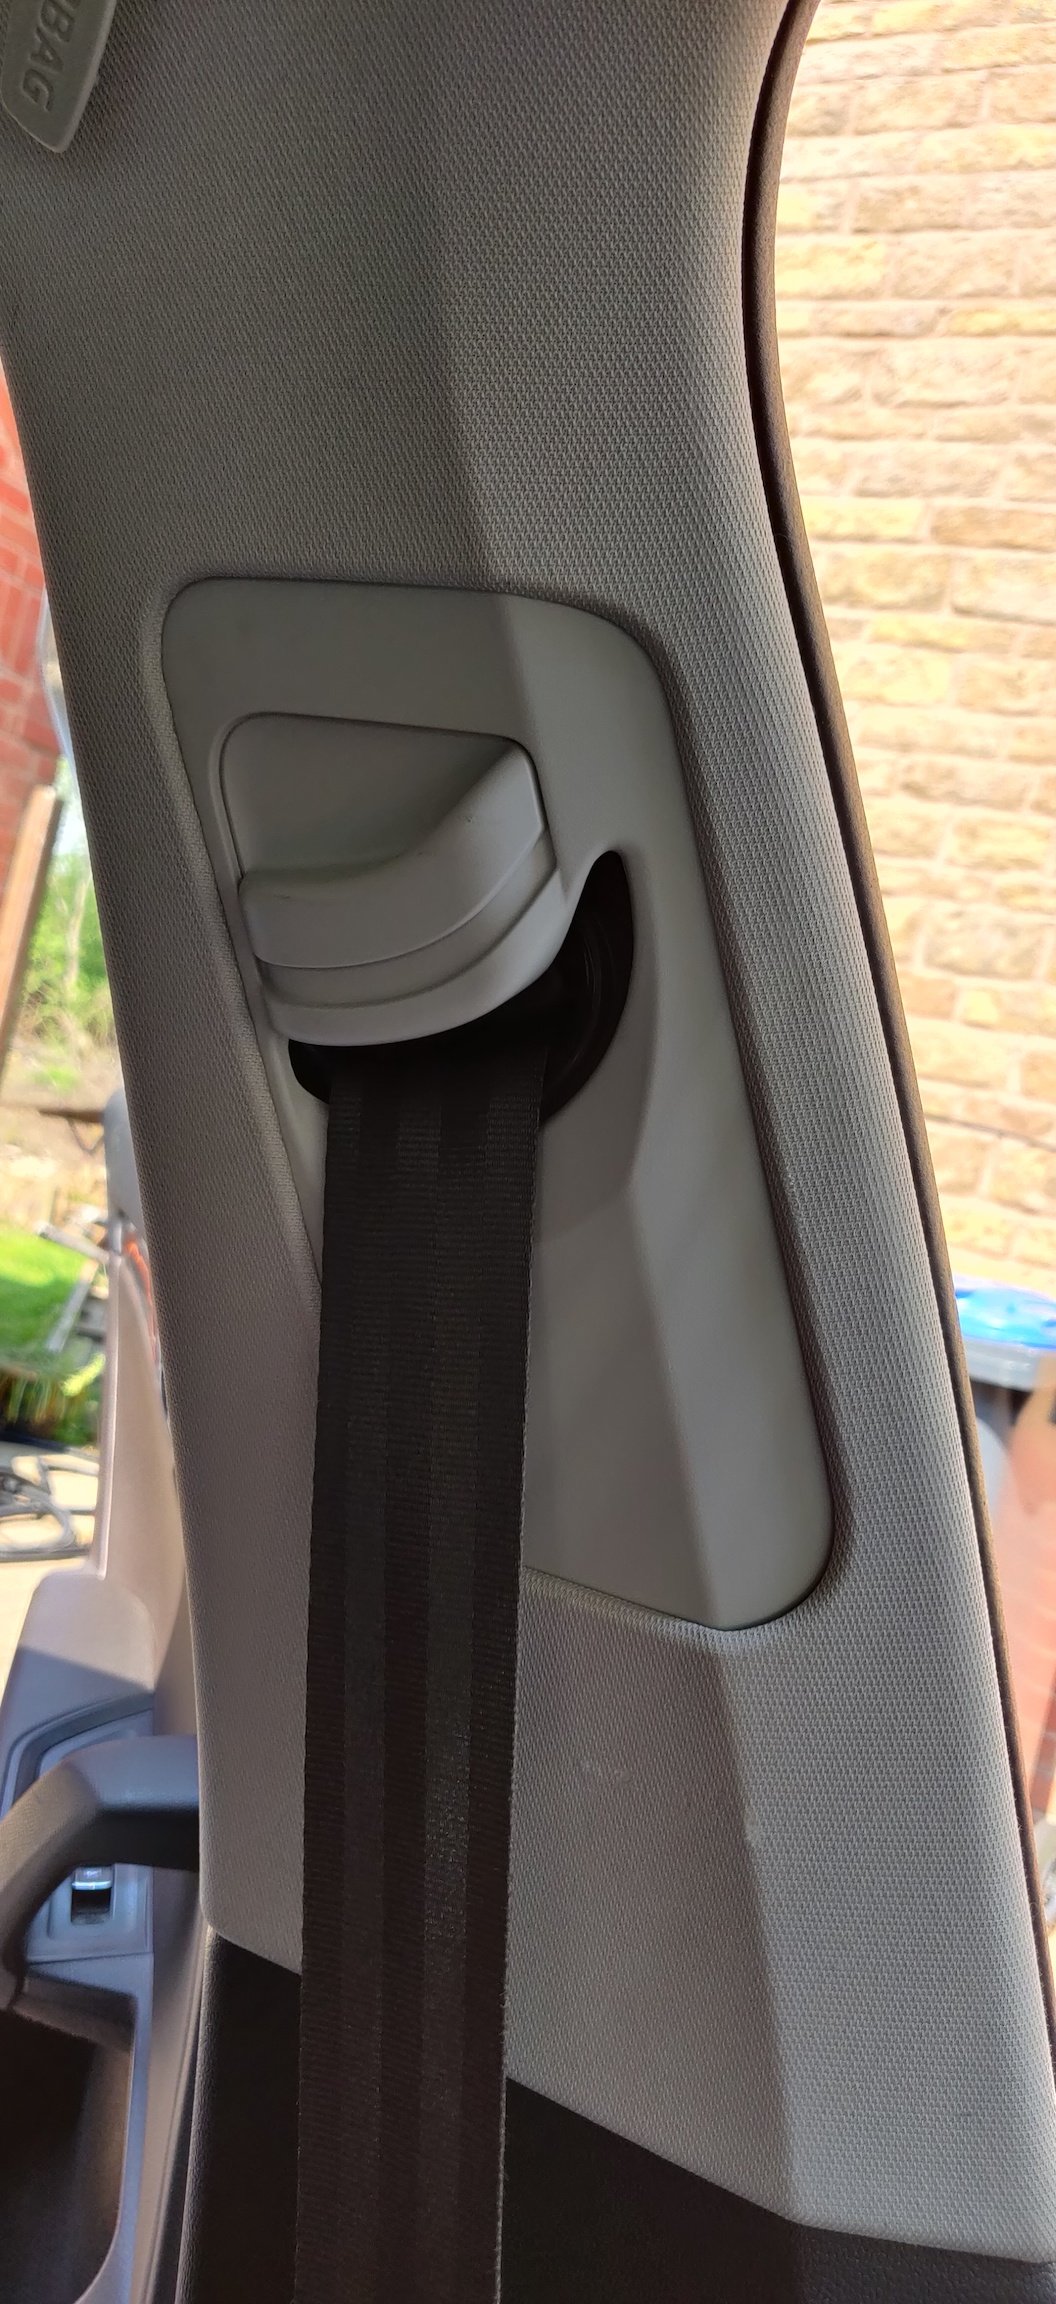
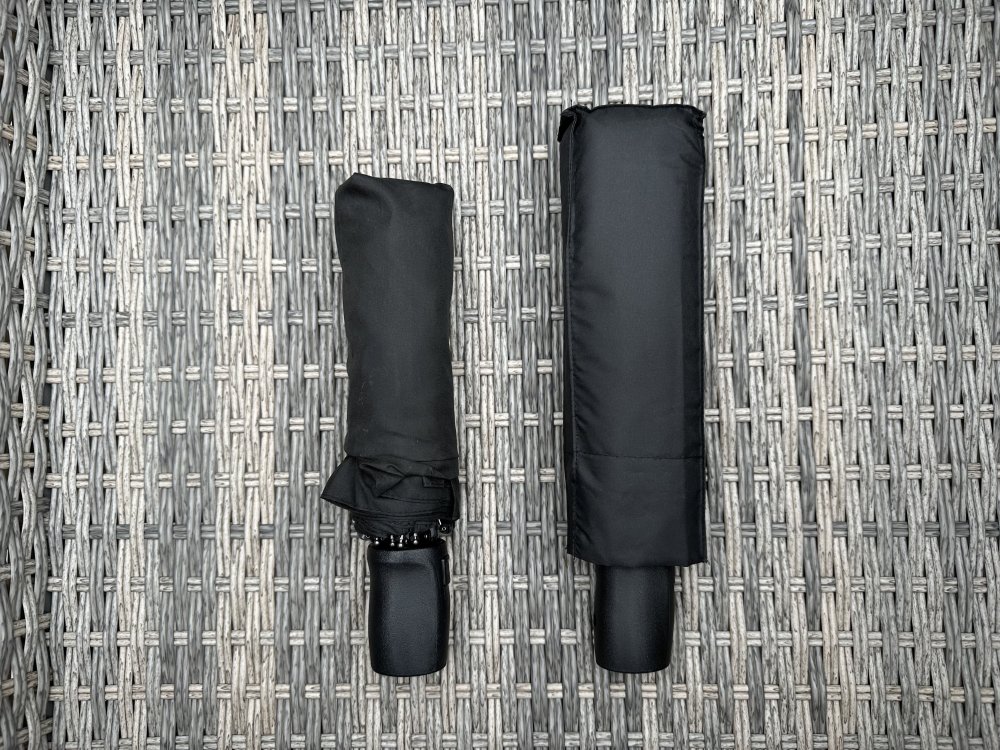
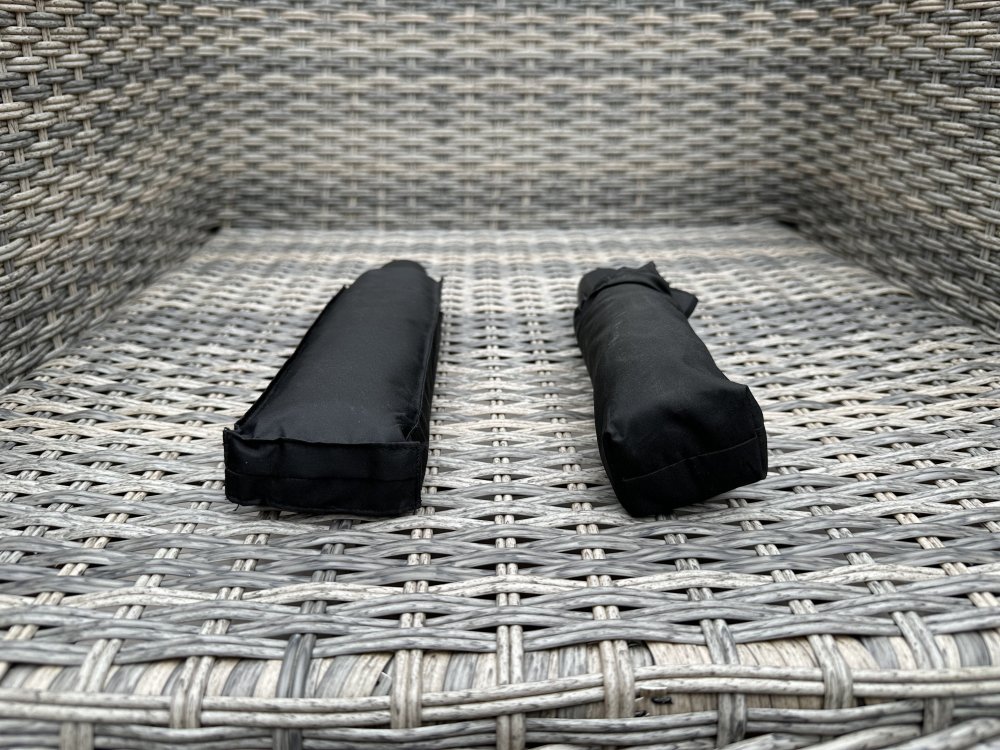
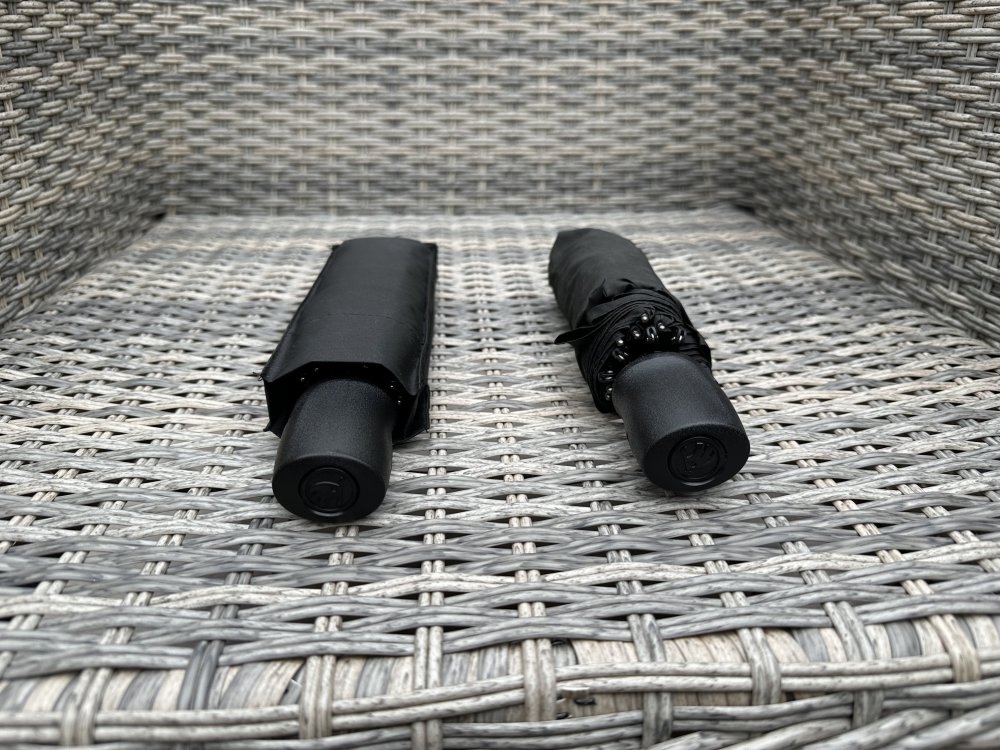
1 pointWhat i'm saying though is that the dealer has sourced the wrong umbrella for you..... There are two different umbrellas with different part numbers. One is smaller in length and rounder and designed for cars that store the umbrella under the front passenger seat and the other is longer in length and flatter in shape to match the rectangular shape of the storage area in the door and is for cars that store the umbrella in the front doors. Notice they both have the same Skoda embossed handle but are totally different sizes and shapes to match the area they are stored in. As can be seen by these photos...... The larger one is from my Octavia vRS (stored in the door) and the smaller one is from our Fabia (Stored under the seat). So if you're saying the Skoda umbrella the dealer got for you is too long to fit in the storage area under the passenger seat I would say the dealer has sourced you the one from my Octy rather than the one we have in our Fabia.
 1 point
 -
1 pointSo I have been away from having a Skoda for 3.5 years, having had a KIA E Niro 4+, so I picked up my Enyaq Coup'e last Saturday 18th May, I have to say it is so good to be back in a Skoda. I did not want to post on this issue until I had actually received my new Enyaq Coup'e 85 Edition. So, the time line for my car is as follows, 1) 16-01-2024, configured my Enyaq 85 Edition on the Skoda configurator , added extras were, Moon White, Advanced Pack, Suit Interior, 20" Vega Silver metallic alloy wheels, Rubber Matts and Mud Flaps (Front & Rear). 2) 19-01-2024, sent Enyaq configuration to my Main Dealer. 3) 24-01-2024 Confirmation from the dealer that the car was ordered. 4) 13-02-2024 Dealer confirmed a build for week 12. 5) 06-04-2024 Dealer confirmed that car had been built. 6) 02-05-2024 Dealer confirmed the car had arrived in the UK. 7) 07-05-2024 Dealer confirmed the car had arrived at dealership. 8) 10-05-2024 View car in it's transport packaging at Dealers and arranged pick up date. 9) 18-05-2024 Took delivery of my new Enyaq Coup'e. I have to say, there was no way I had expected to get the car before July - August, I hope this may help, I do not know if others have had such a quick delivery, my Dealer was amazing, communication was over and above anything i have had before. So after being able to actually look at the car in detail, I have to say it is amazing, inside and out, but boy , it is a big car, love it.
 1 point
 -
+1 for the 110, not as silky smooth as the 1.4 but a very willing engine. The 6-speed box on the manual version is a bonus.1 point
-
The two turbo engines are good. The 110ps is surprisingly quick, the 95 is more sedate but isn't a complete slouch. Perfect for tootling about in the town and in the country.1 point
-
Four 1 litre engines are fitted to the 2015-2021 Fabia III:- 1.0 MPI 60 PS. 1.0 MPI 75 PS. 1.0 TSI 95PS & 1.0TSI 110 PS Thanks. AG Falco1 point
-
My mate sets his valve clearances to his setting rather than the book as the engine aren't new and he has so much experience on the engines and having used his "classic" as a "daily" for so long and the engines aren't standard anyway. He now owns my last "classic" that I used as a "daily" and the only car I owned for the previous 16 years (I could also use my wife's car if available but it rarely was). The others have seen the vid but you might be interested. My neighbour asked if he could do a video on the car for his YT channel and his well established comprehensive website on motor car history, this was all done in a bit of a rush on s/h camera just out of Covid lockdown (hence my long "covid-locks" hair) everything one take and edited on free software. His site. - https://motor-car.net/ The video, a go car not a show car. -1 point
-
Hi all, so the latest update, Got my car back on Saturday morning after a week and a half with the expert in vw & skoda engines. He drove it for a while and encountered the errors as per my previous post. So he replaced the crank shaft sensor, oil pressure sensor, and checked the timing belt set up just in case that was off, but it was fine. So drove 300miles or so over the weekend and no problems so far, fingers crossed. Regards n.p1 point
-
Downloaded and installed, works a treat , thanks👍1 point
-
1 point
-
Are you losing any coolant? In round numbers, for every litre of fuel your engine burns, a litre of water is created as a product of the chemical reactions. Most people don't believe this. Petrol and diesel are hydrocarbons; compounds primarily made of hydrogen (H) and carbon (C). When burnt in air they combine with oxygen (O2) to make carbon dioxide (CO2), and water (H2O). The only place they emerge is from the tailpipe. It's usually hot enough that the water part is steam, which you can't see. While the whole exhaust system is warming up, you may see it in the rear view mirror as condensed water vapour. If you do enough short journeys it may build up in the exhaust system as liquid water, which following drivers may see dripping out of your tailpipe as you accelerate away. People who say " Oh yeah, that's just condensation that builds up overnight" have not understood what's really going on.1 point
-
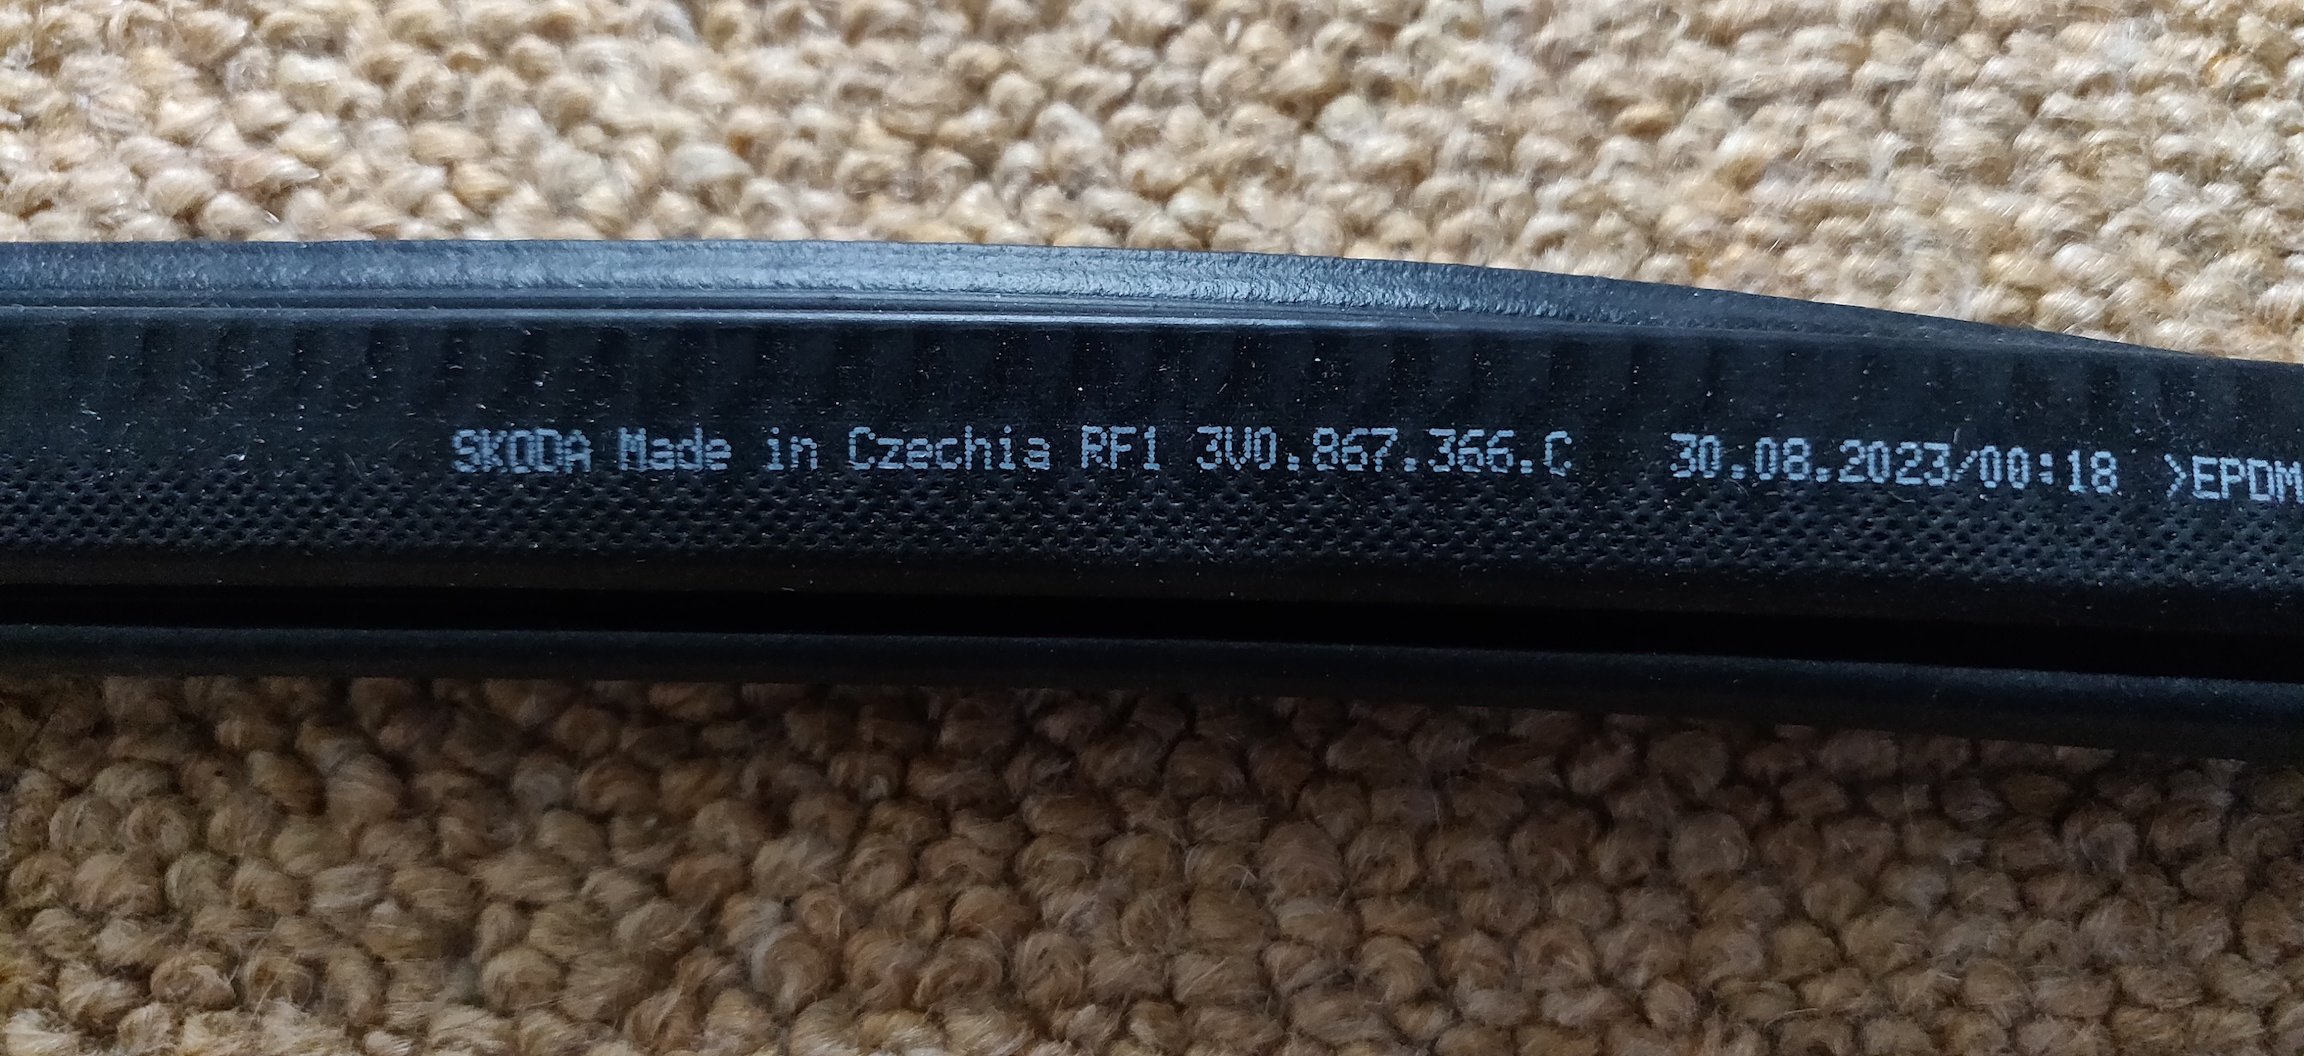
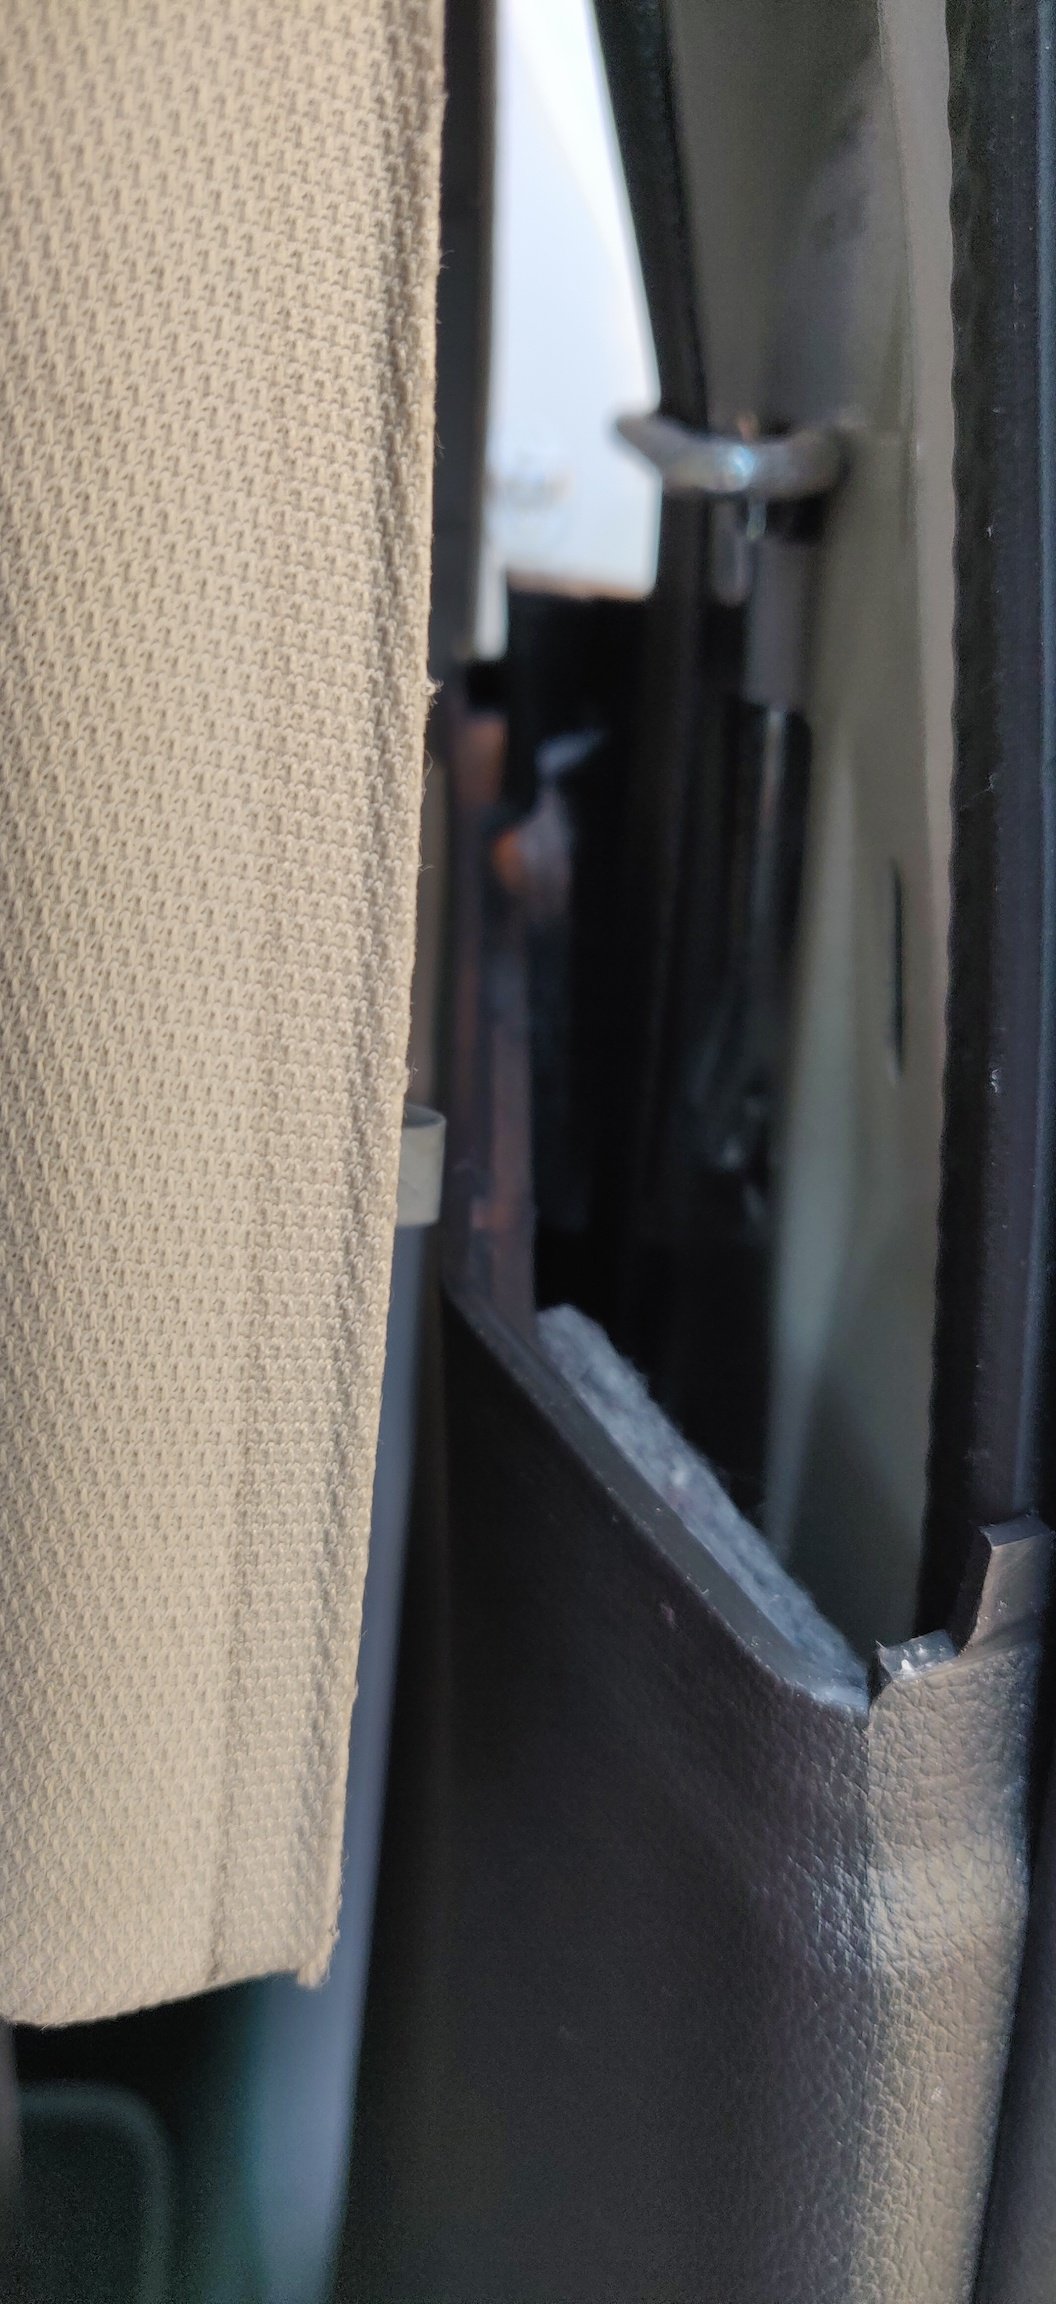
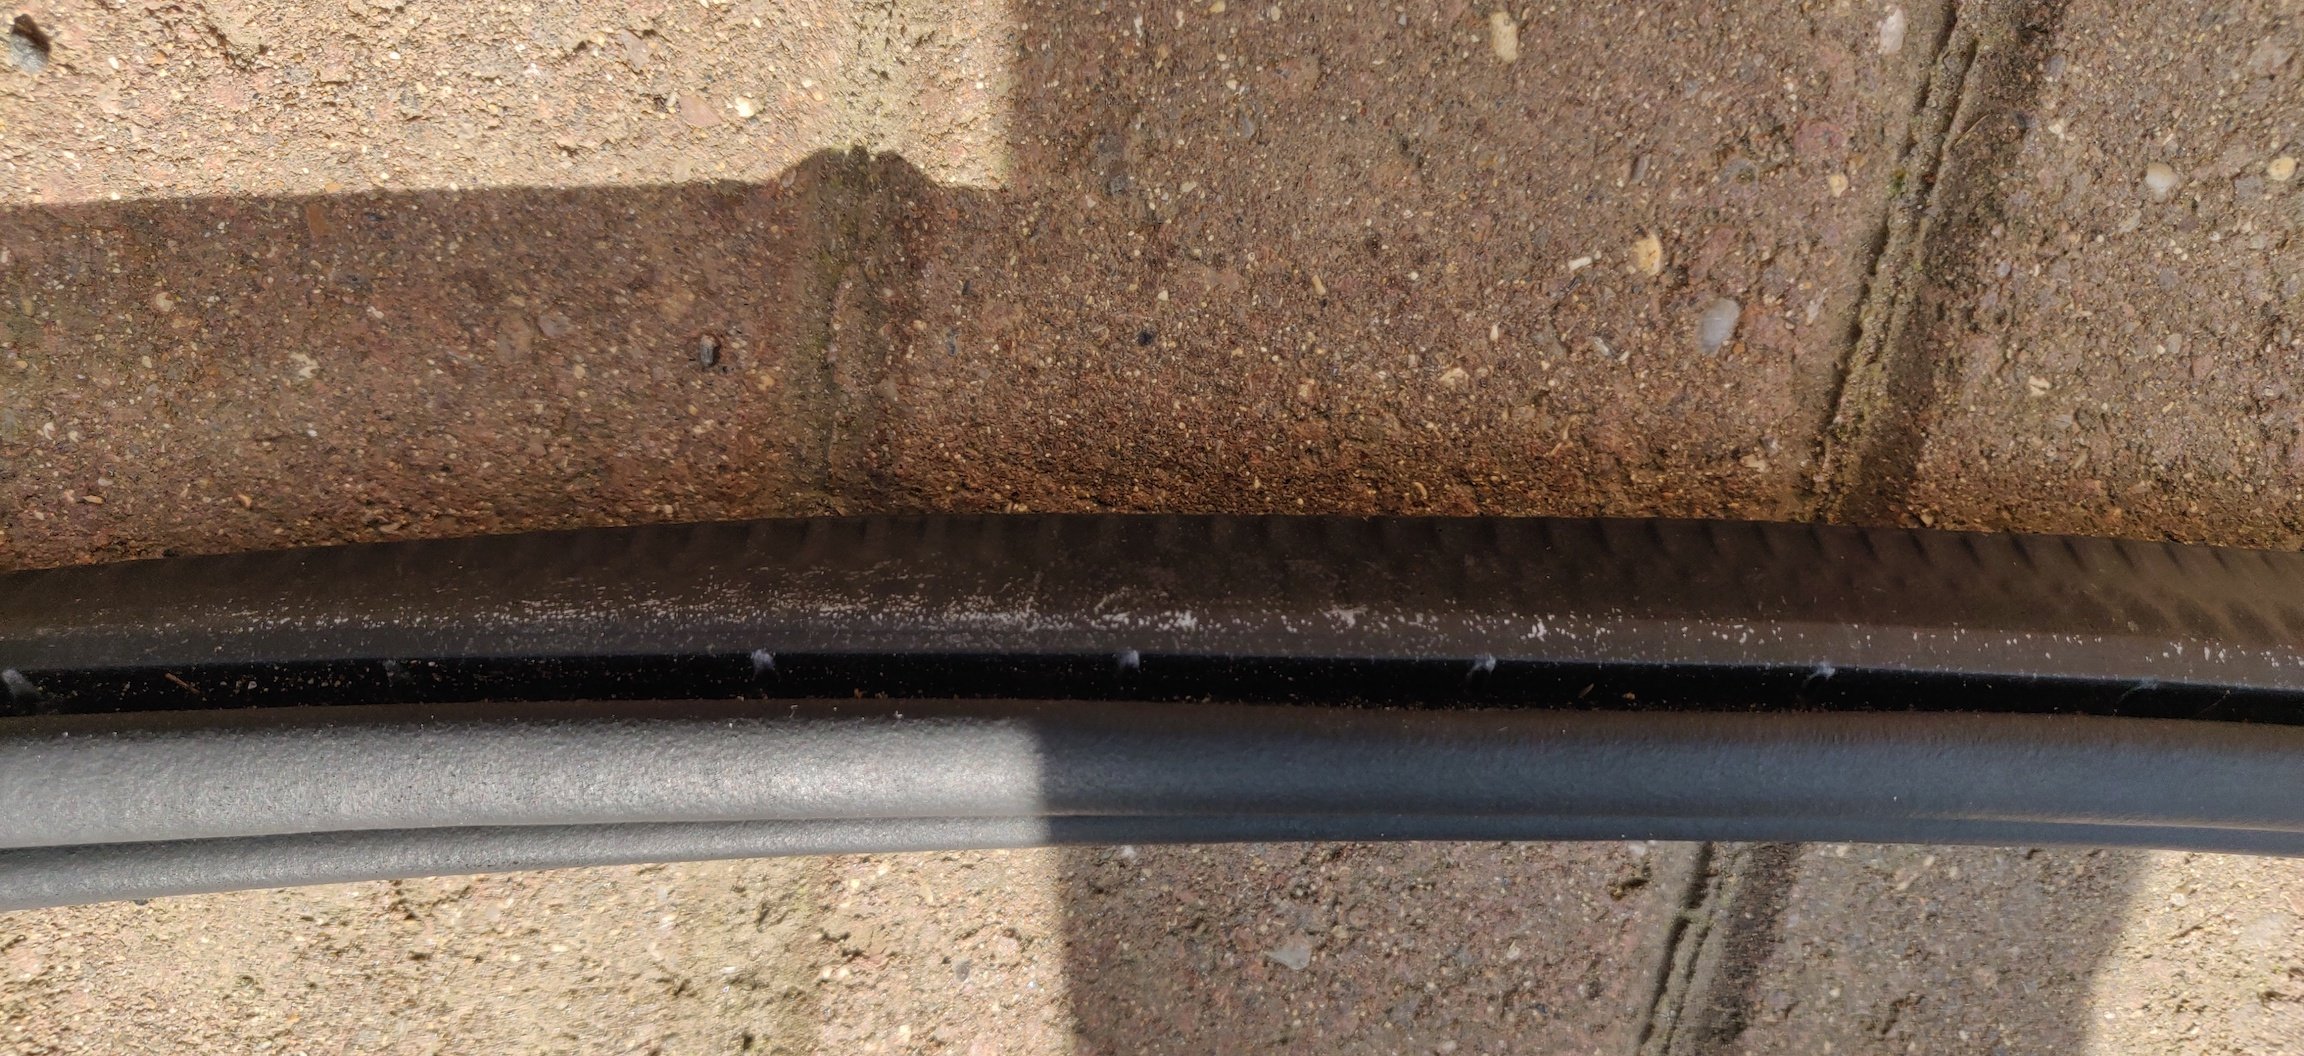
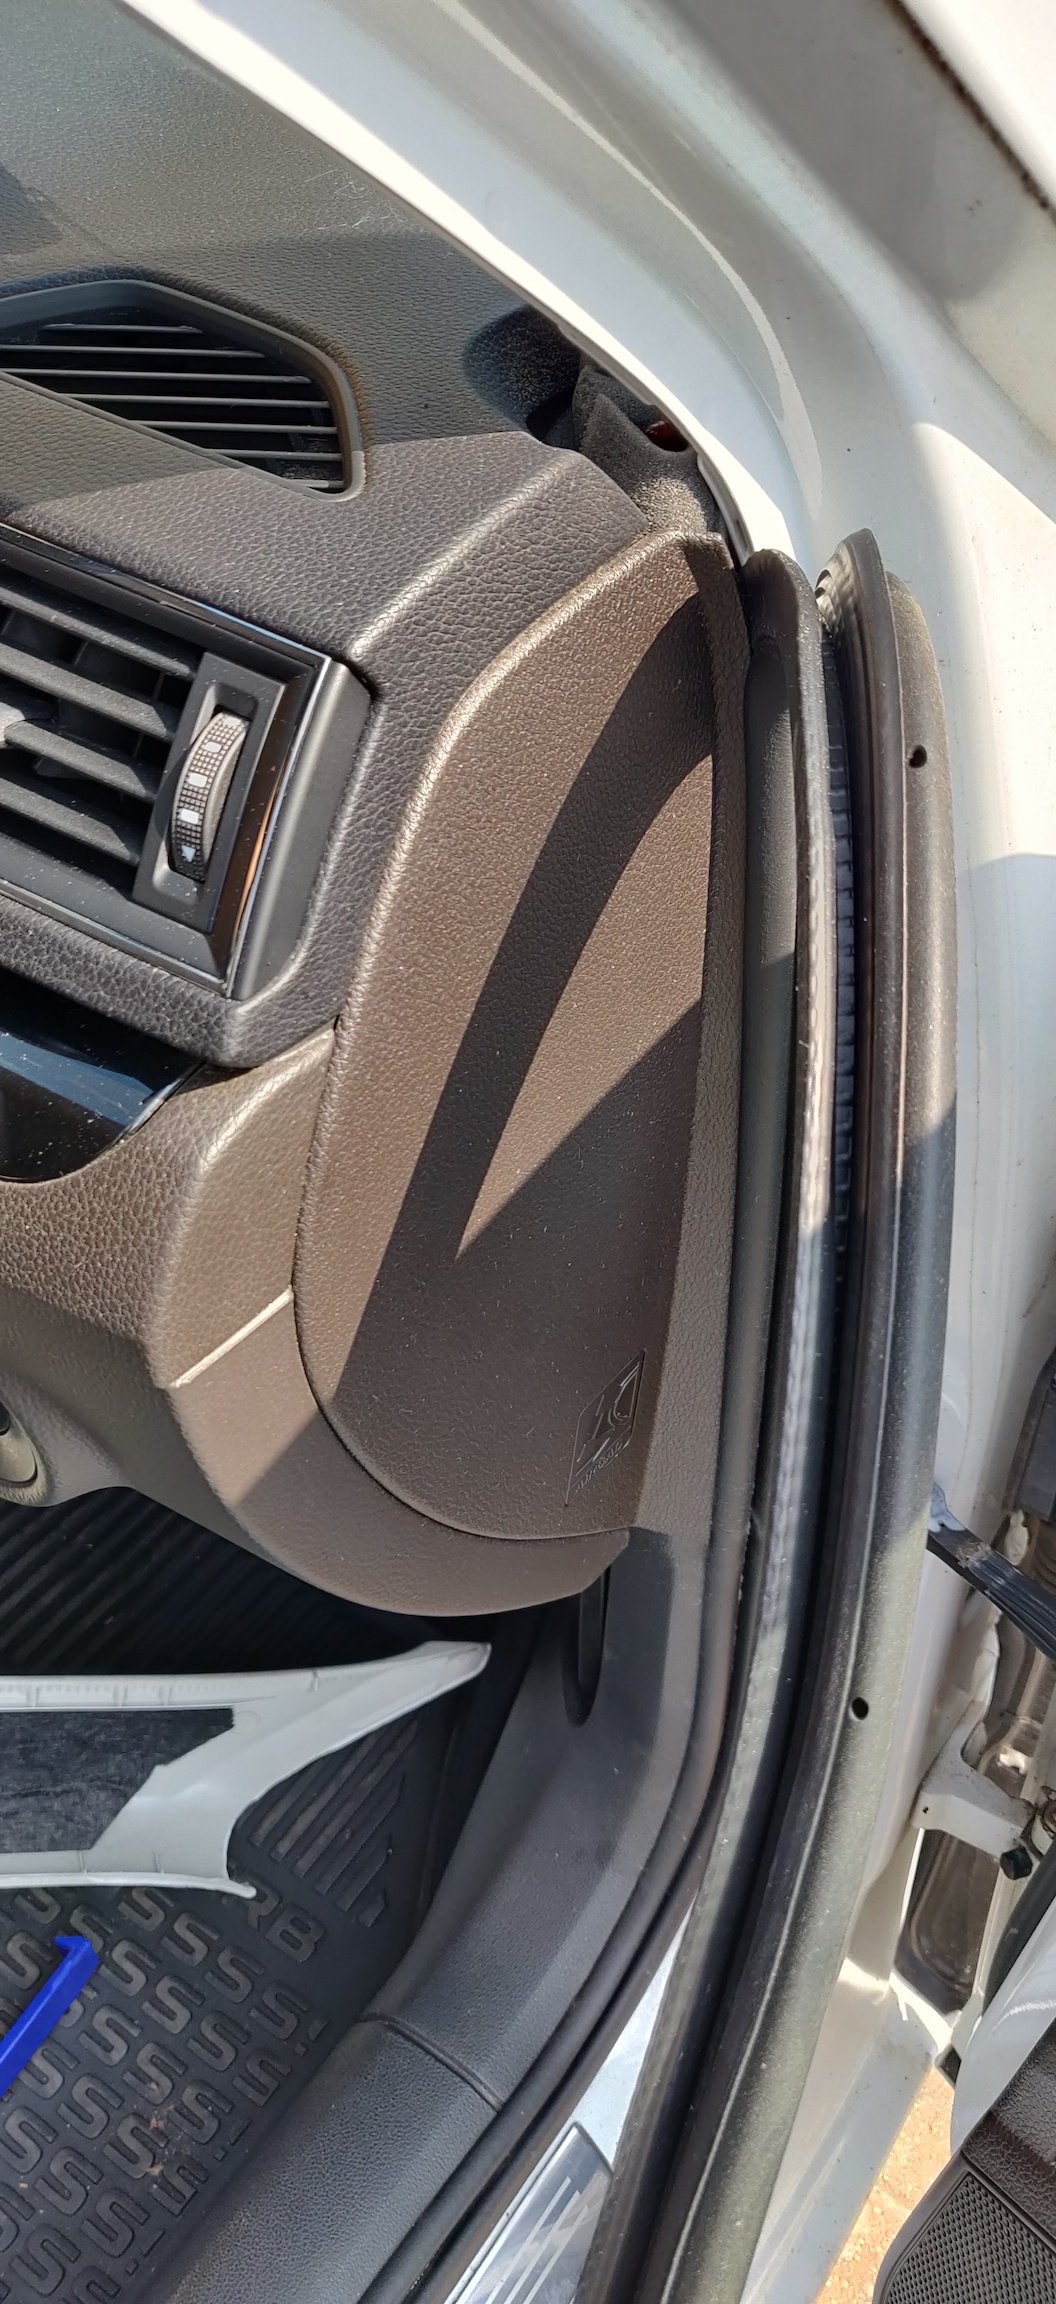
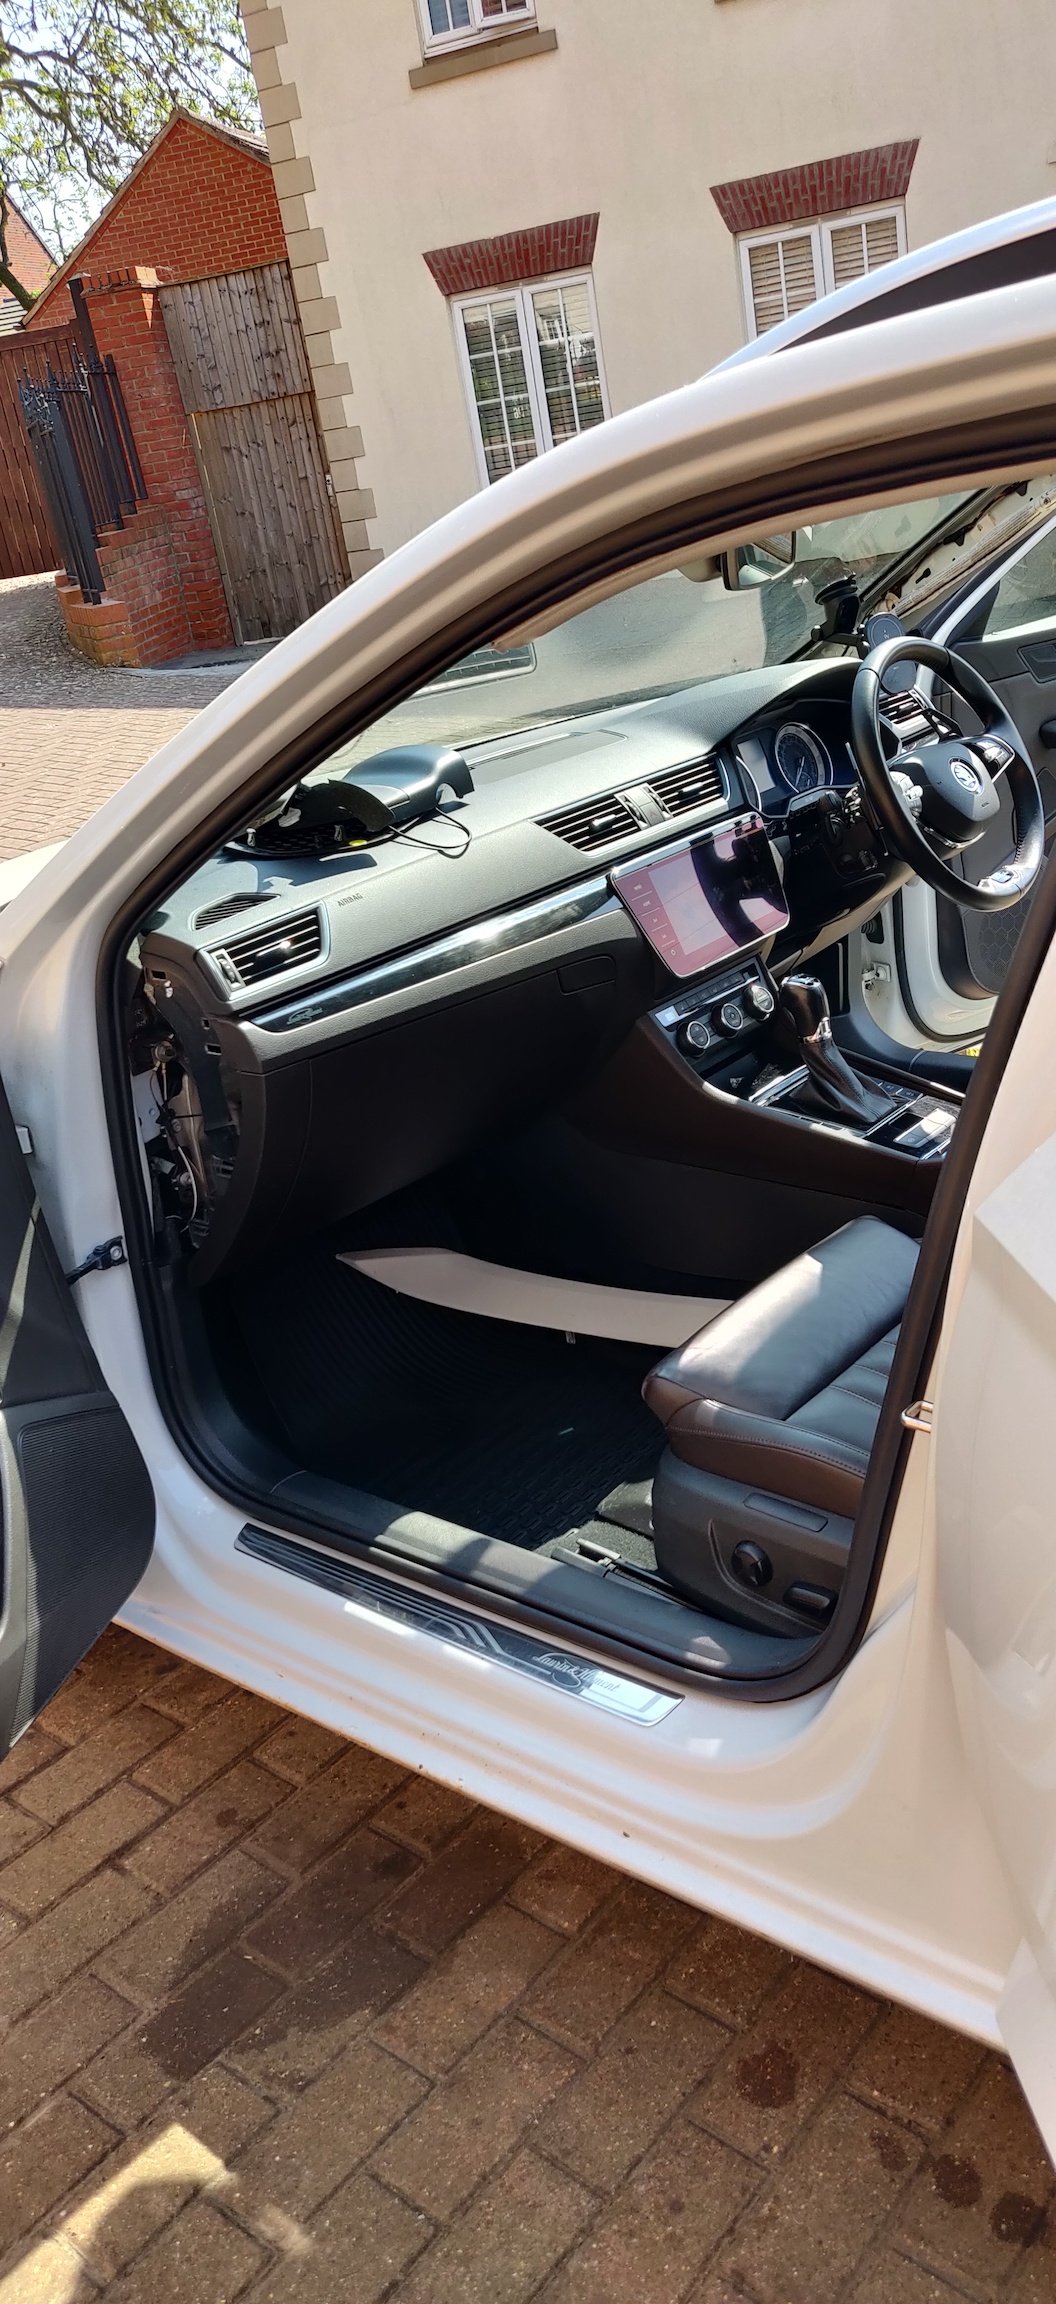
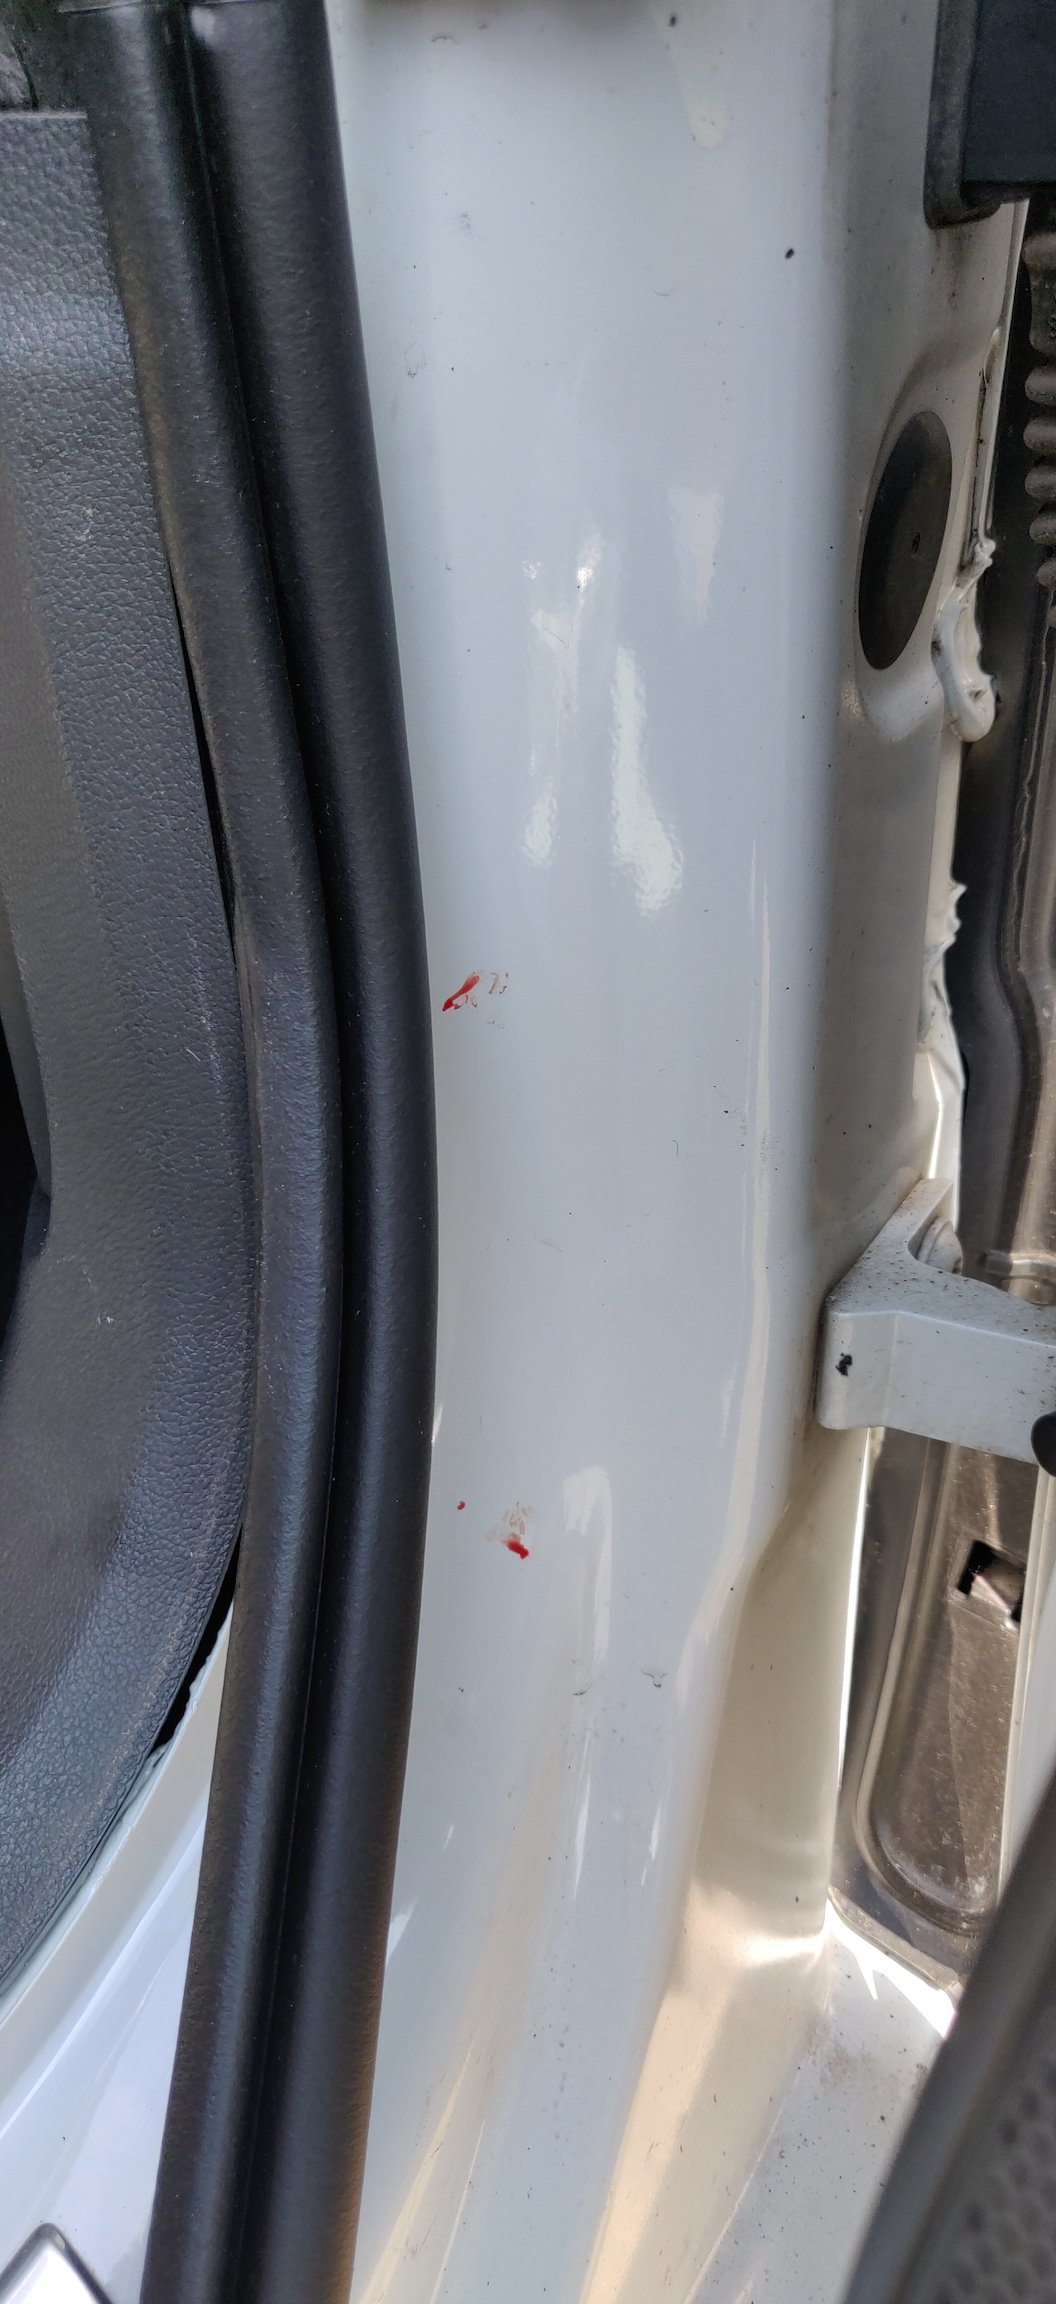
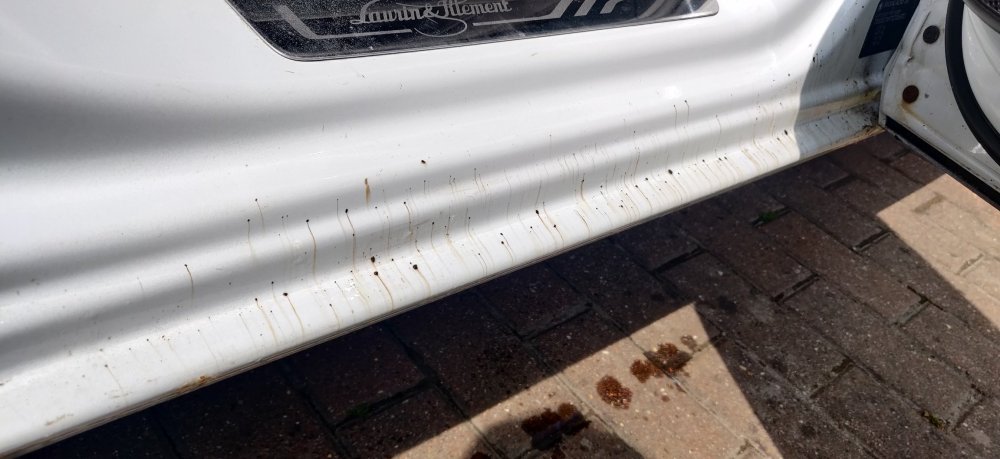
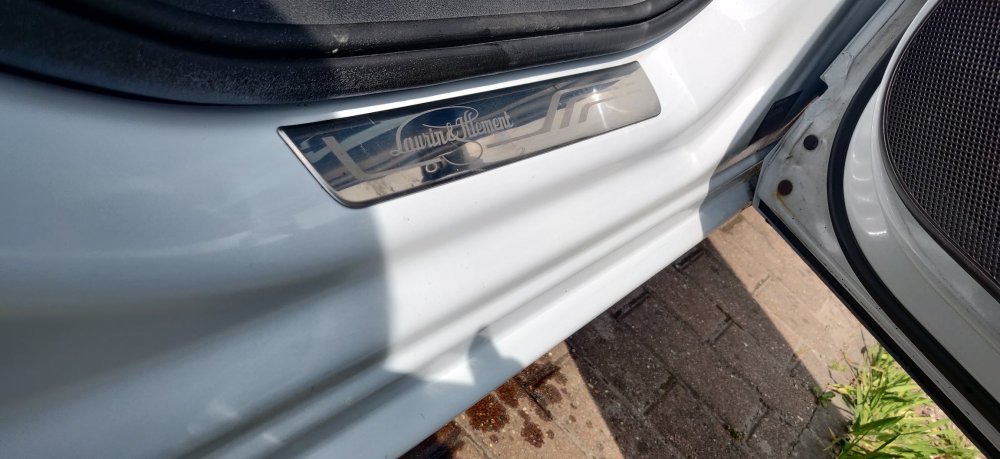
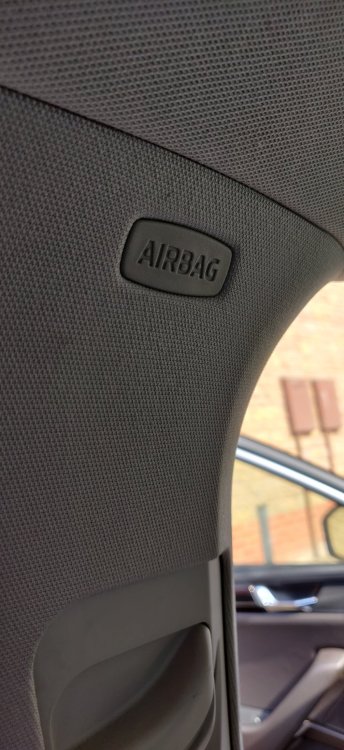
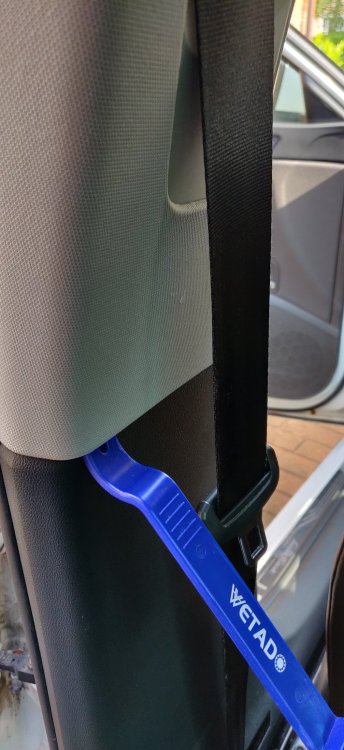
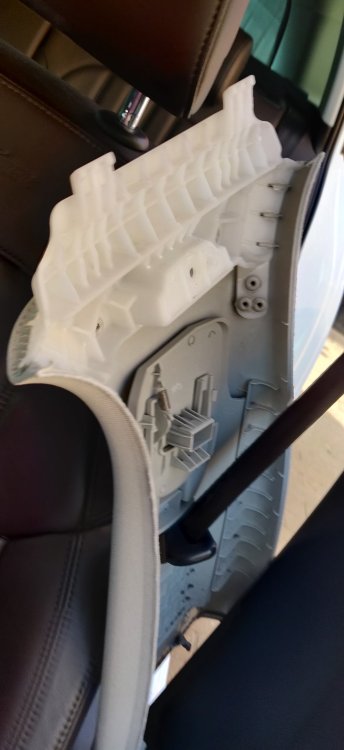
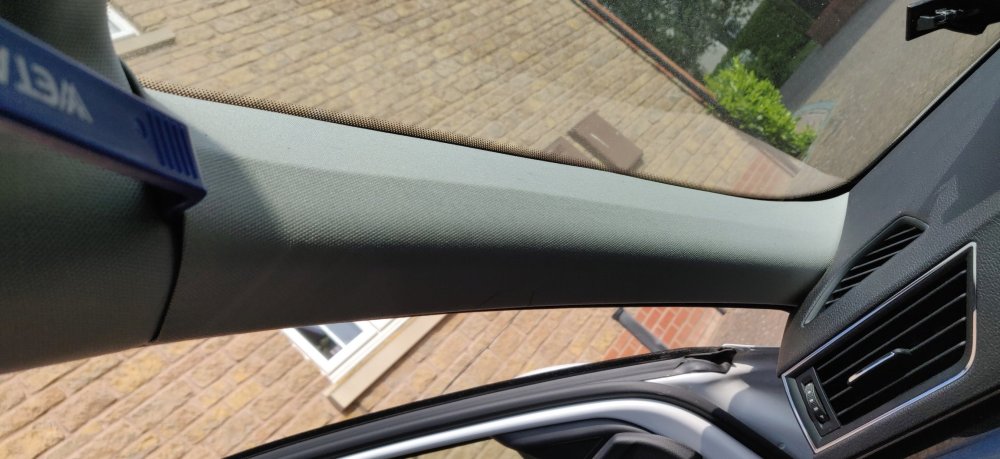
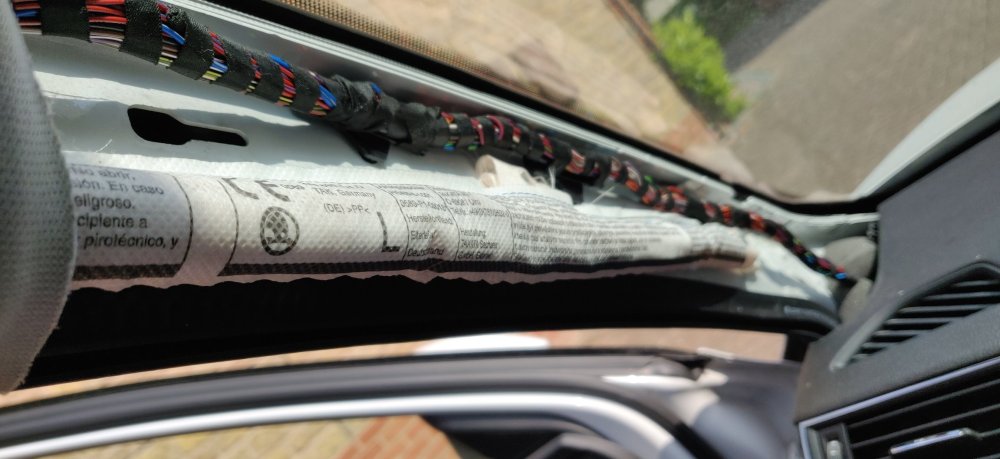
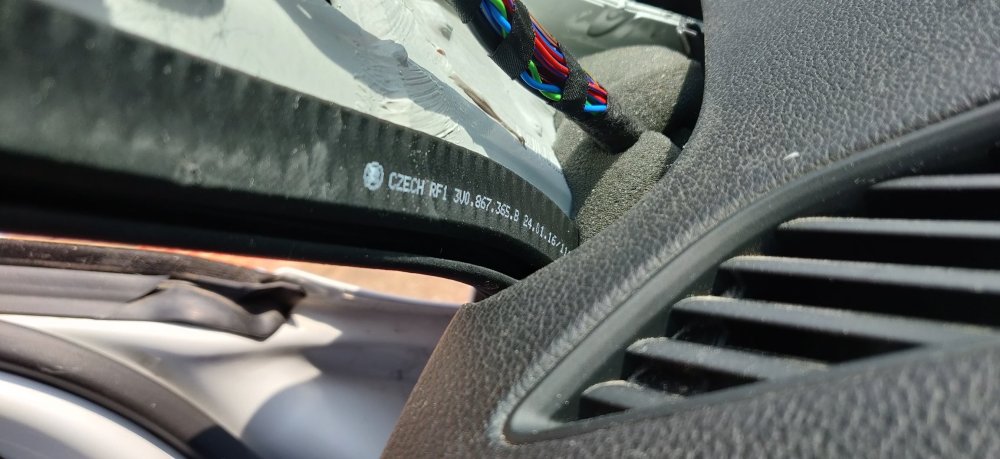
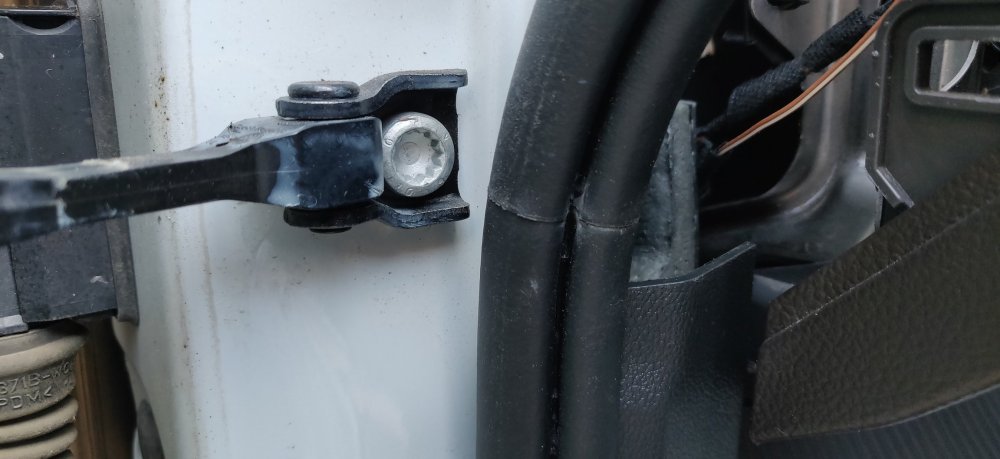
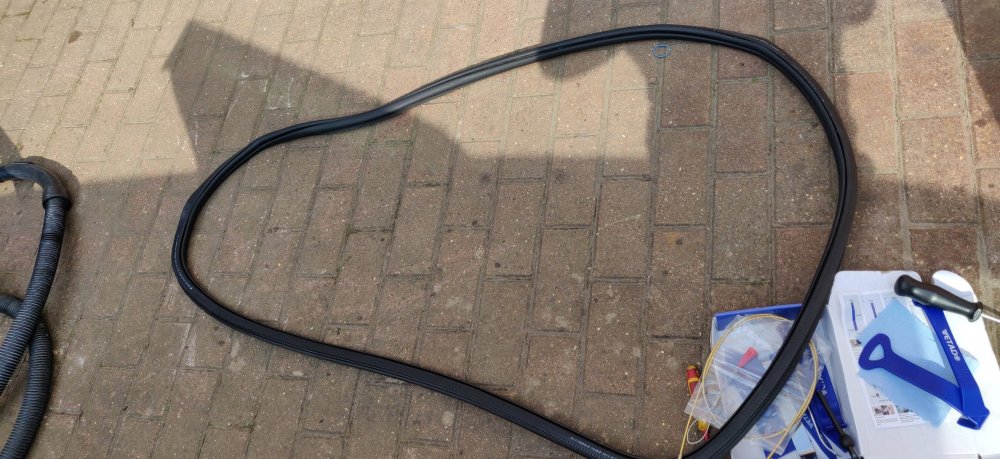
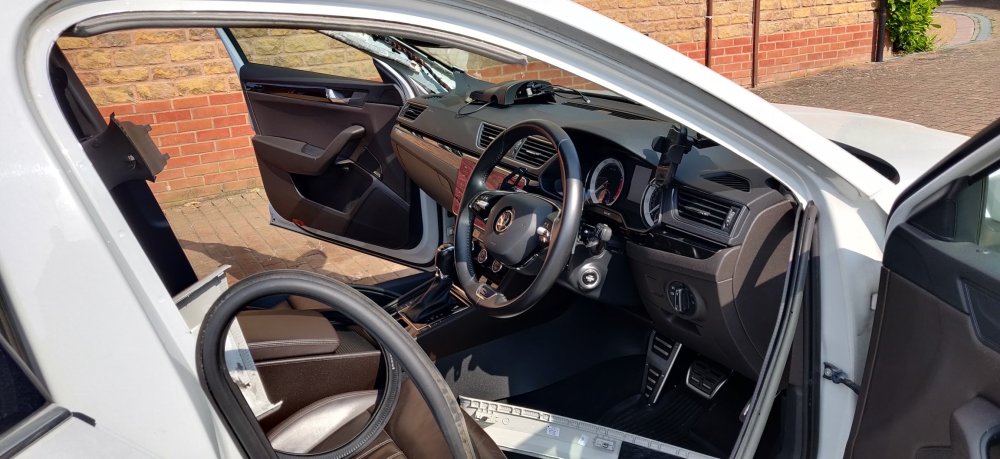
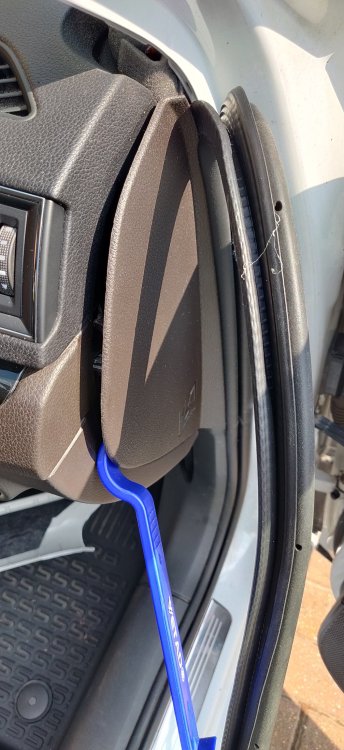
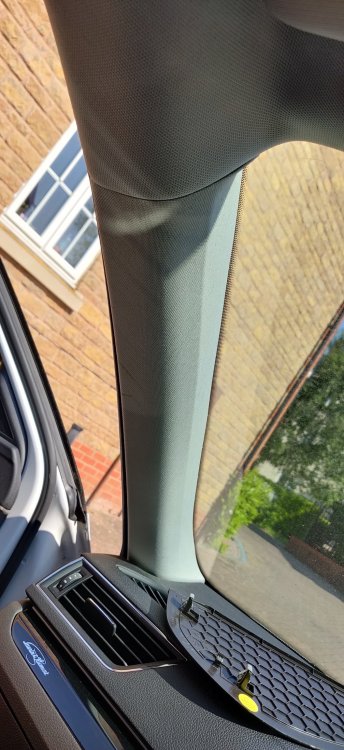
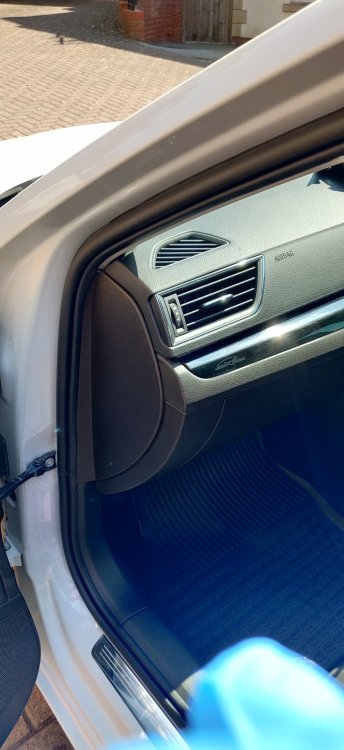
Very sunny weekend, but nothing particular planned. I'm one of those that don't mind the Eurovision so just happily sat and watched that in the evening, and otherwise catching up on telly for a weekend. Whilst cleaning up the garage, decided to see if some Tar Remover I bought a few months back can help with the sills: It had an orange hint to it, so I suspect it isn't really much different to Goo Gone, i.e. some petroleum based solution. As you can see, after a minute or so, it was certainly doing something to the tar spots, so got some shop cloths and started wiping away. Some of the bits were awkward and needed a few applications and wipes. Once clear, got some panel degreaser and cleaned the general areas: Pretty much repeated it for the other remaining areas. Still not sure how this is even possible, is there loads of tar in the air up there? I'll need to do the same for the engine bay area as there's bits there as well. It is forecast to rain this afternoon, ending a nice sunny few days, so before that: Went and revisited the replacement door seals that have been sitting in the house for ages. The pic above shows the part numbers. I believe the general rule is that odd numbers are left and vice versa, so this ending 366 C should be the right hand side. I'm not sure it even matters though, one could easily flip it over? Kudos to @ChrisCh via: for perfectly outlining the required steps. He's noted that the upper B pillar trim also needs removing, which the workshop manual doesn't mention, suggesting the A pillar area is sufficient. So went to have a look: Got a trim removal tool to loosen out the "Airbag" labelled cover, which eventually pops out, no rhyme or reason really. This is easier to do with the front seat moved all the way back I felt. This reveals the T25 torx screw behind: I suggest something magnetic when taking this out, as I've had past incidents with dropped bolts and washers into the abyss in the past! There are two trim clips along the bottom of this trim piece: So a gentle pry and a not-so-gentle pull: Freeing it from the bottom then separates the seat belt height bit. This is pretty much the usual for cars, where the trim bit connects to the actual seat belt anchor behind, so needs to be aligned when refitting. Anyways, the trim piece itself is loosely fitted along the top, so just pulling it straight down: Frees the piece and in this case, just move the trim piece away, no need to disconnect the seat belt anchor, etc. Next is the A pillar: So pried from the top, and eventually, with again, not-so-gentle pulling, the two clips keeping it in place come away: The chassis appears to be slotted, so presumably, the trim is located, before being pushed downwards and then presumably into the slot to secure it. With the piece removed, the part number for the left side trim is visible: Thus confirming the odd number part being the left side. I took a note of the location of the seal's joining point: The workshop manual mentions this needs aligning to a hinge, although the pic above suggests its to the door check strap, so I'll roughly align it there when installing the new one. It's then a case of just pulling the trim away: Then lobbing it onto the floor. Bits of dirt was escaping between the grooves of the seal: So out with the vacuum and a damp cloth to clean up the general area around the seal before fitting the new one. Whilst it was drying (not really that long with this lovely weather), went and repeated on the other side: I got about halfway through removal as you can see before realising: The dashboard side trim was still in place on the right side. The left side was removed ages back during the wiring of the wireless charger and heated steering wheel, so that was already removed. So simply prying with the trim tool: There's about 4 or so clips keeping it place, so nice and simple. Then once removed, went back to the other side: To fit the new seal. I started with the joining line bit, put that roughly along the door check strap location, and went clockwise, pushing the seal along the car frame as far it goes along the way. The workshop manual says to start at the top rear corner, but then also mentions that alignment, which felt a little impractical. I luckily didn't have much drama from this, as long as its fit without deliberate loose parts, it's a nice slightly snug fit. Then it's a case of tucking the trims and seals appropriately, where bits of the trim sit over and under parts of it. Whilst repeating for the other side: Noticed specks of red and somehow managed to cut my finger. This car is now taking pounds of flesh. So plastered up and mess wiped away, installed the other side: Bits on this side were more of a hassle for some reason, trim not wanting to move around, etc. Once all in, just a case of reversal for getting the trim bits back on: So for the B pillars, push them up into the grooves in the top of the car, then align the seat belt height adjuster, then push the two bottom clips into place. Screw the bolt back in (magnetic screwdriver lest it decides to be annoying and fly for freedom), then that cover back on. Workshop manual suggests 2.5Nm but I just did it to hand tight. The A pillars next: Left side felt straightforward, slot it roughly at the bottom, then align the bottom clip in that groove before pushing the trim downwards and into the car metal as much as possible. Then I guess just tap it into place with the back of my fist until it clicked. The other side was more awkward for some reason, and still doesn't feel like it's in place. This could be the sun beating down on my back on that side of the car though possibly. Then its clipping back the dashboard sides: That's it really. Another go through checking the seal is all aligned and neat with the trims, and that was that. Probably could have a preponed the MoT to earlier than the 20th to be honest, I think it'll be much easier with the car being road legal before exploring the CAN/BCM stuff in case I need to travel. In the grand scheme of things, it's only another week, so hardly the end of the world really. What I really need to do is carry on cleaning up the garage after all of this, and to really prep for a big bunch of jobs on the poor Honda Insight, which is seriously in need of some TLC. I technically need to prep the old suspension for disposal, but I think I'll do that in the distant future when I really have nothing else to do. Technically, the rear dampers seem to be ok, they slowly go back to position, but at least they do. They're just so rusty that I don't see how anyone would want it. One front damper is shot, not retracting at all; and its relative rust correlates, especially compared to the other, which does retract and has only slight rust. I guess to be honest, suspension should be done in pairs, so unless someone is in a bind and wants a spare front DCC damper, then I'll be disposing that as well. @nicknorman can probably suggest when that damper was replaced, else I peruse the old invoices. That's probably me for the week, unless I find something random to post about. Fingers crossed for the 20 May. Maintenance: £2317.23 Upgrades: £1414.46 Miscellaneous: £697.20


 1 point
 -
1 pointIt all depends on what you want/need to do. There are some special tool you might want such as a a brake calliper rewind tool, unless you have drums on the back. I'm not sure about your front callipers, you may need a 7mm (hex) allen socket to remove slider pins. Being petrol a spark plug socket and feeler gauges (for the gap) will be useful to. If you need to do suspension work then a ball joint splitter and maybe spring compressors. However I didn't need them for my Fabia. I could be sarcastic and say all you need to fix it is WD-40 and Duct tape! 😛 In saying that I can remember being told that to work on an old mini all you needed was 2 (imperial) spanners.1 point
-
1 point
-
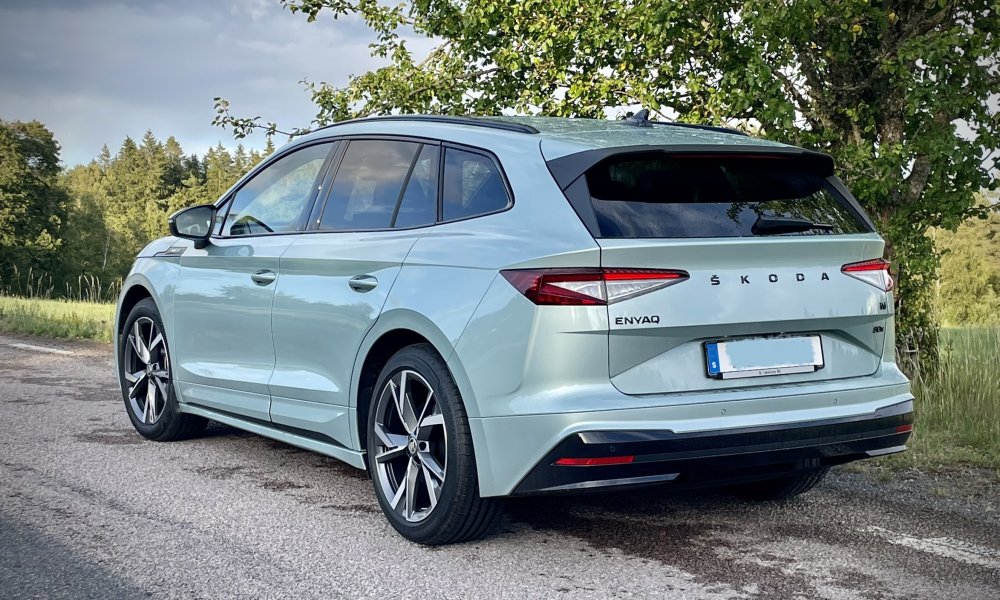
1 pointRealised I never posted a pic of my wife’s Enyaq. Had it over a year now and she loves it.
 1 point
 -
1 pointMerry X-mas. The IV 60 energy blue is home for christmas. Some snow, cold and icy conditions. No problem!
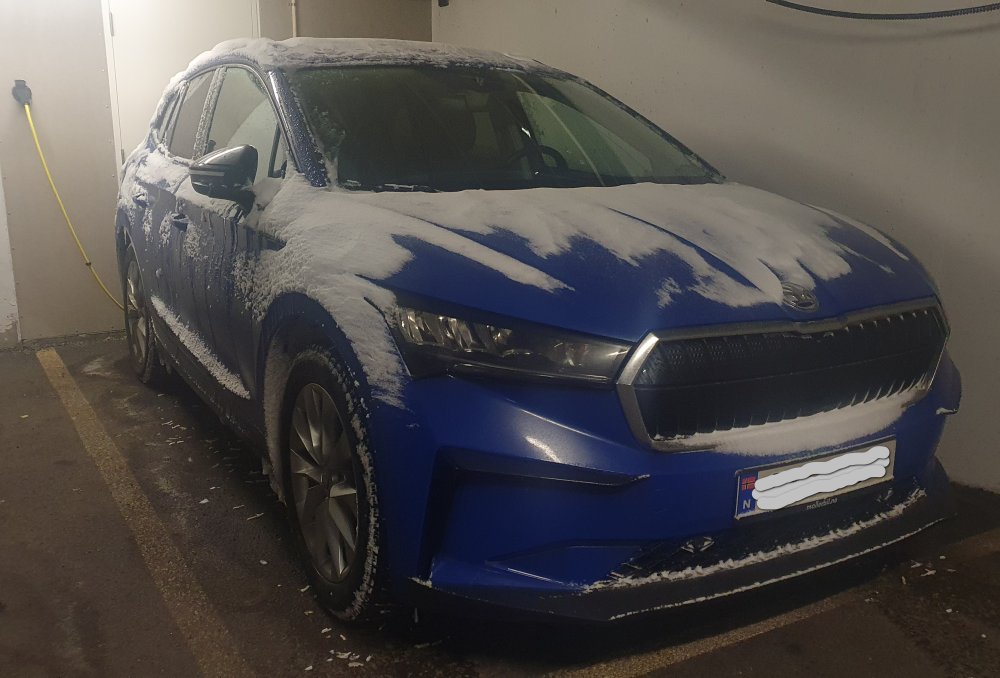 1 point
 -
1 pointI had this exact same issue after picking up my new Karoq SE L on Wednesday. Android Auto worked fine with a usb cable but dropped the wireless connection after a few seconds when not connected via usb and refused to reconnect. I found a reference online to a setting in my phone (Samsung Z Flip3) that suggested a conflict if Android Auto had been used on other cars. This seemed worthy of investigation as Android Auto worked seamlessly on my wife's Kamiq. On your phone open 'Settings' Select 'Connected Devices' Scroll down to and select 'Android Auto' You should see '+ Connect a Car' Below that click on 'Previously connected cars' Remove all cars in the list ( I had 2 x Skoda's) Ensure 'Add new cars to Android Auto' is enabled Close everything down, restart the car and see if it connects wirelessly. Mine connected automatically and after agreeing to the various permissions required on the phone it is working normally. Hope this helps.1 point
-
1 pointSo, it ended up being beginning of July, 7/7/23 to be specific. And, it didn’t start too well, with a 56 km extra test drive on the meter (as indicated by a note in the globe compartment) and still a faulty battery coolant pump… now replaced. I had a VRS coupe as a loaner in the mean time, so I shall not complain too much. Seats are a bit of a disappointment - I’m too tall and wide shouldered to fit them well. Colour is nice, much better than anticipated.

 1 point