


Leaderboard
-
Lady Elanore
FREEDOM17Points24,912Posts -
AnnoyingPentium
FREEDOM12Points5,656Posts -

Lee01
FREEDOM8Points36,451Posts -
.jpg.1006585dfe4e2977315b67c3d642e37b.jpg)
Guest_
FREEDOM6Points83,824Posts


.thumb.jpg.9dd3f612ba7f13d10be5c518d3c8d255.jpg)

Popular Content
Showing content with the highest reputation on 20/03/25 in all areas
-
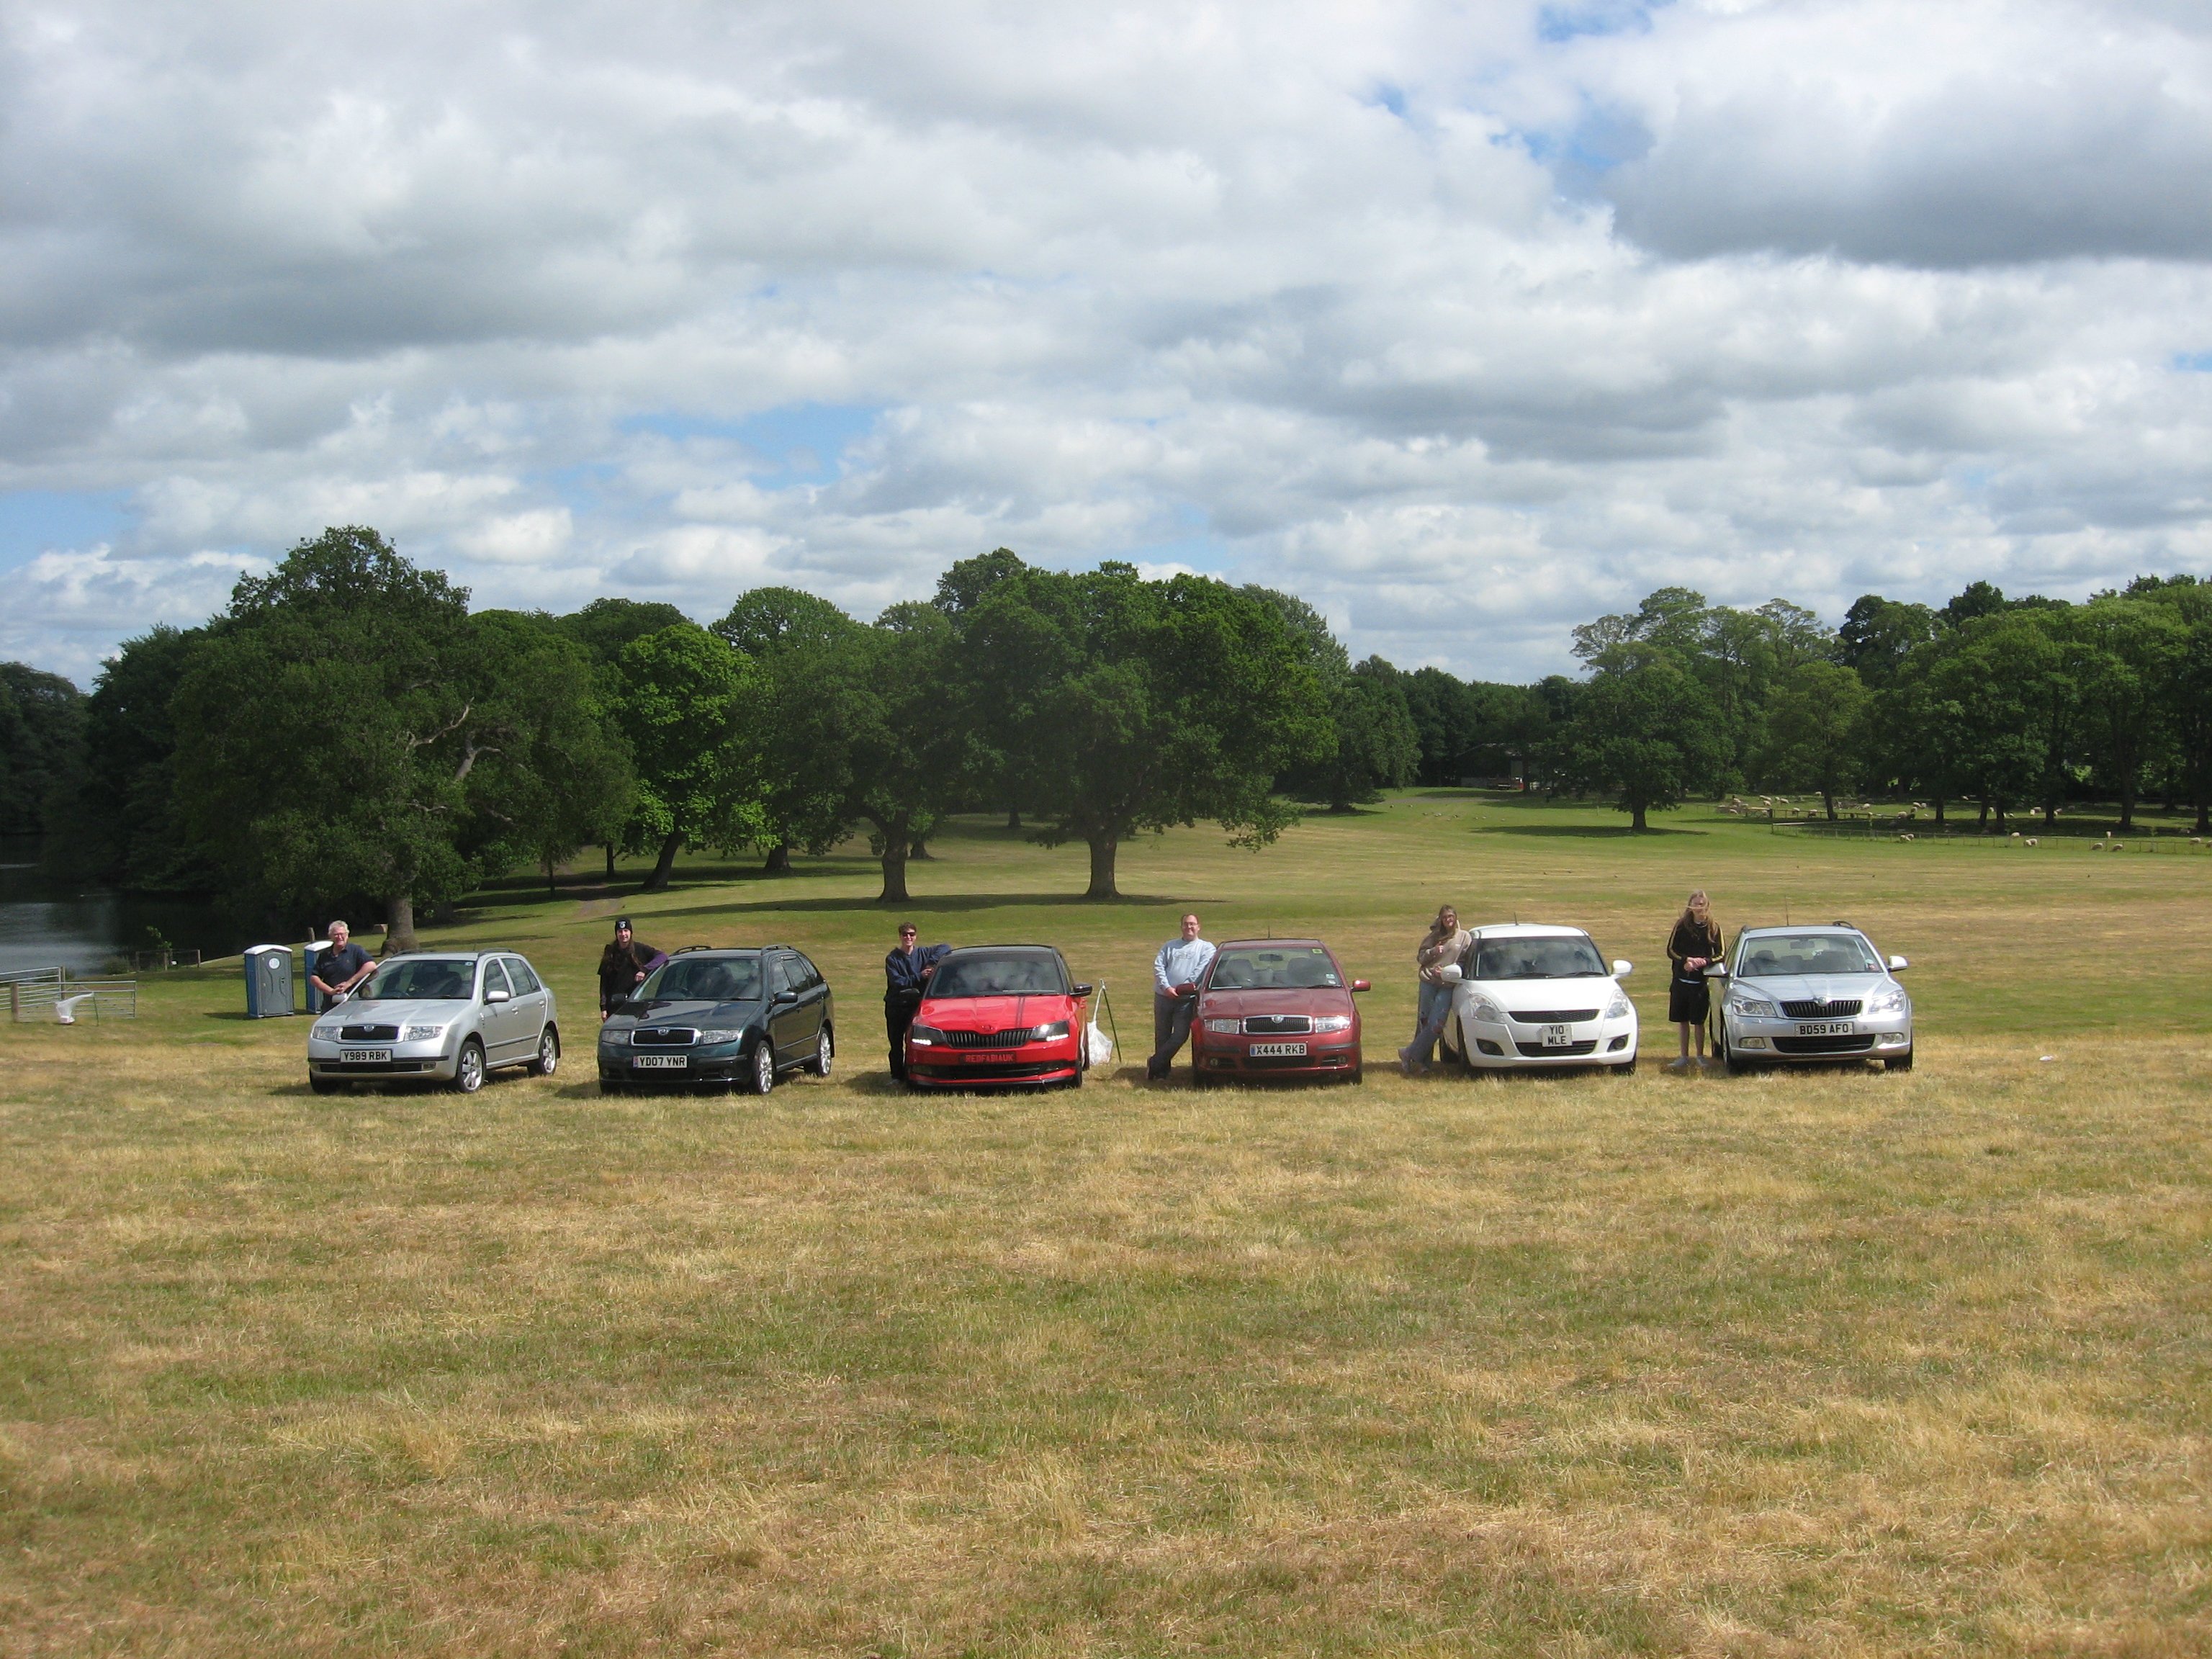
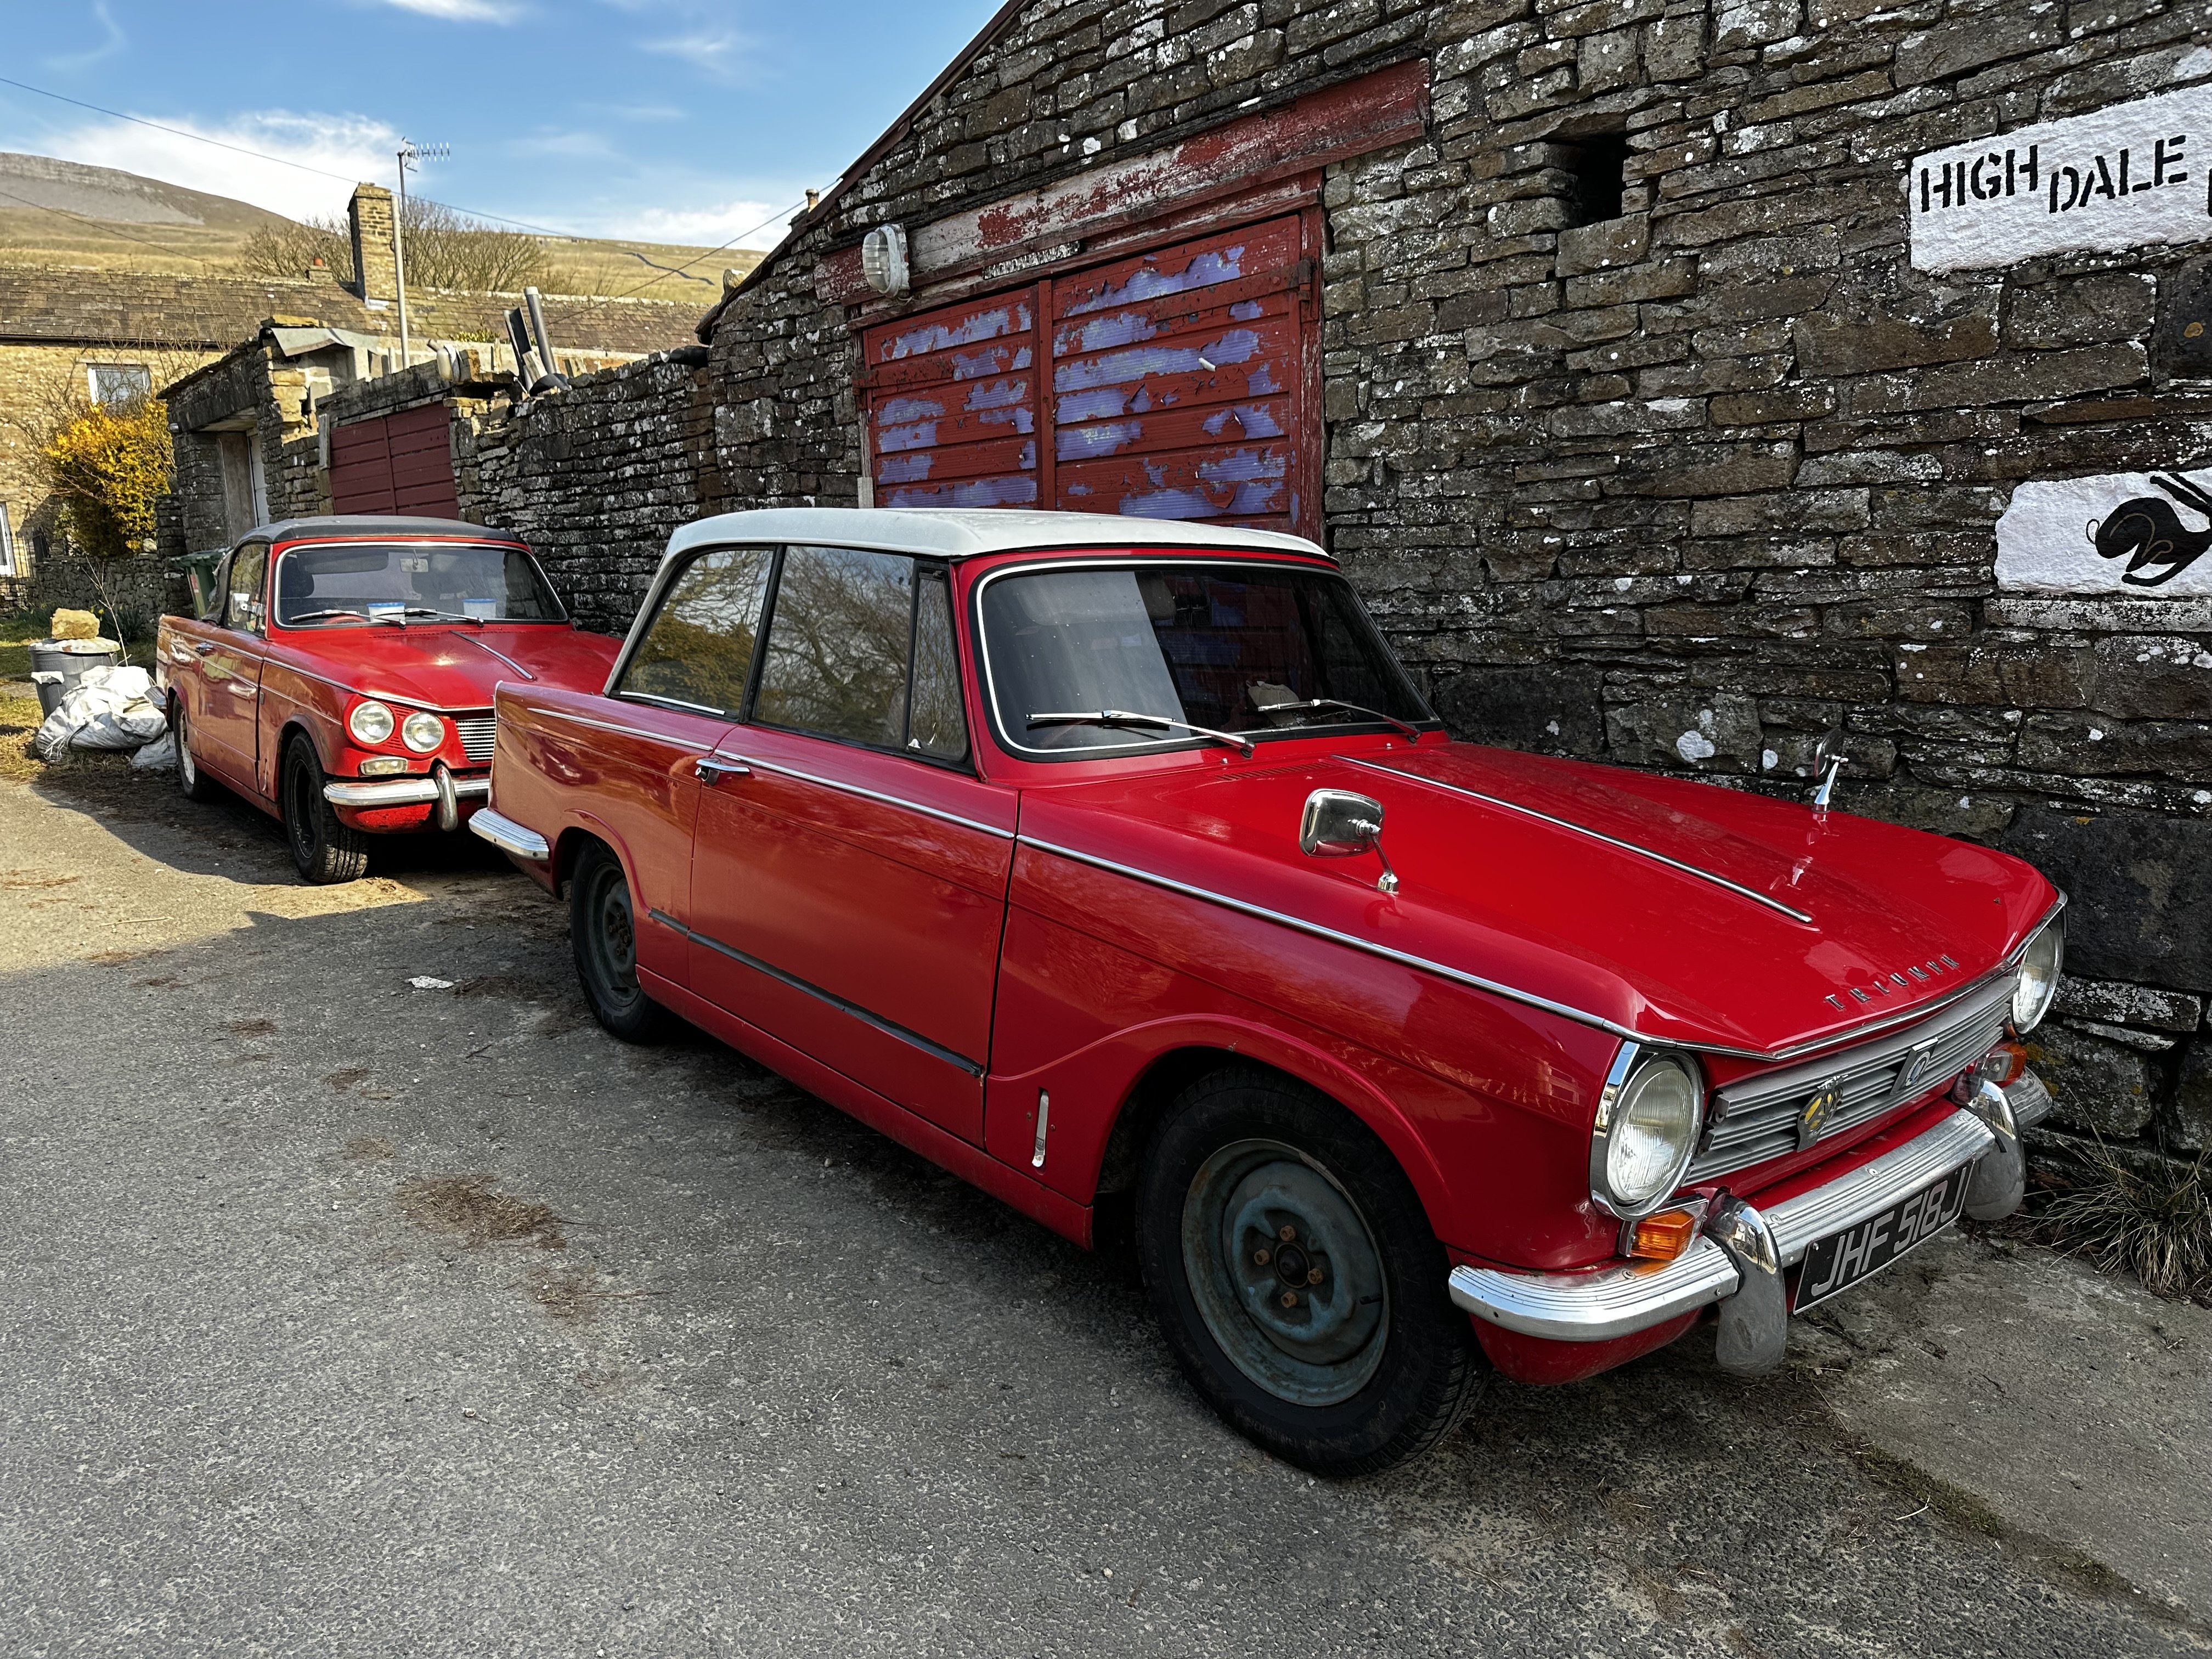
Two old school Triumphs today, in need of a little TLC though, especially the Vitesse.
 4 points
 -
The original battery could well have been fine only the system had been set to 13a instead of 130a by the previous owner.3 points
-
Hi, how did you get on with this? I had a very similar problem with my 2015 150hp Scout. Since I got it, the stop start didn't work, one of the display messages was 'high power consumption'. Checked everything I could with a meter, couldn't find any current draw with the amp clamp, battery seemed healthy but same problem even after a few good charges with the battery off the car. Took it to my local garage, they condemned the battery, so I fitted a new one. Problem wasn't cured. Few months go by, got sick of it again, did lots of googling, decided I needed the coding checking. Took it to a local VAG specialist, they told me the battery didn't need coding on this car and the battery was knackered. Dubious of this given the battery was only a couple of months old, and having read various things about coding, I tracked down a guy I used to work with on the spanners who I knew had VCDS. He hooked it up, there are three battery specific things that need to be coded, one of them was the battery amp hours. My battery was 130ah, the coding was for 13ah. Easy as pie he recoded it to what it should be, 130ah.. Problem solved, stop start working fine, no dash messages, all good. So the car thought it had a tiny capacity battery so it didn't want to engage the stop start in fear of flattening the battery. Really pleased with the fix, really disappointed with the so-called VAG specialist not knowing about battery coding.3 points
-
Are you now saying the noise pattern is related to wheel rotation speed and not engine revs?3 points
-
2 pointsIndeed. Any association with TESLA is widely considered a risk now. Dealerships, TESLA chargers, fire bombing individual vehicles.2 points
-
2 pointsUpdate: I got hold of a decent 19" with a usable tyre for reasonable price. It fits in the boot well perfectly and the shelf would sit down level except... The tool kit. The polystyrene insert sits on the rim rather than down into the wheel, hence sticks up. Looks like I'm going to have to carefully shave a little off the sides until it will sit down flush.2 points
-
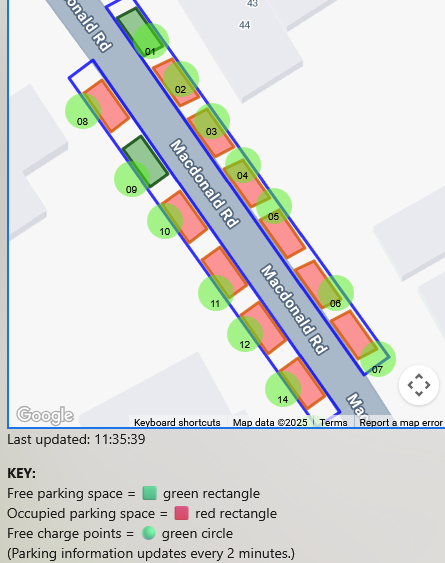
London got these hidden kerb-side charge points ElectrekLondon is getting 570 'flat and flush' sidewalk EV chargersEV drivers in Camden, London, will soon see a major boost in sidewalk chargers, thanks to Camden Council and Trojan Energy.I see lots of them on the map and looks like even has sensor to tell if nearby space is occupied. Curious, I signed up for free and getting one of those mahoosive adaptor in the post soon. 0 cost to me so far. In the portal, there is also a setting for smart charging to minimise carbon emissions and thus price, sounds like how Intelligent Octopus Go works. Downside is less elegant solution to EV driver with the huge adaptor, compared to simple lamp post sockets (I've also tried). But up side is that 22 kW charging can be made available along any road for every single park-able space. If this can be rolled out everywhere, no more social divide.
 2 points
 -
If the knocking noise is related to wheel rotation does it vary with acceleration or on extreme lock in either direction? Universal joint wear? Rarely reported on VAGs but since we still don't know the car mileage or whether it is subjected to a lot of full lock maneuvers like a taxi driver would likely do?2 points
-
Firstly, congratulations on the Race Blue, the best colour. Secondly, the quoted faults can all be either fixed (hopefully) or confirmed using VCDS or OBD II. Just cancel them and see if they stay gone.2 points
-
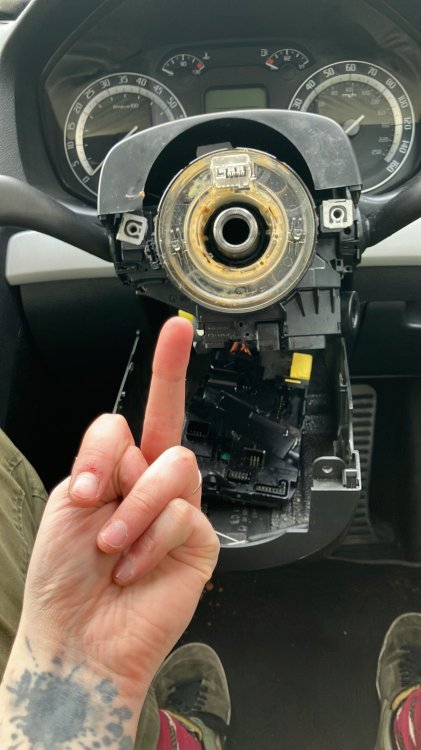
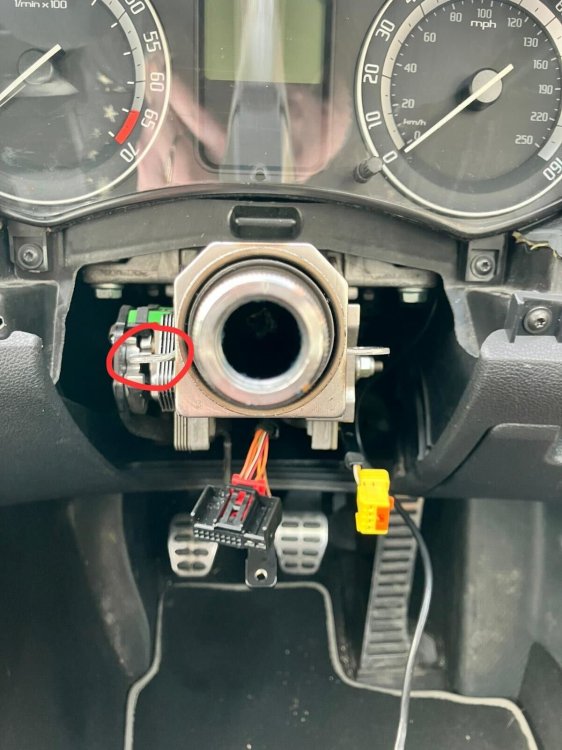
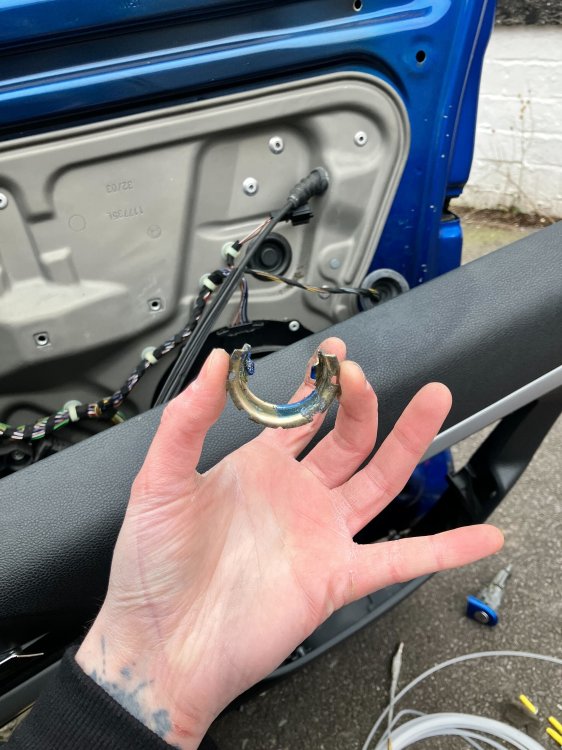
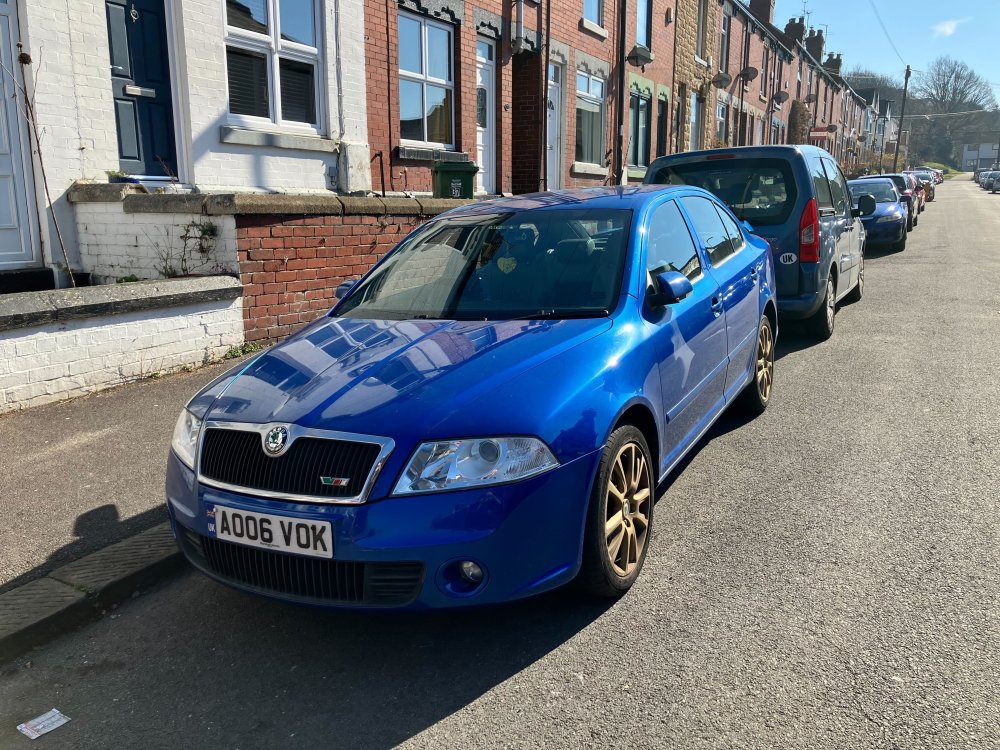
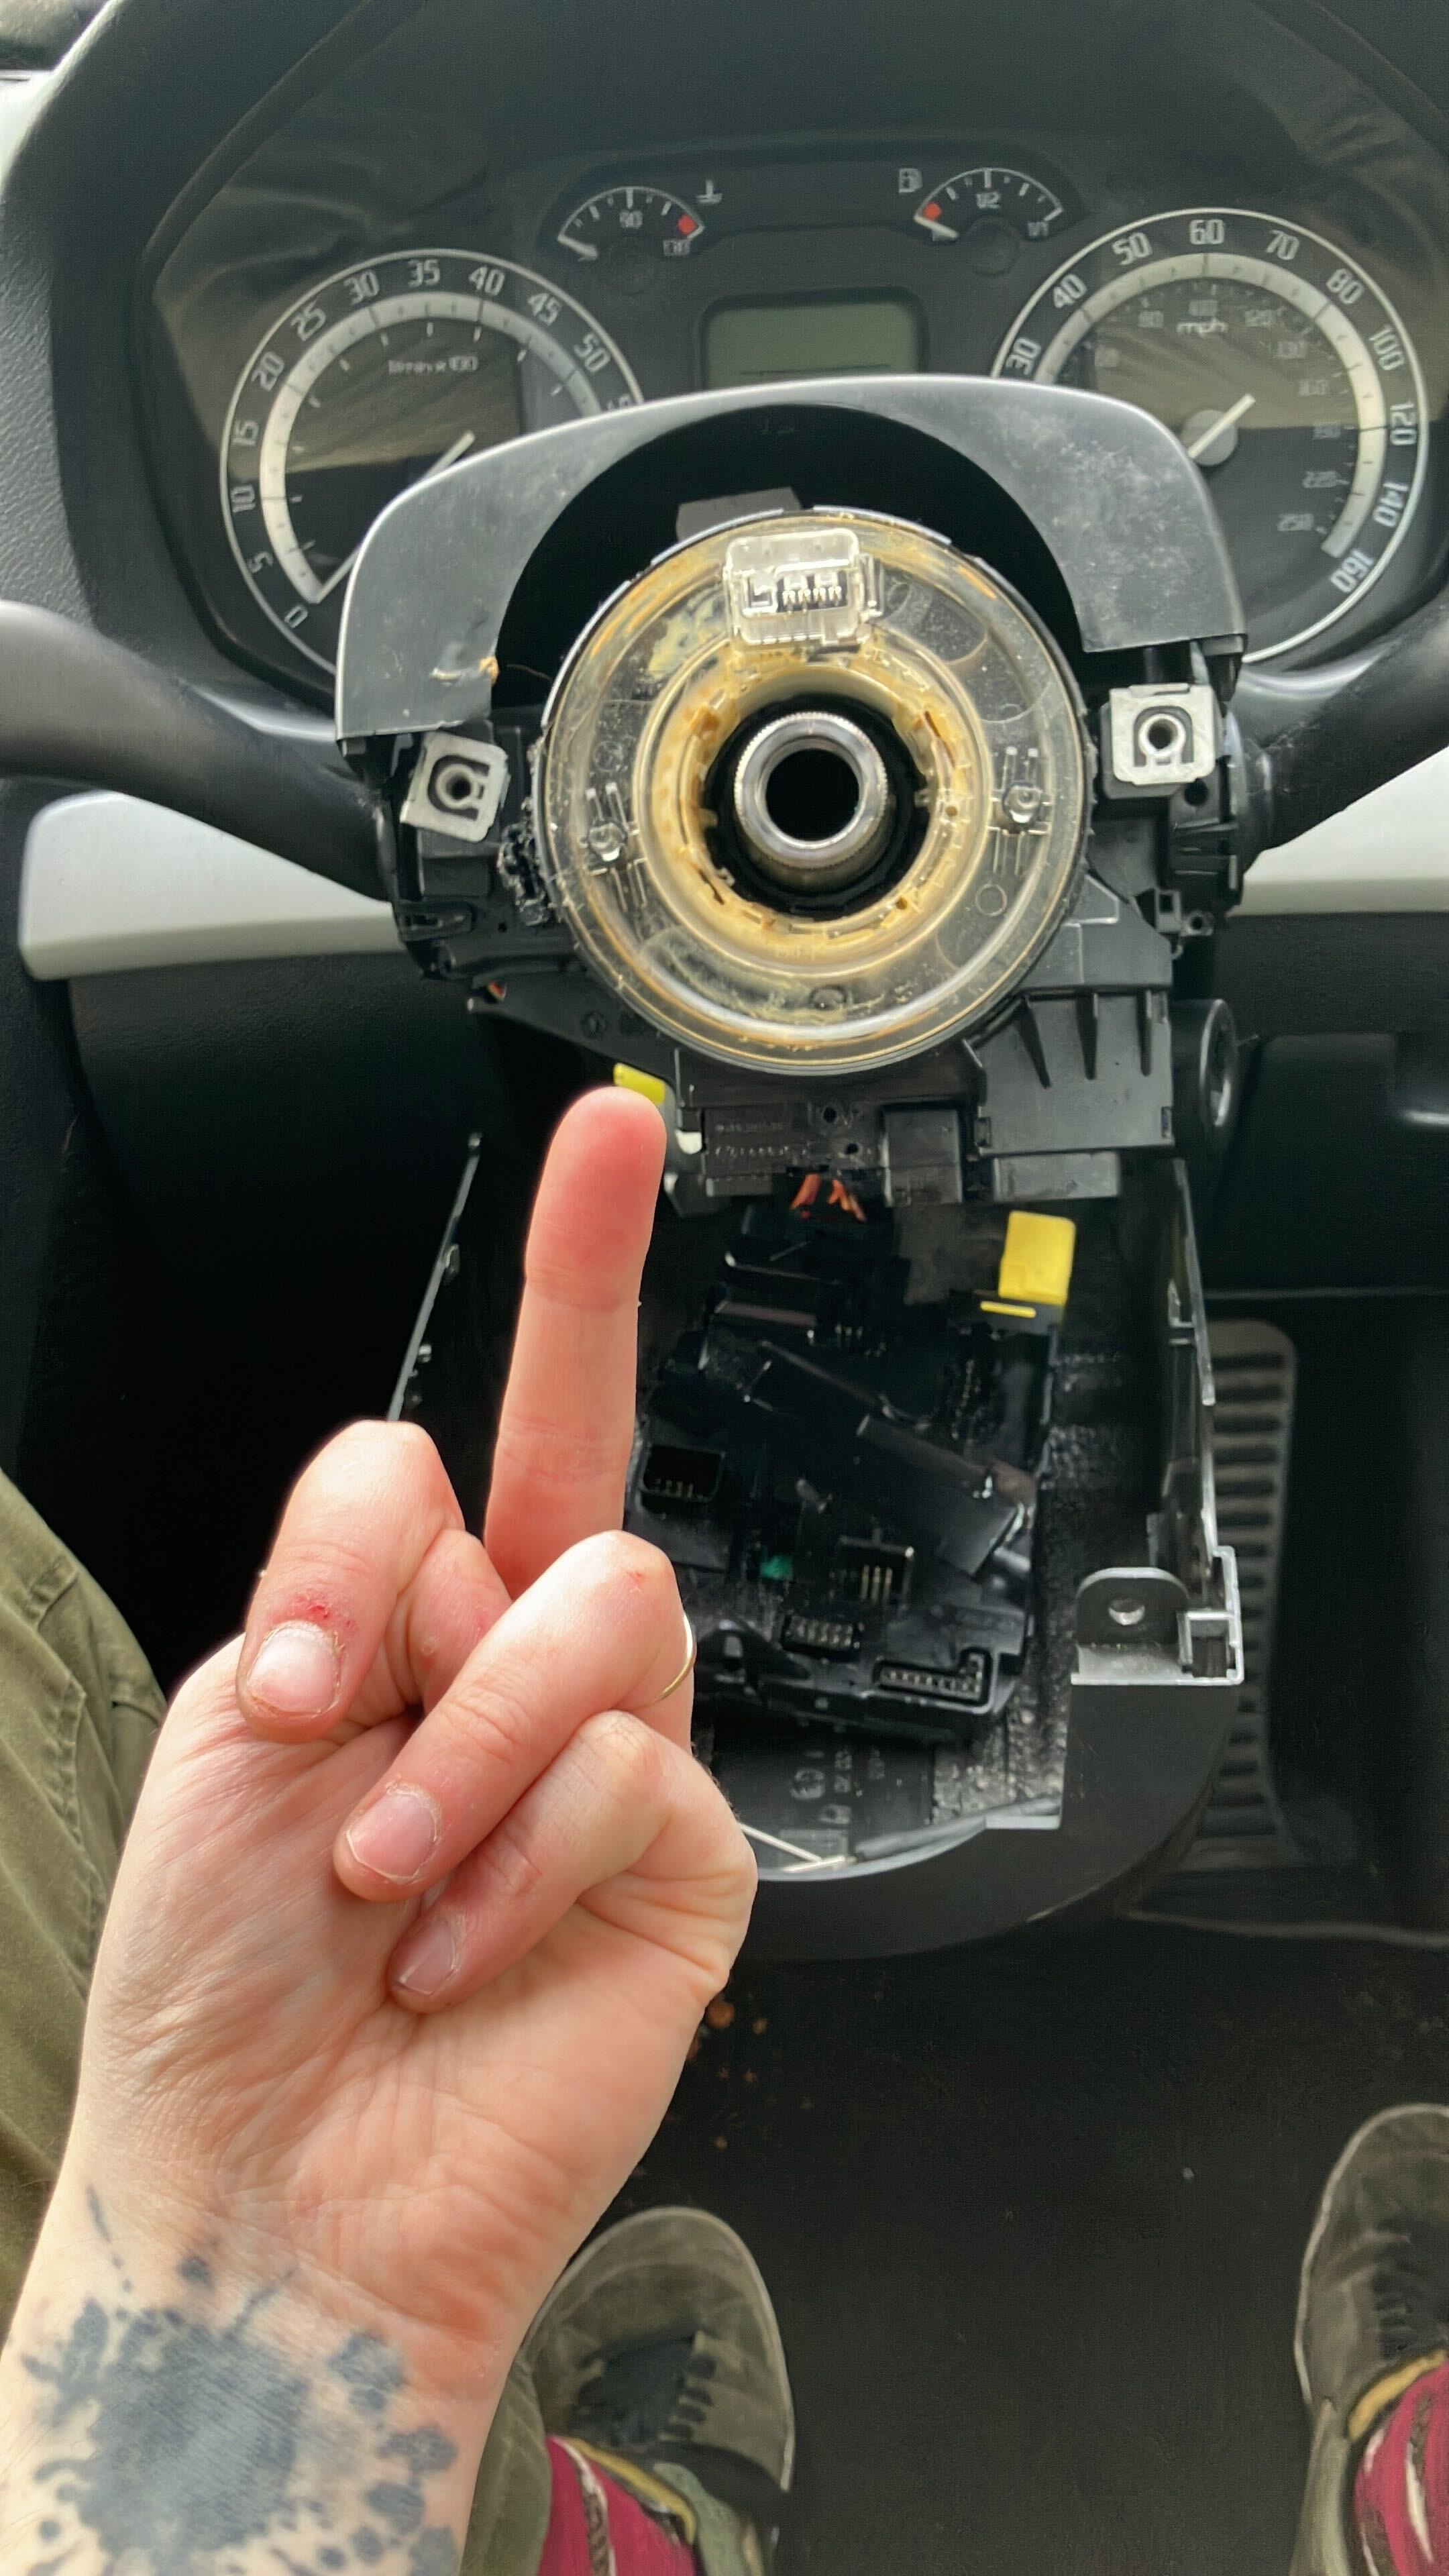
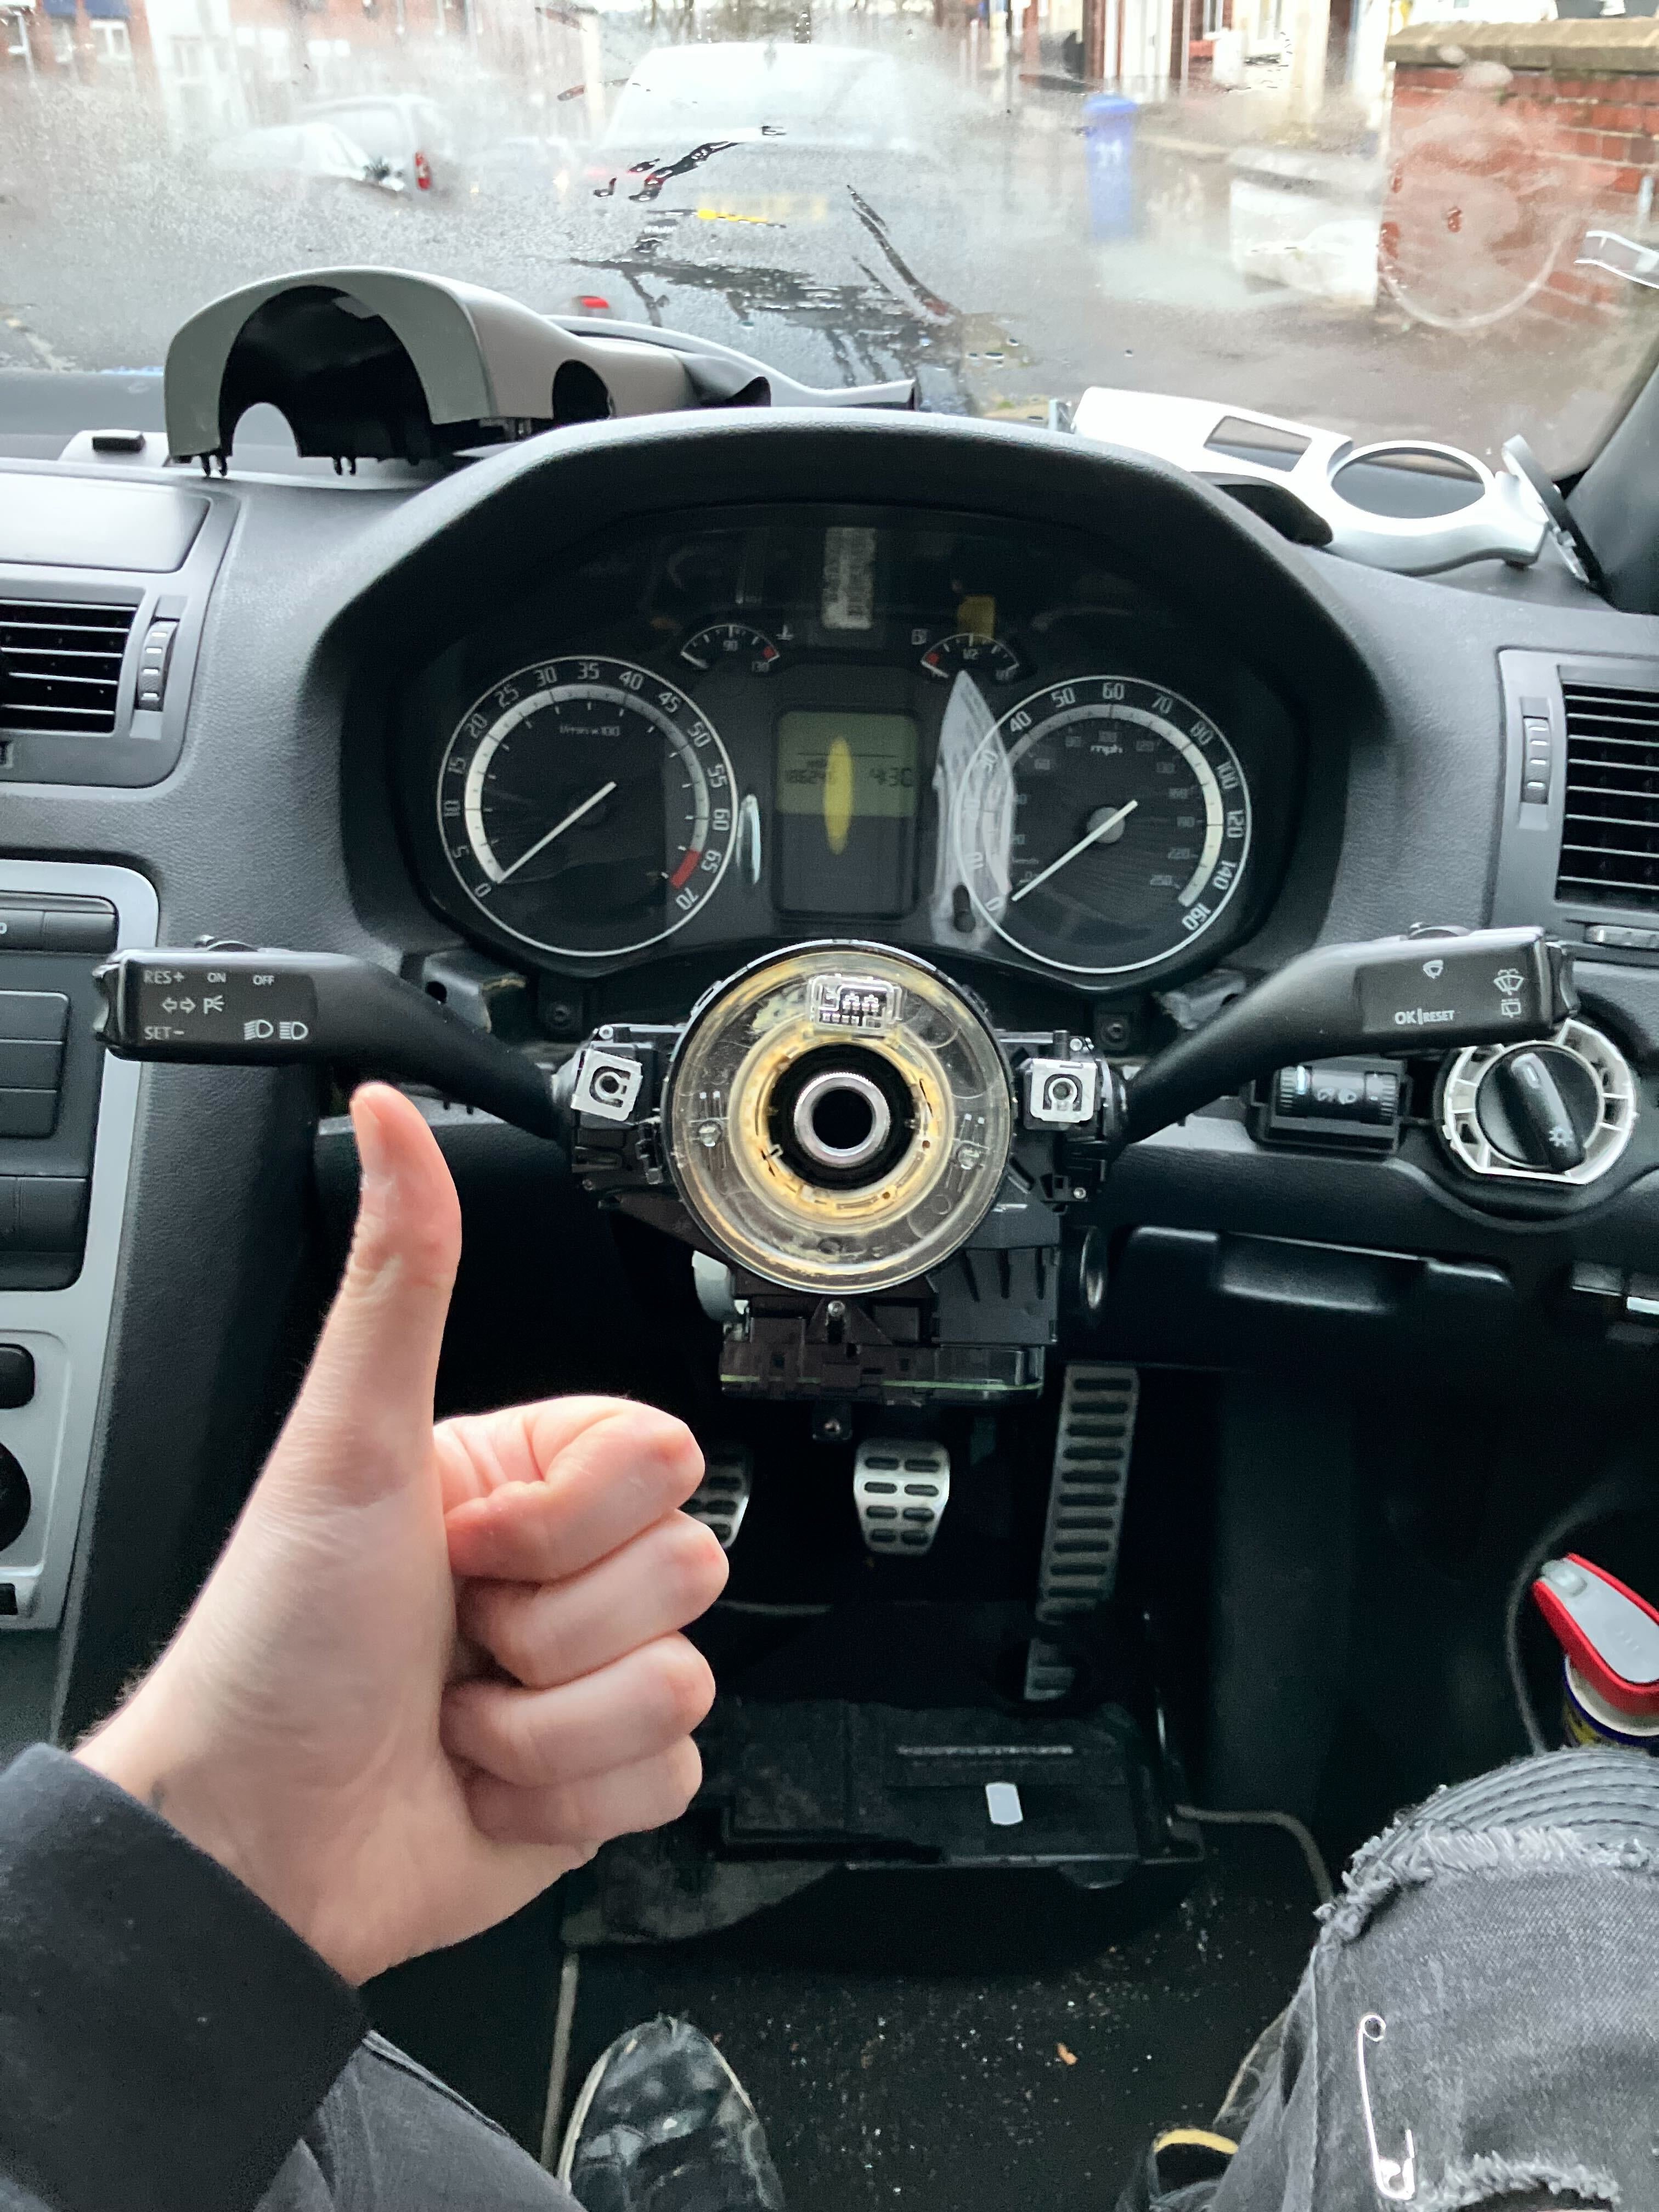
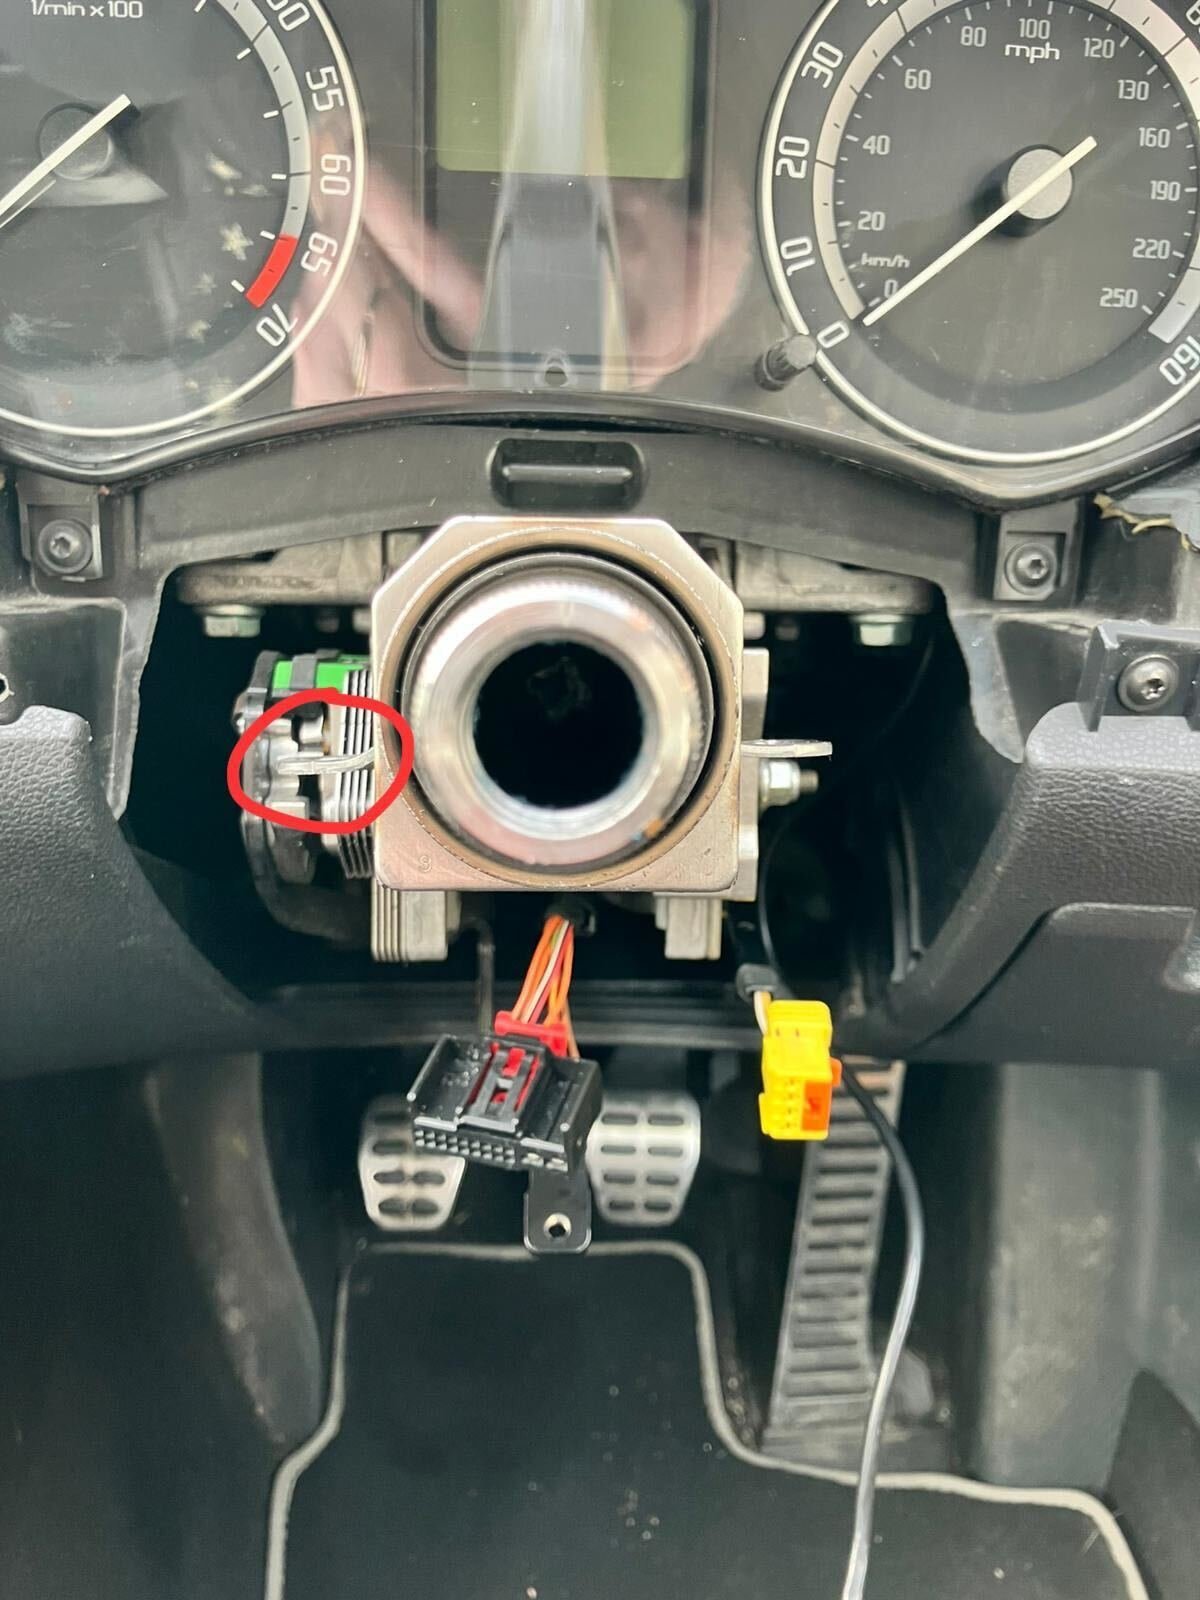
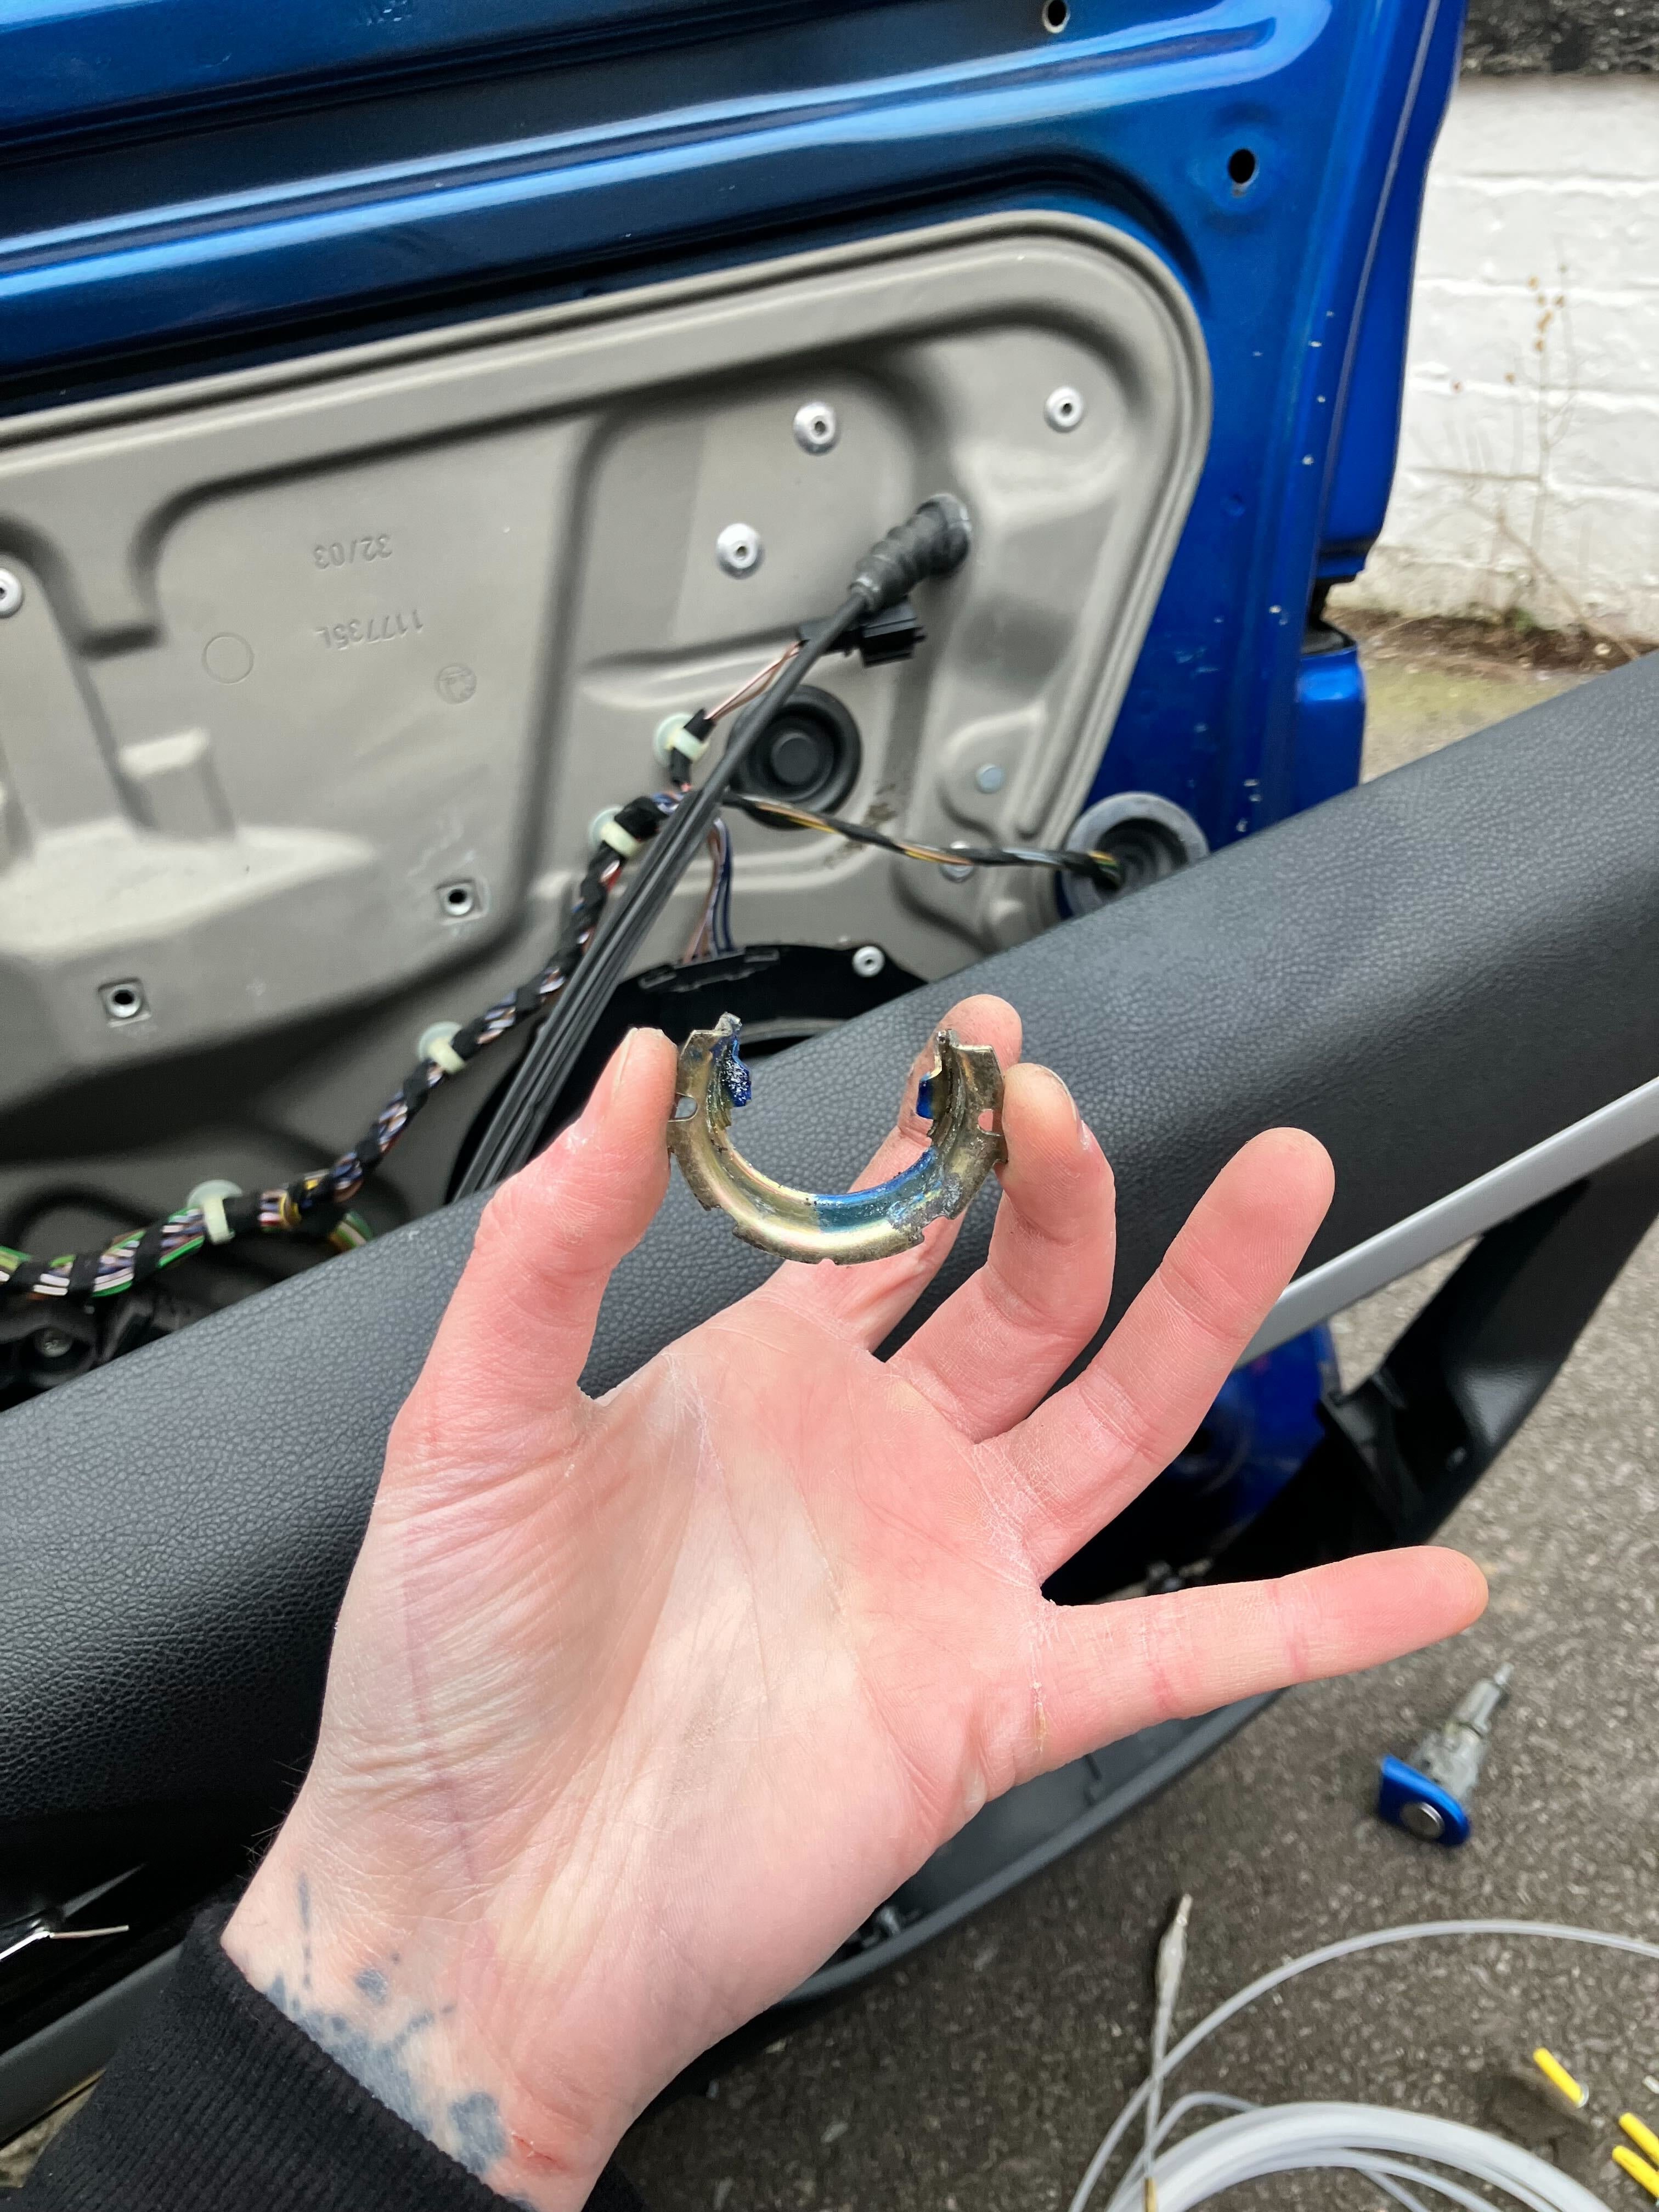
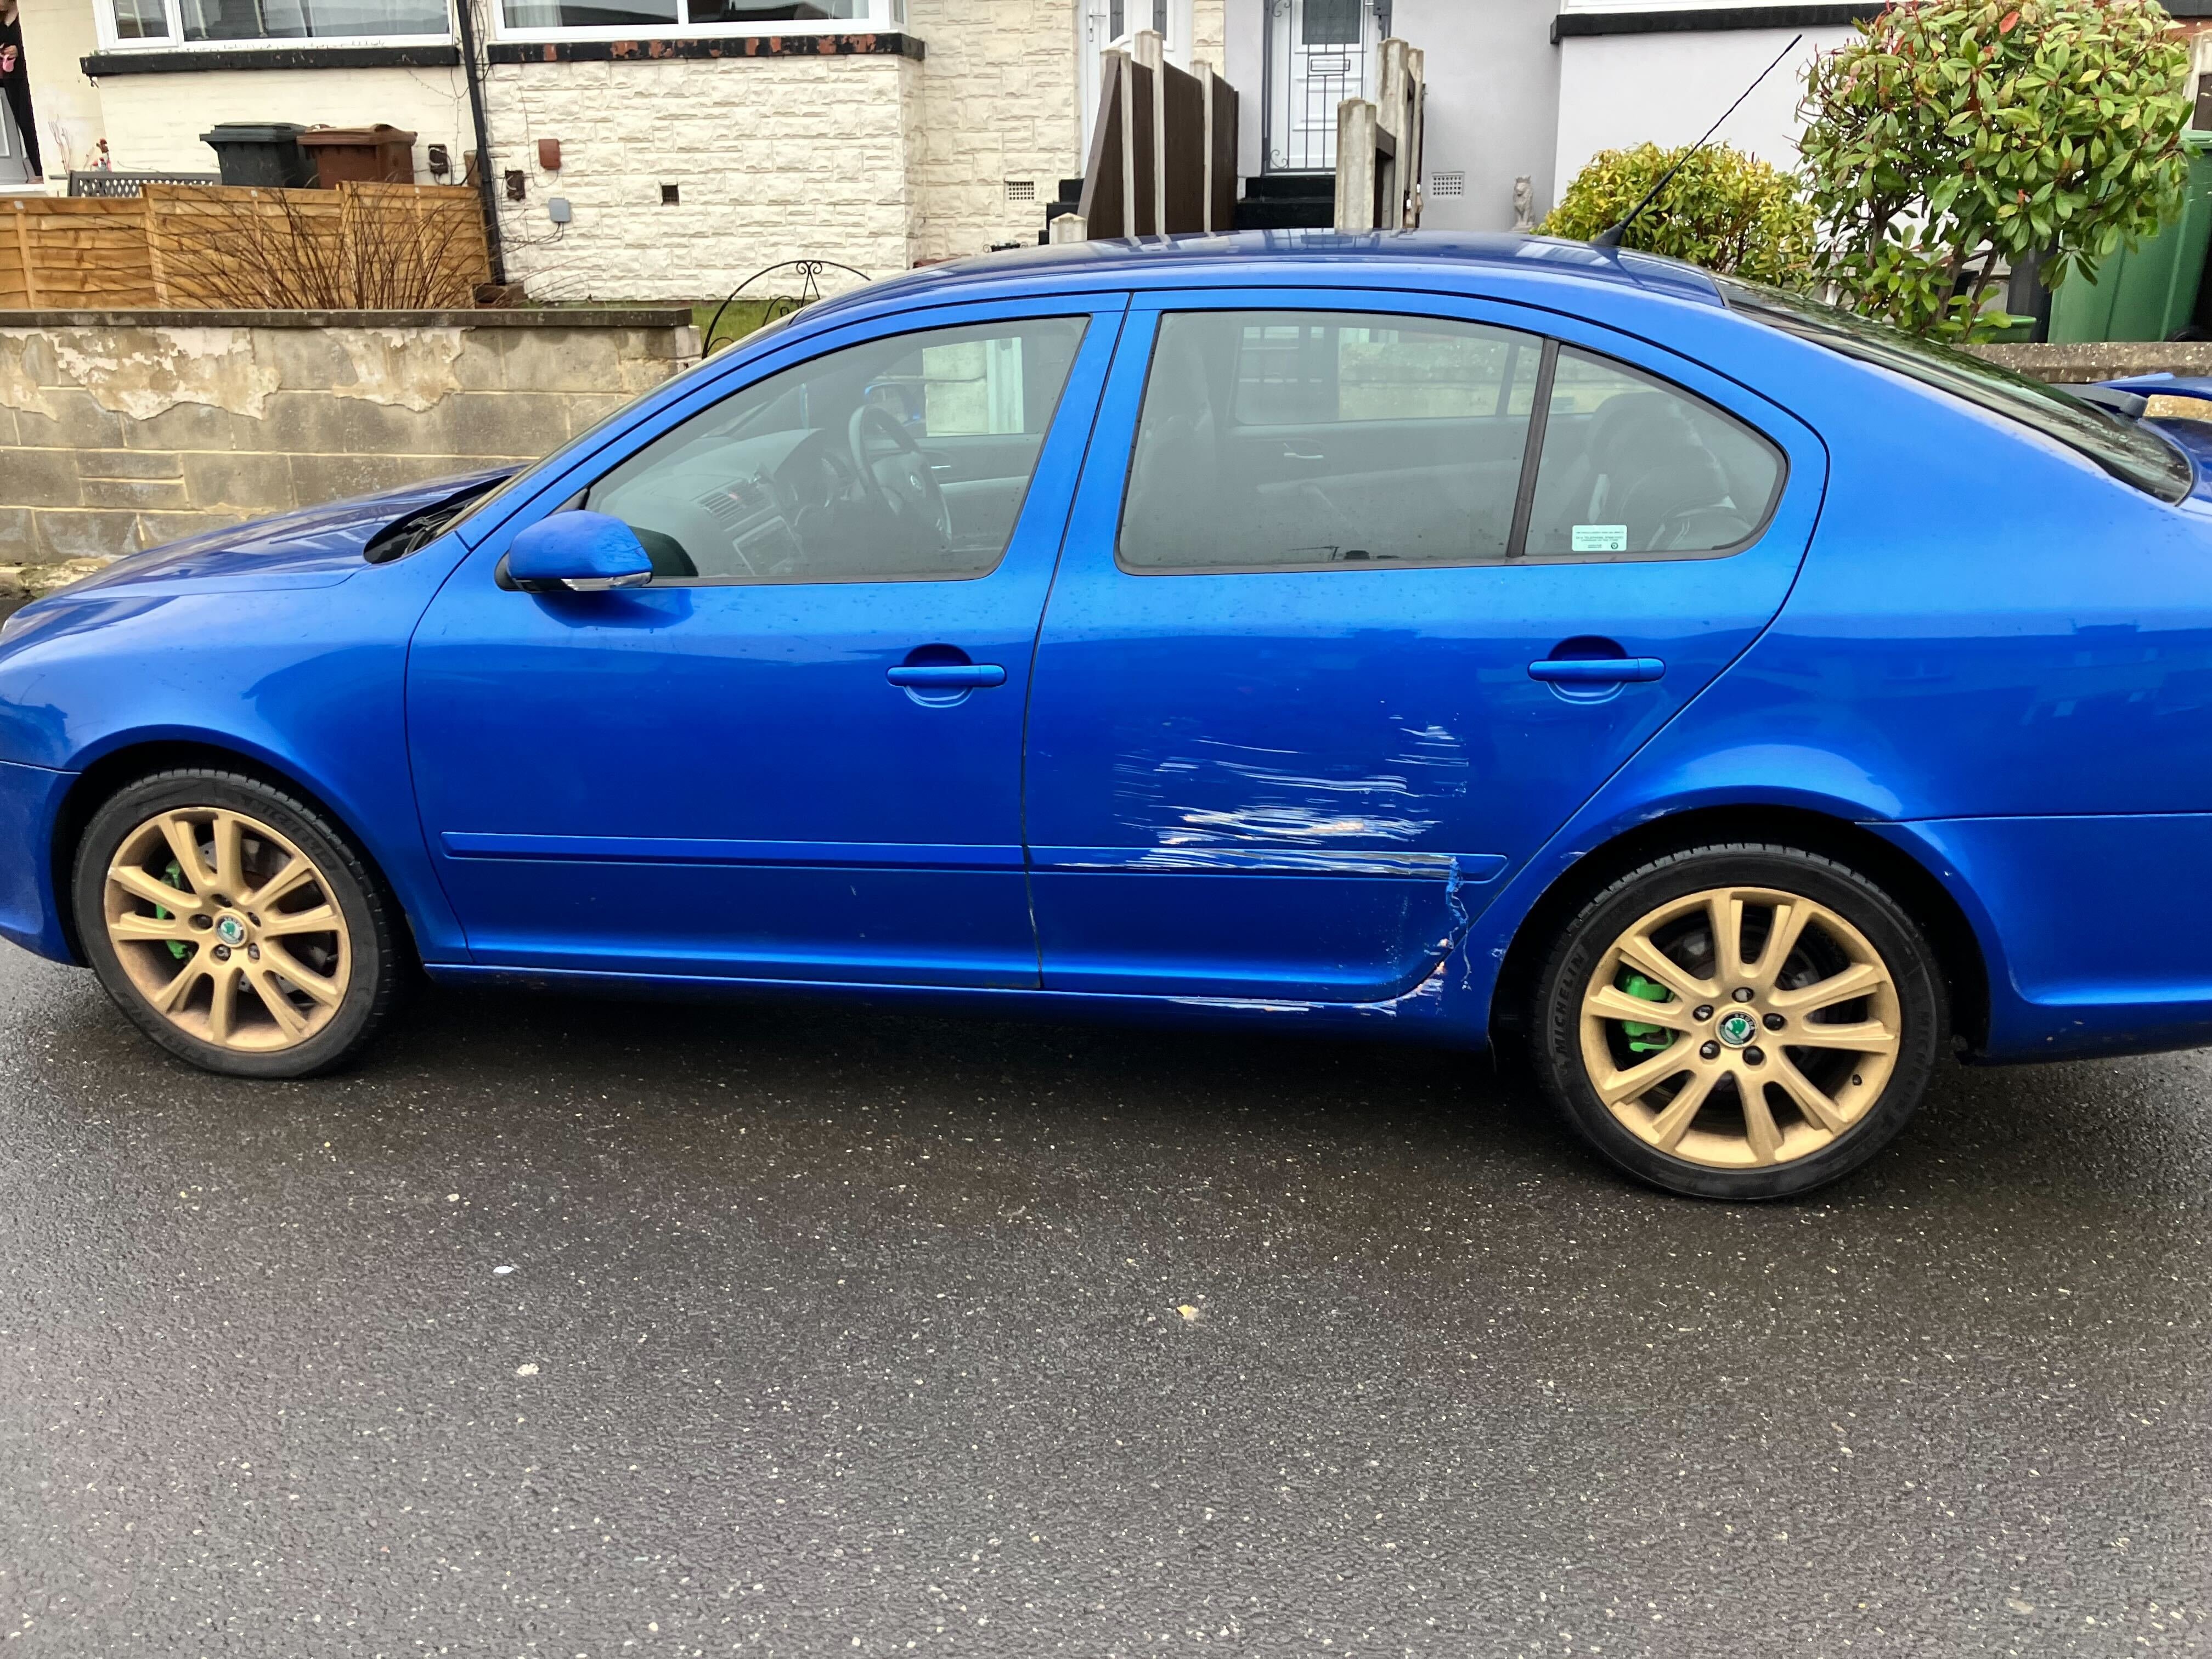
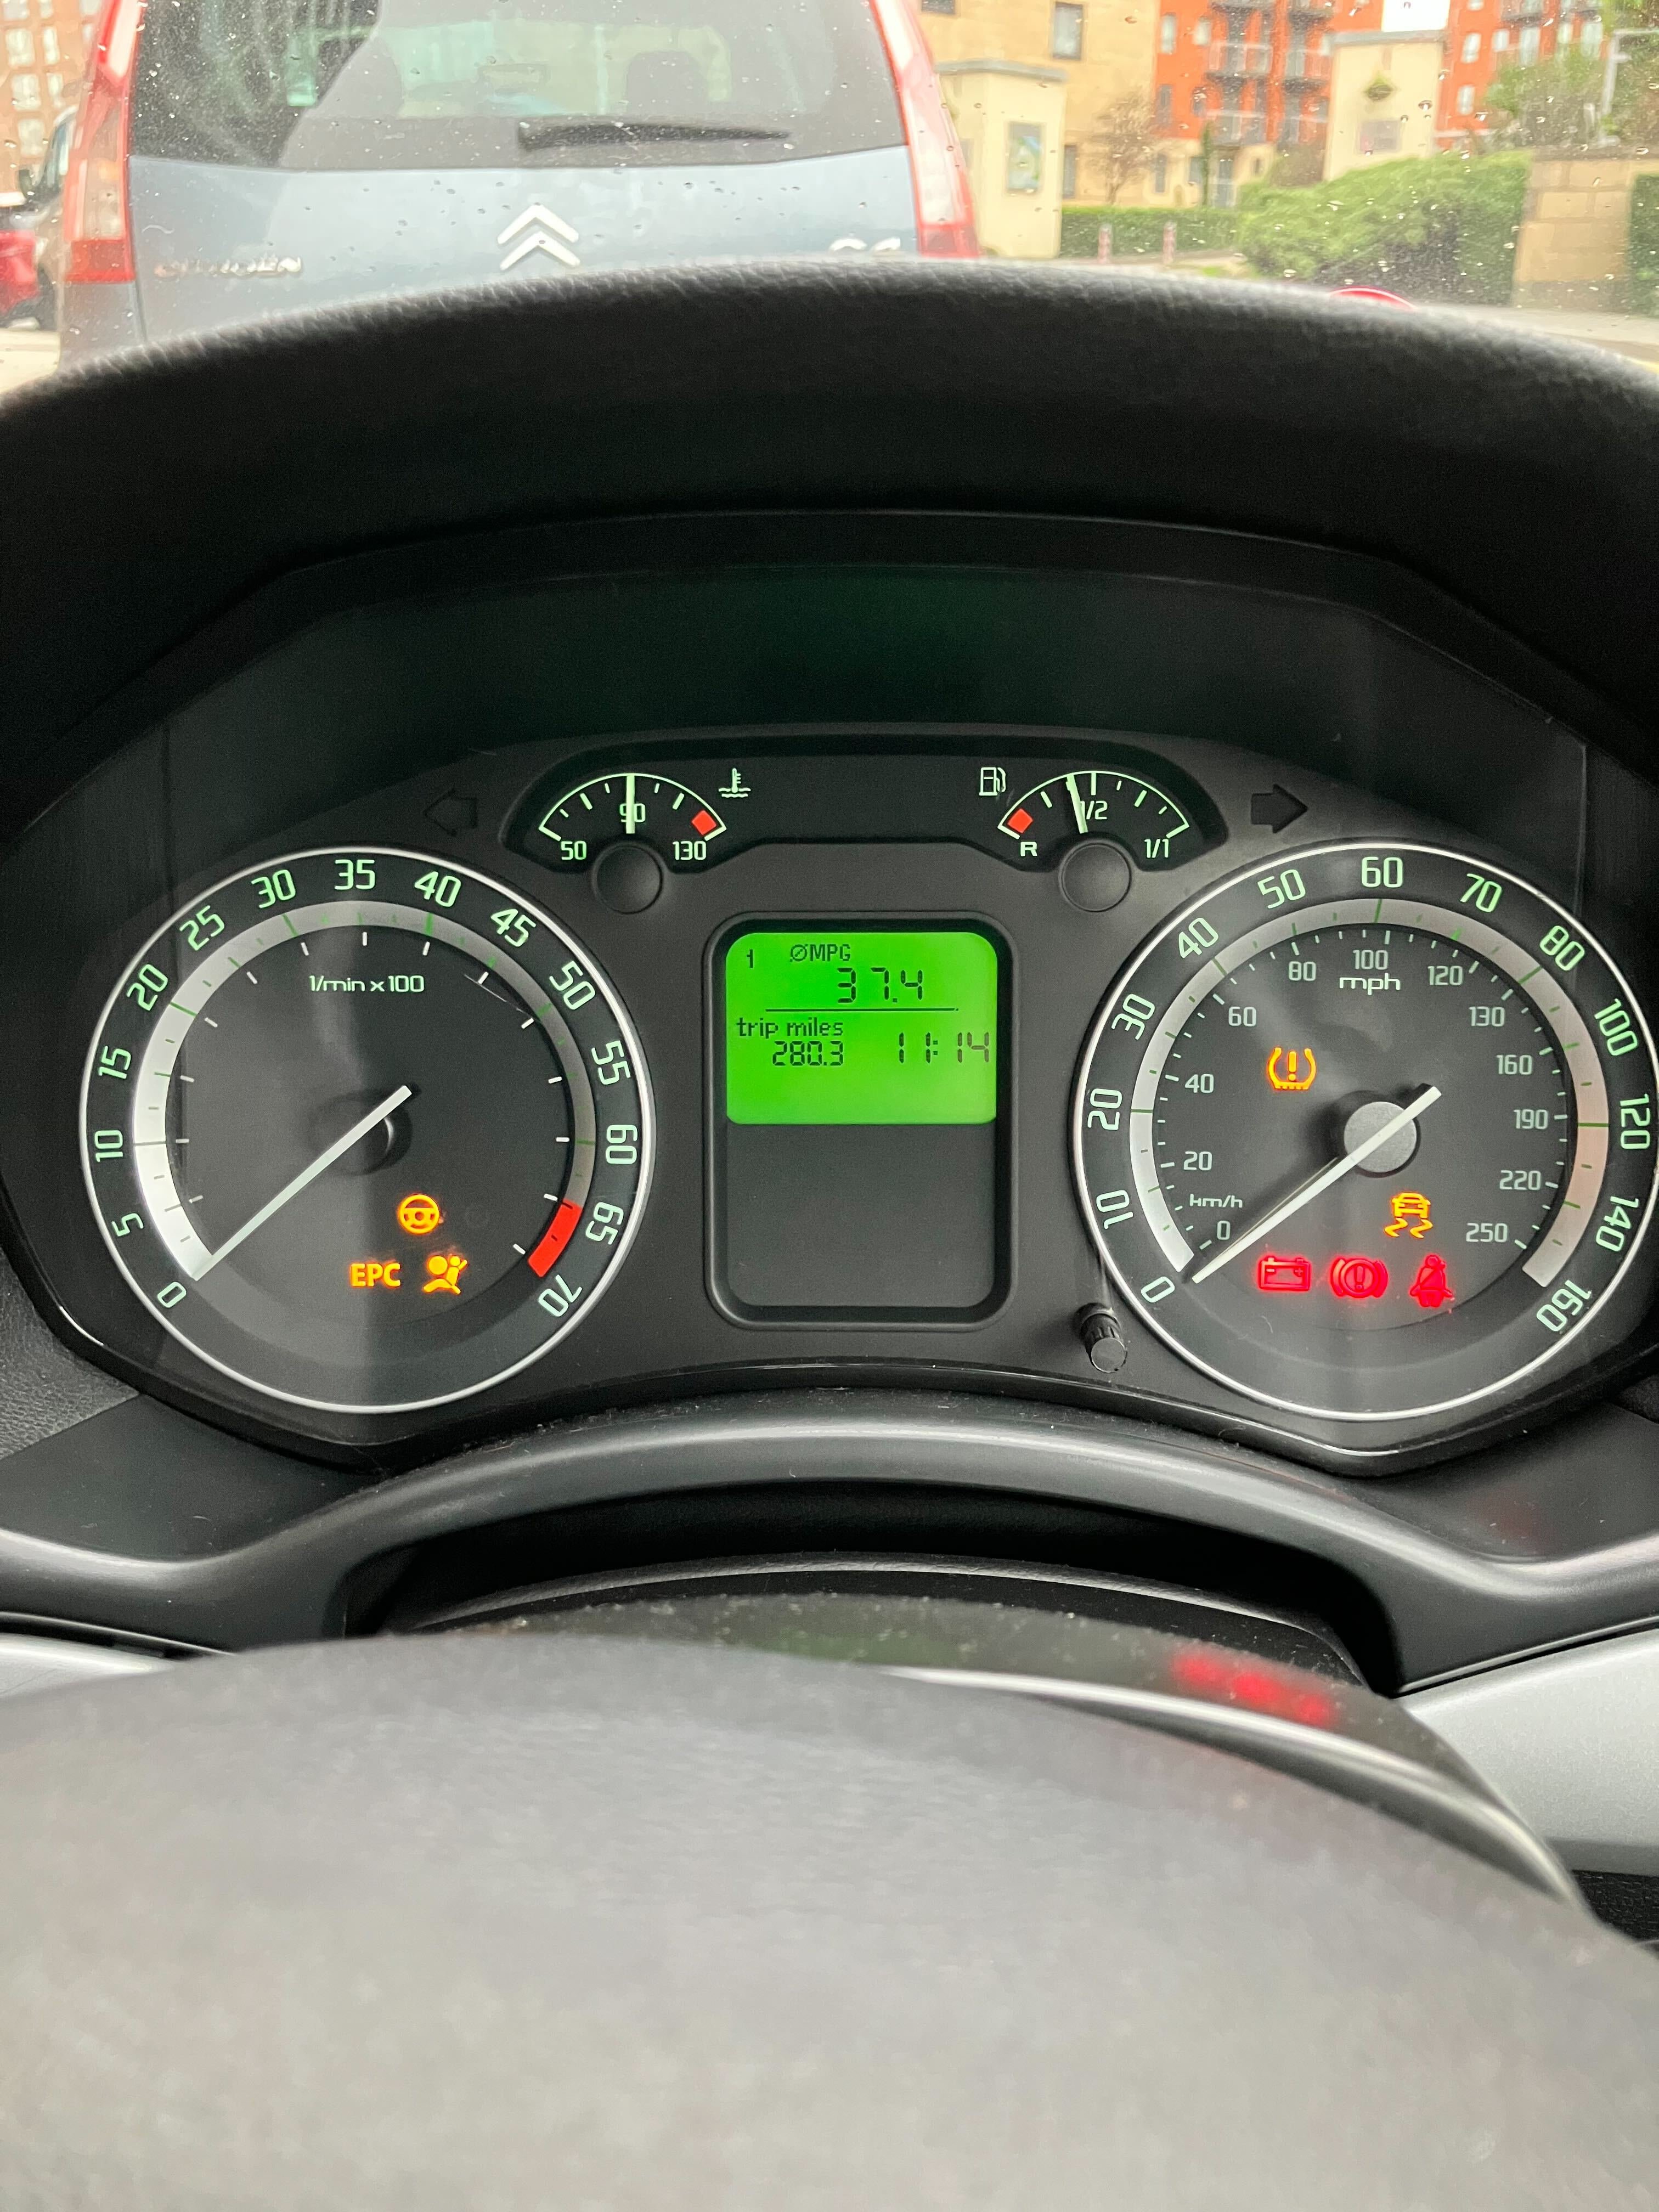
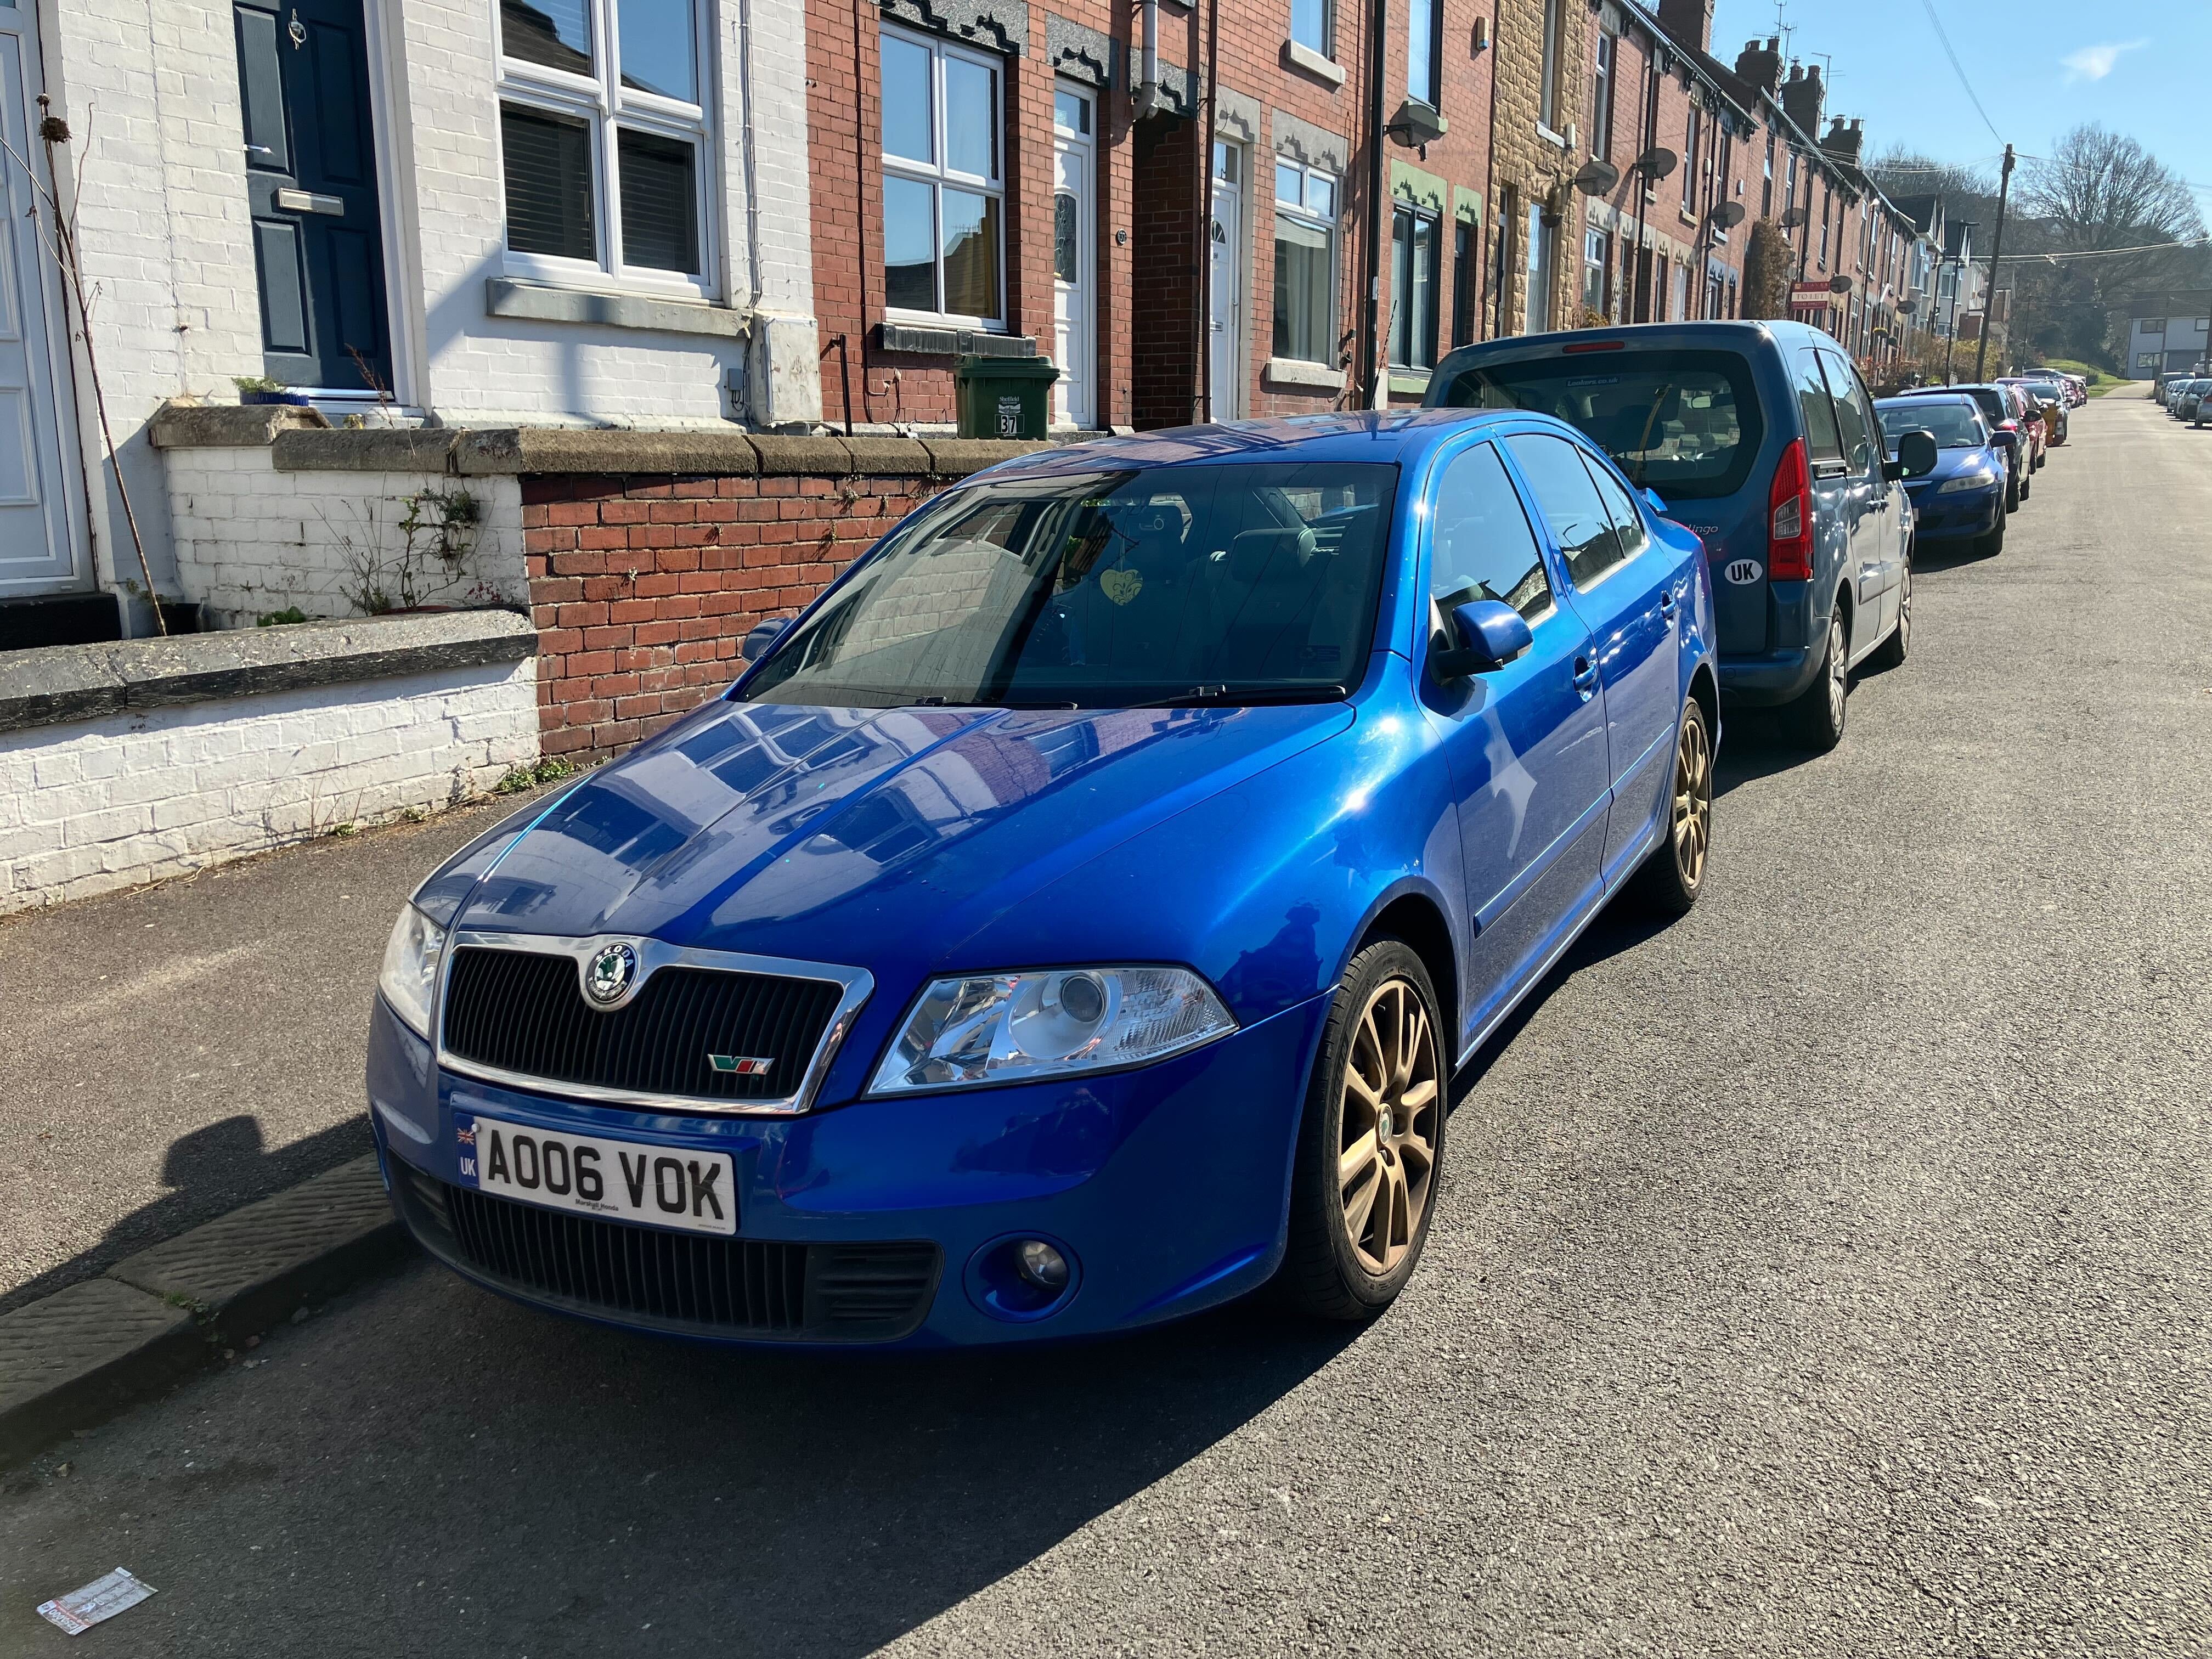
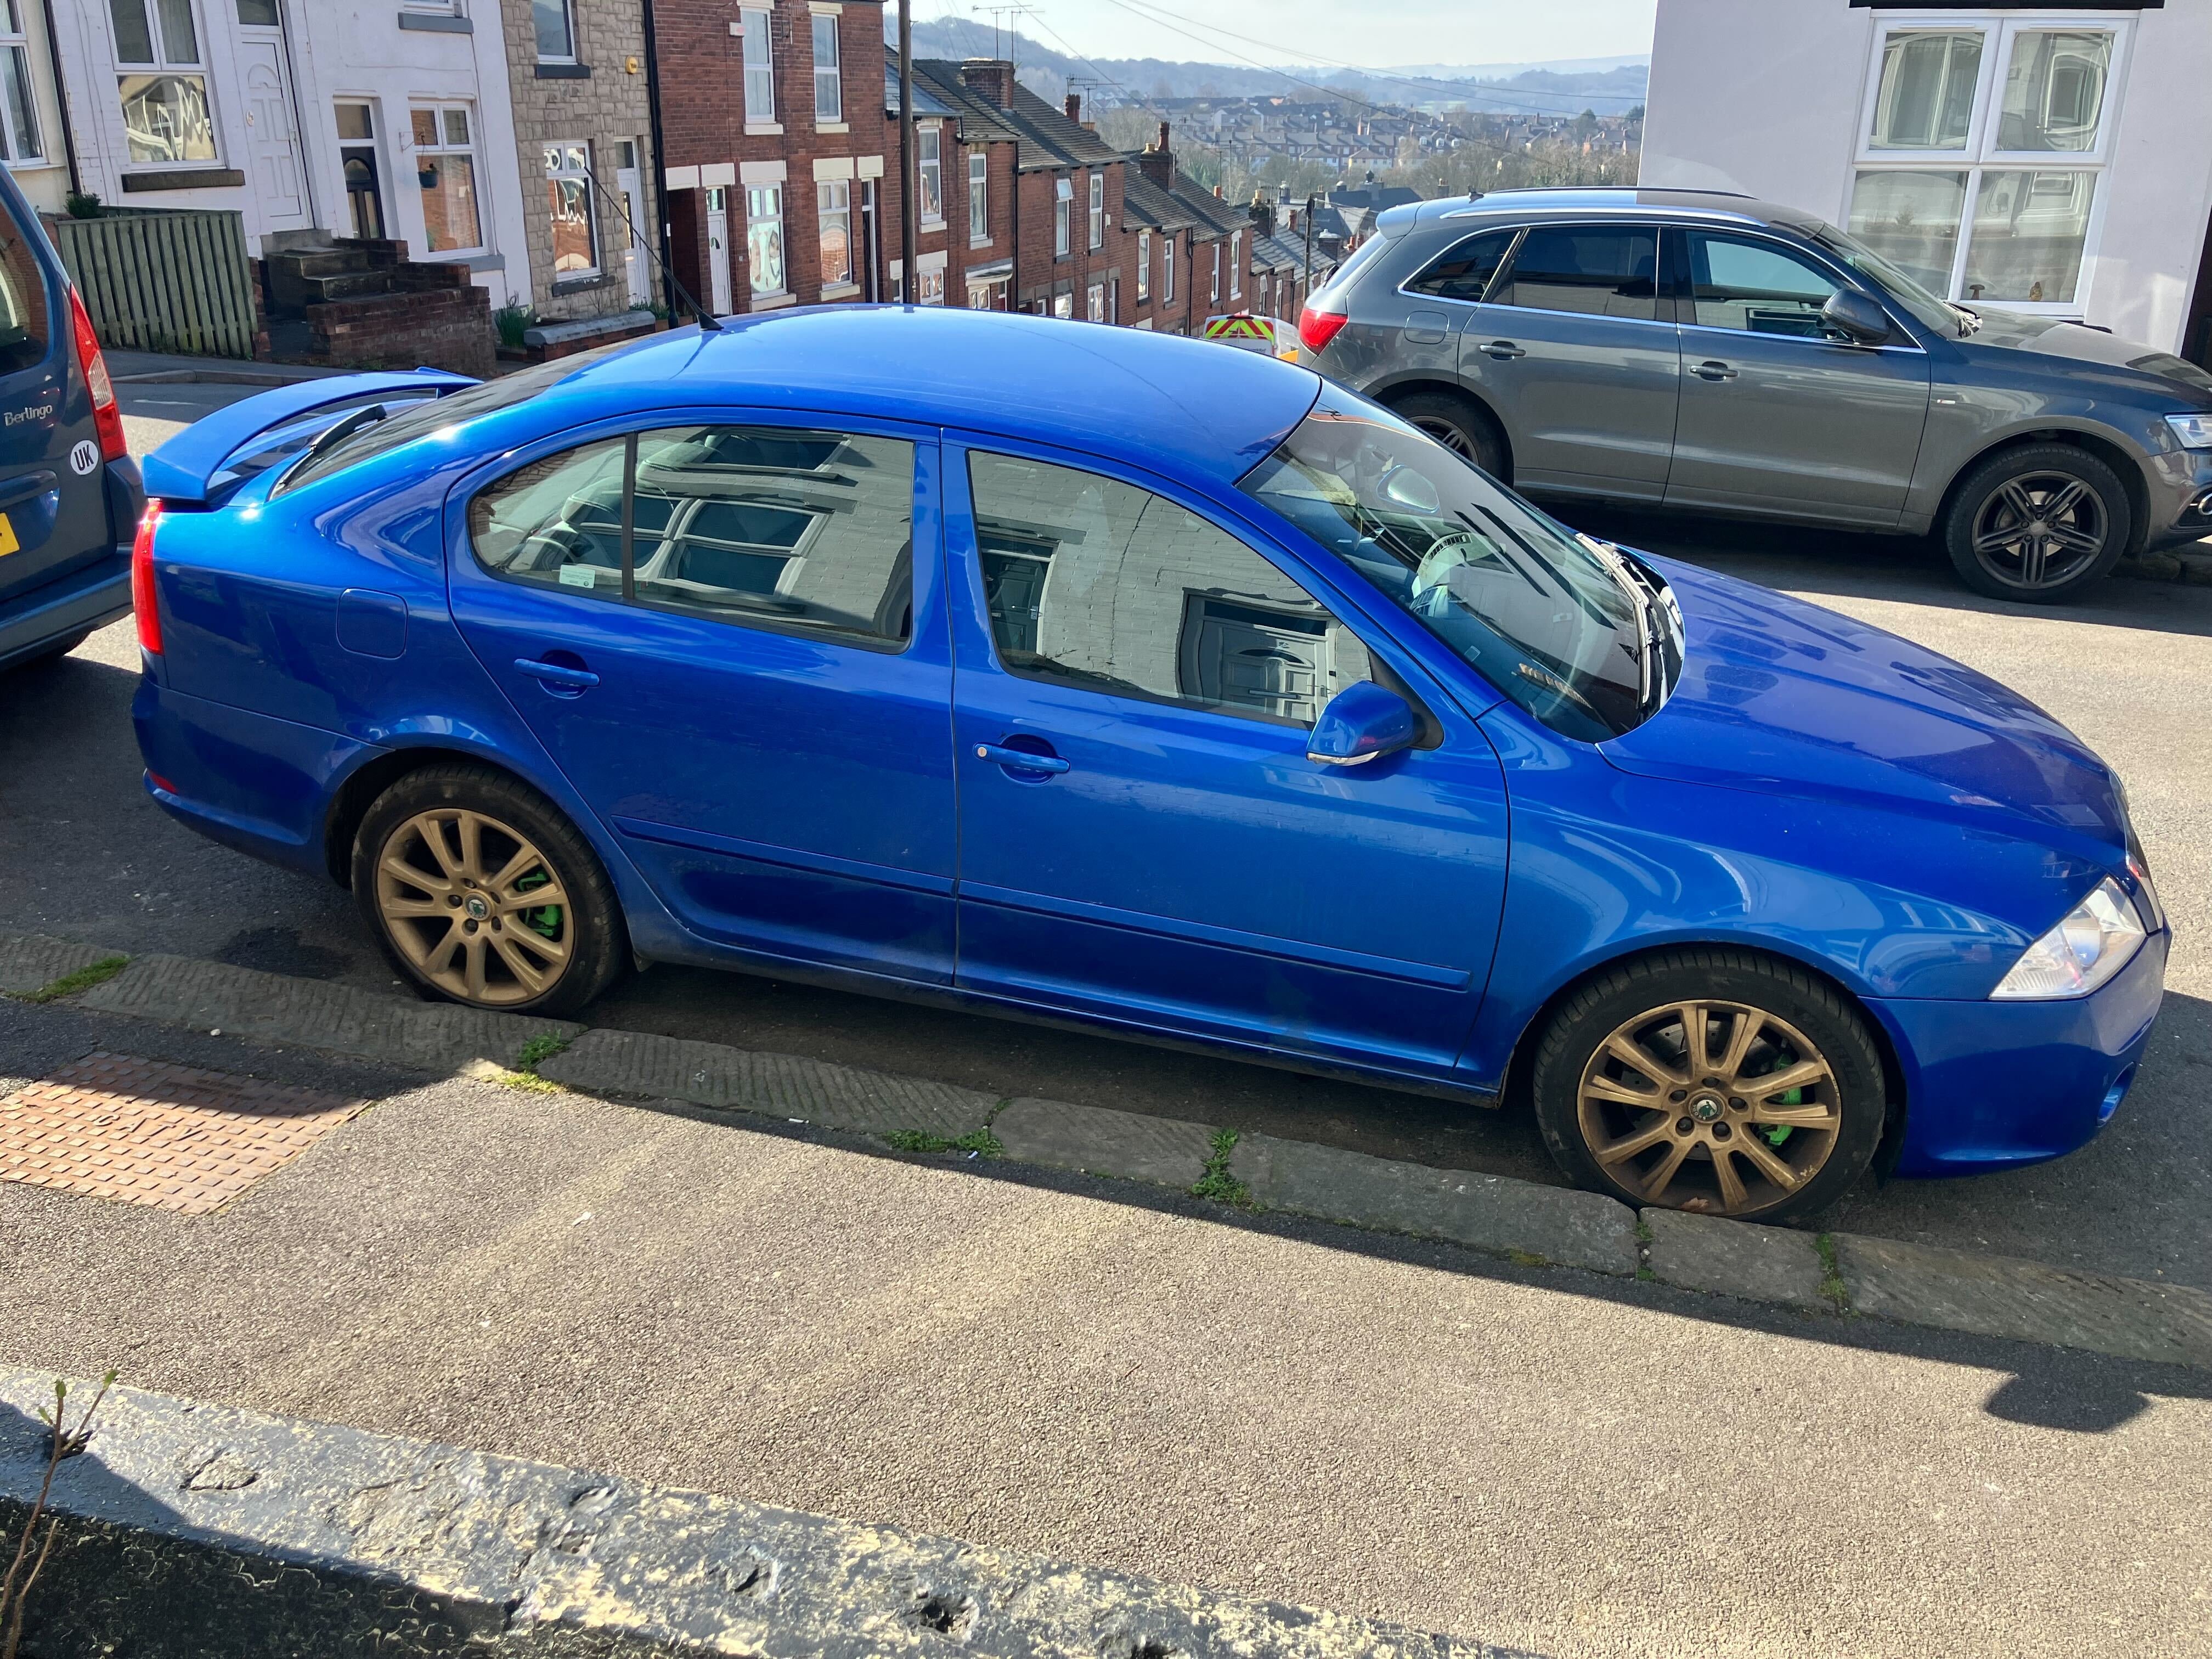
Well, this seems like as good a place as any to detail my misadventures. First post, please be gentle. 😇 Late last year I came into possession of a 2006 Skoda Octavia Mk2 VRS. It's a 2.0 petrol, pre-facelift, and was named 'Verity' by a friend, on account of the first letter on the number plate. It's my first car, and as such, I love it to pieces. ...and have also spent far too much of my free time figuring out how it works, fixing various components, and yelling obscenities into the engine bay. Things I Have Fixed/AddedReplaced the handbrake blind, which had split entirely into two separate pieces Replaced a missing dust cap on one of the tyres (I know, heavy duty stuff) Replaced the ignition barrel/steering lock (part number 1KO905865) with the help of a friend, as it had seized and wouldn't turn, rendering the car inoperable Side note: I never want to see another shear bolt ever again Hardwired a front and rear dashcam, routing the wires through the body of the car This was an endless nightmare Fixed the steering locking mechanism, with a hammer Got a tyre repair place to fix my back left tyre, whose air pressure valve had somehow sunk into the tyre wall Replaced my fog lights. This is more difficult than you'd think on this particular model. Ask me how I know. Things I Have BrokenThe front ashtray light (RIP) Countless clips, fixings and pieces from various interior trim pieces (remember the dashcam hardwiring?), much of which has either been replaced, or epoxied back together Some fixings on the driver side interior door card, from an apparently misguided attempt to replace the door lock Got the old door lock out, promptly dropped a mystery interior piece into the door, then spent the next 3 hours trying to fish it out through a hole in the panelling. Door lock still isn't replaced. An entire ****ing door, by attempting to overzealously park in a space that was simply too small, resulting in a very quickly-lost argument with a cast iron gate This necessitated the purchase of a door from someone breaking the same model of Octavia, which then sat in my living room for a month as a reminder of what I'd done/an ill-advised art deco piece Things I Have Yet To FixThe various warning lights on my dashboard, which lit up like a Christmas tree after I took the steering wheel apart, and refuse to leave (anyone in Sheffield got a VCDS unit handy?) Airbag warning light, which was already on when I bought the car Tyre pressure warning light - I think one of the sensors is busted EPC, Power Steering, TCS/ESP warning lights - all came up after the ignition barrel was swapped over, but car is no less functional and all 3 components work. Need to clear via VCDS The incredibly annoying wind noise coming from both back doors, where the window panels meet (I think I know how to fix this) The equally annoying wind noise coming from the driver side door, which I have much less of a clue on fixing ...it's been an eventful 4 months of car ownership. 😂 Wouldn't change it for the world though, as this car has given me an amazing sense of freedom, and I love learning how to fix this kind of stuff. I'd love to add mods as well, but I'm not sure how much can be done given its age! It was previously owned by an enthusiast though, so a fair few mechanical mods (turbo mapping, upgraded brakes & suspension) have already been done. I just wanna add interior LEDs lol. If you've made it this far, I salute you for your reading tenacity (but seriously, thanks). Pleasure to be here - you've all helped me plenty already, so I figured I'd try to add some humour to your day(s). xo, Ellie


.thumb.jpg.15abbe428530ef00931d265b0eb35e1b.jpg)

 1 point
 -
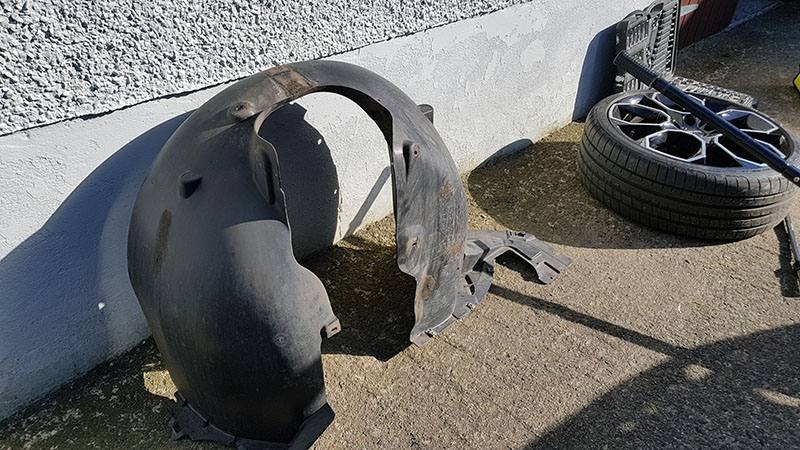
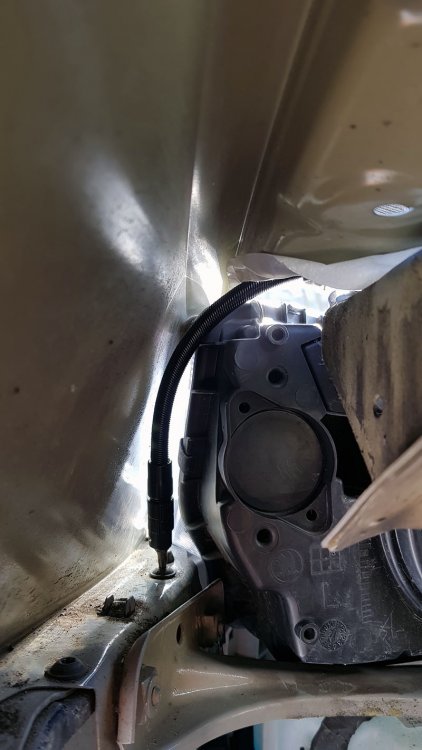
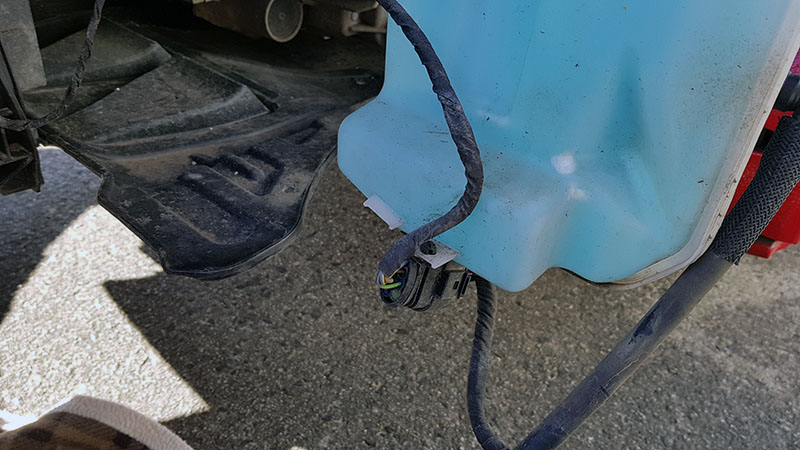
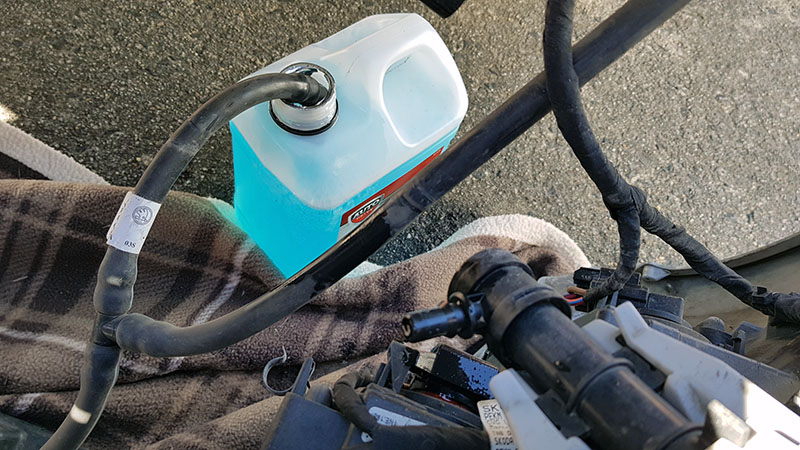
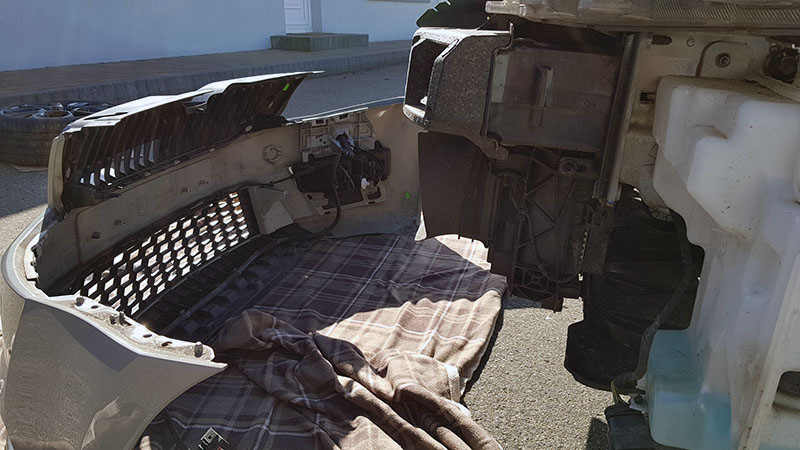
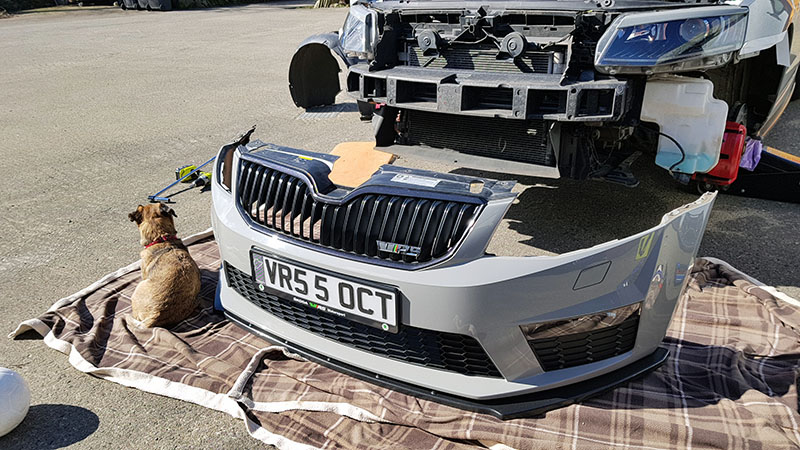
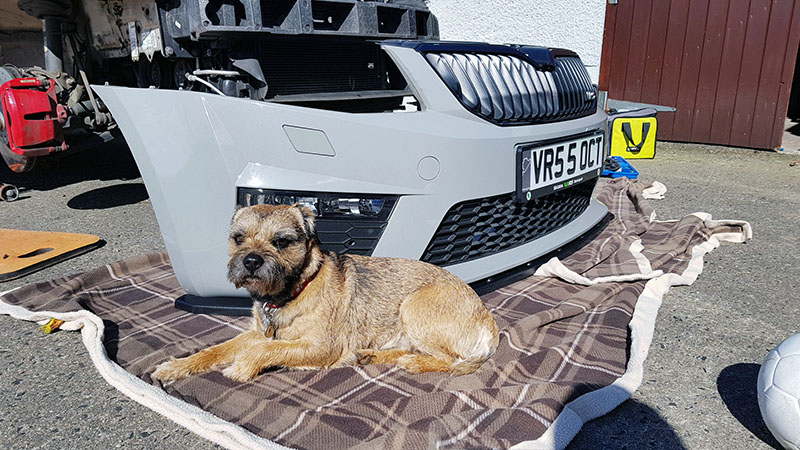
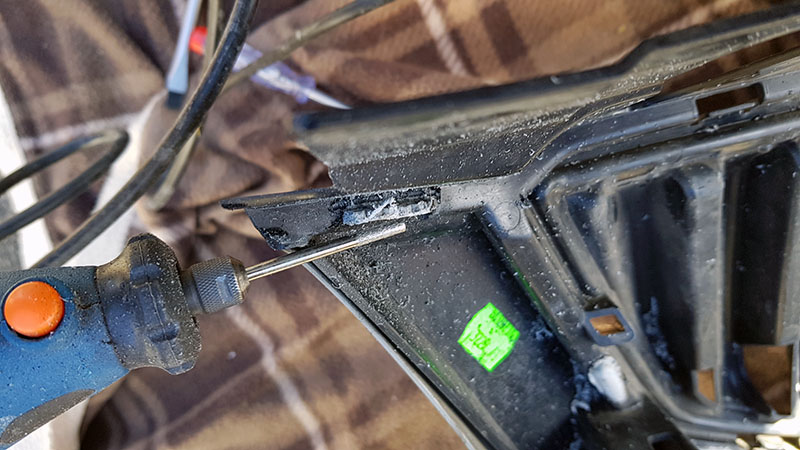
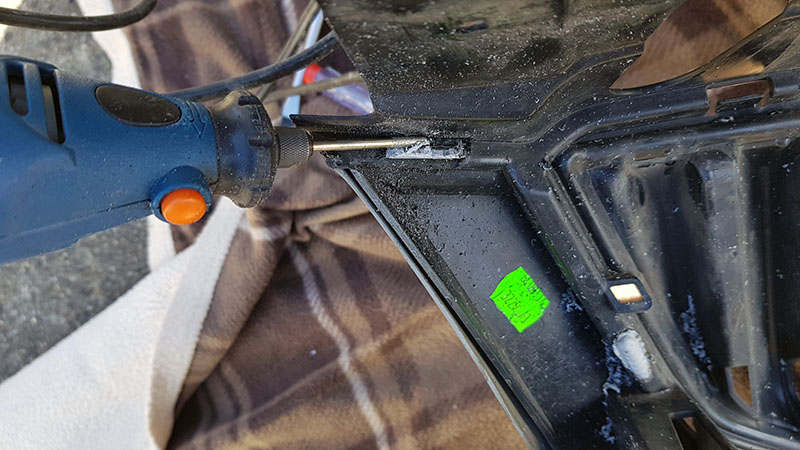
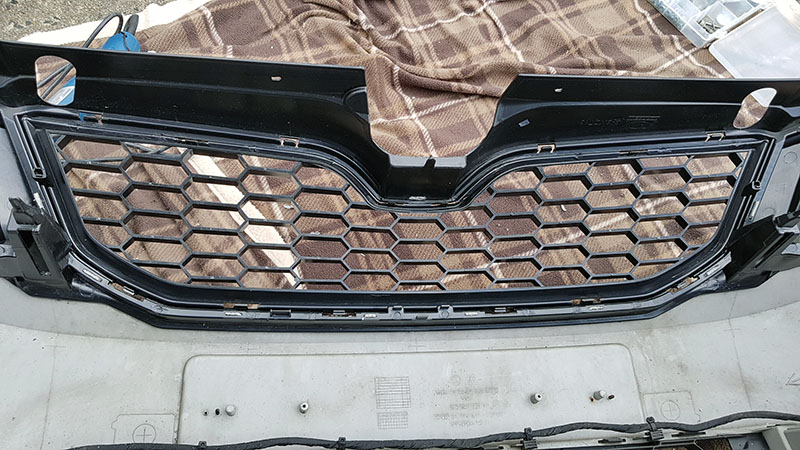
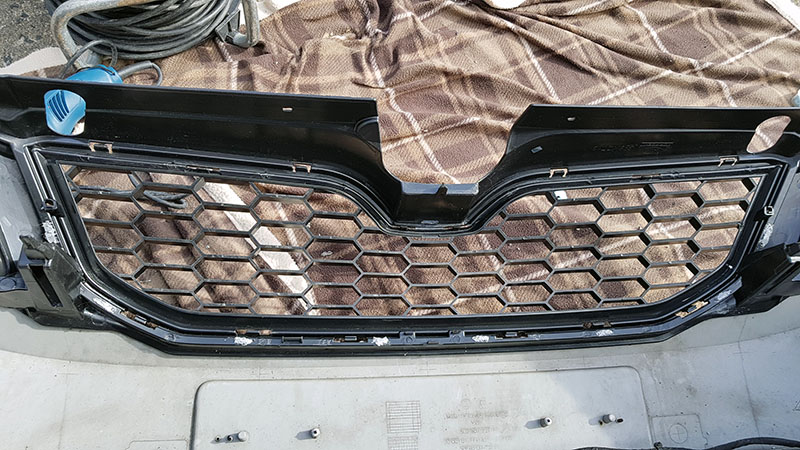
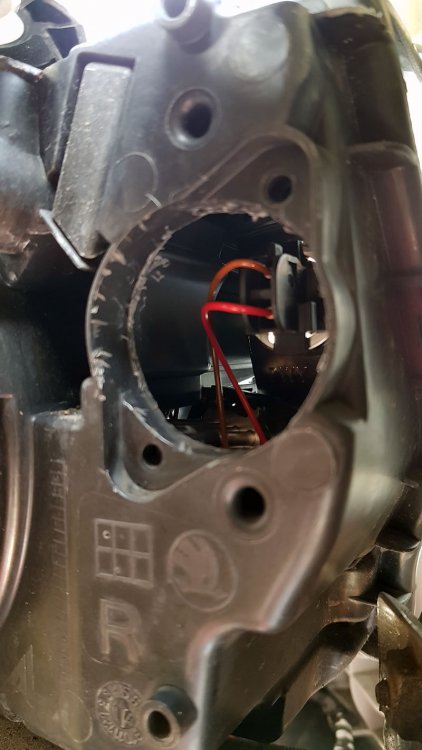
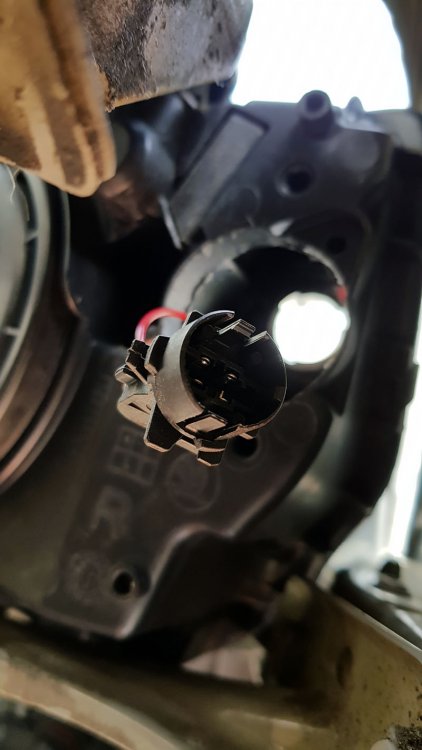
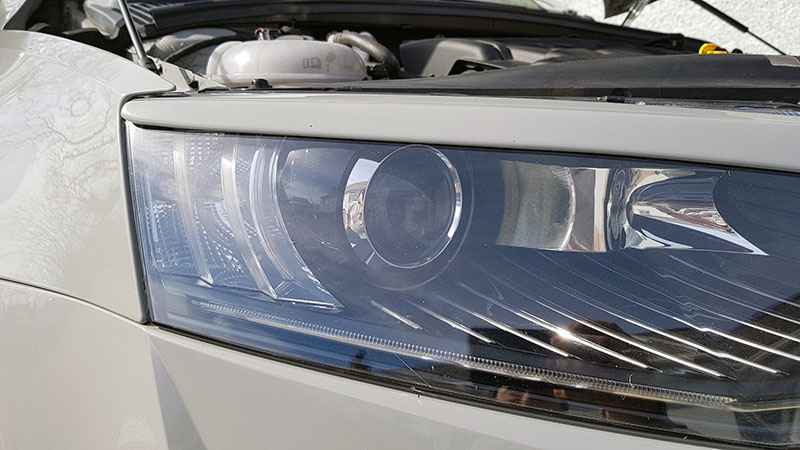
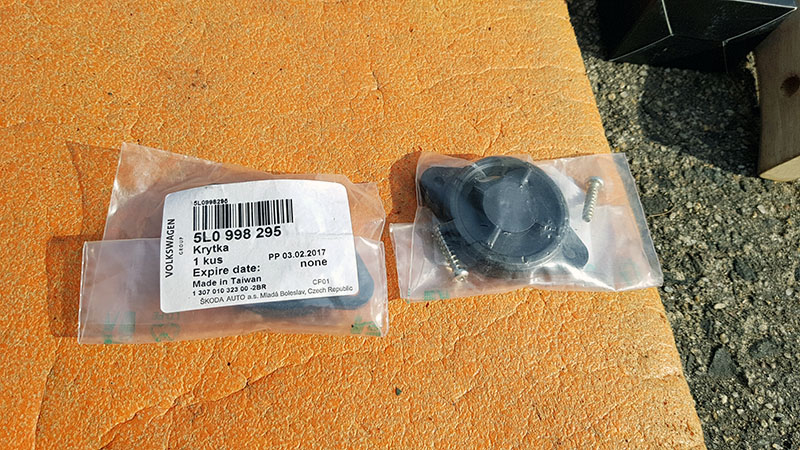
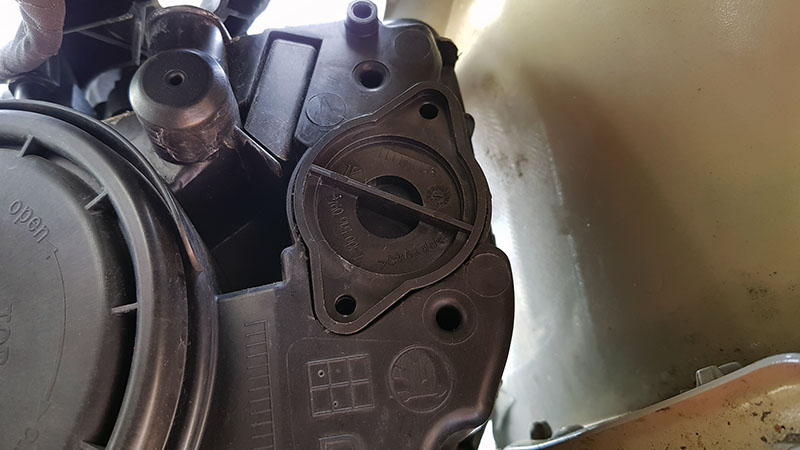
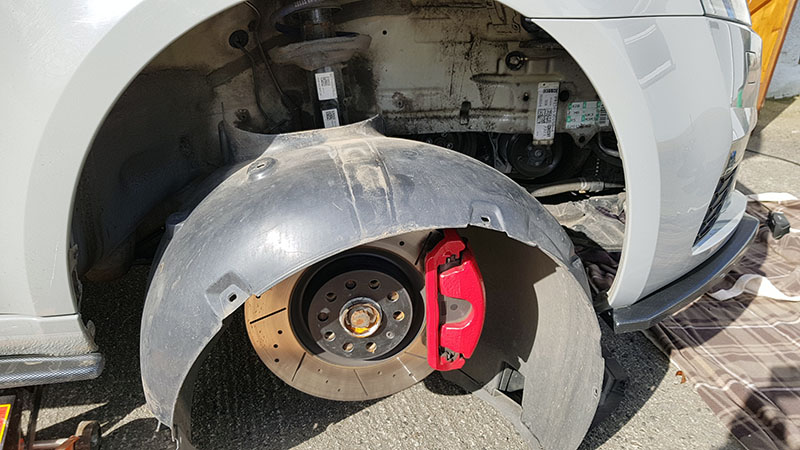
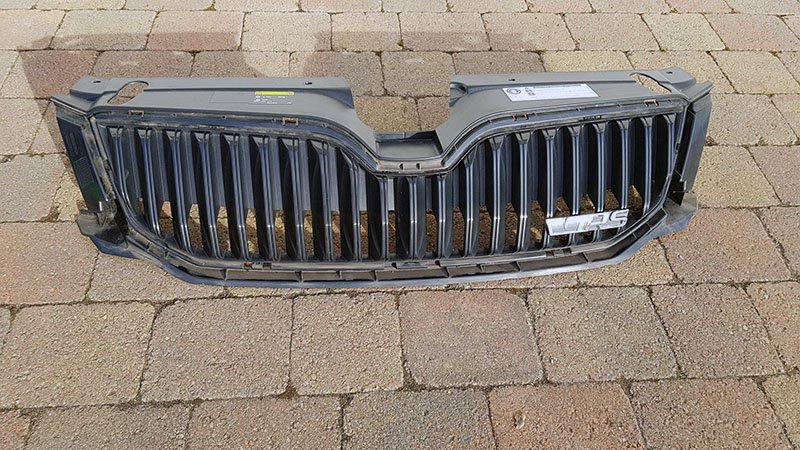
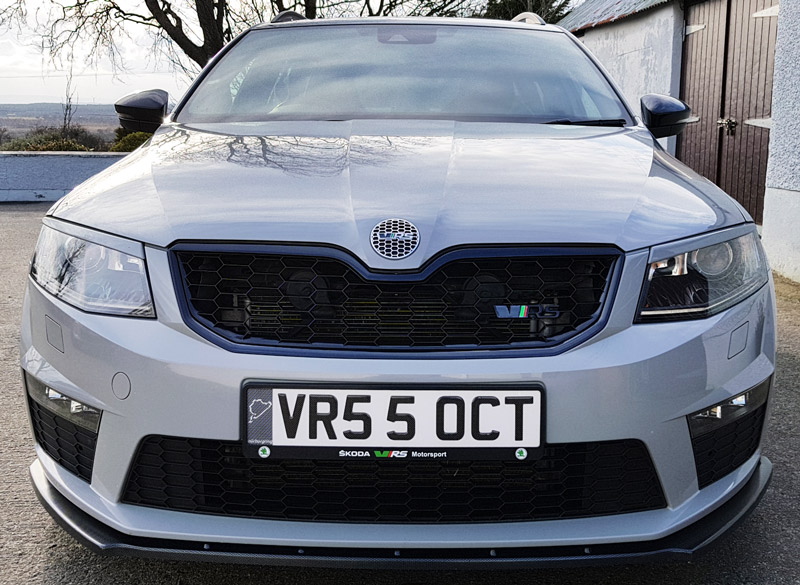
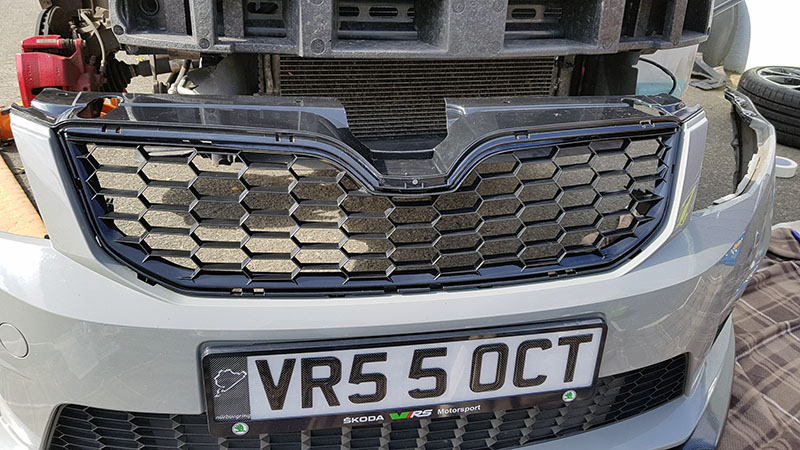
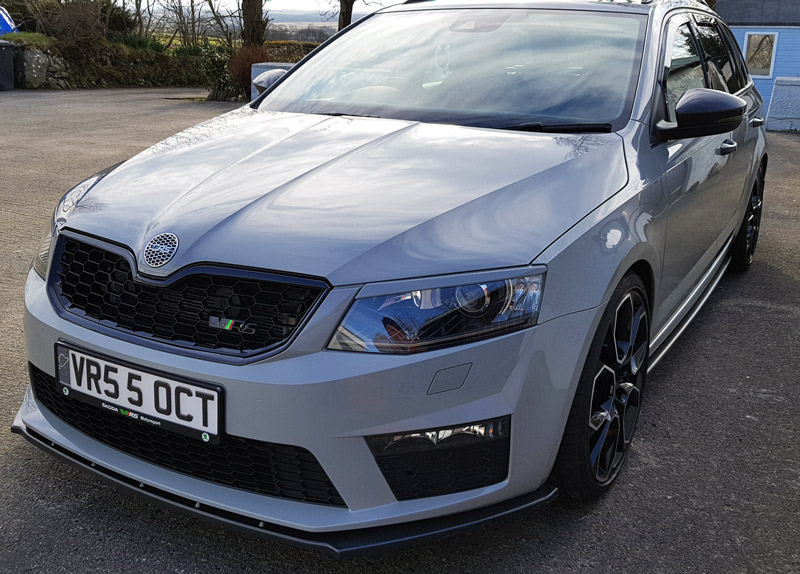
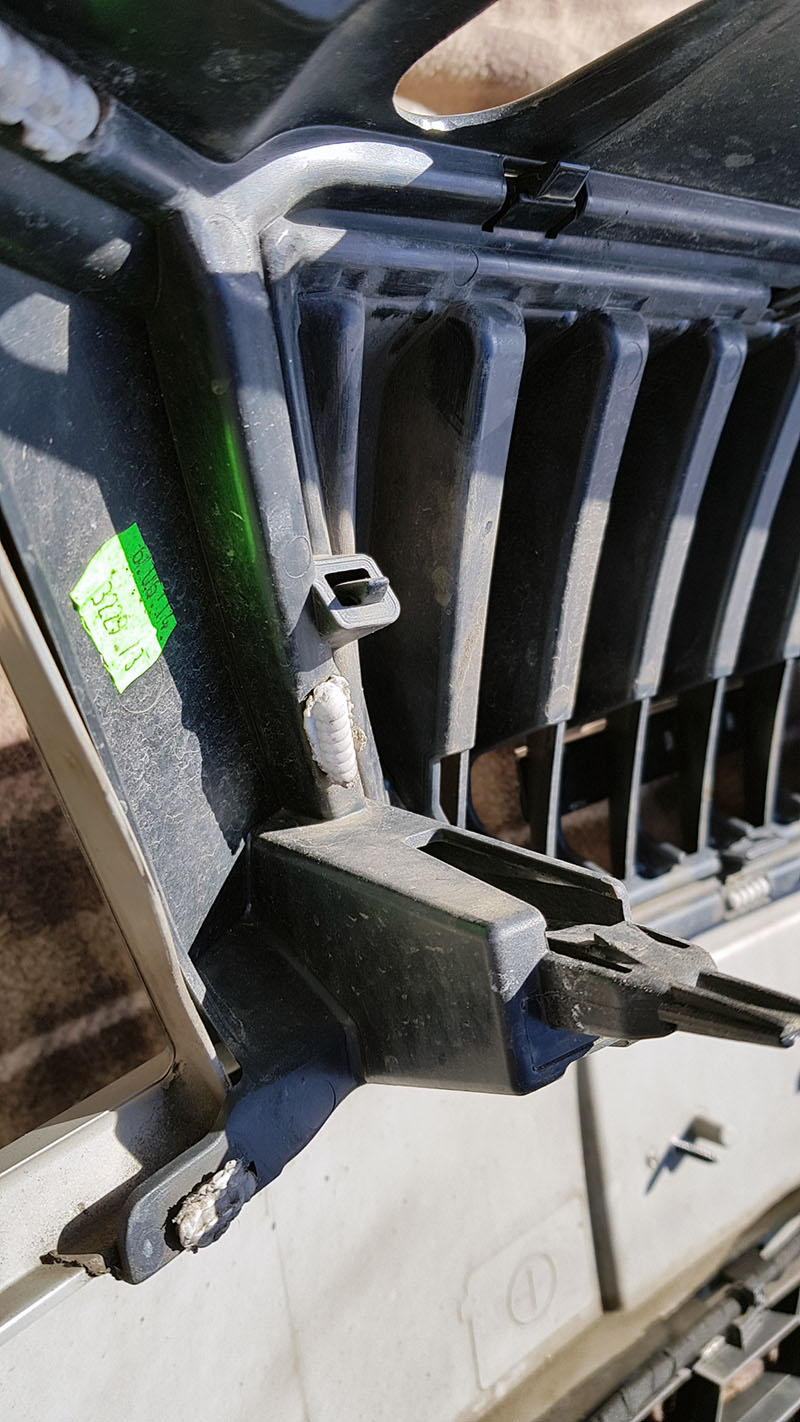
I struggled to find any decent pics of the actual process of removing and fitting the honeycomb grill so i took a few of my own. arch lining removed, the lining extends to the front of the car so you have to remove at least four fixings under the car on the engine tray (all the fixings are torx 25) before you can pull it out. I think there are about 15 torx head fixings per arch liner. two screws that need loosening before the bumper can be dropped, i tried but failed to do this without removing the arch lining but to be honest, i spent more time swearing than it would have taken to get the wheel and arch out, if you dont have a flexi tool you will need a small ratchet as even a medium one is too bulky to get at the bolt at the front. I ended up coming down though the engine bay using a 20 torx to work the screw out. Electrics must be disconnected here i found it easier to drain the bottle from the connector on the headlight washer before removing the connector from the bottle. bumper disconnected and ready to remove the grill surround i had some help removal of the surround is easy with the bumper off. Be careful not to damage the clips, start at the top and work along left to right, and then do the bottom as i found it was easier to work the surround off more gently. here you can see one of the two brackets on the bumper fixing it to the body, if you open the bonnet and look down through the two large round openings at the front you can see where you use a flat head screw driver to push down on this clip and pull back to drop the bumper down. plastic welding on the grill surround looks like this and has to be dremelled off Dont remove too much as you will melt the reminder to fix the new grill on. new grill popped into place... and the remaining plastic melted over with a soldering iron... Plastic melted over forms a strong enough bond to not need glue or any adhesive, its not pretty but its strong and solid enough not to come off. Just make sure you only dremel off enough to remove the bumper and no more. while i had access to the headlight from the arch i removed the indicator cover with a blade and replaced the nasty orange indicator with an LED one, and used the cover kit from skoda to seal the headlight again. the LED is coloured but no where near as strong as the original bulb. Brightness is the same or stronger i haven't had a chance to see it at night but day time definitely looks same or better. the holder has a groove so the bulb can only fit in one way. Dont forget to test the indicator before refitting (thanks @KevC_Derby) here is the part number if you need the covers from skoda, they are about £7 each i think. cover in, nice tight fit, it has an O-ring so should be moisture resistant. No drilling required as the supplied torx bolt just screws in. not a great pic, sorry, but no more nasty orange glow in bright sunlight. with the grill fitted, time to reverse the process... I fitted the surround back before refitting the bumper as i was able to see all the tabs seated correctly from the back. wheel arch back in... old grill out (and forsale) vRS badge painted in black magic also fitted that's it, i don't think i would be as nervous next time as when you figure out all the fixings its fairly straight forward. Some tips would be tape up the inner wing if you are accessing the inner bumper screws from the engine as it will protect the paint on the wing if the flexi-driver rubs it. Also tape the join between the wing and bumper before you remove the bumper as it has a tendency to flip up as you pull it out if you are on your own. This should stop the wing getting damaged/scraped. tools were 20 and 25 torx bits, flexi driver to reach the awkward bolts, large flat head screw driver to pop the two front brackets and a flat blade trim tool to remove the grill surround, dremel for the plastic welds and a soldering iron to melt them back again, other than the normal tools for removing the wheel. Over all for fitment i would give it 9.5/10 all the fixing points are perfect but the top of the grill just below were the front bonnet badge is, sits a few mm too low and looks as though its where the moulding was filled, you have to get up close to see it but its nothing to fret about, im just very fussy. The only thing i would worry about are the extra stones onto the radiator, but i've seen someone fit a mesh ordered from eBay which was the perfect size and looked great. I'll do a follow up when i get it.


 1 point
 -
1 pointExcept for the ones that drive through fake 'Road Runner' Wyle E Coyote style walls. https://www.popsci.com/technology/mark-rober-tesla-foam-wall-video/
 1 point
 -
So pleased, well sort of pleased I saw this thread, picked up my 12 month old Sportline plus today and noticed the rear wiper was more or less "set" one way, tried it and as others have said it just juddered up the screen, Order the recommended A403H one from Amazon, only to then see this thread, fortunately in time to cancel the order, like many I have trawelled the Internet but can't find any reference to the new wiper. Can't believe this is going to be a part we need to order through Skoda!!1 point
-
1 pointYep exactly. I have a ton of music on a tiny 64Gb usb stick hardly bigger than the plug itself. Something like this1 point
-
1 pointNice to hear from you timjfw5. I began to think I was talking to myself this week. Very few posts so I thought everyone must be out enjoying their new cars1 point
-
Have you checked the rear armrest is clear of stuff, and opened the ski whole and closed? Can’t think of much else without hearing it1 point
-
Surely you're better off finding a good condition one from a salvage car etc?1 point
-
1 point
-
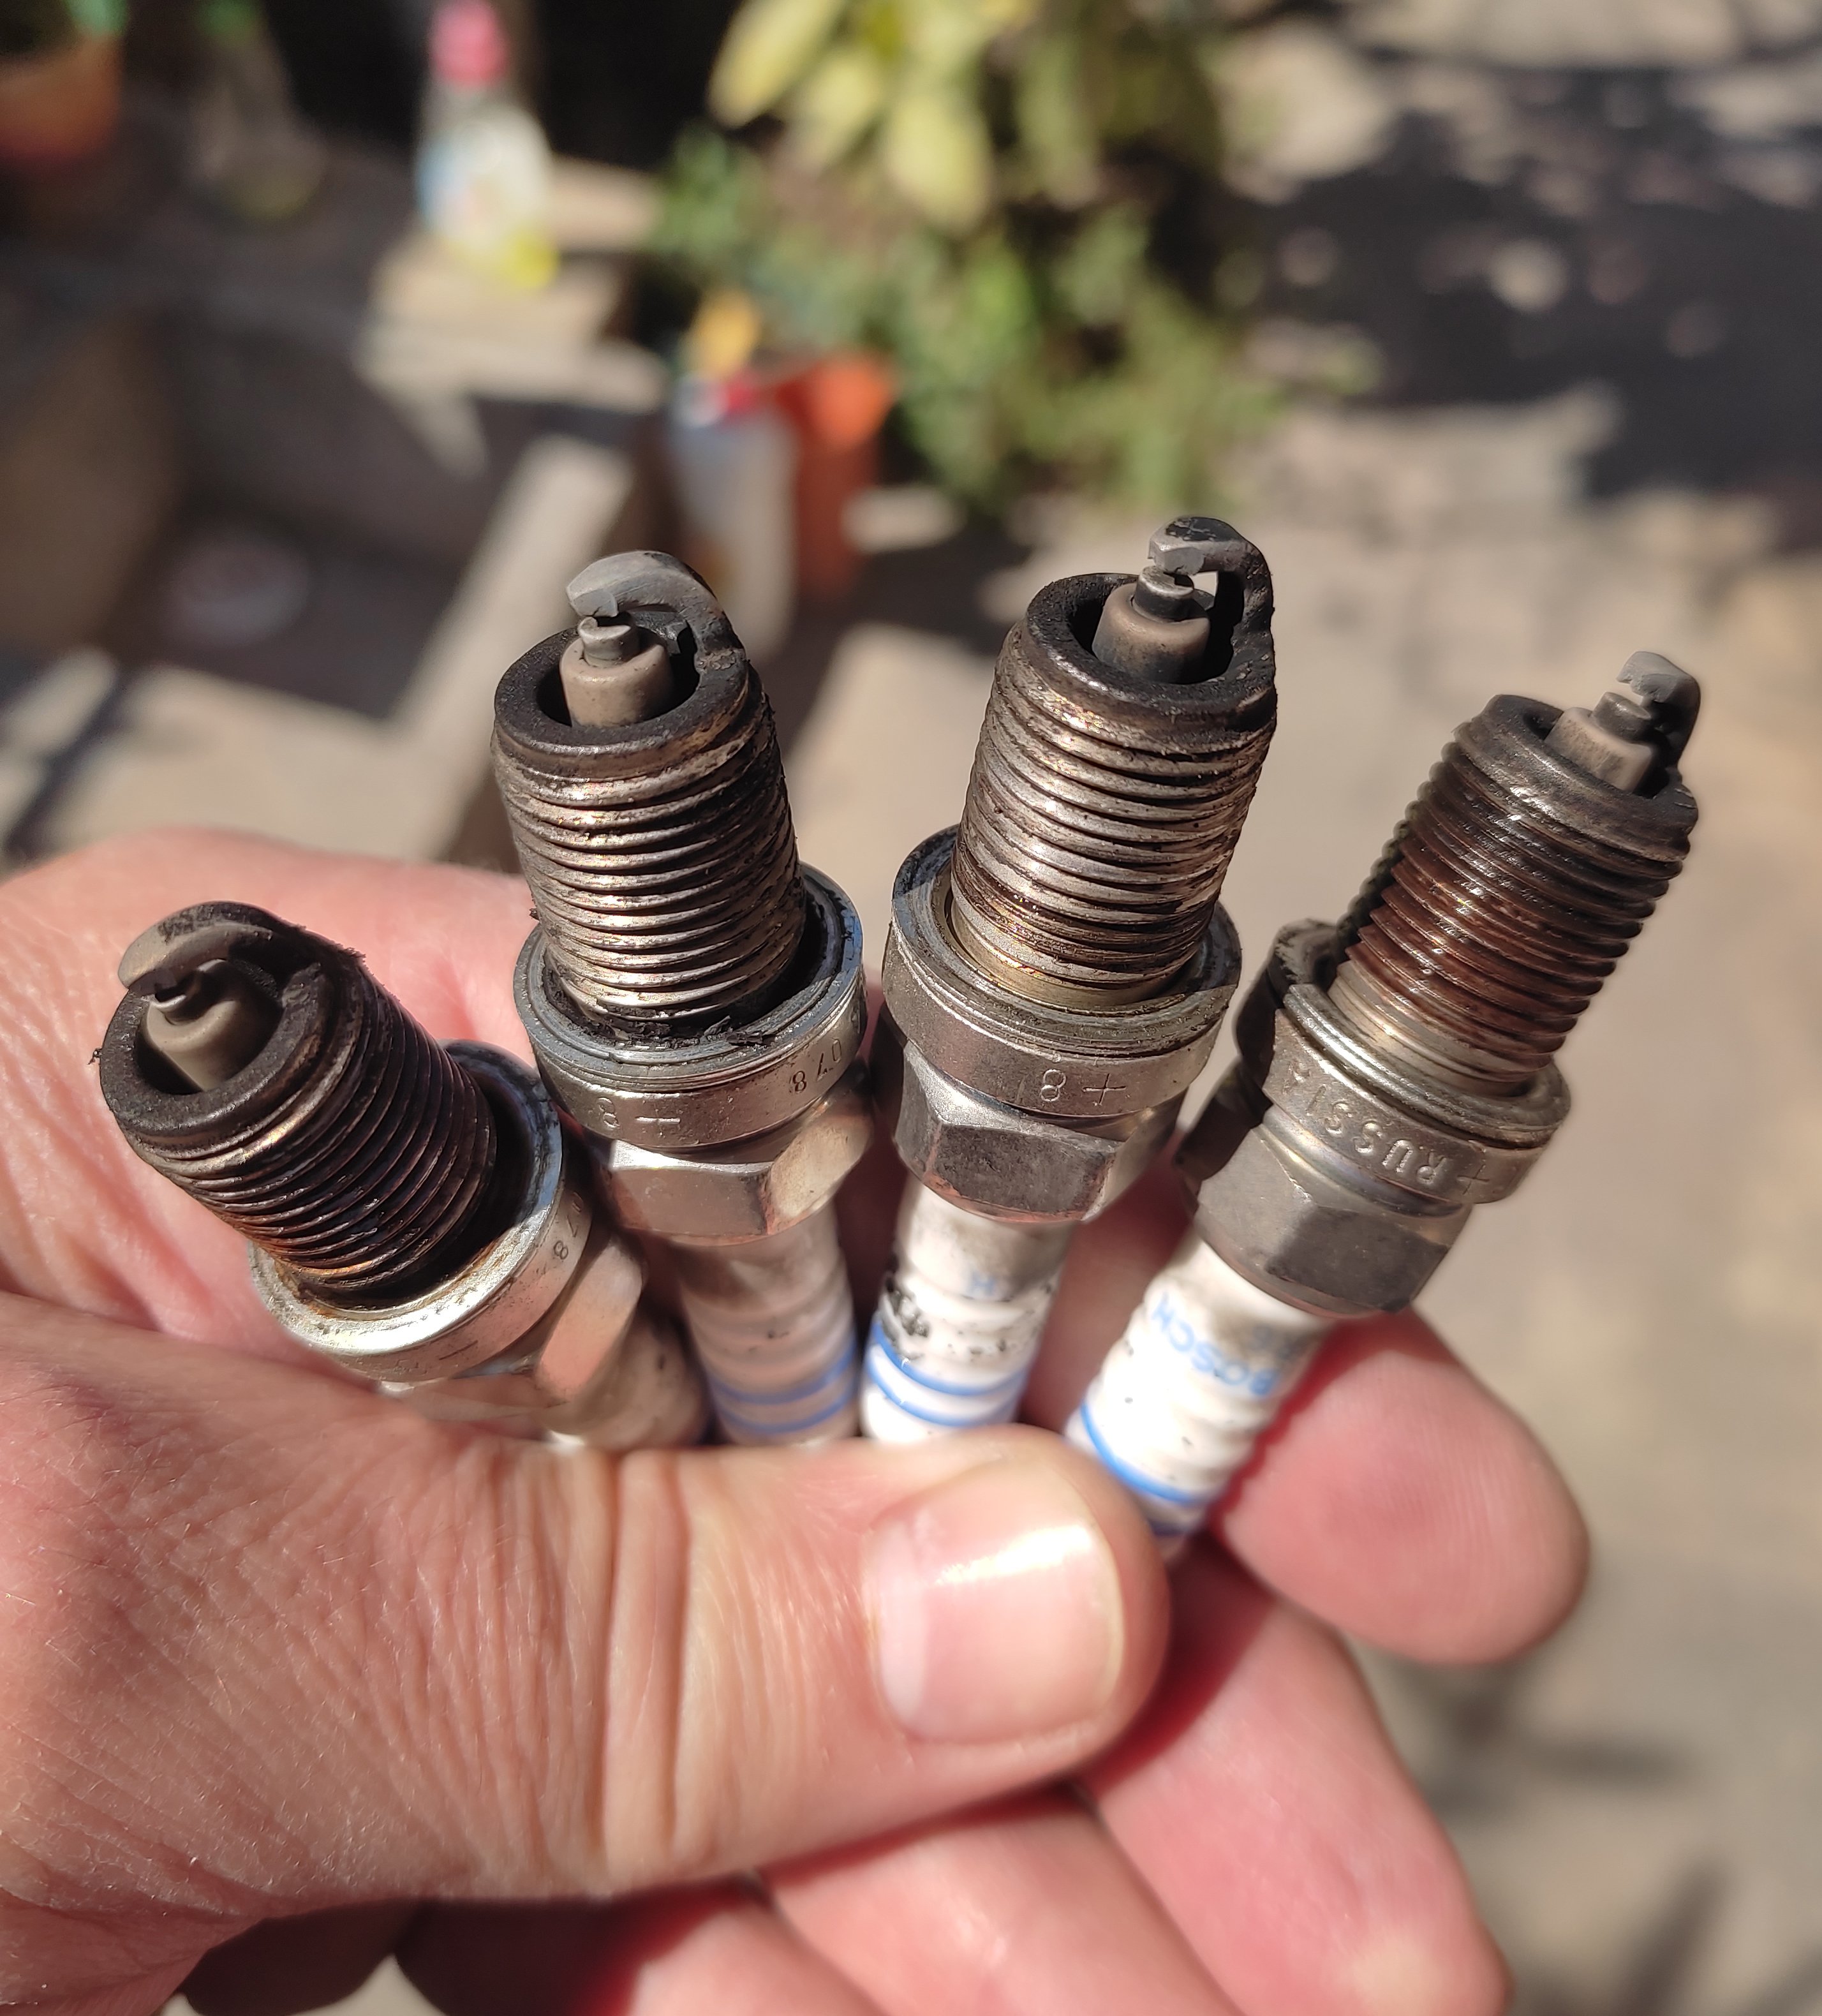
1 pointI checked the sparkplugs and the image show how they look after the engine stalls and shuts down, they were Bosch Fr7dc and didn't seem like they are bad, just out of curiosity i put the old ones i had till last summer which are Denso Q16PR-U, and with them the engine ran fine for 30+ minutes, and as i was getting ready to celebrate.. it stalled again..
 1 point
 -
1 pointCybertruck panels are falling off as they're just glued on and one of Tesla's CEO's is calling for Musk to go as share prices plummet and Musk isn't doing his job :DD https://www.roadandtrack.com/news/a63857202/tesla-cybertruck-losing-body-panels-reports/ ssstwitter.com_1741856199935.mp4 ssstwitter.com_1742472182969.mp41 point
-
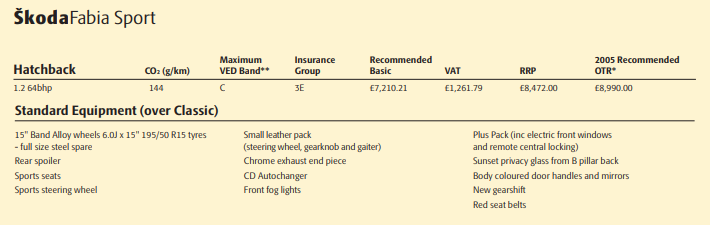
1 pointI think it's a Fabia Sport. Available either as a 1.2 or 1.4 with tinted glass, vRS seats (but in black cloth), 15" alloys, red seatbelts, spoiler. Was meant to "look" a bit like the vRS but without the diesel and by extension the insurance costs. It had the 1.4 when the trim was launched, then "upgraded" to the 1.2 12v. Here's a snippet from the 2005 brochure.
 1 point
 -
1 pointI ordered my new vRS on the 10th Feb and was told 8-10 weeks for delivery. Got an email on Wed last week advising the car had now been built and had left the factory but it would be a few weeks yet before it arrives at the dealership.. Hoping it will be ready to collect at the end of the month or the first week in April...1 point
-
1 pointWe went down the East side on our way to Italy, so obviously went a different direction to you after Saint Quentin, but we got a Toll-Tag for the journeys there and back and it made such a difference - well worth the money 👍 I love driving in France, such a pleasure compared to the mostly shoite roads we've got 🙄 Gaz1 point
-
If it's not rotational as Gerrycan has asked, could it be your bonnet knocking on its stops or at the latch? Drop links creaking? Bonnet release cable rattling? Radiator nice and firm? Can you make it do it while stationary - someone in the driver's seat, the other bouncing the car? Can you replicate it without rolling, but taking up drive and then letting off, so rocking the engine with its own energy? Gaz1 point
-
Thanks for posting the update - serves to stress how important correct adaptation is when replacing the battery.1 point
-
1 pointThe issue you really need to check is whether it supports the non-entertainment features of the OEM infotainment units, many of those units do not. They allow you to both check, and more importantly setup/change/configure, many of the car functions (hence the CAR button).1 point
-
Well, that is very interesting, that might be it. Which would mean, that while the feeling in the foot is strange and indeed uncomfortable, it probably doesn't do any harm to the clutch or anything else, which is important. The modifications described in that technical document are interesting, but I guess no service would agree to do it under the warranty. So not really a solution right now, but but good news nevertheless1 point
-
App was useless. I just rocked up and used a Credit Card. PS. On the AC charger now, minimum charge South Ayrshire Council £5. It should be 47 pence a kWh on the AC but CPS app shows being charged 62 pence. This had happened before. Once I have 11 kWh I will stop and charge to full later on a Rapid.1 point
-
1 point
-
1 pointHi, for what is is worth: I received my Superb from the dealership in early December 2024. In the first weeks, it had a series of the error messages like you experienced. Took it back for servicing in late December. They then 'reset' it - think that was just the fuse-removal you have also mentioned. Since then, no issues worth mentioning. My sense from this forum is that the earlier 2024 models have the persistent issue. So maybe an option to switch for a late 2024 or 2025 model? Whatever you decide, hope it works for you. Sounds like all of this has been super frustrating and taken a lot of time and back-and-forth with the dealer + Skoda.1 point
-
1 pointHi nta16, thank you for the response. The fuel pump is mechanical and i dont have a spare one to check and compare, hopefully its not the pump because its not available to buy where i live :) . Im curious about the fuel color too, i didn't add anything to it, its how it came from this gas station, but i have used gas from the same gas station for months. If by "dissy cap" you mean the distributor cap then yes, i have checked it, it was ok, no cracks or moist inside, the contacts are a bit worn out, so its next on the list to replace. The blanked off hose is as it was from the factory. I haven't checked the exhaust , so i don't know if there is any difference. The air filter is fairly new and pretty clean, there is an automatic "warm cold air auto adjustment to air intake", but i dont think it has anything to do with the issue because the problem is same with opened filter cap too, and it does it when its warm during the sunny day yesterday, and in the evening when its cold. I haven't checked for air leaks around the carburetor, the choke is automatic and it seems to be working ok-ish, but the problem arises usually when the engine is in operating temperature and no choke.. I didn't check the spark plugs since they are fairly new, maybe 6 months, but i will check them today because once years ago i had a sparkplug with a melted electrode after driving 100km..1 point
-
1 point
-
1 pointGammyleg has the dry clutch DQ200 box, which is very high mileage at almost 200,000 miles. Both the 272 and 280 come with the DQ380/381, which are superb boxes - they come in the vRS, GTI, R, S3, Cupra and more. A lot of people put well over 500nm through them with nothing more than a TCU tune. Indeed, TVS do a sintered clutch pack to take you over 900nm - they are very strong boxes.1 point
-
1 pointHi, welcome. You're in the 'Hellos and Goodbyes' forum at the moment, you might be better looking at and/or posting in the 'Skoda Octavia Mk2 (2004 - 2013)' forum in case this might be a known issue there (link at bottom of post). If you swapped from EFB to AGM did you have the battery 'coded' for the car's system (assuming start/stop car). If the previous battery was allowed to go too low for the computers' liking, regardless of how bright the headlights seemed or no issues with starting the engine, then they can throw all sorts of unexpected wobbles, warnings, error codes, issues and problems. If you don't have access to a scan tool I would try disconnecting the battery for a while and reconnecting to see if it might clear plus you might need to start the engine put the headlights on with air-con on and turn the steering fully both ways to let the car know you have plenty of battery power, and then go for a short drive and see if light remains on , or returns. Bosch I was told are labelled Varta batteries. HTH. 'Skoda Octavia Mk2 (2004 - 2013)' -https://www.briskoda.net/forums/forum/28-skoda-octavia-mk2-2004-2013/1 point
-
Each code details exactly which variant of component is used or fitted.1 point
-
1 pointNo the engine was off when the battery was changed. I've tested the alternator and still working fine. Getting a charge to the battery with no drop when putting lights on, radio etc. The only change I have is the battery light staying on1 point
-
1 pointSolved. Went to use the windscreen washers today & they didn't work. Checked the diagram: F42 "Control unit for central locking rear door - left, right, headlight cleaning system, windscreen wipers" Fuse was there but not in properly. Pushed it in & boot & washers now work. Must have pulled it & not put it back properly. What a prat 🤦1 point
-
Thanks to you both. I feel like a total dip switch myself but it turns out I was changing the wrong bulbs and not the dipped beams. This is obviously very stupid and embarrassing but at least it is now fixed. Tell you what though, that bulb on the right is really obstructed by the fuel pump and I do not know if I am going to manage the change myself!1 point
-
1 pointHi, it's good to know other Kamiqs rev as high. Mine does it for a minute however which is a lot of fuel to waste waiting for it to warm up. The car does, after all, switch itself off at the lights to save petrol. You've given me pause for thought though, cheers.1 point
-
2nd charging stop today and 2nd time ElectroVerse card was not accepted on Charge Place Scotland charger. I have one more charge to do today and I will see if 3rd time lucky or then I will contact them. The ElectroVerse has been OK up to now but it is a few weeks since used it. Nice cheap charging at this location just 1/2 mile from Stirling Castle View Park and ride. 38 minutes for 20 kWh £10. £1.45 for first kW then 45 pence a kWh. Then £1 a minute over 50 minutes. PS. Last night used new Chargers at an Arnold Clark dealership in Glasgow. 55 pence a kWh. This morning in Girvan on a 11 kW AC @47 pence a kWh. The CCS / DC is 62 pence here or at Turnberry public car park. Cheaper is at Trump Turnberry in the Golfers car park 60 pence. Supposedly for guests. Or at Dowhill Farm. 55 pence.1 point
-
I was looking in my car yesterday: brake pedal is made of steel clutch pedal is made of plastics maybe thats the reason why the vibrations are felt on clutch pedal and not on the brake pedal also I found some old technical bulletin regarding the vibrations on the clutch pedal on some old vw models equipped with 1.9 tdi - they suggested it could be problem in frequency modulator - a part that minimizes vibration transfer through the clutch line to the pedal https://www.valeoservice.com/en-com/techassist/technical-document/hydraulic-dampers1 point
-
That would seem to rule out anything related to the engine then. Can you post a video or audio file of the noise?1 point
-
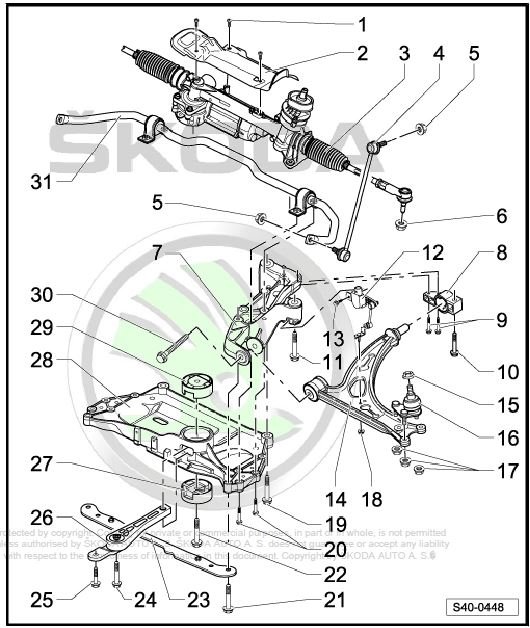
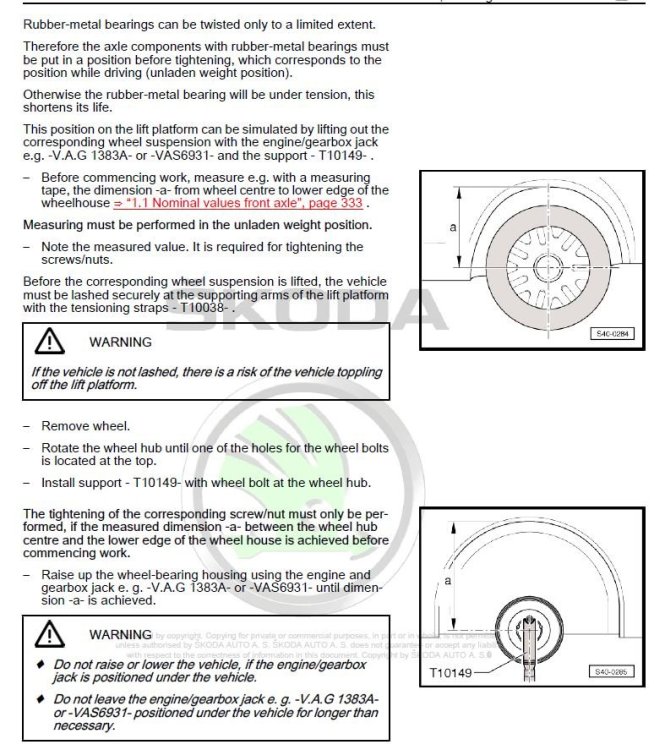
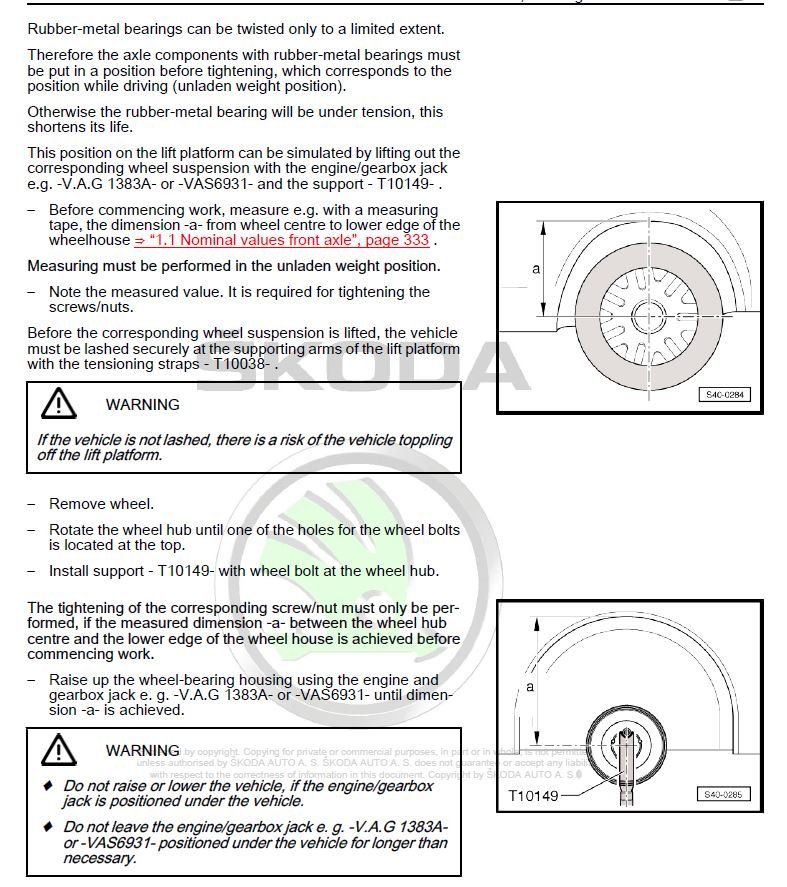
1 pointYes after 150 miles the noise has gone, no creaks, no groans at all, its item 30 on the diagram which needs to be loosened and tightened up (70NM) with the suspension under a simulated load of an unladen vehicle. ie with a second jack under the ball joint (item 16) jack up until it just and only justs starts to lift off the main jack. Then torque up. Its a tight fit to get the torque wrench in there due to the wheel arch cover but it will flex out of the way.
 1 point
 -
1 point
-
1 pointWith the new ps5's (so new wheels in a new colour with new tyres)

 1 point
 -
Not all dealer service techs are born equal. I too have had no issues with my dealer. Changing to another product won't guarantee a better car or dealer service, so better keep your Basil branch handy for the future, just in case...😜1 point
-
1 point
-
1 point1 pointHere is a quick guide on how to remove and install the rear make and model badges / Emblems. What you need Adhesive Remover (Autoglym Tar Remover , WD40 etc) Trim removal tool or dental floss Microfiber Cloth Tape (Electrical or Masking tape) New badges / Emblems (Rapid in Black Magic and Skoda in Black Magic) or lesser quality but cheaper (Ebay Acrylic Skoda Emblem and eBay Acrylic Black Rapid) Step one Make sure the working area is clean as possible. No need to wash the car completely down, but give the area a quick wash with soapy water and rinse with clean water. Ensure the working area is completely dry before going any further and out of the elements / weather. Step two Using the masking tape or electrical tape, mark the area around the badge as close as possible. This will help when installing the new badges. If you're just removing the badges completely then there is no need to carry out this step. Step three There are a couple of ways this step can be done so pick which one you prefer. First, using dental floss (this is a favorite) in a sawing motion from top to bottom. Draw the floss through the adhesive backing until each individual letter becomes lose. This method will prevent any undue damage to the paintwork but can be time consuming. Second method is what i used. Using plastic trim removal tools, use the most appropriate tool and push it in behind the lettering. Ensuring to not use to much force, lever the letters away from the body of the vehicle. You may need to adjust the position of the tool around the same letter to lever sections off at a time. This is quicker but could cause damage to the paintwork if you're not careful. The final way is risky but is lots quicker and less messy if you do it right. Using a heat gun or hair drier, apply heat to an individual letter at a time to reduce the effectiveness of the adhesive. As it heats up the letter will become lose and can simply be pulled away from the body. Be careful as applying to much heat in one area could cause the paint to burn or burn the adhesive onto the paint leaving unsightly marks. If you use a hair drier the risks of burning the paint is much lower but will take a lot longer for the lettering to become lose and can still leave a lot of residue behind. Step Four You need to remove the left over adhesive. To do this, use the adhesive remove and apply small quantities either to a microfiber cloth if you have a bottle of the stuff or spray directly onto the adhesive remains if it comes in a spray bottle. Allow a few minutes for the adhesive remover to do its work and then using a microfiber cloth to rub the remaining adhesive away. You may need to use a plastic spatula to help remove some of the more stubborn material or just your nails if you're careful. The area behind the emblems will have residual road grime, this is nothing to worry about and can be removed, so be sure to give the area a good clean before moving on. Step Five If you're removing the badges / emblems completely then you can now remove the tape and you're done! If you're adding alternative badges / emblems then you need to give the area a clean down with some clean water to that no adhesive remover remains. This will give a good surface for the new adhesive to adhere too. Peel the backing paper off from the new emblems. DO NOT REMOVE THE CLEAR FRONT! This is what holds the letters equally apart and remains on until later. You'll then need to line up the new badge within the edges of the tape that you put on earlier. Be careful to hold the badge / emblem away from the body as it is extremely sticky and will grab immediately. (I can assure you that although the car is dirty, the working area was clean in this picture) Once lined up press the badge onto the body, ensuring to press all parts of the letters and not just the center area to ensure the adhesive has grab entirely. With this done you can now remove the clear front and all the tape. I would advise not washing for at least 24hrs to give the adhesive enough to fix itself. Now repeat on the alternative side.1 point


.jpg.61a5185c060d13979f6636dee2414c15.jpg)


.thumb.jpg.f83a46b9b3c0d976b9dbffbb523c9874.jpg)


.thumb.png.26e4ef1cd991d7943ece4e7bf5baf72f.png)


Important Information
Welcome to BRISKODA. Please note the following important links Terms of Use. We have a comprehensive Privacy Policy. We have placed cookies on your device to help make this website better. You can adjust your cookie settings, otherwise we'll assume you're okay to continue.