Leaderboard

.thumb.jpg.9dd3f612ba7f13d10be5c518d3c8d255.jpg)


.jpg.1006585dfe4e2977315b67c3d642e37b.jpg)

Popular Content
Showing content with the highest reputation on 08/05/25 in all areas
-
2 pointsWhy this upgrade? (I'll post some more pictures of the process today)I drive a Skoda Superb Combi 1.4 iV PHEV Sportline (MQB platform), and while it's a comfortable cruiser, I always felt the stock 288 mm brakes were underwhelming, especially during emergency braking. As a volunteer firefighter, I sometimes need to get to the station quickly. I found the stopping power to be insufficient for such a heavy car (1.8 tons), I also own a 2004 Audi RS6 C5, which has 8-piston Brembo front brakes — and the difference is night and day. While the RS6 is more powerful and performance-focused, it made me realize just how undersized the brakes on the Superb iV are, especially when you need to stop hard from higher speeds. That’s what motivated me to upgrade to a proper 340 mm OEM front brake setup, as found on GTI/Cupra models. so I upgraded to a 340 mm front brake setup. Similar to what’s used on Golf GTI / Cupra Leon / Golf GTE. MQB(Evo) platform I also installed: Hardrace rear sway bar DCC module tweak greatly improved braking and handling stability. Eibach Pro kit I sourced all parts from a scrapyard, except for the dust shields, which I ordered new from the dealer. That makes this a budget-friendly OEM-style upgrade — not a fancy aftermarket setup, but a factory-matching improvement that fits perfectly on the MQB(EVO)-based Superb. Good donor cars to look for: Golf 7 GTI Cupra Leon (5F or KLCF) Golf GTE / Octavia RS / Cupra Formentor Most of these use the exact FN3 caliper with 340 mm front discs. Partslist: Part OEM Number Qty Notes Brake caliper + carrier 5Q0615105EG (L) / 5Q0615106EG (R) 1 set FN3 calipers from GTI/Cupra/Formentor Brake discs 340x30mm 5Q0615301G 2 Vented, for FN3 caliper Brake pads – 1 set Match FN3 caliper (ATE, Ferodo, etc.) Carrier bolts N90678001 4 Stretch bolts, always use new ones Dust shields 5Q0615311F (L) / 5Q0615312F (R) 2 Required for 340 mm clearance Brake fluid (DOT 4) 1–1.5L ATE Typ 200 recommended InstallationIt's easier to turn the wheels in the direction you're going to work on. Raise the car and remove the wheel Remove the old caliper and disc ( You can leave the old caliber hanging on the line until you have the new one in place.) Install the larger dust shield (or trim the old one to fit) Fit the new 340x 30 mm disc Clean the hub and apply copper grease to prevent rust Bolt the caliper carrier in place Torque spec: 200 Nm + 90° angle Mount the brake pads and caliper on the carrier (DIS)Connect the brake hose Keep it upright or temporarily plug it to avoid leaks Bleed the brakes With a helper or transparent hose in fluid Sequence: RR → LR → RF → LF Check for: Leaks, Firm pedal, Fluid level in reservoir Test drive at low speed Verify pedal feel, brake balance, and straight braking
 2 points
 -
I too have the same issue, I updated the app to 8.2.0. I know it was working at the end of March, it’s my preferred method of entering destinations as it’s much easier than the infotainment keyboard entry. My Karoq was serviced at the end of March and had the s/w update for the Kessy system that prevents locking w keys in the car. I can’t see how this would affect it. I ve assumed that the app communicates with a VAG server which in turn talks to the car. Somewhere in the app documentation it said only one route can be sent to the car at a time, each route sent has to be accepted and saved on the car before sending another route. The Nav app in the car seems to be getting traffic information in realtime perfectly. I have also raised this Škoda UK customer care, as I can see their office in MK from my home it’s very tempting to progress it face to face.2 points
-
2 points
-
Tried clearing the cache, still no joy. Next step is clear the data as you suggested - but first need to ensure that I still know the password!2 points
-
OK, I've been a bit short of time recently but some progress (or not). There's nothing wrong with the fuel pump or module, I tested them in another vehicle and they work fine. Haven't had a chance to fit the front panel/ambient sensor yet, hopefully over the weekend.2 points
-
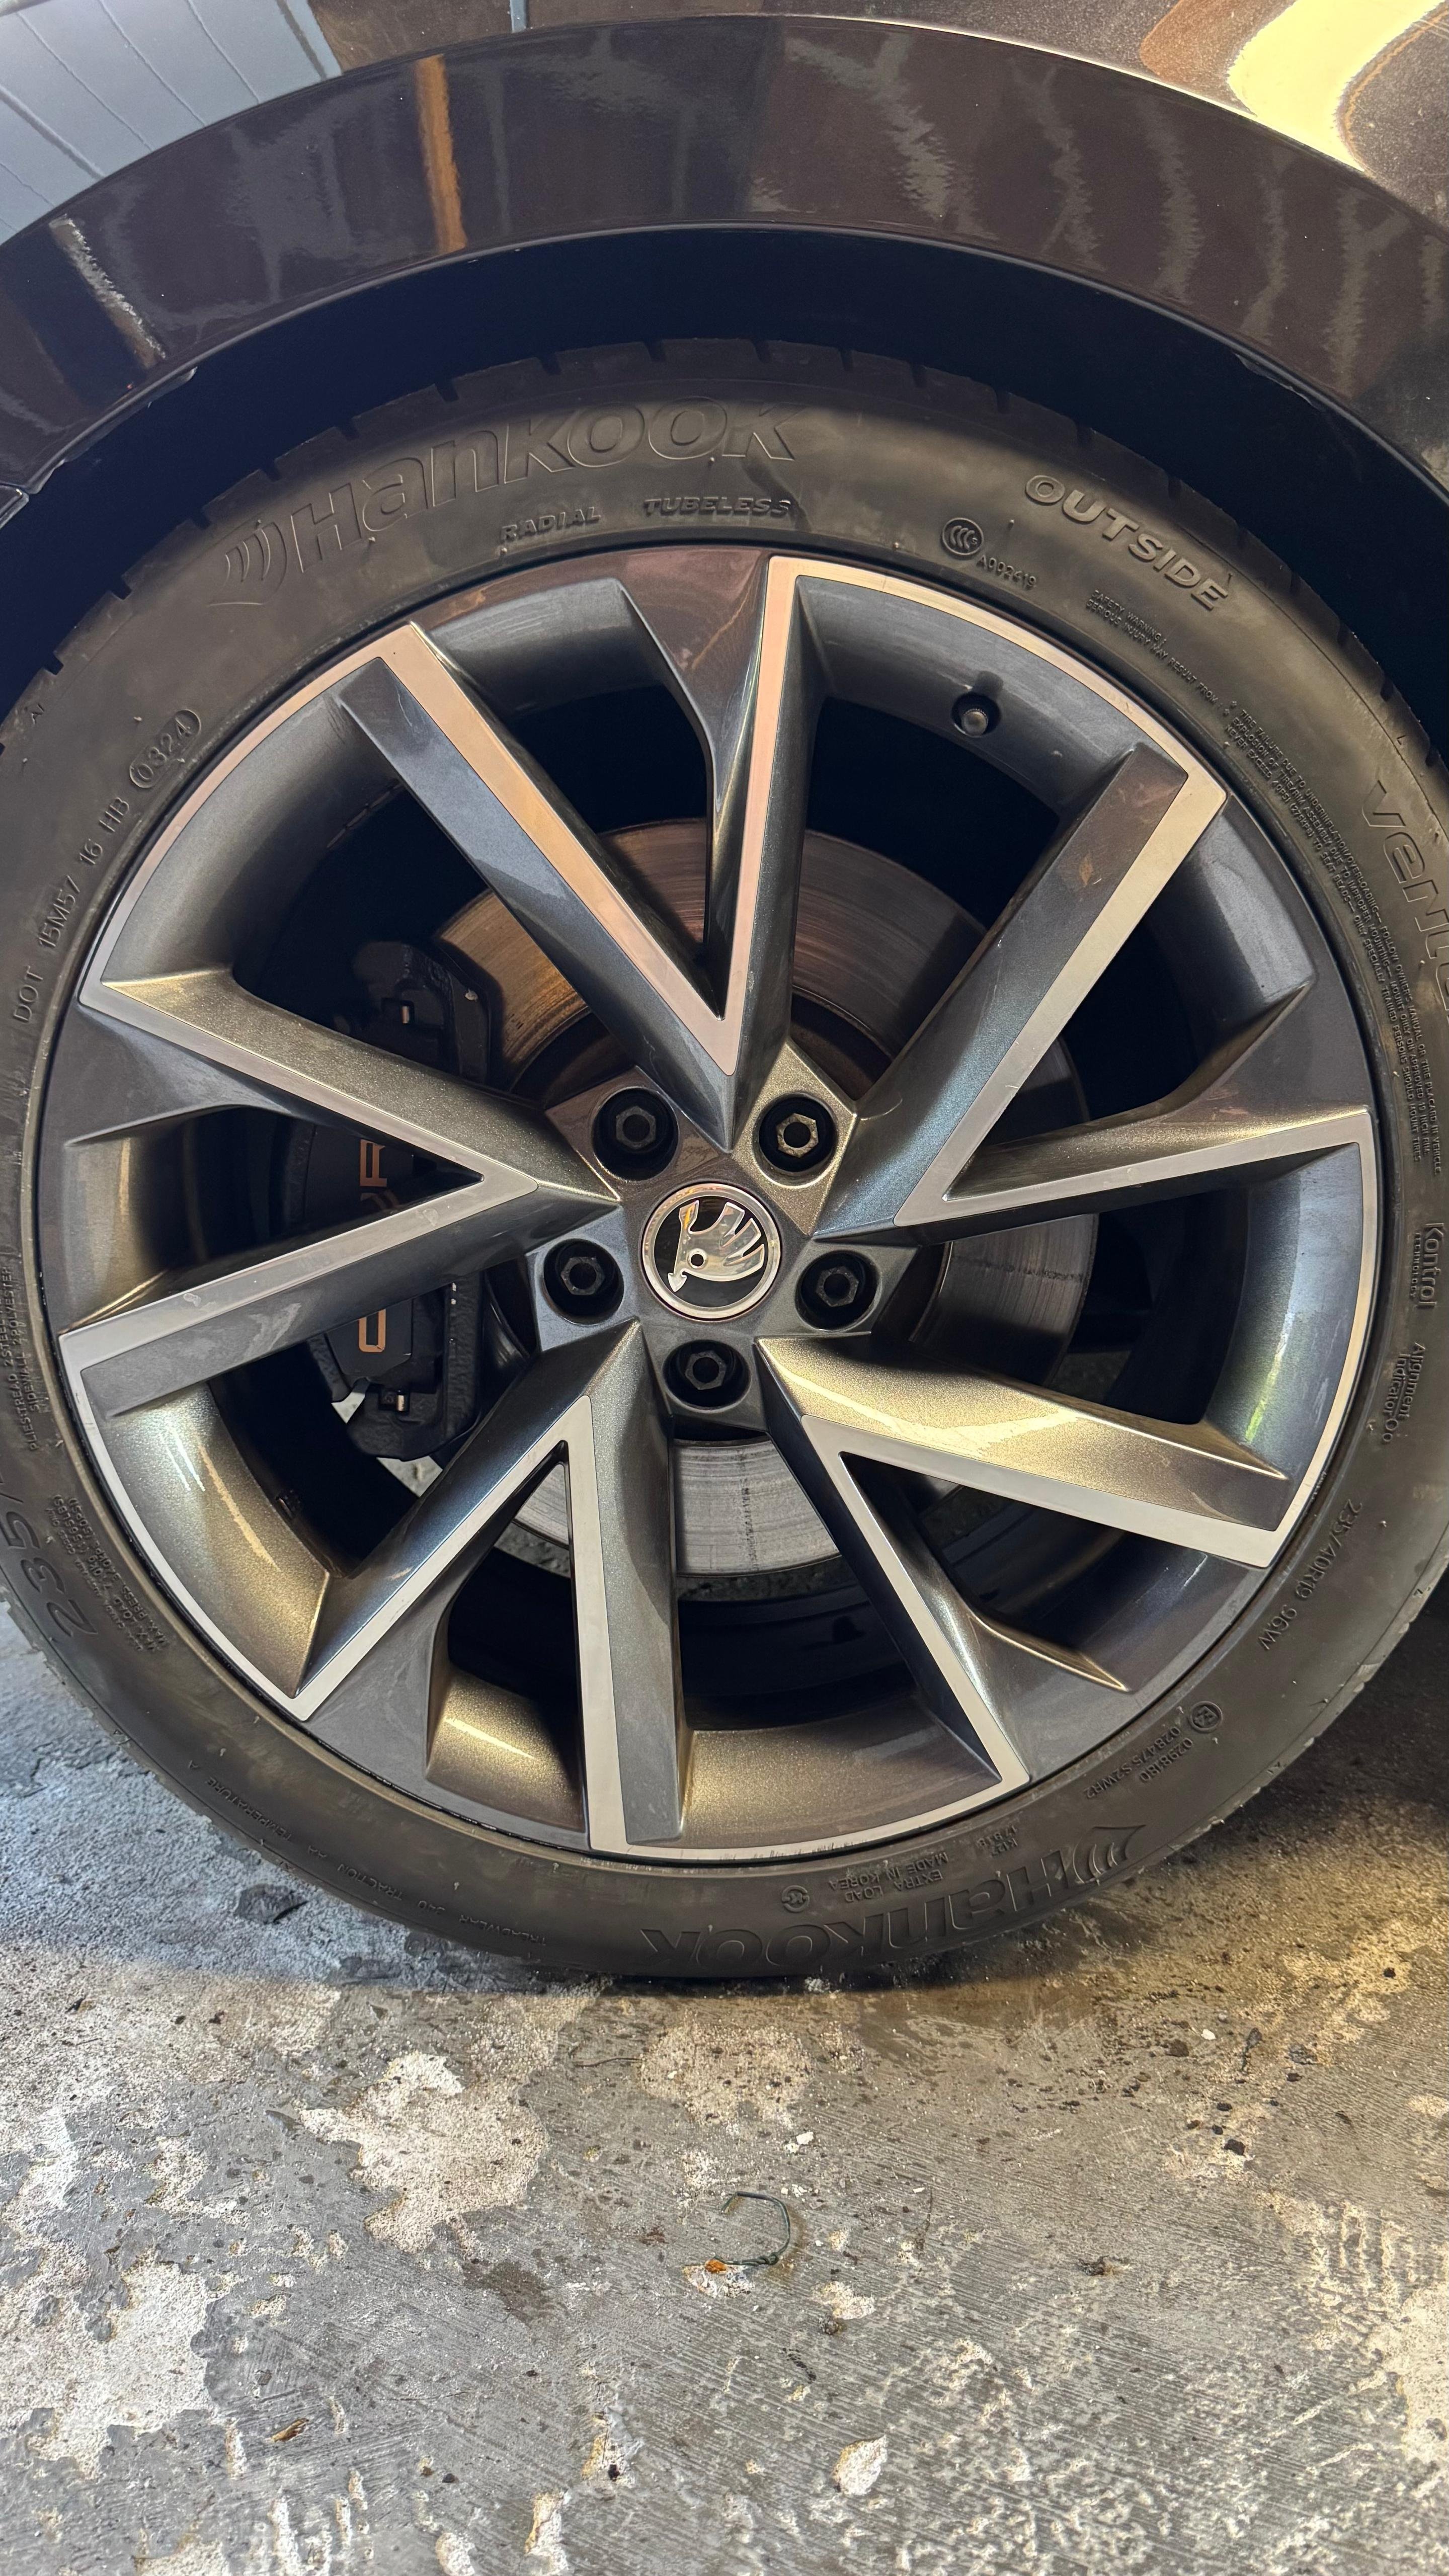
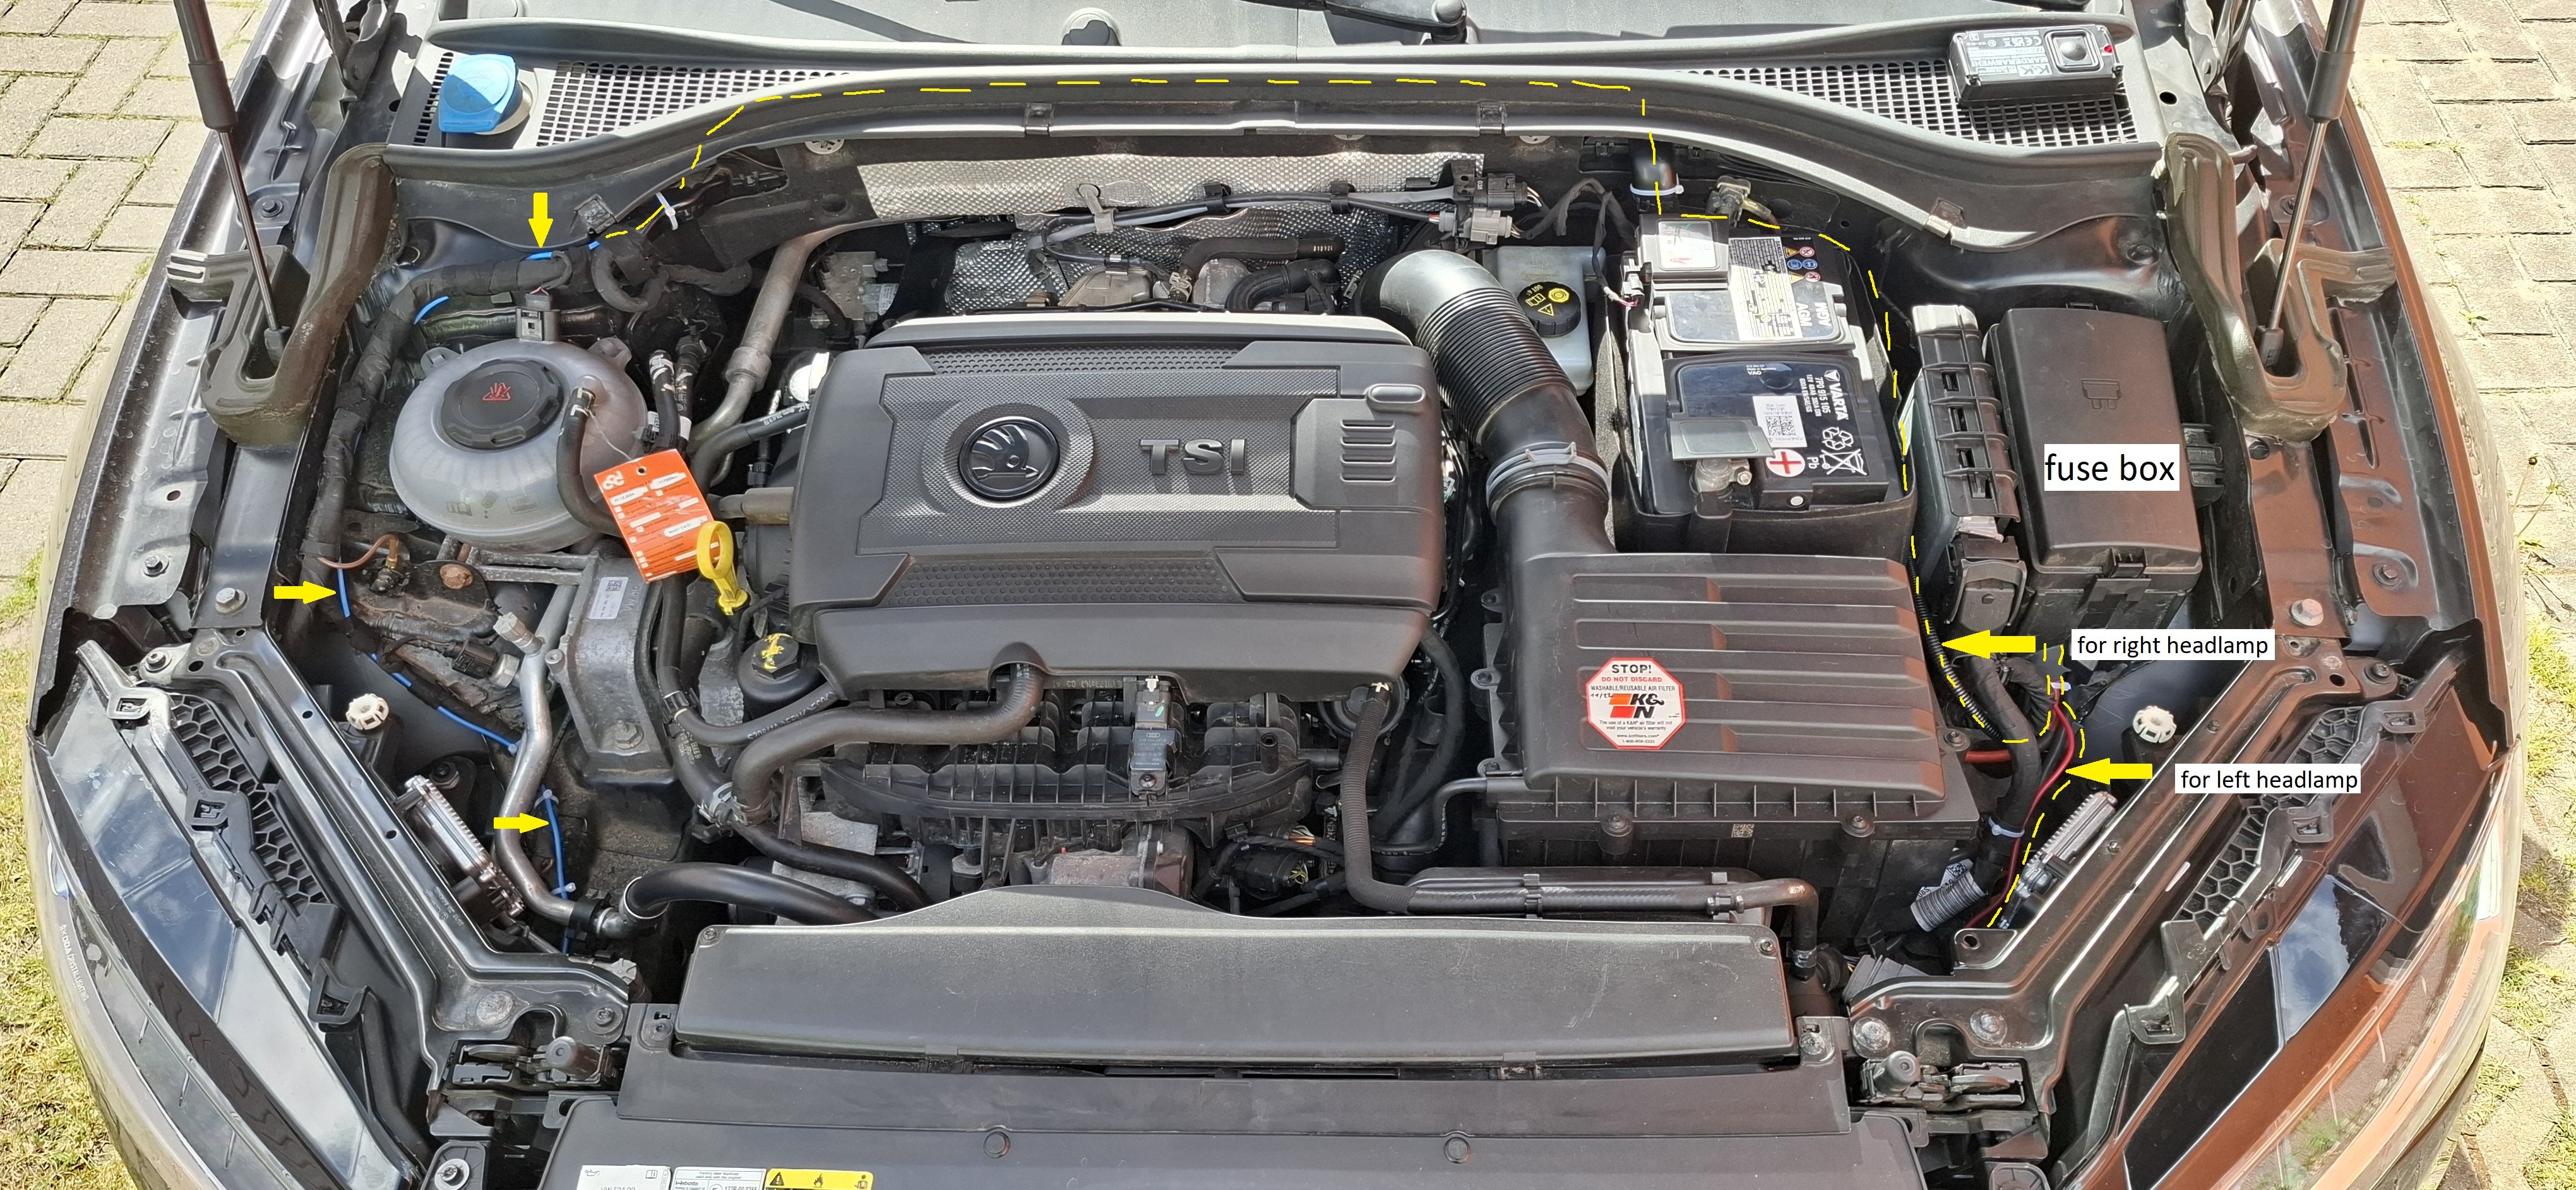
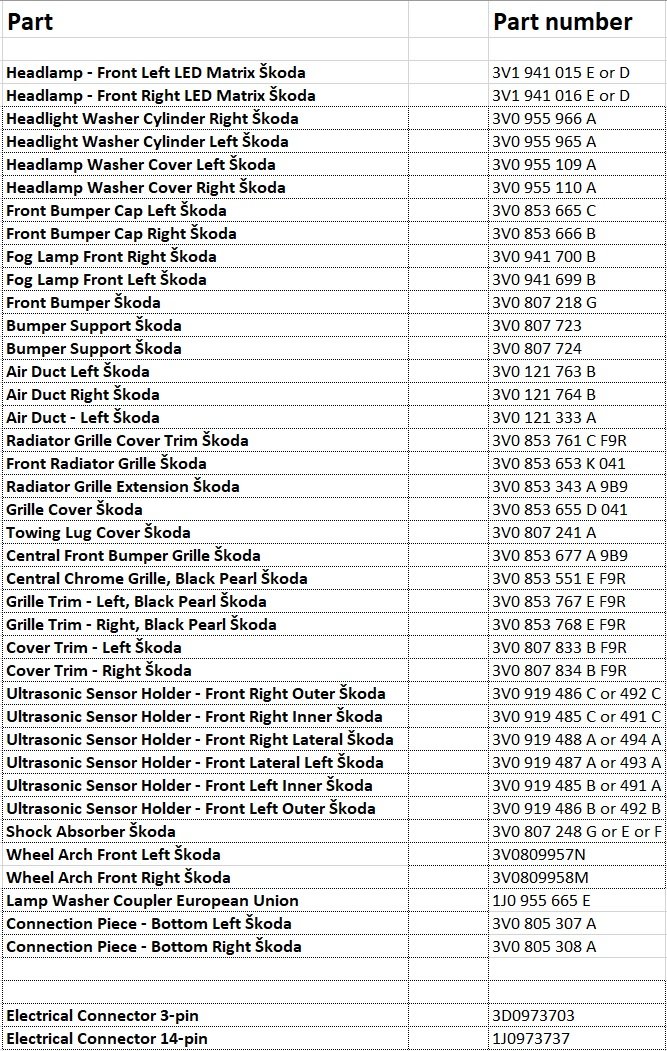
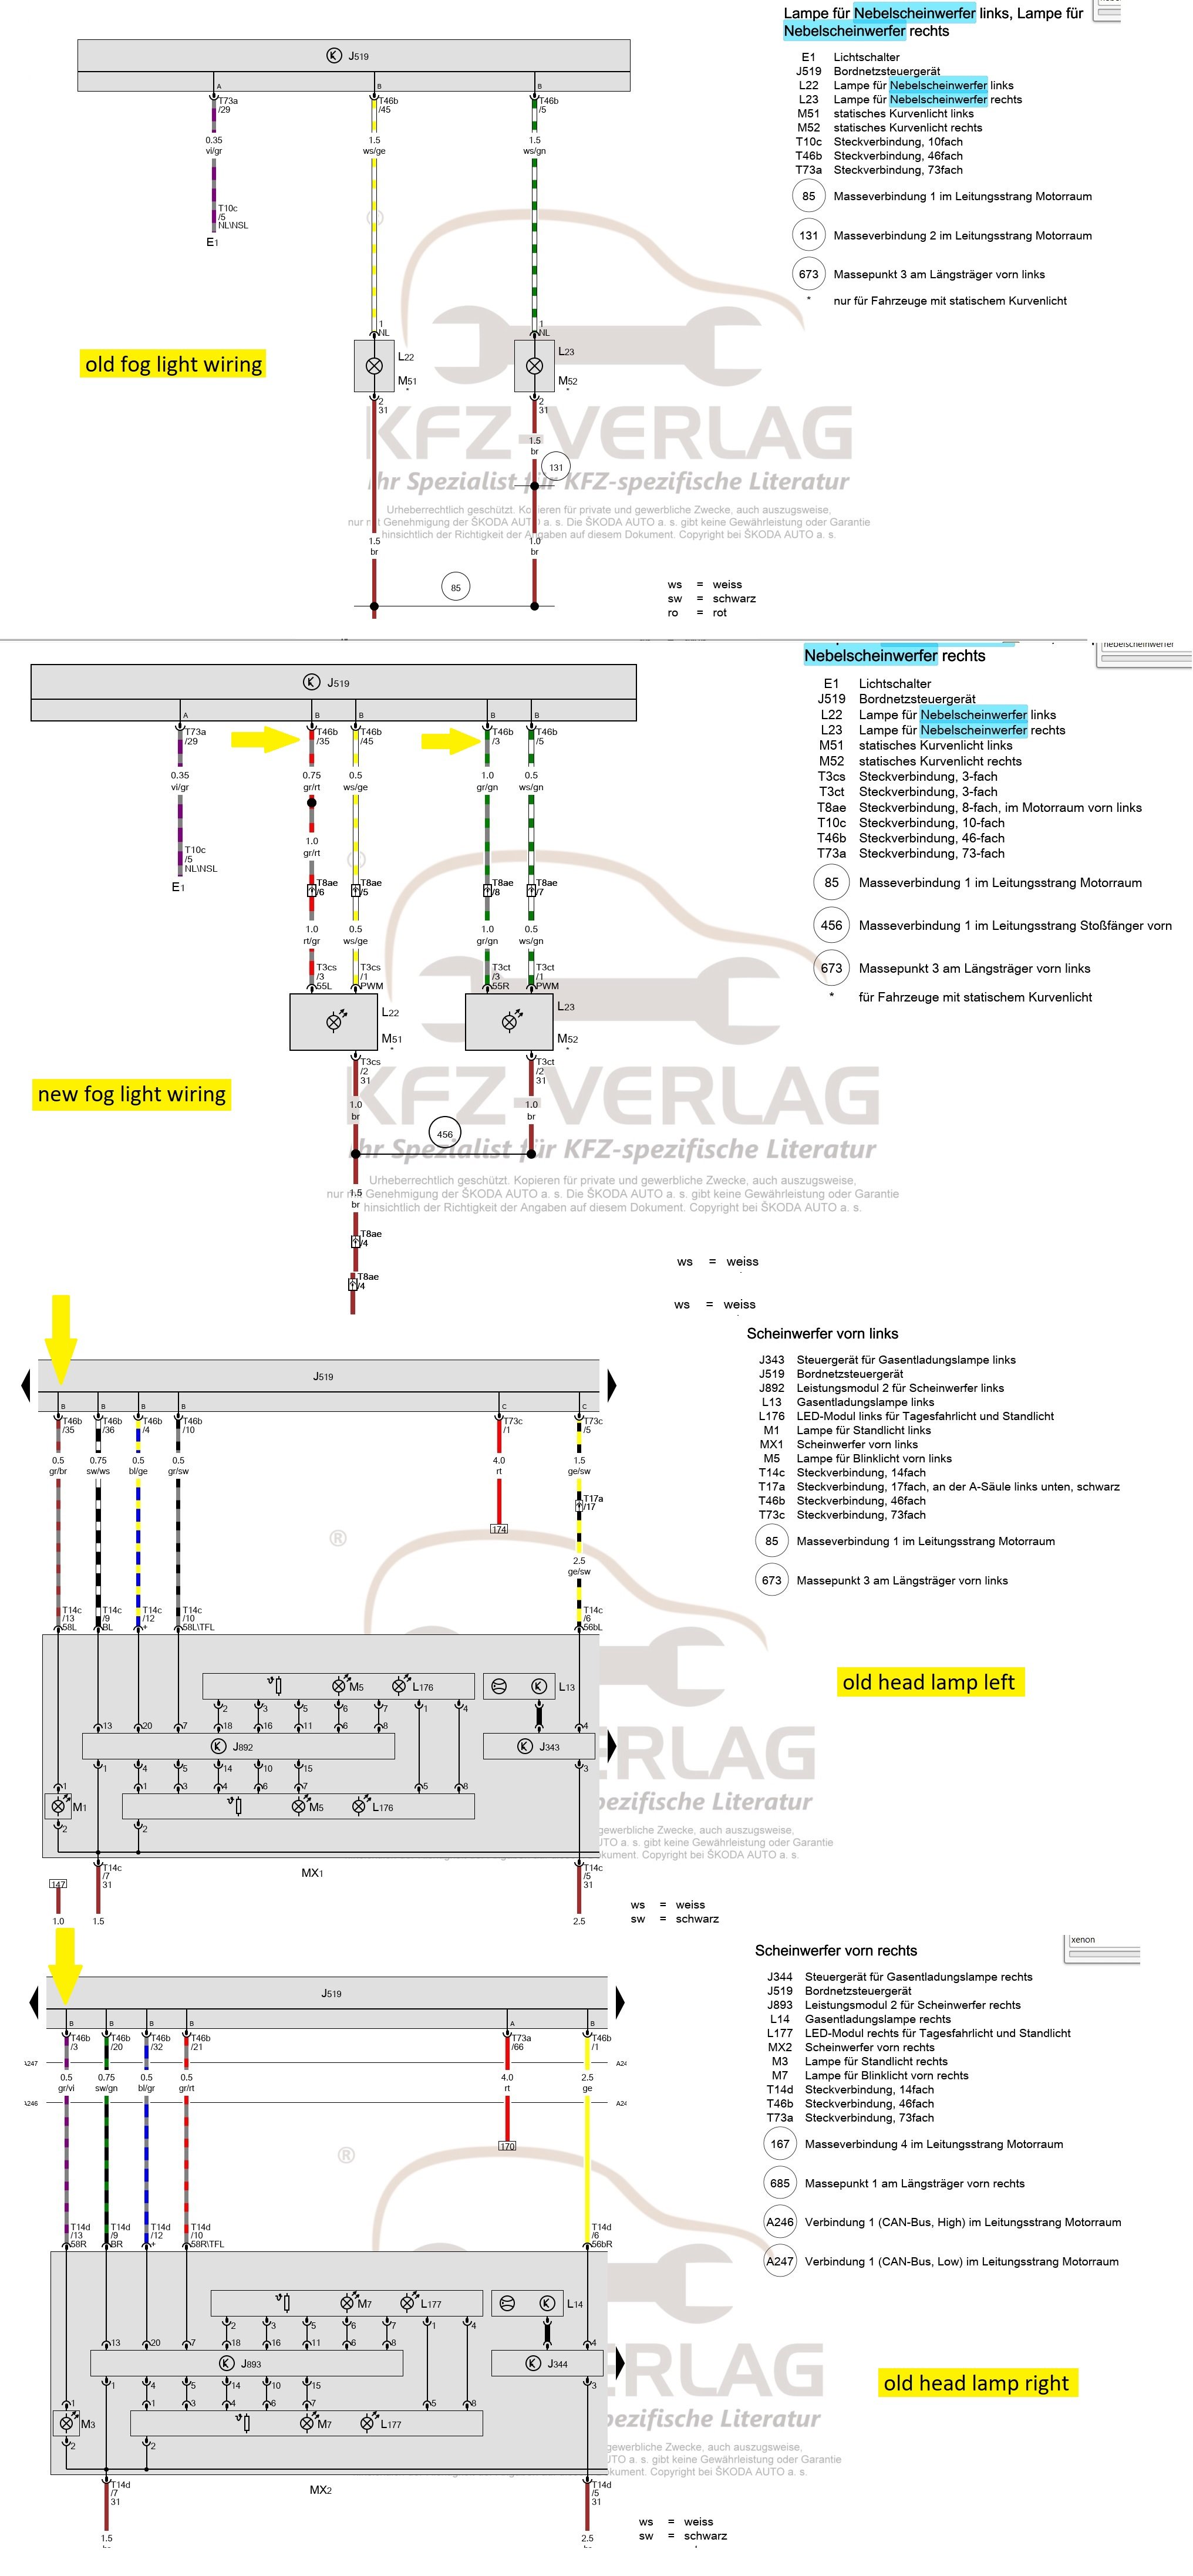
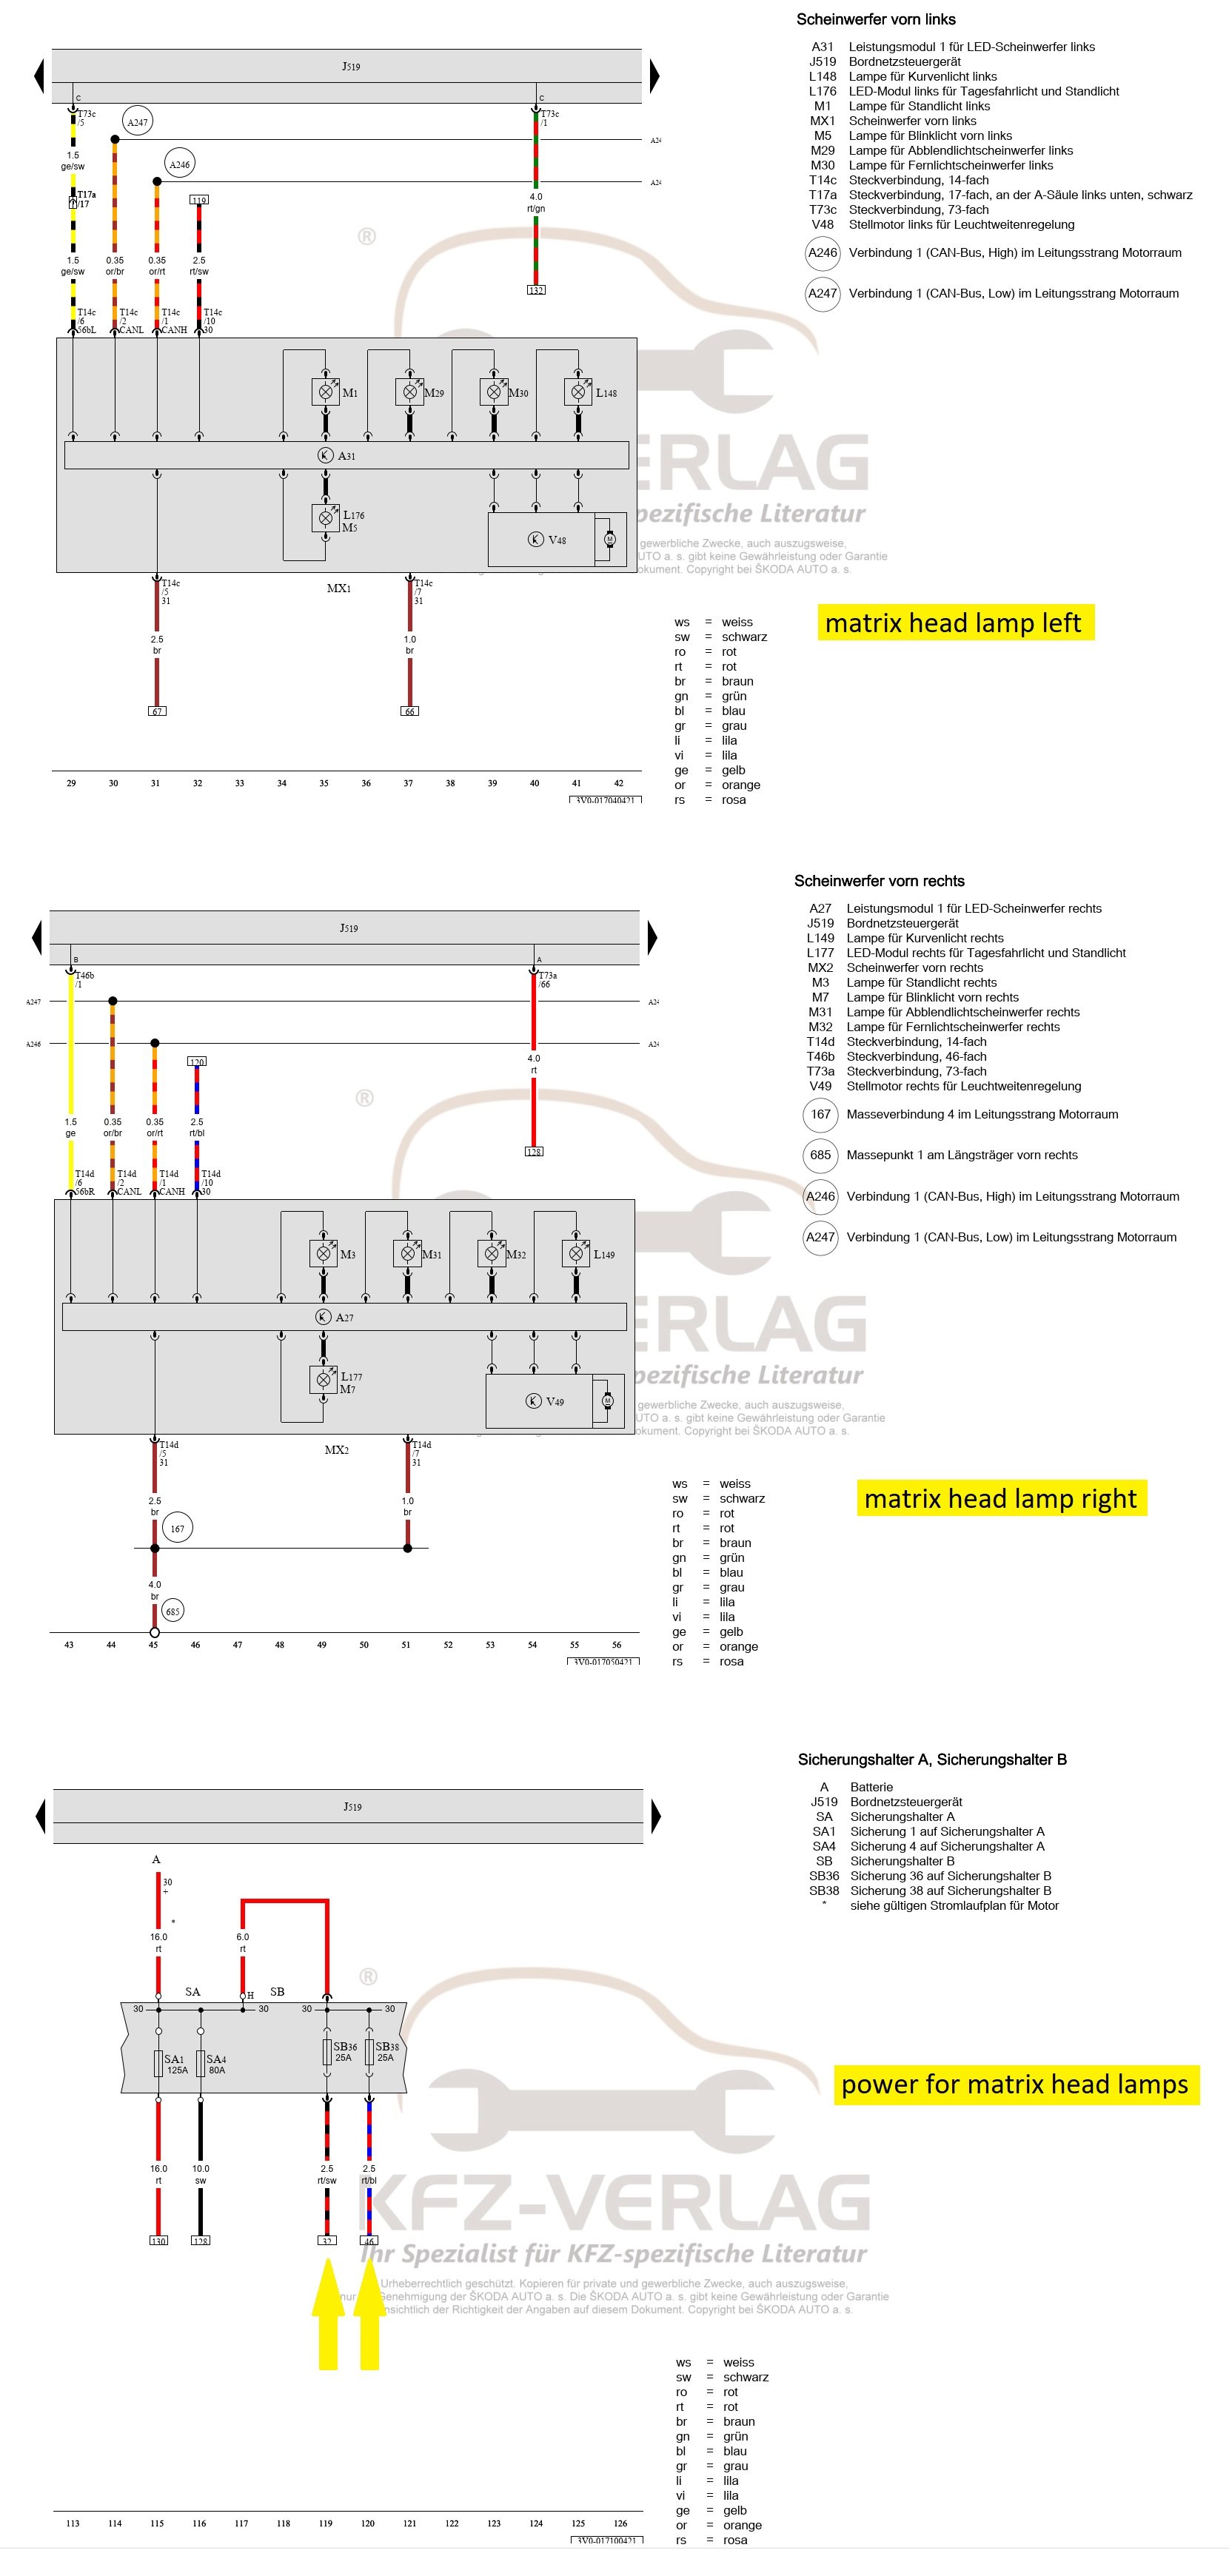
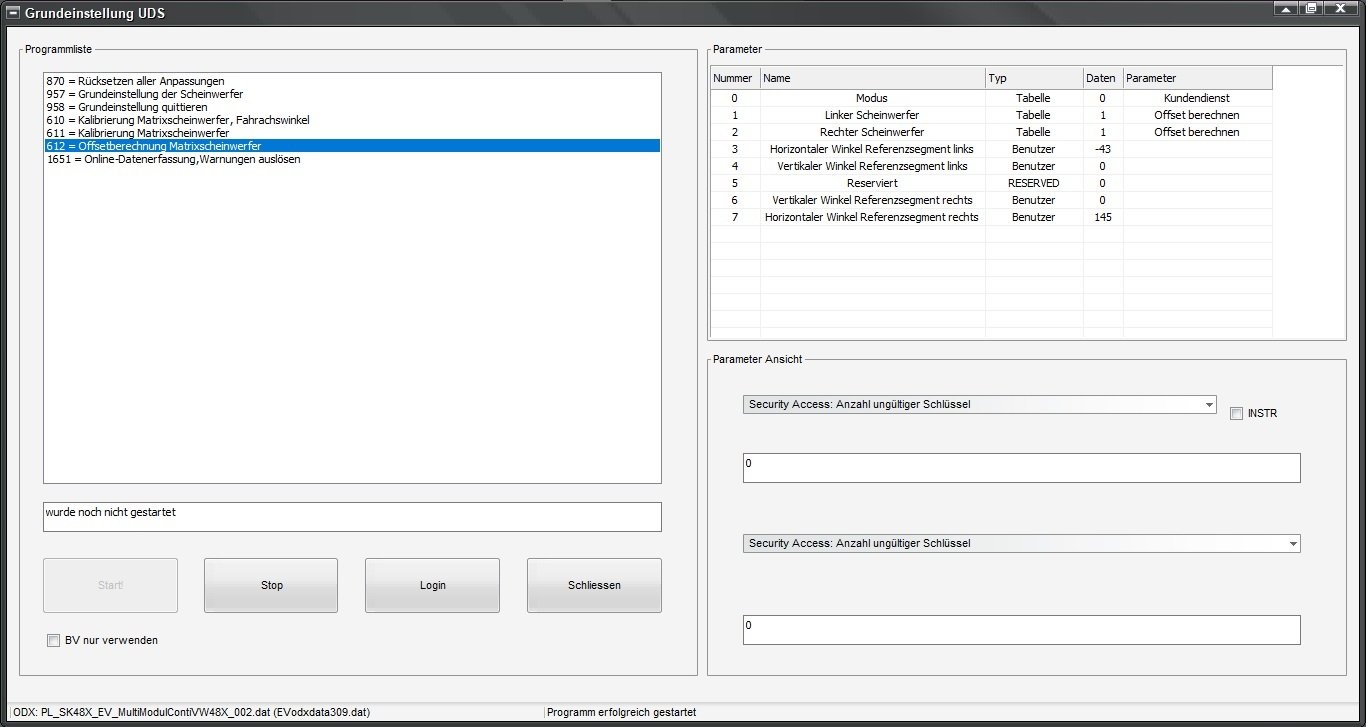
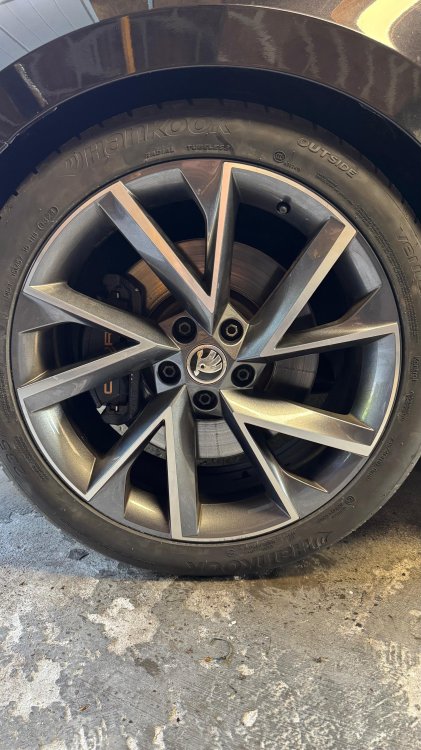
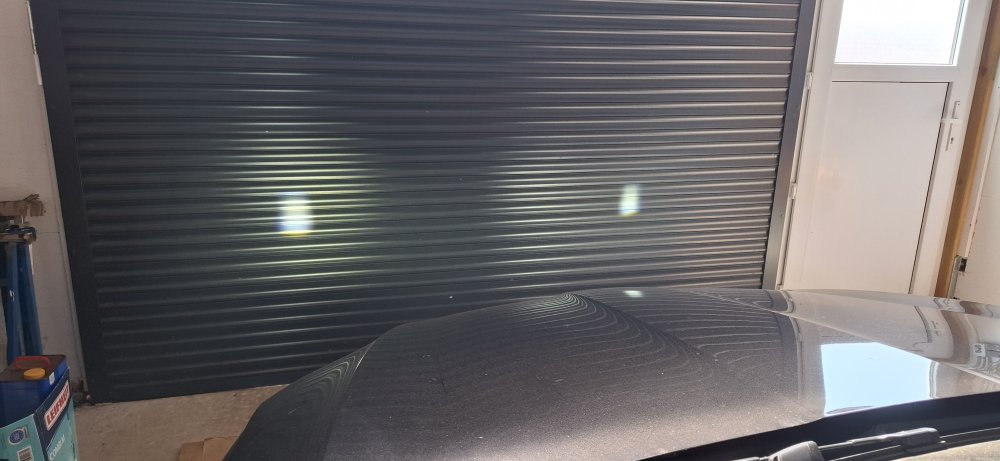
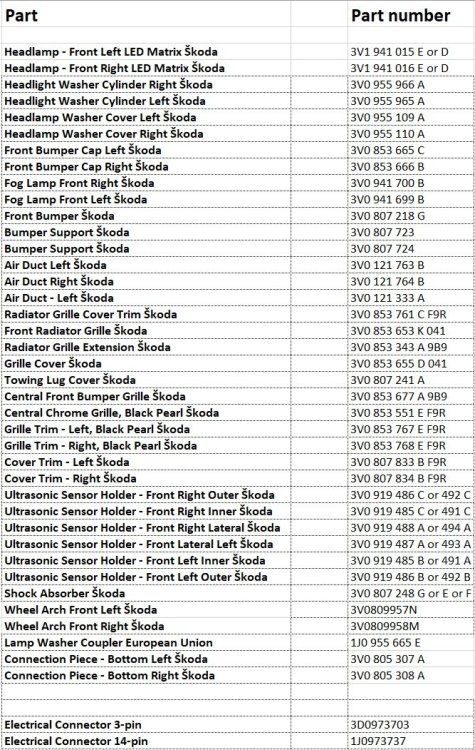
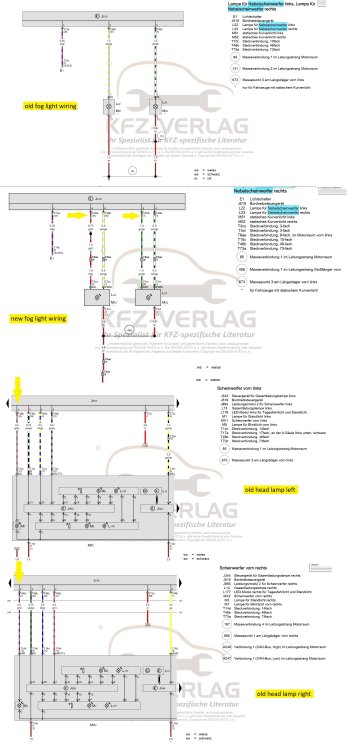
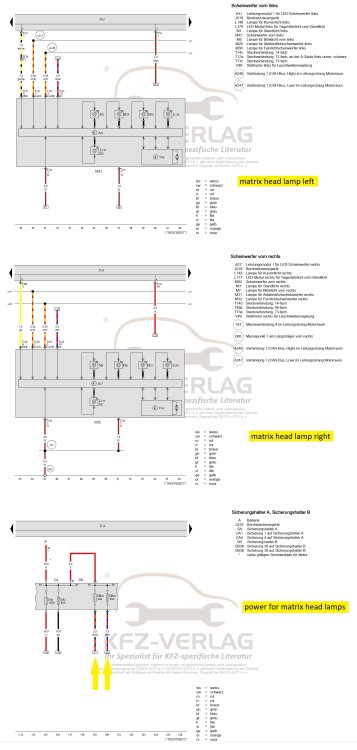
Hi guys, I converted the front of my Superb MK3 PreFacelift Sportline MY2017 to facelift MY2020 with LED matrix headlights and wanted to share my experiences. I have written a short guide for people who want to retrofit LED matrix headlights on a Prefacelift Skoda Superb. 1. Remove headlights and bumper 2. Headlights wiring the new headlights require a direct power supply from the fuse box (Pin 10 in the connector on the headlight), the old connector for the BiXenon headlights still fits and only needs to be adapted the existing pin 10 has to be removed, I put it in the free slot 8 so that the pin doesn't hang around uselessly Lay a new 2.5mm² cable from the fuse box to the headlights and insert it into pin 10 (a new pin is required) the left side is done quickly, here you only need about 50cm from the fuse box to the connector on the headlight right side is a bit more complex, I laid the cable behind the engine bay in the existing cable harness both are protected with 25A each I could not find the original pins from the fuse box, so I used universal fuse holders and connected them directly to the battery 3. Fog lights wiring the connectors (3D0973703) for the new LED fog lights is different and the old one must be replaced Pin 13 from the headlights becomes pin 3 on the fog lights, the old cables white/yellow becomes pin 1 left fog light, grey/green pin 1 right fog light and brown pin 2 left and right (ground) 4. install new headlights and bumper (Partlist for Sportline is attached -> all Trims black) 5. I have replaced 4B Multifunction Module from 3Q0907338 to 3Q0907338C, because I only have the data set for C Version the 4B can be found under the steering wheel. To access it, the knee airbag and the air duct must be removed (note: it is not necessary to unplug the knee airbag connector) 6. Once everything is assembled, you can start coding First activate D6 and D7 in 19 gateway, these are the control units of the new headlights I did this with VCDS -> connect to 19 -> select "installation list" -> check D6 and D7 -> save coding 7. Flash data set "superb_fcm_3q0907338c.zdc" with VCP to control unit 4B Multifunction Module (3Q0907338C) -> it is available in VCP Filemanager 8. Coding: 4B Multifunc. Module(3Q0907338C) Coding: 00000007090008F206003D13010000000000000000000000000000000000 - Byte 3 -> Hex 07 -> Bit0-1= 03 Verbau AFS,Light Control Plus Bit 2= 1 -> LED_Headlight,freigeschaltet - Byte 6 -> Hex 06 -> it is for headlight range adjustment - Byte 7 -> Hex F2 -> Bit 5= 1 Bit 7= 1 - Byte 9 -> Hex 00 - Byte 10 -> Hex 3D -> Bit 0= 1 Bit 1= 0 Bit 2= 1 Bit 3= 1 Bit 4= 1 Bit 5= 1 Bit 6= 0 mdf_activation,freigeschaltet Bit 7= 0 glw_activation,freigeschaltet - Byte 11 -> Hex 13 -> Bit 0= 1 Prädiktive Streckendaten,freigeschaltet Bit 1= 1 Kreuzungslicht mit Streckendaten,freigeschaltet Bit 4= 1 Matrix-head-lamp,freigeschaltet - Byte 12 -> Hex 01 -> Bit 0-2= 01 statisches Kurvenlicht,ECE R48 4B Adaptations IDE01996-SFT00041-Verbauliste Sollverbau-Lichtsteuerung links -> nein IDE01996-SFT00057-Verbauliste Sollverbau-Lichtsteuerung rechts -> nein IDE01996-SFT00214-Verbauliste Sollverbau-Lichtsteuerung links 2 -> ja IDE01996-SFT00215-Verbauliste Sollverbau-Lichtsteuerung rechts 2 -> ja IDE08418-Matrixscheinwerfer: Gesamtdimmung -> 100.8 % IDE13612-Matrixscheinwerfer: Lenkwinkel -> 9600.00 ° A5 Frt Sens. Drv. Assist (3QD980654) Coding: 020408020000040100222355C150A90098000E300080 - Byte 19 -> Hex 10 -> Bit 0-3= 00 FLA_Additional_High_Beam,no_Additional_High_Beam Bit 4-7= 30 FLA-Headinglight_type,LED_witch_variable_light_distribution - Byte 21 -> Hex 80 -> Bit 5-7= 80 AFS_coding_Light_Assist,Matrixbeam 09 Cent. Elect. (5Q0 937 084 CQ) Adaptations ENG141650-MAS13782-Fernlicht_assistent-Assistenzfahrlicht: Empfindlichkeit per BAP einstellbar -> vorhanden ENG141650-ENG141973-Fernlicht_assistent-Erweiterte_Fernlichtsteuerung -> AFS: FLA: Fernlicht (GLW:MDF) ENG141650-ENG116639-Fernlicht_assistent-Fernlichtassistent Reset -> aktiv ENG141650-ENG116637-Fernlicht_assistent-Menuesteuerung Fernlichtassistent -> vorhanden ENG141650-ENG116641-Fernlicht_assistent-Menuesteuerung Fernlichtassistent Werkseinstellung -> vorhanden ENG116936-ENG115873-Leuchte 0 BLK VL B36-Lasttyp 0 -> not activ ENG116937-ENG115892-Leuchte1BLK VRB20-Lasttyp 1 -> not activ ENG116938-ENG115910-Leuchte2SL VLB10-Lasttyp 2 -> not activ ENG116939-ENG115929-Leuchte3SL VRB21-Lasttyp 3 -> not activ ENG116940-ENG115948-Leuchte4TFL LB4-Lasttyp 4 -> not activ ENG116941-ENG115967-Leuchte5 TFL RB32-Lasttyp 5 -> not activ ENG116942-ENG115996-Leuchte6ABL LC5-Dimming Direction CD 6 -> maximize ENG116942-ENG116000-Leuchte6ABL LC5-Dimming Direction EF 6 -> maximize ENG116942-ENG116004-Leuchte6ABL LC5-Dimming Direction GH 6 -> maximize ENG116942-ENG115991-Leuchte6ABL LC5-Dimmwert AB 6 -> 127 ENG116942-ENG115995-Leuchte6ABL LC5-Dimmwert CD 6 -> 127 ENG116942-ENG115999-Leuchte6ABL LC5-Dimmwert EF 6 -> 0 ENG116942-ENG116003-Leuchte6ABL LC5-Dimmwert GH 6 -> 0 ENG116942-ENG115988-Leuchte6ABL LC5-Fehlerort mittleres Byte DTC-DFCC 6 -> 00 ENG116942-ENG116556-Leuchte6ABL LC5-Lampendefektbitposition 6 -> 00 ENG116942-ENG115986-Leuchte6ABL LC5-Lasttyp 6 -> 43 - allgemeine LED ENG116942-ENG115992-Leuchte6ABL LC5-Lichtansteuerung HD AB 6 -> Always ENG116942-ENG115989-Leuchte6ABL LC5-Lichtfunktion A 6 -> Versorgungsbedarf der LCM Module ENG116942-ENG115990-Leuchte6ABL LC5-Lichtfunktion B 6 -> not activ ENG116942-ENG115993-Leuchte6ABL LC5-Lichtfunktion C 6 -> Standlicht allgemein (Schlusslicht: Positionslicht: Begrenzungslicht) ENG116942-ENG115994-Leuchte6ABL LC5-Lichtfunktion D 6 -> Parklicht links (beidseitiges Parklicht aktiviert li & re) ENG116943-ENG116015-Leuchte7ABL RB1-Dimming Direction CD 7 -> maximize ENG116943-ENG116019-Leuchte7ABL RB1-Dimming Direction EF 7 -> maximize ENG116943-ENG116023-Leuchte7ABL RB1-Dimming Direction GH 7 -> maximize ENG116943-ENG116010-Leuchte7ABL RB1-Dimmwert AB 7 -> 127 ENG116943-ENG116014-Leuchte7ABL RB1-Dimmwert CD 7 -> 127 ENG116943-ENG116018-Leuchte7ABL RB1-Dimmwert EF 7 -> 0 ENG116943-ENG116022-Leuchte7ABL RB1-Dimmwert GH 7 -> 0 ENG116943-ENG116007-Leuchte7ABL RB1-Fehlerort mittleres Byte DTC-DFCC 7 -> 00 ENG116943-ENG116557-Leuchte7ABL RB1-Lampendefektbitposition 7 -> 00 ENG116943-ENG116005-Leuchte7ABL RB1-Lasttyp 7 -> 43 - allgemeine LED ENG116943-ENG116011-Leuchte7ABL RB1-Lichtansteuerung HD AB 7 -> Always ENG116943-ENG116008-Leuchte7ABL RB1-Lichtfunktion A 7 -> Versorgungsbedarf der LCM Module ENG116943-ENG116009-Leuchte7ABL RB1-Lichtfunktion B 7 -> not activ ENG116943-ENG116012-Leuchte7ABL RB1-Lichtfunktion C 7 -> Standlicht allgemein (Schlusslicht: Positionslicht: Begrenzungslicht) ENG116943-ENG116013-Leuchte7ABL RB1-Lichtfunktion D 7 -> Parklicht rechts ENG116948-ENG116110-Leuchte12NL LB45-Dimming Direction CD 12 -> maximize ENG116948-ENG116114-Leuchte12NL LB45-Dimming Direction EF 12 -> maximize ENG116948-ENG116118-Leuchte12NL LB45-Dimming Direction GH 12 -> maximize ENG116948-ENG116105-Leuchte12NL LB45-Dimmwert AB 12 -> 100 ENG116948-ENG116109-Leuchte12NL LB45-Dimmwert CD 12 -> 0 ENG116948-ENG116113-Leuchte12NL LB45-Dimmwert EF 12 -> 0 ENG116948-ENG116117-Leuchte12NL LB45-Dimmwert GH 12 -> 0 ENG116948-ENG116102-Leuchte12NL LB45-Fehlerort mittleres Byte DTC-DFCC 12 -> 00 ENG116948-ENG116562-Leuchte12NL LB45-Lampendefektbitposition 12 -> 00 ENG116948-ENG116100-Leuchte12NL LB45-Lasttyp 12 -> 4 - LED Tagfahrlichtmodul Signal ENG116948-ENG116106-Leuchte12NL LB45-Lichtansteuerung HD AB 12 -> Always ENG116948-ENG116103-Leuchte12NL LB45-Lichtfunktion A 12 -> Nebellicht links ENG116948-ENG116104-Leuchte12NL LB45-Lichtfunktion B 12 -> Abbiegelicht links ENG116949-ENG116129-Leuchte13NL RB5-Dimming Direction CD 13 -> maximize ENG116949-ENG116133-Leuchte13NL RB5-Dimming Direction EF 13 -> maximize ENG116949-ENG116137-Leuchte13NL RB5-Dimming Direction GH 13 -> maximize ENG116949-ENG116124-Leuchte13NL RB5-Dimmwert AB 13 -> 100 ENG116949-ENG116128-Leuchte13NL RB5-Dimmwert CD 13 -> 0 ENG116949-ENG116132-Leuchte13NL RB5-Dimmwert EF 13 -> 0 ENG116949-ENG116136-Leuchte13NL RB5-Dimmwert GH 13 -> 0 ENG116949-ENG116121-Leuchte13NL RB5-Fehlerort mittleres Byte DTC-DFCC 13 -> 00 ENG116949-ENG116563-Leuchte13NL RB5-Lampendefektbitposition 13 -> 00 ENG116949-ENG116119-Leuchte13NL RB5-Lasttyp 13 -> 4 - LED Tagfahrlichtmodul Signal ENG116949-ENG116125-Leuchte13NL RB5-Lichtansteuerung HD AB 13 -> Always ENG116949-ENG116122-Leuchte13NL RB5-Lichtfunktion A 13 -> Nebellicht rechts ENG116949-ENG116123-Leuchte13NL RB5-Lichtfunktion B 13 -> Abbiegelicht rechts ENG116952-ENG116186-Leuchte16BLK SLB35BLK SL KC9-Dimming Direction CD 16 -> maximize ENG116952-ENG116190-Leuchte16BLK SLB35BLK SL KC9-Dimming Direction EF 16 -> maximize ENG116952-ENG116194-Leuchte16BLK SLB35BLK SL KC9-Dimming Direction GH 16 -> maximize ENG116952-ENG116181-Leuchte16BLK SLB35BLK SL KC9-Dimmwert AB 16 -> 127 ENG116952-ENG116185-Leuchte16BLK SLB35BLK SL KC9-Dimmwert CD 16 -> 0 ENG116952-ENG116189-Leuchte16BLK SLB35BLK SL KC9-Dimmwert EF 16 -> 0 ENG116952-ENG116193-Leuchte16BLK SLB35BLK SL KC9-Dimmwert GH 16 -> 0 ENG116952-ENG116178-Leuchte16BLK SLB35BLK SL KC9-Fehlerort mittleres Byte DTC-DFCC 16 -> 00 ENG116952-ENG116567-Leuchte16BLK SLB35BLK SL KC9-Lampendefektbitposition 16 -> 00 ENG116952-ENG116176-Leuchte16BLK SLB35BLK SL KC9-Lasttyp 16 -> 1 - LED Tagfahrlichtmodul Versorgung ENG116952-ENG116182-Leuchte16BLK SLB35BLK SL KC9-Lichtansteuerung HD AB 16 -> Always ENG116952-ENG116179-Leuchte16BLK SLB35BLK SL KC9-Lichtfunktion A 16 -> Nebellicht links ENG116952-ENG116180-Leuchte16BLK SLB35BLK SL KC9-Lichtfunktion B 16 -> Abbiegelicht links ENG116953-ENG116205-Leuchte17TFL R BLK SRB3TFL R BLK SR KC3-Dimming Direction CD 17 -> maximize ENG116953-ENG116209-Leuchte17TFL R BLK SRB3TFL R BLK SR KC3-Dimming Direction EF 17 -> maximize ENG116953-ENG116213-Leuchte17TFL R BLK SRB3TFL R BLK SR KC3-Dimming Direction GH 17 -> maximize ENG116953-ENG116200-Leuchte17TFL R BLK SRB3TFL R BLK SR KC3-Dimmwert AB 17 -> 127 ENG116953-ENG116204-Leuchte17TFL R BLK SRB3TFL R BLK SR KC3-Dimmwert CD 17 -> 0 ENG116953-ENG116208-Leuchte17TFL R BLK SRB3TFL R BLK SR KC3-Dimmwert EF 17 -> 0 ENG116953-ENG116212-Leuchte17TFL R BLK SRB3TFL R BLK SR KC3-Dimmwert GH 17 -> 0 ENG116953-ENG116197-Leuchte17TFL R BLK SRB3TFL R BLK SR KC3-Fehlerort mittleres Byte DTC-DFCC 17 -> 00 ENG116953-ENG116568-Leuchte17TFL R BLK SRB3TFL R BLK SR KC3-Lampendefektbitposition 17 -> 00 ENG116953-ENG116195-Leuchte17TFL R BLK SRB3TFL R BLK SR KC3-Lasttyp 17 -> 1 - LED Tagfahrlichtmodul Versorgung ENG116953-ENG116201-Leuchte17TFL R BLK SRB3TFL R BLK SR KC3-Lichtansteuerung HD AB 17 -> Always ENG116953-ENG116198-Leuchte17TFL R BLK SRB3TFL R BLK SR KC3-Lichtfunktion A 17 -> Nebellicht rechts ENG116953-ENG116569-Leuchte17TFL R BLK SRB3TFL R BLK SR KC3-Lichtfunktion B 17 -> Abbiegelicht rechts 9. After coding, the basic setting of the headlights and matrix high beam must be made i used VCP for this-> - switch on low beam - connect to 4B - go to basic settings - go to "basic headlamp setting" and press start, adjust the headlamps to the correct height, then press stop - now go to "Acknowledge basic setting" press start, wait a moment then press stop - switch to Position "0" or "parking light" (low beam must be off) - go to "matrix light, calibration" -> set "calibrate" for left and right - now a reference light can be seen - it must be measured with headlight adjusting unit VAS621001 or Maha MLT3000 Matrix high beam calibration mode -> note the angles - Stop calibration and go to "Offset calculation matrix light" -> set "cablibrate offset" for both headlights - Keep vertical at 0, enter angles for horizontal -> press start, wait a moment and press stop - delete fault codes - finished For the Headlight washer cylinder you need a 10mm connector (1J0955665E), a short piece of 10mm hose and a pipe connector 10mm/6mm to connect it to the old washerhose. Everything works very well and the matrix light is really great, i love it

 2 points
 -
1 pointHey all. I've had to scrap my mk2 estate and found this in the cupboard, can I sell it on here and how much is it worth?
 1 point
 -
A complete day of detailing. Perfect weather: cloudy almost all day long and sunny in the early evening for pictures! Inside: Completely vacuumed (even the spare wheel well), leathers cleaned and moisturized, plastics brushed (espacially door sills and drivers pedals), rubber mats cleaned and brushed with an APC. Outside: Intensive handwash (doors and tailgate hinges, bonnet & tailgate logos, folds of door seals around windows, all cleaned with a paint brush), tar removed, windows cleaned with alcohol. It was my way to be grateful to my Mk3 after 7.5 years and 136500 km on the clock before selling it. As a 'feedback', it granted me all this subtil metallic glitters of its Moon white color 😍, that I had almost forgotten... 🙄1 point
-
1 pointWhile everyone’s entitled to their opinion, I think the way one has chosen to express it is unnecessarily derogatory. It’s one thing to prefer another website, totally fair, we all have our preferences. However, t’s another thing entirely to come into this community and trash the site in such a dismissive way. If the roles were reversed, I’m sure VerticalScope the owner of the site you prefer would be thrilled to know one of their members was out publicly belittling other communities online. That kind of behavior reflects more on the individual than on any platform they’re talking about. There’s always room for improvement in any community, and thoughtful, constructive criticism is always welcome. But this kind of negativity doesn’t build anything, it just tears down. If you’ve got suggestions, let’s hear them. If not, maybe consider the kind of energy you’re bringing into the space. We’re all here to make things better, not bitter. Enjoy your site, and don’t let the door hit you backside on the way out…1 point
-
1 pointDoes the red alternator charge (battery) light illuminate when the ignition is first switched on - then extinguish as soon as the engine starts?1 point
-
1 point
-
It would be interesting to hear from anyone who actually does a side-by-side comparison of Bilstein B8 front shock absorbers with Skoda's sports front shock absorbers...particularly in regard to the fully compressed lengths.1 point
-
1 pointA belated welcome to the forum. A note that you need to join Freedom to sell on the forum.1 point
-
I do have a VCDS but after looking a bit online and stuff i saw lift is needed and such. So i will go to a mechanic probably soon1 point
-
1 pointOkay I found the issue. Somehow I assumed camera gets the power from the button connector. I connected it directly to battery and then plugged into tv and it worked. Whats the best option for power source? Saw something about adding fuse splitter to dashboard fuse and take the power from there. Is this good idea? Dashboard gets power when ignition is turned on, therefore camera will also get power then I assume. Is there a better source? @pab567 hey, where did you take the power source from?1 point
-
1 pointWell that's a little annoying, I will try advertising it on here and see what happens, people can always tell me they think it's overpriced and offer less than way. Thanks1 point
-
You’ve got plenty of facts to lay before Škoda UK exec team highlighting how bad the dealer is. Should add weight to your case with them, and hopefully pressure on a dealer to get it resolved. Going back to the dust, mine got covered in dust over last weekend; looks awful. So yes, dust coming up from the Sahara dumped in southern Britain (happens several times a year).1 point
-
1 pointbottom right of bumper is gone, wheel is fine but lower arm has been bent quite badly back, power steering pump bracket has been mangled too but pump seems salvageable, managed to find the part number on the sheared off part - 02t301252A, seems to be a shifter tower end cap so hoping it’s the spring or minor damage on it causing the first few gears to not engage1 point
-
No, the bonnet and fenders or wings are still the same. I only replaced the headlights, bumper and wheel archs. No further adjustments are necessary.1 point
-
1 point
-
1 pointwill definitely take it off soon when i get the time, could be to do with the selector and have a spring from what i could find1 point
-
Yes. But from your answer you didnt read the current situation1 point
-
The Hand Brake thing i was pointing out really is for Traffic Light Grand Prix / Hill Climbs / Drag sprints. ............ As to Rear Brake light, it is amazing how many with e-brakes & AUTOHOLD do not know or care that the Brake Lights are on when AUTOHOLD functioning. It was not always the case until recent models.1 point
-
The dust on the car issue was obviously hiding the level of paint work required (the car would look worse if it used a pen). Regardless there are larger cosmetic issues on the paint that werent addressed or just badly filled possibly by previous owners but i doubt its went through any inspection. Thank you for the comment on the softeare thats really helpful. Im currently running 1804 how old is that?1 point
-
I tried holding the car on the handbrake this morning instead of the footbrake to test the theory that it would set off without a pause, but after a couple of seconds of releasing the foot brake the car engaged drive and the back of the car suddenly dipped down making the rear brakes creak as the car tried to overpower the handbrake. I do usually use the handbrake in heavy traffic because I too think it's bad manners to dazzle the following driver with my brake lights, but I will also have to select neutral and learn to tolerate the hesitancy when I put it back into gear, and perhaps the odd beep from impatient following drivers, when setting off again.1 point
-
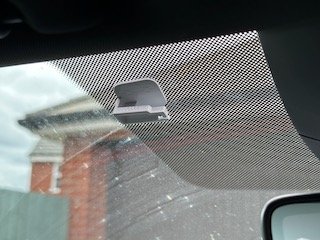
Don't have a Mk2 - but I have a Mk1.5 vRS with a heated windscreen. My tag goes right up at the top next to the mirror on the passenger side. Never had an issue with it. Be warned though... you have to get right up close to the barrier before it 'beeps' and the barrier lets you through. Can be a bit 'wtf?!' the first couple of times, especially using the express lanes where you don't stop! (yes, my windscreen needs a clean!)
 1 point
 -
1 pointI sent you link to MEN2_EU_SKGPx_P0080L_8755, this is the most recent I have. Don't use USB, just SD. 1. format SD (best max 32GB) under FAT32 2. unpack to root (metainfo2.txt and all the folders must be placed directly on SD, not in any folder) 3. insert SD card into the slot 4. enter Service Menu (long press MENU button)1 point
-
1 point(Looking at this spec for heated seats, front and rear sensors) The SEL spec has all those as well. It doesnt have the sunroof and electric tailgate though. It does have (almost!) 'real' tyres 18" and 50 profile, rather than the 'rubber bands' on the sportline1 point
-
I would have thought there might be some information here on setting the carb. You do need to give up more information, you have the car everyone else only has it in their imagination of the engine bay and its contents, you may have put up photos before in other threads but they are forgotten by me at least. Is the carb a factory fitted standard carb (make, model), are you on just petrol or LPG too. For later, I too, for one, need reminding of your ignition set up, as it is now, my memory is you have got electronic ignition, cheap replacement dissy, new (undeclared make) HT leads, new (undeclared make and model) spark plugs. There are photos and or videos of carbs here, one or some might be from you for all I know. Generally the engine running sounds smoother when the mixture is set richer so whilst you want to hear a smooth steady idle you need some instrument to confirm mixture for economical running at least.1 point
-
Massively helpful thank you! I’m guessing these got covered somehow when the bodyshop fitted it, hopefully it stays intact :-/1 point
-
1 pointMines a Sportline as well, it has all the new stupid EU regulations with the speed warning stuff you have to turn off every time, Will get some the rest of info this afternoon as can't remember.1 point
-
These days, with a CO meter. It used to be possible to work by exhaust colour, but that needs leaded fuel. By ear and/or a tachometer. Set the slowest speed where the engine idles without any sign of stalling.1 point
-
1 pointThe eXtra Load index of 235/35R20 is only 92(630kg). The Superb MK3 normally uses tyres with at least a 94(670kg) load index. It might be worth checking to make sure that the maximum rear axle load isn't more than 1260kg...otherwise using 92(630kg) tyres would be illegal.1 point
-
1 pointThis is listed in the Superb MK2 section, so is the car a Superb MK2 or an Octavia MK2? The outside diameter of 235/50R18 is far too big for either the Superb MK2 or the Octavia MK2, as shown in the chart below. Up to 1.5% bigger outside diameter than standard is generally considered acceptable, so 8.6% bigger than standard is far too big an increase in outside diameter. Outside diameter of tyre 225/40R18 637.2mm 235/50R18 692.2mm (8.6% bigger outside diameter compared to 225/40R18)1 point
-
1 point
-
1 pointI had a Fabia MK2 and this car from the vin should have had 256mm size vented frnt discs fitted but it turned out they were 282mm size i remember getting the shields from Autodoc the only drawback is the potage cost but if i remember it still worked out cheaper than the dealership (which they kept saying was the smaller ones) Pads were the same they kept giving me the wrong typei found out mydelf by looking at them and then looking at the different types ,turned out to be Lucas pads1 point
-
1 point
-
One thing to try if you haven't already is to clear the cache if Android. Failing that clear the data, but you'll need to login again. Poorly written programs refer to the same area of memory but a revision of the program without the programmer thinking about it, it's all change on the read of the data so doesn't work. Worth a try.1 point
-
I bought used headlights and a used bumper, trims and other small parts are all new and bought directly from Skoda. In total it was about 3500€.1 point
-
1 pointI don't see what the site software has to do with anything - it's no less navigable than it was before. Same topics are in the same forums and sub-forums. Not many CitiGo posts maybe because as mentioned it's been taken out of production. Last one rolled off the line five years ago.1 point
-
1 pointI purchased a carista obd2 reader from Amazon, and then downloaded the VAG DPF app. Cost £7.49. set the app up to connect with the carista and away it goes. I'm guessing as the miles build it'll not be able to clear as much and it'll have to be cleaned or replaced.1 point
-
pull it out and wash it. i used 7% HCL and shining like new.1 point
-
1 point
-
From my apprenticeship days, carburising is the process of stoving steel in a carbon-rich medium, in the first stage of case hardening. The metal then being hardened in the 2nd stage by heating and quenching.1 point
-
Depends which aspect of performance you wanted. Better go usually means better stopping is advisable so you could get some better discs and pads; not necessarily bigger but drilled/grooved will stop heat fade so much; ceramic pads are lower dust as well as better performing over original. And braided brake hoses will stop any loss of brake fluid pressure albeit under relatively heavier/more sustained braking. Rear anti-roll bar is useful to keep the rear from rolling if you’re going round some bends enthusiastically. Otherwise, depends on budget and what you want - drop in a v8 lump? 😬1 point
-
1 point
-
1 pointThanks to all for the many responses to my question. However, the responses quickly turned into a discussion about software and firmware. I realise that the software level of the infotainment system probably has nothing to do with the draning of the battery. And yet, an infotainment system that doesn't shut down properly when the car is turned off may still drain the battery. The bottom line is that I have no overall knowlegde about how the various systems and computer units in my car interact with each other. Anyway, I just wanted to know how to locate my 12 Volt battery. My intention was to replace the battery myself when the time comes. And it will come, sooner or later, because no acid lead battery can endure repeatedly being discharged below 12 Volt. But now I have learned that a replacement of the battery can only be done by someone who knows about the coding of the battery. I assume that this coding is some kind of chip built into the battery in order to prevent us mortals from interfering with the servicing of our own cars. I'm afraid that the same level of ignorance as mine exists among a large percentage of the service persons at the dealers. People who are supposed to help me instead of telling me fairy tales.1 point
-
1 pointThe volt drop from the modules active during the first 30 minutes after locking alone are sufficient to put the battery below 12.5v especially if you have done a short journey and the battery has not heated internally through charging. You want the battery to go into sleep mode yet still be able to open the doors with the electronic keys, that is precisely what it would do if it were functioning correctly, shut down all of the controllers aside from the alarm and central locking after no more than 20-30 minutes, it will not do so if any of them are still communicating so that is the root of your problem. As myself and others have pointed out multiple times replacing the battery would be as big a waste of money as would filling a car with fuel which has a hole in the bottom of the tank.1 point
-
1 pointA well written software would put the system into sleep mode when the battery tension drops below 12.5 Volts. If the system drains the battery in sleep mode then somebody at Skoda needs to go back to the drawing board. According to what I have heard and read about PHEVs then the 12 Volt batteries have had problems in several PHEV car brands incl. Ford. It seems as though some of the car owner´s drive patterns difer from what the car builders expected. If you, like I, drive many short trips in e-mode then you will regularly have to put a charger to your 12 Volt battery. The charging of the High Voltage battery alone doesn't seem to suffice. Choosing the hybrid drive mode seems to keep the 12 Volt battery happy. Then you could ask yourself why the Skoda PHEV defaults to e-mode when starting the car. I still haven't tried long time parking at an airport. (I don't dare)1 point
-
1 point