Leaderboard
-

Lee01
FREEDOM11Points36,414Posts -
pinkpanther
FREEDOM11Points3,922Posts -

chills
Members11Points1,689Posts -
.jpg.5f5908b5afb5ed410c43d763df801089.jpg)
Evolution13
FREEDOM10Points2,492Posts
.thumb.jpg.9dd3f612ba7f13d10be5c518d3c8d255.jpg)


Popular Content
Showing content with the highest reputation on 24/01/26 in all areas
-
3 points@lol-lol If the Public EV charging prices really drop they need to drop lots. Even if the VAT goes from 20% to 5% on Public Charging that is not lots, that is very little, 'real world' out of peoples income that they have after tax. Home charging is lovely, very cheap electric for 6 or 7 hours, even giving you cheap electricity for Household, Garage, Swimming Pool, greenhouse, battery storage etc etc. The Social Divide. Have and have nots,. but haves might really be able to reduce their energy bill, and transportation bill.3 points
-
3 pointsI dont think the concentration of coolant helps cooling at all. Water is the best cooling medium due to its enormous specific heat capacity, but we mix it with glycol etc to prevent freezing and corrosion of cooling system. The mix also inhibits boiling to some degree but that is largely due to a pressurised cooling system. Really diluted coolant probably cools the best3 points
-
2 pointsNot sure if this is it, but exactly one minute after the PHEV starts, this jolt happens. Sometimes it feels like a car is braking, sometimes like releasing brakes. Factory requested the gearbox swap, but the issue did not go away. Currently an sw update is expected that should fix this.2 points
-
2 pointsMoreover, in the UK, idling is an offence under The Road Traffic Act 1988 Section 42. And yes, you guessed correctly it's to do with air pollution.2 points
-
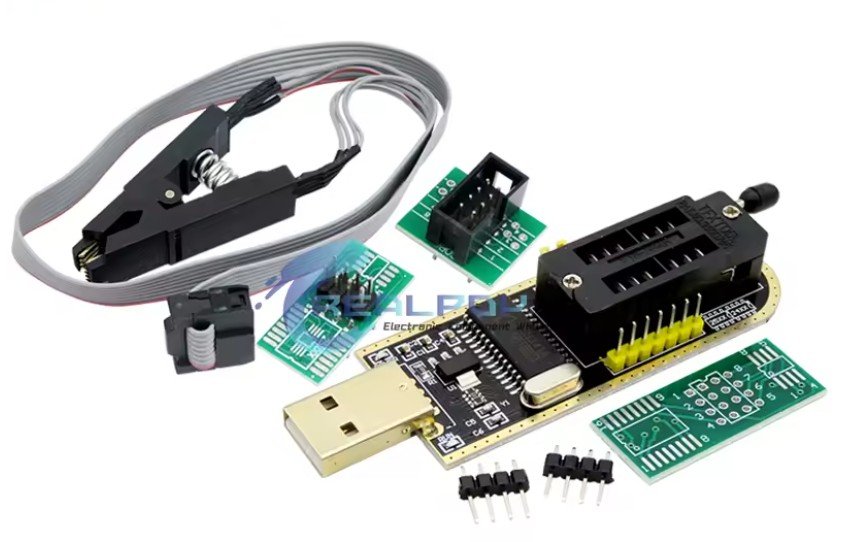
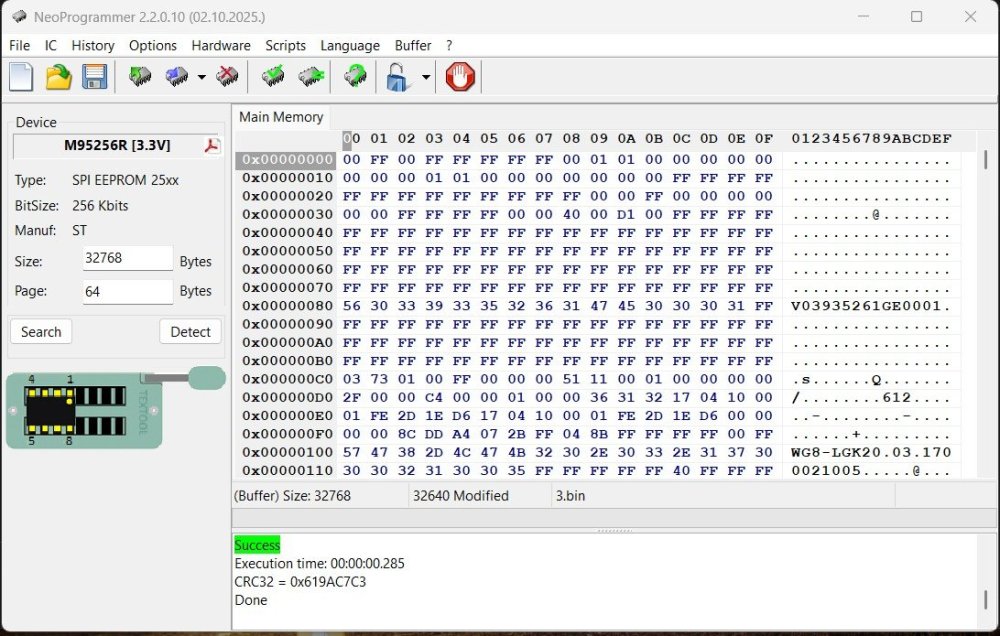
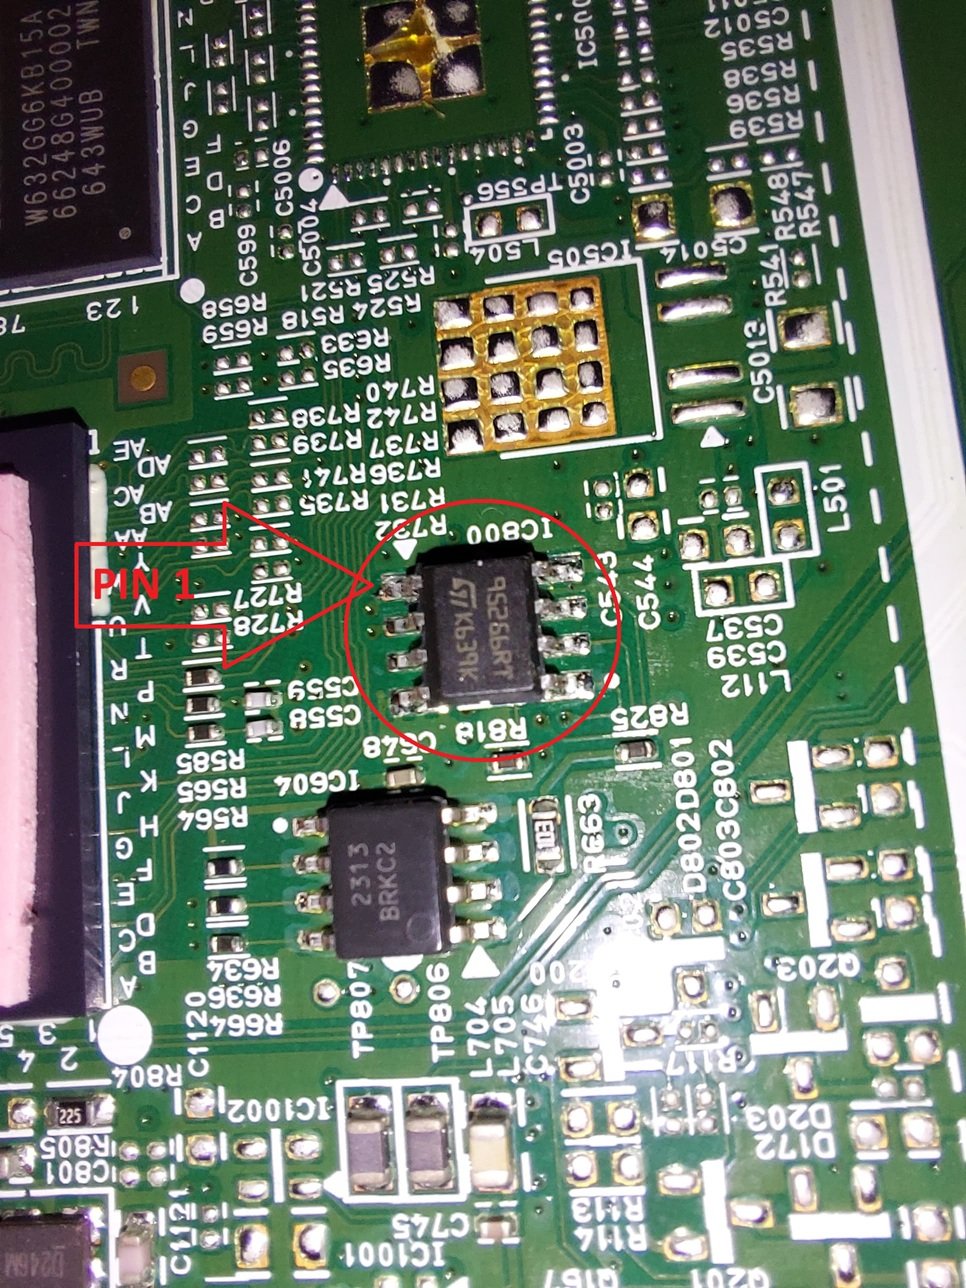
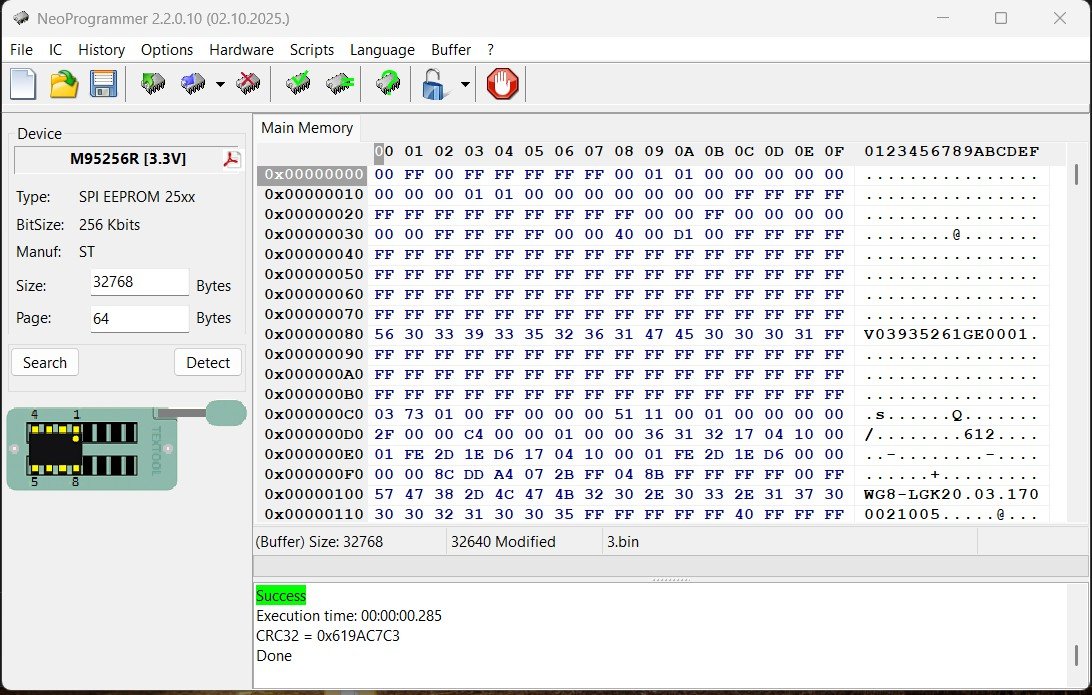
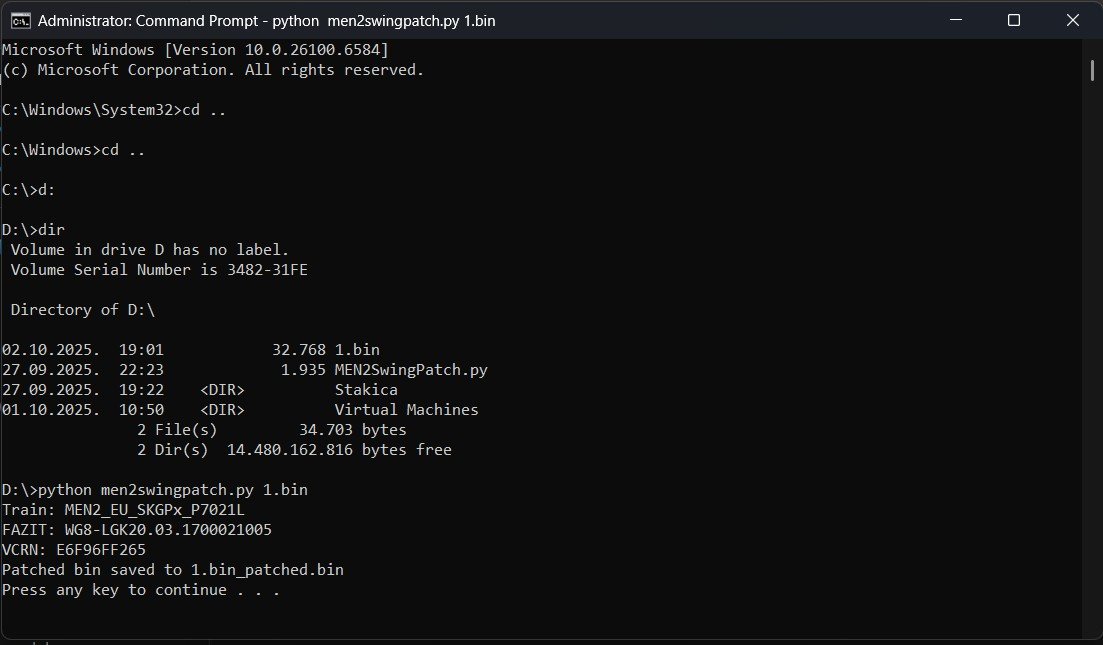
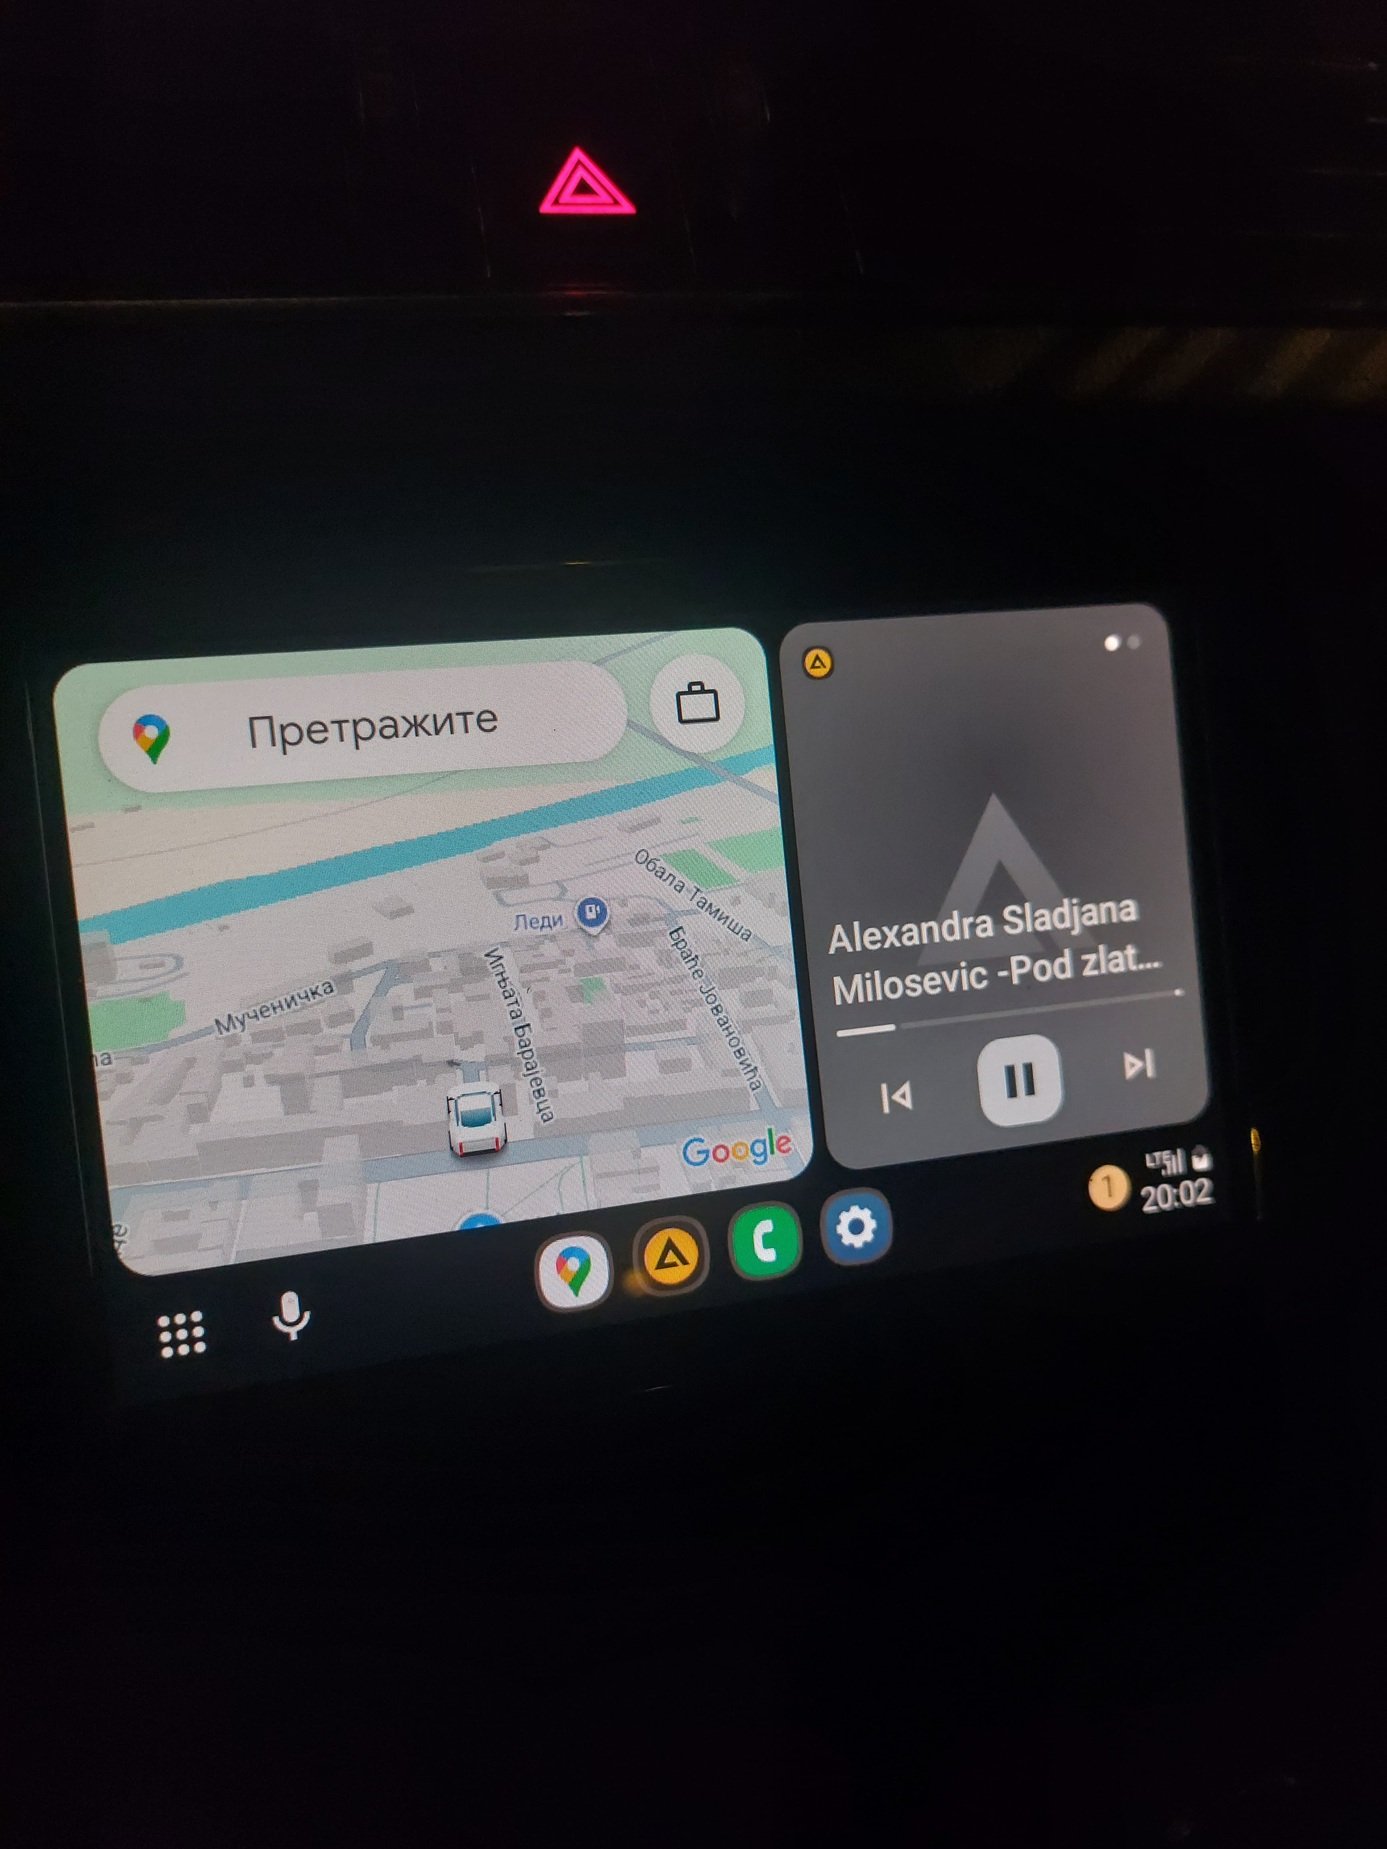
1 pointHello, I activated Smart Link on my swing 3 radio, at Skoda Octavia mk3 MY 2018, so I want to share with everyone how it can be done. DISCLAIMER: You do it at your rensponsability, is not easy to do, and you can mess things out, possible brick you device. Do it only if you have expereince in this kind of activity. Physical tools needed: Tool for removing radio 4 pieces, just google "VAG radio removal tool", cost about 1€. CH341A Mini Programmer, cost about 10€. PC/Laptop Philips screwdriver Software needed (all software in attachment): CH341A driver NeoProgrammer Python (In windows 11, open start menu, type cmd, press enter, type Python, press enter. Microsoft store will open with Python 3.13, click on "Get" and wait to install complete.) Python script for activating CarLink (MEN2SwingPatch.py) Install CH341A driver and NeoProgrammer, make sure python is installed, put MEN2SwingPatch.py script at some accessible location (for example at root D:\). Firstly, you need to remove radio from car, its pretty simple, just insert four "keys" and pull the radio out. Then remove 6 screws from the top and 2 from the bottom, split display from the unit, and pull the top cover to expose top of the PCB. I removed PCB fully from the case to check is there present video chip for reversing camera (unfortunately not), but you don't have to do that. After top cover is removed, and PCB is accessible, you have to find ST 95256 R EEPROM. Put clamp from the CH341A on the EEPROM chip, make sure red cable (clamp) is on the pin 1 (EEPROM). Clamp connector insert in appropriate adapter, and adapter insert in CH341A in part intended for 25XX, make sure red cable facing toward lever. Plug CH341A in computer USB port. All this can be sawn in picture named EEPROM 2. Run NeoProgrammer.exe, go to Hardware tab, select "CH341 Black". Next go to IC>Search>type 95256>select M95256R> click on Read IC. This is the tricky part, if you get all blank result it means that clamp on the eeprom not have a good grip, try to move clamp left-right, take it off and put on again. After 5-6 times of re adjusting clamp I finally got the eeprom content. Save it on pc (for example at root D:\ as 1.bin). Read IC couple more times to be sure that you have good conection to the eeprom chip (if you want to take extra check, you can compare couple .bin with Notepad++ to be sure that you have identical read every time, this is good sign that all is correct). Make sure you dont move accidentaly clamp or PCB. Click on start, type cmd, press enter, navigate to D:\ (place where you saved EEPROM dump and script), type python men2swingpatch.py 1.bin, press enter. If everything is correct you should get printed on display TRAIN:xxx, FAZIT: xxx (see picture "script"), and now you have file named 1.bin_patched.bin. This new file we now need to write back to the eeprom. Get back to the NeoProgrammer, click on File>Open and find 1.bin_patched.bin at D:\, click on Write IC. After writing you can read it again and compare to patched bin, just to be sure its written correct. Now you can disconnect clamp, assemble unit and put it back in the car. Enjoy in your unlocked Smart Link. DOWNLOAD needed software


 1 point
 -
1 pointI never really trusted High Beam Assist , but I find it useful when I forget to dip my beams - I've had them in other cars - my Merc Eclass being the most reliable! When I set HBA, under streety lighting lights remain on dipped, when out of sreet lighting main beams comes on, approaching headlights (even high intensity and doing more that 30kmph)? - Nothing! still on high beam! Go back to street lighting - switches to dipped! Bloody Useless!1 point
-
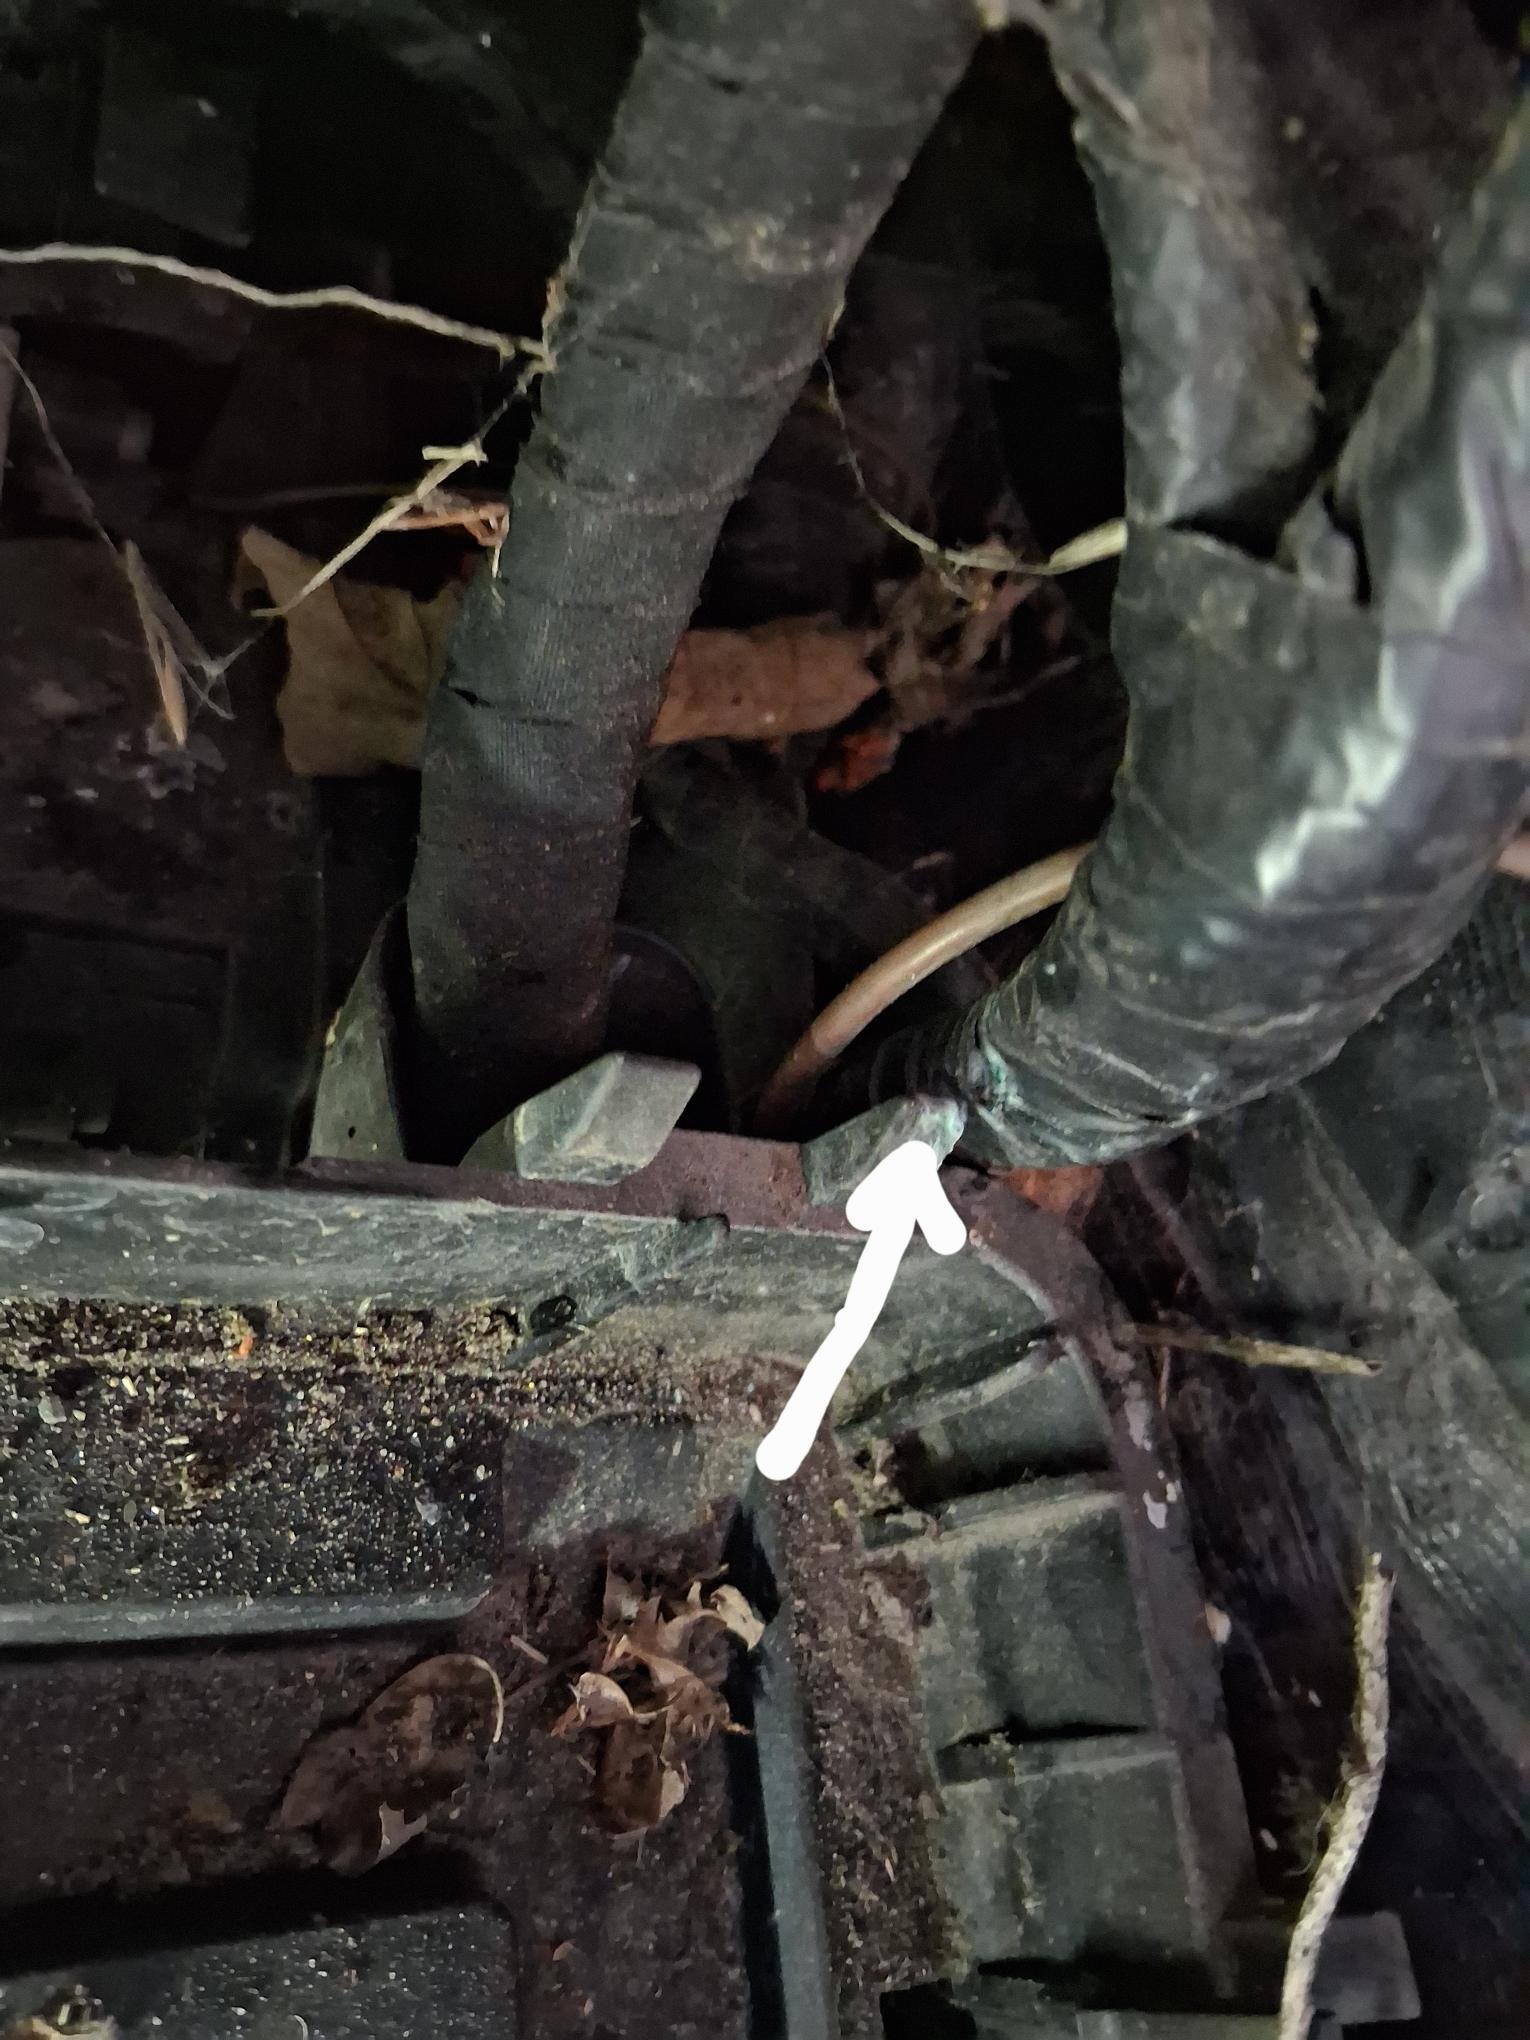
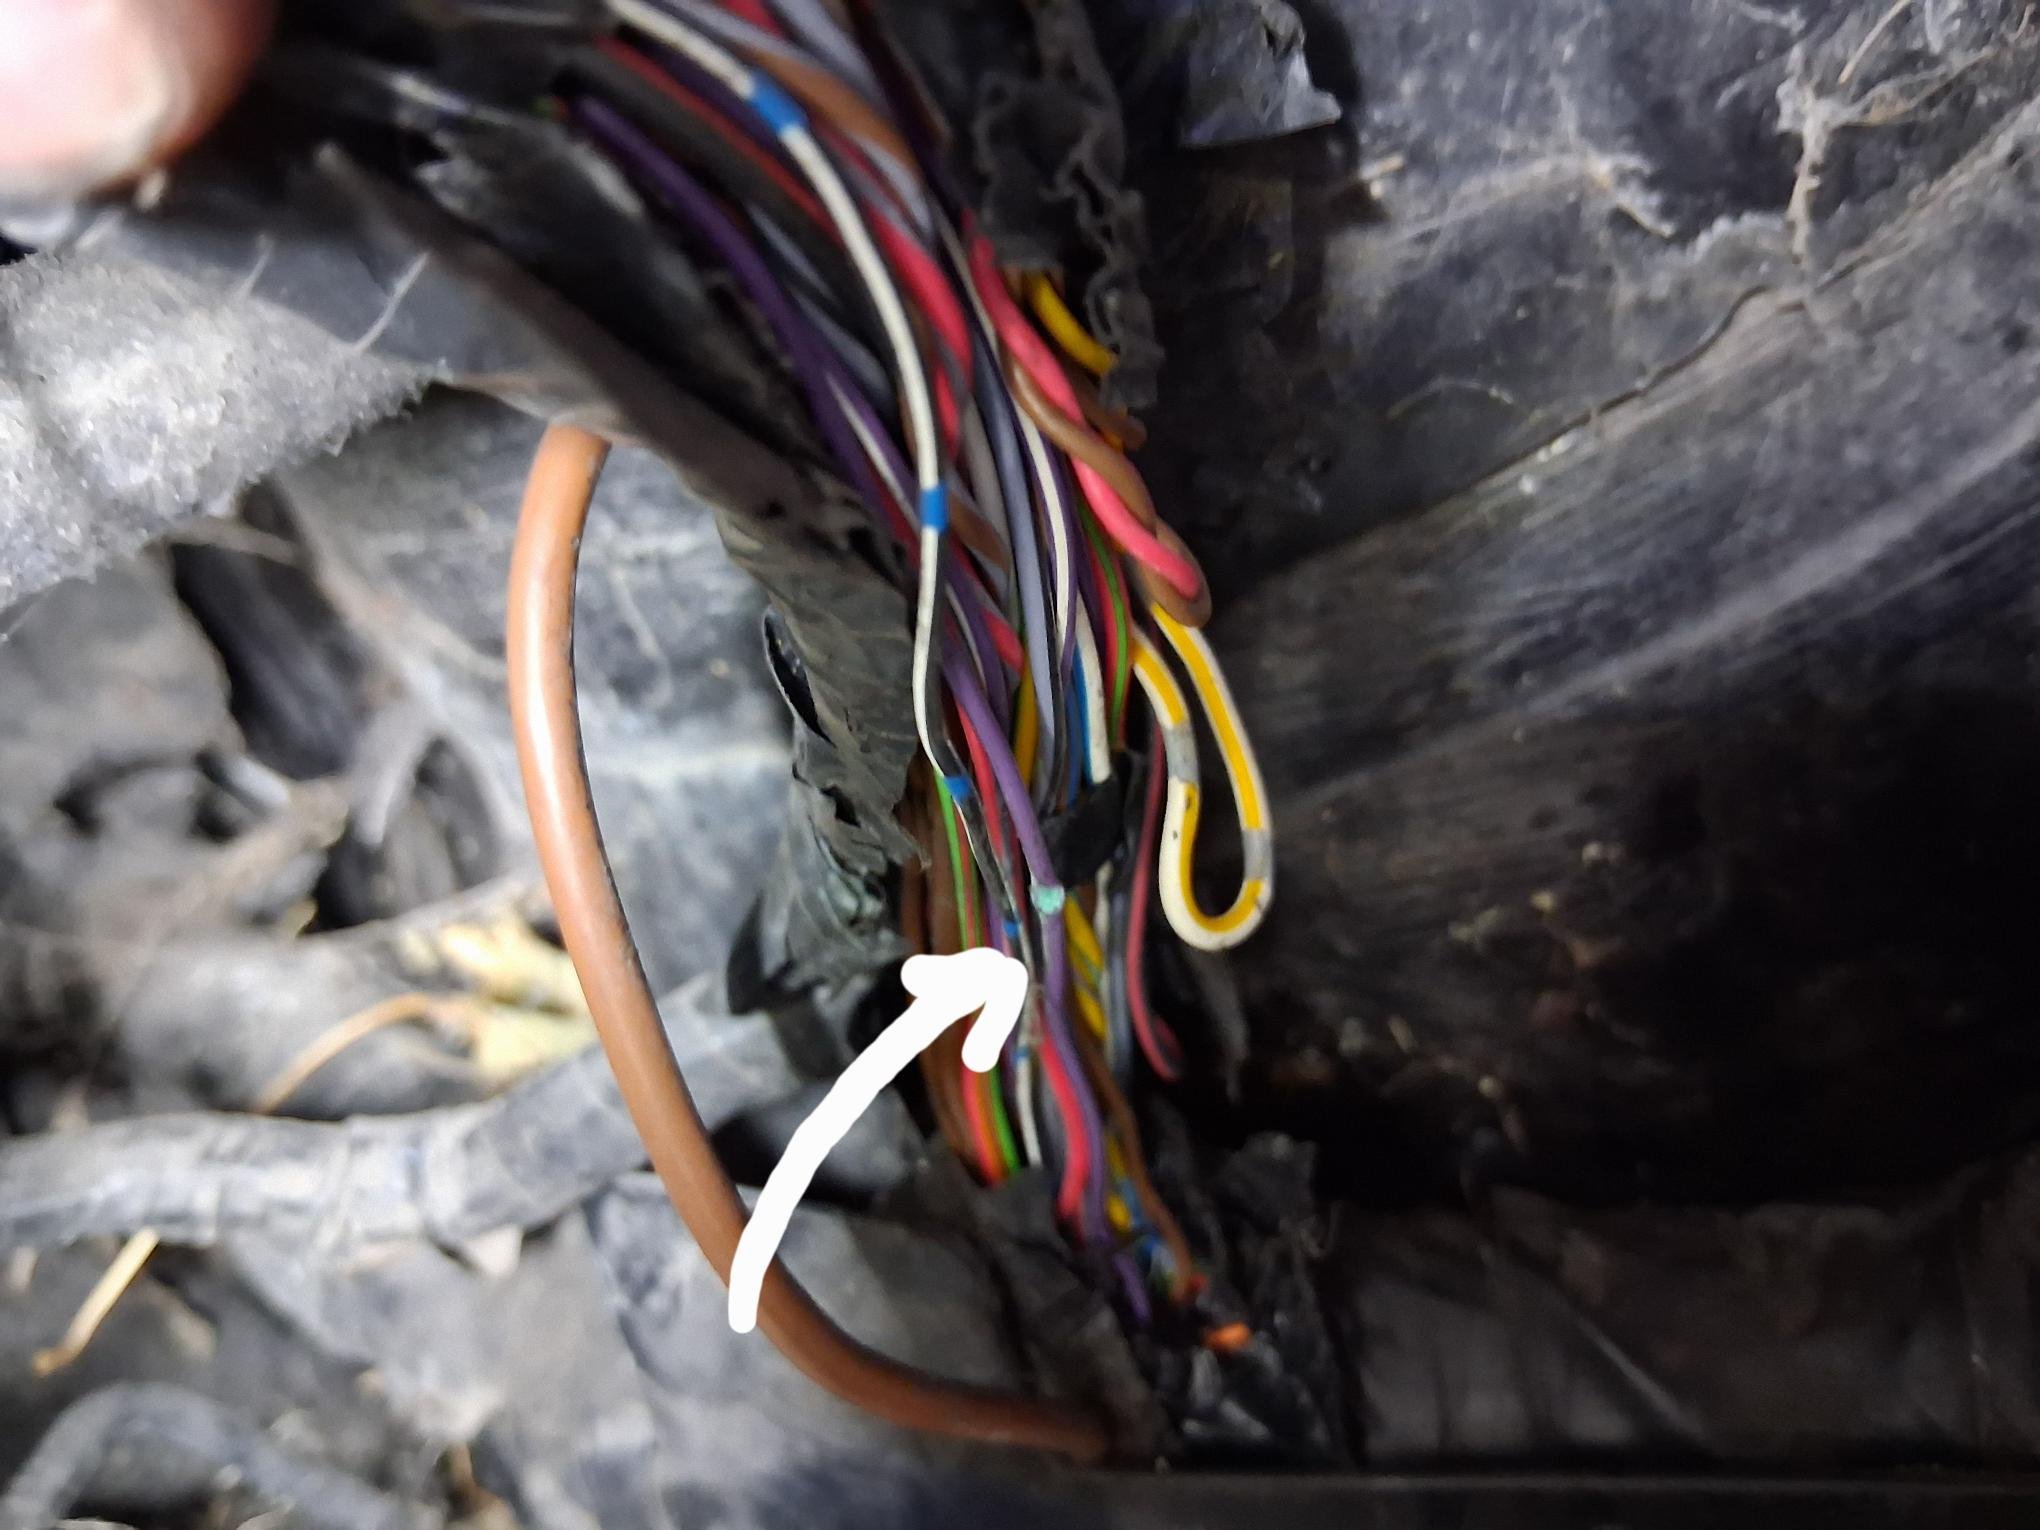
Hi everyone, I own a 2012 superb diesel 2.0L, and the front wipers have been working intermittently for the past few weeks. I wanted to reach out to anybody that has also encountered these symptoms. Before I get on to how I repaired it, I have tried cleaning the contacts behind the wiper switch/stalk, still not working. I replaced the wiper motor J400 type and still not working. I replaced the BCM with the same part number, still not working. Just to note all of these parts were second hand from a salvage yard. The only function working was the windscreen washer jets, not the headlights. I looked through a good few forums on BRISKODA, and to be fair all of the suggestions were good ones to try rectify the wiper issue. If anybody is trying to clean the contacts on the wiper stalk, be careful putting the arm back into place as I broke off a small plastic lug, that operates the pull back washer function. This cannot be repaired easily, and it's not worth the effort as it's tiny. This is why I replaced the full stalk unit(second hand), as a main dealer part is expensive!! So onto the fix... 3 wires coming out of the motor. Live Earth LIN( purple) With multimeter I was reading system voltage on the live connector 12v I connected this wire directly to positive on the battery and got 0v.. so no voltage drop. I did the same with the negative cable on the motor. With multimeter I was reading system voltage when connected to battery positive lead 12v I checked this connector for voltage drop by connecting it directly to battery negative and got 0v The LIN bus (purple) cable was reading system voltage also when using a multimeter to earth of the battery. I read a forum that stated a customer has brought his car to an auto electrician and they found an issue with the wiring loom between the bulkhead and the battery box holder. I removed the wipers, wiper cowl, both sides, I removed the wiper motor, I removed the ECU which is located to the right of the motor. I removed the ECU holder(plastic). I removed the battery. I followed the wiper motor wiring loom and it goes through the bulkhead and down below the inner side of the battery box plastic holder. On closer inspection I spotted the loom was tight against the edge of the holder, and could clearly see green oxidation. I removed the battery box holder and stripped down the insulation around the loom, and found the purple cable was squashed and green with oxidation. This was the cause of my intermittent wiper operation. The high resistance within the cable was causing the issue. I found that the wipers worked at random in the very cold weather, maybe because materials expand and contract in cold weather? I have attached a few pictures to show where the issue was. I found an old breakout box wiring loom from over 20 years ago that had wires the perfect size and color. I just cut out the damage bit, about 4mm of cable and added in new. I used head shrink, but allowed an inch extra long on the cable. I taped up the loom again and used 3/4" qualplex pipe insulation to put between the loom and the battery box holder. I actually grinded off a little bit from the corner of the battery box holder. I put the car back together and it works perfectly, even the headlamp washer jet works again!! I hope this long winded explanation helps somebody. Just to note I didn't have any diagnostic tools, however I've over 26 years experience as a motor mechanic!! I'd say if the system was checked, I'd say it would have read high resistance or open circuit for LIN bus cable, between J400 and the BCM under the driver's side above the clutch and brake pedals.
 1 point
 -
1 pointI’m not sure on the whole left and right hand drive stuff but I think in both cars they are located on the left had side as you look at the car from the rear.1 point
-
1 point
-
1 pointHi Evolution13 , No , the gearbox is being serviced by an independent VW specialist in Worcester. The Supplying Skoda dealer of my car refused to quote as they say that's it's not necessary.The other Skoda dealer never replied to my enquiry. Skoda have written to me twice stating the gearbox oil change is not necessary. A mechanic I know well (Audi mastertech ) says it's down to the useage of the car. I use the car round town so the gearbox is used in a severe cycle so he recommended that I had the oil changed.What he did say if you don't have the oil changed now don't change it.( He did make it clear to me that this was his opinion and not of the VW group ) For your information using VW oil the cost was £220.00 including VAT Using OEM oil the cost was £175.00 including VAT The gearbox does not have a replacement oil filter as such. A friend of mine has a 2016 Superb and he very recently had the box oil changed , 2 litre diesel dsg cost £220.00 including VAT in Worcester.1 point
-
1 pointfor whoever wants it, this is the original men2 fec activator, the difference between them is that this one shows more info on your car, you just drag the .bin file to it and it launches and outputs the patched.bin, it does the same job just like the patcher op posted here. men2_fec_activator.exe1 point
-
1 point
-
For the next next time, I'll explain how VWs PNs work. First three are model or platform - Felicia is 6U model, so most Felicia-specific parts also start with 6U (the third character is body variant, but in this case, it's the same part for estate and hatchback). It's not a definitive rule, however, Felicia also uses a few 6X* parts (Polo/Lupo platform) or 11* parts (those that carried over from Favorit), plus engine/gearbox parts have their own model numbers. The second three is group - 8** is body Last three is part identifier. Also the last number suggest to which side the part belongs - odd for left, even for right (so parts that have left/right variants only differ on the last character). Additionaly, there's suffix that denotes part variant. It can be 3-character colour code, or 1-2 letter variant - sometimes, it can be nearly identical part that was just replaced during production, different look or function for various equipment trims, or entirely different part that doesn't even fit, because it's meant for different car variant. This is why the Fabia part has almost identical PN. Be careful when looking for parts with PNs, stores often just throw all PNs together under a product and search engines often show wrong part, because there's only one character difference.1 point
-
1 pointCorrect, more then 24h Over https://mega.nz/file/xn8WlQCK#vEyrHUD997FiQJmQ8jUu9a-YOxSZS1oA5TCSBHcL4SA1 point
-
1 pointIf the funnel caught the sediment I would just fill the tank with a premium diesel fuel. Five weeks is a short time for the fuel to go off it's possible the sediment was in the jerry can when you put it in. "AI response: Since the fuel was only 5 weeks old, those grains weren't "growth" or "dirt"—they were almost certainly paraffin wax crystals" In the winter fuel stations normally sell diesel treated for winter to stop it waxing, beware of your supplier.1 point
-
Try banging around the ignition switch and raising/lowering steering wheel if it has that option. It may be a bad connection at the chip reader coil. If that doesnt work you could try removing fuses for ABS system. Think they are in fuse box near battery and are strip fuses. They have a tendency to crack but often not noticeable until you remove them . I got my old Seat imobilser deleted as it would stick on randomly although I doubt anyone would bother stealing it. Alasdair1 point
-
1 point91% of cars are bought on finance and I suspect the majority are on PCP arrangements. If one is gappy with that monthly PCP payment then that is what you pay for the next 2, 3 or 4 years. With electric cars the servicing can be as little as £9 a month, road tax is a tenner for the first year and then the standard £195 a year on many EVs. With PCP, whilst knowing your monthly outgoing you are protected from any dip in market value. If its lower you just give it back and walk away. If the value is higher then pay the balloon payment and either keep it or sell it and make a profit. Renault 5 I just got is on 0% finance for the balance after deposit. Both the 5 and the Scenic have modular battery packs so if the rare scenario happened that cells needed replacing this can be done at a module level. Six hours driving during last week, 230 miles, no need to public charge, cost about £5, nice.1 point
-
1 point@Graham Butcher This would have been perfect for me if i did not have the EV Estate, lovely condition. but it looks like i am getting back the BMW estate as son maybe going abroad.

 1 point
 -
1 pointEven the Government Departments do Press Releases that are a Wish more than a Promise. Daily the BBC say stuff about the Government which is really only about England & Wales and laws or regulations there. MOT,s are a England, Wales & Scotland thing, Northern Ireland has it's differences. First MOT at 4 years. Once the DfT / DVLA really have things sorted out & testing stations and examiners then great. I will have my 2nd hand EV MOT,d where i bought it and where it was MOT'd before i bought it. Also where they did servicing and part replacement. Not my usual place.1 point
-
1 pointThat's a very low oil pressure, don't know what it should be in the mid/high rpm range but would expect at least 50/60 psi, needs investigating.1 point
-
1 pointRachel Reeves MP did appear surprised that Vehicles were due a MOT first at 3 years. Not long since the past Government was wanting MOT,s at 4 years. Strict Headlight Alignment Inspections annually would be 'Simply Clever'. Actually for EV,s the DVSA could have Mobile Units visiting EV Charging Hubs rather than going roadside Vehicle Checks halts. Actually send them around places doing Mileage Checks, Lights etc. Efter all there are so few EV,s in the UK supposedly. TAXI / Private Hire Vehicles checks at various Local Authorities are more regular than Annual, or first at 3 years. So plenty of those can have Mileage checks carried out.1 point
-
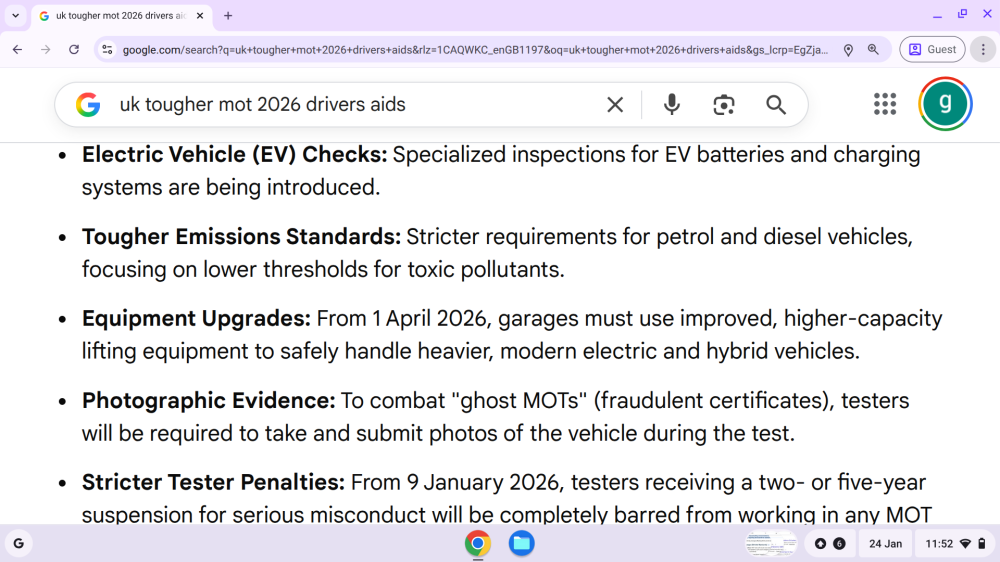
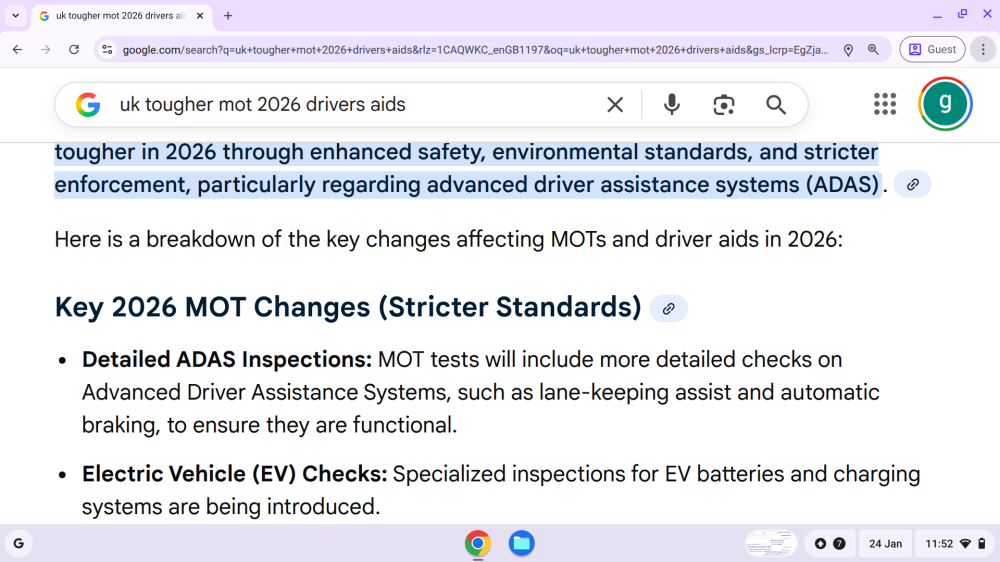
1 pointOh, so there does indeed seem to be some provenance out there, at least to the fact that April 2026 is when these changes will become effective. I wonder just how they plan to test all the safety and drivers aid systems built into cars, which include emergency braking, cruise control, etc.? I also heard them talking about how any sign of battery casing damage could also mean a failure to pass the test.1 point
-
1 point'Specialised Inspections'. Interesting, Which MOT test stations have EV Specialist MOT Examiners ready to get rocking and rolling. Or is the Test Stations for BEV,s going to be limited to only those with all the Gear and Ideas. & Training. Different fee?
 1 point
 -
1 pointI overheard MOT testers talking about it when getting my car tested earlier this month. Apparently nothing is planned to be publicly announced about these changes; they will just be quietly introduced. It is going to be far tougher for ICE vehicles as well to pass the MOT then.1 point
-
1 pointElectric, if it suits your requirements for the daily usage pattern and if most of your charging can be done at home using cheap electric, or free at work etc, then yes, an electric car could well be the perfect car for you, especially if you can negate the massive depreciation that comes with them. If you plan to keep the car long-term and can escape the replacement battery costs (should it be needed) with home charging, mostly short local journeys, etc., then they can be excellent packages and sound financial cases. Has anyone discovered anything about the tougher MOT tests that are supposed to be operational from April this year? Rumour has it all the driver aids will be part of it, such as lane keep assist, blind spot monitoring, and others, etc., will also be part of the MOT. It is also apparently has a gotcha for electric cars on battery degradation, if the battery hits 70% of its capacity, then it the car becomes an instant MOT failure and banned from further use???1 point
-
1 pointI was trying to keep the post brief but to the point and not do a full discourse on all the exclusions, ifs and buts. You're the only one to mention Private Ground !!1 point
-
That is def not normal ... but more than the return spring sticking, sounds like a valve or switch as mentioned above.... Try to do the same test but this time using your hand instead of the foot? This way, first you are closer to the source of the noise, and second with the hand is usually easier to "modulate" the effort and try different levels of said effort. For this is necessary to - here I get to my favorite part 😄- make sure the footwell and area is clean - pedal as well - you can remove the floor mat and use it for your knees, and then assume the ritualistic posiiton of kneeling down in position to Mladá Boleslav and enter part of the body in the driver's hole. Based on your experience and interest, and also physical size and atheltic shape, you can enter in the basic kneel/prone position, or you can employ the side-snake approach, or in extreme cases - say when you have to deal with a brake switch, ask me how I know - you get to the highest level of contorsionism, the break-your-back over the door sill, standing on your back and propping your butt up. Besides releasing a flush of swear energy and thoughts about yourself and your place in the order of things in the universe, making a mental note to call immediately your chiropractor to sort your back, better still, some nice and gentle masseuse, it makes also a good leg workout! Making this in your driveway with neighbours passing or popping by makes it for an interesting scene, and will cement your status among them as a weird individual, a person with too much of a problematic car, or in any case someone perhaps to avoid - which is not necessarily a bad thing! Sorry the tone is just to remove drama ...🙂1 point
-
1 pointWorks fine in my 2019 Skoda Fabia III FL with MIB2GP). One remark: to connect using Windows 10, I also had to install the CH341WDM driver (it’s included in the NeoProgrammer V2.2.0.10 “Drivers” folder). Thanks a lot!1 point
-
1 pointI agree with @Colin1051 re the quality of the manuals. The version that came with my 2025 Superb is bloody awful to say the least! The online version isn’t much better. No where near the quality of the manual that came with my 67 plate Passat. All these penny pinching ideas detract from the Skoda ethos of Simply Clever 😵💫1 point
-
Could be the siren battery is flat as well or failed. Low voltage in main battery or siren battery can sometimes confuse alarm and set it off randomly. Hopefully it will settle down once system is back up to charge. My old Octavia thats sitting waiting repair alarm goes off if I let battery get to low. If it doesnt stop I would disconnect battery for charging. Alasdair1 point
-
Looks great. i use the same. but i fog on the camera is an issue sometimes. but so cheap and still working. they gps modul for obd2 i also have and its very nice with a 4g simcard in it. i have to much expensive hifi, So i wanna be able to track it all time.1 point
-
1 point
-
1 pointI see you fell for the hype regarding diesel not going to be sold shortly with the first to stop selling it being London. Just follow the money trail on where that guff came from. It will be years before diesel is withdrawn from sale, if it ever does, which I doubt it will. Demand for diesel powered cars is increasing, not declining, with the 2nd hand prices climbing steadily, well above the trade book prices they are going for in auctions. To run alongside this, the second hand prices of BEV's and all kinds of hybrids is still dropping like a stone.1 point
-
1 pointYes, that is total guff, just a narrative designed to generate more movement towards electric in an attempt to shaw up waning sales and get back on track. Second hand diesels in the auctions are showing a rise in demand along with increased selling prices, sometimes selling well above book prices.1 point
-
Can’t help with why it’s different but the fact you said it upsets your eyes makes me think you should get an eye checkup, just to be sure Then I’d also recommend night glasses, they’ll be yellow and can help loads, yes you’ll look like John Goodman from Big Lebowski but who cares. I’ve read reports of people moaning about LED headlights, yes they are bright but for anyone who has issues, eye checkup and night glasses and you’ll be good1 point
-
The coolant expansion tank with a pressure cap, vents anything in excess to a tube and vent hole on the permiter of the cap recess. It flows to the base of the reservoir and to the inner guard of the car beneath.1 point
-
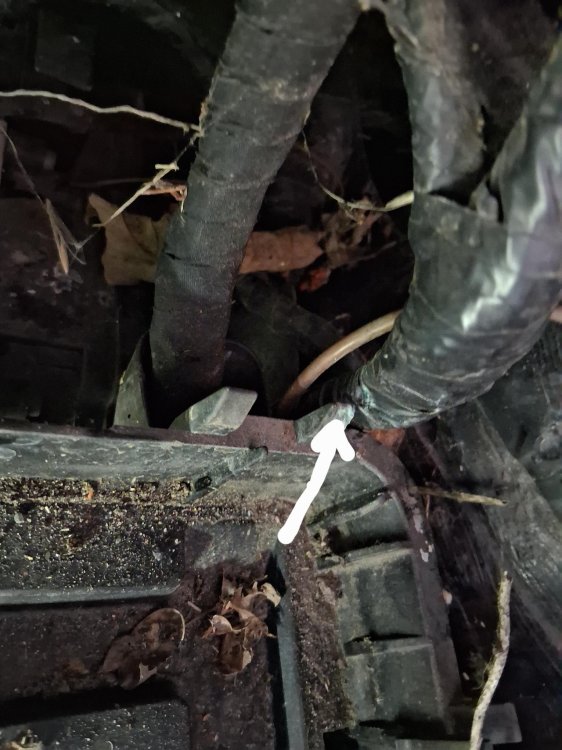
1 pointWith the mkII check around the plenum chamber especially where water flows down into the rear of the front wing. It's prone to getting blocked/ restricted and if it does water will find it's way in somehow. Also check behind the wheel arch liner where the rear of the front wheel arch meets the sills - it's usually full of all sorts of carp and can eventually rust through. Easy job undoing a few screws each side.
.thumb.jpg.b5a5724312522337184405ed3db76854.jpg) 1 point
1 point -
I went for middle ground in the finish and got an oem version from Skodaparts.com in Czech republic. Very reasonably priced and being fitted tomorrow along with two new wishbones..1 point
-
Well Steff from idriveaclassic has posted a video on YT today reviewing the Skoda 120 (Estelle) , don't be fooled by this girl he owns several classics , standard 10 , Humber , couple of moggies , a mid 90's proton a metro1 point
-
It is horrible when that unit fails. Although it has been a few years now since my mechatronic unit was replaced I do worry if it may happen ever again. But have done £40k miles on the new one.1 point
-
Today’s job was to replace the front door speakers which weren’t working. Thought it worthy of its own post.1 point
-
They were surely a Technician and work full time on Skoda / Seat or whatever. Trained and experienced. Had they not a clue and prepared to investigate further?1 point
-
i been using this device a bit. water spalsh and fog seems to be a problem somehow. but i wipe it off and everything is fine. 7/10 i would say. dont know how to fix this only issue. picture quality is also 7/10 and the Dynamic Trajectory works well with space the the one site when u parking1 point
-
You car was manufactured in 2016 but it's MY17. Your trunk handle part number is 6V0827566. OEM part number of trunk handle with reverse camera is 6V0827566G so from the link you sent you need model F:
 1 point
 -
I sent you PM with VIN request so I can check part number of your current traunk handle and let you know which camera to order.1 point
-
Hi all, As many VAG cars, my Superb Mk3, is fitted with a DSG6 (DQ250) gearbox. Here is a tutorial to change its oil and filter on your own. You'll probably tell me: What's the point with it? Just have a look on Google or YouTube and you'l find plenty of them! That's true, but having done this exercise, I could see that it is very rare to have all information in a single tutorial. I will therefore try to be as exhaustive as possible. Here a list of some Skoda models also DSG6 equipped (I nevertheless let you check on your own, since depending on engine type or MY, some may be DSG7 fitted⚠️ instead of DSG6) ! - Octavia 2 - Yeti - Kodiaq - Superb 2 - Superb 3 First of all, here is the DQ250 gearbox: We're going to focus on the following items: #17: Filter housing - Tightening torque : 20Nm #18: O-ring - P/N N910 845 01 (normally sold with the filter) #19: Oil filter - P/N 02E 305 051C #26: Oil pipe - Tightening torque: 3Nm #27: Seal ring - P/N N 043 089 2 (normally sold with the sealing plug) #28: Sealing plug - P/N N902 154 04 - Tightening torque: 45Nm Not shown on this pic: DSG Oil - P/N G 052 182 A2 - 6l - Difficulty : 2 - Time needed : approx. 2h - Number of person needed : 1 - Necessary tools : ¤ VCDS software (or similar, To be confirmed) ¤ 24mm socket ¤ 8mm and 14mm Hex ¤ Torx 25 and 45 ¤ Ratchet or classic wrenches for disassembly ¤ Torque wrench(es) to apply specified torques (3 / 20 / 45 Nm) ¤ Short and intermediate extensions for ratchet or torque wrenches to enable easier access to screws ¤ Small flat screwdriver ¤ Filling hose VAS6262 ¤ Wooden toothpick ¤ Small fork ¤ Slip joint pliers ¤ Oil drip tray ¤ Twine (about 80cm long) or an old metallic hanger (wire one) ¤ Wide masking tape ¤ Rags ¤ Lifting means Concerning VAS6262, you can find one on numerous website at various prices. Without switching to a much more expensive pump model, I suggest taking a filling hose with a 1/4 turn shut-off valve close to the adapter on the can side. These ones are less widespread but still at affordable price and of course easier to use, since you can work without being 'showered' with oil. I've chosen this one on toolstogo-uk.com https://www.tools2go-uk.com/13664247/gear-oil-filling-hose-for-vag-dsg?g…=&Lng=en Dealing now with the DSG oil kit, you really have to be careful on the kit content ⚠️. Indeed some kits only content DSG oil and oil filter, but no sealing plug nor seal ring! ⚠️ Warning: Prices can really be different from a website to another (starting form 90€ up to ~200€ !) Chose the right one! After hours of searches and checks, I finally bought the Febi-Bilstein kit, which can be found on autodoc.co.uk for 100€-ish https://www.autodoc.co.uk/febi-bilstein/15821763?search=FEBI BILSTEIN Transmission oil change kit (171762) It effectively contains: - 6l of gearbox oil - DSG oil filter (#19) and its O-ring (#18) - Sealing plug (#28) and 2 seal rings (#27). By the way, I still don't understand why 2 rings?🤔 Note: I did not take time to ask for OEM spare parts prices by my local dealer. Step #0 : Preparation You need to lift the car high enough to get under the car and to get enough space to move your arms comfortably around the gearbox. Note: Though you've lifted the car, it needs to remain horizontal to make a proper filling with right oil level (see step 7). Step #1 : Air system removal Start with removing the air box. You first have to remove the 2 T25 Torx screws (#1), then unclip the cover on the rear face (#2) and lift it by rocking it as shown by arrow to avoid breaking the 2 lugs at the front side of the cover (#3). Finally simply push to the rear to release the lugs (#3). You now have to unclip the 2 lugs, where the 2 torx screws you have just removed where tightened (#1). Be careful for this step, since these 2 lugs may break. I've seen 1 or 2 pics of broken lugs on this forum. ⚠️ Then, you need to push the airbox backwards, so that its front side can 'rip' other the bonnet slam panel. Then unclip the hose (#3) and with a rocking motion back and forth, release the front side so that the airbox can be fully removed. However, do not hesitate to put one hand on the back of airbox to be able to pull forwards more easily (#4) and take the airbox out, which is quite large. This being done, you need to remove the air filter housing. This is simpler. Start with unplugging the small hose (#2) at the air filter housing outlet and unplug the air flow meter connector (#3). ⚠️Be careful: There's a small grey latch on the connector (if equipped) to unlock before pulling the connector off, otherwise it won't come out or you risk ripping it off. Now, remove the metal collar (#4) on the large air hose downstream the air flow meter. Use a slip joint plier for this. You can now unclip the air filter housing, which is simply fitted onto 3 shock absorber pins (#1). Pull vertically upwards. Don't hesitate to pull hard (continuously and not jerkily), it holds up really well! The 3rd pawn is under the air box (dotted circle), but it comes out quite easily when the other 2 are already out. Once the air filter hosing has been unclipped, all you have to do is disconnecting the large hose, downstream from the flow meter. Be careful to 'close' the hose to avoid any foreign object damage or even just dust towards the engine. Masking tape will do do the job! Step #2 : Battery removal To take it out, you need to remove a 13mm hex screw, which tightens a retaining bracket et holds the battery in place. This screw is on the front of the battery (#5 on previous pic). Then remove both battery terminal covers (by lifting vertically) to access the clamping nuts of both battery terminals posts (10mm Hex socket). Warning⚠️: Start disconnecting the "-" terminal post before disconnecting the "+" terminal post! For more safety, wrap them with masking tape as well if you want. Battery can be then removed easily, even if it weighs! Step #3 : Battery fixing plate removal You can now access the battery fixing plate, which is held by 2 10mm Hex screws (blue squares) and one 10mm hex nut. Sorry, the latter is out of the pic, but it can be found easily (just follow blue arrow). Be careful don't be too quick at this step, several fixing staples are indeed attached to the battery holder. You might be tempted to cut the tie-wraps, but these are attached to small brackets, which are simply stapled (red circles) or clipped (orange circle) to the battery fixing plate. Staples can be removed by simply pushing them with a flat screwdriver, while the clip-on holder can be pulled out with a small fork. There is now a small Control Unit attached to the battery fixing plate. Unclip the small lug (red circle) and pull the control unit vertically (as suggested by arrow) to remove it from the battery fixing plate: The battery fixing plate can now be removed. Step #4 : Oil draining You can finally access the DSG oil filter housing: A 24mm hex socket is necessary to remove it. Once done, protecting the filter location against foreign object damage or dust is necessary. Aluminium foil will do the job. FYI, here is the difference between a new filter and a filter with 60,000 km on the clock. Now remove the sealing plug with the 14mm Hex. Once done, the oil flow will be very thin, due to the oil pipe. Remove the oil pipe, using a 8mm Hex. After that, the oil flow is more important. Step #5 : Oil filter replacement Once the gearbox is empty, you can put back in place: - The Oil pipe (still using the 8mm Hex. Tightening torque = 3nm). If you don't have a torque wrench complying with such a low range. Take it easy! Just to give an idea, it is roughly the same order of magnitude as for closing a jam jar lid. (Sorry, this is the only simple image I found quickly ...). Well just keep in mind, it's light !! - The new DSG oil filter (don't forget to moisten the O-ring in its hole) - The new O-ring on the filter housing (don't forget to moisten this one too) - The filter housing, which must be tightened at 20 Nm (with the 24mm Hex socket) Step #6 : Reassembly Steps #1 and #2 can be processed in the reverse order to reassemble : - The battery fixing plate (and the small control unit) - The Battery - The air filter housing and the hoses - The airbox. Step #7 : Oil filling The filling hose can now be screwed in the sealing plug thread At the other end, donc forget to shut the 1/4 turn valve, before screwing it onto the oil can. To make it easier, you can attach the can to the bonnet with a 80cm long twine or an old metal hanger (wire one), that you can shape to transform it as a can holder. If you want to fill the gearbox faster, you just need to make a little hole in the can bottom (now upside down ) to enable air getting in the can. Of course, don't forget to open the 1/4 turn valve. http://img.xooimage.com/files1/b/e/c/whistle-1bb1.gif You have to fill approximately 5,5l. Once again, don't forget to shut the 1/4 turn valve upon each oil can change http://img.xooimage.com/files1/b/e/c/whistle-1bb1.gif. Warning: Do not make a hole in 6th can, otherwise there could be some side effects... http://img.xooimage.com/files1/3/e/0/33-2bc7.gif When the 6th can is half empty, shut the 1/4 turn valve, remove the can from the filling hose. Put now the free end of the filling hose into the dip tray. You can now open the 1/4 turn valve to start adjusting the oil level Step #8 : Oil level adjustment ⚠️ Now, start the engine and keep your foot pressing the brake pedal. Move the gear lever in accordance with the following sequence: P to R, wait 3s R to N, wait 3s N to D, wait 3s D to S, wait 3s S to D, wait 3s From this point, most other tutorial suggest getting back directly to P. I personally rather got back step by step, still waiting 3s after each step. Once back to P, you can remove your foot from the brake pedal, but keep the engine idling. Now, connect your VCDS cable and select the gearbox controller (02 Auto Trans): Once in the gearbox controller menu, there are 2 options: 1) Either get into "08 Meas. Blocks". then in the new window, get into "Group 019" and check the Temperatur cell of "ATF (Auto Tranmission Fluid)" parameter. This is at least what I've found in several other tutorials. But though owning an official VCDS cable, the "08 Meas. Blocks" is greyed on mine. (may be my Micro-CAN version starts reaching its limits). Hence I had to use option #2 below. 2) Or get into "Adv. Meas. Values" menu: From this point, type "trans" in the search cell to find all parameters related to the gearbox. In the results list, tick "ATF temperature - Transmission fluid temperature": Now with the engine still idling, just wait for the oil temperature to get between 35 and 45°C. It may take several minutes. Be patient. When oil temperature is close to 35°C, you can remove the filling hose completely. Don't worry temperature is increasing really slowly. The oil flow from the oil pipe starts decreasing. Once the oil temperature is within the 35-45°C range, you can observe that a slight amount of oil flows out via the overflow tube every 30 seconds, independent of the oil level. This is caused by oil pulses, which cool down the coupling. According to workshop manual, this oil quantity is not a criterion to determine the correct oil level. Therefore, they must not be taken into account when assessing oil level. You can now screw back the sealing plug (with 14mm Hex). Tighten it at 45Nm. From this point, you only need to stop the engine, disconnect your VCDS cable and put the soundproof housing back in place under the engine, and... That's it! Well, non counting the specific tools, you've just saved ~200€! Note: I'd also like to write special Thanks to @J.R., who helped me to translate some technical words I was missing! Much appreciated.👍 _1 point
-
Nope. Just kind of dialled it out of my mind. Nothing seems to be wrong with the brakes. Think the dealer meant to say ‘prevalent’ rather than ‘normal’…1 point
-
that is not normal. with Auto Hold active or not, the brake pedal should release the same way each time, with no pops bangs or noises.1 point
-
If like me you can find a genuine VAG new old stock aluminium one piece cast concentric release bearing then you can be guaranteed of no future problem, otherwise you are just replacing a failed part with a new one with the same potential failure mode, a ticking time bomb.1 point
-
Yes but the spring acts on a cam and equally holds the pedal down when there is a hydraulic problem and the clutch return mechanism is not acting on the master cylinder piston to push it back up, after it has risen half way the pedal box spring will then raise it to the top. I am guessing that you have a concentric slave cylinder on a 6 speed gearbox, you will find I have started & contributed to several threads on the subject, I had a very long saga before biting the bullet and doing the big job I had hoped to avoid. A master cylinder change might bring some relief for a while but the problem will get worse and worse in hot weather and heavy traffic, just when you least need the grief, at the end i was having to bleed my clutch twice a day and could not drive more than 30 miles, a lot less if I hit traffic. The fault was air being drawn into the system through an O ring inside the bellhousing where they have made the later plastic concentric slave cylinders in 2 seperate mouldings with an O ring seal that fails through heat and vibration, it never leaks fluid but draws air in. The solution was transmission removal and replace the clutch & DMF at the same time as the flatulent slave cylinder.1 point


.jpg.0b44e881be6c06b515e08603e048f611.jpg)