


Leaderboard
-
Lady Elanore
FREEDOM30Points24,875Posts -
AnnoyingPentium
FREEDOM23Points5,646Posts -

john999boy
Honorary19Points11,233Posts -
.jpg.1006585dfe4e2977315b67c3d642e37b.jpg)
Guest_
FREEDOM13Points83,824Posts


Popular Content
Showing content with the highest reputation on 15/12/21 in all areas
-
3 pointsI eventually had a chat here a la frog with an independant , ancient, VW specialist, he said it was the sensor and just to replace it, found one on ebay for about £30. replaced it and as they say that solved the problem, took about 10 mins in total! General view is that they should be good for about 80k-100k, mine failed at about 35-36k, No subsequent probs.3 points
-
3 pointslow 20's around town, maybe a bit more if it gets time to warm up. Mid 30's on any kind of run, maybe 40 if I am gentle. Towing a 6'9" to the roofline 5' wide flat front box trailer knocks 6-9mpg off dependant on speed. Remember Skoda like you to use Super Unleaded in a 280 so factor that in to your pounds/mile calcs. With prices like they are, and a 66 litre tank, I managed my first ever £100 fill up the other day. But if you are buying a 280 for economy, you probably shouldn't.3 points
-
3 pointsSurely if you drive the 280 it should be SPG (smiles per gallon) measured?3 points
-
3 points
-
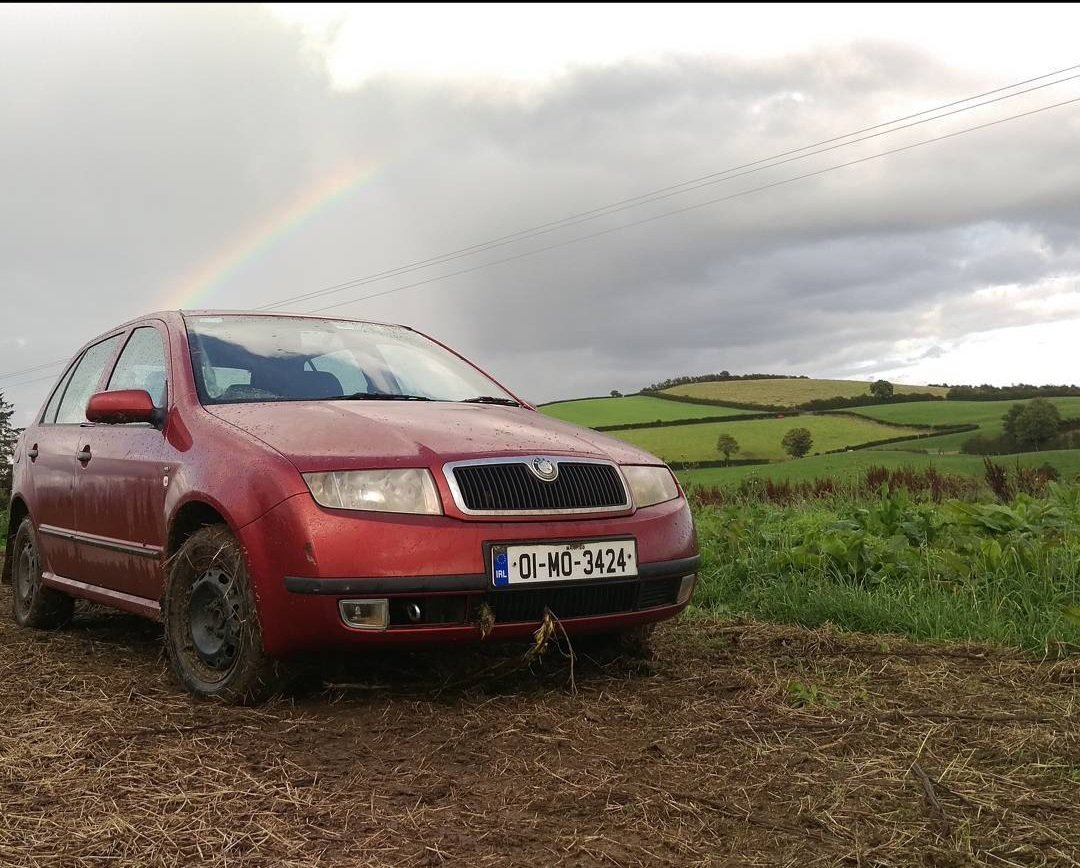
2 pointsAt a good speed too, that fields very hilly and because it doesnt have much power I got to gunning it going downhill and putting it into a slide to carry as much speed as I could when I looped around to go back up it. It was a while ago but I think I was going about 50mph when I hit the drinker. More or less I was in a slide, hit the drinker head on, sent it flying and spun out. Not really, that field hadnt been used in a long time and the drinker was covered over by grass and weeds. I had a loop made for myself and I guess I kept slowly working my way inwards over time. You can sorta see the dirt track I'd carved out, was particularly thick with weeds near the middle of the field conveniently hiding this wacking big drinker under it.
 2 points
 -
2 points
-
2 points@ DieselMonte: I've just been looking at your project thread. How did you manage to crash your car in a field?2 points
-
2 pointsMy rear beam is exactly the same with the two 'ears' and my car is just a 1.4mpi. Maybe the rear beam is universal to be able to take rear discs.2 points
-
2 pointsThis is a fairly well known failure of the window regulator. It affects manual windows as well as electric ones.2 points
-
2 points1. Check for leaks from the rear door ancillaries carriers. Most obvious by small puddles on the horizontal section of the seal in the doorway when you open a rear door after rainfall. Check front doors for similar puddles, but it's usually the rears. 2. There's a relay called the X contact relief relay which powers the fuse for the cabin fan; it also powers front (if fitted) and rear fog lights, so try to see if the fan non-function correlates with fog lights not working, and vice-versa. If it does, you may have a dirty/worn contact on the relay; it's in position 11 on the relay panel near the steering wheel.
 2 points
 -
2 points
-
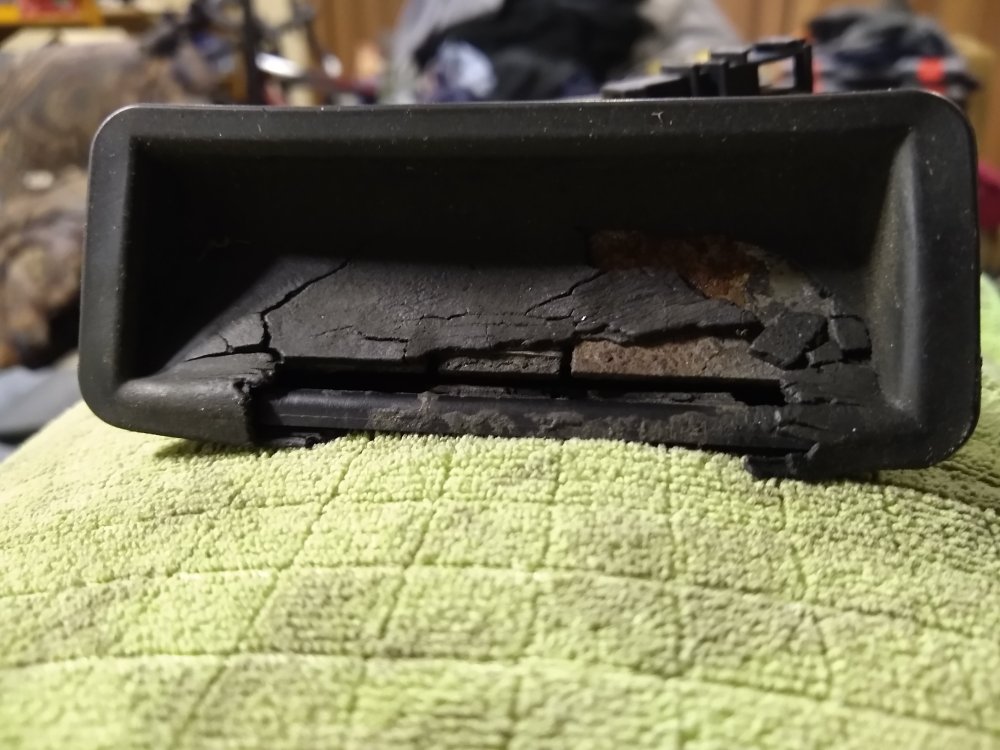
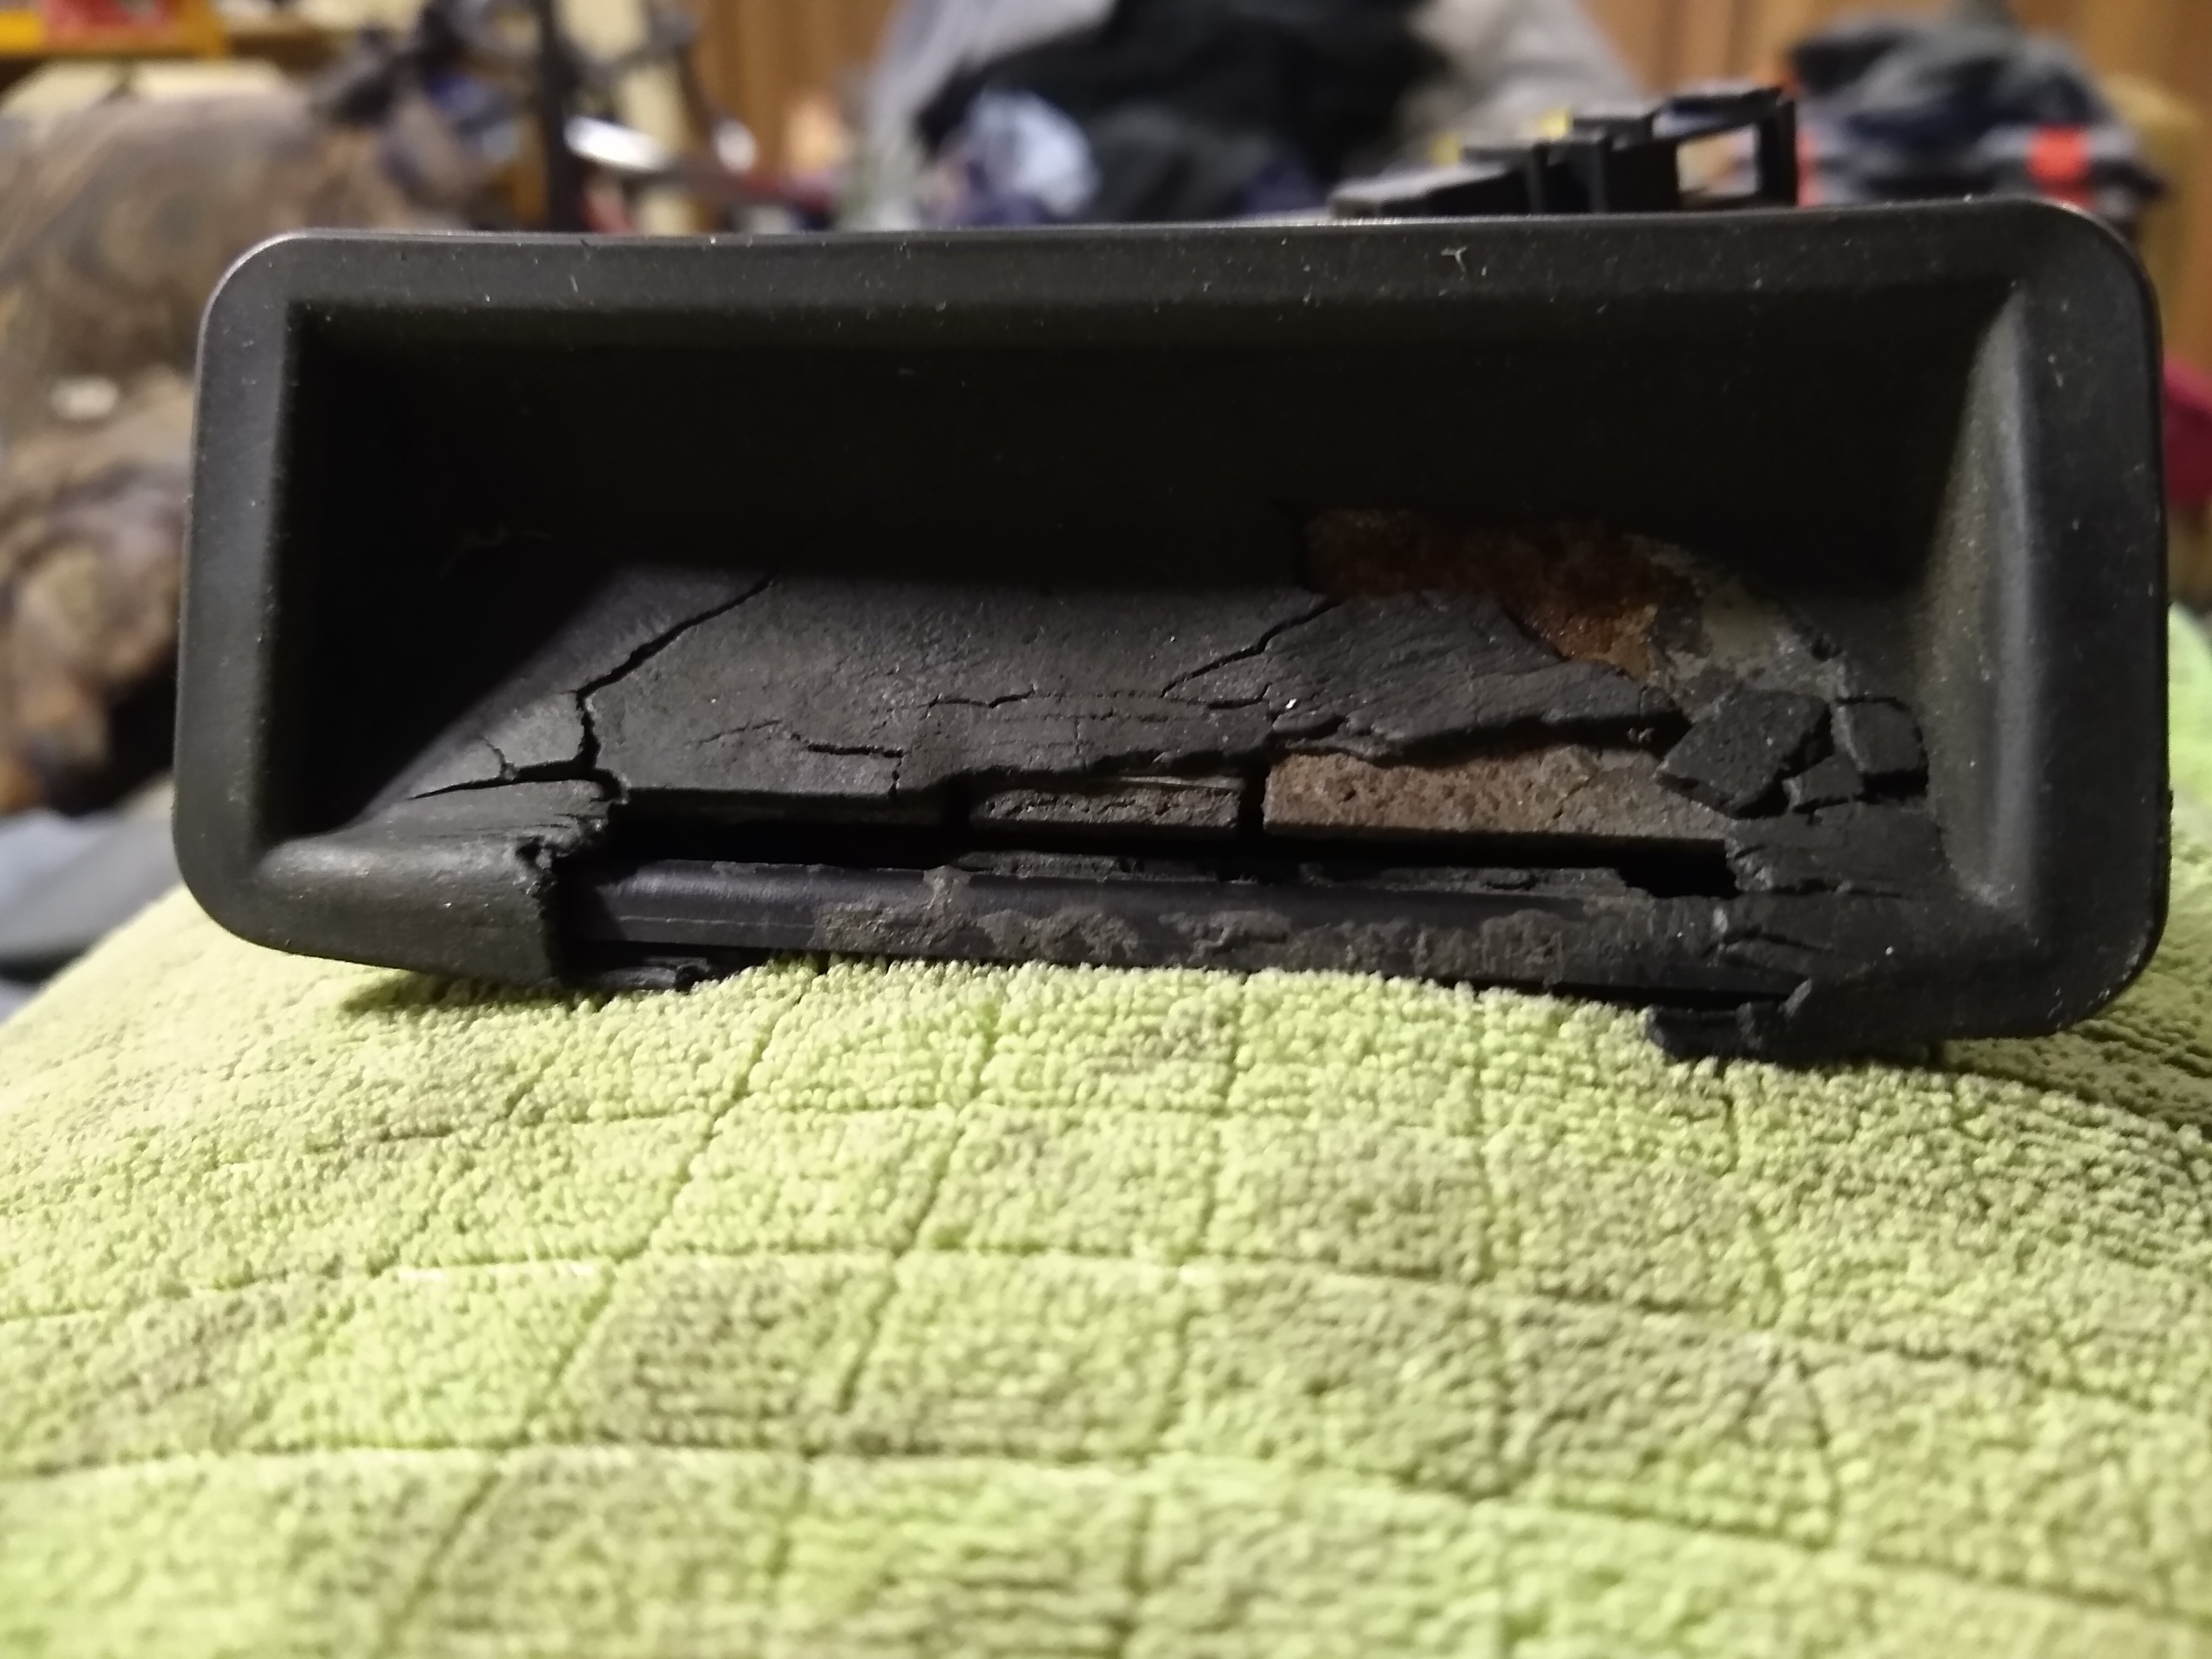
2 pointsReplaced this crumbly rear hatch release handle/button with a new one. Got it off Aliexpress. https://www.aliexpress.com/item/4001286216876.html?spm=a2g0s.9042311.0.0.41814c4d21lbKv Plus delivery and taxes, came to a "convenient" £14.99 or so. Ordered 27th November, arrived 14th December. Quality wise it's identical to the one that came off. Casing shape, potting of wiring etc. A little cheaper than some on eBay and far cheaper than genuine Skoda parts on eBay. Used HatBoyHarvey's Youtube videos on removing/refitting the trim and removing/fitting the handle. Find or make a pry tool. I used a breaker/nail puller wrapped in cardboard. One very minor foible, the connector wiring (handle side) was zip-tied to the main loom, so a small cutter pliers was needed to free it. A not so minor foible was trying to realign all those blasted steel spring clips to put the trim back on the hatch. It looked impossible so I just started whacking them in. Somehow, once a few were in, they all started behaving.
 2 points
 -
2 pointsI'm glad my days of driving for smiles is over 😉 These fuel economies would make me cry.2 points
-
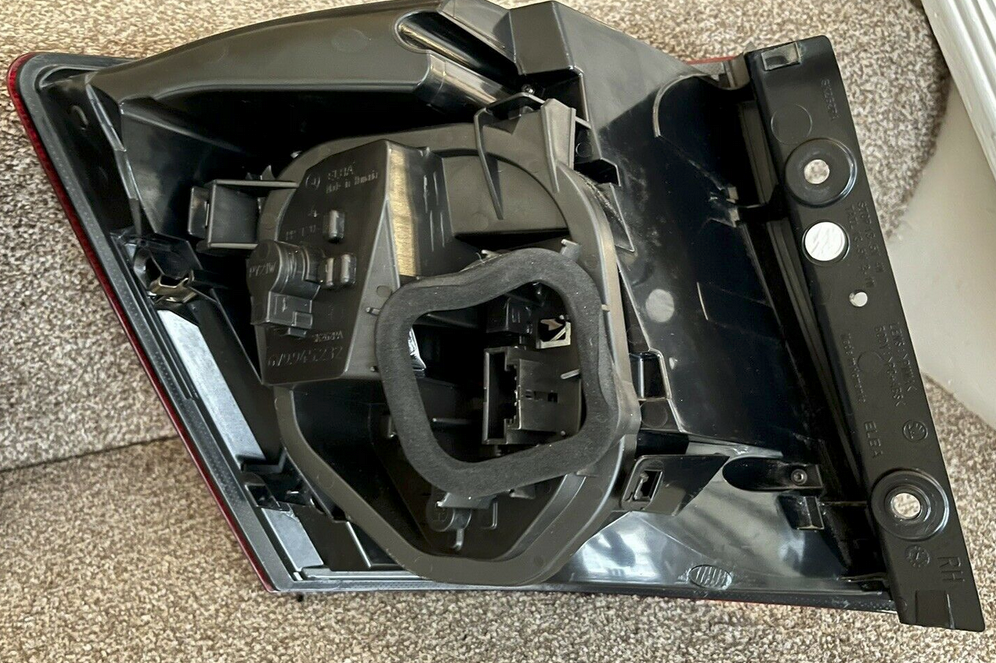
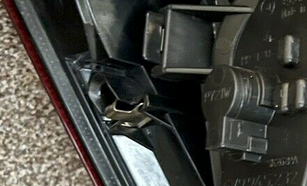
2 pointsIs it this unit? and if so, have you lost the little clip here? The bad news is, if it's been coming loose, and has now gone to the floor, it's probably not worth refitting it in the light unit. You might be able to relocate it. Can't see that clip being listed as a spare.
 2 points
 -
2 pointsAre they telling you front or rear? Analysis on your description or actually driving? Front or back? Having done both myself there will be a massive difference in cost depending which end! That have the tooling to change bearings if front, as specific tooling is required - cannot be just pressed to position. There needs to be a few questions answered for a real analysis to take place:- 1/ You have had the car since Feb so assume you have driven on roads where you are noticing this, is the noise recent or has it always been there, 2/ Generally a wheel bearing would not be limited to road surface types - is the noise always there. 3/ Are the tyres as fitted when you bought the car, while wear may change any noise would not expect them to cause so much concern. 4/ If tyres are a concern have you considered swapping front to back. 5/ Generally wheel bearings give a whirring noise that increases with speed. Is this the case as sound clip not really clear. 6/ You mention applying brakes at 7 seconds - does sound change volume, tone etc2 points
-
2 pointsSkoda have history here, they've done it for years, as I'm sure other manufacturers do too. For launch they stuff the vehicles full with features and innovation, the Kodiaq was no exception being their first 7-seater SUV. Then as the product passes through its typical life cycle, cost savings are implemented. This doesn't mean the product doesn't improve, or benefit from additional features not available at launch, but it can often result in what some might see as penny-pinching. It all depends on how you perceive certain aspects of your vehicle. For some it matters, especially those moving from one to another but it could be argued that those new owners who have no experience of the older versions are less likely to notice. Perhaps Skoda are less interested in loyalty / returning customers than they are of attracting new customers and taking market share? This was the list of changes to the Kodiaq a few years ago (MY19 to MY20 I think), there have been plenty of others before and no doubt after... Removal of door safety lights, now replaced with reflectors Removal of passenger side footwell net Removal of chrome on window switches Removal of rear door sill plates Removal of net program in boot Removal of removable flashlight in boot Removal of seat rail covers Footwell lighting no longer standard, now only included with ambient lighting package Exterior mirror lighting is now only available with electric memory front seats Interior rear-view mirror now always black instead of headliner colour 5 seater: two bag hooks instead of four 7 seater with spare wheel: removal of cover under loading floor Sleep Package: One blanket now included instead of two Umbrella: only one included instead of two SportLine/vRS: rear badges now black SportLine: air vent frames now black instead of chrome vRS/L&K/Scout: Removal of logos on rear seat rows2 points
-
2 pointsYes in the end I think it would be easier to put a set of coilovers, I saw some of them for 250ish euros on ebay. Don’t know why I havent looked at this possibility before. I had in mind that coilovers were not confortable. I guess it can’t be worse than lowered springs on sport shocks, since I don’t want to lower it that much. For a full replacement with shocks, springs and everything it was around 400€, and that was with « basic » parts. So it may even be cheaper that way.2 points
-
2 pointsI think you have crossed over LHD and RHD. In the UK we drive on the Left in Right Hand Drive vehicles, in Europe they drive on the Right in Left Hand Drive vehicles.2 points
-
2 points
-
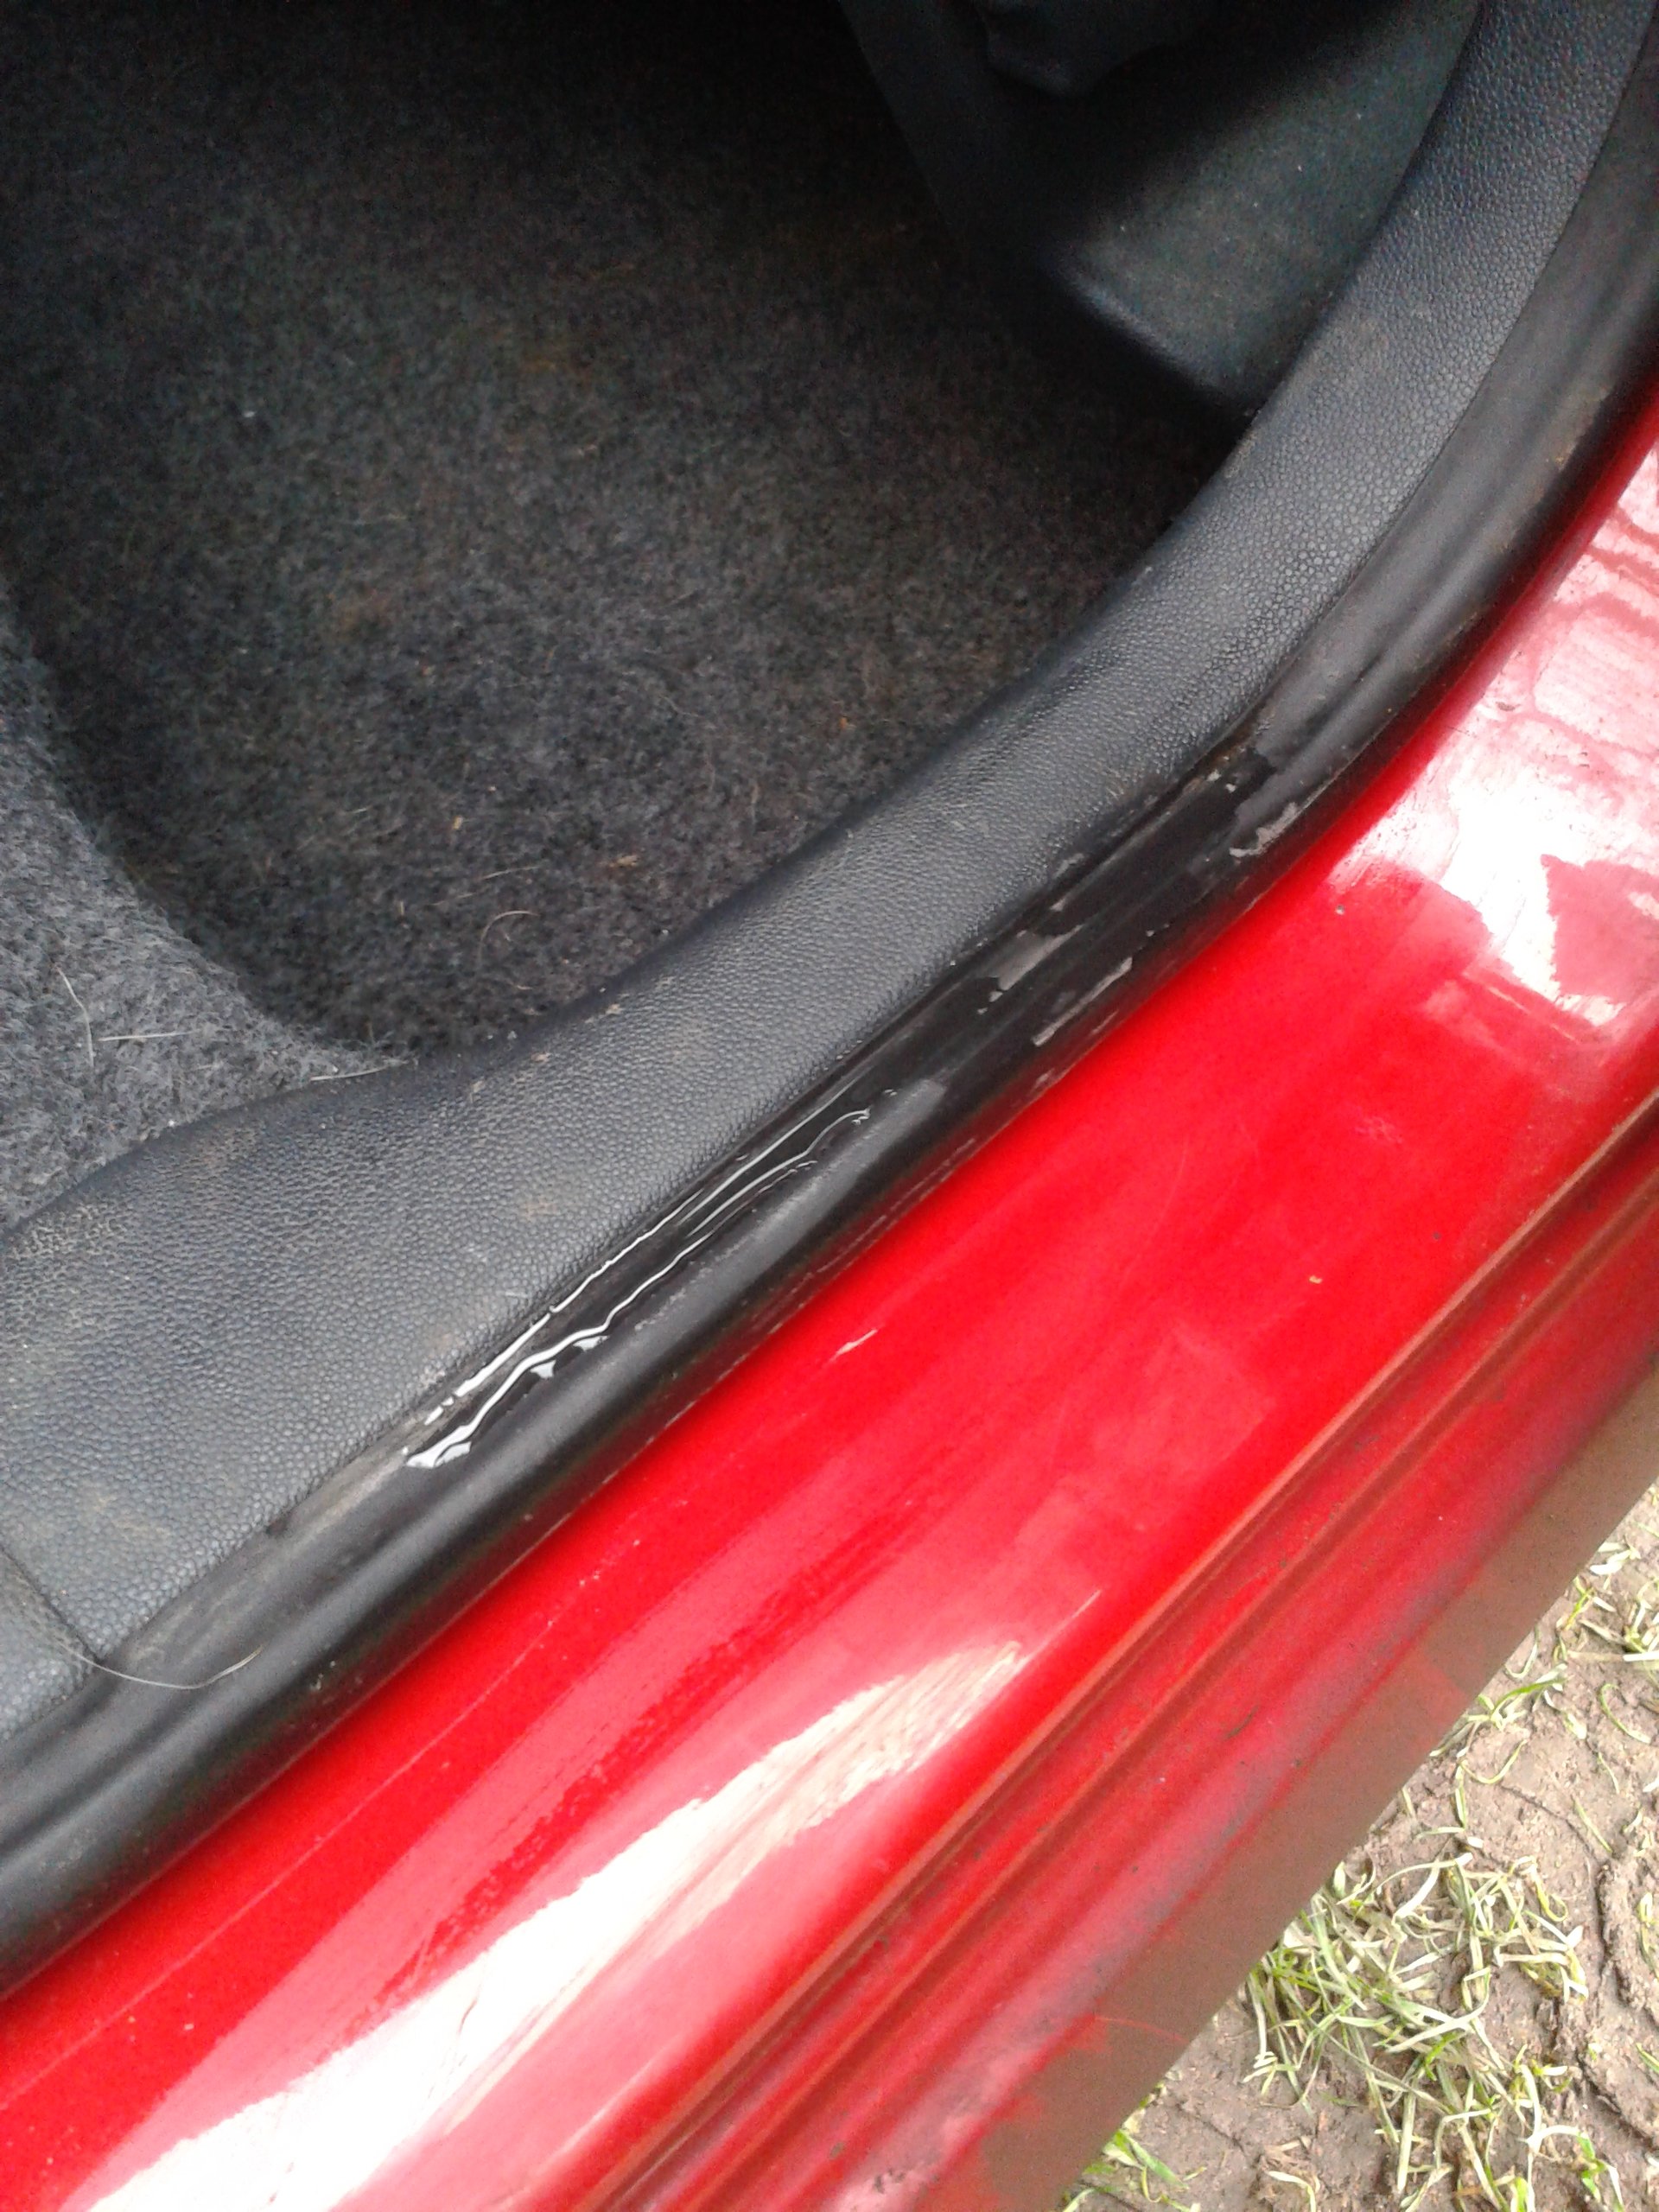
Look for broken wire(s) in the rubber boot between doors and a-pillars. A thin grey/white wire would be the prime suspect.2 points
-
2 pointshttps://thedriven.io/2021.08/02/volkswagen-forges-new-jv-to-avoid-repeat-of-id-3-software-problems https://www.teslarati.com/volkswagen-software-issues-id-3 $9Billion is Just a drop in the ocean & a 2019 figure on what THEY ARE TO SPEND, which is nothing compared to what VW group paid in fines for the software that they had developed and that they bought in previously to have the Defeat Devices they wanted. Contractors do leave VW Group because they are always trying to screw down the costs of everything. (VW dumped chip suppiiers quicker than others and they were already demanding cheaper than other manufacturers and the chip suppliers started supplying others quicker when the demand picked up. Vorsprung Durch Technik. VW Needs to learn to stop taking the pith with New Technology as it advances.) VW Group will actually blame the software developers and providers for illegal ECU's / Software where it was them that bought it in and used it having been made aware that it was illegal. https://www.nytimes.com/2017/02/01/business/bosch-vw-diesel-settlement.html https://www.dw.com/en//bosch-pays-90-million-euro-fine-over-diesel-scandal/a-48843405 VW group get left in the lurch often with component shortages even like with interiors and materials as they say they punt suppliers but the truth is suppliers abandon VW Group. VW Group do drop suppliers after they have had them increase staff and production and want them to be the supplier for VW and not others, then try screwing down the costs and profits of the suppliers while VW Group can increase their profits. https://www.reuters.com/article/us-volkswagen-production-idUSKCN10S2BR Software development is expensive you have to poach the best people from other companies, and the best developers have been at it a long time and can have errors and faults and losses, VW Group have a long way to go until they get to be up there with the people that can do things right. Lots of the best Engineers & Developers, designers etc will not work for VW Group because like with the Deafeat Devices they will blame Minions and the top people the Engineers Engineers that know everything know nothing and do not go to jail and Engineer or 2 do, selectively deaf dumb and blind in the Board Rooms. The issue is that any software errors and coc-kups can be a risk, but VW Groups are in Vehicles. Vehicles driving on roads with humans in them and around them. From the first link. Hits the nail on the head!

 2 points
 -
2 pointsI was going to say be better off just going for an all round set of coilovers you can pick up some decent sets for around £250 and when you way that up against new shocks and springs front and rear plus pump stops and fixings provs not any difference price wise.2 points
-
They achieved 480bhp at 2.0bar with 410lbsft.2 points
-
2 pointsFor what it's worth... anyone who is ordering a new Kodiaq (or other car that has the option) and wants to use a dash cam really should get the USB-C socket in the mirror housing. It's charge only, ignition switched, and solves all these issues and more in one go. Can't recommend it enough. Now they just need to provide a similar socket at the top of the tailgate for rear cameras...2 points
-
1 pointHi all, I've had my MK1 fabia for a couple of months now and put 6k kilometers on it. She's lovely, and mechanically perfect. There are some issues creeping up since the past few weeks, they are strange and I wonder if they could be related. 1. There is moisture on the windshield on the inside. And it's quite a lot, enough for me to need a towel to dry it. 2. The interior fan rarely works. It broke 2 weeks ago on a return trip (the way there it worked) but on return it didn't turn on. I say rarely, because on on the last trip after we where driving back (1,5 hour trip) it turned on after 2/3 of the way. Today i checked and it was off again. I've checked the fuses and they seem fine. The airco light also does not turn on if the fan doesn't work. When the fan came on, the airco worked again as well. I know it isn't the motor, because I leave it on full blast since the heat passively comes from the engine and the motor kicked on last trip. It could be some loose connection but I don't know where to look. 3. The drivers window fell in the door. On a recent trip, after trying to close the driver's window (fan doesn't work), the glass of the door made a strange noise and fell in frame off the rails. I pulled it up by hand and taped it to the frame as a temporary measure I have electric windows, so my guess is that it jumped of the gear or something. Is this a common issue, can I fix this myself? I have replaced the speakers, but I made sure that nothing could touch the glass. I did notice that some of the rivets inside where missing, I'm guessing someone messed with it before. Wondering if I can fix this myself. All these issues occured in the last few weeks. Margreet (as she is called) has had some quirks before, but they've been there since I bought it. Like the keyfob sometimes unlocks all the doors, except the drivers door, or the beep letting you know that the headlights are on sometimes doesn't work either. I've taken these for granted since she's 15 years old but the 3 problems mentioned above actually cause me to worry a bit. I want to work on these issues myself where possible and learn, and hope some of you can guide me a little bit on the way. Kind regards, Wessel!1 point
-
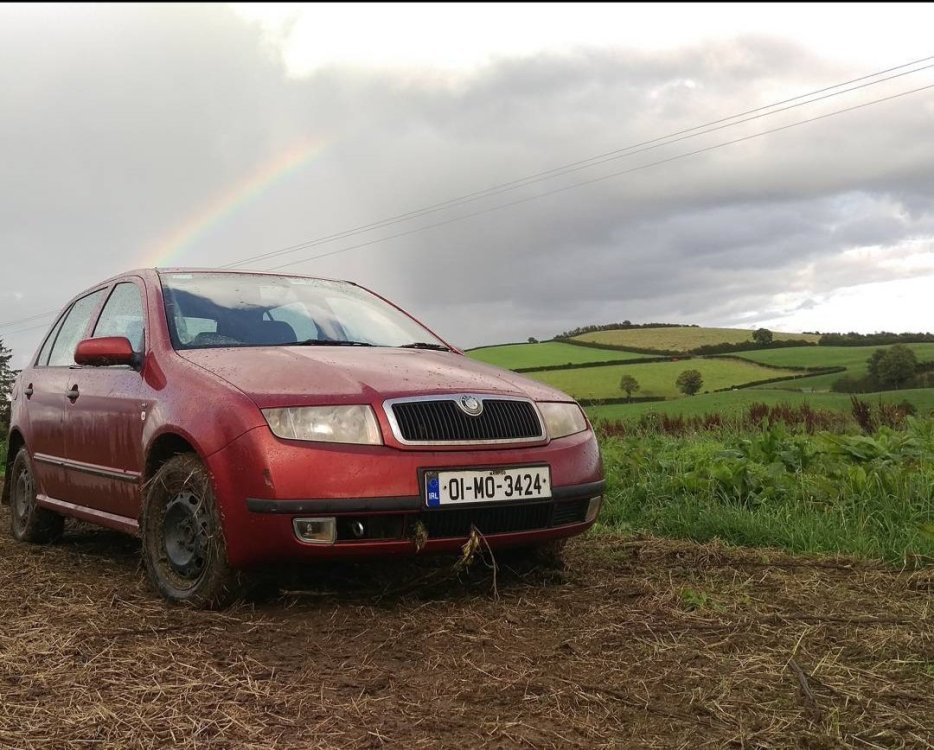
1 pointAlways look at the reg plate of your Fabia and think it's someone shouting to their mate. Obviously the "01" looks like "OI", and the MO could be someone called Mo, so you can get where I'm coming from...1 point
-
1 point1 point1 pointWeird, I always thought the reason you had to change the axle for discs was because the drum axle didnt have the mounts for a caliper carrier. So thats why everyone who swapped for discs just swapped the whole axle out. If those mounts are useable to mount carriers to I'd probably get brakes, lines etc to go onto it and put it into my mk2.1 point1 pointHi don't see many over here in that colour it's usually greys and blacks or blues I'm happy with the colour was thinking of getting a black spoiler fro the boot lid like the ones on a sportline ☺👍1 pointEtc is the offset and dictates how far the wheel sits into the arch. You need to know the wheel width too. Usually the wheel will have marking like "8j18et47" which states the rim is 8 inches wide, 18 inches diameter and 47mm inset from the face of the bolt surface. Then you need tyres to match. 235/45r18 is a standard size for superb.1 point1 point1 pointGet them back but make sure they cannot point to another cause and worm their way out of responsibility.1 pointThe crank sensor would explain the difficult starting, but you still have looming lambda probe issues. I would delete all codes after saving a copy of your scan, run for few days, then rescan to see what returns. Some of the codes when deleted have to complete several duty cycles (read start/stop with the ignition key) before they will return, but defective safety items will return immediately. What fault code did the crank sensor return and its description, as the code will divide into defective or intermitent?. Having said that, if it was showing defective I wouldn't expect the car to start at all. Does your VCDS lead and version allow you to do data logging or it VCDS lite with an aftermarket cable?.1 point1 pointtail lights with turn signal, brake and tail lights, reflector rear fog light D >> - 30.07.2018 Skoda Fabia [Fabia (2016 - 2019)] (7zap.com) Can you see the item here?1 pointYep! Yesterday I averaged 3.2 mile/kWh on a 106 mile round trip. Almost summer consumption figure that is.1 pointI had my control module replaced but the solution will depend on exactly what the problem is, do you have the ability to read the fault codes? I included the full details at the end of this thread: Brand new Scala SOS emergency call fault1 point1 point1 pointHybrid only really makes sense for company car drivers like me who are paying very little BIK tax as it will do miles on electric only. The increased list cost over a standard petrol version far outweighs any extra fuel costs if you are a private buyer.1 point1 pointIt's SO dependant on drivibg pattern when in town I've been on a slow but moving in route recently 8 miles so it gets warm , getting around 27mpg, add some stop start traffic jams (with stop start turned off and it's 24 ish) did 31mpg coming home today but 9pm gentle flow the whole way. Previous car struggled to crack 22mpg ( mondeo 2.5T) so I'm still well chuffed and feel like I'm winning. Hitting the brakes kills the consumption, if you can drive on 'accelerator sense' it's much better.1 point1 point1 pointCouldn't be leaking in through the Plenum Chamber like it does on the Fabia? I'm not sure if there's a design on the Yeti that prevents this, but it's just a consideration. Good luck with your problem, I hope you find a solution.1 point1 pointVAG say there is currently NO fix for the adaptive cruise problem. Mine has been in recently for all the available updates but nothing for the cruise. First motorway journey after updates it braked for EVERY car I tried to pass on the return journey NONE. It's much worse being inconsistent as you never know which way it's going to go.1 point1 point1 pointAs a qualified tech trained in ADAS too I can promise you geometry and wheel alignment make a huge difference. To start with the radar has no way of knowing direction of travel without steering wheel input and setting the radar up to be perfectly parallel to the cars straight ahead alignment (done off the rear axle) this is done to a tolerance of 1-2mm to give you an example of how import it is. The radar doesnt look straight ahead and know everything and its position relative to the car, it needs to be told this and thats why it needs calibrating. Adjusting alignment, front bracket placement, replacing suspension components, moving subframes all have the chance to throw this out.1 point1 pointBy then the event has already happened and the vehicle following too close behind gets an awful amount closer or someone panics because they see your brake lights. Even if you learn this instinctively how about when your wife is, for the first time, experiencing this. Skoda have no excuse but perhaps the solution is for a rear end accident to happen and the innocent driver to be prosecuted for brake checking a vehicle carrying a dash cam when in fact the car got frightened. Maybe then Skoda will take this seriously. To be fair to Skoda and their rotten software I also experienced this on a Toyota. So much for self-driving cars eh?1 point1 pointI'm very pleased with the Brembo discs I bought from ECP; they've been on for over a year now and, despite little use, they have remained rust-free. I went with the same for the fronts. The Brembo pads aren't great though - they make lots of dust and don't have the same 'bite' as the original pads. I wouldn't buy these again. Ferodo DS Performance were very good on my previous car. @BanquoWait a week or two and ECP will have 40-50% off Brembo yet again.1 point1 point1 pointThe vehicle will consume less than 30ma, probably less than 20ma once it has gone into sleep mode. What probably happened is that the current drawn by the dashcam prevented the other systems from shutting down and the current draw would have been even more than you think. You cannot use the entire theoretical battery ampere hour capacity, using only 15-20% of it will drop the voltage so low (10.5v) that if the vehicle were even to start (unlikely) the battery would be permanently damaged. I thought you said there were no accessories on the vehicle? Glad that you got to the bottom of it though.1 point1 pointWorth noting that with modern smart alternator/ micro hybrid charging systems, the battery is normally only charged to around 80% to allow space for the alternator to dump charge on the overrun.1 point1 pointInformation for anyone whose interested in DIY'ing their own brakes, I guess these cars are still quite new. Applies to All Superb MK3 (3V) MQB Chassis Might I recommend Parts in Motion (Great Service, They Check your Compatibility and Offer Free Returns, Often Next Day) https://www.partsinmotion.co.uk/ I have a 65 Plate (Now wearing a vanity plate) registered early 2016, my vehicle is a 1.6TDI 120PS, Manual, Hatchback. I went for Juratek Discs with Blueprint Pads. Disclaimer - For Information only, I am not responsible for damage to yourselves or your cars. The Fronts - Chock Rear Wheels Apply Parking Brake Ensure you are on a level piece of ground ideally concrete that will support the jack safely. Position Jack Under the Correct Point on the sill (Note there's an embossed arrow, the jacking point is obvious, use jack pad if you wish to protect the underseal) Do not jack up yet Remove plastic caps over wheel bolts (There plastic tool in your spare wheel kit for this) Ensure you have the locking wheel nut key at this point. Use a 17mm deep socket and a breaker bar to crack loose all wheel bolts including security bolt. Jack the vehicle until the wheel will spin freely (providing not a DSG in park) or until you can safely place under an axle stand (I put this under the subframe) Behind the Front Control Arm Bushes. Remove 17mm wheel bolts completely. Remove tyre, can be tricky if rusted onto the hub (use a rubber mallet if necessary on the back of the wheel) Safely stow tyre rim side up so as not scratch it and so it isn't a trip hazard. Remove the T25/T30 Torx retaining screw from the brake disc. Use a pair of vise grips of similar to prevent the nut on the end of the slider boot from spinning. Undo 2x 13mm bolts from the caliper carrier (There should be replacement bolts with your new pads dependent on the brand you bought, you can reuse with Loctite re-applied) Remove the caliper and hook safely out of the way, I found on the top of the shock was a good temporary mount (pay attention not to twist the brake hose etc) Remove existing pads using a flat bladed screwdriver, note the orientation, the pad is chamfered on the bottom to go with the contours of the brake disc. If you put the pads in the carrier the wrong way, They will catch the brake disc. Note that the little tab on the pads needs to be compressed and go within the carrier not be forced so it is bent and on the outside of the carrier. For the front you need to remove two 21mm bolts for the caliper mounting bracket these are tight (use a suitably sized breaker bar and a lump hammer if required) there is debate as to whether these should be reused as with all VW bolts, I reused mine with thread lock applied. (Someone to add correct torque settings) Once the mounting brakes is removed you can now remove the brake disc, dependent on levels of corrosion it may need rotating whilst you tap the rear with a mallet. Take care not to distort the metal dust cover. Whilst the caliper mounting bracket is off the car, thoroughly clean it of any debris and dirt, ensure that the area where the pads sit is free from corrosion etc using sandpaper, a dremel etc. Ensure the hub is also clean, I put a smear of copper grease on the hub to ensure easier disassembly in future. Remove the rubber slide boots and clean out with brake cleaner, wipe any old grease off and replace with red rubber grease or similar, do not use copperslip etc on slider pins and it will increase wear and swell the rubber boots. Thoroughly clean your new brake disc with brake cleaner, some makes have machining oil etc on them. Install new brake disc and replace T30 retaining screw. Replace Caliper Mounting Bracket 2 x 22mm bolts (can be tricky to line up, careful not to cross thread) Install new brake pads. Note the driver side is the one with the wear sensor if fitted, the passenger side does not have this. The wear sensor simply unplugs and should be fitted to your new pads as necessary. Ensure that you compress the metal retaining pin when you install the pads, make sure it doesn't bend out and ensure the pads follow the curvature of the disc, they can be made to go in the wrong way, which will catch the inside of your new disc and score it. Use a brake rewind tool to push back the piston on your brake caliper (standard right hand thread tool works for both front and back calipers) Note there is no need to open the bleed nipple. It is good practice to open the bonnet and extract some fluid from the brake res so it doesn't overflow. Install caliper and new 13mm bolts or reuse with Loctite (as applicable) Refit road wheel, remove axle stand, slowly let down jack, torque wheel bolts, replace plastic caps. Repeat for the other side, when satisfied, depress the brake pedal to ensure the caliper piston is hard against the pads. The rears - For this I used OBDeleven (There is a manual way involving, releasing the handbrake and removing the motor from the epb, I have not tried this) First chock the front wheels and put the car into gear/park (as applicable) Use OBDeleven, connect to the car go into Brakes/ABS Module, Basic Settings, Then run "brake lining change" the motors in the electronic handbrake will whir for a few seconds, then the dashboard will light up with ESP and ABS Faults. People state to connect a battery charger to maintain the battery I did not do this and it was okay as the job was quick. I kept the ignition in the accessory position with the ODBeleven connected Safely Jack the vehicle and support using a axle stand and then remove rear wheels as discussed. Remove T25/T30 Brake Disc Retaining Screw (Reuse) Remove two rubber dust caps from rear of caliper to expose two slider pins. Use a T45 or Appropriate Allen Key to remove the slider pin from the caliper, these are different from the fronts, you remove the whole tubular slider pin Remove caliper and support as appropriate (take care not to strain or twist the brake hose) The caliper simply pushes back as per the front calipers once the brake lining change command has happened. Remove the existing brake pads (note that there is a pad with a spring and a pad without a spring, the pad with the spring goes at the back (away from you), the pad without the spring goes at the front (nearest exterior of the car) I did not need to remove the caliper mount in order to remove the rear discs, the simply moved out of the way being a thin solid disc unlike the vented ones on the front. If you want to remove this you need a special M14 ZXN Type Socket. Ensure all mounting surfaces, such as the hub and pad carriers are cleaned use sandpaper, a dremel etc to ensure there is not dirt or rust, clean backing plate etc. Apply a smear of copper grease or similar to the hub before installing the disc. Ensure discs are cleaned with brake cleaner/alcohol of all grease and oils. Install disc and retaining bolt (t25/t30) Install Pads into carrier (spring one at the back) Ensure slider pins are clean, use sandpaper, apply red rubber grease. Reinstall caliper Ensure that rubber dust plugs are installed once slider pins are tighten. Refit wheels Pump the brake pedal to push calipers back out OBDEleven back in ABS/Braking Module, Basic Settings, "brake lining end" the motors will whir to close up the rear calipers. Test Drive Upon first use of the brakes there will be little braking effort, this is due to them needing to bed in. Essentially there needs to be a uniform amount of brake material applied to the surface of the disc to produce better adhesion and friction. Find a empty road. Warm up the brakes essentially, drive at 40mph and brake down to 10mph, repeat this 10 times with 30 seconds in between, do not stop. Stopping causes hot spots on the disc and uneven pad material transfer (This is what people mistake for warped discs) Repeat from 60mph to 10-20mph 5 times. Drive the car normally until a safe place to stop, when you exit the vehicle you should hear the metal tinkering of the brakes being hot, place the back of your hands near a wheel and you should feel the heat. Leave the car to cool down preferably overnight. Drive carefully for the first 100-200 miles, avoiding emergency/hard braking. You will gradually feel the brakes get better and better. Note, I do not put copper grease or any other grease on the rear or sides of brake pads. The only place any grease goes is on the slider pins and between the rear of the disc and the hub. Putting coppergrease on pads, just attracts brakedusts. Good pads will always have shims etc that will stop rattling and squealing, IMO no coppergrease is needed on the pads or pad carriers of these cars. Always ensure that discs have been thoroughly wiped down before use, noting that some brakes now have a coating that is worn off on first brake, this is to prevent corrosion. always read the manufactures instructions.1 point


.thumb.jpg.06721e8c8b33ed0eea16572ff131b291.jpg)


.thumb.jpg.f83a46b9b3c0d976b9dbffbb523c9874.jpg)


Important Information
Welcome to BRISKODA. Please note the following important links Terms of Use. We have a comprehensive Privacy Policy. We have placed cookies on your device to help make this website better. You can adjust your cookie settings, otherwise we'll assume you're okay to continue.