


All Activity
- Past hour
-
Agreed. The battery needs changing and I need to make sure I charge it. Amazingly the battery Seems well capable of starting the car.
-
The shift is definitely cable. You can see it move when pulling the shift lever. I have had a first go at adjusting it but the **** socket extension dropped in into somewhere….. we’ve all been there. Finished lunch so I’m back out to have another go. This time with the extensions taped together. I’m 99% certain I’ve found the problem but getting onto the bolt and pulling the cable etc presents a minor challenge!
-
Chris47 joined the community
-
DaveH555 joined the community
-
If the shift is fly by wire as E13 says, a failing battery can definitely be the cause of many electrical gremlins. 11.6 volts on no load is below 20% SOC and is well below battery danger level!
-
Does the signal chime occur after the pairing process? I have never Edit Controller 4c On Cluster Software 608 tpms Reset dont work
-
I doubt driving around a block is long enough for the system to relearn. On a MY12, you probably don't even need a button assuming you have a maxidot cluster running SW: 06xx or newer... Try these instructions: https://www.briskoda.net/forums/topic/363554-tpm/#findComment-4746144
- Today
-
If the washer pump is actually operating without any fluid appearing at the rear nozzle, I'd be checking for a blockage, kink or leak - possibly where the washer hose loops between the body and the rear hatch/tailgate.
-
My wife had a cold run to the borders yesterday, was getting about 3.6m/kWh. As we've only had the car in good weather so far it's quite the hit from the 4.2 we've been getting. Still the previous ID.4 would have been around 3.4 m/kWh in similar conditions.....
-
No luck yet. Coded Instruments 17 and ABS 03, Also tried Electronics Byte 8. After coding & scanning there were no errors and the dash TPMS warning now lights momentarily at IGN on for dash lamp self test. Checked a front tyre pressure at 2.4 Bar, did ABS TPMS reset via vcds (accepted) & drove around the block. Reduced pressure to 2 Bar and repeated the test drive. No TPMS warning. I know on my V.W working ABS TPMS is very sensitive, it comes on after a tyre change when new tread is thicker and rolling radius increases. I've sometimes had it come on working on the car IGN on and jacking a wheel. I'm puzzled that if it was simple to enable, they would have done so on the car when new. According to vcds labels, resetting TPMS in the ABS controller should work without a reset button and the only thing left could be that first hard reset is an enabling function? From a few photos of past mod. kits, one wire end had a connector pin. I'll guess that's the wire for the ABS connector.
-
Try skoda-parts.com. Highly recommend!
-
I normally stay away from Champion as have found there plugs not very reliable. Not sure about there glowplugs but generally I use NGK on everything and have had no problems. Old mechanic friend said get engine hot before trying to remove glow plugs and also a bit of engine oil/releasol dripped around them for a day or two before attempting removal. Alasdair
-
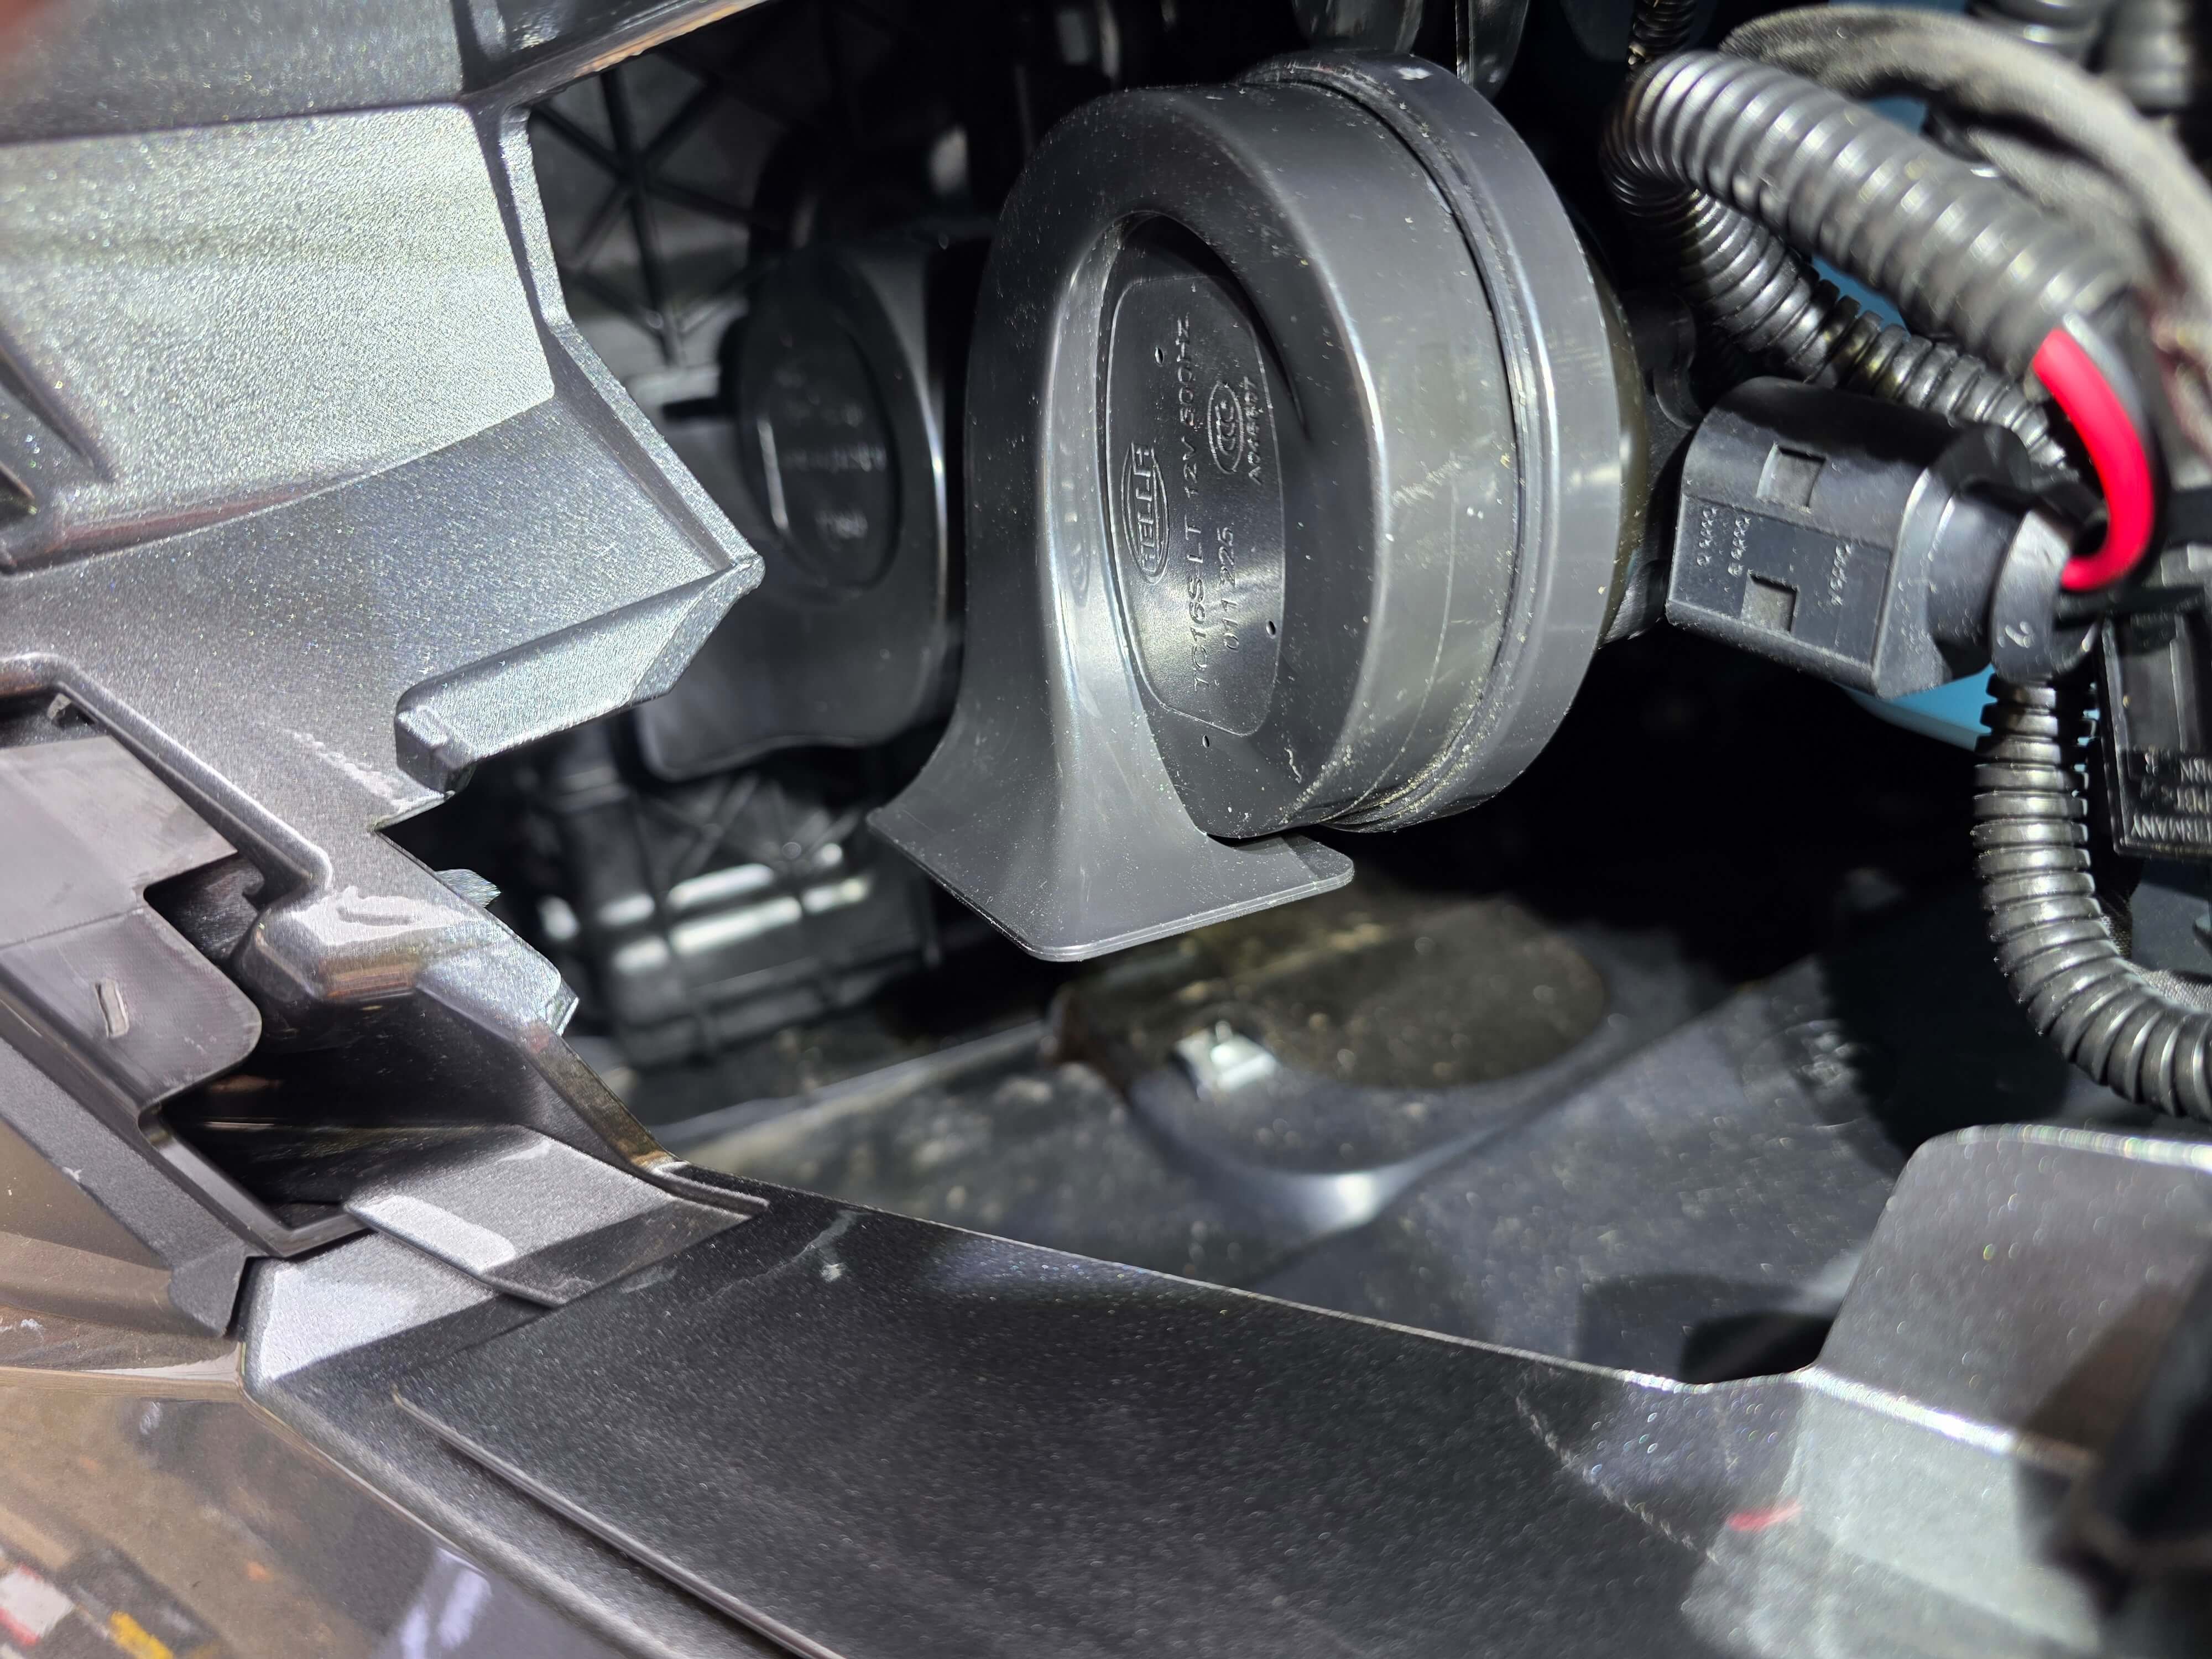
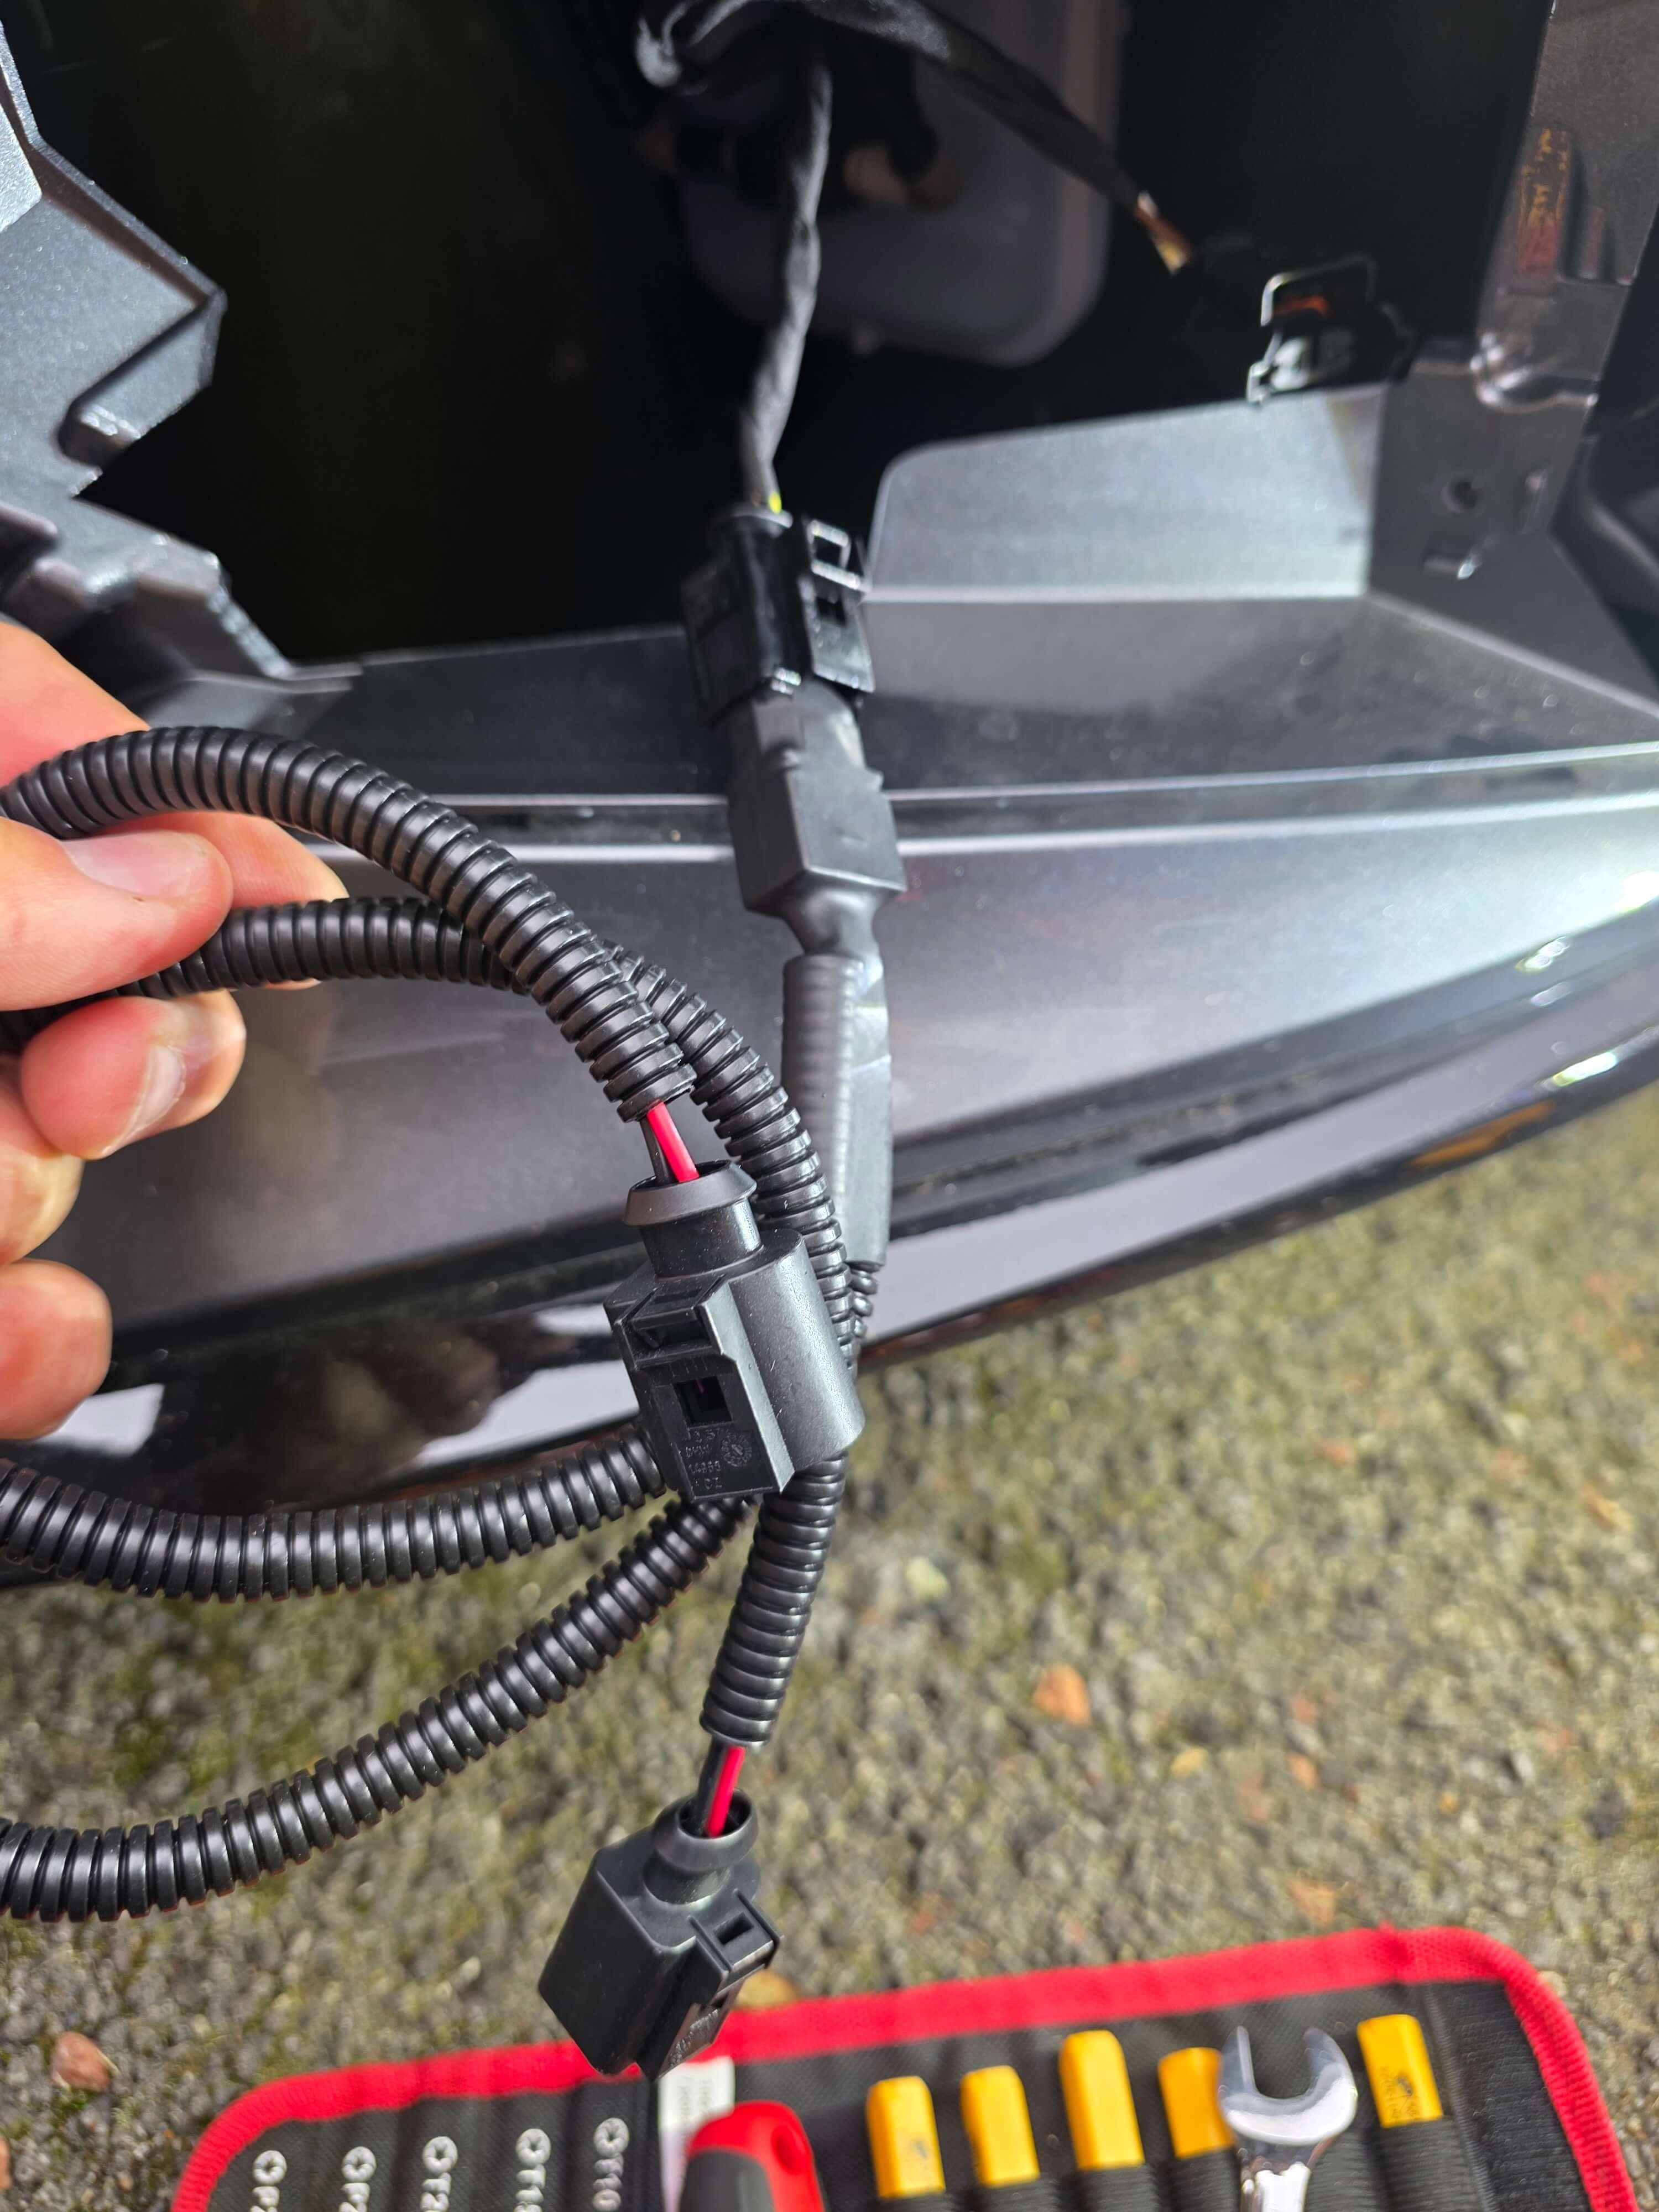
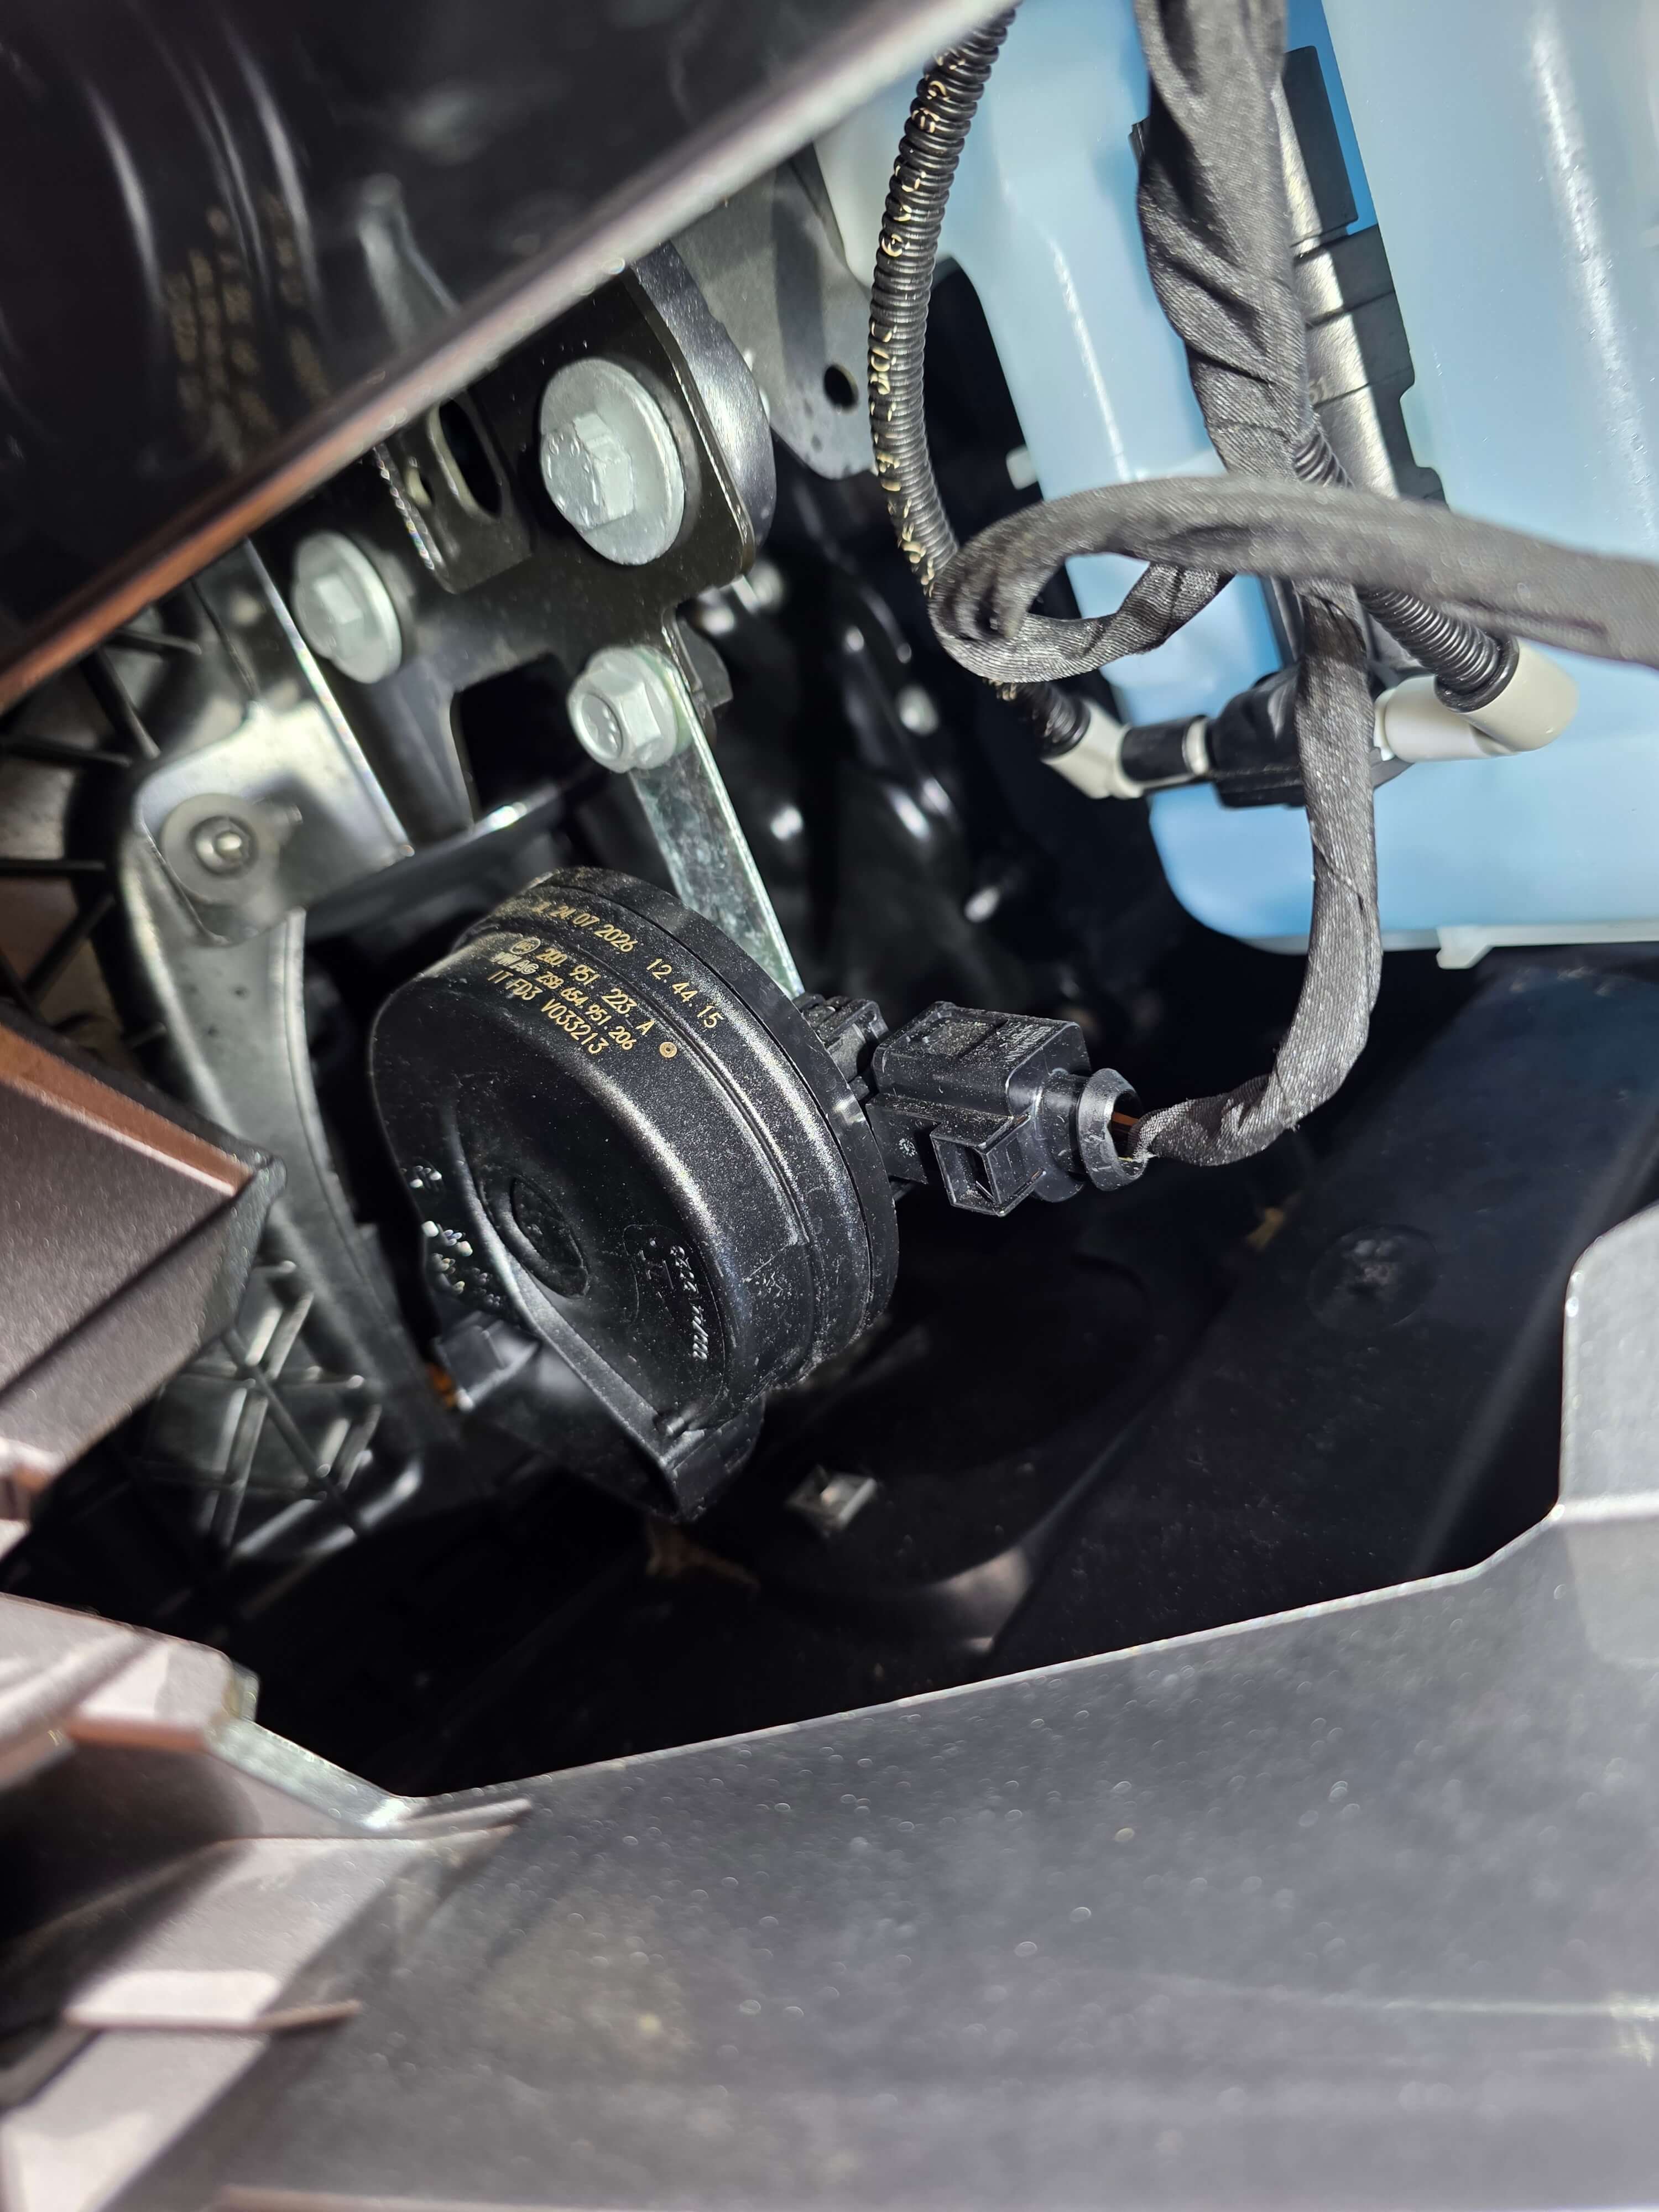
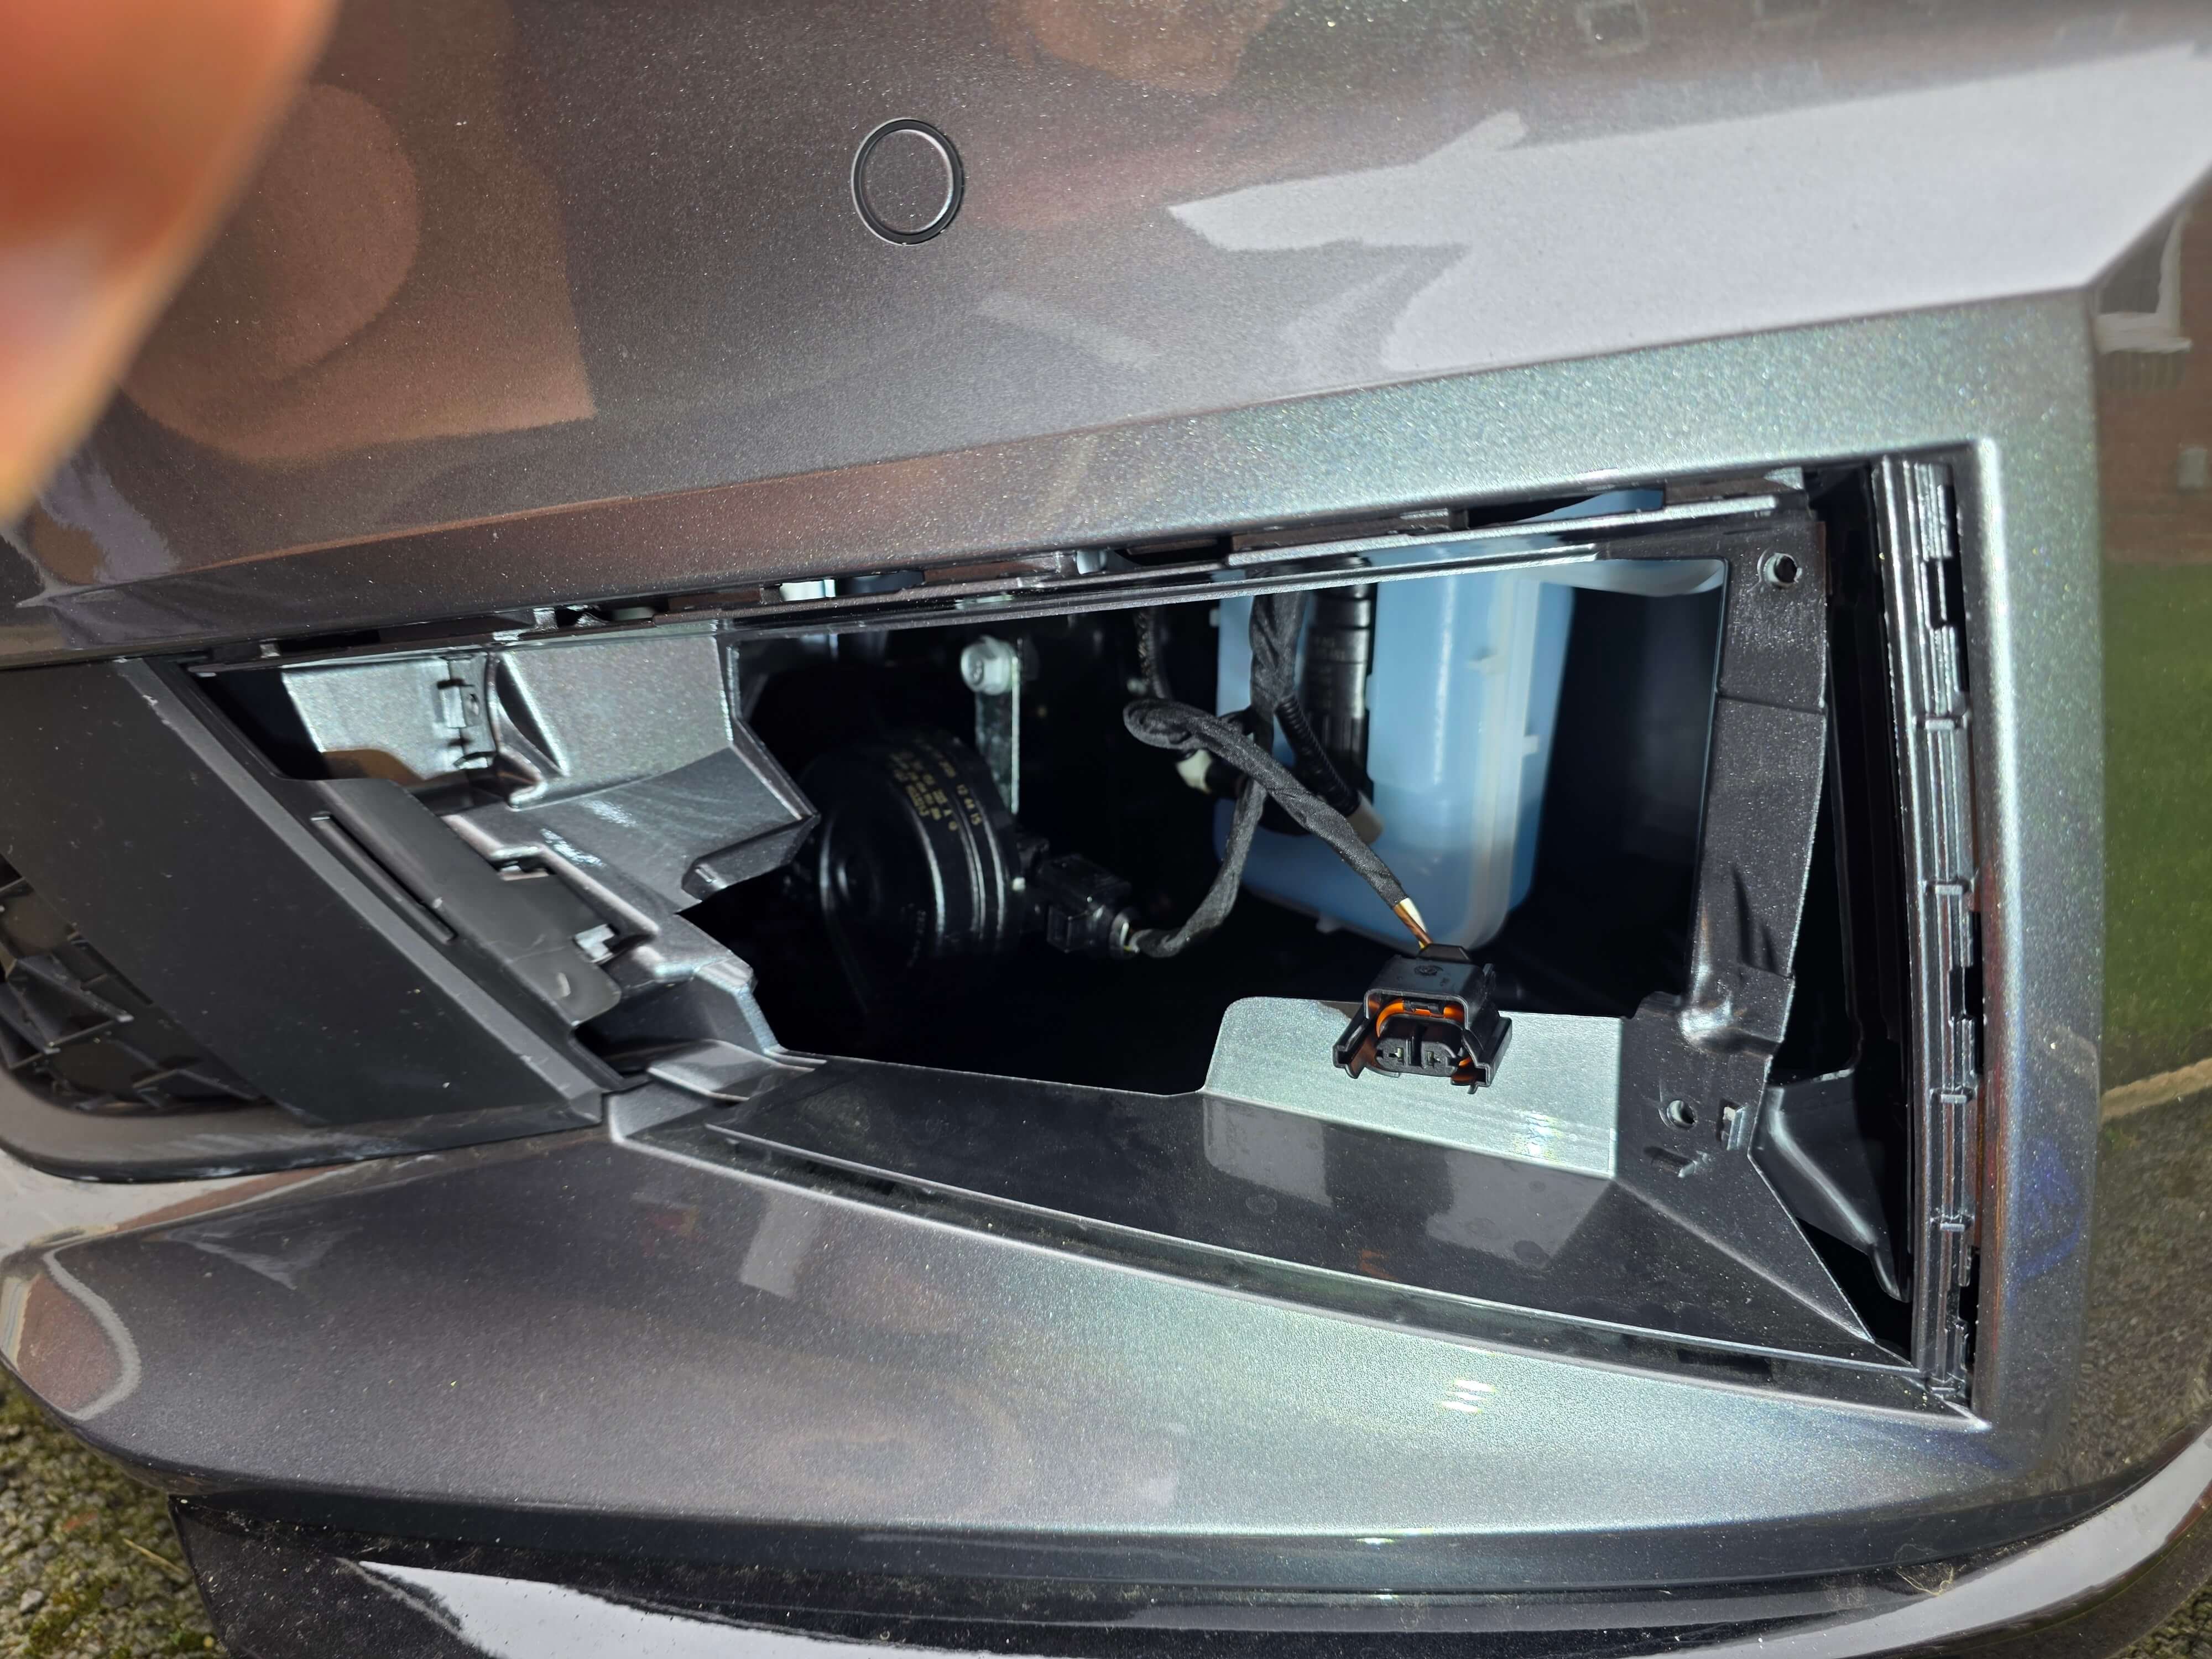
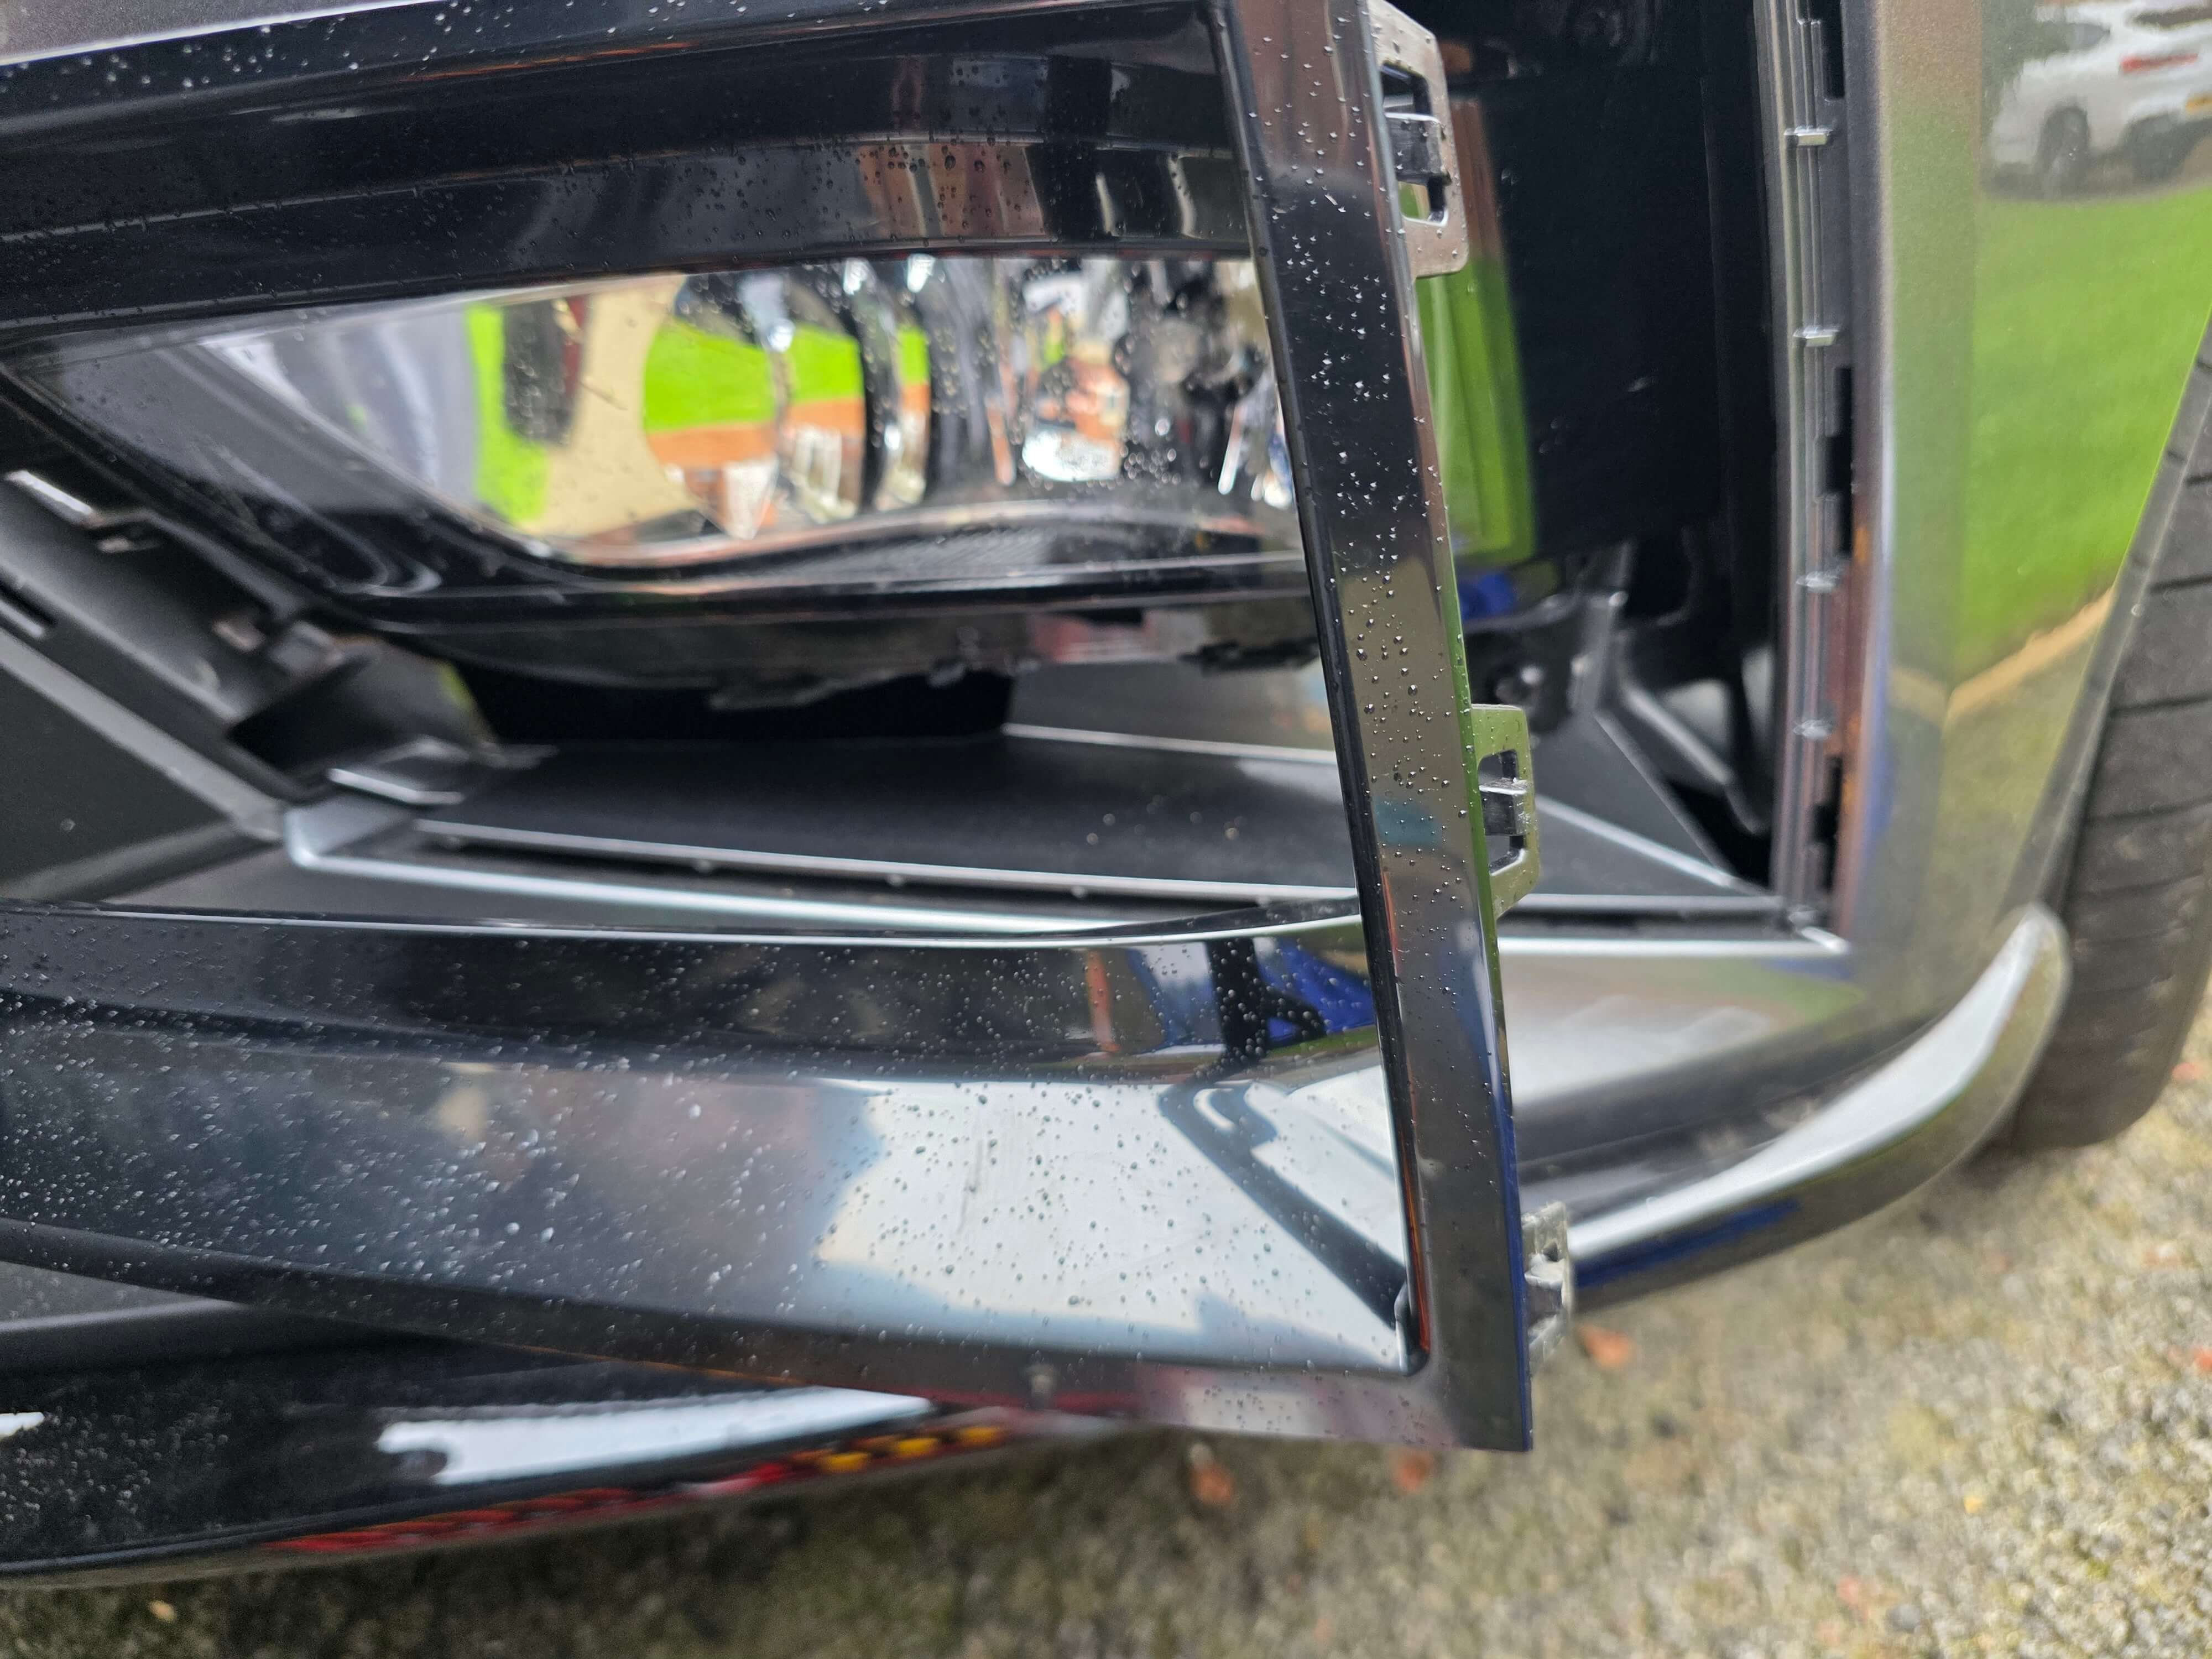
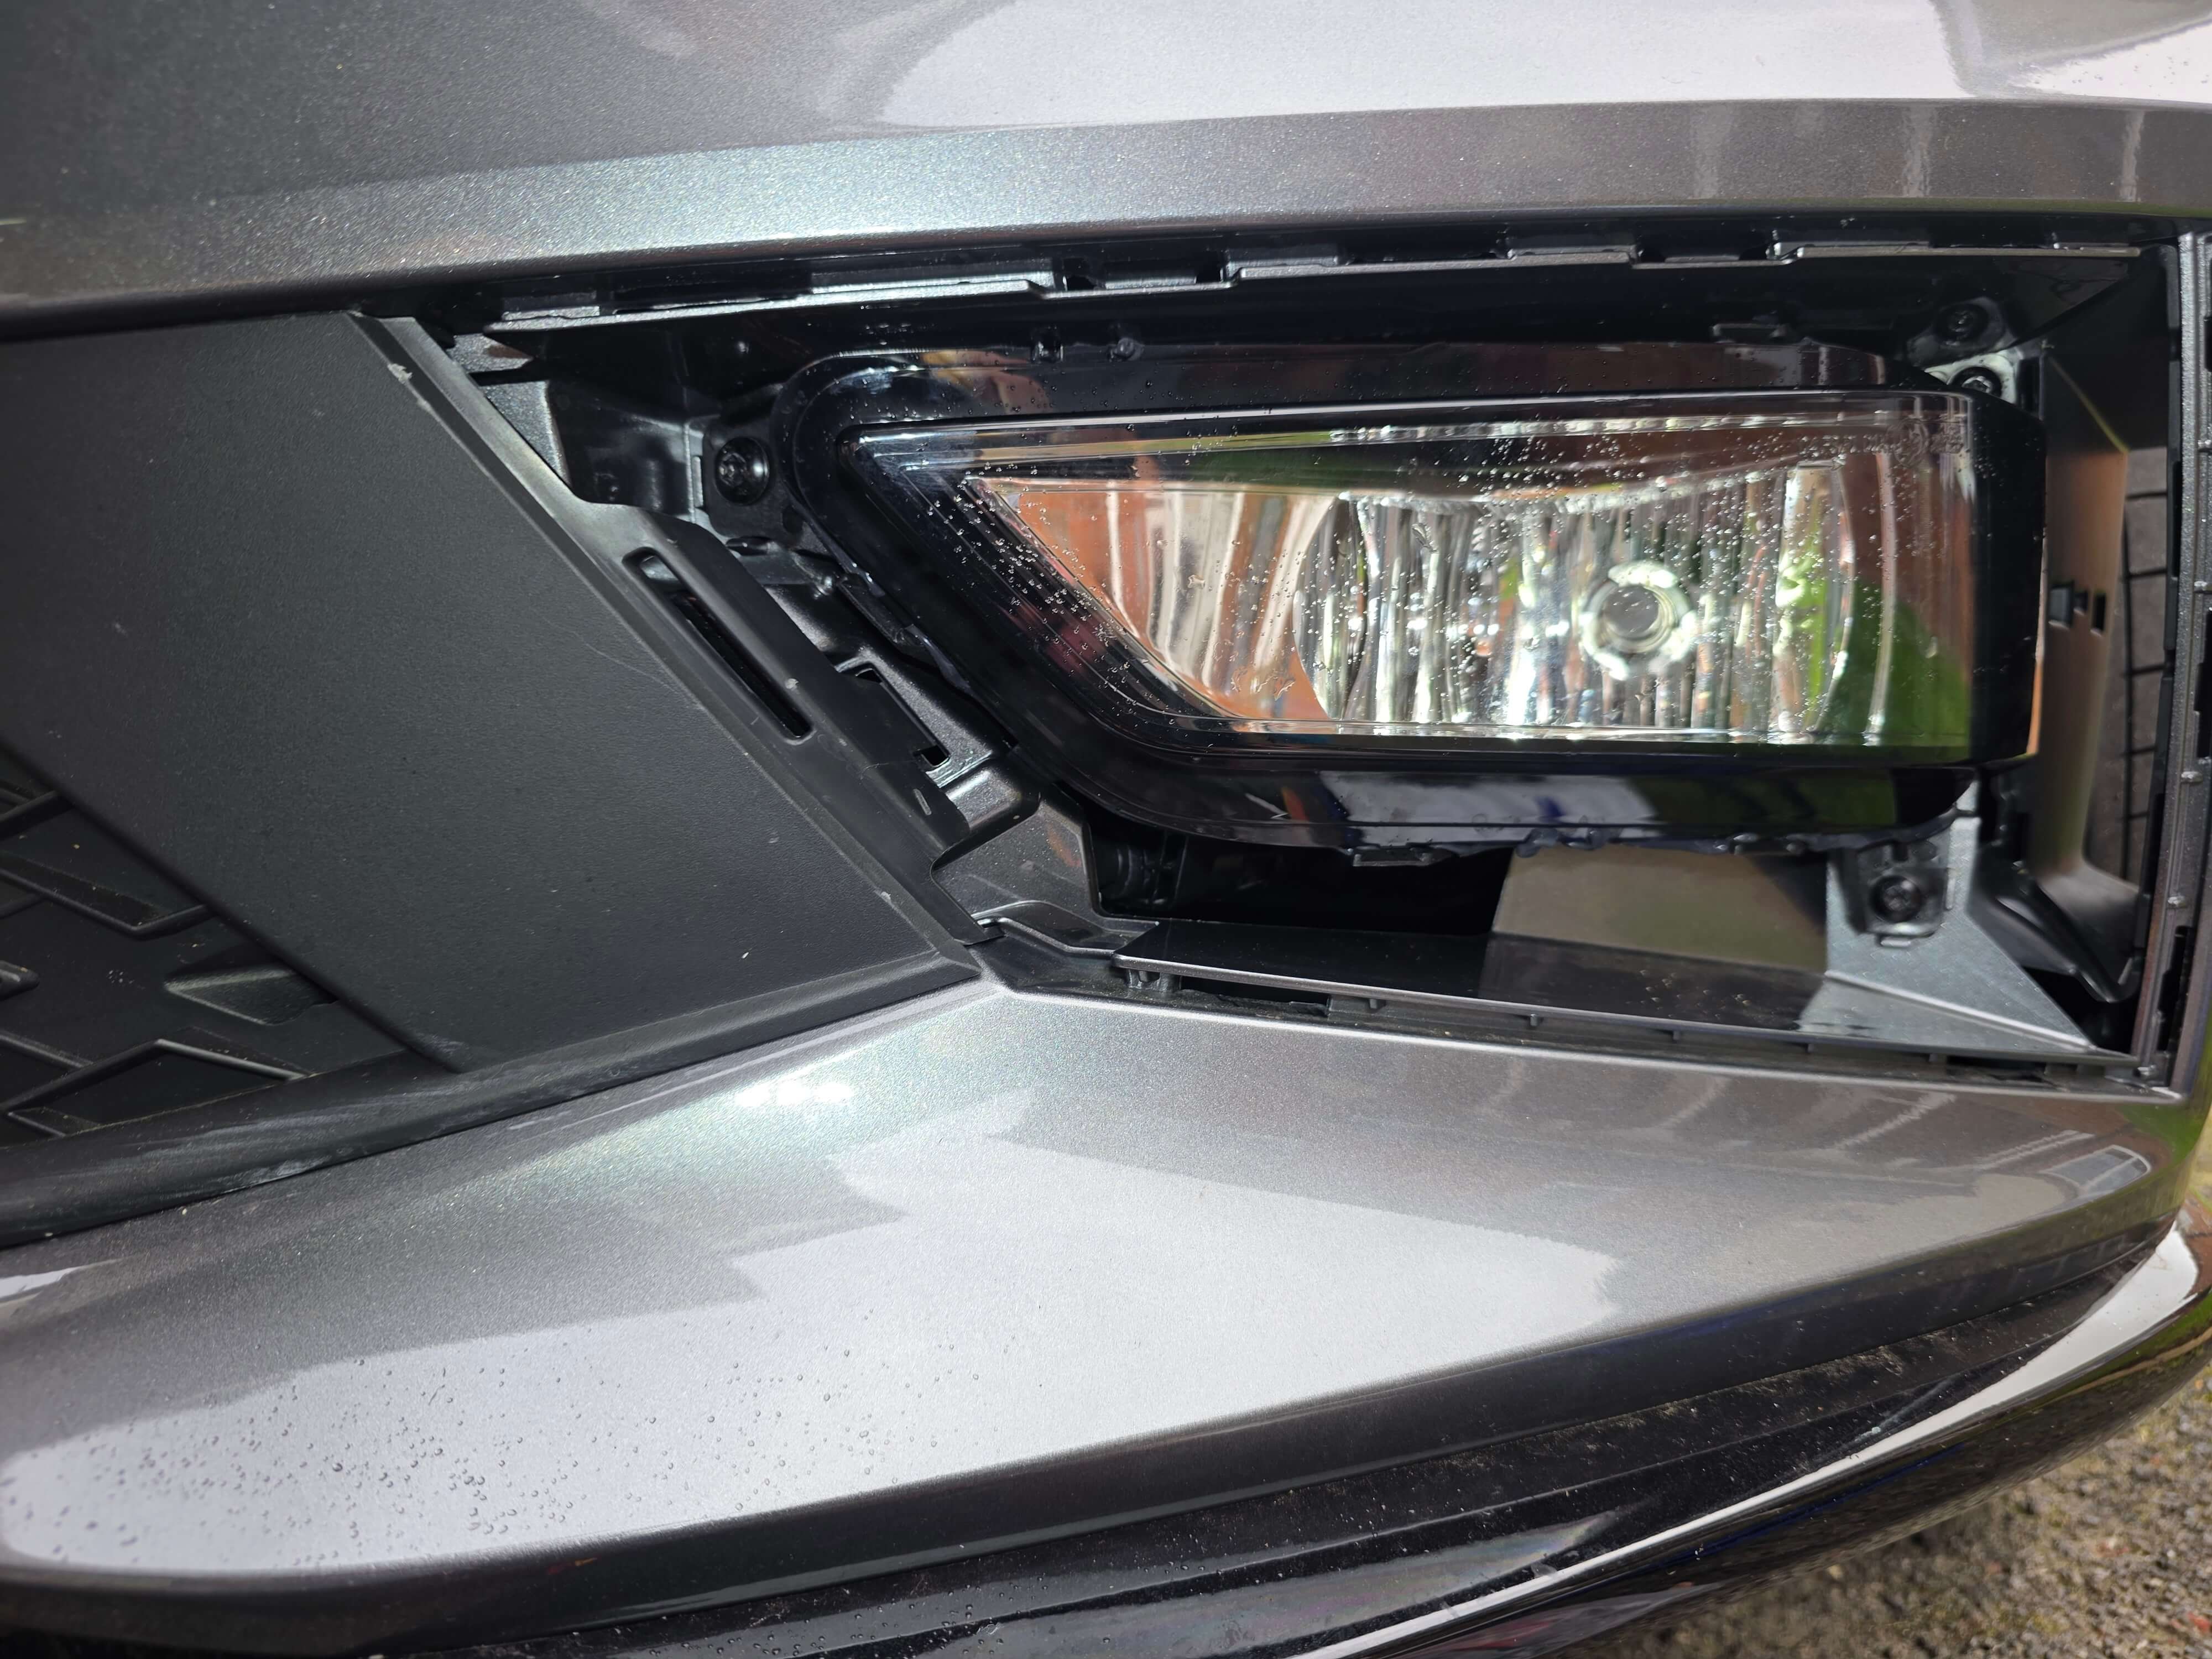
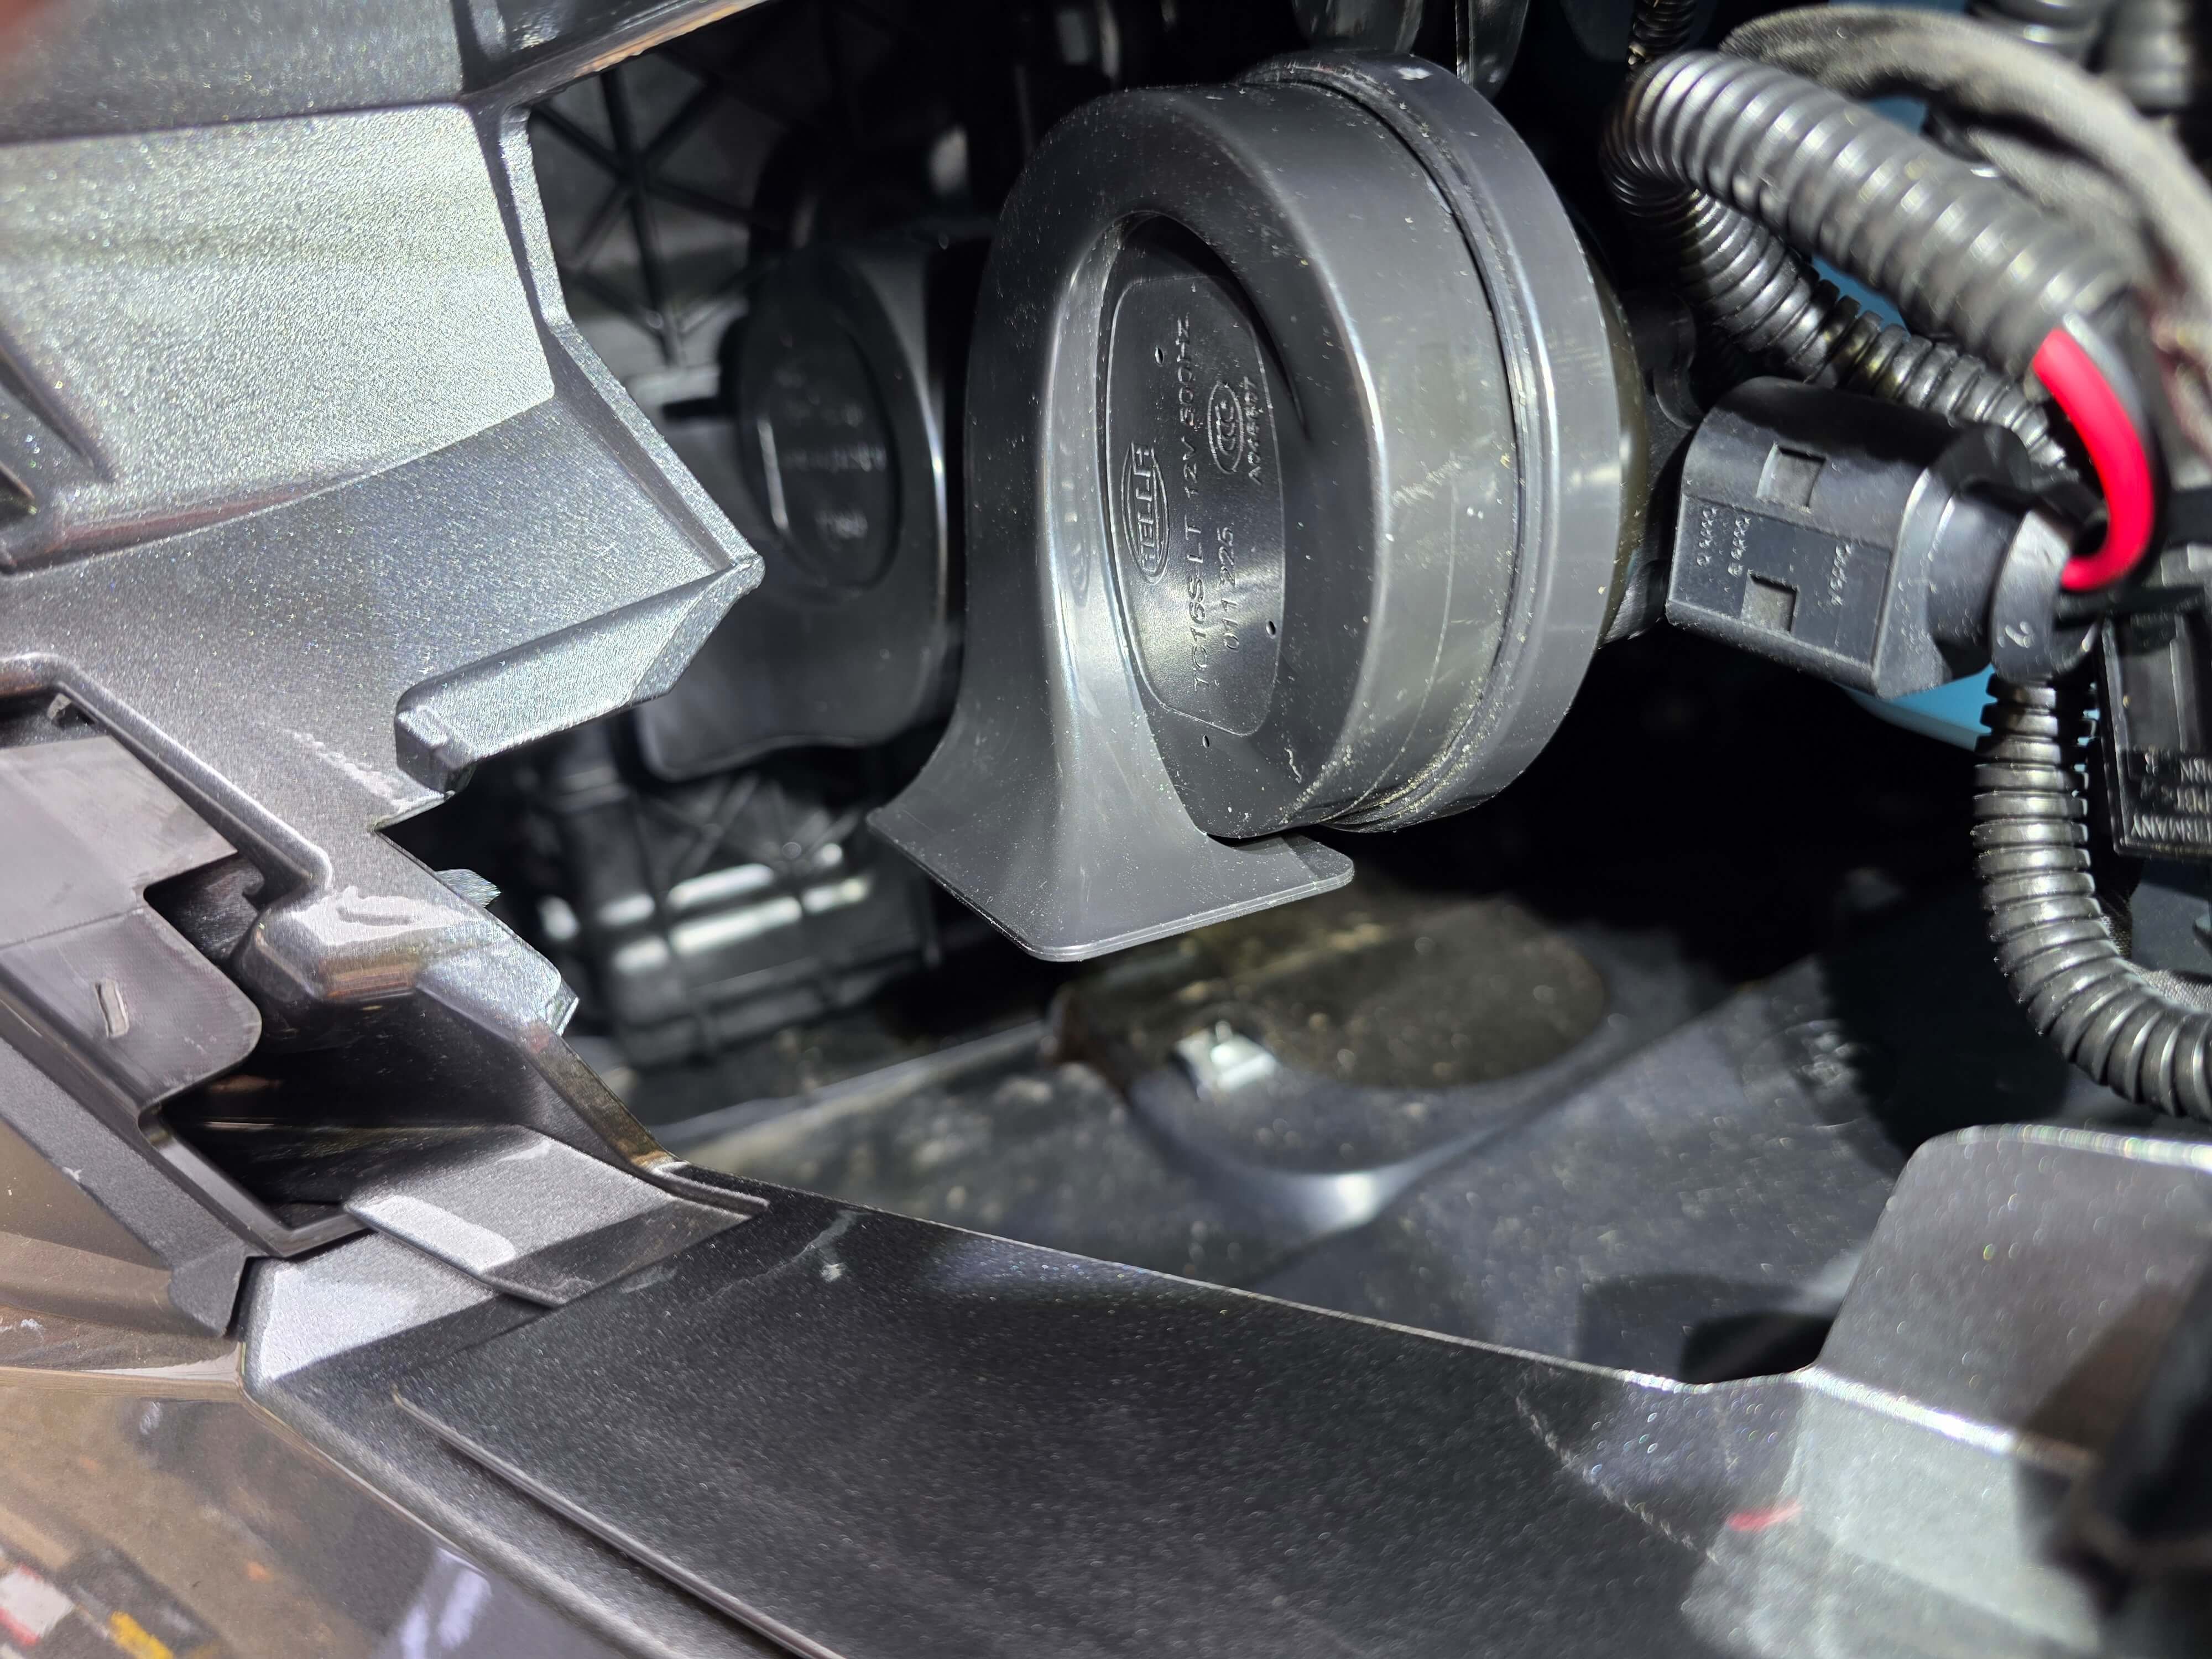
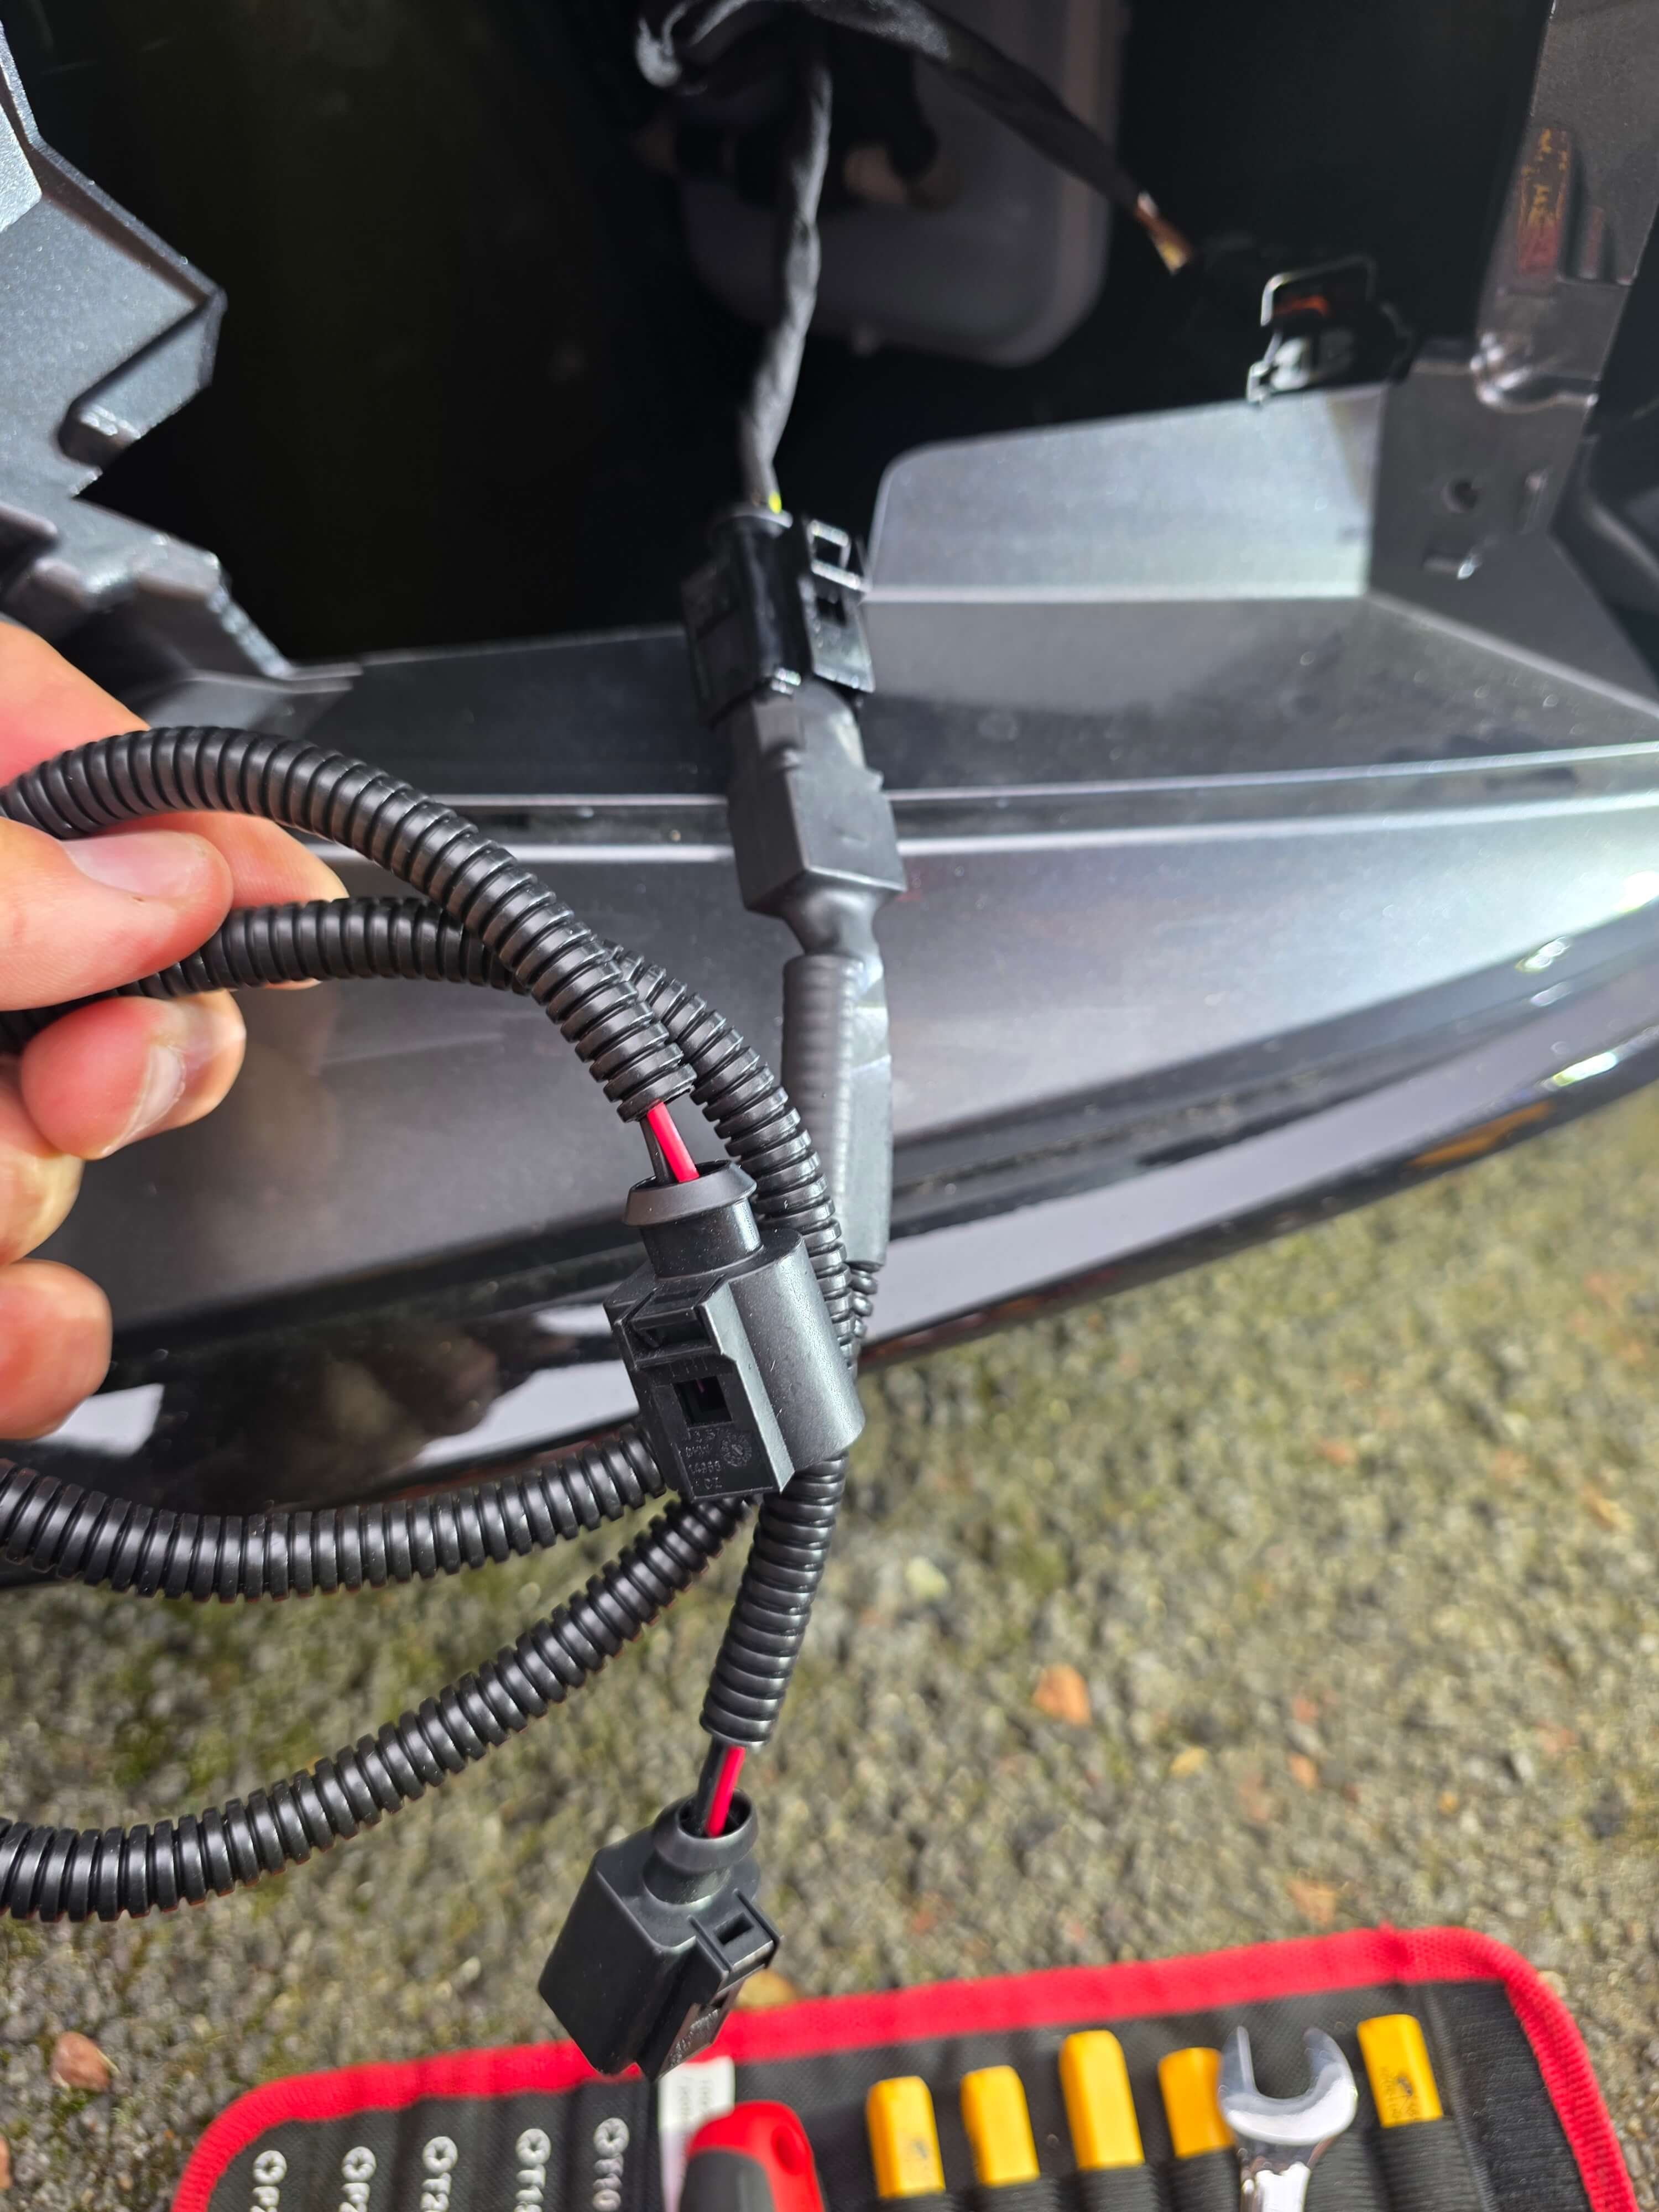
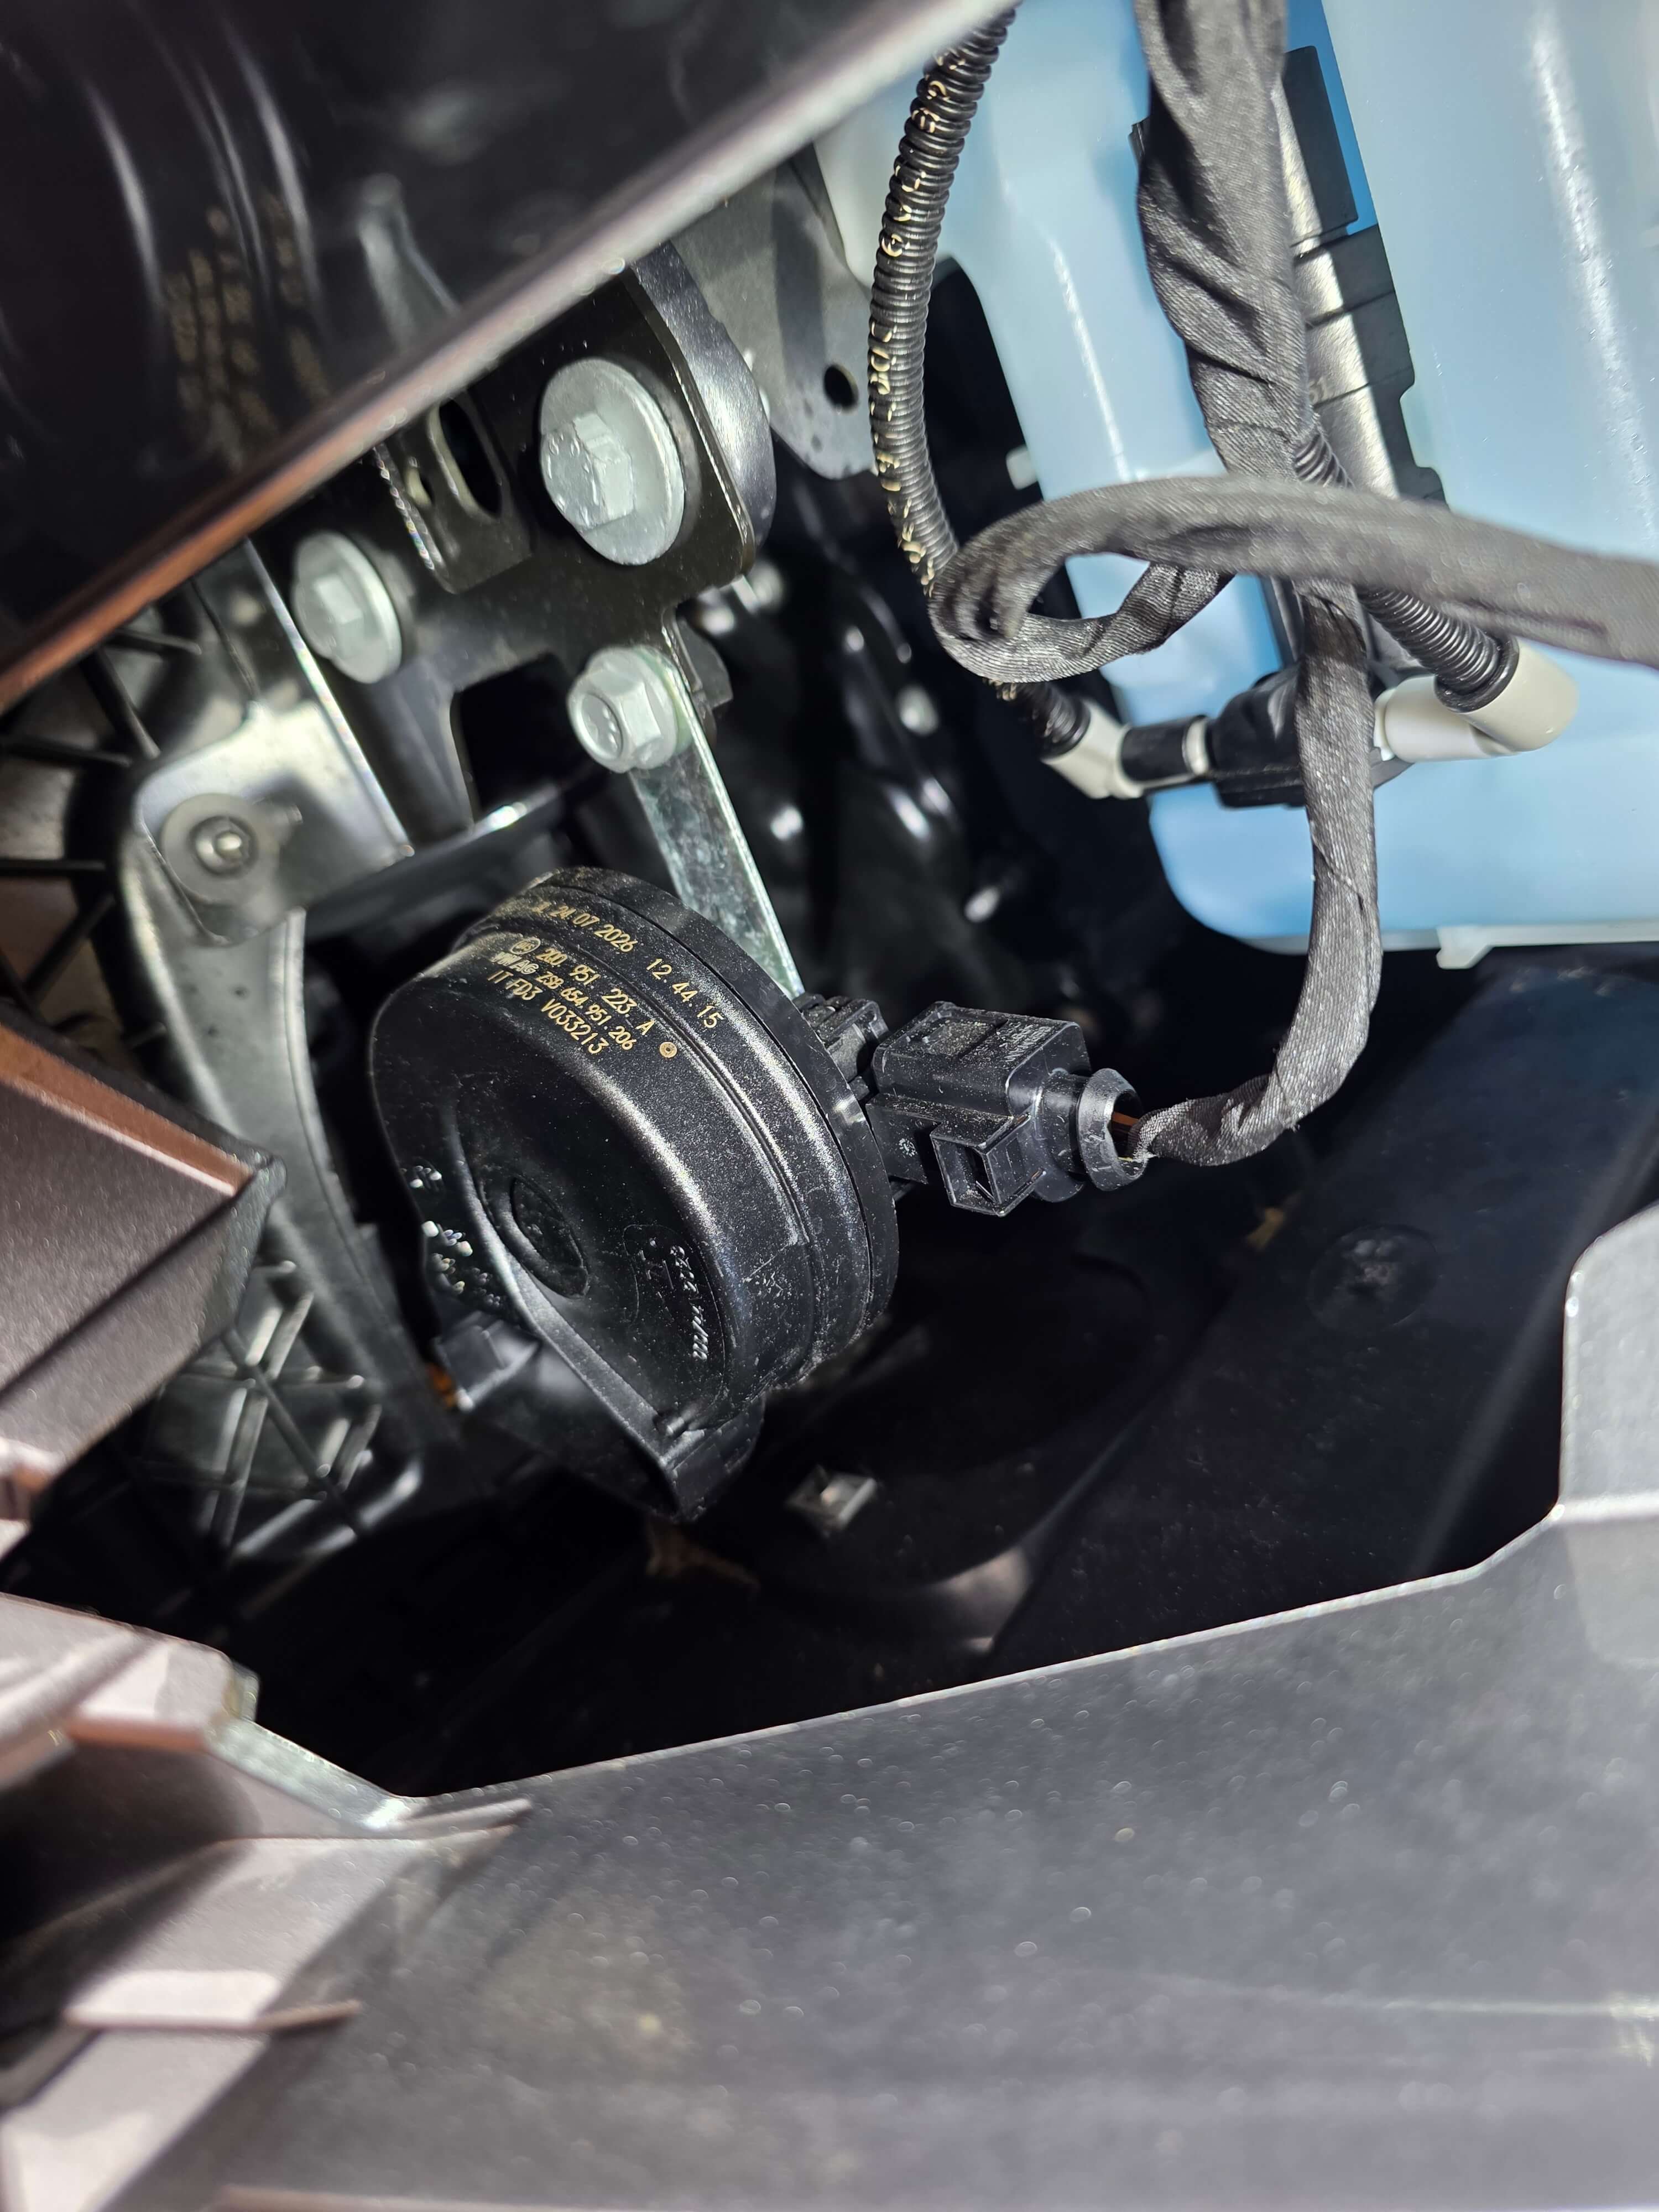
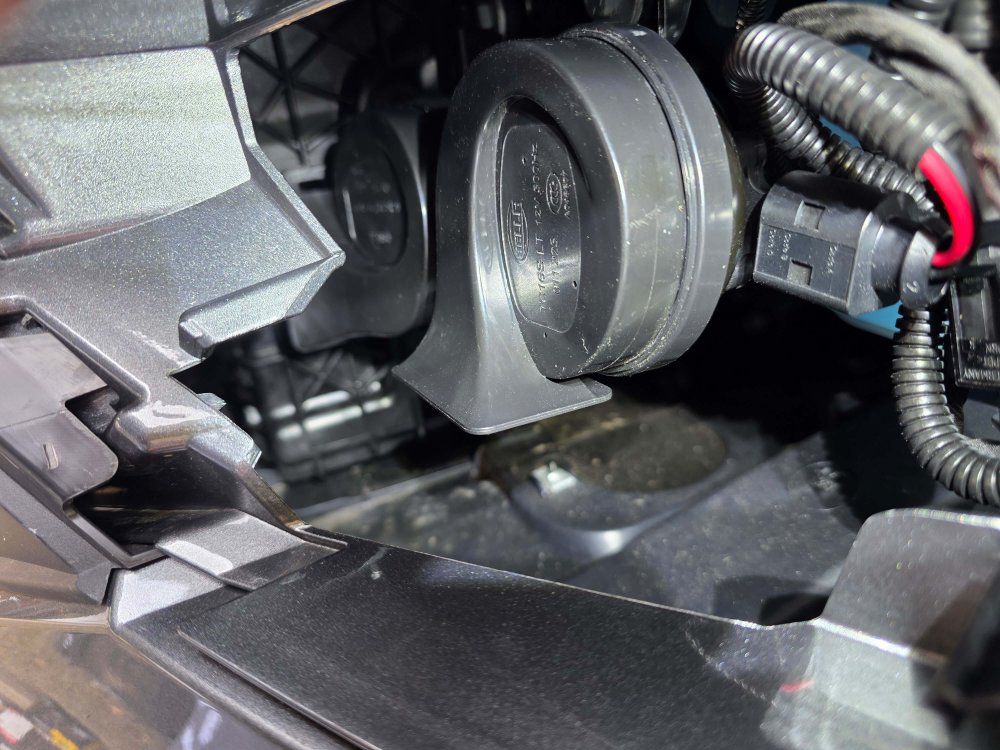
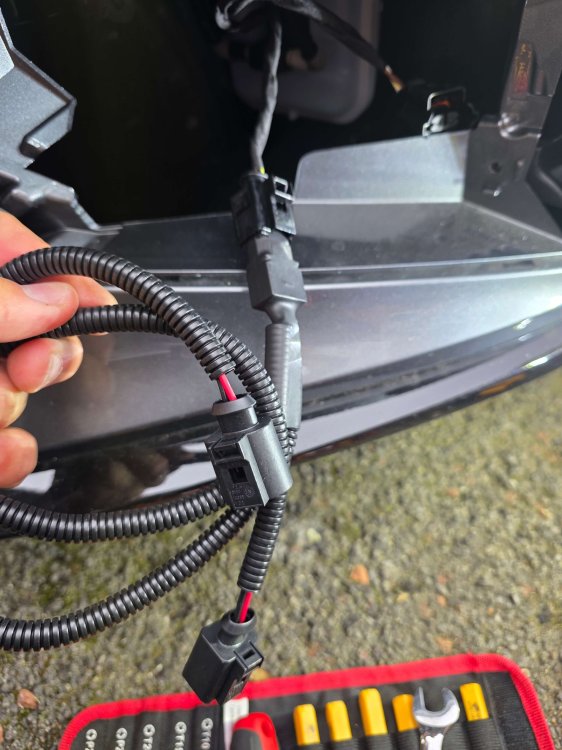
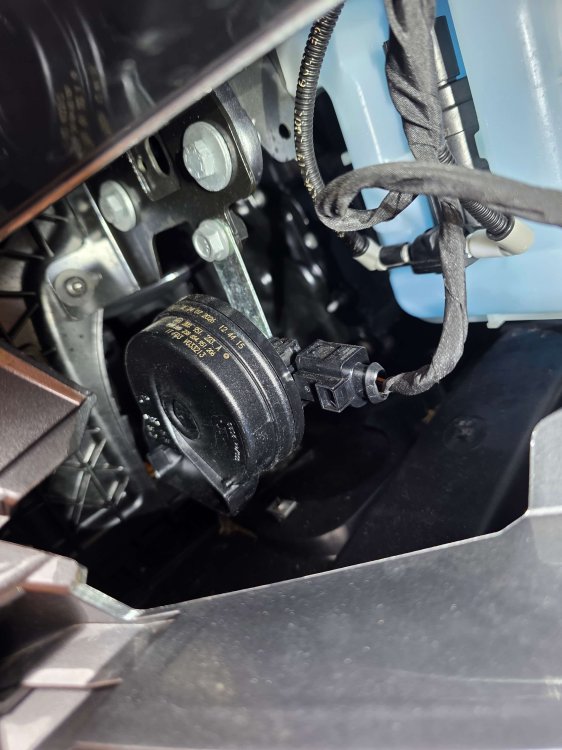
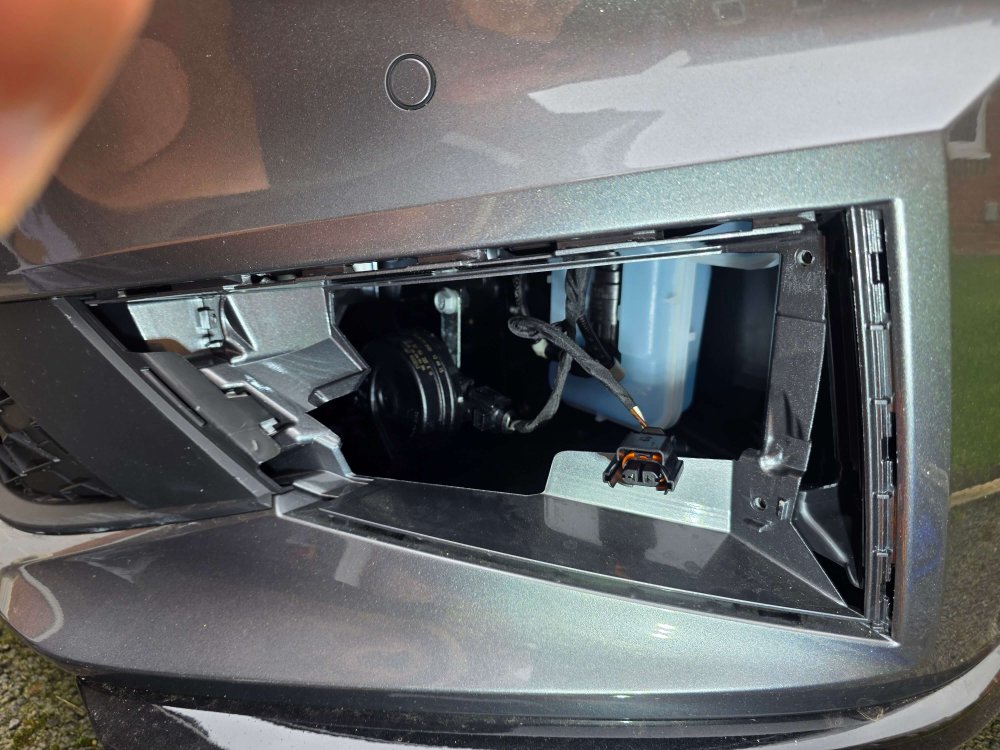
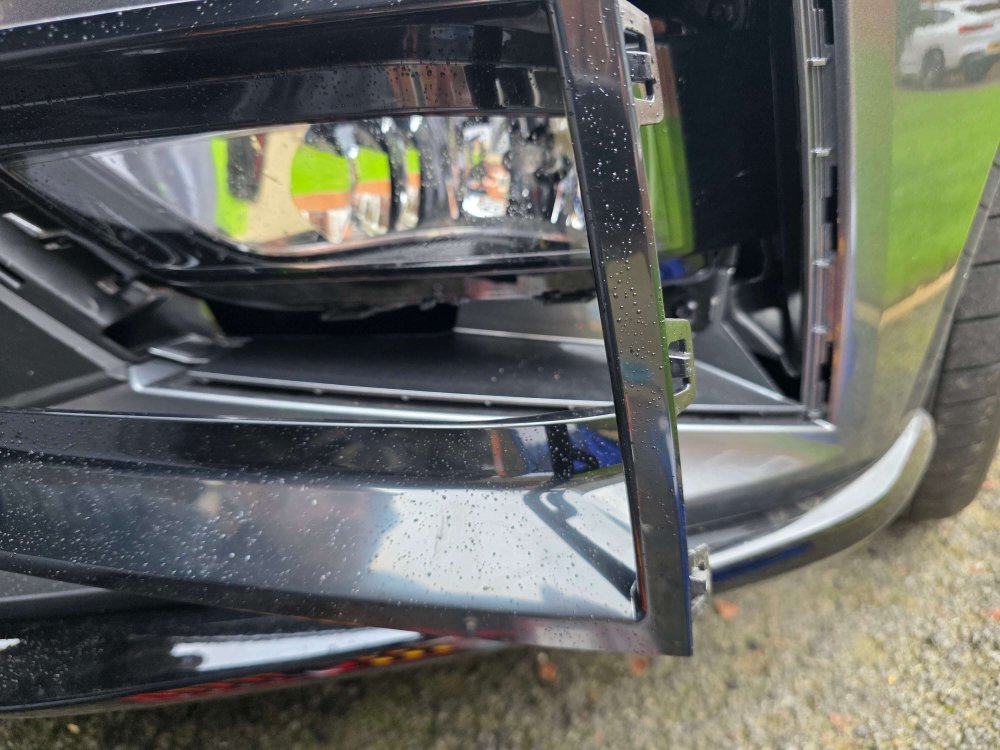
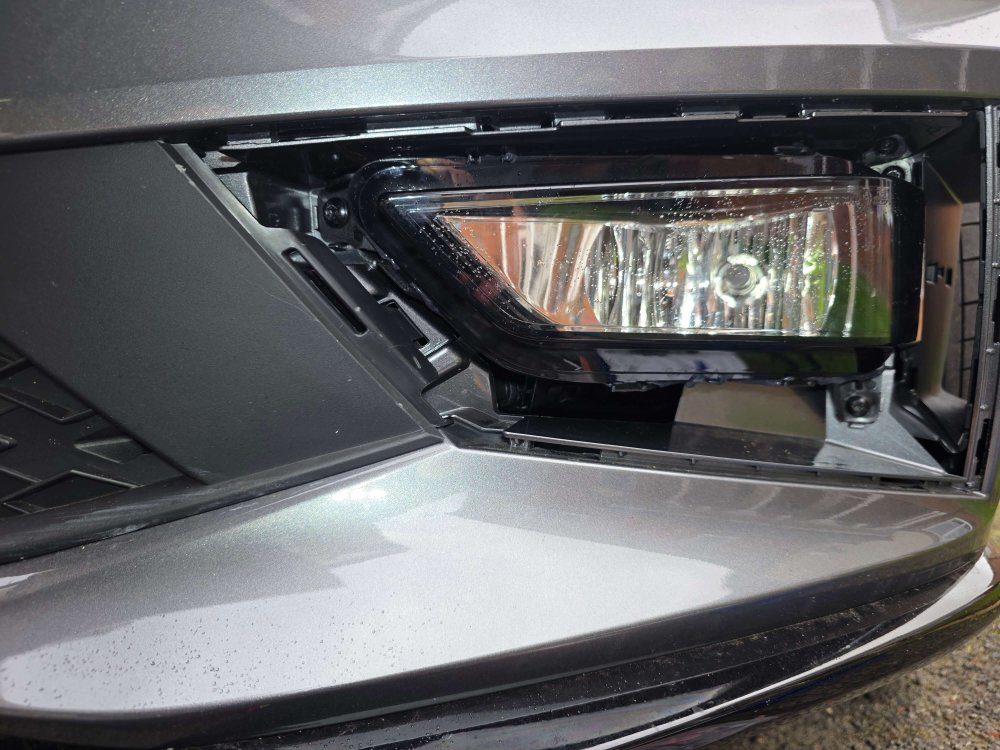
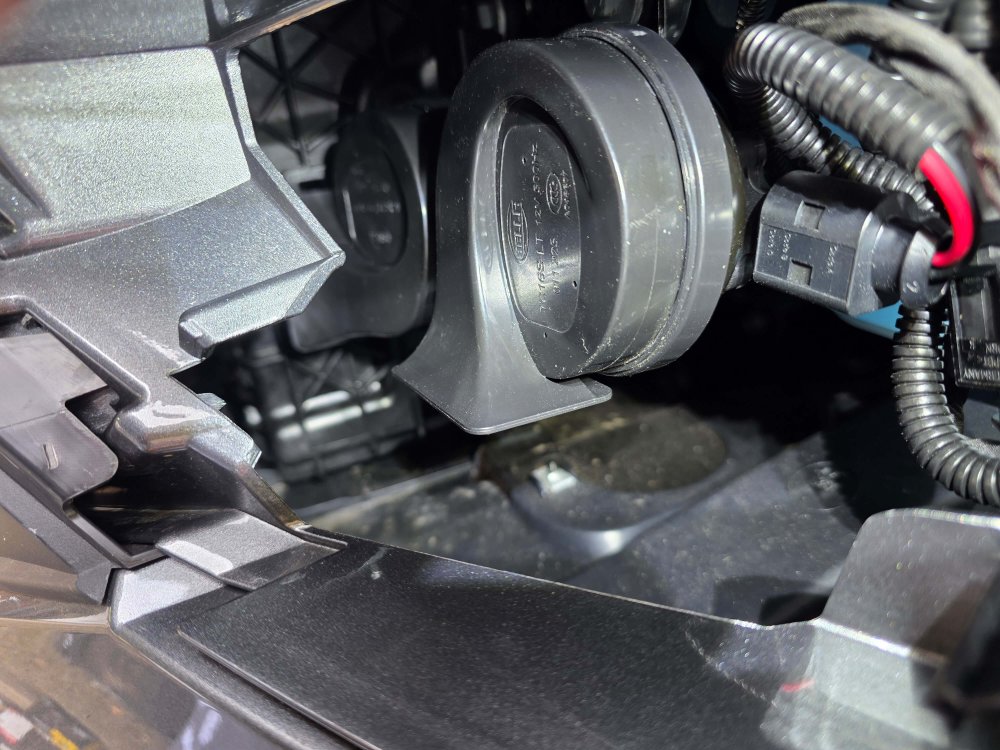
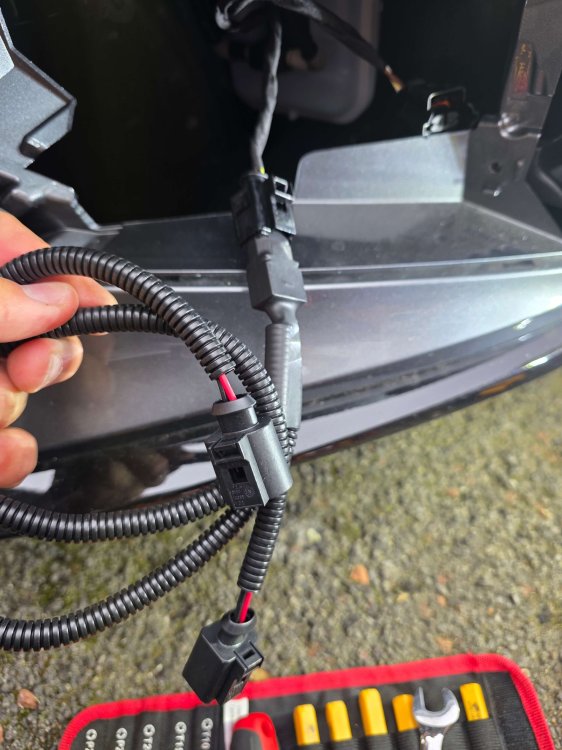
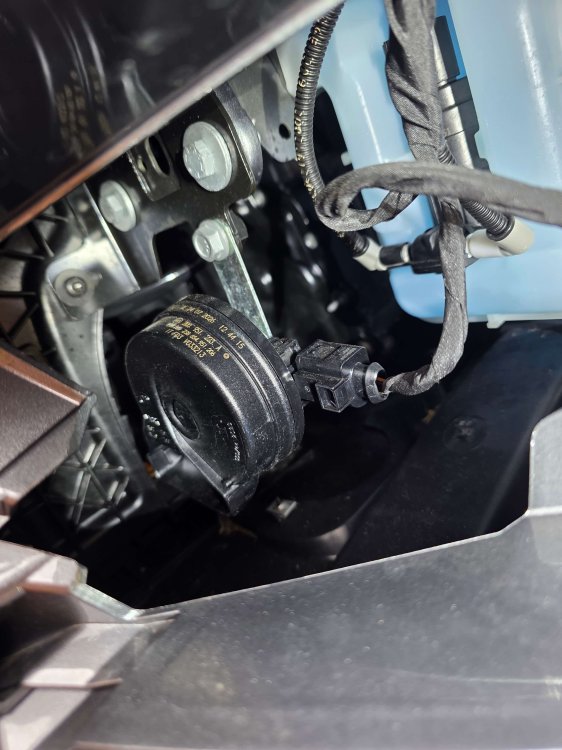
Took delivery of the car a few weeks ago and couldn't believe how pathetic the horn was. Ended up ordering a twin Hella kit with splitter wire included and looked for some guidance on best way to replace the roadrunner sound installed. Mostly worked it out myself but thought I could help others. Firstly, it's located behind the bumper on the nearside (UK model) and the easiest way is to remove the fog light. Use a trim removal tool and gently prise the trim around the light out from the bumper, starting nearest to the centre of the car. Prise the rest of it out working towards the wheel, be careful with the last part as the clips on this bit pull towards the front of the car. Then remove the 3 torx bolts (T25) from the fog light and pull the light out, remove the wire connection and place it out of the way. The original horn is clearly visible in the gap. This can be removed with a 13mm socket and the wire disconnected. Clip the splitter wire into the original harness, plug in the new horns and test to make sure they work! Bolt the bracket to each new horn and mount with the original 13mm bolt through both of the new brackets. Make sure they are positioned out of the way so that your fog light has room to go back in and cable tie the new wires out of the way so they can't jiggle about. Replace the light by plugging it back in and tightening the 3 screws to hold it in place. Push the trim back into place and test that fog light and horns still work. Hope this helps, took me around half an hour.
-
-
Haven't noticed on mine either - have you got adjustable rideheight?
-
-
Prillerthriller joined the community
-
-
Renee joined the community
-
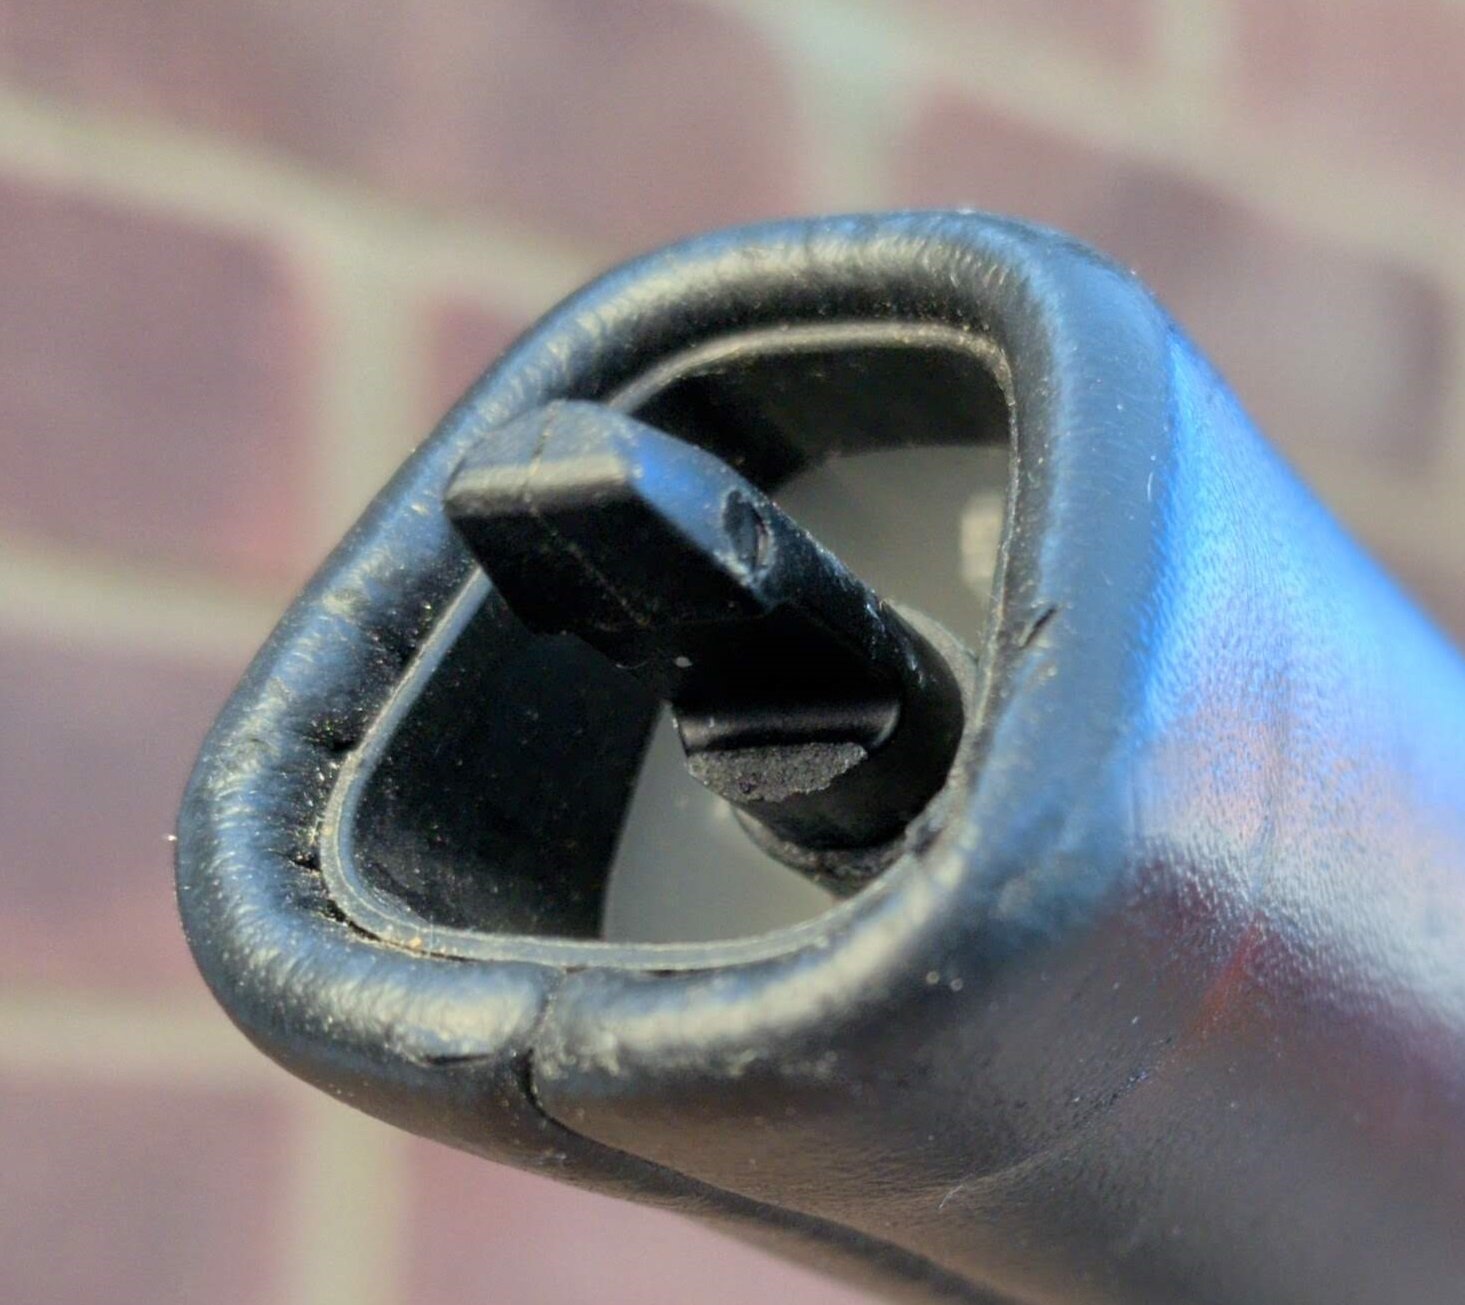
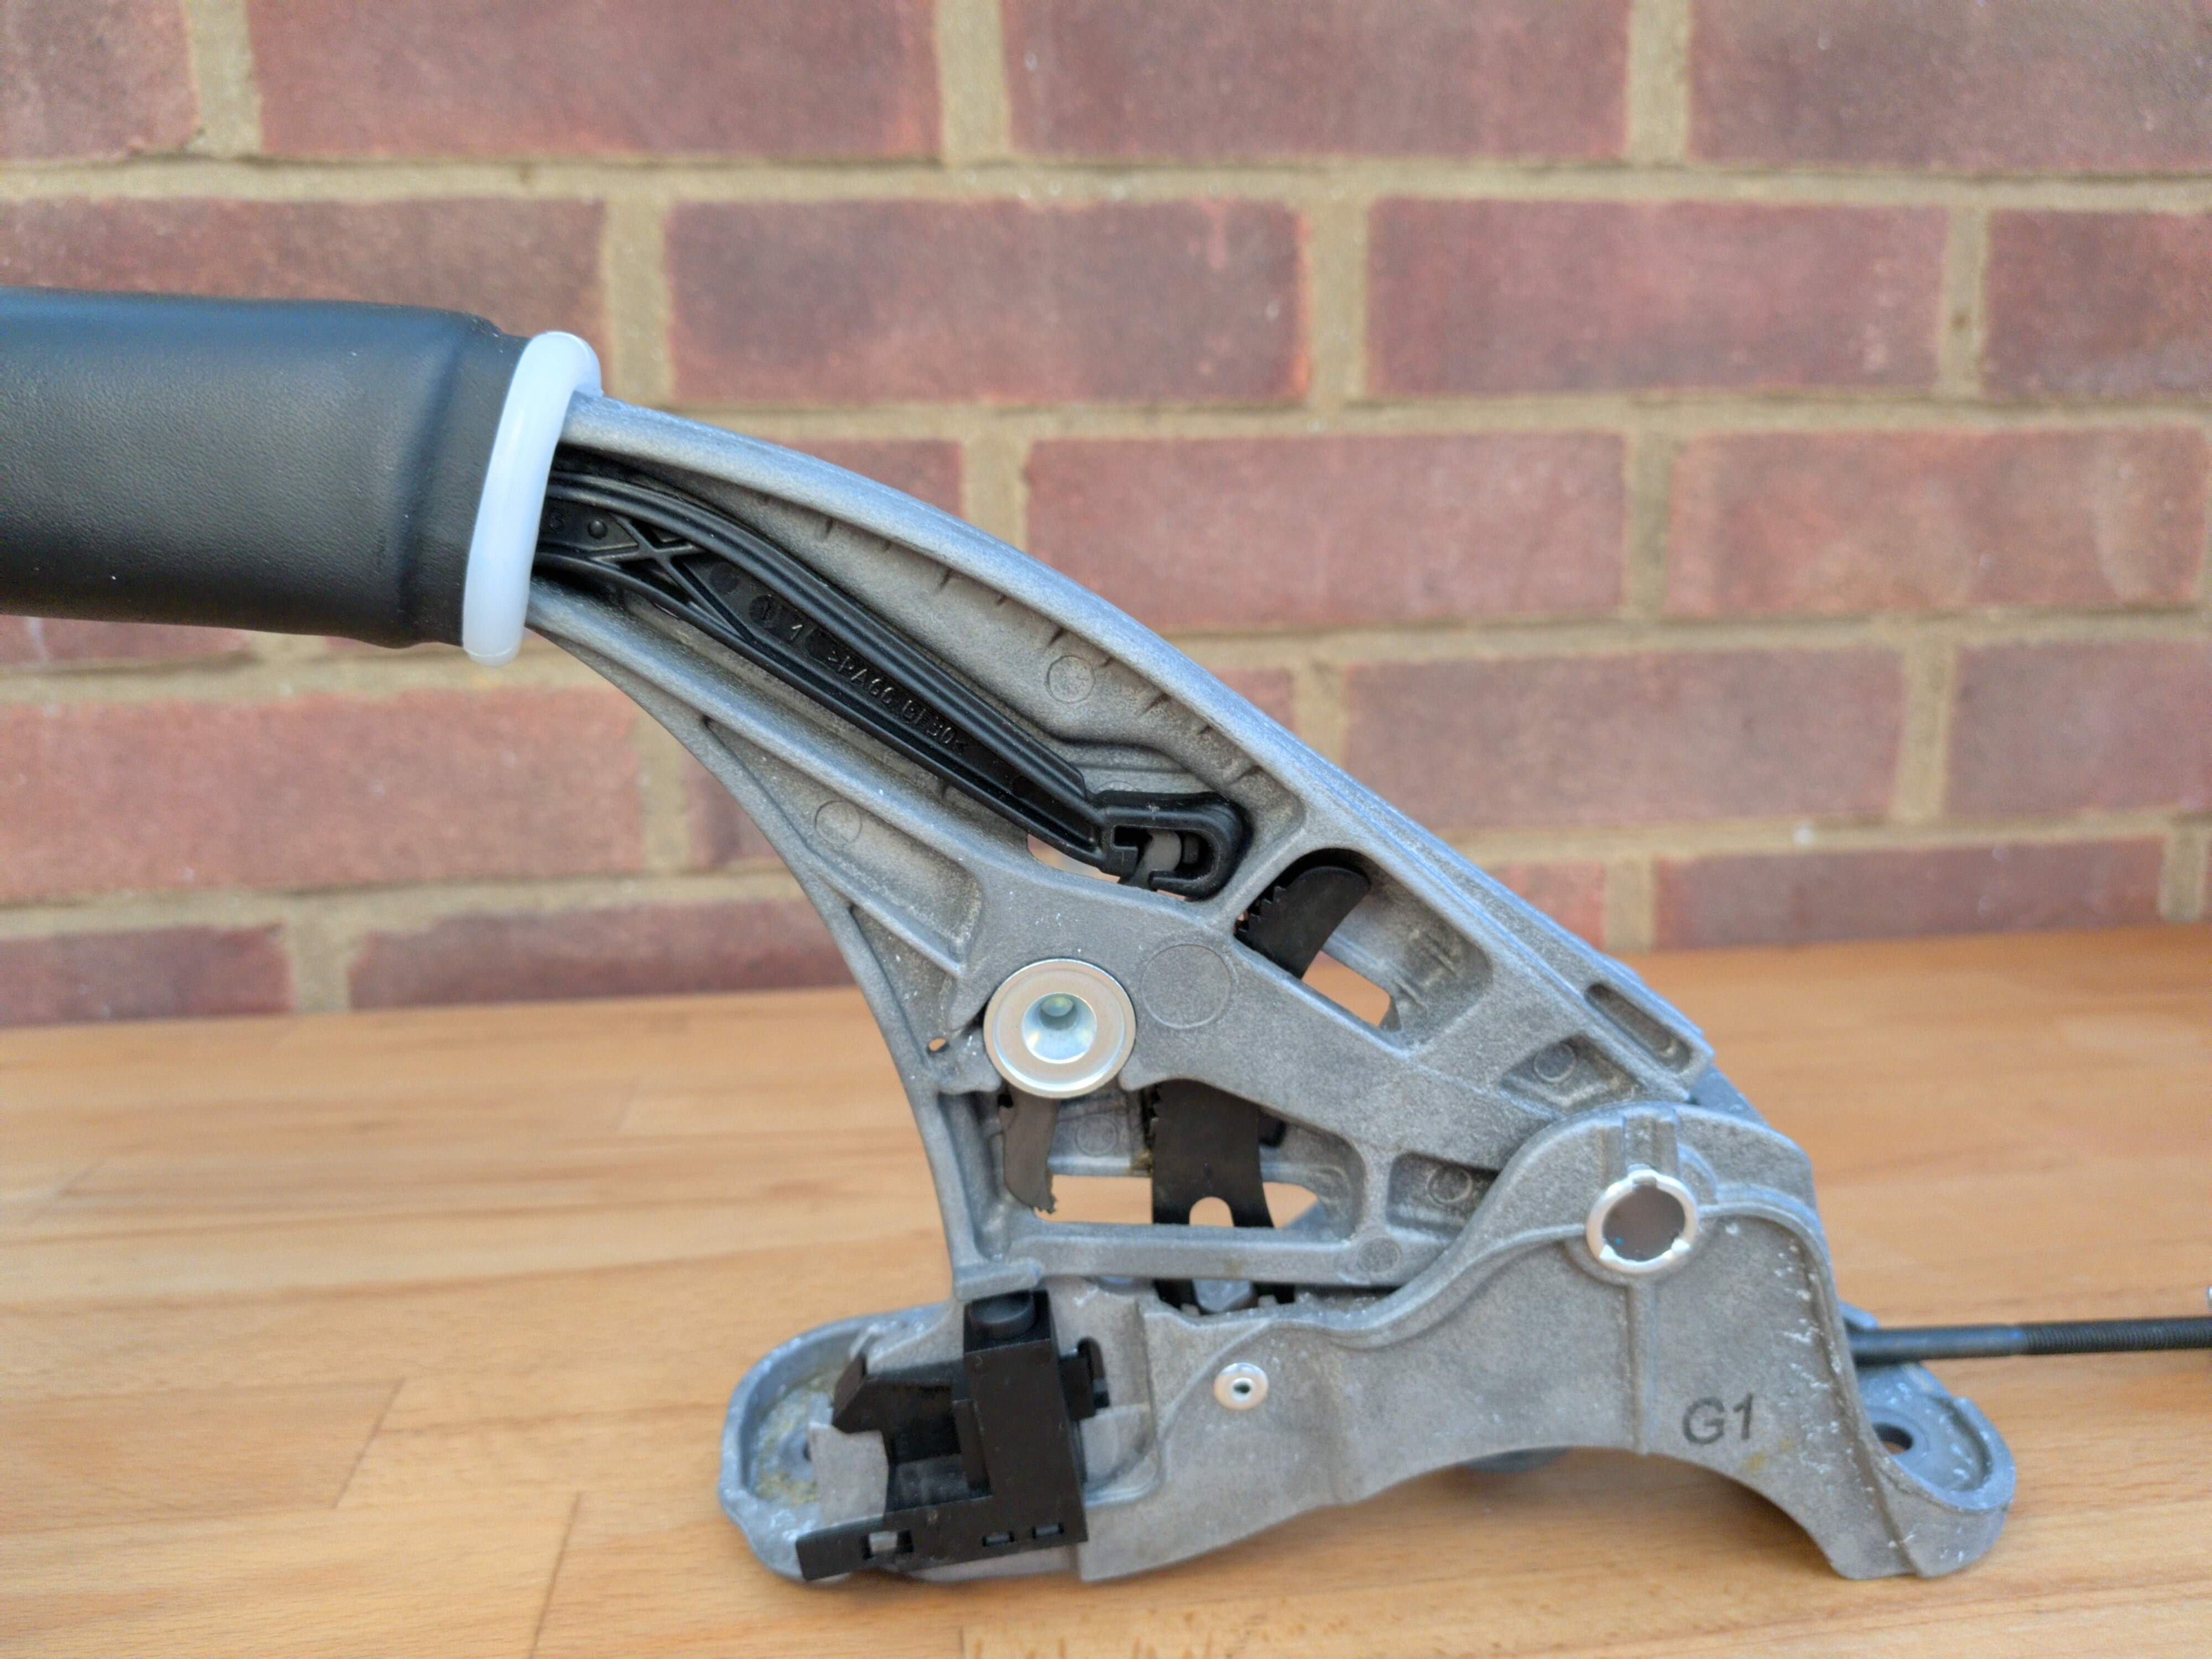
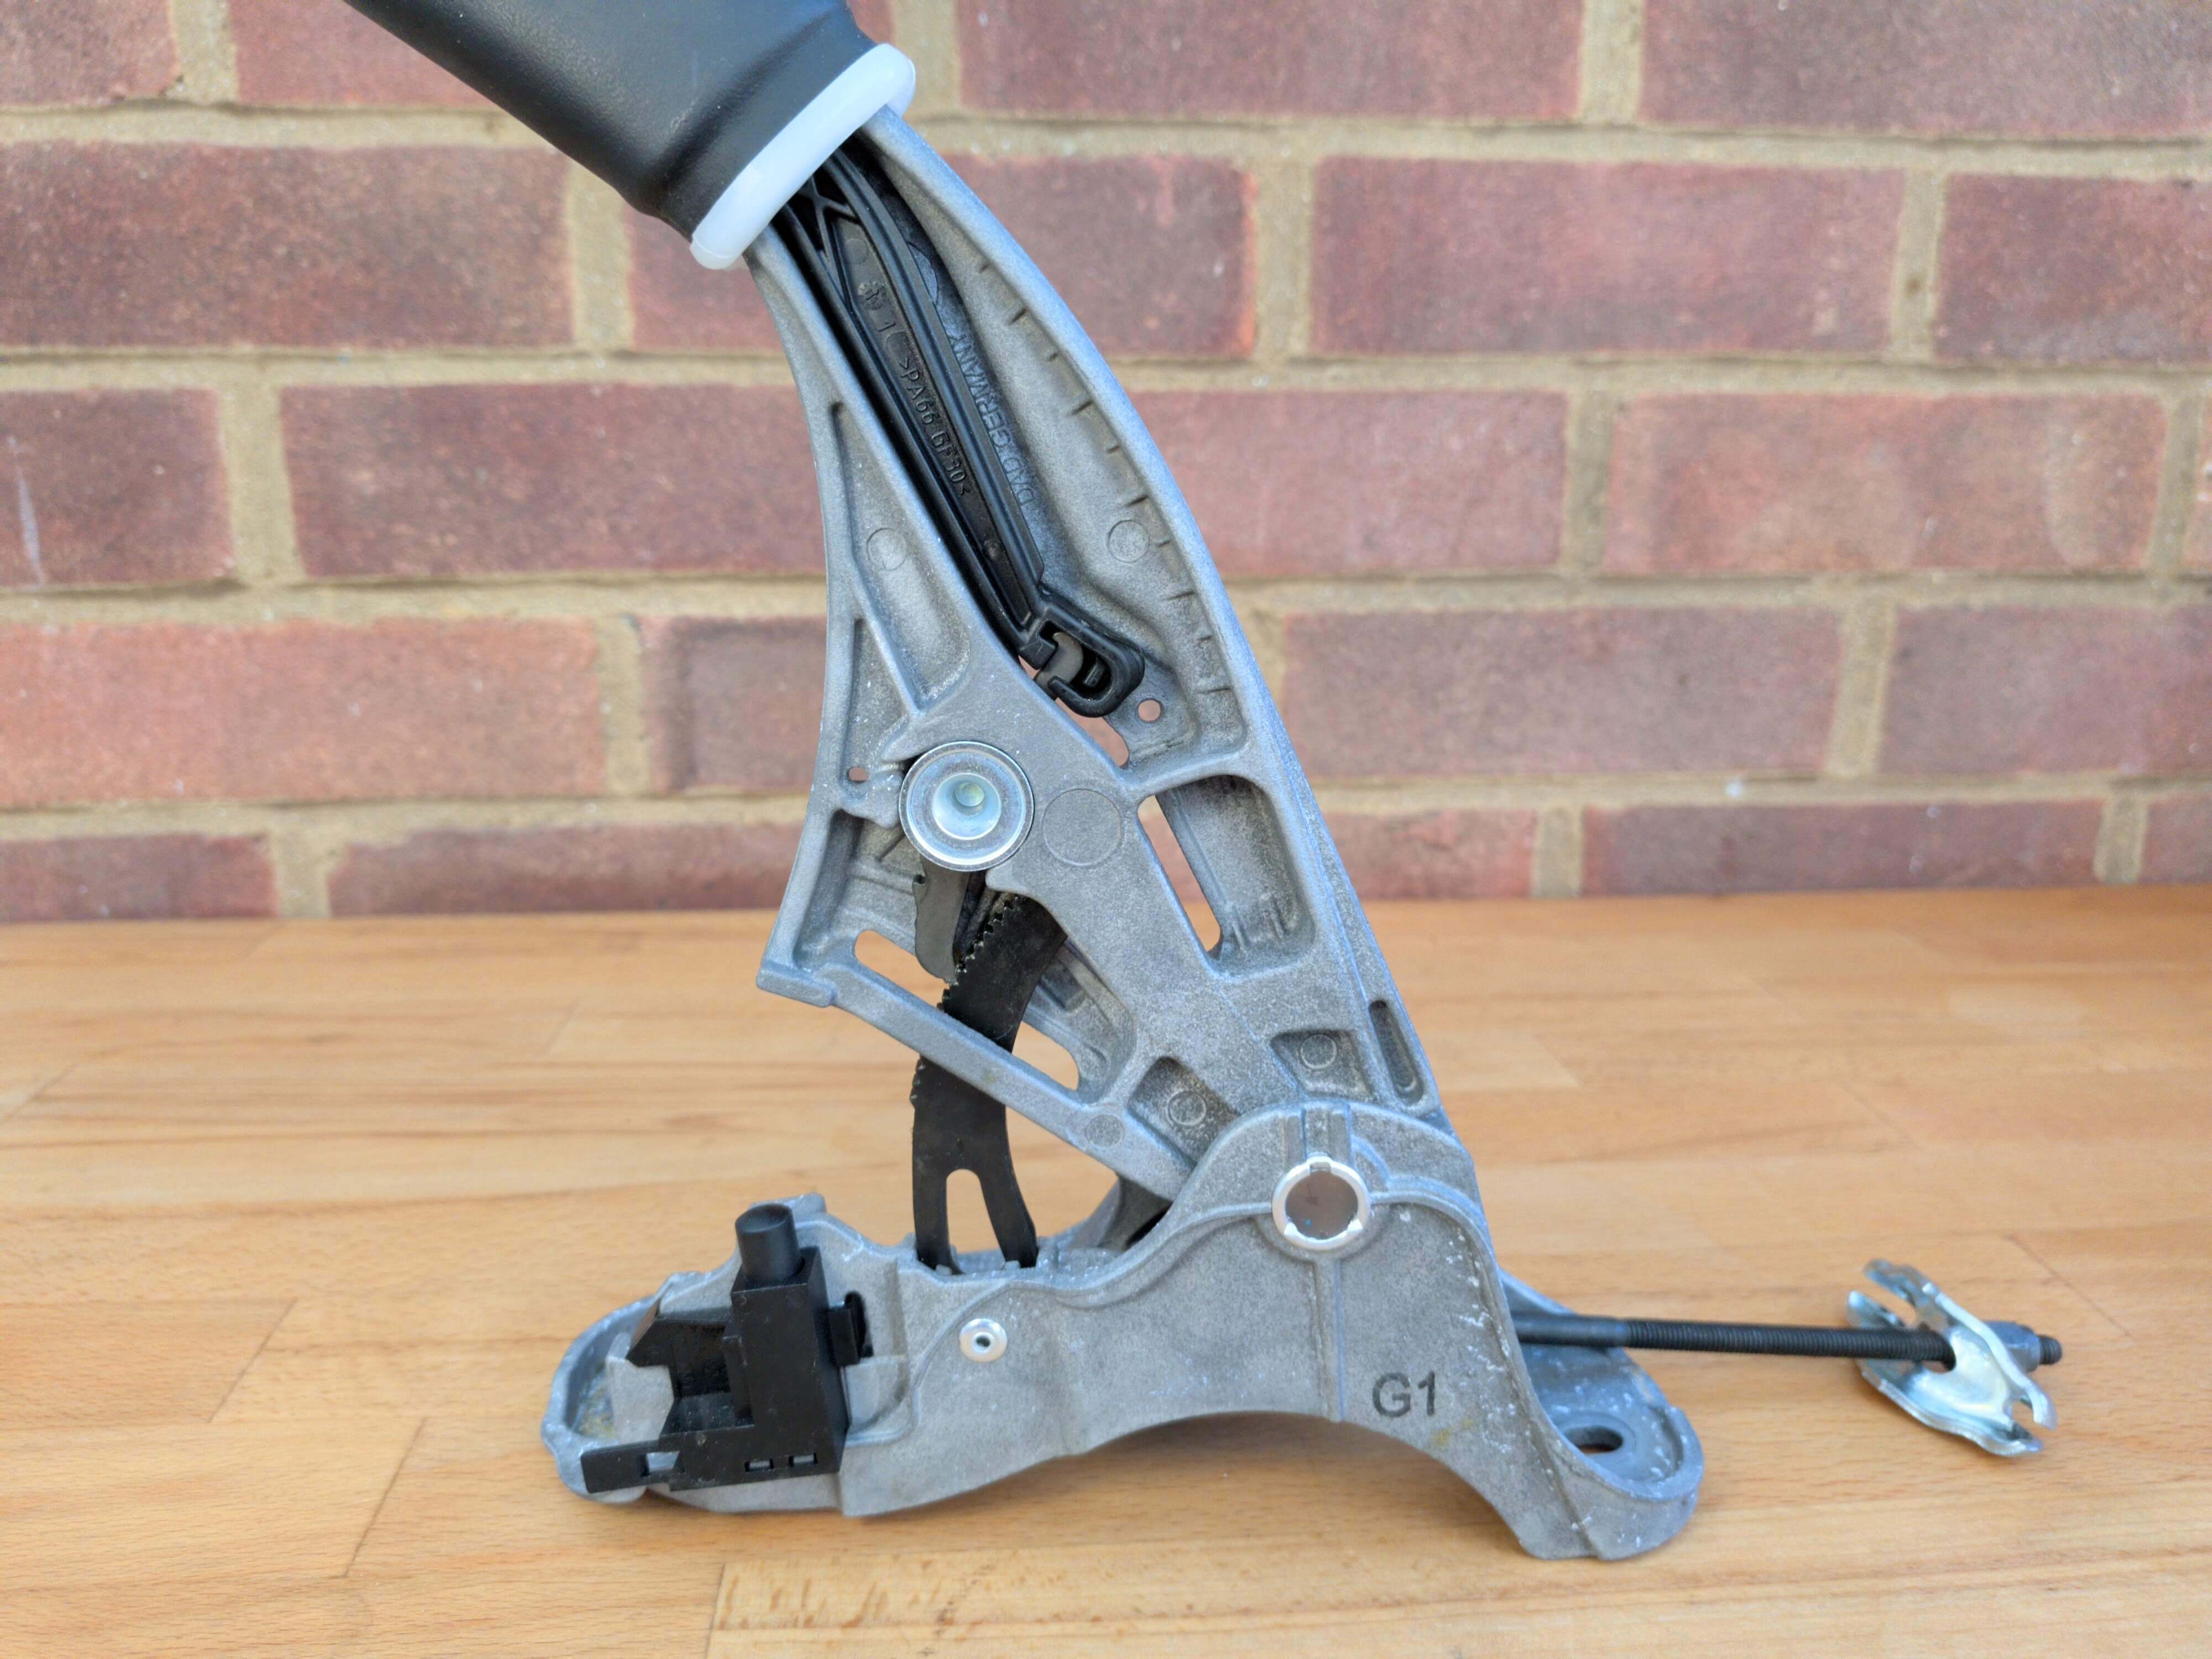
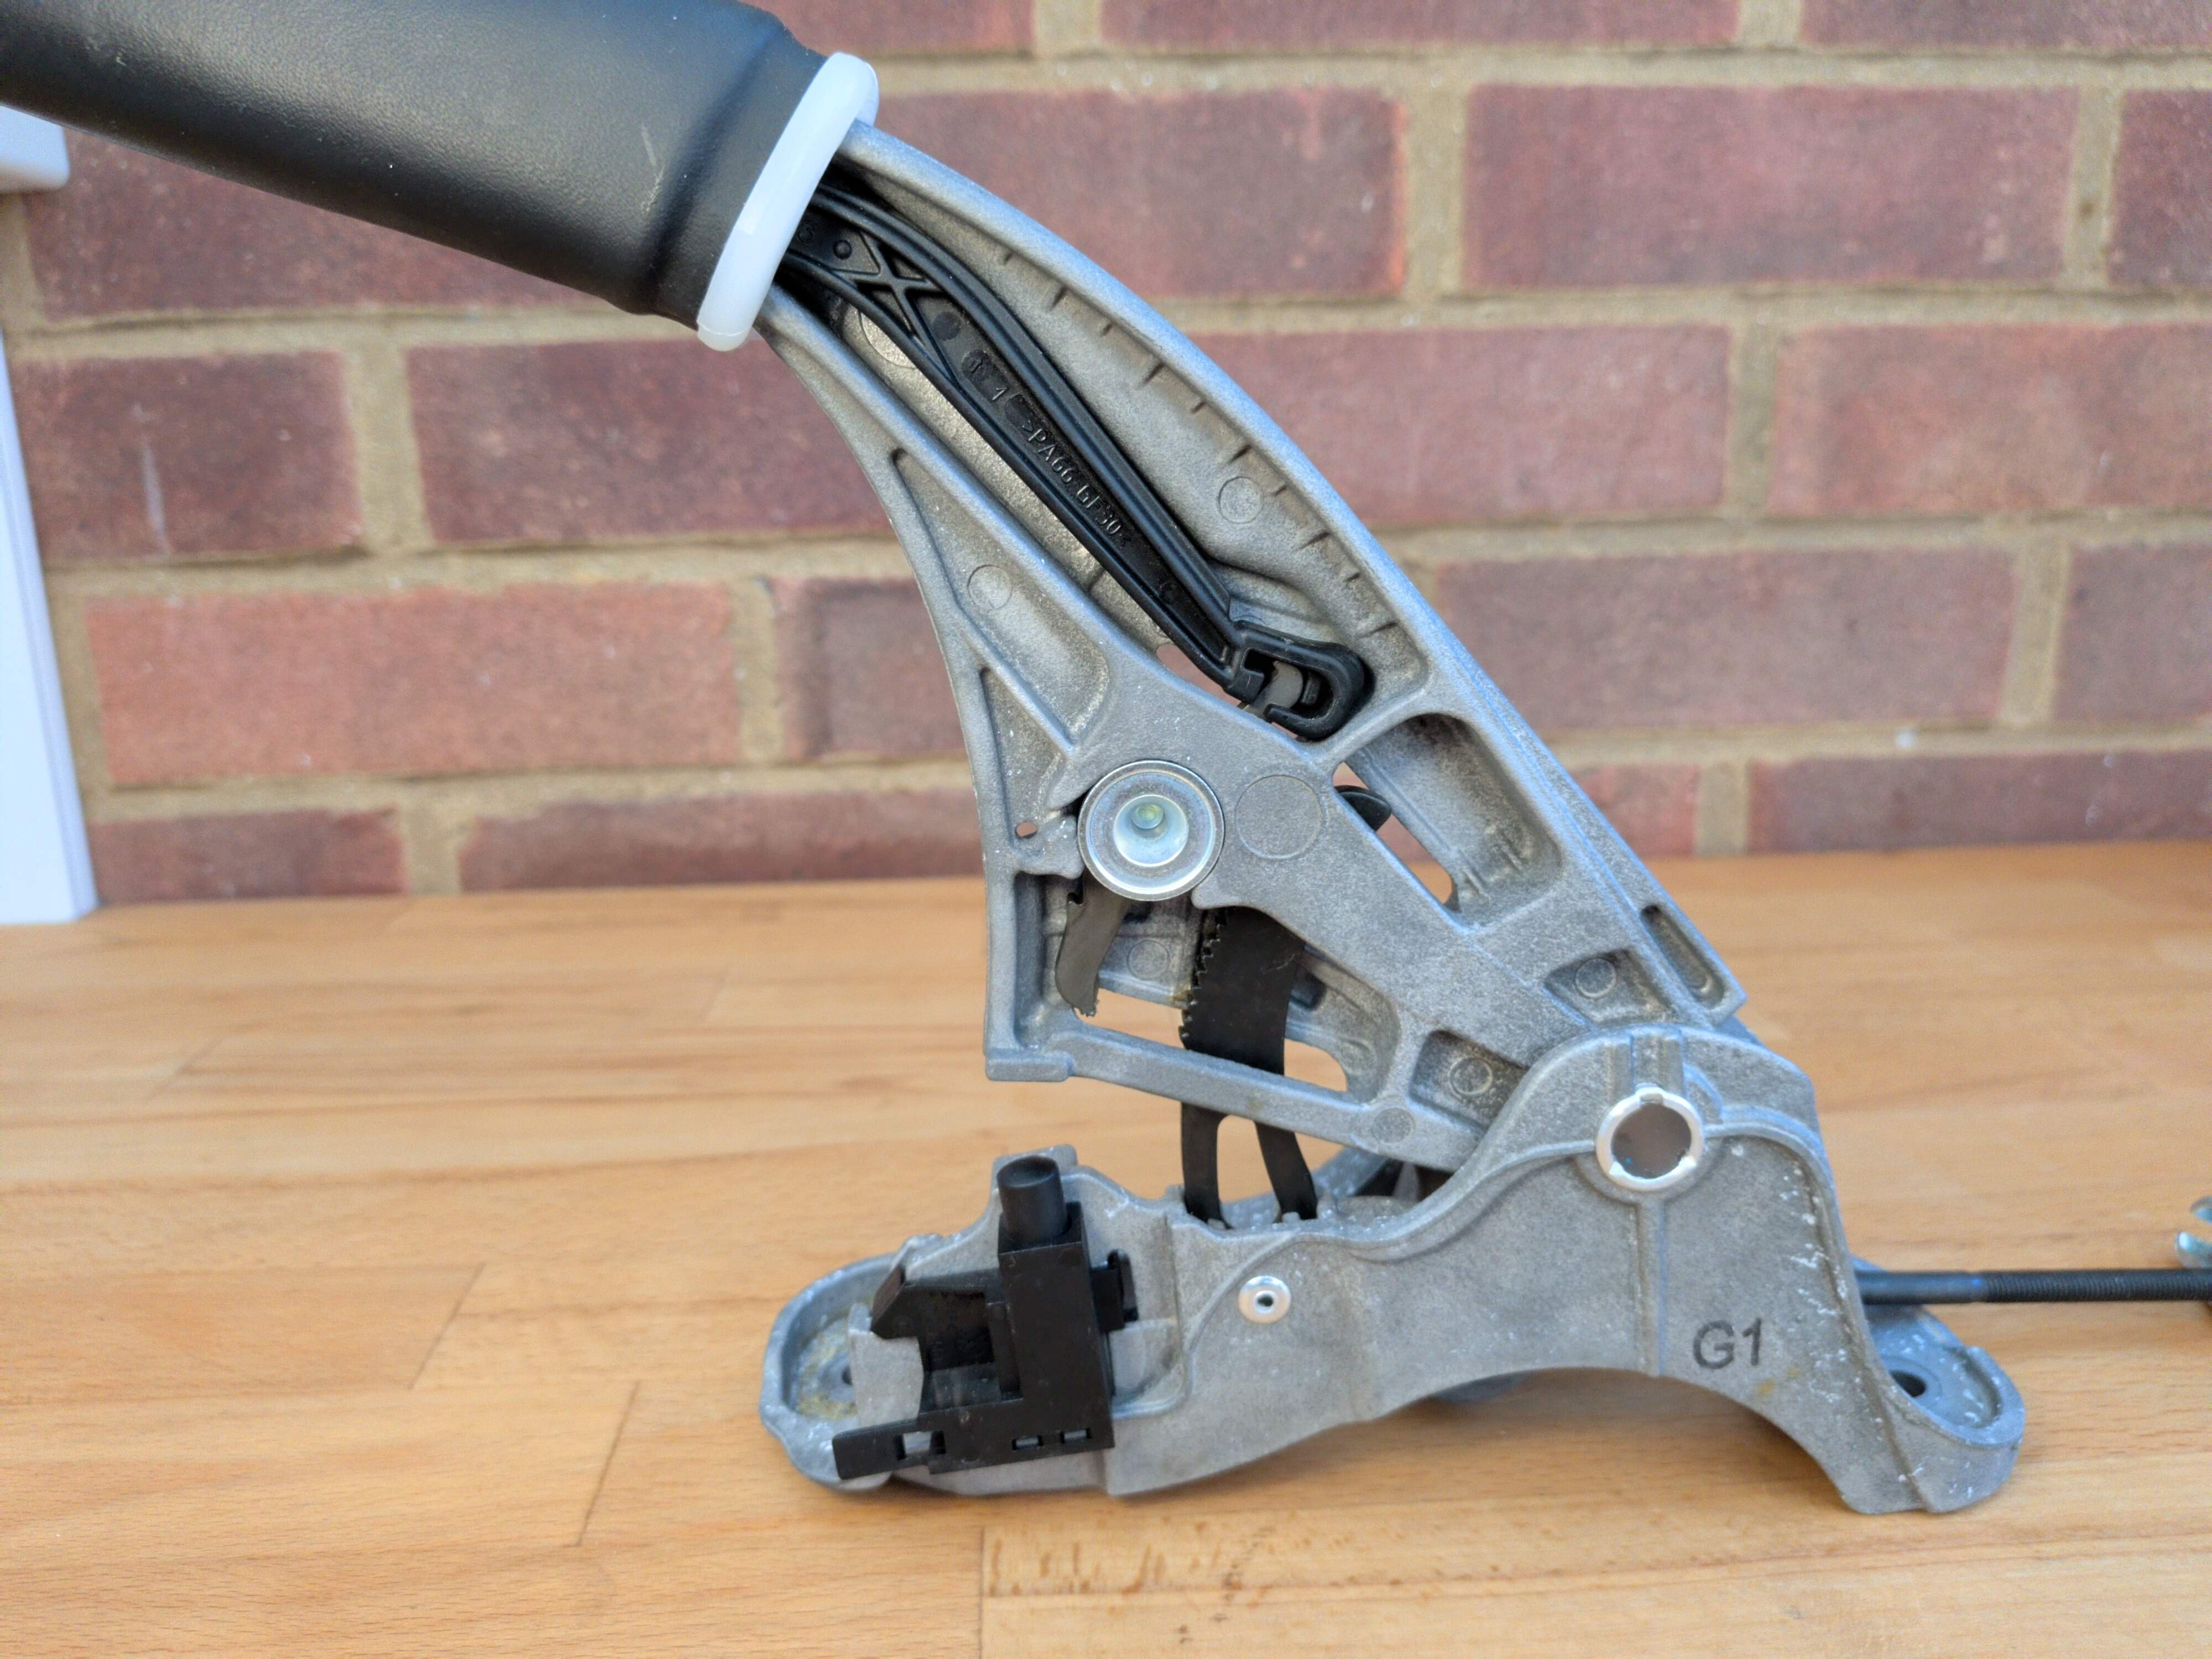
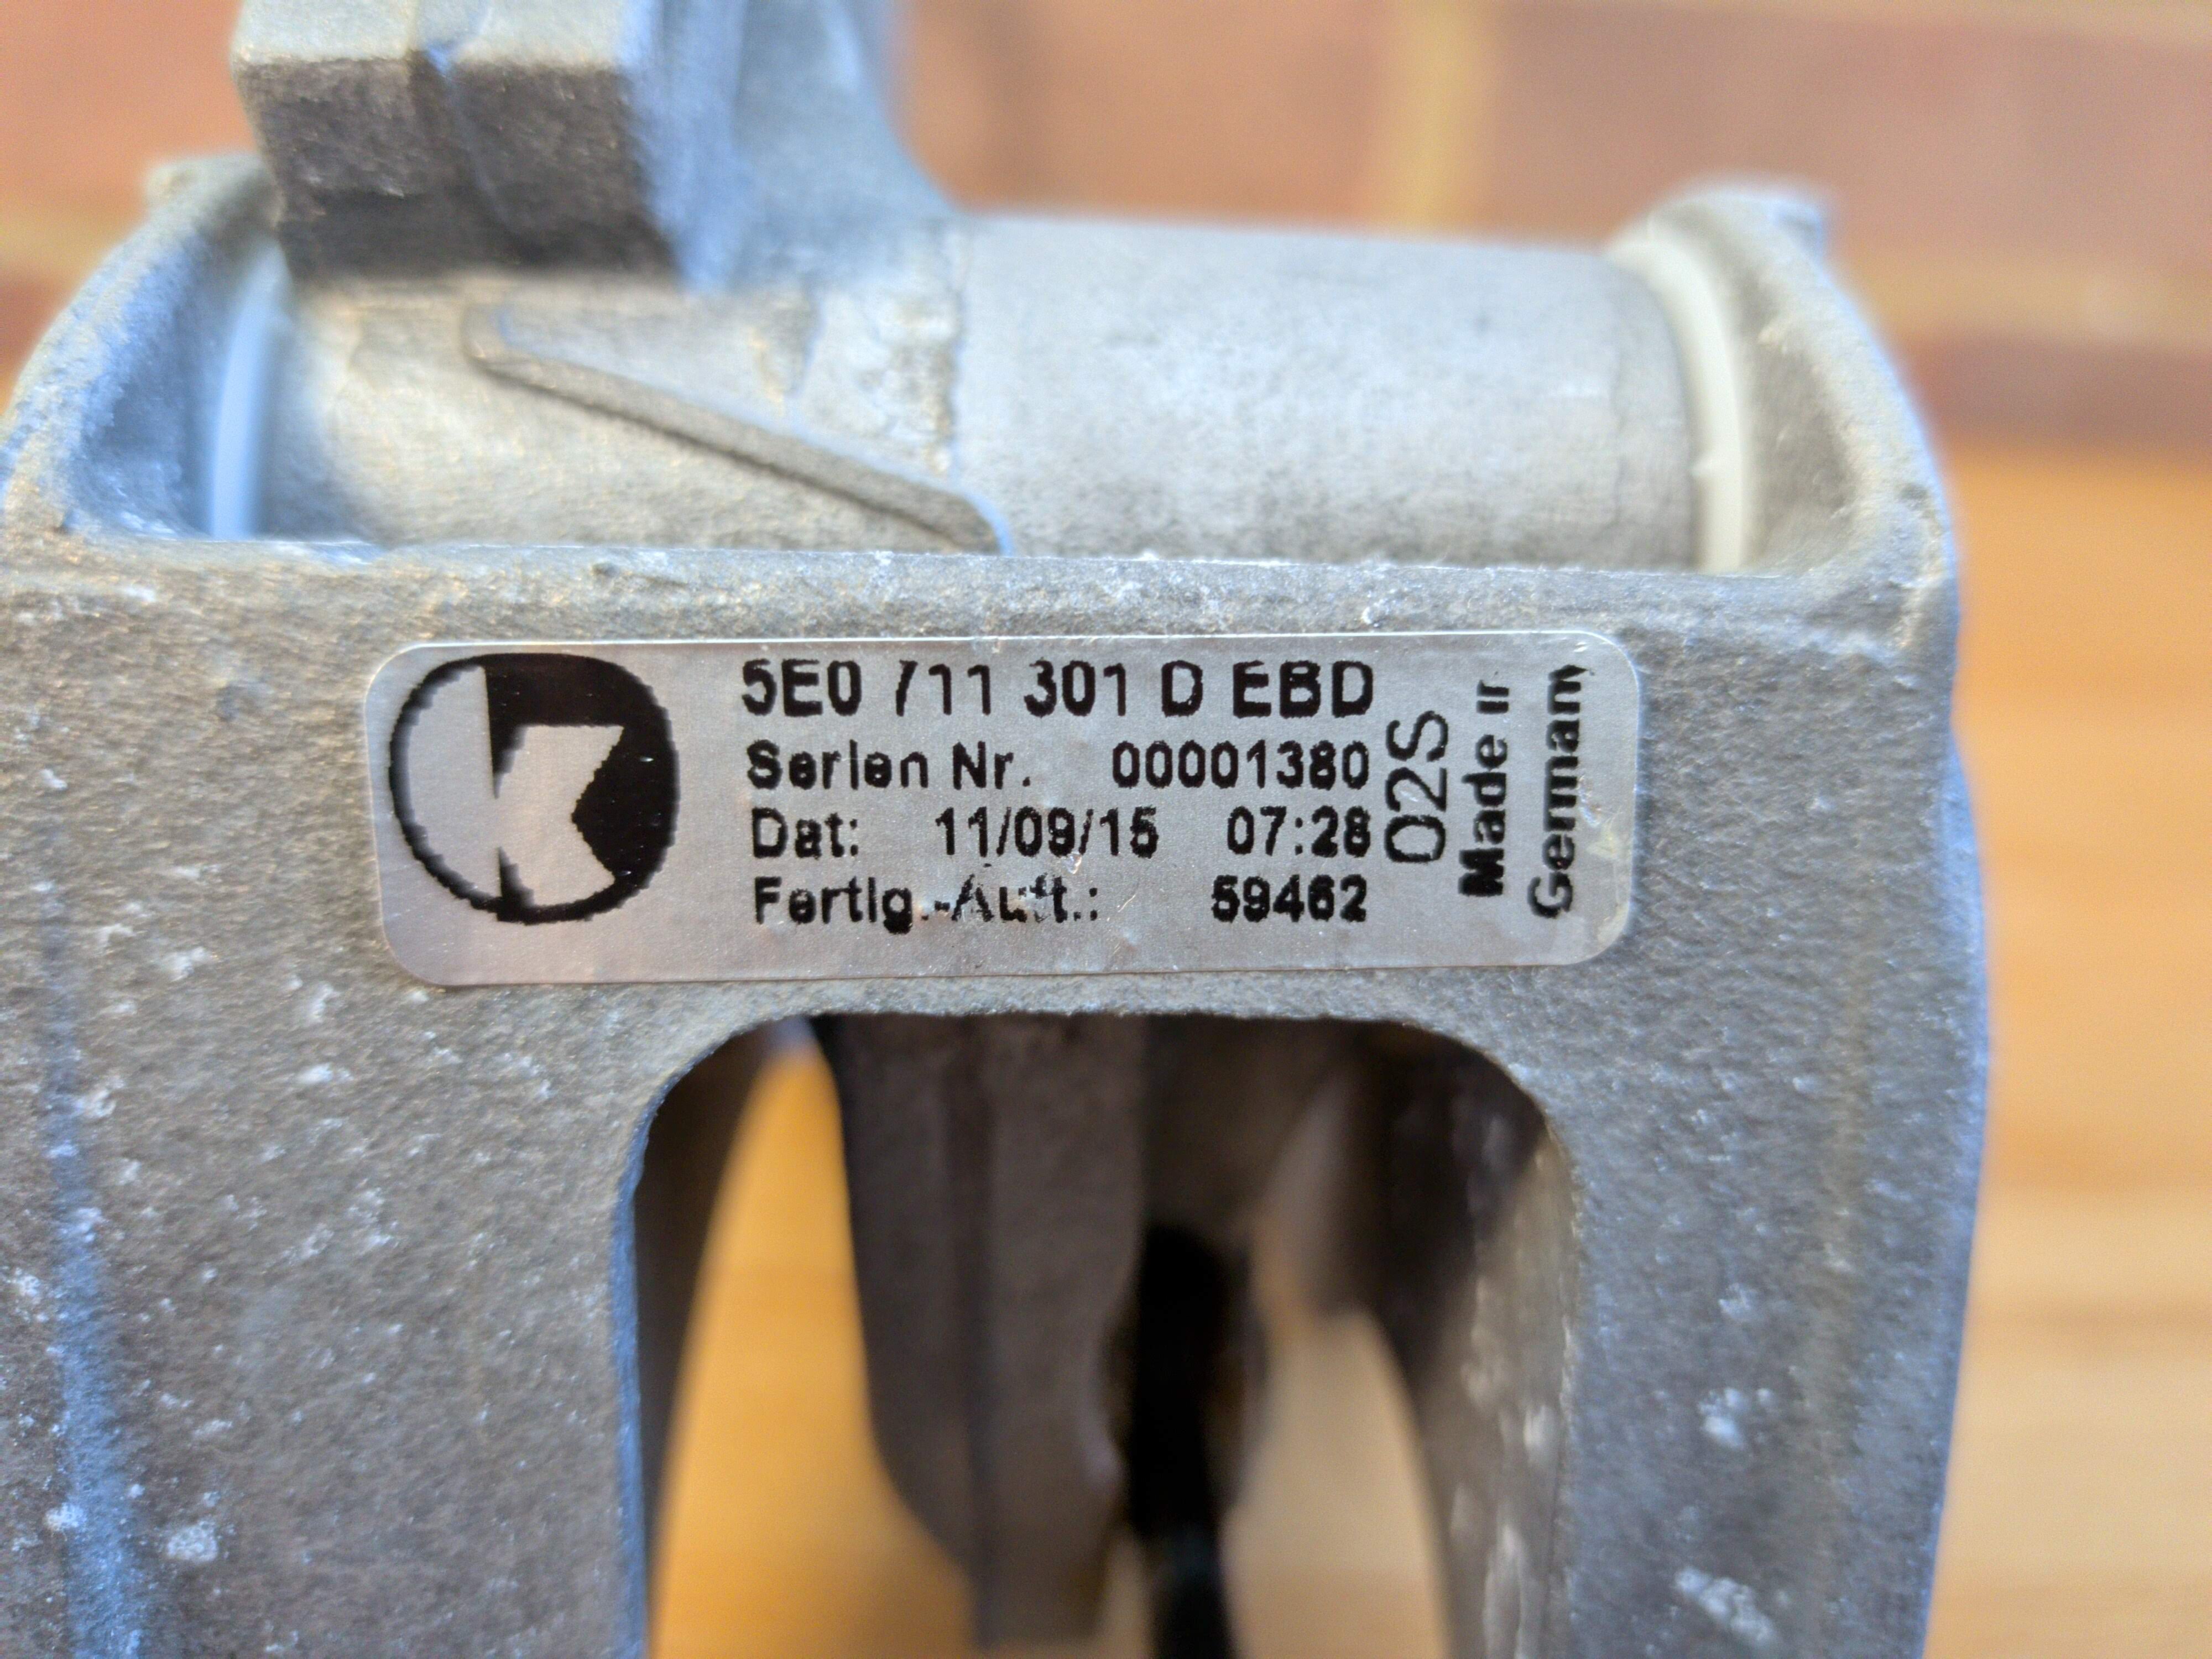
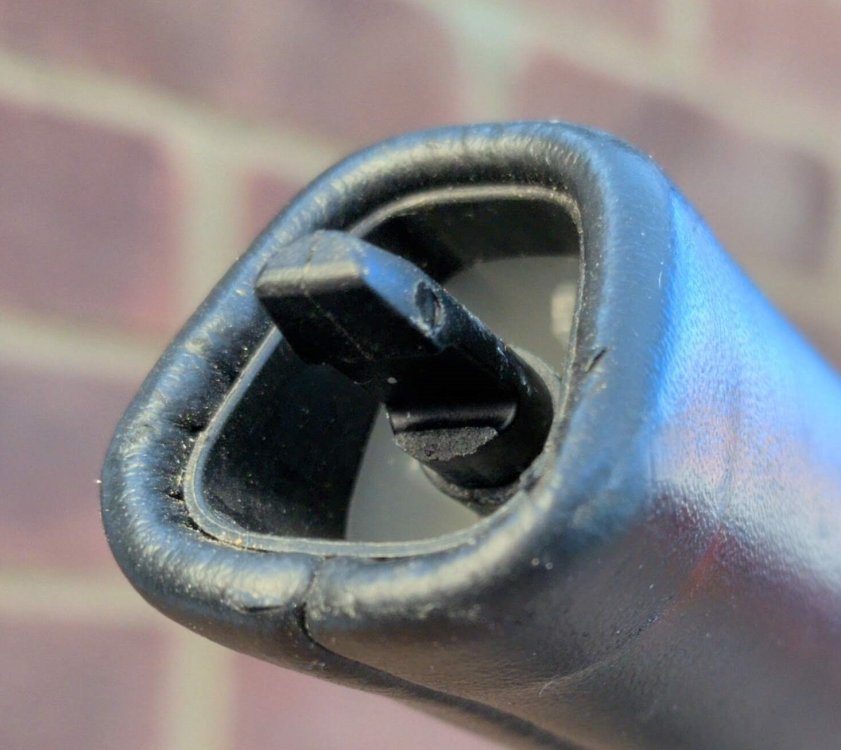
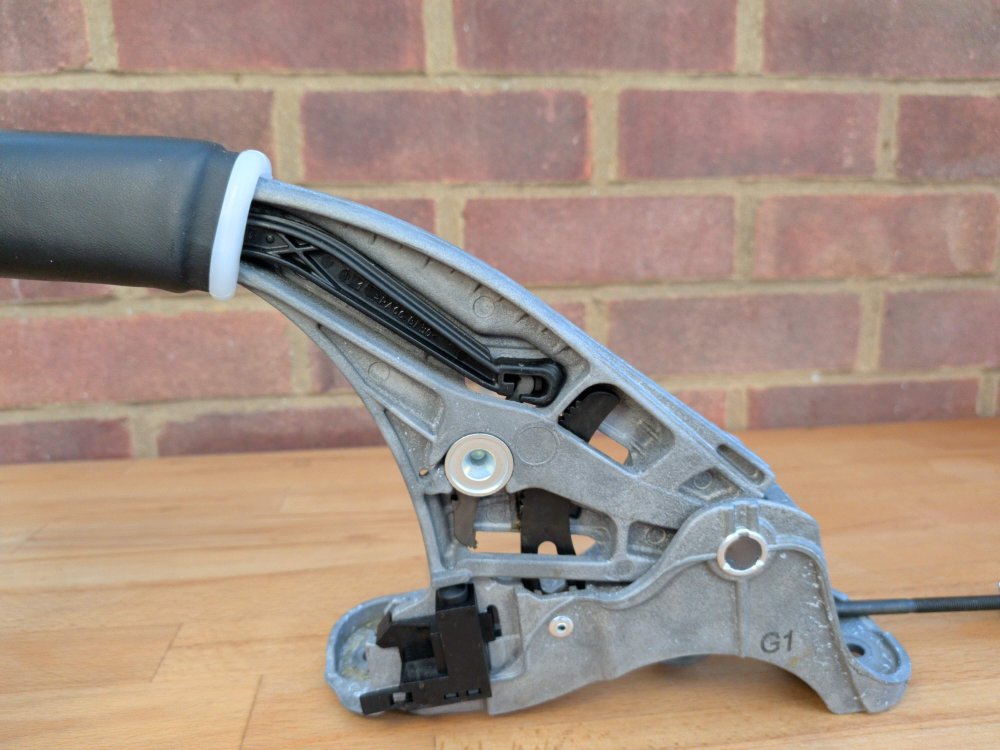
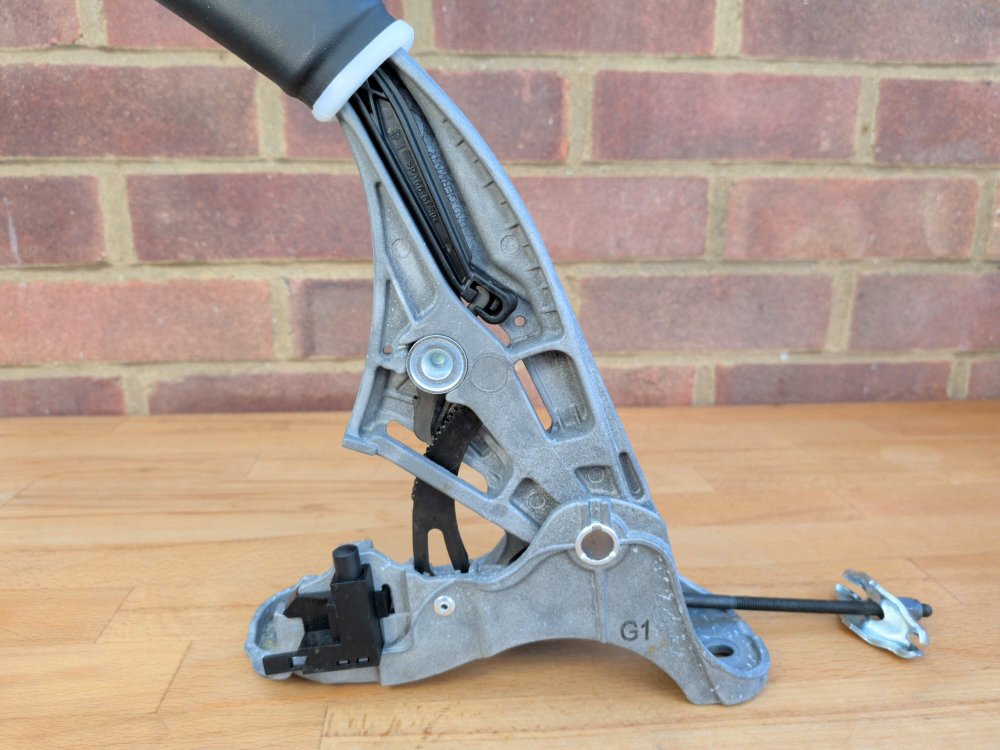
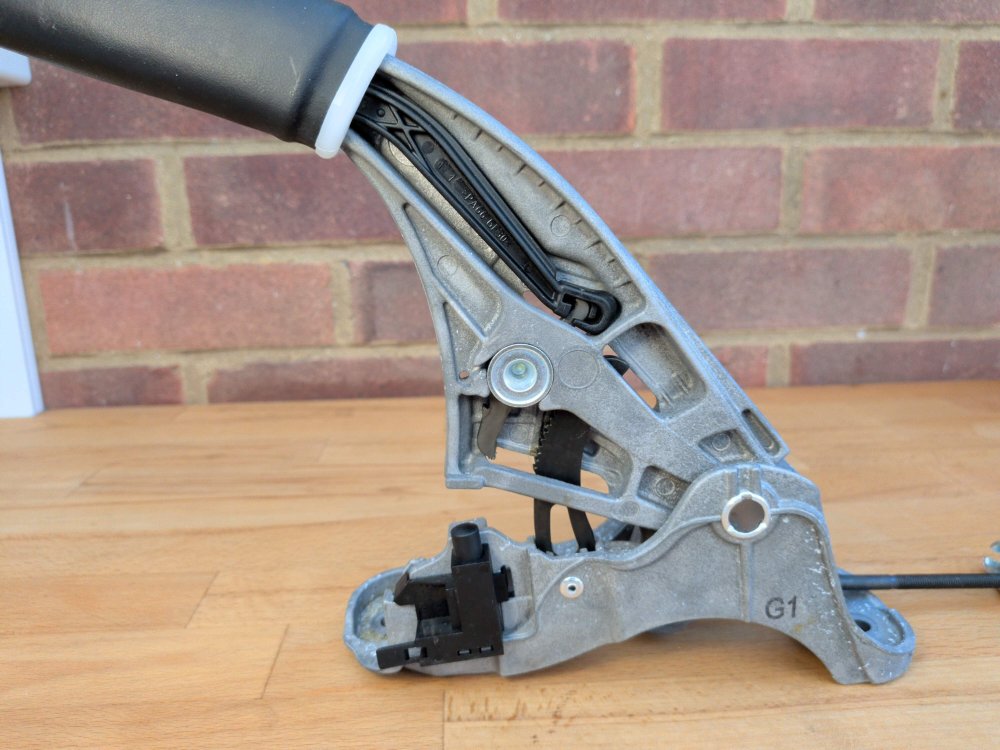
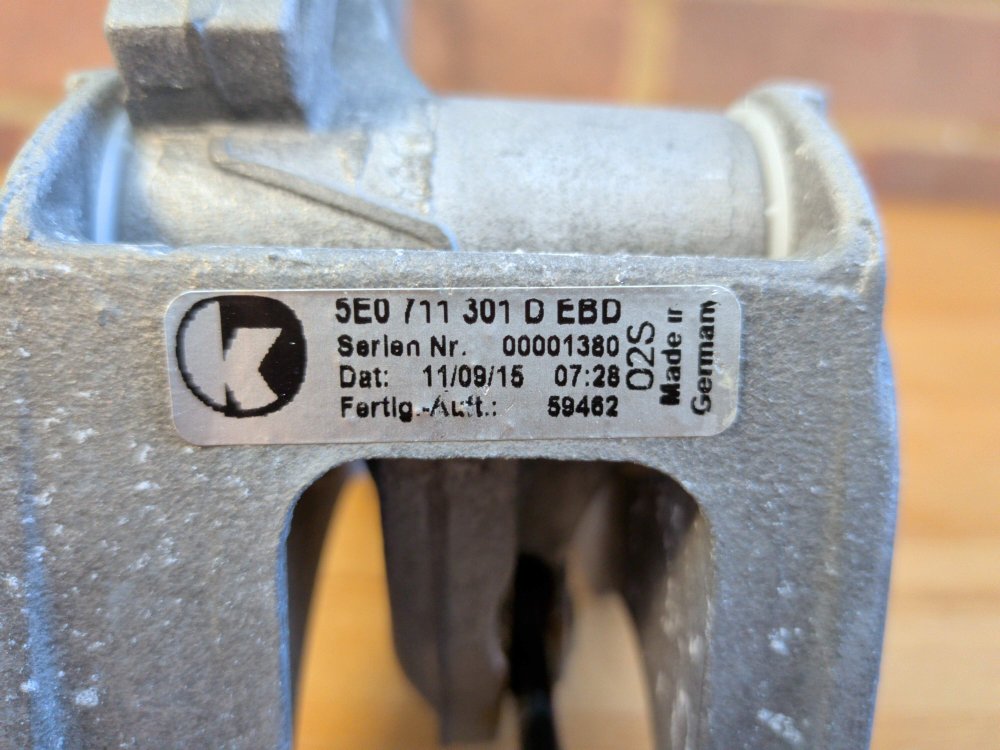
I posted in 2024 on this thread above with my experience. I see that others are affected by it. I went back in my garage to find my old handbrake to take photos, because it is not intuitive how the handbrake works until you see its insides. My car is 65 plate, delivered Nov 2015, leather version (SE L). My problem was that the plastic pawl was broken, NOT the button. See attached photos. Broken Plastic pawl. This ATTACHES to the button, with a spring underneath. The spring pressure acts on the button to PUSH it, and therefore the plastic rod FORWARDS. Sideways view of plastic rod inside the handle. The rod attaches to a Claw (grey colour) via a pivot (shiny silver colour). This picture simulates the Button Pressed, Rod pushed back, the Claw is disengaged from the fixed ratchet (black colour). This picture simulates parked position. Button is not pressed, Rod is pushed forwards under spring pressure, the claw is engaged onto ratchet. This picture simulates button OR pawl failure (or just pressing the button). Without the button or spring, there are NO forces acting on the plastic rod at all, pulling it forward or back. It will be luck whether it engages with ratchet at all. It is easy for the plastic rod to "fall" backwards, this disengages the claw from the ratchet. Note the claw and ratchet is greased. Label on the handbrake assembly that was removed. So you see I had the 5E0711301D manufactured 11/09/15 and it broke in 2024. Very similar to how others found it, button and spring randomly in cabin. Hopefully that helps others understand what is happening. This is why I said in my original post it is not intuititve how the handbrake works because of the way the button and spring interacts with the plastic rod. Lose the spring, you lose the ratchet engagement, and you lose functionality. I still maintain it is a ridiculously non-proportinate critical failure: a tiny plastic breakage of the button or plastic pawl leads to a significant safety problem. You can replace a broken button relatively simply (it is actually an instruction to do this when replacing handbrake cables) but with a broken pawl, you will need to replace this assembly. For those budding engineers, this is a good study in FMEA/FMECA.
-
They really do look genuine 👍 But, was it an option offered by Skoda? I can't see any mention of it in any literature. Yeah, the absence of the rear parking sensors is odd, with the car being an Elegance model they should be standard. Looks like an aftermarket rear sensor has been installed.
-
Will try.
-
Controller 17 Byte 02 Bit 00
-
Buy a Battery Charger with low miles these modern cars need charging now and then !
-
After 4 years I'm getting my old fabia sleeper back
-
Thanks for all your help. Rather than buy the switch and find it won't work, I'll try getting a wire to the ABS module and connect an ordinary push button switch. I still can't understand why just coding 03 hasn't worked to activate and show a dash warning. Perhaps I've misled myself after coding 03, TPMS was actually active and the dash warning reset to off, so I have to drive, then let some air out of a tyre to confirm?
-
You can turn it off via the steering wheel buttons. For me it's the ones on the right side of the steering wheel. Press the button above the chrome rotary control, a menu should appear in the dash, the top line should be lane assist, press (not turn) on the chrome rotary button, the tick should vanish, lane assist is off until the next engine start.
-
I wish. Yea 2018 Still no further forward, sent VIN to autodoc and they sent me a link containing 34 parts which is no better than my initial search containing a mix of valeo/denso
-
4 days ago left home fully charged, and did 160 miles and had 5 miles range left. £3.50 Temp about 10 degrees C and some rain. Windy . Today fully charged after paying £26. 0-3 degrees max. Used 65% of battery in 68 miles. There was a diversion of an extra 10 miles because of a crash. Just put in a charge to 52% to get home. Showing 100 miles range. Still 3 degrees C. I will see how much left to 75 miles. Some 70 mph, then the rest will be an average of under 50 mph. Cold weather and all season tyres. PS EDIT, never went above 5 degrees C. 67 miles driven and 10 miles left showing.