


Leaderboard

.thumb.jpg.9dd3f612ba7f13d10be5c518d3c8d255.jpg)

.jpg.1006585dfe4e2977315b67c3d642e37b.jpg)


Popular Content
Showing content with the highest reputation on 06/04/25 in all areas
-
Here some info that I've found: 1st Generation (3AA/4H0 PQ/MLB): Installed at a 22-degree angle to the lateral side of the vehicle. It can detect three lanes simultaneously: on the left, right, and behind the vehicle. These sensors can track the trajectory of an approaching vehicle from behind, meaning they can warn the driver via a mirror indicator before the vehicle enters the blind spot. This is BSD (Blind Spot Detection) via SWA (Side Warning Assist). This generation supports the Rear PreCrash function, which, in the event of a potential rear-end collision, activates all preparatory safety features (closes windows, tightens seatbelts, etc.). The mirror indicators can also adjust their brightness depending on the distance to the detected object. 2nd Generation (5Q0): Mounted at a 45-degree angle and are no longer capable of predicting vehicle trajectories. BSD works independently for the left and right sides, and brightness adjustment is not available. However, the RTA (Rear Traffic Alert) function was introduced — it assists when backing out of a parking space by detecting moving objects crossing behind the vehicle (cars, pedestrians, cyclists). Due to the steeper angle, the detection range is shorter than that of the 1st generation sensors. 3rd Generation (2Q0): Also installed at a 45-degree angle but combine the capabilities of both previous technologies. While the range doesn’t quite match that of the 1st generation, it is significantly better than the 2nd. Additionally, they outperform the 5Q0 radars — they can detect guardrails, recognize up to 5 lanes, and transmit data to the front assistant camera, which helps improve the accuracy of Lane Assist.3 points
-
2 points
-
2 pointsIt doesn't work the way you expect because it's a smart alternator🫣 I have watched the behaviour of my alternator when solo and when towing When towing it sits at a steady 14.4v as you might expect. When solo it only charges and goes up to 14.4v on overrun, never when accelerating. It's a smart alternator designed to minimise the load on the engine and thus increase MPG. Find a long hill where you can drive down in gear with no throttle using engine braking. Check the voltage and you will find it's where you expect it to be.2 points
-
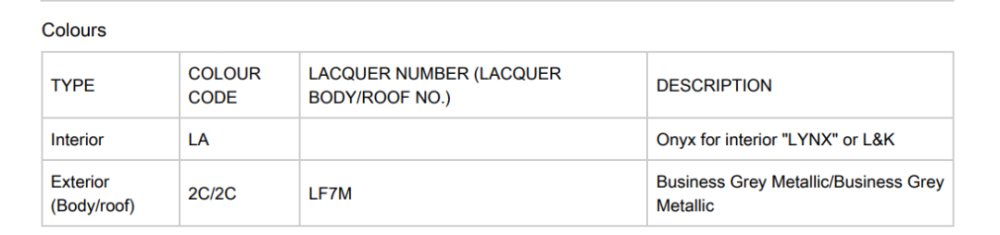
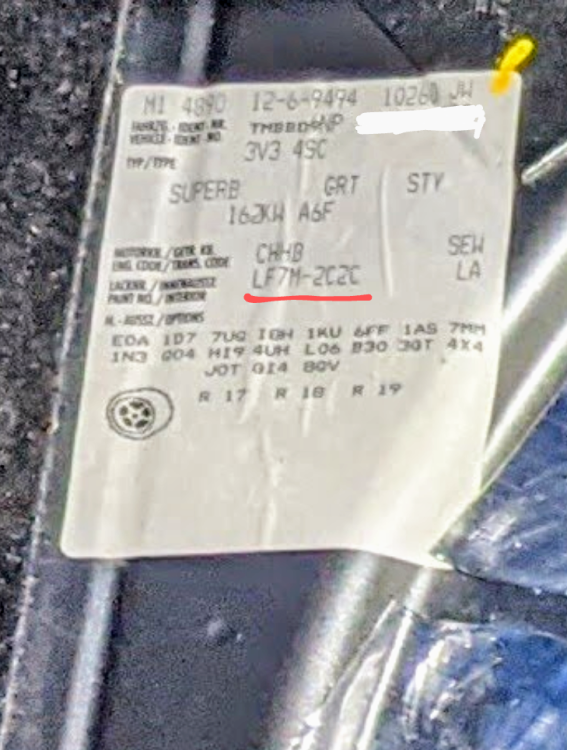
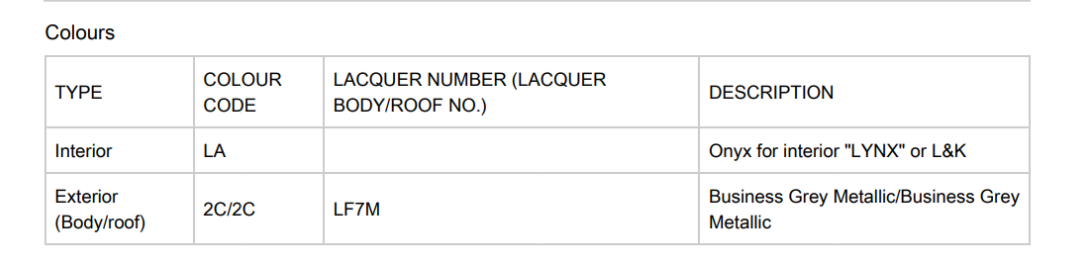
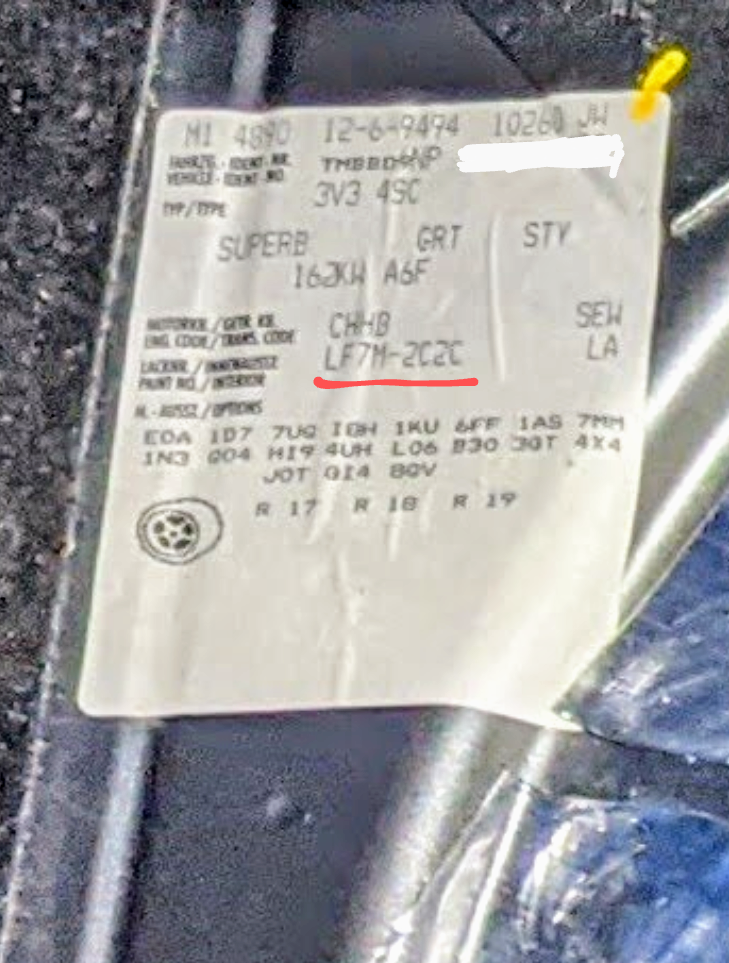
Paint code is made up of two parts:- Colour Code + Lacquer Number. The colour code (exterior) has two parts in itself - body/roof. In my case, Business Grey, is LF7M 2C2C. There is a sticker in the boot with the paint details. Alternatively, a report from eRwin will show u this too, based on ur VIN. Boot sticker.... From Skoda eRwin....
 2 points
 -
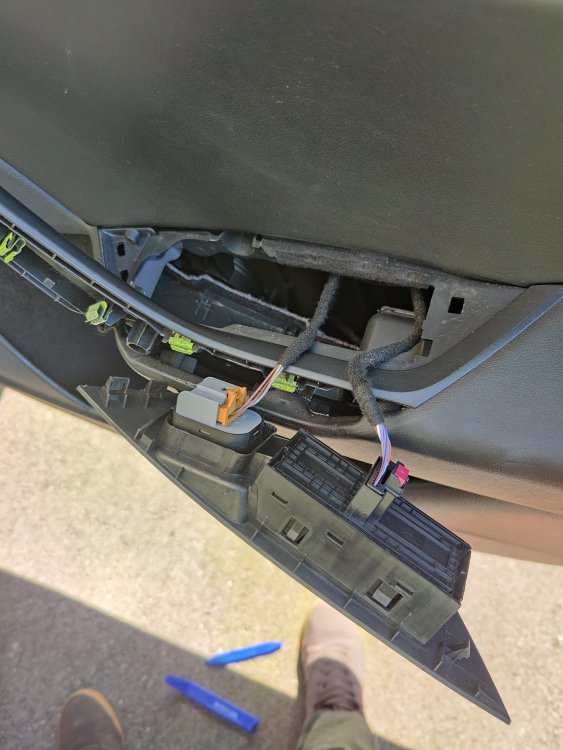
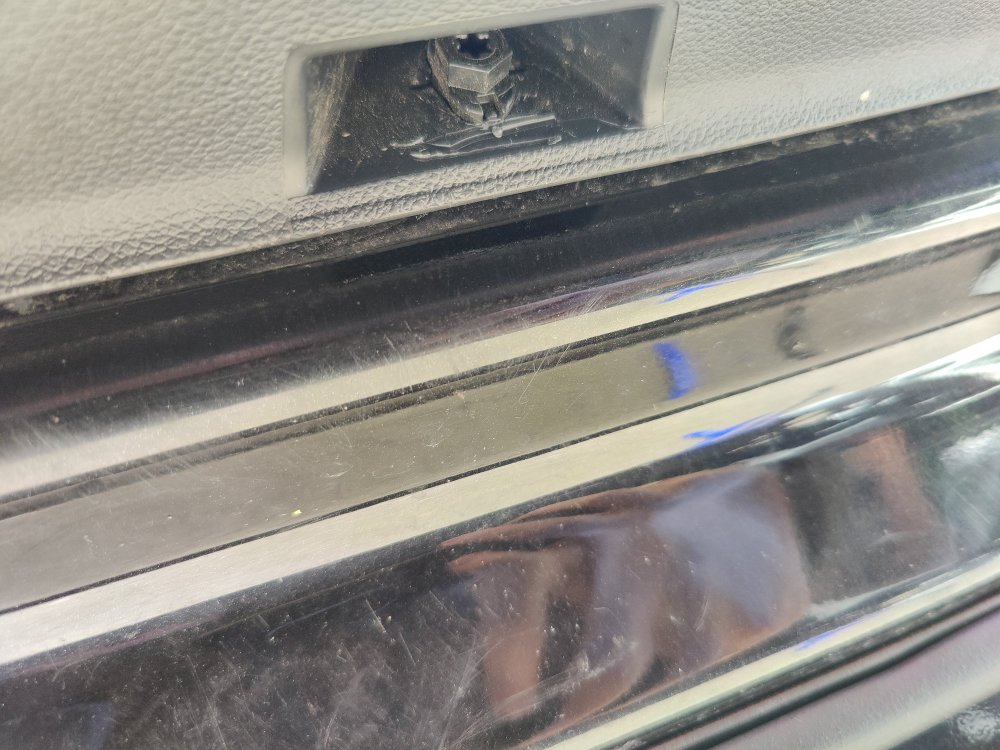
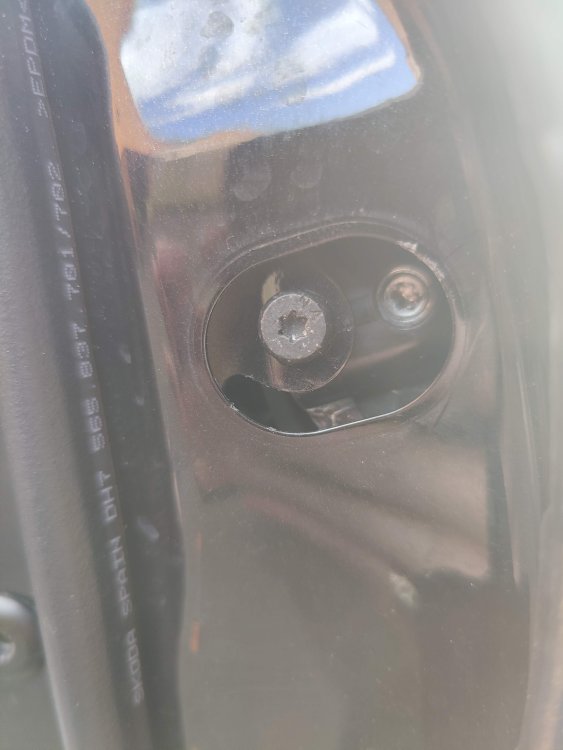
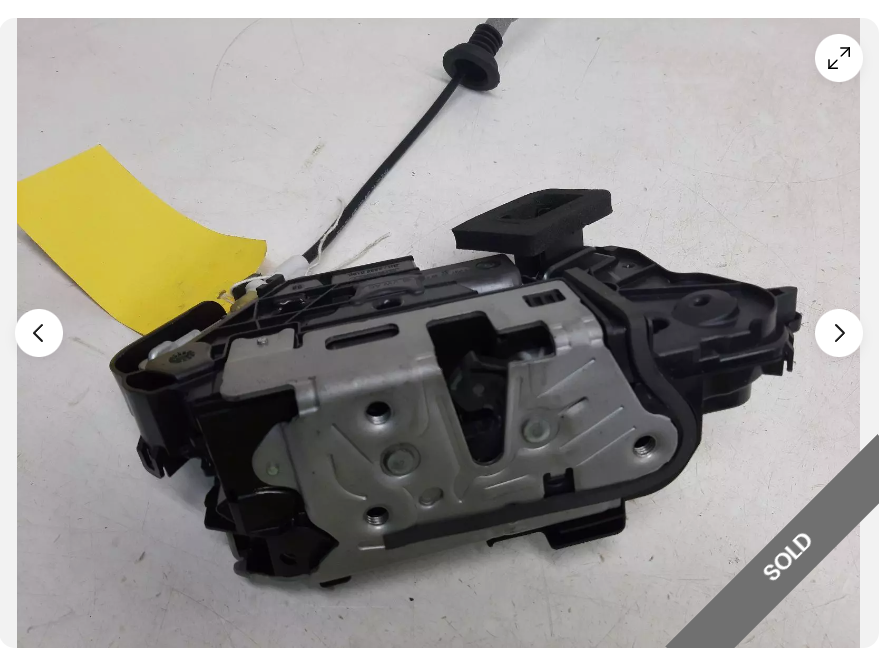
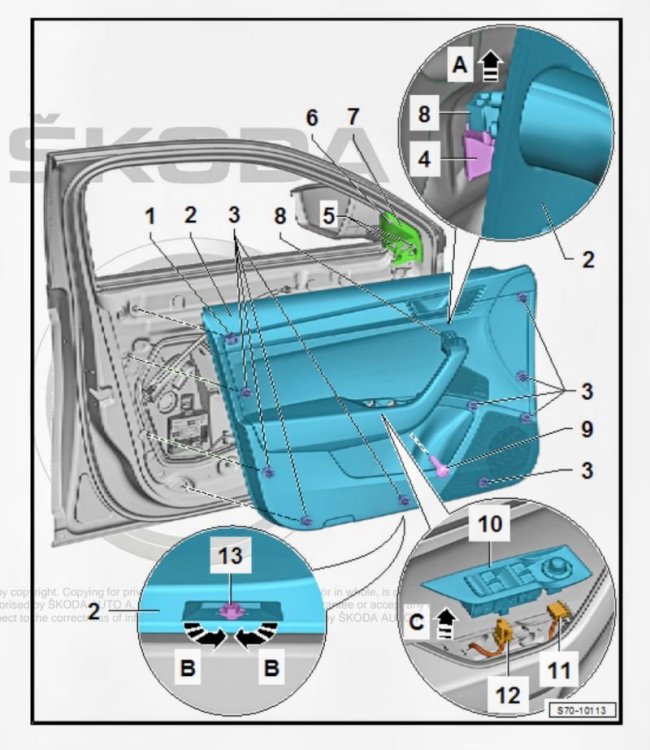
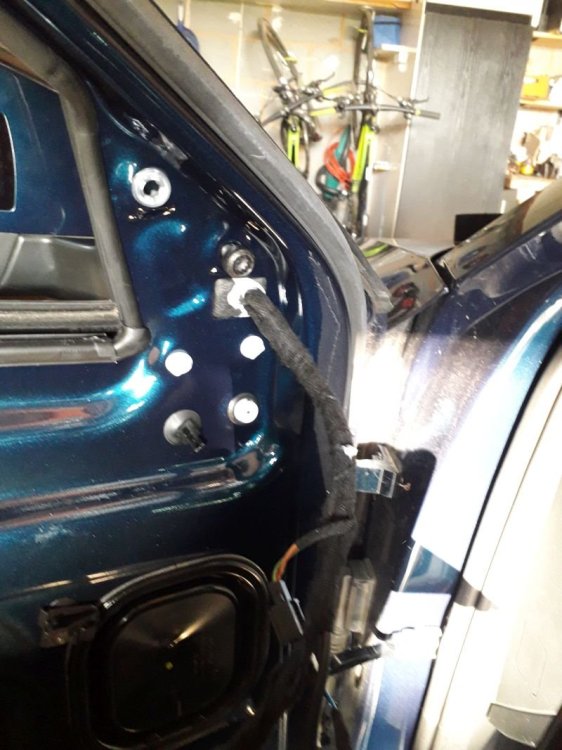
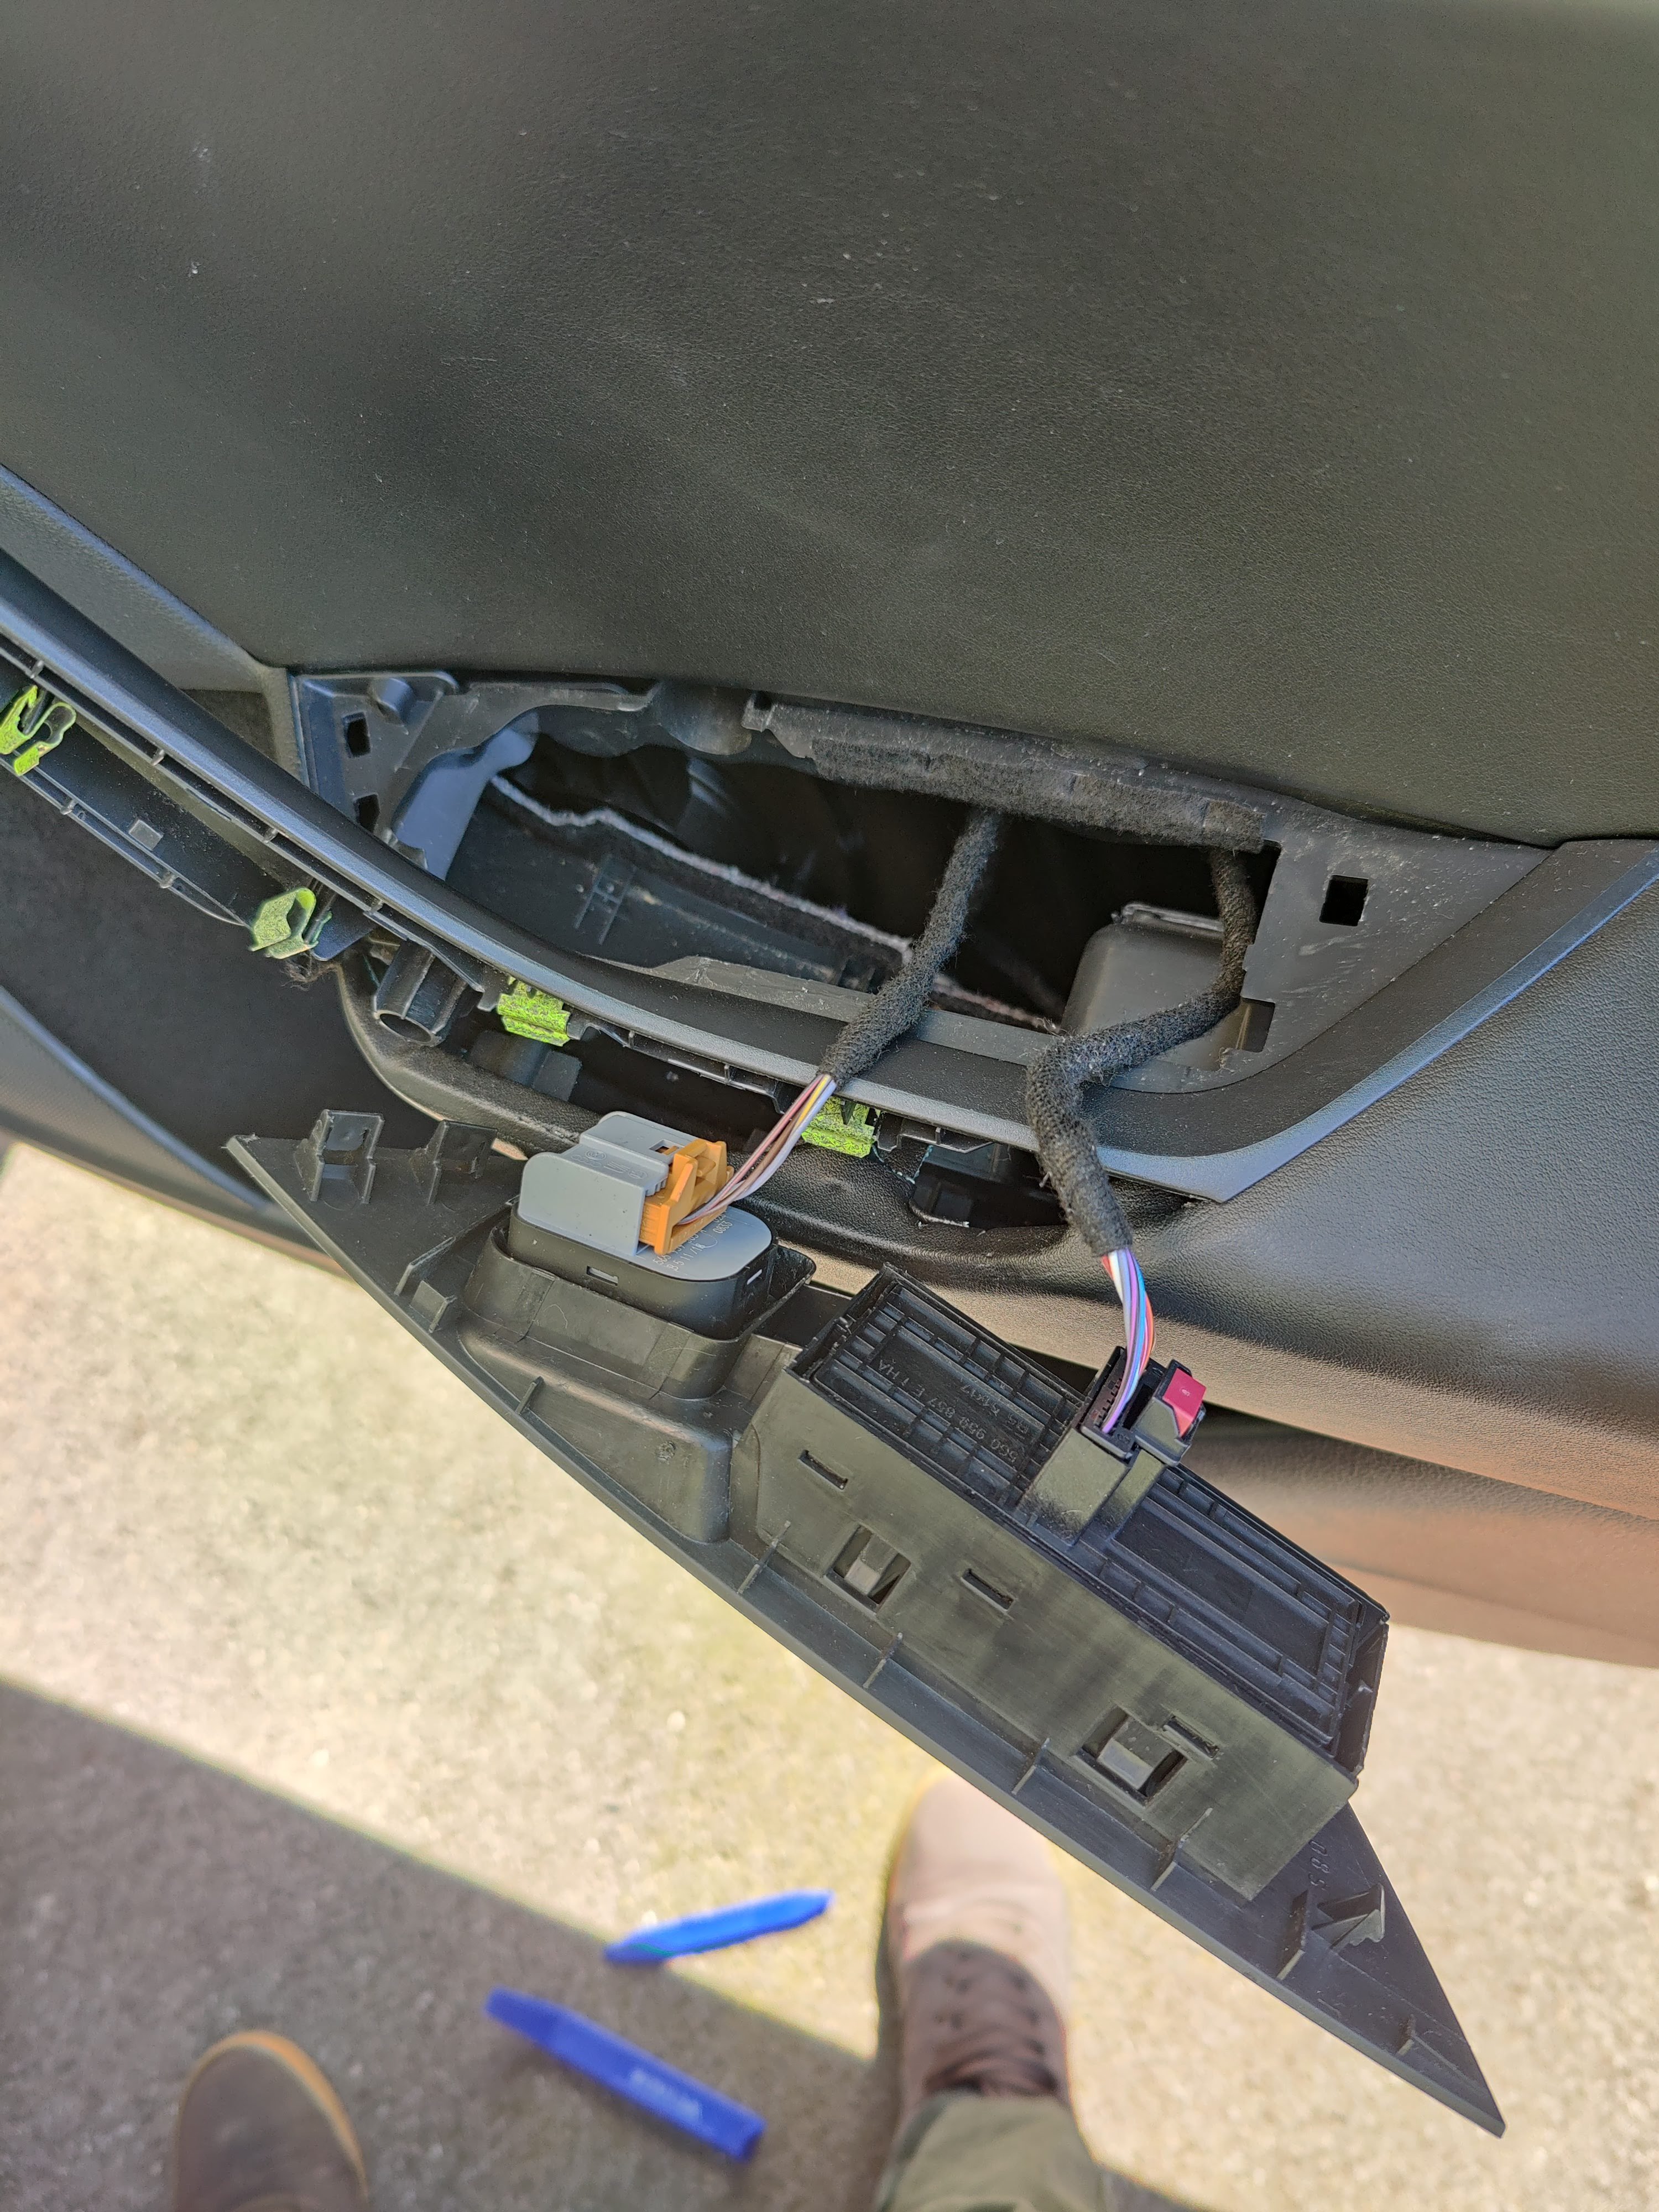
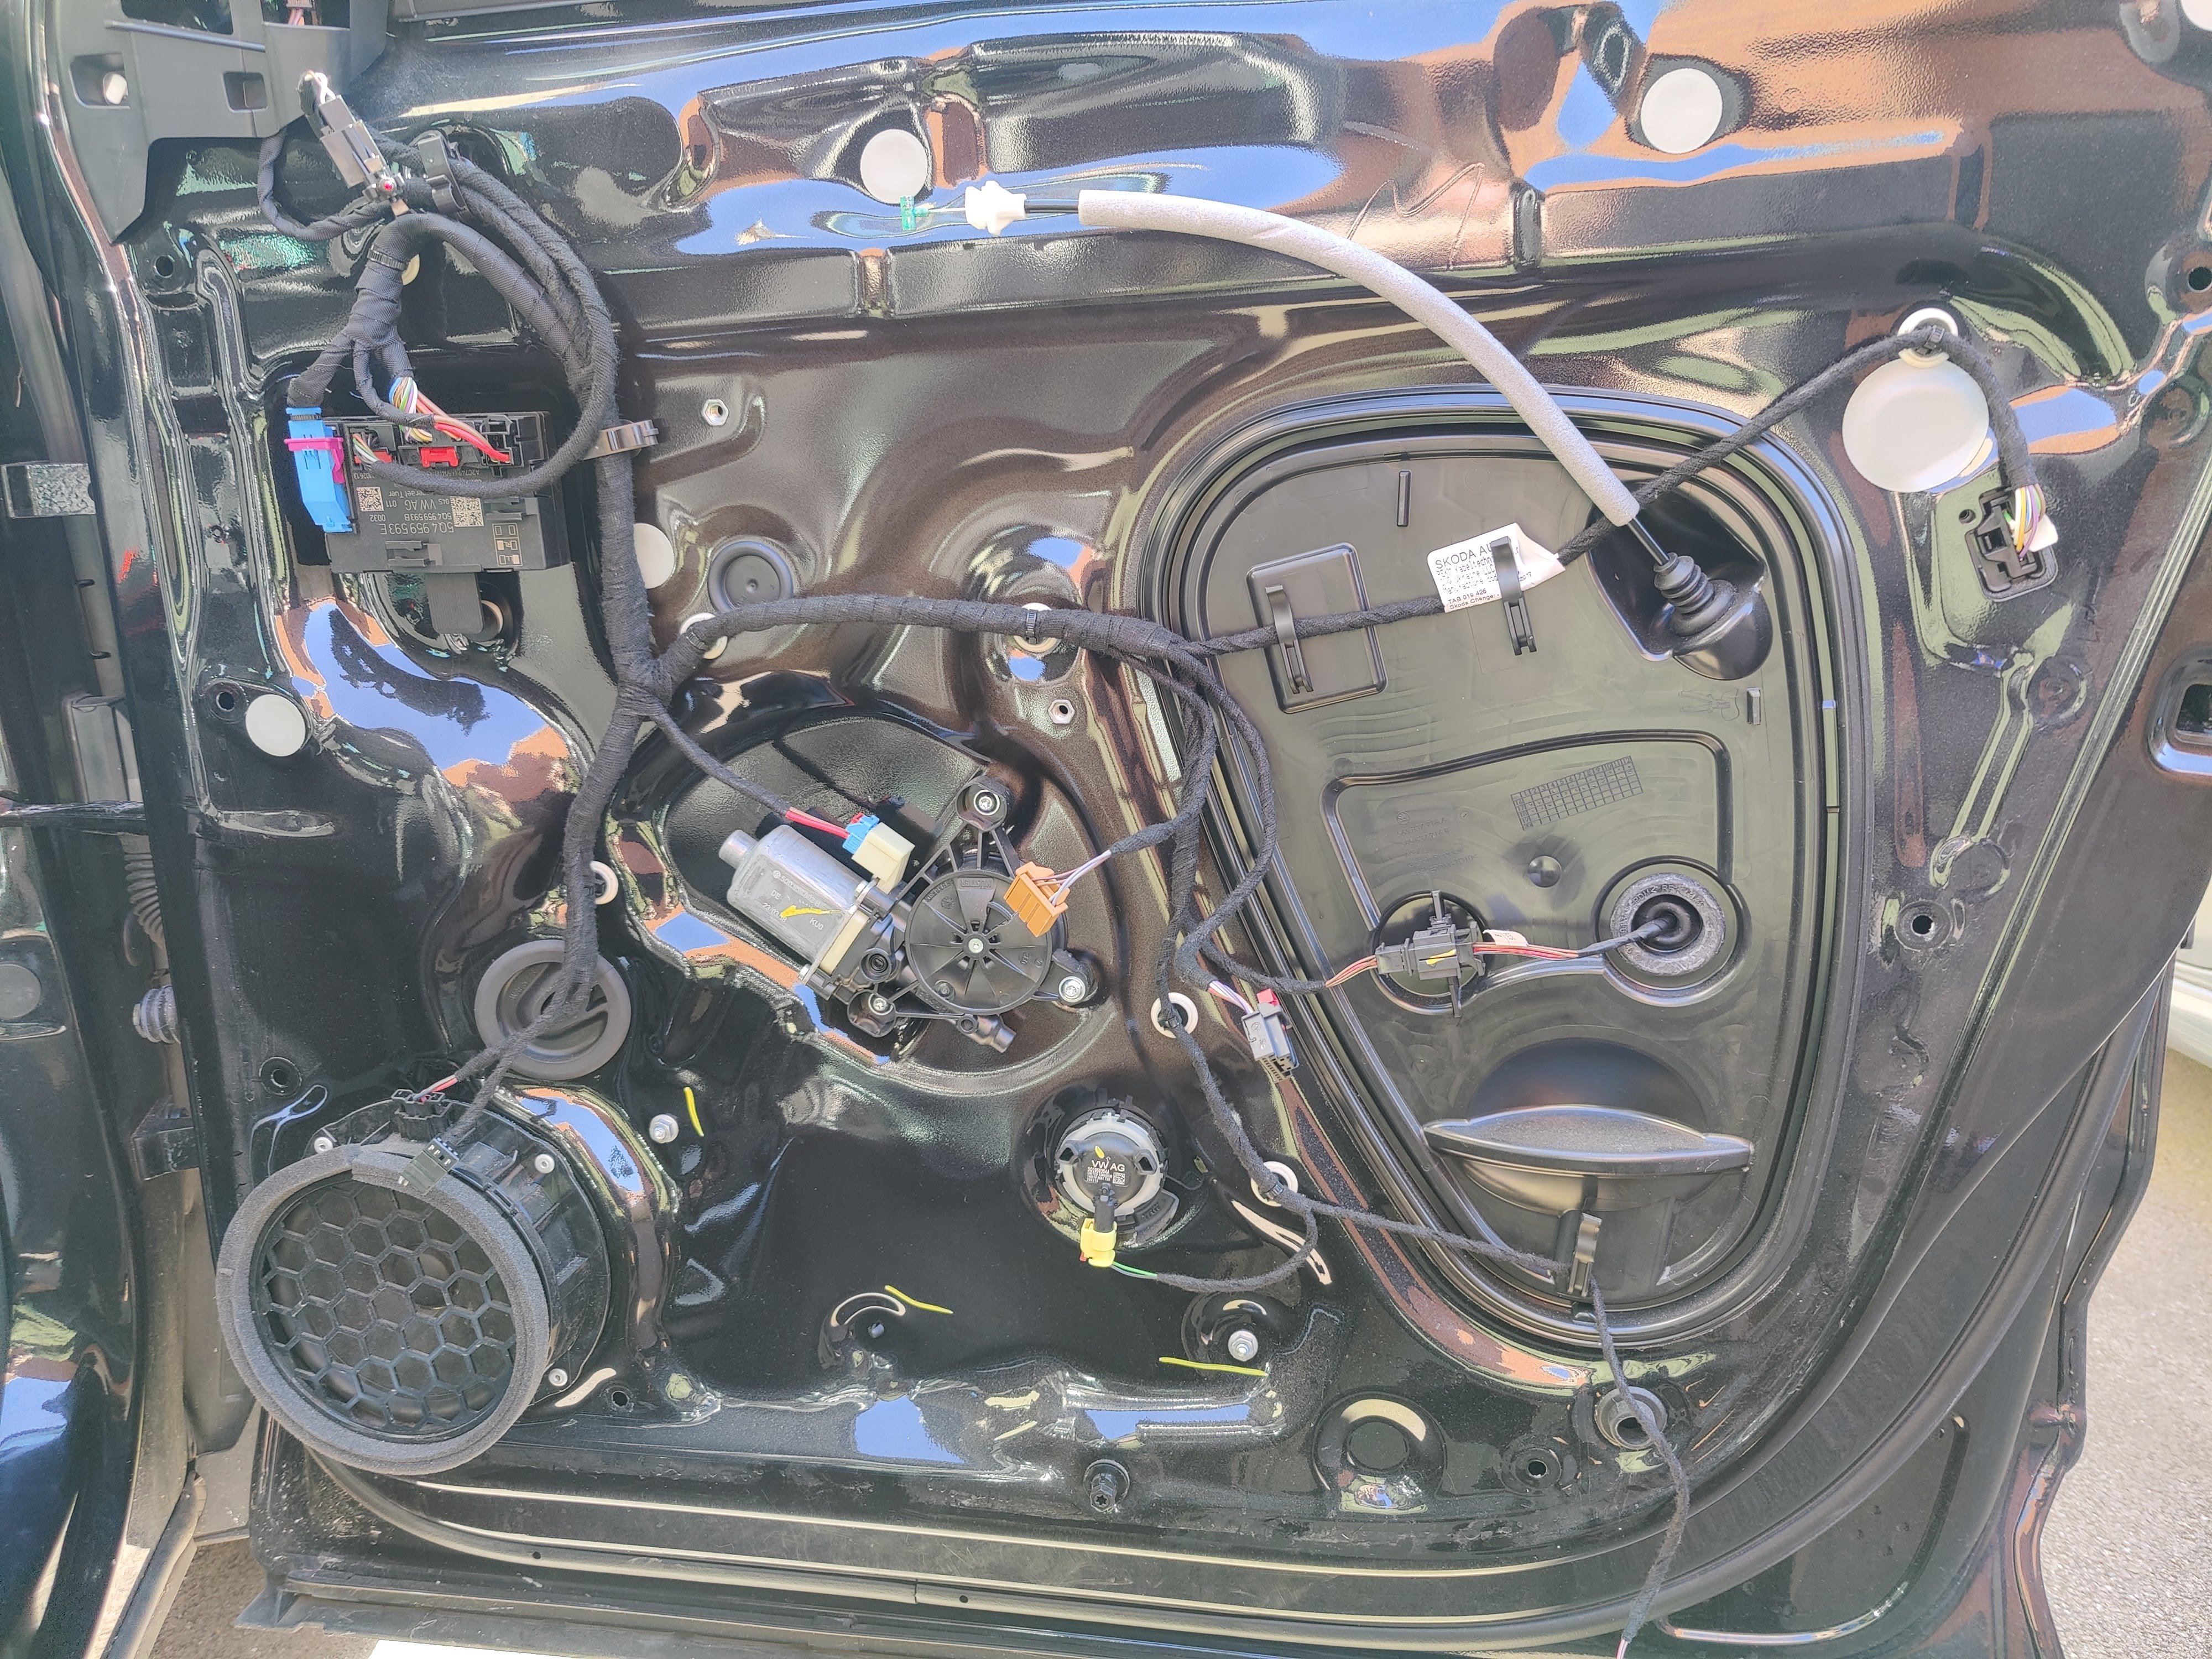
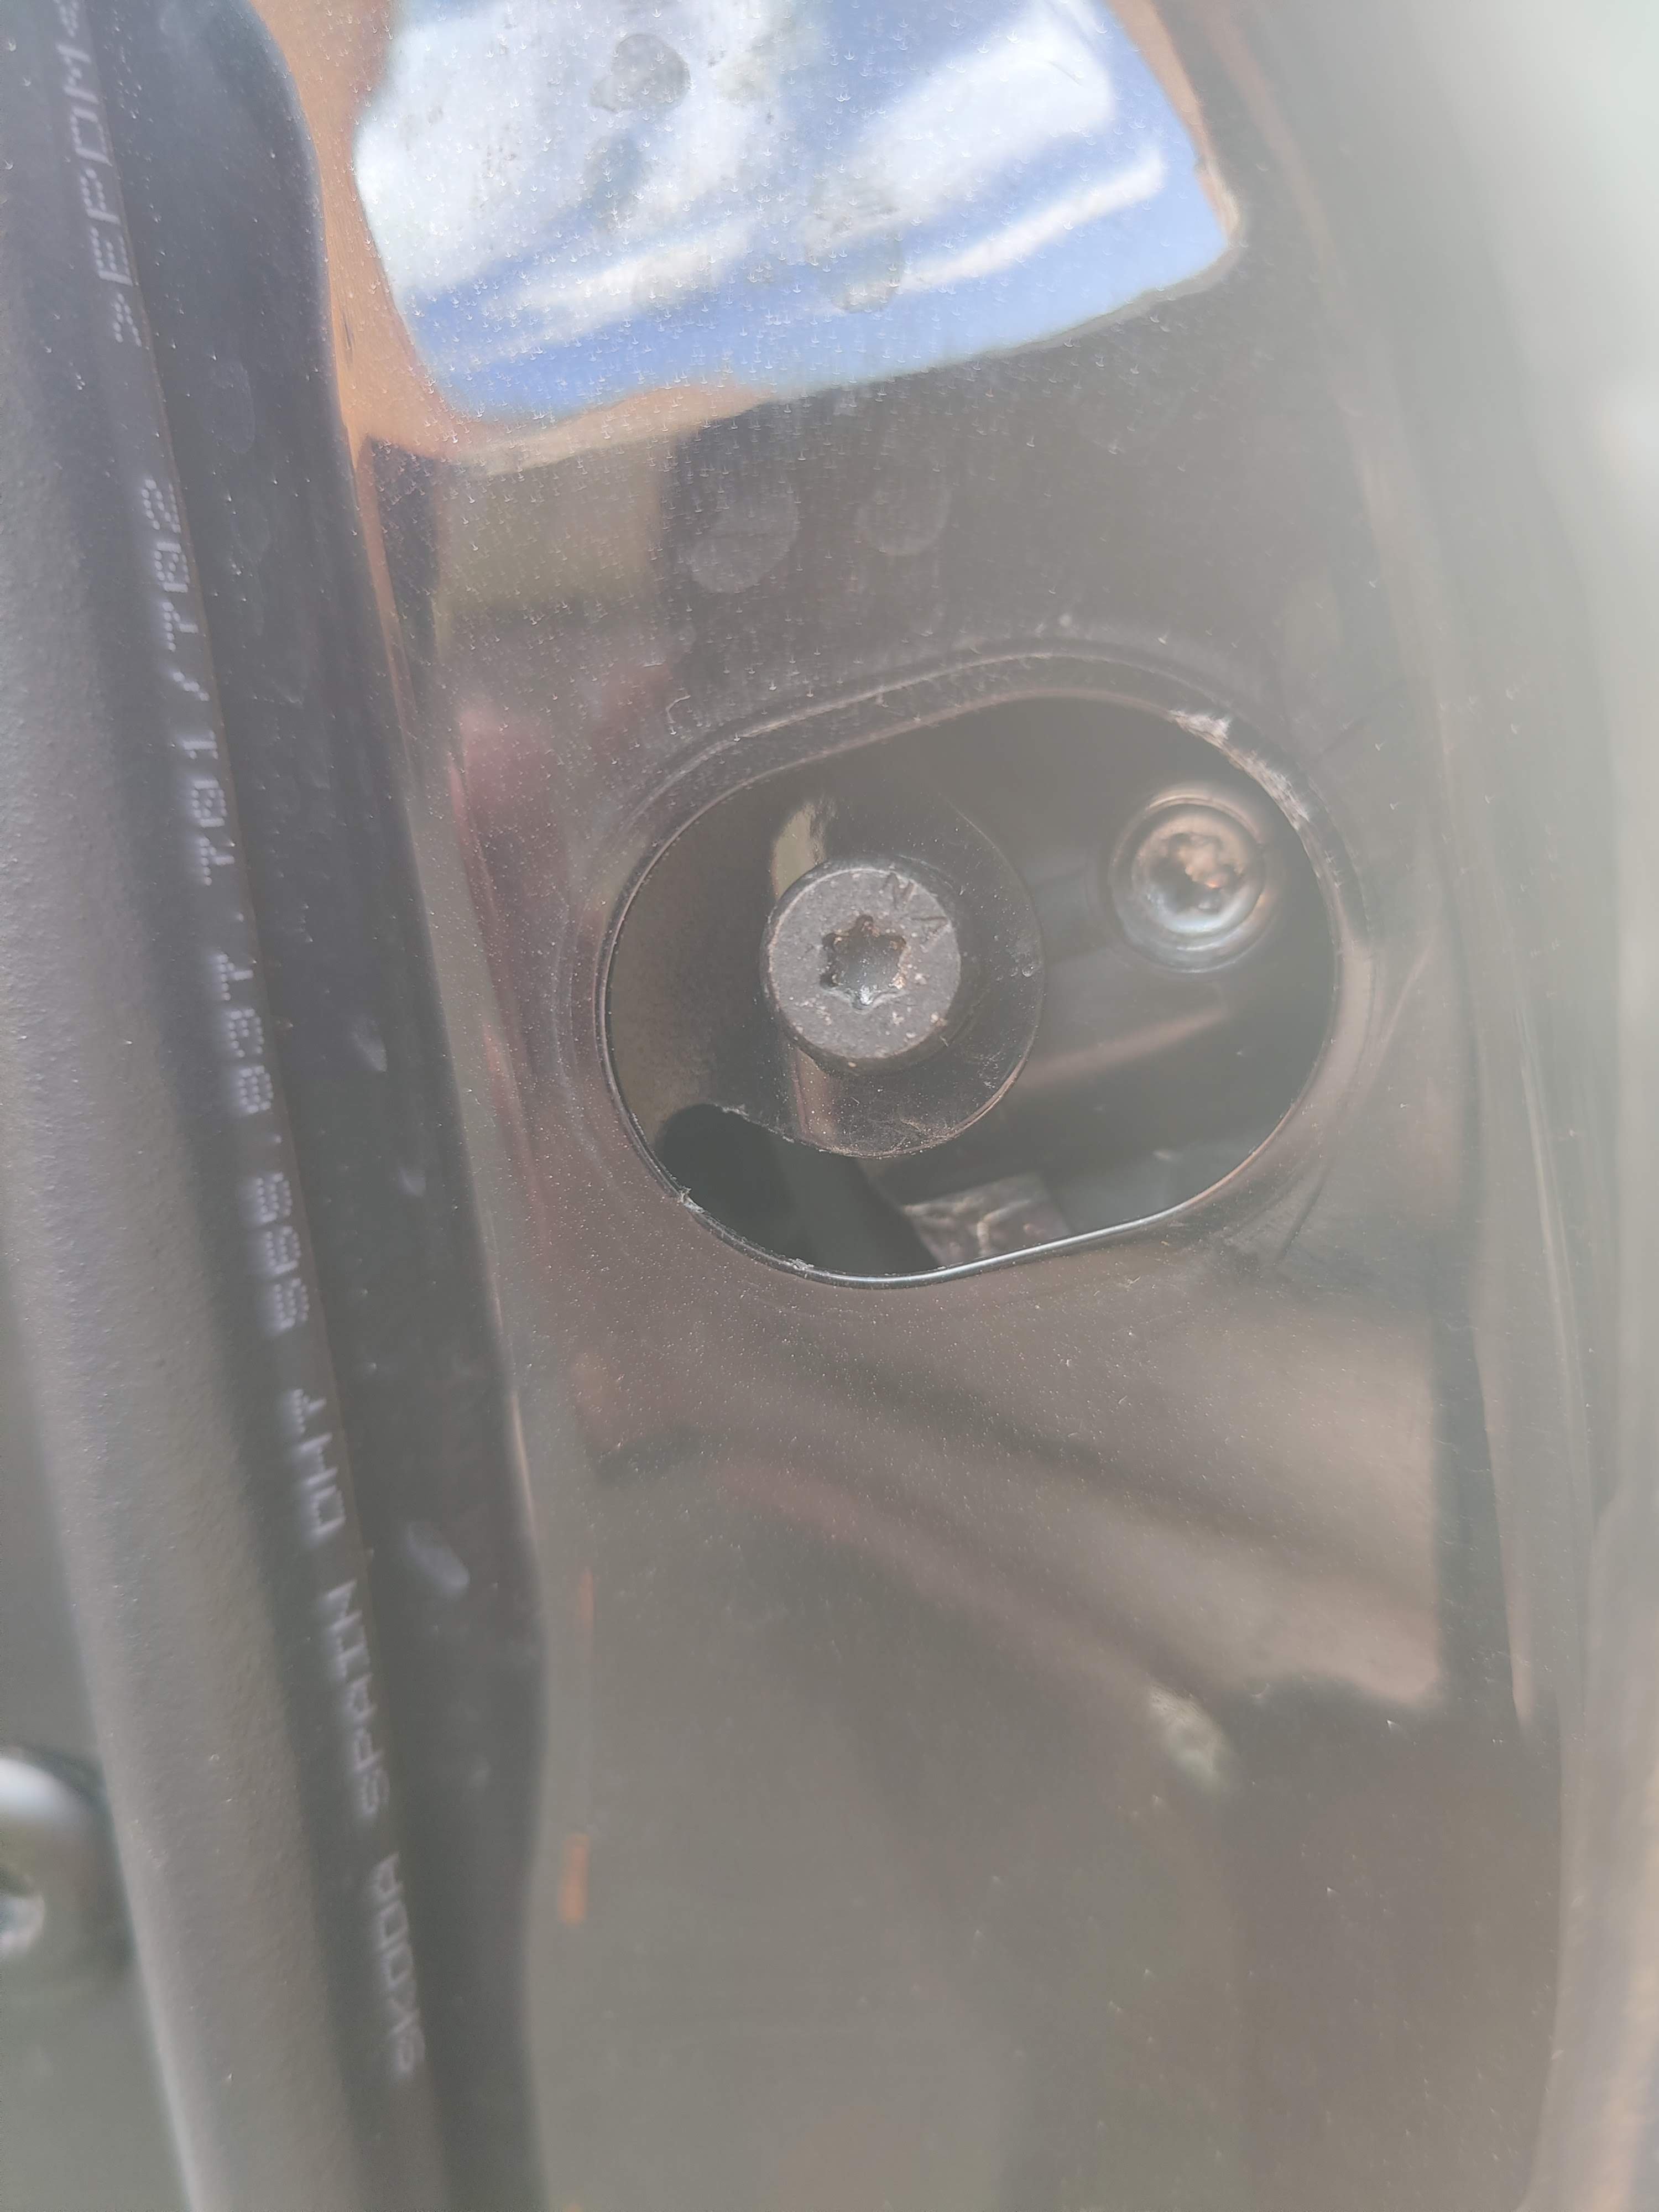
1 pointFound my 2018 (160k mile) Kodiaq was starting to suffer from an intermittent fault where the drivers door wouldn't always lock and the occasional spray of lube wasn't going to keep the mechanism working any more. I was worried this may have been a "dealer" only job due to having KESSY and it may need some specialist coding done. Also didn't want it to get to the stage where it got stuck in the locked position resulting in having to take a more drastic approach to accessing the lock. Thankfully after doing a bit of a research and seeing a similar done on some other Skoda models it seemed it was fairly plug and play and got a spare ordered up for ~£50 off ebay. All in this probably took me a couple of hours to do though your mileage may vary. Things you will need: Replacement door locking mechanism (mine came with the cable that links it to the internal handle but you could getway without it) Trim removal tools 11mm spanner (I think) Torx bits (can't quite remember sizes as a couple different ones are needed) XZN Multipoint bit (size 6 I think) Torch (optional) Spare VAG trim clips (optional but good to have to hand) I started off by removing the trim around the internal hold handle. This should come off fairly easily by starting off using your trim removal tools on the underside and steadily working your way around. There will be some metal clips that may come off with it, put these back onto where the trim came off from being careful to make sure you have them the correct way round. You then need to lever up the window control switch module as there is a Torx head bolt you will need to get to behind it. It may bet a bit finnkey to get off but will pop out if you go about it in the right manner. Unplug any cables from it and pop to one side. (FYI I did all this work with the car unlocked but didn't bother disconnecting the battery or anything) Next you need to look at the underside of your door and will find a plastic locking wing nut type thing. Use a spanner to turn this 90° so that it is no longer holding the bottom of the door card in place. Then undo the two torx bolts in the door. You will find one behind where the window switch was and another towards the top of the handle. You should then be able to start prying off the door card steadily working your way round it. (this is where the spare clips come in, in case you snap any) I found starting from the bottom worked best for me. Once loose from the door you will then need to work you way round unplugging the numerous accessories from the back of the door card. I would advise propping it up on something to take the strain off the cables giving you more freedom to use both hands. Each cable had a slighly different way to disconnect it but were all fairly simple. The most difficult I found being the red door opening light on the bottom corner and I never knew that the cubby hole for the umbrella has a little drain on it, this is just a pipe pushed through a hole in the door (, rubber grommet you can see at the bottom righ of the pic below), so no need to uncrimp it or anything. I used this video here for reference You should then be left with a naked door. You then want to unhook/clip any cables from the large kidney/triangle shaped cover and unplug the door locking mechanism from the cable you can see in the top right of the image (car will probably ding at your to say it has a fault with the KESSY system if you have it but no need to worry). Again all these cables have slighly difference connectors but are fairly easy to figure out. I then loosend up the two rubber grommets by easing them into the door before using the trim removal tools to get the cover off. It does have a image on it saying to use some stong pliers to pull on the plastic tab just below the top grommet to remove it but I found this a bit futile so went back to prying it off instead. Once off you should then have access to the door locking mechanism. However before you can remove it, you will need to remove the key barrel from the door, for me this was probably the most troublesome part to get done. It's not difficult I think I was just being a little too hasty. This can be done by flicking off the small oval shaped cover on the end of the door not far above the latch to reveal a torx bolt and a grub screw. The bolt I removed while the grub screw I wound all the way back without removing. You then can then remove it by feeding it out from inside the door or carfully using a plastic prying tool on the outside to get it out. I found it took a few attempts adjusting the grub screw in and out to get it to finally submit and then easily glide out it's hole to be kept for later. (I forgot to take any more pictures from here so will have to take my word for it but I did use this video here as a guide for the lock replacement which helped a lot) Key barrel out you can now use the multipoint bit to remove the two bolts holding the locking mechansim in place. I needed a fair bit of force to get them going but they will go. This will allow you to now remove the locking mechanism from inside the door (there may be a loom cable that will need unlcipping from it first). Finally you will need to unclip and unhook the cable that links the locking mechanism to the external door handle This is behind the little flappy panel it feeds into and may take a little effort to get off but again will come off. You can then switch it out with the replacement mechanism do everything you have just done in revese and hey-presto! (Just make sure to check that everything is plugged back in and tied back where it should be again to avoid any knocks and rattles & or head scratching as to why the windows won't go up and down 🤪)

 1 point
 -
1 pointMy Karoq has the indirect system, and when I had a puncture it told me which tyre was low.1 point
-
1 pointI read it and am impressed with your dedication to resurrecting such a heap...1 point
-
Many thanks for another update. FC1 point
-
1 point
-
1 pointIl probably pass for now haha. Will keep in mind. Might be my last mod if anything to be honest. Thanks tho.1 point
-
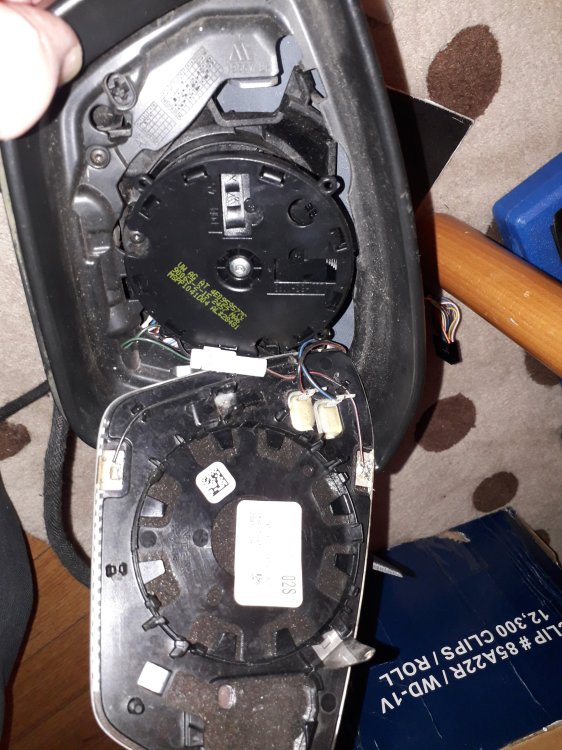
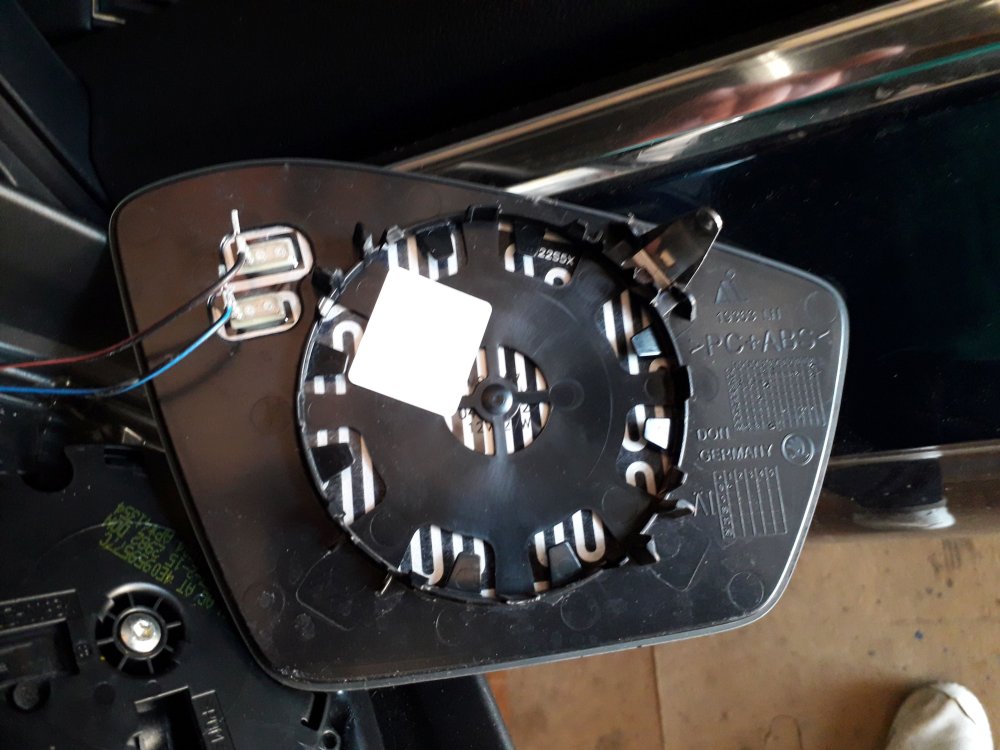
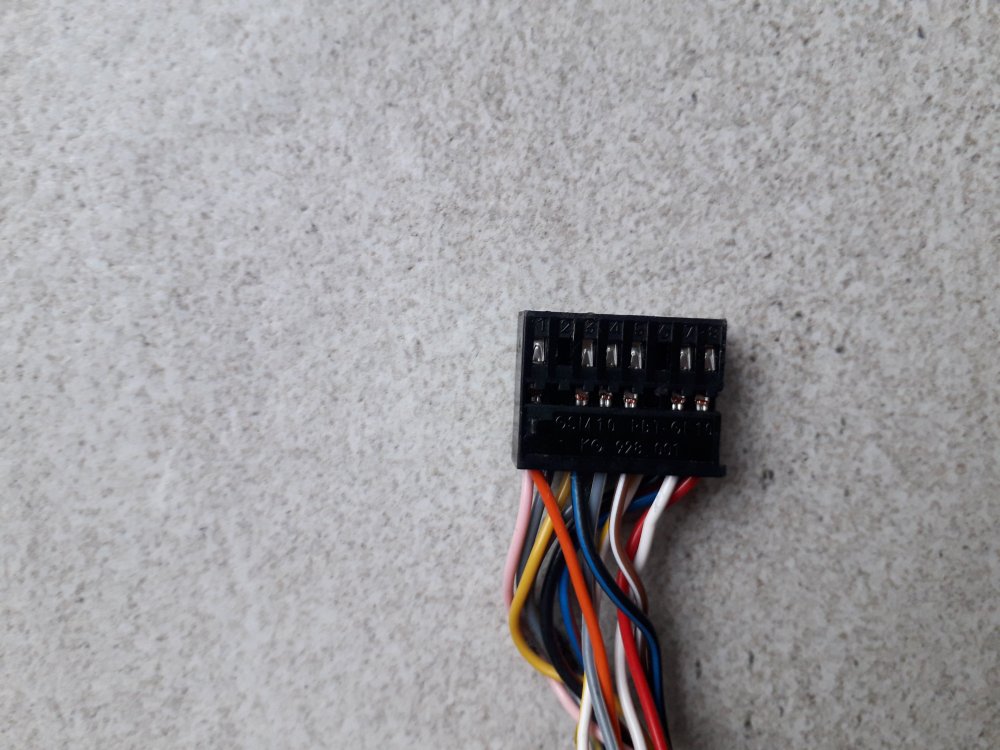
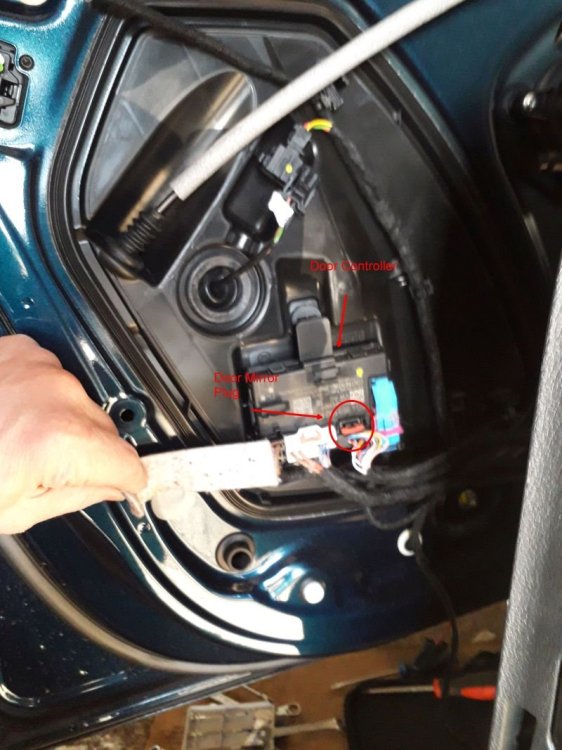
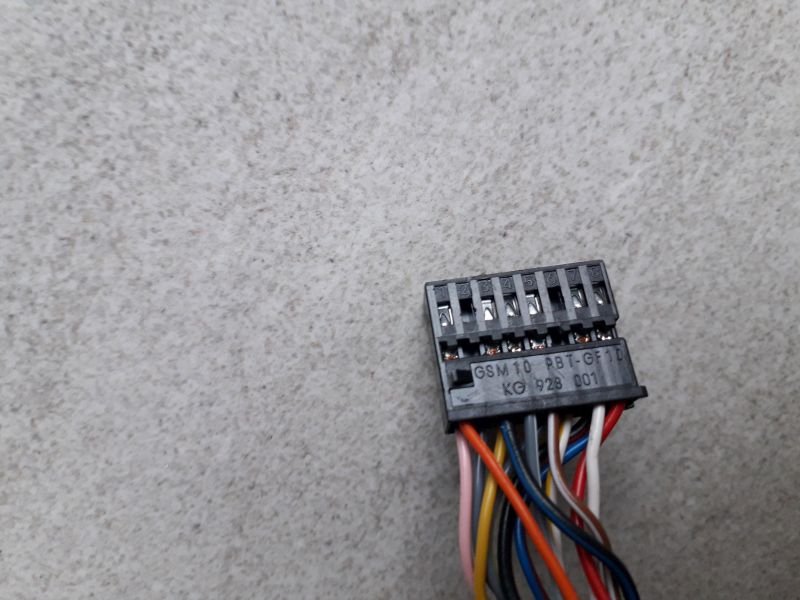
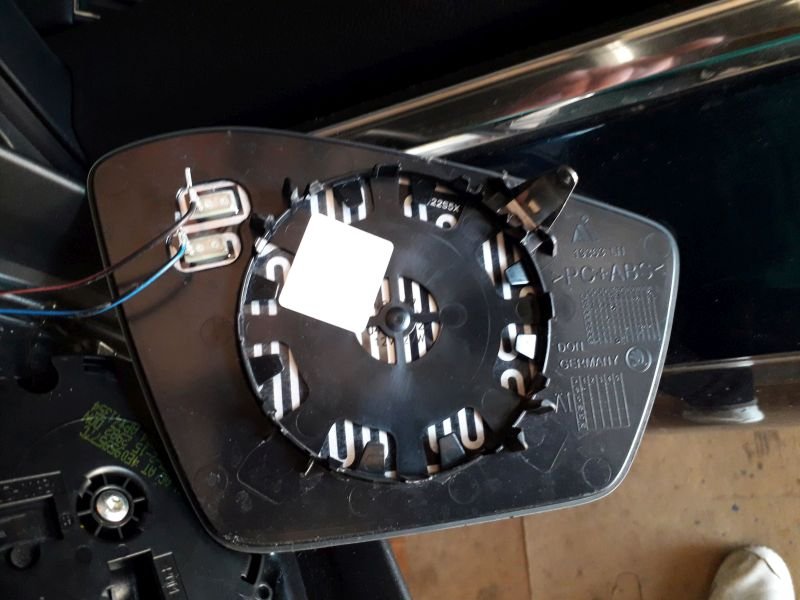
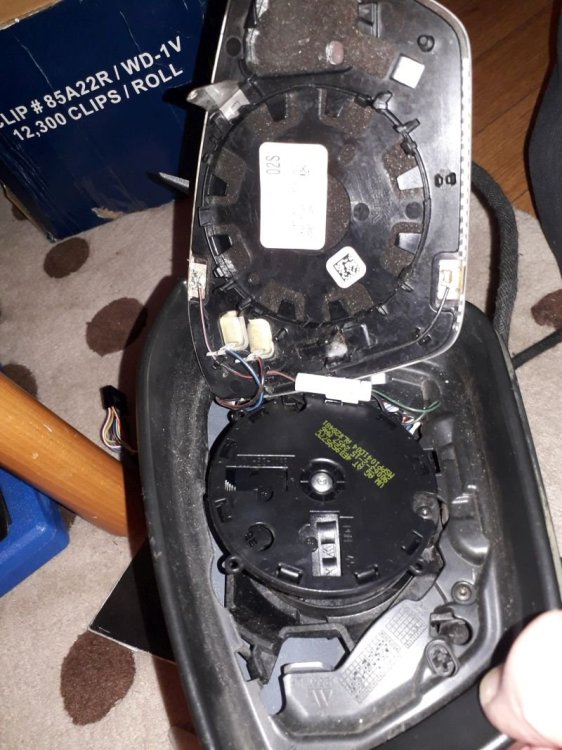
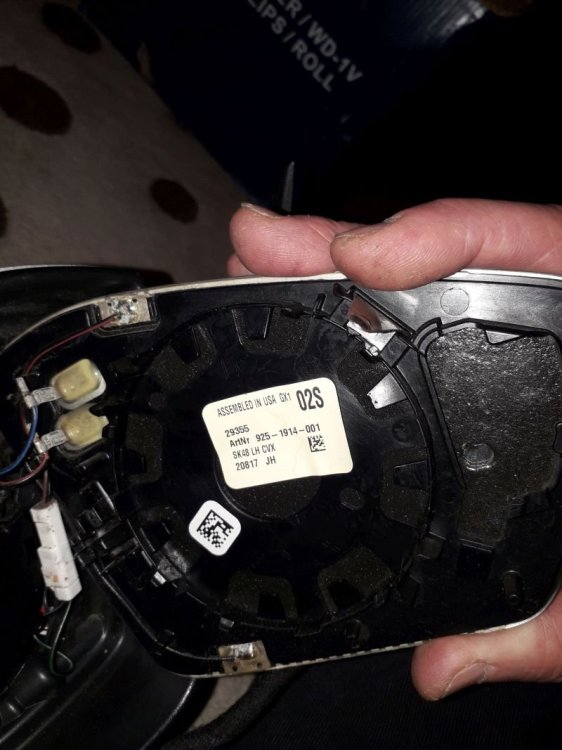
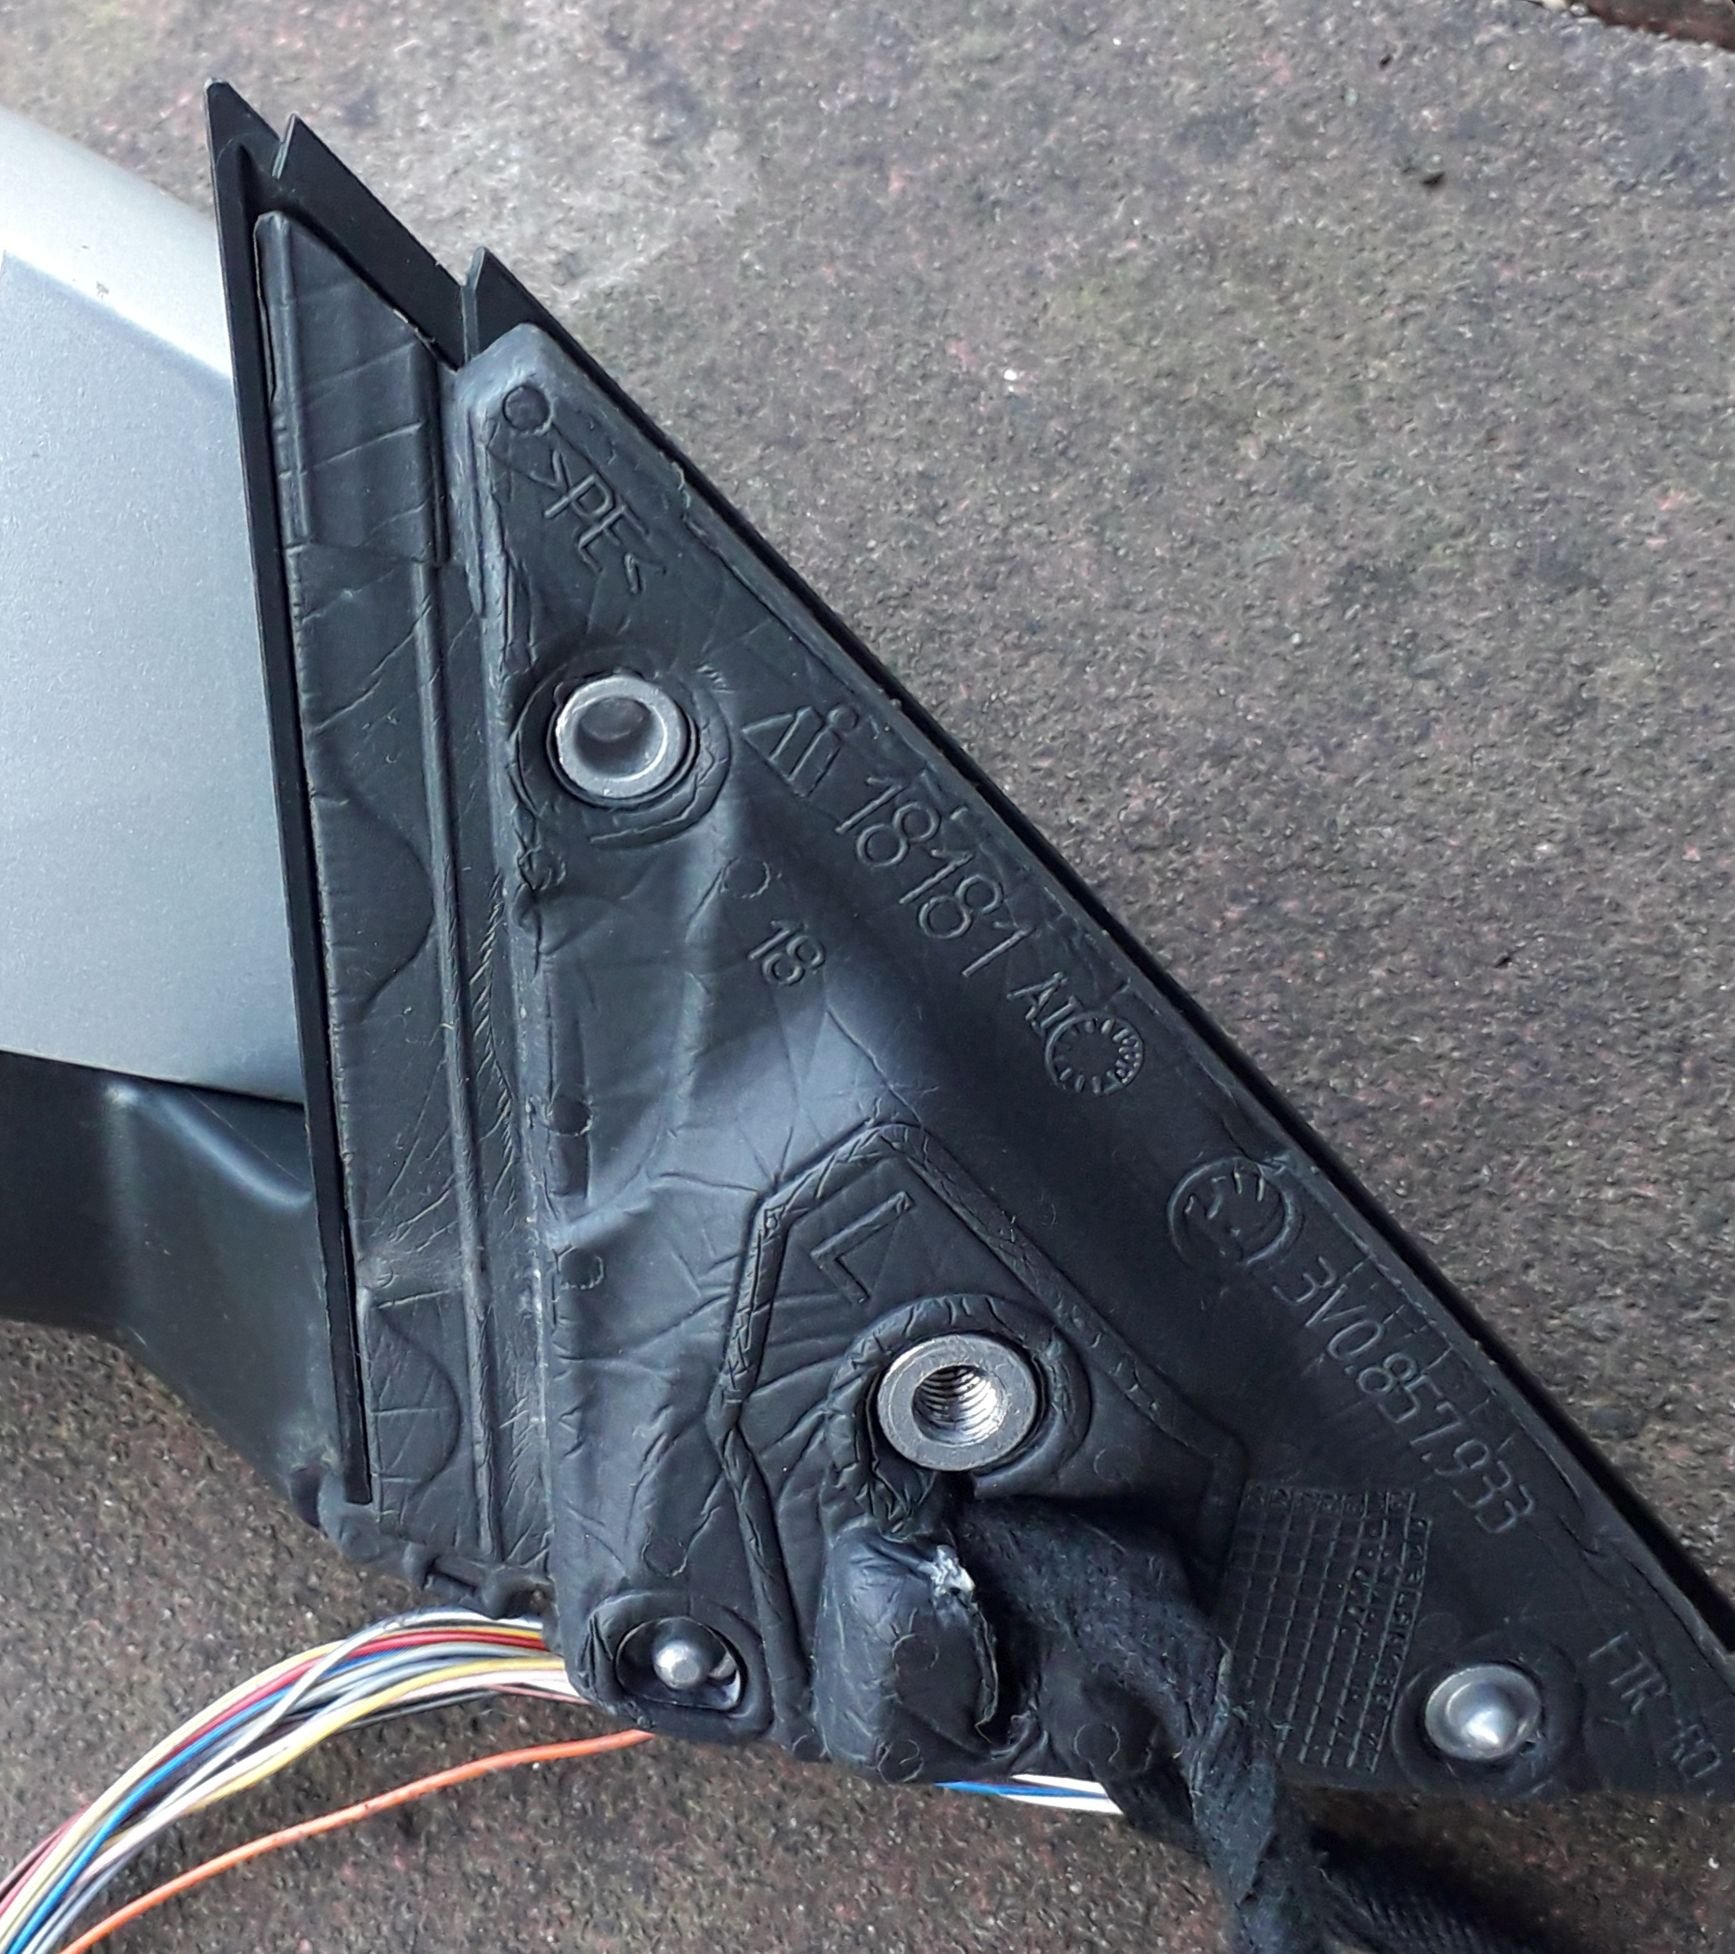
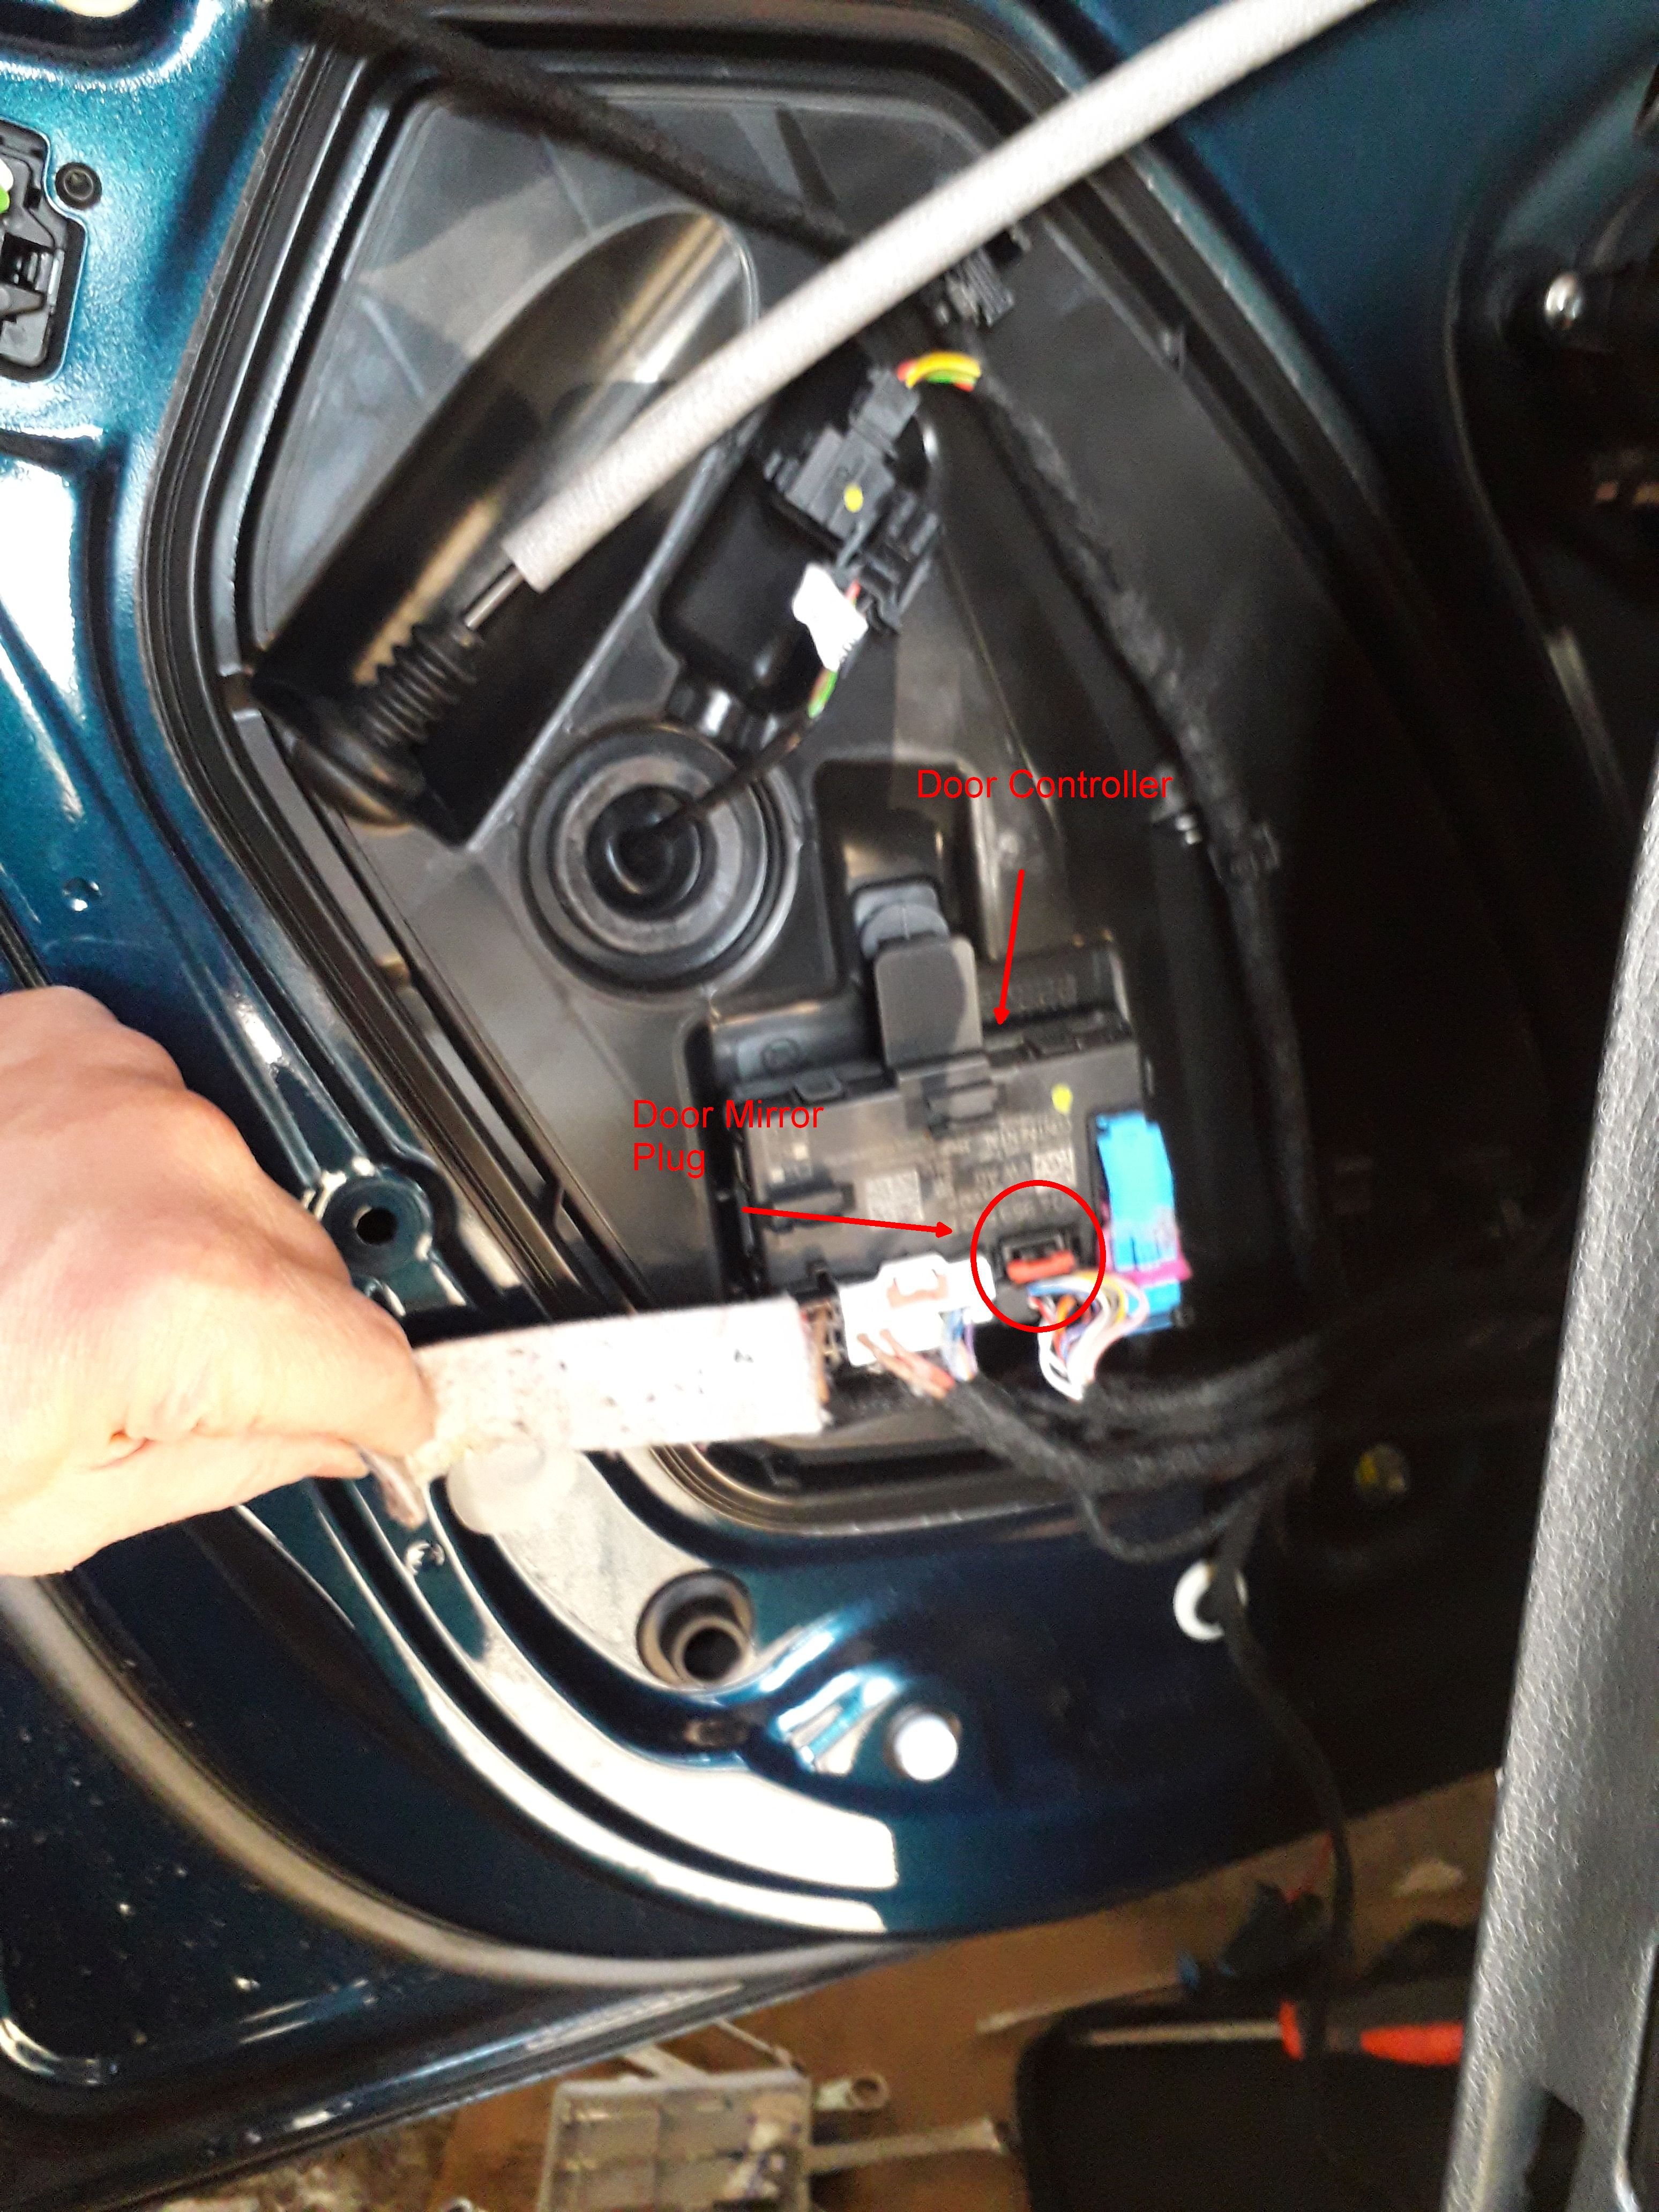
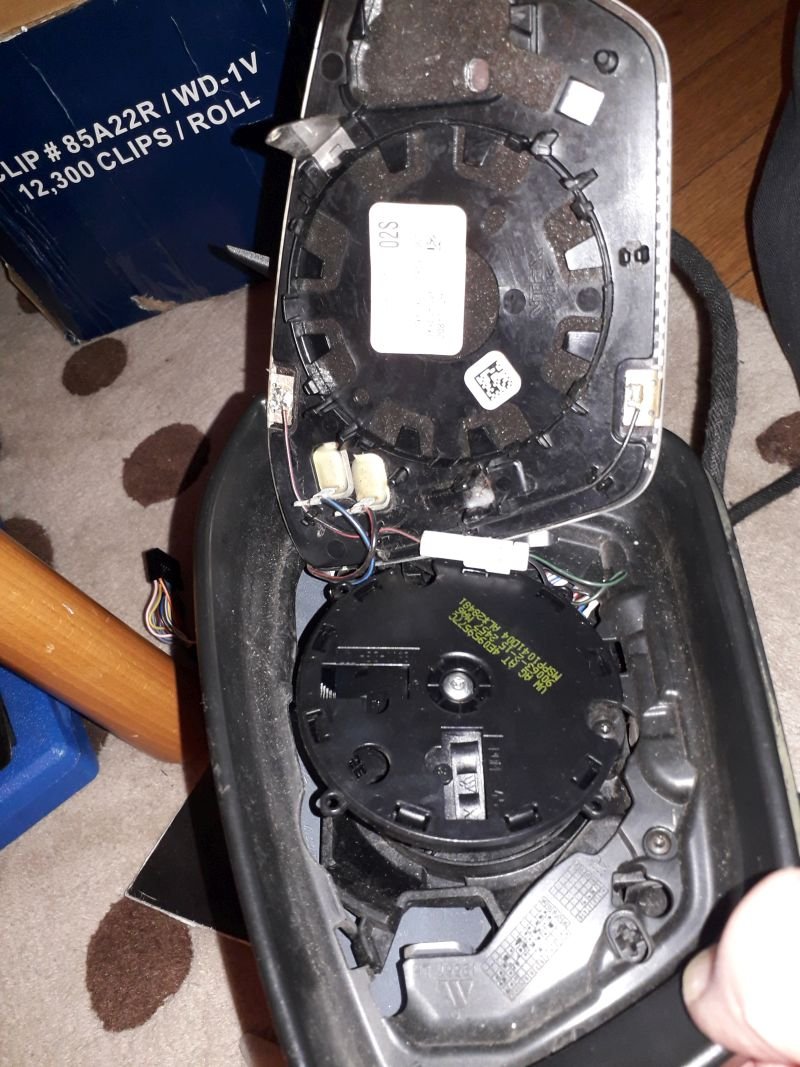
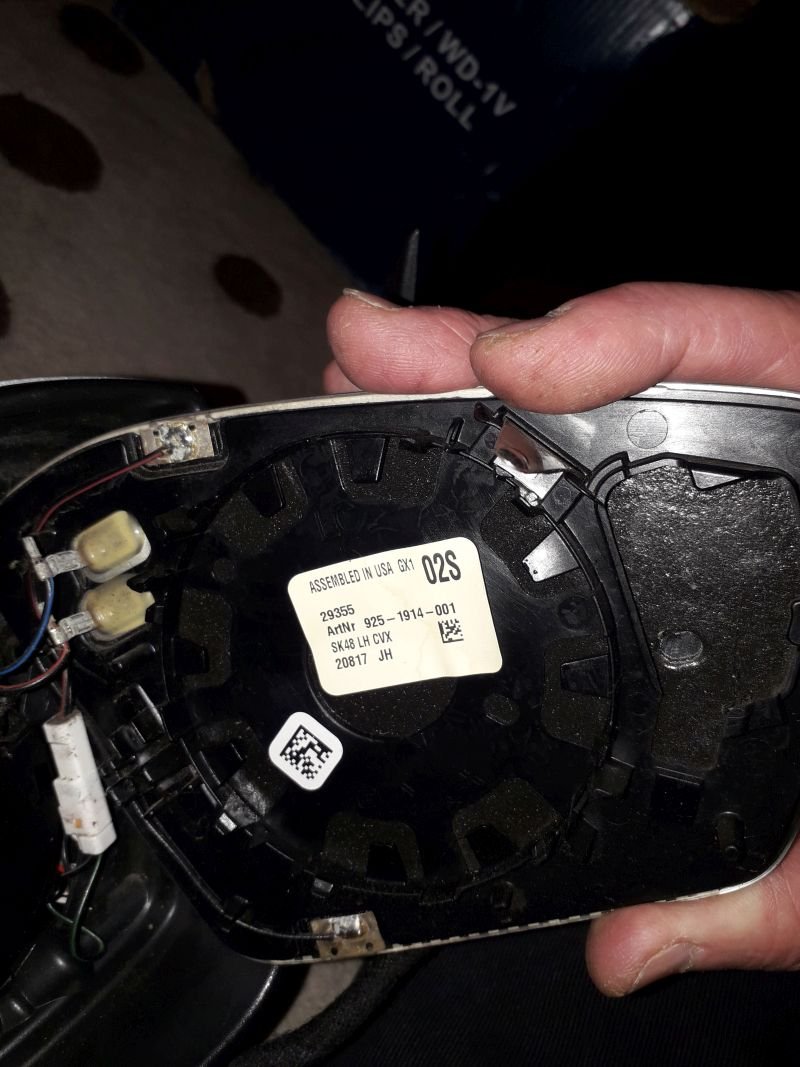
I bought a 2023 SIII last year and soon found that over my previous SII some parts had been scaled down by Skoda. One bit I did not pick up before was the passenger wing mirror WITHOUT the autodimming function I only found out when driving at night once. According to my dealer both mirrors included autodimming - a little dim on their side. I tried to buy a OEM retrofit mirror - none on offer from Skoda. I then found an instruction by Skoda.cz which is ONLY for LHD, i.e. continental European cars. My local Skoda dealer did not find an equivalent. Automatisch abblendbaren Außenspiegel nachrüsten.PDF So I decided to buy a preFL autodimming passenger mirror from a 2017 car without the lane assist (SWA) function. PreFL cars have a SWA icon in the mirror glass, mine has a yellow warning light in the plastic casing. I was not sure if it might fit into my mirror at all as Skoda seem to be selling different passenger mirror glasses at very different prices according to the kit fitted to the mirror. Also I was a little weary of cracking my mirror glass as the replacement prices for a new one are eye watering. I tested the autodimming before taking anything apart by putting 12V onto pins 2 and 6 - it worked. I could practice to remove a mirror glass on the one I bought. It comes out with a little bit of force when moved into the lowest position and levering with a wide plastic spatula from the top. It will also not just drop out as there are still wires attached on the inside for the heating. The replacement mirror (preFL) with autodimming has 2 more wires attached on the inside and an extra little bracket on the back of the mirror glass to secure this bracket. The fitting is exactly the same as on the non-autodimming FL one. After disconnecting the heating wires on the replacement mirror I took the mirror motor and the frame out. This is done by removing 5 little Torx screws, 3 going the the motor casing and 2 extra in the frame connecting it to the painted mirror outer casing. The black frame needs to be unclipped from the back casing which allows more access to the wiring. The back casing slides off the mirror easily now. I removed the cloth tape from the preFL wiring to be able to get the autodimming wires out of the loom. The autodimming wires are pinned into the 16 pin connector on pins 2 and 6. In my FL 2023 connector pin 2 and 6 are ........ yes you guessed it - empty. The wires are Black / Green and Black / Grey. To get the the wires through the mirror bracket that attaches it to the door you have to remove the black polystyrene which is only pushed in. It comes off easily. There is a little bit of grey sealant between the cloth tape and the polystyrene. To unpin 2 and 6 you have to take the plug apart. Now it was crunch time for my car. To fit the new old mirror I removed the glass first on mine to check for compatibility. Exactly the same. Now I removed the door trim - one large Torx below the armrest and a 10mm Hex at the bottom which needs to be turned 90°. The pull the trim off the clips. They all survived. Now detach some of the electrical connectors and the door opener. There is also the drainage for the umbrella compartment. I could not get the door trim off completely. 2 connectors were so inaccessible that I gave up, but the door trim DOES NOT HAVE TO BE REMOVED! In retrospect these connectors were from the window controller and this can be lifted out of the door handle. Once you can get into the door go straight to the door controller at the bottom left. Remove the adhesive protective cloth cover from the connectors and ONLY disconnect the door mirror plug. I pinned the new wires into the door mirror plug and connected it to the autodimming mirror to check if it working together with the driver side and internal mirrors. It did!! All the wiring is in the door right up to the controller. Now unclip the door mirror loom only from the clips in the door. Then remove the trim for the speaker covering the spline XZN screw holding the mirror. I did not remove the mirror completely as I did not cut the loom in the door out. It is very securely taped together. I wrapped this new 2-wire loom in cloth tape and taped it alongside the existing loom going into the mirror. I did the next steps with my son as one person was holding the mirror and one was working on the mirror. On my mirror the steps were the same as on the donor mirror. Loosen the polystyrene on the bracket side. I cut one tiny cable tie which got on the way. Remove the 5 small Torx scres holding the mirror motor and the black frame. Unclip the frame. Remove the back cover. Now you have access to the wiring channel in the mirror. This channel is quite full as I have SWA, 360° cameras, courtesy light and all the mirror motors as standard. I fed a small wire wire back down to be able to pull the white autodimming connector up into the back of the mirror casing. Then refit the back cover, screw in the frame and mirror motor, push the polystyrene back and take care to reseal the loom. Screw the XZN screw in to hold the mirror, refit the speaker trim and make sure to reconnect everything in the door card. Fit your new auto dimming mirror glass. The new old autodimming glass does not have a VAG PN. It only showed a number string: 19363 LH, 925-1914-001, SK48 LH CVX, 20817 JH. I think this is a Gendan number. Skoda seems to be selling lots of different mirror glasses at very different and interesting prices. Looking at the PR numbers I thought that some of these functions surely have to have different mirror glasses, but I think you are buying the loom too because only the loom determines the various functionalities. Looking at the parts I cannot quite understand why Skoda skimped on the AUTODIMMING. It cannot really cost a lot more over the parts used. I hope the new Superb IV will get a passenger autodimming mirror option.


 1 point
 -
1 pointThe driver's door is certainly the "master door", so I tend to open that quickly - and probably just close it again after I've unlocked the car (2015 VW Polo) if I don't want anything silly happening. Too often in recent years I've parked to drop my wife off at shops, she grabs bags out of the boot, then I've forgotten to open>close the driver's door, so my wife gets back from shopping, she gets a bit annoyed when she finds the boot locked has re-locked itself.1 point
-
Latest Updated Speedcams - April, 2025. Here's the latest update of my customised version of EUR Speedcams ( April, 2025 ). They consist of the full EUROPE speed cameras which I've split up into four consolidated poi categories i.e. Redlight Speedcams, Fixed Speedcams ( which now include European tunnel speedcams ), Average Speedcams and Variable Speedcams. They come supplied with my own preferred personal choice of icons, shown below, to match each of the speedcam categories. Remember to Install them as I explained in the first post in this thread i.e. after extracting the zip file remember to open the newly extracted folder and place only the PersonalPOI folder and metainfo2.txt file onto your sd card ( Please Note: a usb stick will not work! ). Also, please remember to select/tick the relevant newly added poi categories and the poi audible warning alert in your infotainment map menu settings after performing the update or they will not display on your map or audibly alert you. Hope you all enjoy them! EUR Speedcams - April, 2025.zip * Credit to jungblume2005 from Gpsurl for the use of his database which was used and converted in order to compile these files.


 1 point
 -
@Ootohere I was in the process of editing my earlier post re the recalls but was prevented by the server being offline for maintenance.1 point
-
1 pointAlso the very similar Audi etron of course. Talking to one etron owner but I think they were on salary sacrifice where a would be 1,000 a month rental turns into 530 or 570 pound a month depending on if you are on higher or highest England or Wales team rates, don't know what they are in Scotland but same or more avoidance possible I presume. Surely some sort of ceiling would be appropriate ie one can only claim £5k a year of salary sacrifice on cars or the like ?1 point
-
Should owners who do not care, ignore DVLA Recalls or advice from Manufacturers be allowed to take their vehicles anyplace. Car parks, multi-storey, underground, overground, wombling free. Parking at Heathrow etc etc. This is an issue, there are plenty that will not do the sensible thing. Should Porsche / VW UK be acting more responsibly?1 point
-
1 pointThe only thing I can see with that is that it doesn't come with the securing screw that keeps the spare wheel in place in the wheel well (The wheel is obviously smaller than the space it fits into so you can remove it) With the proper kit you get a large bolt with a handle on one end that you screw into the floor of the car to secure the spare wheel. Then you also get a foam insert that fits into the spare wheel and holds your jack, wheel brace, centre cap and wheel nut cover removal tools and locking wheel nut. This also supports the boot floor above it.1 point
-
1 pointMassive tax avoidance scheme for new ones which means big value drops from new value to 3 years where these cars are well under half price and of close to a third the value.1 point
-
1 pointHi, my name is Darko, I am a great fan of Škoda, few day ago u changed from Octavia to Superb 3T. I wish to find new stuff about Škoda in this forum, thanx for having me here.1 point
-
1 pointHi Darko, greetings from Bulgaria! The forum is very helpful and I am sure you will find a lot of useful stuff here ;) I’ve also changed my Octavia 3 for Superb 3 and I am pleased with it so far. Happy reading!1 point
-
They need to ban the likes of e-scooters / e-bikes or their Batteries being taken into Tall Building or even lower buildings. Maybe ban shops / repair centres for these being near any other properties. Also places where Motability Scooters are sold, maintained, stored or are taken into buildings will require legislation. So much to deal with where there are fire risks. ................. Some might need to choose. Burn to death or possibly drown.
 1 point
 -
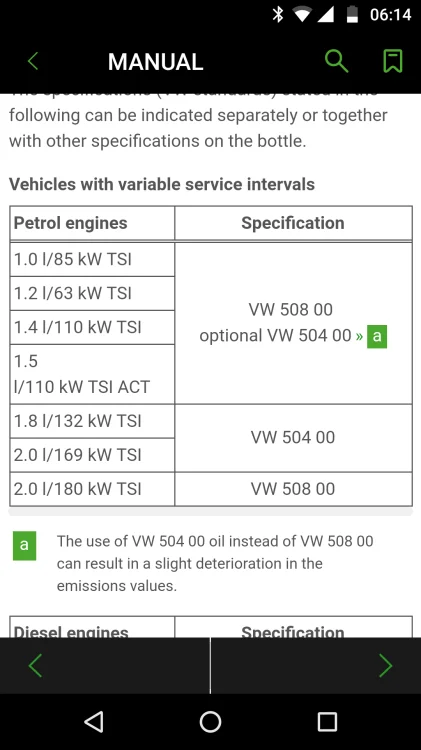
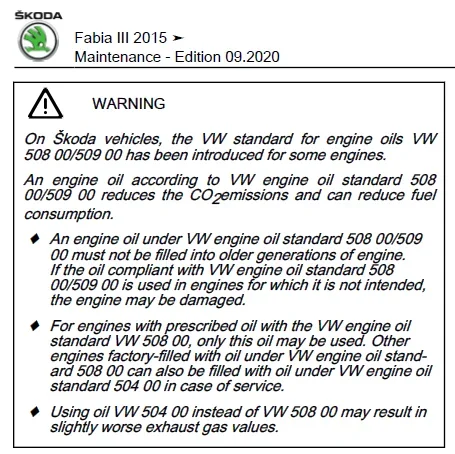
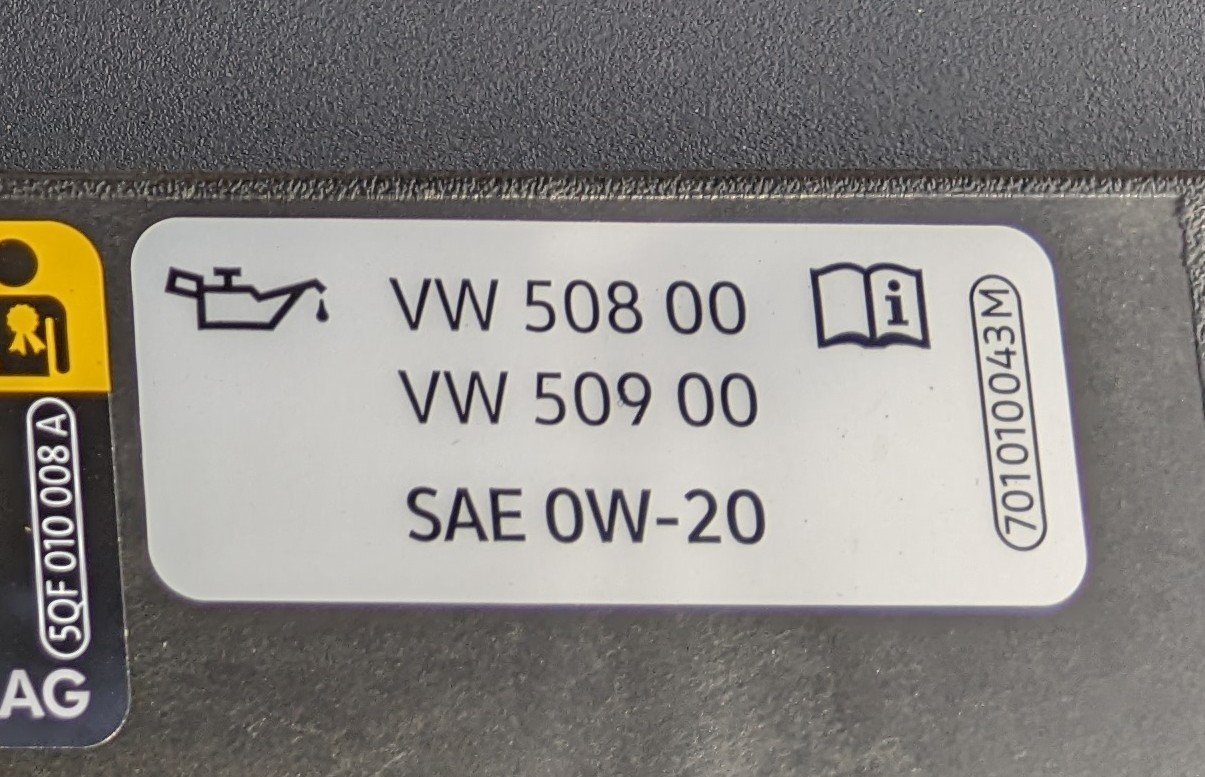
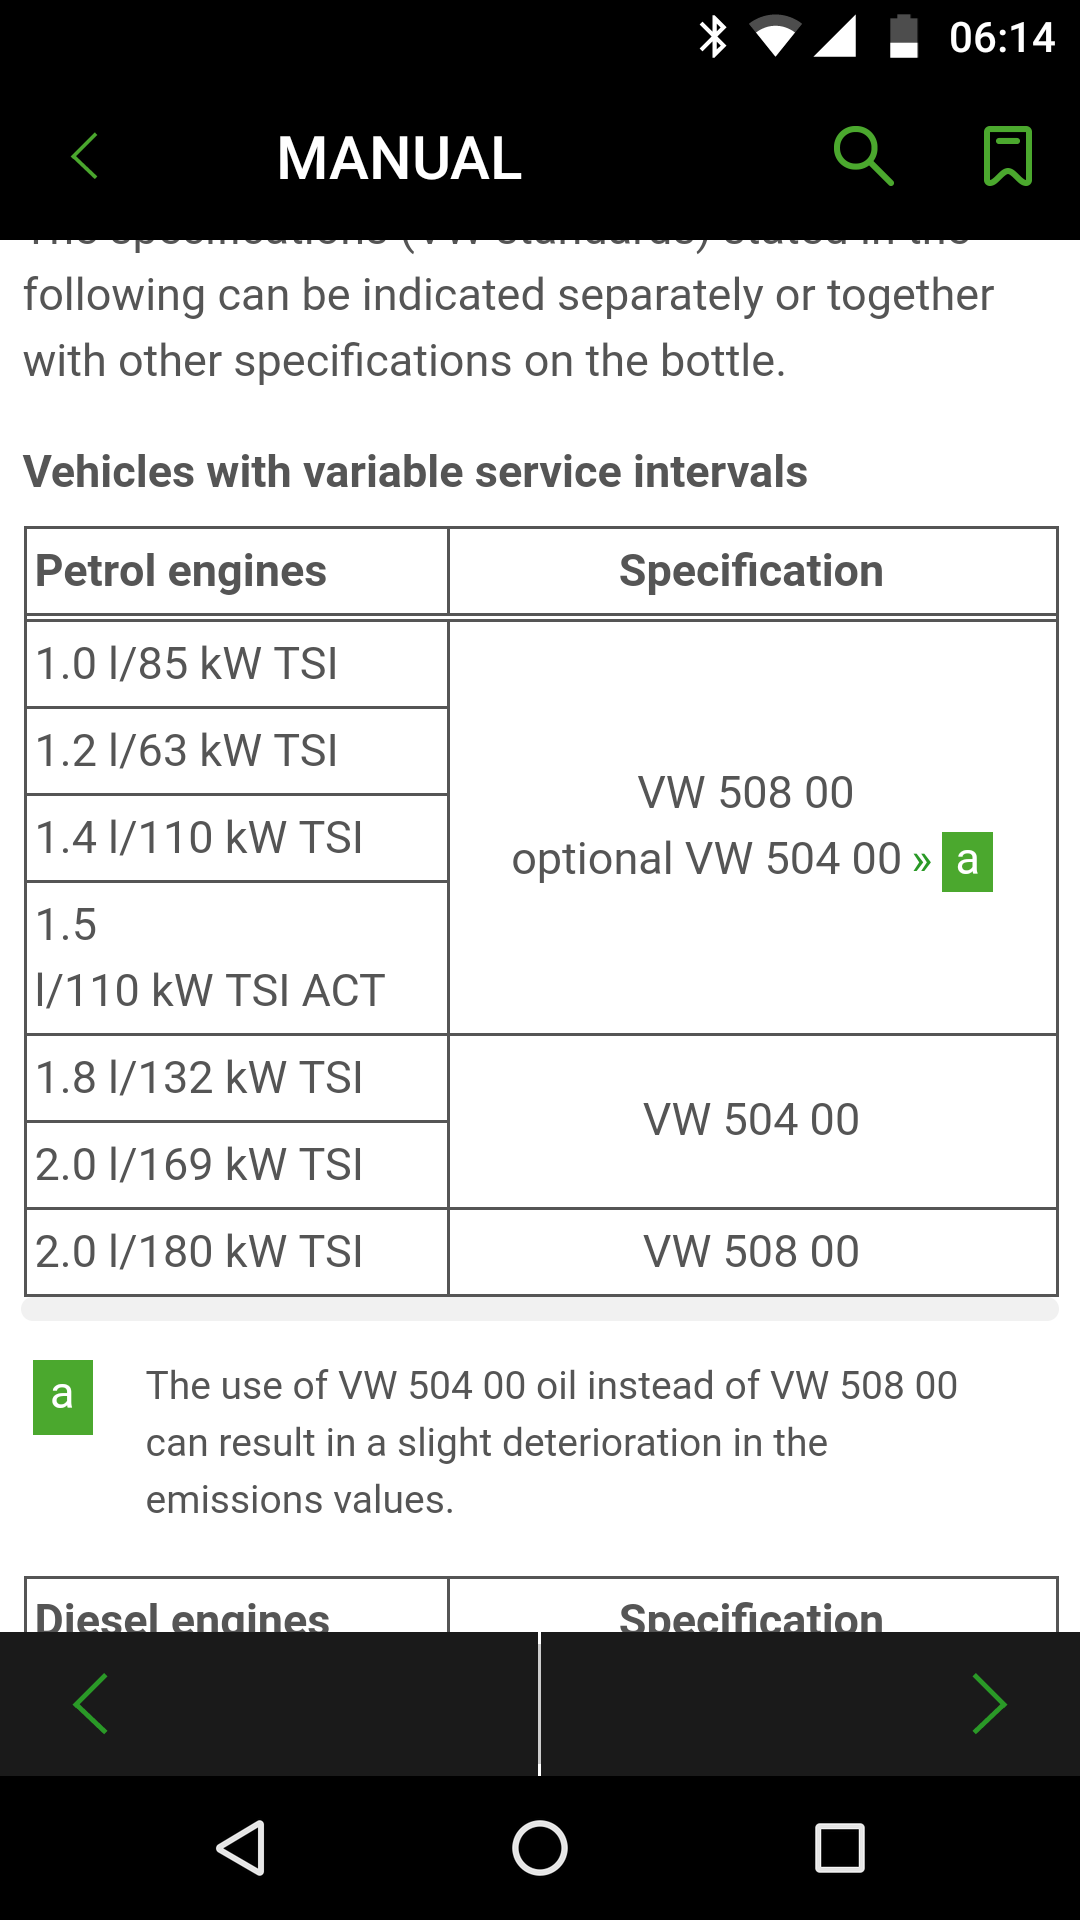
The Factory Fill oil in 2018 was certainly VW508 00 / 509 00. So that is the recommended, advised, oil they guide you to use. But as shown from the owners manual VW504 00 / 507 00 can be used. Just not by Skoda / VW Group incase a car was subjected to a WLTP test as it was imported into a country. There was a reason they went 0w 20 FS IV pre WLTP Certification was started.

 1 point
 -
Hi Gerrycan, do you really get 7 year warranty on Skodas in Oz?1 point
-
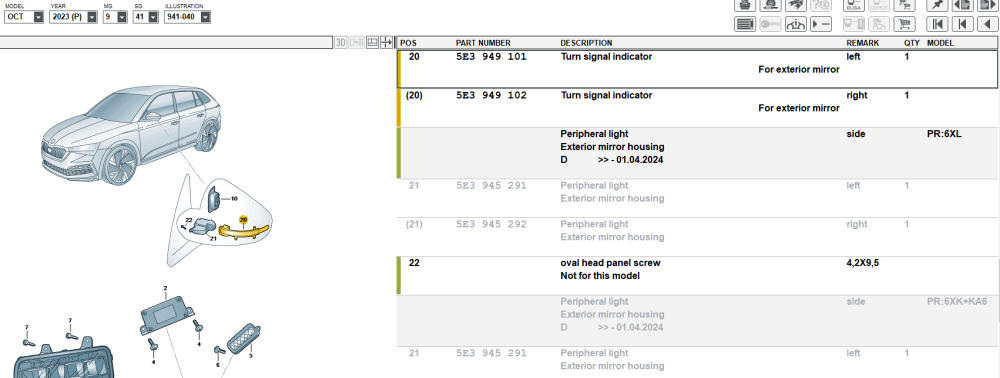
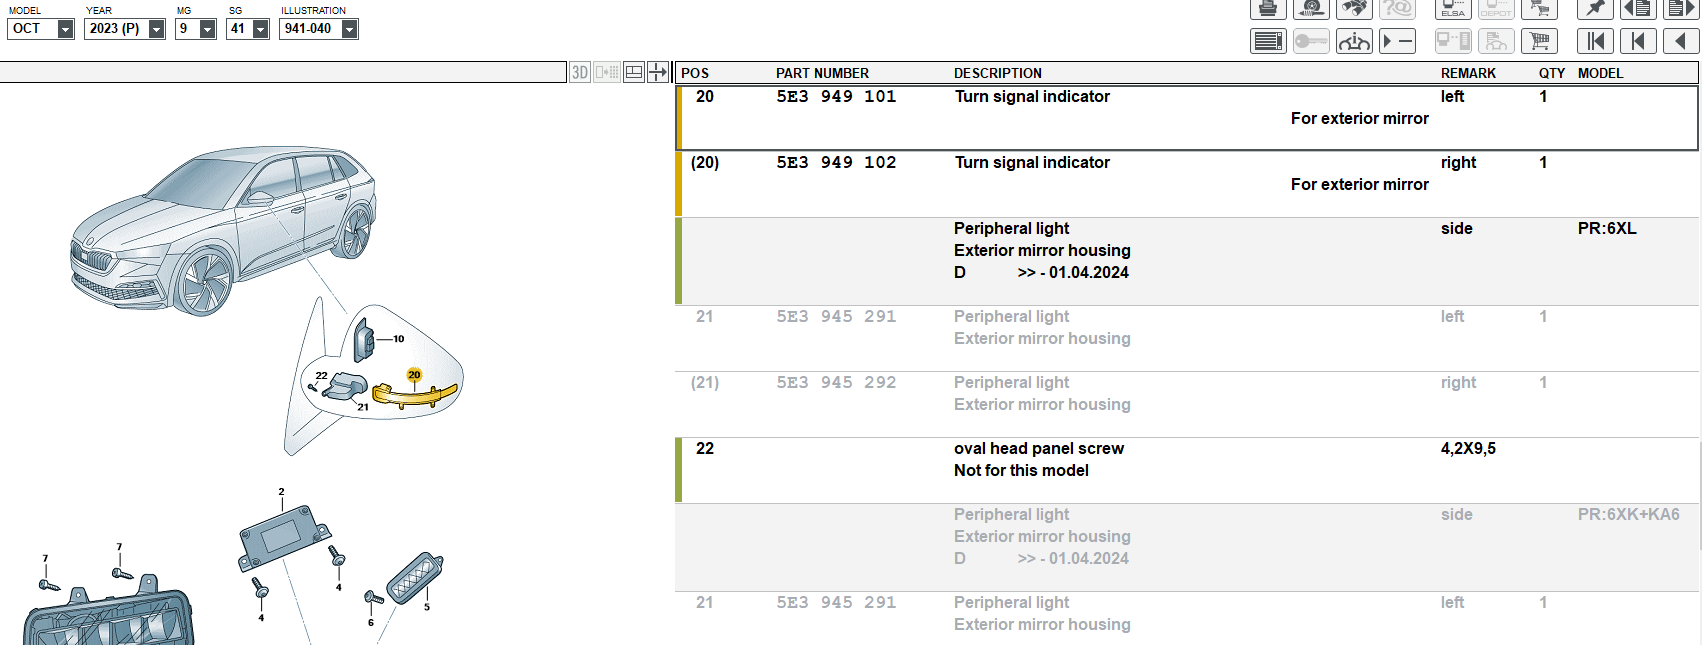
1 pointOK, there is a start. I found the same on Alixpress at a lower price. It's smoked black, I prefer the clear glass option, but it's not available. https://www.aliexpress.com/item/1005008665725468.html?spm=a2g0o.detail.pcDetailBottomMoreOtherSeller.14.66adDj6lDj6l2x&gps-id=pcDetailBottomMoreOtherSeller&scm=1007.40050.354490.0&scm_id=1007.40050.354490.0&scm-url=1007.40050.354490.0&pvid=6a714554-1e20-44ee-bbed-76842b7649bc&_t=gps-id:pcDetailBottomMoreOtherSeller,scm-url:1007.40050.354490.0,pvid:6a714554-1e20-44ee-bbed-76842b7649bc,tpp_buckets:668%232846%238111%231996&pdp_ext_f=%7B%22order%22%3A%228%22%2C%22eval%22%3A%221%22%2C%22sceneId%22%3A%2230050%22%7D&pdp_npi=4%40dis%21EUR%2168.83%2120.65%21%21%2174.40%2122.32%21%40210385a817439185960088775e6f45%2112000046152823432%21rec%21GR%21109817215%21X&utparam-url=scene%3ApcDetailBottomMoreOtherSeller%7Cquery_from%3A I checked the part number from ETKA and it is the same as the seller (for my car MY2023). It is the 5E3949101 and 5E3949102
 1 point
 -
1 point
-
It should not be forgotten that the VAG group did have some difficult times with this engine. When the new WLTP emission requirements came out this engine virtually disappeared from production for about 18 months. When it eventually appeared there were many posts about the cold start kangaroo's issues especially for manual transmission owners across all models. The issues seem sorted now and I would not mind owning one although it is pretty rare here in Australia where the old, but still good, 1.4tsi predominates across new vag group vehicles.1 point
-
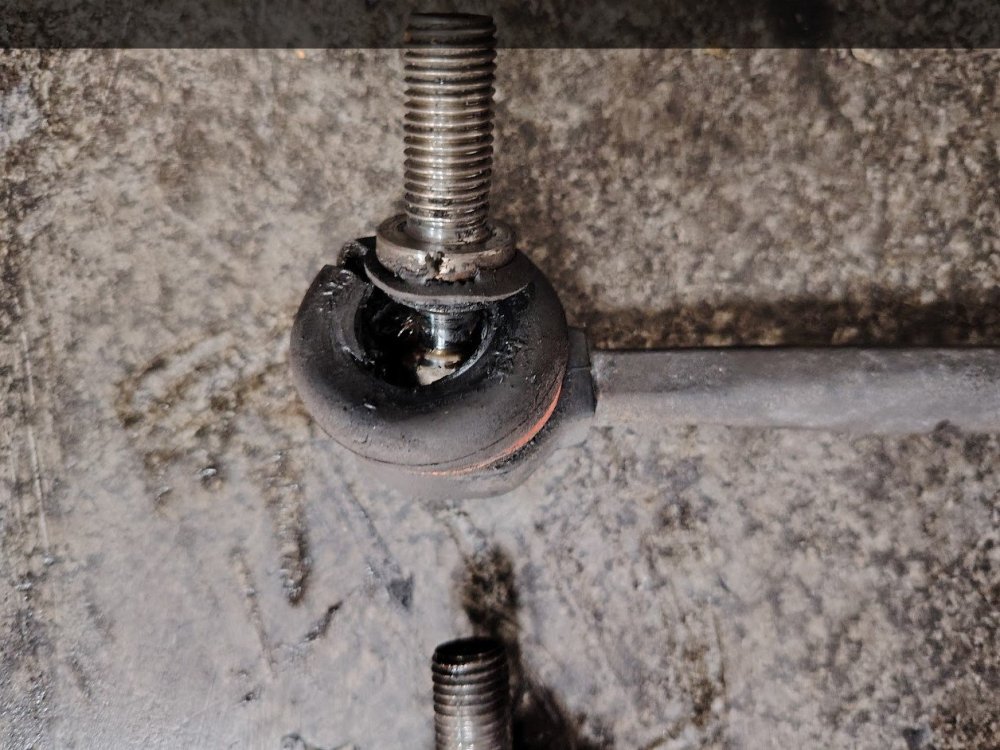
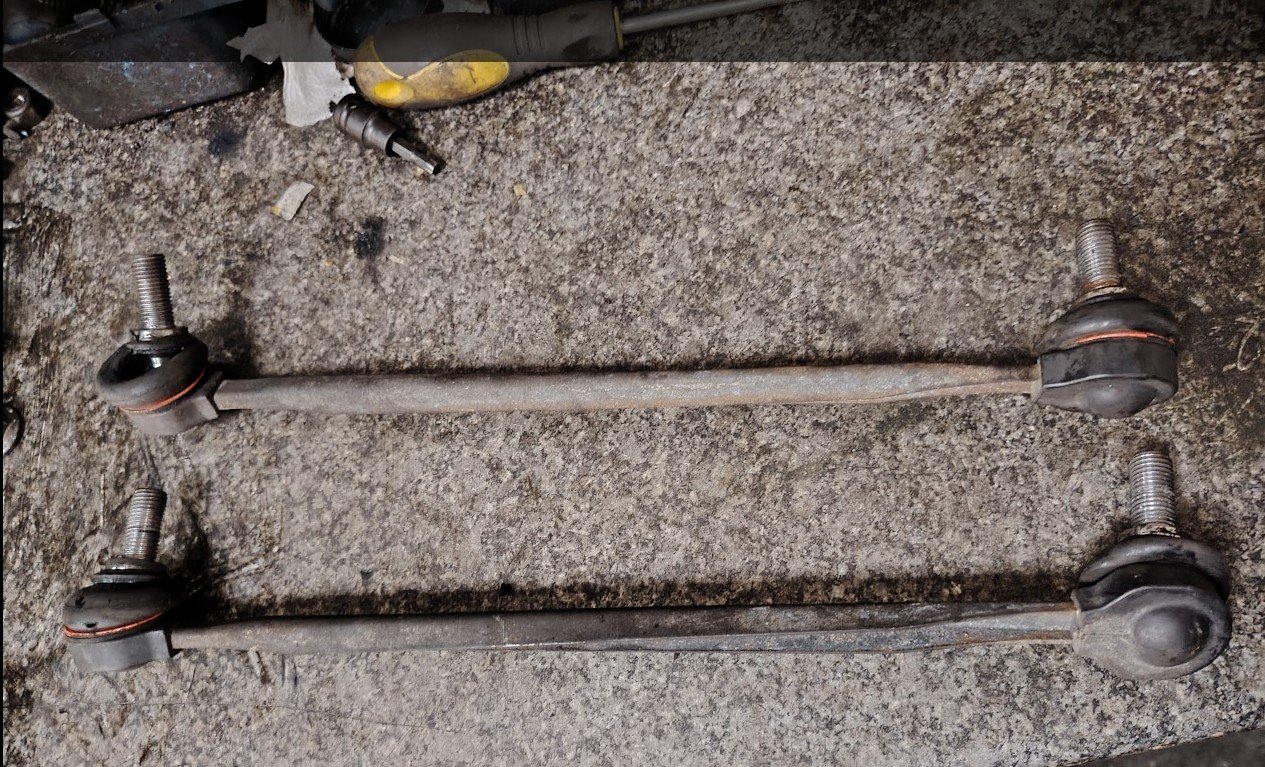
After replacing the ARB links on both front wheels, the noise is pretty much gone now. There's still a slight rattle from a panel or something, but it's nothing major – totally bearable.
 1 point
 -
I care! I had no idea how complicated my engine control systems are. The result is impressive power, excellent low revs torque, & amazing fuel efficiency. I regularly get over 50 mpg, & on a run occasionally >60 mpg. Superb car.1 point
-
1 pointUnfortunately I need some interest from Mrs DSL. She knows I’m subtly hinting bit not biting. She does ( wearing of trousers) and mouse (man or) before anyone asks. 🤣1 point
-
1 pointIch habe das hier gerade auf AliExpress gefunden: €66.65 | Für Skoda Octavia MK4 NX Schrägheck Combi vRS 1,0 1,4 2,0 Hybrid 2020-2025, dynamische LED-Seitenspiegel-Blinker-Signallampe https://a.aliexpress.com/_EwRCjNA1 point
-
1 pointOne thing to do is to verify that all the door detection switches are operating correctly, open each door in turn and check that the indicator on the instrument panel responds accordingly.1 point
-
1 pointChecked out this thread before having the clutch on my 2007 Octy replaced, and to update on costs my usual specialist charged £940 for clutch, DMF, master and slave cylinders.1 point
-
1 pointHow long does it take you for the 5 M walk to car after pressing unlock button? Are you are aware that doors will relock if no door is opened approx. 35 secs after unlocking?1 point
-
1 point
-
1 pointSo, do you unlock the the car before you are next to it? Has the key got a metal blade that you put in the steering lock to start the car? Or is it a 'KESSY' type key? What is set to open on the car when you push the unlock button once. You can change this on the infotainment system. Does it do anything different if you push the unlock button twice? Thanks. AG Falco1 point
-
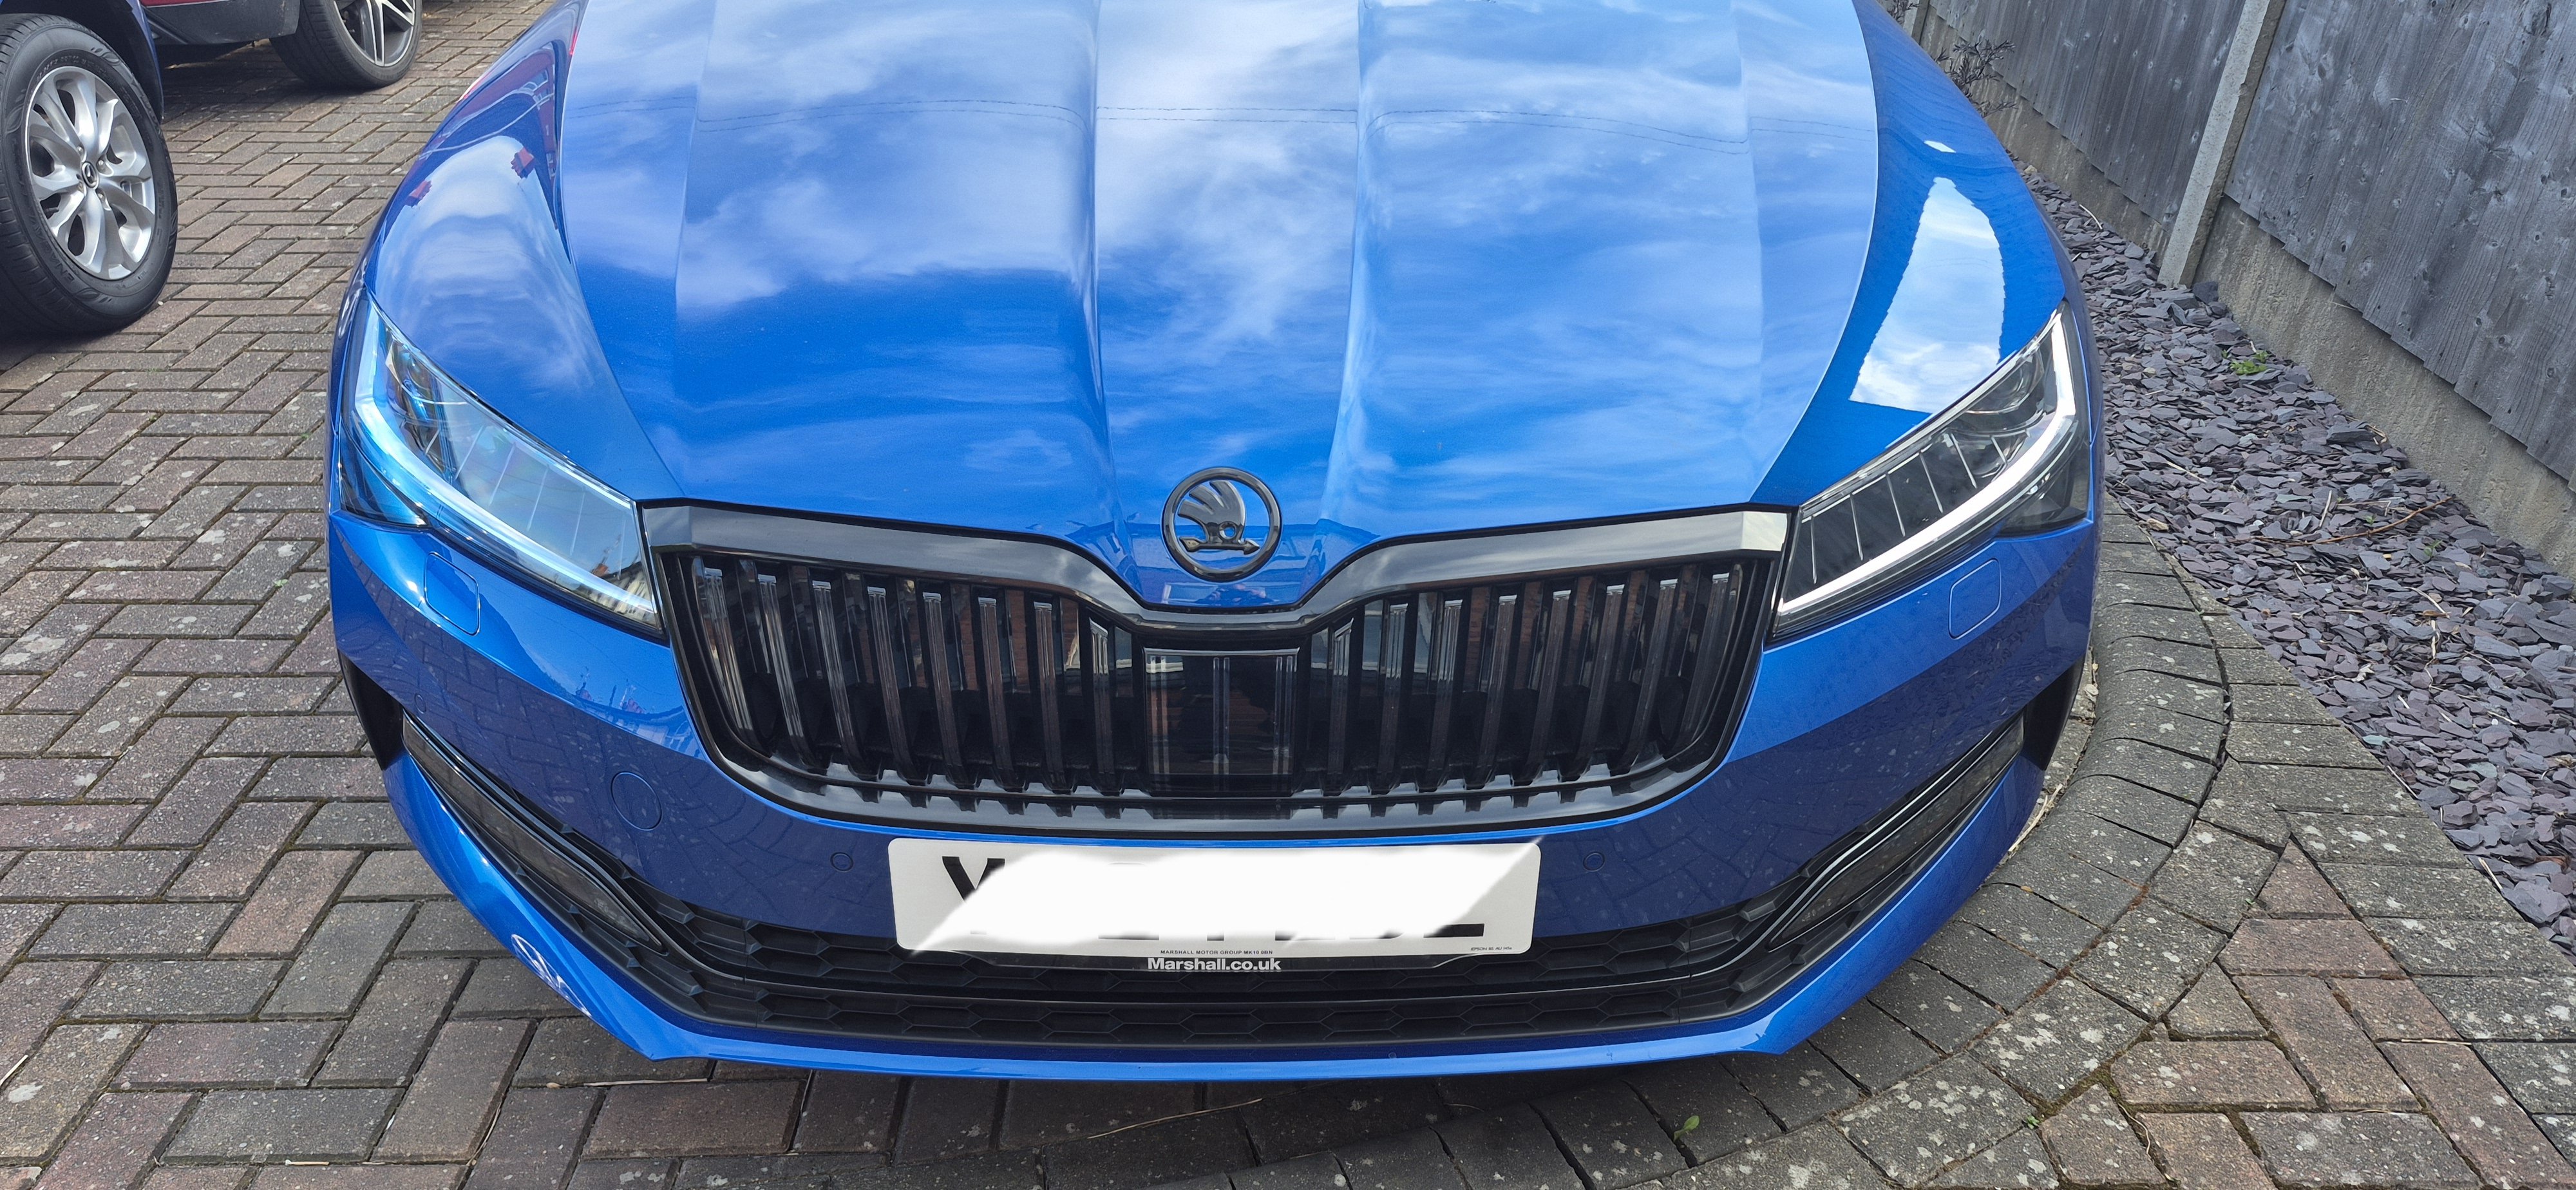
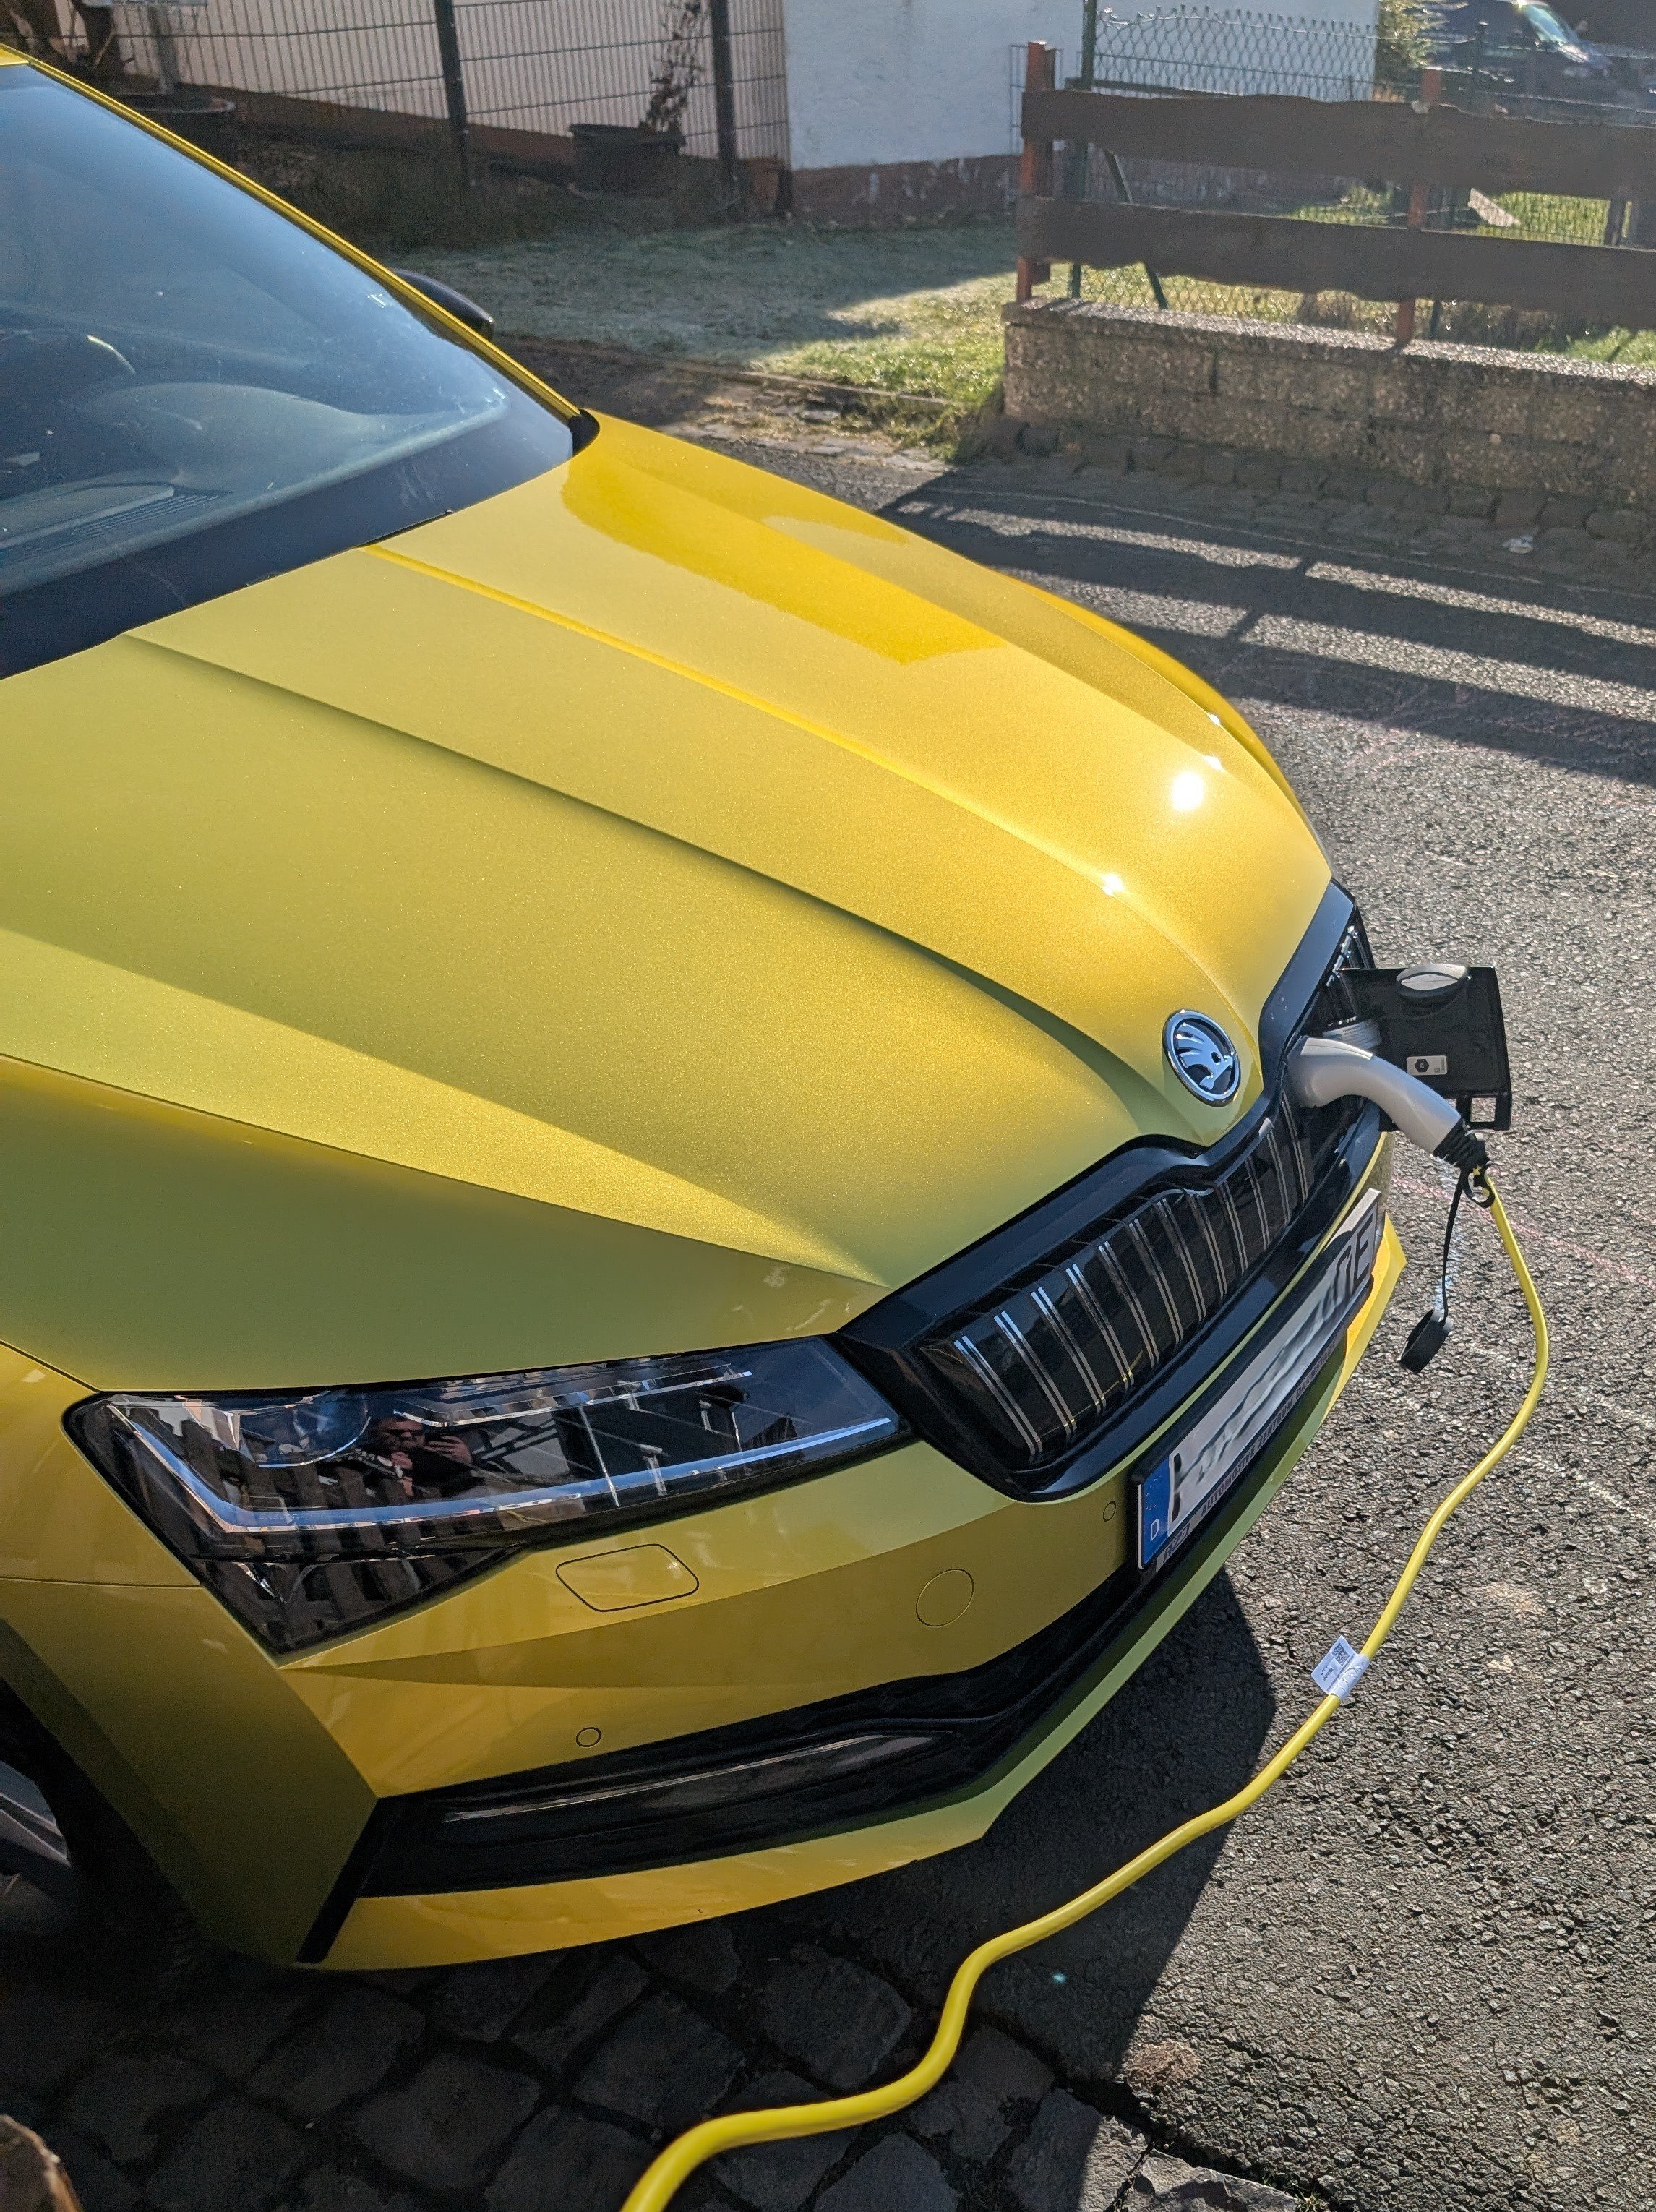
1 pointDone, nerve-wracking but done, weirdly had to cut the 3 prongs down as they were way too long for the divots in the bonnet, but apart from that, it went well. colour match it perfect too. 😁
 1 point
 -
1 pointI'm not entirely certain how much help this is, but if you unlock the car and don't open a person door within a minute it relocks itself by design.1 point
-
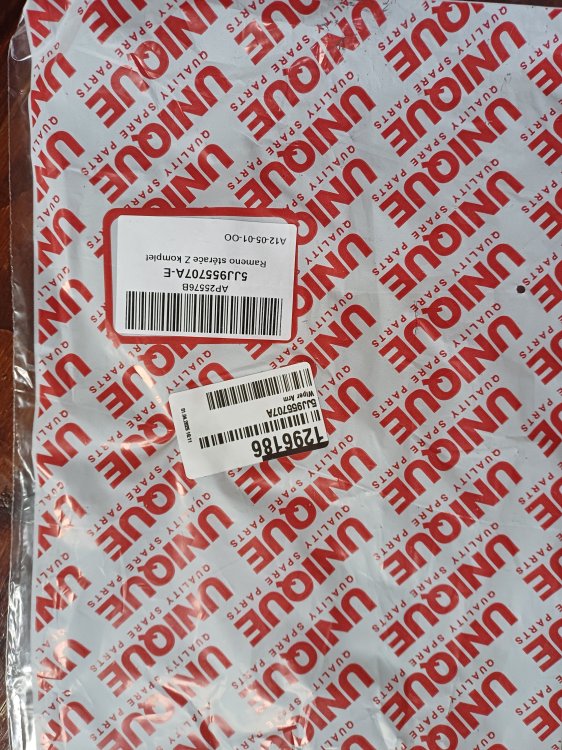
New wiper arm for 'old' style blade fitted. No noise - excellent! Arm from Skoda Parts included a blade (not sure what make - see packaging with nos.). This blade does not judder - for how long? Who cares.........I can now fit a Bosch replacement. Thanks to all the others who trialled this first. Cheers
 1 point
 -
1 pointWrong Group - asking for ADMIN to move it to the Skoda RAPID group.1 point
-
1 point
-
1 pointGo onto Opie oils and just put you reg in. It’s supposedly a 0w20 or something ridiculous. I have an up gti with the same engine and it’s quieter and I use a 5w40 ee oil fo m millers1 point
-
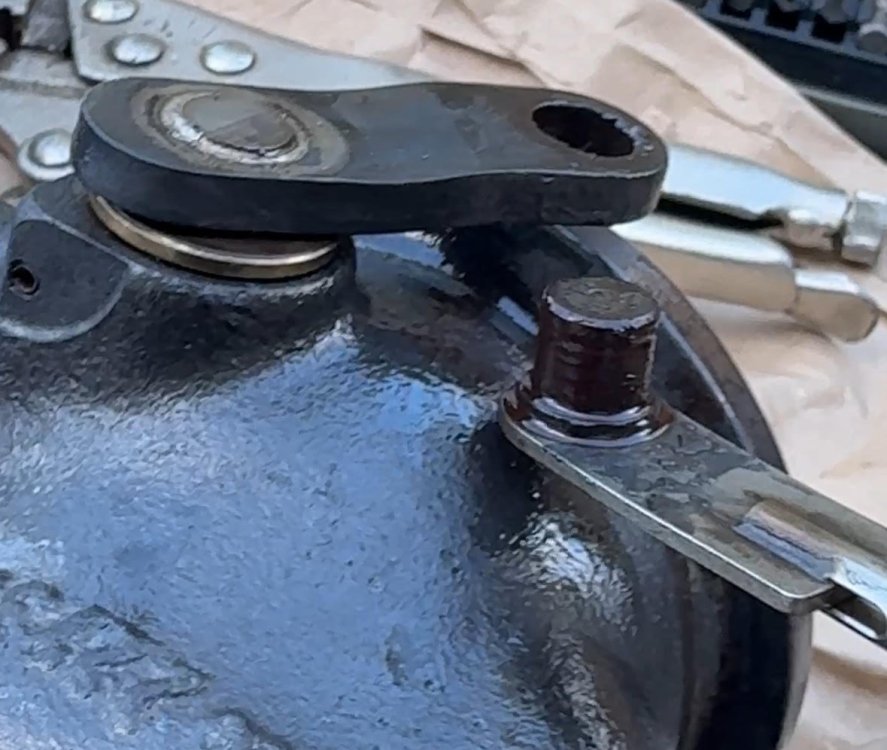
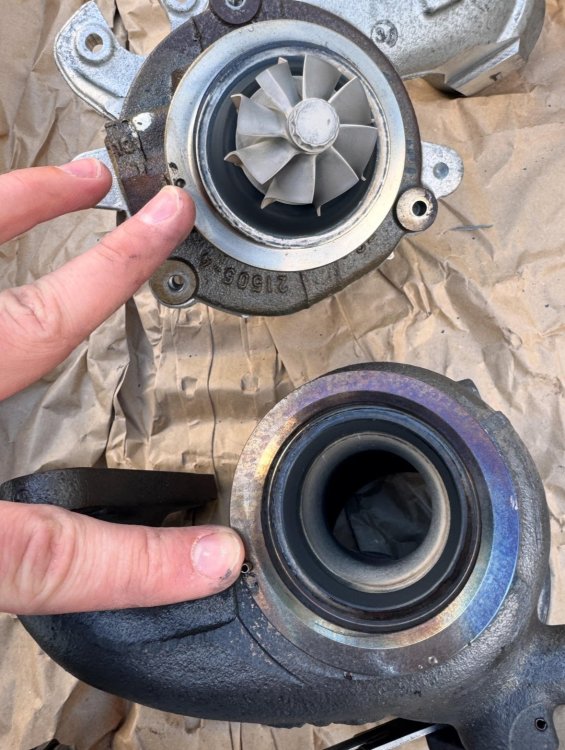
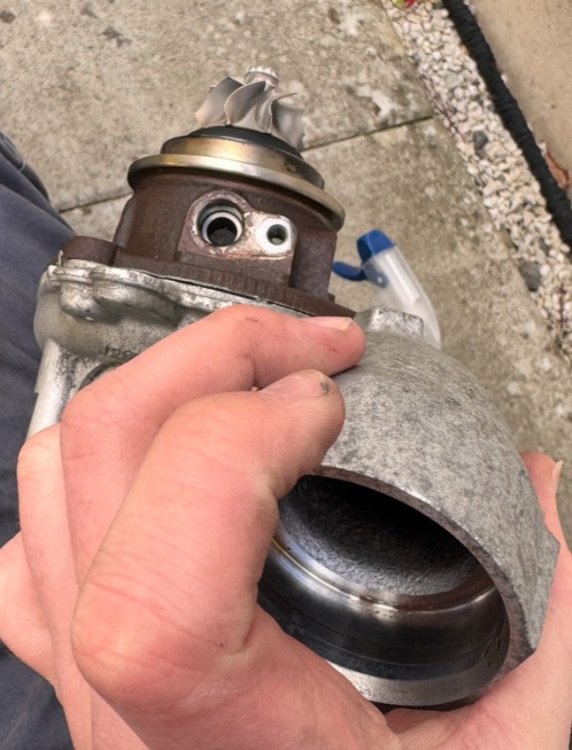
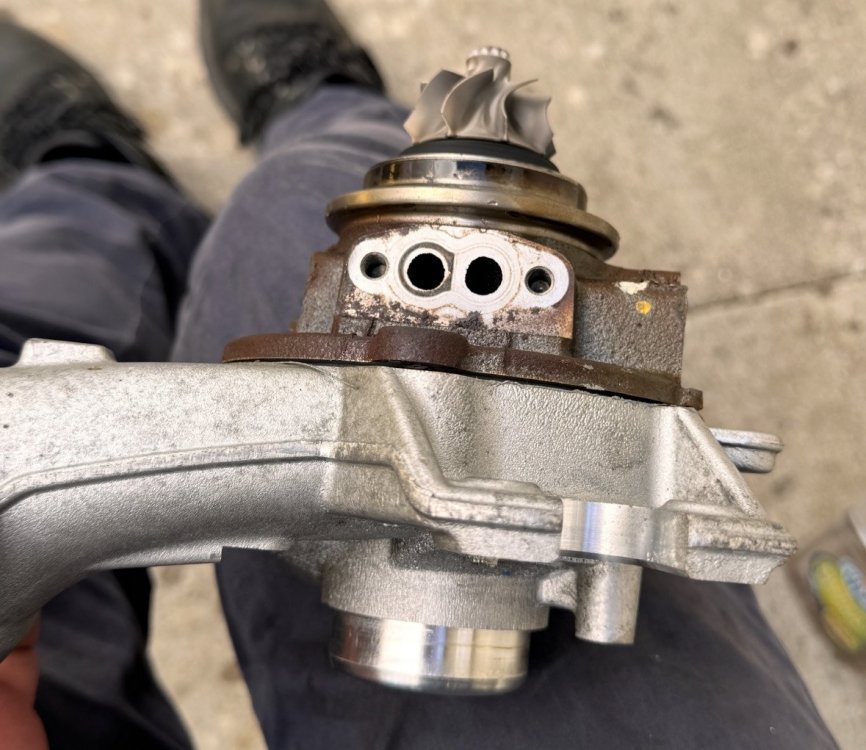
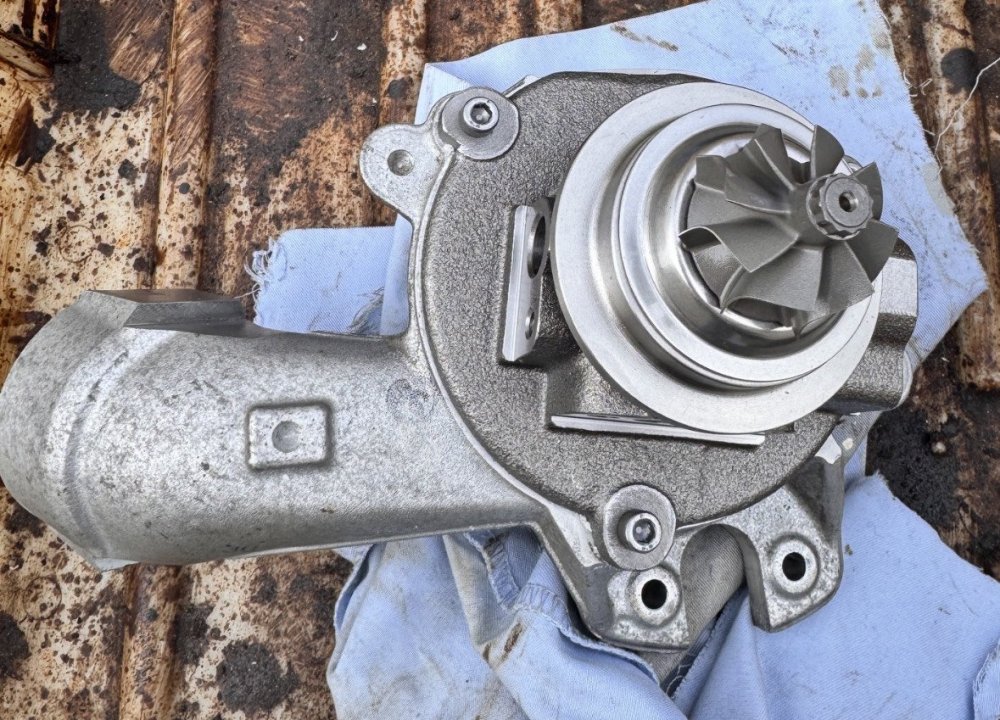
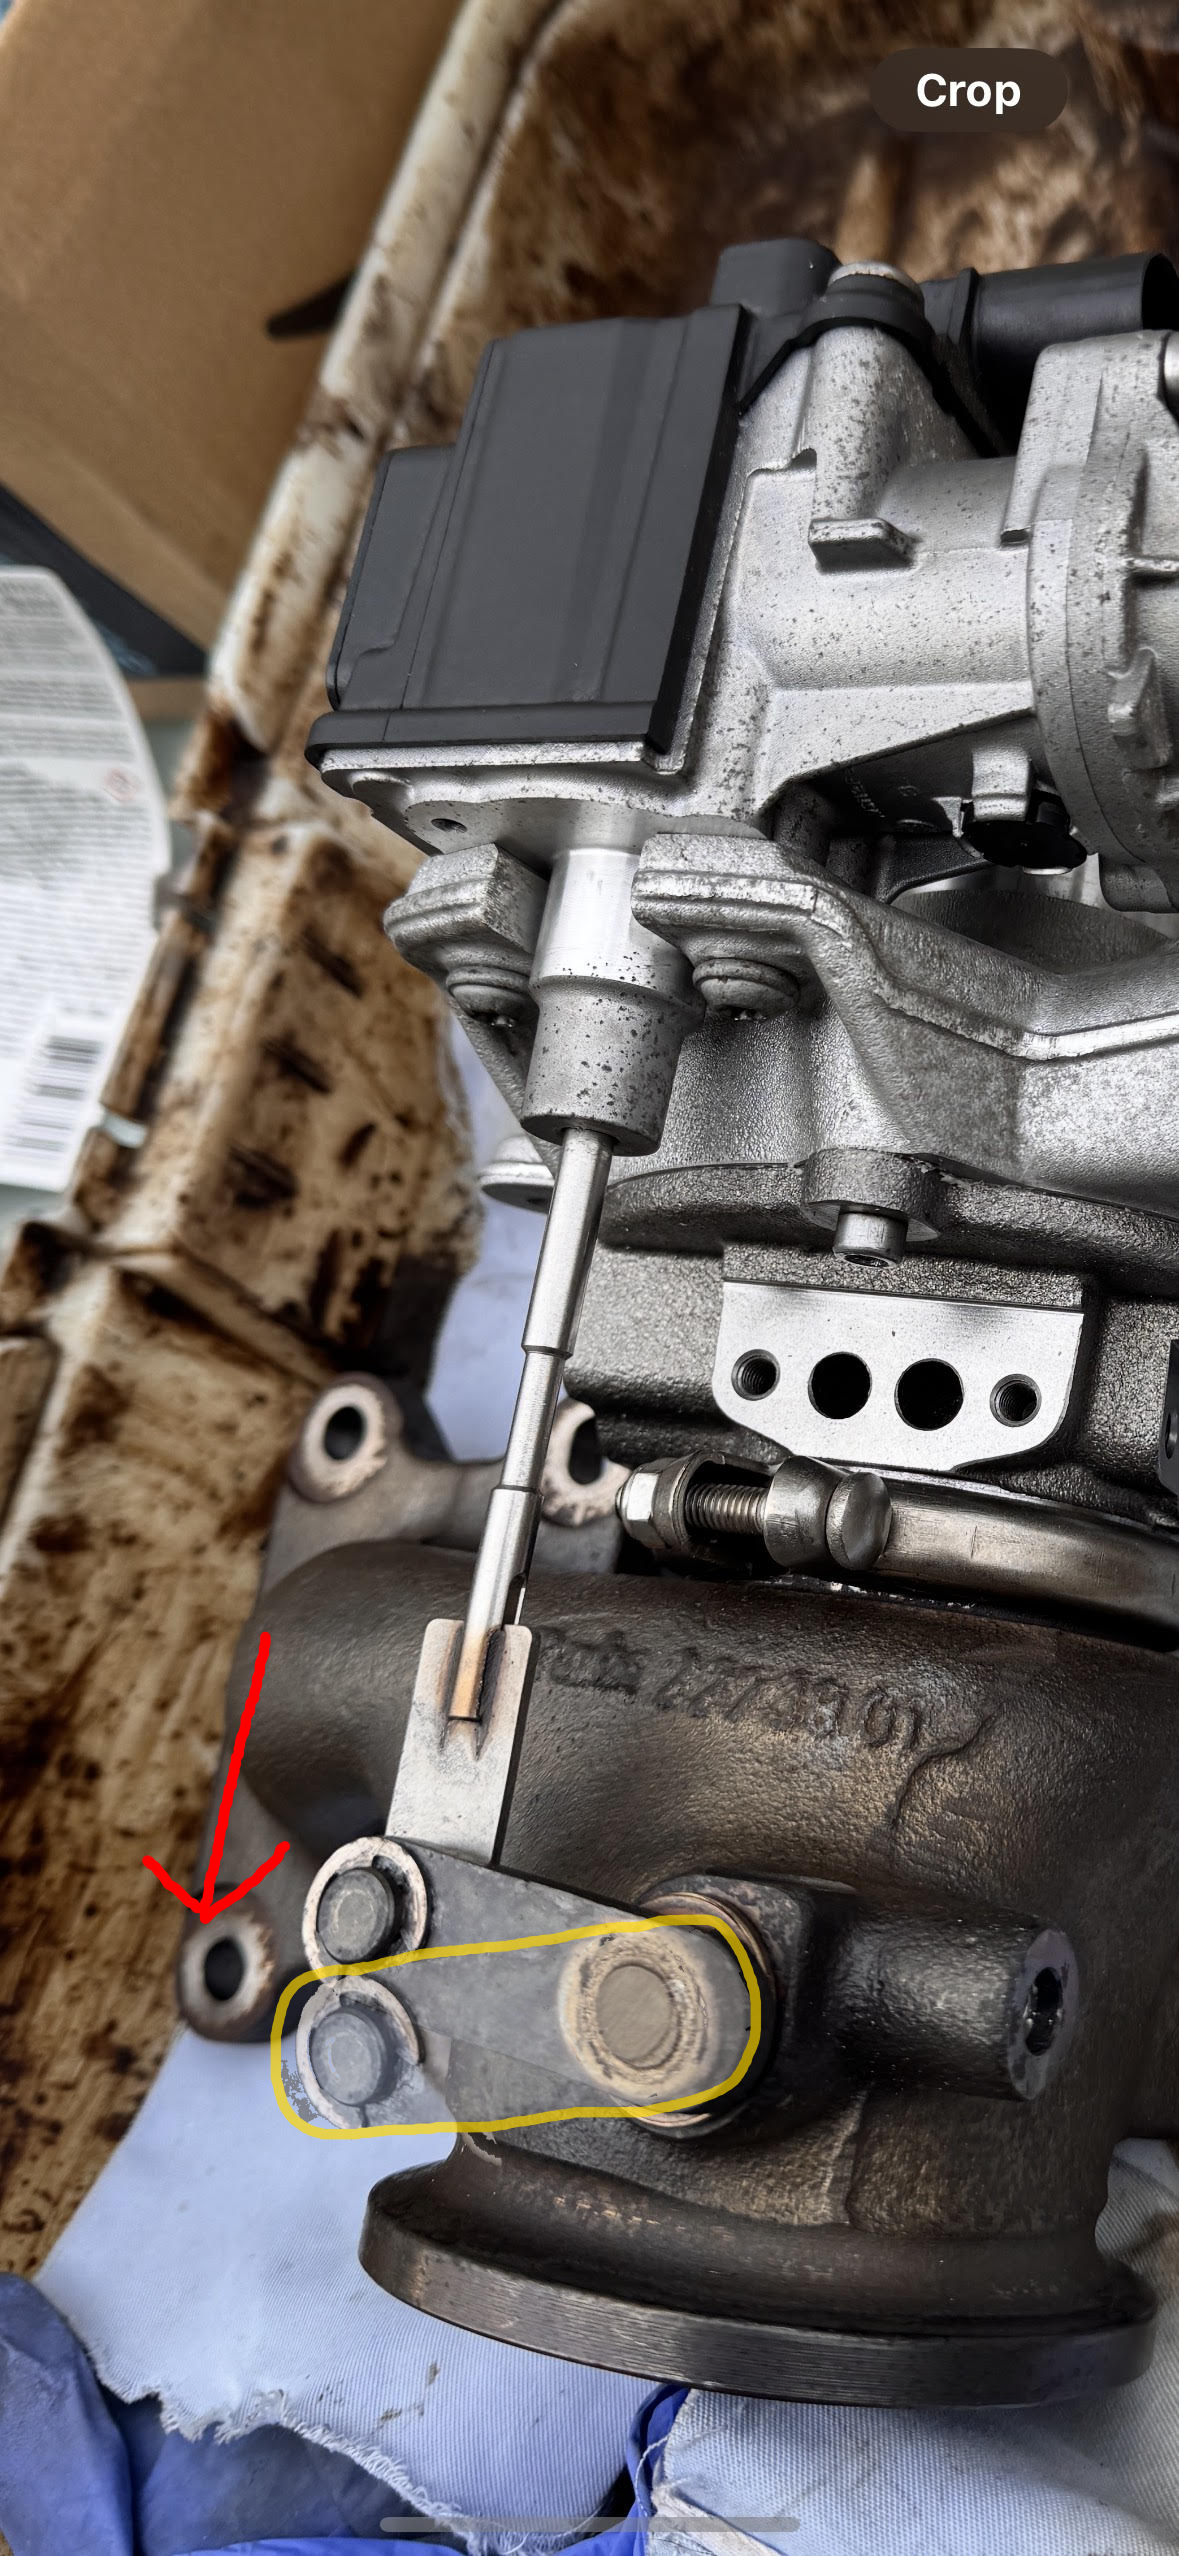
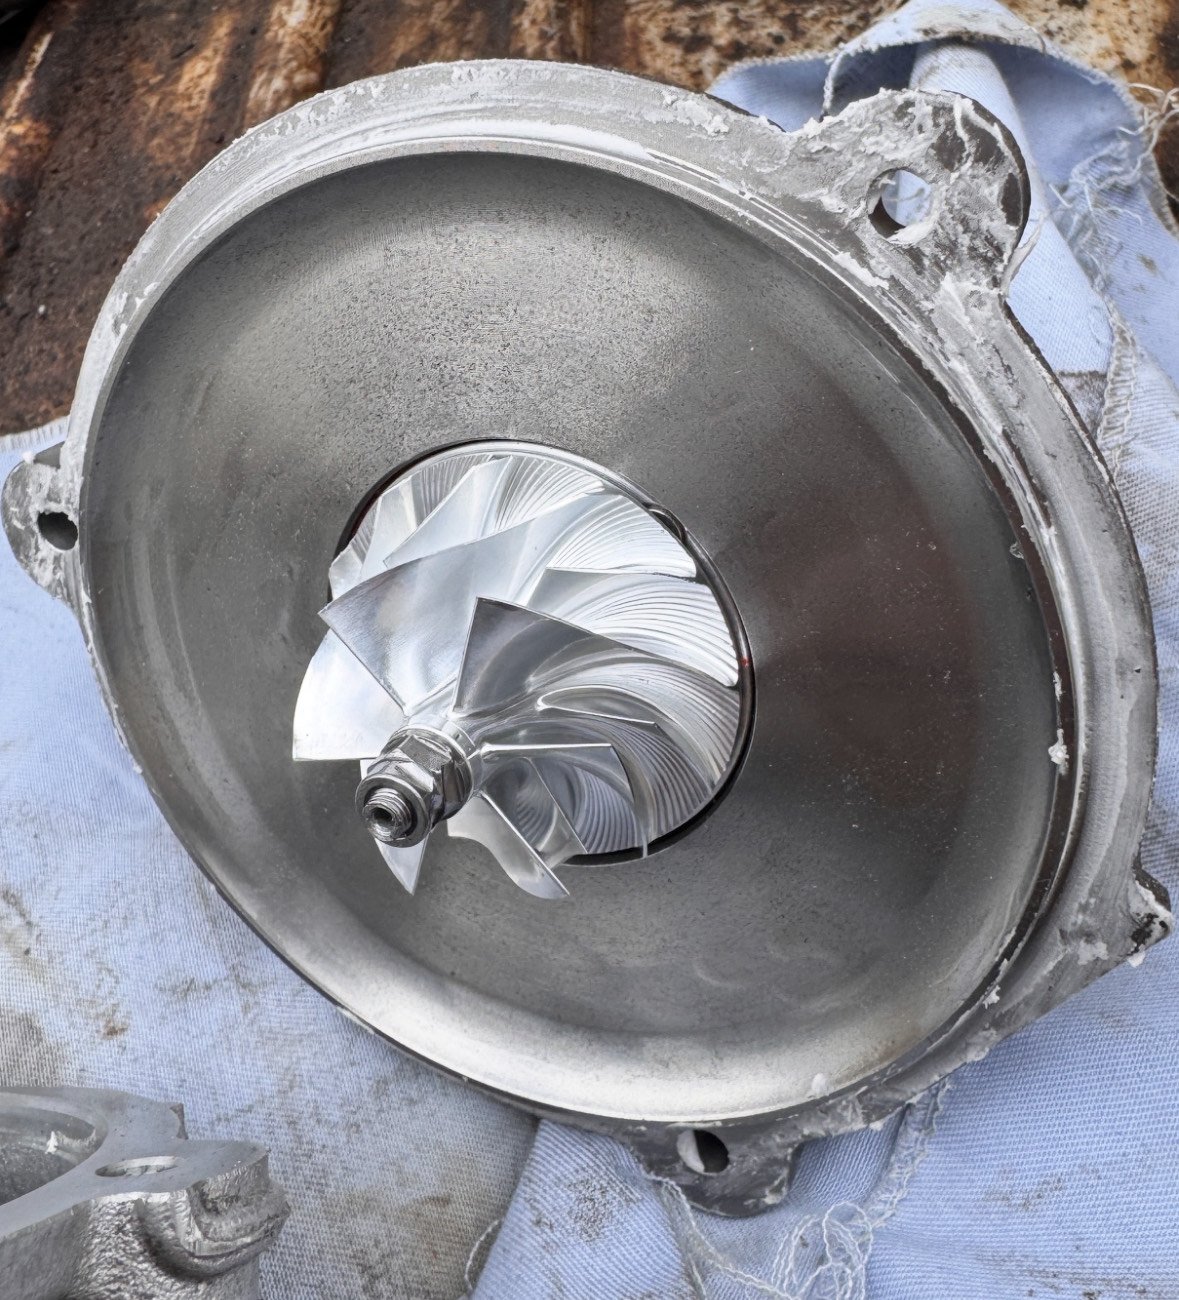
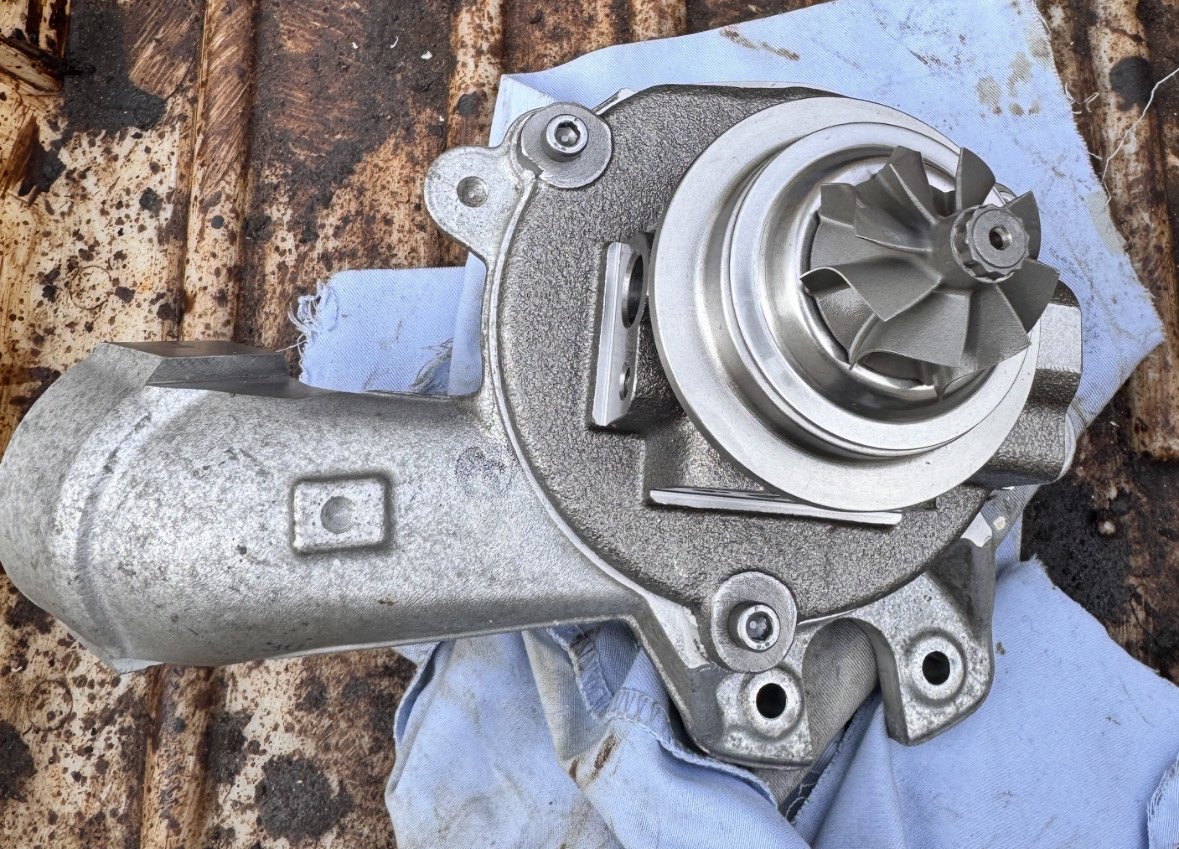
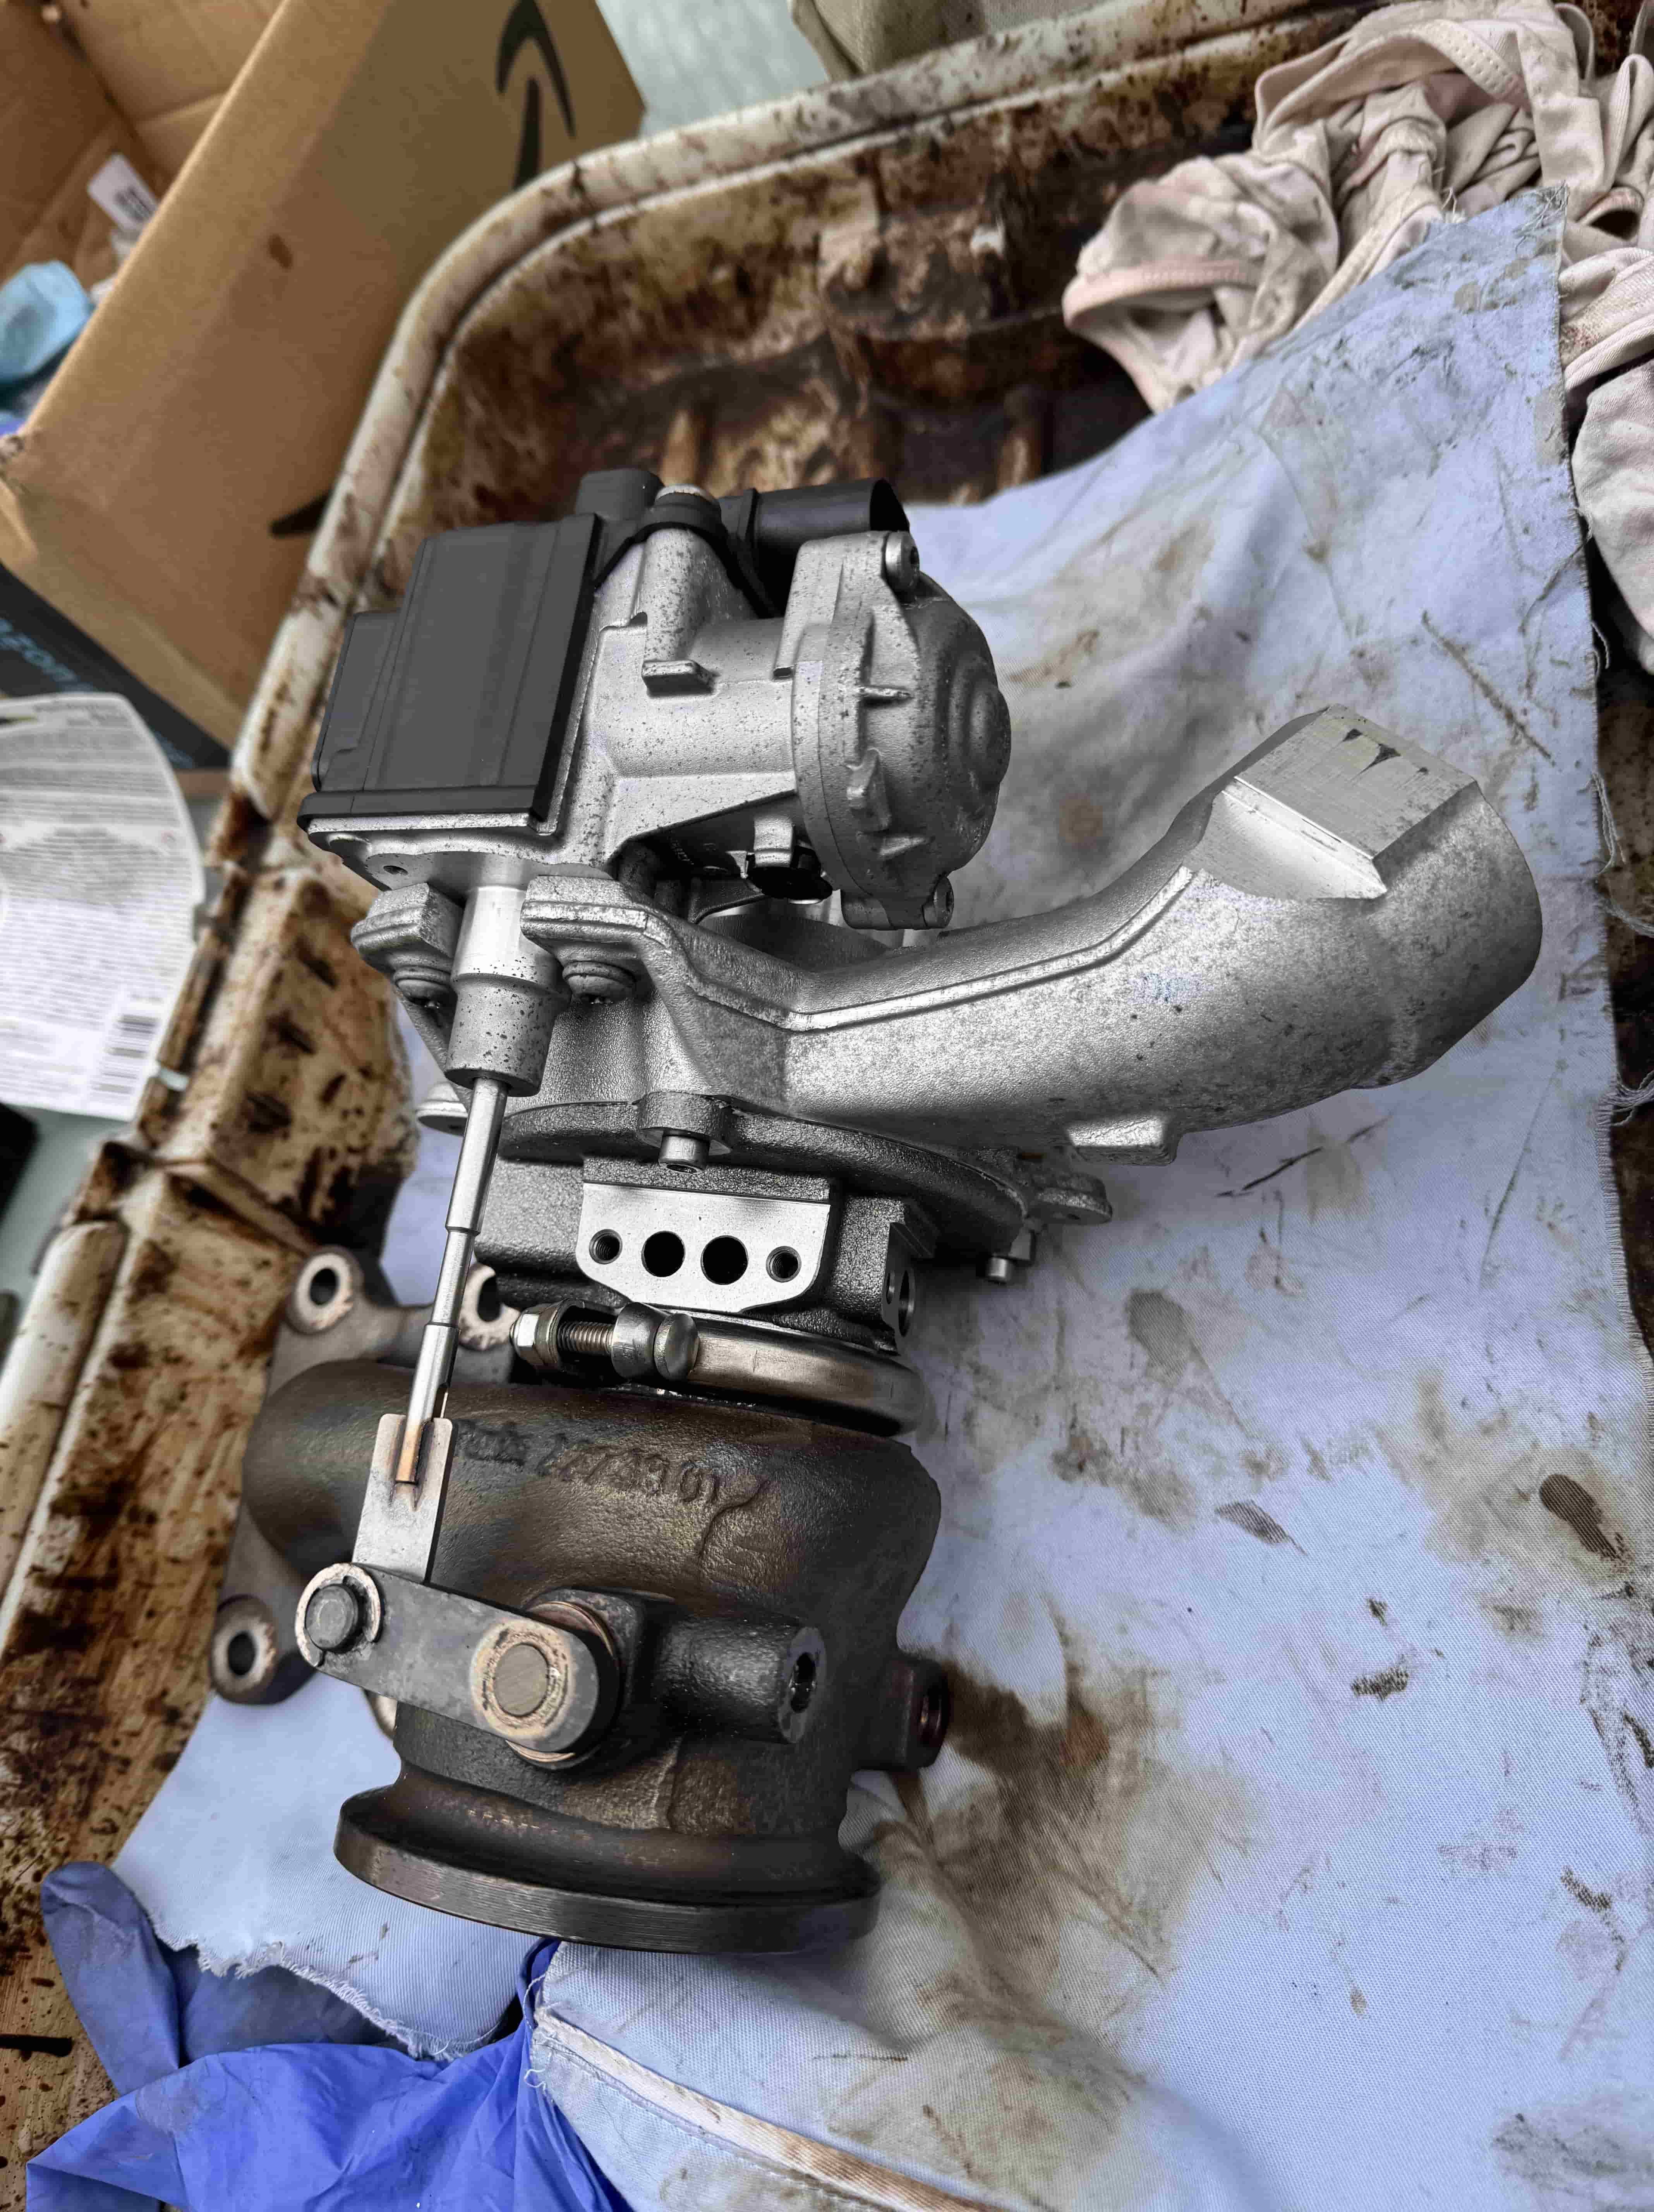
1 point1 point1 point1 pointTried a few weeks ago to get the panel out of the lower grill to gain acess to the fog light bulb, had a few replies but most suggested pushing panel out from the rear but this does not work as mine is the 2019 facelift model with the honeycomb type grill markings and the panel has to come out from the front of the car, tried pulling and swearing at it but no go at one point i thought the whole front bumper was going to come away before this panel came out!!, left it for a few days and then as an afterthought used a hair dryer with mid heat on and around the panel did this for about 5 mins and then used the ring clip tool in the hole and wow out it came !!, undone the 2 screws and out came the fog light, changed the bulb and also did the other side the same way a lot easier like this I also warmed the panel back up before refitting and then when in place held it in place with one hand and gave the panel area a few blasts with the cold/cool setting on the dryer nothing like this suggested in the manual but worked a treat for me1 pointUpon deciding to keep my Mk3 Fabia until its death, I've decided I want some more power from my EA211 1.2TSI 110 and as such needed a larger turbo. This very handy guide linked below by @FabiaGonzales will tell you everything, except self refurbishment, that you need to know about fitting a larger turbocharger from the bigger sister engine 1.4tsi; https://www.briskoda.net/forums/topic/481489-turbo-swap-choices-for-ea211-12-tsi/ Now, I decided that I didn't want to fork out for a brand new turbocharger, and I didn't want to ship a turbo off to Europe for refurbishment, so I decided I'd do it myself. With limited resources online about how to do this, it was a slow job whilst I made sure I did it correctly. However, Hopefully this guide will be of use to anybody looking to replace the turbocharger core on their EA211 1.2 or 1.4TSI. I picked up a used turbo (04E 145 721B) from ebay for £87. Quite a steal if you ask me. Now, The turbo itself seemed fine, but i was not about to risk it exploding in my engine, so I picked up a new turbocharger core (the most important part) from London-2020-TurboShop for £100. This will come with a balancing sheet to put your mind at ease, and is also supposedly an upgrade from OEM as its wheel is lighter - whether or not actually proves real performance differences im not sure. You dont need many tools for this job, namely; T30 Torx bit 4mm Hex bit 10mm socket WD40 / GT85 Carb Cleaner a few rags Nickel Grease Exhaust Assembly Paste PLEASE NOTE: I am in no way a trained super mechanic or turbocharger extraordinaire, this guide is simply how I completed the job, and is in no way the definite, correct method. If you undertake this job, you do so at your own risk (Like I did), and I am not responsible for any damage caused to anything. If you are not mechanically sound, I would suggest letting professionals deal with the job. Turbochargers can spin up to speeds in the hundreds of thousands of RPM range, and an imbalance can destroy both the turbocharger, and your engine. Part one First step is to free off the actuator pivot. This may not apply to everybody. I found the turbo I bought had seized on the pivot, a common issue. If you can extend the actuator and thus open the wastegate, you're fine. If, however, you can't, with your hands, extend the actuator then its seized. You'll need to just go to town with some WD40 or GT85 and a wire brush to try and wiggle it free. Images - demonstrates normal movement of the actuator (yellow outline is wastegates open position) Firstly, Remove the circlip from the pin. Then, remove the two T30 screws holding the actuator to the turbocharger. You should then be able to push the pin DOWN and out of the arm. You can see this in the image above, on the right. Like a see-saw, this will raise the actuator away from the turbo inlet side. Now that that's done I gave the actuator pin and wastegate arm a good clean, ready to be reinstalled with some nickel grease later. Part two After removing the actuator from the turbo, I then proceeded to remove the exhaust side from the core. First job is to remove the clamp that holds the core to the exhaust side. Just use your 10mm socket to loosen off the bolt, then remove the clamp. You should then just be able to pull away the exhaust side with ease. Notice in the photo what i am pointing to. There is a little notch on the exhaust side that fits in to a groove on the turbo core. This is to ensure correct orientation when fitting. Images - Exhaust & Core Notch Excellent, Now we're ready to remove the core from the inlet side. Before doing so, please take images of the correct orientation of your core, as there is no groove to align it properly on this side. Images - Core Orientation Remove the 3x 4mm hex bolts from the face of the core. Once removed, you should just be able to pull the core off. It seems there was a paste used to seal this side, so I had to slightly twist and wiggle the core to break this, then pull it off. Now, your turbo should be fully disassembled into the 3 parts. I now cleaned up the cast parts. I used carb cleaner for the exhaust side and it did look slightly less black afterwards. I avoided using a wire brush on any internal, smooth parts, as I didnt want to introduce imperfections to the surface. Now, reassembly is mostly the same but in reverse order. Be VERY CAREFUL with your new core as it is very delicate. I applied some Exhaust Assembly Paste around the outer lip of the core (The surface that sits against the inlet side) before fitting back and bolting down. Just ensure that if any exhaust assembly paste sits ON or inside the lip you wipe this off. We only want it sitting outside, and not smushing inside when you bolt the core down. Images - Exhaust Assembly Paste & New Core Fitment Once completed, pop the exhaust side back on, minding the core & remembering to align the notch. Then, Tighten the clamp back down to hold it in place. Lastly we have to fit the actuator again. I applied Nickel grease to the pin and arm hole to ensure effective movement and to prevent it from seizing in the future. Then just bolt it back in. Hooray! Now you've completed the refurb, and your turbo should look beautiful, like the below. I hope this guide has helped, if anybody has any better tips/guidance feel free to leave them in the comments. This is by no means the "correct" way to do this job, just how I did it! Lew


.thumb.jpeg.c6a5781c36a4232ac5751e07c65cc4bf.jpeg)
.thumb.jpeg.abc1825d8963798323d5e84a4a481aab.jpeg)
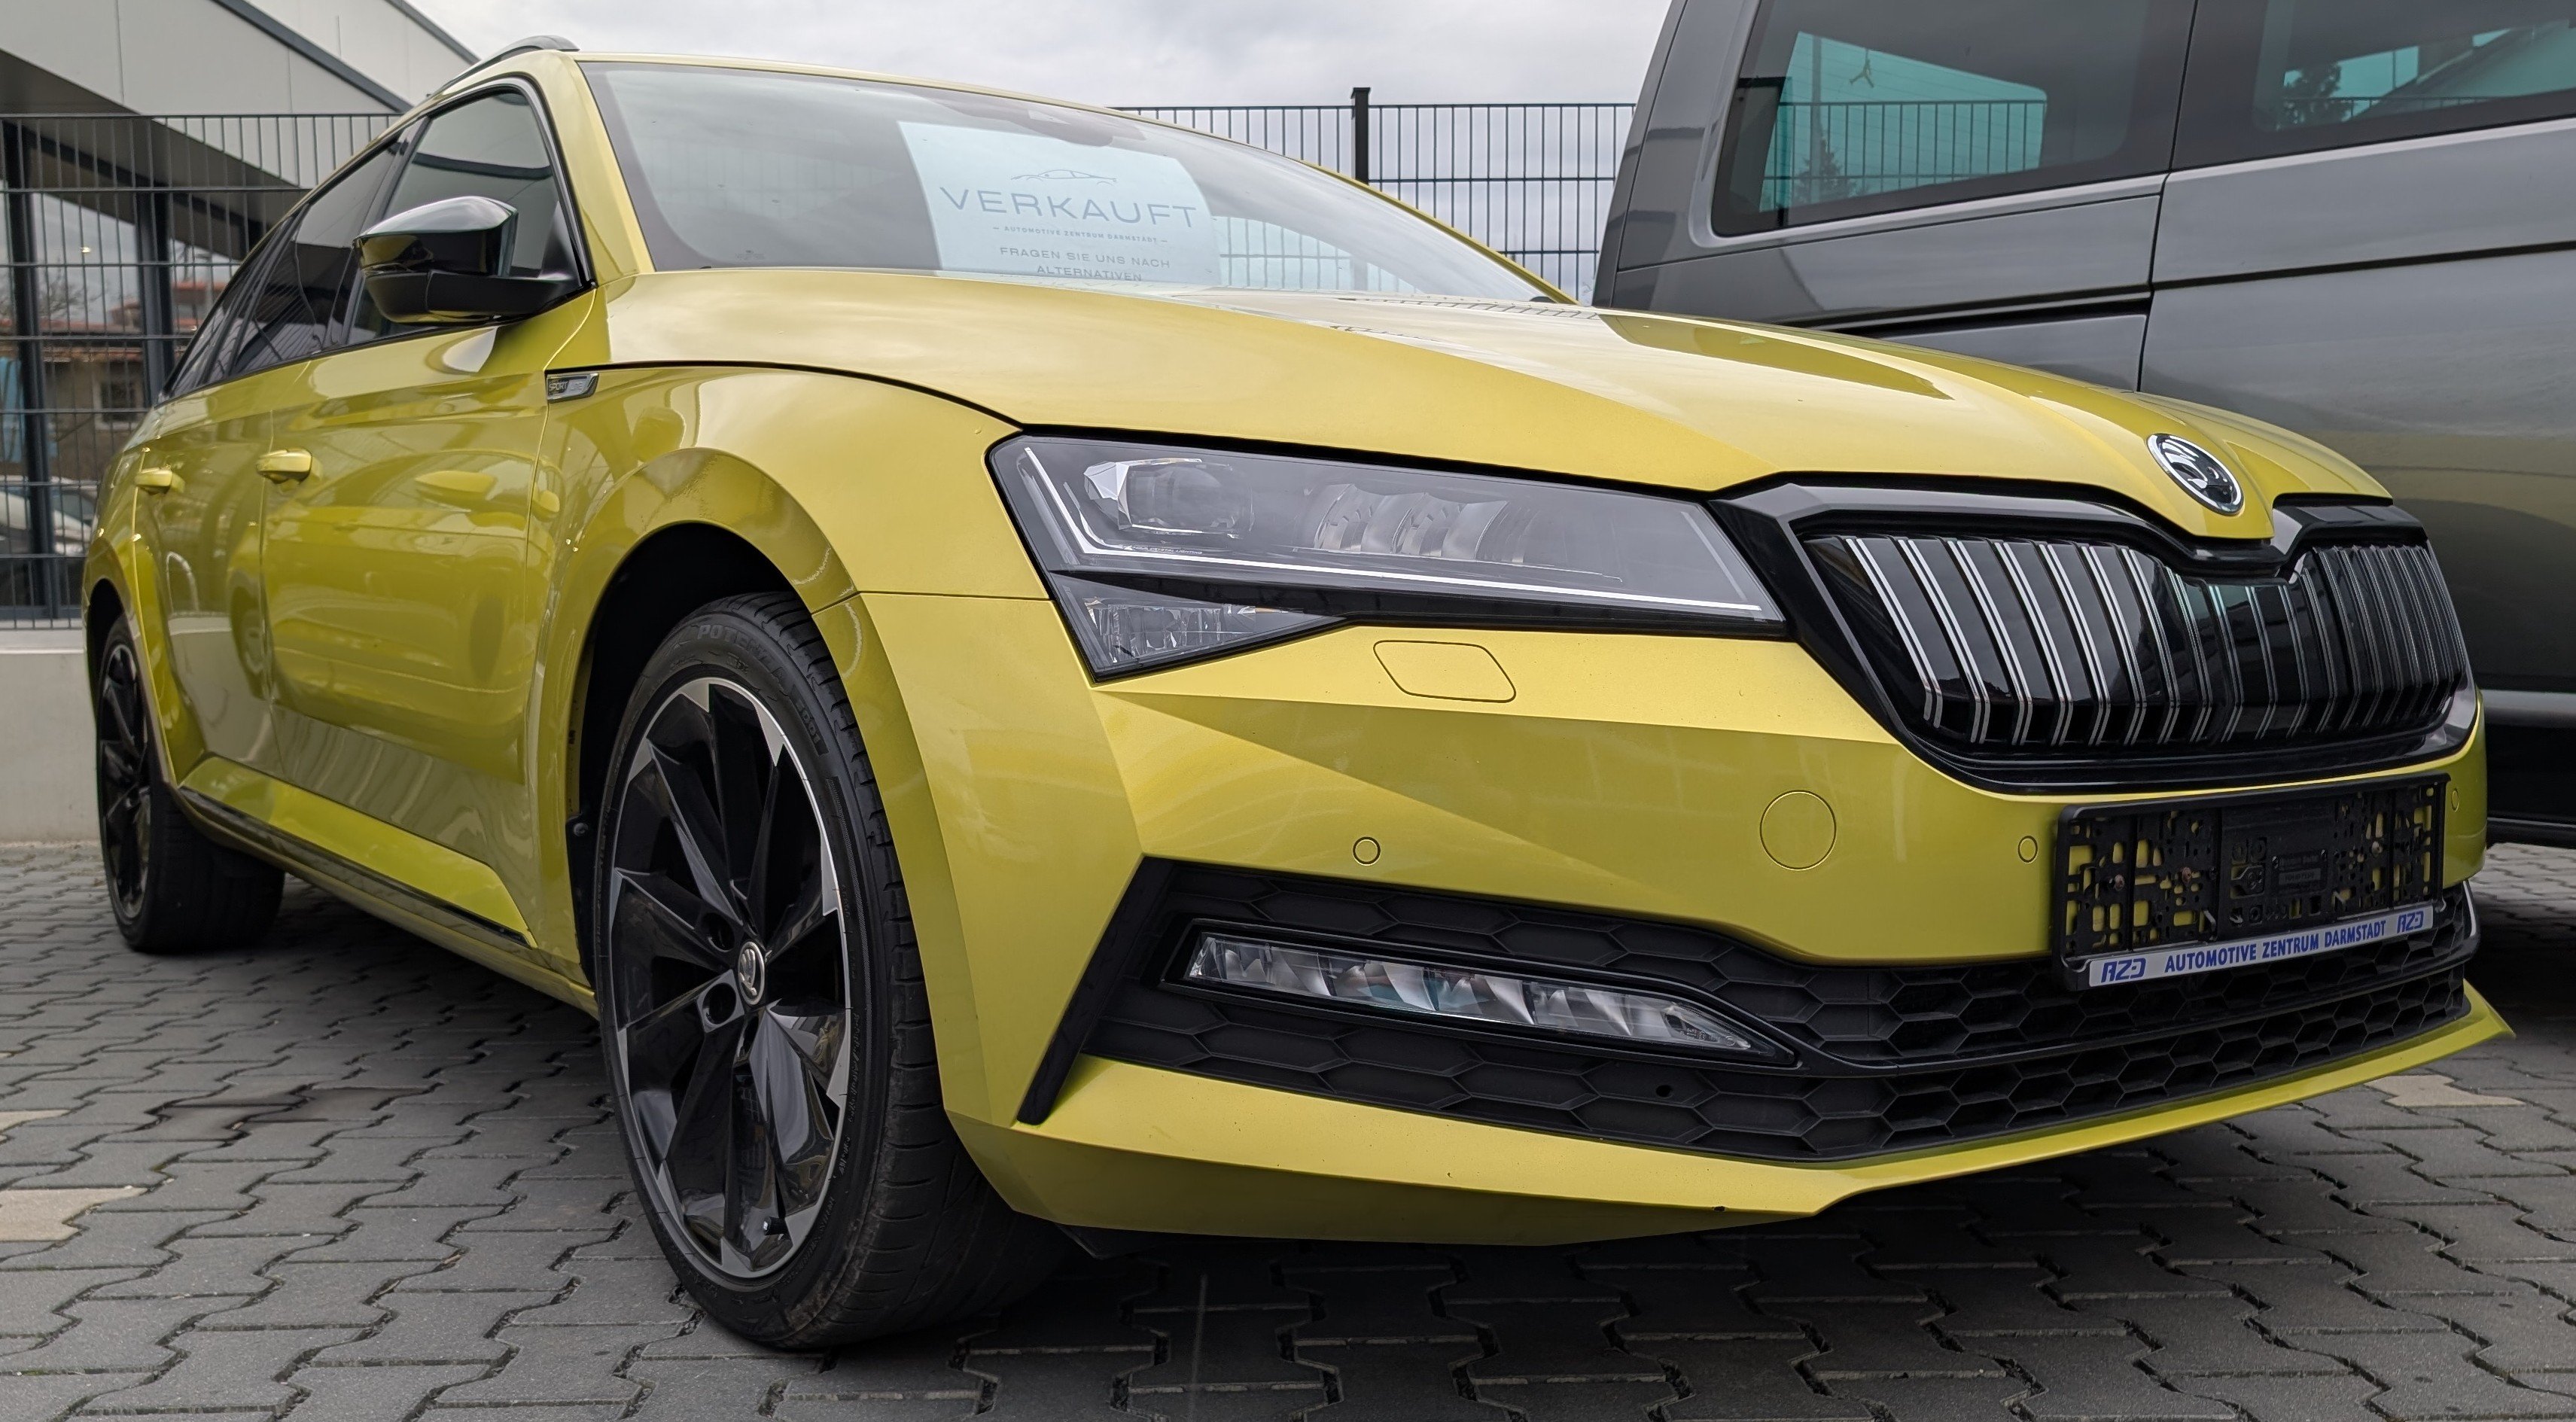
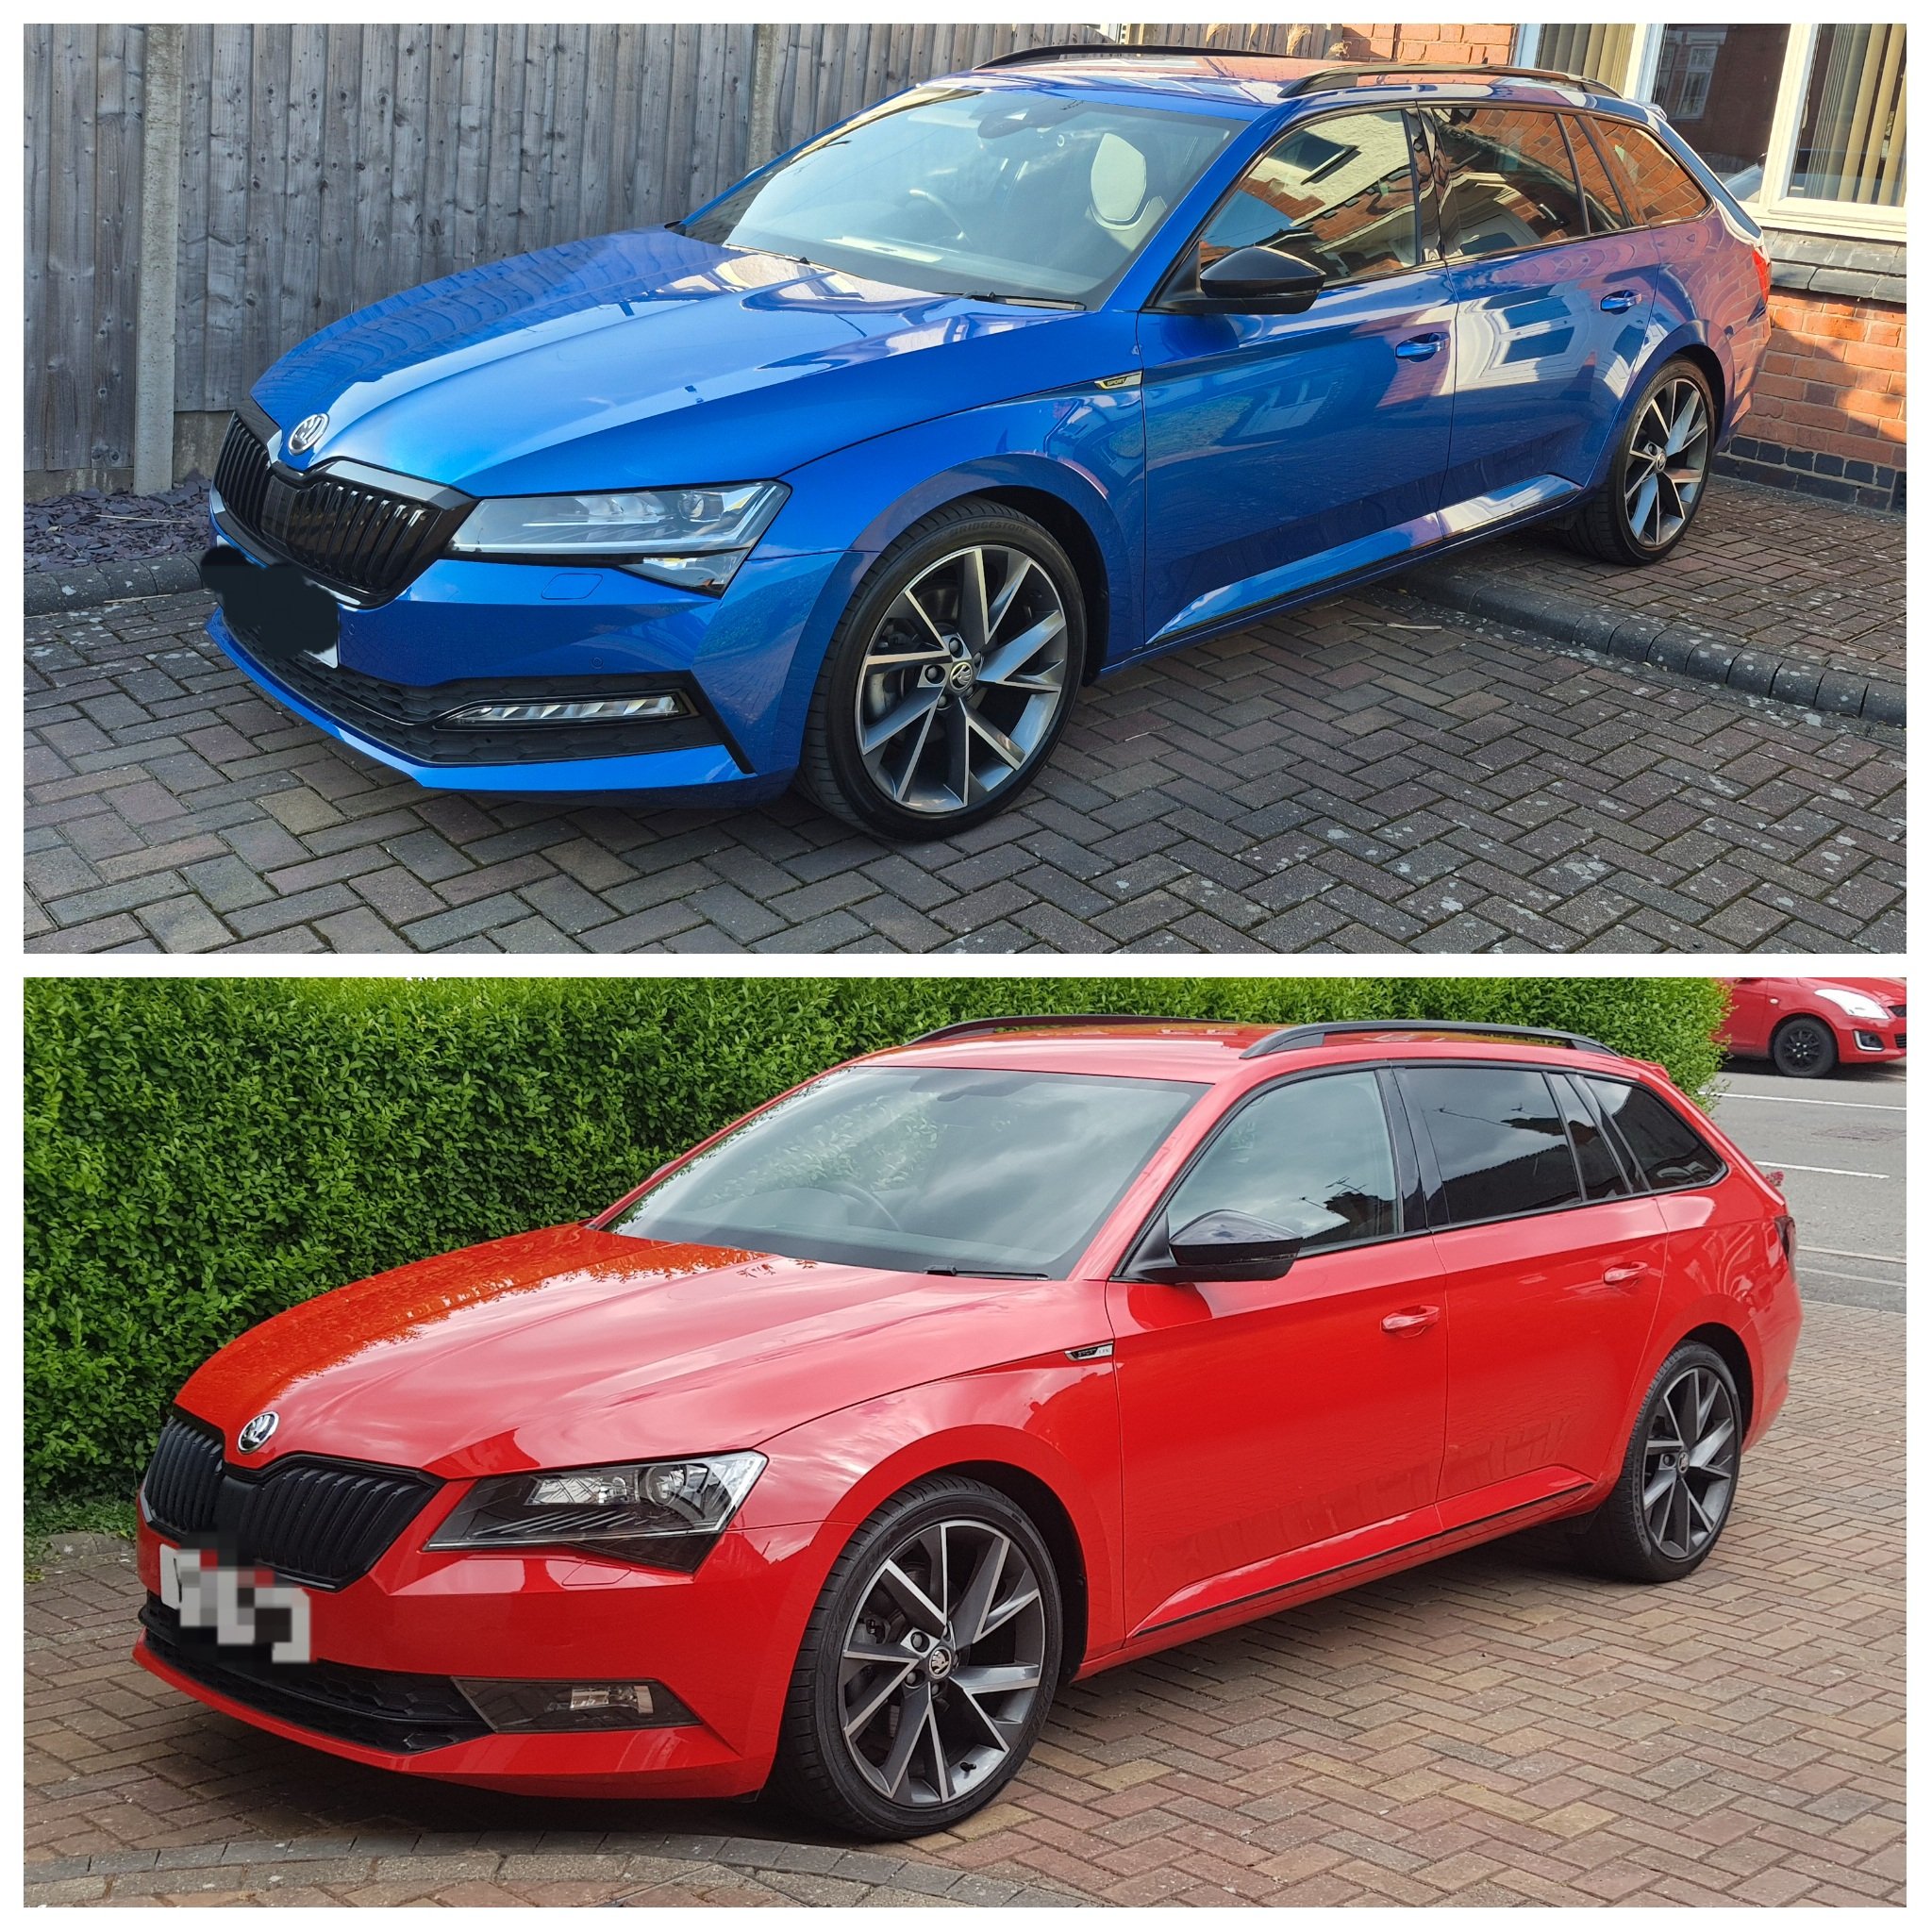
 1 point1 pointis it worth to to swap VELA rims to second rim kit Propus for winter tires ? Image phtoshoped.
 1 point1 pointIt's not good that any Fabia Mk3 has problems with electric windows even a 2014/5 shouldn't be old enough for such let alone 2018 on. ☹️1 pointI guess you need to assess how long you want to keep the car, of if having invested in a refresh you may be likely to accept keeping it a bit longer to get the benefit out of it. I can say that doing all the stuff to our Tiguan it really feels new again. I really would encourage you to not just keep slapping cheap tyres on just to cover up the problem - the car will feel SO much better when it sorted and on some half decent rubber. Your main cost with all of this is going to be labour - I did all the front end with my brother helping me so but still looked to minimise the number of times we pulled parts apart due to VW's stupid 'use once' bolt policy. Getting the wishbones changed shouldn't be a hugely expensive cost - you can buy complete units all built up with ball joint and rear console bush for not a lot really. The new wishbone will also have a fresh front bush in it but this one isn't renound for waring. Personally though I really would look to get the S3 or Meyle HD rear console bush as something a little more durable. This is a standard console bush - see all the holes which while reducing noise/vibration they rip really easily across these holes as so much more movement is allowed: [img]https://i.imgur.com/AkNErK5m.jpg[/img] This is a Meyle HD bush, similar to an S3 I believe: [img]https://i.imgur.com/G7rLQLkm.jpg[/img] The clunking noise I would take a guess at being the lower engine mount that's pushed into the subframe - these ware and allow fore-aft travel of the engine around the lover engine mount / dog-bone bar that bolts back to the chassis. Its the round rubber 2-part bush that has a white nylon outer ring. In itself its not desperately expensive but as above its the labour. This usually means subframe off, however there is a tool by Laser that allows the job to be done in situ. I got the tool (several hundred as I had at least 2 cars to do immediately) and still did the job with the subframe off the car. This is the lower engine mount bush: [img]https://i.imgur.com/AkNErK5m.jpg[/img] This is the whole subframe built up with alloy wishbones ready to jack back up into place: [img]https://i.imgur.com/lARb9Iel.jpg[/img] IF I was going to do this all again I would look to get a set of used aluminium Passat wishbones off ebay, clean them up, pop out the front little bushes drilling the rubber out and replace with a PSB poly bush and then get the Meyle HD rear console bush and a generic balljoint. NB - the Passat and S3 balljoint isnt right for the cast hub that is standard on the Superb so don't be tempted to use the one that comes with it. They aren't big money, get a fresh one. Then get your favourit local garage to put it all on for you, get it tracked and see how you go. As said, that clonking may not be too cheap to get sorted yourself and will likely be a subframe off job. Maybe try to hunt around for an independent VAG specialist, they may be more used to doing some of these jobs and be quicker and have better advisory capabilities. I know of a good one in the Gloucester area and one in the Warwick area, they are about ... Happy to keep discsussing this here OR PM me to discuss offline.1 pointHi - are you still needing a response on this? Although they call what you are wanting to change the 'lower' arms' there are no front upper ones. Rear has upper and lower arms. From your description I would suggest you are referring to the front 'wishbone' as the control arm (interchangeable terms). This is all a slippery slope - you can either change what it necessary OR do a complete refresh. From experience once you start replacing one worn part with a new fresh firmer item it shows up all the rest of the old failing bits and likely speed up the ware on those old bits. I have recently done a full suspension overhaul on a 2010 Tiguan 4motion. Literally everything, all arms, anything rubber, springs, shocks, arb's, subframe collars, ... you are in for quite a lot of money but it will be really really good and you can get bits on from other VAG models too to improve things. Depends on what you want to achieve. I've gone for preventative maintenance along with making it less of a truck as we are keeping it at least another 5 years so will get the benfit from all the new goodies. I decided to do it all together as once you get close to lowering the front subframe there are several parts you can change OR will have to drop the subframe again for in maybe 6-24 months again with the associated labour costs and (ideally) another set of new subframe bolts if you adhere to the VW 'use once' philosophy of their bolts. Personally, I would get the alloy Passat wishbones and a Meyle HD rear console bush. The HD console bush doesnt have the large holes that rip - less ware and lasts longer. Alternatively there is, I believe the genuine S3 rear console bush which is also either solid or has less voids. For the wishbones, as the alloy ones are essentially fine buying used, get a used pair off of ebay and just get the front small bush replaced. I have done this before by drilling out the old bush and inserting a poly item from Problem Solving Bushings. That bush will never need replacing again. If you have an auto/dsg then the (UK) passenger side will be a problem and likely the subframe will need to be dropped a bit. I found once you start on the front chassis parts, if you really look in to it, its a very slippery slope ... because if you are dropping the subframe do you then replace the front ARB rubbers (integral to the ARB unfortunately and requires subframe removal ...) Also, ECS subframe collars will put your front subframe in correct alignment permanently, while your subframe is being lowered... Happy to detail more in a more detailed response below if needed ...1 point2. coded out Start-Stop prevent Engine start when car in front move 13 Adaptive Cruise Control Adaptation -> Expanded restart function On -> Off1 point


.jpeg.f28a2e19103dc39fa31f676051b4c527.jpeg)
.jpeg.087aef71746b7681583d8d9d1b7df865.jpeg)


Important Information
Welcome to BRISKODA. Please note the following important links Terms of Use. We have a comprehensive Privacy Policy. We have placed cookies on your device to help make this website better. You can adjust your cookie settings, otherwise we'll assume you're okay to continue.