


Leaderboard
-
Lady Elanore
FREEDOM5Points24,874Posts -
J.R.
Resident Member4Points15,266Posts -

john999boy
Honorary4Points11,233Posts -

lancpudn
Members4Points862Posts


Popular Content
Showing content with the highest reputation on 13/06/21 in all areas
-
3 pointsAll depends how tall you are - without the 'pointless bit of rubber' many folk wouldn't be able to pull the tailgate down...........3 points
-
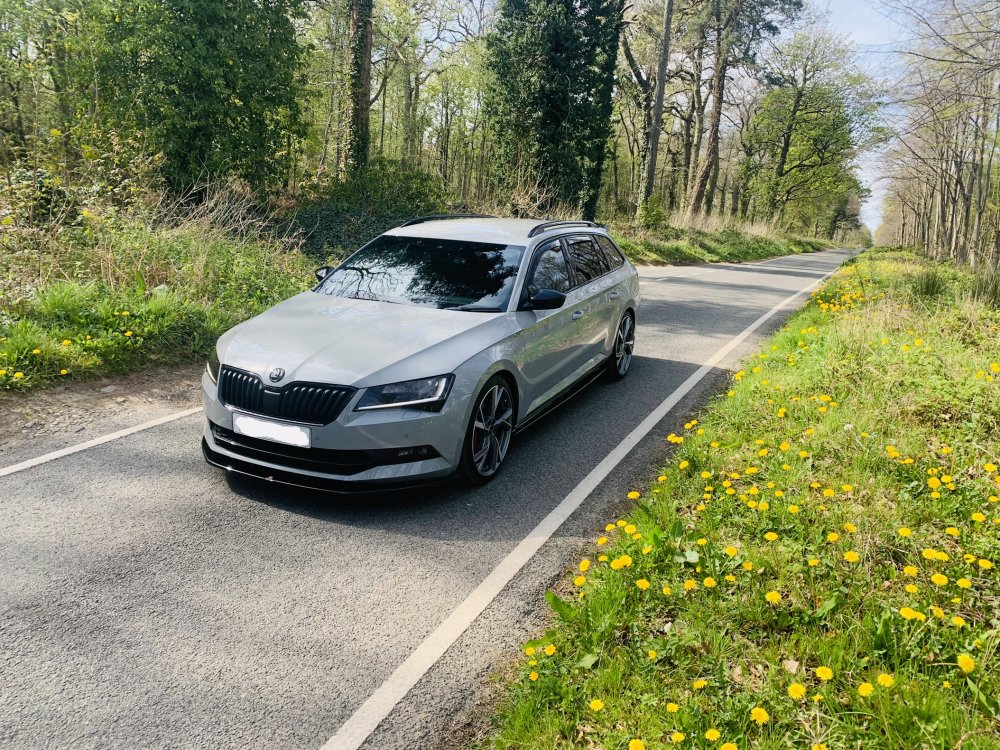
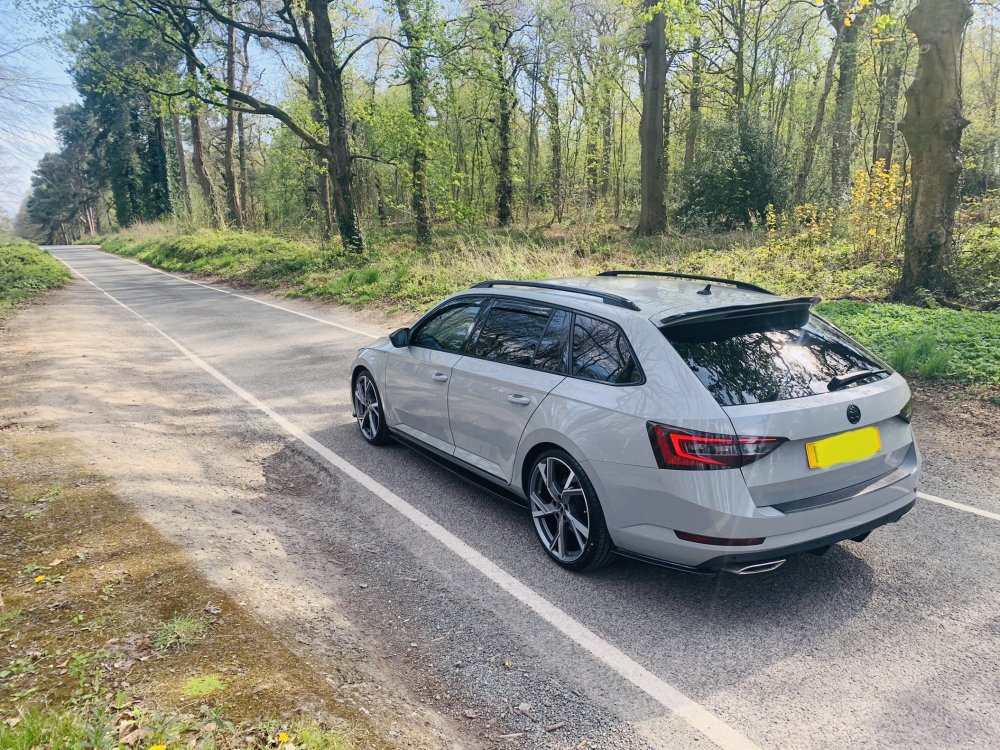
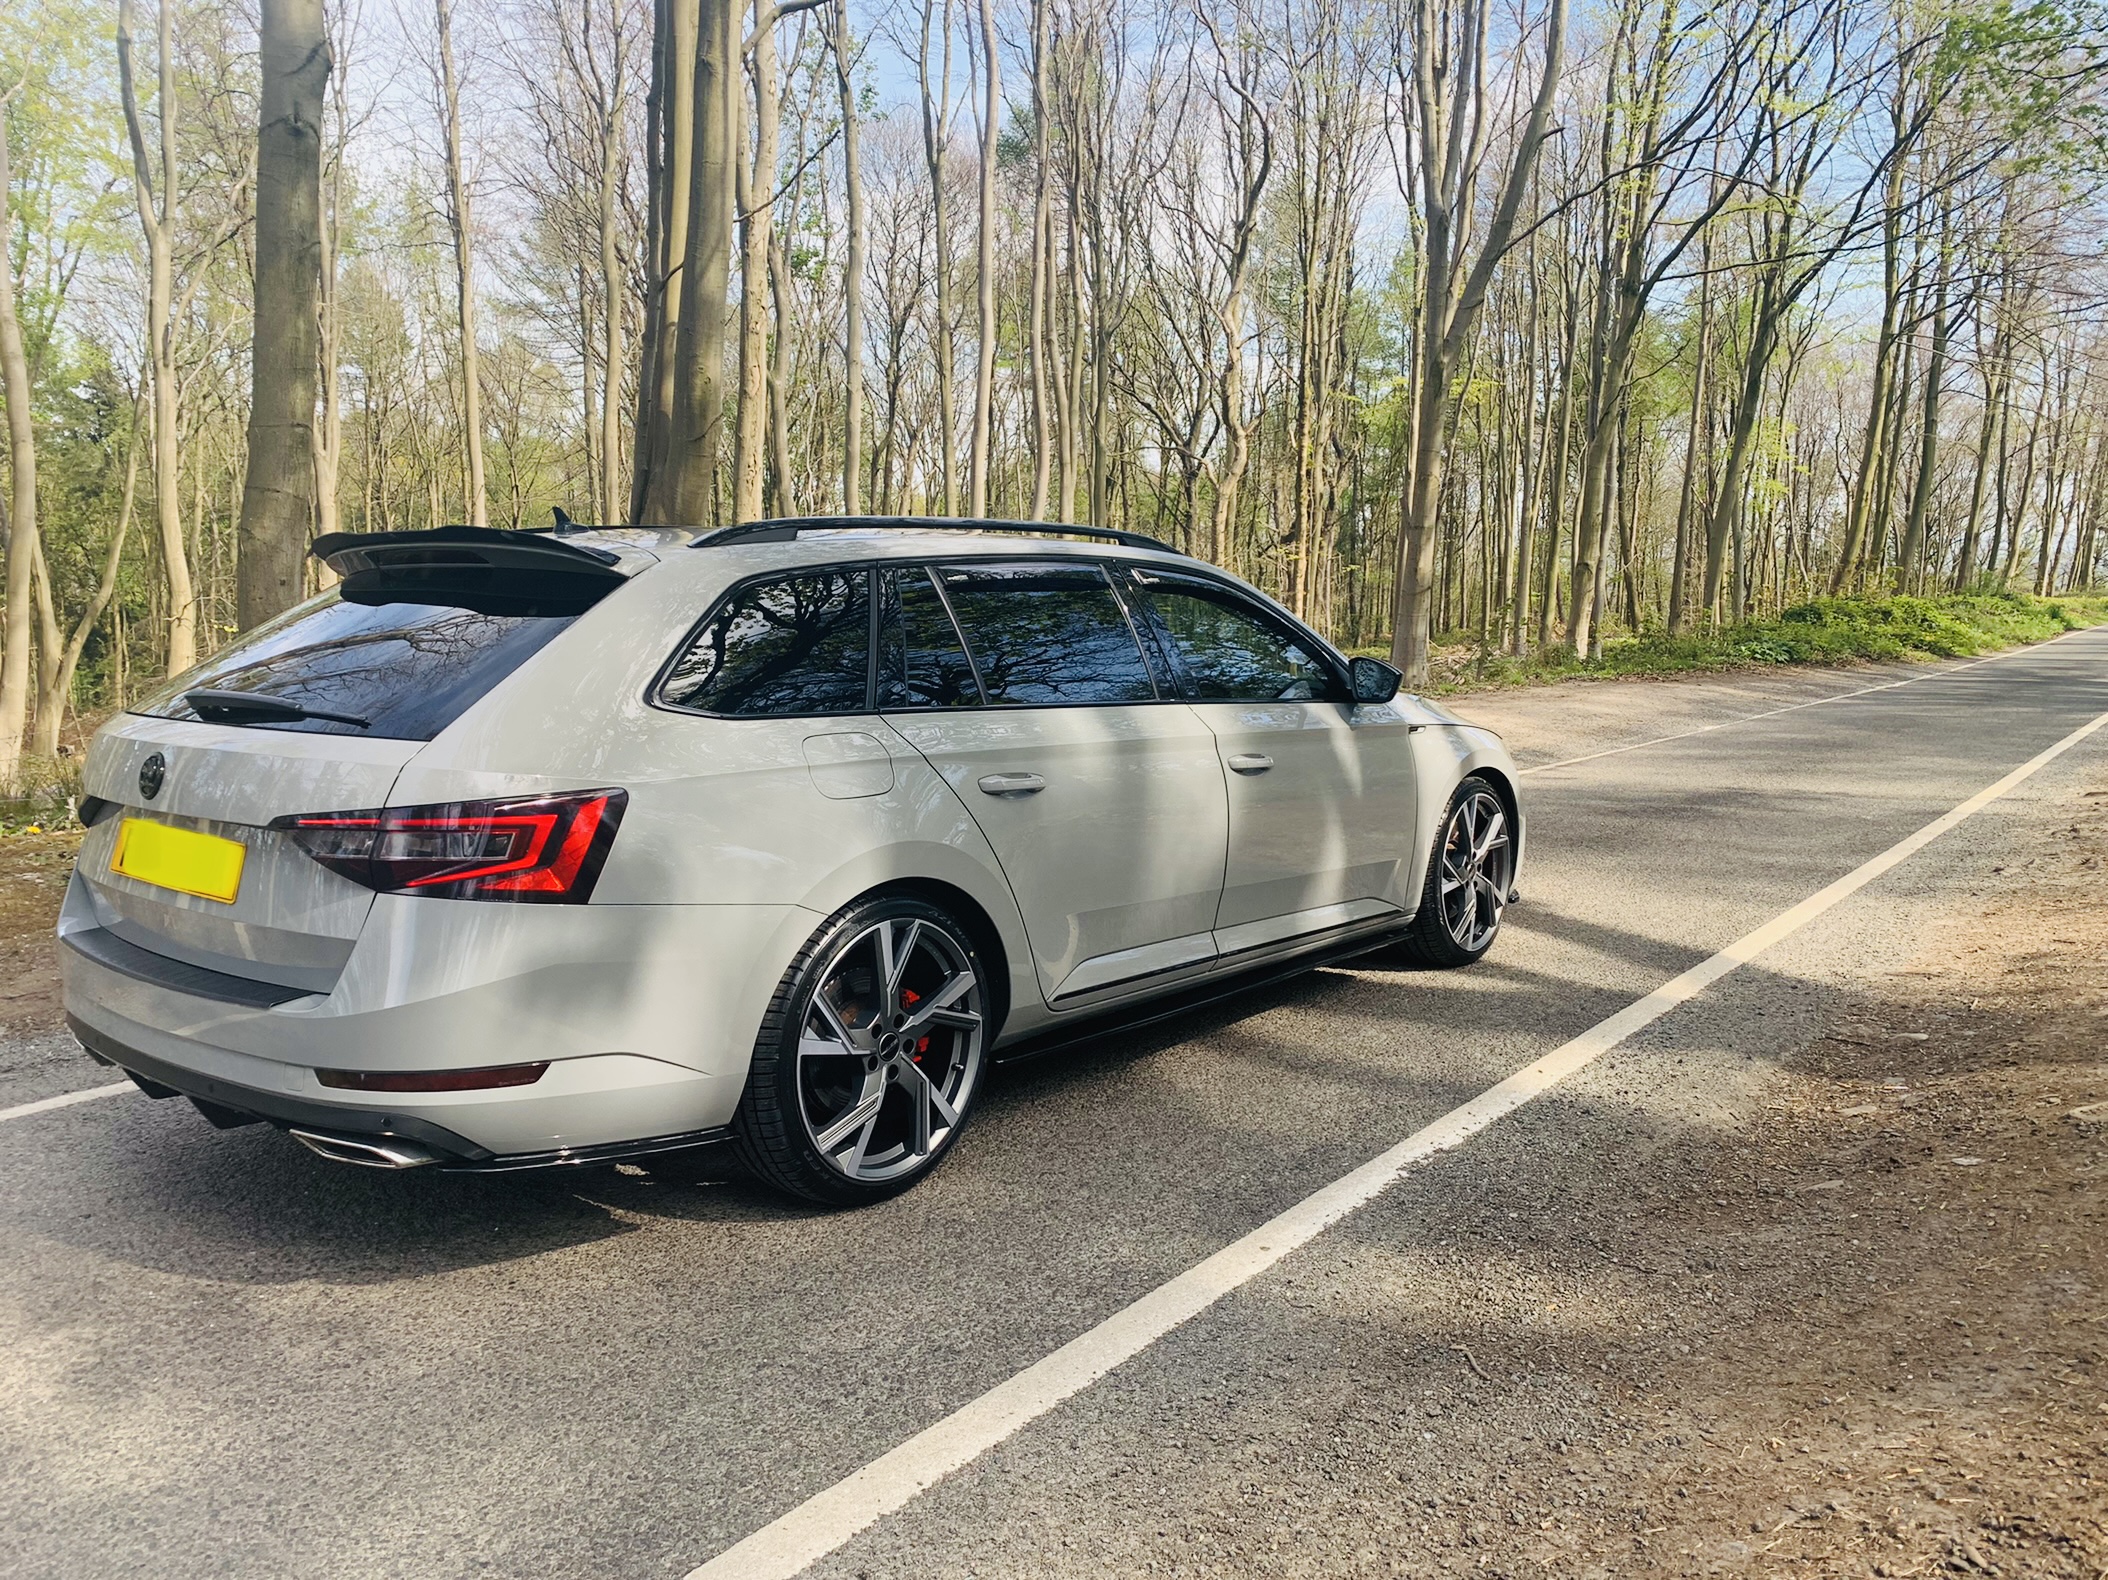
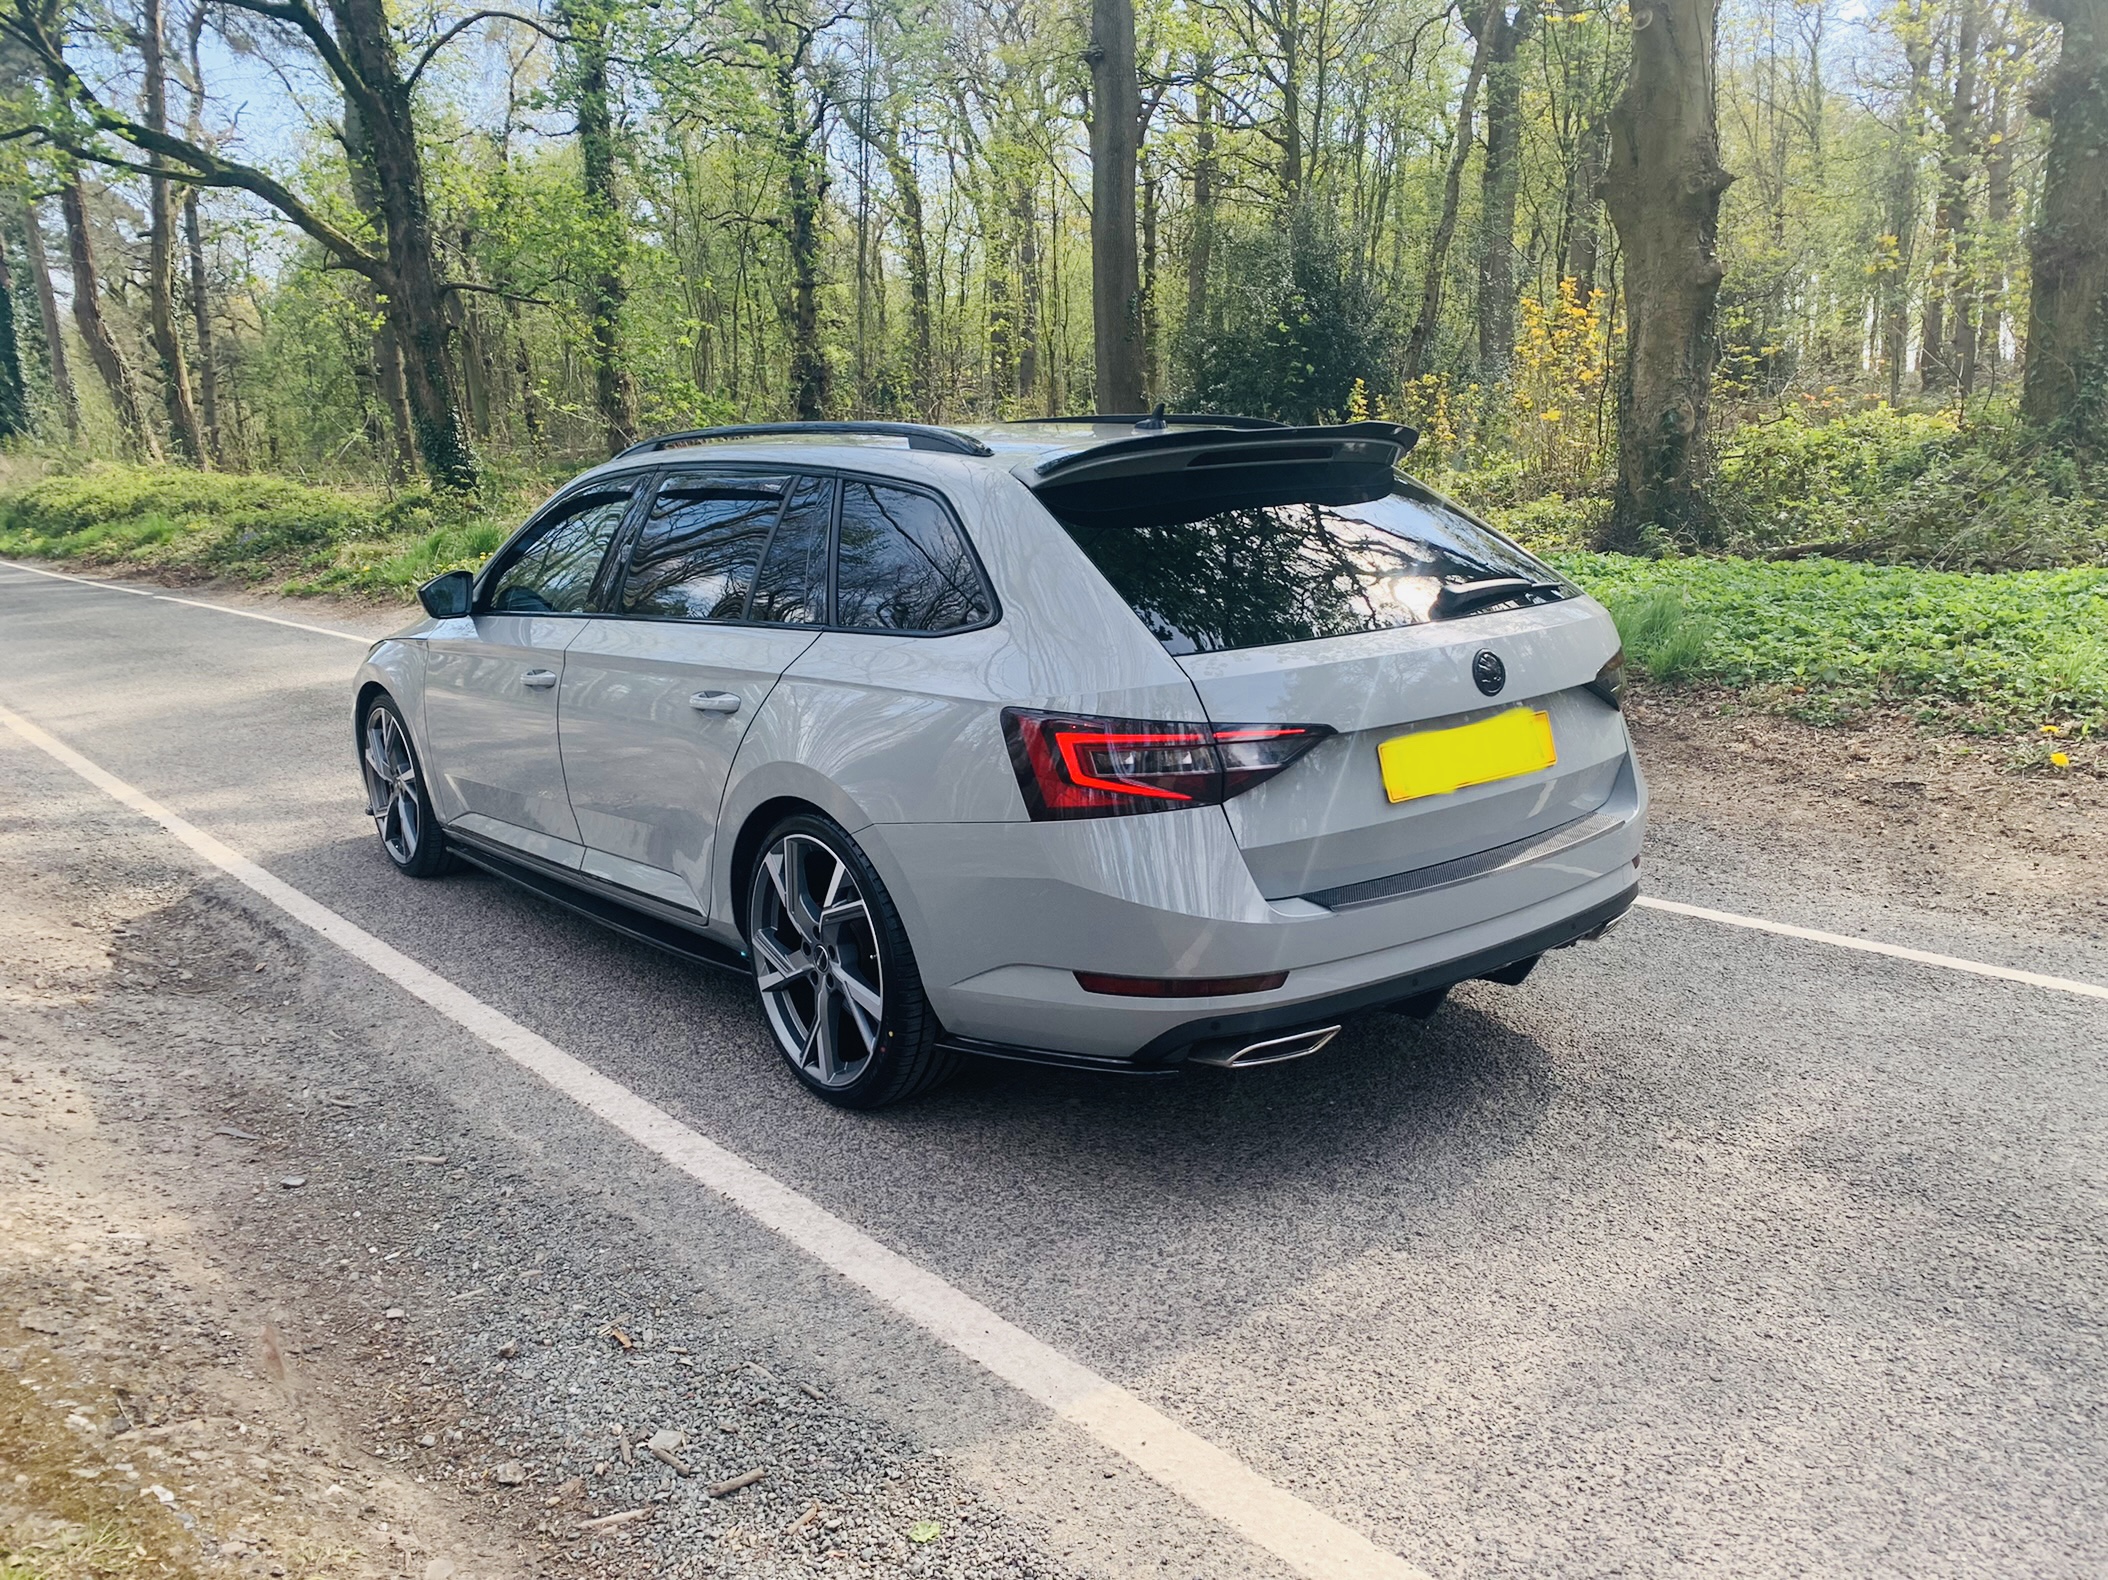
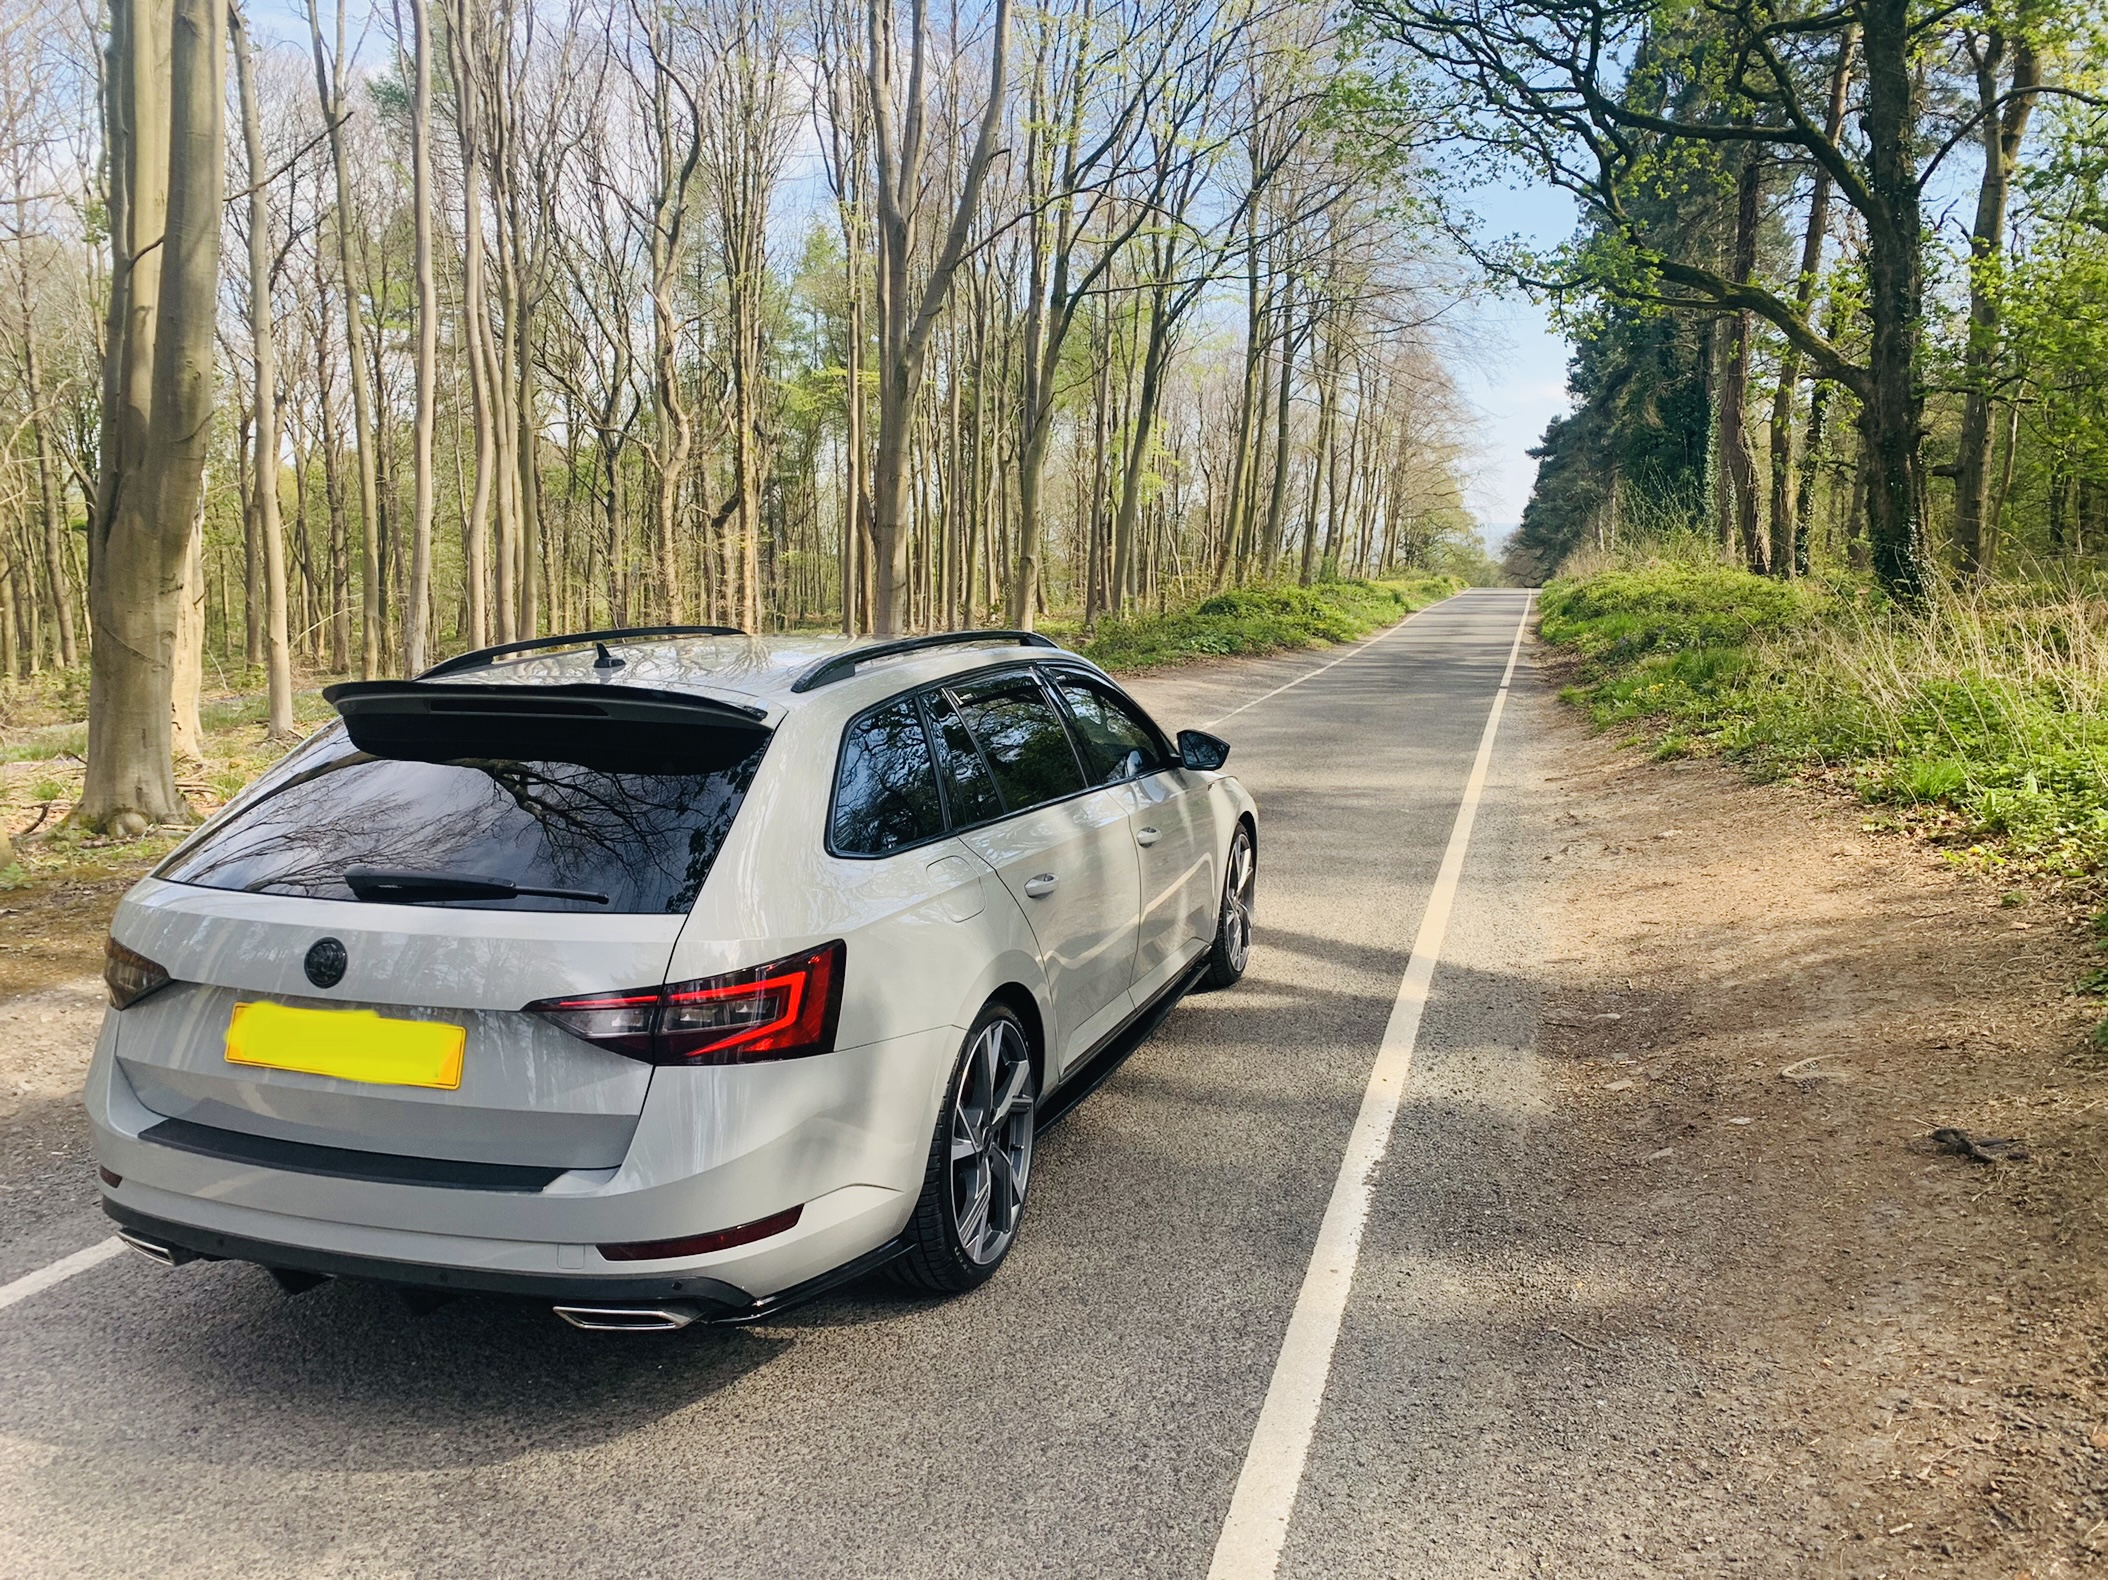
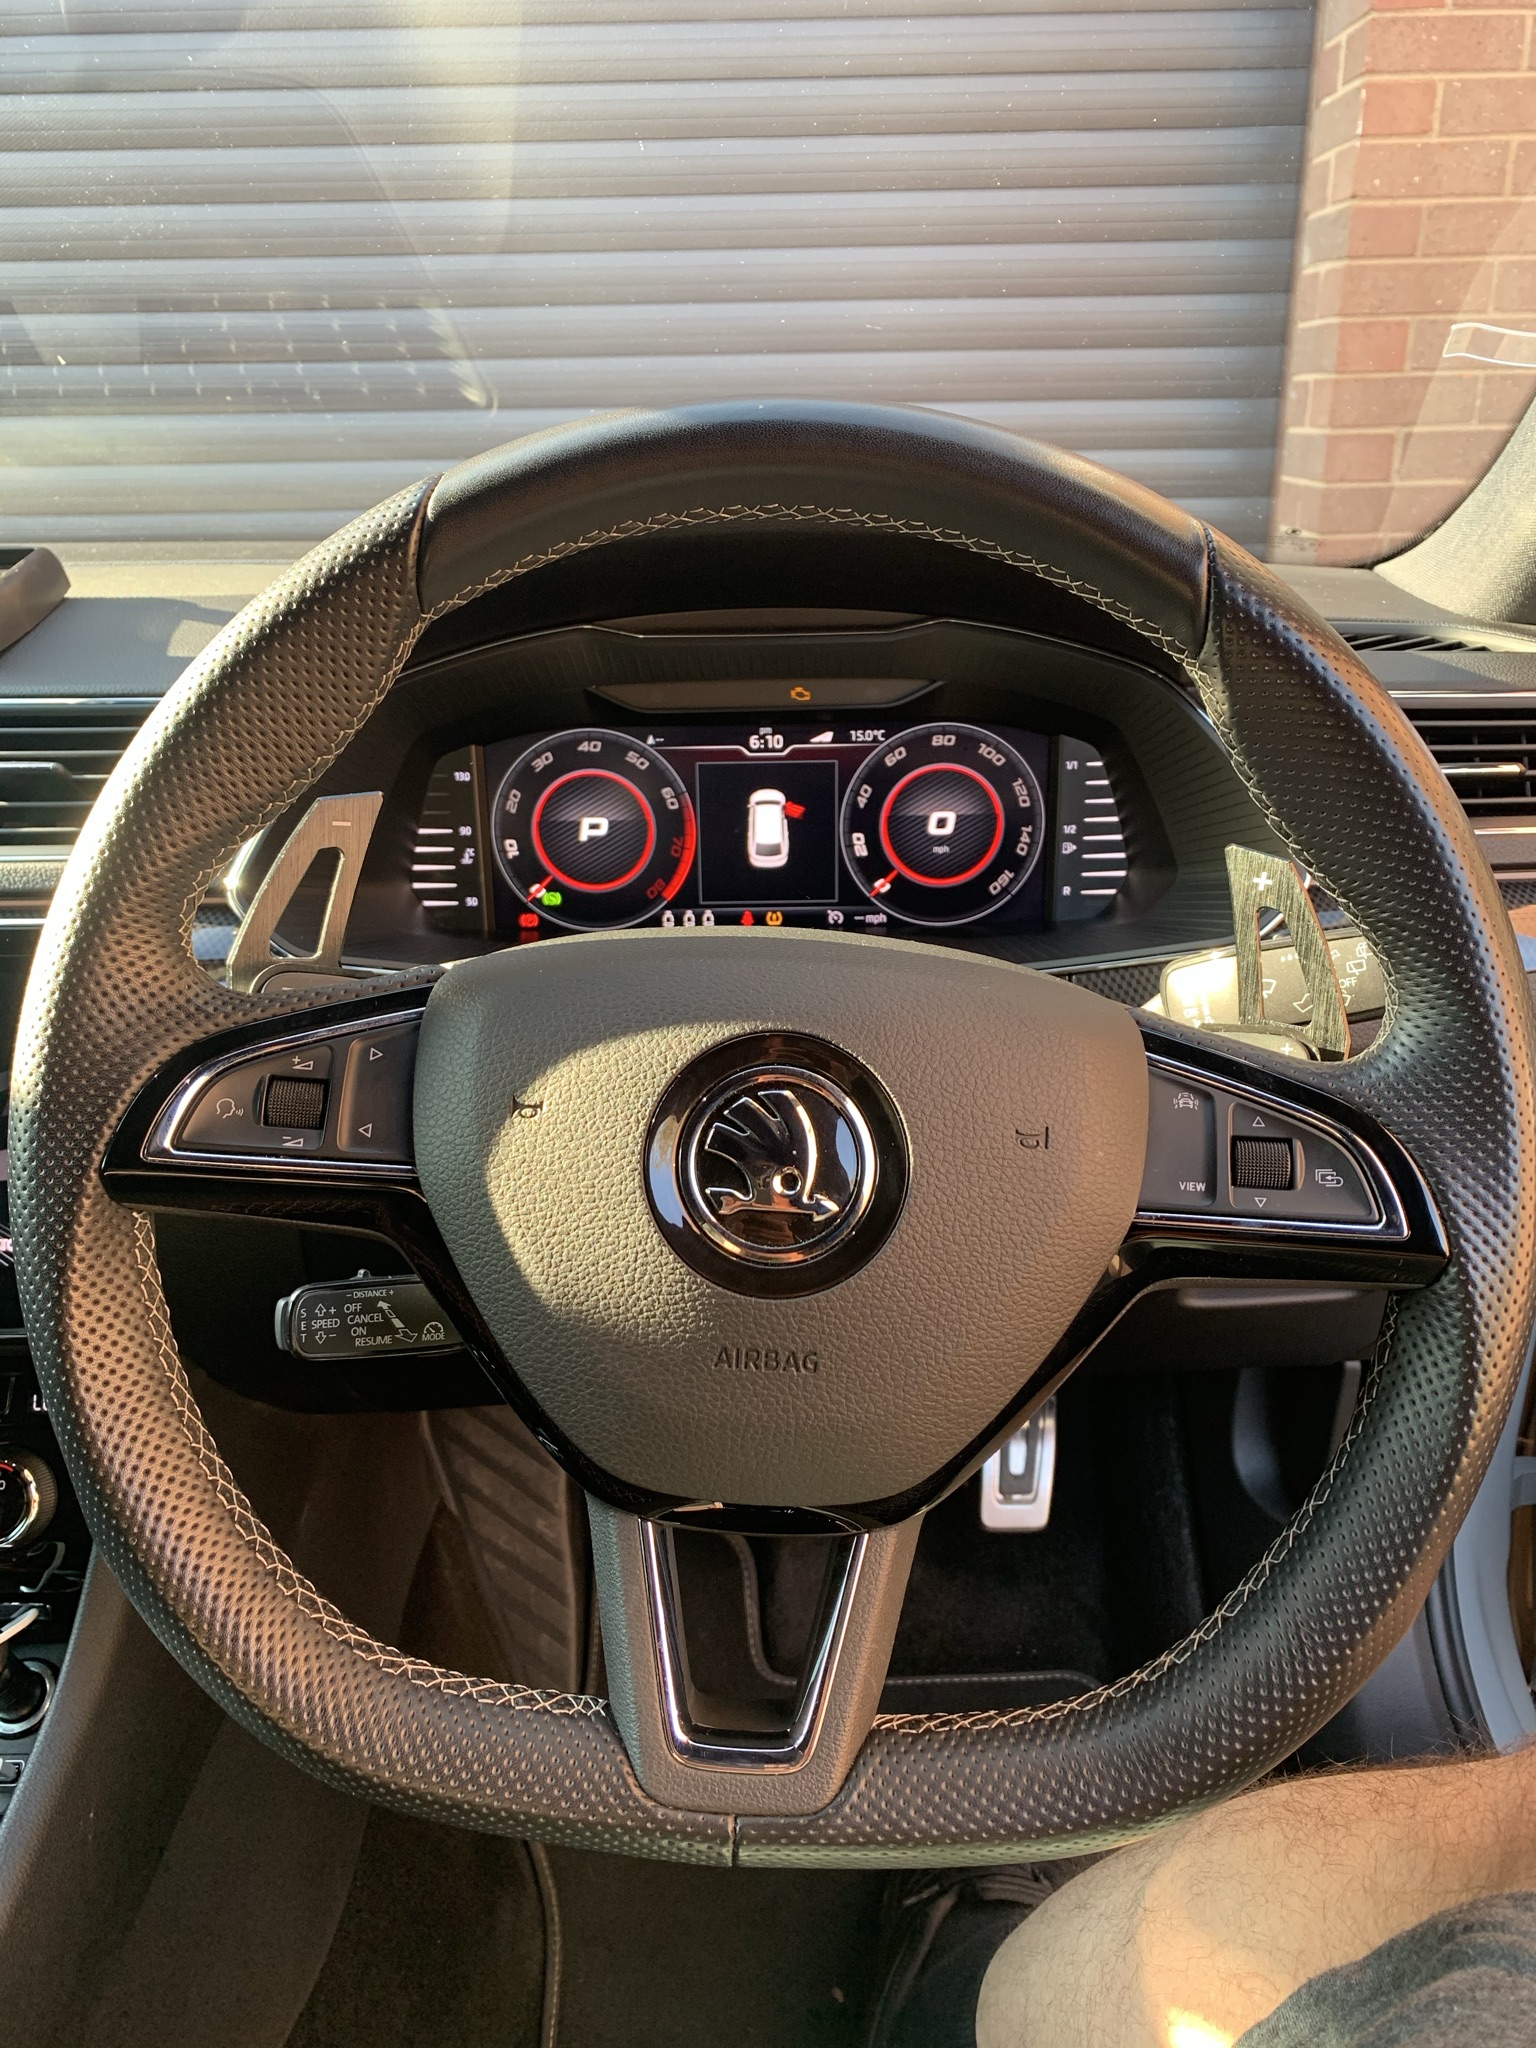
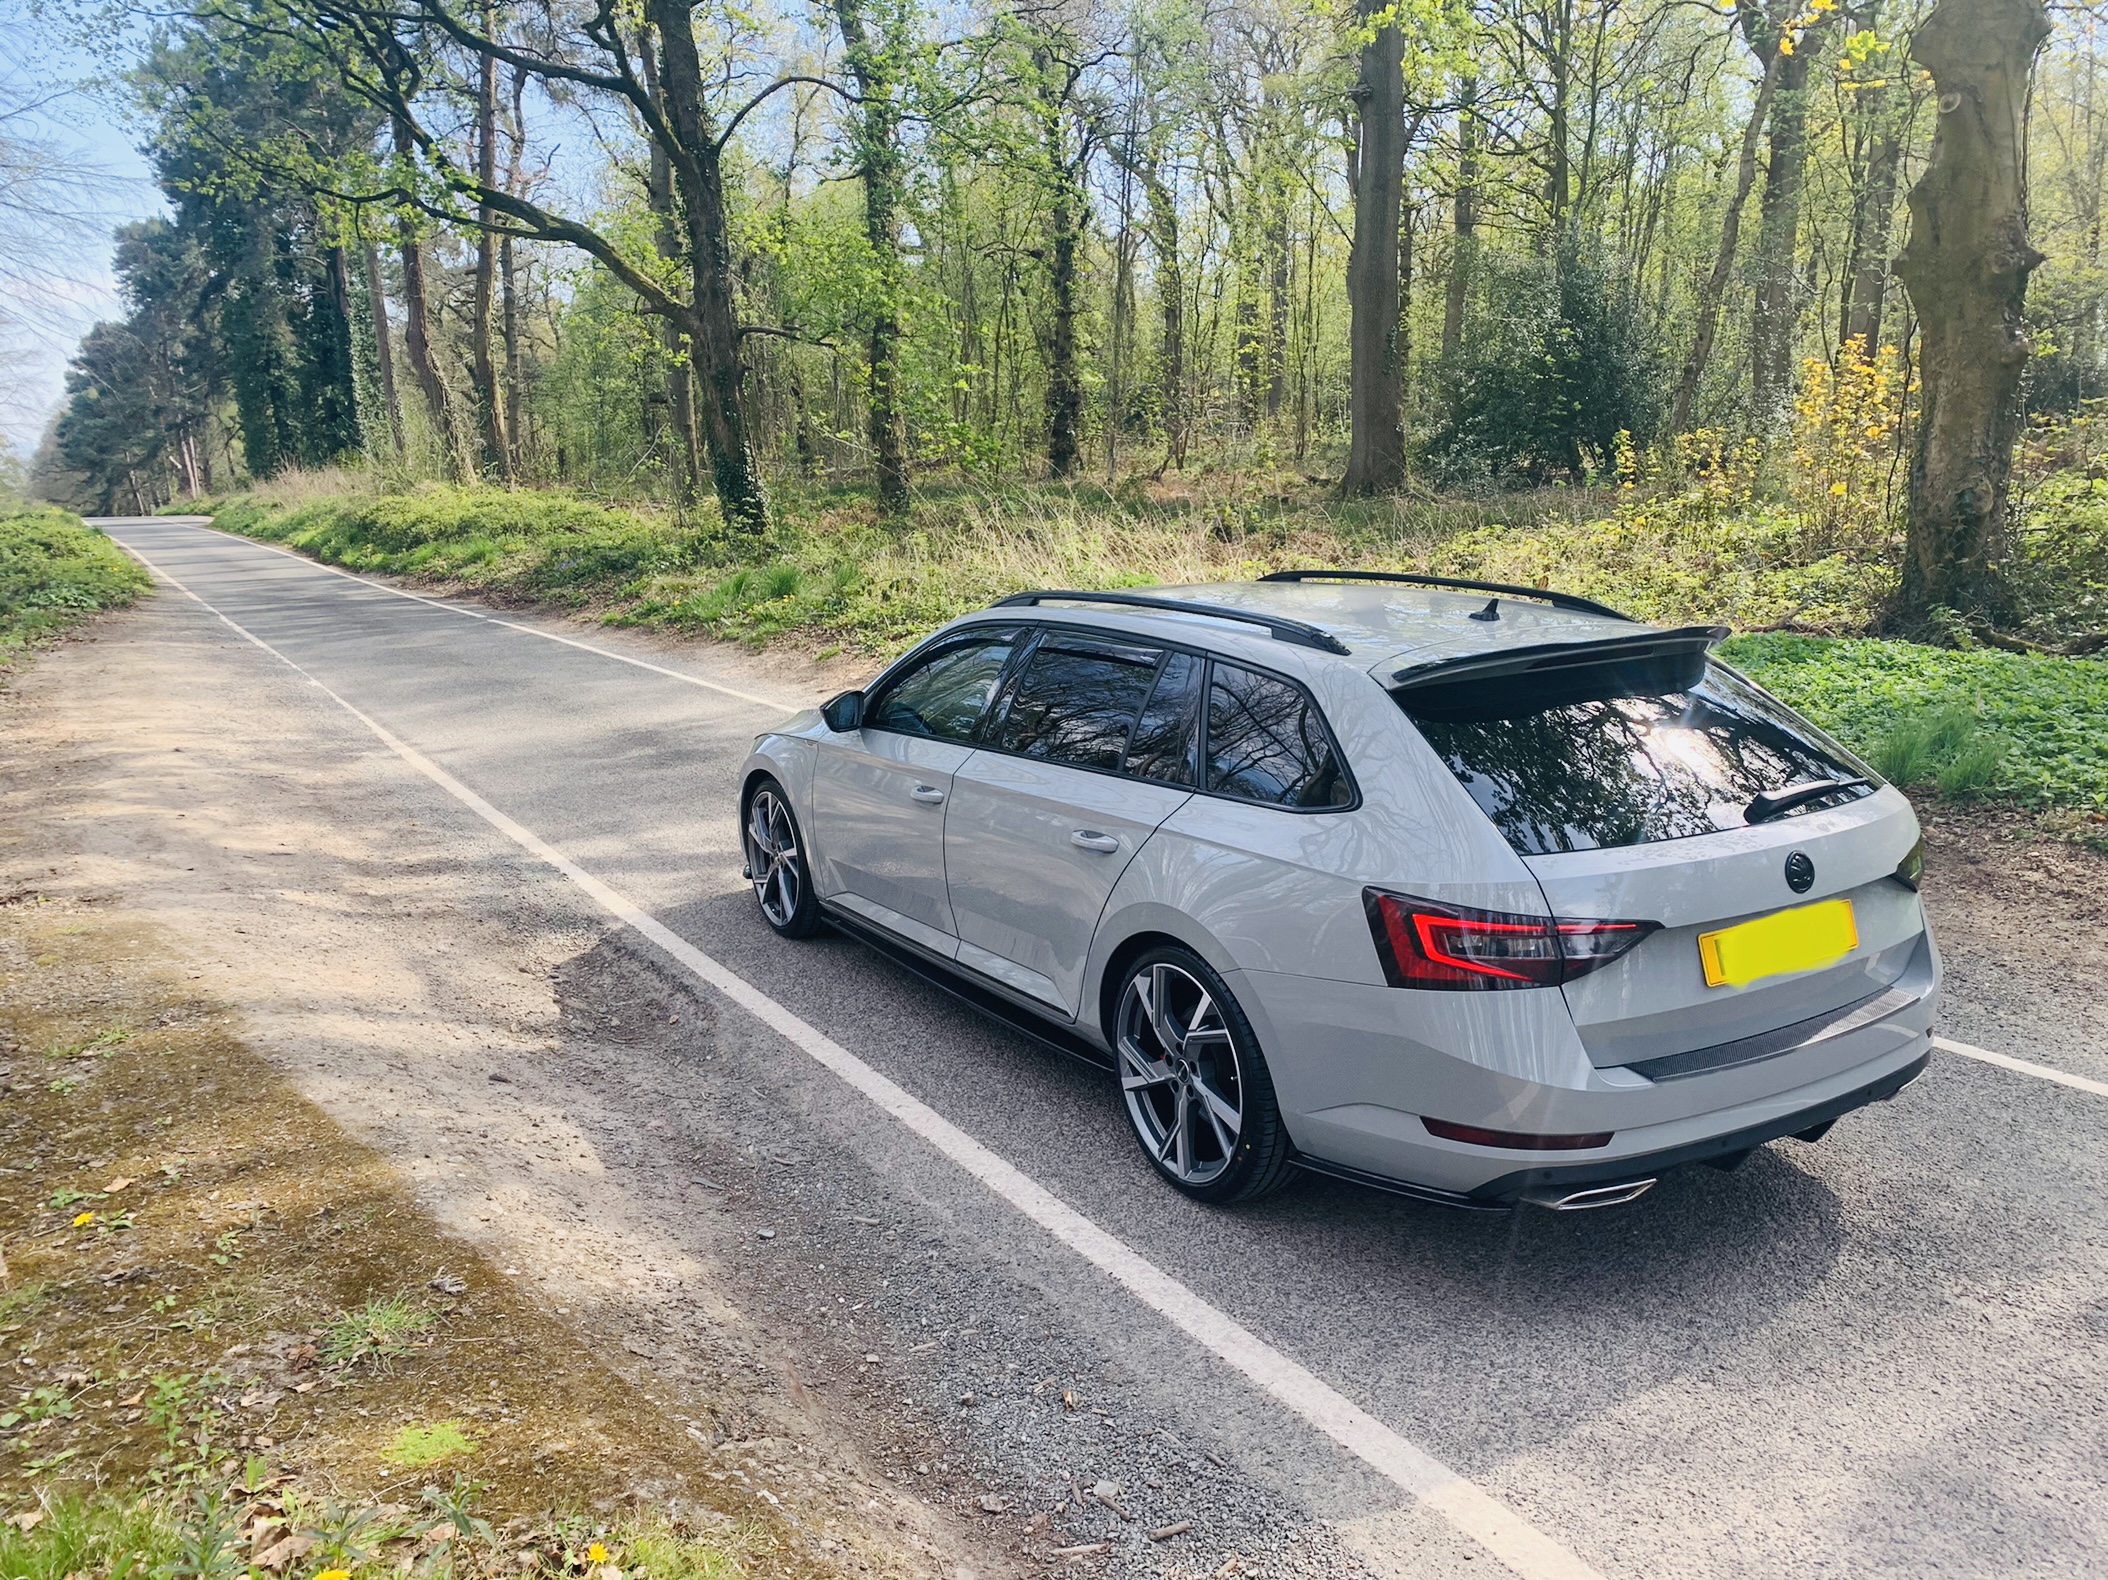
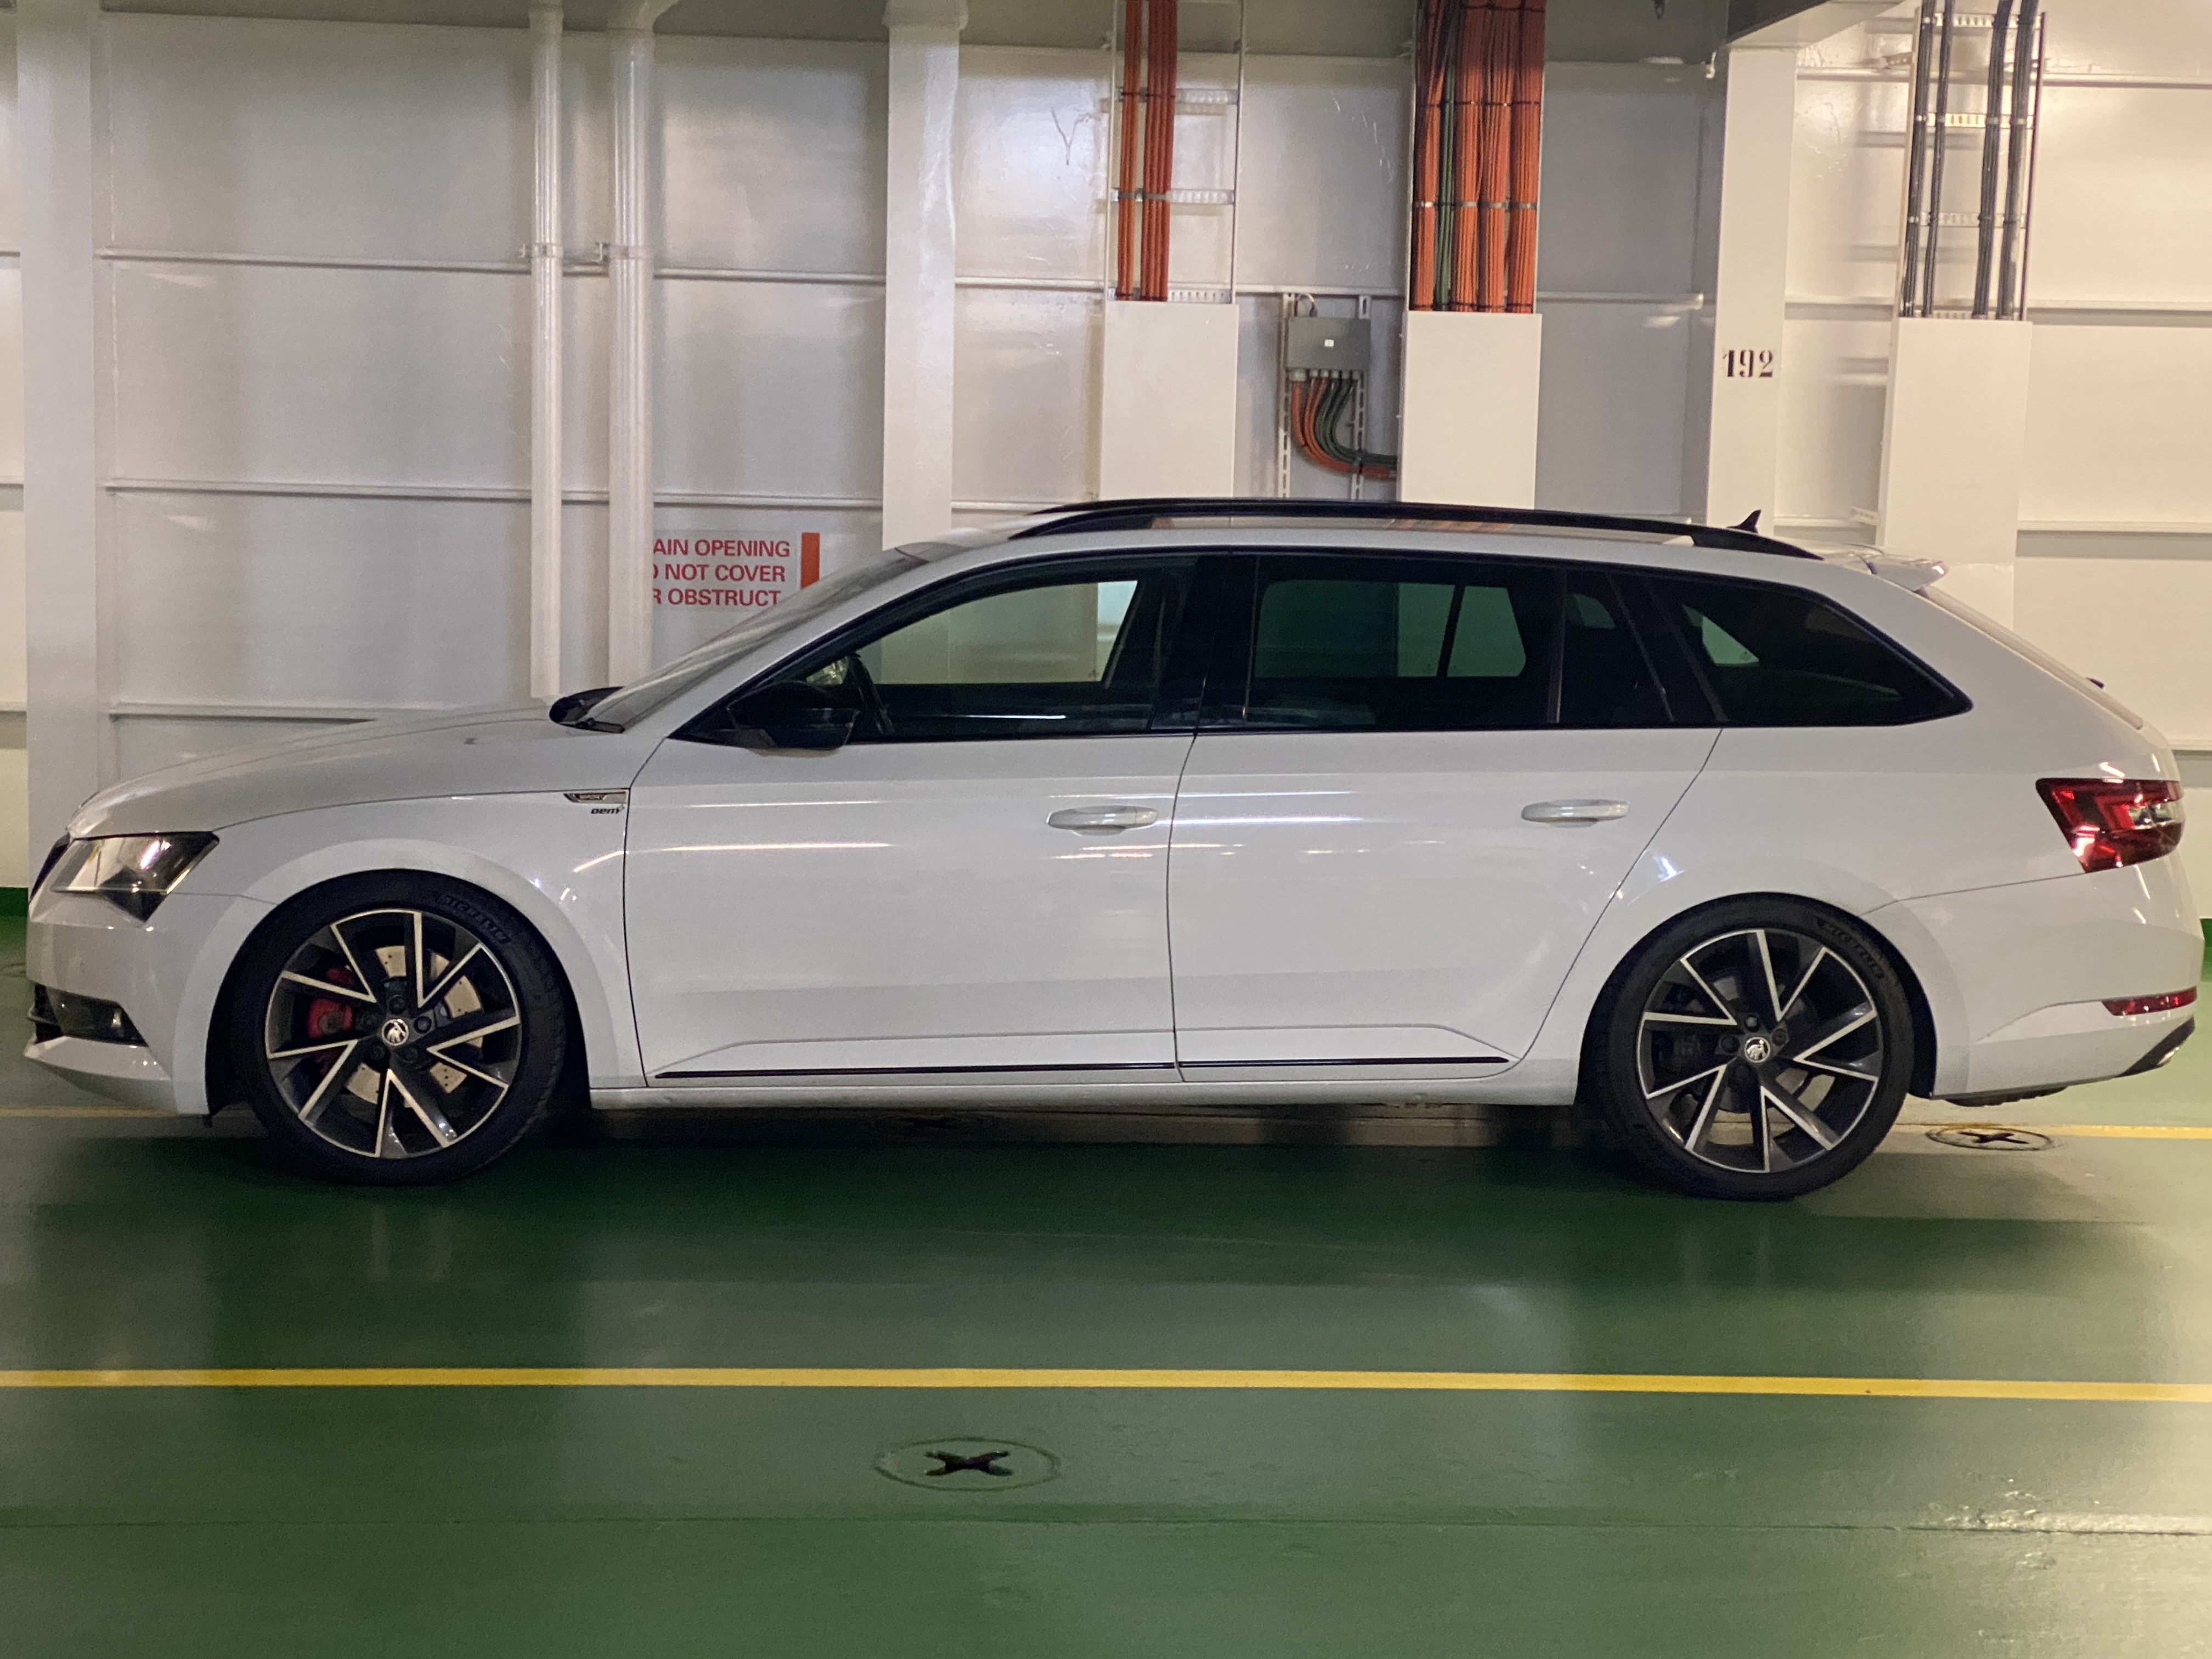
Having taken delivery of a new MY21 Superb Sportline 280 hatch, I thought I would provide a little summary of my observations compared to my previous MY19 Sportline. Background: I had a MY19 Sportline 280 hatch for just over a year until it was written off in a collision last September by an SUV driver running a red light and t-boning my vehicle in the side and front (car safety was excellent and I walked away without a scratch). My insurance cover was for a full new vehicle replacement and after allowing for COVID factory shutdowns, semi-conductor shortages and shipping delays, I finally received a replacement MY21 Sportline 280 hatch just over a week ago. Note: The Aus-Spec MY21 Sportlines do not (yet) need to conform to Euro 6 regulations so my new vehicle retains the 280hp engine without a particulate filter. It is also retains the 6 Speed DQ250 DSG transmission. Everything else is consistent with European MY21 vehicles. Pros: DSG appears to be recalibrated and is far more lively and crisp than previous versions with virtually none of the dreaded hesitation and lurch at initial take off. It’s the first time I can say I’m actually enjoying a DSG. Paddle shifters are larger and better shaped (but see cons below) Matrix LED headlights work well and rear LED light animations are cool ‘Sportline’ start-up instrument panel animations add a little theatre More bass/mid/treble settings for the Columbus Canton system than before, although the overall Canton sound is much the same The black lettering on the rear suits a Sportline, as do the rear dark tinted and smoked light lenses KESSY on the rear doors as well now Wireless Apple CarPlay works seamlessly The blindspot warning light in the mirrors has been relocated to a much larger warning light on the car window side of the external mirror housings. This is a great improvement over the MY19, which had a tiny light built into the mirrors surface and was impossible to see in bright sunlight Cons: The quad outlet exhausts with valves has been deleted. Despite retaining the previous 280 engine and running gear, the quad outlets and valves I had on my MY19 vehicle have been replaced by a simple dual exhaust and no valves (single outlet each side). Rather sad about that… Related to the above, it seems that Skoda spent whole minutes working closely with Dyson to specially tune the exhaust note. A little rumble would have been nice (and no, I don't want a resonator-delete and I'm not taken with the couple of aftermarket systems I've seen on here for the Superb) MIB III infotainment system ‘user experience’ is definitely a step backwards. The Skoda dealer warned me everyone hates it and I’m starting to join that club. The menus are clunky and finding some of the settings buried in sub-menus and sub-sub-menus with odd titles takes way more time than it should The Performance Gauges with configurable dials like turbo boost etc that used to appear on the centre screen has gone completely (thanks again MIB III) Driver profile settings are not remembered when you switch off the vehicle. So, if you set 'Individual' with your own settings (for example: DCC and Steering switched to Sport), the vehicle will automatically revert to the standard default settings when you next start it up, and you will then need to flick through the menu to put the vehicle back into 'Individual' mode again. My previous MY19 vehicle stuck with whatever Individual settings I had when the car was restarted. Paddle shifter shape appears to be unique. ie. different shape to previous Superb (MY19 and earlier), and looks like a different shape to VW Golf Mk8 etc. So no paddle extensions available to fit, nor can you easily fit full replacement shifter paddles as the fastening pins that were accessible on previous models have been hidden inside the wheel boss. I have both Carista and Ross-Tech VCDS and it’s clear VW/Skoda have locked out a great many features previously accessible on my MY19 – there are very few VCDS tweaks available on MY21 (at least at this stage) Only one USB-C port and one standard USB port in the entire vehicle and none in the rear. This should have been resolved for the MY21 update I like the new steering wheel overall, but the leather stitching design is more basic and less attractive than on the previous wheel You now only get one Skoda umbrella per vehicle, just in the driver’s door (although the Skoda dealer was kind enough to put another one in the front passenger door for me) The removable flashlight in the boot has been deleted, even the mount Modifications so far: · BMS Throttle Controller (best value single upgrade in my opinion) · 034 Motorsport Air Intake with a Pipercross panel filter · HG-Motorsport hi-flow aluminium Turbo Inlet Pipe · JB1 stage 1 piggy back ECU ...and a full tank of 98RON! Overall, the 2021 Sportline is a fantastic car: well built, quiet, sure footed AWD and genuinely fast. After six months in a little Hyundai rental car, it’s a joy to be back behind the wheel.


 2 points
 -
2 points
-
2 pointsI agree. An even film of dirt looks "kind of clean" until some muppet closes the boot with their fingers and leaves clean finder smudges/marks that make it look even dirtier that it is/looked. I'm a big fan of the handle!!2 points
-
2 pointsDoing the DCC recalibration on mine fixed the last remaining floatiness and crashy bounces that the Eibachs couldn't eliminate. It's great now.2 points
-
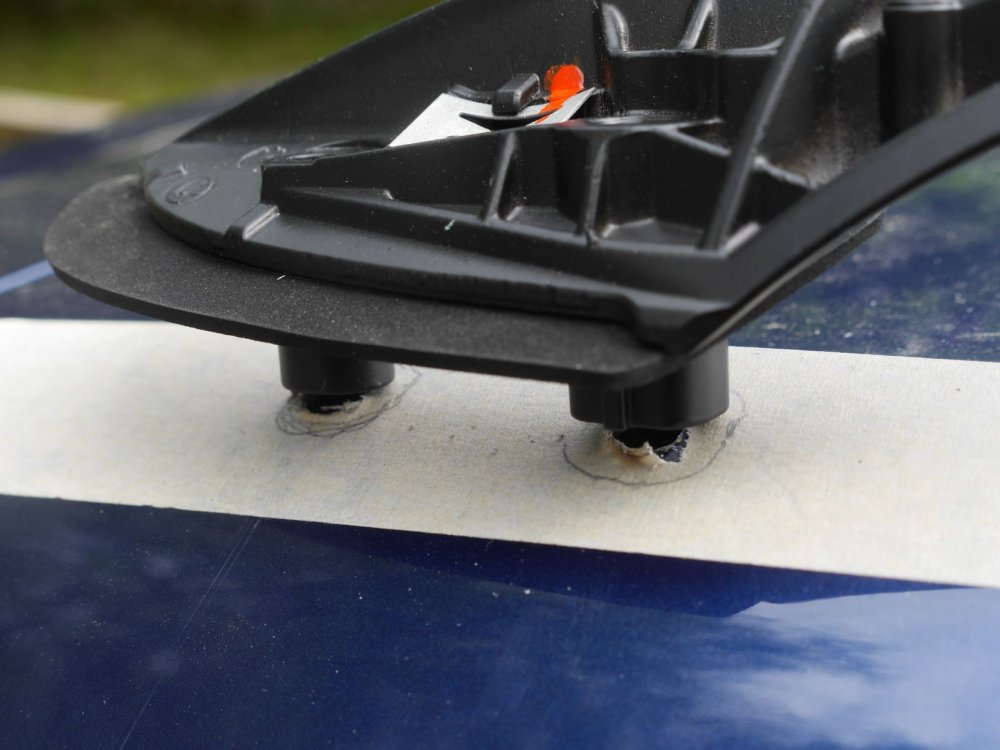
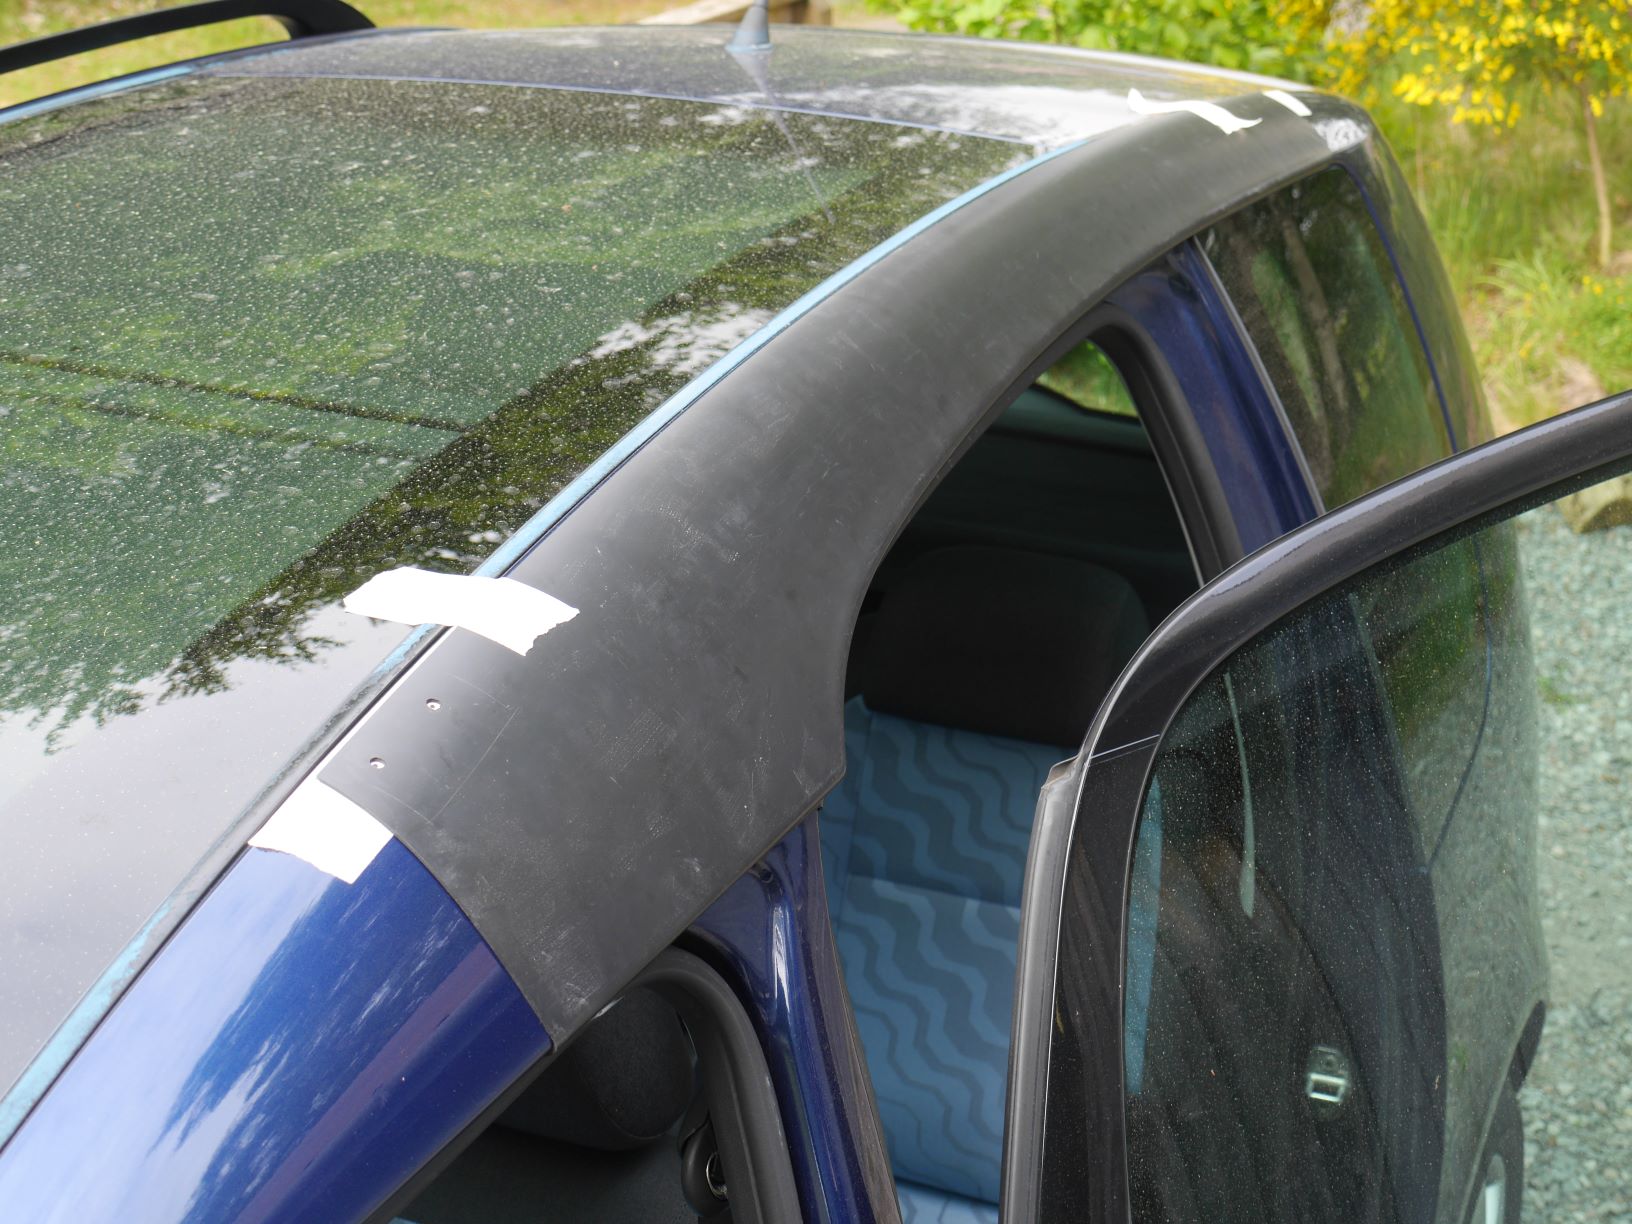
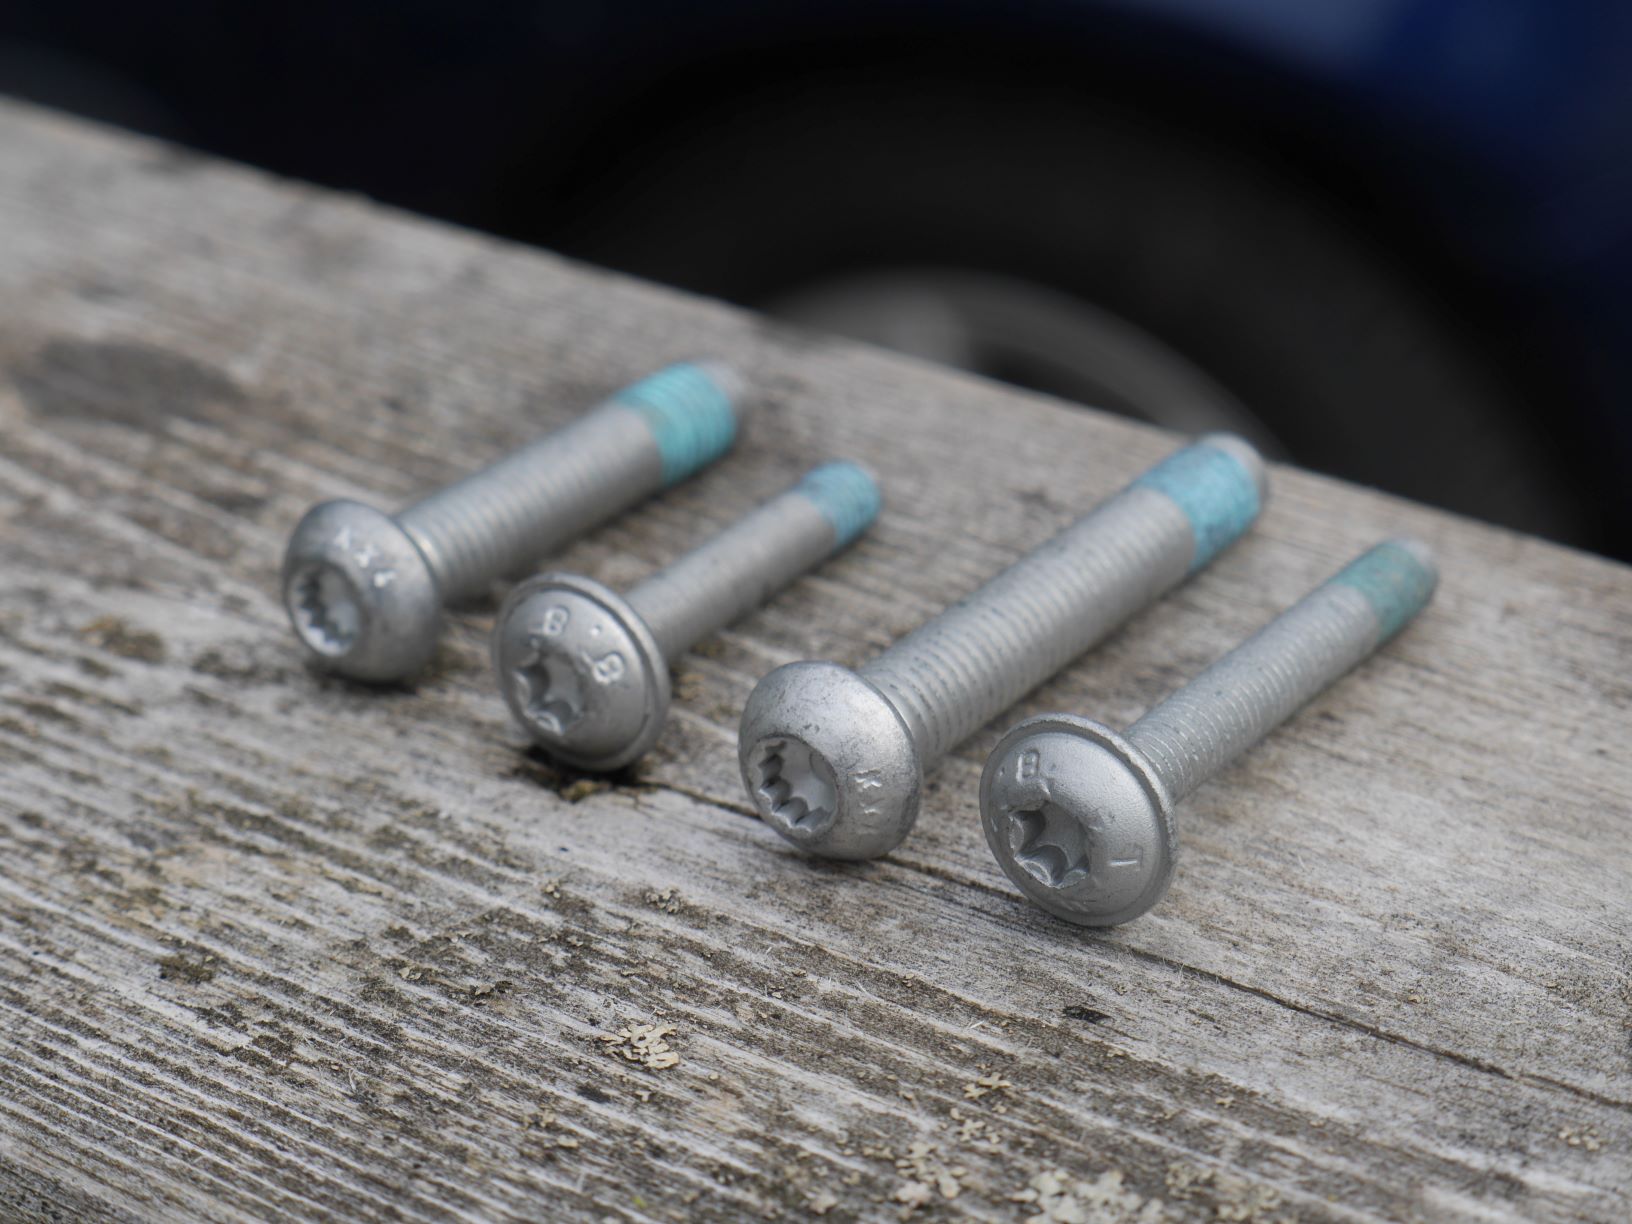
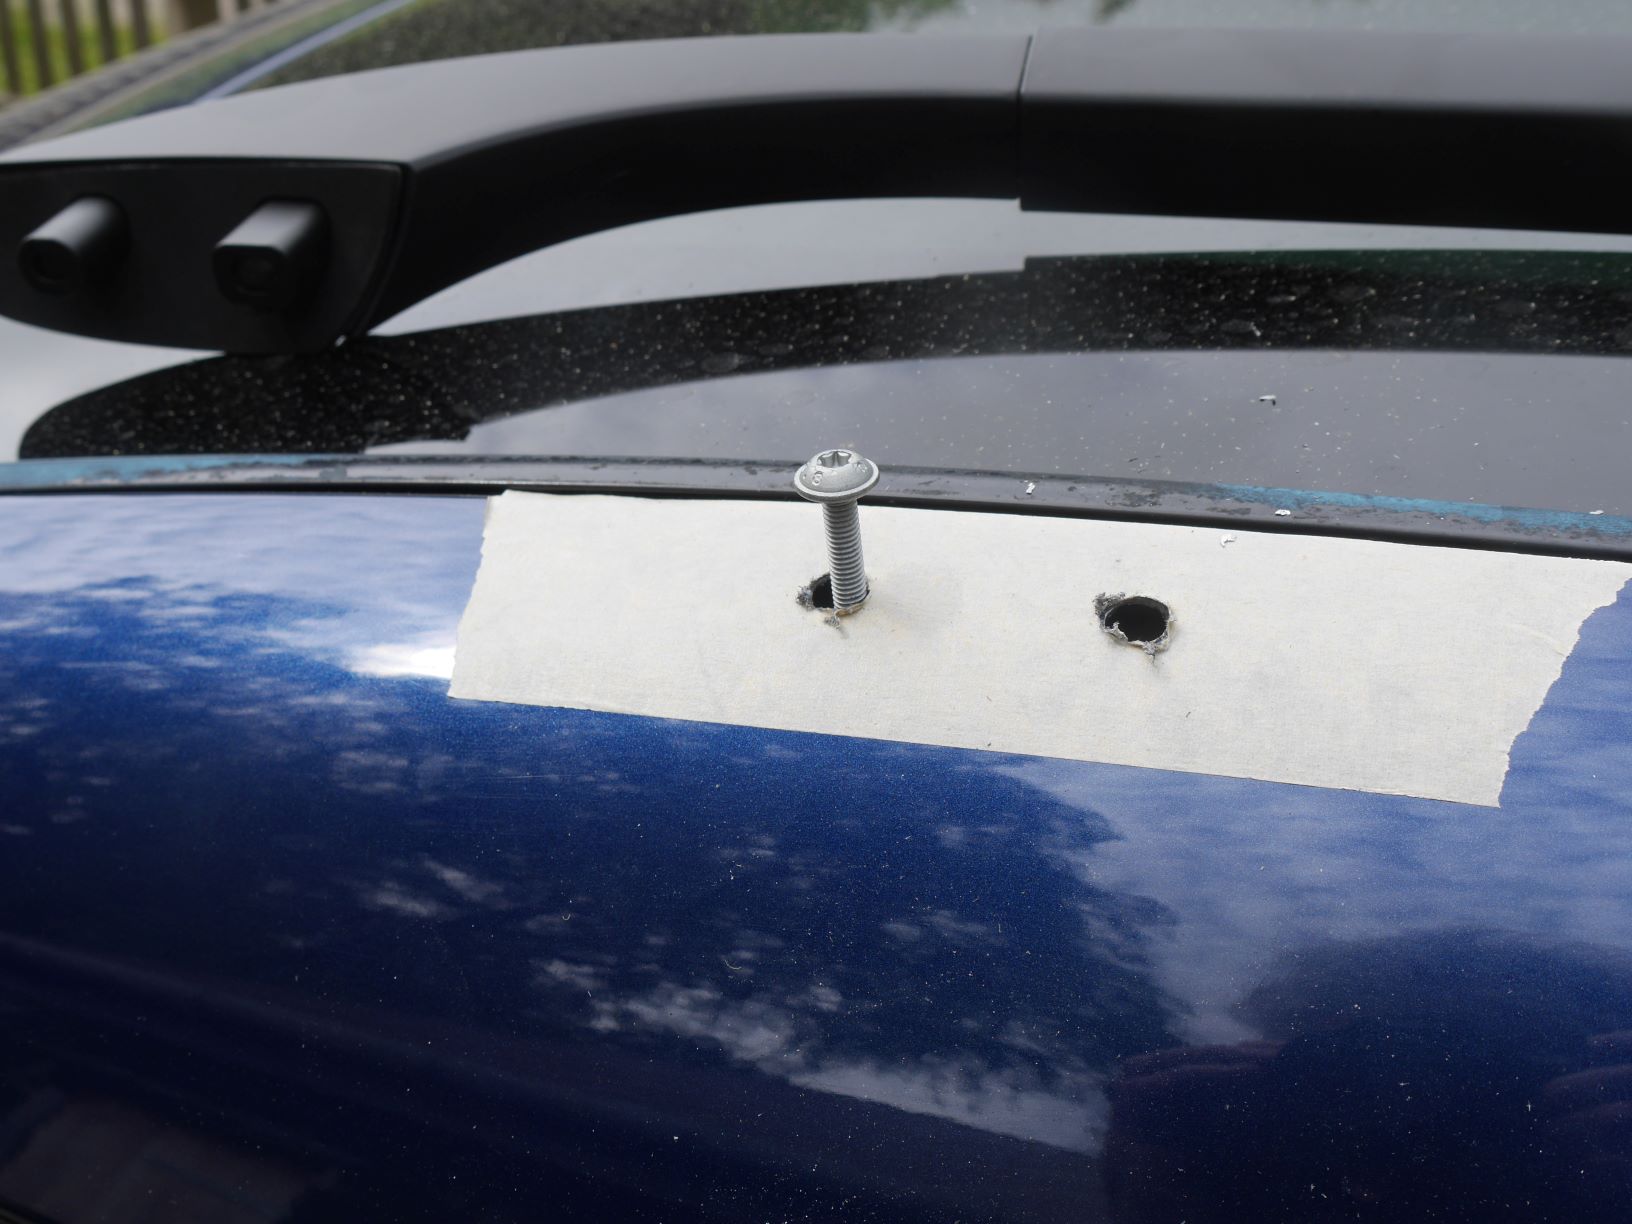
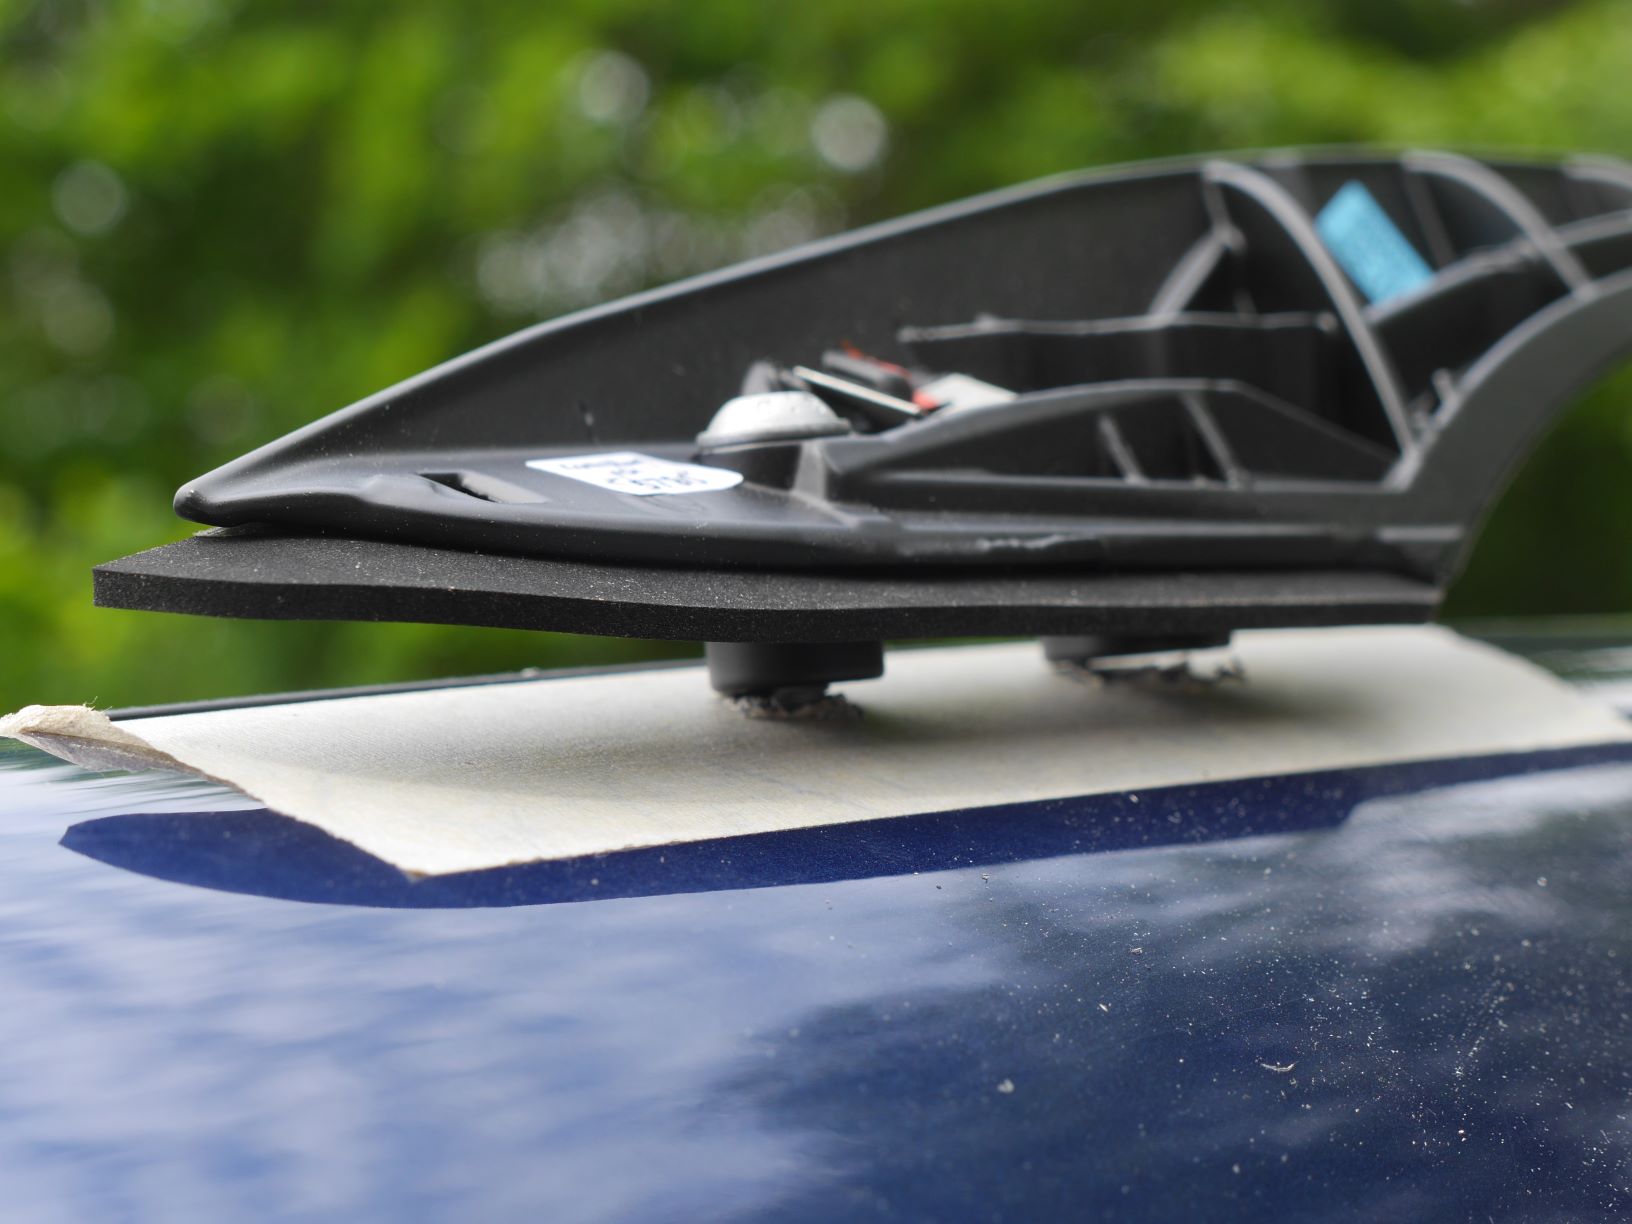
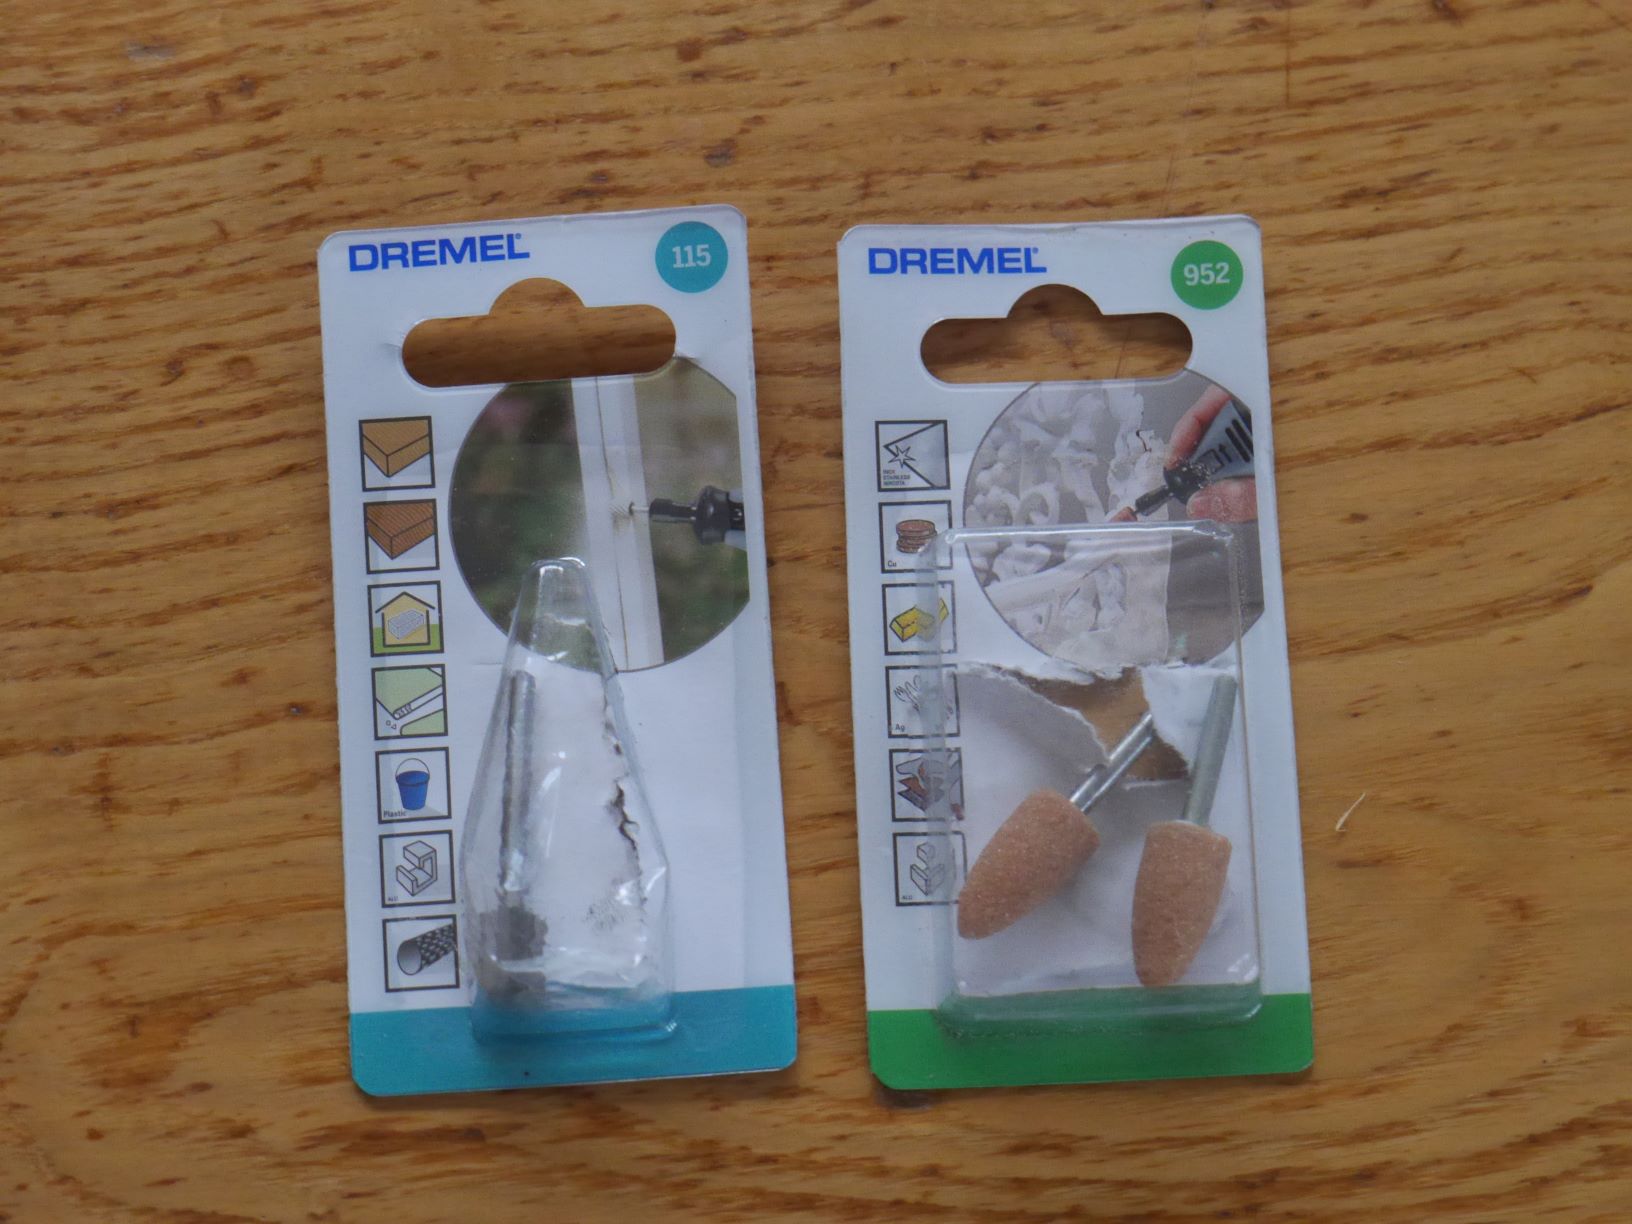
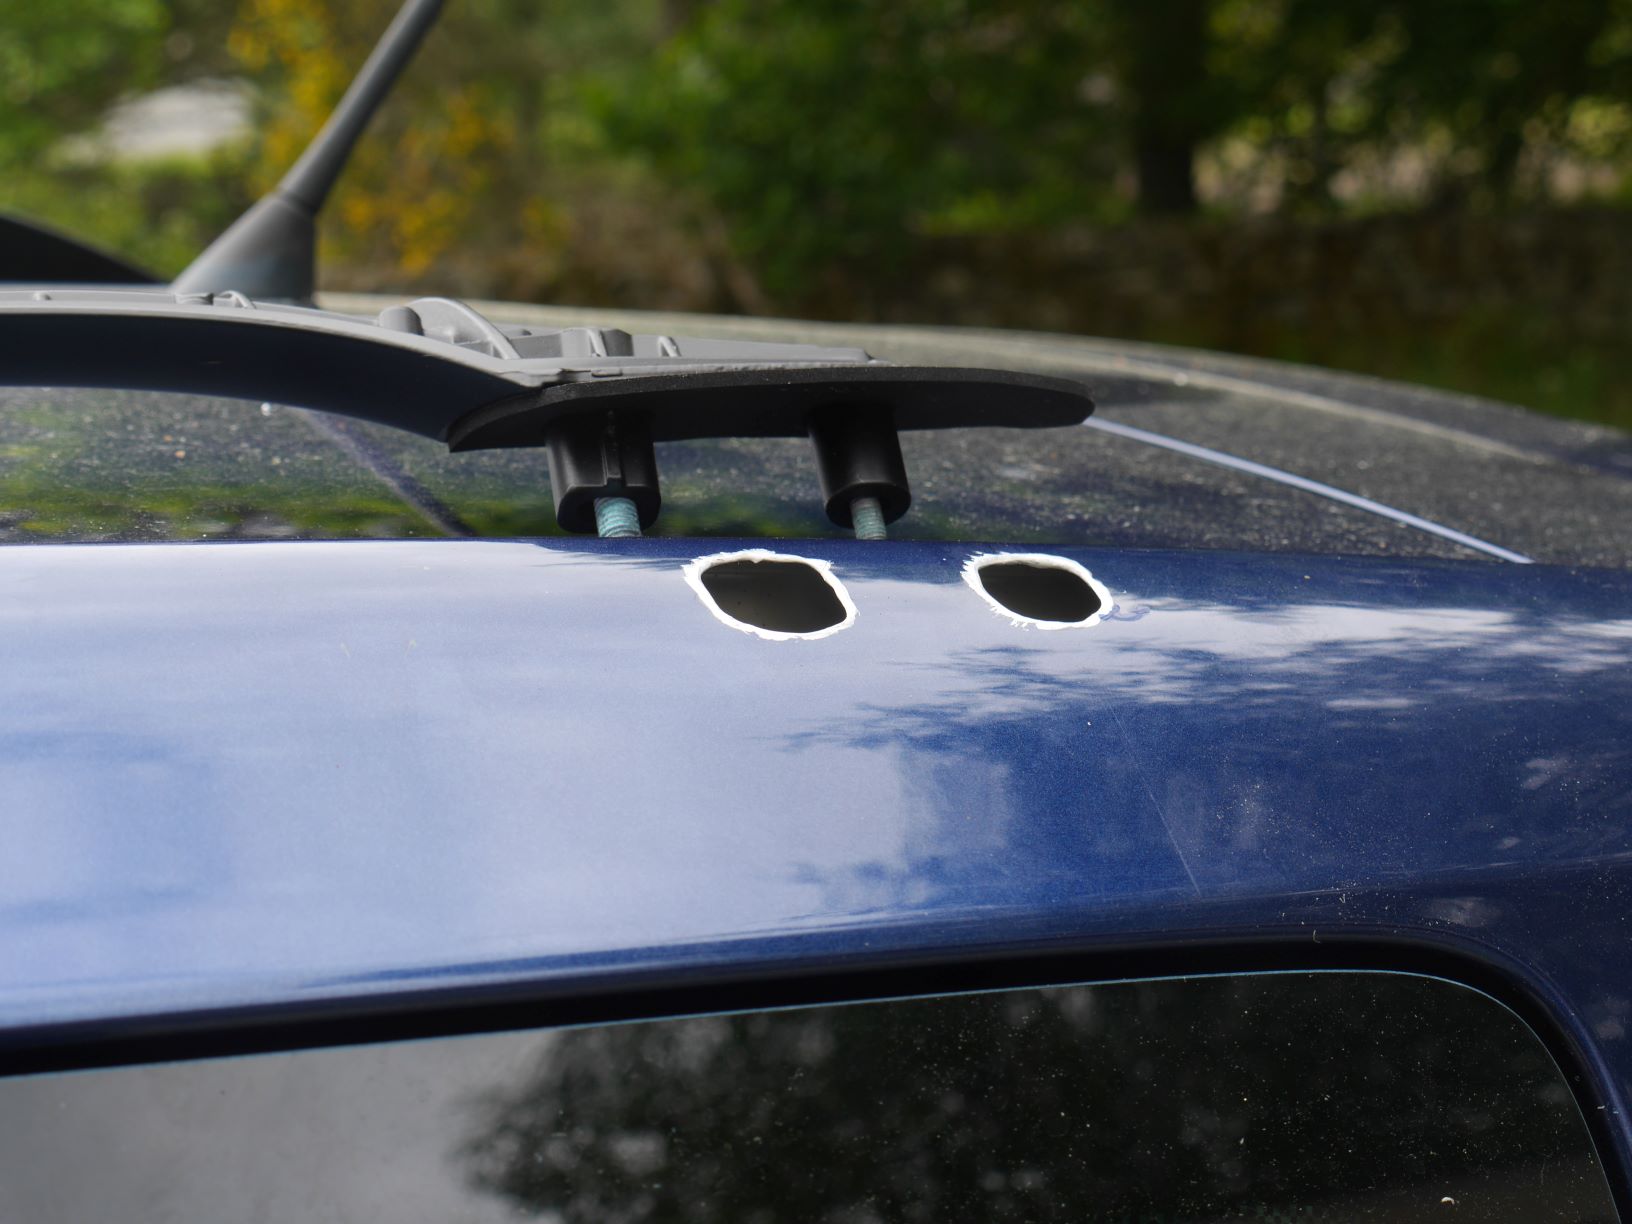
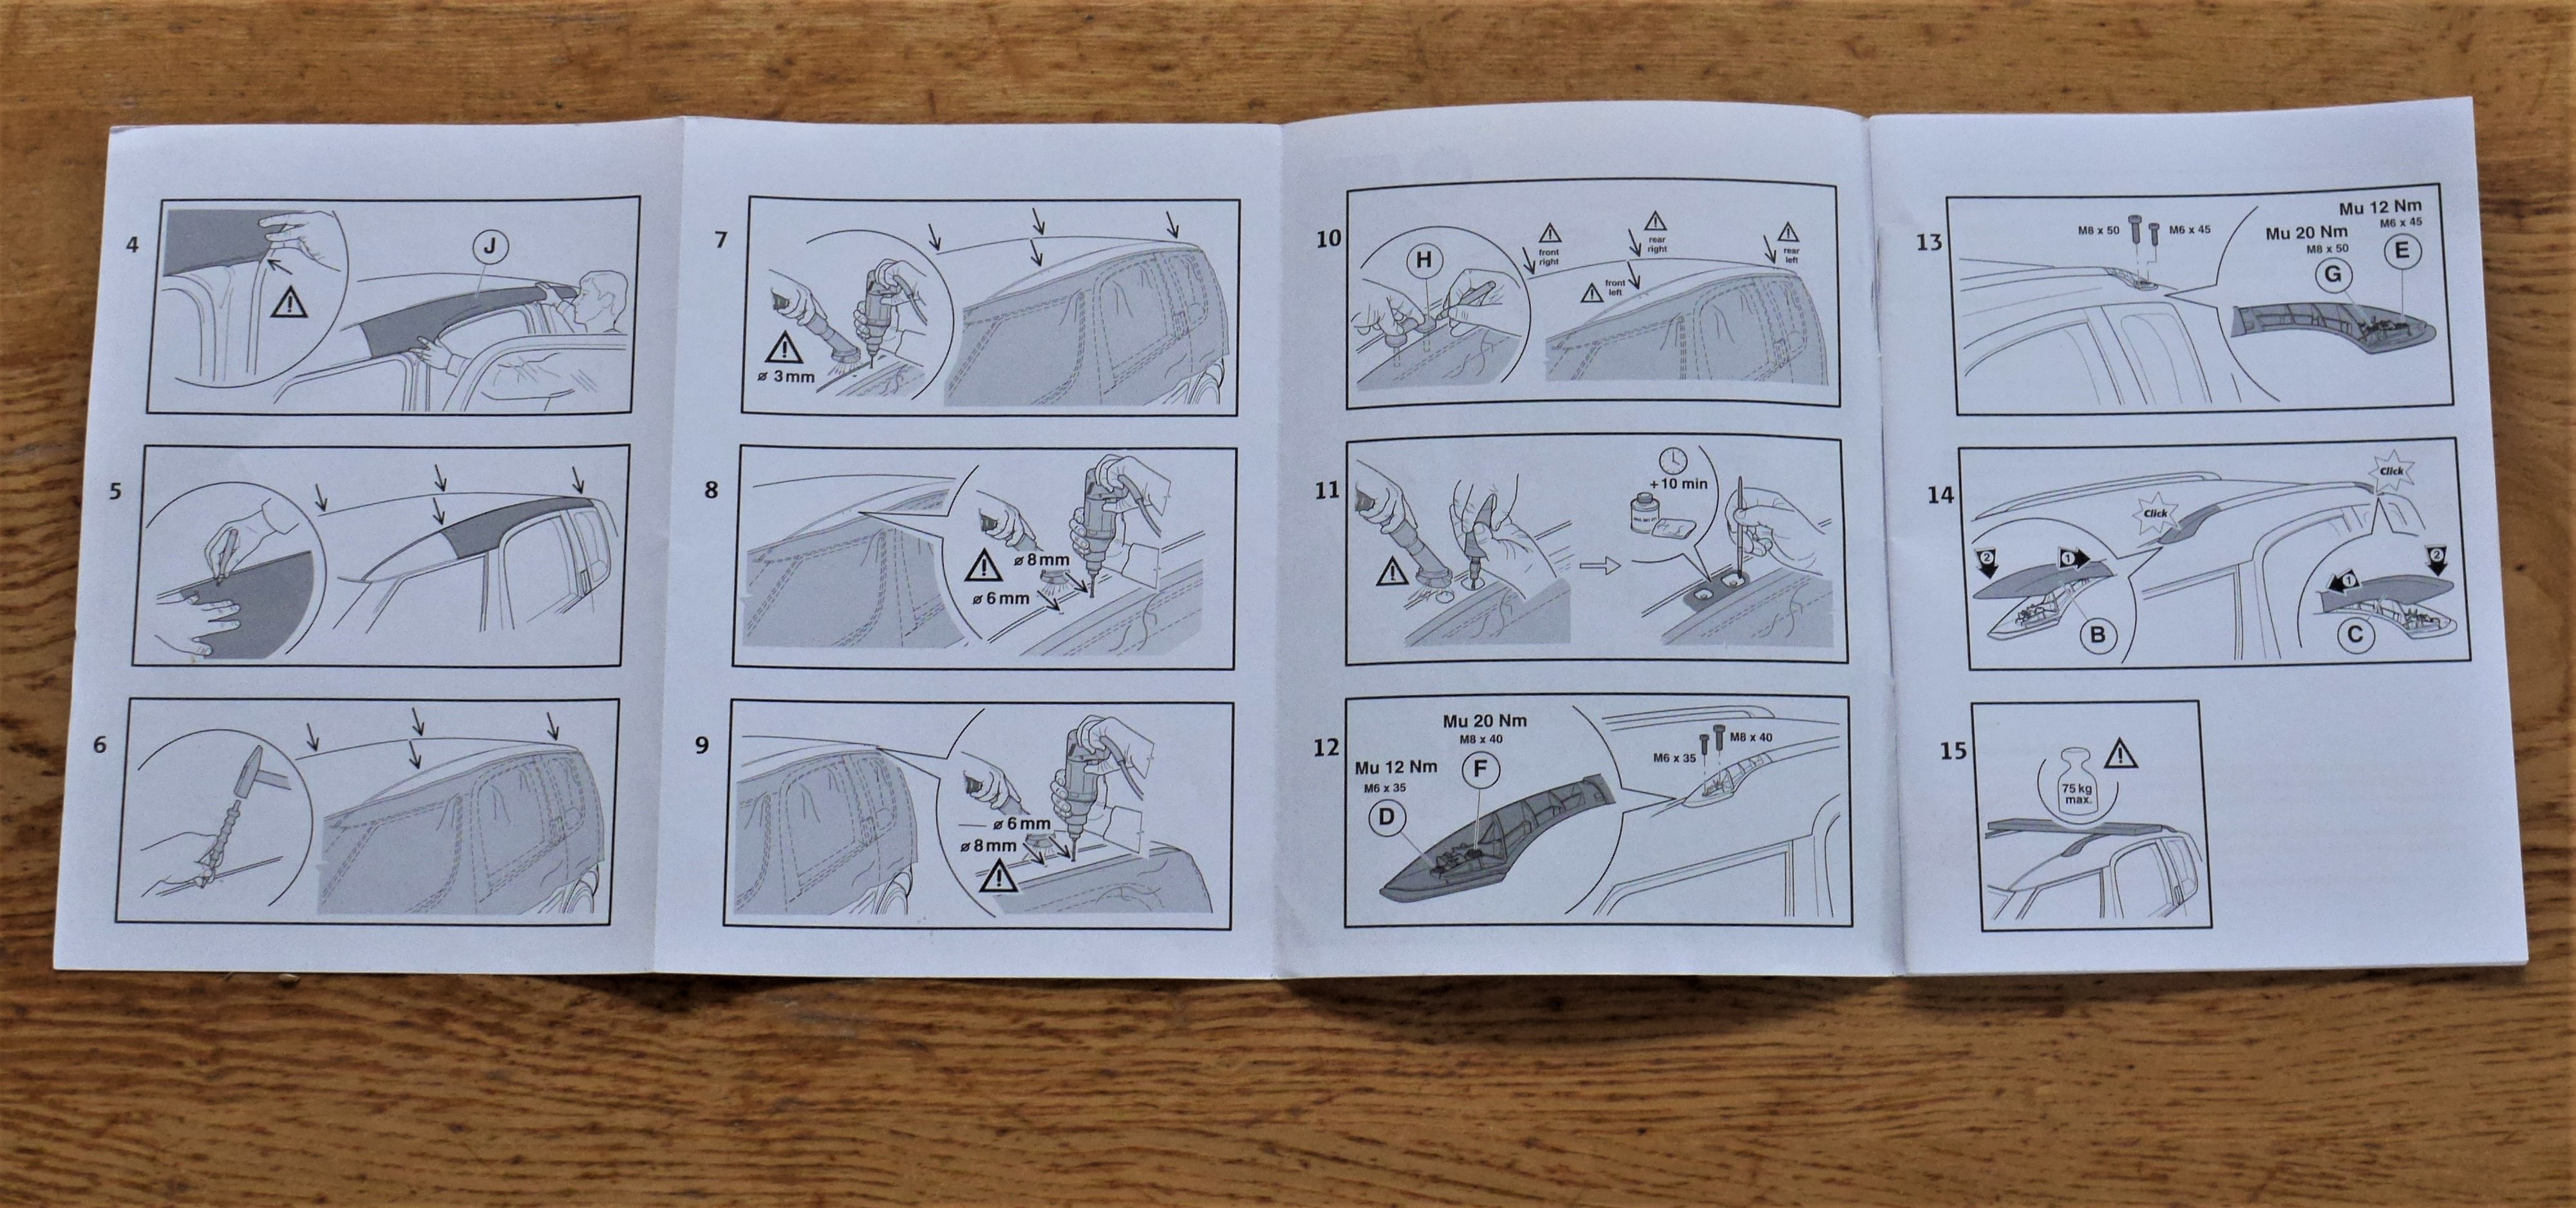
There have been various threads and postings on this DIY installation job but not a step-by-step guide. Have just fitted these on my 2009 Roomster with a Pano roof and thought others might benefit from my fumblings! The Big Picture The roof rails can be retro-fitted to cars with or without a Pano roof. There's no difference when it comes to installing the roof rails. If you're not too handy with tools (or have limited access to tools) and you have deep pockets, then definitely get a Skoda dealer to do this job for you. There's been mention on the forum of Skoda dealer Parts Department staff producing low 'book price' labour quotes. Accept the quote! Drilling into the car to locate some hidden captive nuts certainly feels a little 'balls out' (even using the Skoda template) so the job is not for those of a nervous disposition either! However, if you're a bit of an impecunious bugger like me and have done a few more technical things on your car then this job is definitely do-able....as long as you have the right tools. Stuff you'll need:- The roof rails themselves. Skoda part number: LAH770001 The roof rails template. (Attempting to do this job without the large templates would be a nightmare and if you get it wrong it might require an expensive visit to a bodyshop to put right your mistakes). Skoda part number: LAH770011 . There are two of them, one for each side and they can't be mixed up. If you buy this installation kit from a Skoda dealer then it will also come with a selection of small plastic templates that allow the accurate enlargement of the pilot holes you'll be making. I didn't have these small widgits so had to ad lib a bit but nevertheless achieved a satisfactory outcome Tools Power drill, Dremel drill thing (or die grinder, or similar), 1/2" or 3/8" torque wrench (that goes as low as 12NM), a Torx and a splined bits for torqueing down the securing bolts. A sharp-pointed centre punch, hammer & needle nose pliers. Consumables Drill bits: 3mm, 5mm, 6mm, 8mm. HSS or similar. I broke two of the 3mm bits so have a few spares of these smaller one. Dremel or die grinder bits to expand and clean up the quite large holes you've made. Paint: Primer (I used rattle can of acid etch primer, sprayed a bit into a jar and used and a very small artist's paint brush to apply the paint. Plus some sort of quick drying top coat to seal the primer and keep the weather out. (Above) #1. One of the large Skoda OE templates in position on the Roomster. It's made of cheap plastic but carefully and accurately moulded to the contours of the roofline and B pillar. Don't leave the template out in the sun just before you use it - which is what I did - because it expands lengthways at least 8mm or so which was a bit alarming and gave quite a locational error at the rear rail fixing points. I let it cool down to below room temperature and then got busy marking the centre of each aperture onto the masking tape I'd put down in the general location of the bolt holes in the roofline. (Above) #2. A bolt set for one roof rail shown. 4 bolts per side, all different sizes. M6 and M8. The two longer ones go at the rear fixing points. *Note they have Torx and splined socket heads. (Above). #3 The captive bolts are located beneath the black dots....I hope! Make a dot in the centre with a pencil or Sharpie then lightly punch it with a centre punch. This will reduce the chances of your drill wandering around too much when you first start the 3mm hole. (Above) #4 Using a selection of drill bits progressively make the holes 6mm and 8mm. The 6mm holes are at the front end and rear end of each rail. (You should be able to see the captive nuts down in the holes....and yes, they were there thank God, pretty much spot on!) If you have the selection of small plastic hole templates in your installation kit this is when you insert and trace around them to give you the finished hole sizes sizes. I didn't have the small plastic widgits so had to use other freehand methods to sketch the larger holes onto the masking tape. (If you have the small plastic widgit templates then you can skip the next three photos.) (Above) #5 My free-stylee approach to sketching the larger holes. As a temporary measure, place the longest 6mm bolt into the hole at the front of the car and lightly screw it into place. Finger tight only. (The bolt you're using will eventually be used to secure the roof rail at the very rear of the car.) (Above) #6 With the roof rail lightly attached at the front of the car, next swing the roof rail over where the rear holes are and temporarily tape it in position. They won't line up, which will freak you out slightly (or a lot). You'll assume the roof rail is too short, or the template was wrong , or the captive nuts in the wrong place. Or all of those things! But don't worry everything will come good. (Above) #7 Trace around the projecting pegs onto the masking tape at the front of the car. (Above) #8 Drill 3mm holes then enlarge with 5mm until all the drilled holes merge and the excess metal in the centre can be pulled out with needle nosed pliers. (Above) #9 Dremel time! Smooth out the edges of the holes. Test fit the roof rails. Make sure there's clearance all round each protruding peg since you'll need to rust protect the edges of each hole so you don't want any pegs rubbing on the sides of the holes. Make sure you hoover out all the metal chipping that have fallen into the holes. (Above) #10 The Dremel with one of the metal grinding bits I used - Dremel grinding bit 115. A steady and firm hand is required when using this tool. You definitely need face protection when this thing is cutting metal at 22000 revs. The grinding bit was just about up to the job of cleaning up the holes but only just. No way could it have been used to remove most of the 'meat'. (Above) #11 Also used Dremel grinding stones (right) to smooth off any final rough edges around each hole. (Above) #12 Remember photo #6 above, the one where the holes didn't line up? Well, with the two holes at the front of the car now complete and front pegs dropped into place, miraculously the pegs at the rear of the vehicle become aligned. Witchcraft! Next step is to drill and enlarge the rear holes similar to previous steps. (Above) Paint protection for the holes. I used acid etch primer and then some anti corrosion stuff I had lying around in the garage. It's at this point you'll want to touch up any nicks you created when using the Dremel or die grinder. I had a couple that needed minor attention with a body coloured touch up paint kit. (Above) Almost there. A test fit of the roof rail. Torque down the bolts at each end of the rails. M6 bolts torqued at 12NM and M8 bolts at 20NM. Nearest the camera you can just make out where I nicked the paintwork with the wayward Dremel. I fixed the paint prior to final fixing. (Above) The finished job. The plastic cover trims at either end of the rails snap into place easily & securely after you've torqued down the rails. (Above) The 'Destructions'! Each set of roof rails comes with a easy to understand set of written and diagrammatic instructions. Well worth referring to. Hope this helps! End note: If money was no object I would definitely let the dealer do this job!


 1 point
 -
1 pointCheck out this vid. One of the better descriptions of how to take it apart. Should give you a some idea if it is worth the effort.1 point
-
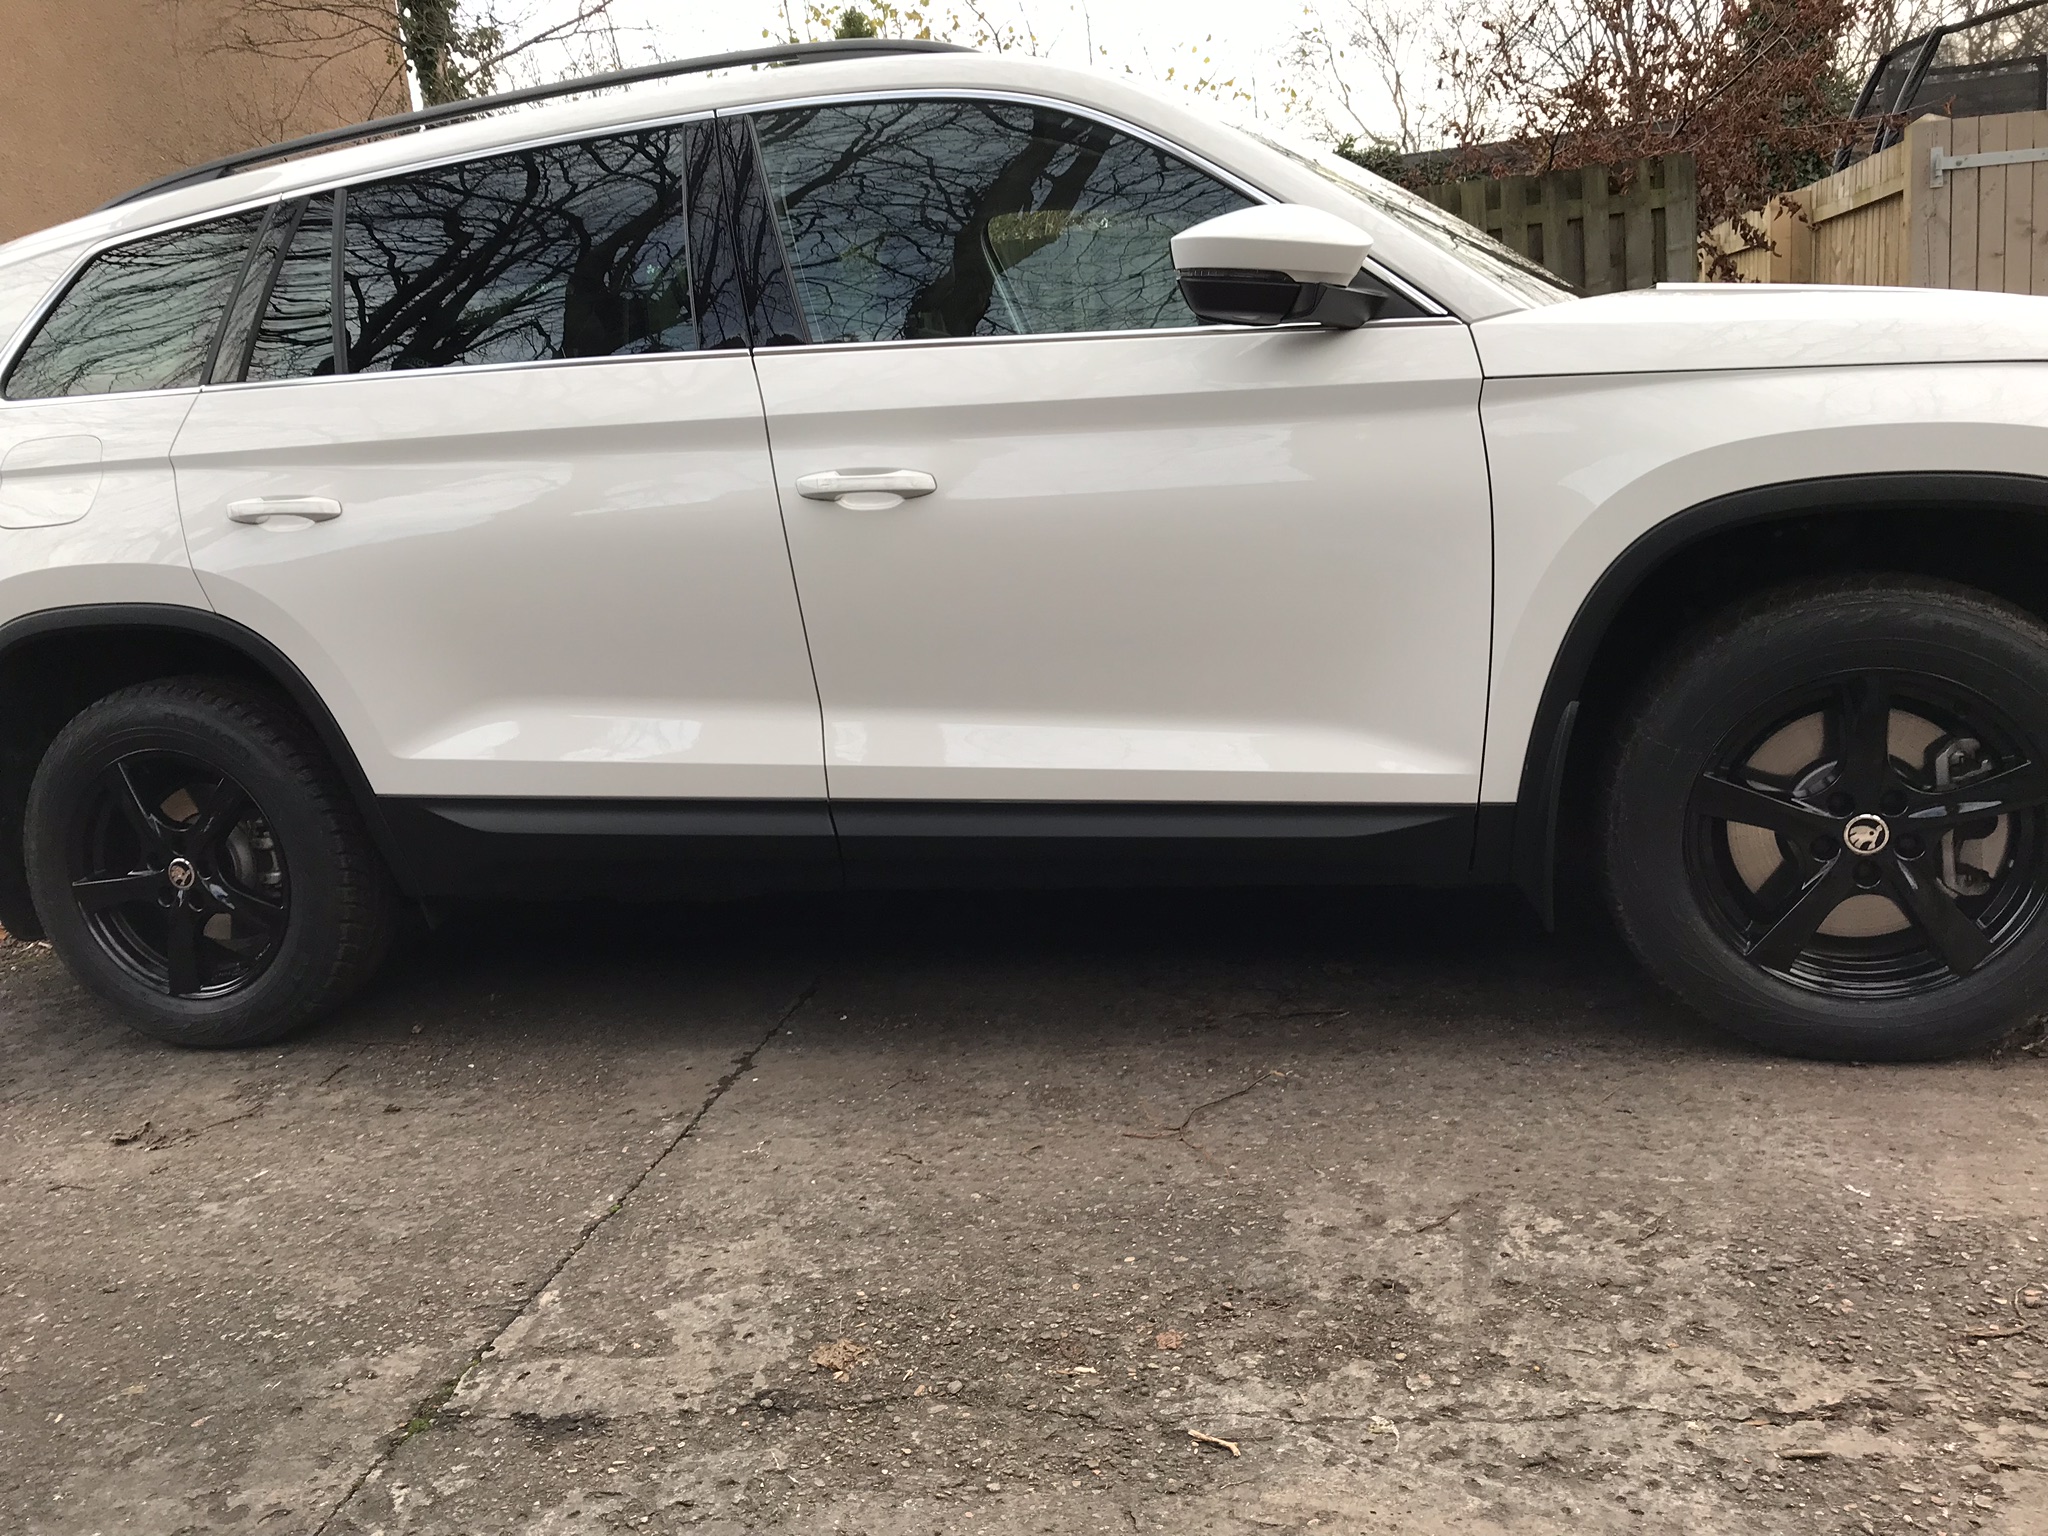
Hey Guys, I bought my 2019 superb Sportline Plus 272 4x4 a couple of months ago and have been adding my own touches to it since. I think I’m now at a point where I’m happy ... for the time being. Full list of mods below (a couple done by previous owner but most by me) 20” GMP Italia Angel Alloys Painted brake callipers gloss red Climair wind deflectors Tinted windows Boot edge protector Smoked headlights Smoked tail lights Maxton front splitter (v3) Maxton side skirts Maxton spats Maxton rear valance Maxton spoiler extension De badged rear Black Skoda badges Metal shift paddles Hard wired dash cam Rear facing baby cam and monitor OEM tablet holder in rear headrest Previous owner did a resonator and muffler delete - it’s far too loud for me so will be getting a customs exhaust - question is do I leave original tail pipes or go for quad pipe? More mods in the future methinks - please fee free to follow me on Instagram @sportlineplusuk IMG_0529.MOV IMG_0529.MOV


 1 point
 -
Both cars washed this weekend in the evenings when they aren't bathed in sunlight. Both had the same treatment: 2 Bucket Method Autoglym Bodywork Shampoo Rinse Dry with micofibre cloth DemonShine 'Spray on Shine' n buff Simoniz Ultrcare Alloy Cleaner On wheels Rinse DemonShine 'Wet look' tyre dressing
.thumb.jpg.ee1c8fb59292b2abf206aff95699459e.jpg)
 1 point
 -
I'll give that a go, even if it'll see me right until I can source the correct replacement. Thanks1 point
-
1 pointThanks but I don't have the strength as I broke my arm a while back. I'll have my friend try soon. Thanks so much for the info it makes sense.1 point
-
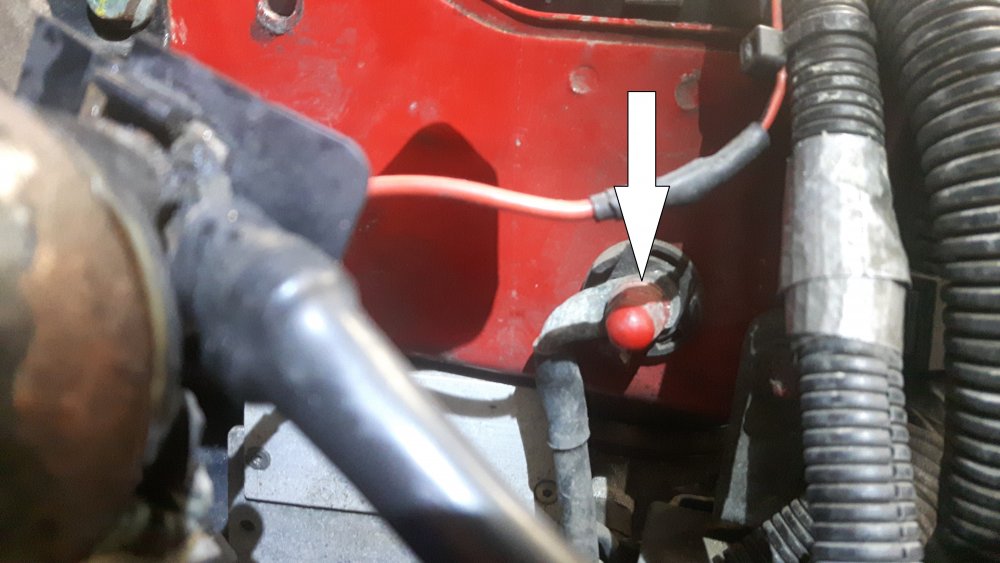
I think the alternator and battery are both in good working order, but the effect of the battery booster suggests that one of the cables between the alternator and battery may be higher resistance than it should be. This is quite likely to be due to corrosion at one or both terminal connections. Both of the earth cable ends are quite open to splashed water. I would start with the main earth cable that links starter motor and chassis. Take off the battery negative clamp first, then disconnect both ends of this cable, and clean the connecting crimp terminals, as well as the surfaces they touch when installed. The engine end connects to the upper mounting bolt of the starter motor, the chassis end connects to the left chassis leg, just above the fan control module, arrowed in this photo:
 1 point
 -
1 pointFinally repaired. 8 weeks but worth it. Windscreen and headlining stayed in. Thank you David Smalley at Horton Lincoln for sorting it out.
 1 point
 -
1 point
-
1 point
-
1 pointIs it possible to disable "cabin air recirculation auto off" via vcds? If the outside temperature below 5 C it shuts off randomly, sometimes it shuts off in an area with bad smell and it is too late when i realize that it shut off. Or can this 5 C threshold be changed? for example to 0 C??1 point
-
You need to check the entire vacuum system for leaks, not just the actuator line.1 point
-
Don't worry. I read that 2 of this years rounds have just cancelled.1 point
-
No. All 190 TDI Karoqs are DSG 4x4.1 point
-
1 pointI have a 2.0 TSi Edition model and replaced the 19-inch wheels with Borbet alloy 17-inch shod with Michelin Cross Climate + tyres: my local tyre dealer is 'garaging' the original wheels/tyres and when the car gets sold, those will go back on. I obtained the wheel spec from Skoda, everything fits just as it ought to. Round here, the roads are absolutely atrocious (and getting worse) and the higher-profile tyres give a lot more protection and cushioning. In the short time I had the original wheels/tyres, I was impressed by both the ride and low level of road noise. The switch to 17-inch wheels means the ride is noticeably improved when encountering the road imperfections (round here, that's, er, all the time) and a bonus of a small but noticeable reduction in road noise (more to do with the CC+ tyres I guess rather than the tyre profile). I run the tyres at or slightly below Skoda's recommended pressure of 2.4 bar. (As an aside, I can't quite see why Skoda recommend the same pressure for 19, 18 and 17-inch wheels/tyres, given that the larger volume of tyre as wheel size decreases would normally suggest a lower pressure. Hmmm) Given my style of driving, I detect absolutely no downside to fitting the smaller wheels and as mentioned above, this wheel/tyre combo is available in the EU (most EU countries do not share the UK fetish for crazy large wheels with rubber-band low-profile tyres). My local tyre dealer will happily tell many stories of how the local roads wreck these fetish wheels/tyres, which is good for his business. His brother-in-law runs an alloy wheel refurb business - surprise, he's doing a roaring trade..... And one final bonus: my Borbet alloys are 5-spoke and thus much easier to clean than the factory-fitted wheels.1 point
-
1 point
-
My first 6 months of driving was around The Midlands during the long hot summer of 1976 so I know your pain. Somehow four open windows and 70mph don’t quite cut it - like standing in front of a hair drier on full heat 😂 Joking aside, it sounds like some of the control linkages have come adrift on your car - hope they can fix it soon…1 point
-
1 pointAin't that the truth, you can count on it being one or the other and never anything inbetween!1 point
-
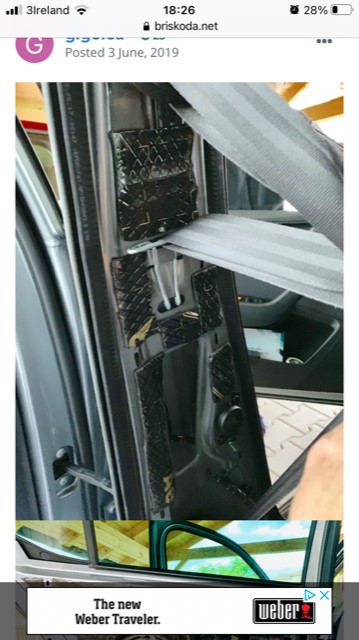
1 point1 point1 pointhey gabriel yes you should have stuck some noico on the metal parts, especially on the ouside of the metal outside. While it's good you put some on the plastic part from the inside it's the metal that is the main source of vibrations. You seat regulator most likely doesn't move because you haven't aligned it whet re-assembling. When putting the cover back you need to make sure that your seat belt is set to it's highest position. Therefore open the thing again / take out the panels, and first check if you can change the seat belt height now. Most likely you can and if this is the case you only need to align the things for it to work properly And add noico to the metal. please see what I did. I am using close foam carpet underlay (4mm) to stuff things. I put everywhere I could withouth preventing the belt to work properly. BTW you can't put too much stuff inside the plastic panel as it will start rubbing against the seat please see my pics below. The first one shows the carpet underlay before it is properly stuck inside. Put as much stuff as you can but keep separate from the belt mechanism. the B panels made a big difference in audible noise coming from the around my head.
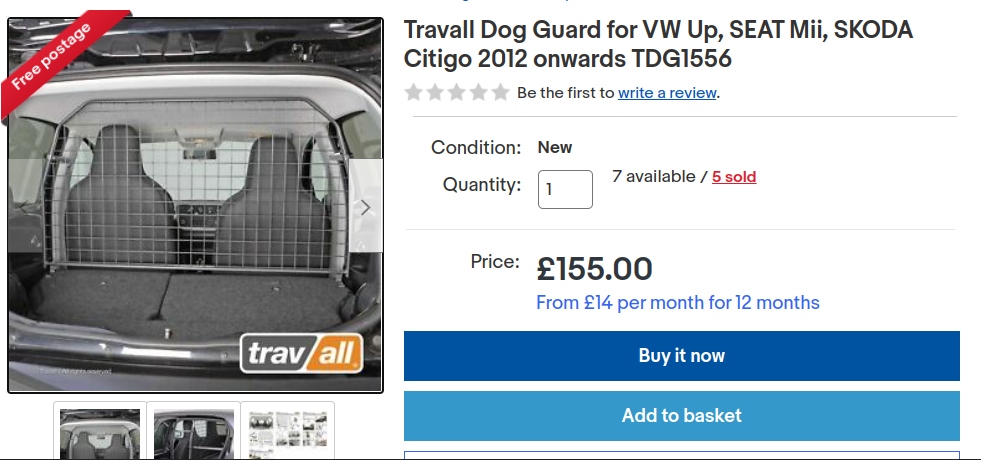
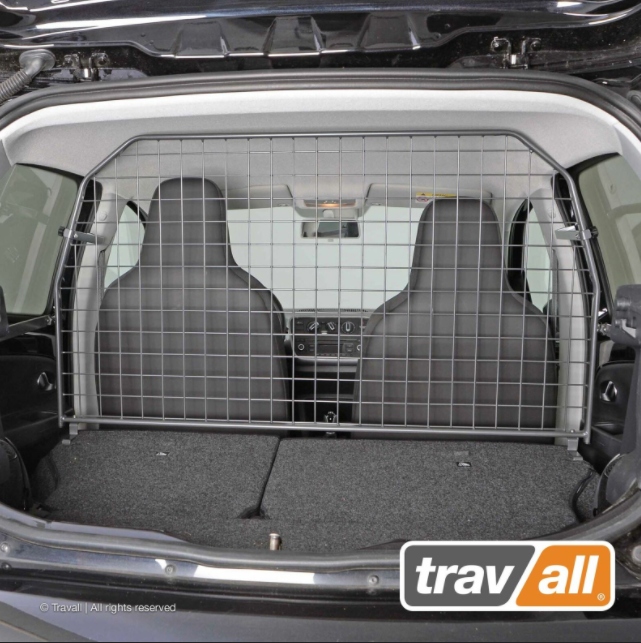
 1 pointIf you can find part numbers the Volkswagen Up! does come in cargo form from factory as far as I know, TPS use a couple of VW's locally for parts delivery, you can probably do something yourself, I did find this which is probably a good starting point https://www.carparts-expert.com/interior/dog-guards-dividers/volkswagen-up-2011-present-3-5-door-hatchback-dog-guard-detail.html1 point1 pointI watched this and couldn't believe how bad it was. It was so boring that I wanted to go and watch this year's Monaco GP again.1 point1 point1 pointI’ve got 17” Borbet wheels that were supplied from Mr Winter Wheels with my winter tyres. I can honestly say I can’t notice much if any difference in comfort or handling between them and the standard 19” s. I find the standard 19” tyres very comfortable at the correct pressure 2.3-2.4 bar, and I do run the 17” winters at 2.6-2.7 bar.
 1 point1 pointAfter trying different cars I'm yet again back in a skod. So bit of background. 2x MK1 Octavia VRs 1x MK1 Octavia estate TDI 2x MK1 fabia VRs I'm now in a 2008 Superb PD DSG. Think I got a bargain for the barge, few niggles that I need to sort but that's why I'm back. Questions questions questions to prepare me for the work
 1 point1 point1 pointThat is due to crypto mining mostly. Not due to shortage. Wife wanted titan blue i said i am paying only for the petrol blue 😄(lava blue here)1 pointWelcome to the forum. Just do as this member has with their Yeti. http://briskoda.net/forums/topic/486314-yeti-commercial It looks like a pretty easy project to buy a suitable size Dog Guard or Bulk head grill that you can find at an online Auction Site and 2 pieces of Fibre Board or Ply Wood that you can get cut at a DIY Warehouse type place when you but a board and they do 2 cuts for you, then cover with suitable carpet / carpet tiles or rubber that you get at DIY Warehouse places or online. A grill must be available cheaper than this one @ £155 in the UK.
 1 point1 pointAbsolutely, first time it happened to me i nearly had a heart attack. When you know you are going to hit something your mind is prepared for the crunch. When you know for sure there is nothing to hit and a tall weed slams the brakes on the pulse rate goes through the roof..1 pointI think this may have been true for some time just described in a different way. Our late 2019 SE L 190 TDI Karoq has flappy paddles by virtue of having the heated steering wheel, I remember checking the options at the time and that was one pack.1 point1 pointThe button pulls a shaft that runs down the centre of the stick. This would need shortening. I can't remember what the end of the shaft looks like to recommend how best to do it. It a hole or something. 2 ways: 1) cut the end off, remove a section and refit the end. 2) remake the end fitting after chopping some off. Then shortening the main stick should be relatively straightforward. Just need to be very accurate with how much you remove. The fitting on top with the button section I think comes off once the shaft is disconnected from the button. Do some googling on replacing the lever and you should see what I'm talking about.1 pointIn my case no, at first I was thinking I am loosing that way, but, later on when I was inspecting it more, it wasn't the case... If your car is spilling it out of the closed expansion tank, your problem could be with heat matrix core in cabin... But just to be sure, try checking both the chargecooler and egr cooler too... Those are 3 options you can firstly try, and also the cheapest possible cases... Oh, yes, I almost forgot, you can try putting a new expansion tank cap, from friends car or something like that... This is some begininng notes I can give you...1 point1 pointI did my own services on my old 2015 1.6 CR TDi. I must have changed the fuel filter about 10 times and I never topped up with diesel and the car is still going strong on nearly 200k miles.1 point1 pointGuess who’s back and so so happy to have her back! Long long chat with Aftersales Manager re. the situation and a full apology given. Apology accepted and happy to go back there again in future. Car performing great. Interesting comment picked up on…. ‘Another identical model / age in for the same fault’ so might become a common thing these high pressure pumps. Also SOS will be a software fix and expected a month away. Won’t be ‘over the air’ but one that must be booked in. Alls well that ends well!
 1 point1 pointThere probably is also a bias in reporting. The people on forums are more likely to report problems. They may have joined the forums for that reason! Overall, after 6+ months, no problems at all and I love the Octavia, mainly for low consumption and spaciousness. I had about 8 types of cars so far in my life and with the exception of Hondas which are unbreakable even at 350,000kms, all others had problems, especially the BMWs (electrical problems). This is my first VW engine and I love every moment of it. But I am not auto-crossing anymore, so not much load on the car1 point1 pointStarted to clean the engine bay of general custard today...it was absolutely filthy! I just used Screwfix's No nonsense degreaser from a spray bottle, applying to a microfibre towel rather than the bonnet directly. I also used a hog's hair detailing brush to work the degreaser into more awkward areas. Beginning of the clean; Half way through; The end (for now!); Sorry about the blurry final pic!1 point1 pointCarista is straightforward and easy from my recent experience on a Kodiaq. It's done what I needed to do for less than a tenner for a months subscription as I already had an ELM327 dongle. As others have said a lot of the changes people make are made once and that's it. I've changed a few things just to try them and then changed some back with no issues (and still have a couple of weeks left to play)1 point1 pointCarista is a great tool and is growing with features year on year. I have had it for years. (Only recently upgraded to OBDEleven when I retrofitted fog lights into my Colour Edition and needed to code them in) If you just want to activate the basics like Scandinavian DRL's (rear lights on with drl), needle sweep, unlock all doors, hill hold assist then paying £25 for the Carista dongle on amazon is your best option and being that its just a simple click to activate its fool proof. OBD11 on the other hand is more advanced and can cause issues if you do something wrong as you will be doing the coding yourself. BUT that said, if you do backups and make notes of the coding before you change it, you can always revert what you've done easily. This tool is great if you plan on retrofitting add ons like, reversing camera, auto light sensor, fog lights, washer fluid level sensors etc etc as this tool allows you to delve into the long coding. Plus if you are planning on coding more than your own car within the VAG range and not only a Fabia its also a little better. But for the many Carista is the better option and far cheaper, plus you only activate the options once and then you wont touch the device again until you need to read a code. You can get a free months trial of Carista PRO which gives you full access. Carista - Basic but great for your average joe who just wants to have simple and easy adaptations (£25) OBDEleven - For those at home DIY / Driveway mechanics and those who want to do more advanced coding. (£125) For the full list of what you can do on the Fabia have a look at the list I created on here. -1 point1 pointRemoving them is extreme but would pretty much guarantee that the rear wheels will never be punctured on the road.1 pointMy first and last Skoda. Wish I'd read the forums first. Can't get lane assistant to stay off permanently. It randomly loves to try and send me off the road if it thinks it's seen something. Front collision assist randomly threw the brakes on as I was going around Marine Drive. Infotainment system is running the worst software I've ever encountered in 40 years of computing. Even ET on the Atari was coded better. Genuinely shocked by how bad it is. It's a different fault every day. Some plain dangerous, some just really annoying like failing to connect to Android auto or taking three button presses to do something when one would do. Or just deciding not to play today. I regularly get home from my commute before it boots. Farcical. Engine is terrible, really asthmatic and weedy. Car feels frightening to drive over 80mph and terrifying nearer 100. Cars on lease hire. I don't care what it costs me, I'm handing it back early.1 point1.4tsi with torque converter box, what an ideal combination. Pity the EU insist on us getting 2nd best to please the greenie activists who jet around the world to their hot air conferences and jollies.1 point1 pointI've got a reversing camera on my current car and have specified it for my Kamiq as it helps with visibility, especially of bollards.1 point


.jpg.56d6e69fa139b202694b496c789c9f67.jpg)


Important Information
Welcome to BRISKODA. Please note the following important links Terms of Use. We have a comprehensive Privacy Policy. We have placed cookies on your device to help make this website better. You can adjust your cookie settings, otherwise we'll assume you're okay to continue.