


Leaderboard
-
Stonekeeper
Resident Member16Points2,842Posts -

mac11irl
FREEDOM13Points16,636Posts -
.jpg.1006585dfe4e2977315b67c3d642e37b.jpg)
Guest_
FREEDOM13Points83,824Posts -
skomaz
FREEDOM11Points11,077Posts


Popular Content
Showing content with the highest reputation on 07/04/24 in all areas
-
It always angers me to see the difference between a service and an extended scope service! For the nearly £100 price difference you get the following…. Wheels removed and brakes checked - I mean this is one of the first things that should be done on any vehicle a mechanic will be driving even if it’s not in for a service… it takes all of 2 minutes (without having to remove the wheels) Check/adjust drive belts - I’d love to find a Skoda tech and ask to see their drive belt tension checking tool - and adjustable tensioners haven’t been on vag cars for the last 25 years almost. Check/replenish manual gear oil - seen as most cars are dsg this is fairly moot and even then will very likely be a cursory glance at the gearbox for any leaks and a box tick. Seen as gearbox oil doesn’t just disappear either, offering to replenish it is all well and good when you’ve got a leak that needs fixing. check of final drive oil - will most likely be exactly the same as above and not include the haldex coupling which is arguably more prone to failure check suspension system - again, a glance at the underside which should be part of even the most basic service and if you’re lucky (and hopeful) a little pull, push and wobble to check for worn out suspension parts. check heating/air con - I very much doubt this is a full air con check involving pressure/weight testing or such (as they charge extra for this is a separate ‘aircon service’) and checking the operation of the heating again is a very basic check that should be part of every service lubricate door mechanisms - a lovely spray of white grease that within a few weeks will be blasted completely in dirt, but it is a visual to the customer that ‘we have done stuff to your car’ when in reality it doesn’t do much bar make a mess (except the bonnet latch which is fair to grease) that’s my rant over…. In a nutshell the ‘extended scope’ is the bare minimum that should be done on any service and charging £100 on top for it is an absolute con. in my opinion - a service should include all checks no matter what level and an oil and filter change. After this the additional service parts required either through time/mileage/request/dirty should be charged accordingly. That way you know a full check has been done and you know exactly what parts have been changed on your car.5 points
-
3 points
-
3 pointsInitially it will continue to charge the new battery like the old one but it will soon learn that the battery SOC changes differently and adapt to the new battery. Coding just starts this learning process immediately.3 points
-
I.e. so badly damaged that it's no longer recognisable as a Hyundai i30 😁 and someone slapped Seat badging on it 😇 Go on, admit it, y'all knows I'm right3 points
-
OK so the result is in... It a Seat Ibiza Excellence 1.0 110bhp in white with a few scrapes on the front bumper. Hence the closest in this competition of hire car bingo is @mac11irl as he did at least mention an ibiza even if he ultimately went for something else... Seems to pull OK, albeit with a bit of a judder when cold and is comfy enough but the sat nav is an absolute bloody nightmare... It seems to insist on offering me all the previous destinations it has been to and has already sent me to the wrong location from the one I asked for. I've done a factory reset and have managed to change the language to English so hopefully it'll behave tomorrow.3 points
-
If only there was an ApertureS in every major town across the country............ Is there anyone out there who offers a cloning service?3 points
-
3 pointsNo it won't, screw your new battery that is, did that nonsense come from the guy that did the recoding?3 points
-
2 pointsTruth if the matter is that in about 70,000 miles of EV driving with very little home charging until the last 7 months i have only sat in and had food 4 times while charging. Mainly because there is no place to eat or drink where i charge. The last time i had a Krispy Kreme and a Coffee at a Krispy Kreme and it was £5.20 about 6 weeks ago. Before that is was at a Starbucks & 2 of us were about £15 for 2 drinks and a pastry. I was not paying. Twice at KFC,s. I live cheap. Eat cheap and take liquid and food with me which is bought when buying food. That used to be buying food while charging cheaply or originally free at Supermarkets. Now that Public charging is so expensive and more than driving an ICE vehicle i will be resuming buying food in shops and not Fast Food outlets of Doughnut Places, Coffee establishments where a cup / mug costs twice the price of the 100 gram jar of coffee i buy.2 points
-
2 points
-
2 of our plant hire contractors have them fitted for rail mounting and with one pulling and one pushing for brakes can haul over 500 Tonnes of ballast across 8 tipping rail trailers. unimogs are brilliant.2 points
-
Photos to follow but it's a pre facelift with 64k km on the clock... So older dash design etc. It seems to bumble along ok but nothing to shout about and it's no match for the Swift back home... That's much nicer inside and a lot livelier but then it weighs about a ton compared to about 1.2t for the Ibiza.2 points
-
2 pointsIt wasn't clear to me from the original post whether the new battery was actually giving any trouble or not. Seemed more like the unexpected charging voltages were giving the OP the (false) impression that there was a residual problem.2 points
-
2 pointsif you have the Pop Pop sound and SOS error flashing up then very likely you require the Telematics Module firmware updated - this can only be done by the dealer / or equipped specialist. Just updating the Infotainment software would not resolve the issue. The good news is once the module firmware is updated and you are running at least software version 1941 your system should be rock solid (I suffered the Pop Pop sound snd SOS system constantly crashing, often taking the Infotainment system with it and the module firmware update sorted it out completely ). There is a Škoda issued TPI covering some of these issues which you could refer a dealer to (I have posted previously about this). Also, is the car still under the original 3 year warranty as you could get these issues resolved under that?2 points
-
2 pointsYou can get a dealer to do it at cost, if you have an early software revision, it's better to pay them a £100 or so to do it, rather than try doing it yourself and bricking the infotainment system and having to have it replaced. Although I believe that East_Yorkshire Retrofits maybe able to recover it if you were to attempt it and fail. http://www.eastyorkshireretrofits.co.uk2 points
-
I am lucky in I have an Independent Garage I can trust near to where I live. Being a volunteer Driver and taking people to Hospitals and Treatment Centres they go the extra mile when I have a problem. Dealers equals stealers.2 points
-
The button is dying, replace it. You can buy it online and do it yourself in 10 minutes.2 points
-
2 points
-
prices of the power may be going down but the grid connection charges are up 500% in the last year. Now several thousand pounds per connector just to have power to a unit2 points
-
I don’t doubt there are, but i don’t want to have to travel hours to go to one. And I baulk when there is no availability for two months “courtesy cars” that are actually hire cars (so I had to wait in the reception area, cos I was damned if I’d pay £30 for a Citigo for 3 bloody hours). ridiculous hourly pricing work not carried out and rude and ignorant staff and GM’s who don’t give a toss… Well, that was my experience of the three main dealers I had to use on this car before the warranty ran out, but I don’t suffer any of these main dealer features anymore.2 points
-
I know there are many honest Skoda dealers out there so I don't want to tar them all with the same brush, but there is definitely some cowboy behaviour going on in terms of serious overcharging. Skoda would want to get their s*** together before it kills off all of the good will us loyal customers have.2 points
-
For numerous reasons, like those the OP cites and others, I stopped using main dealers as soon as the 5 year warranty expired. Find a decent VAG specialist and stick with them.2 points
-
2 pointsHi all! I have a 2010 year RS wagon, I love it, when it's good. And hate it when it's not 😅 Last year it happened to be a major engine problem (one of the balance shafts was stuck, there was no oil pressure, chain jumped... /175.500 mi/) but it'll be ready in 2 weeks, so it'll return to the roads again2 points
-
2 pointsTinkering with the native monochrome modes on my new(-ish) Nikon Zf - taken in Cam Idwal, Snowdonia

 2 points
 -
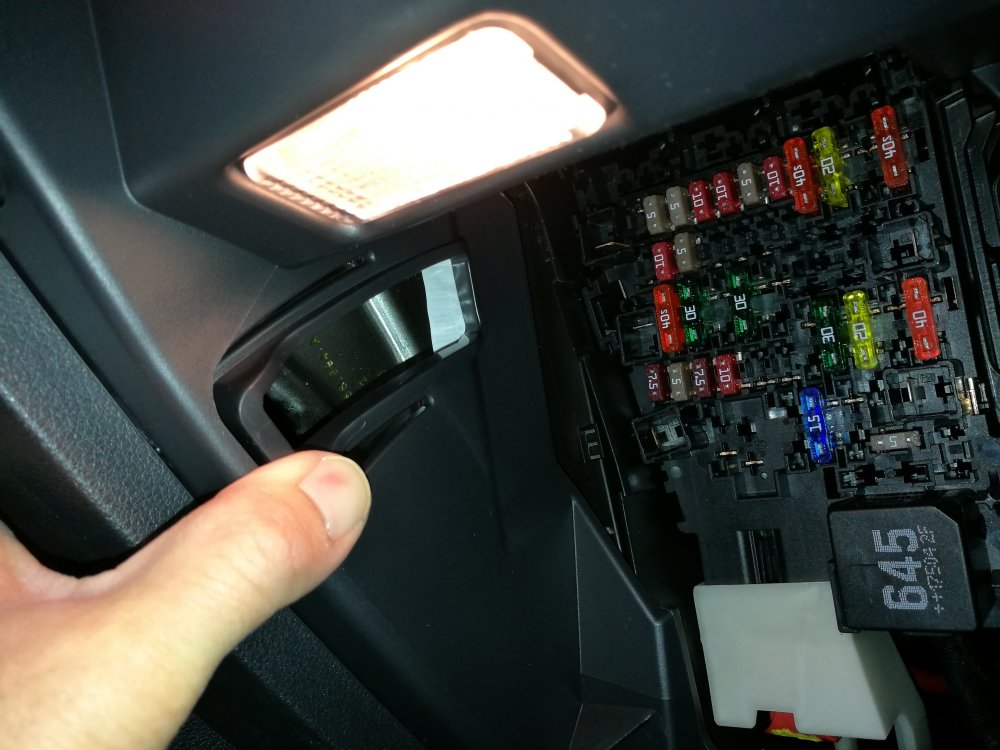
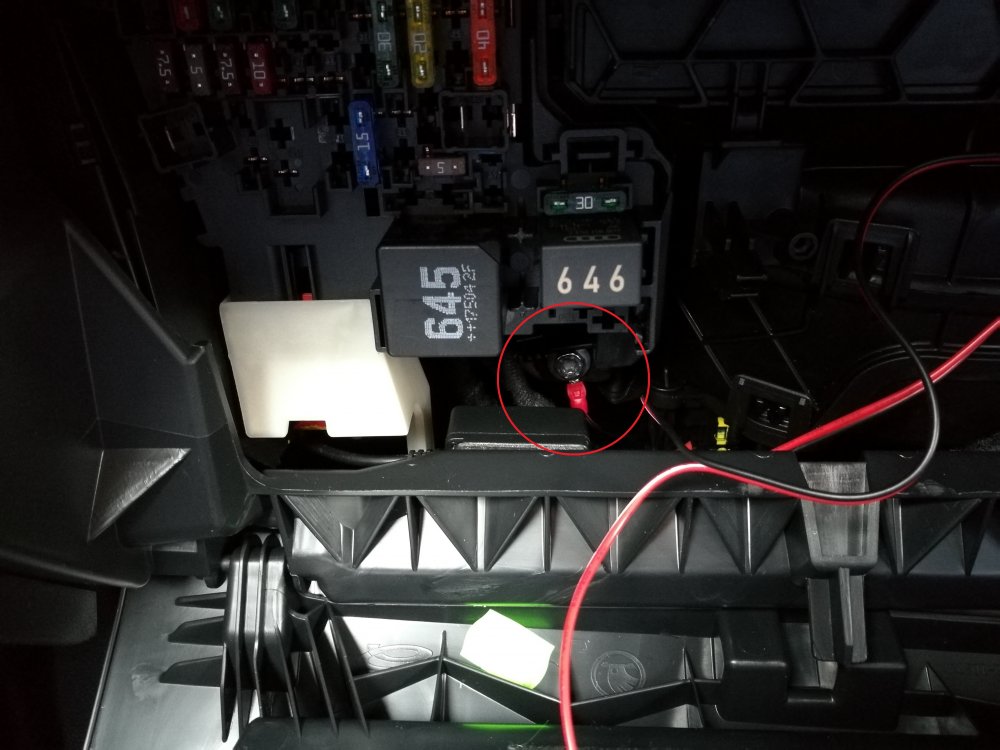
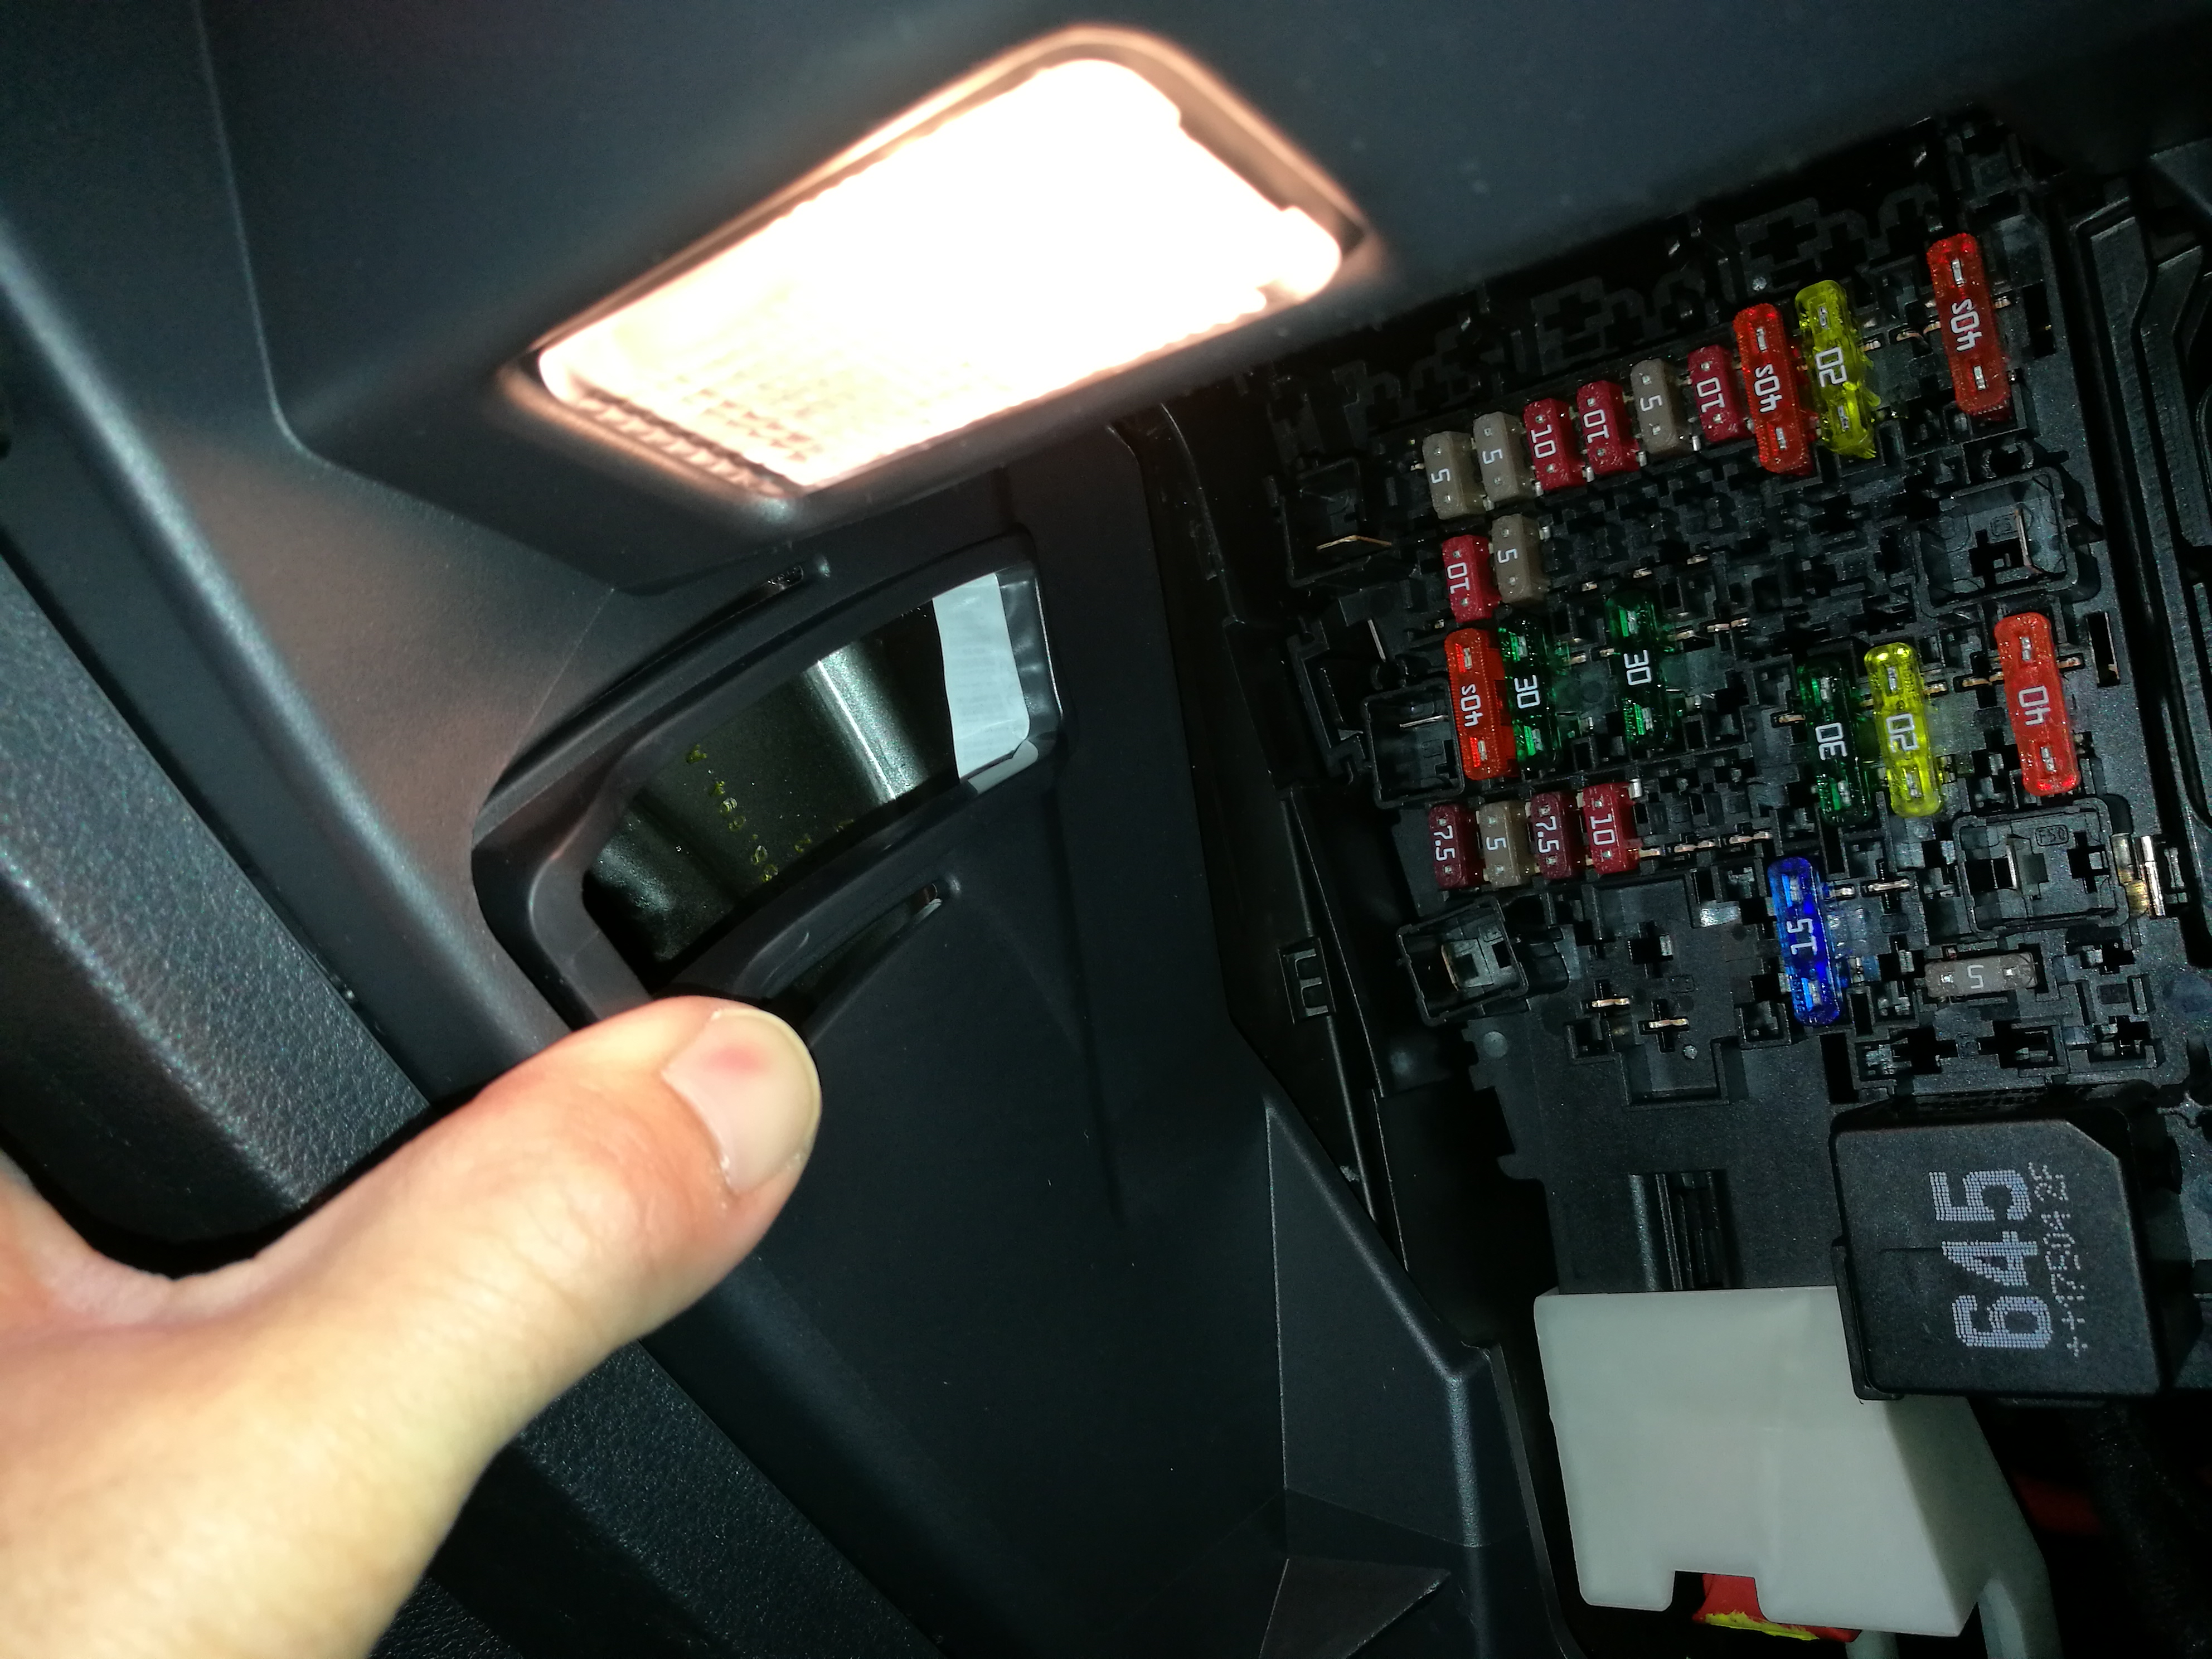
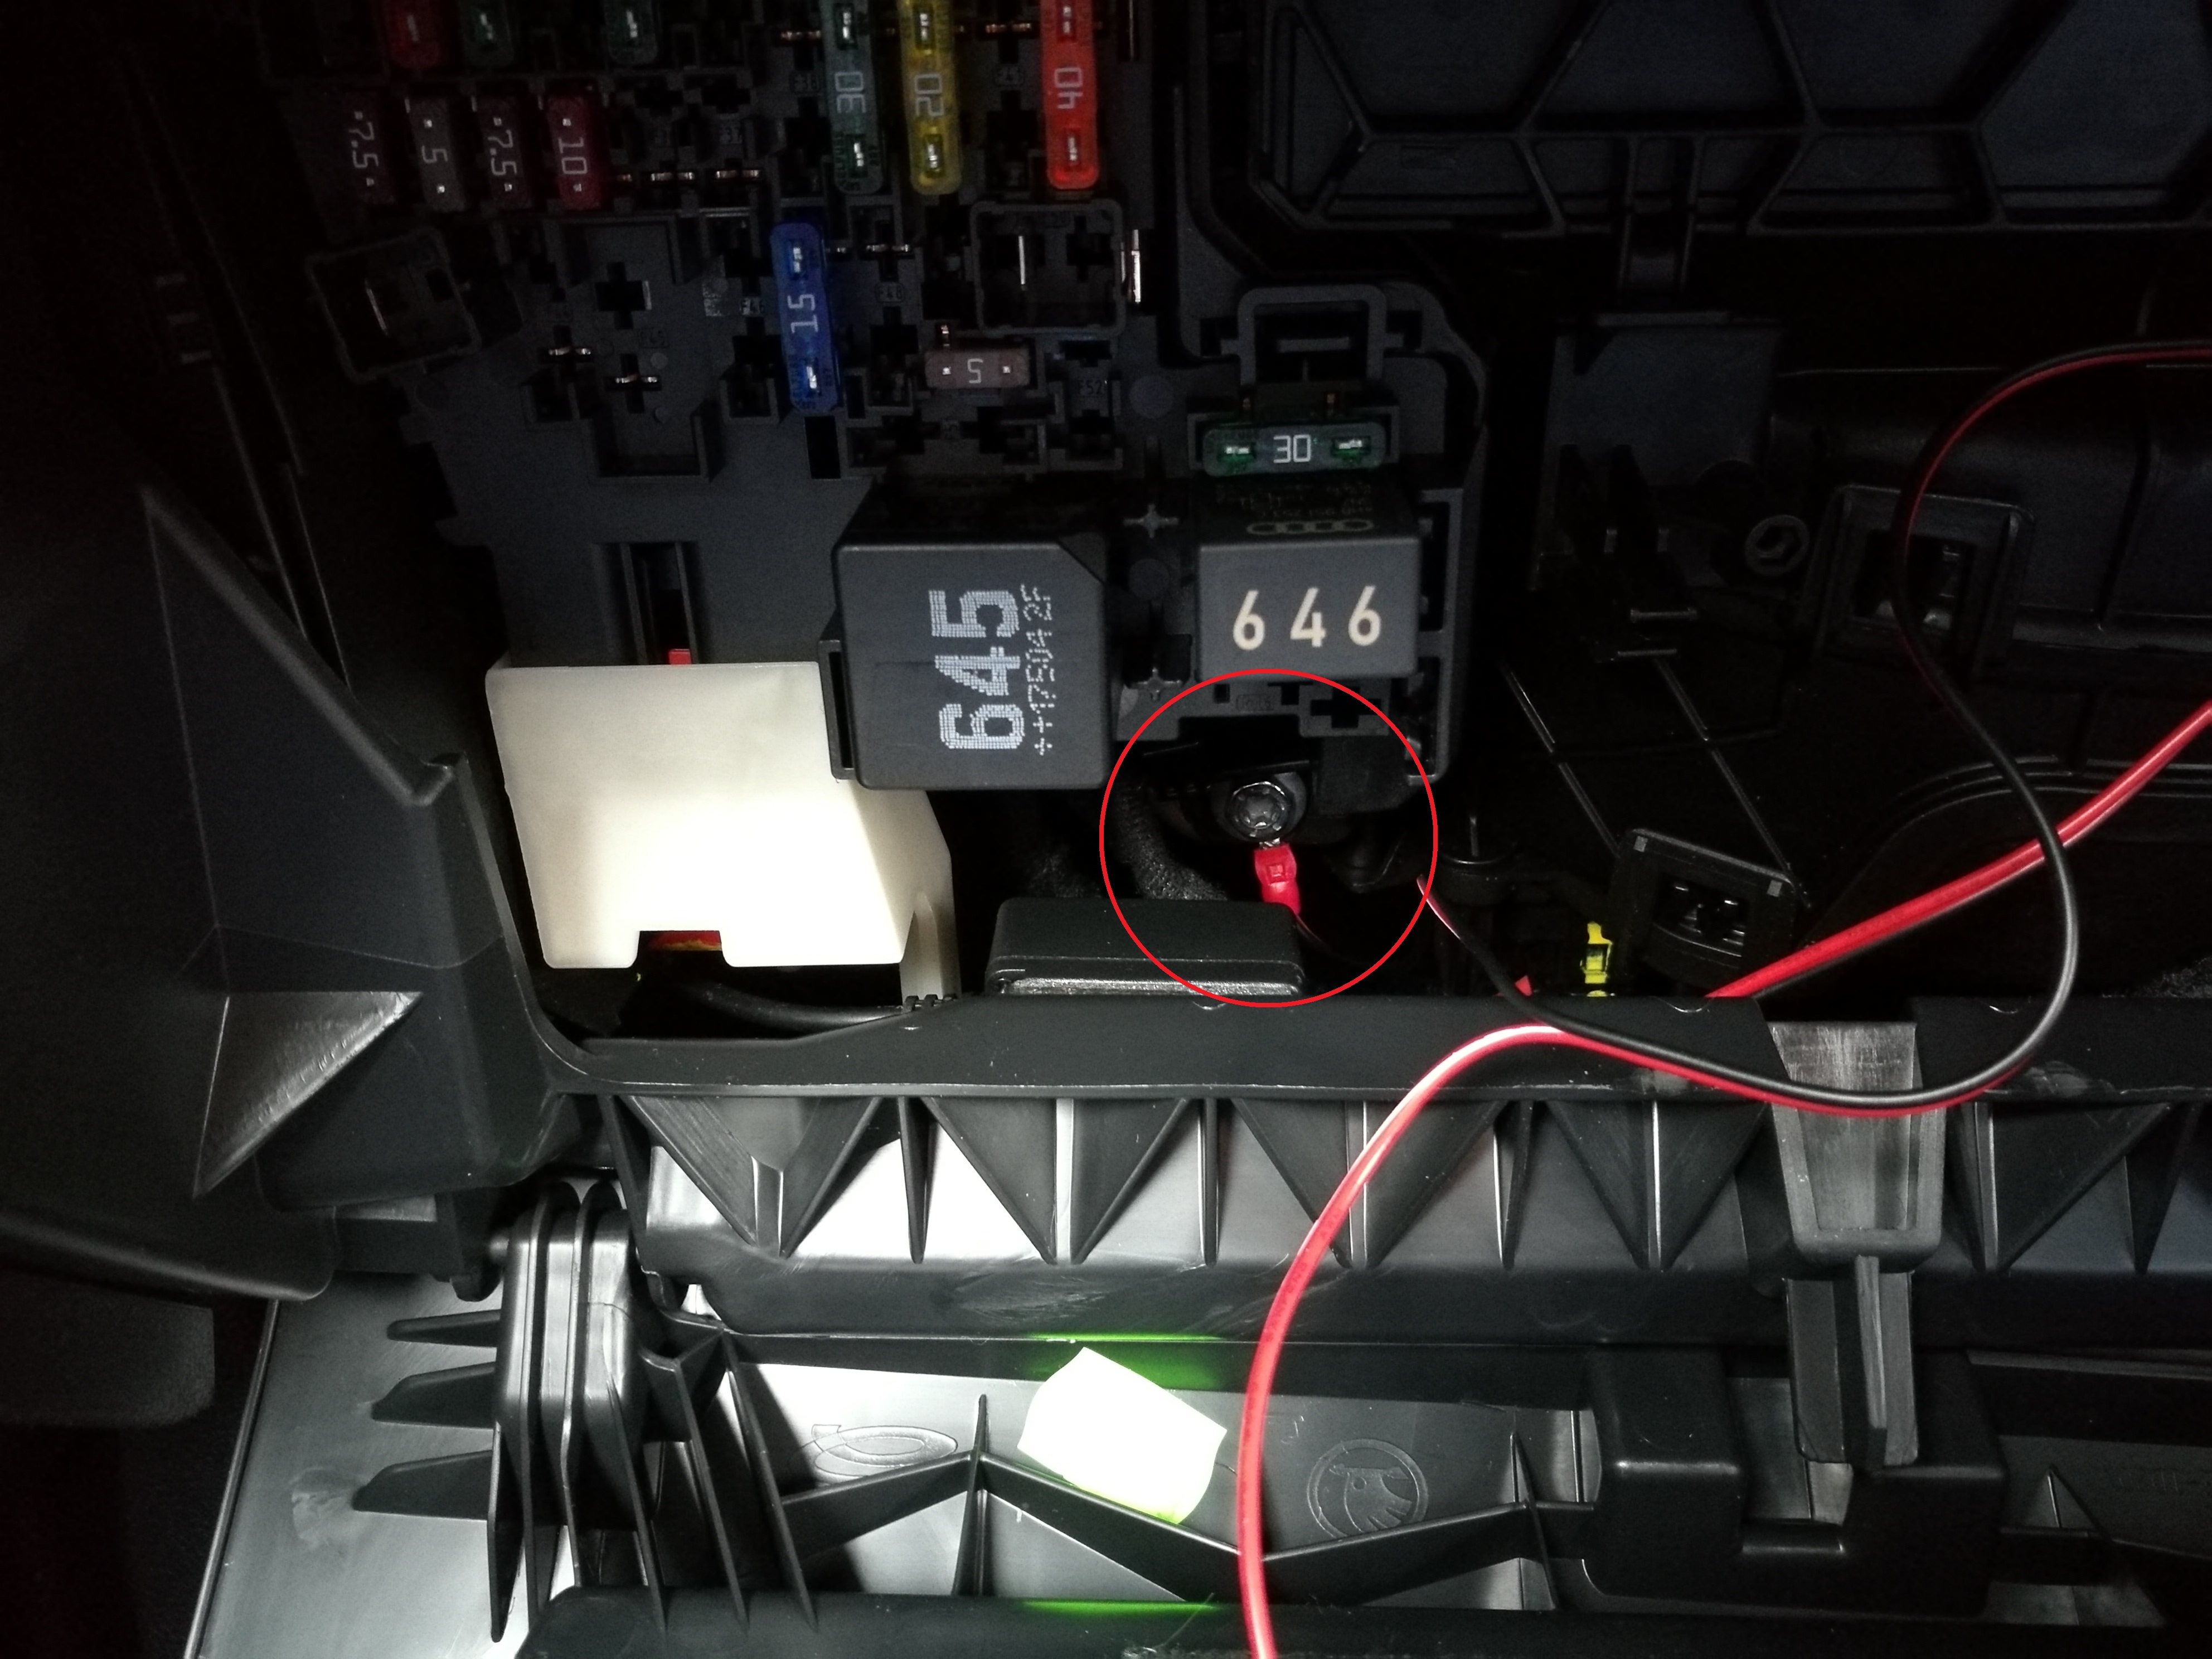
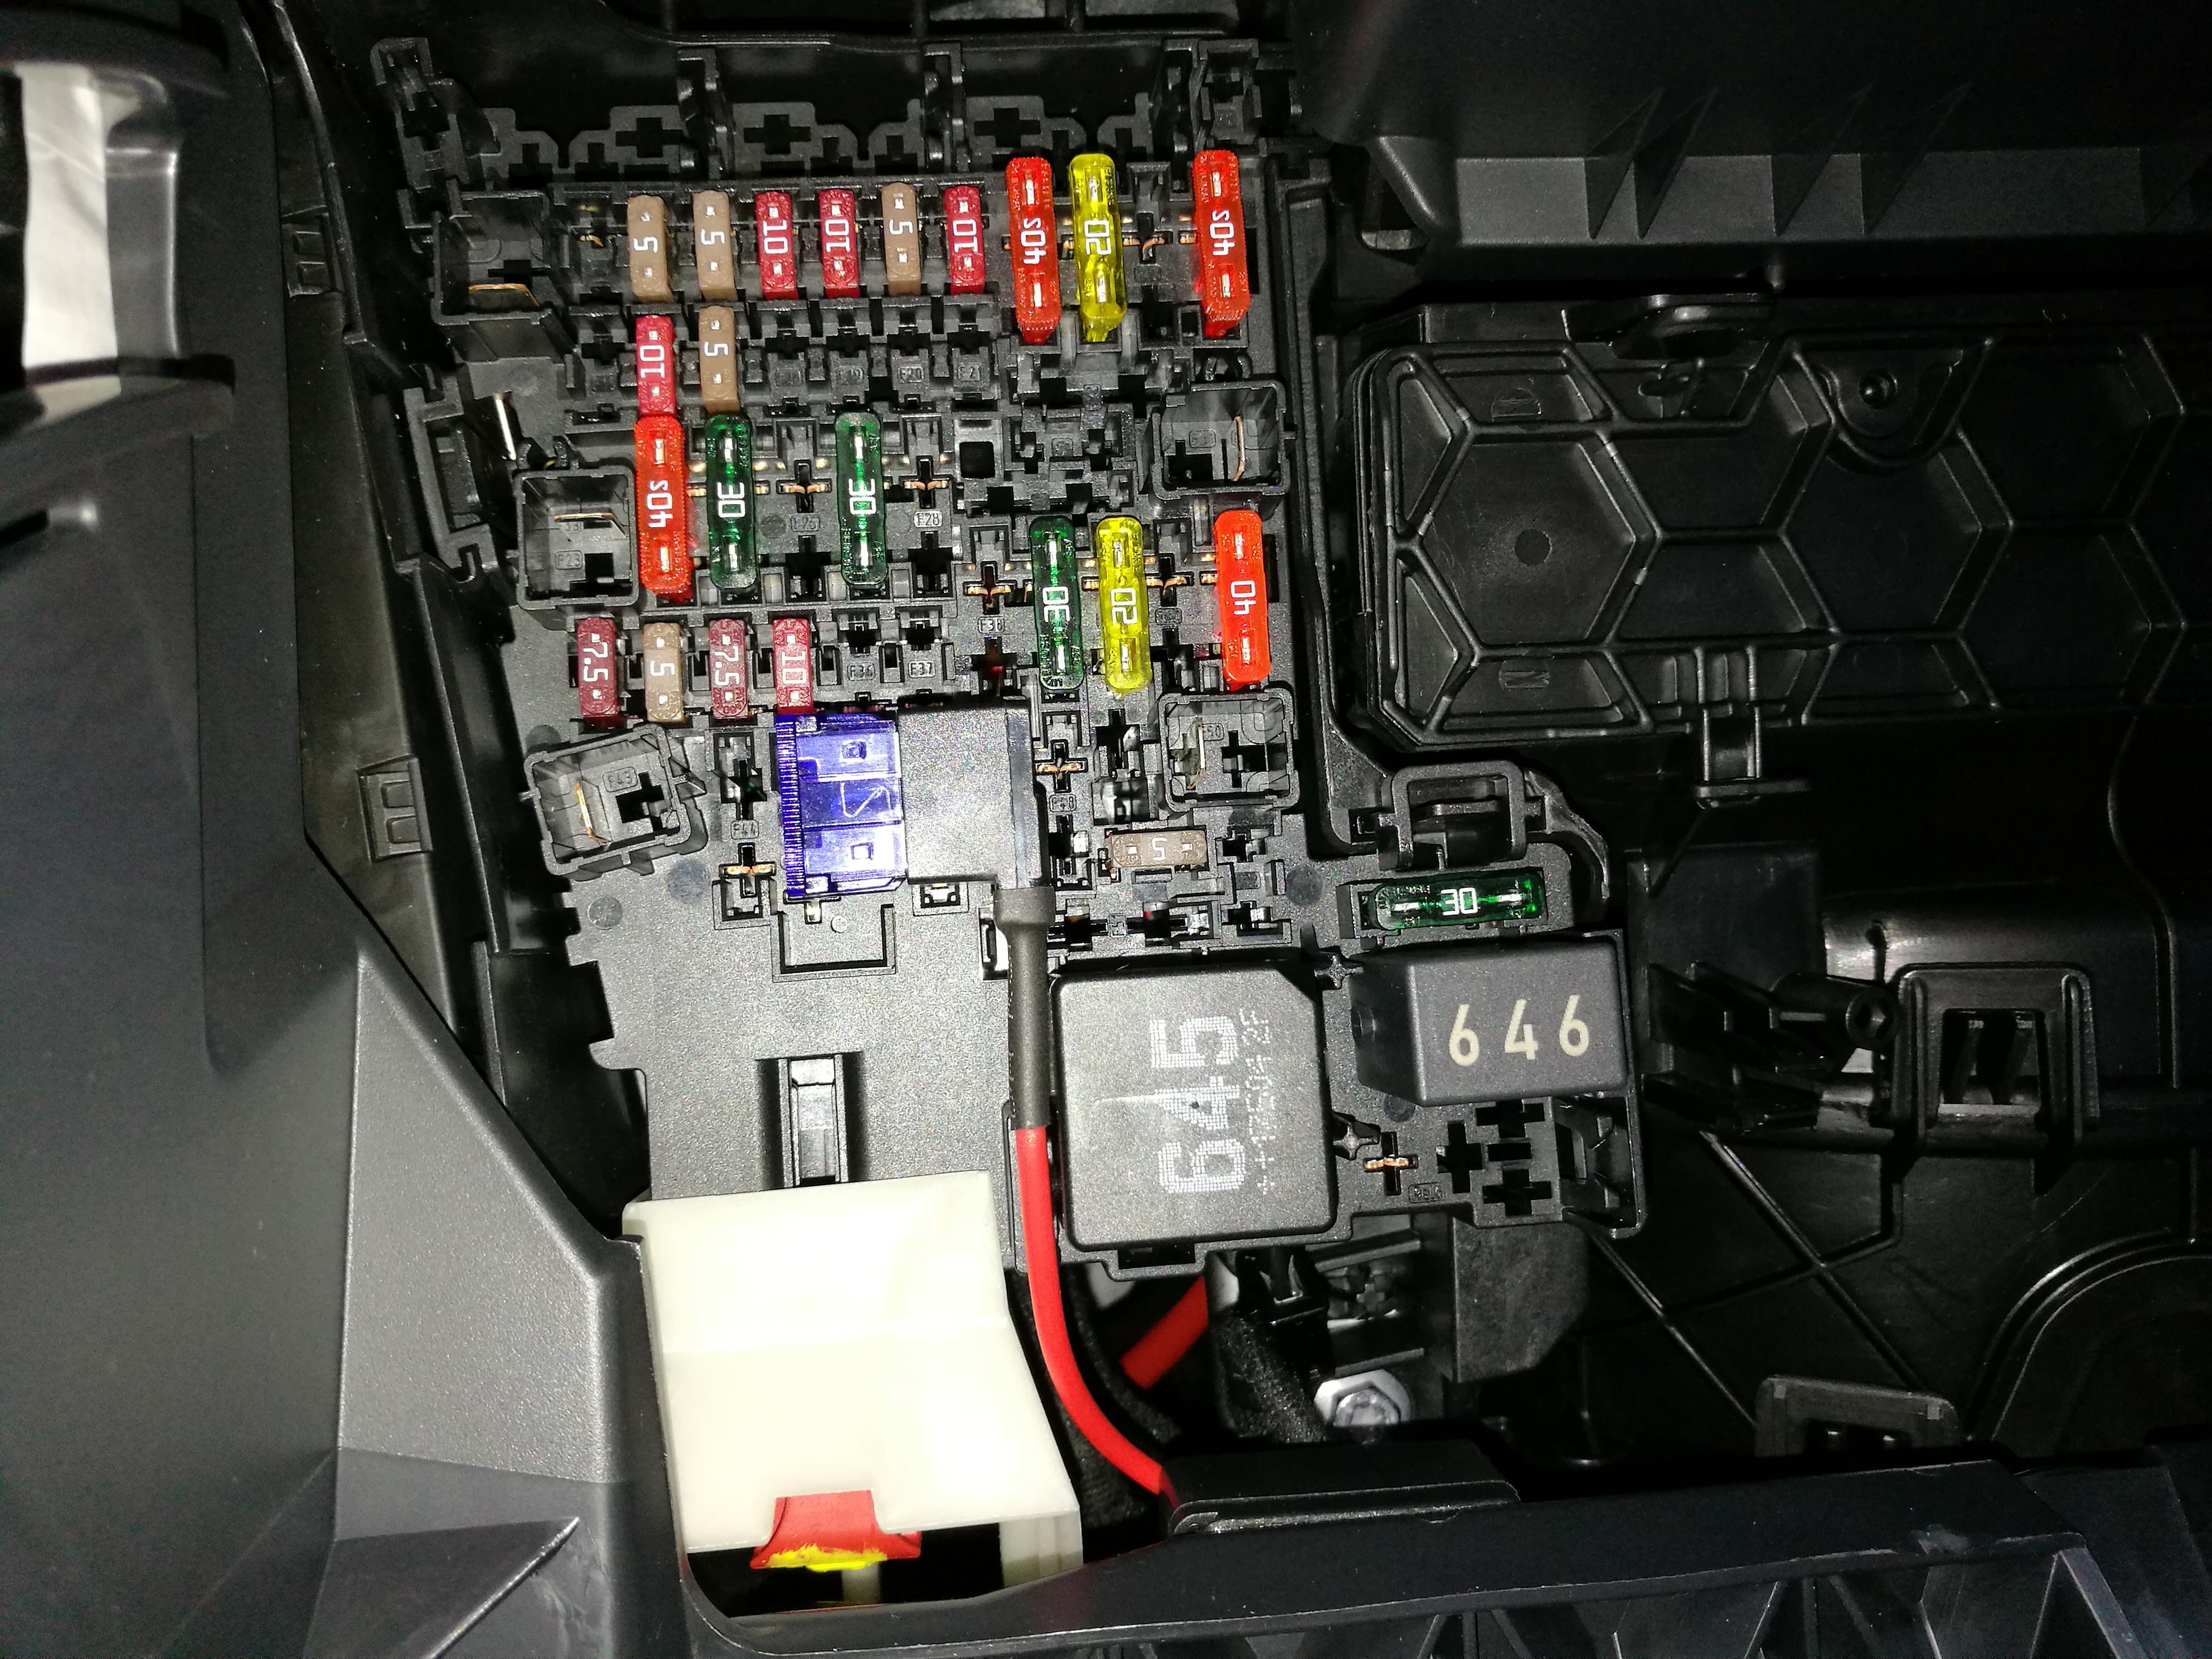
1 pointRecently got ourselves a Karoq, first Skoda for us and we really like it. Replaces a Tiguan for the family moving duties. Anyway for whatever reason the lighter socket on the Karoq is always live which isn't very useful for powering a dashcam. Had a look for a how-to for tapping a switched feed from the fusebox but only found little bits of info here and there so here is my quick guide to how I've done it. Convieniently there is a fuse box right behind the glove box (UK RHD car). Getting to the fuse box was in my opinion the most difficult task! The instruction manual does describe the process but it still took some figuring out. The glovebox is hinged at the bottom, has 2 bump stops (one either side) and a damping arm. The damping arm is removed by first pressing the lowest pivot point of the arm towards the engine, this should free the bottom pivot point and allow the arm to be detatched from the glove box. The 2 bump stops are freed by pressing them away from the glove box, see photo. From there it's pretty straigh foward. I used piggy-back/add a fuse to take a switched feed from fuse 47. For a return I used a ring tag on the T27 torx bolt that holds the fusebox in place, it's not ideal as the fuse box is plastic but I couldn't find anything easier or better that didn't probably involve taking more things apart. Routing the cable to the dashcam was simple, drops easily out the back of the glove/fuse box, behind the rubber seal up the door frame/A pillar and along the top of the headlining/windscreen. Hope this helps others with installing a dashcam. Cheers John
 1 point
 -
Could be... It is a hire car after all so I doubt it's been well looked after. A couple of times today it didn't let me have a gear either... any gear... so I'm not sure if the slave cylinder is on the way out too (it's quite a low biting point) or if I wasn't quite getting it fully depressed. Pumping the pedal a couple of times fixed it, or repositioned my foot enough... One or the other... and it's not happened since but I'm a bit wary now.1 point
-
1 pointNow that was ironic and doubly funny as those that repeated it possibly didn't know or forgot that some BL cars at least were devoid of such luxuries. Best one I heard was when I got my first speeding ticket, in 1985 in my 1985 120LS (4-speed) Estelle 2, the pedestrian copper waved me down at the roadside and apologised for having to report me but locals had been complaining, I didn't say so but was glad he'd pulled me over where he did as I was yet to get into 3rd off the lights, a wag at work later said "wot, did he write down your VIN number as you passed him at the roadside", one of the most original and best I heard. Doesn't look so good on paper and perhaps you had to be there to get the off the cuff speed, wit and intonations of it. I'm too young for 1976 driving and a new 1979/80 car so don't really know the 110R but I was once given as a courtesy car, not that they really done such things then, the Dealership (backstreet, lowly, friendly garages unlike the VWSKoda ever (but never) changing ones now) "flagship of the fleet" 105 Mk1 Estelle with huge mileage which I was told they couldn't kill despite giving it no attention, it was great fun slow but very willing and always trying, probably down in the 30s for hp, but a relatively light car (unlike lardy German stuff and modern cars) but boy was the steering stiff and heavy, even for the time and for such a relatively light car. I was overtaking something on a dual-carriageway when it cut out and sailed to a stop, no fuel. When I moaned about this when I returned the garage co-owner said "I told you to ignore the fuel gauge not the red low warning light". I was young having some fun, the Estelles were great fun, particularly the 2s and with wide (185/70r13 IIRC) Goodyear Eagle tyres, easy to embarrass a de-badged (ETA: BMW), even in those days, (probably 1.6) on the back roads.1 point
-
It probably is having the issues that the 3 cylinder 1.0 TSI,s with a GPF seem to be suffering from. Spark plugs needing replaced before 4 years or 40,000 miles.1 point
-
1 pointBrake Fluid replacement was @ 3 years then each 2. Now on newer cars back to @2 years and each 2. As it was back about 14 years ago. For Dealers income since they no longer get the Gooses Golden egg from Cam belt changes. Henrys Tech could have tested the Brake Fluid for H2o content. They might on their own cars, or friends, or just change it. For customers the SERVICE DESK staff know little about cars. They are employed because of the lack of mechanical engineering knowledge. Some because of poor memory from one customer experience to the next. Everyday is a learning day, each next day they forgot what the learned the day before. Do not expect them to know a DQ381, DQ250 or a DQ200. Even more so a sales executive...1 point
-
Thanks for taking the time to respond@nta16. Trying to pass on knowledge as we go - that was part of joining the forum, so I can at least be pointed in the right direction to save on trouble-shooting time. We went for the 1.0MPI SE partly to keep things as mechanically simple as possible and minimise the electronic reliance..... So far no bumps/squeaks/rattles and we've been doing lots of manoeuvring and been over some fairly harsh speedbumps, so fingers crossed. I hadn't heard about that one as something model specific, will look into it. Thanks for the pointer. Completely understand your description of "hassle money" too!1 point
-
This sounds really stupid, but next time it happens, try pressing the dead centre of the stop/start button. My car started suffering from this, garage couldn;t replicate the issue when the looked at it therefore wouldn't sanction a replacement under warranty. It was the service desk who told me this and it's always worked for me. As per above, it's a cheap fix to replace the button, but never bothered now that I know to press the dead centre of the button.1 point
-
1 pointBought this one just now. https://www.amazon.co.uk/gp/product/B0858YRC6Z/ref=ppx_yo_dt_b_asin_title_o00_s00?ie=UTF8&psc=11 point
-
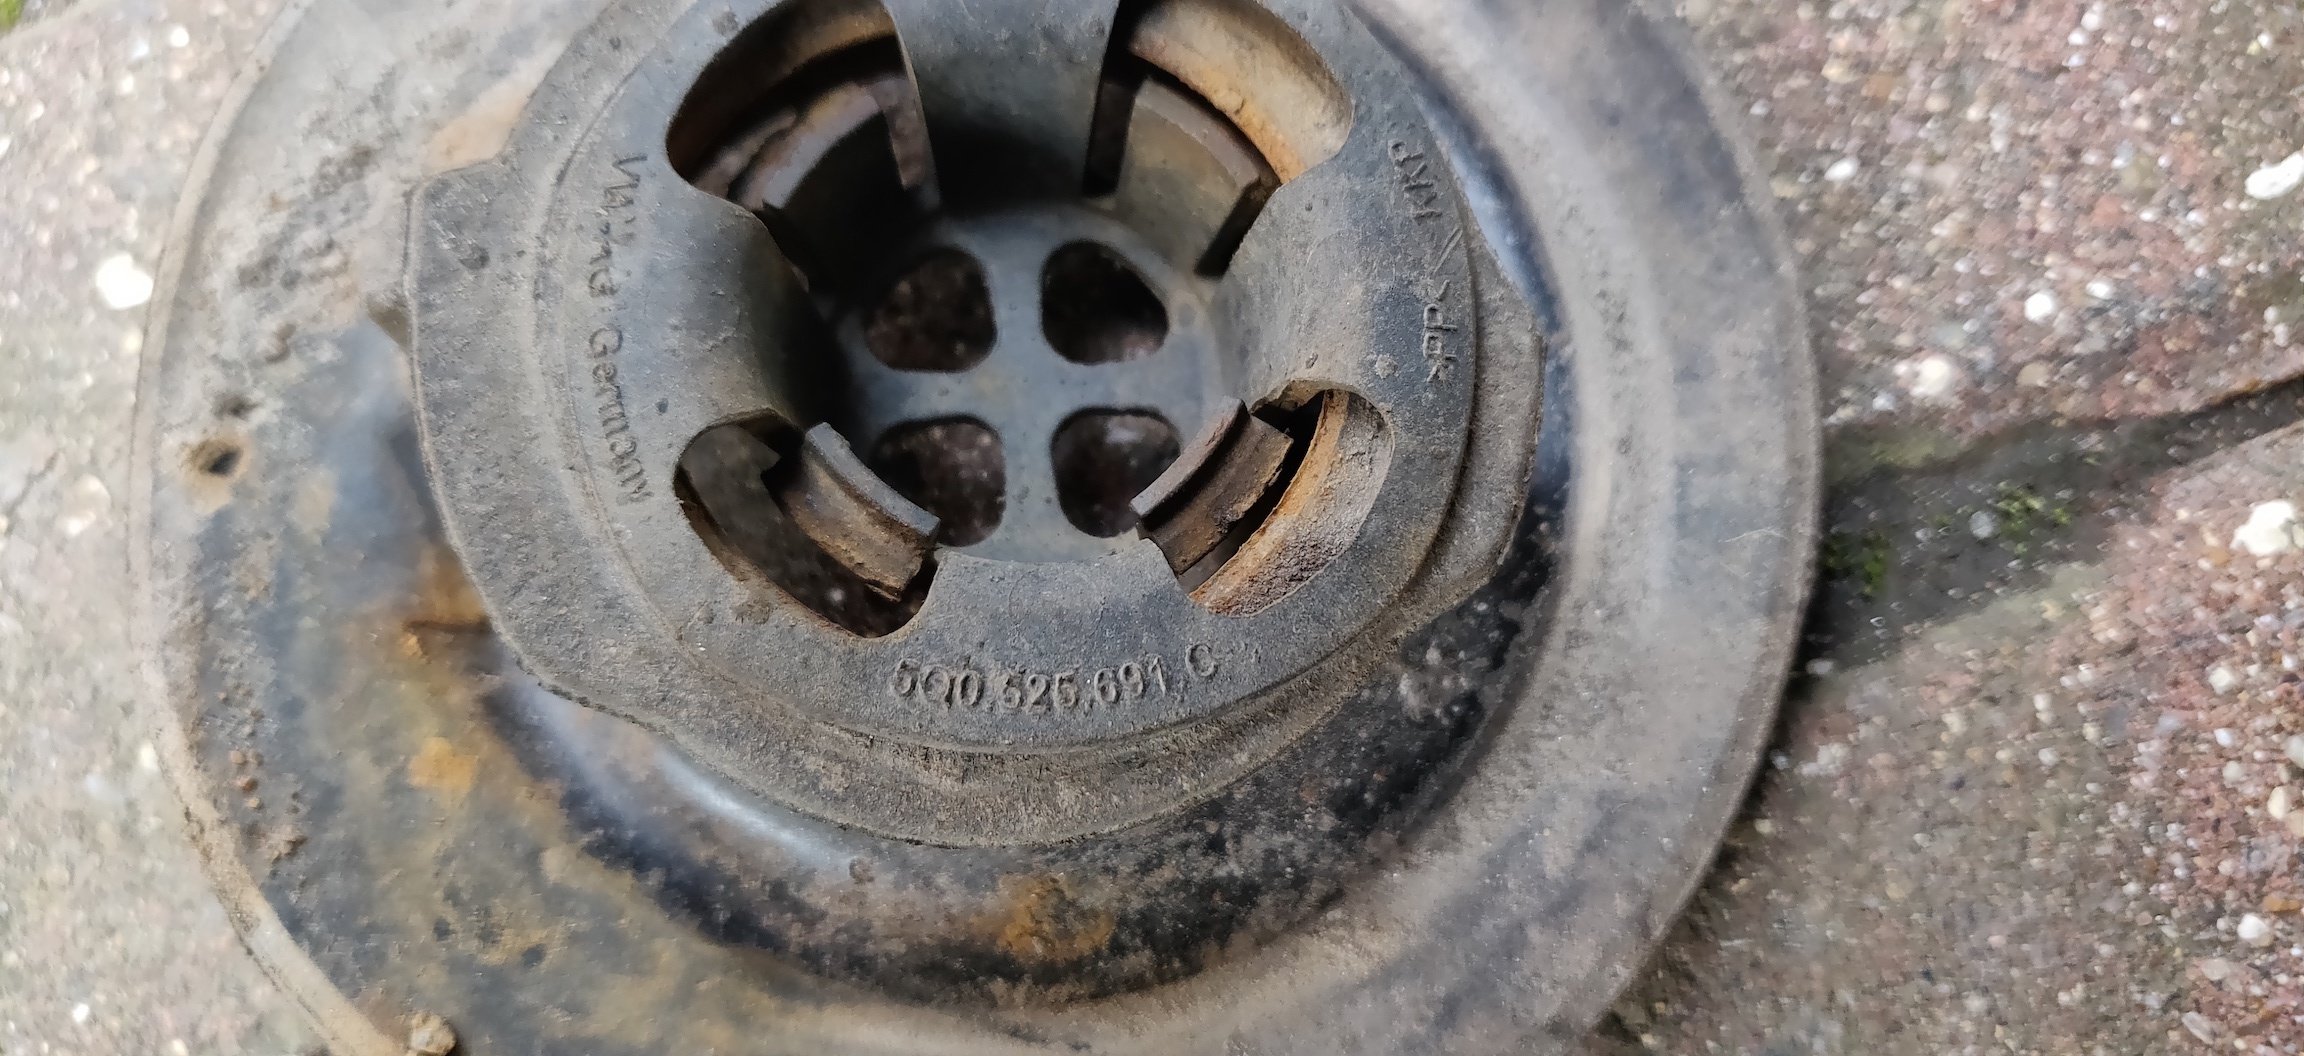
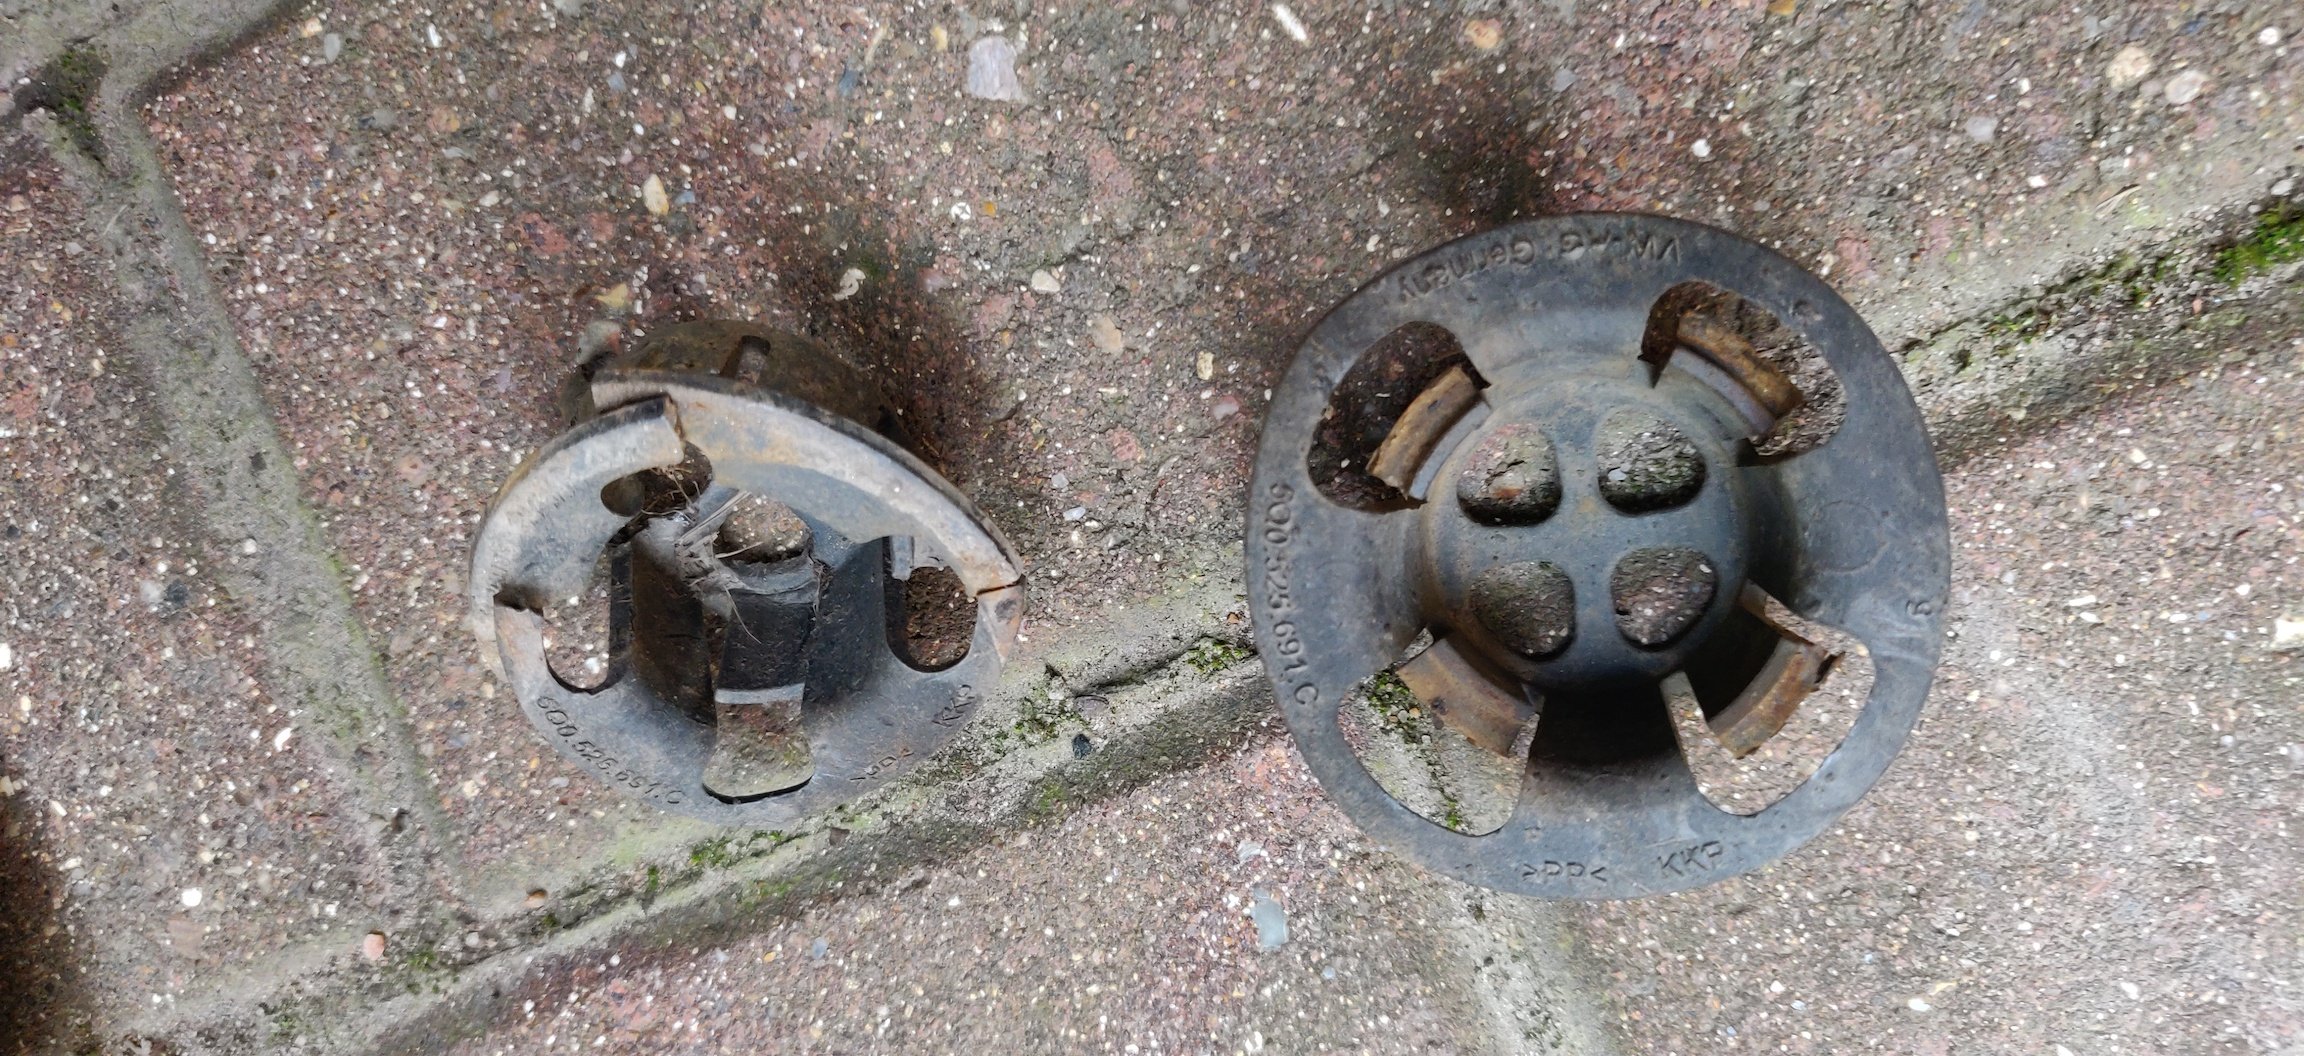
The OP is wrong, the clip is removeable my Yeti was missing one and I used one from the rear seat of my old vehicle, it stands out now being a different colour. Robjon has kindly shown a photograph that explains better than my words could ever.1 point
-
1 pointWhere can you access the list of trips as I cannot see anywhere that lists my fuel consumption either on the app (Android) or website. Ignore - just found it on the website 🙃1 point
-
1 pointFYI - you don't need to have the ignition switched on. You can simply switch the head unit on by itself - that way, you don't have any systems active / drawing power. But do not open the door during update as that may switch the unit off. Personally, I have found 1969 to load faster and (so far) I haven't had any issues where the media player shows a black screen and that happened to me on pretty much every drive on 1941.1 point
-
1 point
-
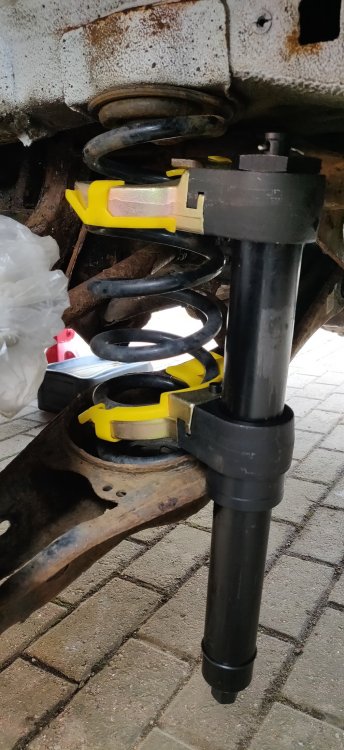
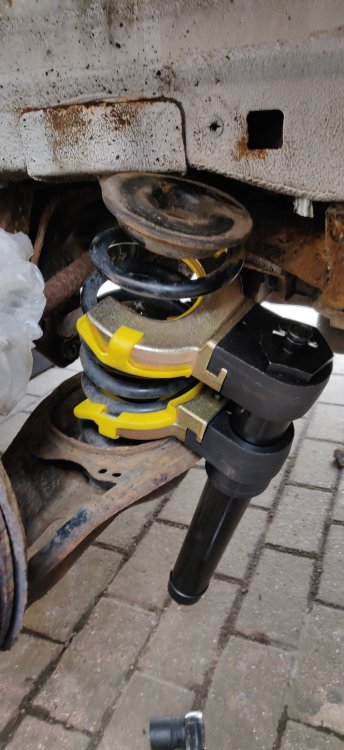
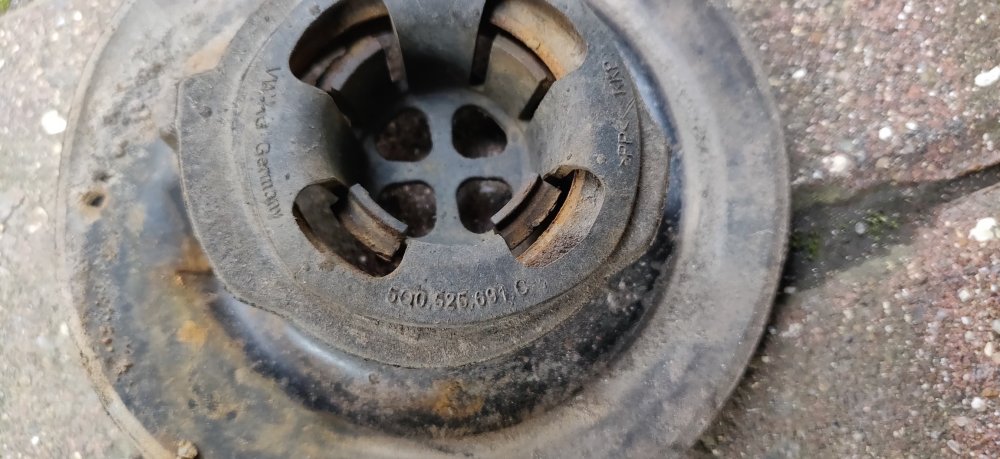
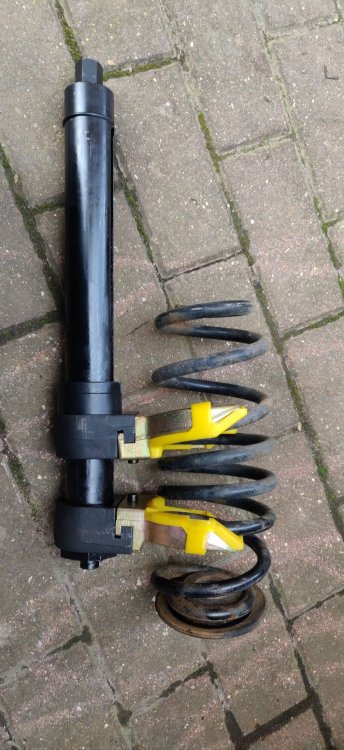
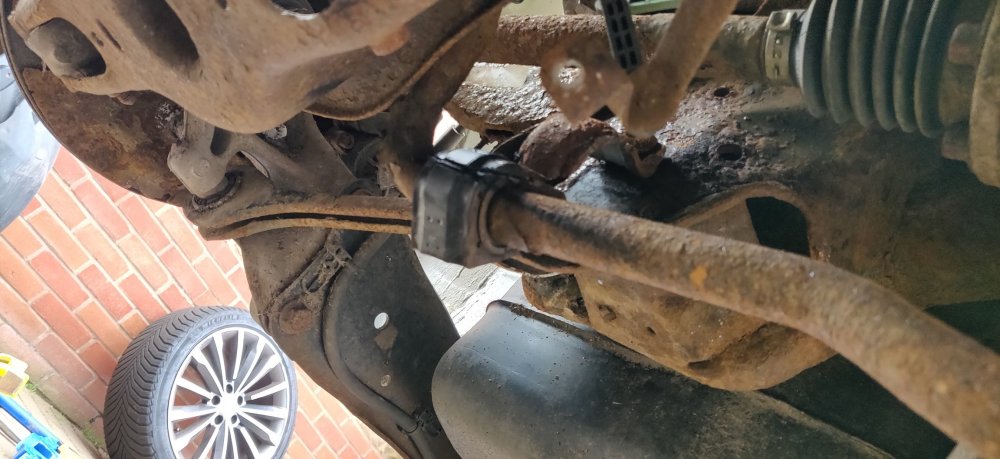
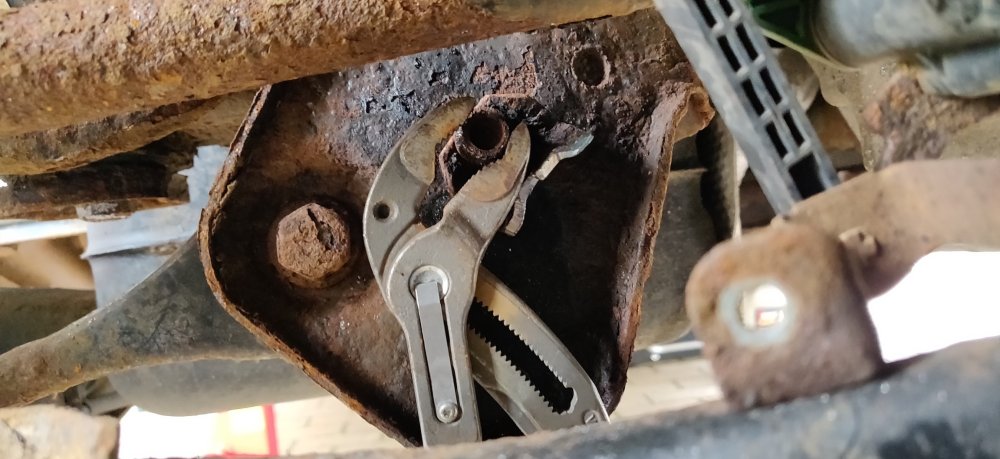
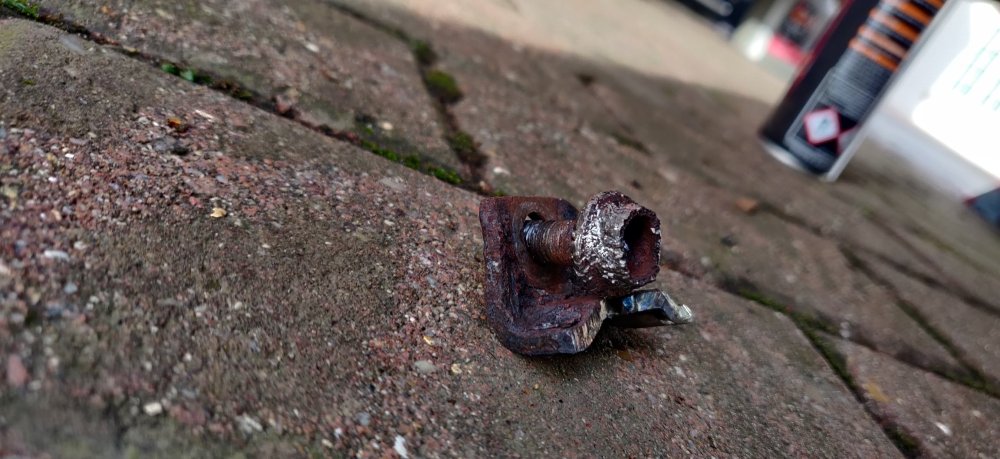
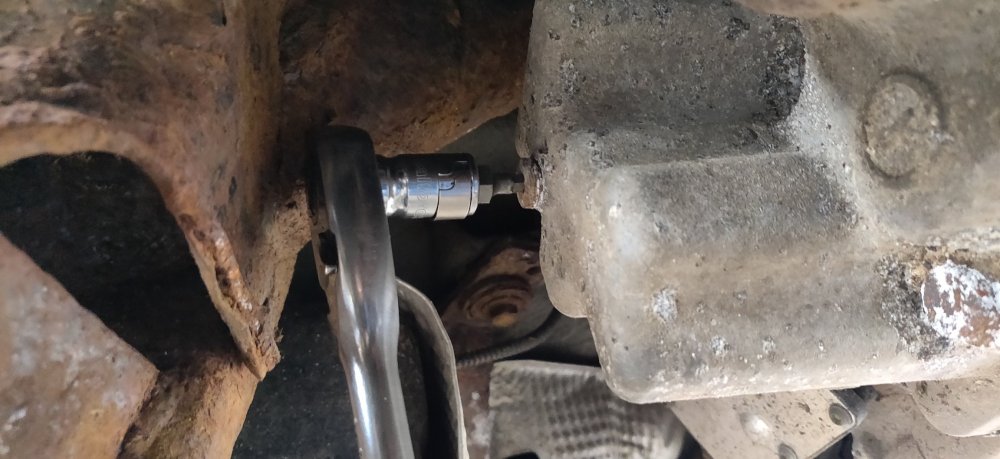
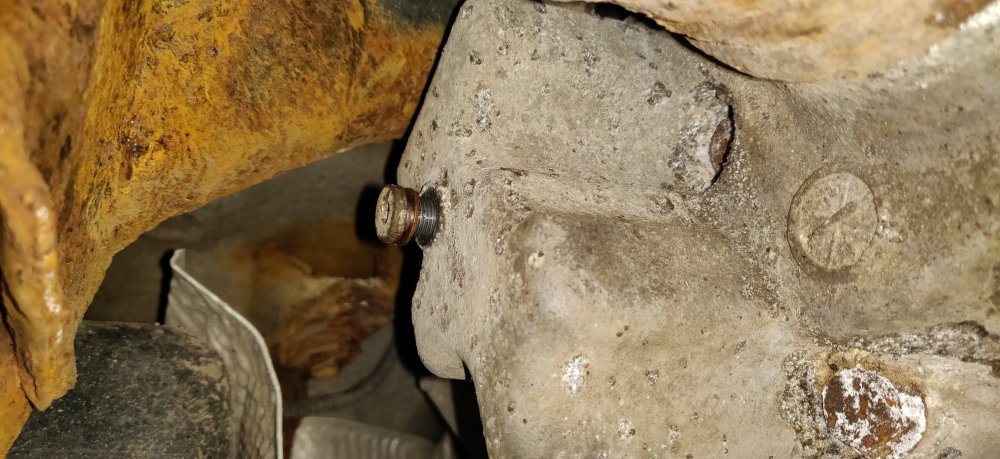
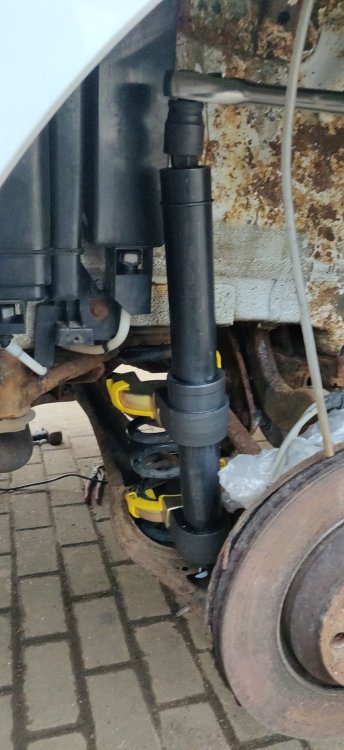
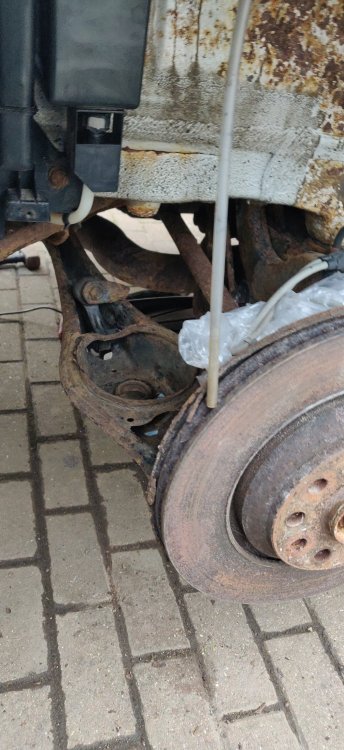
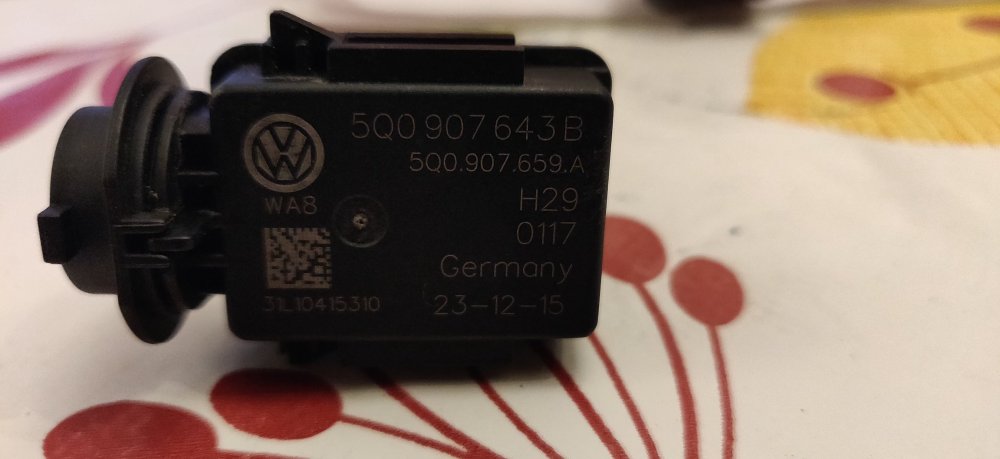
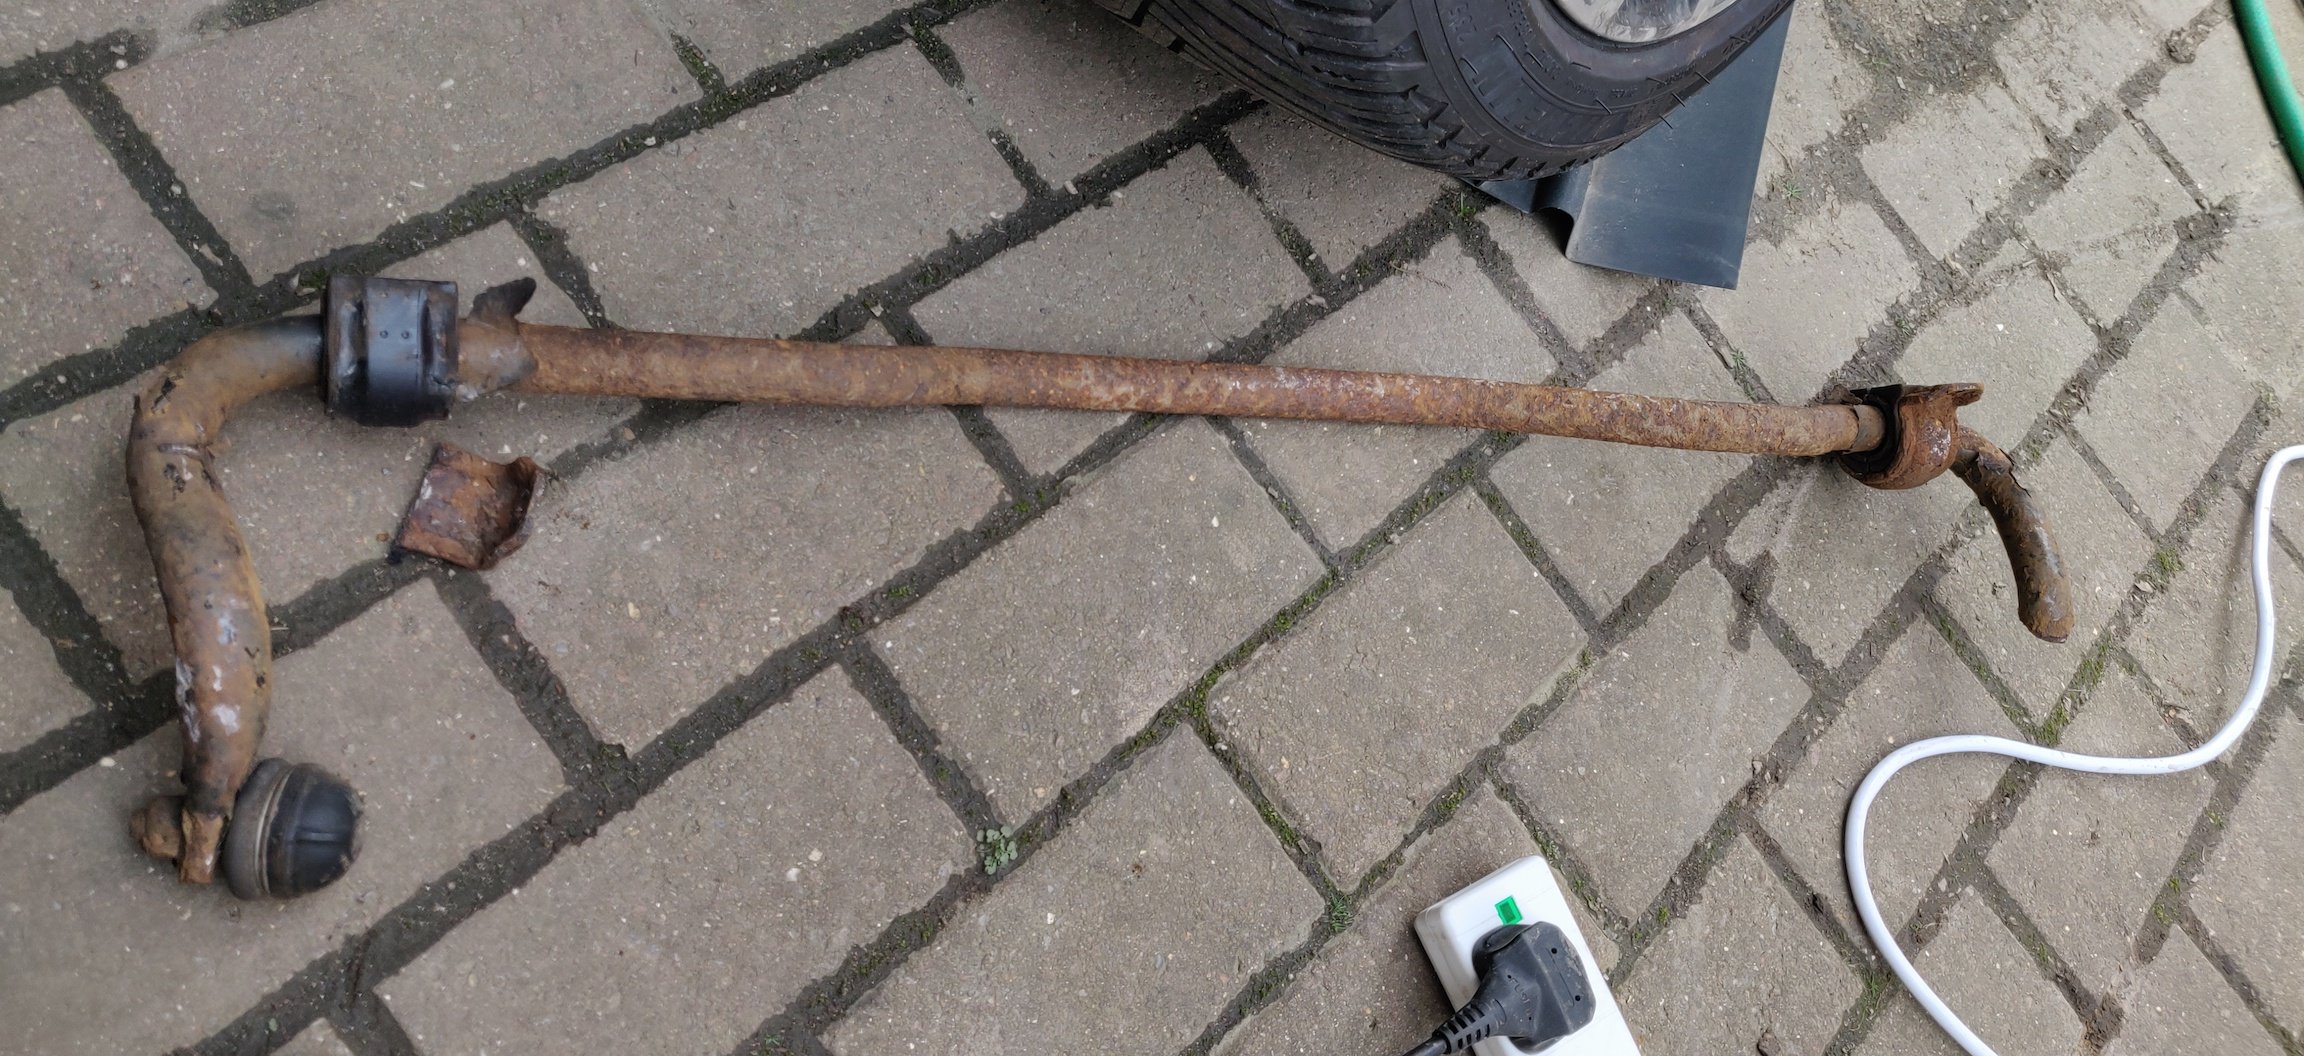
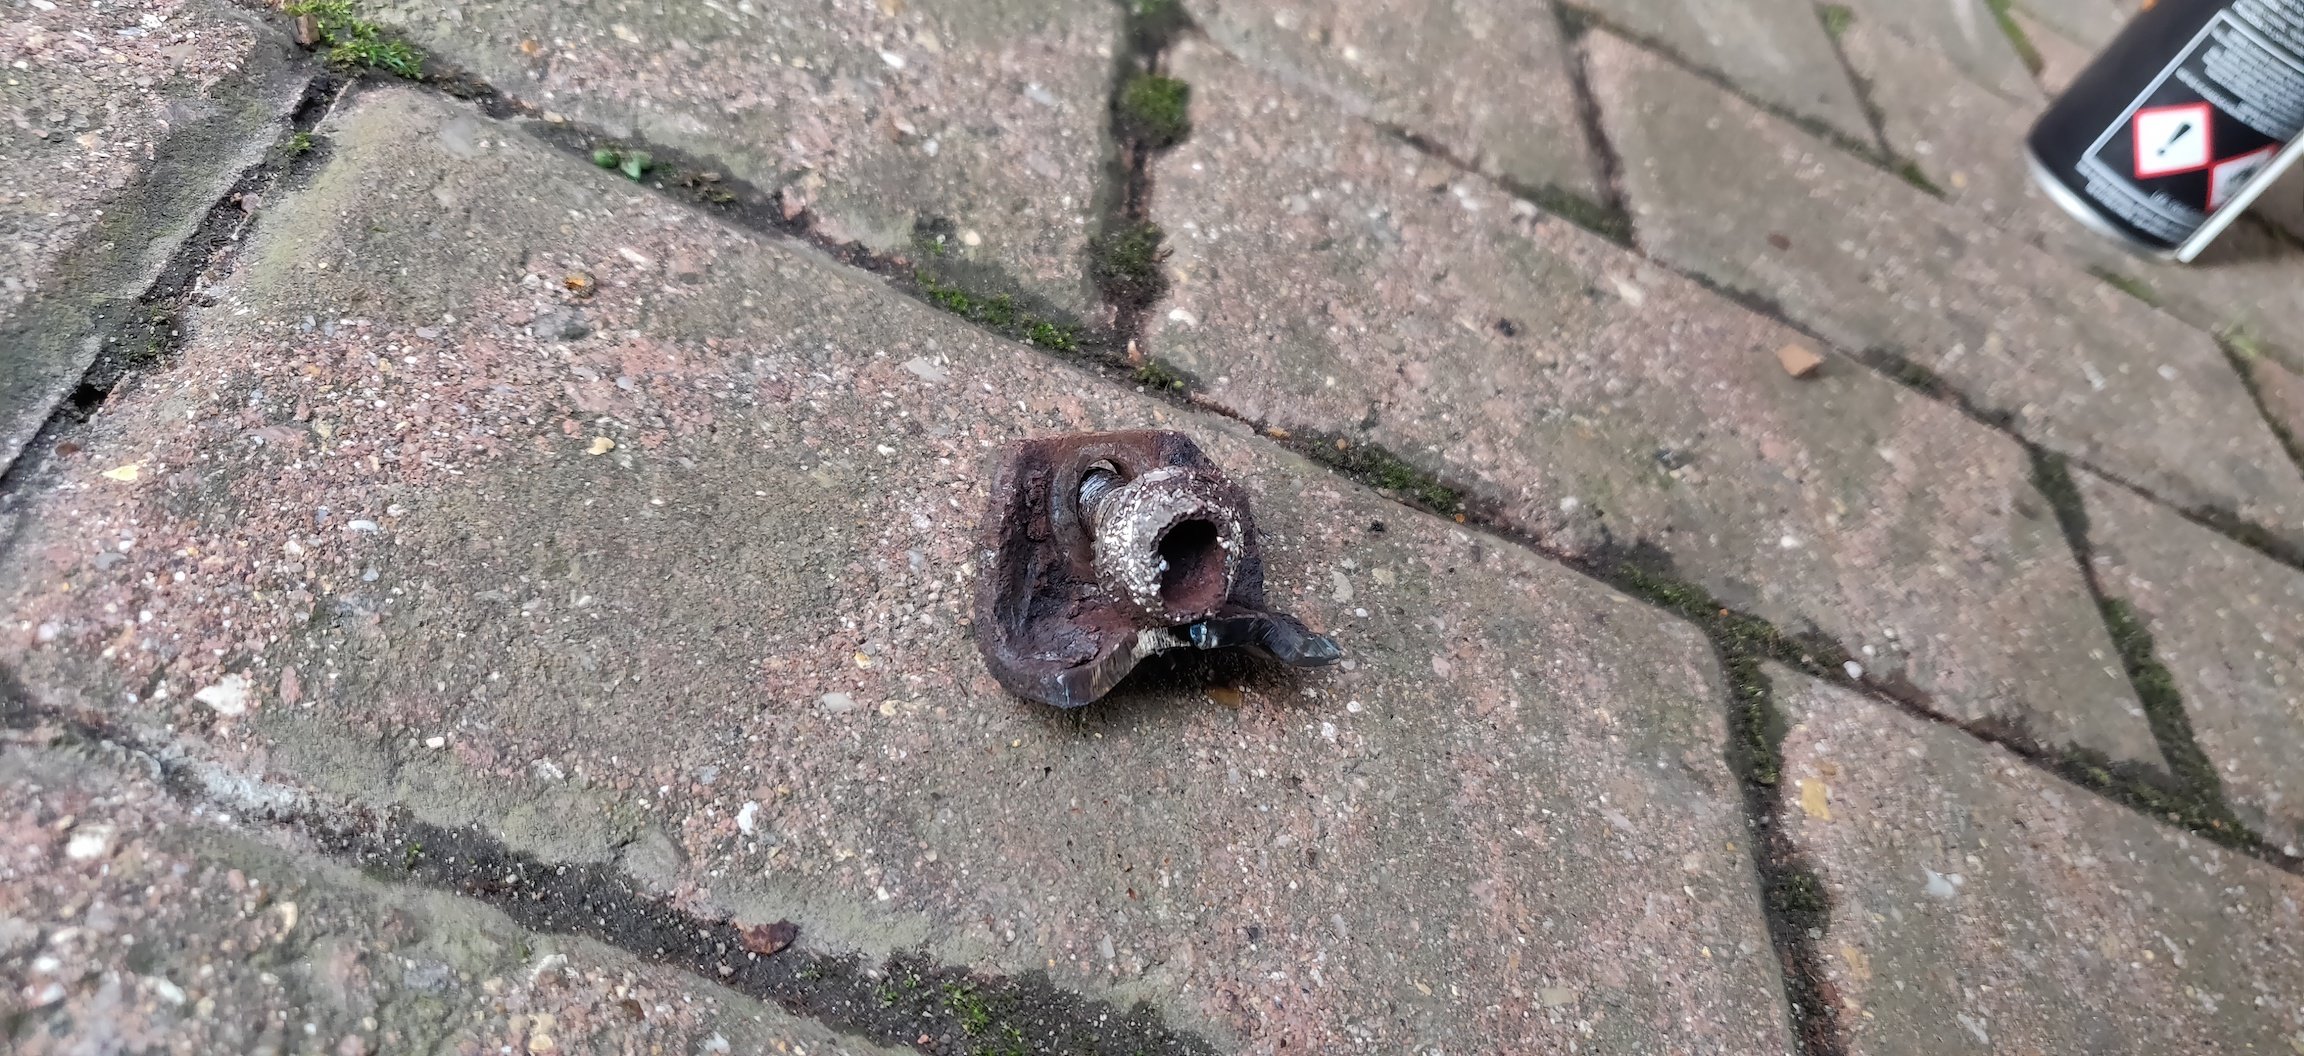
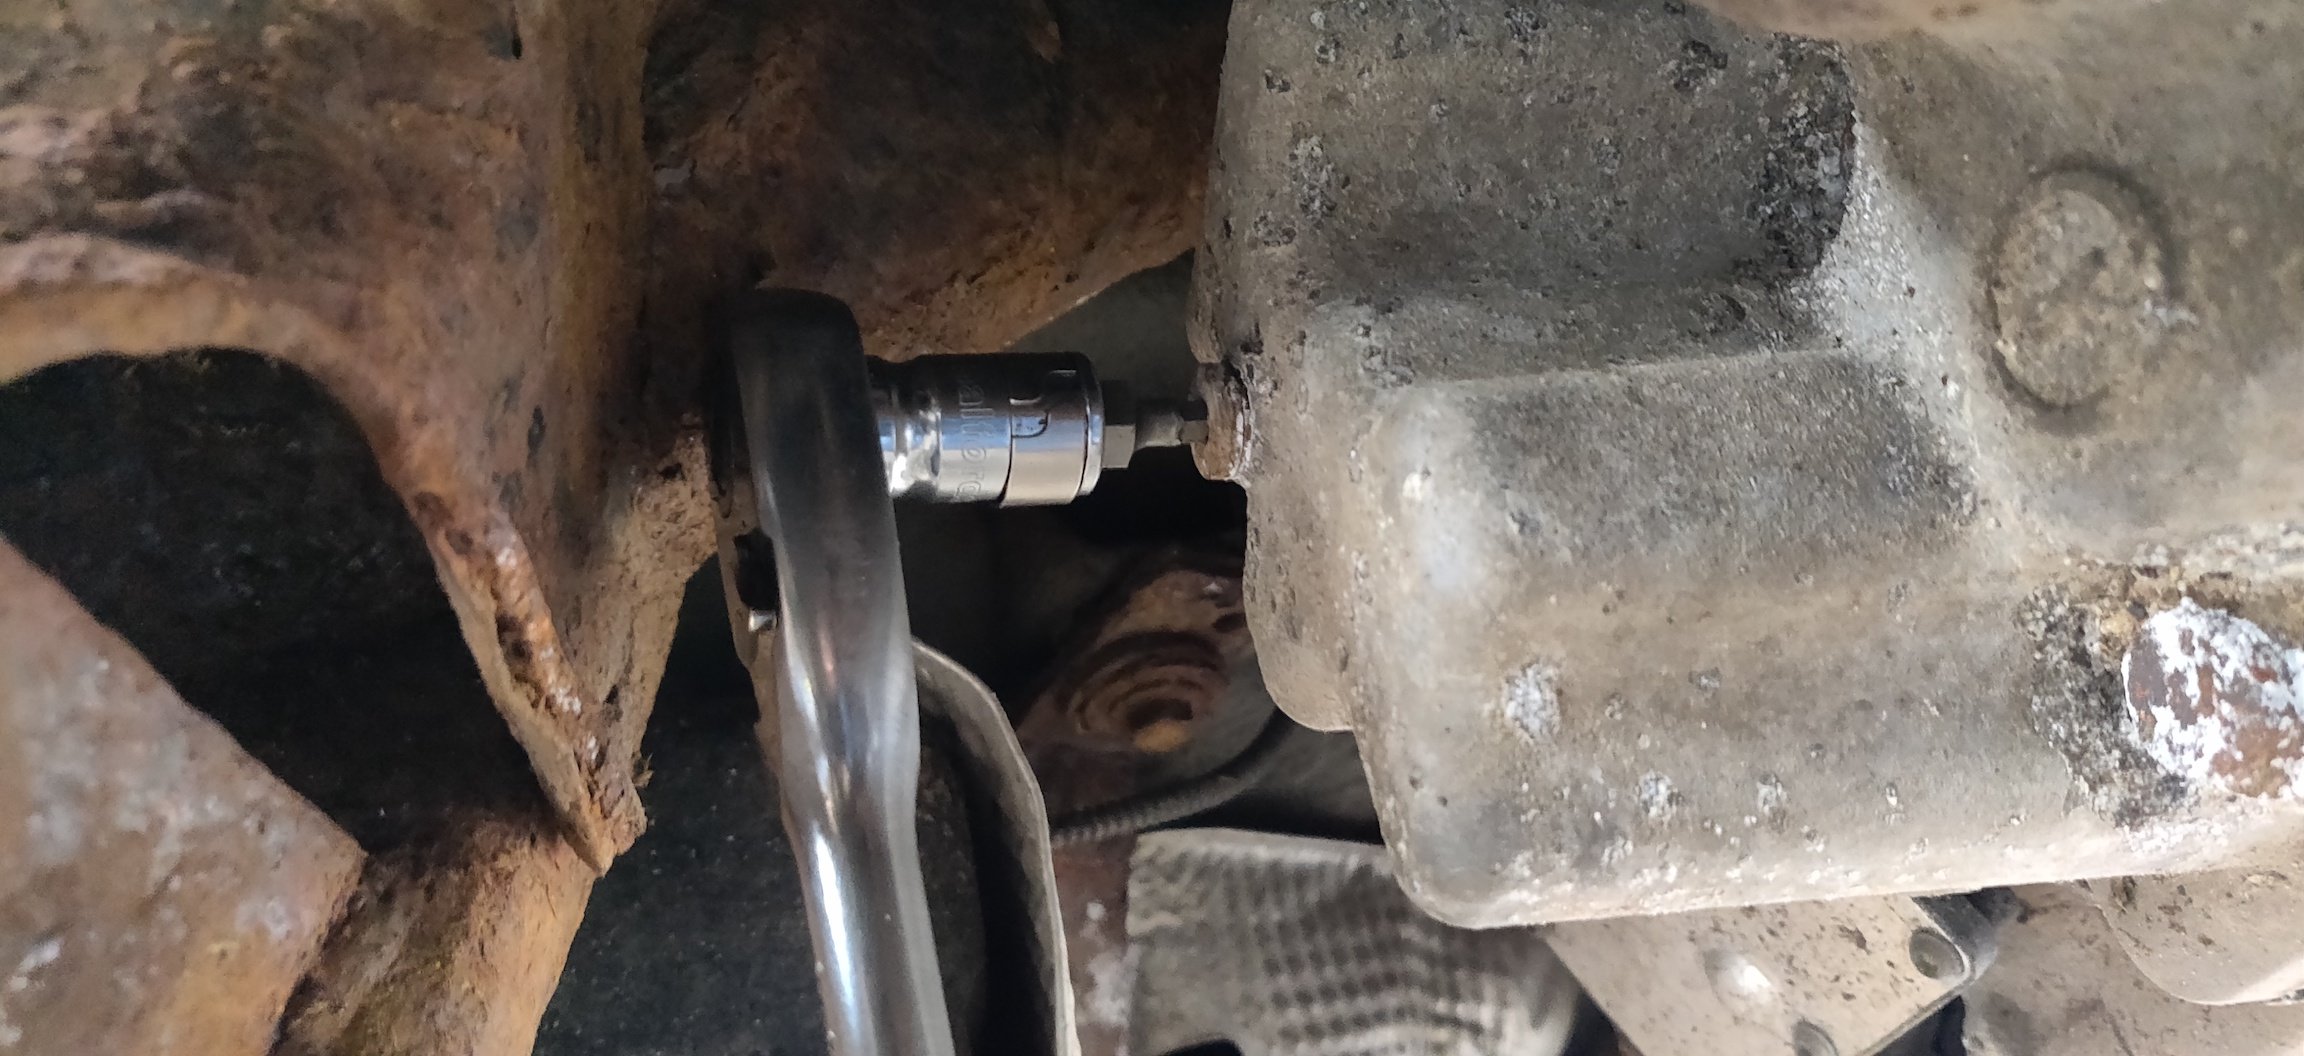
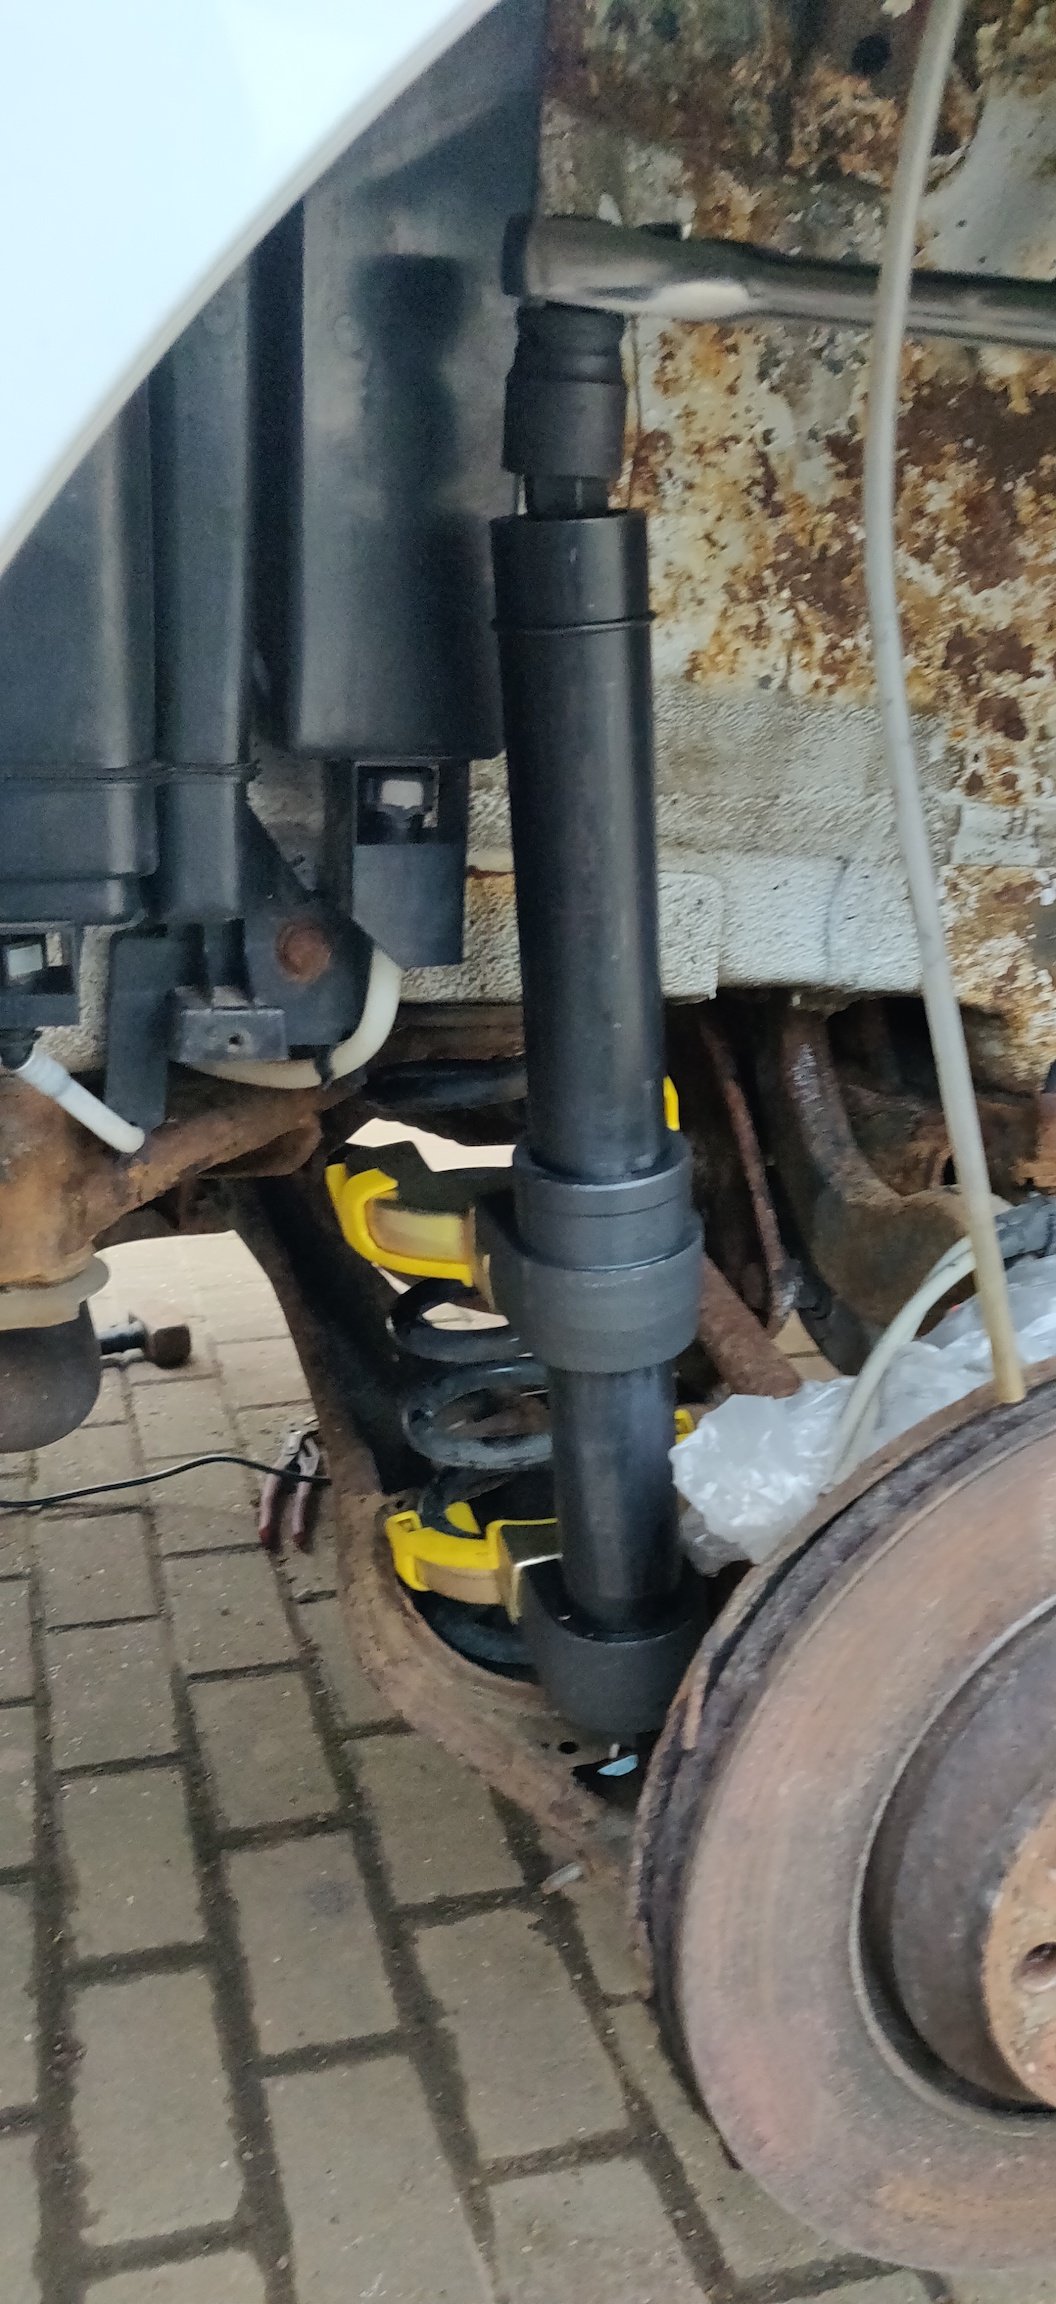
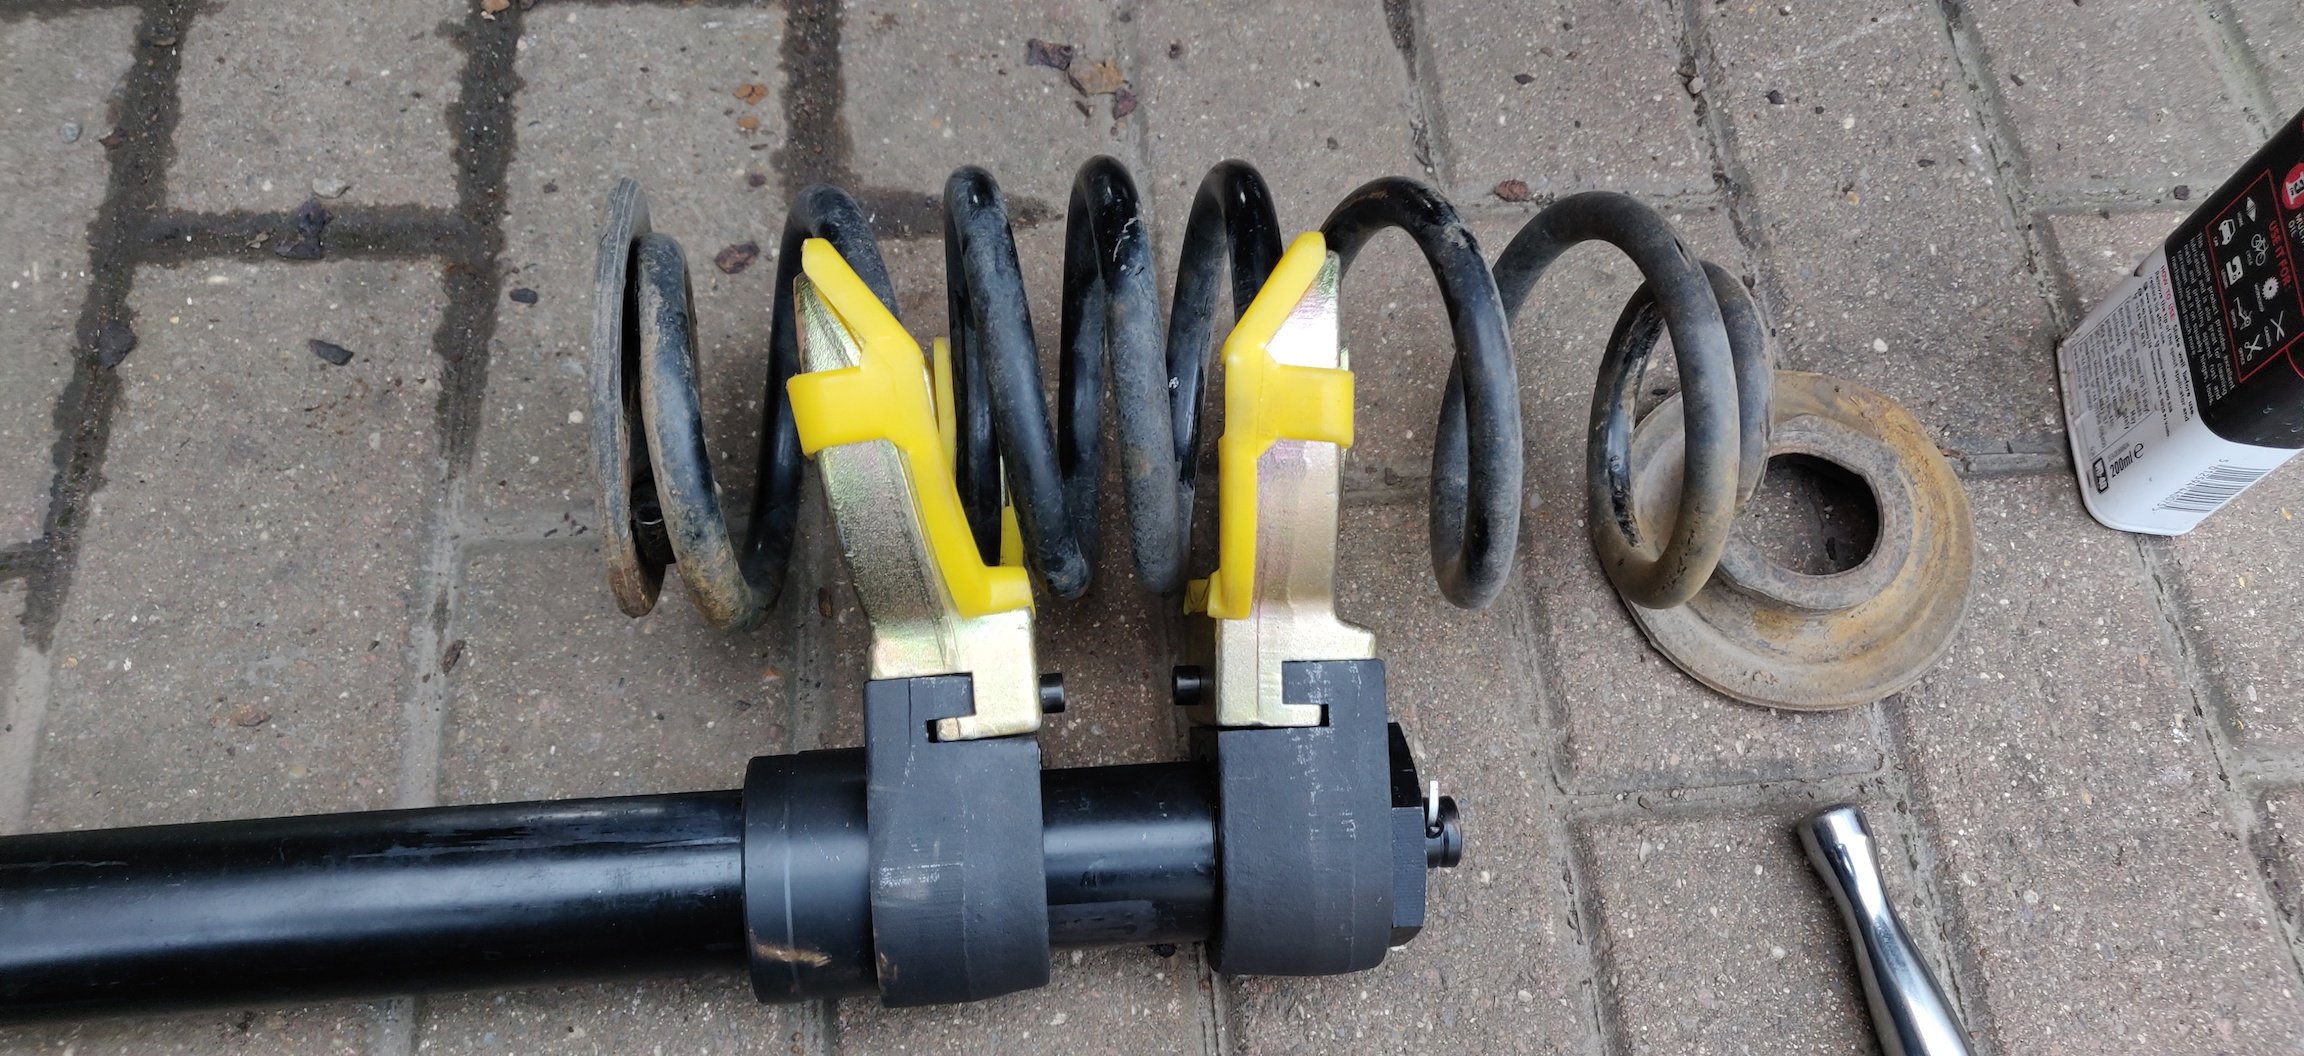
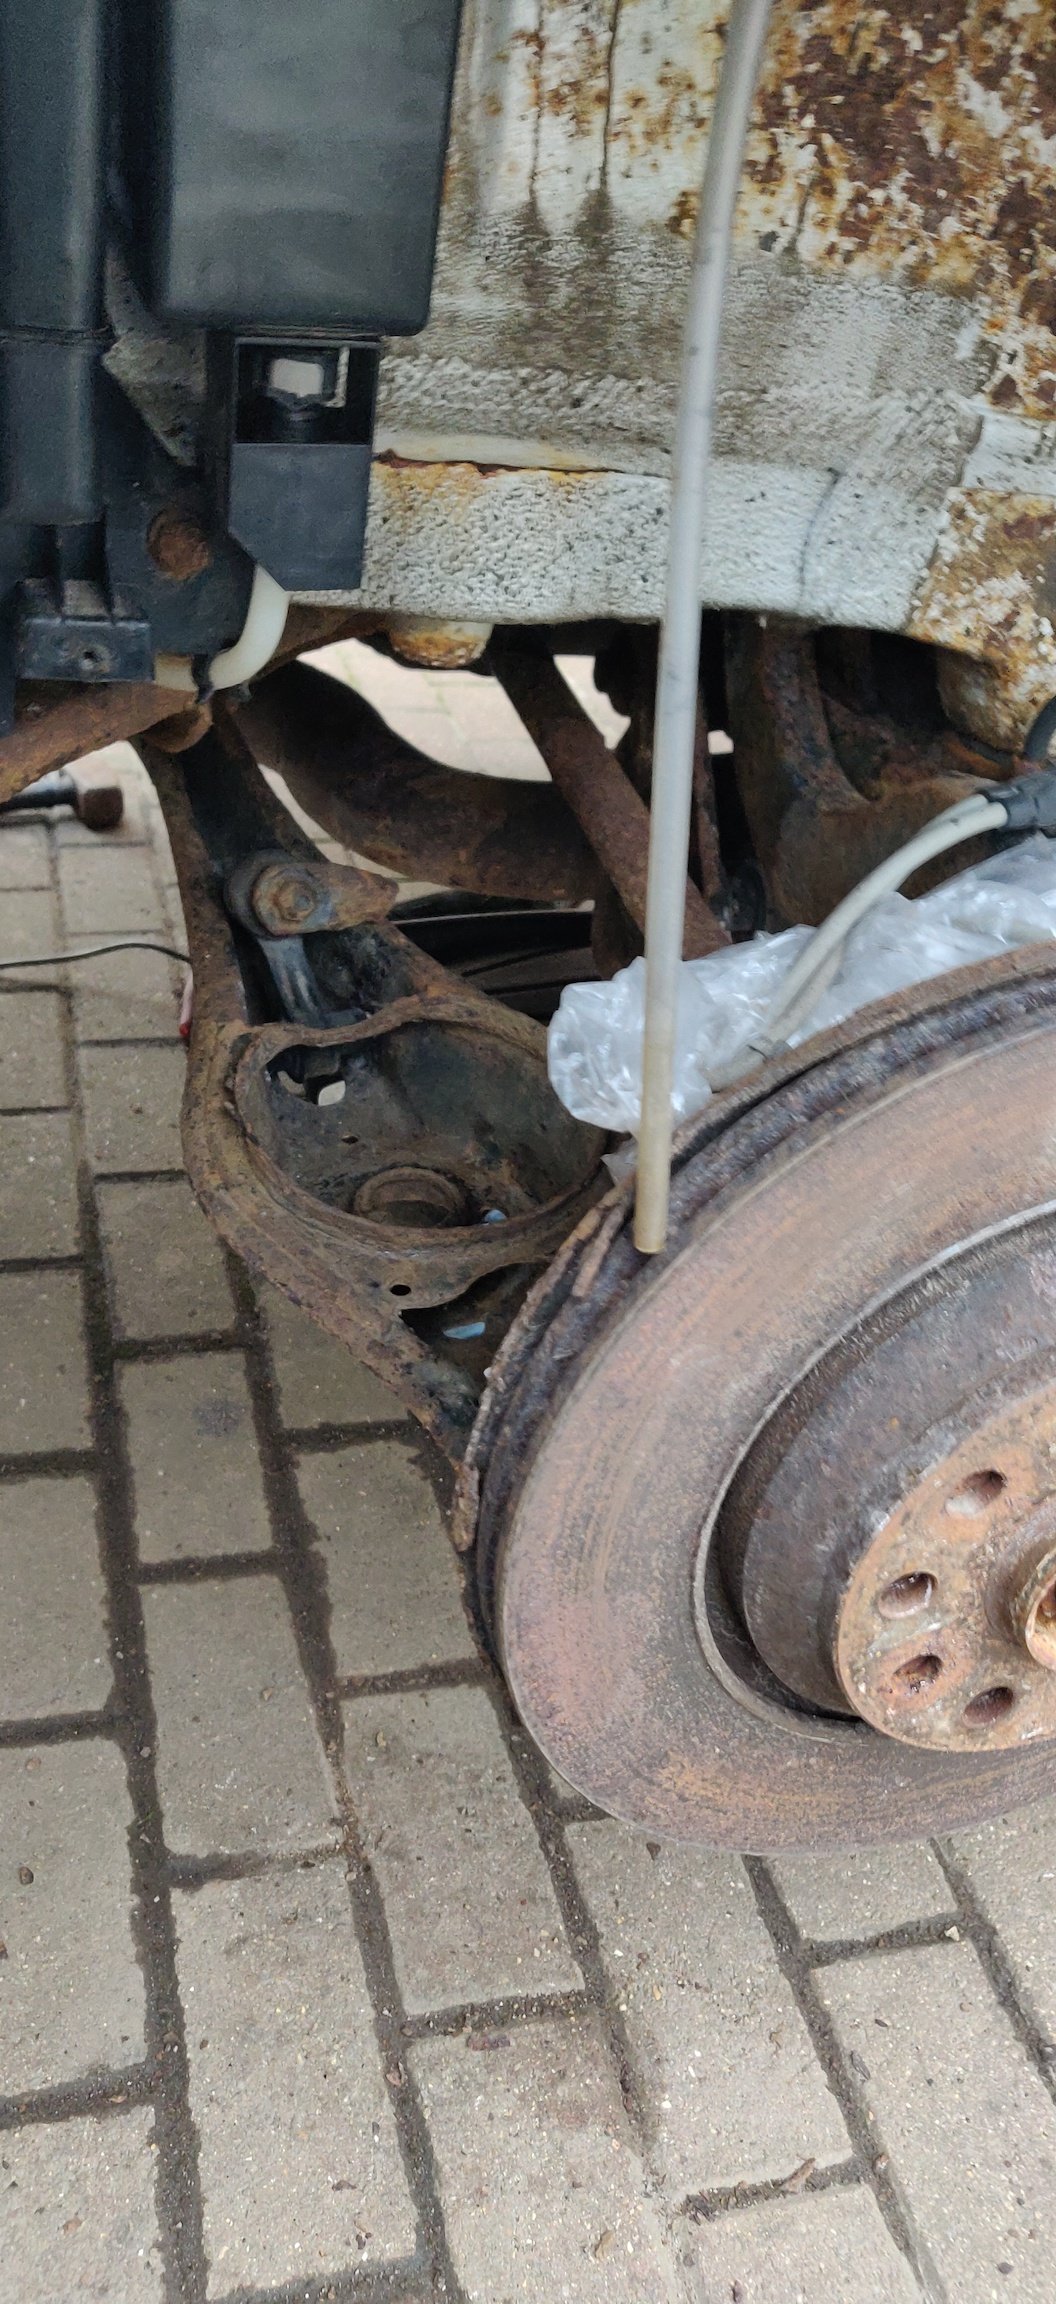
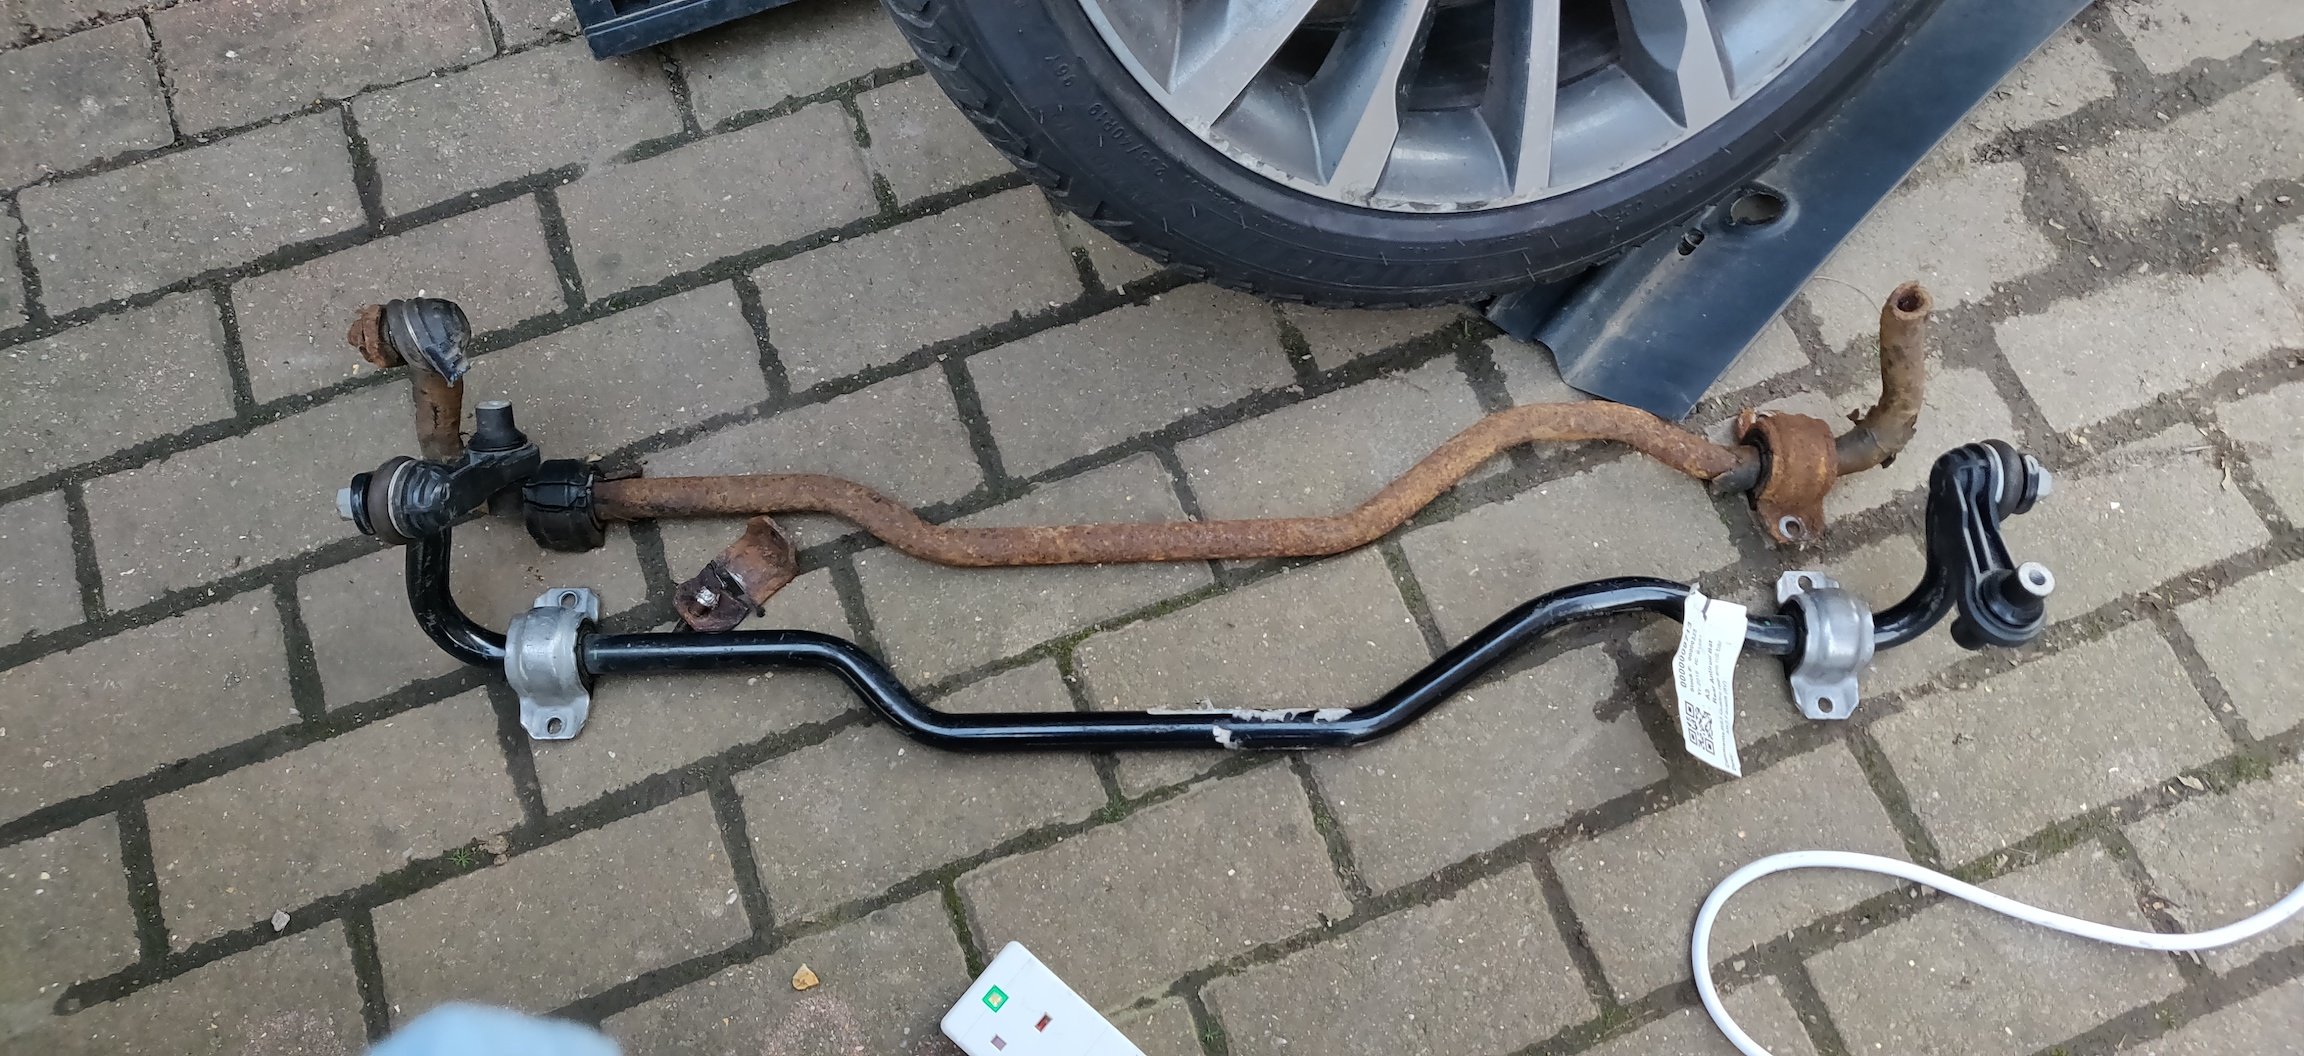
So in order to have a chance at tackling that one remaining rounded socket on the anti roll bar clamp, I needed to remove the springs. Given I actually have replacement rear springs, they would need to be removed anyway. Logic would suggest that with the strut removed, the suspension bolt attaching the lower arm to the hub could also be removed, and in doing so, lower the arm enough to free the spring. Alas, this was the same logic that applied to the Ford Focus, and I anticipate the same issues involved. Given the anti roll bar bolts have seized onto the bushes, I would bet my mortgage on the hub bushes to suffer the same fate. In fact, attempting to use the impact wrench on the bolt yielded no movement. I suspect even if I used the breaker bar and undid the bolt and nut, it'll be seized onto the bush, meaning it'll need destroying. If that was done, then the hub pretty much needs to be removed in order to press in a replacement bush, or another specialist tool to press it in in situ. Either way, it'd also mean sourcing a new bush. So I was pretty much stuck with needing to compress the spring: I lucked out with the purchase of this spring compressor, as it just about fits. So once in position, got a wrench with a 23mm socket and tightened away. It'll need some compression before the top clears away: The bottom was still attached to something: This thing, which has tabs that can be squeezed in from the underside, looks to keep the rubber seat in place. Once unclipped, the spring comes free: So it looks like about 4 coils need compressing to get enough clearance. The same assembly tool on the other side: Looks to have a suffered a bit. This was most likely when I applied fire to the anti roll bar link, the heat near and hot enough to melt bits of the right side assembly tool. I'll need to find out whether these are critical. In any case, this gave enough access to the clamp with the rounded bolt. Initial attempts with the Sawzall wasn't frankly quick enough. I guess with enough patience, it could be done. The Sawzall did make quick work of the anti roll bar link on this side though, but the links are made of plastic for this car. So rather than persist with the Sawzall for this obstacle, checked to see if the angle grinder has enough clearance to get in: It does. A cut along the bottom half of the clamp allowed the bush to come free. This meant that after some wiggling: A sigh of relief, as the anti roll bar is out at last. I cannot remember the routing I took to get it out, which would have been useful to note, as it was a faff even with a broken end on it. Another couple of cuts on the clamp left enough room to get some pliers on: The next 45 minutes was painstakingly squeezing the pliers to try and get purchase, and slowly quarter turning the stiff bolt. There was the occasional application of fire and plus gas which either helped it along or acted as a decent placebo. Persistence got through: The Knipex pliers are effective if you can get the purchase: The bolt was probably not going to allow for this any longer if it remained. Whilst I was down there, took a look at the Haldex unit: The filler appears to be a 5mm hex bolt, with not a lot of space due to the subframe. Wanted to get as big a wrench as possible as I didn't want to risk rounding this thing. But it came out without much issue: So put that back in place ready for a proper drain eventually. So next was the right side spring. Unfortunately, the spring compressors were only able to grab at 3 coils, which isn't enough to get the spring out. It is almost there, but even with a pry bar involved in folding down the lower arm, there still was not enough clearance. Then an idea struck me: I used the spring compressor the other way around. This allowed the grabbing of four coils, and once compressed: Out it slid, not much drama one that was figured out. So to install the new springs, it'll be pretty much a case of getting 4 coils, but sod's law this will take a few attempts, as removing them did not mean any considerations for alightment and positioning of the compressors. So the anti roll bar links are in clearer view: Access is still pretty tight for the Sawzall, and the metal lip on the lower arm means an angle grinder isn't practical here either. Once I've recovered sufficiently, I'll try the Sawzall on the inside of the links, around the bushes, which hopefully will mean the bolt going through is cut enough to mean the link can be removed. Sized up the new one against the old: It looks like it should fit. It's amazing how a 2016 vs 2019 can make such a difference. That was pretty much it for the day. With the springs out, and the front left strut out, gave those areas another round of the Engine Cleaner and brush and rinsed it off. The wheel arches are as ready as they'll ever be for a couple of goes with Lanoguard. Whilst I was there, I took out the old air quality sensor: The replacement was installed, just a connector and a small latch underneath to attach it to the plastic clip which attaches to the car itself. This is marked 5Q0 907 643 B, with the replacement installed being 5Q0 907 643 C. Hopefully that doesn't make a difference, but time will tell. So other than the rear anti roll bar links, today hasn't gone too badly, quite good in comparison to last week really. Once these links are removed, that should be it in terms of obstacles right now. Weather tomorrow will dictate whether any further progress is made, but it's getting there slowly. Maintenance: £1857.08 Upgrades: £1020.69 Miscellaneous: £637.12


 1 point
 -
1 pointIf you have a look in the Skoda parts catalogue, you will see that the specification of the standard 19" wheels is 7.5Jx19 ET51 or to give the full specification it's 7.5Jx19 ET51 5/112 57.1 Skoda parts catalogue https://www.lllparts.co.uk/catalogs/skoda/CZ/OCT/805/6/601/6010901 point
-
1 pointYes as I love the factory elegance ones and ideally like it looking 100% oem externally, these are still winter wheels. The previous owner has also supplied them with the car and they have been power coated silver just need some tyres when I get some space and time.1 point
-
Just tell her while you are driving her to somewhere she REALLY wants to go. 😮 Thanks. AG Falco1 point
-
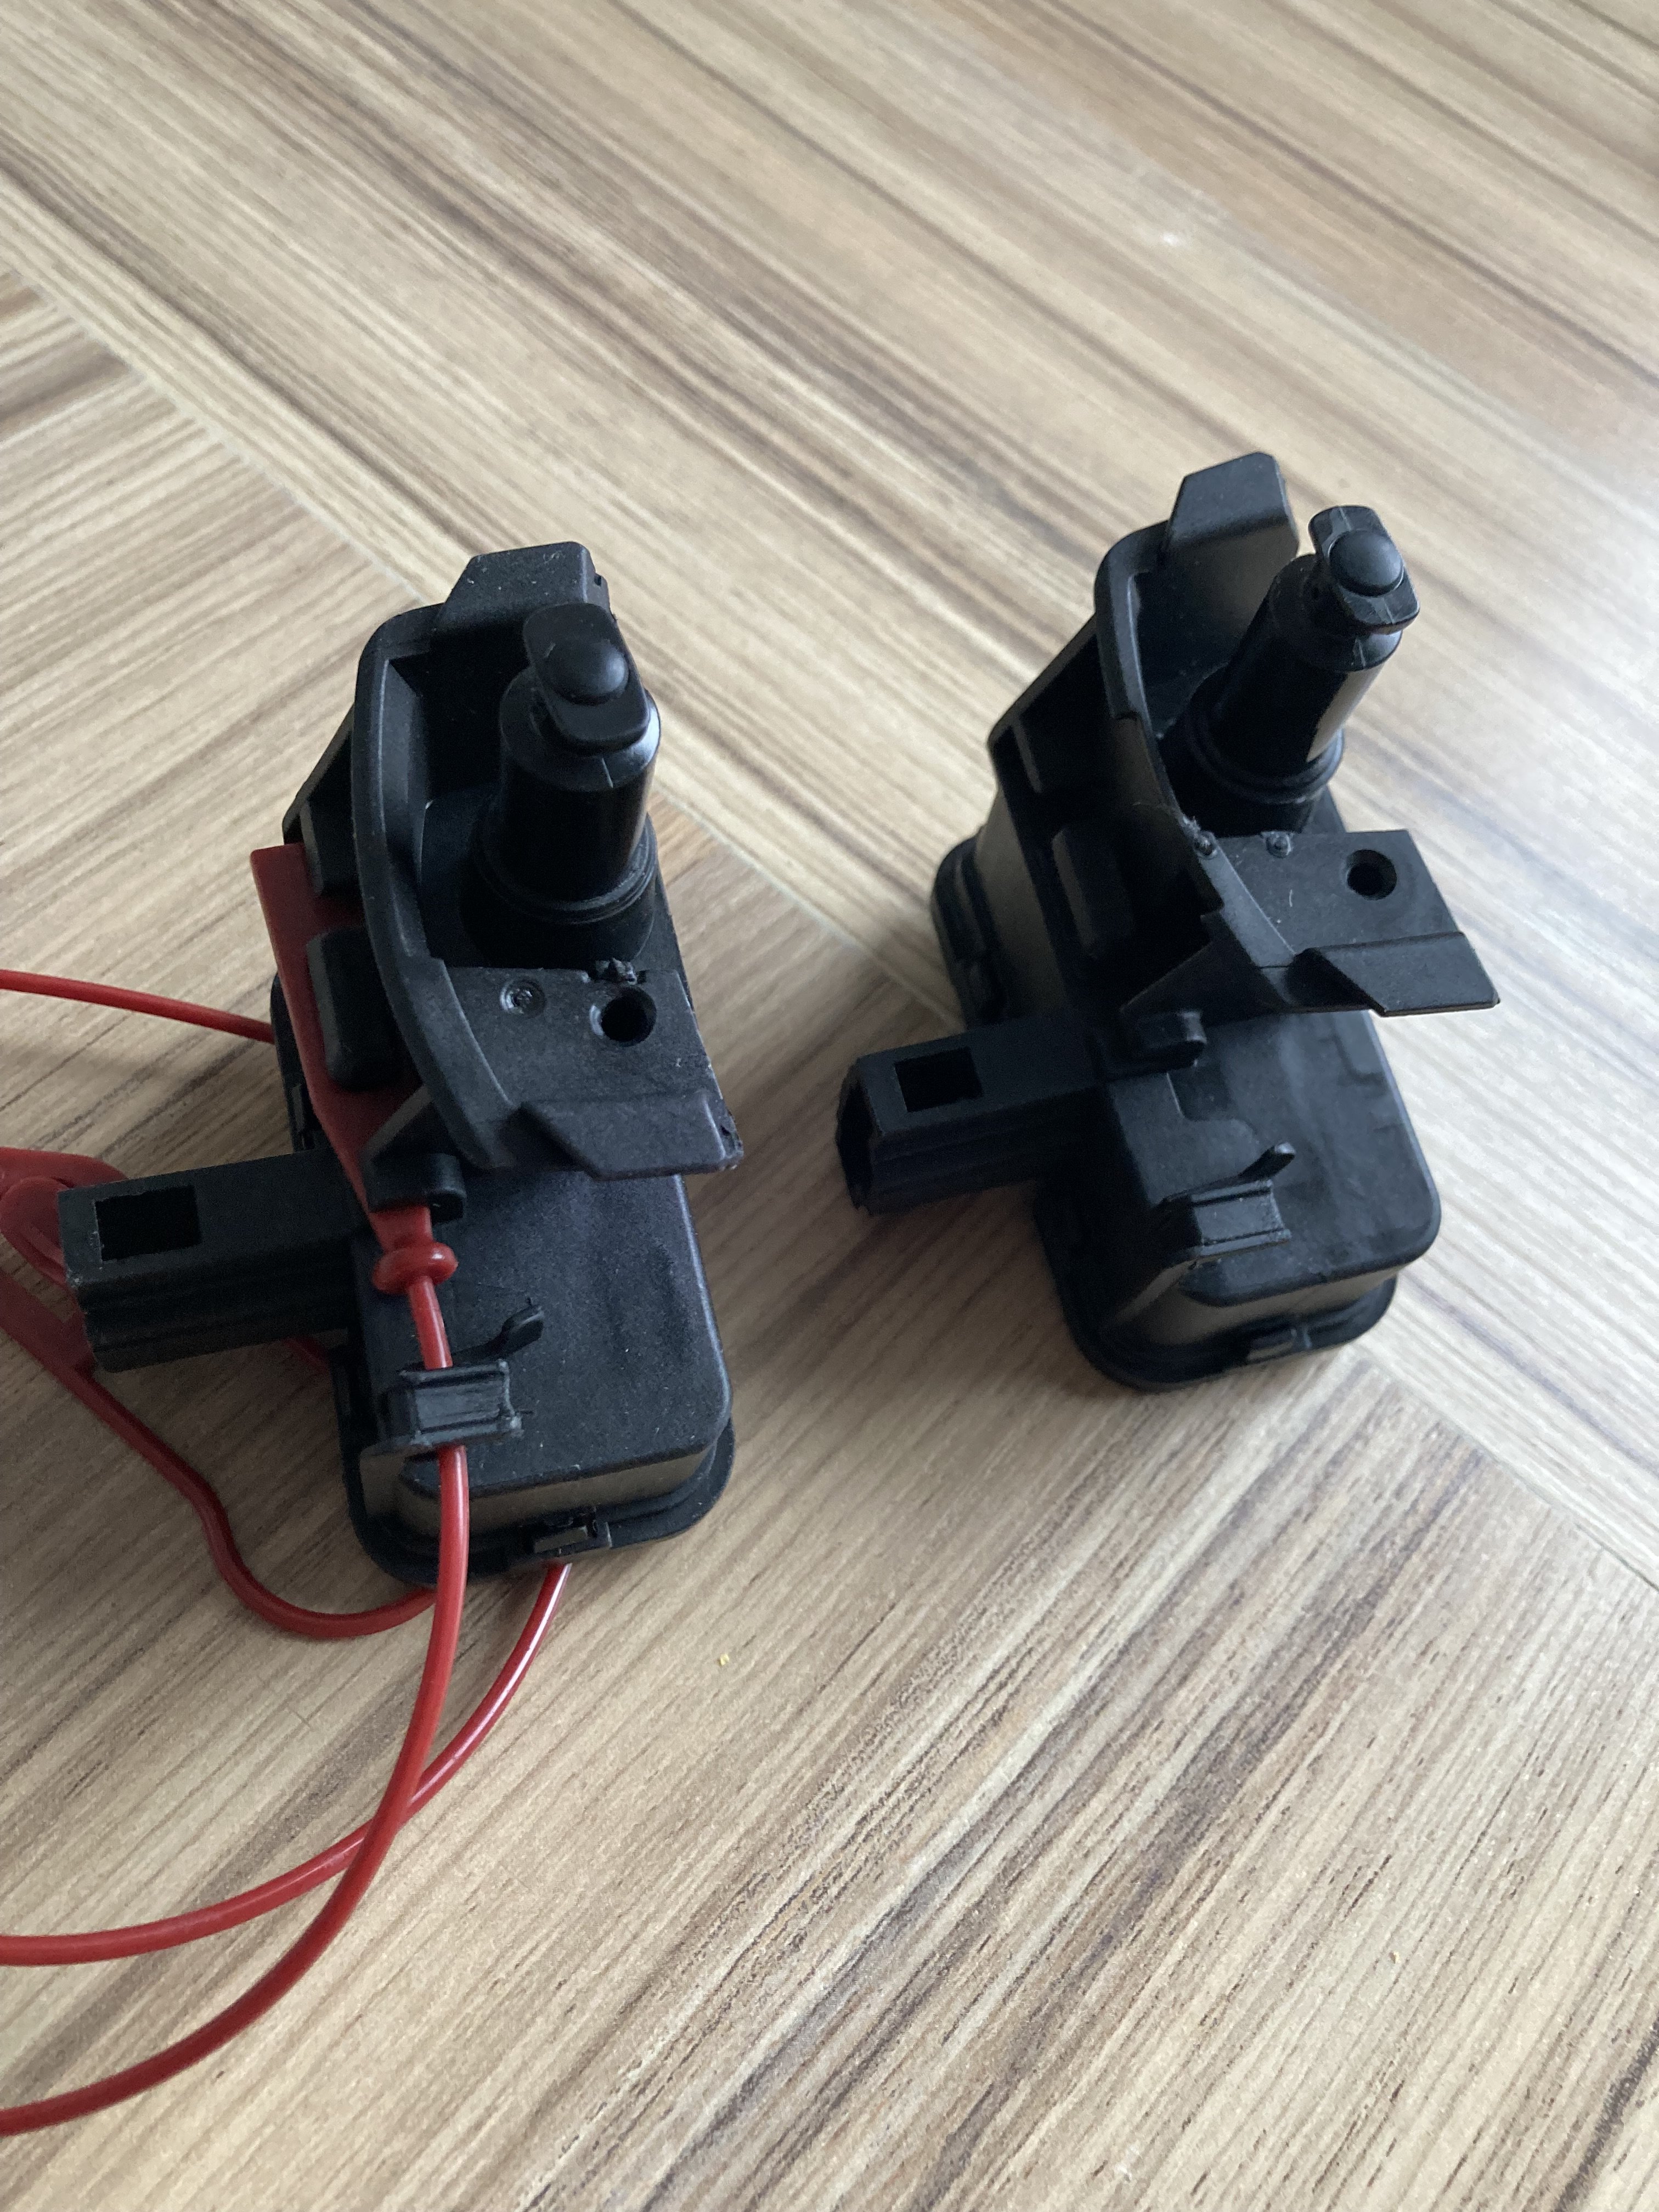
1 pointBought the part in the link you sent mate, fitted in 10 mins, 20 mins to feed the pull cord through - works a treat! Cheers for the help! 👍 Part on the right - OEM £48 Part on the left - after market - £12 Identical parts! 🤷♂️
 1 point
 -
Ooh I like that... Very neat!1 point
-
1 point
-
1 pointSkoda Superb 2018 2.0TDI 140KW from recently, looking for some experience sharing on this forum 👍🏼1 point
-
1 point
-
1 pointA mature driver with not many years of experience, that's me. Hi 😁 My firstcar was Fiat Panda - I was a learner, wanted a cheap car to takw me from A to B. Then I had Suzuki Alto 2014. Great, lovely car, cheap, cheerful, good looking but small and frail. I now bought Skoda Octavia 2013 to accompany my family's grovong need. 1.2 TSI in RED 🙃😭😁 buth the milage was only 71k and the price was just under £5k so I bit. Getting used to the size. It actually matters (who knew 🤷). Foumd this forum/community as I am about to install the reverse cam and there is a great thread here I am about to follow. Wish me luck (?)🍀😀1 point
-
1 pointIndeed but I lived in London for years so the idea of having a car wasn't just that appealing when the Tube was just there 😎1 point
-
On recent models, no they can't. One of the fobs on my new Octavia was broken on delivery, the replacement had to come from the factory because keys are now encoded to the VIN of the vehicle. I also needed to take it to a dealer to get it paired to the car - they don't have access to do this directly, it needs a connection to the Skoda mothership. https://forums.ross-tech.com/index.php?threads/17071/post-1523541 point
-
1 pointQuick little update New rims! TSW Sebring 19x8.5j with Goodyear Eagle F1 Asym 6 225/35/19 Wanted something as unique as the Scala and really pleased with how they look and sit.1 point
-
I can confirm that the Wi-Fi hotspot for wireless Android Auto/Apple Carplay is available on Australian cars @PetrolDave, but the cars do not have an inbuilt mobile data connection. For whatever reason, Skoda Australia decided to deliver all of the current models (up to 2022) with no inbuilt mobile data connection. Anything related to online services simply isn't there to select on the infotainment screen. There is no online store, no OTA updates, no remote control via MySKODA/SKODA Connect, no user profiles, and no emergency SOS calling. Unfortunately, there is no workaround to access OTA updates or any of the online services in Australia @thecrevis. Software updates need to be done at the dealer. You can think of Australian delivered cars as completely offline save for the content that is displayed by your phone when using Android Auto/Apple Carplay. If I were to speculate, it's because market potential is low due to being a really big island with a sparse population. I would expect the reason that Skoda made this decision was because they did not want to make the investment in infrastructure (onshore application servers, etc) or working out agreements with the local cellular providers. The cellular modems in the cars themselves may also require some work around localisation to be used in Australia so they either meet regulatory approval or possibly support different frequency bands to the rest of the world (for example, LTE band 28 is commonly used in Australia, but less so elsewhere in the world). Hell, there may have even been hurdles for the legal department that prevented online services being available in Australia. I'm sure it would have been technically possible to offer everything that's on offer elsewhere in the world, but probably not at a cost or in a timeframe that they were willing to commit to. Personally, I see it as a blessing because Australian delivered cars miss out on all the software bugs to do with online services and SOS emergency calling that I've heard about on this forum.1 point
-


.thumb.jpg.f83a46b9b3c0d976b9dbffbb523c9874.jpg)


Important Information
Welcome to BRISKODA. Please note the following important links Terms of Use. We have a comprehensive Privacy Policy. We have placed cookies on your device to help make this website better. You can adjust your cookie settings, otherwise we'll assume you're okay to continue.