


Leaderboard
-

Lee01
FREEDOM12Points36,163Posts -
mac11irl
FREEDOM11Points16,637Posts -
Lady Elanore
FREEDOM8Points24,875Posts -
AnnoyingPentium
FREEDOM8Points5,646Posts
.thumb.jpg.9dd3f612ba7f13d10be5c518d3c8d255.jpg)


Popular Content
Showing content with the highest reputation on 23/11/22 in all areas
-
3 pointsAwesome, comparing the latest CSV with one I have here looks spot on. Glad to hear it's all working as expected too! While I appreciate the PayPal offer, I enjoy the challenge of figuring out what has been messed with so don't worry about it Instead, maybe consider helping support Briskoda by becoming a paid up member for a year: https://www.briskoda.net/forums/subscriptions/3 points
-
2 pointsThis might help.. https://www.physiomed.co.uk/uploads/guide/file/21/Physiomed_Sitting_Guide_-_Driving_Digital.pdf2 points
-
My PC is newer than that and on win10, but im using the classic shell plugin/mod so my win10 looks just like windows 2000 (start menu included!)2 points
-
2 pointsIt was also there on the previous Octavia 3 from 2013, VAG seem to think it's a useful option ⁉️2 points
-
2 pointsIt says 140 Nm in the manual: Wheels > Changing the wheel and raising the vehicle > What you should be mindful of https://digital-manual.skoda-auto.com/w/en_GB/show/708c3bafe83886dcac6ba38ab4af34a0_11_en_GB For Octavia III it is 120 Nm.2 points
-
2 points120 Nm by the looks of it... https://www.wheelfitment.eu/car/Skoda/Octavia (2020 - ).html https://www.wheel-size.com/size/skoda/octavia/2021/#trim-20-tsi-eudm-2412 points
-
2 pointsYou can see in the charts below, that the Karoq (Front Wheel Drive) has 225/40R19 tyres when the 19" option is specified. For someone with a back problem, these are completely unsuitable. Changing to 215/60R16 tyres fitted to 6Jx16 ET43 5/112 57.1 rims (this is a standard tyre and rim combination on the Karoq (front wheel drive) will make the ride a lot softer and more comfortable. Make sure you choose tyres with soft and flexible sidewalls to get the maximum improvement. Skoda Karoq 2018 1.5TSI (Front Wheel Drive) – Generation: NU7 [2017 .. 2022] – Market: EUDM – Power: 148 hp | 110 kW | 150 PS – Engine: 1.5L, DADA, I4, Petrol – Options: SE, SE L, Ambition, Executive, Style, SportLine, Premium – Center Bore: 57.1 mm – PCD: 5x112 – Wheel Fasteners: Lug bolts – Wheel Tightening Torque: 140 Nm – Thread Size: M14 x 1.5 – Trim Production: [2017 .. 2021] Tire Rim 215/60R16 95V 6Jx16 ET43 2.2 215/55R17 94V 7Jx17 ET45 2.2 215/50R18 92V 7Jx18 ET45 2.4 225/40R19 93W 8Jx19 ET45 2.4 235/40R19 96W 8Jx19 ET45 2.4 Skoda Karoq 2018 1.5TSI (Four Wheel Drive) – Generation: NU7 [2017 .. 2022] – Market: EUDM – Power: 148 hp | 110 kW | 150 PS – Engine: 1.5L, DADA, I4, Petrol – Options: SE, SE L, Ambition, Executive, Style, Scout, SportLine – Center Bore: 57.1 mm – PCD: 5x112 – Wheel Fasteners: Lug bolts – Wheel Tightening Torque: 140 Nm – Thread Size: M14 x 1.5 – Trim Production: [2018 .. 2021] Tire Rim 225/55R17 97V 7Jx17 ET45 2.4 225/60R16 98V 6Jx16 ET43 2.3 225/50R18 95V 7Jx18 ET45 2.4 225/45R19 92W 8Jx19 ET45 2.4 https://www.wheel-size.com/size/skoda/karoq/2018/#trim-15tsi-eudm-1482 points
-
Hi I have replaced the element in my drivers seat. The "wire" has something like 7 parallel strands insulated from each other by a thin lacquer or plastic coating. Where they pass under the raised bolster cushion at the side, they are vulnerable to flexing damage. Firstly one core will break, then another. Each time a core breaks, the wattage goes down and you get less heating. Eventually the last core breaks and you have no heat at all. For longer life, don't kneel on this part or sit sideways on it to put your walking boots on !2 points
-
1 pointI am currently testing a new solution to the noise produced by these cars- see photo attached
 1 point
 -
1 pointSo do you think it’s the sound of stress on the DMF and just to change down earlier?1 point
-
1 pointOooh, careful on this one. I had a clutch spring plate fail on mine, one of the leaf springy bits had a clear fatigue failure, and departed company with the rest of the plate. It proceeded to bounce around the inside of the clutch housing, before eventually punching through the gearbox casing, and allowing gear oil to dribble down on to hot bits of exhaust. I noticed the lack of clutch one day that went away (clearly the bit of metal getting stuck somewhere it shouldn't be,) and then the smell of gear oil first (it stinks!). I ended up needing a new clutch (and flywheel), new clutch slave cylinder, and a gearbox casing strip down, weld up and rebuild. Skoda were not at all interested in the failure, even though it was not long out of warranty, and can clearly be attributed to a fatigue failure of a sub-standard clutch component. I had a thread on here about it somewhere....1 point
-
Tesla have lowered their prices and is now around 50p / kWh for non-Tesla cars. Handy if one is on route for you as cheaper than most mainstream networks.1 point
-
1 pointAs above, older ones require a hub and the newer ones are Bluetooth, so just need the app. If you have any smart home devices such as Alexa/Google Assistant, they integrate really well for voice control. Nearly every bulb in my house (and outside) is Hue, never had an issue with them.1 point
-
Classic Shell I've been using Classic Shell on W7, W8.1, W10 & W11 PCs ever since W7 made an appearance.1 point
-
1 pointIf I remember correctly, it depends how old the bulb is. Older ones need a hue hub to work Newer ones have bluetooth and can work without a hub.1 point
-
1 pointIf he dropped the glovebox door, I suspect that the cogwheel that operates a rack and pinion in the RH arm has dropped out. It happened to me last week when I replaced the pollen filter. Drop the lid by pressing - very firmly - on the arm at each side. Check that the RH arm isn't floating freely minus the cog. Or the arm hasn't been refitted into the slot at all. ps - my fingers weren't strong enough to reach and press both RH and LH arms at the same time so I used a screwdriver in each hand to pop the struts.1 point
-
1 pointI think Hue requires an additional hub to allow an app (or hardware controller) to make full use of the bulb. Other bulb options don't require a controller so may be better in the long run.1 point
-
Doing another on a T6 tomorrow.1 point
-
The two week did last week both had failed water pump but no symptoms.1 point
-
1 pointI used 120Nm dispite the manual stating 140Nm.I searched (googled) quite a lot and most Vag group cars Golf,Cupra Leon etc seemed to say 120Nm as did the wheel calculators.Correct answer is to contact your dealer I guess.1 point
-
Couldn't find someone with a stock MPI engine yet. Almost everyone convert their fuel system to LPG. The LPG system for MPI engines is different than what I have in my car. It's a "smart" system. It starts with gasoline and automatically switches to LPG when engine temperature reaches 30ºC. One Felicia MPI owner claims, 5.5l gasoline on intercity roads. City consumption was 7lt. That was almost 10 years ago before he adopted a LPG system. Another user says, intercity consumption should be between 5 and 6lt of gasoline for a "normal" engine. City consumption and cold start times are sketchy because of the presence of the LPG system.1 point
-
1 pointSaying that something cheap and nasty looks cheap and nasty is being an infant? No mate, it’s an opinion. Forums are for people to ask questions, invite opinions, share ideas etc and if you/he don’t like what you read then maybe this isn’t the place for you. My reply wasn’t abusive in any way. Do you get upset when someone doesn’t like the shoes you are wearing or isn’t keen on the car you drive? I have no time for snowflakes who cry just because someone has an opinion different to theirs🙄1 point
-
1 pointIt's a bit unkind to ask forum members to give you "any ideas", then dismiss an idea as an unrequested opinion. You might not like @carefree's idea of getting rid of the switch, but you did ask. My idea is to go back to the dealer, complain that the switch doesn't work, and see what they say.1 point
-
1 pointJust compl;eted my first drive over a decent distance 860 miles, Somerset to Stirling and back over the weekend. Car took it in its stride no problems at all. Used the ACC extensiveley for the first time. Didn't like it when I first got the car but persevered and now wouldn't want to do without it. Weather was atrocious with heavyweight rain and gallons of spray. Goty a bit hairy at times and down to under 30mph on the motorway because of it. Because of the varying speeds i' don;t know what the mpg whould be but it reckon I was getting 45 to the gallon - 2ltr petrolf. Well pleased.1 point
-
1 pointFirst can be a good sciatica cushion. http://briskoda.net/forums/topic/442391-can-anyone-recommend-a-lumber-cushion Then you can try a Car trimmer and see about having them reshape your seat. They may be able to with the cover it has on or do a good match. Wheels / tyres is the other option, as is modding suspension, but if the seat does not suit that can be money wasted.1 point
-
DTE Pedal Box, fitted, configured and well happy! Difference is amazing as is the the control option available, lucky second hand purchase! 👍 Waiting on delivery of a Race Chips RS tuning chip from fleabay, bit of a bargain so hoping for the same result! 🤞1 point
-
1 point1 point1 pointAll sorted and not too expensive thankfully. Main dealer for the part and a local sear restorer / specialist fit the part 👌🏻1 point1 pointA lot of the superbs have a rear clock that shows temperature outside and the time. Yes it can be added, a power, ground and lin wire need to be ran to that point that the control panel plugged in. ive got a spare one for sale going cheap if you’re interested1 point1 pointSurely (Shirley) you try and find what it is fitted for and can it work. Then disconnect and leave that switch doing nothing and fit another where you want it and functioning, or just leave that one to do it's job. Really who cares what it looks like other than the driver. Wiring done by a professional or diy and run to were you want the switch.1 pointWhen something is lopsided on my car it bugs me endlessly. As a result I’ve been wringing my hands about what to do with one side of my Superb 206/280 exhaust tips being 7mm lower than the other. Apparently it’s always the left side too 😂. After spending a few minutes with my head under the rear end hiding from my kids I realized a marine grade snail clip around the exhaust hanger was the perfect answer! Two minutes later, perfect symmetry and infinitely adjustable for about $2. (Just don’t ask me if the vRS badge is straight…🤔)
 1 point1 point1 pointWho needs a ute when you have a roof rack? 100kg of cement in the boot and passenger footwell as well as a bit of timber. The guys at Placemakers seemed a bit bemused by it all.1 point1 pointYou’re confusing the handbrake with the auto hold feature. Handbrake is as simple as imagine the button like your handbrake lever, up to engage, down to release, use it like you would a handbrake before. Except the car will release it for you if you tap the throttle when it gear and doors are shut and seatbelt on. Same way when you switch the car off it should reapply it automatically1 point1 pointIt’s 2022 not 1922. As others have said, you don’t need to do anything. Re the handbrake, try to just forget it’s there. You’ll probably find yourself looking for the handbrake lever for a few drives; I certainly did the first time I drove a car with an auto handbrake. When you pull away, it automatically disengages. When you stop it re-engages to stop the car from rolling. If you look at the dash, you’ll notice the handbrake light stays green. On a hill, it stops you rolling back; again the warning light stays green. However, when you park and stop the engine, the actual handbrake engages and the warning light turns red and the brake remains fully engaged.1 point1 pointHi Yop, not experienced the VW/Skoda version, but have driven a few vehicles with electronic hand brakes - familiarise yourself with all controls, including HB operation, somewhere safe before heading out onto the road.1 pointMaybe it's more dependent on geographical location, certainly here in the southeast garages are not interested in fitting customer supplied parts.1 pointNo they won't unless they're desperate because supplying the parts and making a margin on them is part of their income.1 point1 point1 pointI agree it's worth waiting for, but prolonging the waiting times brings frustration. Regarding your car, there is one thing for sure; even if you forget where you left your car, you could not miss it in a parking lot even if you wanted to 😉😀.1 point1 pointFinally got my car a couple of weeks ago. And it pains me to admit it but I’m glad I waited.
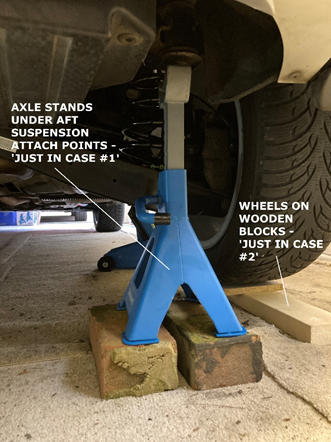
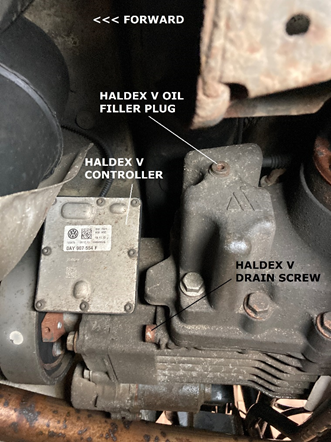
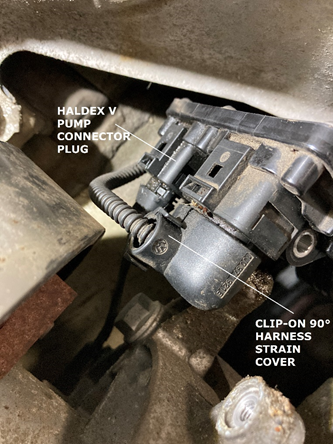
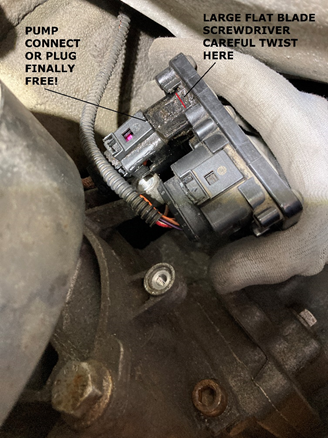
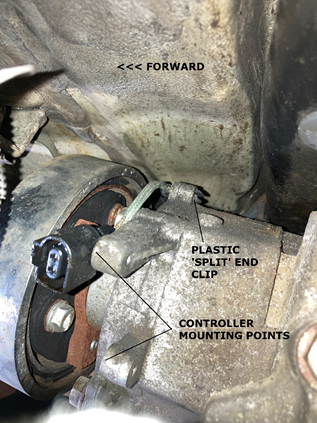
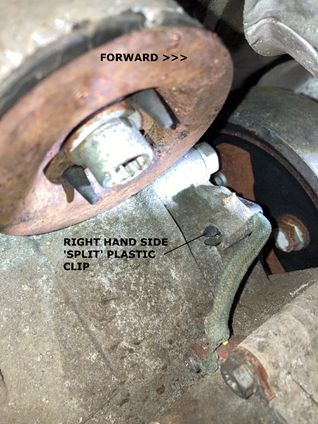
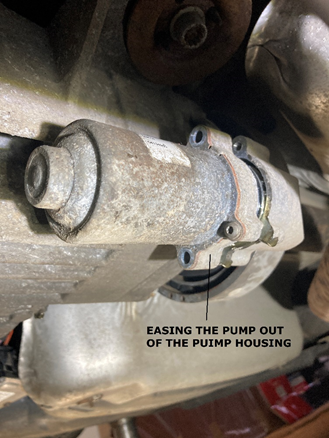
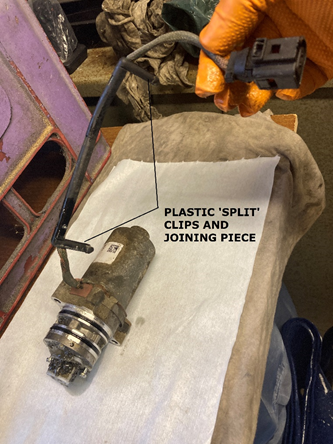
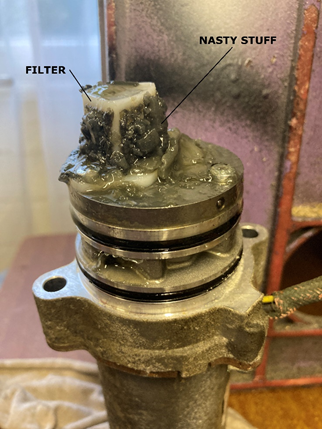
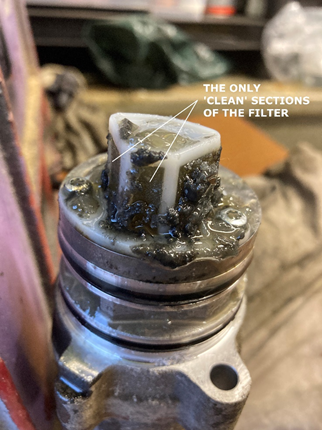
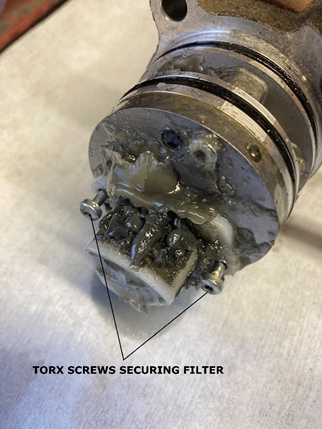
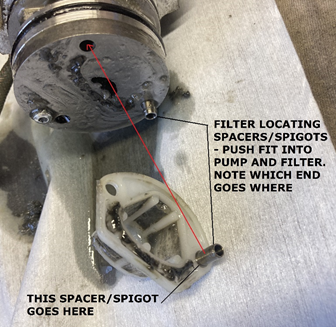
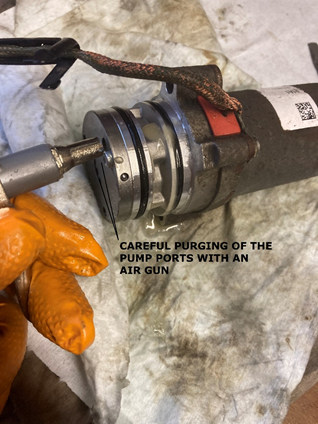
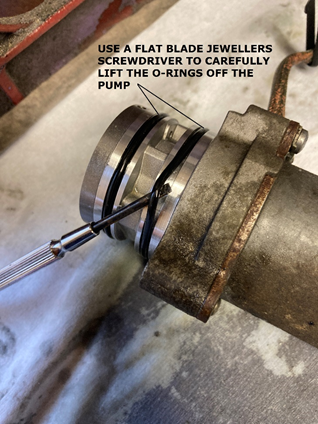
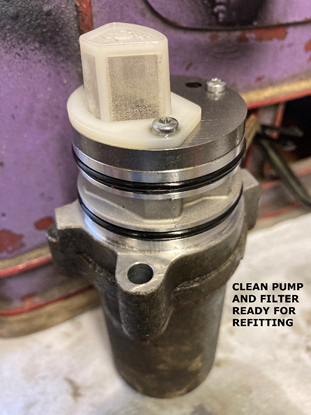
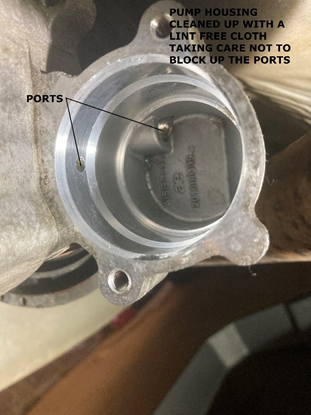
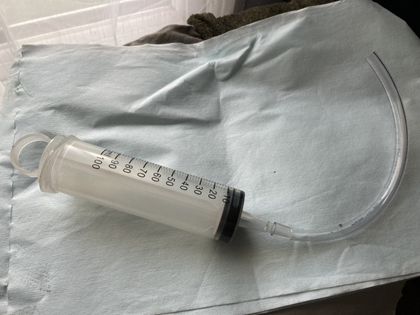
 1 point1 pointWeek 43 happened thankfully and told today, car is made and on the way to Emden Port for December delivery. So looks like it will be just under the 1 year mark from ordering to delivery which, strange to say it, would actually be one of the quicker turnarounds.1 pointYour car is a favorit is it not, which means that the ibiza belt buckle would not fit, because early felicia's and favorit's used a diffrent seatbelt latching design / style (I seem to remember) Your best chance will probably be a generic china belt buckle with warning wire connector Also you will have to start from the begining with the wiring connector to see if the favorit has a unused connector for the seatbelt warning light1 pointAs the Americans say ''we are still alive and kicking" 💪 Now i am waiting for a rainy day to see (at last) both wipers working.1 point1 pointBoth - AFH peak torque is around 4k RPM and power peak around 6k, so it requires pretty short gearbox for maximum performance. AEE on the other hand is like a diesel - in fact, Felicia gearbox has similar gearing to Fabia SDI. That's exactly what I'd like to see - as it would look from the factory. I think that the original filterbox would be fine even with a paper insert, it seems to be designed for a 100hp engine it's a bit unfortunate that you cannot source a shorter box - but Škoda put the AEE box to the 40kW 1.3 (only the 50kW variant had the short gearbox), so the AFH should be able to run with it, too.1 point1 point1 pointComing soon when I get the pictures to appear... INTRODUCTION As I mentioned previously in another thread, I decided to have a go at changing the Haldex oil and clean the filter on TIBET III’s Haldex V unit after reading the threads on Briskoda. The idea of this guide is simply how I did it, based on advice from others but it maybe, that I did things slightly differently to others or perhaps I had a problem that others haven’t encountered and which someone else might find useful to know about. It is also Yeti-specific. SERVICE HISTORY After reading about the pump filter issues on the Haldex V and having lost faith with the MK dealer for various reasons, I decided to do it myself. Experience level – I’ve maintained my cars over the years (I’m an aircraft engineer by trade) but more recently, with the cars being under warranty, I’ve let the dealer do it. I reckon anyone who is competent at basic servicing tasks (oil and filter changes etc) can cope with the Haldex V oil change and filter clean. JOB PREPARATION One of my concerns was jacking (safely for me!) the Yeti giving me sufficient room underneath to do the job without struggling for access. I’ve never really trusted the drive on ramp idea so it was going to have to be jacks and axle stands. To jack the Yeti up, I used the standard car jack on one side and a straight lift mechanical pillar jack on the other (actually a 4.5T Land Rover jack). I prefer to rely on mechanical lifting but had in addition a trolley jack on the jack pad inside and aft of the Yeti jack. The LR jack had the good old slotted ice hockey puck to protect the sill flange. The axle stands I positioned at the rear suspension attach points just forward of the bumper behind the wheels. They weren’t taking any weight as such but were there in case the world moved from under the jacks. This may not be an ‘approved’ support point but their role was one of protecting me in the worst-case scenario. I also had wood blocks under the wheels which meant I wasn’t going to get squashed even if someone nicked all the jacks and axle stands whilst I was looking the other way… Perhaps this was all a bit OTT but I had the kit, it doesn’t take long to do and you’re a long time dead. The service kit came from haldexrepairs.co.uk – an excellent and useful website, lots of good info and tips and a good service. The kit was complete including everything from the oil and replacement drain and filler plugs to a pair of gloves. Brilliant. ON WITH THE JOB DISCONNECTING THE CONTROLLER The first thing was to run VCDS to check for any errors but everything was fine. It also warmed the car and everything up. No idea if the Haldex system likes being warmed up but it won’t do any harm! I knew one of the most ‘difficult’ tasks was accessing the pump harness to enable the pump to be removed. In actual fact it wasn’t too bad but even with a torch and mirror, once again the adult-proof VAG plug on the controller was impossible to undo. Yes, I’ve watched all the ‘how to guides’ but it didn’t push further on, the locking tab wouldn’t budge and the plug stayed fast. Plan B was to remove the controller from the Haldex unit to allow better access to the plug. This worked a treat. It’s held in place with two 10mm bolts but it still needed a gentle prize to free the controller from the Haldex unit mount after removing the bolts. This meant I could now get to the plug although it didn’t budge until a subtle and careful twist with a large flat blade screwdriver provided just enough force to ease the plug clear. The other connector plug on the controller has a clip-on 90° cable strain relief cover on it. Removing that enabled more flexibility to access the pump connector plug. The harness is held into position on the top of the Haldex unit above the drive shaft by two plastic split clips. It was easy to do one from the lefthand side (above where the controller was) and the other from the righthand side. The trick is two squeeze the end of the clip together from the aft side and then push the clips forward and out of the locating holes. The two clips are actually joined together by a length of split plastic. The workshop manual says to lower the main final drive unit down for access (7 turns) but I’m not sure why you’d need to. DRAINING THE RESERVOIR & PUMP REMOVAL Delighted with getting the pump electrically disconnected, I slackened the filler point plug and the drain plug - both are Allen socket head screws (8mm for the drain plug and 5mm for the filler plug). The drain plug must be more than just a drain plug as it’s pretty long and torqued (according to the Yeti workshop manual) to 40 Nm. The filler plug is much smaller and shorter and torqued to 15 Nm. I gave the area around and above the drain and filler points a good clean to prevent any crud getting inside the unit. With the drain plug removed, the oil drained into the drip tray and removing the filler plug allowed a full flow. I was impressed as the oil looked pretty clean. Perhaps my filter was going to be okay… DRAINING THE RESERVOIR & PUMP REMOVAL Delighted with getting the pump electrically disconnected, I slackened the filler point plug and the drain plug - both are Allen socket head screws (8mm for the drain plug and 5mm for the filler plug). The drain plug must be more than just a drain plug as it’s pretty long and torqued (according to the Yeti workshop manual) to 40 Nm. The filler plug is much smaller and shorter and torqued to 15 Nm. I gave the area around and above the drain and filler points a good clean to prevent any crud getting inside the unit. With the drain plug removed, the oil drained into the drip tray and removing the filler plug allowed a full flow. I was impressed as the oil looked pretty clean. Perhaps my filter was going to be okay… Whilst the reservoir drained, I set about moving the pump. The first thing to do was to give the pump and the housing a good wipe down to prevent any dust and dirt from unduly contaminating the pump. This was easy with two Torx screws to undo followed by a very gentle tap with a nylon hammer and then a wriggle and out it came, releasing a bit more fluid. FILTER AND PUMP CLEANING I couldn’t believe just how blocked up the filter was – and the congealed mess left inside the pump housing on the Haldex unit – exactly as others had found. It’s strange – almost like grease with little substance when you touch it. It didn’t seem to be water/moisture contamination. The next job was to remove the filter which is held in place by two Torx screws. Then it was a case of gently easing the plastic filter clear. It sits on two locator bushes that also act as spacers and should protect the filer from being crushed when the Torx screws are tightened. I used warm water and a small paint brush and some washing up liquid to clean the filter and then once rinsed, left it to dry off whilst I cleaned up the pump. The pump cleaned up easily and I used a small blast of air from my compressor to clean the old fluid out of the ports. It was then a case of replacing the O-rings, removing the old ones carefully with a very small flat blade screw driver being careful not to damage the pump. Incidentally, there was a couple of patches of light corrosion on the pump (on the mounting flange). This was easily removed with a Scotchbrite pad – don’t use wire-wool as this can cause dissimilar metal corrosion if stands of the wire-wool get embedded in the aluminium pump. I also use lint-free cloths for the cleaning to avoid fluff and stuff getting into the bits where you don’t want fluff. With the O-rings replaced, I blew air through the filter to ensure it was dry and refitted it to the pump. There seems to be two ports in the pump housing – presumable an inlet and an outlet. I scooped the gunge out being as careful as I could to avoid pushing any of it into the ports. REFITTING THE PUMP AND FILLING THE RESERVOIR As with all good Haynes manual advice – installation is the opposite of refitting. Before fitting the pump, I gave the O-rings a good coating in fresh Haldex oil to lubricate them as the pump is refitted. It slipped in a treat and I secured it in place with the two Torx screws. I made sure the harness had the correct routing before I fully pushed the pump home. Once the pump was properly installed, I locate the right and then left harness clips and then reconnected the pump connector plug to the controller, the 90° harness stain relief cover to the other controller plug and refitted the controller to the mounting points on the Haldex unit. I used the airline to give a light blast through from the filler point after putting a very small amount of fluid into the reservoir to help flush it through. I had a small syringe to do this with. A big 100 ml syringe (and a length of plastic hose) comes with the service kit from Haldex Repairs for the main filling. Next job was to fit the new drain screw. The service kit came with new drain screw and filler plug but the original ones could have been reused – there was nothing obviously wrong with them. The new ones obviously have new sealing washers on them. As mentioned, the drain screw is torqued to 40 Nm according to the workshop manual. With everything secure, the next task is to refill the reservoir. The big 100 ml syringe with the service kit works a trat with a plastic hose that just fits in the filler point. I found you had to be careful not to block the filler point completely and that made it pretty much airtight and difficult to operate the syringe. The reservoir took most of the fluid and some started to over flow out so I refitted the filler plug. FINAL CHECK AND VCDS ERROR CHECK AND PUMP RECALIBRATION Next job was to check everything was clear and I lowered the Yeti pretty much to being off the jacks. I started the engine and let it run for 5 minutes. I then used VCDS to run the ‘learn pump’ program as suggested by Haldex Repairs. You could clearly hear the pump running through a specific cycle. The tone changed as the pump filled up. A quick jack up again enabled another oil level check of the Haldex reservoir. What I had initially thought to be fluid flowing showing the reservoir was full but with a more concerted effort on the syringe, I found I got a fair bit more into the reservoir and when it was really full it really did flow out! Unfortunately, I forgot to get a picture of the refilling but that’s a pretty simple job – just be careful not to put too much effort into operating the syringe and end up blowing the plastic pipe off. I used probably 800 ml of the 850 ml supplied in the bottle. Although the car was jacked up at the back, it probably wasn’t that much of an angle so I think the reservoir is pretty good on the level. Another good look round was done as a final leak and security check. I then ran the engine and again went through the VCDS error code check and ‘learn pump’ program. All appears good. I am at a loss as to how the system worked with about 80% of the filter blocked – perhaps it wasn’t. I haven’t been in any snow for three years now. Anyway, job done and as others have said – it is a job that has got to be done. If you’re not up to it then it shouldn’t be too costly to get a garage or dealer to do it – you’d just better point the dealers to Briskoda or the Haldex Repairs website to find out how to do it! Next job will be to take the Yeti out for a road test this weekend. Forecast for snow on Friday…. PS Apologies for the low res pictures, haven't got time this evening to suss why they didn't load - if anyone needs hi res pictures (or a PDF of all of the above) then PM me.
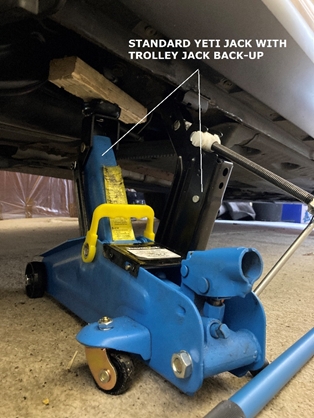


 1 point1 pointWheetabix..... I mean have you tried removing it from a bowl after its soaked the milk in then dried? I’m thinking if they can find a way to put that in sealant, then they really have got a winning product.1 point


.thumb.jpg.f83a46b9b3c0d976b9dbffbb523c9874.jpg)


_11zon.thumb.jpg.c16ba152683ee4538cef55a48f4a17b4.jpg)


Important Information
Welcome to BRISKODA. Please note the following important links Terms of Use. We have a comprehensive Privacy Policy. We have placed cookies on your device to help make this website better. You can adjust your cookie settings, otherwise we'll assume you're okay to continue.